97
Comodo Network Center Software Version 1.1 User Guide Guide Version 2.3.112311 Comodo Security Solutions 1255 Broad Street STE 100 Clifton, NJ 07013
ComodoNetwork Center
Software Version 1.1
User GuideGuide Version 2.3.112311
Comodo Security Solutions1255 Broad Street
STE 100Clifton, NJ 07013
Comodo Network Center - User Guide
Table of ContentsComodo Network Center - Introduction...................................................................................................................................... 4
Software Components and System Requirements.................................................................................................................... 5
Hardware and Software Requirements .............................................................................................................................. 5
Installing Comodo Network Center............................................................................................................................................ 6
Installing Comodo Network Center Agent................................................................................................................................ 12
Installing CNC Agent To Already Installed Operating System ...........................................................................................12
Starting Comodo Network Center............................................................................................................................................ 14
Logging-in to the Administrative Console................................................................................................................................ 16
CNC - Registry License Key & Endpoints......................................................................................................................... 16
The Main Interface ................................................................................................................................................................. 17
Dashboard Navigation Pane....................................................................................................................................................... 18
Operating System Installation................................................................................................................................................. 18
Distribution Kits (ISO Images) Management..................................................................................................................... 18
Installation Wizard............................................................................................................................................................. 23
Installing Operating Systems On Computers Using CNC Templates................................................................................31
Backup/Restore....................................................................................................................................................................... 33
Backup Wizard.................................................................................................................................................................. 34
Backup Images................................................................................................................................................................. 36
Backup Templates............................................................................................................................................................. 41
Restore Wizard................................................................................................................................................................. 43
Restore Templates............................................................................................................................................................ 47
Configuration .......................................................................................................................................................................... 49
Startup Configuration Wizard............................................................................................................................................ 50
Network Configuration....................................................................................................................................................... 50
Computers........................................................................................................................................................................ 53
Users ................................................................................................................................................................................ 56
Users.......................................................................................................................................................................... 57
Roles........................................................................................................................................................................... 58
Permissions................................................................................................................................................................ 59
Scheduling.............................................................................................................................................................................. 59
Manage Scheduling Operations........................................................................................................................................ 60
Result of Scheduled Operations........................................................................................................................................ 64
Creating Your Comodo Network Center Account Through Comodo Accounts Manager Interface....................................65
Microsoft Active Directory Integration...................................................................................................................................... 70
Comodo Network Center Settings............................................................................................................................................. 72
Comodo Network Center Profile................................................................................................................................................ 74
Using Comodo Network Center Help......................................................................................................................................... 75
How To... Tutorials...................................................................................................................................................................... 75
How To Add A New User ........................................................................................................................................................ 76
How To Add A Role To A New User......................................................................................................................................... 77
How To Log In To Comodo Network Center With New User Account......................................................................................78
How To Edit /Delete Already Backed Up Images..................................................................................................................... 78
How To Delete A Scheduled Backup...................................................................................................................................... 80
How To Configure The Network Using External DHCP........................................................................................................... 80
How To Edit/Delete Assigned Account User............................................................................................................................ 84
Comodo Network Center User Guide | © 2013 Comodo Security Solutions Inc. | All rights reserved 2
Comodo Network Center - User Guide
How to Create Partitions......................................................................................................................................................... 85
How To Delete A Target Computer ......................................................................................................................................... 85
How To Cleanup The Installation Processes........................................................................................................................... 86
How To Delete An Installation Template.................................................................................................................................. 86
How To Deploy A Template To A Target Computer................................................................................................................... 87
How To Schedule an Operating System Installation Template ............................................................................................... 88
How To Edit/Delete Distribution Kits........................................................................................................................................ 90
How To Restore Selected Files/Folders.................................................................................................................................. 90
How To Install Operating Systems On Multiple Hosts............................................................................................................. 93
Uninstalling Comodo Network Center....................................................................................................................................... 94
Appendix 1 - Terms Definitions.................................................................................................................................................. 96
About Comodo............................................................................................................................................................................ 97
Comodo Network Center User Guide | © 2013 Comodo Security Solutions Inc. | All rights reserved 3
Comodo Network Center - User Guide
Comodo Network Center - IntroductionComodo Network Center (CNC) is a web-based application designed to simplify and automate daily administrative tasks for network admins. Using CNC’s friendly web based interface, administrators can:
• Remotely install / re-install operating systems
• Remotely schedule backup and OS installations
• Remotely initiate parallel and /or consecutive OS installations
• Remotely recover non system data
• Remotely initiate and manage backups of endpoint machines
• Remotely take snapshots of disks, partitions, folders and files
• Remotely restore a backup to any endpoint
Tight integration with Microsoft Active Directory and Domain Controller means existing network environments and users can easily be imported and managed (CNC also supports dhcpcd for Linux/Unix systems). Apart from a dedicated ISO Distribution manager, the application further simplifies installation tasks with its ‘Templates’ feature. Once set, a template can be re-used to install operating systems on multiple computers using exactly the same installation conditions. Templates can also be created for any backup or restore task.
CNC has two distinct modes of operation, ‘Online Mode’ and ‘Offline Mode’. Each of these modes is specifically targeted to accomplish specific tasks. ‘Offline Mode’ is used for OS installation, system rescue and cold backups and requires the target machine to run a special ''pre-boot'' operating system. In order to use offline mode, CNC acts as a Preboot Execution Environment (PXE) server that provides the operating system to your endpoints. 'Online Mode' is used for snapshot and restore operations – requiring the installation of an agent on the target machine.
Guide Structure
This guide is intended to take you through the installation, configuration and use of Comodo Network Center
• Section 1,Comodo Network Center Introduction - An Overview of the application
• Hardware and Software Requirements
• Installing Comodo Network Center
• Installing Comodo Network Center Agent
• Starting Comodo Network Center
• Logging-in to the Administrative Console
• The Main Interface
• Section 2, Dashboard Navigation Pane -Explains configuration and overall application behavior.
• Operating System Installation
• Distribution kits (ISO images) management
• Backup/Restore
• Scheduling
• Configuration
• Section 3, Creating Your Comodo Network Center Account Through Comodo Accounts Manager Interface – Step-by-step guide on how to create, login, and manage Comodo Network Center account
• Section 4, Microsoft Active Directory Integration – Describes integration CNC server and Microsoft Active Directory
• Section 5, Comodo Network Center Settings - Detailed view on every stage of security, software configuration, network and user settings
• Section 6, Comodo Network Center Profile – Viewing customer and service information
Comodo Network Center User Guide | © 2013 Comodo Security Solutions Inc. | All rights reserved 4
Comodo Network Center - User Guide
• Section 7, Using Comodo Network Center Help, Provides the ability to add or remove computers by hand and discover computers in the network
• Section, 8 How To... Tutorials, Contains guidance on how to use various features of the application effectively
• How To Add A New User
• How To add A Role To A New User
• How To Log In With New User Account
• How To Edit/Delete Already Backed Up Images
• How To Edit A Scheduled Backup
• How To Configure The Network Using External DHCP
• How To Edit/Delete Assigned Account User
• How To Create Partitions
• How To Delete A Target Computer
• How To Cleanup The Installation Processes
• How To Delete An Installation Template
• How To Deploy A Template To Target Computer
• How To Schedule An Operating System Installation Template
• How To Edit/Delete Distribution Kits
• How To Restore Selected Files/Folders
• How To Install Operating System On Multiple Hosts
• Section 9, Uninstalling Comodo network Center - A brief outline on uninstalling the application.
• Appendix 1 -Terms Definitions
• About Comodo, Contains company and contact information.
Software Components and System Requirements
Hardware and Software Requirements To ensure optimal performance of Comodo Network Center, please ensure that your central service computer complies with the minimum system requirements.
Supported Operating Systems
• Windows NT 5.x - Windows XP (32 bit), Windows Server 2003 SP2 (32 bit) (NOT Available for Beta 1)
• Windows NT 6.x - Windows Vista (32 and 64 bit), Windows 7 (32 and 64 bit), Windows Server 2008 (32 and 64 bit) Windows Server 2008 R2 (32 and 64 bit)
Minimum Hardware Requirements• 1.5 GHz CPU
• 2GB RAM
• 1Gb + 8GB (WAIK)+5GB (distribution kits) free Disk Space. Summary - 14Gb or more
Recommended Hardware • 2.5 GHz CPU or more
• 4GB RAM or more
• 1Gb + 8GB(WAIK), 5GB (distribution kits) free Disk Space or more. Summary - 14Gb or more
Comodo Network Center User Guide | © 2013 Comodo Security Solutions Inc. | All rights reserved 5
Comodo Network Center - User Guide
• Dedicated HDD for distribution kits
Installing Comodo Network CenterBefore you install Comodo Network Center read the installation instructions carefully and review the system requirements. Also note that the installer requires administrative privileges.
Comodo Network Center is available for 32 bit and 64 bit versions of Windows XP (not for Beta 1), Vista, Windows 7 and Windows Servers 2003 and 2008: networkcenter.comodo.com
When you sign up for a trial or commercial license, the appropriate download link will be mailed to you.
After downloading the Comodo Network Center file to your local hard drive, double click on the SetupCNC executable to start the installation wizard.
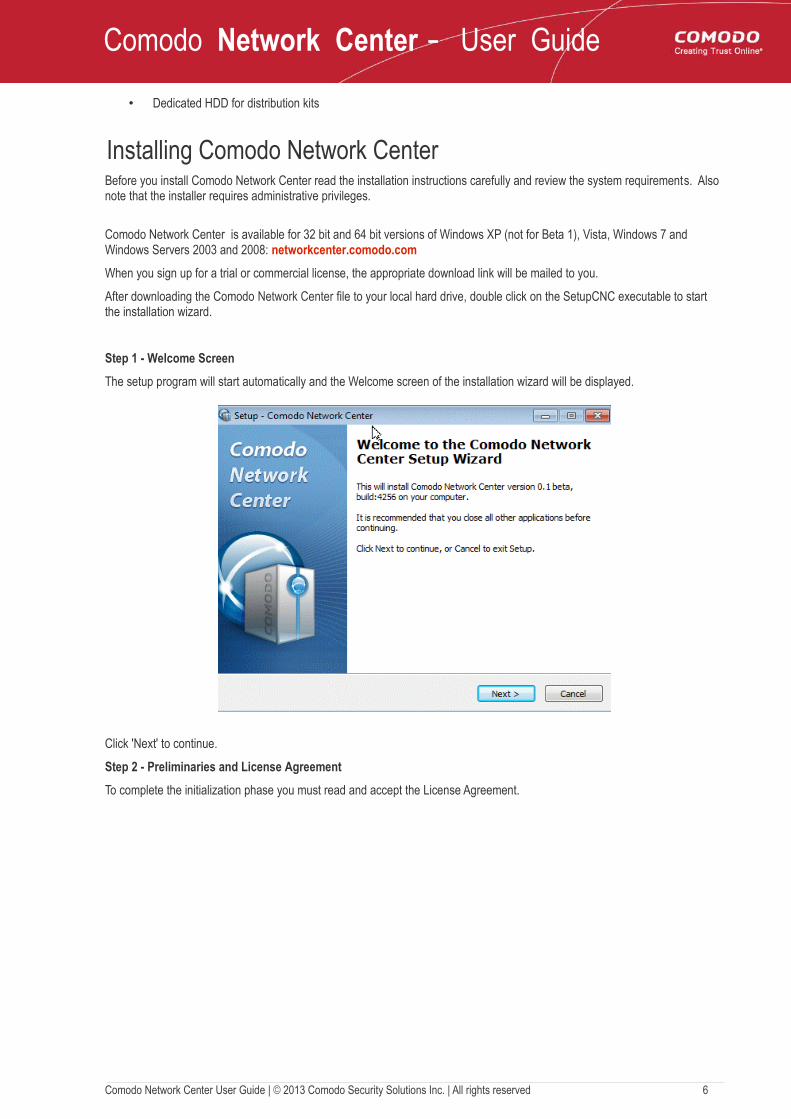
Step 1 - Welcome Screen
The setup program will start automatically and the Welcome screen of the installation wizard will be displayed.
Click 'Next' to continue.
Step 2 - Preliminaries and License Agreement
To complete the initialization phase you must read and accept the License Agreement.
Comodo Network Center User Guide | © 2013 Comodo Security Solutions Inc. | All rights reserved 6

Comodo Network Center - User Guide
After you have read the End-User License Agreement, check the 'I accept the agreement' checkbox and click 'Next' to continue installation. If you decline, you cannot continue with the installation.
Step 3 - Choosing Installation Location
The next screen allows you to select the folder in your hard drive for installing Comodo Network Center. The default installation location is c:\cnc.
If you want to install the application in a location other than the default, click 'Browse' to choose a different location and click 'Next'.
Comodo Network Center User Guide | © 2013 Comodo Security Solutions Inc. | All rights reserved 7
Comodo Network Center - User Guide
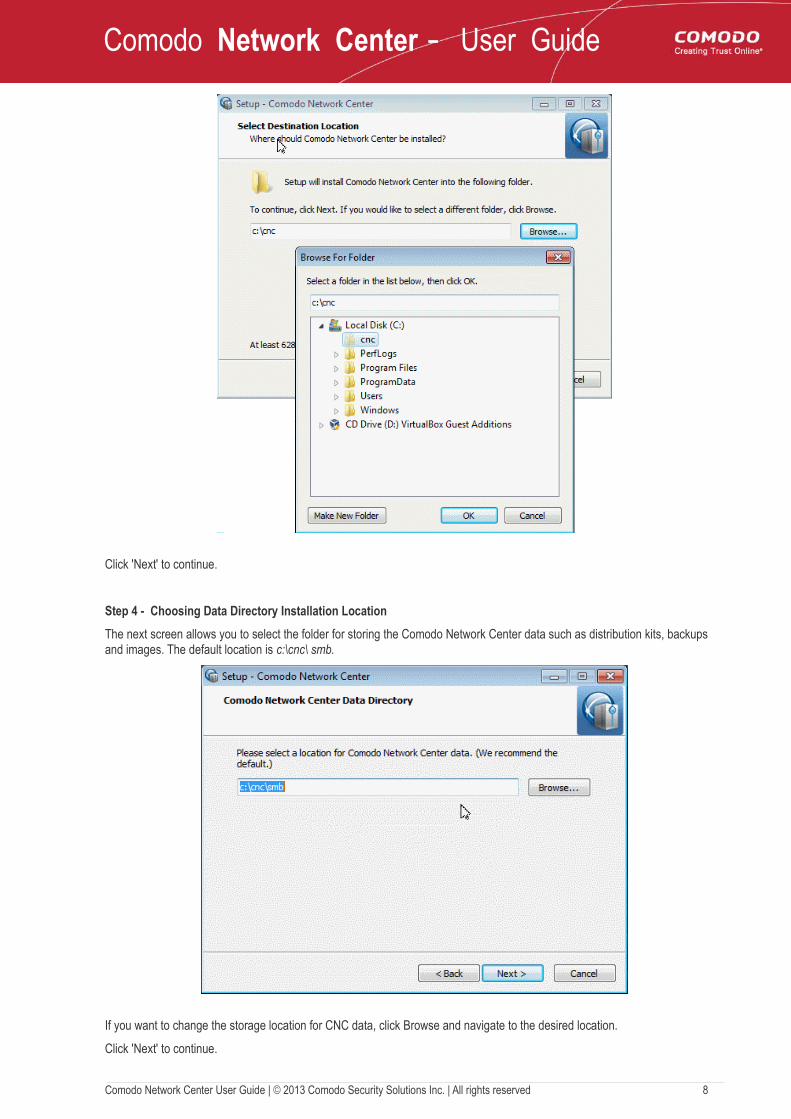
Click 'Next' to continue.
Step 4 - Choosing Data Directory Installation Location
The next screen allows you to select the folder for storing the Comodo Network Center data such as distribution kits, backups and images. The default location is c:\cnc\ smb.
If you want to change the storage location for CNC data, click Browse and navigate to the desired location.
Click 'Next' to continue.
Comodo Network Center User Guide | © 2013 Comodo Security Solutions Inc. | All rights reserved 8
Comodo Network Center - User Guide
Note: If the computer is not part of a Windows domain, Comodo Network Center OS Data Base will be used as default.
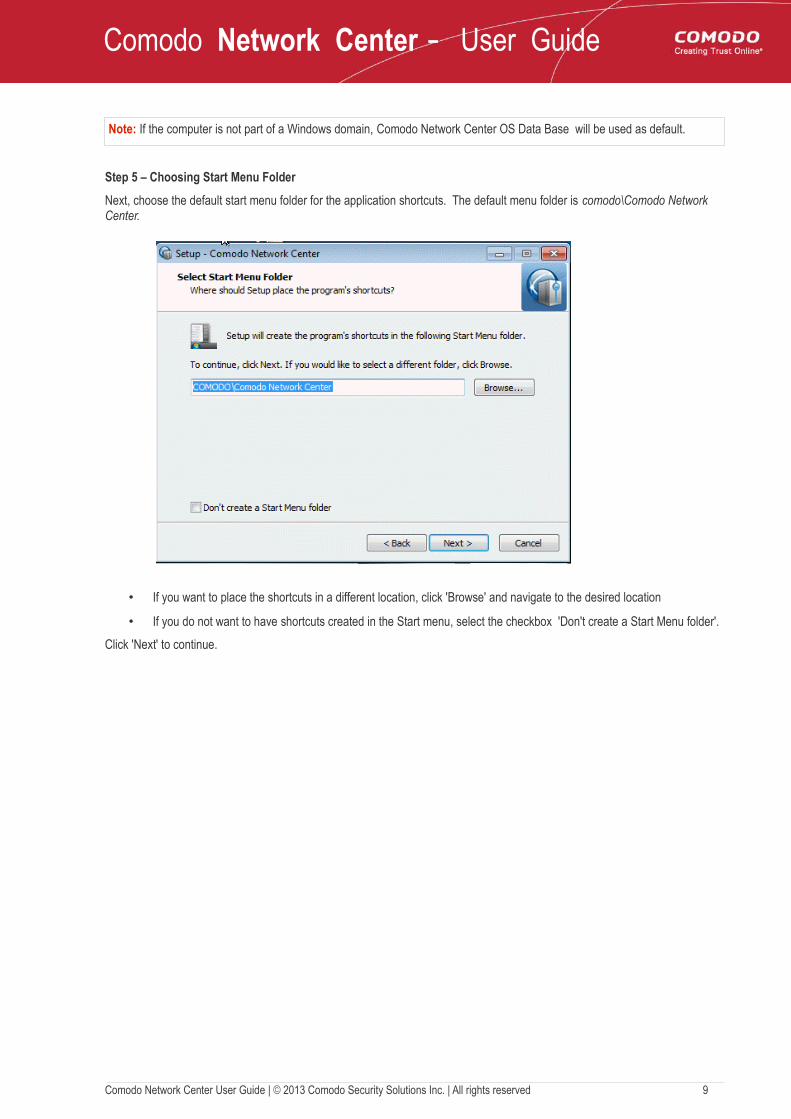
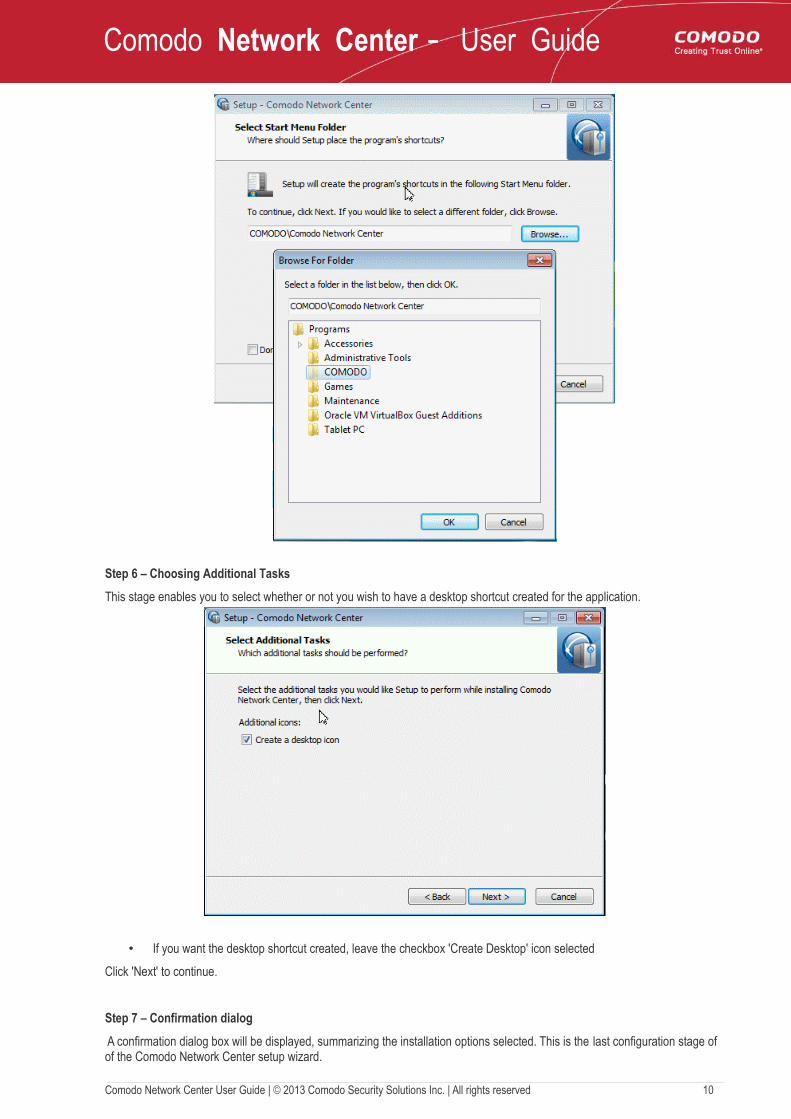
Step 5 – Choosing Start Menu Folder
Next, choose the default start menu folder for the application shortcuts. The default menu folder is comodo\Comodo Network Center.
• If you want to place the shortcuts in a different location, click 'Browse' and navigate to the desired location
• If you do not want to have shortcuts created in the Start menu, select the checkbox 'Don't create a Start Menu folder'.
Click 'Next' to continue.
Comodo Network Center User Guide | © 2013 Comodo Security Solutions Inc. | All rights reserved 9
Comodo Network Center - User Guide
Step 6 – Choosing Additional Tasks
This stage enables you to select whether or not you wish to have a desktop shortcut created for the application.
• If you want the desktop shortcut created, leave the checkbox 'Create Desktop' icon selected
Click 'Next' to continue.
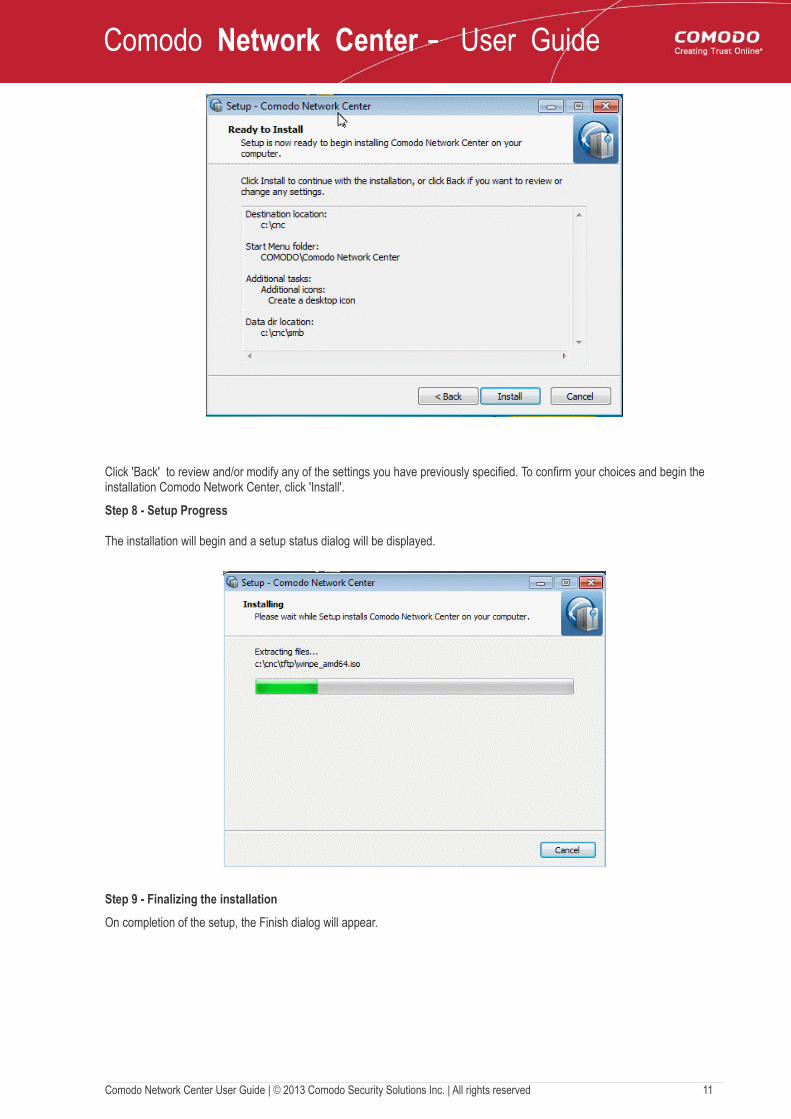
Step 7 – Confirmation dialog
A confirmation dialog box will be displayed, summarizing the installation options selected. This is the last configuration stage of of the Comodo Network Center setup wizard.
Comodo Network Center User Guide | © 2013 Comodo Security Solutions Inc. | All rights reserved 10
Comodo Network Center - User Guide
Click 'Back' to review and/or modify any of the settings you have previously specified. To confirm your choices and begin the installation Comodo Network Center, click 'Install'.
Step 8 - Setup Progress
The installation will begin and a setup status dialog will be displayed.
Step 9 - Finalizing the installation
On completion of the setup, the Finish dialog will appear.
Comodo Network Center User Guide | © 2013 Comodo Security Solutions Inc. | All rights reserved 11

Comodo Network Center - User Guide
Click 'Finish' to complete installation and exit the wizard.
Installing Comodo Network Center Agent
Comodo Network Center Agent is an application that runs on client computers to allow control by the CNC service. The agent is capable of executing commands on the local computer, such as running a backups, system reboots, etc., as received from the central CNC computer.
To install Comodo Network Center Agent, go to the folder on your hard drive where Comodo Network Center has been installed. By default, the installation directory is C:\cnc. From the redist sub-folder, copy the ''setupagent.exe'' file to removable media or a network drive accessible to your client machines.
• Installing CNC Agent to already installed OS
Installing CNC Agent To Already Installed Operating System
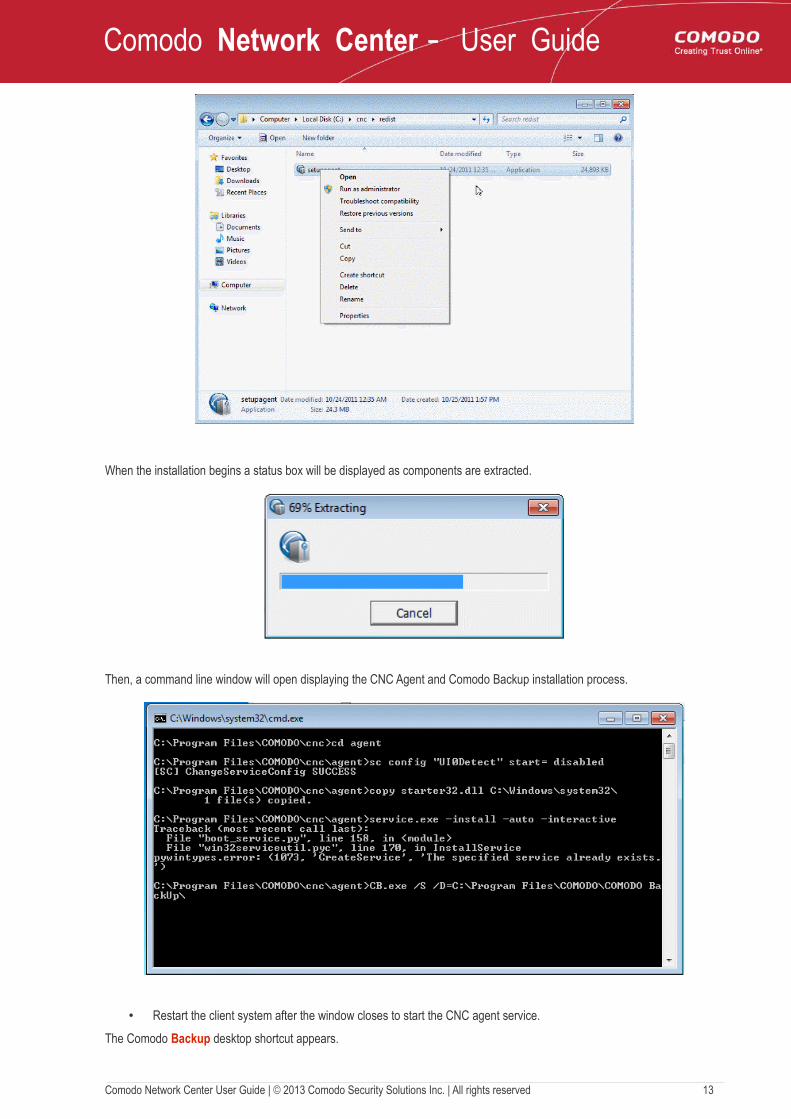
Copy setupagent.exe to a temporary folder on your client computer and right click the file. Select 'Run as administrator' from the Windows context menu.
Comodo Network Center User Guide | © 2013 Comodo Security Solutions Inc. | All rights reserved 12
Comodo Network Center - User Guide
When the installation begins a status box will be displayed as components are extracted.
Then, a command line window will open displaying the CNC Agent and Comodo Backup installation process.
• Restart the client system after the window closes to start the CNC agent service.
The Comodo Backup desktop shortcut appears.
Comodo Network Center User Guide | © 2013 Comodo Security Solutions Inc. | All rights reserved 13
Comodo Network Center - User Guide
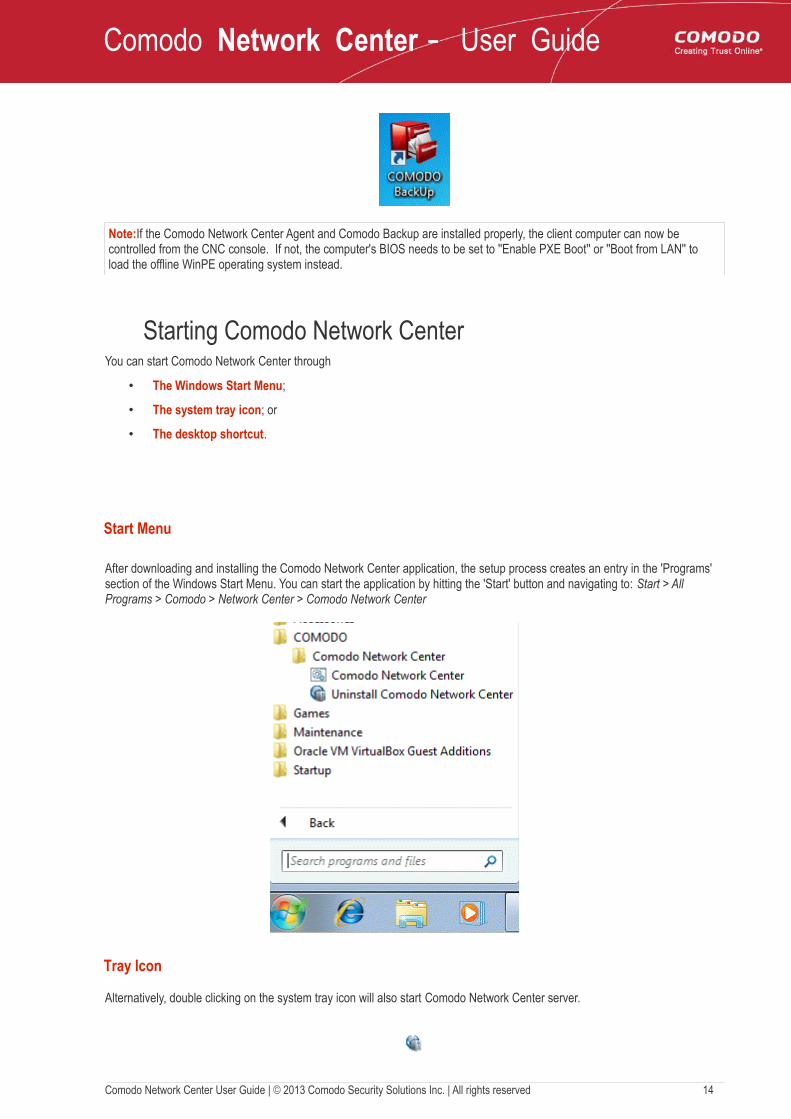
Note:If the Comodo Network Center Agent and Comodo Backup are installed properly, the client computer can now be controlled from the CNC console. If not, the computer's BIOS needs to be set to ''Enable PXE Boot'' or ''Boot from LAN'' to load the offline WinPE operating system instead.
Starting Comodo Network CenterYou can start Comodo Network Center through
• The Windows Start Menu;
• The system tray icon; or
• The desktop shortcut.
Start Menu
After downloading and installing the Comodo Network Center application, the setup process creates an entry in the 'Programs' section of the Windows Start Menu. You can start the application by hitting the 'Start' button and navigating to: Start > All Programs > Comodo > Network Center > Comodo Network Center
Tray Icon
Alternatively, double clicking on the system tray icon will also start Comodo Network Center server.
Comodo Network Center User Guide | © 2013 Comodo Security Solutions Inc. | All rights reserved 14
Comodo Network Center - User Guide
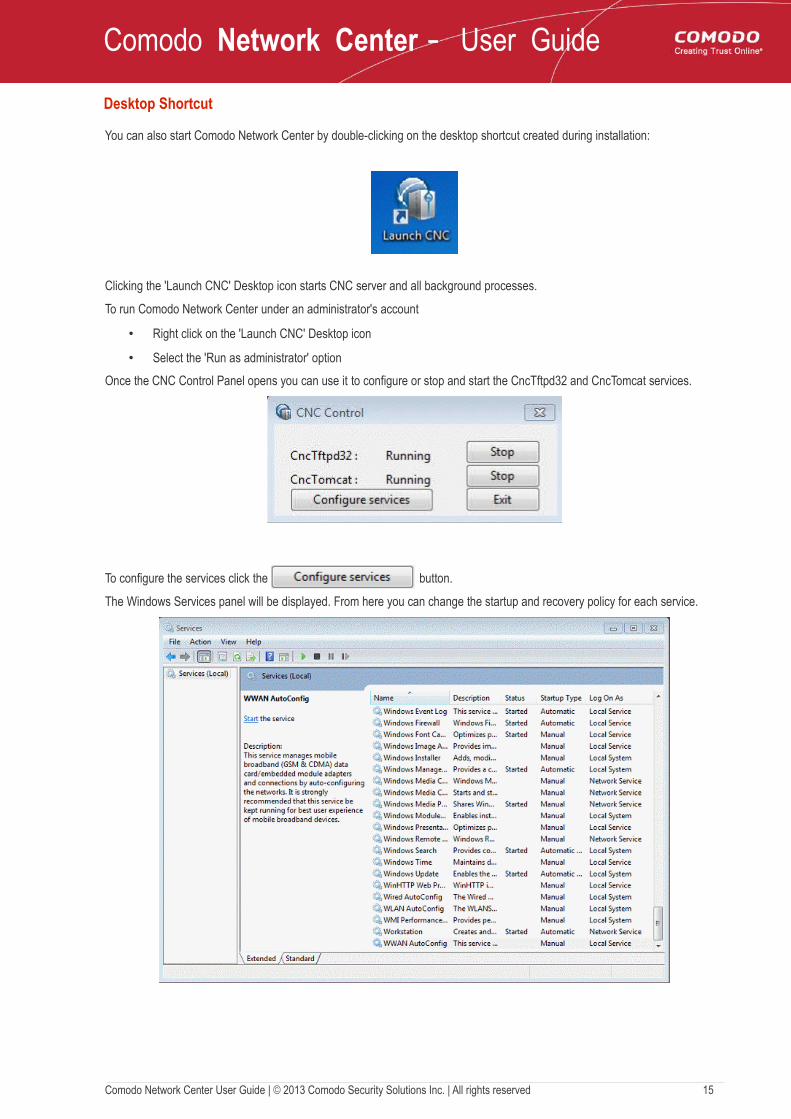
Desktop Shortcut
You can also start Comodo Network Center by double-clicking on the desktop shortcut created during installation:
Clicking the 'Launch CNC' Desktop icon starts CNC server and all background processes.
To run Comodo Network Center under an administrator's account
• Right click on the 'Launch CNC' Desktop icon
• Select the 'Run as administrator' option
Once the CNC Control Panel opens you can use it to configure or stop and start the CncTftpd32 and CncTomcat services.
To configure the services click the button.
The Windows Services panel will be displayed. From here you can change the startup and recovery policy for each service.
Comodo Network Center User Guide | © 2013 Comodo Security Solutions Inc. | All rights reserved 15
Comodo Network Center - User Guide
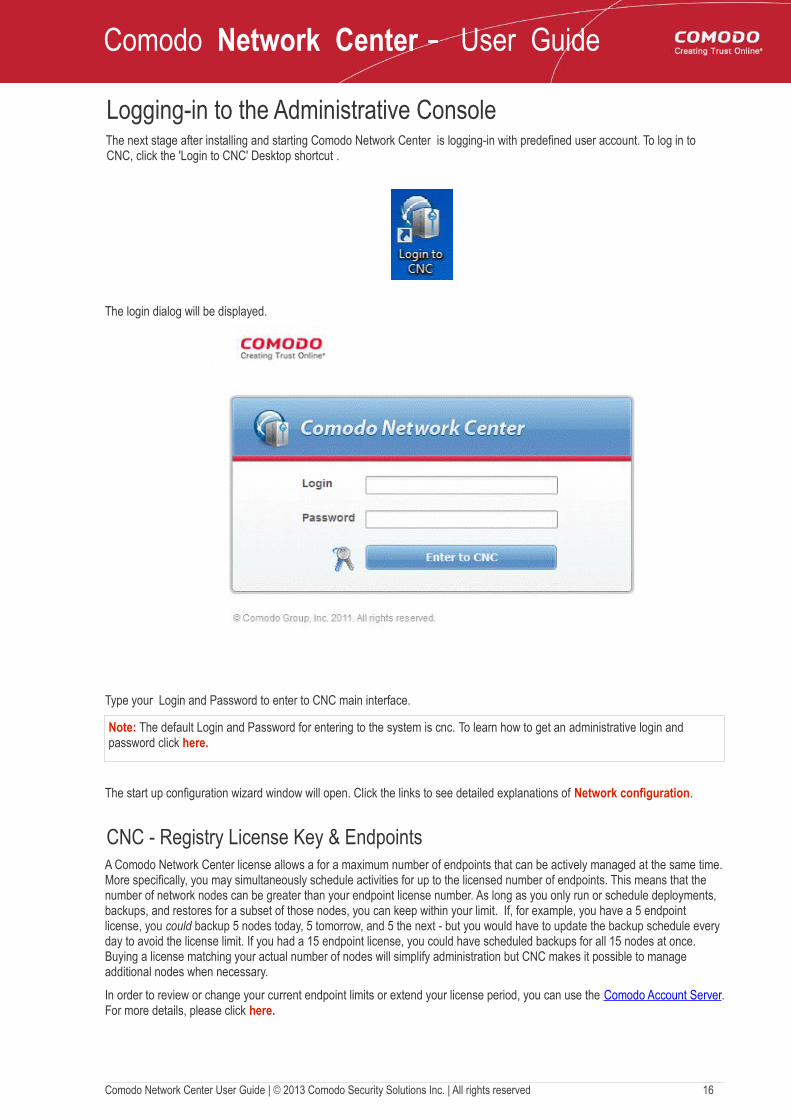
Logging-in to the Administrative ConsoleThe next stage after installing and starting Comodo Network Center is logging-in with predefined user account. To log in to CNC, click the 'Login to CNC' Desktop shortcut .
The login dialog will be displayed.
Type your Login and Password to enter to CNC main interface.
Note: The default Login and Password for entering to the system is cnc. To learn how to get an administrative login and password click here.
The start up configuration wizard window will open. Click the links to see detailed explanations of Network configuration.
CNC - Registry License Key & EndpointsA Comodo Network Center license allows a for a maximum number of endpoints that can be actively managed at the same time. More specifically, you may simultaneously schedule activities for up to the licensed number of endpoints. This means that the number of network nodes can be greater than your endpoint license number. As long as you only run or schedule deployments, backups, and restores for a subset of those nodes, you can keep within your limit. If, for example, you have a 5 endpoint license, you could backup 5 nodes today, 5 tomorrow, and 5 the next - but you would have to update the backup schedule every day to avoid the license limit. If you had a 15 endpoint license, you could have scheduled backups for all 15 nodes at once. Buying a license matching your actual number of nodes will simplify administration but CNC makes it possible to manage additional nodes when necessary.
In order to review or change your current endpoint limits or extend your license period, you can use the Comodo Account Server. For more details, please click here.
Comodo Network Center User Guide | © 2013 Comodo Security Solutions Inc. | All rights reserved 16
Comodo Network Center - User Guide
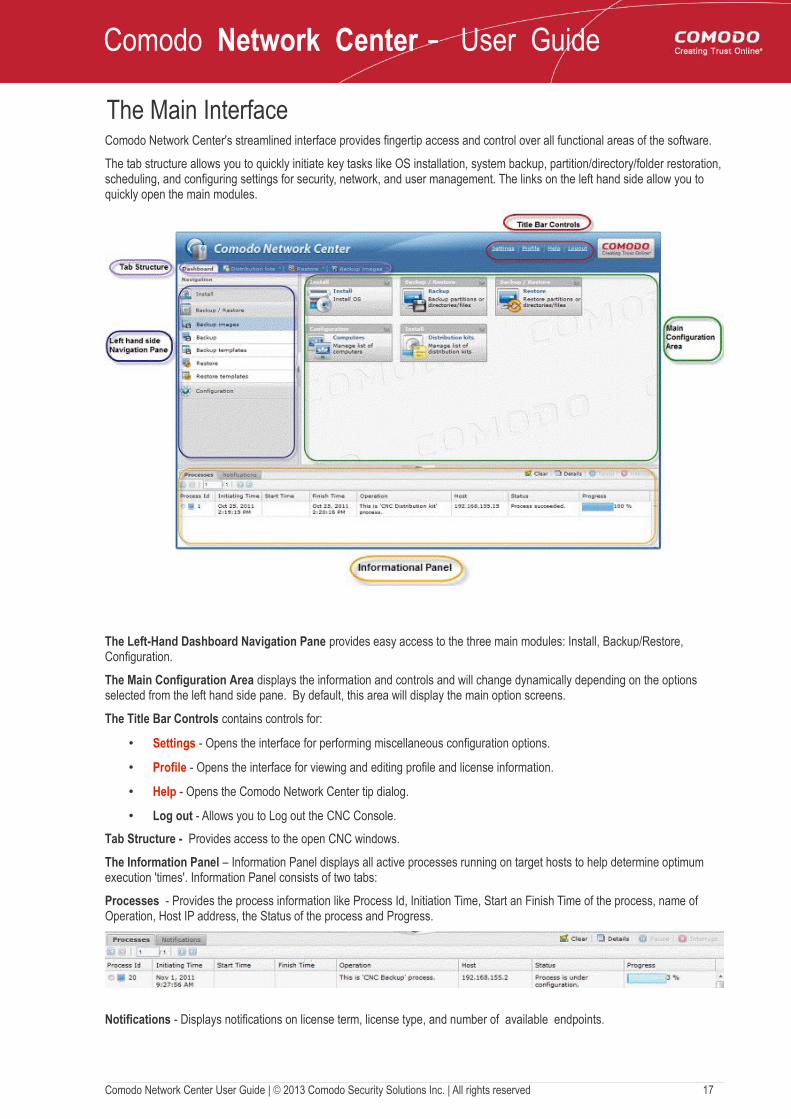
The Main Interface Comodo Network Center's streamlined interface provides fingertip access and control over all functional areas of the software.
The tab structure allows you to quickly initiate key tasks like OS installation, system backup, partition/directory/folder restoration, scheduling, and configuring settings for security, network, and user management. The links on the left hand side allow you to quickly open the main modules.
The Left-Hand Dashboard Navigation Pane provides easy access to the three main modules: Install, Backup/Restore, Configuration.
The Main Configuration Area displays the information and controls and will change dynamically depending on the options selected from the left hand side pane. By default, this area will display the main option screens.
The Title Bar Controls contains controls for:
• Settings - Opens the interface for performing miscellaneous configuration options.
• Profile - Opens the interface for viewing and editing profile and license information.
• Help - Opens the Comodo Network Center tip dialog.
• Log out - Allows you to Log out the CNC Console.
Tab Structure - Provides access to the open CNC windows.
The Information Panel – Information Panel displays all active processes running on target hosts to help determine optimum execution 'times'. Information Panel consists of two tabs:
Processes - Provides the process information like Process Id, Initiation Time, Start an Finish Time of the process, name of Operation, Host IP address, the Status of the process and Progress.
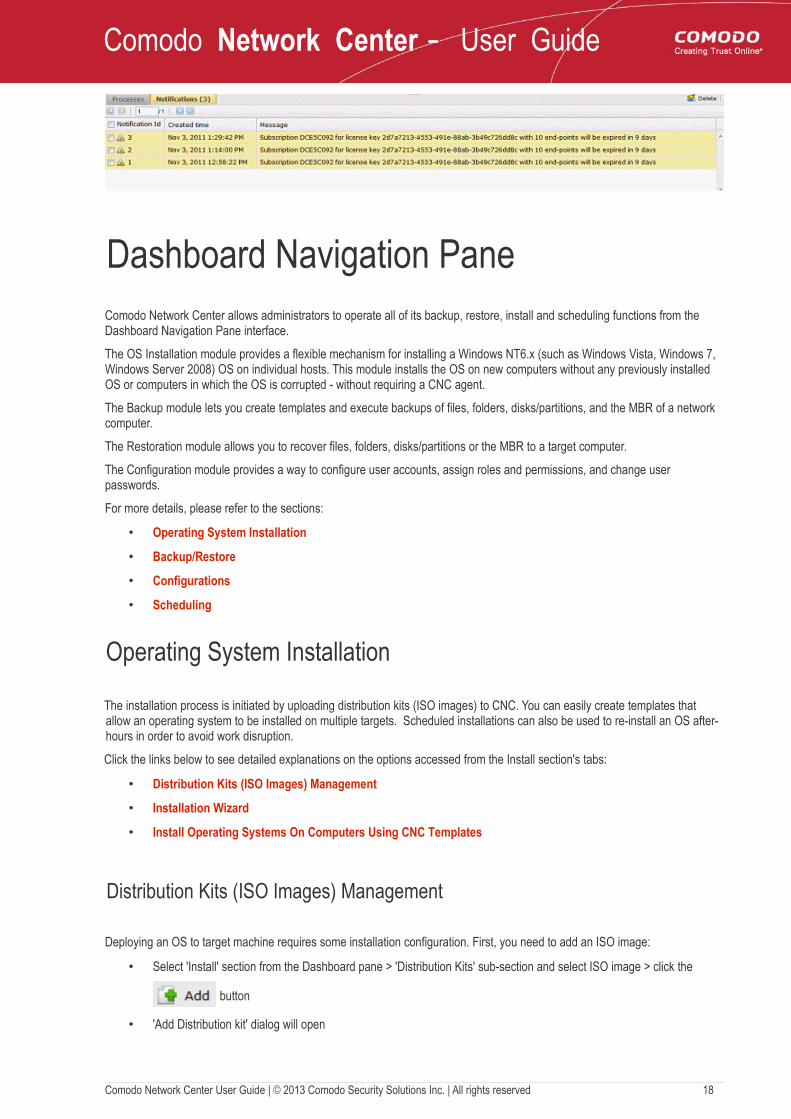
Notifications - Displays notifications on license term, license type, and number of available endpoints.
Comodo Network Center User Guide | © 2013 Comodo Security Solutions Inc. | All rights reserved 17
Comodo Network Center - User Guide
Dashboard Navigation PaneComodo Network Center allows administrators to operate all of its backup, restore, install and scheduling functions from the Dashboard Navigation Pane interface.
The OS Installation module provides a flexible mechanism for installing a Windows NT6.x (such as Windows Vista, Windows 7, Windows Server 2008) OS on individual hosts. This module installs the OS on new computers without any previously installed OS or computers in which the OS is corrupted - without requiring a CNC agent.
The Backup module lets you create templates and execute backups of files, folders, disks/partitions, and the MBR of a network computer.
The Restoration module allows you to recover files, folders, disks/partitions or the MBR to a target computer.
The Configuration module provides a way to configure user accounts, assign roles and permissions, and change user passwords.
For more details, please refer to the sections:
• Operating System Installation
• Backup/Restore
• Configurations
• Scheduling
Operating System Installation
The installation process is initiated by uploading distribution kits (ISO images) to CNC. You can easily create templates that allow an operating system to be installed on multiple targets. Scheduled installations can also be used to re-install an OS after-hours in order to avoid work disruption.
Click the links below to see detailed explanations on the options accessed from the Install section's tabs:
• Distribution Kits (ISO Images) Management
• Installation Wizard
• Install Operating Systems On Computers Using CNC Templates
Distribution Kits (ISO Images) Management
Deploying an OS to target machine requires some installation configuration. First, you need to add an ISO image:
• Select 'Install' section from the Dashboard pane > 'Distribution Kits' sub-section and select ISO image > click the
button
• 'Add Distribution kit' dialog will open
Comodo Network Center User Guide | © 2013 Comodo Security Solutions Inc. | All rights reserved 18

Comodo Network Center - User Guide
• In the opened window, type the Distribution kit name and Distribution kit description in the text boxes and click the 'Upload' button.
Since uploading a distribution kit uses Java Applets a Java Runtime Environment must be installed. If you do not have Java installed, the follow screen prompting you to download plug-in will be displayed.
• Click here link to jump to the web site to download and install the Java plug-in
Java plug-ins can be downloaded at http://www.oracle.com/technetwork/java/index-jsp-141438.html#download
Note: Depending on your operating system and browser, follow these recommendations for the correct JRE needed for loading Distribution Kits (visit this web page)
• For all windows x86 and x64:If using x86 browsers (Firefox, Google Chrome, IExplorer_x86) you should download "JRE for Windows x86"
• If using an x64 browser (IExplorer_x64) you should download "JRE for Windows x64"
After installing the Java plugin, you can continue running the Java-based uploader.
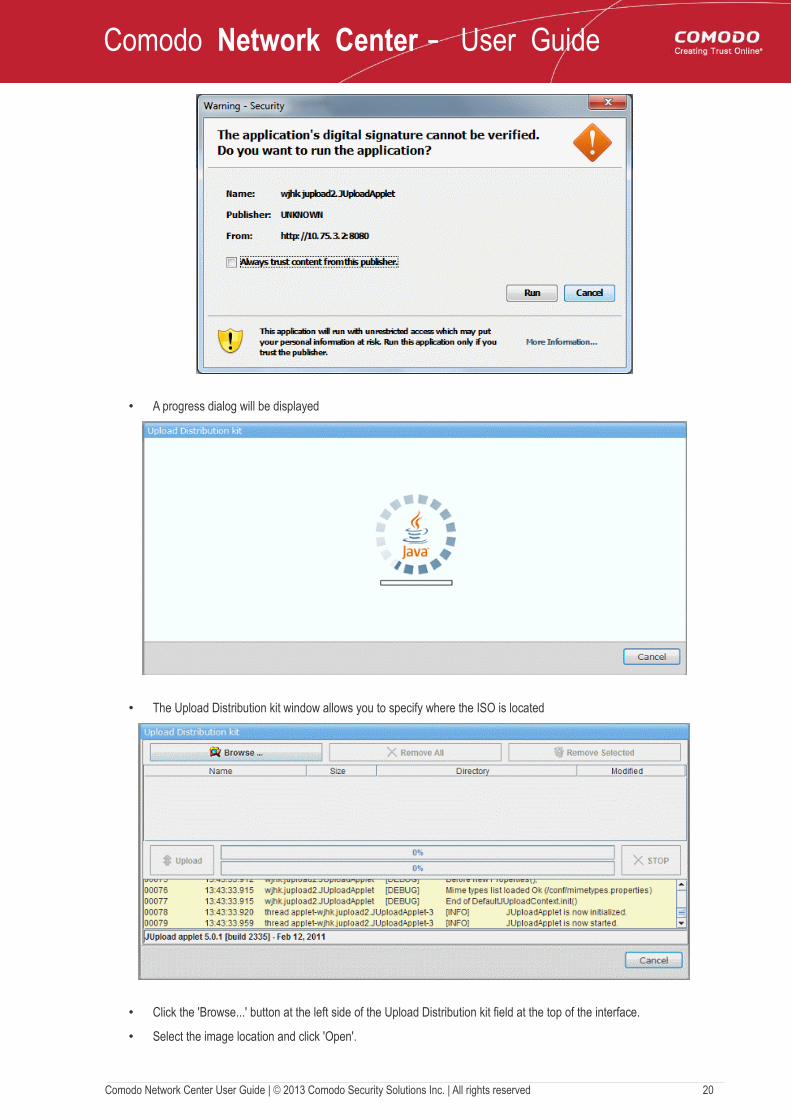
• Warning - If a Security dialog appears, click 'Run'.
Comodo Network Center User Guide | © 2013 Comodo Security Solutions Inc. | All rights reserved 19
Comodo Network Center - User Guide
• A progress dialog will be displayed
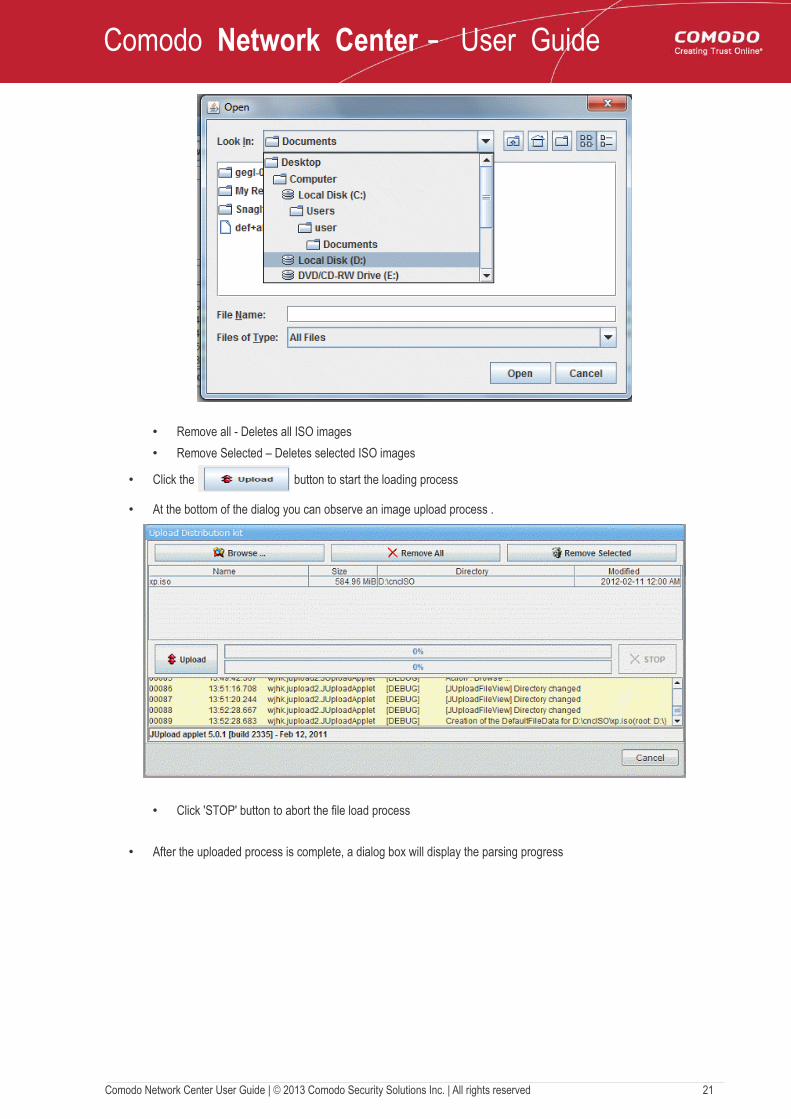
• The Upload Distribution kit window allows you to specify where the ISO is located
• Click the 'Browse...' button at the left side of the Upload Distribution kit field at the top of the interface.
• Select the image location and click 'Open'.
Comodo Network Center User Guide | © 2013 Comodo Security Solutions Inc. | All rights reserved 20
Comodo Network Center - User Guide
• Remove all - Deletes all ISO images
• Remove Selected – Deletes selected ISO images
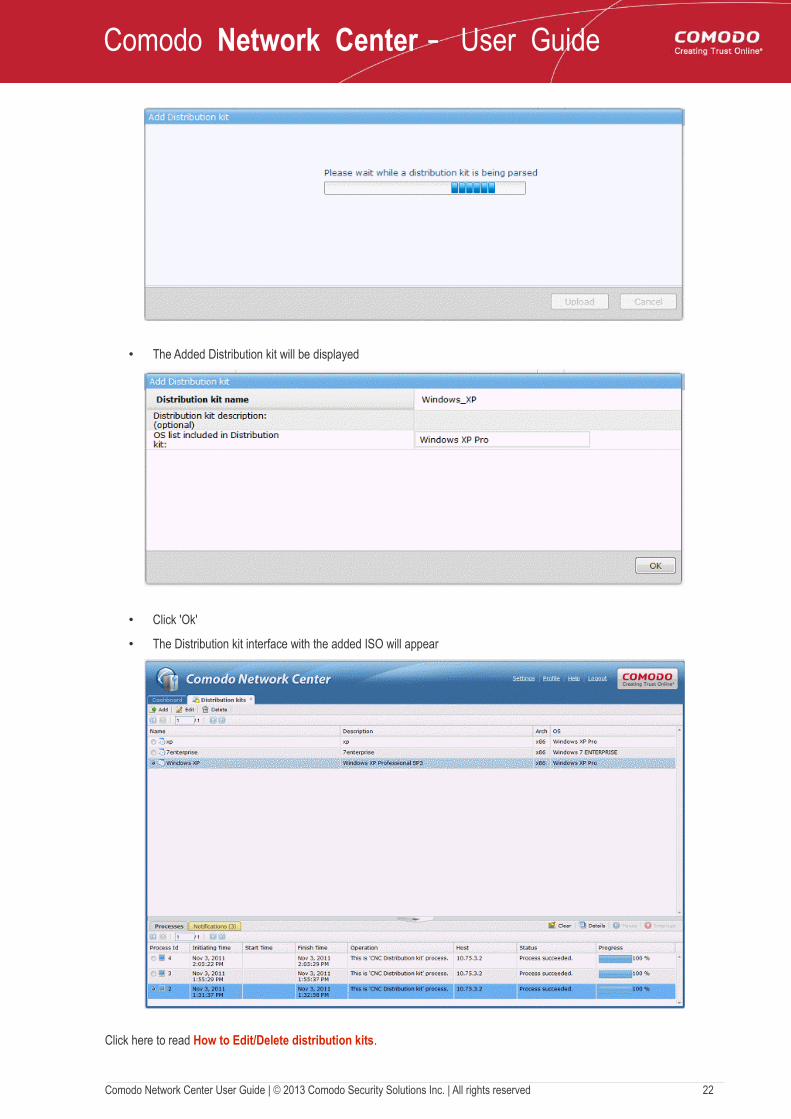
• Click the button to start the loading process
• At the bottom of the dialog you can observe an image upload process .
• Click 'STOP' button to abort the file load process
• After the uploaded process is complete, a dialog box will display the parsing progress
Comodo Network Center User Guide | © 2013 Comodo Security Solutions Inc. | All rights reserved 21
Comodo Network Center - User Guide
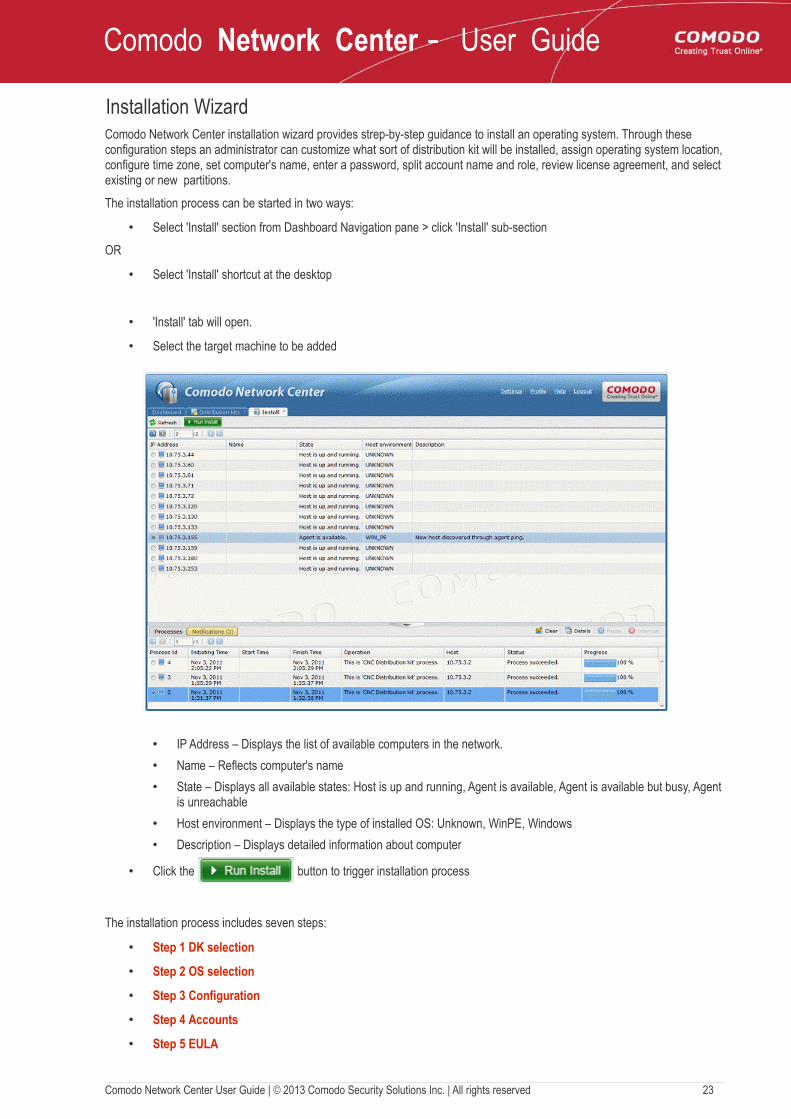
• The Added Distribution kit will be displayed
• Click 'Ok'
• The Distribution kit interface with the added ISO will appear
Click here to read How to Edit/Delete distribution kits.
Comodo Network Center User Guide | © 2013 Comodo Security Solutions Inc. | All rights reserved 22
Comodo Network Center - User Guide
Installation WizardComodo Network Center installation wizard provides strep-by-step guidance to install an operating system. Through these configuration steps an administrator can customize what sort of distribution kit will be installed, assign operating system location, configure time zone, set computer's name, enter a password, split account name and role, review license agreement, and select existing or new partitions.
The installation process can be started in two ways:
• Select 'Install' section from Dashboard Navigation pane > click 'Install' sub-section
OR
• Select 'Install' shortcut at the desktop
• 'Install' tab will open.
• Select the target machine to be added
• IP Address – Displays the list of available computers in the network.
• Name – Reflects computer's name
• State – Displays all available states: Host is up and running, Agent is available, Agent is available but busy, Agent is unreachable
• Host environment – Displays the type of installed OS: Unknown, WinPE, Windows
• Description – Displays detailed information about computer
• Click the button to trigger installation process
The installation process includes seven steps:
• Step 1 DK selection
• Step 2 OS selection
• Step 3 Configuration
• Step 4 Accounts
• Step 5 EULA
Comodo Network Center User Guide | © 2013 Comodo Security Solutions Inc. | All rights reserved 23
Comodo Network Center - User Guide
• Step 6 Partition manager
• Step 7 Install summary
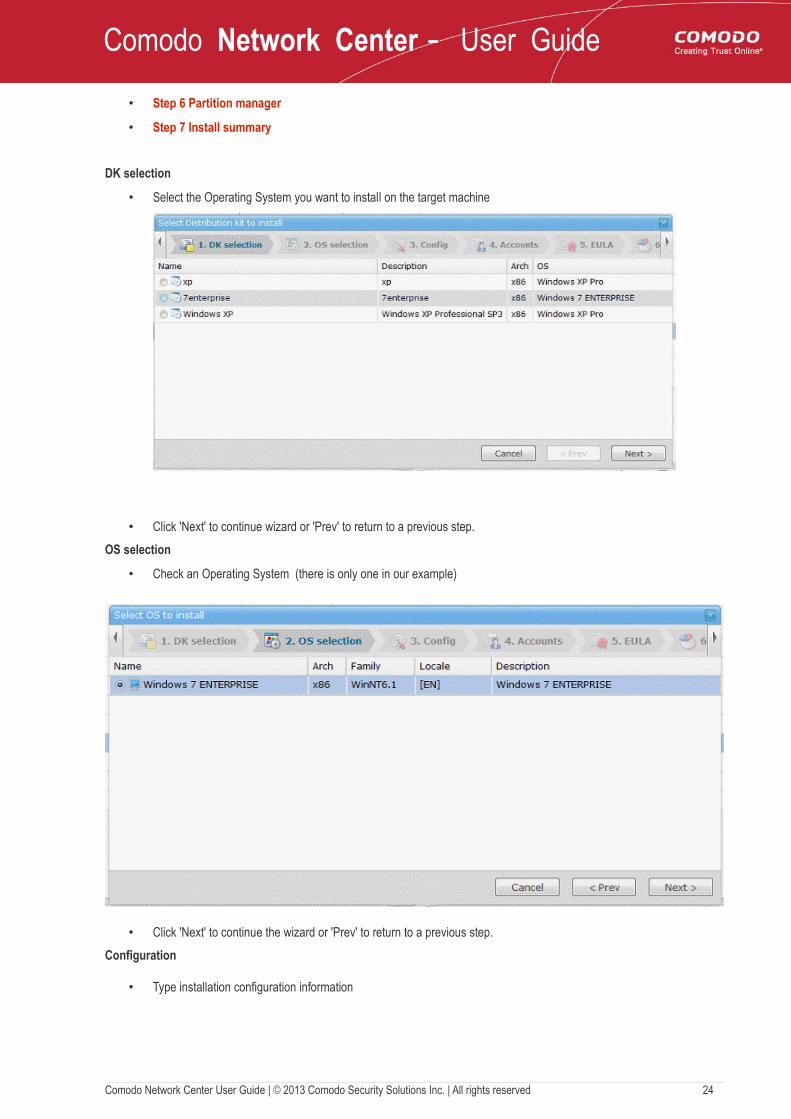
DK selection
• Select the Operating System you want to install on the target machine
• Click 'Next' to continue wizard or 'Prev' to return to a previous step.
OS selection
• Check an Operating System (there is only one in our example)
• Click 'Next' to continue the wizard or 'Prev' to return to a previous step.
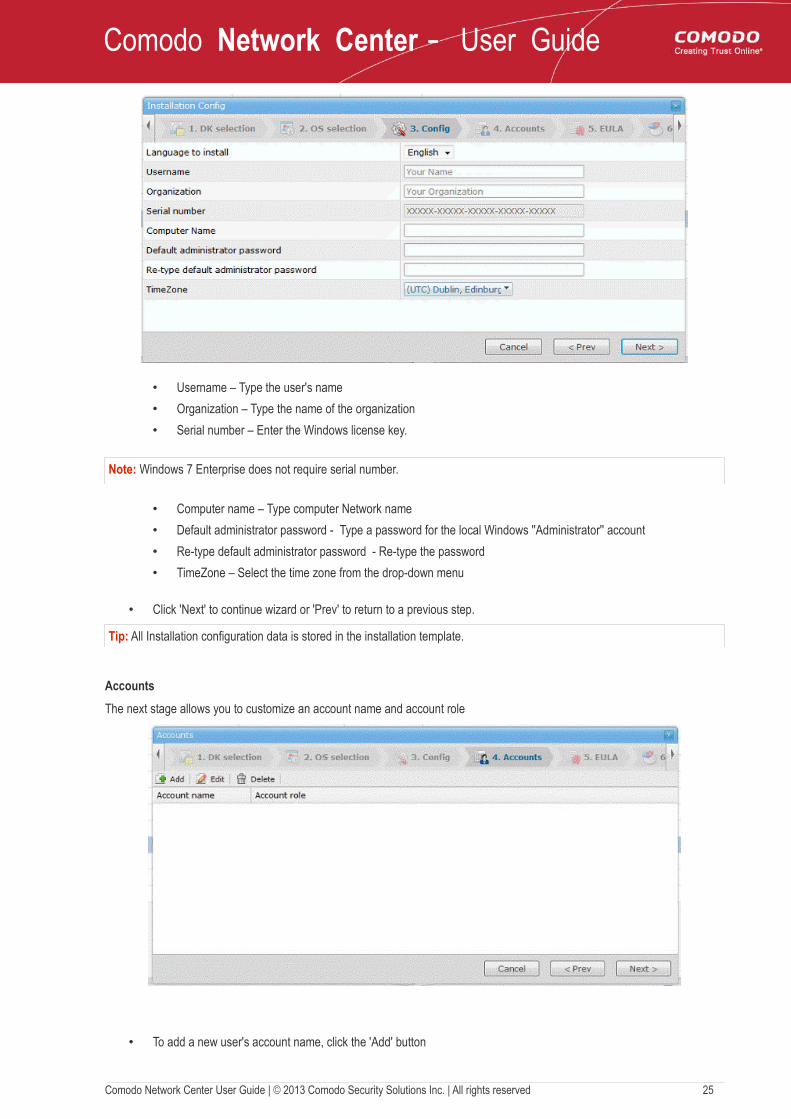
Configuration
• Type installation configuration information
Comodo Network Center User Guide | © 2013 Comodo Security Solutions Inc. | All rights reserved 24
Comodo Network Center - User Guide
• Username – Type the user's name
• Organization – Type the name of the organization
• Serial number – Enter the Windows license key.
Note: Windows 7 Enterprise does not require serial number.
• Computer name – Type computer Network name
• Default administrator password - Type a password for the local Windows ''Administrator'' account
• Re-type default administrator password - Re-type the password
• TimeZone – Select the time zone from the drop-down menu
• Click 'Next' to continue wizard or 'Prev' to return to a previous step.
Tip: All Installation configuration data is stored in the installation template.
Accounts
The next stage allows you to customize an account name and account role
• To add a new user's account name, click the 'Add' button
Comodo Network Center User Guide | © 2013 Comodo Security Solutions Inc. | All rights reserved 25

Comodo Network Center - User Guide
• Fill in the 'Account name' and 'Account password' text boxes.
• Re-type the password and then select a Role for the new user. Note: We are strongly recommend adding at least one user with an administrators role.
• Click 'Save' for the settings to take effect.
• The name and account role will appear in the Account dialog.
• Click 'Next' to continue the wizard or 'Prev' to return to a previous step.
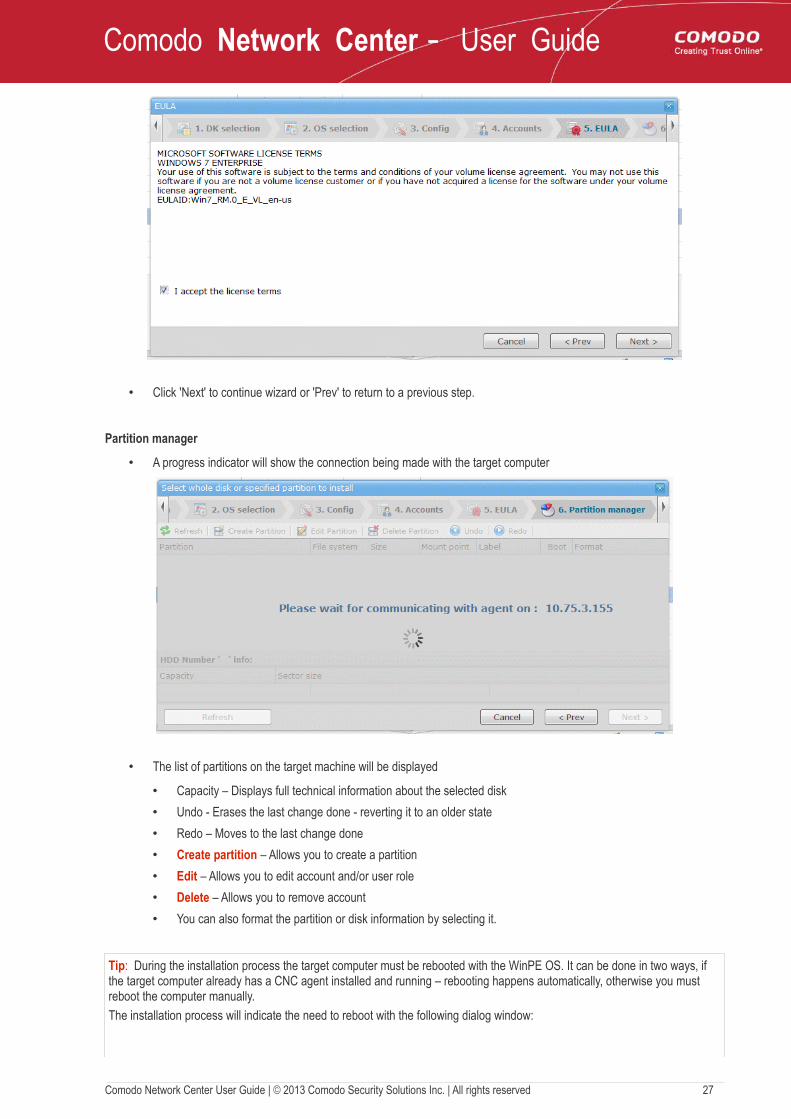
EULA
• Read the complete User License Agreement by clicking the 'User License Agreement' tip box.
Comodo Network Center User Guide | © 2013 Comodo Security Solutions Inc. | All rights reserved 26
Comodo Network Center - User Guide
• Click 'Next' to continue wizard or 'Prev' to return to a previous step.
Partition manager
• A progress indicator will show the connection being made with the target computer
• The list of partitions on the target machine will be displayed
• Capacity – Displays full technical information about the selected disk
• Undo - Erases the last change done - reverting it to an older state
• Redo – Moves to the last change done
• Create partition – Allows you to create a partition
• Edit – Allows you to edit account and/or user role
• Delete – Allows you to remove account
• You can also format the partition or disk information by selecting it.
Tip: During the installation process the target computer must be rebooted with the WinPE OS. It can be done in two ways, if the target computer already has a CNC agent installed and running – rebooting happens automatically, otherwise you must reboot the computer manually.
The installation process will indicate the need to reboot with the following dialog window:
Comodo Network Center User Guide | © 2013 Comodo Security Solutions Inc. | All rights reserved 27
Comodo Network Center - User Guide
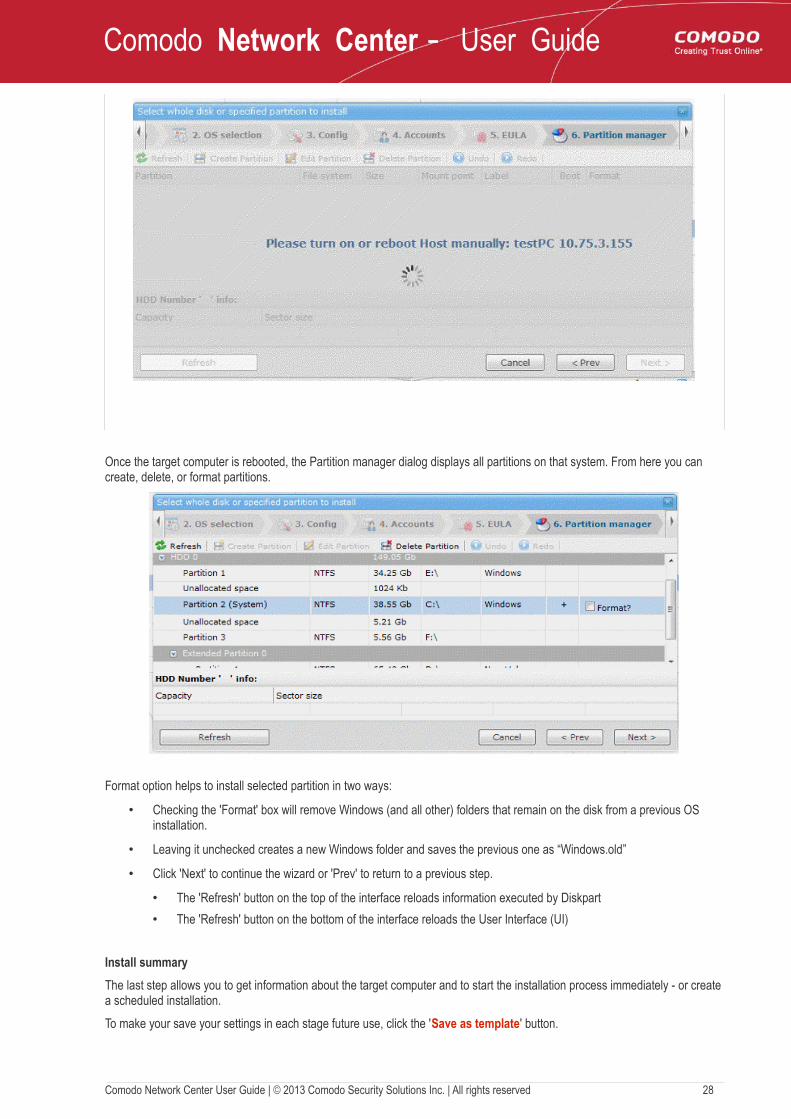
Once the target computer is rebooted, the Partition manager dialog displays all partitions on that system. From here you can create, delete, or format partitions.
Format option helps to install selected partition in two ways:
• Checking the 'Format' box will remove Windows (and all other) folders that remain on the disk from a previous OS installation.
• Leaving it unchecked creates a new Windows folder and saves the previous one as “Windows.old”
• Click 'Next' to continue the wizard or 'Prev' to return to a previous step.
• The 'Refresh' button on the top of the interface reloads information executed by Diskpart
• The 'Refresh' button on the bottom of the interface reloads the User Interface (UI)
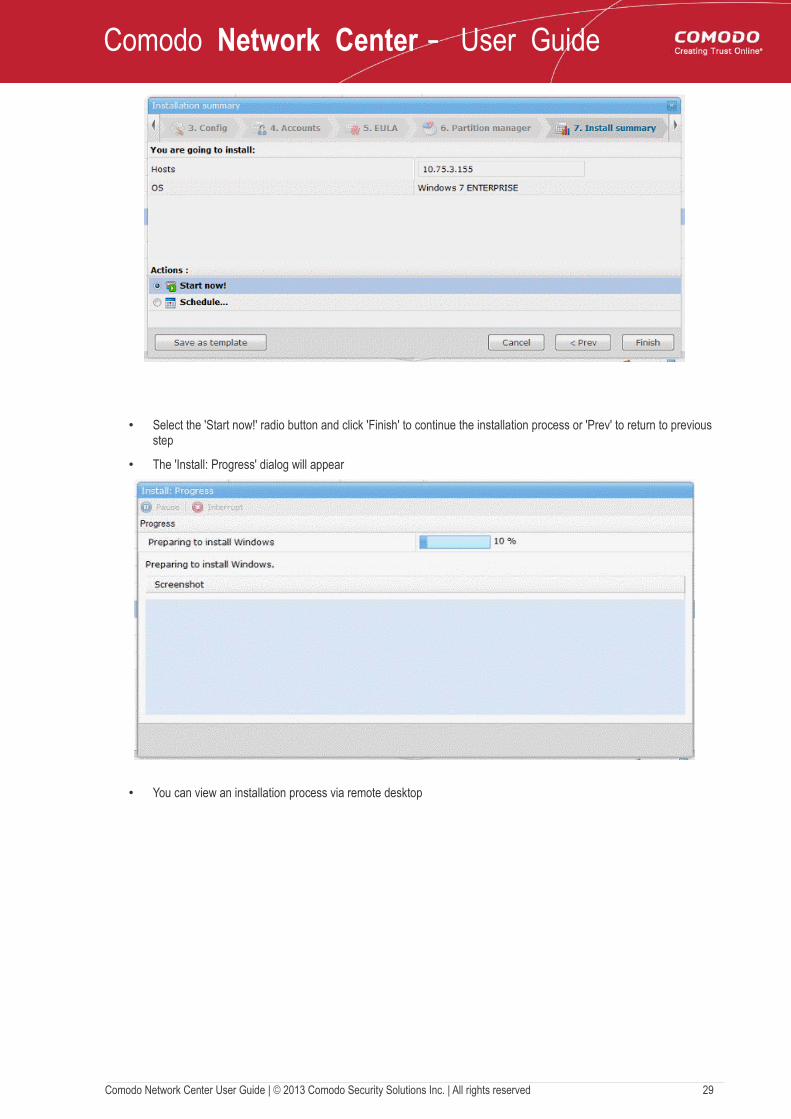
Install summary
The last step allows you to get information about the target computer and to start the installation process immediately - or create a scheduled installation.
To make your save your settings in each stage future use, click the 'Save as template' button.
Comodo Network Center User Guide | © 2013 Comodo Security Solutions Inc. | All rights reserved 28
Comodo Network Center - User Guide
• Select the 'Start now!' radio button and click 'Finish' to continue the installation process or 'Prev' to return to previous step
• The 'Install: Progress' dialog will appear
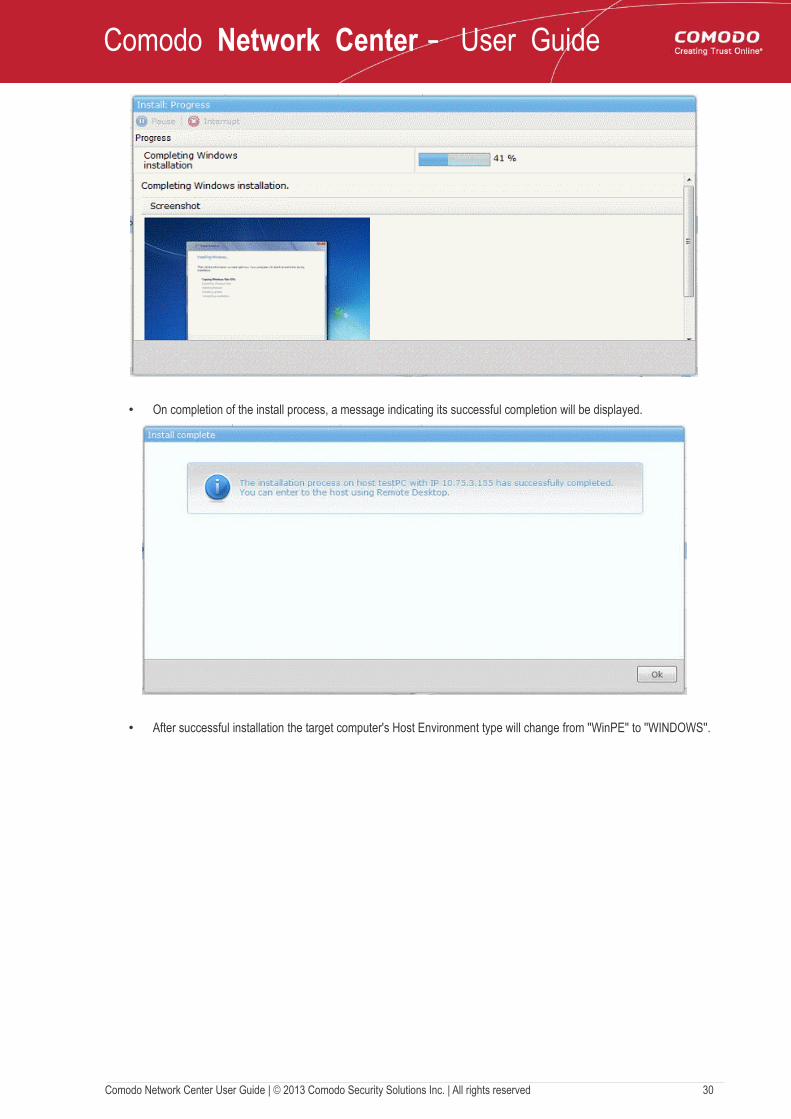
• You can view an installation process via remote desktop
Comodo Network Center User Guide | © 2013 Comodo Security Solutions Inc. | All rights reserved 29
Comodo Network Center - User Guide
• On completion of the install process, a message indicating its successful completion will be displayed.
• After successful installation the target computer's Host Environment type will change from ''WinPE'' to ''WINDOWS''.
Comodo Network Center User Guide | © 2013 Comodo Security Solutions Inc. | All rights reserved 30
Comodo Network Center - User Guide
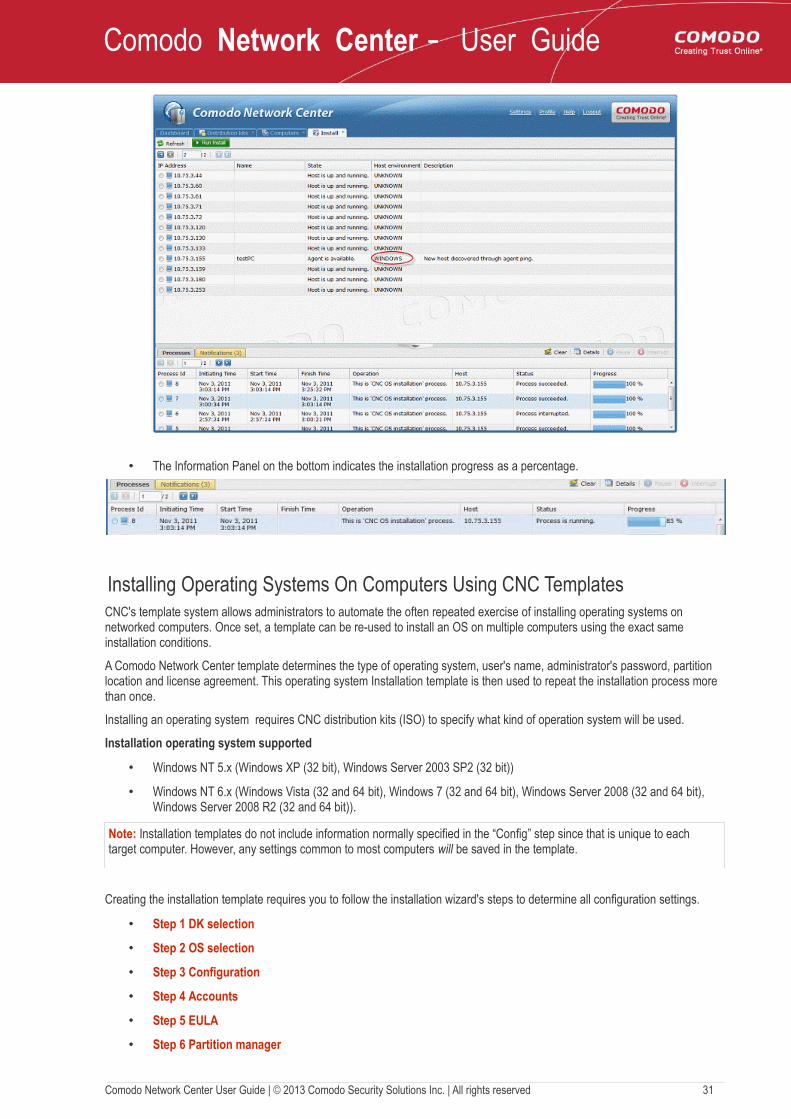
• The Information Panel on the bottom indicates the installation progress as a percentage.
Installing Operating Systems On Computers Using CNC TemplatesCNC's template system allows administrators to automate the often repeated exercise of installing operating systems on networked computers. Once set, a template can be re-used to install an OS on multiple computers using the exact same installation conditions.
A Comodo Network Center template determines the type of operating system, user's name, administrator's password, partition location and license agreement. This operating system Installation template is then used to repeat the installation process more than once.
Installing an operating system requires CNC distribution kits (ISO) to specify what kind of operation system will be used.
Installation operating system supported
• Windows NT 5.x (Windows XP (32 bit), Windows Server 2003 SP2 (32 bit))
• Windows NT 6.x (Windows Vista (32 and 64 bit), Windows 7 (32 and 64 bit), Windows Server 2008 (32 and 64 bit), Windows Server 2008 R2 (32 and 64 bit)).
Note: Installation templates do not include information normally specified in the “Config” step since that is unique to each target computer. However, any settings common to most computers will be saved in the template.
Creating the installation template requires you to follow the installation wizard's steps to determine all configuration settings.
• Step 1 DK selection
• Step 2 OS selection
• Step 3 Configuration
• Step 4 Accounts
• Step 5 EULA
• Step 6 Partition manager
Comodo Network Center User Guide | © 2013 Comodo Security Solutions Inc. | All rights reserved 31
Comodo Network Center - User Guide
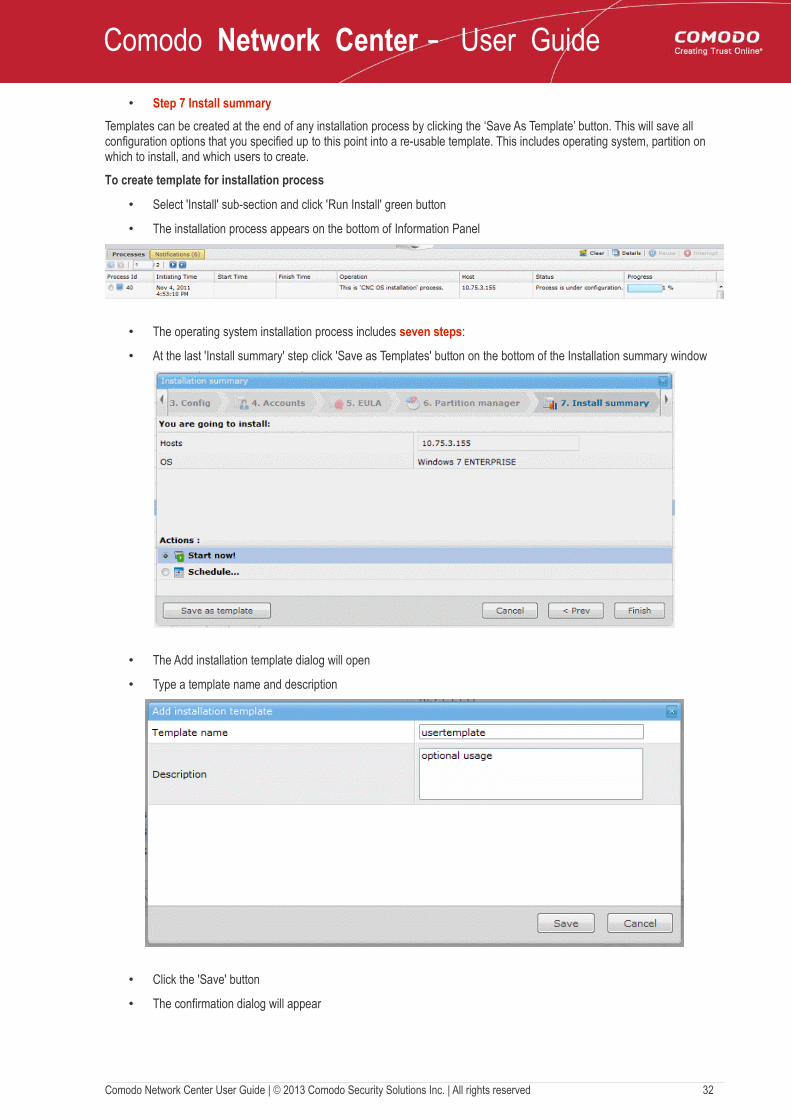
• Step 7 Install summary
Templates can be created at the end of any installation process by clicking the ‘Save As Template’ button. This will save all configuration options that you specified up to this point into a re-usable template. This includes operating system, partition on which to install, and which users to create.
To create template for installation process
• Select 'Install' sub-section and click 'Run Install' green button
• The installation process appears on the bottom of Information Panel
• The operating system installation process includes seven steps:
• At the last 'Install summary' step click 'Save as Templates' button on the bottom of the Installation summary window
• The Add installation template dialog will open
• Type a template name and description
• Click the 'Save' button
• The confirmation dialog will appear
Comodo Network Center User Guide | © 2013 Comodo Security Solutions Inc. | All rights reserved 32
Comodo Network Center - User Guide
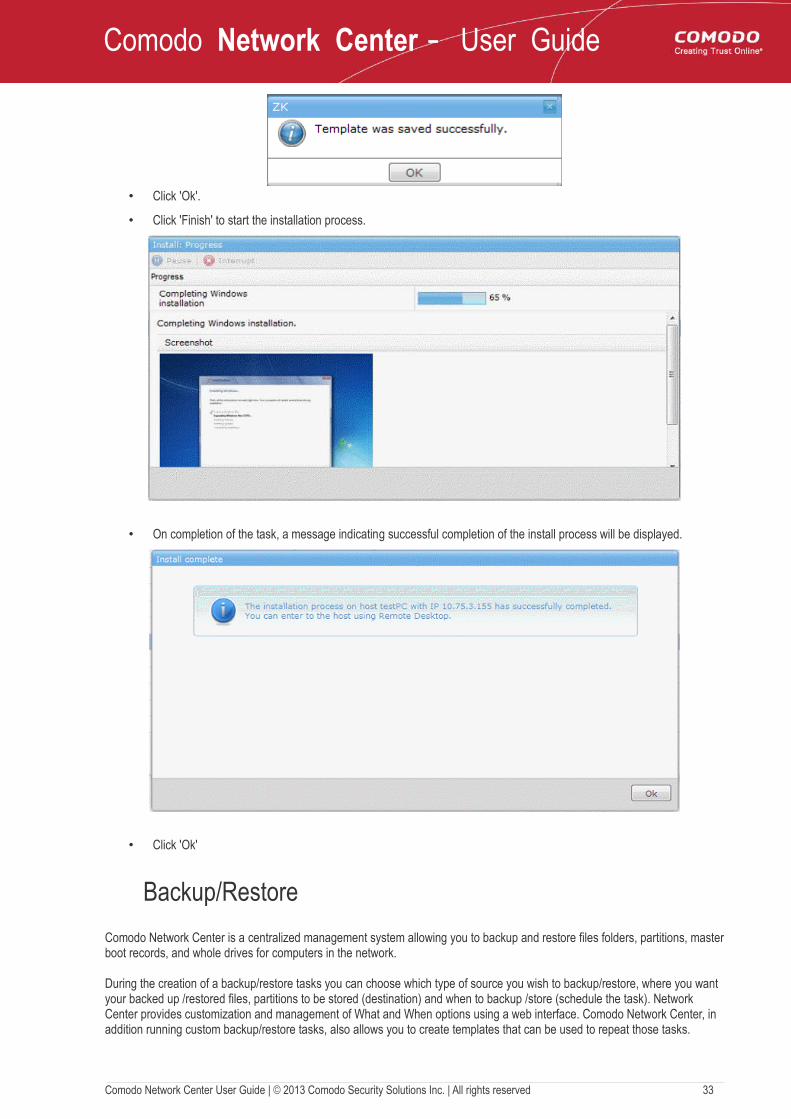
• Click 'Ok'.
• Click 'Finish' to start the installation process.
• On completion of the task, a message indicating successful completion of the install process will be displayed.
• Click 'Ok'
Backup/Restore
Comodo Network Center is a centralized management system allowing you to backup and restore files folders, partitions, master boot records, and whole drives for computers in the network.
During the creation of a backup/restore tasks you can choose which type of source you wish to backup/restore, where you want your backed up /restored files, partitions to be stored (destination) and when to backup /store (schedule the task). Network Center provides customization and management of What and When options using a web interface. Comodo Network Center, in addition running custom backup/restore tasks, also allows you to create templates that can be used to repeat those tasks.
Comodo Network Center User Guide | © 2013 Comodo Security Solutions Inc. | All rights reserved 33
Comodo Network Center - User Guide
Click the links below to see detailed explanations on each option in Backup/Restore:
• Backup wizard
• Backup templates
• Backup images
• Restore wizard
• Restore templates
Backup Wizard
Note: Ensure that the CNC agent is installed and running on all target endpoints. If you need assistance downloading or installing this agent, please see.
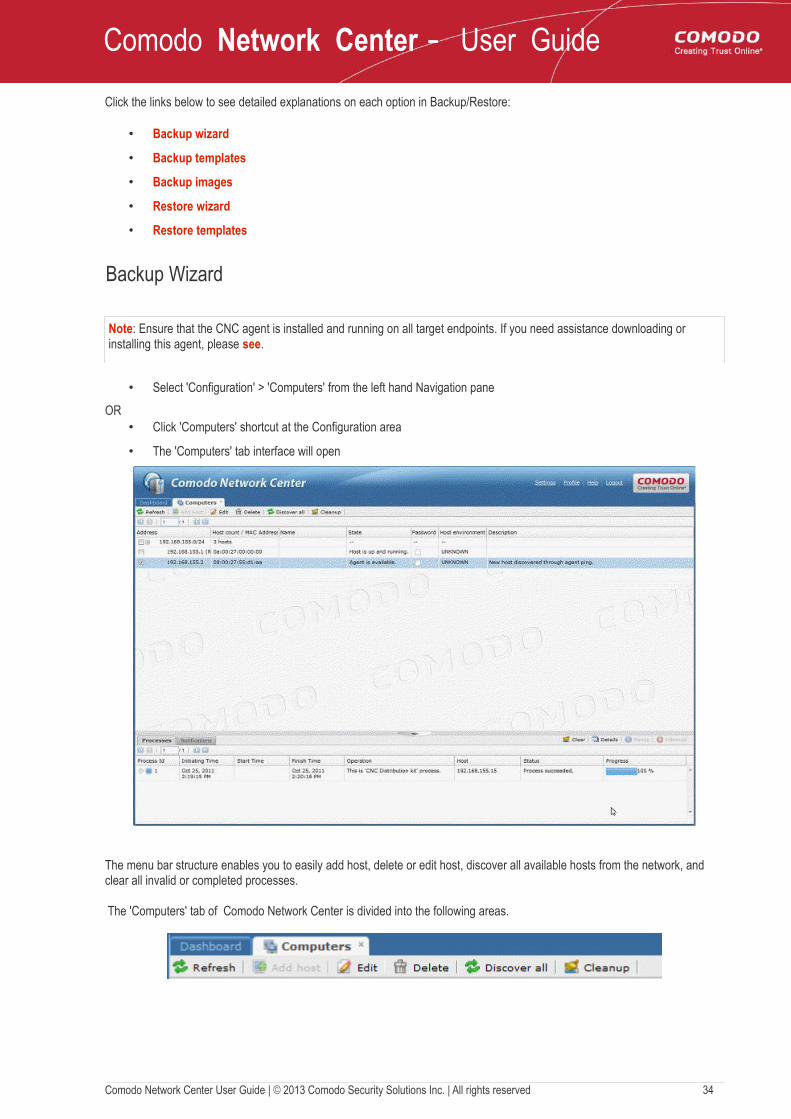
• Select 'Configuration' > 'Computers' from the left hand Navigation pane
OR• Click 'Computers' shortcut at the Configuration area
• The 'Computers' tab interface will open
The menu bar structure enables you to easily add host, delete or edit host, discover all available hosts from the network, and clear all invalid or completed processes.
The 'Computers' tab of Comodo Network Center is divided into the following areas.
Comodo Network Center User Guide | © 2013 Comodo Security Solutions Inc. | All rights reserved 34
Comodo Network Center - User Guide
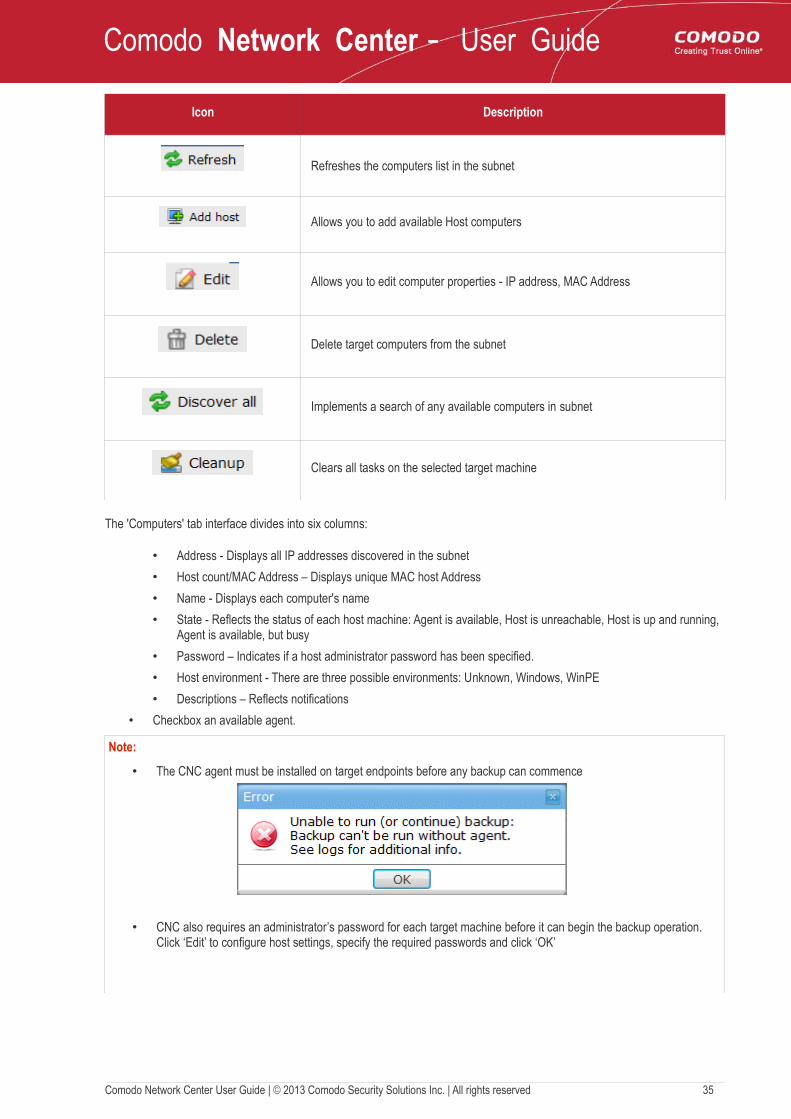
Icon Description
Refreshes the computers list in the subnet
Allows you to add available Host computers
Allows you to edit computer properties - IP address, MAC Address
Delete target computers from the subnet
Implements a search of any available computers in subnet
Clears all tasks on the selected target machine
The 'Computers' tab interface divides into six columns:
• Address - Displays all IP addresses discovered in the subnet
• Host count/MAC Address – Displays unique MAC host Address
• Name - Displays each computer's name
• State - Reflects the status of each host machine: Agent is available, Host is unreachable, Host is up and running, Agent is available, but busy
• Password – Indicates if a host administrator password has been specified.
• Host environment - There are three possible environments: Unknown, Windows, WinPE
• Descriptions – Reflects notifications
• Checkbox an available agent.
Note:
• The CNC agent must be installed on target endpoints before any backup can commence
• CNC also requires an administrator’s password for each target machine before it can begin the backup operation. Click ‘Edit’ to configure host settings, specify the required passwords and click ‘OK’
Comodo Network Center User Guide | © 2013 Comodo Security Solutions Inc. | All rights reserved 35
Comodo Network Center - User Guide
Backup ImagesCreating a custom backup task allows you to select items to be backed-up, like the folders/files, an entire disk, a partition, registry entries – plus the destination where you wish to save the backup. You can also schedule the backup job to be executed at set intervals.
Backups created by Comodo Network Center protects your valuable data against damage or loss. Backups can be made to Comodo's highly secure Online Storage facility for additional off-site protection against loss or corruption.
You can back up:
• Backing up disk, partition and/or MBR
• Backing up folders or files
To backup the whole Disk drive, drive partition(s) and / or the MBR
• Select Backup/Restore from the Dashboard navigation Panel
• Click the 'Backup' tab
• Select checkbox 'Agent is available' state to make it active
• Click button
• The Backup wizard will display. It has six stages:
• Stage 1 Backup source type
• Stage 2 Backup source
• Stage 3 Destination type
• Stage 4 Destination settings
• Stage 5 Destination path
• Stage 6 Backup summary
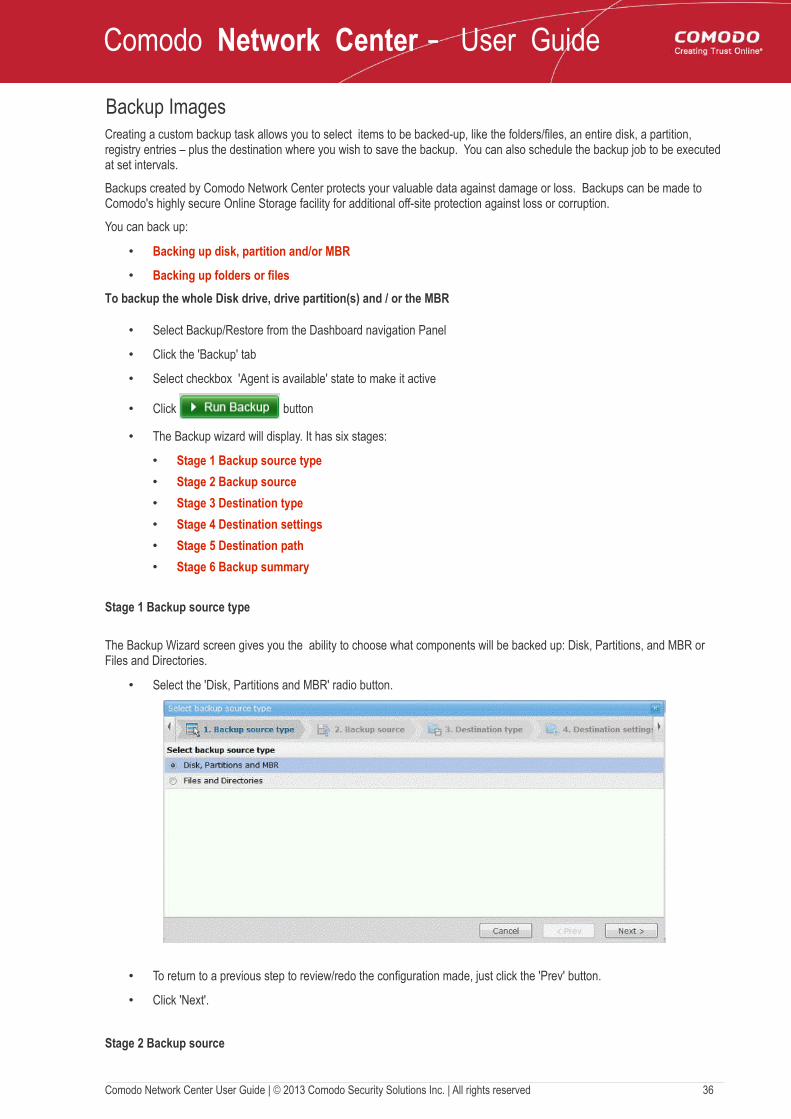
Stage 1 Backup source type
The Backup Wizard screen gives you the ability to choose what components will be backed up: Disk, Partitions, and MBR or Files and Directories.
• Select the 'Disk, Partitions and MBR' radio button.
• To return to a previous step to review/redo the configuration made, just click the 'Prev' button.
• Click 'Next'.
Stage 2 Backup source
Comodo Network Center User Guide | © 2013 Comodo Security Solutions Inc. | All rights reserved 36

Comodo Network Center - User Guide
• The progress of connecting to the CNC Agent will be displayed
• The CNC server will connect to the CNC Agent and all information about the target computer's disks, partitions, and MBR will be displayed.
• To return to a previous step to review/redo the configuration made, just click the 'Prev' button.
• Select the disk partition to be backed up and click 'Next'
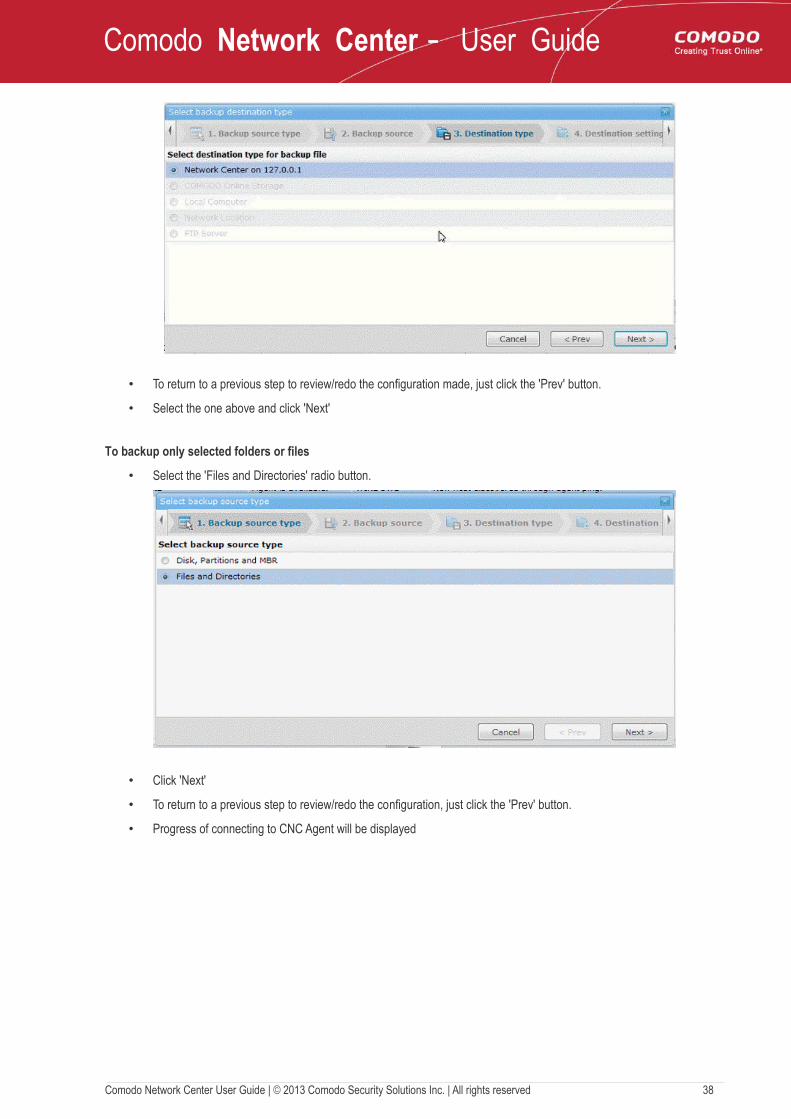
Stage 3 Destination type
• The third stage of the process is to choose the destination for storing your backup Disk, Partitions, or MBR
• Network Center – All backed up data will be stored at the backup folder located in the CNC data directory. CNC data directory was set during CNC server installation.
• Comodo Online Storage – Saves backup data on the Comodo Online Storage service.
• Local Computer – Saves backup data on the target computer's local hard drive, removable drives connected to the computer or a network drive.
• FTP Server - Saves backup data on an FTP server.
Comodo Network Center User Guide | © 2013 Comodo Security Solutions Inc. | All rights reserved 37
Comodo Network Center - User Guide
• To return to a previous step to review/redo the configuration made, just click the 'Prev' button.
• Select the one above and click 'Next'
To backup only selected folders or files
• Select the 'Files and Directories' radio button.
• Click 'Next'
• To return to a previous step to review/redo the configuration, just click the 'Prev' button.
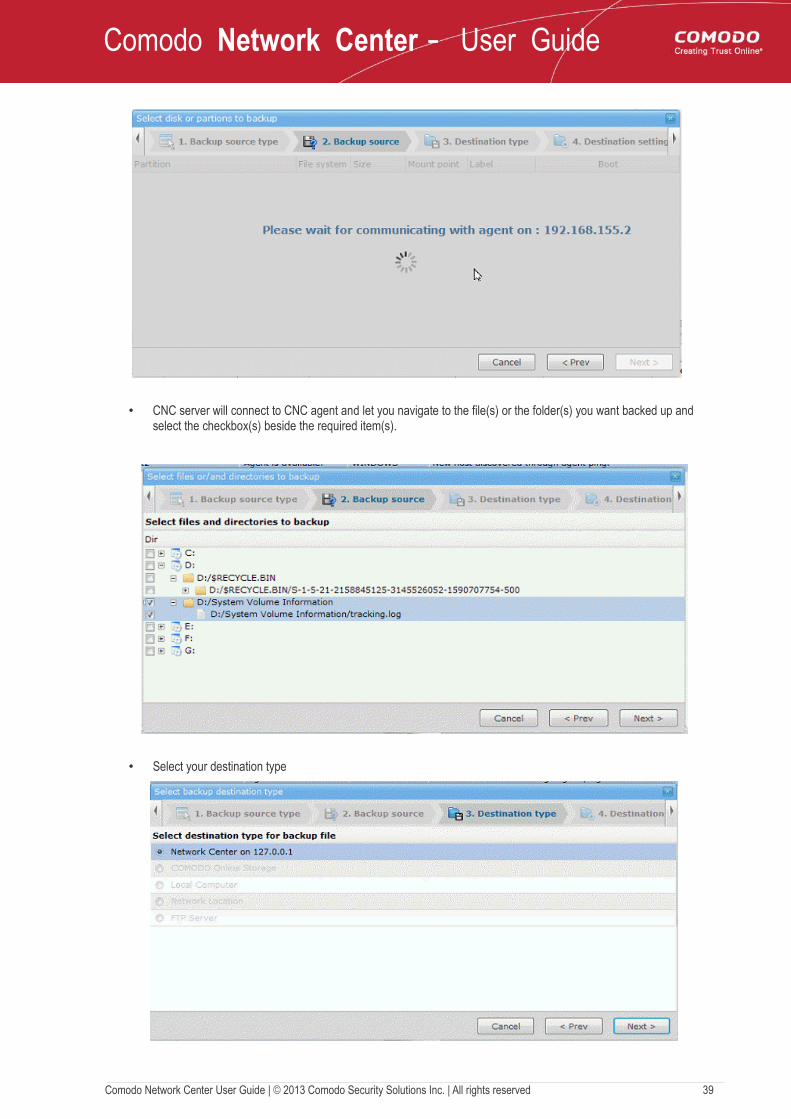
• Progress of connecting to CNC Agent will be displayed
Comodo Network Center User Guide | © 2013 Comodo Security Solutions Inc. | All rights reserved 38
Comodo Network Center - User Guide
• CNC server will connect to CNC agent and let you navigate to the file(s) or the folder(s) you want backed up and select the checkbox(s) beside the required item(s).
• Select your destination type
Comodo Network Center User Guide | © 2013 Comodo Security Solutions Inc. | All rights reserved 39

Comodo Network Center - User Guide
• Click 'Next'
Stage 4 Destination settings
skip to stage 6
Stage 5 Destination path
skip to stage 6
Stage 6 Backup summary
The Backup summary stage allows you review selections made in the previous stages prior to starting or scheduling the backup.
From here you can see whether all settings are correct.
Note: The backed up files will be saved with a .cbu extension in the default location or your selected location.
• To return to a previous step to review/redo the configuration, just click the 'Prev' button.
• Click 'Finish' for the settings to take effect.
• 'Calculate size' button allows you to see the size of the backup image file.
• Click 'Next'.
Actions
The 'Actions' option allows you to run backup process instantly or lets you set up a scheduled backup according to your preferences. You can also save your backup selections by clicking the 'Save as template' button. To learn how to create a backup template, click here.
• Check box 'Start now!' button
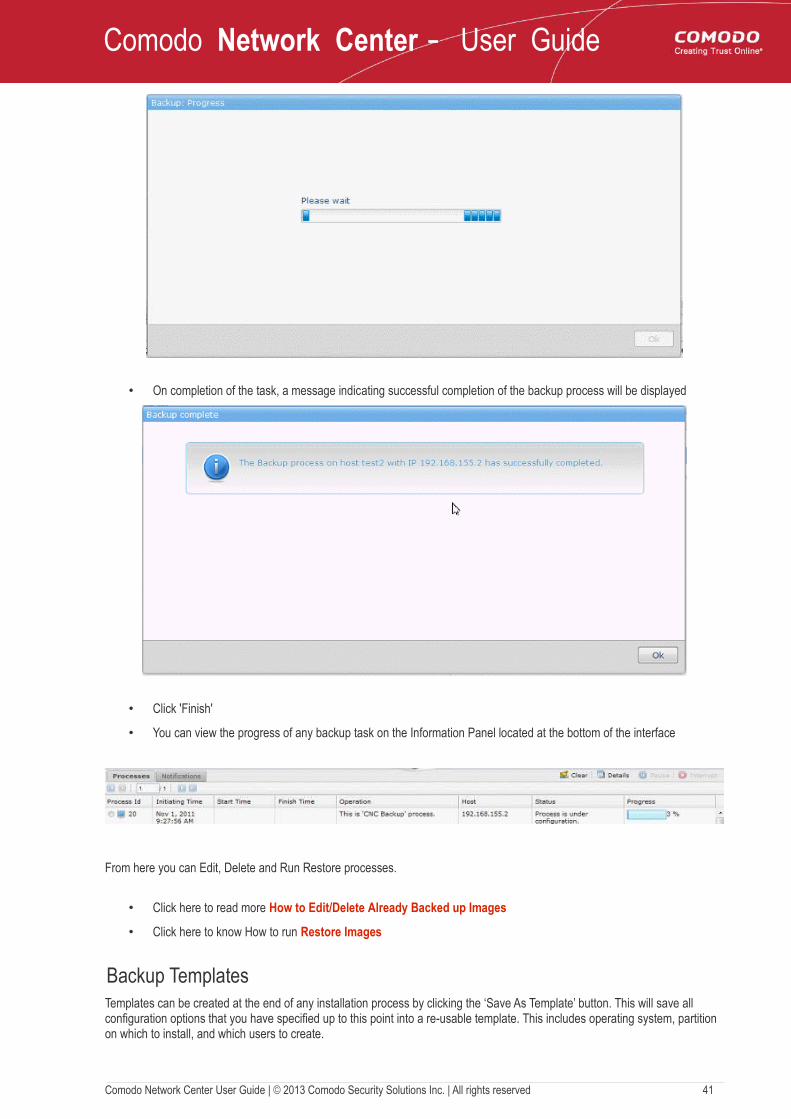
• Backup progress will be indicated
Comodo Network Center User Guide | © 2013 Comodo Security Solutions Inc. | All rights reserved 40
Comodo Network Center - User Guide
• On completion of the task, a message indicating successful completion of the backup process will be displayed
• Click 'Finish'
• You can view the progress of any backup task on the Information Panel located at the bottom of the interface
From here you can Edit, Delete and Run Restore processes.
• Click here to read more How to Edit/Delete Already Backed up Images
• Click here to know How to run Restore Images
Backup TemplatesTemplates can be created at the end of any installation process by clicking the ‘Save As Template’ button. This will save all configuration options that you have specified up to this point into a re-usable template. This includes operating system, partition on which to install, and which users to create.
Comodo Network Center User Guide | © 2013 Comodo Security Solutions Inc. | All rights reserved 41
Comodo Network Center - User Guide
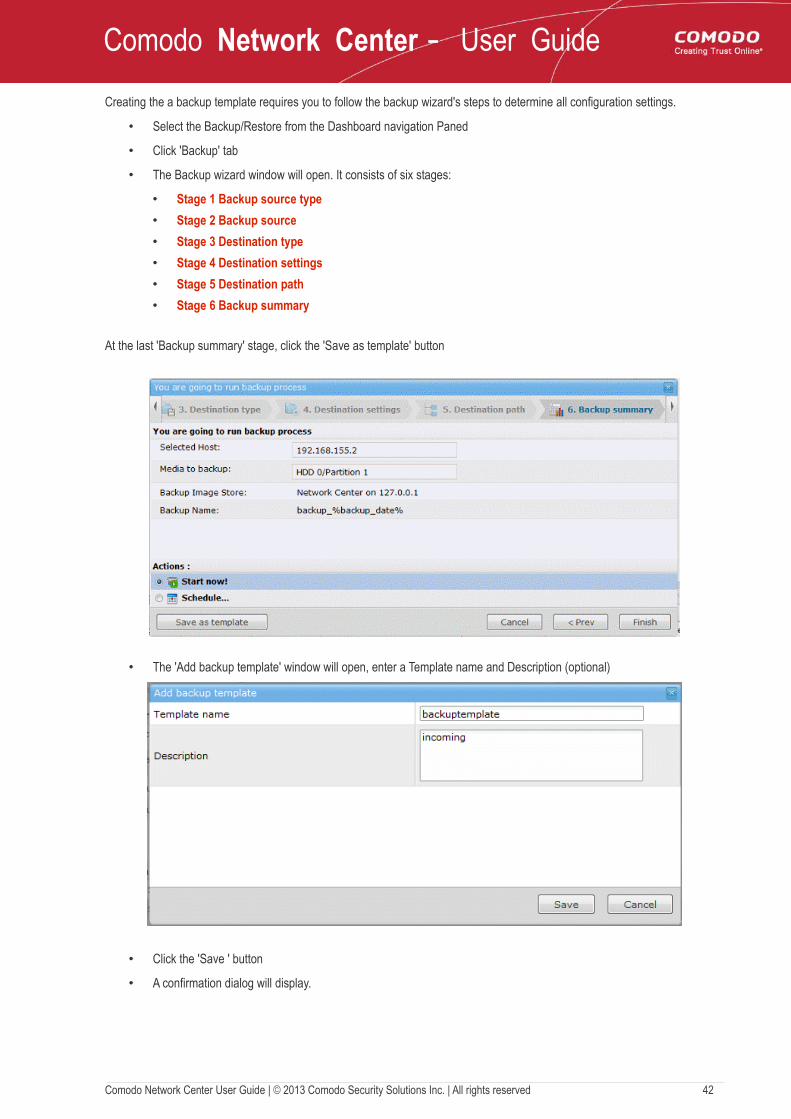
Creating the a backup template requires you to follow the backup wizard's steps to determine all configuration settings.
• Select the Backup/Restore from the Dashboard navigation Paned
• Click 'Backup' tab
• The Backup wizard window will open. It consists of six stages:
• Stage 1 Backup source type
• Stage 2 Backup source
• Stage 3 Destination type
• Stage 4 Destination settings
• Stage 5 Destination path
• Stage 6 Backup summary
At the last 'Backup summary' stage, click the 'Save as template' button
• The 'Add backup template' window will open, enter a Template name and Description (optional)
• Click the 'Save ' button
• A confirmation dialog will display.
Comodo Network Center User Guide | © 2013 Comodo Security Solutions Inc. | All rights reserved 42
Comodo Network Center - User Guide
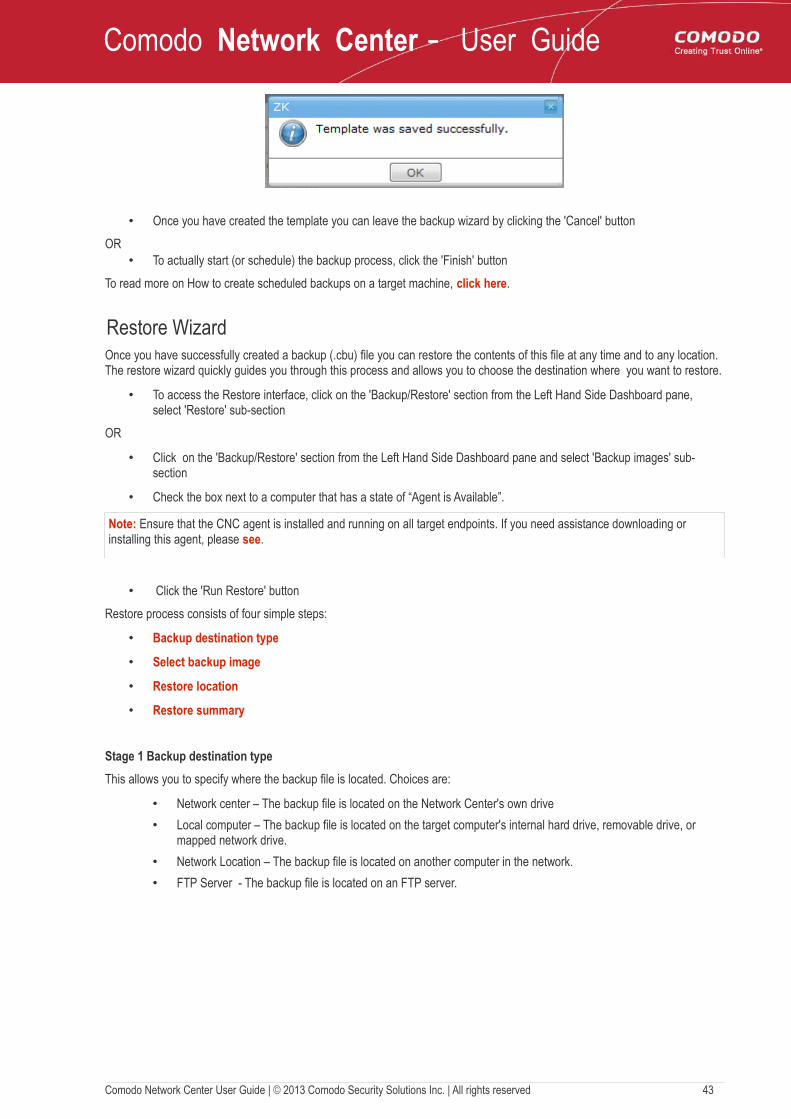
• Once you have created the template you can leave the backup wizard by clicking the 'Cancel' button
OR• To actually start (or schedule) the backup process, click the 'Finish' button
To read more on How to create scheduled backups on a target machine, click here.
Restore WizardOnce you have successfully created a backup (.cbu) file you can restore the contents of this file at any time and to any location. The restore wizard quickly guides you through this process and allows you to choose the destination where you want to restore.
• To access the Restore interface, click on the 'Backup/Restore' section from the Left Hand Side Dashboard pane, select 'Restore' sub-section
OR
• Click on the 'Backup/Restore' section from the Left Hand Side Dashboard pane and select 'Backup images' sub-section
• Check the box next to a computer that has a state of “Agent is Available”.
Note: Ensure that the CNC agent is installed and running on all target endpoints. If you need assistance downloading or installing this agent, please see.
• Click the 'Run Restore' button
Restore process consists of four simple steps:
• Backup destination type
• Select backup image
• Restore location
• Restore summary
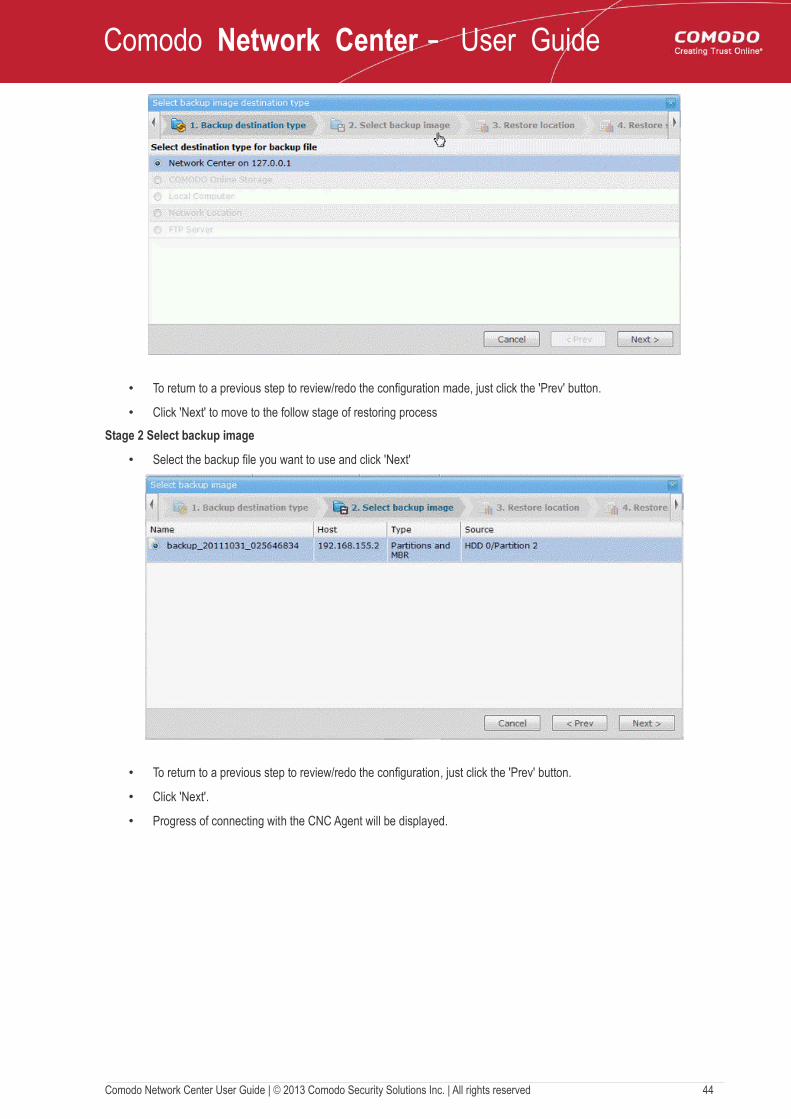
Stage 1 Backup destination type
This allows you to specify where the backup file is located. Choices are:
• Network center – The backup file is located on the Network Center's own drive
• Local computer – The backup file is located on the target computer's internal hard drive, removable drive, or mapped network drive.
• Network Location – The backup file is located on another computer in the network.
• FTP Server - The backup file is located on an FTP server.
Comodo Network Center User Guide | © 2013 Comodo Security Solutions Inc. | All rights reserved 43
Comodo Network Center - User Guide
• To return to a previous step to review/redo the configuration made, just click the 'Prev' button.
• Click 'Next' to move to the follow stage of restoring process
Stage 2 Select backup image
• Select the backup file you want to use and click 'Next'
• To return to a previous step to review/redo the configuration, just click the 'Prev' button.
• Click 'Next'.
• Progress of connecting with the CNC Agent will be displayed.
Comodo Network Center User Guide | © 2013 Comodo Security Solutions Inc. | All rights reserved 44
Comodo Network Center - User Guide
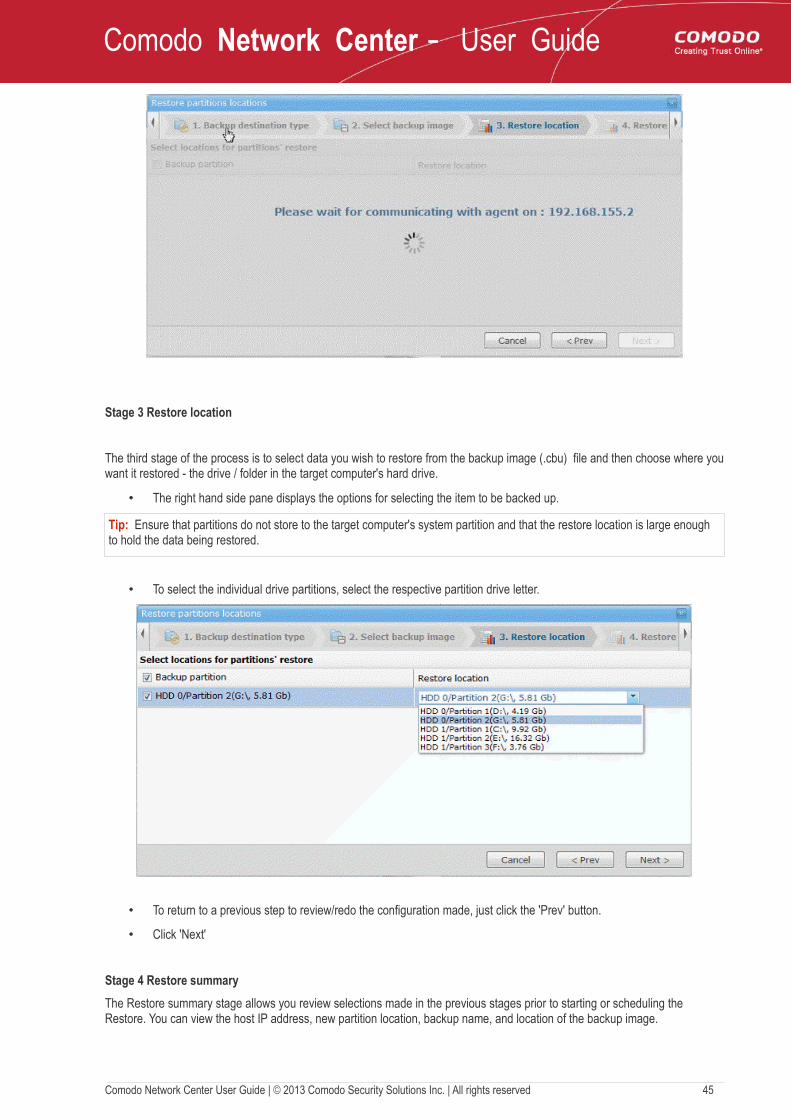
Stage 3 Restore location
The third stage of the process is to select data you wish to restore from the backup image (.cbu) file and then choose where you want it restored - the drive / folder in the target computer's hard drive.
• The right hand side pane displays the options for selecting the item to be backed up.
Tip: Ensure that partitions do not store to the target computer's system partition and that the restore location is large enough to hold the data being restored.
• To select the individual drive partitions, select the respective partition drive letter.
• To return to a previous step to review/redo the configuration made, just click the 'Prev' button.
• Click 'Next'
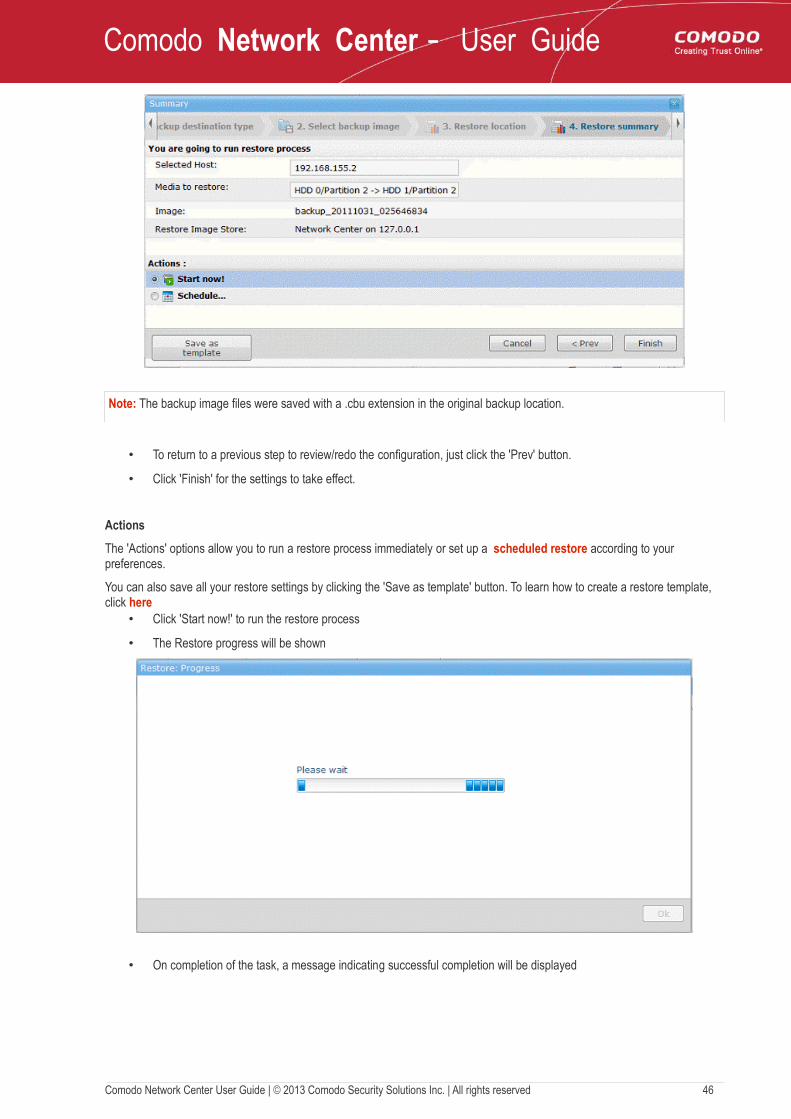
Stage 4 Restore summary
The Restore summary stage allows you review selections made in the previous stages prior to starting or scheduling the Restore. You can view the host IP address, new partition location, backup name, and location of the backup image.
Comodo Network Center User Guide | © 2013 Comodo Security Solutions Inc. | All rights reserved 45
Comodo Network Center - User Guide
Note: The backup image files were saved with a .cbu extension in the original backup location.
• To return to a previous step to review/redo the configuration, just click the 'Prev' button.
• Click 'Finish' for the settings to take effect.
Actions
The 'Actions' options allow you to run a restore process immediately or set up a scheduled restore according to your preferences.
You can also save all your restore settings by clicking the 'Save as template' button. To learn how to create a restore template, click here
• Click 'Start now!' to run the restore process
• The Restore progress will be shown
• On completion of the task, a message indicating successful completion will be displayed
Comodo Network Center User Guide | © 2013 Comodo Security Solutions Inc. | All rights reserved 46
Comodo Network Center - User Guide
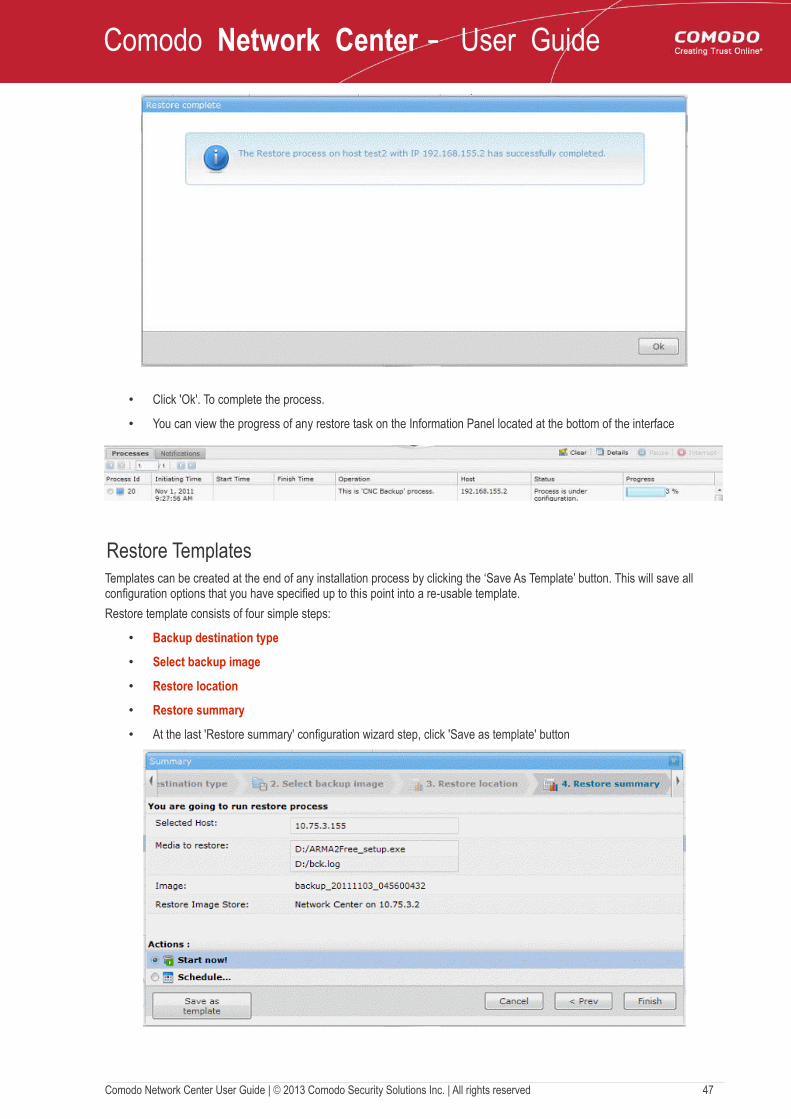
• Click 'Ok'. To complete the process.
• You can view the progress of any restore task on the Information Panel located at the bottom of the interface
Restore TemplatesTemplates can be created at the end of any installation process by clicking the ‘Save As Template’ button. This will save all configuration options that you have specified up to this point into a re-usable template.
Restore template consists of four simple steps:
• Backup destination type
• Select backup image
• Restore location
• Restore summary
• At the last 'Restore summary' configuration wizard step, click 'Save as template' button
Comodo Network Center User Guide | © 2013 Comodo Security Solutions Inc. | All rights reserved 47
Comodo Network Center - User Guide
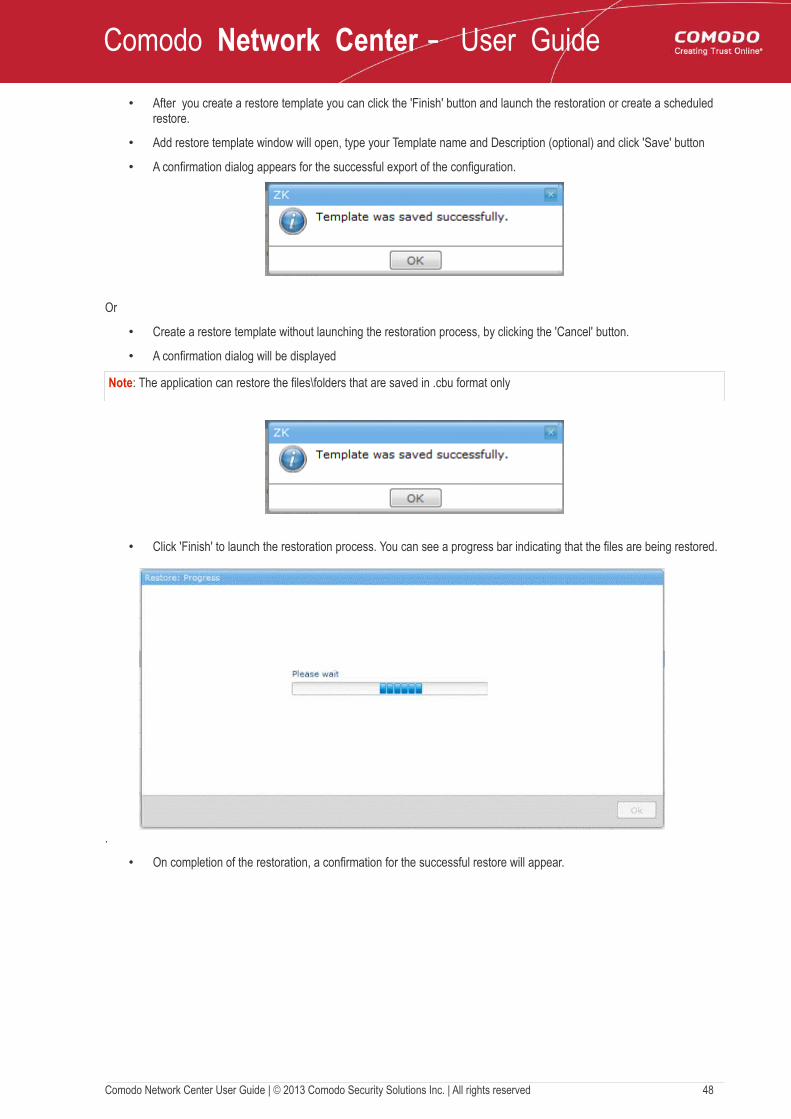
• After you create a restore template you can click the 'Finish' button and launch the restoration or create a scheduled restore.
• Add restore template window will open, type your Template name and Description (optional) and click 'Save' button
• A confirmation dialog appears for the successful export of the configuration.
Or
• Create a restore template without launching the restoration process, by clicking the 'Cancel' button.
• A confirmation dialog will be displayed
Note: The application can restore the files\folders that are saved in .cbu format only
• Click 'Finish' to launch the restoration process. You can see a progress bar indicating that the files are being restored.
.
• On completion of the restoration, a confirmation for the successful restore will appear.
Comodo Network Center User Guide | © 2013 Comodo Security Solutions Inc. | All rights reserved 48
Comodo Network Center - User Guide
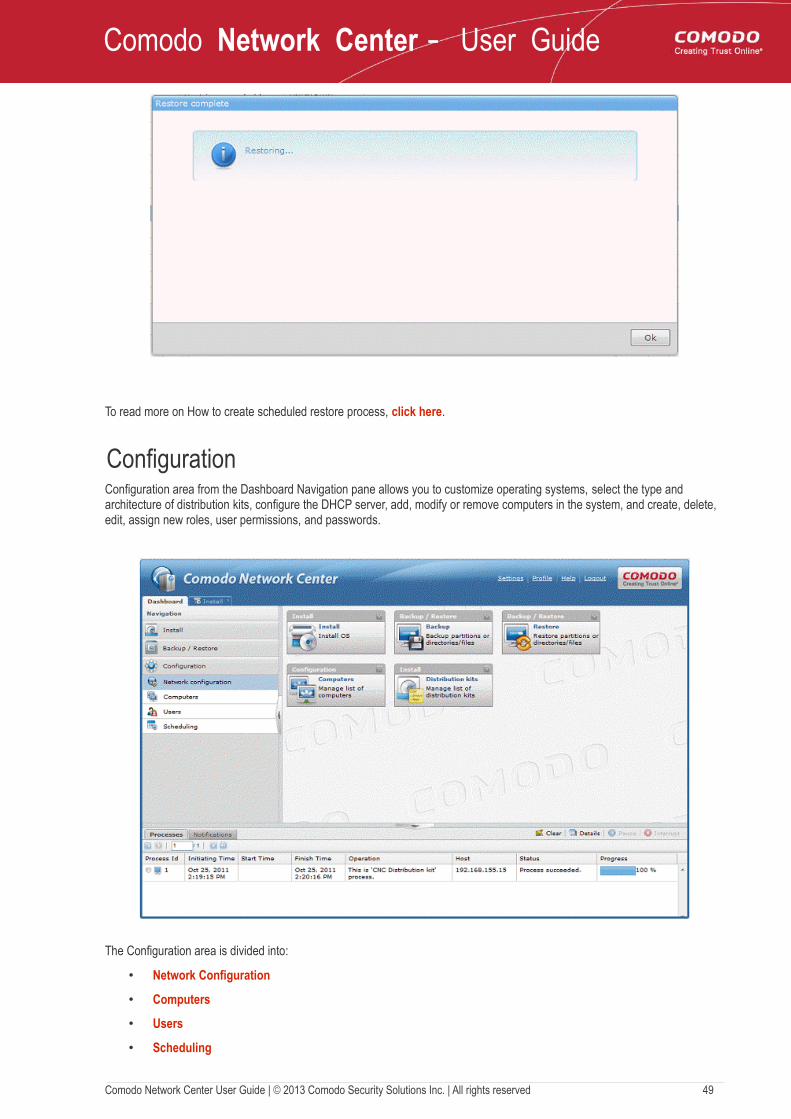
To read more on How to create scheduled restore process, click here.
Configuration Configuration area from the Dashboard Navigation pane allows you to customize operating systems, select the type and architecture of distribution kits, configure the DHCP server, add, modify or remove computers in the system, and create, delete, edit, assign new roles, user permissions, and passwords.
The Configuration area is divided into:
• Network Configuration
• Computers
• Users
• Scheduling
Comodo Network Center User Guide | © 2013 Comodo Security Solutions Inc. | All rights reserved 49
Comodo Network Center - User Guide
Startup Configuration WizardComodo Network Center allows you to make network settings appropriate for your sub-net.
To start up the configuration wizard, please read Network Configuration section.
Note: You do not need to select another subnet to activate configuration subnet settings. Otherwise, all information about the previous one would be lost.
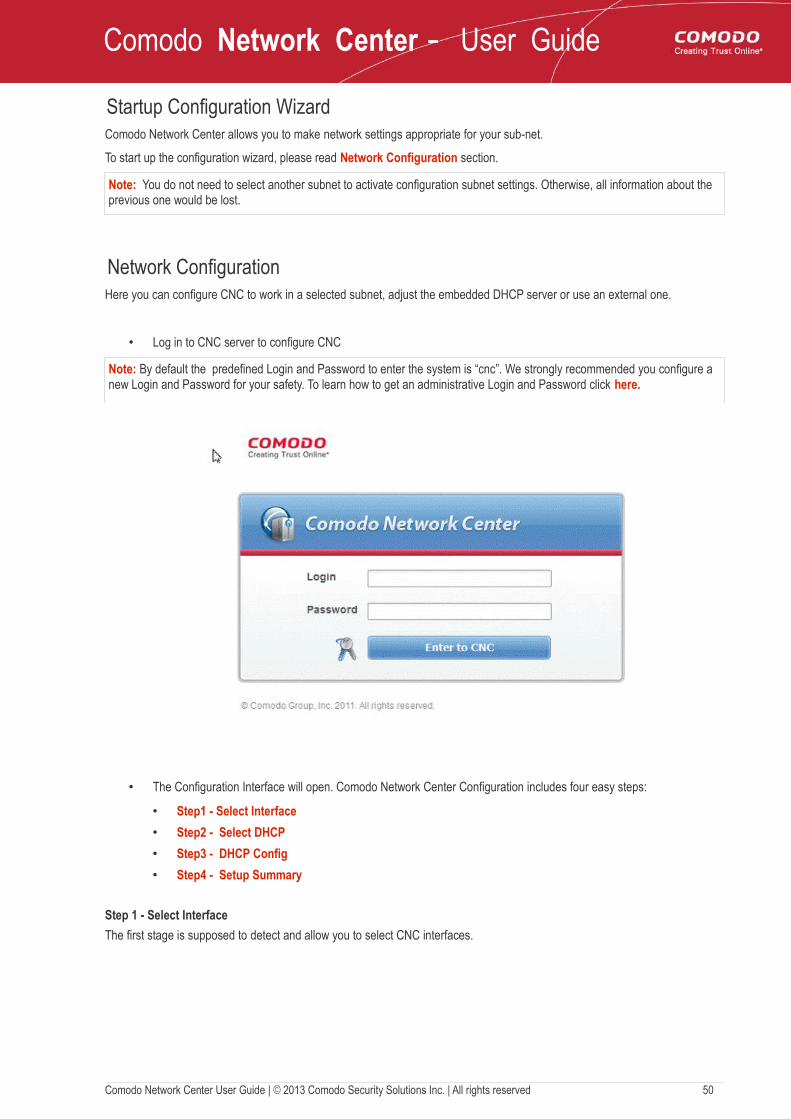
Network ConfigurationHere you can configure CNC to work in a selected subnet, adjust the embedded DHCP server or use an external one.
• Log in to CNC server to configure CNC
Note: By default the predefined Login and Password to enter the system is “cnc”. We strongly recommended you configure a new Login and Password for your safety. To learn how to get an administrative Login and Password click here.
• The Configuration Interface will open. Comodo Network Center Configuration includes four easy steps:
• Step1 - Select Interface
• Step2 - Select DHCP
• Step3 - DHCP Config
• Step4 - Setup Summary
Step 1 - Select Interface
The first stage is supposed to detect and allow you to select CNC interfaces.
Comodo Network Center User Guide | © 2013 Comodo Security Solutions Inc. | All rights reserved 50

Comodo Network Center - User Guide
• Click 'Next' to continue the configuration process or 'Prev' button to return to a previous step
To configure the network using CNC DHCP
Step 2 - Select DHCP
• Select the type of DHCP server
There are two types of DHCP server:
• External DHCP – Select this option if a DHCP server is already in use on the IP subnet
• CNC DHCP – Select this option if there is no DHCP server available on the IP subnet
• Click 'Next' to continue the configuration process or 'Prev' button to return to a previous step
Step 3 - DHCP Config
The DHCP Configuration interface will open. Network Center's configuration interface includes customizable (Start Pool, End Pool and assign IP Address ONLY from this range) and options automatically detected by CNC (DNS, Default Gateway).
Comodo Network Center User Guide | © 2013 Comodo Security Solutions Inc. | All rights reserved 51

Comodo Network Center - User Guide
• Click 'Next' to continue the configuration process or 'Prev' button to return to a previous step.
Step 4 - Setup Summary
This step allows you to check whether all previous settings were configured correctly.
• Click 'Finish' to complete the configuration process or 'Prev' button to return to a previous step.
• On successful completion the confirmation message will be displayed.
Comodo Network Center User Guide | © 2013 Comodo Security Solutions Inc. | All rights reserved 52
Comodo Network Center - User Guide
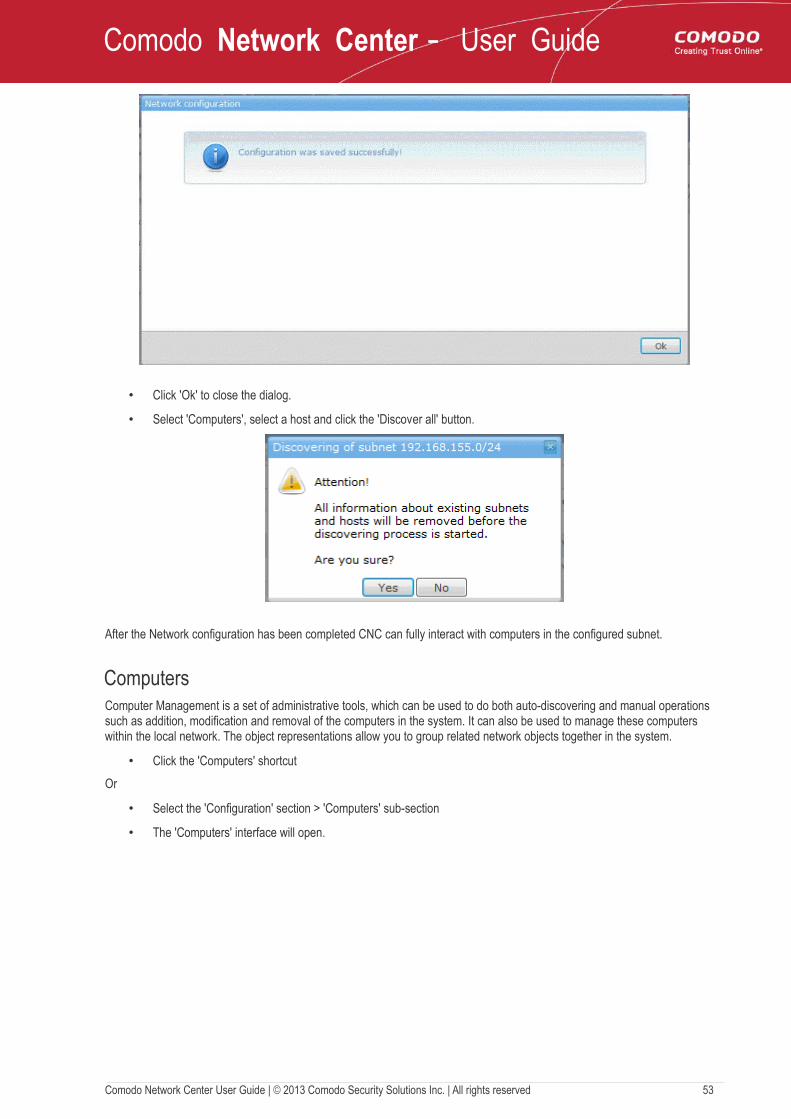
• Click 'Ok' to close the dialog.
• Select 'Computers', select a host and click the 'Discover all' button.
After the Network configuration has been completed CNC can fully interact with computers in the configured subnet.
ComputersComputer Management is a set of administrative tools, which can be used to do both auto-discovering and manual operations such as addition, modification and removal of the computers in the system. It can also be used to manage these computers within the local network. The object representations allow you to group related network objects together in the system.
• Click the 'Computers' shortcut
Or
• Select the 'Configuration' section > 'Computers' sub-section
• The 'Computers' interface will open.
Comodo Network Center User Guide | © 2013 Comodo Security Solutions Inc. | All rights reserved 53
Comodo Network Center - User Guide
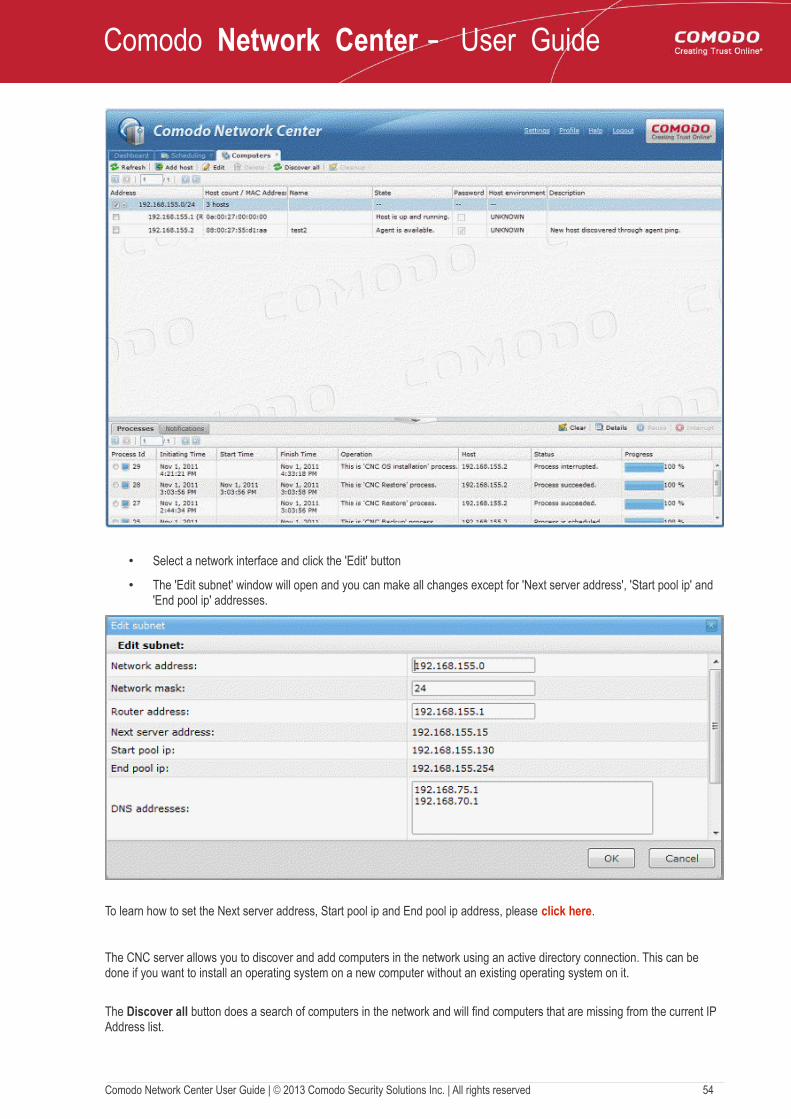
• Select a network interface and click the 'Edit' button
• The 'Edit subnet' window will open and you can make all changes except for 'Next server address', 'Start pool ip' and 'End pool ip' addresses.
To learn how to set the Next server address, Start pool ip and End pool ip address, please click here.
The CNC server allows you to discover and add computers in the network using an active directory connection. This can be done if you want to install an operating system on a new computer without an existing operating system on it.
The Discover all button does a search of computers in the network and will find computers that are missing from the current IP Address list.
Comodo Network Center User Guide | © 2013 Comodo Security Solutions Inc. | All rights reserved 54
Comodo Network Center - User Guide
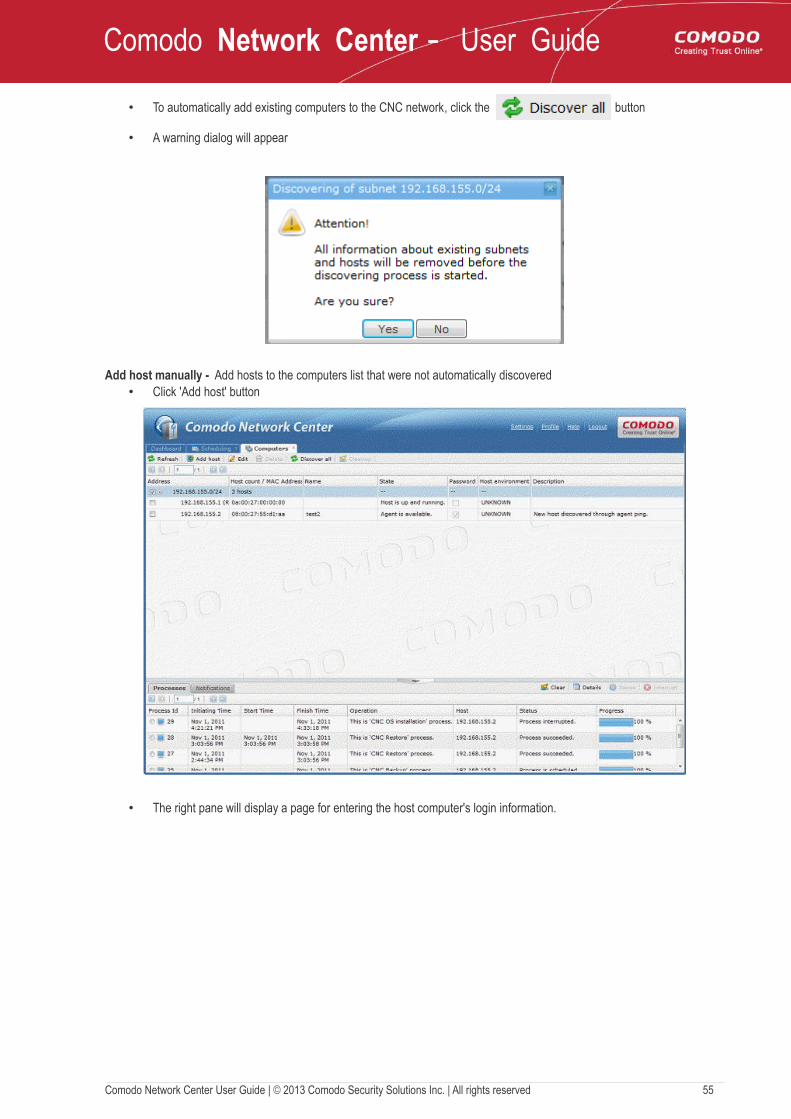
• To automatically add existing computers to the CNC network, click the button
• A warning dialog will appear
Add host manually - Add hosts to the computers list that were not automatically discovered• Click 'Add host' button
• The right pane will display a page for entering the host computer's login information.
Comodo Network Center User Guide | © 2013 Comodo Security Solutions Inc. | All rights reserved 55
Comodo Network Center - User Guide
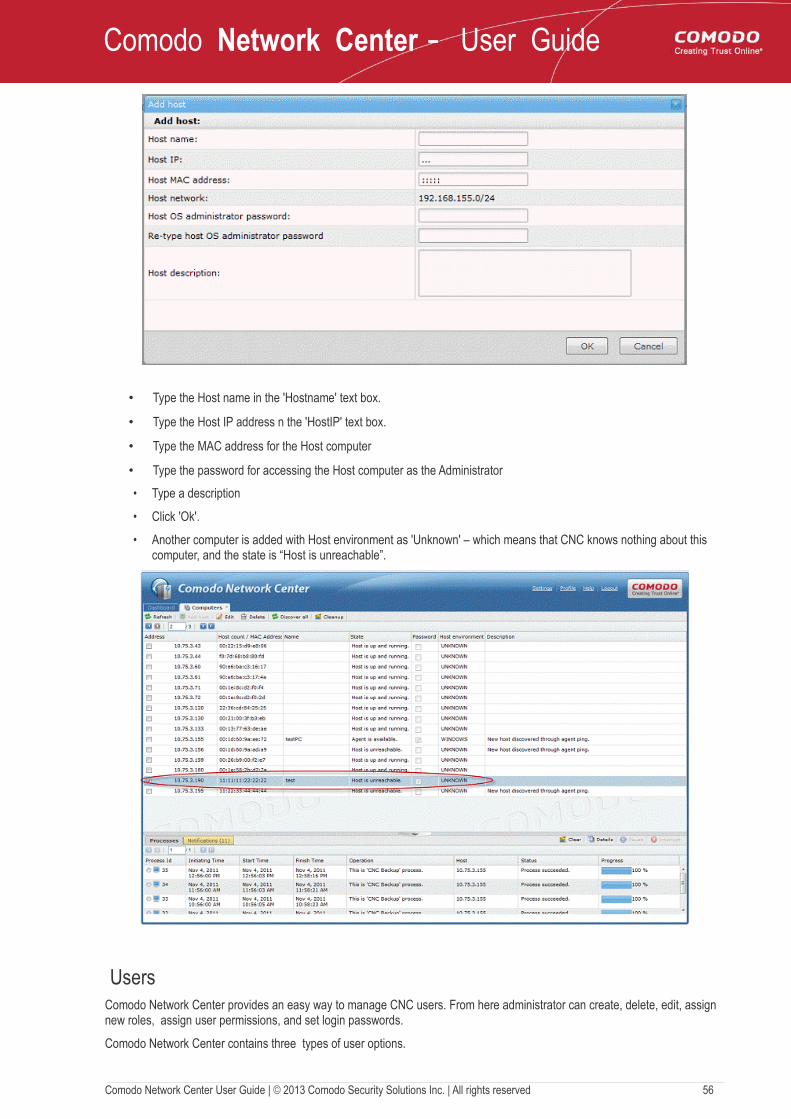
• Type the Host name in the 'Hostname' text box.
• Type the Host IP address n the 'HostIP' text box.
• Type the MAC address for the Host computer
• Type the password for accessing the Host computer as the Administrator
• Type a description
• Click 'Ok'.
• Another computer is added with Host environment as 'Unknown' – which means that CNC knows nothing about this computer, and the state is “Host is unreachable”.
Users Comodo Network Center provides an easy way to manage CNC users. From here administrator can create, delete, edit, assign new roles, assign user permissions, and set login passwords.
Comodo Network Center contains three types of user options.
Comodo Network Center User Guide | © 2013 Comodo Security Solutions Inc. | All rights reserved 56
Comodo Network Center - User Guide
• User
• Roles
• Permissions
UsersComodo Network Center's (CNC) 'Users' tab allows you to remove, add, edit users.
The 'Users' sub-area consists of three sorts of users:
• CNC System User
• CNC Users
• Guest Users
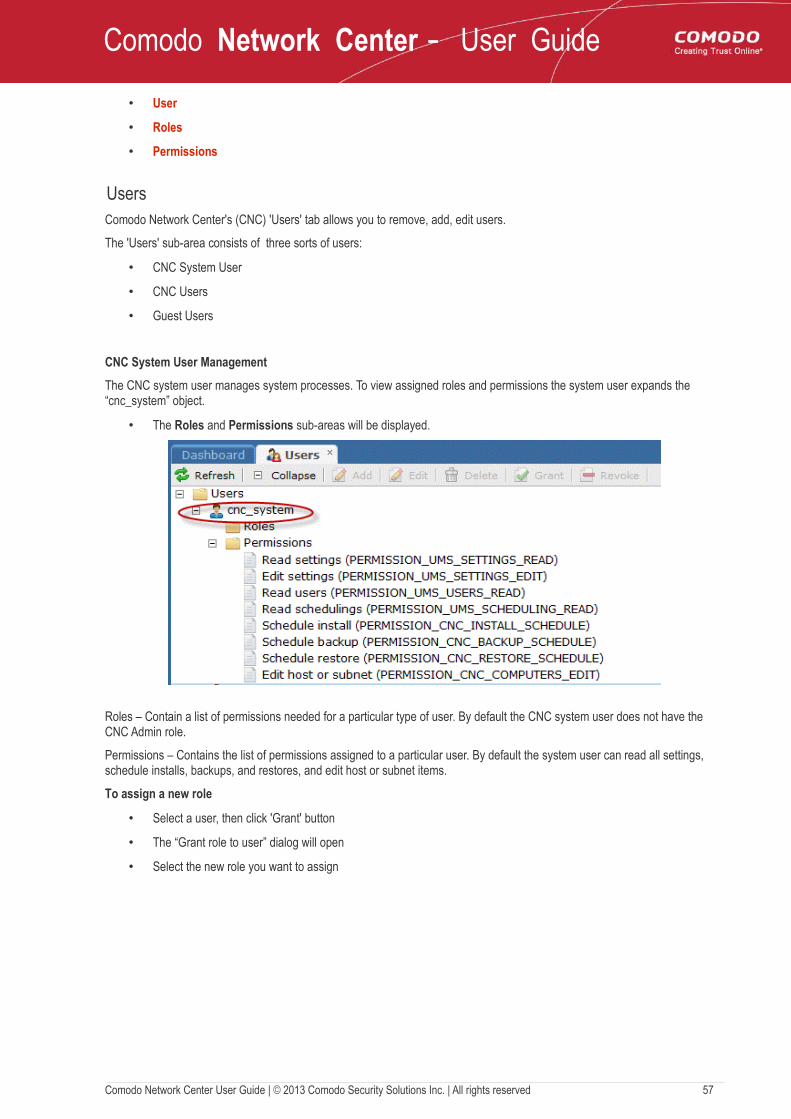
CNC System User Management
The CNC system user manages system processes. To view assigned roles and permissions the system user expands the “cnc_system” object.
• The Roles and Permissions sub-areas will be displayed.
Roles – Contain a list of permissions needed for a particular type of user. By default the CNC system user does not have the CNC Admin role.
Permissions – Contains the list of permissions assigned to a particular user. By default the system user can read all settings, schedule installs, backups, and restores, and edit host or subnet items.
To assign a new role
• Select a user, then click 'Grant' button
• The “Grant role to user” dialog will open
• Select the new role you want to assign
Comodo Network Center User Guide | © 2013 Comodo Security Solutions Inc. | All rights reserved 57
Comodo Network Center - User Guide
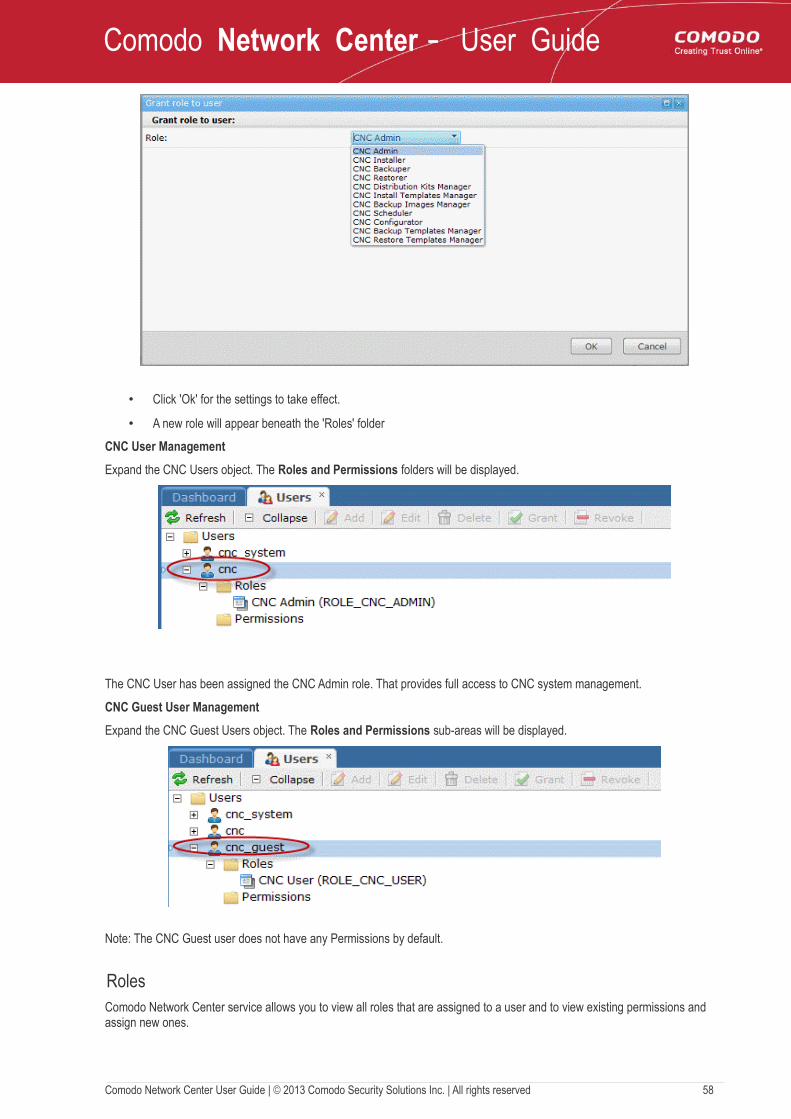
• Click 'Ok' for the settings to take effect.
• A new role will appear beneath the 'Roles' folder
CNC User Management
Expand the CNC Users object. The Roles and Permissions folders will be displayed.
The CNC User has been assigned the CNC Admin role. That provides full access to CNC system management.
CNC Guest User Management
Expand the CNC Guest Users object. The Roles and Permissions sub-areas will be displayed.
Note: The CNC Guest user does not have any Permissions by default.
RolesComodo Network Center service allows you to view all roles that are assigned to a user and to view existing permissions and assign new ones.
Comodo Network Center User Guide | © 2013 Comodo Security Solutions Inc. | All rights reserved 58

Comodo Network Center - User Guide
PermissionsPermissions are assigned to an administrator or user in order to perform specific actions.
For example, HTTP connect - allows the user to login in to the CNC server, Run install - lets them launch the installation process, View processes - view Informational Panel.
SchedulingCNC's scheduling module allows administrators to create precise timetables for backup, restore and OS installation tasks.
• Scheduled OS installation on target hosts from template or image file
• Backup and restore of data on target hosts
• Apply schedules to tasks that you have created previously
Refer to the sections for more details:
• Manage Scheduling Operations
• Result of Scheduled Operations
Comodo Network Center User Guide | © 2013 Comodo Security Solutions Inc. | All rights reserved 59
Comodo Network Center - User Guide
Manage Scheduling OperationsThe scheduling option in Comodo Network Center enables you to schedule previously configured tasks to run at a set time or interval of time. Once scheduled, the task will be executed at the set intervals without your intervention.
Note: Ensure that the CNC agent is installed and running on all target endpoints. If you need assistance downloading or installing this agent, please see.
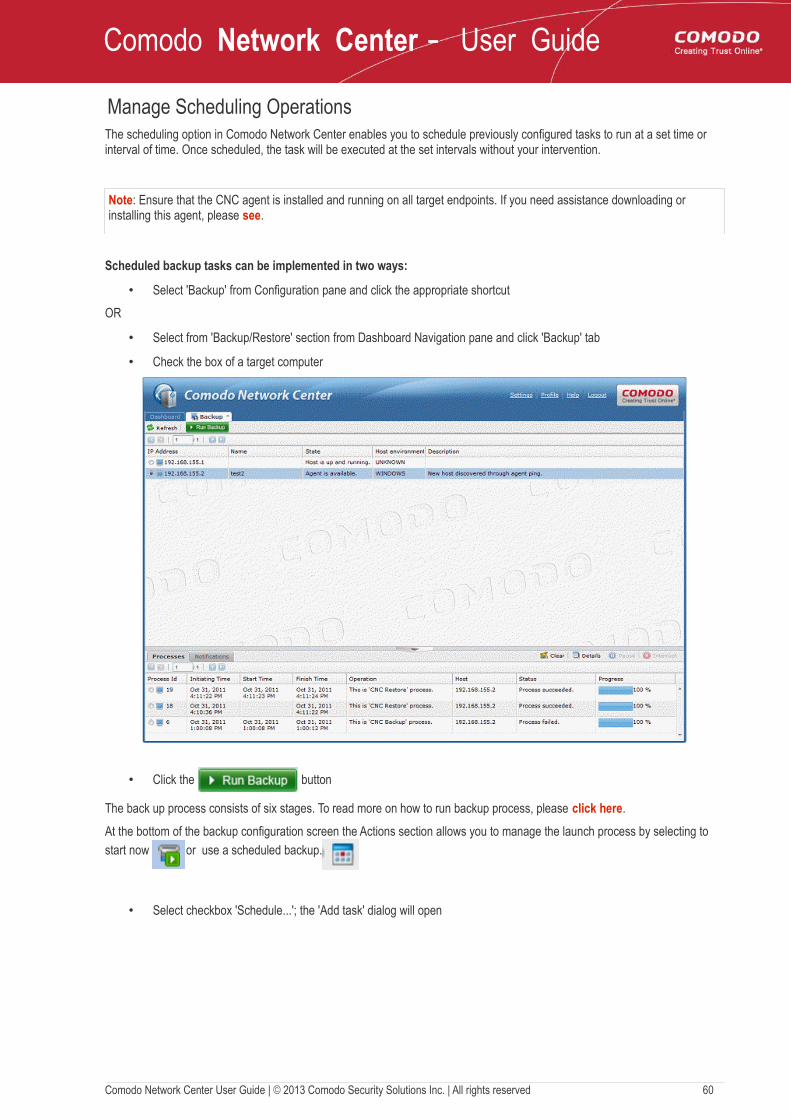
Scheduled backup tasks can be implemented in two ways:
• Select 'Backup' from Configuration pane and click the appropriate shortcut
OR
• Select from 'Backup/Restore' section from Dashboard Navigation pane and click 'Backup' tab
• Check the box of a target computer
• Click the button
The back up process consists of six stages. To read more on how to run backup process, please click here.
At the bottom of the backup configuration screen the Actions section allows you to manage the launch process by selecting to start now or use a scheduled backup.
• Select checkbox 'Schedule...'; the 'Add task' dialog will open
Comodo Network Center User Guide | © 2013 Comodo Security Solutions Inc. | All rights reserved 60
Comodo Network Center - User Guide
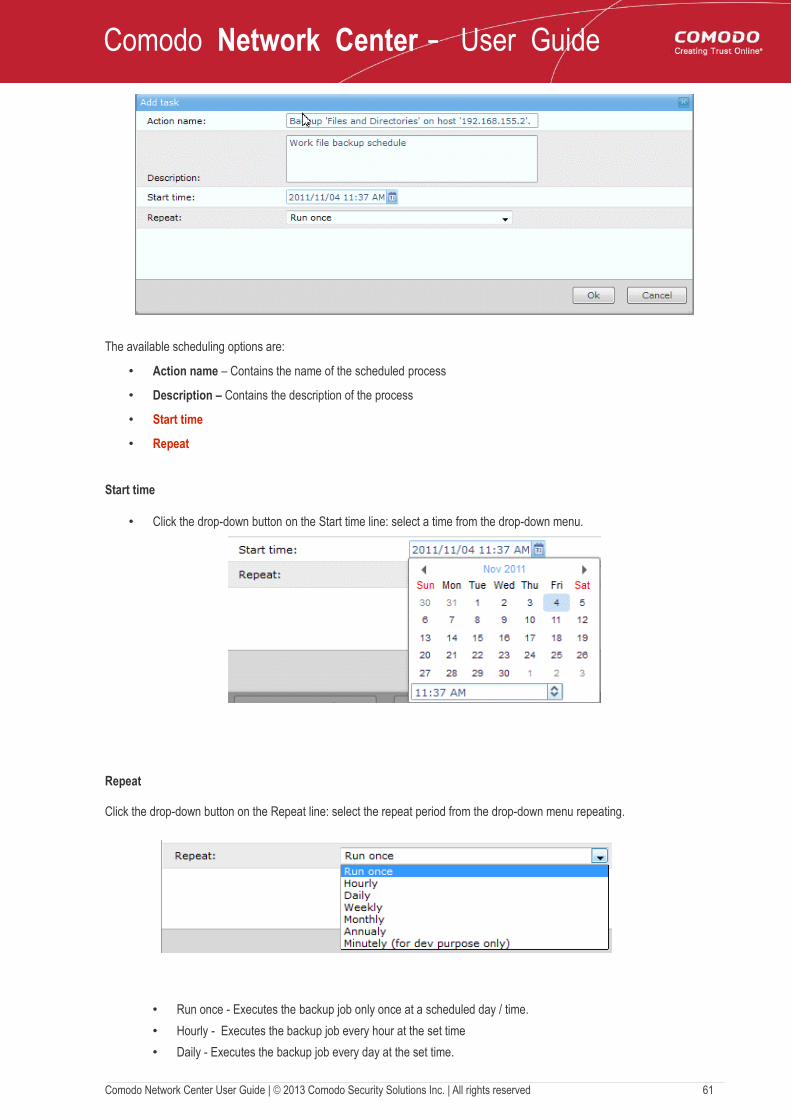
The available scheduling options are:
• Action name – Contains the name of the scheduled process
• Description – Contains the description of the process
• Start time
• Repeat
Start time
• Click the drop-down button on the Start time line: select a time from the drop-down menu.
Repeat
Click the drop-down button on the Repeat line: select the repeat period from the drop-down menu repeating.
• Run once - Executes the backup job only once at a scheduled day / time.
• Hourly - Executes the backup job every hour at the set time
• Daily - Executes the backup job every day at the set time.
Comodo Network Center User Guide | © 2013 Comodo Security Solutions Inc. | All rights reserved 61
Comodo Network Center - User Guide
• Monthly - Executes the backup job on the selected day of every month at the set time.
• Annually - Executes the backup job on the selected date of every year at the set time
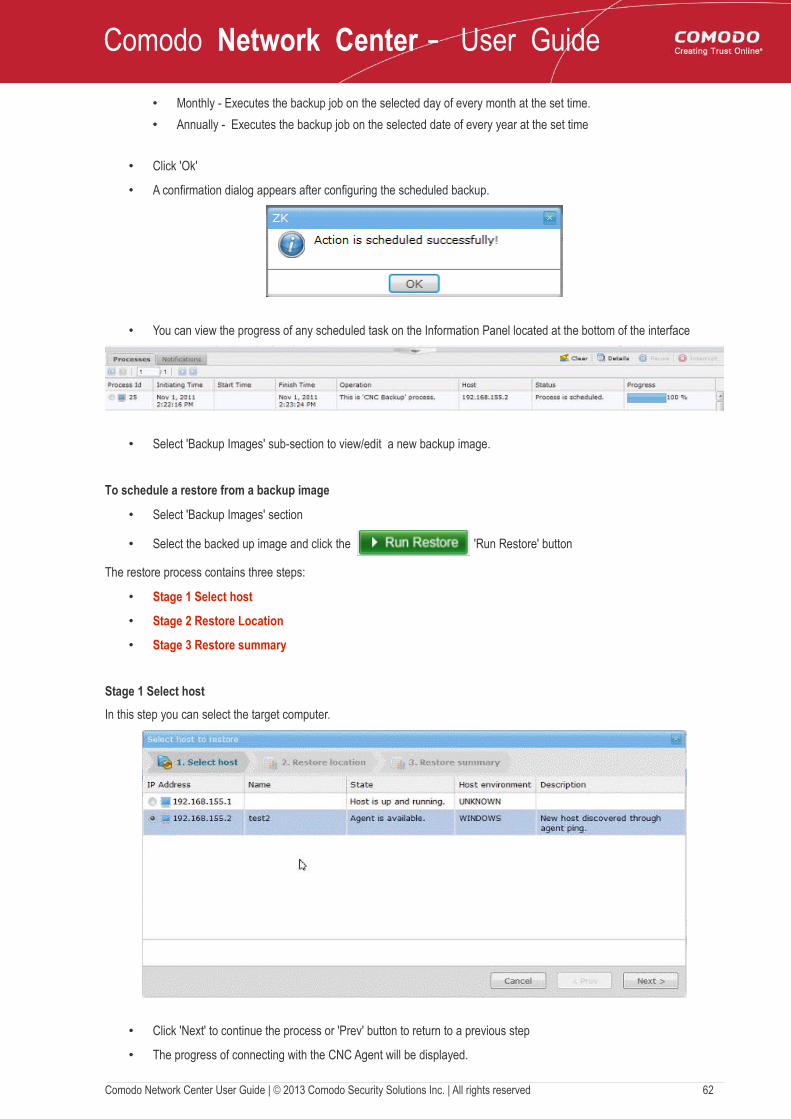
• Click 'Ok'
• A confirmation dialog appears after configuring the scheduled backup.
• You can view the progress of any scheduled task on the Information Panel located at the bottom of the interface
• Select 'Backup Images' sub-section to view/edit a new backup image.
To schedule a restore from a backup image
• Select 'Backup Images' section
• Select the backed up image and click the 'Run Restore' button
The restore process contains three steps:
• Stage 1 Select host
• Stage 2 Restore Location
• Stage 3 Restore summary
Stage 1 Select host
In this step you can select the target computer.
• Click 'Next' to continue the process or 'Prev' button to return to a previous step
• The progress of connecting with the CNC Agent will be displayed.
Comodo Network Center User Guide | © 2013 Comodo Security Solutions Inc. | All rights reserved 62

Comodo Network Center - User Guide
Stage 2 Restore Location
The second stage of the process is to specify the path where the backup image is located.
• Click 'Next' or 'Prev' button to return to a previous step
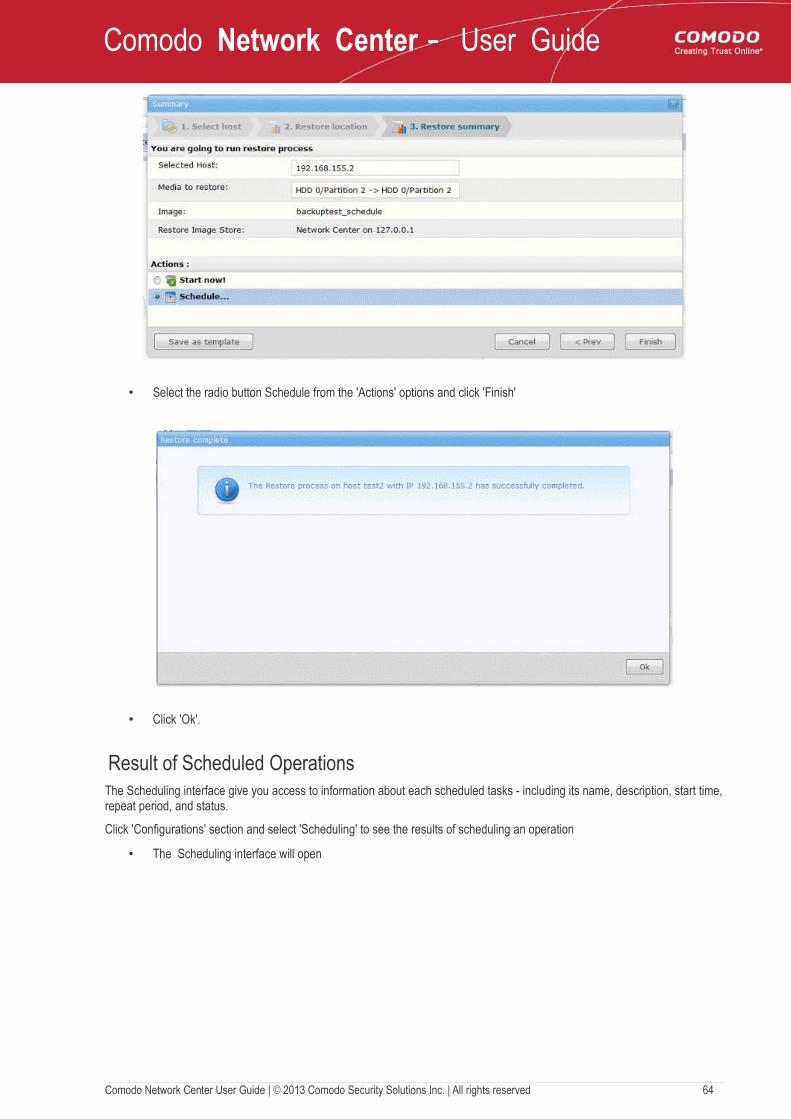
Stage 3 Restore summary
The summary information about all settings will be displayed at this final step
Comodo Network Center User Guide | © 2013 Comodo Security Solutions Inc. | All rights reserved 63
Comodo Network Center - User Guide
• Select the radio button Schedule from the 'Actions' options and click 'Finish'
• Click 'Ok'.
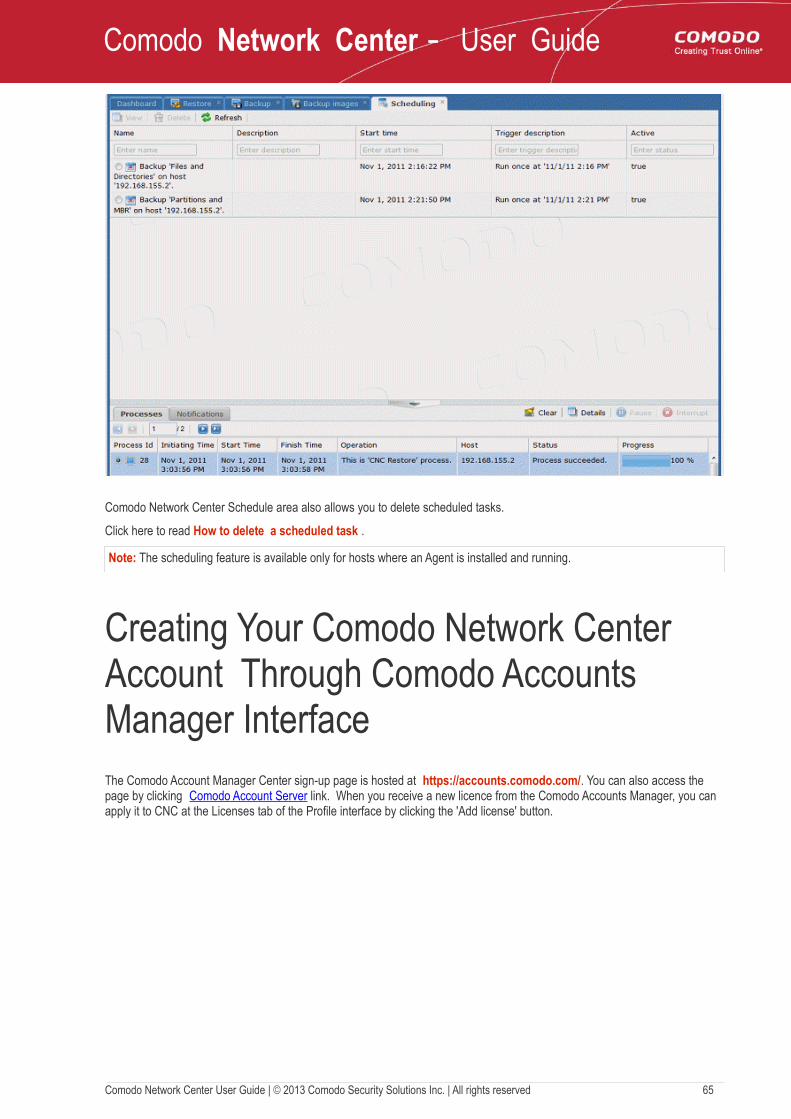
Result of Scheduled OperationsThe Scheduling interface give you access to information about each scheduled tasks - including its name, description, start time, repeat period, and status.
Click 'Configurations' section and select 'Scheduling' to see the results of scheduling an operation
• The Scheduling interface will open
Comodo Network Center User Guide | © 2013 Comodo Security Solutions Inc. | All rights reserved 64
Comodo Network Center - User Guide
Comodo Network Center Schedule area also allows you to delete scheduled tasks.
Click here to read How to delete a scheduled task .
Note: The scheduling feature is available only for hosts where an Agent is installed and running.
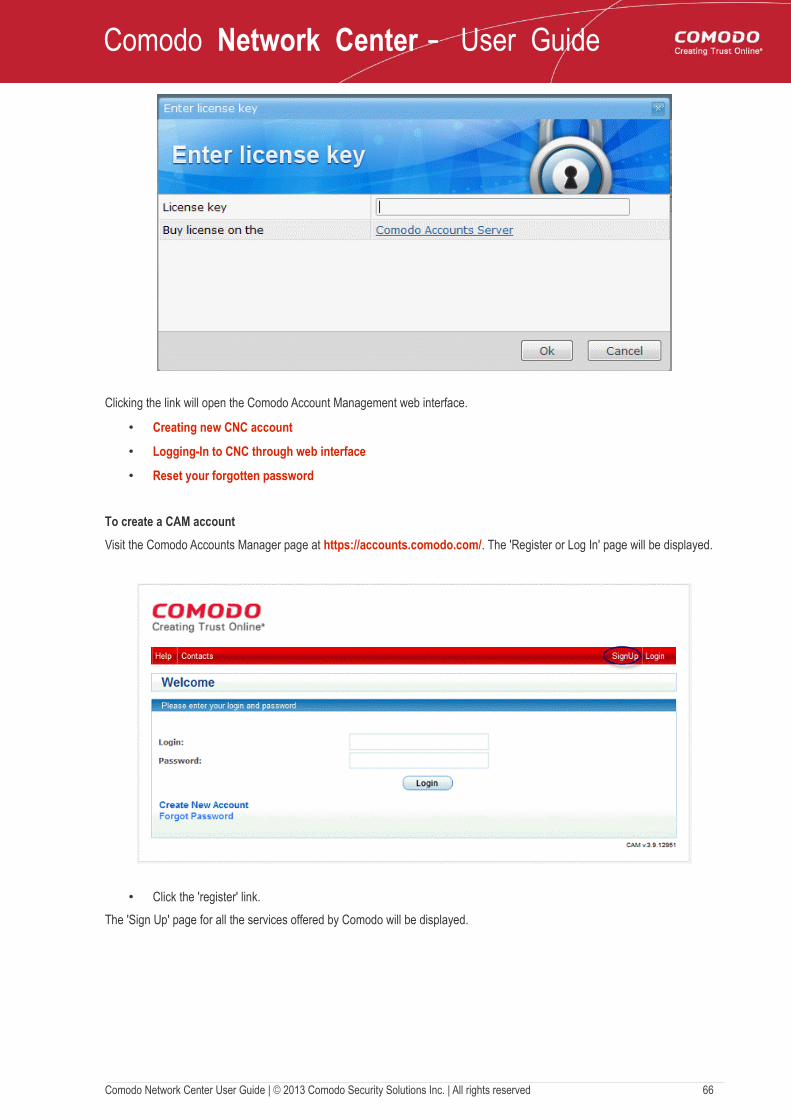
Creating Your Comodo Network Center Account Through Comodo Accounts Manager InterfaceThe Comodo Account Manager Center sign-up page is hosted at https://accounts.comodo.com/. You can also access the page by clicking Comodo Account Server link. When you receive a new licence from the Comodo Accounts Manager, you can apply it to CNC at the Licenses tab of the Profile interface by clicking the 'Add license' button.
Comodo Network Center User Guide | © 2013 Comodo Security Solutions Inc. | All rights reserved 65
Comodo Network Center - User Guide
Clicking the link will open the Comodo Account Management web interface.
• Creating new CNC account
• Logging-In to CNC through web interface
• Reset your forgotten password
To create a CAM account
Visit the Comodo Accounts Manager page at https://accounts.comodo.com/. The 'Register or Log In' page will be displayed.
• Click the 'register' link.
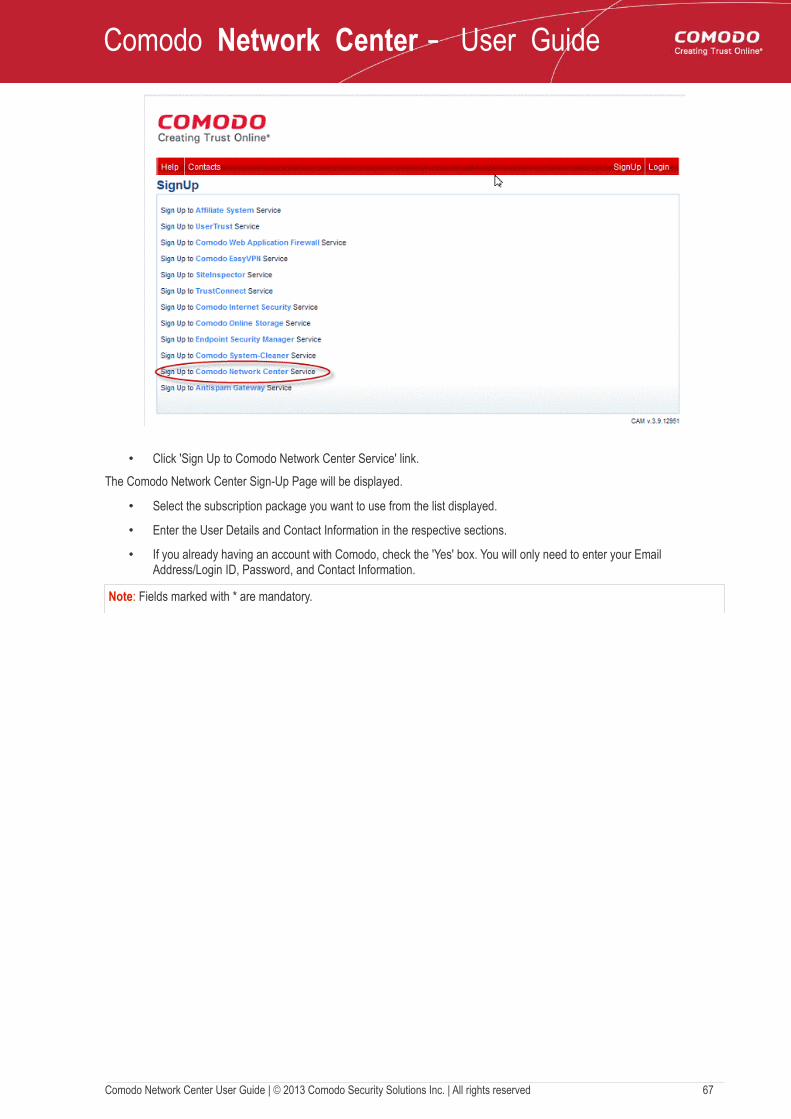
The 'Sign Up' page for all the services offered by Comodo will be displayed.
Comodo Network Center User Guide | © 2013 Comodo Security Solutions Inc. | All rights reserved 66
Comodo Network Center - User Guide
• Click 'Sign Up to Comodo Network Center Service' link.
The Comodo Network Center Sign-Up Page will be displayed.
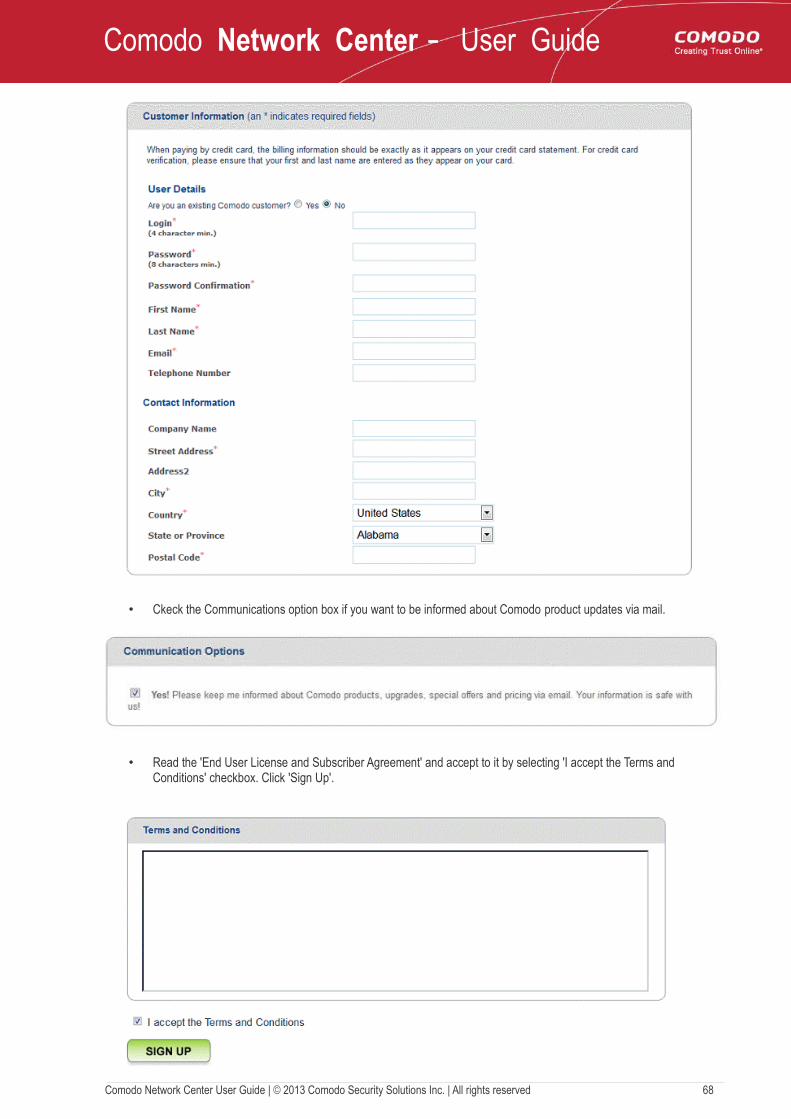
• Select the subscription package you want to use from the list displayed.
• Enter the User Details and Contact Information in the respective sections.
• If you already having an account with Comodo, check the 'Yes' box. You will only need to enter your Email Address/Login ID, Password, and Contact Information.
Note: Fields marked with * are mandatory.
Comodo Network Center User Guide | © 2013 Comodo Security Solutions Inc. | All rights reserved 67
Comodo Network Center - User Guide
• Ckeck the Communications option box if you want to be informed about Comodo product updates via mail.
• Read the 'End User License and Subscriber Agreement' and accept to it by selecting 'I accept the Terms and Conditions' checkbox. Click 'Sign Up'.
Comodo Network Center User Guide | © 2013 Comodo Security Solutions Inc. | All rights reserved 68

Comodo Network Center - User Guide
Your order will be processed and a confirmation email will be sent from Comodo. You can use your email address as your user name along with the password you specified (during the ordering process) to login to Comodo Account Manager.
Accessing you Comodo Network Center subscription through the CAM Web Interface
• Click 'Login'. The login form will appear.
• Enter your Login name (your email address) and password in the respective fields and click 'Login'.
• Your CAM home page will then be displayed.
• The 'Comodo Network Center' tab will display your Comodo Network Center account details - like your validity period and the number of managed endpoints allowed. This area also allows you to upgrade your license key.
• The 'My Account' tab displays the full details of your account with Comodo Accounts Manager. This area also allows you to change your login password.
• The 'Help' tab takes you to Comodo's searchable knowledge base and troubleshooter at https://support.comodo.com/. If you do not find a solution in our Knowledgebase or Troubleshooter, you can submit a support ticket after registering an account. Registration is free.
• The 'Contacts' tab takes you to the 'Contact Us' page. The 'Contact Us' page contains telephone numbers and email addresses for contacting Comodo, purchasing Comodo Products and Services, and getting Product Support.
Reset Forgotten Password
In case if you forget your password you can click the 'Forgot Password' link. The Forgot Password web interface will open.
Comodo Network Center User Guide | © 2013 Comodo Security Solutions Inc. | All rights reserved 69
Comodo Network Center - User Guide
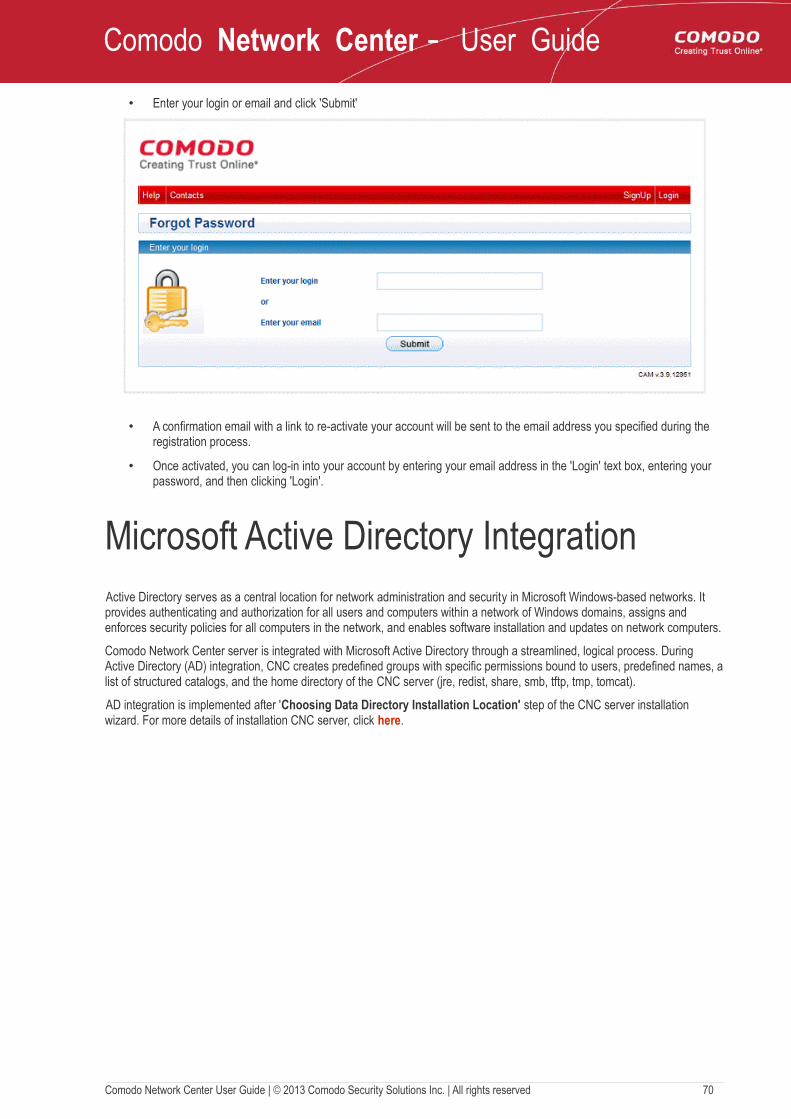
• Enter your login or email and click 'Submit'
• A confirmation email with a link to re-activate your account will be sent to the email address you specified during the registration process.
• Once activated, you can log-in into your account by entering your email address in the 'Login' text box, entering your password, and then clicking 'Login'.
Microsoft Active Directory IntegrationActive Directory serves as a central location for network administration and security in Microsoft Windows-based networks. It provides authenticating and authorization for all users and computers within a network of Windows domains, assigns and enforces security policies for all computers in the network, and enables software installation and updates on network computers.
Comodo Network Center server is integrated with Microsoft Active Directory through a streamlined, logical process. During Active Directory (AD) integration, CNC creates predefined groups with specific permissions bound to users, predefined names, a list of structured catalogs, and the home directory of the CNC server (jre, redist, share, smb, tftp, tmp, tomcat).
AD integration is implemented after 'Choosing Data Directory Installation Location' step of the CNC server installation wizard. For more details of installation CNC server, click here.
Comodo Network Center User Guide | © 2013 Comodo Security Solutions Inc. | All rights reserved 70
Comodo Network Center - User Guide
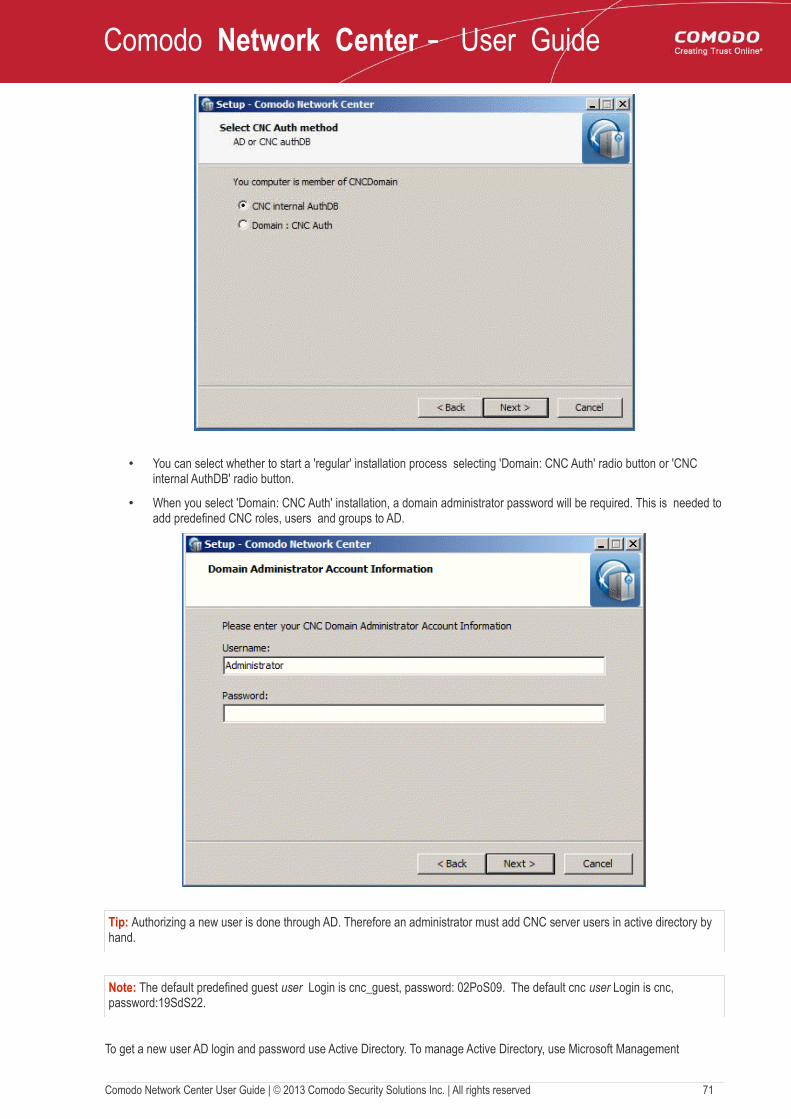
• You can select whether to start a 'regular' installation process selecting 'Domain: CNC Auth' radio button or 'CNC internal AuthDB' radio button.
• When you select 'Domain: CNC Auth' installation, a domain administrator password will be required. This is needed to add predefined CNC roles, users and groups to AD.
Tip: Authorizing a new user is done through AD. Therefore an administrator must add CNC server users in active directory by hand.
Note: The default predefined guest user Login is cnc_guest, password: 02PoS09. The default cnc user Login is cnc, password:19SdS22.
To get a new user AD login and password use Active Directory. To manage Active Directory, use Microsoft Management
Comodo Network Center User Guide | © 2013 Comodo Security Solutions Inc. | All rights reserved 71
Comodo Network Center - User Guide
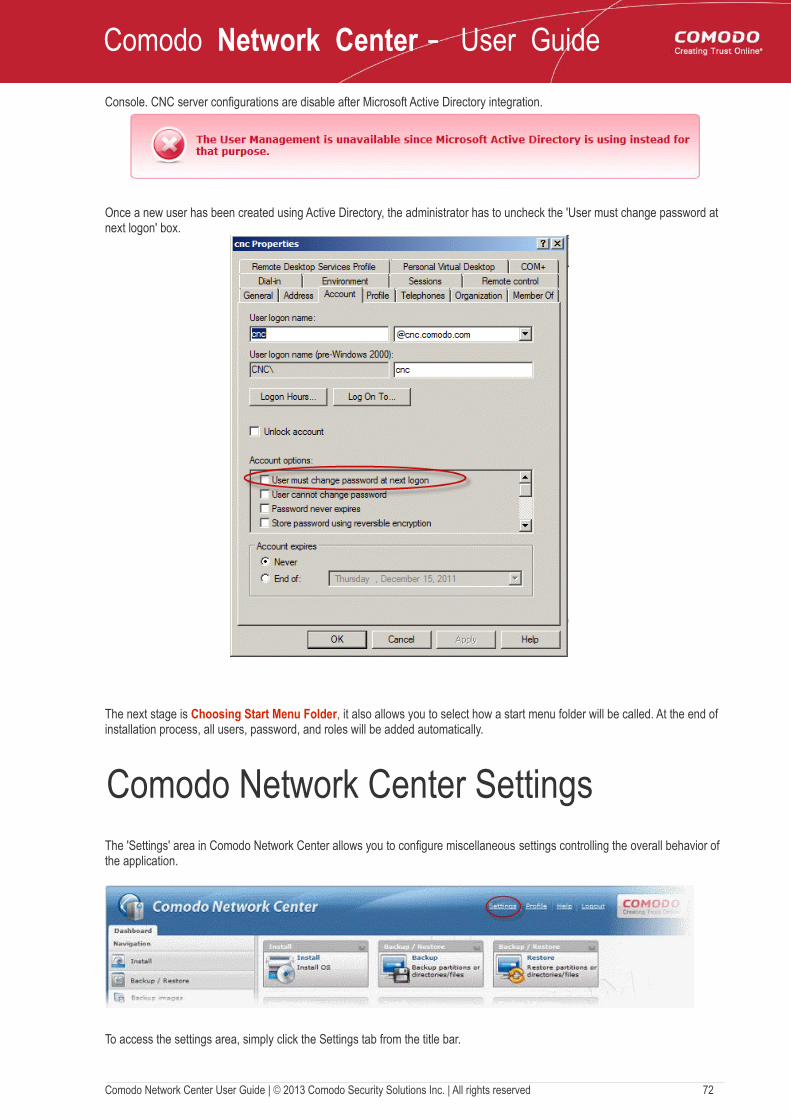
Console. CNC server configurations are disable after Microsoft Active Directory integration.
Once a new user has been created using Active Directory, the administrator has to uncheck the 'User must change password at next logon' box.
The next stage is Choosing Start Menu Folder, it also allows you to select how a start menu folder will be called. At the end of installation process, all users, password, and roles will be added automatically.
Comodo Network Center SettingsThe 'Settings' area in Comodo Network Center allows you to configure miscellaneous settings controlling the overall behavior of the application.
To access the settings area, simply click the Settings tab from the title bar.
Comodo Network Center User Guide | © 2013 Comodo Security Solutions Inc. | All rights reserved 72
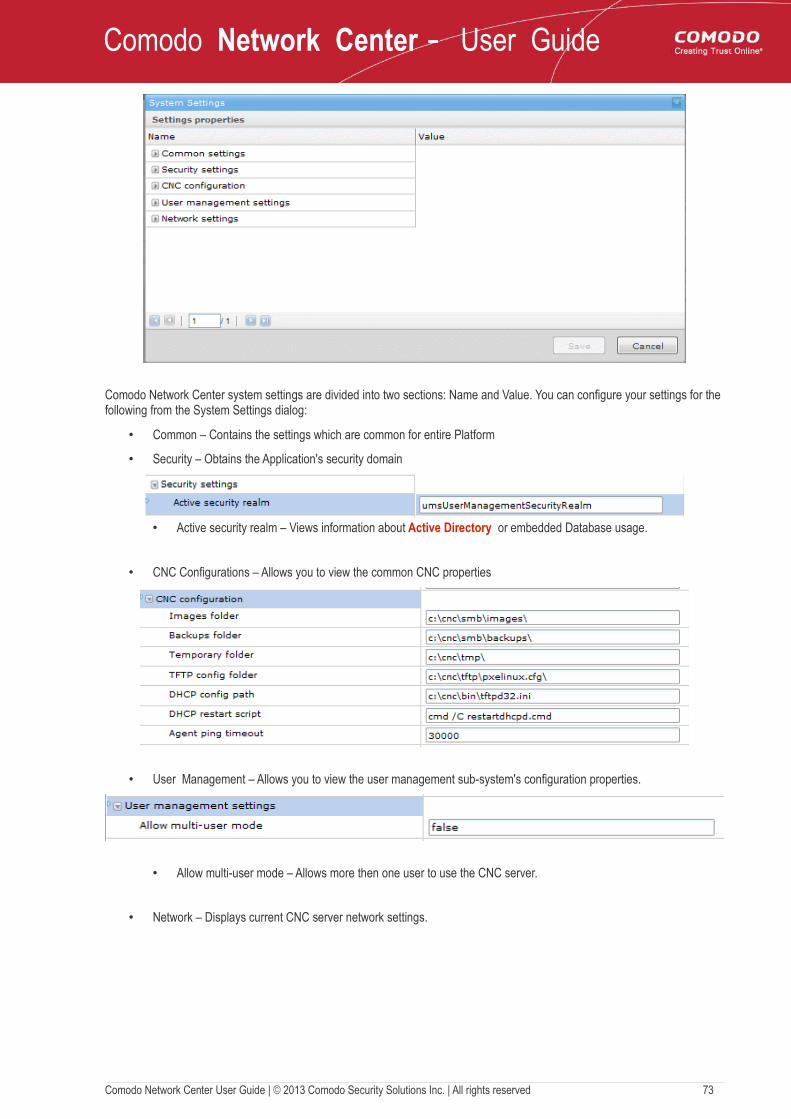
Comodo Network Center - User Guide
Comodo Network Center system settings are divided into two sections: Name and Value. You can configure your settings for the following from the System Settings dialog:
• Common – Contains the settings which are common for entire Platform
• Security – Obtains the Application's security domain
• Active security realm – Views information about Active Directory or embedded Database usage.
• CNC Configurations – Allows you to view the common CNC properties
• User Management – Allows you to view the user management sub-system's configuration properties.
• Allow multi-user mode – Allows more then one user to use the CNC server.
• Network – Displays current CNC server network settings.
Comodo Network Center User Guide | © 2013 Comodo Security Solutions Inc. | All rights reserved 73

Comodo Network Center - User Guide
Comodo Network Center ProfileClick the 'Profile' option in the title bar to view the 'Profile' information.
The Profile interface is divided into two sections:
• Customers info
• Licenses
The Customer Info tab includes such information as your name, email and organization.
The licenses information contains license key data: expiration date and endpoints allowed. A user or administrator can obtain a license by clicking 'Add license' button. In the opening login screen, click the Comodo Account Server link to obtain the license key.
Comodo Network Center User Guide | © 2013 Comodo Security Solutions Inc. | All rights reserved 74
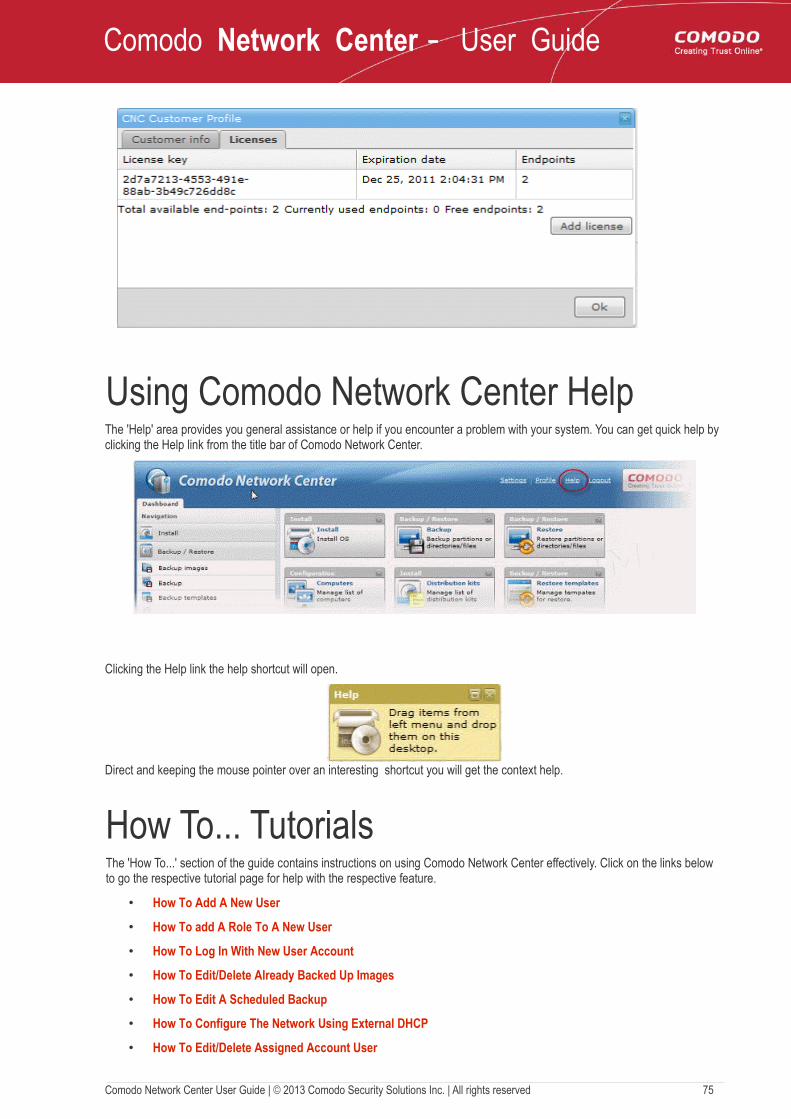
Comodo Network Center - User Guide
Using Comodo Network Center HelpThe 'Help' area provides you general assistance or help if you encounter a problem with your system. You can get quick help by clicking the Help link from the title bar of Comodo Network Center.
Clicking the Help link the help shortcut will open.
Direct and keeping the mouse pointer over an interesting shortcut you will get the context help.
How To... TutorialsThe 'How To...' section of the guide contains instructions on using Comodo Network Center effectively. Click on the links below to go the respective tutorial page for help with the respective feature.
• How To Add A New User
• How To add A Role To A New User
• How To Log In With New User Account
• How To Edit/Delete Already Backed Up Images
• How To Edit A Scheduled Backup
• How To Configure The Network Using External DHCP
• How To Edit/Delete Assigned Account User
Comodo Network Center User Guide | © 2013 Comodo Security Solutions Inc. | All rights reserved 75
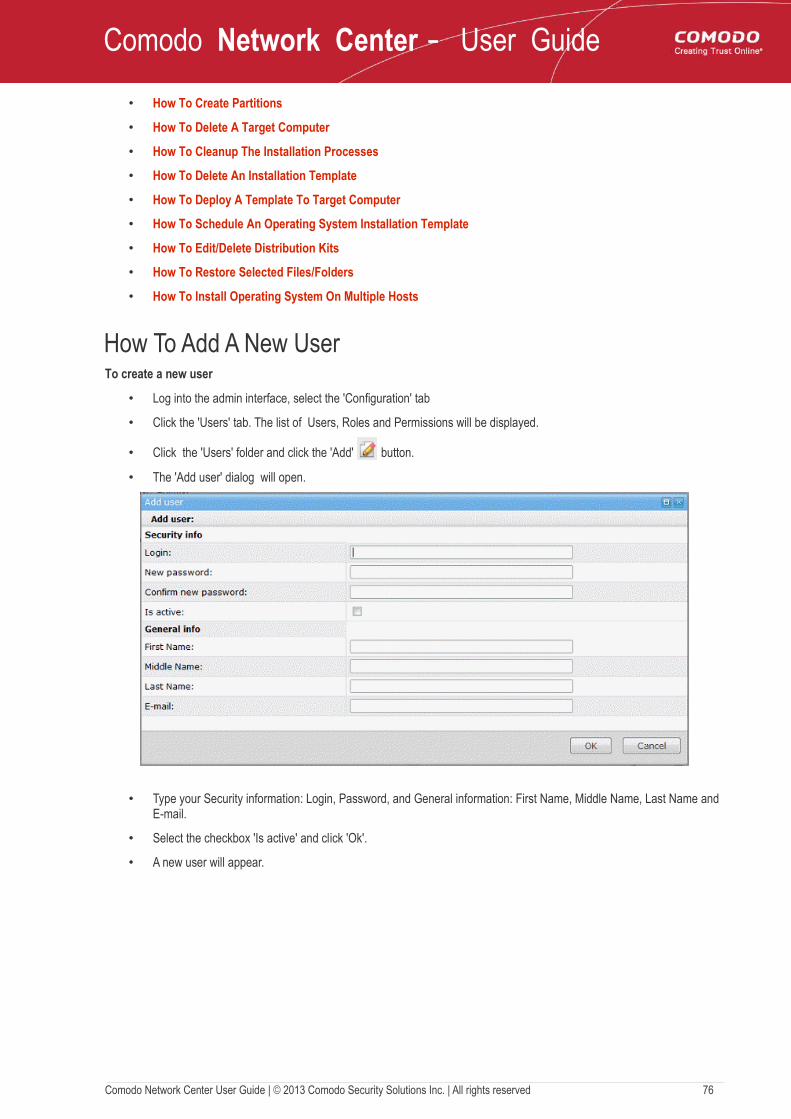
Comodo Network Center - User Guide
• How To Create Partitions
• How To Delete A Target Computer
• How To Cleanup The Installation Processes
• How To Delete An Installation Template
• How To Deploy A Template To Target Computer
• How To Schedule An Operating System Installation Template
• How To Edit/Delete Distribution Kits
• How To Restore Selected Files/Folders
• How To Install Operating System On Multiple Hosts
How To Add A New User To create a new user
• Log into the admin interface, select the 'Configuration' tab
• Click the 'Users' tab. The list of Users, Roles and Permissions will be displayed.
• Click the 'Users' folder and click the 'Add' button.
• The 'Add user' dialog will open.
• Type your Security information: Login, Password, and General information: First Name, Middle Name, Last Name and E-mail.
• Select the checkbox 'Is active' and click 'Ok'.
• A new user will appear.
Comodo Network Center User Guide | © 2013 Comodo Security Solutions Inc. | All rights reserved 76
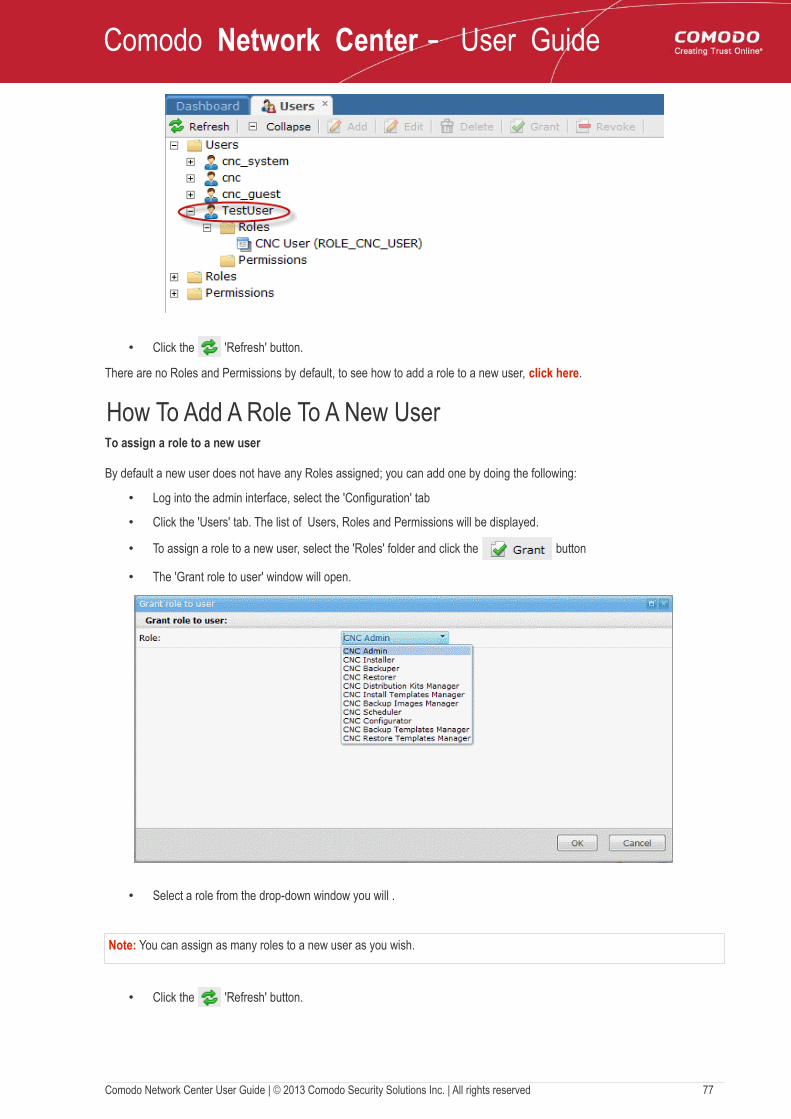
Comodo Network Center - User Guide
• Click the 'Refresh' button.
There are no Roles and Permissions by default, to see how to add a role to a new user, click here.
How To Add A Role To A New UserTo assign a role to a new user
By default a new user does not have any Roles assigned; you can add one by doing the following:
• Log into the admin interface, select the 'Configuration' tab
• Click the 'Users' tab. The list of Users, Roles and Permissions will be displayed.
• To assign a role to a new user, select the 'Roles' folder and click the button
• The 'Grant role to user' window will open.
• Select a role from the drop-down window you will .
Note: You can assign as many roles to a new user as you wish.
• Click the 'Refresh' button.
Comodo Network Center User Guide | © 2013 Comodo Security Solutions Inc. | All rights reserved 77
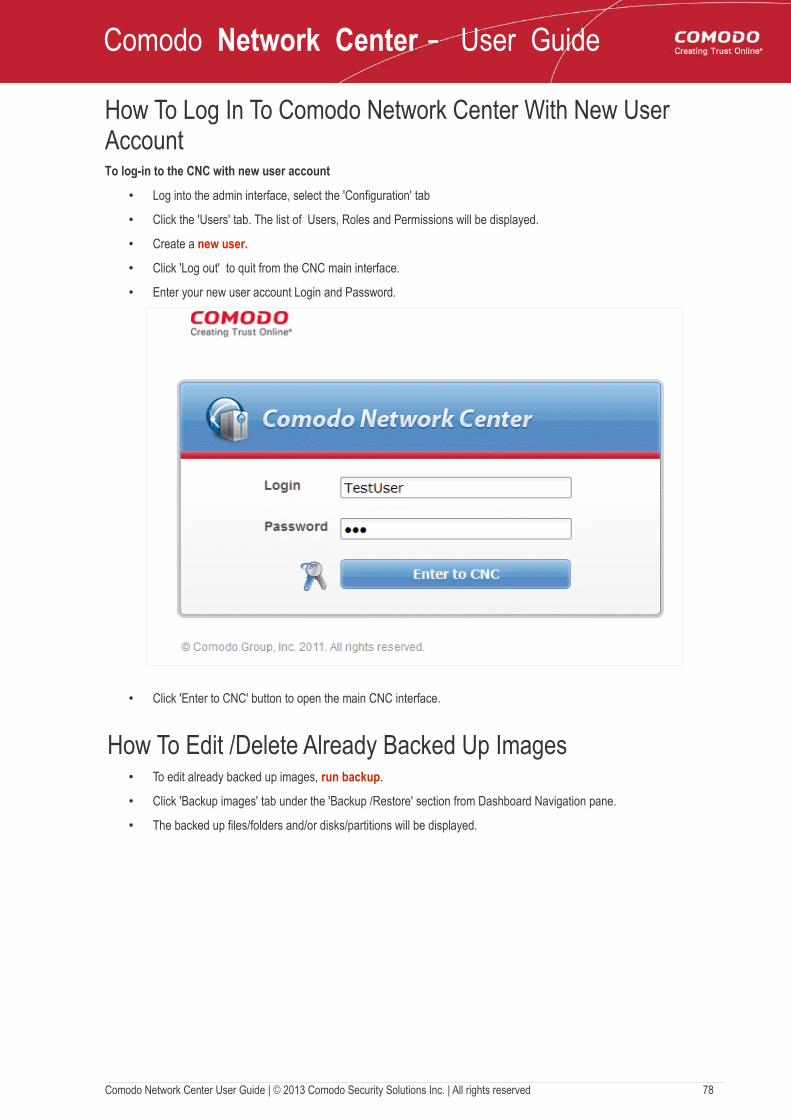
Comodo Network Center - User Guide
How To Log In To Comodo Network Center With New User AccountTo log-in to the CNC with new user account
• Log into the admin interface, select the 'Configuration' tab
• Click the 'Users' tab. The list of Users, Roles and Permissions will be displayed.
• Create a new user.
• Click 'Log out' to quit from the CNC main interface.
• Enter your new user account Login and Password.
• Click 'Enter to CNC' button to open the main CNC interface.
How To Edit /Delete Already Backed Up Images• To edit already backed up images, run backup.
• Click 'Backup images' tab under the 'Backup /Restore' section from Dashboard Navigation pane.
• The backed up files/folders and/or disks/partitions will be displayed.
Comodo Network Center User Guide | © 2013 Comodo Security Solutions Inc. | All rights reserved 78
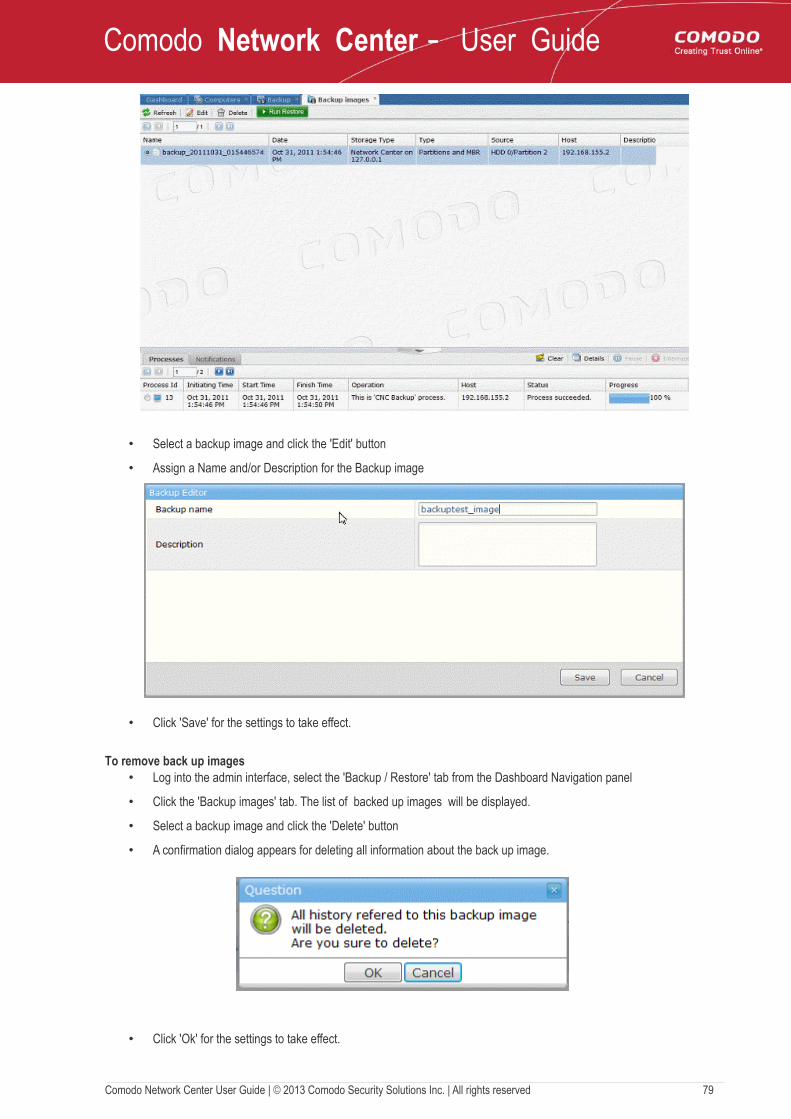
Comodo Network Center - User Guide
• Select a backup image and click the 'Edit' button
• Assign a Name and/or Description for the Backup image
• Click 'Save' for the settings to take effect.
To remove back up images• Log into the admin interface, select the 'Backup / Restore' tab from the Dashboard Navigation panel
• Click the 'Backup images' tab. The list of backed up images will be displayed.
• Select a backup image and click the 'Delete' button
• A confirmation dialog appears for deleting all information about the back up image.
• Click 'Ok' for the settings to take effect.
Comodo Network Center User Guide | © 2013 Comodo Security Solutions Inc. | All rights reserved 79
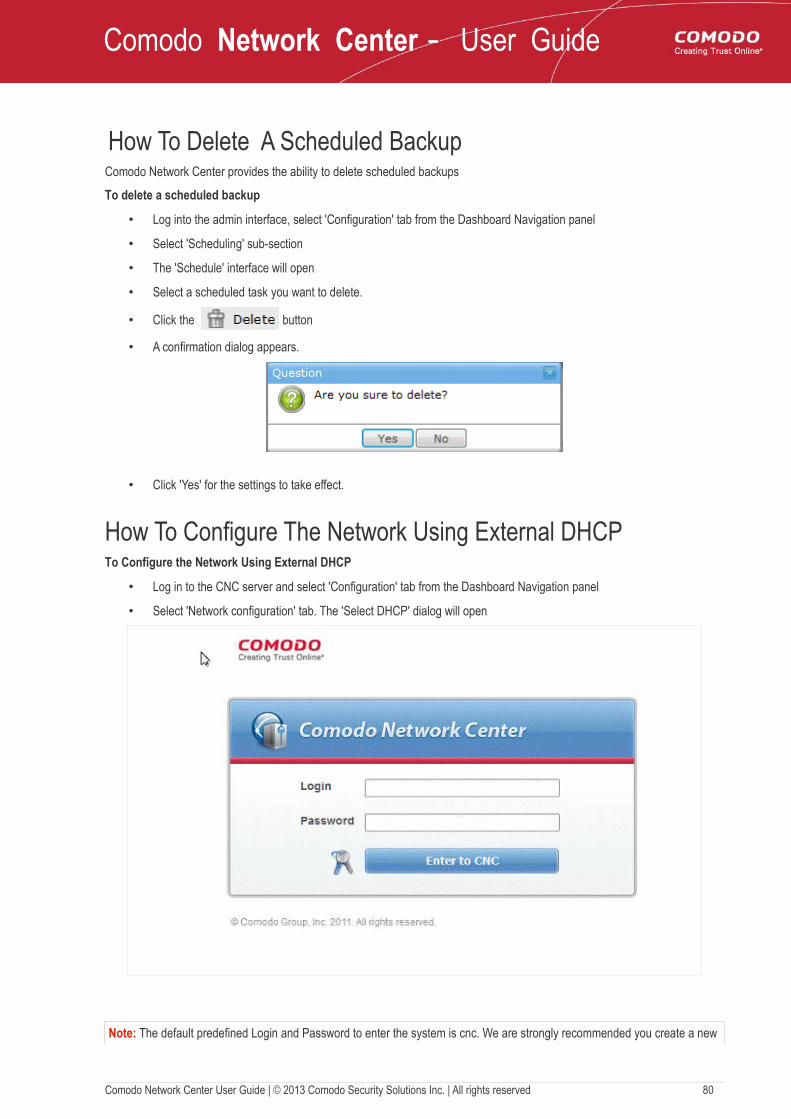
Comodo Network Center - User Guide
How To Delete A Scheduled BackupComodo Network Center provides the ability to delete scheduled backups
To delete a scheduled backup
• Log into the admin interface, select 'Configuration' tab from the Dashboard Navigation panel
• Select 'Scheduling' sub-section
• The 'Schedule' interface will open
• Select a scheduled task you want to delete.
• Click the button
• A confirmation dialog appears.
• Click 'Yes' for the settings to take effect.
How To Configure The Network Using External DHCPTo Configure the Network Using External DHCP
• Log in to the CNC server and select 'Configuration' tab from the Dashboard Navigation panel
• Select 'Network configuration' tab. The 'Select DHCP' dialog will open
Note: The default predefined Login and Password to enter the system is cnc. We are strongly recommended you create a new
Comodo Network Center User Guide | © 2013 Comodo Security Solutions Inc. | All rights reserved 80
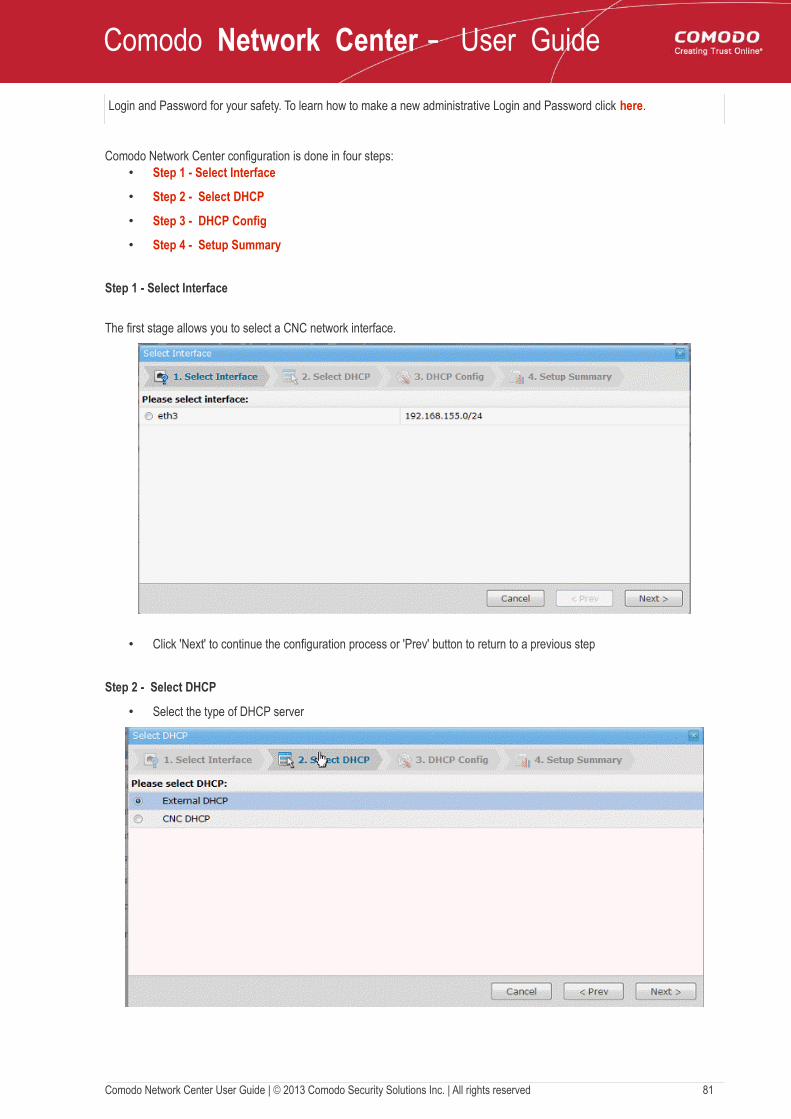
Comodo Network Center - User Guide
Login and Password for your safety. To learn how to make a new administrative Login and Password click here.
Comodo Network Center configuration is done in four steps:• Step 1 - Select Interface
• Step 2 - Select DHCP
• Step 3 - DHCP Config
• Step 4 - Setup Summary
Step 1 - Select Interface
The first stage allows you to select a CNC network interface.
• Click 'Next' to continue the configuration process or 'Prev' button to return to a previous step
Step 2 - Select DHCP
• Select the type of DHCP server
Comodo Network Center User Guide | © 2013 Comodo Security Solutions Inc. | All rights reserved 81
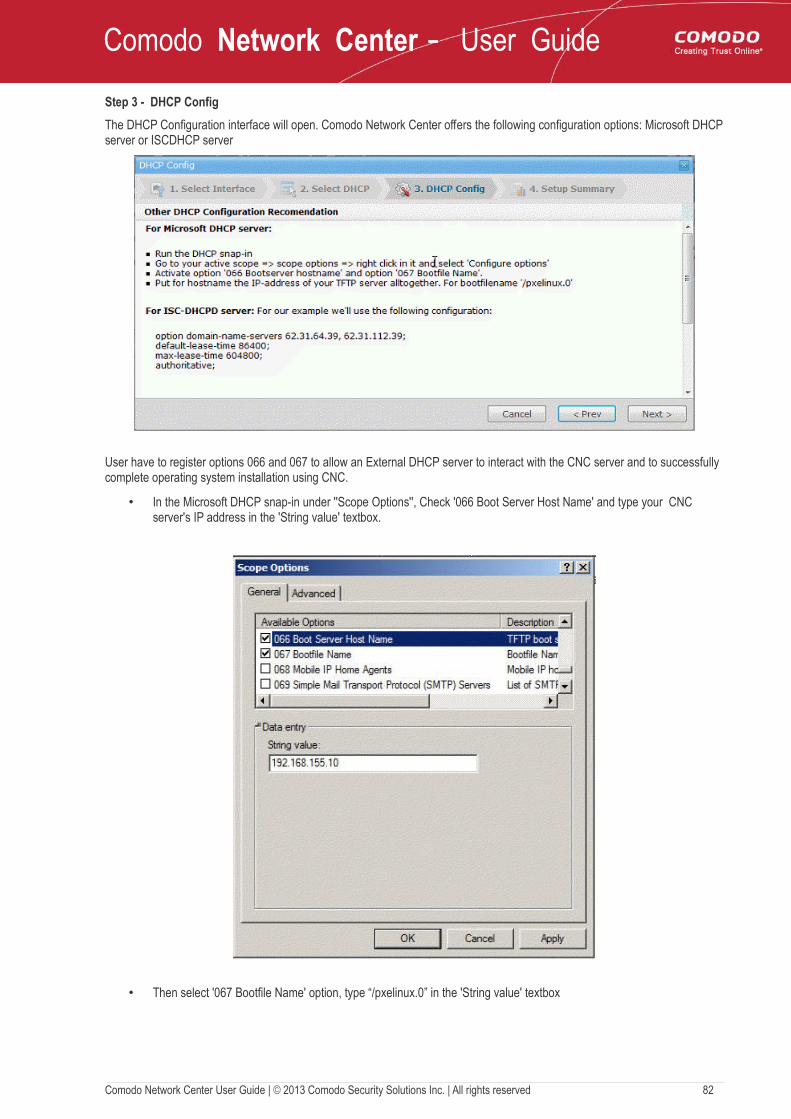
Comodo Network Center - User Guide
Step 3 - DHCP Config
The DHCP Configuration interface will open. Comodo Network Center offers the following configuration options: Microsoft DHCP server or ISCDHCP server
User have to register options 066 and 067 to allow an External DHCP server to interact with the CNC server and to successfully complete operating system installation using CNC.
• In the Microsoft DHCP snap-in under ''Scope Options'', Check '066 Boot Server Host Name' and type your CNC server's IP address in the 'String value' textbox.
• Then select '067 Bootfile Name' option, type “/pxelinux.0” in the 'String value' textbox
Comodo Network Center User Guide | © 2013 Comodo Security Solutions Inc. | All rights reserved 82
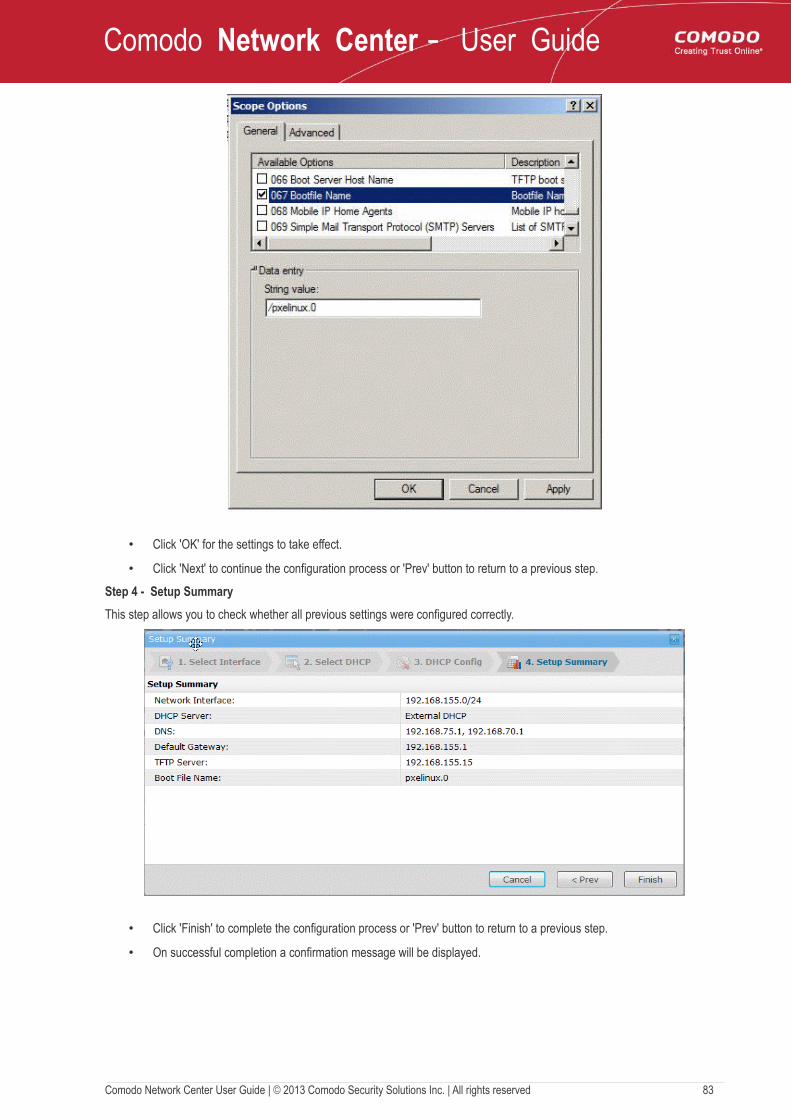
Comodo Network Center - User Guide
• Click 'OK' for the settings to take effect.
• Click 'Next' to continue the configuration process or 'Prev' button to return to a previous step.
Step 4 - Setup Summary
This step allows you to check whether all previous settings were configured correctly.
• Click 'Finish' to complete the configuration process or 'Prev' button to return to a previous step.
• On successful completion a confirmation message will be displayed.
Comodo Network Center User Guide | © 2013 Comodo Security Solutions Inc. | All rights reserved 83
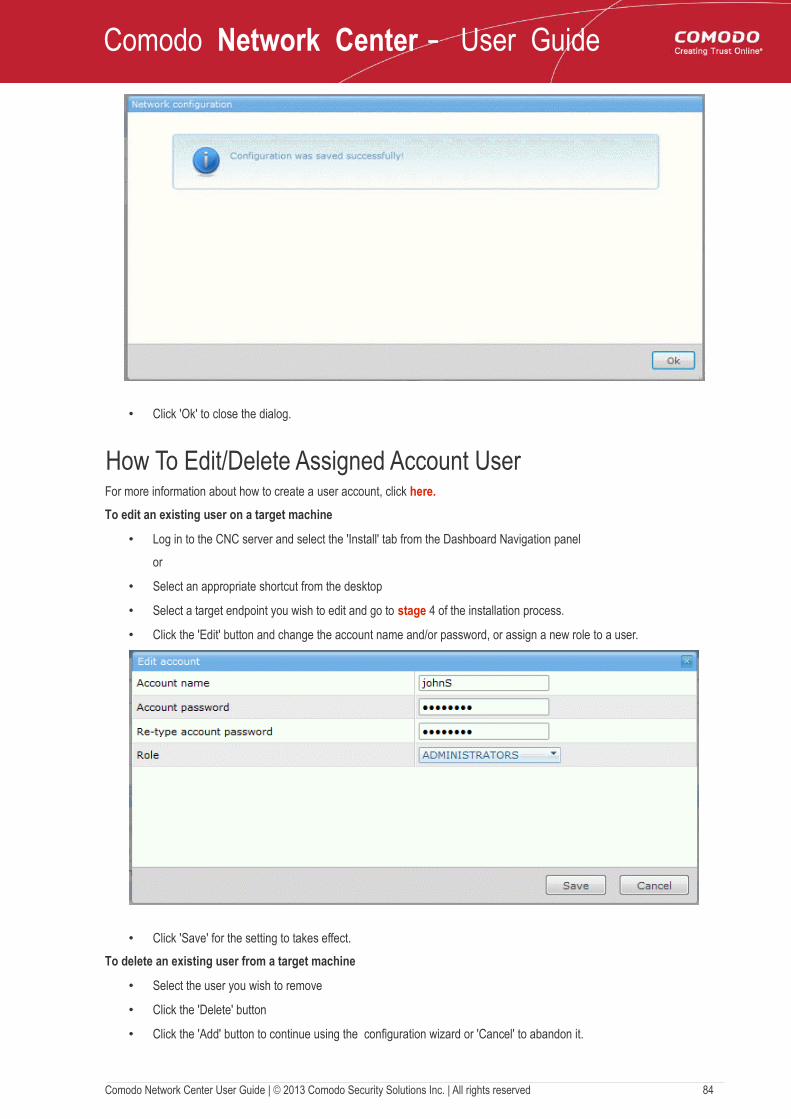
Comodo Network Center - User Guide
• Click 'Ok' to close the dialog.
How To Edit/Delete Assigned Account UserFor more information about how to create a user account, click here.
To edit an existing user on a target machine
• Log in to the CNC server and select the 'Install' tab from the Dashboard Navigation panel
or
• Select an appropriate shortcut from the desktop
• Select a target endpoint you wish to edit and go to stage 4 of the installation process.
• Click the 'Edit' button and change the account name and/or password, or assign a new role to a user.
• Click 'Save' for the setting to takes effect.
To delete an existing user from a target machine
• Select the user you wish to remove
• Click the 'Delete' button
• Click the 'Add' button to continue using the configuration wizard or 'Cancel' to abandon it.
Comodo Network Center User Guide | © 2013 Comodo Security Solutions Inc. | All rights reserved 84
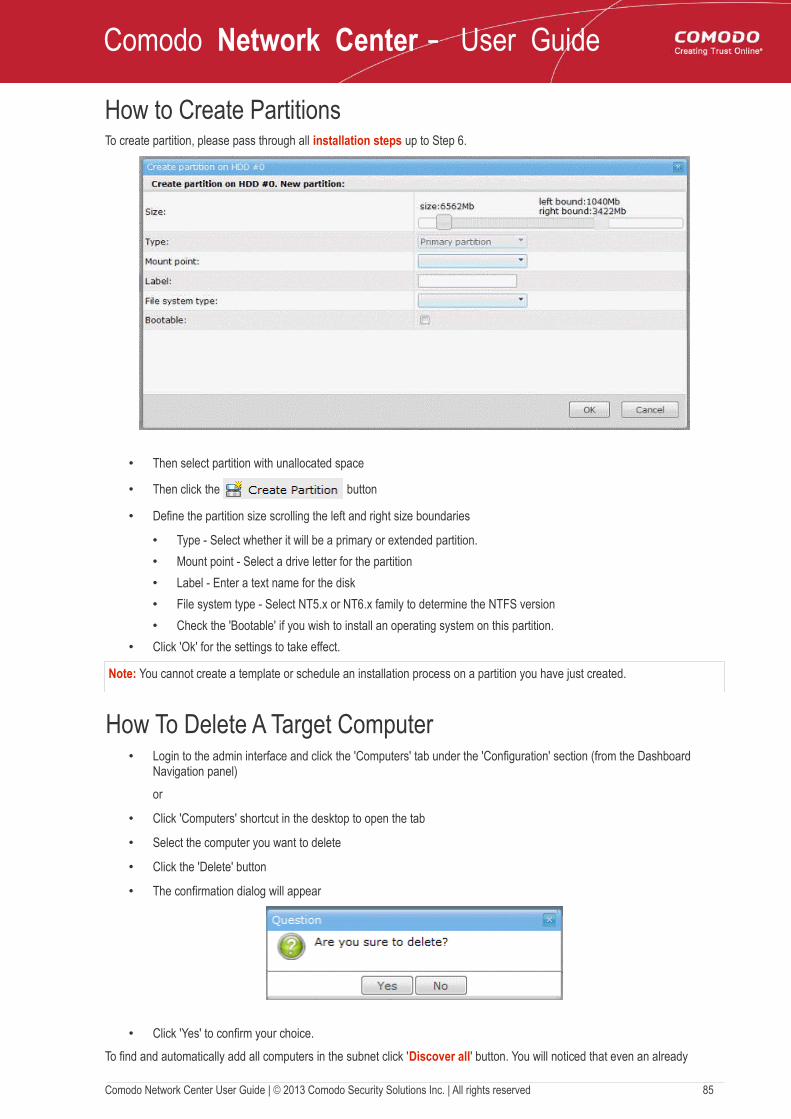
Comodo Network Center - User Guide
How to Create PartitionsTo create partition, please pass through all installation steps up to Step 6.
• Then select partition with unallocated space
• Then click the button
• Define the partition size scrolling the left and right size boundaries
• Type - Select whether it will be a primary or extended partition.
• Mount point - Select a drive letter for the partition
• Label - Enter a text name for the disk
• File system type - Select NT5.x or NT6.x family to determine the NTFS version
• Check the 'Bootable' if you wish to install an operating system on this partition.
• Click 'Ok' for the settings to take effect.
Note: You cannot create a template or schedule an installation process on a partition you have just created.
How To Delete A Target Computer • Login to the admin interface and click the 'Computers' tab under the 'Configuration' section (from the Dashboard
Navigation panel)
or
• Click 'Computers' shortcut in the desktop to open the tab
• Select the computer you want to delete
• Click the 'Delete' button
• The confirmation dialog will appear
• Click 'Yes' to confirm your choice.
To find and automatically add all computers in the subnet click 'Discover all' button. You will noticed that even an already
Comodo Network Center User Guide | © 2013 Comodo Security Solutions Inc. | All rights reserved 85

Comodo Network Center - User Guide
deleted computer will be found.
How To Cleanup The Installation Processes
The Cleanup button located at the top of 'Computers' tab and allows you to clear all incorrectly completed
installation processes.
To cleanup an installation process
• Login to the admin interface and click the 'Computers' tab under the 'Configuration' section (from the Dashboard Navigation panel)
or
• Click the 'Computers' shortcut in the desktop to open the tab
• Select a computer with state: Agent is available
• Click the 'Cleanup' button
• The 'Perform cleanup?' dialog will appear and offer to reboot the target computer.
• The next step is to select whether the reboot process will be run from the OS installed on the Local Drive or by using WinPE32 / WinPE64
• Select Local Drive if the target machine has an operating system installed on it, otherwise, select the radio button 'WinPE32/64'
• Click the 'Perform cleanup' button to launch reboot.
Note: The cleanup process can only work when its state is ' Agent is available' and not when 'Host is up and running' and 'Agent is unreachable'.
How To Delete An Installation TemplateTo delete installation template
• Login to the admin interface and click the 'Install templates' tab under the 'Install' section (from the Dashboard Navigation panel)
• Select a template you want to remove
• Click 'Delete' button
• The confirmation dialog will appear
Comodo Network Center User Guide | © 2013 Comodo Security Solutions Inc. | All rights reserved 86
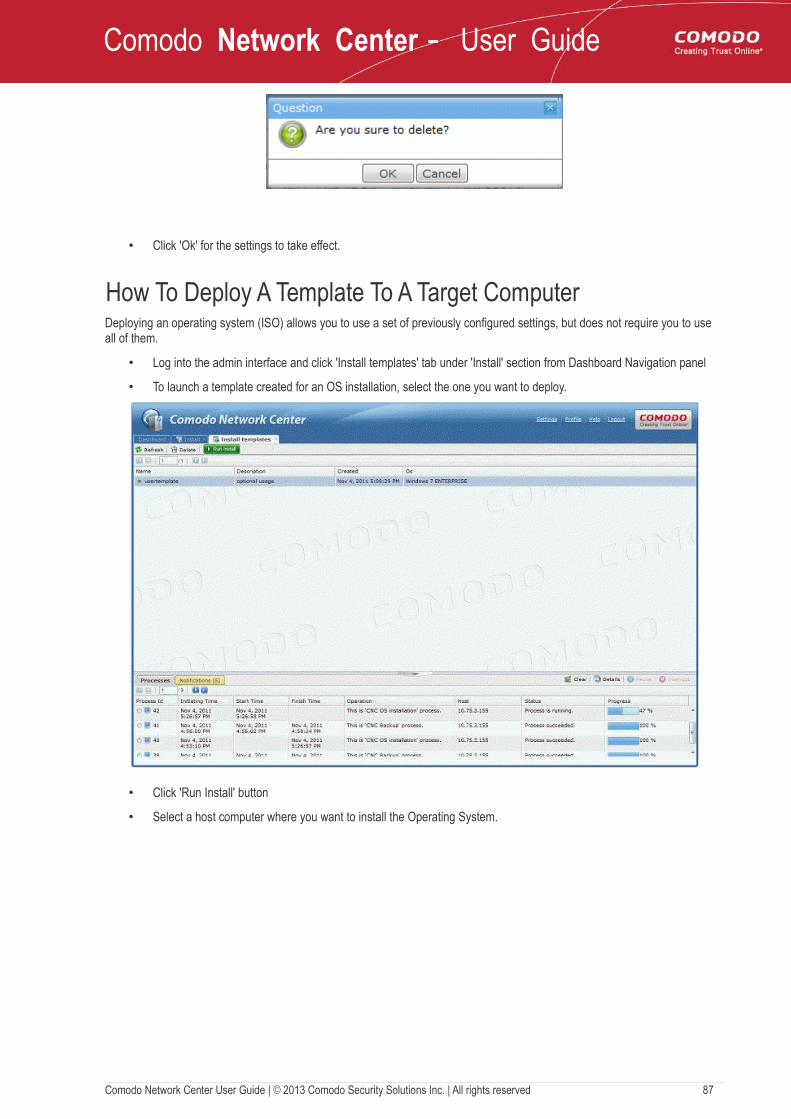
Comodo Network Center - User Guide
• Click 'Ok' for the settings to take effect.
How To Deploy A Template To A Target ComputerDeploying an operating system (ISO) allows you to use a set of previously configured settings, but does not require you to use all of them.
• Log into the admin interface and click 'Install templates' tab under 'Install' section from Dashboard Navigation panel
• To launch a template created for an OS installation, select the one you want to deploy.
• Click 'Run Install' button
• Select a host computer where you want to install the Operating System.
Comodo Network Center User Guide | © 2013 Comodo Security Solutions Inc. | All rights reserved 87
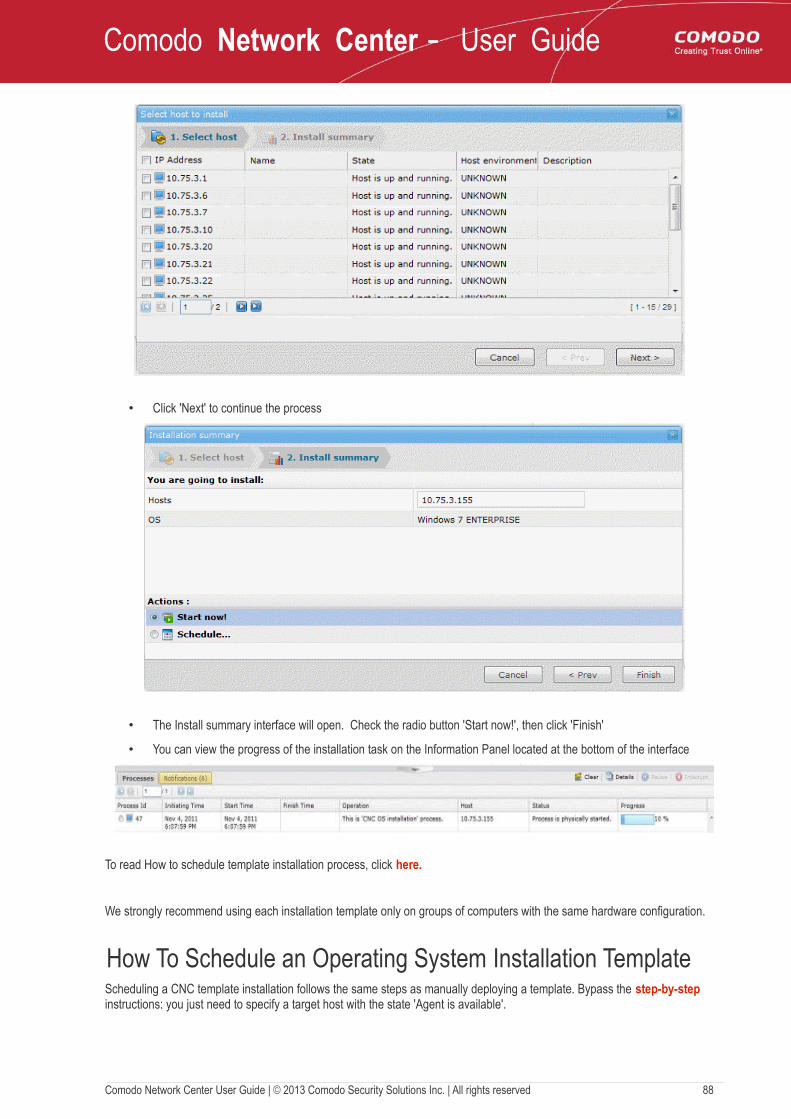
Comodo Network Center - User Guide
• Click 'Next' to continue the process
• The Install summary interface will open. Check the radio button 'Start now!', then click 'Finish'
• You can view the progress of the installation task on the Information Panel located at the bottom of the interface
To read How to schedule template installation process, click here.
We strongly recommend using each installation template only on groups of computers with the same hardware configuration.
How To Schedule an Operating System Installation Template Scheduling a CNC template installation follows the same steps as manually deploying a template. Bypass the step-by-step instructions: you just need to specify a target host with the state 'Agent is available'.
Comodo Network Center User Guide | © 2013 Comodo Security Solutions Inc. | All rights reserved 88
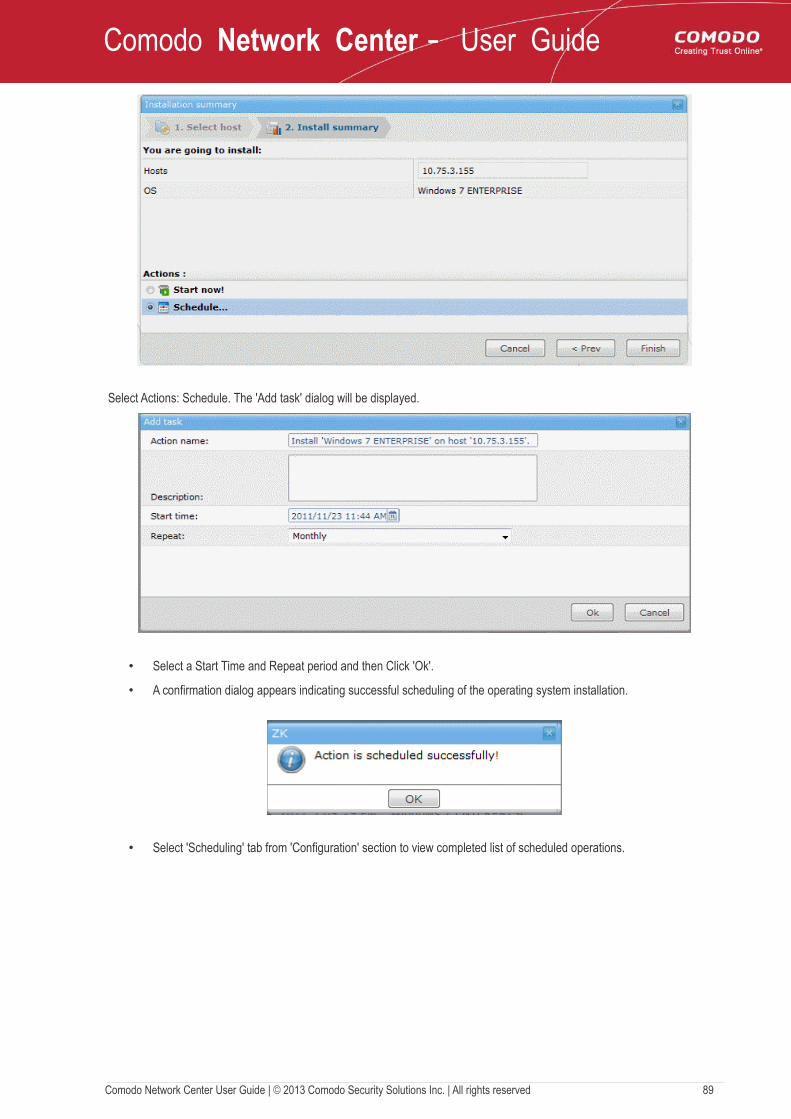
Comodo Network Center - User Guide
Select Actions: Schedule. The 'Add task' dialog will be displayed.
• Select a Start Time and Repeat period and then Click 'Ok'.
• A confirmation dialog appears indicating successful scheduling of the operating system installation.
• Select 'Scheduling' tab from 'Configuration' section to view completed list of scheduled operations.
Comodo Network Center User Guide | © 2013 Comodo Security Solutions Inc. | All rights reserved 89
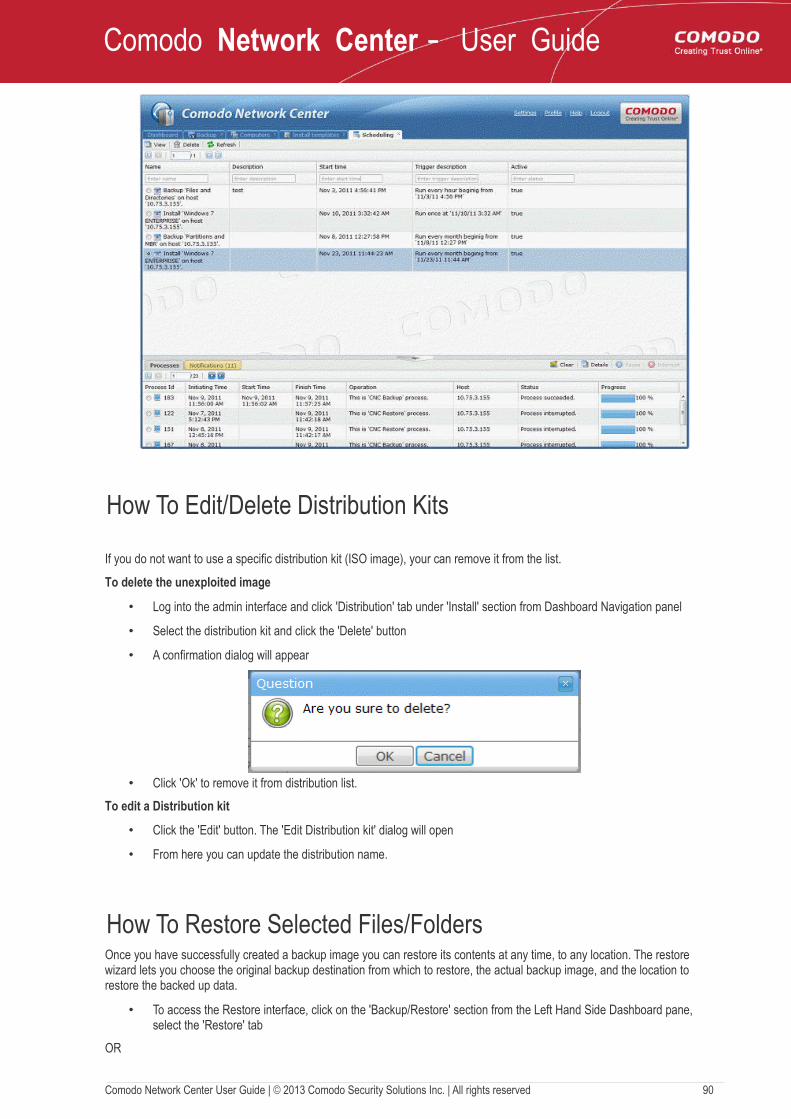
Comodo Network Center - User Guide
How To Edit/Delete Distribution Kits
If you do not want to use a specific distribution kit (ISO image), your can remove it from the list.
To delete the unexploited image
• Log into the admin interface and click 'Distribution' tab under 'Install' section from Dashboard Navigation panel
• Select the distribution kit and click the 'Delete' button
• A confirmation dialog will appear
• Click 'Ok' to remove it from distribution list.
To edit a Distribution kit
• Click the 'Edit' button. The 'Edit Distribution kit' dialog will open
• From here you can update the distribution name.
How To Restore Selected Files/FoldersOnce you have successfully created a backup image you can restore its contents at any time, to any location. The restore wizard lets you choose the original backup destination from which to restore, the actual backup image, and the location to restore the backed up data.
• To access the Restore interface, click on the 'Backup/Restore' section from the Left Hand Side Dashboard pane, select the 'Restore' tab
OR
Comodo Network Center User Guide | © 2013 Comodo Security Solutions Inc. | All rights reserved 90
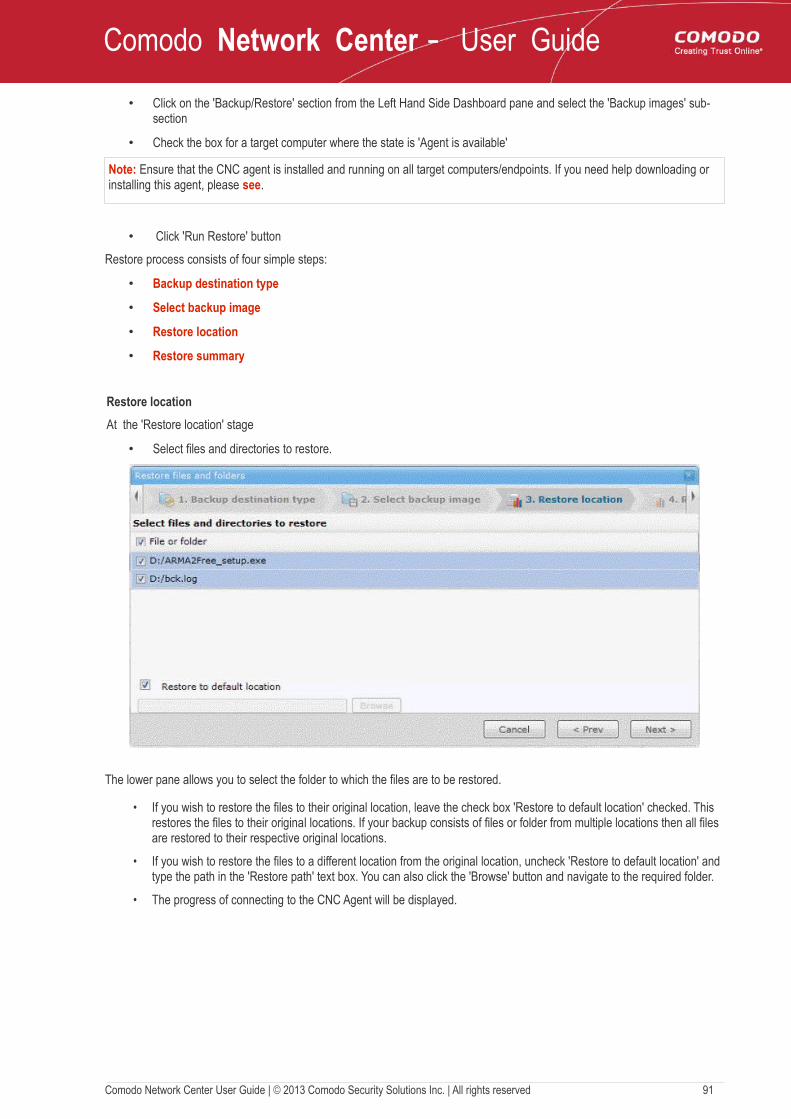
Comodo Network Center - User Guide
• Click on the 'Backup/Restore' section from the Left Hand Side Dashboard pane and select the 'Backup images' sub-section
• Check the box for a target computer where the state is 'Agent is available'
Note: Ensure that the CNC agent is installed and running on all target computers/endpoints. If you need help downloading or installing this agent, please see.
• Click 'Run Restore' button
Restore process consists of four simple steps:
• Backup destination type
• Select backup image
• Restore location
• Restore summary
Restore location
At the 'Restore location' stage
• Select files and directories to restore.
The lower pane allows you to select the folder to which the files are to be restored.
• If you wish to restore the files to their original location, leave the check box 'Restore to default location' checked. This restores the files to their original locations. If your backup consists of files or folder from multiple locations then all files are restored to their respective original locations.
• If you wish to restore the files to a different location from the original location, uncheck 'Restore to default location' and type the path in the 'Restore path' text box. You can also click the 'Browse' button and navigate to the required folder.
• The progress of connecting to the CNC Agent will be displayed.
Comodo Network Center User Guide | © 2013 Comodo Security Solutions Inc. | All rights reserved 91
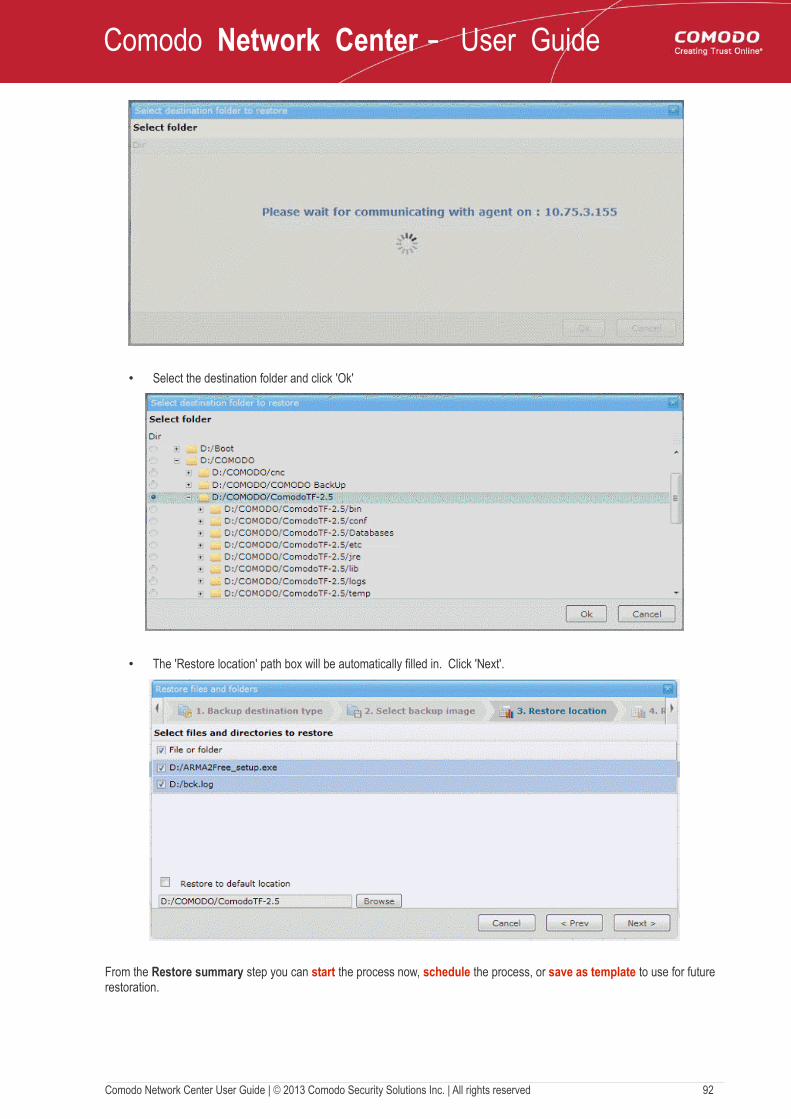
Comodo Network Center - User Guide
• Select the destination folder and click 'Ok'
• The 'Restore location' path box will be automatically filled in. Click 'Next'.
From the Restore summary step you can start the process now, schedule the process, or save as template to use for future restoration.
Comodo Network Center User Guide | © 2013 Comodo Security Solutions Inc. | All rights reserved 92
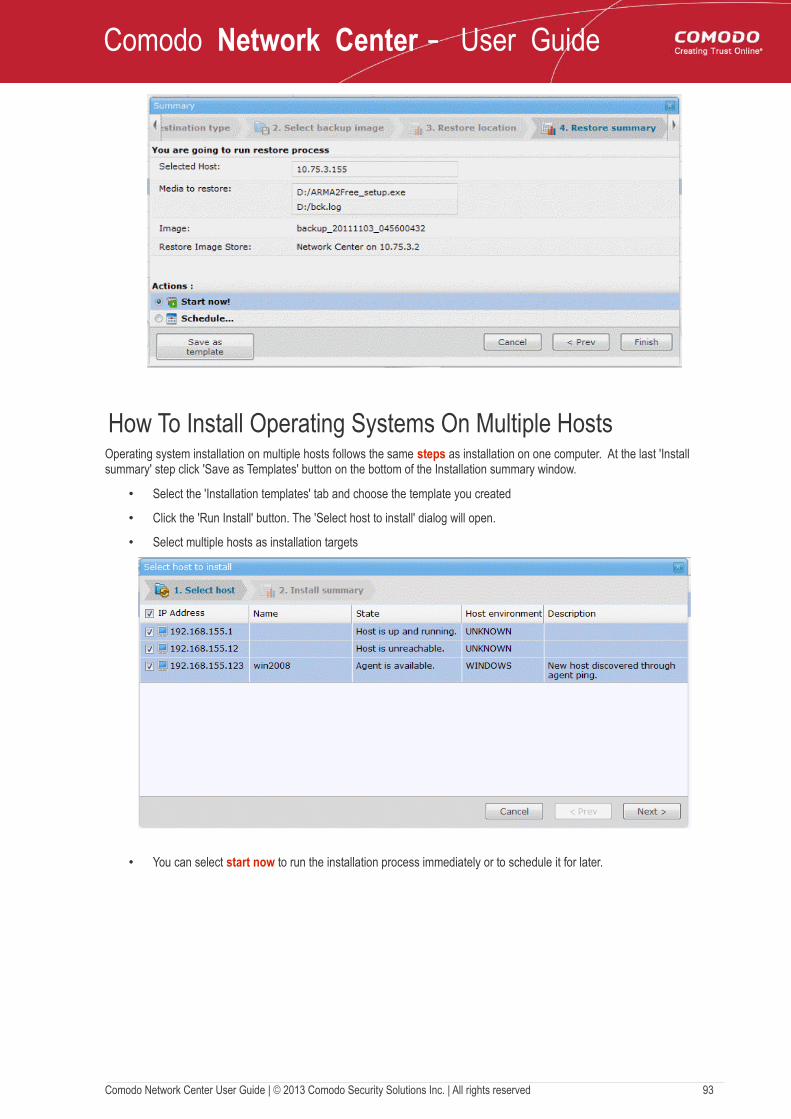
Comodo Network Center - User Guide
How To Install Operating Systems On Multiple HostsOperating system installation on multiple hosts follows the same steps as installation on one computer. At the last 'Install summary' step click 'Save as Templates' button on the bottom of the Installation summary window.
• Select the 'Installation templates' tab and choose the template you created
• Click the 'Run Install' button. The 'Select host to install' dialog will open.
• Select multiple hosts as installation targets
• You can select start now to run the installation process immediately or to schedule it for later.
Comodo Network Center User Guide | © 2013 Comodo Security Solutions Inc. | All rights reserved 93
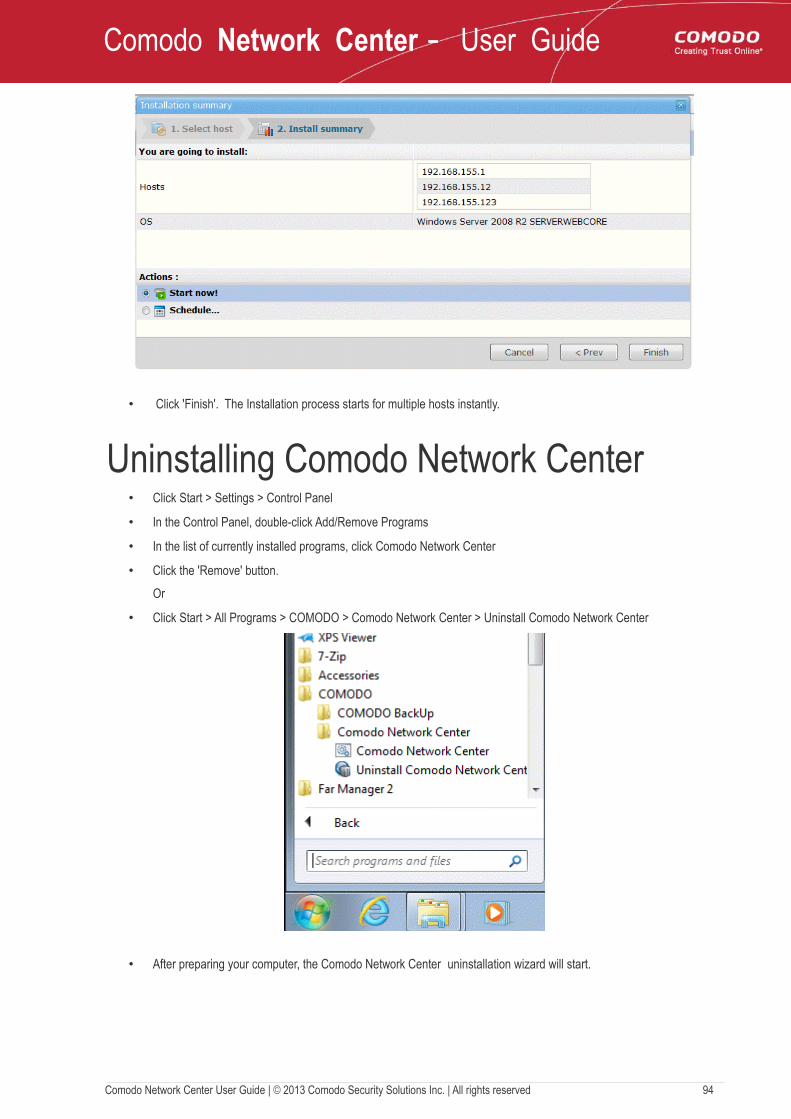
Comodo Network Center - User Guide
• Click 'Finish'. The Installation process starts for multiple hosts instantly.
Uninstalling Comodo Network Center• Click Start > Settings > Control Panel
• In the Control Panel, double-click Add/Remove Programs
• In the list of currently installed programs, click Comodo Network Center
• Click the 'Remove' button.
Or
• Click Start > All Programs > COMODO > Comodo Network Center > Uninstall Comodo Network Center
• After preparing your computer, the Comodo Network Center uninstallation wizard will start.
Comodo Network Center User Guide | © 2013 Comodo Security Solutions Inc. | All rights reserved 94
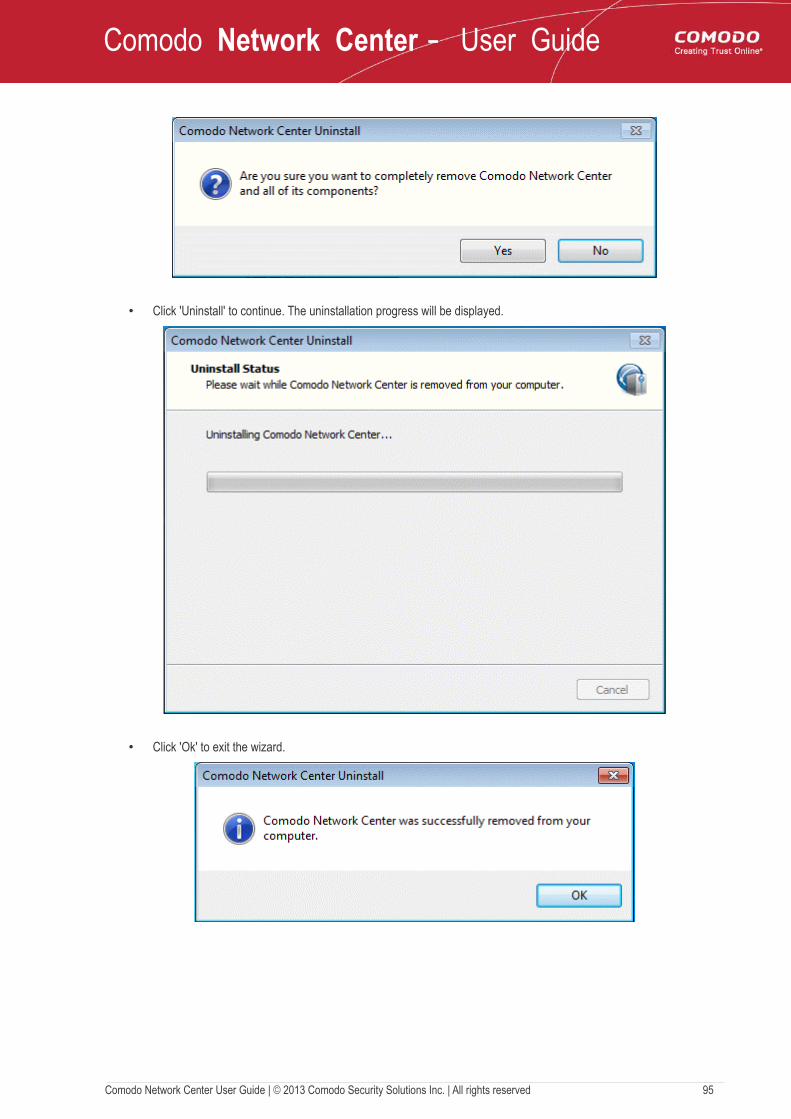
Comodo Network Center - User Guide
• Click 'Uninstall' to continue. The uninstallation progress will be displayed.
• Click 'Ok' to exit the wizard.
Comodo Network Center User Guide | © 2013 Comodo Security Solutions Inc. | All rights reserved 95
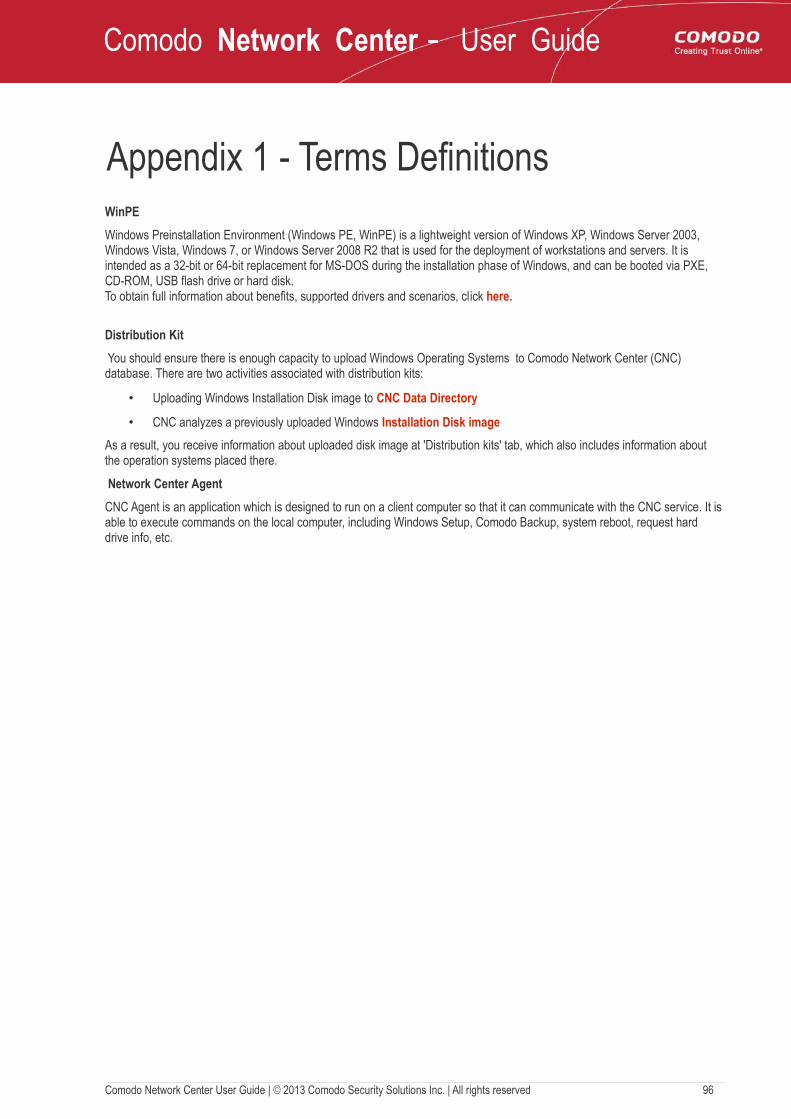
Comodo Network Center - User Guide
Appendix 1 - Terms DefinitionsWinPE
Windows Preinstallation Environment (Windows PE, WinPE) is a lightweight version of Windows XP, Windows Server 2003, Windows Vista, Windows 7, or Windows Server 2008 R2 that is used for the deployment of workstations and servers. It is intended as a 32-bit or 64-bit replacement for MS-DOS during the installation phase of Windows, and can be booted via PXE, CD-ROM, USB flash drive or hard disk. To obtain full information about benefits, supported drivers and scenarios, click here.
Distribution Kit
You should ensure there is enough capacity to upload Windows Operating Systems to Comodo Network Center (CNC) database. There are two activities associated with distribution kits:
• Uploading Windows Installation Disk image to CNC Data Directory
• CNC analyzes a previously uploaded Windows Installation Disk image
As a result, you receive information about uploaded disk image at 'Distribution kits' tab, which also includes information about the operation systems placed there.
Network Center Agent
CNC Agent is an application which is designed to run on a client computer so that it can communicate with the CNC service. It is able to execute commands on the local computer, including Windows Setup, Comodo Backup, system reboot, request hard drive info, etc.
Comodo Network Center User Guide | © 2013 Comodo Security Solutions Inc. | All rights reserved 96

Comodo Network Center - User Guide
About ComodoThe Comodo companies are leading global providers of Security, Identity and Trust Assurance services on the Internet. Comodo CA offers a comprehensive array of PKI Digital Certificates and Management Services, Identity and Content Authentication (Two-Factor - Multi-Factor) software, and Network Vulnerability Scanning and PCI compliance solutions. In addition, with over 10,000,000 installations of its threat prevention products, Comodo Security Solutions maintains an extensive suite of endpoint security software and services for businesses and consumers.
Continual innovation, a core competence in PKI and a commitment to reversing the growth of Internet-crime distinguish the Comodo companies as vital players in the Internet's ongoing development. Comodo, with offices in the US, UK, China, India, Romania and the Ukraine, secures and authenticates the online transactions and communications for over 200,000 business customers and millions of consumers, providing the intelligent security, authentication and assurance services necessary for trust in on-line transactions.
Comodo Security Solutions, Inc.
1255 Broad Street
STE 100
Clifton, NJ 07013
United States
Tel: +1.877.712.1309
Tel: +1.703.637.9361
Email: [email protected]
For additional information on Comodo - visit http://www.comodo.com.
Comodo Network Center User Guide | © 2013 Comodo Security Solutions Inc. | All rights reserved 97


