320
Working together Norstar Compact Plus Release 3 System Administration Guide
Working together
Norstar
Compact Plus Release 3
System Administration Guide

Published by Nortel Networks on behalf of British Telecommunications PLC. All possible care has been taken in the preparation of this publication, but British Telecommunications PLC assumes no liability for any inaccuracies that may occur. British Telecommunication PLC reserves the right to make changes without notice both to this publication and to the product that it describes.
No part of this publication may be reproduced, transmitted, transcribed, stored in a retrieval system, or translated into any human or computer language in any form or by any means without prior written permission of British Telecommunications PLC.
If you find any errors in this publication, or would like to make suggestions for its improvement, please write to:British TelecommunicationsNorstar Product ManagerWeston House246 High HolbornLondon, WC1V 7DQ
British Telecom is a registered trademark of:British Telecommunications PLCRegistered Office 81, Newgate StreetLondon, EC1A 7AJRegistered in England, Number 1800000
Meridian, Companion, and Norstar are trademarks of Nortel.Meridian Norstar Business Communication System is manufactured by Nortel.Touchtone is a trademark of British Telecom.
This document is for use with Compact Plus Release 3 Norstar UK.
P0905531 Issue 01Printed in Canada©1999 Northern Telecom

i
Contents
SECTION I: System Administration 1
Introduction 3Safety and Regulatory information 4You must be the administrator 5Here’s what you need to start programming 6Understanding the telephone keys 7Starting a programming session 9Ending a programming session 9Using passwords to access programming 9Understanding your system 10Map of Administrator Plus programming 10
SECTION II: System programming 13
System programming introduction 15Conventions used in this guide 16Programming overview 16Using passwords 22Programmable settings and features 24Making suggestions 30Advice Line 30
Programming Terminals and Extensions 31Terminals and extensions 32Assigning a line to an extension (line access) 32Assigning line pool access 34Assigning a Prime line to an extension 34Assigning intercom keys to an extension 35Assigning an Answer key to an extension 36Setting the Originating Line Identification for an extension 37
Programming Hospitality Services 39Common extension 40Room extension 40Hospitality Services admin telephone 40Alarm time (AL) feature 40Hospitality Services admin alarm feature 42Room occupancy (RO) 43Room condition (RC) 44Service time 46
Network features 47CLI blocking 48Network Call Diversion 48Selective Line Redirection 50
P0905531 Issue 01 Compact Plus System Administration Guide

ii
Software Keys 53Viewing the System ID 54Software Keys 54
Setting System speed dial 57Setting System speed dial 58Assigning a number to a System speed dial code 58Selecting a line 59Setting the system to display a name instead of a number 59Setting whether the speed dial number bypasses restrictions 60
Naming extensions and lines 61Naming extensions 62Naming lines 63
Changing the time and date 65Changing the time and date 66Changing the time 66Changing the date 67Changing the time and date using the Basic password 67Changing the time by an hour 68Automatic Time & Date 68
Assigning a Direct-Dial extension 69Programming Direct-Dial 70Programming an internal Direct-Dial extension 70Programming an external Direct-Dial extension 71
Barring calls and privileges (Restrictions) 73Using restriction filters to bar calls 74Assigning filters to a telephone (Extn restrns) 77Assigning filters to a line (Line restrns) 78Assigning filters to a specific line/extension (Line/extn restrns) 79Class of Service passwords 80Assigning a remote access filter 83Locking an extension 86Preventing Last Number Redial 87Preventing Saved Number Redial 88Preventing Recall 89Preventing Redirect 89
Programming capabilities 91Programming an extension 92Setting Call Forward no answer 92Setting Call Forward on Busy 94Programming Do Not Disturb on Busy 94Programming Handsfree 95Programming Handsfree answerback 96Assigning a Pickup group 97Assigning a page zone 97Programming paging 98Assigning telephones to the Direct-Dial extension 98Allowing Priority call 99Assigning a Hotline 100Auxiliary ringer 101Activating Redirect ring 101Receive tones 102
Compact Plus System Administration Guide P0905531 Issue 01
iii
Programming User preferences 105Programming User preferences 106Changing the key programming for an extension 106Changing a personal (user) speed dial code 107Changing the Call log options 107Changing the dialling options 108Changing the display language 109Changing the display contrast 109Changing the Ring type 110
Programming Hunt groups 111Programming Hunt Groups 112Adding or removing members from a group 113Moving members of a group 113Assigning or unassigning lines to a group 114Setting the distribution mode 115Setting the hunt delay 116Programming options if all hunt members are busy 116Programming the queue timeout 117Programming the overflow extension 118Setting the name 118Checking hunt group metrics 119
Programming feature settings 121Background music 122On hold 122Receiver volume 123Camp timeout 123Park timeout 124Park mode 124Transfer callback 125Network callback 126Held line reminder and delay 126Conference tone 127Directed (call) pickup 128Page tone 128Page timeout 129Call log space 129Alarm extension 130Answer extension 131
Moving and copying 133Extension relocation 134Copying programming for telephones 135
Settings for analogue equipment 139Settings for analogue equipment 140Setting the delay before the ATA/I-ATA answers 140Changing the dial mode of an ATA or an I-ATA 141Setting whether the ATA/I-ATA should receive system tones 142Setting whether an ATA is used on-site or off-site 142
Services 145Using alternate or scheduled services 146Turning services on or off 146Designating alternate routes for calls 148Programming routes 151
P0905531 Issue 01 Compact Plus System Administration Guide
iv
Programming destination codes 152Turning a manual service on or off with a feature code 155Assigning control extensions 155Changing the name of a schedule 157Changing the time of a schedule 157
Passwords 159Password security 160Setting the SAPLUS password 160Setting the Administrator password 160Setting the Basic password 161Hospitality passwords 162I-RAD password 163
Call services 165Erasing a forgotten Call log password 166Programming Call services 1661st Display 166Auto called ID 167
Remote access 169Programming lines and features for remote access 170
Auto Attendant 175Auto Attendant 176System Answer 176Custom Call Routing (CCR) 176CCR groups 177Direct extension dialling 177Customising System Answer and CCR 178Turning System Answer on or off 178Turning CCR on or off 179Choosing the attendant telephone 179Setting the number of rings before System Answer answers a call 179Setting the number of rings before a caller hears the CCR greeting 180Adding or removing extensions from a CCR group 180Using the pre-recorded greetings 181Using customised greetings for System Answer and CCR 182Recording customised greetings for System Answer and CCR 183Programming or changing CCR destinations 184Testing your custom System Answer and CCR 184
Maintenance 187Beginning a Maintenance session 188Checking the system version of the software 188System Administration Log record 189
Troubleshooting 191Recording and reporting alarm codes 192Clearing lines 192Power failure 193Power-fail telephone 194
Compact Plus System Administration Guide P0905531 Issue 01

v
SECTION III: Using telephone features 195
About Norstar telephones 197About Norstar telephones 198M7324N telephone 198M7310N telephone 199M7208N telephone 200M7100N telephone 200M7000 telephone 201Release key 202Visually Impaired Operator Console 202Central Answering Position 203Common feature display messages 204
Customising a Norstar telephone 207Dialling mode 208Display contrast 209Key Inquiry 209Moving line keys 210Ring type 210Ring volume 211
Using personal features 213Background music 214Do Not Disturb 214Personal Speed Dial codes 215Using Speed Dial 215
Answering calls 217Answering a call 218Privacy feature (external calls only) 218Answering the next queued call 218Answering hunt group calls 219Multiple appearances of DIA lines 219Using Handsfree 219Answering a telephone using Directed Pickup 221Answering a telephone using Pickup Group 221Answer keys 222Listening in a group 223Disconnecting accidentally 223
Holding calls 225Holding 226Listening on hold 226
Routing calls 229Call Parking 230DIA calls 231Making a Priority call 232Transferring a call 233Transferring to a busy extension (Call Camping) 233
Making external calls 235Using an exchange code 236Using line pools 236Making a conference call 237Using Class of Service passwords 240
P0905531 Issue 01 Compact Plus System Administration Guide

vi
Making internal calls 241Making an internal call 242Making a conference call 242Accessing a Direct-Dial extension 242Leaving messages 242Paging 245Remote paging 245Voice call 246
Forwarding calls 249Forwarding all calls 250External Call forward 250Line redirection 252
Saving time with features 255Using System Speed Dial 256Using Autodial 256Using Redial 258Programming memory keys 258Using Ring Again 260Using Hotline 260
Using display features 261Time and Date 262Static Time 262Call Duration Timer 262Call Information 262Call Log 264Autobumping 269
Special dialling features 271Special dialling features 272Inserting a pause 272Setting Long tones 272Programmed Release 273Recall 273Run/Stop 273Wait for Dial Tone 274
Integrated Services Digital Network (ISDN) 275ISDN services 276Digital Network Adapter 278
Feature quick reference 279Compact Plus feature codes 280ISDN terminal features 283ATA extension features 284
Appendix A: Programming overviews 287
Index 307
Compact Plus System Administration Guide P0905531 Issue 01
SECTION I: System Administration
P0905531 Issue 01 Compact Plus System Administration Guide

2
Compact Plus System Administration Guide P0905531 Issue 01

Introduction
� Safety and Regulatory information.........4
� You must be the administrator.........5
� Here�s what you need to start programming.........6
� Understanding the telephone keys.........7
� Starting a programming session.........9
� Ending a programming session.........9
� Using passwords to access programming.........9
� Understanding your system.........10
� Map of Administrator Plus programming.........10
P0905531 Issue 01 Compact Plus System Administration Guide
4 Introduction
the
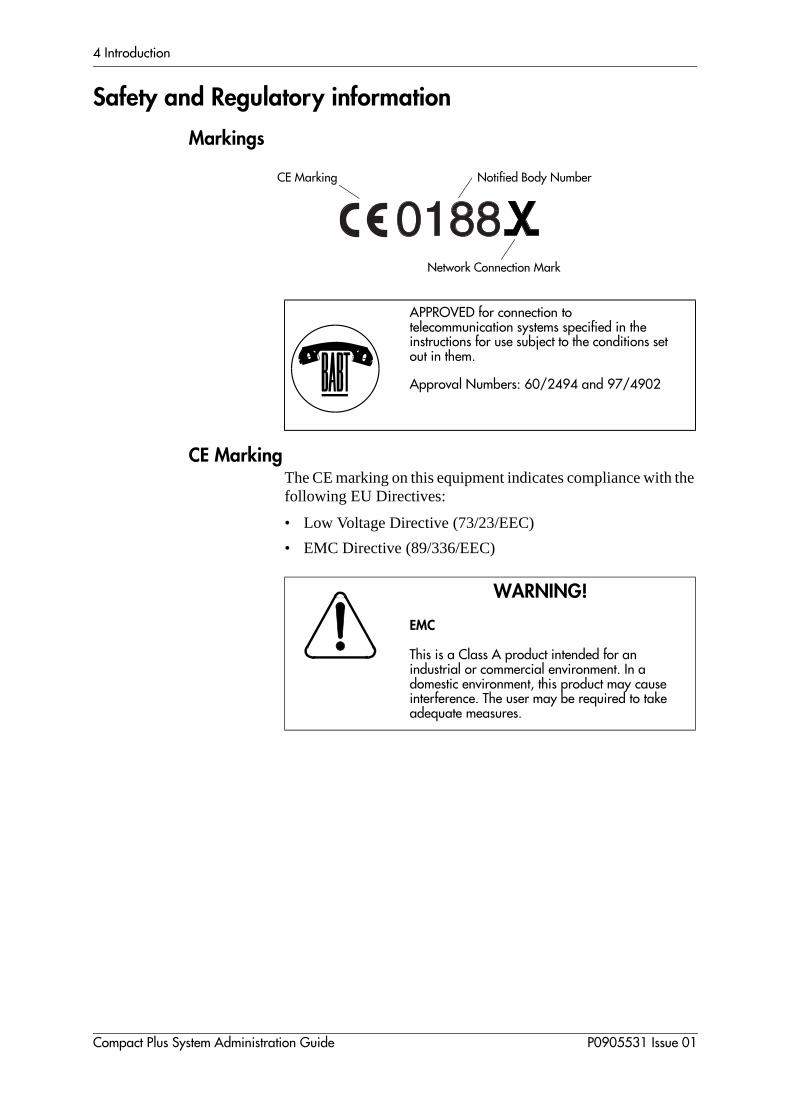
Safety and Regulatory information
Markings
CE MarkingThe CE marking on this equipment indicates compliance with following EU Directives:
• Low Voltage Directive (73/23/EEC)
• EMC Directive (89/336/EEC)
APPROVED for connection to telecommunication systems specified in the instructions for use subject to the conditions set out in them.
Approval Numbers: 60/2494 and 97/4902
WARNING!
EMC
This is a Class A product intended for an industrial or commercial environment. In a domestic environment, this product may cause interference. The user may be required to take adequate measures.
CE Marking Notified Body Number
Network Connection Mark
Compact Plus System Administration Guide P0905531 Issue 01

Introduction 5
e
our nt
You must be the administrator
If the installer has given this guide to you, you’re most likely thsystem administrator.
As an administrator, your role is to
• help your colleagues learn to use their Norstar telephones
• change Norstar programming to customise the system for yoffice or to keep up with changes in your office environmeor personnel
• call for help or service when necessary
System Administration Guide contains all the information youneed to become proficient at using and programming the Compact Plus system.
P0905531 Issue 01 Compact Plus System Administration Guide

6 Introduction
g a he
eys ve
xit
f lit
Here�s what you need to start programming
By following instructions on the telephone display and pressinfew keys, you can change the Compact Plus system to suit tspecific needs of your office. Before you begin programming,make sure you have these items:
• an M7310N extension and its programming overlay
OR
• an M7324N telephone and its programming overlay.
Placing the programming overlay
Place the programming overlay on the appropriate memory kas shown in the preceding illustrations. Four memory keys haspecial functions during a programming session. Once you eprogramming, the keys return to their normal functions. The programming keys are active or inactive at different stages oprogramming. When a key is active, the indicator next to it iswith a (» or ¼).
This is what each programming key does:
Heading—shows you the heading for the current level
Back—moves you back one item at the current level
Show—shows you the first setting within the level
Next—moves you one item forward at the current level
Heading
Back
Show
Nor
star
Pro
gram
min
gO
verla
yM
7310
N
Next
Heading
Back
Show
Norstar Programming Overlay M7324N
Next
Compact Plus System Administration Guide P0905531 Issue 01

Introduction 7
y
Understanding the telephone keys
Take a few minutes to study the telephones. Notice that the M7324N telephone does not have a Shift key or dual memorkeys.
Locate the different items shown in the following illustrations.
The following table describes the various items.
keypad Used for dialling numbers when you are making calls and for entering numbers and letters when you are programming.
Display Shows instructions for using and programming the telephone.
Display key Activates the instruction that appears on the display above the display key.
Memory key Activates a number or feature code stored in the key.
Dual memory key Can store two numbers or feature codes (M7310N only).
Shift key Press the Shift key before a dual memory key to activate the number or feature code stored in the secondary memory of the dual memory key (M7310N only).
Feature key Allows you to enter a feature code while using or programming the telephone.
Hold key Puts an active call on hold.
Release key Hangs up an active call or ends programming.
M7310N 1
2
3
4
6
7
8
9
8 7 9
5
6
23
KeypadDisplayDisplay keysMemory keys (with indicators)Dual memory keys (without indicators)Shift keyFeature keyHold keyRelease key
1
4
5
5
M7324N 1
2
3
4
67
8
8
3
KeypadDisplayDisplay keysMemory keys (with indicators)Feature keyHold keyRelease key
1
2
1
3
4
78
4
4
6
1
2
3
4
5
6
7
8
9
P0905531 Issue 01 Compact Plus System Administration Guide

8
Introduction
tters
ple,
is
ord bers.
a es
e to tion play
Entering numbers and letters using the keypadUse the keys on the telephone keypad to enter numbers and leduring programming. When you enter programming or use a feature code, the keys you press often spell a word. For examwhen you press ƒ••¤flfl‹››, the number keys spell CONFIG. The C is on key number 2, the Oon key number 6, the N is also on key number 6, and so on. However, the display shows numbers instead of letters. The wjust provides an easy way to remember the sequence of num
Entering names using the keypadWhen you want to use a key to spell a name, such as naminghunt group during programming, the function of the key changaccording to the number of times you press the key. The following illustration shows the functions for the keypad key ‹when entering letters.
Keypad key
More about display keysUse the three display keys below the display on your telephonset and select options. Their function depends on the instructhat appears on the display directly above each key. Some disinstructions that you may see during programming are DOWN, UP, or OK.
Display keys
press four times for the number 3
press once for the letter D
press twice for the letter E
press three times for the letter F
Contrast level 2 DOWN UP OK
Display textInstruction fordisplay key
Display key
Compact Plus System Administration Guide P0905531 Issue 01

Introduction 9
the
r by
een
for .
a
eing
Starting a programming session
As administrator, the first steps in making any change to the Compact Plus system are always the same. You must press Ä button and then press ¥¥ÛßßÜÝÝ to access Configuration programming.
Ending a programming session
The system proceeds with any changes you make to programming as soon as you move away from a setting, eitheusing the navigation keys or ̈ .
You can see if the changes you have made to telephone programming have taken effect by pressing the UPDATE display key. The display shows you how many telephones have not bupdated yet.
Using passwords to access programming
There are three passwords for Administration programming.
• àÛàÞ¡à (SAPLUS) — The System AdministratorPlus password lets the administrator access all the settingsAdministration programming, plus several installer settings
• ÛÜßÝß (ADMIN) — The Administrator password accesses most of the settings for Administration programming.
• ÛÛàÝÛ (BASIC) — The Basic password accessesfew settings that can be changed using feature codes.
The Basic password lets you delegate some of the duties of ban administrator without allowing access to sensitive
Jan1 12:00pm Press Ä.
Feature:ºººººººº
ºººººººººººººººº
Press ¥¥ÛßßÜÝÝ (CONFIG).
Password:ººººººº
ºººººººººººRETRY
Press ÛÜßÝß (ADMIN). Press RETRY to re-enter the password if it is entered incorrectly.
Terminals&Extnsº
ºººººººººººººººº
The display shows the first of the seven headings available for programming.
ÛÜßÝß (ADMIN) is the password, unless the password has been changed. Check Programming Record for the most recent password.
Possible display
ººººººººººCHANGE
Press ̈to end the session.
Endofsession
ºººººººººººººººº
After a few seconds, the time and date reappear on the display.
P0905531 Issue 01 Compact Plus System Administration Guide
10 Introduction
hen ).
ic that rds"
r
ns n the
1 as sion in
you
programming. It should be given out with care and changed wnecessary (for example, when someone leaves the company
For information on changing passwords, see "Setting the Baspassword" on page 161. For more information on the settings can be changed with the Basic password, see "Using passwoon page 22.
Understanding your system
Exchange lines have been set up by your installer to be eithepublic, private, or part of a line pool.
• A public line is assigned to more than one extension.
• A private line is assigned to only one extension and to thePrime extension for that line.
• A line can be assigned to one of three line pools. Extensioare assigned access to line pools and they share the lines ipool with other extensions having access to that pool.
The Compact Plus system automatically assigns extension 22the Prime extension for each exchange line. The Prime extenprovides back-up answering for all unanswered calls comingon the exchange line.
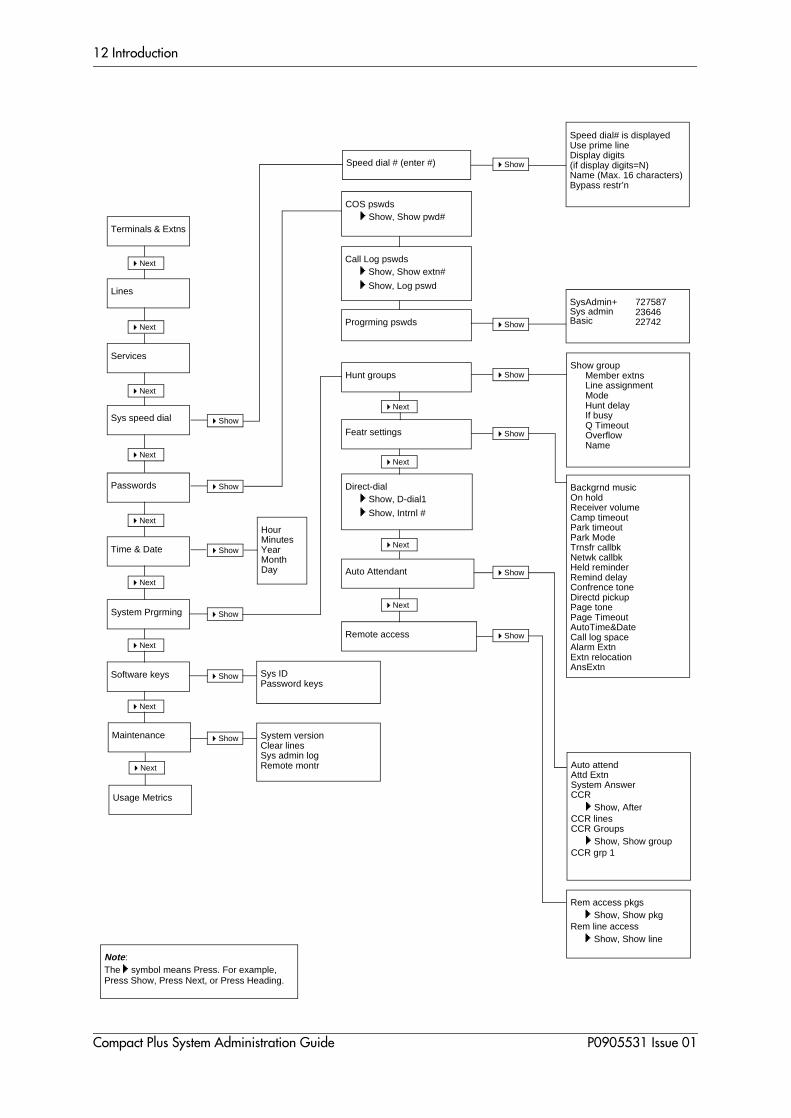
Map of Administrator Plus programming
The programming map on the following pages shows the headings, sub-headings, and settings that you can view whenaccess the programming menus after pressingÄ¥¥ÛßßÜÝÝ (CONFIG) and entering the Administrator Plus password àÛàÞ¡à.
Compact Plus System Administration Guide P0905531 Issue 01

Introduction 11
Programming map (Administrator Plus)
Enter extension then
or
to go through a list of telephones.
Enter line number or
to go through a list ofthe lines.
These Headingscontinue on next page.
Show extn#
Ringing groupsSched:Night Sched:Evening Sched:Lunch Sched:Sched 4Sched:Sched 5Sched:Sched 6
Show line
Terminals & Extns
Lines
Services
Sys speed dial
Passwords
Time & Date
System Prgrming
Line access
Capabilities
Name
User Prefernces
Restrictions
Call Services
Name
Ringing service
Routing service
Restrn service
Line assignmentö Show, Show line
Line Pool accessö Show, Line Pool A
ö Show, Line Pool B
ö Show, Line Pool CPrime lineIntercom keysAnswer extns
ö Show, Show extn#
ö Show, 221OLI #
Fwd no answerö Show, Fwd to
Fwd on busyö Show, Fwd to
DND on busyHandsfreeHF on answerbackPickup grpPage zonePagingD-DialPriority callHotlineAux. ringerRedirect ringReceive tonesATA settings
ö Show, ATA ans timerATA modeATA tonesATA use
ModelKey PrgrmingUser speed dialCall log opt’nsDialing opt’nsLanguageDisplay cntrstRing type
Restrn filtersö Show, Show filter
Extn restrnsFiltersExtn LockAllow last noAllow saved noAllow recallAllow redirect
Line/extn rstrnö Show, Show line
Auto call infoö Show, Show line
1stDisplayAuto called IDLog space
Sched:Night Sched:Evening Sched:Lunch Sched:Sched 4Sched:Sched 5Sched:Sched 6
RoutesDest codesSched:Night Sched:Evening Sched:Lunch Sched:Sched 4Sched:Sched 5Sched:Sched 6
Note :The ö symbol means Press. For example,Press Show, Press Next, or Press Heading.
ö Showö Next
ö Show
ö Show
ö Next
ö Next
ö Next
ö Next
ö Next
ö Next
ö Show
ö Show
ö Show
ö Show
ö ShowMaintenance
Software keys
ö Next
ö Next
ö Next
ö Next
ö Next
ö Next
ö Next
ö Next
ö Show
ö Next
Restrictions
ö Next
ö Next
Restrn filtersLine restrnsRemote restrns
ö Show
Control extnsSchedule namesSchedule times
ö Next
Common settings
ö Show
ö Show
ö Show
ö Show
ö Show
Usage Metrics
ö Next
P0905531 Issue 01 Compact Plus System Administration Guide
12 Introduction
Auto attendAttd ExtnSystem AnswerCCR
ö Show, AfterCCR linesCCR Groups
ö Show, Show groupCCR grp 1
Speed dial # (enter #)
Call Log pswdsö Show, Show extn#
ö Show, Log pswd
Progrming pswds
Featr settings
Direct-dialö Show, D-dial1
ö Show, Intrnl #
Auto Attendant
Remote access
Speed dial# is displayedUse prime lineDisplay digits(if display digits=N)Name (Max. 16 characters)Bypass restr’n
Backgrnd musicOn holdReceiver volumeCamp timeoutPark timeoutPark ModeTrnsfr callbkNetwk callbkHeld reminderRemind delayConfrence toneDirectd pickupPage tonePage TimeoutAutoTime&DateCall log spaceAlarm ExtnExtn relocationAnsExtn
Rem access pkgsö Show, Show pkg
Rem line accessö Show, Show line
Sys IDPassword keys
SysAdmin+ Sys admin Basic
7275872364622742
System versionClear linesSys admin logRemote montr
HourMinutesYearMonthDay
Terminals & Extns
Lines
Services
Sys speed dial
Passwords
Time & Date
System Prgrming
Maintenance
Software keys
ö Next
ö Next
ö Next
ö Next
ö Next
ö Next
ö Next
ö Next
Note :The ö symbol means Press. For example,Press Show, Press Next, or Press Heading.
ö Show
ö Show
ö Show
ö Show
ö Show
ö Show
Hunt groups
ö Show
ö Show
ö Show
ö Show
Show groupMember extnsLine assignmentModeHunt delayIf busyQ TimeoutOverflowName
COS pswdsö Show, Show pwd#
ö Show
ö Next
ö Next
ö Next
ö Next
ö Show
Usage Metrics
ö Next
Compact Plus System Administration Guide P0905531 Issue 01

SECTION II: System programming
P0905531 Issue 01 Compact Plus System Administration Guide

14
Compact Plus System Administration Guide P0905531 Issue 01

System programming introduction
� Conventions used in this guide.........16
� Programming overview.........16
� Using passwords.........22
� Programmable settings and features.........24
� Making suggestions.........30
� Advice Line.........30
P0905531 Issue 01 Compact Plus System Administration Guide
16 System programming introduction
ss.
ault
w
Conventions used in this guide
This section describes the programming choices available toassist you in designing a system that is efficient for your busineWhen you see a numbered symbol, Ú, it represents the numberson the telephone keypad. A lettered symbol, �, represents the letters on the telephone keypad. ª represents a telephonekey. Keys shown like this, Ä, are found on the Norstartelephones. Four keys, Ð, , Ò, and Ô, are labelled on the programming overlay and represent the temporary use of keys during programming.
A word shown like this, OK, represents the display key directly below that word on the display of M7310N and M7324N telephones.
All default settings appear in bold in the procedures. For example, if the default setting is none, it appears as None.
Programming overview
Use programming to change default settings as required. Defsettings for the PBX template are shown in bold in the programming map on page 18.
Headings and sub-headings in programming help you to knowhere you are.
Programming has the following main headings:
Each main heading has sub-headings within it. For example,Terminals&Extns has six sub-headings: Line access, Capabilities, Name, User preferences, Restrictions, and Callservices.
Terminals&Extns Assign settings to each extension.
Lines Assign settings to each internal, external, and DIA line.
Services Create services such as night ringing, routing, and restrictions for making external calls.
Sys speed dial Create Speed Dial codes that can be used by any extension in the system.
Passwords View and change passwords for programming and features.
Time&Date Set the time and date on the system clock.
System prgming Change system-wide settings, Auto Attendant, and custom call routing programming.
Call services Assign settings for external voice message services.
Software Keys Upgrade a restricted Feature Cartridge or activate the Remote Administration feature using key codes.
Maintenance View diagnostic information about the system.
Usage Metrics View statistical information about Hunt group calls.
Compact Plus System Administration Guide P0905531 Issue 01
System programming introduction 17
me l
to ou the
the
ally to
tor
Using the System Administrator Plus password, you programsettings for the entire system as well as settings for individuaextensions.
The first three steps of each procedure are provided to get toTerminals&Extns on the telephone display and can be used programme any individual item at any time. However, when yare programming the whole system, once you have completedfirst programming item, it is not necessary to start at step 1 ofnext procedure unless you leave programming. Just press Ô to move to the next item in the programming sequence.
While you are programming the system, the display occasionshows Update. You can press the display key below the word see what programming changes the system is undergoing.
Any procedure that specifies using the Administrator (ADMIN ) password can also be accessed using the System AdministraPlus (SAPLUS) password.
Programming affects system operation.
Only a qualified installer or sales support officer should perform start-up, installation, and maintenance programming. Some of the settings affect the correct operation of the system.
P0905531 Issue 01 Compact Plus System Administration Guide
18 System programming introduction
Programming MapStartup
Template: PBX, Square, Hybrid
Start Extension: 221
Terminals & ExtnsShow extn#:_
Line access
Line assignment
Show line:_
(Non-DIA line)
L001: Ring only, Appr&Ring , Appr only, Unassigned
(DIA line)
L101: Ring only, Appr&Ring , Appr only, UnassignedAppearances:1
LinePool access
Line Pool A: Y, Line Pool B: N, Line Pool C: Y
Prime line: None, PoolA, Pool C, Intcm
Intercom keys: 2 (0 to 8)
Answer extns
Show extn#:_
221: Unassigned , Appr&Ring, Appr only
OLI #: Extn #
Capabilities
Fwd no answer
Fwd to: None
Forward delay: 2, 3, 4, 6, 10
Fwd on busy
Fwd to: None
DND on busy: 221: N, Others: Y
Handsfree: None , Auto, Std
HF answerback: Y
Pickup grp: None , 1, 2, 3, 4
Page zone: None, 1, 2, 3
Paging: Y
D-Dial: None, Extn1
Priority call: N
Hotline: None , Intrnl, Extrnl
(if Extrnl) Use prime line , Use line, Pool code, Use routing tabl
Aux. ringer: N
Redirect ring: Y
Receive tones: N
ATA settings
ATA ans timer: 3, 5, 7, 10
(If DN is the I-ATA) Use ringback
ATA mode: Tone , Pulse
ATA tones: N
ATA use: On site, Off site
Name: 221
User prefernces
Model: M7208, M7310, M7324, M7100
Key prgrming
(If M7000) 1 key
(If M7100N) 1 key
(If M7208N) 8 keys
(If M7310N) 10 +24 keys
(If M7324N) 24 keys
User speed dial
Call log opt’ns: No one answered , Unanswerd by me, Log all calls, No auto logging
Dialling opt’ns: Automatic dial , Predial, Standard dial
Language: English , Opratng
Display cntrst: 1, 2, 3, 4, 5, 6, 7, 8, 9
Ring type: 1, 2, 3, 4
Restrictions (extns)
Restrn filters (00-99)
Show filter:_
Restrn flt: 00
No restrictions
Restrn flt 01:
Restrn 01:
Deny: 0
Override 001: 0800
Restrn 02:
Deny: 1
Override 001: No overrides
Restrn flt: 05
Restrn 01: 010
Compact Plus System Administration Guide
Deny: 010
No overrides
Restrn 02: 1
Deny: 1
No overrides
Restrn 03: 00
Deny: 00
No overrides
Restrn flt: 06
Restrn 01: <ANY>
Deny: <ANY>
No overrides
Extn restrns
Filters
Normal: 02
Night: 11
Evening: 12
Lunch: 13
Sched 4: 00
Sched 5: 00
Sched 6: 00
Extn lock: None , Partial, Full
Allow last no: Y
Allow saved no: Y
Allow link: Y
Allow redirect: N
Line/extn rstrns
Show line:_
Normal: None
Night: None
Evening: None
Lunch: None
Sched 4: None
Sched 5: None
Sched 6: None
Call Services
Auto call info
Show line:_
Caller ID set: N (Default for DIA: Y)
Call log set: N (Default for DIA: Y)
1stDisplay: Numbr , Line
Auto called ID:N
Log space
Log 0 Pool 250
LinesShow line:
Line data
(BRI lines) 1-8, 31-38
TrunkType: BRI
Line type: PoolA, PoolB, PoolC, Public , Private to:
PrimeExtn: 221
Auto privacy: Y
Ans mode: Auto, Manual (if Ans mode: Auto) Ans with DISA: N
Aux. ringer: N
Full AutoHold: N
(Exchange lines) 1-4, 31-34 analogue
Line type: PoolA, PoolB, PoolC, Public , Private to:
Dial mode: Tone , Pulse
Prime extn: 221
Auto privacy: Y
Mode: EarthCallng , LoopGuarded, LoopUnguard
(if Mode: LoopUnguard) Recall: Timed brk , Earth500, Earth1000, Earth1500
Aux. ringer: N
Recall time: Time Brk
Recall at EXCH: N
Dial Tone: Detect , Delay
(if Mode: Earth Calling or loop unguarded) Ans mode: Auto, Manual (if Ans mode: Auto) Ans with DISA: N
Full AutoHold: N
(AC15A private circuits) 61-62
TrunkType: AC15
Line type: PoolA, PoolB, PoolC, Public , Private to:
Dial mode: Tone , Pulse
PrimeExtn: 221
Auto privacy: Y
Ans mode: Auto, Manual (if Ans mode: Auto) Ans with DISA: N
Amplified AC15: Y
Vol. setting: 1, 2, 3
P0905531 Issue 01
System programming introduction 19
Aux. ringer: N
Recall at EXCH: N
Full AutoHold: N
(Direct Inward Access lines) 101-140
DIA line
Line type:Public , Private to:
Received numbrs
Private#: (defaults to extn # ) (1 to 7 digits)
Public#: (defaults to extn # ) (1 to 7 digits)
If busy: BusyTone , To prime
PrimeExtn: 221
Aux. ringer: N
Name: Line001
Restrictions (lines)
Restrn filters (00-99)
Show filter:_
Restrn flt 00
No restrictions
Restrn flt 01
Restrn 01:
Deny: 0
Override 001:0800
Restrn 02:
Deny: 1
Override 001: No overrides
Restrn flt: 05
Restrn 01:
Deny: 010
Override 001: No overrides
Restrn 02:
Deny: 1
Override 001: No overrides
Restrn 03:
Deny: 00
Override 001: No overrides
Restrn flt: 06
Restrn 01:
Deny: <ANY>
Override 001: No overrides
Line restrns
Normal: 03
Night: 21
Evening: 22
Lunch: 23
Sched 4: 00
Sched 5: 00
Sched 6: 00
Remote restrns
Normal: 04
Night: 31
Evening: 32
Lunch: 33
Sched 4: 00
Sched 5: 00
Sched 6: 00
ServicesRinging service
Ringing groups (01-20)
Show group:_
Ring grp: 01
Show extension:_
221: Assigned , all others: Unassign
Sched:Night
Service: Manual , Auto, Off
Trunk answer: Y
ExtraDial: 221
Line settings
Show line:_
Ring grp: 0 (0 to 20)
Aux. ringer: Y
Sched: Evening
Sched: Lunch
Sched: Sched 4
Sched: Sched 5
Sched: Sched 6
P0905531 Issue 01
Restrn service
Sched: Night
Service: Manual, Auto, Off
Sched: Evening
Sched: Lunch
Sched: Sched 4
Sched: Sched 5
Sched: Sched 6
Routing service
Routes (000-200)
Show route:_
DialOut: No numbr (Max.24 digits)
Use: Pool A , Pool B, PoolC
Dest codes
Show DstCode:_
Normal: 000
AbsorbLength: All
Night: None
Evening: None
Lunch: None
Sched 4: None
Sched 5: None
Sched 6: None
Sched: Night
Service: Manual, Auto, Off
Overflow: N
Sched: Evening
Sched: Lunch
Sched: Sched 4
Sched: Sched 5
Sched: Sched 6
Common settings
Control extns
For lines
Show line:_
L001: 221
For extns
Show extn#:_
221: 221
Schedule names
Sched 1: Night
Sched 2: Evening
Sched 3: Lunch
Sched 4: Sched 4
Sched 5: Sched 5
Sched 6: Sched 6
Schedule times
Monday
Sched: Night
Start time: 23:00
Stop time: 07:00
Sched:Evening
Sched: Lunch
Sched: Sched 4
Sched: Sched 5
Sched: Sched 6
Tuesday
Wednesday
Thursday
Friday
Saturday
Sunday
Sys speed dialSpeed dial #: (Max. 24 digits)
Use prime line , Use line, Pool code, Use routing tabl
Display digits: Y
(if Display digits=N) Name: Max. 16 characters
Bypass restr'n: N
PasswordsCOS pswds
Show pswd #:_ (00-99)
COS pswd # 00
Pswd 00: None
User flt: None (00 to 99)
Compact Plus System Administration Guide
20 System programming introduction
Line flt: None (00 to 99)
Remote pkg: None (00 to 15)
Call log pswds
Show extn#:_
Log pswd: None
Progrming pswds
Installer: 266344 (CONFIG)
SysAdmin+: 727587 (SAPLUS)
Sys admin: 23646 (ADMIN)
Basic: 22742 (BASIC)
IRAD pswd : SysID (displayed after initial setting is done through RACE)
Hospitality
Desk pswd: 4677
(HOSP)
Cond: None
Time&DateHour: 01
Minutes: 00
Year: 99
Month: 01
Day: 01
System prgrmingHunt Groups
Show grp:_
HGn:<DN>
Members
01:<extn>...
Appr only, Appr&Ring , Ring only
Line assignment
Show line:_
Lnnn: Unassigned , Assigned
Mode: Sequential , Cyclic, Broadcast
Hunt delay: 1, 2, 3, 4, 5, 6, 7, 8, 9, 10
If busy: busyTone , overflow, queue
Q Timeout: 15, 30, 45, 60, 120, 180
Overflow: <extn>
Name: HGn,_<7 characters>
Change extns
Old extn:_ (Max. 7 digits)
NEW extn:_ (Max. 7 digits)
Featr settings
Backgrnd music: N
On hold: Tones , Music, Silence
Receiver volume: Use sys volume , Use extn volume
Camp timeout: 30, 45, 60, 90, 120, 150, 180
Park timeout: 30, 45, 60, 90, 120, 150, 180, 300, 600
Park Mode: Lowest , Cycle
Trnsfr callbk: 3, 4, 5, 6, 12
Network callbk: 15, 30, 45, 60, 90, 120
DRT to prime: Y
DRT delay: 1, 2, 3, 4, 6
EX-EX Trf/Conf: Y
Held reminder: Y
Remind delay: 30, 60, 90, 120, 150, 180
Confrence tone: Y
Directd pickup: Y
Page tone: Y
PageTimeout: 15, 30, 60, 120, 180, 300, 600, 2700
AutoTime&Date: Y
Call log space
Reset all logs?
Host delay: 1000 (1000 to 7000 in 500 ms increments)
AlarmExtn: 221
Extn relocation: N
Exch ring: Preset , Echo
PCct delay: 200, 800, 1600
Ans.Extn: Basic , Enhanced, extended
Direct-dial
D-Dial 1: Intrnl , Extrnl, None
Intrnl#: 221, Extrnl#: None
CAP assignment
CAP1: None
Access codes
Line pool codes
Line pool A: 9, Line pool B & C: None
Park prefix: 1
Exch code: 9
Direct-Dial: 0
Compact Plus System Administration Guide
Auto #: None
DISA #: None
Auto Attendant
Auto attend: Off , On
Attd extn: 221
System Answer
After: 3 rings (2 to 12)
CCR
After: 3 rings (2 to 12)
CCR lines
L001: Answer: No, Yes
CCR groups
Show group:_
CCR grp 1
Show DN:_
221: Unassgnd , Assigned
Remote access
Rem access pkgs (00 to 15)
Show pkg:_
LinePool access
Pool A: (9) N
Remote page: N
Remote admin: N
Remote monitor: N
Rem line access
Show line:_
L001: Rem pkg: 00
IRAD
Answer line: None
After: 5 ring (1 to 12)
Rec’d # lengths
Private length: 3 (1-7)
Public length: 3 (1-7)
Extn # length: 3
Intrl modem: Fast , Slow
Alarm reporting
Auto-report: Off , On
Phone #1: None
Phone #2: None
Use line: None
Retry time: 15
Num. retries: 5 (0 to 9)
Hospitality
Room / desk info
Show extn:__
Room #:_
Adm pwd req�d: Y
Call restrns
Vacant: 00
Use fit:
Basic: 00
Mid: 00
Full: 00
Service time
Hour: 00
Minutes: 00
Alarm
Attn attempts: 3
Retry intrvl: 4
Attn duration: 15
Time format: 12hr, 24hr
Expired Alarms
Notify extn: None
Use tone: N
Software KeysSysID (8 digits)
Password keys
Key 1 (8 digits)
Key 2 (8 digits)
Key 3 (8 digits)
HardwareCd1 - CCU: BRI-4, BRI-2, Loop
Cd2 - CCU: BRI-4, BRI-2, Loop
(if BRI card)
Loops: (Cd1 loops 201-204), (Cd2 loops 231-234)
Type: S, T
(If Type T) press ¦ to view Lines on loop(If Type T) Protocol: EURO, BTNR191
P0905531 Issue 01

System programming introduction 21
(If Type S) Sampling: Adaptve , Fixed
Extns on Loop
Assign Extns (273-304)
Show extn#:_
304: Availabl
Loop extn#: None
Cd2 - CCU: Loop
MaintenanceSystem version
Clear lines
Port/Extn status
Module status
Sys test log
Sys admin log
Provisioning
Tests
Remote montr: Off , On
Diagnostic tools *
Usage MetricsHunt groups
Show group:_
HG <n> metrics
P0905531 Issue 01 Compact Plus System Administration Guide
22 System programming introduction
in
re s.
if CE)
Using passwords
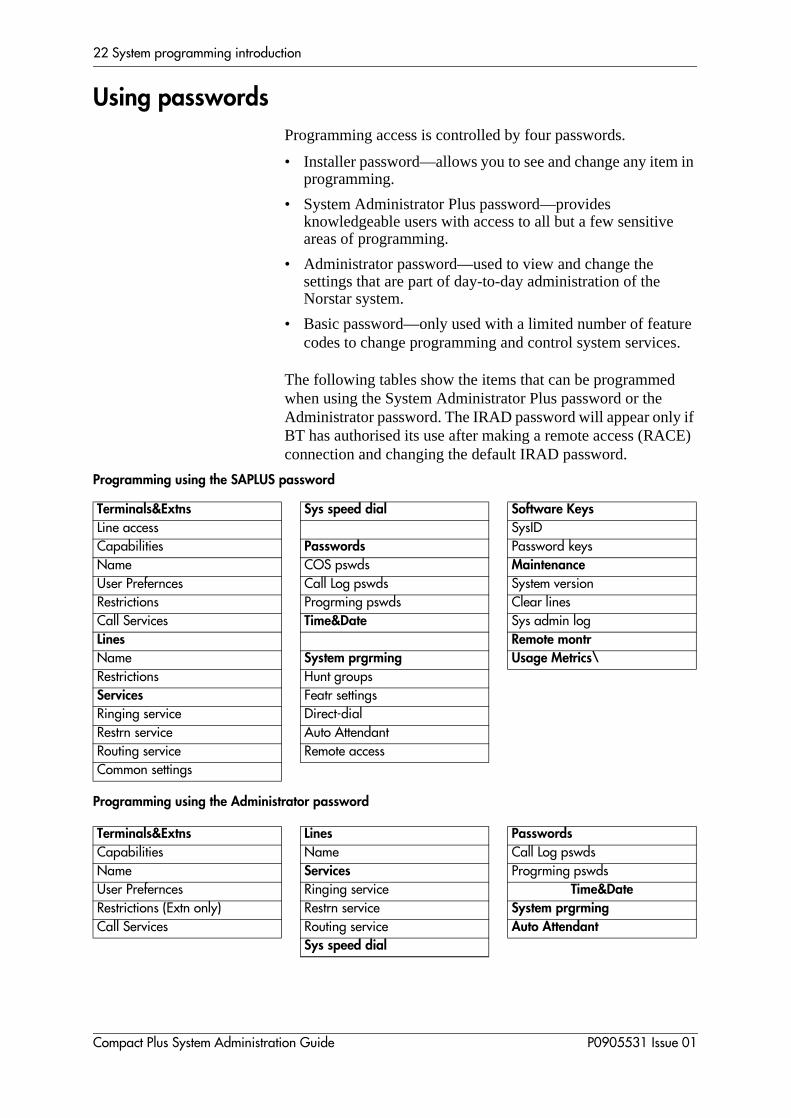
Programming access is controlled by four passwords.
• Installer password—allows you to see and change any itemprogramming.
• System Administrator Plus password—provides knowledgeable users with access to all but a few sensitiveareas of programming.
• Administrator password—used to view and change the settings that are part of day-to-day administration of the Norstar system.
• Basic password—only used with a limited number of featucodes to change programming and control system service
The following tables show the items that can be programmedwhen using the System Administrator Plus password or the Administrator password. The IRAD password will appear onlyBT has authorised its use after making a remote access (RAconnection and changing the default IRAD password.
Programming using the SAPLUS password
Programming using the Administrator password
Terminals&Extns Sys speed dial Software Keys
Line access SysIDCapabilities Passwords Password keysName COS pswds Maintenance
User Prefernces Call Log pswds System versionRestrictions Progrming pswds Clear linesCall Services Time&Date Sys admin logLines Remote montrName System prgrming Usage Metrics\
Restrictions Hunt groupsServices Featr settingsRinging service Direct-dialRestrn service Auto AttendantRouting service Remote accessCommon settings
Terminals&Extns Lines Passwords
Capabilities Name Call Log pswdsName Services Progrming pswdsUser Prefernces Ringing service Time&Date
Restrictions (Extn only) Restrn service System prgrming
Call Services Routing service Auto AttendantSys speed dial
Compact Plus System Administration Guide P0905531 Issue 01
System programming introduction 23
tor a tly. the
y
e of
t to
Entering programming using the SAPLUS password
The staff person who is in charge of making changes to the Compact Plus system is called the system administrator.
The System Administrator Plus password lets the administraaccess all the settings for Administration programming, plus few installer settings that may have to be changed infrequenAll procedures in this guide indicate whether you need to useSystem Administrator Plus or the Administrator password.
The default System Administrator Plus password is àÛàÞ¡à, which spells SAPLUS on the keypad.
1. Press Ä¥¥ÛßßÜÝÝ (CONFIG).The display shows Password :.
2. Enter àÛàÞ¡à (SAPLUS). The display shows Terminals&Extns. Three triangular indicators ¼ appear on the vertical display between the rows of keys.
3. Place the programming overlay over the keys pointed to bthe indicators ¼.
Entering programming using the Administrator password
The Administrator password is your key to Administration programming. Most of the programming in this guide can be entered with the Administrator password.
The default Administrator password is ÛÜßÝß, which spells ADMIN on the telephone keypad.
Entering programming using the Basic password
The Basic password allows you to do day-to-day maintenancindividual telephones without allowing access to sensitive programming.
The default Basic password is ÛÛàÝÛ, which spells BASIC on the telephone keypad.
You do not enter Basic programming using ÛßßÜÝÝ (CONFIG). Instead, you enter the Feature code that you wanprogram, followed by ÛÛàÝÛ (BASIC). For example:
1. Press Ä¥¥, followed by the code.
2. Enter ÛÛàÝÛ (BASIC).
3. Follow the instructions on the display and make your selections using the display keys.
P0905531 Issue 01 Compact Plus System Administration Guide

24 System programming introduction
s,
not n be ns
her side
act r to
a ou
.
en that
The following feature codes can be accessed using the Basicpassword:
• Ä¥¥¡àÜà (USER)—User preferences settings allow you to programme telephone model, key assignment, User speed dial, Call log options, Dialling options, Language, Display contrast, and Ring type.
• Ä¥¥¡ÝßÜ (TIME)—Time and Date settings let you change any of the settings for hour, minuteseconds, year, month, and day.
Programmable settings and features
Compact Plus has several features for ensuring that calls dogo unanswered or do not get lost. For example, extensions caprogrammed to provide back-up answering for other extensioor lines. You can also create an attendant position to provideanswering for a group of extensions.
You can forward calls that are unanswered, pick up calls for otextensions, redirect selected lines to telephones inside or outyour business, and have calls answered from any extension during non-business or off-peak hours.
Many call capture features are pre-configured with your CompPlus system. Others, however, must be programmed in ordetake full advantage of their flexibility. The following programming settings are used to enhance answering and handling calls:.
Do Not Disturb (DND) on Busy
When this setting is turned on, you do not hear any ringing ifsecond call arrives while you are talking on the telephone. If ywant to know when a second call arrives, turn this setting off
For example, Mr. Forbes dislikes having his telephone ring whhe is on a call. Therefore, he uses the DND on Busy feature so
Do Not Disturb (DND) on busy Answer extension
Forward on Busy Call Forward all calls
Forward No Answer Call Pickup Directed
Hunt groups Call Pickup Group
Pickup Group Callback
Prime extension Call Queuing
Prime line Do Not Disturb (DND)
Redirect Ring Line redirection
Trunk Answer Transfer
Compact Plus System Administration Guide P0905531 Issue 01

System programming introduction 25
as n
n n
ey m-alls
rd
re e
ey o is
Mr.
rd
gle asily
lls and
o
additional calls are diverted to the Prime extension until he hfinished his current call. If your telephone is a Prime extensiofor any line, do not use the DND on Busy feature.
If an extension is a member of a hunt group and the extensioactivates this feature, the extension will not receive notificatioof incoming hunt group calls while on a call.
See "Programming Do Not Disturb on Busy" on page 94.
Forward on Busy
When you already have a call, ensure that other calls to yourextension are answered. Forward the additional calls to an extension that you know will be monitored.
For example, Miss Vale works with Mr. Cassidy as a team. Thanswer each other’s calls. Forward on Busy is set for the teamate’s extension. When Mr. Cassidy is busy on a call, other cto his extension are forwarded immediately to Miss Vale.
If your extension is a member of a hunt group, the Call Forwaon Busy setting is overridden by the hunt group routing.
See "Setting Call Forward no answer" on page 92.
Forward No Answer
When you are away from your telephone, ensure that calls aanswered by forwarding to an extension that you know will bmonitored.
For example, Miss Vale works with Mr. Cassidy as a team. Thmake sure that one of them is always in the office. Forward NAnswer is set for the team-mate’s extension. When Miss Valeaway from her telephone, calls are forwarded immediately to Cassidy.
If your extension is a member of a hunt group, the Call ForwaNo Answer setting is overridden by the hunt group routing.
See "Setting Call Forward no answer" on page 92.
Hunt groupsEstablish hunt groups in your system to allow external and internal callers to reach a group of extensions by calling a sindirectory number. The hunt groups feature ensures calls are erouted to the appropriate people. You can programme the members for a group, member position within a group, how caare distributed, how long is spent looking for available agents what happens if all agents are busy.
For example, your company has five sales people available tfield calls from clients. Bob is your most experienced sales person and you would like him to receive incoming calls first.
P0905531 Issue 01 Compact Plus System Administration Guide

26 System programming introduction
the s
all calls
p ith
a kup
1 as ller
calls
e
se e
the
le that and
n in
You would set up a Hunt Group with these five extensions asmembers, programme Bob’s extension as the first member ingroup, set the distribution mode to sequential so Bob receiveincoming calls first, and name this group SALES.
See "Programming Hunt groups" on page 111.
Pickup group
Assign extensions to one of nine Pickup groups for maximum ccoverage. This ensures that extensions in a group can answerfor any other extension in that group.
For example, Mr. Forbes and Ms. Smith both belong to Pickugroup 3. When Mr. Forbes is away from his extension, Ms. Smpresses ÄàÞ on her own extension to answer Mr. Forbes’ calls.
A hunt group call ringing at an extension that is a member ofhunt group can be picked up by any extension in that Call PicGroup.
See "Assigning a Pickup group" on page 97.
Prime extensionThe Compact Plus system automatically assigns extension 22the Prime extension for each exchange line. Your system instacan change the extension number in Lines programming. The Prime extension can be programmed to receive unanswered through Delayed Ring Transfer, Held Line Reminders and DoNot Disturb transfers.
In a busy office, the receptionist or secretary extension may bdesignated as the Prime extension.
Prime line for an extensionA line can be assigned to a telephone as its primary line to uwhen making an outgoing call. This feature saves the user timbecause the system automatically selects the line rather thanuser having to select the line.
See "Assigning a Prime line to an extension" on page 34.
Redirect ring
When this feature is turned on, the telephone gives an audibsignal whenever a call has been redirected. This reminds youa line has been redirected using the Line redirection feature serves as a cue to turn the feature off.
For example, you have re-directed line 1 to another extensiothe network. If Redirect ring is on, you hear a short ring everytime a call on line 1 is forwarded to the other telephone.
See "Activating Redirect ring" on page 101.
Compact Plus System Administration Guide P0905531 Issue 01

System programming introduction 27
ans an r line
1:00 is s as
n ale
n’s
r a
the is
to
rd
m
Trunk answer
This feature is active by default for all Service modes. This methat during non-business or non-busy times, any extension canswer calls ringing at any other extension. It does not mattewhich lines appear on the extensions. It only matters that the itself has been placed in a Service mode using its Control extension.
For example, during the lunch break between 11:30 a.m. and p.m., lines 1, 2, and 3 are put in Lunch mode. Trunk answer active, so whenever any extension rings, Mr. Cassidy, who acta temporary attendant, can answer from his extension.
See "Using alternate or scheduled services" on page 146.
Answer extension
If your telephone has an Answer key for someone else’s extension, you can answer that other person’s calls on your telephone.
For example, Mr. Cassidy’s telephone has an Answer key forMiss Vale. When Miss Vale’s telephone rings, Mr. Cassidy caanswer it on his telephone by pressing the Answer key. Miss Vhas been assigned as an Answer extension on Mr. Cassidy’stelephone.
Simply press the Answer key when you hear the other persotelephone ringing.
See "Answer keys" on page 222.
Call Forward all calls
If you know you are going to be away from your telephone fowhile, forward your calls to another extension. Otherwise thecallers must wait for the Forward No Answer feature to automatically transfer the call after several rings.
For example, Mr. Forbes knows that most client calls arrive in morning, but he will be in meetings until noon. He forwards hextension to Ms. Smith, who can deal with issues right away.
Press ÄÝ, then the extension number that you wish send the calls to.
If your extension is a member of a hunt group, the Call Forwaall calls setting is overridden by the hunt group routing.
See "Forwarding all calls" on page 250.
Call Pickup Directed
If any telephone is ringing in your office, you can answer it froyour extension.
P0905531 Issue 01 Compact Plus System Administration Guide
28 System programming introduction
the
e
21.
alls
p ith
21.
n
and s
rn
ing t
by
ice.
For example, only a few people are in the office early in the morning. When Miss Vale’s telephone rings, Mr. Forbes takes call using Call Pickup Directed.
Press Äàß, then dial the extension of the telephonthat is ringing.
See "Answering a telephone using Pickup Group" on page 2
Call Pickup Group
If your telephone is part of a Pickup Group, you can answer cringing on any telephone in the same group.
For example, Mr. Forbes and Ms. Smith both belong to PickuGroup 3. When Mr. Forbes is away from his telephone, Ms. Smuses the Call Pickup Group feature on her own extension to answer Mr. Forbes’ calls.
Press ÄàÞ.
See "Answering a telephone using Pickup Group" on page 2
Call Queuing
When more than one call is ringing at your telephone, you caensure you answer the calls in the order they arrive.
For example, Mr. Cassidy notices that he has calls on Line 3 on line 4. He does not know which call arrived first, so he useCall Queuing to answer.
Press Ä¡âÚ.
See "Answering the next queued call" on page 218.
Do Not Disturb
If you do not want to be interrupted by any telephone calls, tuon the Do Not Disturb feature so that calls are immediately transferred to the Prime extension.
For example, Mr. Moore is having a performance review meetwith the president of the company. Mr. Moore turns on Do NoDisturb before the meeting so that all calls are routed to the attendant.
Press Ä¡Þ.
A hunt group extension can temporarily leave the hunt groupactivating this feature.
See "Do Not Disturb" on page 214.
Line redirection
You can use the Line redirection feature to redirect the calls coming in on your external lines to a telephone outside the off
Compact Plus System Administration Guide P0905531 Issue 01

System programming introduction 29
d es
e n o a n
.
n is u to
gain iss
ll
ne tter Ms.
You can redirect exchange lines to AC15A private circuits, anyou can redirect AC15A private circuits to either exchange linor private circuits, and you can redirect one exchange line toanother.
You may choose to redirect all your external lines or only somof them. For example, you generally receive personal calls oLine 1 and customer calls on Line 2. You can redirect Line 2 tcolleague when you are busy, but still accept personal calls oline 1.
Press Ä¡Ý, then follow the prompts on your display
See "Line redirection" on page 252.
Ring Again
You can have the Norstar system notify you when an extensioeither not busy or has just been used. This feature enables yoreach the person on that extension.
For example, Miss Vale has an urgent request for Mr. Moore.When she dials his extension, it is busy. She uses the Ring Afeature to monitor the line. As soon as Mr. Moore hangs up, MVale’s telephone rings to let her know that she can try her caagain.
Dial the extension number, press ÄÛ, then hang up.
See "Using Ring Again" on page 260.
Transfer
If you are an attendant, or if a call should be routed to someoelse, you can do it easily with Compact Plus. For example, aclient calls Mr. Forbes. Mr. Forbes realises that it would be befor the client to speak to Ms. Smith, so he transfers the call to Smith’s extension. When Ms. Smith answers, Mr. Forbes explains the situation briefly and then hangs up. The client remains on the line with Ms. Smith.
Press Äàâ, dial the number, then hang up.
See "Transferring a call" on page 233.
P0905531 Issue 01 Compact Plus System Administration Guide

30 System programming introduction
ate
Making suggestions
Please submit your comments and suggestions to
British TelecommunicationsNorstar Product Manager Weston House 246 High HolbornLondon WC1V 7DQU.K.
Advice Line
If you have difficulty programming or using a system feature,refer to the description of the feature, and follow the appropriprocedures. If you still have difficulty, call the Advice Line at 0800 378822.
Compact Plus System Administration Guide P0905531 Issue 01
Programming Terminals and Extensions
� Terminals and extensions.........32
� Assigning a line to an extension (line access).........32
� Assigning line pool access.........34
� Assigning a Prime line to an extension.........34
� Assigning intercom keys to an extension.........35
� Assigning an Answer key to an extension.........36
� Setting the Originating Line Identification for an extension.........37
P0905531 Issue 01 Compact Plus System Administration Guide

32 Programming Terminals and Extensions
N
s.
one y
rd and
N
Terminals and extensionsTerminals&Extns lets you assign settings to each telephone.
1. Place the programming overlay on any M7310N or M7324telephone.
2. PressÄ¥¥ÛßßÜÝÝ (CONFIG). The display shows Password :.
3. Press àÛàÞ¡à (SAPLUS). The display shows Terminals&Extns.
4. Press . The display shows Show extn#:.
5. Enter the extension number of the telephone you want toprogramme. The display shows nnn:nnn (nnn represents thethree-digit extension number).
Assigning a line to an extension (line access)
Line access allows you to assign lines to individual extension
When you are finished programming line access settings for extension, you can copy those settings to other extensions busing COPY at the Line Access display. For more information about copying extension programming, see "Copying programming for telephones" on page 135.
Line AssignmentThis setting allows you to assign physical lines and Direct InwaAccess (DIA) lines to each extension. DIA lines are assigned removed in the same manner as other lines.
1. Place the programming overlay on any M7310N or M7324telephone.
2. PressÄ¥¥ÛßßÜÝÝ (CONFIG). The display shows Password :.
3. Press àÛàÞ¡à (SAPLUS). The display shows Terminals&Extns.
4. Press . The display shows Show extn#:.
5. Enter the extension number of the telephone you want toprogramme. The display shows nnn:nnn.
6. Press three times. The display shows Show line:.
7. Enter the line number. The display shows Lnnn:Unassigned.
8. Press SCAN to see the setting and then press SCAN again to view the lines assigned to this extension.
9. Press CHANGE to change the setting for each line: Appr&Ring , Appr only, Unassigned, or Ring only.
10. Press ̈ to exit or Ô to continue programming.
Compact Plus System Administration Guide P0905531 Issue 01

Programming Terminals and Extensions 33
for
a key
ra
nd
ise,
of a to alue
N
In general, exchange lines are not assigned to telephones. Ifassigned, they are used for monitoring incoming call usage ormaking outgoing calls.
You cannot assign a line that is private to another telephone.
Each line assigned to appear at a telephone must appear at with an indicator on that extension.
If you set a line to Ring only, incoming calls appear on an intercom key.
A Central Answering Position (CAPN) module can provide extline keys.
The M7100N telephone is an exception. It has no line keys acan be assigned any number of lines. Make sure that lines assigned to an M7100N telephone are assigned to ring; otherwyou cannot detect incoming calls on the lines.
Number of appearancesThis setting allows you to assign the number of appearancesDIA line (lines 101 to 140) allowed on an extension. In order programme the number of appearances, the line assignment vmust not be Unassigned. The default setting is 1.
1. Place the programming overlay on any M7310N or M7324telephone.
2. PressÄ¥¥ÛßßÜÝÝ (CONFIG). The display shows Password :.
3. Press àÛàÞ¡à (SAPLUS). The display shows Terminals&Extns.
4. Press . The display shows Show extn#:.
5. Enter the extension number of the telephone you want toprogramme. The display shows nnn:nnn.
6. Press three times. The display shows Show line:.
7. Press Ô. The display shows Lnnn: and the line’s assignment.
8. Press . The display shows Appearances:1. This prompt does not appear if the line is unassigned.
9. Press CHANGE and enter a numeric value from 1 to 255.
10. Press OK.
11. Press ̈ to exit or Ô to continue programming.
P0905531 Issue 01 Compact Plus System Administration Guide
34 Programming Terminals and Extensions
of
hree to ess
N
line
N
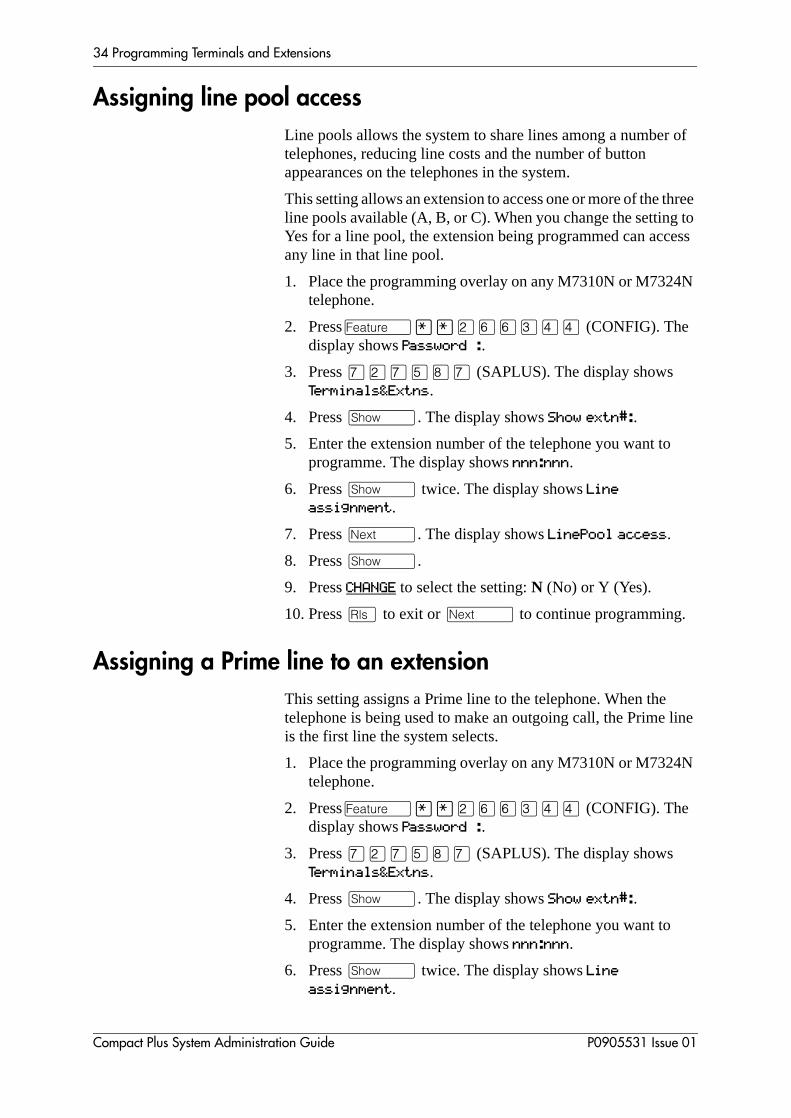
Assigning line pool access
Line pools allows the system to share lines among a numbertelephones, reducing line costs and the number of button appearances on the telephones in the system.
This setting allows an extension to access one or more of the tline pools available (A, B, or C). When you change the settingYes for a line pool, the extension being programmed can accany line in that line pool.
1. Place the programming overlay on any M7310N or M7324telephone.
2. PressÄ¥¥ÛßßÜÝÝ (CONFIG). The display shows Password :.
3. Press àÛàÞ¡à (SAPLUS). The display shows Terminals&Extns.
4. Press . The display shows Show extn#:.
5. Enter the extension number of the telephone you want toprogramme. The display shows nnn:nnn.
6. Press twice. The display shows Line
assignment.
7. Press Ô. The display shows LinePool access.
8. Press .
9. Press CHANGE to select the setting: N (No) or Y (Yes).
10. Press ̈ to exit or Ô to continue programming.
Assigning a Prime line to an extension
This setting assigns a Prime line to the telephone. When thetelephone is being used to make an outgoing call, the Prime is the first line the system selects.
1. Place the programming overlay on any M7310N or M7324telephone.
2. PressÄ¥¥ÛßßÜÝÝ (CONFIG). The display shows Password :.
3. Press àÛàÞ¡à (SAPLUS). The display shows Terminals&Extns.
4. Press . The display shows Show extn#:.
5. Enter the extension number of the telephone you want toprogramme. The display shows nnn:nnn.
6. Press twice. The display shows Line
assignment.
Compact Plus System Administration Guide P0905531 Issue 01

Programming Terminals and Extensions 35
of a
ess
ade
ion. in
al
N
7. Press Ô until the display shows Prime line:.
8. Press CHANGE to select the setting: None, Pool A, or Intcm (intercom). Only assigned lines and line pools appear.
9. Press ̈ to exit or Ô to continue programming.
An assigned Prime line is not associated with the assignmentPrime extension.
An exchange line must be assigned to the extension in Line assignment before it can be assigned as the Prime line to theextension.
A line pool must be assigned to the extension in line pool accbefore a line pool can be assigned as the Prime line to the extension.
By assigning a line pool as a Prime line, an extension can be mto search automatically for an idle line in a pool.
Note: If you set Prime line to Intcm (intercom), you can still access any line pools you have assigned to the extensWhen you enter the line pool access code, the systemsearches for an idle line in that pool. When all the linesthe pool are busy, the display shows No free lines. The system does not search from one pool to another.
Assigning intercom keys to an extension
Intercom keys can provide an extension with access to internlines and line pools.
1. Place the programming overlay on any M7310N or M7324telephone.
2. Press Ä¥¥ÛßßÜÝÝ (CONFIG). The display shows Password :.
3. Press àÛàÞ¡à (SAPLUS). The display shows Terminals&Extns.
4. Press . The display shows Show extn#:.
5. Enter the extension number of the telephone you want toprogramme. The display shows nnn:nnn.
6. Press twice. The display shows Line
assignment.
7. Press Ô until the display shows Intercom keys:.
8. Press CHANGE to select the setting: 0, 1, 2, 3, 4, 5, 6, 7, or 8.
9. Press ̈ to exit or Ô to continue programming.
P0905531 Issue 01 Compact Plus System Administration Guide

36 Programming Terminals and Extensions
lly and ed
nce
e alls.
t m
ys one.
ed at the rs.
N
n
d
Each intercom key assigned during programming automaticaappears on the extension. The keys start with the lower right-hkey, or one key above if the Handsfree/Mute feature is assignto the extension.
An extension needs two intercom keys to establish a conferecall with two other Norstar extensions.
Only one intercom key may be required if the key is only to bused to access line pools and to make and receive internal c
If an extension has several lines assigned only to ring and noappear, the arrangement works better if there are two intercokeys.
The M7100N telephone default assignment of two intercom kecannot be changed. These keys do not appear on the teleph
Assigning an Answer key to an extensionCalls for other Norstar telephones can appear and be answerthe extension being programmed. The extension numbers ofother telephones are referred to as Answer extension numbeYou can assign up to eight Answer extension numbers to thetelephone being programmed.
1. Place the programming overlay on any M7310N or M7324telephone.
2. PressÄ¥¥ÛßßÜÝÝ (CONFIG). The display shows Password :.
3. Press àÛàÞ¡à (SAPLUS). The display shows Terminals&Extns.
4. Press . The display shows Show extn#:.
5. Enter the extension number of the telephone you want toprogramme. The display shows nnn:nnn.
6. Press twice. The display shows Line
assignment.
7. Press Ô until the display shows Answer extns.
8. Press . The display shows Show extn#:.
9. Enter the extension number.
10. Press CHANGE to change the setting for the Answer extensionumber: Appr&Ring, Appr only, or Unassigned.
11. To assign additional Answer extension numbers, press Ð, , then enter the next Answer extension number.
12. Press SCAN to view the Answer extension numbers assigneto this extension.
Compact Plus System Administration Guide P0905531 Issue 01
Programming Terminals and Extensions 37
ing
me d
ted
er
n line the
if sure igits
nts OLI ved he
he ide r.
N
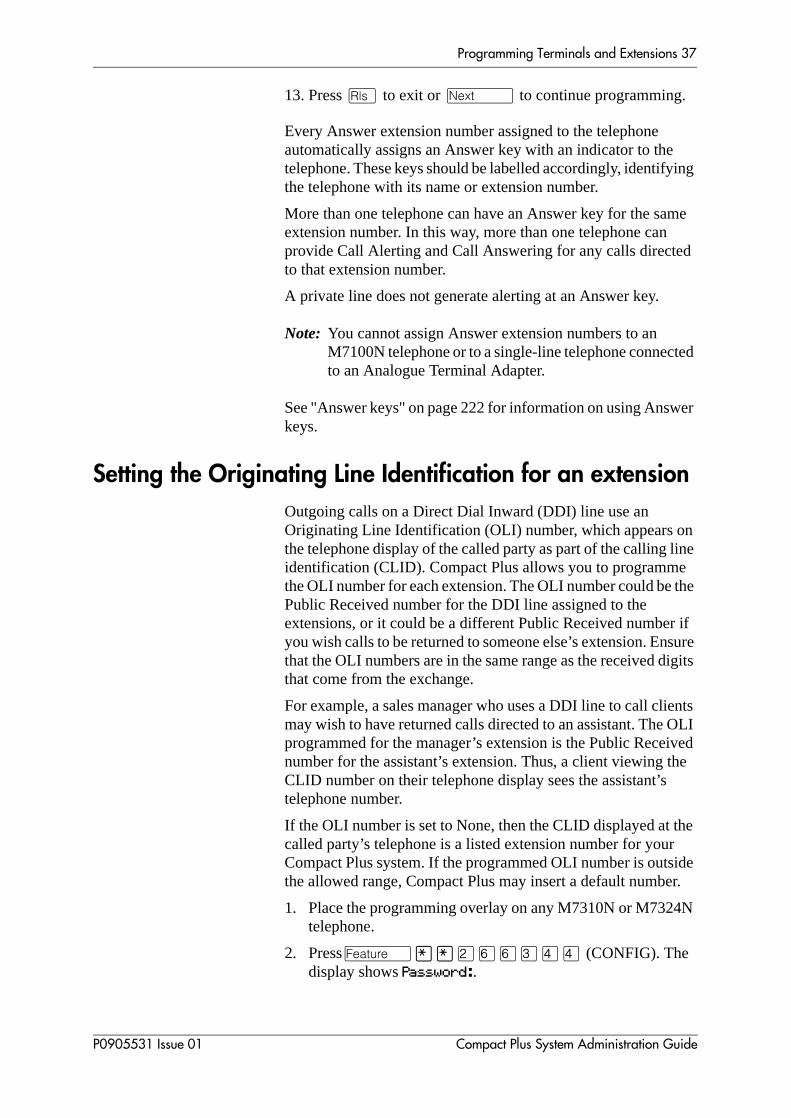
13. Press ̈ to exit or Ô to continue programming.
Every Answer extension number assigned to the telephone automatically assigns an Answer key with an indicator to thetelephone. These keys should be labelled accordingly, identifythe telephone with its name or extension number.
More than one telephone can have an Answer key for the saextension number. In this way, more than one telephone canprovide Call Alerting and Call Answering for any calls directeto that extension number.
A private line does not generate alerting at an Answer key.
Note: You cannot assign Answer extension numbers to an M7100N telephone or to a single-line telephone connecto an Analogue Terminal Adapter.
See "Answer keys" on page 222 for information on using Answkeys.
Setting the Originating Line Identification for an extension
Outgoing calls on a Direct Dial Inward (DDI) line use an Originating Line Identification (OLI) number, which appears othe telephone display of the called party as part of the calling identification (CLID). Compact Plus allows you to programmethe OLI number for each extension. The OLI number could be Public Received number for the DDI line assigned to the extensions, or it could be a different Public Received numberyou wish calls to be returned to someone else’s extension. Enthat the OLI numbers are in the same range as the received dthat come from the exchange.
For example, a sales manager who uses a DDI line to call cliemay wish to have returned calls directed to an assistant. The programmed for the manager’s extension is the Public Receinumber for the assistant’s extension. Thus, a client viewing tCLID number on their telephone display sees the assistant’s telephone number.
If the OLI number is set to None, then the CLID displayed at tcalled party’s telephone is a listed extension number for yourCompact Plus system. If the programmed OLI number is outsthe allowed range, Compact Plus may insert a default numbe
1. Place the programming overlay on any M7310N or M7324telephone.
2. PressÄ¥¥ÛßßÜÝÝ (CONFIG). The display shows Password:.
P0905531 Issue 01 Compact Plus System Administration Guide

38 Programming Terminals and Extensions
3. Press àÛàÞ¡à (SAPLUS). The display shows Terminals&Extns.
4. Press . The display shows Show extn#:.
5. Enter the extension number of the telephone you want toprogramme. The display shows nnn:nnn.
6. Press twice. The display shows Line
assignment.
7. Press Ô until the display shows OLI #:.
8. Press CHANGE and enter the number.
9. Press ̈ to exit or Ô to continue programming.
Compact Plus System Administration Guide P0905531 Issue 01

Programming Hospitality Services
� Common extension.........40
� Room extension.........40
� Hospitality Services admin telephone.........40
� Alarm time (AL) feature.........40
� Hospitality Services admin alarm feature.........42
� Room occupancy (RO).........43
� Room condition (RC).........44
� Service time.........46
P0905531 Issue 01 Compact Plus System Administration Guide
40 Programming Hospitality Services
the
f
,
.
em ame
ne. to
e
n
Hospitality Services (HS) is a group of features that increasesvalue of the Compact Plus system in small to medium sized hotels, motels or hospitals.
In a hotel setting, guests gain improved services through immediate access to basic functions like:
• wake-up service or reminders
• accurate tracking of the room’s service requirements (for example check-in/check-out).
Hospitality Services features must be activated by qualified personnel using Software keycodes. See "Software Keys" onpage 54.
Norstar telephones are classified as one of following types otelephones: a common extension, a room extension or a HS admin telephone.
Common extension
A common extension can be a telephone found in a lobby, officeor common area; it is not associated with a room. A commonextension does not have access to all HS features.
Common extensions are Norstar telephones or analogue telephones connected to an analogue terminal adapter (ATA)
Room extension
A Room extension is a telephone assigned to a room in Systprogramming. Up to five telephones can be assigned to the sroom (they all share the same room number).
Room extension can be any Norstar telephone or analogue telephone connected to an ATA.
Hospitality Services admin telephone
A HS admin telephone is any two-line display Norstar telephoA HS admin telephone can be programmed to require a userenter the Desk admin password before access to HS admin features is granted. To change the Desk admin password se"Hospitality passwords" on page 162.
Alarm time (AL) feature
The Alarm time feature provides an alarm clock capability onNorstar telephones and analogue telephones connected to a
Compact Plus System Administration Guide P0905531 Issue 01
Programming Hospitality Services 41
a e the es in
lus larm
24
:
or
ATA. Both room extensions and common extensions can be programmed to sound an audible alert at a requested time.
One Alarm time within a 24 hour period is programmable on room or common extension and must be reset daily. When thalarm sounds, all telephones in a given room alert. Cancellingalarm on any telephone cancels the alarm on all the telephonthe room. A new Alarm time entered on a room or common extension overwrites any alarm set previously.
If the Compact Plus system experiences a mains failure, the failure can result in missed Alarm times. When the Compact Psystem is running and the system’s time resets, the missed Atimes alert on respective room or common extensions. At all times, the Compact Plus system allows up to a maximum of extensions that can alert at the same time.
Programming the Alarm time feature
To programme the Alarm time feature on a Norstar telephone
1. Press Ä¡àÞ. The display shows Alrm:
07:00am OFF.
2. If the alarm time is correct press ON/OFF. The display shows Alrm:07:00am ON. Press DONE to exit.orTo enter a new alarm time press CHG. The display shows Enter time:.
3. Enter a new 4 digit alarm time.
— If the 24 hour clock format is used (hour: 00 to 23 and minutes: 00 to 59), no confirmation is required. The display shows Alarm ON hh:mm.
— If the 12 hour format is used, the display shows hh:mm AM
or PM?. Press the AM or PM display key. The display showsAlarm ON hh:mm.
To programme the Alarm time feature on an M7000 telephoneanalogue telephone:
1. Press ²¡àÞ on an M7000 telephone or press À¥¡àÞ on an analogue telephone.A tone sounds.
2. Enter a 4 digit alarm time.
— If the 24 hour clock format is used (hour: 00 to 23 and minutes: 00 to 59), a tone sounds.
— If the 12 hour format is used, press ¥ to select am or £ to select pm. A tone sounds.
P0905531 Issue 01 Compact Plus System Administration Guide

42 Programming Hospitality Services
or sic
e.
e
n
ck
. n.
he m n
At the selected times, telephones in the room ring to wake-upremind the occupant of the next event or meeting. If Music onhold is programmed for the system the occupant will hear muwhen they answer a wake-up call.
Changing or cancelling an earlier selected Alarm time
To set a new time for an Alarm time, re-enter a new Alarm timThe new time overwrites any earlier set time. Cancelling the Alarm time for any telephone cancels the Alarm time for all thtelephones in the same room.
Cancelling the alarm
• To cancel the Alarm time on a Norstar telephone, press Ä£¡àÞ. The display reads Alarm off.
• To cancel the Alarm time on an M7000 telephone, press ²£¡àÞ or press À£¡àÞ on an analogue telephone.
Turning off the Alarm
When a telephone rings at the selected time, the occupant carelease the Alarm ring as follows:
• On a Norstar telephone, press any key except the ú key.
• On an M7000 telephone, press any key except the ³ key.
• On an analogue telephone lift and replace the handset bainto position.
Note: If the user presses the ú or ³ key when the telephone rings, it temporarily deactivates the AlarmAfter a number of minutes, the telephone will alert agaiIf the user is on a call when the alarm sounds they canpress any key except ̈ to cancel the alarm and maintain their active call.
Hospitality Services admin alarm feature
Only an Hospitality Services (HS) admin telephone can use tHospitality Services admin alarm feature. The HS admin alarfeature is room oriented only, it does not control the alarms ocommon extensions.
The Hospitality Services admin feature can:
• query the current or last alarm time set for a room
• overwrite previous Alarm time programming for a room onthe system
Compact Plus System Administration Guide P0905531 Issue 01

Programming Hospitality Services 43
s: s
r
s to s
n
c, r
— assign an Alarm time for any room on the system
— change an Alarm time for any room on the system
— cancel an Alarm pending for any room on the system
To programme the Alarm time for a room with the HospitalityServices admin alarm feature:
1. Press Ä¡àà on a two-line display Norstar telephone.
2. If configured, the display reads Password:. Enter the Desk admin password.
3. The display reads Al of rm#:. Enter the room number.
4. Press VIEW. The display shows Alrm: 07:00am OFF:. If the alarm time is correct press the ON/OFF display key to activate the alarm.
5. Enter a four digit alarm time.
— If the 24 hour format is used (hour: 00 to 23 and minute00 to 59), no confirmation is required. The display showAlarm hh:mm ON.
— If the 12 hour format is used, the display shows the foudigit time plus AM or PM?. Press the AM or PM display key. The display shows Alarm hh:mm am or pm ON.
6. Press the ̈ key to exit programming.
Room occupancy (RO)
The Room occupancy (RO) feature allows front desk operatorassign dialling restrictions to room extensions, and also workwith the Room condition (RC) feature.
Dialling restrictions for room extensions, defined in Restrictions under Terminals&Extns and Call restrns under Hospitality in System prgrming, replace dialling filters set under Services. The RO feature does not apply to commoextensions.
The RO feature uses the following room states: Vacant, BasiMid, and Full. A variety of dialling filters can be configured foeach room states. The default setting is Vacant.
• Vacant — Room is empty.
• Basic — Room is occupied.
• Mid — Room is occupied.
• Full — Room is occupied.
P0905531 Issue 01 Compact Plus System Administration Guide

44 Programming Hospitality Services
of a
:
nt
n
of
set ee
a
rvice
Programming the state of a room extension
To access the Room Occupancy feature and assign the stateroom extension:
1. Press Ä¡àá on a two-line display Norstar telephone.
2. If configured, the display reads Password:. Enter the Desk admin password.
3. The display reads Oc of rm#:. Enter the room number and press OK or LIST.
4. The display reads rrrrr:Vacant. Press the CHANGE display key and select the required status for the room extensionVacant, Basic, Mid or Full. The default setting is Vacant.
5. To programme other rooms, press the FIND or NEXT display key and return to step 3. If no more rooms require programming, press the ̈ key to exit programming.
Note: Programming a room to Vacant state cancels any outstanding alarms.
Room condition (RC)
The Room condition (RC) feature allows users to exchange information about the serviced state of a room. Users are frodesk attendants, cleaning or maintenance personnel of an establishment. The RC feature is not available from a commoextension.
The Compact Plus system maintains a database of the stateeach room. This database is accessed from either the room extension or a Hospitality Services admin telephone.You cana Room Condition password to limit access to this features. S"Room condition password" on page 162.
Room extensions can:
• set the associated room’s state to Service done (Srvc done)
• set the associated room’s state to Needs service (Needs srvc)
• query the state of the associated room on a telephone withdisplay.
Hospitality Services admin telephones can:
• set any room’s state to Service done (Srvc done)
• set any room’s state to Needs service (Needs srvc)
• query the state of any room.
The system changes the state of occupied rooms to Needs seon a daily basis at a set time as configured in the system.
Compact Plus System Administration Guide P0905531 Issue 01

Programming Hospitality Services 45
to
ion
to
e
: if
Maintenance personnel programme the condition of the roomService done when service in the room is complete.
The front desk attendant can query or programme the conditof a room with a Hospitality Services admin telephone. The Compact Plus system automatically sets the status of a roomNeeds srvc, when a Room occupancy status changes from occupied to Vacant.
Room condition with a room extension
To update the Room condition using a room extension:
1. Press Ä¡àß on a Norstar telephone; press ²¡àß on an M7000 telephone or press À¥¡àß on an analogue telephone.
2. At the prompt, enter the status of the room.
3. Press Ú on the dialpad to indicate Set to srv done. If required, enter the Room condition password. or,Press Û on the dialpad to indicate Set to needs srv. If required, enter the Room condition password.
4. On a Norstar telephone the display reads Set to srv done or Set to needs srv. On an M7000 telephone or an analogutelephone, replace the handset to exit.
Room condition with a Hospitality service admin telephone
To update or query the Room condition using a Hospitality services admin telephone:
1. Press Ä¡à¡ on a two-line display Norstar telephone.
2. If configured, the display reads Password:. Enter the Desk admin password.
3. The display reads Cd of rm#:. Enter the room number and press OK.
4. The display reads rrrrr:Vacant. Press the CHANGE display key and select the required status for the room extensionthe room is occupied, select Srvc done or Needs srvc; if the room is vacant, select Vacant or Needs srvc. The default setting is Vacant.
5. To update or query other room extensions, press the FIND or NEXT display key and return to step 3. If there are no moreroom extensions updates or queries, press the ¨ key to exit programming.
P0905531 Issue 01 Compact Plus System Administration Guide
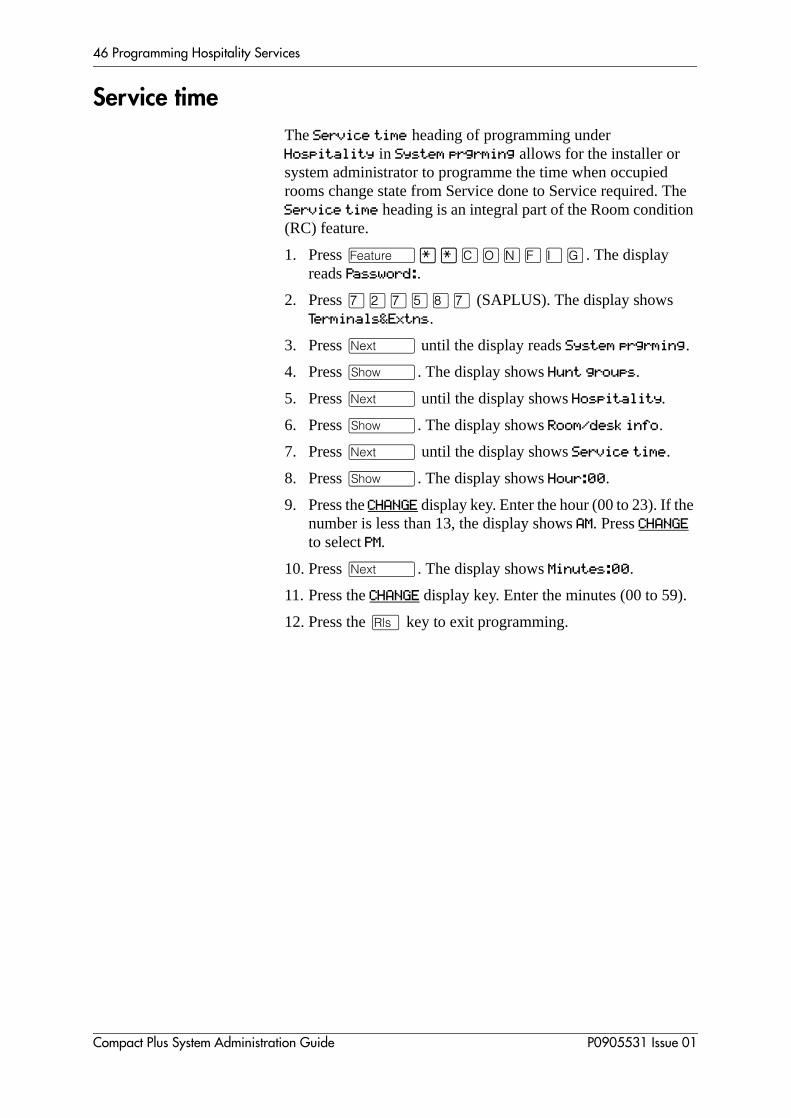
46 Programming Hospitality Services
he n
e
Service time
The Service time heading of programming under Hospitality in System prgrming allows for the installer or system administrator to programme the time when occupied rooms change state from Service done to Service required. TService time heading is an integral part of the Room conditio(RC) feature.
1. Press Ä¥¥�¯öìéí. The display reads Password:.
2. Press àÛàÞ¡à (SAPLUS). The display shows Terminals&Extns.
3. Press Ô until the display reads System prgrming.
4. Press . The display shows Hunt groups.
5. Press Ô until the display shows Hospitality.
6. Press . The display shows Room/desk info.
7. Press Ô until the display shows Service time.
8. Press . The display shows Hour:00.
9. Press the CHANGE display key. Enter the hour (00 to 23). If thnumber is less than 13, the display shows AM. Press CHANGE to select PM.
10. Press Ô. The display shows Minutes:00.
11. Press the CHANGE display key. Enter the minutes (00 to 59).
12. Press the ̈ key to exit programming.
Compact Plus System Administration Guide P0905531 Issue 01

Network features
� CLI blocking.........48
� Network Call Diversion.........48
� Selective Line Redirection.........50
P0905531 Issue 01 Compact Plus System Administration Guide
48 Network features
so
lled.
t to ge ce all-
t
at r
all e
ice is
e
ll
r
ll
CLI blockingWhen activated, Calling line identification restriction (CLIR) blocking, Ä¡Úá blocks the outgoing number CLI.When this feature is used, the call is flagged to the exchangethat the number will not be presented to the person being ca
On CLI supported lines, a call blocking digit sequence is senthe exchange before sending the dialout digits. You can chanthese digits in System Prgrming and set it to the digit sequenrecognised by the local exchange for number blocking on a cby-call basis.
To cancel CLI blocking press Ä¡Úá.
Note: If you want CLI blocking to work on BRI trunks, the OLImust be set to use CLI blocking. The OLI # setting musnot be set to None.
Network Call DiversionNorstar Network Call Diversion (NCD) is a network function thallows forwarding and redirection of calls outside the Norstarnetwork when using an ETSI ISDN line. Functionality is similato that of External Call Forward (ECF).
NCD redirects calls using the same line on which they arrive. Cforward is efficient since there is no need for additional outsidlines.
Examples of NCD include:
• redirecting all calls from and extension to a mobile phone
• forwarding calls to an external destination (rather than to vomail, for example), when an extension is busy or the user unavailable.
Feature descriptionNCD is available only over ETSI ISDN lines. It invoked whencalls are presented to Norstar extensions over ISDN lines. Thuser must program the selected extension. See “External CaForward” on page 250.
NCD is integrated with the following existing Norstar Call Forward features:
• Call Forward Unconditional (CFU)—implemented on NorstaCall Forward All Calls (CFAC) ÄÝ, and Selective Line Redirection (SLR) Ä ¡ Ý, also referred to asLine Redirection. This is programmable by the user.
• Call Forward on Busy (CFB)—implemented on Norstar CaForward Busy.
Compact Plus System Administration Guide P0905531 Issue 01

Network features 49
r to nd
is
SS
CF e
.
t
the lls
• Call Forward on No Response (CNFR)—implemented on Norstar Call Forward No Answer.
NCD and line redirectionForwarding calls externally from an extension requires the useenter either a Destination Code or Line Pool Access Code, athe number to which calls will be forwarded.
Line types describedThe points below describe which diversion feature is invokeddepending on the type of line in use.
• When a call comes in on ETSI ISDN (BRI or PRI) and is diverted back to the PSTN, then ETSI CFU, CFB or CFNRused.
• When a call comes in on DPNSS 1 and is diverted on DPN1, then DPNSS 1 Diversion (DIV) is used.
• When a call comes in on other line types, External Call Forward is used. Note that under certain line conditions, Ewill not work; refer to Line Redirection restrictions. See “LinRedirection” on page page 252.
Note: In all cases, if NCD fails due to network errors or rejections, Norstar invokes ECF. If an outgoing line is unavailable, Norstar routes the call to the line’s prime extension.
Programming and restrictions
NCD features are accessed through existing Norstar featuresExtensions requiring redirection must be programmed individually to either CFAC or SLR. CFB or CFNA must be seduring programming. Allow redirect must be set to Yes for each extension, in Terminals&Extns/Capabilities.
Note: Any other programming applied to specific lines and extensions take precedence, for example Restrictions(extns) under Terminals&Extns.
NCD is used as long as the affected lines are ETSI ISDN, andaffected DIA lines are accessible via ISDN lines. Incoming caare diverted back to the PSTN. If NCD fails due to network
P0905531 Issue 01 Compact Plus System Administration Guide

50 Network features
ing
e
s in
An
to
F.
e
n
ork
ot
will
errors, ECF is invoked. If ECF cannot be executed, the incomcall is routed to the line’s prime extension.
An extension with CFB, CFNA and CFAC programmed will givpriority to CFAC for diversion.
Selective Line Redirection
Selective Line Redirection (SLR), also referred to as Line Redirection, is enhanced for use with digital lines and operateconjunction with NCD.
Diversion by SLR takes precedence over diversion by CFAC. SLR line cannot be diverted by CFAC. If the call arrives on anextension with SLR programmed, a ring splash will sound (if programmed).
For information on redirecting lines and SLR restrictions refer“Line Redirection” on page 252.
Programming Extensions
The User Interface for programming NCD is the same for EC
Different types of Call Forward are available depending on thextension being programmed. Programming an extension to forward calls externally requires the user to enter a destinatiocode or line pool number, in addition to the external phone number. Therefore, care should be taken to identify your netwline types and record the available codes and line pools.
Norstar—NCD functionality in CFAC, CFB and CFNO is supported on Norstar N7XXX extensions.
ISDN—NCD functionality in CFAC and CFNA is supported onISDN terminals. CFB and SLR are not supported on ISDN.
Cordless Handsets—NCD functionality in CFAC, CFB, and CFNA is supported on cordless handset extensions. SLR is nsupported on cordless handsets.
Enhanced Caller IDWhen a Norstar extension with Call Line Identifier (CLID) programmed receives a redirected call due to NCD, the user see the DN for the Calling Number. This is followed by a “>” and
ATTENTION!
If a line is configured to appear on several extensions with redirection programmed, predicting which extension will divert the call is not possible. This should be considered during system configuration.
Compact Plus System Administration Guide P0905531 Issue 01

Network features 51
ll is
,
ted
e,
the redirecting number. This is displayed for as long as the caactive (alerting or answered) at that set.
If the alerting extension is not the CLID extension for that linethe line appearance can be pressed to briefly display the information. Pressing Ä¡ÚÚ or INFO while the call is active invokes Call Info. Call Info on DPNSS displays the redirecting number and the reason for the redirection.
Note: When Norstar requests that an incoming call be redirecby the distance network, Norstar does not inform the network of the redirecting extension number. In this casthe diverted-to party will not see the diverting party extension number.
P0905531 Issue 01 Compact Plus System Administration Guide

52 Network features
Compact Plus System Administration Guide P0905531 Issue 01

Software Keys
� Viewing the System ID.........54
� Software Keys.........54
P0905531 Issue 01 Compact Plus System Administration Guide
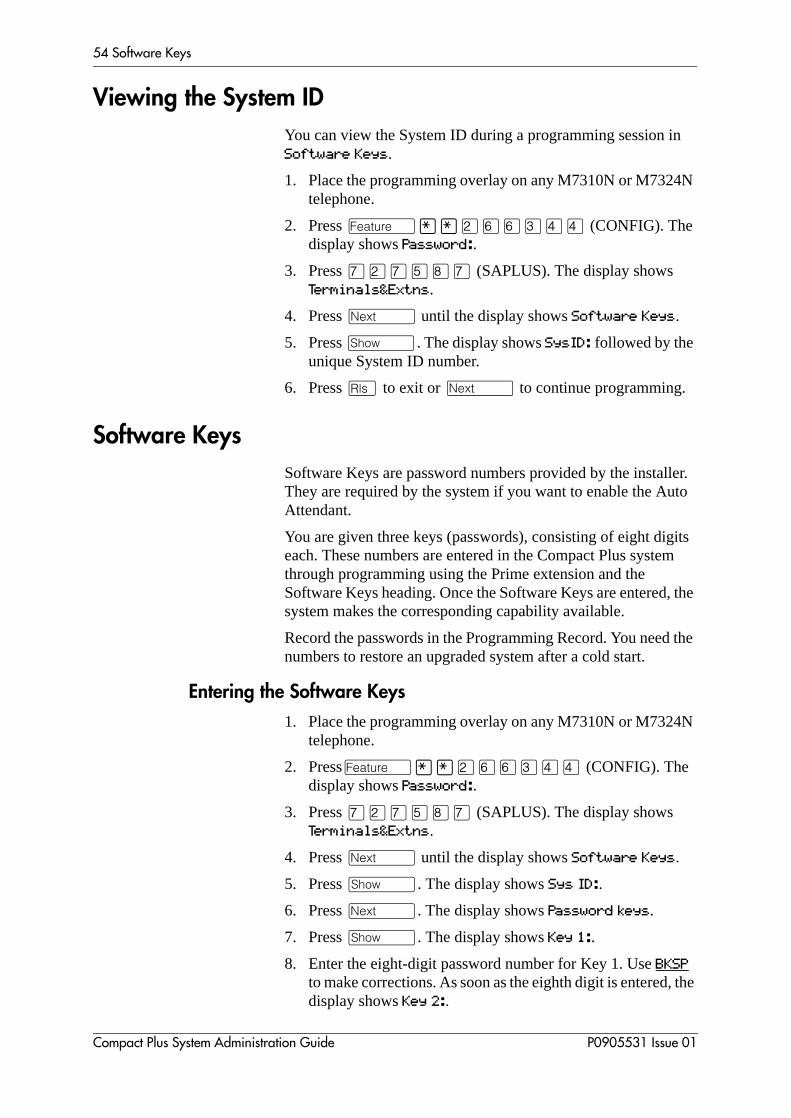
54 Software Keys
n
N
ler. to
its m
, the
the
N
the
Viewing the System ID
You can view the System ID during a programming session iSoftware Keys.
1. Place the programming overlay on any M7310N or M7324telephone.
2. Press Ä¥¥ÛßßÜÝÝ (CONFIG). The display shows Password:.
3. Press àÛàÞ¡à (SAPLUS). The display shows Terminals&Extns.
4. Press Ô until the display shows Software Keys.
5. Press . The display shows SysID: followed by the unique System ID number.
6. Press ̈ to exit or Ô to continue programming.
Software Keys
Software Keys are password numbers provided by the instalThey are required by the system if you want to enable the AuAttendant.
You are given three keys (passwords), consisting of eight digeach. These numbers are entered in the Compact Plus systethrough programming using the Prime extension and the Software Keys heading. Once the Software Keys are enteredsystem makes the corresponding capability available.
Record the passwords in the Programming Record. You neednumbers to restore an upgraded system after a cold start.
Entering the Software Keys
1. Place the programming overlay on any M7310N or M7324telephone.
2. PressÄ¥¥ÛßßÜÝÝ (CONFIG). The display shows Password:.
3. Press àÛàÞ¡à (SAPLUS). The display shows Terminals&Extns.
4. Press Ô until the display shows Software Keys.
5. Press . The display shows Sys ID:.
6. Press Ô. The display shows Password keys.
7. Press . The display shows Key 1:.
8. Enter the eight-digit password number for Key 1. Use BKSP to make corrections. As soon as the eighth digit is entered,display shows Key 2:.
Compact Plus System Administration Guide P0905531 Issue 01
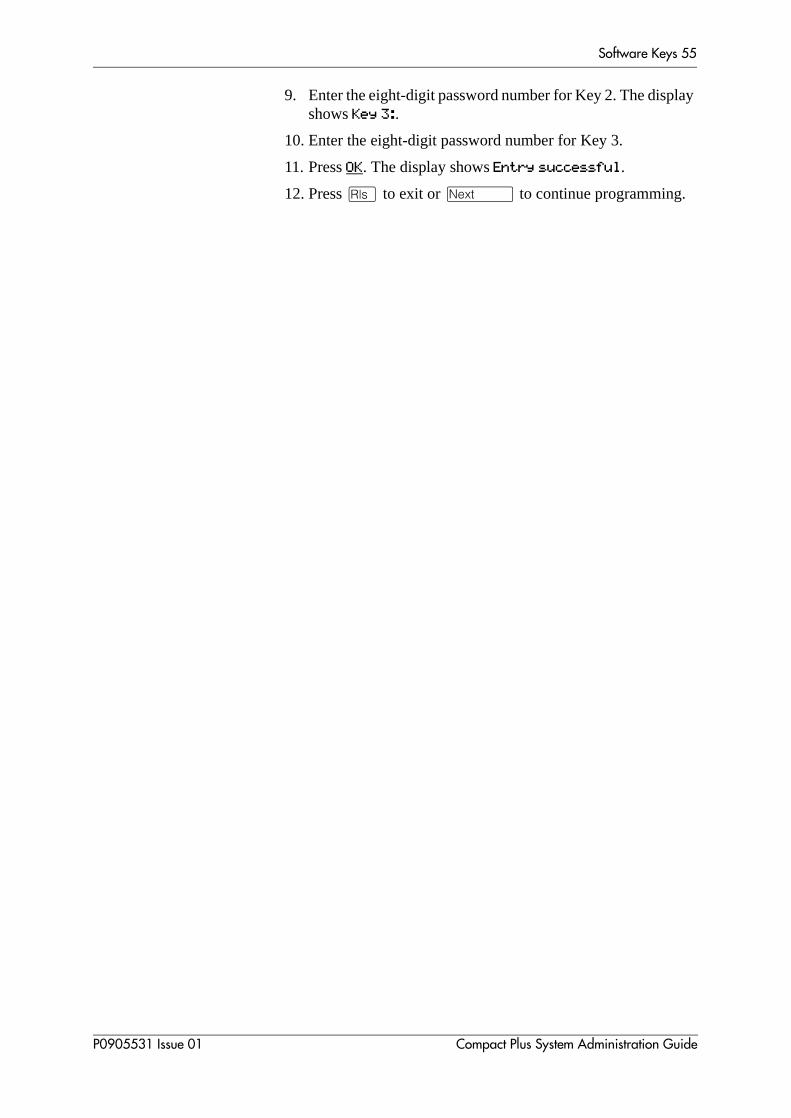
Software Keys 55
lay
9. Enter the eight-digit password number for Key 2. The dispshows Key 3:.10. Enter the eight-digit password number for Key 3.
11. Press OK. The display shows Entry successful.
12. Press ̈ to exit or Ô to continue programming.
P0905531 Issue 01 Compact Plus System Administration Guide

56 Software Keys
Compact Plus System Administration Guide P0905531 Issue 01

Setting System speed dial
� Setting System speed dial.........58
� Assigning a number to a System speed dial code.........58
� Selecting a line.........59
� Setting the system to display a name instead of a number.........59
� Setting whether the speed dial number bypasses restrictions.........60
P0905531 Issue 01 Compact Plus System Administration Guide

58 Setting System speed dial
d
for
onal ee r
s on
for
hen
N
Setting System speed dial
Speed dial saves time by allowing you to dial frequently callenumbers using a two-digit code. For example, you can programme telephone numbers for major suppliers or clientseasy dialling by everyone in the office.
Speed dial codes numbered from 01 to 70 are intended for system-wide use. Speed dial codes from 71 to 94 are for persuse and can be programmed differently at each extension. S"Changing a personal (user) speed dial code" on page 107 fomore information on the Speed dial feature.
The steps to programming System speed dial are:
• assign a number to a System speed dial code
• select an outgoing facility to be used for the number
• set whether the system displays the number or a name (optional)
• set whether the speed dial number bypasses any restrictionthe line or extension where it is used (optional).
See "Chart 1: System Speed Dial" on page 288 in Appendix Aa programming overview.
See also "Using Speed Dial" on page 215.
Assigning a number to a System speed dial code
First, choose a two-digit speed dial code (from 01 to 70) and tassign a telephone number to it.
1. Place the programming overlay on any M7310N or M7324telephone.
2. Press Ä¥¥ÛßßÜÝÝ (CONFIG). The display shows Password:.
3. Press àÛàÞ¡à (SAPLUS). The display shows Terminals&Extns.
4. Press Ô until the display shows Sys speed dial.
5. Press . The display shows Speed dial #:.
6. Enter the System speed dial code (01 to 70).
7. Press . The display shows the number currently assigned to the code or No number.
8. Press CHANGE.
9. Enter the telephone number (up to 24 digits) and press OK.
Compact Plus System Administration Guide P0905531 Issue 01
Setting System speed dial 59
ou e a
ber, d
nly dial
st
n ould the r. fault
N
use.
gits)
Selecting a line
After assigning a telephone number to the speed dial code, ymust select an outgoing facility for the number to use. ChoosPrime line, an exchange line, a line pool, or the routing table.
When you programme a line pool as part of a speed dial numuse Æ and the line pool access code, or a programmeline pool key.
If you assign a specific line to a System speed dial number, oextensions with an appearance of that line can use the speednumber.
1. Begin with the display showing the speed dial code you juchanged in the previous procedure.
2. Press Ô. The display shows Use prime line.
3. Press CHANGE to choose Use prime line, Use routing tabl, Use line, or Pool code. Stop pressing CHANGE when you see the line you want to use for the speed dial.
4. Press ̈ to exit or Ô to continue programming.
Setting the system to display a name instead of a number
You can choose to have the display show either the extensionumber or a name for a speed dial code. For example, you cprogramme a speed dial for a frequently used courier and havedisplay show Courier instead of the courier’s telephone numbeSystem speed dial names can be 16 characters long. The dedisplays the number.
1. Place the programming overlay on any M7310N or M7324telephone.
2. Press Ä¥¥ÛßßÜÝÝ (CONFIG). The display shows Password:.
3. Press àÛàÞ¡à (SAPLUS). The display shows Terminals&Extns.
4. Press Ô until the display shows Sys speed dial.
5. Press . The display shows Speed dial#:.
6. Enter the System speed dial code (01 to 70) you want to
7. Press . The display shows the number currently assigned to the code, or No number.
8. Press CHANGE.
9. Use the keypad to enter the telephone number (up to 24 diand press OK.
10. Press Ô. The display shows Use prime line.
P0905531 Issue 01 Compact Plus System Administration Guide

60 Setting System speed dial
y tter tter 6
, but fault al
N
11. Press CHANGE to choose Use prime line, Use routing tbl, Use line:, or Pool code:. Stop pressing CHANGE when you see the line you want to use for the speed dial.
12. Press Ô. The display shows Display digits:.
13. Press CHANGE to choose Y (Yes) or N (No). No means the display shows a name for the code.
14. Press Ô. The display shows Name:Sys spd diÉ.
Press to see the rest of the display.
15. Press CHANGE. The display shows Name:.
16. Enter the name you want to give to the speed dial code bpressing the appropriate key on the keypad until the first leof the name is displayed. Press -->, then enter the next leof the name and so on until the name is complete. Up to 1characters are allowed. Press # to add spaces.
17. Press ̈ to exit or Ô to continue programming.
Setting whether the speed dial number bypasses restrictions
System speed dial numbers are generally subject to any restrictions that are programmed in the Compact Plus systemthey can be programmed to bypass these restrictions. The desetting is N (No), which means the number is subject to normcall restrictions.
1. Place the programming overlay on any M7310N or M7324telephone.
2. Press Ä¥¥ÛßßÜÝÝ (CONFIG). The display shows Password :.
3. Press àÛàÞ¡à (SAPLUS). The display shows Terminals&Extns.
4. Press Ô until the display shows Sys speed dial.
5. Press . The display shows Speed dial #:.
6. Enter the System speed dial code (01 to 70).
7. Press . The display shows the number currently assigned to the code, or No number.
8. Press CHANGE.
9. Enter the telephone number (up to 24 digits) and press OK.
10. Press Ô until the display shows Bypass restrÕn:.
11. Press CHANGE to choose Y (Yes) or N (No).
12. Press ̈ to exit or Ô to continue programming.
Compact Plus System Administration Guide P0905531 Issue 01

Naming extensions and lines
� Naming extensions.........62
� Naming lines.........63
P0905531 Issue 01 Compact Plus System Administration Guide
62 Naming extensions and lines
g
le,
mes id
wo
, ame rson
for
N
sing
Naming extensions
You can personalise your office communications by assigninnames to lines and extensions in the Norstar system. The extension's default name is its extension number (for exampExtn 221). The line’s default name is its line number (for example, Line 001).
Names can be seven characters long. Line and extension nacan contain both letters and numbers, but not # and *. To avoconfusion, do not assign the same name to two extensions, tlines, or to both an extension and a line in your system. Use creative combinations of initials, abbreviations, or even nicknames, to give each extension a unique name.
As the administrator, you can programme the system so thatwhen you enter an internal extension number, the person’s nappears on your telephone display. At the same time, the peyou are calling sees your name on their display.
See ‘Chart 2: Naming extensions’ on page 288 in Appendix A a programming overview.
1. Place the programming overlay on any M7310N or M7324telephone.
2. Press Ä¥¥ÛßßÜÝÝ (CONFIG). The display shows Password:.
3. Press àÛàÞ¡à (SAPLUS). The display shows Terminals&Extns.
4. Press . The display shows Show extn#:.
5. Enter the extension number of the telephone you want toprogramme. The display shows nnn:nnn.
6. Press . The display shows Line access.
7. Press Ô until the display shows Name:.
8. Press CHANGE.
9. Enter the characters of the name using the key pad by pres--> after each letter or press Ô to restore the default name.
10. Press Ô to store the name.
11. Press ̈ to exit or Ô to continue programming.
Compact Plus System Administration Guide P0905531 Issue 01
Naming extensions and lines 63
. t
t is
r
N
ss
Naming lines
Assigning names to lines can help you identify incoming callsFor example, if both the Sales line and the Service line ring ayour extension, your display shows which line the call is on, Sales or Service, when the line key is pressed or the handselifted.
If the Sales department is in a meeting and they forward theilines to your extension, the telephone display shows Sales for any incoming calls on their lines.
See ‘Chart 3: Naming lines’ on page 289 in Appendix A, for aprogramming overview.
1. Place the programming overlay on any M7310N or M7324telephone.
2. Press Ä¥¥ÛßßÜÝÝ (CONFIG). The display shows Password :.
3. Press àÛàÞ¡à (SAPLUS). The display shows Terminals&Extns.
4. Press Ô. The display shows Lines.
5. Press . The display shows Show line:.
6. Enter the line number. Press . The display shows the current name.
7. Press CHANGE.
8. Enter the characters of the name using the keypad or preÔ to restore the default name.
9. Press Ô to store the name.
10. Press ̈ to exit or Ô to continue programming.
P0905531 Issue 01 Compact Plus System Administration Guide

64 Naming extensions and lines
Compact Plus System Administration Guide P0905531 Issue 01

Changing the time and date
� Changing the time and date.........66
� Changing the time.........66
� Changing the date.........67
� Changing the time and date using the Basic password.........67
� Changing the time by an hour.........68
� Automatic Time & Date.........68
P0905531 Issue 01 Compact Plus System Administration Guide

66 Changing the time and date
tar s is
r
as
es,
a
N
).
e
Changing the time and date
The current time and date appear on the display of idle Norstelephones. Telephones connected to an Analogue TerminalAdapter cannot display the time and date. Whenever the maininterrupted, the time is lost on the clock and needs reprogramming.
Note: You need only change the time and date at one Norstatelephone. The clock is reset for the entire system.
The clock also controls the schedules used for services suchringing and routing.
After a power failure, the clock is behind by the length of timepower was lost. For example, if the power is out for two minutthe clock is two minutes behind.
See ‘Chart 4: Time and Date’ on page 289 in Appendix A for programming overview.
Changing the time
1. Place the programming overlay on any M7310N or M7324telephone.
2. Press Ä¥¥ÛßßÜÝÝ (CONFIG). The display shows Password :.
3. Press ÛÜßÝß (ADMIN). The display shows Terminals&Extns.
4. Press Ôuntil the display shows Time&Date.
5. Press . The display shows Hour:.
6. Press CHANGE (or NEXT if you do not need to change the hour
7. Enter the hour (00 to 23). If the number is less than 13, thdisplay shows AM. Press CHANGE to select PM.
8. Press Ô. The display shows Minutes:.
9. Press CHANGE.
10. Enter the minutes (00 to 59).
11. Press ¨ to exit or Ô to continue programming.
Compact Plus System Administration Guide P0905531 Issue 01

Changing the time and date 67
N
.
).
e
r).
Changing the date
1. Place the programming overlay on any M7310N or M7324telephone.
2. Press Ä¥¥ÛßßÜÝÝ (CONFIG). The display shows Password :.
3. Press ÛÜßÝß (ADMIN). The display shows Terminals&Extns.
4. Press Ô until the display shows Time&Date.
5. Press . The display shows Hour:.
6. Press Ô twice. The display shows Year:.
7. Press CHANGE.
8. Enter the last two digits of the current year.
9. Press Ô. The display shows Month:.
10. Enter the month (01 to 12).
11. Press Ô. The display shows Day:.
12. Press CHANGE.
13. Enter the day of the month (01 to 31).
14. Press ̈ to exit or Ô to continue programming.
Changing the time and date using the Basic passwordYou can change the time and date using Ä¥¥¡ÝßÜ (TIME) and the Basic password
1. Press Ä¥¥¡ÝßÜ (TIME). The display shows Password :.
2. Press Ä¥¥ÛÛàÝÛ (BASIC). The display shows Hour:.
3. Press CHANGE (or NEXT if you do not need to change the hour
4. Enter the hour (00 to 23). If the number is less than 13, thdisplay shows AM. Press CHANGE to select PM.
5. Press NEXT. The display shows Minutes:.
6. Press CHANGE (or NEXT if you do not need to change the minutes).
7. Enter the minutes (00 to 59).
8. Press NEXT. The display shows Year:.
9. Press CHANGE (or NEXT if you do not need to change the yea
10. Enter the last two digits of the current year.
11. Press NEXT. The display shows Month:.
P0905531 Issue 01 Compact Plus System Administration Guide
68 Changing the time and date
for
the r tem ate
N
12. Press CHANGE (or NEXT if you do not need to change the month).
13. Enter the month (01 to 12).
14. Press NEXT. The display shows Day:.
15. Press CHANGE.
16. Enter the day of the month (01 to 31).
17. Press ̈ to exit.
Changing the time by an hour
Norstar offers two features that let you adjust the time quickly changes in British Standard Time.
Moving one hour forward with ** FWD
1. Press Ä¥¥ÜáÜ (FWD). The display shows Forward by 1Hr?.
2. Press YES. The display briefly shows Time Changed.
Moving one hour backward with ** BACK
1. Press Ä¥¥ÛÛÛÞ (BACK). The display shows Backward by 1Hr?.
2. Press YES. The display briefly shows Time Changed.
Automatic Time & DateWhen a Basic Rate Interface (BRI) outgoing call is answered,network may provide time and date information to the Norstasystem. The Auto Time&Date feature enables the Norstar systo use this information to automatically update the time and don the Norstar system.
1. Place the programming overlay on any M7310N or M7324telephone.
2. Press Ä¥¥ÛßßÜÝÝ (CONFIG). The display shows Password:.
3. Press ÛÜßÝß (ADMIN). The display shows Terminals&Extns.
4. Press Ô until the display shows System prgrming.
5. Press Ô. The display shows Featr settings.
6. Press . The display shows Backgrnd music:.
7. Press Ô until the display shows AutoTime&Date.
8. Press CHANGE to choose Y or N.
9. Press ̈ to exit or Ô to continue programming.
Compact Plus System Administration Guide P0905531 Issue 01

Assigning a Direct-Dial extension
� Programming Direct-Dial.........70
� Programming an internal Direct-Dial extension.........70
� Programming an external Direct-Dial extension.........71
P0905531 Issue 01 Compact Plus System Administration Guide

70 Assigning a Direct-Dial extension
act -e. m. ly a t.
can
ial
N
Programming Direct-Dial
Direct-Dial lets you dial a designated telephone in your CompPlus system or private network with a single digit. The DirectDial digit is the digit you dial to reach an attendant in your officYou can have one Direct-Dial extension in your Norstar systeA person whose telephone is a Direct-Dial extension is usualreceptionist for your entire office or for a particular departmen
The Direct-Dial telephone can send up to 30 messages and invoke services to activate the extra-dial telephone.
You cannot forward calls to a Direct-Dial telephone that is outside your Compact Plus system.
Note that ISDN terminals cannot use the Direct-Dial digit to reach a Direct-Dial extension.
For information on which telephones can access the Direct-Dextension, see ‘Assigning telephones to the Direct-Dial extension’ on page 98.
See ‘Chart 5: Direct-Dial’ on page 290 in Appendix A for a programming overview.
See ‘Accessing a Direct-Dial extension’ on page 242 for information on using the Direct-Dial feature.
Programming an internal Direct-Dial extension
1. Place the programming overlay on any M7310N or M7324telephone.
2. Press Ä¥¥ÛßßÜÝÝ (CONFIG). The display shows Password :.
3. Press àÛàÞ¡à (SAPLUS). The display shows Terminals&Extns.
4. Press Ô until the display shows System prgrming.
5. Press . The display shows Hunt groups.
6. Press Ô. until the display shows Direct-dial.
7. Press . The display shows D-Dial1:Intrnl.
8. Press . The display shows Intrnl #:.
9. Press CHANGE.
10. Enter the extension number.
11. Press ̈ to exit or Ô to continue programming.
Compact Plus System Administration Guide P0905531 Issue 01
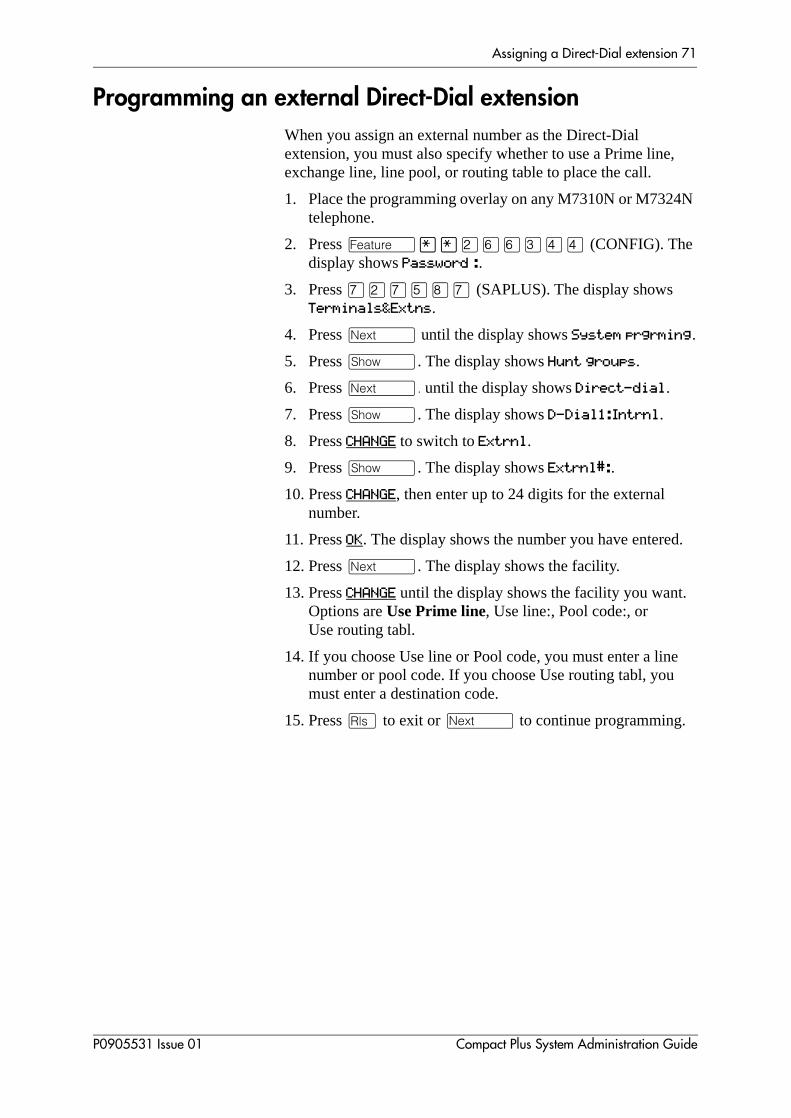
Assigning a Direct-Dial extension 71
,
N
.
Programming an external Direct-Dial extension
When you assign an external number as the Direct-Dial extension, you must also specify whether to use a Prime lineexchange line, line pool, or routing table to place the call.
1. Place the programming overlay on any M7310N or M7324telephone.
2. Press Ä¥¥ÛßßÜÝÝ (CONFIG). The display shows Password :.
3. Press àÛàÞ¡à (SAPLUS). The display shows Terminals&Extns.
4. Press Ô until the display shows System prgrming.
5. Press . The display shows Hunt groups.
6. Press Ô. until the display shows Direct-dial.
7. Press . The display shows D-Dial1:Intrnl.
8. Press CHANGE to switch to Extrnl.
9. Press . The display shows Extrnl#:.
10. Press CHANGE, then enter up to 24 digits for the external number.
11. Press OK. The display shows the number you have entered
12. Press Ô. The display shows the facility.
13. Press CHANGE until the display shows the facility you want. Options are Use Prime line, Use line:, Pool code:, or Use routing tabl.
14. If you choose Use line or Pool code, you must enter a linenumber or pool code. If you choose Use routing tabl, you must enter a destination code.
15. Press ̈ to exit or Ô to continue programming.
P0905531 Issue 01 Compact Plus System Administration Guide

72 Assigning a Direct-Dial extension
Compact Plus System Administration Guide P0905531 Issue 01

Barring calls and privileges (Restrictions)
� Using restriction filters to bar calls.........74
� Assigning filters to a telephone (Extn restrns).........77
� Assigning filters to a line (Line restrns).........78
� Assigning filters to a specific line/extension (Line/extn restrns).........79
� Class of Service passwords.........80
� Assigning a remote access filter.........83
� Locking an extension.........86
� Preventing Last Number Redial.........87
� Preventing Saved Number Redial.........88
� Preventing Recall.........89
� Preventing Redirect.........89
P0905531 Issue 01 Compact Plus System Administration Guide
74 Barring calls and privileges (Restrictions)
of
s ces
but
ent
ore . e
ith
ith
ny
r
Using restriction filters to bar calls
Restrictions are digits that the system does not accept duringdialling. Overrides are digits that the system accepts in spite the restrictions. Groups of restrictions and overrides are programmed into restriction filters.
Rather than define individual restrictions and apply them repeatedly to each telephone and line, a restriction filter allowyou to apply restrictions as a single package of dialling sequenthat are not permitted.
Different filters can be applied to
• lines, to prevent telephones that share a line from dialling restricted numbers
• extensions, to prevent a specific telephone from dialling restricted numbers
• a combination of line and extension, to allow specific telephones to be exempt from the line filter
For example, a manager and four employees share a linethe employees have a line/extension filter that restricts thecalls they can make on that line.
• AC15A private circuits, to prevent people from using your network to make restricted calls
The number of restriction filters that you have for your systemdepends on a number of factors. You may want to have differrestrictions for different times of the day (such as barring long-distance calls after work hours). You may want differentrestrictions for a telephone that clients may use.
Default filters
You may not have to create or change a filter. Some of the mpopular filters that restrict long-distance calls exist by defaultThe following table shows the default restriction filters that thCompact Plus system provides.
Filter 01 prevents you from dialling any number that begins w0 or 1, except when the number begins with 0-800.
Filter 05 prevents you from dialling any number that begins w010, 1, and 00.
Filter 06 prevents you from dialling numbers that begin with adigit.
You may change the default filters before you apply them. Foinstance, you might add override 002 to Restriction 02, permitting calls to 1-800.
Compact Plus System Administration Guide P0905531 Issue 01

Barring calls and privileges (Restrictions) 75
ply
ere to
er. f ree
a as ded
Restriction filter defaults
Customising a call barring filter
You can customise default filters for your needs before you apthem. You can
• create a new restriction filter
• add or remove restrictions
• add or remove overrides
The rules for adding and creating filters are as follows:
• You can have up to 100 restriction filters.
• There is a maximum of 400 restrictions and overrides allocated to the 100 programmable filters.
• Each programmable filter can have up to 48 restrictions. This no limit on the number of overrides that can be allocateda restriction.
• You can use any restriction or override in more than one filtEach time it is used, it counts as one entry. For example, irestriction 411 exists in filters 01, 02, and 03, it uses up thof the 400 entries available.
• You can use ¥ and £ in a sequence of numbers in either restriction or an override. These characters are often usedpart of feature codes for other systems or for features proviby the public switched telephone network (PSTN).
• The maximum length of a restriction is 15 digits. The maximum length of an override is 16 digits.
• The solid dot (•) can represent any digit. It is inserted by pressing ANY.
Filter Restrictions (denied) Overrides
00 No restrictions (cannot be changed)
01 01: 0
02: 1
001: 0800
02 No restrictions
03 No restrictions
04 No restrictions
05 01: 010
02: 1
03: 00
06 01: �
(the dot represents any digit)
07 - 99 No restrictions or overrides programmed
P0905531 Issue 01 Compact Plus System Administration Guide

76 Barring calls and privileges (Restrictions)
s by
a a
o
r
N
• When you are finished programming restrictions for one extension, you can copy those settings to other extensionusing COPY at the Restrictions ö display. For more information about copying extension programming, see ‘Restriction service’ on page 148.
• You cannot delete a filter but you can delete a restriction within a filter. Removing the restrictions programmed on afilter makes it an unrestricted filter, but the filter itself is notremoved.
Applying restriction filters
Once you create the filters, you can assign the restrictions totelephone (under Terminals&Extns), to a line (under Lines), toparticular line on a telephone (under Terminals&Extns), and tremote callers (under Remote access).
To assign restriction filters for different times of the day, see ‘Restriction service’ on page 148.
See ‘Chart 6: Restriction filters’ on page 291 in Appendix A foa programming overview.
1. Place the programming overlay on any M7310N or M7324telephone.
2. Press Ä¥¥ÛßßÜÝÝ (CONFIG). The display shows Password:.
3. Press àÛàÞ¡à (SAPLUS). The display shows Terminals&Extns.
4. Press . The display shows Show extn#:.
5. Enter the extension number of the telephone you want toprogramme. The display shows nnn:nnn.
6. Press . The display shows Line access.
7. Press Ô until the display shows Restrictions.
8. Press . The display shows Restrn filters.
9. Press . The display shows Show filter:.
10. Enter the two-digit code or press Ô.
11. Press .
Removing a restriction changes the identifying number of the restriction.
Removing a restriction removes the overrides associated with it, and changes the identifying number of the restriction. For example, removal of restriction 01 re-numbers restrictions 01 to 08 as 01 to 07.
Compact Plus System Administration Guide P0905531 Issue 01

Barring calls and privileges (Restrictions) 77
ore
N
he
12. Use REMOVE, ADD, the keypad, and OK to change the restrictions for the filter.
13. Press , then Ô to see the overrides for therestriction.
14. Use REMOVE, ADD, the keypad, and OK to change the overridesfor the restriction.
15. Press ̈ to quit or Ô to continue programming.
Assigning filters to a telephone (Extn restrns)
Extension restrictions lets you assign a restriction filter to a telephone to prevent certain numbers from being dialled fromthat telephone. You can assign a different restriction filter for normal service and for each of six schedules.
See ‘Using alternate or scheduled services’ on page 146 for minformation about the schedules.
1. Place the programming overlay on any M7310N or M7324telephone.
2. Press Ä¥¥ÛßßÜÝÝ (CONFIG). The display shows Password:.
3. Press àÛàÞ¡à (SAPLUS). The display shows Terminals&Extns.
4. Press . The display shows Show extn#:.
5. Enter the extension number of the telephone you want toprogramme. The display shows nnn:nnn.
6. Press . The display shows Line access.
7. Press Ô until the display shows Restrictions.
8. Press . The display shows Restrn filters.
9. Press Ô. The display shows Extn restrns.
10. Press . The display shows Filters.
11. Press . The display shows Normal:.
12. Press CHANGE and use the keypad to enter the number of trestriction filter to be assigned to the extension for each schedule.
13. Press ̈ to quit or Ô to continue programming.
The following table shows the default restrictions.
P0905531 Issue 01 Compact Plus System Administration Guide
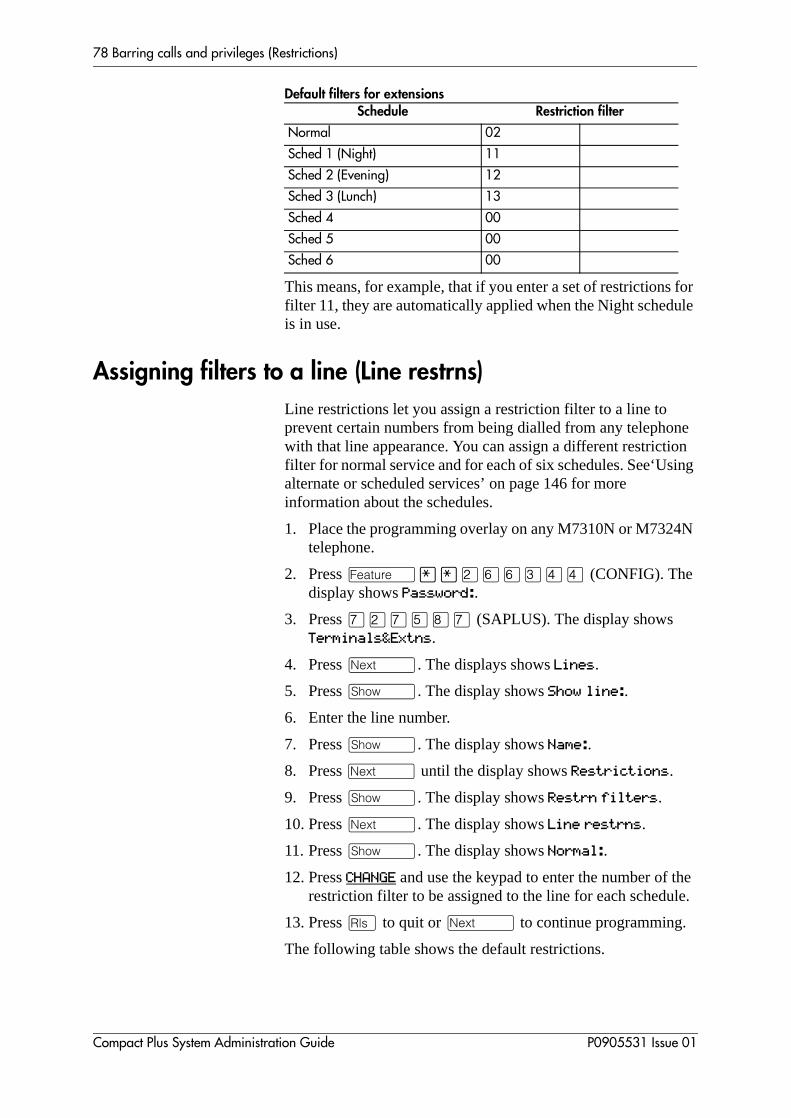
78 Barring calls and privileges (Restrictions)
for ule
ne on ing
N
he le.
Default filters for extensions
This means, for example, that if you enter a set of restrictionsfilter 11, they are automatically applied when the Night schedis in use.
Assigning filters to a line (Line restrns)
Line restrictions let you assign a restriction filter to a line to prevent certain numbers from being dialled from any telephowith that line appearance. You can assign a different restrictifilter for normal service and for each of six schedules. See‘Usalternate or scheduled services’ on page 146 for more information about the schedules.
1. Place the programming overlay on any M7310N or M7324telephone.
2. Press Ä¥¥ÛßßÜÝÝ (CONFIG). The display shows Password:.
3. Press àÛàÞ¡à (SAPLUS). The display shows Terminals&Extns.
4. Press Ô. The displays shows Lines.
5. Press . The display shows Show line:.
6. Enter the line number.
7. Press . The display shows Name:.
8. Press Ô until the display shows Restrictions.
9. Press . The display shows Restrn filters.
10. Press Ô. The display shows Line restrns.
11. Press . The display shows Normal:.
12. Press CHANGE and use the keypad to enter the number of trestriction filter to be assigned to the line for each schedu
13. Press ̈ to quit or Ô to continue programming.
The following table shows the default restrictions.
Schedule Restriction filter
Normal 02
Sched 1 (Night) 11
Sched 2 (Evening) 12
Sched 3 (Lunch) 13
Sched 4 00
Sched 5 00
Sched 6 00
Compact Plus System Administration Guide P0905531 Issue 01

Barring calls and privileges (Restrictions) 79
for ule
a
he s.
r
be
lar
ers
rs
N
Default filters for extensions
This means, for example, that if you enter a set of restrictionsfilter 21, they are automatically applied when the Night schedis in use.
Assigning filters to a specific line/extension (Line/extn
restrns)
Line/extension restrictions let you assign a restriction filter tospecific line that can be used for outgoing calls at a specific telephone. This type of filter replaces any line or extension restriction filters that might otherwise apply. It restricts the numbers you can dial on a line, but only from that telephone. Tsame line on another telephone can have different restriction
As with extension restrictions, you can apply a different line oextension restriction for normal service and for each of six schedules. A maximum of 255 line/extension restrictions mayapplied to lines at telephones.
If a line/extension restriction is assigned to a line at a particutelephone, it overrides any line restrictions or extension restrictions that might otherwise apply.
If no line/extension restrictions have been defined, the numbare checked against the extension restrictions and the line restrictions, if either of these have been defined. The numbemay be rejected by either restriction.
1. Place the programming overlay on any M7310N or M7324telephone.
2. Press Ä¥¥ÛßßÜÝÝ (CONFIG). The display shows Password:.
3. Press àÛàÞ¡à (SAPLUS). The display shows Terminals&Extns.
4. Press . The display shows Show extn#:.
5. Enter the extension number of the telephone you want toprogramme. The display shows nnn:nnn.
6. Press . The display shows Line access.
Schedule Restriction filter
Normal 03
Sched 1 (Night) 21
Sched 2 (Evening) 22
Sched 3 (Lunch) 23
Sched 4 00
Sched 5 00
Sched 6 00
P0905531 Issue 01 Compact Plus System Administration Guide

80 Barring calls and privileges (Restrictions)
he ch
rs s ke
the
ds, r, nd
all he
mly
r, veral tead
e
you
ote
7. Press Ô until the display shows Restrictions.
8. Press . The display shows Restrn filters.
9. Press Ô until the display shows Line/extn rstrn.
10. Press . The display shows Show line:.
11. Enter the line number.
12. Press . The display shows Normal:.
13. Press CHANGE and use the keypad to enter the number of tfilter to be assigned as the line/extension restriction for easchedule. There are no default line/extension restrictions.
14. Press ̈ to quit or Ô to continue programming.
Class of Service passwords
Call barring shows you how to customise and apply dialling filters to restrict calls. You can temporarily override these filtewith a Class of Service (COS) password. The COS passwordreplace one set of filters with another to allow someone to macalls that would otherwise be restricted, without giving them complete freedom to make every kind of call. The COS passwords let you define individual passwords and determinerestriction filter and remote package associated with each.
A system can have a maximum of 100 six-digit COS passworranging from 00 to 99. Each password consists of a user filtewhich replaces the current extension or line/extension filter, aa line filter, which replaces the current line filter.
Your COS password is in effect only for the duration of your cand does not affect the restrictions placed on other users of tsystem.
The COS passwords for a system should be determined randoand should be changed regularly. Employee COS passwordsshould be deleted when they leave the company.
Typically, each user has a separate COS password. Howeveseveral users can share a password or one user can have sepasswords. Users should memorise their COS passwords insof writing them down.
You can use COPY and the keypad to copy the restriction filtersand remote package from one COS password to another. ThCOS passwords must be unique.
Before you begin programming a COS password, make sure have defined the appropriate restriction filters in Restrictions under Lines. Then check that you have created a suitable rempackage in Remote access under System prgrming.
Compact Plus System Administration Guide P0905531 Issue 01

Barring calls and privileges (Restrictions) 81
N
S
; for
N
See ‘Using Class of Service passwords’ on page 240 for information on using this feature.
Selecting a COS password
1. Place the programming overlay on any M7310N or M7324telephone.
2. PressÄ¥¥ÛßßÜÝÝ (CONFIG). The display shows Password:.
3. Press àÛàÞ¡à (SAPLUS). The display shows Terminals&Extns.
4. Press Ô until the display shows Passwords.
5. Press . The display shows COS pswds.
6. Press . The displays shows Show paswd #:.
7. Enter a two-digit password (00 to 99).
8. Press . The display shows the setting for that COpassword.
9. Press CHANGE.
10. Enter a password (maximum six digits).
11. Press ̈ to exit or Ô to continue programming.
Assigning user restrictions to the COS password
A COS password can be used by internal and external userstherefore, you must assign restrictions for the user instead ofthe extension.
1. Place the programming overlay on any M7310N or M7324telephone.
2. PressÄ¥¥ÛßßÜÝÝ (CONFIG). The display shows Password:.
3. Press àÛàÞ¡à (SAPLUS). The display shows Terminals&Extns.
4. Press Ô until the display shows Passwords.
5. Press . The display shows COS pswds.
6. Press . The displays shows Show paswd #:.
7. Enter a two-digit password (00 to 99).
8. Press . The display shows the setting for that COS password.
9. Press Ô. The display shows User flt:.
10. Press CHANGE.
P0905531 Issue 01 Compact Plus System Administration Guide
82 Barring calls and privileges (Restrictions)
h
N
S
N
S
11. Enter the number for the restriction filter to be applied witthis COS password.
12. Press ̈ to exit or Ô to continue programming.
Assigning line restrictions to the COS password
1. Place the programming overlay on any M7310N or M7324telephone.
2. PressÄ¥¥ÛßßÜÝÝ (CONFIG). The display shows Password:.
3. Press àÛàÞ¡à (SAPLUS). The display shows Terminals&Extns.
4. Press Ô until the display shows Passwords.
5. Press . The display shows COS pswds.
6. Press . The displays shows Show paswd #:.
7. Enter a two-digit password (00 to 99).
8. Press . The display shows the setting for that COpassword.
9. Press Ô until the display shows Line flt:.
10. Press CHANGE.
11. Enter the number for the restriction that applies to the linewhen this COS password is used.
12. Press ̈ to exit or Ô to continue programming.
Assigning a remote package to the COS password
1. Place the programming overlay on any M7310N or M7324telephone.
2. Press Ä¥¥ÛßßÜÝÝ (CONFIG). The display shows Password:.
3. Press àÛàÞ¡à (SAPLUS). The display shows Terminals&Extns.
4. Press Ô until the display shows Passwords.
5. Press . The display shows COS pswds.
6. Press . The displays shows Show paswd #:.
7. Enter a two-digit password (00 to 99).
8. Press . The display shows the setting for that COpassword.
9. Press Ô until the display shows Remote pkg:.
10. Press CHANGE.
Compact Plus System Administration Guide P0905531 Issue 01

Barring calls and privileges (Restrictions) 83
this
nd ant
te
ndix
N
11. Enter the number of the remote package that applies withCOS password.
12. Press ̈ to exit or Ô to continue programming.
Assigning a remote access filter
People on other systems in your private network can dial intoyour system over AC15A private circuits or exchange lines amake outgoing calls from your system. Therefore, you may wto limit the numbers that can be dialled over AC15A private circuits and exchange lines. You do this by assigning a remoaccess filter to the AC15A private circuits or exchange lines.
See ‘Chart 7: Remote Access Packages’ on page 292 in AppeA for a programming overview.
1. Place the programming overlay on any M7310N or M7324telephone.
2. Press Ä¥¥ÛßßÜÝÝ (CONFIG). The display shows Password:.
3. Press àÛàÞ¡à (SAPLUS). The display shows Terminals&Extns.
4. Press Ô until the display shows System prgrming.
5. Press . The display shows Hunt groups.
6. Press Ô until the display shows Remote access.
7. Press twice. The display shows Show pkg:.
8. Enter a package number.
9. Press . The display shows LinePool access.
10. Press . The display shows Pool A:.
11. Press CHANGE to choose Y (Yes) or N (No).
12. Press Ð.
13. Press Ô. The display shows Remote page:.
14. Press CHANGE to choose Y (Yes) or N (No).
15. Press Ô. The display shows Remote admin:.
16. Press CHANGE to choose Y (Yes) or N (No).
17. Press Ô. The display shows Remote monitor:.
18. Press Ð.
19. Press . The display shows Rem access pkgs.
20. Press Ô. The display shows Rem line access.
21. Press . The display shows Show line:.
P0905531 Issue 01 Compact Plus System Administration Guide

84 Barring calls and privileges (Restrictions)
).
ated.
ose ine
ew ur of
N
y
22. Enter the number of the AC15A private circuit (061 or 062The displays shows the line number followed by Rem pkg:.
23. Press CHANGE.
24. Enter the number of the remote package that you just cre
25. Press ̈ to exit or Ô to continue in programming.
Setting up a new COS password
As the Administrator you set up the COS passwords. You choa password number, the password, and finally the user and lfilters for your new Class of Service.
If you leave the user or line filter settings at Deflt, the currentfilter is retained for this Class of Service. You may assign a nfilter to either the user or line filter, or to both, depending on yoneeds. You must change at least one of them, or your Class Service is no different from ordinary service.
1. Place the programming overlay on any M7310N or M7324telephone.
2. Press Ä¥¥ÛßßÜÝÝ (CONFIG). The display shows Password :.
3. Press àÛàÞ¡à (SAPLUS). The display shows Terminals&Extns.
4. Press Ô until the display shows Passwords.
5. Press . The display shows COS pswds.
6. Press . The display shows Show pswd #:.
7. Enter an unused password number (00 to 99). The displashows COS pswd # followed by the number you chose.
8. Press . The display shows Pswdnn: and the current setting.
9. Press CHANGE.
10. Enter six digits for the new password.
11. Press Ô. The display shows User flt: and the current setting.
12. If you are changing the user filter, press CHANGE. The display shows User fltr:.
13. Enter the two-digit number of an existing dialling filter.
14. Press Ô. The display shows Line fltr: and the current setting.
15. If you are changing the line filter, press CHANGE. The display shows Line fltr:.
16. Enter the two-digit number of an existing dialling filter.
17. Press ̈ to exit or Ô to continue programming.
Compact Plus System Administration Guide P0905531 Issue 01

Barring calls and privileges (Restrictions) 85
a
N
t to
N
ilter
Changing an existing COS password
To maintain the security of a Class of Service password, it isgood idea to change it frequently.
1. Place the programming overlay on any M7310N or M7324telephone.
2. Press Ä¥¥ÛßßÜÝÝ (CONFIG). The display shows Password :.
3. Press àÛàÞ¡à (SAPLUS). The display shows Terminals&Extns.
4. Press Ô until the display shows Passwords.
5. Press . The display shows COS pswds.
6. Press . The display shows Show pswd #:.
7. Enter the password number of the COS password you wanchange (00 to 99).
8. Press . The display shows Pswd, followed by the number you chose and the current password.
9. Press CHANGE.
10. Enter six digits for the new password.
11. Press ̈ to exit or Ô to continue programming.
Changing the filters assigned to an existing COS password
1. Place the programming overlay on any M7310N or M7324telephone.
2. Press Ä¥¥ÛßßÜÝÝ (CONFIG). The display shows Password :.
3. Press àÛàÞ¡à (SAPLUS). The display shows Terminals&Extns.
4. Press Ô until the display shows Passwords.
5. Press . The display shows COS pswds.
6. Press . The display shows Show pswd #:.
7. Enter the password number of the COS password whose fyou want to change (00 to 99).
8. Press . The display shows Pswd, followed by the number you chose and the current password.
9. Press Ô. The display shows User flt: and the current setting.
10. If you are changing the user filter, press CHANGE. The display shows User fltr:.
P0905531 Issue 01 Compact Plus System Administration Guide
86 Barring calls and privileges (Restrictions)
can
N
t to
m
: l.
11. Enter the two-digit number of an existing dialling filter or leave blank to return to the default filter.
12. Press Ô. The display shows Line fltr: and the current filter assigned.
13. If you are changing the line filter, press CHANGE. The display shows Line fltr:.
14. Enter the two-digit number of an existing dialling filter or leave blank to return to the default filter.
15. Press ̈ to exit or Ô to continue programming.
Erasing an existing COS password
When a Class of Service password is no longer needed, youerase it.
1. Place the programming overlay on any M7310N or M7324telephone.
2. Press Ä¥¥ÛßßÜÝÝ (CONFIG). The display shows Password :.
3. Press àÛàÞ¡à (SAPLUS). The display shows Terminals&Extns.
4. Press Ô until the display shows Passwords.
5. Press . The display shows COS pswds.
6. Press . The display shows Show pswd #:.
7. Enter the password number of the COS password you wanerase (00 to 99).
8. Press . The display shows Pswd, followed by the number you chose and current password.
9. Press CLR.
10. Press Ô.
11. Press ̈ to exit or Ô to continue programming.
Locking an extension
You can limit the number of features that can be used or programmed at a particular extension. The options are
• None (default)— not locked. You can programme any systeor extension setting.
• Full—fully locked. You can programme only these settingsdisplay contrast, ring type, ring volume, and volume contro
Compact Plus System Administration Guide P0905531 Issue 01
Barring calls and privileges (Restrictions) 87
l
o
N
rs or itive
dial
A
N
• Partial—partly locked. You can programme most extensionsettings. You cannot programme system settings, personaspeed dial codes, dialling mode, or memory keys; and youcannot move line keys or enable Voice Call Deny.
Note: Do not apply extension lock to the extension you use tprogramme the system. There must be at least one M7310N or M7324N telephone in the system that has extension lock set to None, or you will not be able to programme the system.
1. Place the programming overlay on any M7310N or M7324telephone.
2. Press Ä¥¥ÛßßÜÝÝ (CONFIG). The display shows Password:.
3. Press àÛàÞ¡à (SAPLUS). The display shows Terminals&Extns.
4. Press . The display shows Show extn#:.
5. Enter the extension number of the telephone you want toprogramme. The displays shows nnn:nnn.
6. Press . The display shows Line access.
7. Press Ô until the display shows Restrictions.
8. Press . The display shows Restrn filters.
9. Press Ô. The display shows Extn restrns.
10. Press . The display shows Filters.
11. Press Ô. The display shows ExtnLock:.
12. Press CHANGE to select None, Full, or Partial.
13. Press ̈ to exit or Ô to continue programming.
Preventing Last Number Redial
Under some conditions, a telephone may be used by customeclients. You can prevent non-employees from accessing sensnumbers by blocking certain features at the telephone. The default setting allows an extension to use the Last Number Refeature.
See ‘Chart 8: Extension restrictions’ on page 293 in Appendixfor a programming overview.
1. Place the programming overlay on any M7310N or M7324telephone.
2. Press Ä¥¥ÛßßÜÝÝ (CONFIG). The display shows Password :.
P0905531 Issue 01 Compact Plus System Administration Guide

88 Barring calls and privileges (Restrictions)
ber
N
3. Press àÛàÞ¡à (SAPLUS). The display shows Terminals&Extns.
4. Press . The display shows Show extn#:.
5. Enter the extension number of the telephone you want toprogramme. The display shows nnn:nnn.
6. Press . The display shows Line access.
7. Press Ô until the display shows Restrictions.
8. Press . The display shows Restrn filters.
9. Press Ô. The display shows Extn restrns.
10. Press . The display shows Filters.
11. Press Ô until the display shows Allow last no:
12. Press CHANGE to choose Y (Yes) or N (No).
13. Press ̈ to exit or Ô to continue programming.
Preventing Saved Number Redial
The default setting allows an extension to use the Saved NumRedial feature.
1. Place the programming overlay on any M7310N or M7324telephone.
2. Press Ä¥¥ÛßßÜÝÝ (CONFIG). The display shows Password:.
3. Press àÛàÞ¡à (SAPLUS). The display shows Terminals&Extns.
4. Press . The display shows Show extn#:.
5. Enter the extension number of the telephone you want toprogramme. The display shows nnn:nnn.
6. Press . The display shows Line access.
7. Press Ô until the display shows Restrictions.
8. Press . The display shows Restrn filters.
9. Press Ô. The display shows Extn restrns.
10. Press . The display shows Filters.
11. Press Ô until the display shows Allow saved no:.
12. Press CHANGE to choose Y (Yes) or N (No).
13. Press ̈ to exit or Ô to continue programming.
Compact Plus System Administration Guide P0905531 Issue 01
Barring calls and privileges (Restrictions) 89
ture.
N
N
Preventing Recall
The default setting allows an extension to use the Recall fea
1. Place the programming overlay on any M7310N or M7324telephone.
2. Press Ä¥¥ÛßßÜÝÝ (CONFIG). The display shows Password :.
3. Press àÛàÞ¡à (SAPLUS). The display shows Terminals&Extns.
4. Press . The display shows Show extn#:.
5. Enter the extension number of the telephone you want toprogramme. The display shows nnn:nnn.
6. Press . The display shows Line access.
7. Press Ô until the display shows Restrictions.
8. Press . The display shows Restrn filters.
9. Press Ô until the display shows Extn restrns.
10. Press .
11. Press Ô until the display shows Allow recall:.
12. Press CHANGE to choose Y (Yes) or N (No).
13. Press ̈ to exit or Ô to continue programming.
Preventing RedirectThe default setting allows an extension to use the Redirect feature.
1. Place the programming overlay on any M7310N or M7324telephone.
2. Press Ä¥¥ÛßßÜÝÝ (CONFIG). The display shows Password :.
3. Press àÛàÞ¡à (SAPLUS). The display shows Terminals&Extns.
4. Press . The display shows Show extn#:.
5. Enter the extension number of the telephone you want toprogramme. The display shows nnn:nnn.
6. Press . The display shows Line access.
7. Press Ô until the display shows Restrictions.
8. Press . The display shows Restrn filters.
9. Press Ô until the display shows Extn restrns.
10. Press .
P0905531 Issue 01 Compact Plus System Administration Guide

90 Barring calls and privileges (Restrictions)
11. Press Ô until the display shows Allow redirect:.
12. Press CHANGE to choose Y (Yes) or N (No).
13. Press ̈ to exit or Ô to continue programming.
Compact Plus System Administration Guide P0905531 Issue 01
Programming capabilities
� Programming an extension.........92
� Setting Call Forward no answer.........92
� Setting Call Forward on Busy.........94
� Programming Do Not Disturb on Busy.........94
� Programming Handsfree.........95
� Programming Handsfree answerback.........96
� Assigning a Pickup group.........97
� Assigning a page zone.........97
� Programming paging.........98
� Assigning telephones to the Direct-Dial extension.........98
� Allowing Priority call.........99
� Assigning a Hotline.........100
� Auxiliary ringer.........101
� Activating Redirect ring.........101
� Receive tones.........102
P0905531 Issue 01 Compact Plus System Administration Guide
92 Programming capabilities
t
r
ir
en
h an
le’s
ly
dix
ered the ll
and
ot ot to to
rd
all
Programming an extension
Many features that can be used at individual extensions (see‘Appendix A: Programming overviews’ on page 287) must firsbe programmed for use. As the Administrator, you can
• programme Full and Automatic Handsfree
• assign Pickup Groups to allow colleagues to easily answecalls ringing at a telephone other than their own
• assign page zones so that colleagues can page within thegroups without disturbing the whole office
• programme an auxiliary ringer (loud bell) that alerts you whthere are incoming calls to an extension
• assign a Direct-Dial extension so your colleagues can reacattendant by dialling just one digit
• set Call Forward so that all calls are answered when peoptelephones are busy or unanswered
• programme Do Not Disturb on Busy
• activate Redirect Ring
• assign a Hotline extension to call one number automatical
• allow Priority call
See ‘Chart 9: Extension capabilities 1’ on page 294 in AppenA for a programming overview.
Setting Call Forward no answer
When you set the system up to forward calls that are not answat a particular telephone, you must define the extension that calls are sent to and the number of times that an incoming carings before the call is forwarded. You can choose 2, 3, 4, 6, 10 rings. The default is 4 rings.
Note: If the extension that you are forwarding calls to does nhave a free intercom key, or has Do Not Disturb or Do NDisturb on busy activated, the incoming call continues visually alert at your telephone, and the caller continueshear ringback.
If this is not desirable, you can programme a Call Forwaon Busy or Call Forward no answer destination for the second extension.
For example, extension 224 is programmed to forward incoming calls to extension 235, which in turn is programmed to forward all incoming calls to extension240.
Compact Plus System Administration Guide P0905531 Issue 01

Programming capabilities 93
t
no ue
ion.
N
N
Unanswered calls coming in on an outside line are automatically transferred to the Prime extension for thaline.
If the extension is a member of a hunt group, the Call Forwardanswer feature is overridden and the hunt group call will continto ring until the hunt time has expired.
A hunt group extension can be a Call Forward on busy extens
1. Place the programming overlay on any M7310N or M7324telephone.
2. Press Ä¥¥ÛßßÜÝÝ (CONFIG). The display shows Password :.
3. Press ÛÜßÝß (ADMIN). The display shows Terminals&Extns.
4. Press . The display shows Show extn#:.
5. Enter the extension number of the telephone you wish toprogramme. The display shows nnn:nnn.
6. Press three times. The display shows Fwd
to:None.
7. Press CHANGE and enter the extension number where you want the calls to be sent. You can press CLR to change the destination back to None.
8. Press ̈ to exit or Ô to continue programming.
Changing the number of times the telephone rings before it is forwarded
1. Place the programming overlay on any M7310N or M7324telephone.
2. Press Ä¥¥ÛßßÜÝÝ (CONFIG). The display shows Password :.
3. Press ÛÜßÝß (ADMIN). The display shows Terminals&Extns.
4. Press . The display shows Show extn#:.
5. Enter the extension number of the telephone you wish toprogramme. The display shows nnn:nnn.
6. Press . The display shows Capabilities.
7. Press . The display shows Fwd no answer:.
8. Press . The display shows Fwd to:nnn.
9. PressÔ. The display shows Forward delay:.
10. Press CHANGE to choose the number of times the telephonerings before it is forwarded: 2, 3, 4, 6, or 10 rings.
11. Press ̈ to exit or Ô to continue programming
P0905531 Issue 01 Compact Plus System Administration Guide
94 Programming capabilities
r ll to
on ue
ion.
N
r d t a n
nd en
the
Setting Call Forward on Busy
When a call comes in and you are already engaged on the telephone or when you have Do Not Disturb activated at youtelephone, Call Forward on Busy automatically passes the caanother extension.
If the extension is a member of a hunt group, the Call ForwardBusy feature is overridden and the hunt group call will continto ring until the hunt time has expired.
A hunt group extension can be a Call Forward on Busy extens
1. Place the programming overlay on any M7310N or M7324telephone.
2. Press Ä¥¥ÛßßÜÝÝ (CONFIG). The display shows Password :.
3. Press ÛÜßÝß (ADMIN). The display shows Terminals&Extns.
4. Press . The display shows Show extn#:.
5. Enter the extension number of the telephone you wish toprogramme. The display shows nnn:nnn.
6. Press . The display shows Capabilities.
7. Press . The display shows Fwd no answer:.
8. Press Ô. The display shows Fwd on busy.
9. Press . The display shows Fwd to:.
10. Press CHANGE and enter the extension number you want toreceive the calls. Press CLR to change the destination back toNone.
11. Press ̈ to exit or Ô to continue programming.
Programming Do Not Disturb on Busy
When you are busy on a call and a second call comes in, youtelephone rings softly to alert you to the second call. If you finthis second ring distracting, you can have the system prevensecond call from ringing by assigning Do Not Disturb (DND) oBusy to your telephone.
When DND on Busy is turned on for the extension, internal aprivate network callers hear a busy tone instead of ringing whyou are on the telephone. External callers are transferred to Prime extension used in your system.
If you use DND on Busy, the line indicator for an external incoming call still flashes, but your telephone does not ring.
Forward on Busy takes priority over DND on Busy.
Compact Plus System Administration Guide P0905531 Issue 01
Programming capabilities 95
all will
, ur
sy eive
is
ing
N
as
If an external call uses a Direct Inward Access (DIA) line, the cis processed according to the programming of the DIA line. Ifthere are no available appearances of the DIA line, the caller hear a busy tone.
Note: When using DND on busy with the M7100N telephonethere is no indication that a second call is ringing on yotelephone. Putting your first call on hold automatically answers the second incoming call.
If the extension is a member of a hunt group, the DND on Bufeature overrides the hunt group. This extension does not recnotification of hunt group calls while on a call.
See ‘Do Not Disturb’ on page 214 for information on using thfeature.
Setting and cancelling Do Not Disturb on Busy
You can set or cancel DND on Busy for each extension accordto personal preference.
The default is Y (Yes, DND on Busy is enabled), except for extension 221.
1. Place the programming overlay on any M7310N or M7324telephone.
2. Press Ä¥¥ÛßßÜÝÝ (CONFIG). The display shows Password :.
3. Press ÛÜßÝß (ADMIN). The display shows Terminals&Extns.
4. Press . The display shows Show extn#:.
5. Enter the extension number of the telephone you wish toprogramme. The display shows nnn:nnn.
6. Press . The display shows Line access.
7. Press Ô. The display shows Capabilities.
8. Press . The display shows Fwd no answer:.
9. Press Ô twice. The display shows DND on busy:.
10. Press CHANGE to choose Y (yes) or N (No).
11. Press ̈ to exit or Ô to continue programming.
Programming Handsfree
Norstar telephones allow you to make calls without using thetelephone handset. When Full Handsfree operation is programmed for a telephone, a Handsfree/Mute key is automatically assigned to the telephone. Once a telephone h
P0905531 Issue 01 Compact Plus System Administration Guide

96 Programming capabilities
e. ree
ith t 10:
his
N
ng .
N
Full Handsfree, you can also programme Automatic HandsfreAutomatic Handsfree allows you to make and receive Handsfcalls without pressing the Handsfree/Mute key.
You can programme the type of Handsfree operation used weach telephone or activate Handsfree Answerback. See ‘CharExtension capabilities 2’ on page 295 in Appendix A for a programming overview.
See ‘Using Handsfree’ on page 219 for information on using tfeature.
1. Place the programming overlay on any M7310N or M7324telephone.
2. Press Ä¥¥ÛßßÜÝÝ (CONFIG). The display shows Password :.
3. Press ÛÜßÝß (ADMIN). The display shows Terminals&Extns.
4. Press . The display shows Show extn#:.
5. Enter the extension number of the extension you wish to programme. The display shows nnn:nnn.
6. Press twice.
7. Press Ô until the display shows Handsfree:.
8. Press CHANGE to choose Auto, Std, or None.
9. Press ̈ to exit or Ô to continue programming.
Programming Handsfree answerback
Handsfree answerback allows you to answer a call without liftithe receiver. It is always turned off for an M7100N telephone
1. Place the programming overlay on any M7310N or M7324telephone.
2. Press Ä¥¥ÛßßÜÝÝ (CONFIG). The display shows Password :.
3. Press ÛÜßÝß (ADMIN). The display shows Terminals&Extns.
4. Press . The display shows Show extn#:.
5. Enter the extension number of the telephone you wish toprogramme. The display shows nnn:nnn.
6. Press twice.
7. Press Ô until the display shows HF answerback:.
8. Press CHANGE to choose Y (Yes) or N (No).
9. Press ̈ to exit or Ô to continue programming.
Compact Plus System Administration Guide P0905531 Issue 01
Programming capabilities 97
ne.
See
a
N
3,
f the
g, nes e
ents .
e.
Assigning a Pickup group
The Call pickup feature allows you to pick up calls that are ringing at another extension in your Pickup group.
You can assign extensions into one of four Pickup groups. Options for this setting are 1 to 4, and None. The default is No
Extensions can be put into and taken out of any Pickup group.‘Answering a telephone using Pickup Group’ on page 221 forinformation on using this feature.
A hunt group call ringing at an extension that is a member ofPickup group can be picked up by any extension in that call Pickup group.
1. Place the programming overlay on any M7310N or M7324telephone.
2. Press Ä¥¥ÛßßÜÝÝ (CONFIG). The display shows Password :.
3. Press ÛÜßÝß (ADMIN). The display shows Terminals&Extns.
4. Press . The display shows Show extn#:.
5. Enter the extension number of the telephone you wish toprogramme. The display shows nnn:nnn.
6. Press twice. The display shows Fwd no answer.
7. Press Ô until the display shows Pickup grp:.
8. Press CHANGE to assign the telephone to Pickup group 1, 2,4, or None.
9. Press ̈ to exit or Ô to continue programming.
Assigning a page zone
Page zones give you the advantage of paging different parts ooffice without disturbing the entire office. You can assign extensions to one of three page zones. (A zone is any set of Norstar extensions that you want to group together for paginregardless of their location.) The options for this setting are zo1, 2, 3, or None (no page zone assigned). The default is pagzone 1.
Members of a hunt group can be included in a page zone.
You can make an extension part of a page zone only if the extension has paging set to Y (Yes).
Make sure that everyone who needs to make page announcemhas a list showing the extensions that are in each page zone
See ‘Paging’ on page 245 for information on using this featur
P0905531 Issue 01 Compact Plus System Administration Guide

98 Programming capabilities
ing .
N
N
ers
ct-
Note: You can make an announcement to one person by placa Voice call (Äßß) to that person’s extension
1. Place the programming overlay on any M7310N or M7324telephone.
2. Press Ä¥¥ÛßßÜÝÝ (CONFIG). The display shows Password:.
3. Press ÛÜßÝß (ADMIN). The display shows Terminals&Extns.
4. Press . The display shows Show extn#:.
5. Enter the extension number of the telephone you wish toprogramme. The display shows nnn:nnn.
6. Press twice. The display shows Fwd no answer.
7. Press Ô until the display shows Page zone.
8. Press CHANGE to assign page zone 1, 2, 3, or None.
9. Press ̈ to exit or Ô to continue programming.
Programming paging
1. Place the programming overlay on any M7310N or M7324telephone.
2. Press Ä¥¥ÛßßÜÝÝ (CONFIG). The display shows Password:.
3. Press ÛÜßÝß (ADMIN). The display shows Terminals&Extns.
4. Press . The display shows Show extn#:.
5. Enter the extension number of the telephone you wish toprogramme. The display shows nnn:nnn.
6. Press twice. The display shows Fwd no answer.
7. Press Ô until the display shows Paging:.
8. Press CHANGE to choose Y (Yes) or N (No).
9. Press ̈ to exit or Ô to continue programming.
Assigning telephones to the Direct-Dial extension
This setting allows you to programme which Direct-Dial extensions the telephone can call. Direct-Dial extension numband the digits you use to reach Direct-Dial telephones are programmed in System programming. See ‘Assigning a DireDial extension’ on page 69.
Compact Plus System Administration Guide P0905531 Issue 01
Programming capabilities 99
or
can
dix
N
ou upt
If ust
s 8 ng
g l.
g
N
Direct-Dial extensions are usually a receptionist for your officefor a particular department.
You can change which Direct-Dial telephone an extension is assigned to including none at all. Any number of telephones be assigned to call the Direct-Dial telephone.
See ‘Chart 11: Extension capabilities 3’ on page 296 in AppenA for a programming overview.
See ‘Accessing a Direct-Dial extension’ on page 242 for information on using this feature.
1. Place the programming overlay on any M7310N or M7324telephone.
2. Press Ä¥¥ÛßßÜÝÝ (CONFIG). The display shows Password:.
3. Press ÛÜßÝß (ADMIN). The display shows Terminals&Extns.
4. Press . The display shows Show extn#:.
5. Enter the extension number of the telephone you wish toprogramme. The displays shows nnn:nnn.
6. Press twice. The display shows Fwd no answer.
7. Press Ô until the display shows D-Dial.
8. Press CHANGE to select Extn1 or None.
9. Press ̈ to exit or Ô to continue programming.
Allowing Priority call
If you get a busy signal or a Do Not Disturb message when yhave an urgent call for someone in your office, you can interrtheir call using the Priority call feature.
By default, telephones are not allowed to make Priority calls.you want a telephone to be able to make a Priority call, you mprogramme Priority call for that telephone.
A person who receives a Priority call while on another call haseconds to accept or block the call. For information on blockicalls, see ‘Do Not Disturb’ on page 214. If the person does nothing, the Priority call feature puts their active call, includinconference parties, on Exclusive Hold and connects your cal
See ‘Making a Priority call’ on page 232 for information on usinthis feature.
1. Place the programming overlay on any M7310N or M7324telephone.
2. Press Ä¥¥ÛßßÜÝÝ (CONFIG). The display shows Password:.
P0905531 Issue 01 Compact Plus System Administration Guide
100 Programming capabilities
ne ss
at
N
3. Press ÛÜßÝß (ADMIN). The display shows Terminals&Extns.
4. Press . The display shows Show extn#:.
5. Enter the extension number of the telephone you wish toprogramme. The display shows nnn:nnn.
6. Press twice. The display shows Fwd no answer.
7. Press Ô until the display shows Priority call:.
8. Press CHANGE to choose Y (Yes) or N (No).
9. Press ̈ to exit or Ô to continue programming.
Assigning a Hotline
You can set up a Hotline telephone that automatically calls onumber (internal or external) when you lift the handset or prethe © key. For example, you can have an external Hotline to your local taxi company for your customers to use.
A hunt group extension number can be specified as a Hotlinetelephone.
Label the telephone, telling people that it is a Hotline and whnumber it dials so that they do not use it mistakenly.
See ‘Using Hotline’ on page 260 for information on using thisfeature.
1. Place the programming overlay on any M7310N or M7324telephone.
2. Press Ä¥¥ÛßßÜÝÝ (CONFIG). The display shows Password:.
3. Press ÛÜßÝß (ADMIN). The display shows Terminals&Extns.
4. Press . The display shows Show extn#:.
5. Enter the extension number of the telephone you wish toprogramme. The display shows nnn:nnn.
6. Press twice. The display shows Fwd no answer.
7. Press Ô until the display shows Hotline.
8. Press CHANGE to select the type of call the Hotline makes: None, Intrnl, or Extrnl.
Choosing Internal assigns an extension number.Choosing External assigns an external number.
If you select an external number:
9. Press . The display shows Extrnl#:None.
Compact Plus System Administration Guide P0905531 Issue 01

Programming capabilities 101
e
ell the
for
dix
N
to erts
10. Press CHANGE.
11. Enter the telephone number as you would dial it. Press OK.
12. Press Ô, then CHANGE to choose Use prime line, Use line:, Pool code:, or Use routing tabl.
13. Press ̈ to exit or Ô to continue programming.
Bypassing a Hotline
Press a line key, or use the Pre-Dial or Automatic Dial featurbefore you pick up the handset or press © on a Hotline telephone. Refer to Telephone Feature Card.
Auxiliary ringer
An auxiliary ringer is a separate external telephone ringer or bthat must be connected by the installer. The installer programsauxiliary ringer to ring for calls on a particular line in programming. An auxiliary ringer can also be programmed toring for a line placed in a Service mode. The extension defaultauxiliary ringer is No.
See ‘Chart 12: Extension capabilities 4’ on page 297 in AppenA for a programming overview.
1. Place the programming overlay on any M7310N or M7324telephone.
2. Press Ä¥¥ÛßßÜÝÝ (CONFIG). The display shows Password:.
3. Press ÛÜßÝß (ADMIN). The display shows Terminals&Extns.
4. Press . The display shows Show extn#:.
5. Enter the extension number of the telephone you wish toprogramme. The display shows nnn:nnn.
6. Press twice. The display shows Fwd no answer.
7. Press Ô until the display shows Aux. ringer.
8. Press CHANGE to choose Y (Yes) or N (No).
9. Press ̈ to exit or Ô to continue programming.
To use the auxiliary ringer with Night service, you must programme under Services.
Activating Redirect ring
As the administrator, you may want to programme the systemremind people when a line is being redirected. Redirect ring al
P0905531 Issue 01 Compact Plus System Administration Guide
102 Programming capabilities
ne
is
N
em. r r
nly
n to
N
your extension with a brief ring when a call is redirected on oof its lines.
See ‘Line redirection’ on page 252 for information on using thfeature.
1. Place the programming overlay on any M7310N or M7324telephone.
2. Press Ä¥¥ÛßßÜÝÝ (CONFIG). The display shows Password:.
3. Press ÛÜßÝß (ADMIN). The display shows Terminals&Extns.
4. Press . The display shows Show extn#:.
5. Enter the extension number of the telephone you wish toprogramme. The display shows nnn:nnn.
6. Press twice. The display shows Fwd no answer.
7. Press Ô until the display shows Redirect ring:.
8. Press CHANGE to select Y (Yes) or N (No).
9. Press ̈ to exit or Ô to continue programming.
How Line redirection is different from Call Forward
Call Forward forwards all calls that arrive at a particular telephone to another telephone within the Compact Plus systLine redirection redirects only the lines you specify, no mattewhich telephones they appear on, to a telephone outside theCompact Plus system. Line redirection takes precedence oveCall Forward.
Receive tones
Analogue equipment that is connected to the system with anAnalogue Terminal Adapter (external or internal), responds oto tone dialling signals. If you have analogue equipment connected to a telephone, set Receive tones for that extensioYes. Otherwise, leave Receive tones set to No.
1. Place the programming overlay on any M7310N or M7324telephone.
2. Press Ä¥¥ÛßßÜÝÝ (CONFIG). The display shows Password:.
3. Press ÛÜßÝß (ADMIN). The display shows Terminals&Extns.
4. Press . The display shows Show extn#:.
5. Enter the extension number of the telephone you wish toprogramme. The display shows nnn:nnn.
Compact Plus System Administration Guide P0905531 Issue 01

Programming capabilities 103
6. Press twice. The display shows Fwd no answer.
7. Press Ô until the display shows Receive tones.
8. Press CHANGE to choose Y (Yes) or N (No).
9. Press ̈ to exit or Ô to continue programming.
P0905531 Issue 01 Compact Plus System Administration Guide

104 Programming capabilities
Compact Plus System Administration Guide P0905531 Issue 01

Programming User preferences
� Programming User preferences.........106
� Changing the key programming for an extension.........106
� Changing a personal (user) speed dial code.........107
� Changing the Call log options.........107
� Changing the dialling options.........108
� Changing the display language.........109
� Changing the display contrast.........109
� Changing the Ring type.........110
P0905531 Issue 01 Compact Plus System Administration Guide

106 Programming User preferences
s for
urb ode. can
ing
to
hat e.
N
n
y
Programming User preferences
The User preferences section of programming allows you to programme memory keys, speed dial codes, and other settingany Norstar telephone on the system.
For example, an employee may want to have the Do Not Distfeature programmed to a memory key or create a speed dial cInstead of programming from that employee’s telephone, you enter User preferences on the nearest telephone to make thechange.
See ‘Chart 13: User preferences’ on page 298, for a programmoverview.
You can copy User preferences settings from one extension another whenever COPY appears on the display. The only programming that does not get copied is key programming between different models of telephone.
Changing the key programming for an extension
If there is one or more key on a particular model of telephone tyou would like to change, you can customise one key at a tim
1. Place the programming overlay on any M7310N or M7324telephone.
2. Press Ä¥¥ÛßßÜÝÝ (CONFIG). The display shows Password:.
3. Press àÛàÞ¡à (SAPLUS). The display shows Terminals&Extns.
4. Press . The display shows Show extn#:.
5. Enter the extension number of the telephone you wish toprogramme. The display shows nnn:nnn.
6. Press . The display shows Line access.
7. Press Ô until the display shows User prefernces.
8. Press . The display shows Model: followed by a five-digit code.
9. Press Ô. The display shows Key prgrming.
10. Press . The display shows how many keys are othat model of telephone.
11. Press FIND or press Ô to see a list of key programming.
12. Press TEL#, FEATR, or CLR to change the programming for ankey.
13. Press ̈ to exit or Ô to continue programming.
Compact Plus System Administration Guide P0905531 Issue 01
Programming User preferences 107
on
N
.
ge.
ay
re.
N
Changing a personal (user) speed dial code
See ‘Personal Speed Dial codes’ on page 215 for informationusing this feature.
1. Place the programming overlay on any M7310N or M7324telephone.
2. Press Ä¥¥ÛßßÜÝÝ (CONFIG). The display shows Password:.
3. Press ÛÜßÝß (ADMIN). The display shows Terminals&Extns.
4. Press . The display shows Show extn#:.
5. Enter the extension number of the telephone you wish toprogramme. The display shows nnn:nnn.
6. Press . The display shows Capabilities.
7. Press Ô until the display shows User prefernces.
8. Press . The display shows Model: followed by a five-digit code.
9. Press Ô twice. The display shows User speed
dial.
10. Press . The display shows the number of speed dial codes that are available.
11. Press Ô to see the first speed dial code (71).
12. Press Ô to search through all the speed dial codes
13. Press when you see the code you want to chan
14. Press CHANGE and enter the telephone number the same wyou would dial it on the telephone.
15. Press OK.
16. Press Ô and choose the line (or enter a code for aline pool) that the speed dial code should use.
17. Press ̈ to exit or Ô to continue programming.
Changing the Call log options
See ‘Call Log’ on page 264 for information on using this featu
1. Place the programming overlay on any M7310N or M7324telephone.
2. Press Ä¥¥ÛßßÜÝÝ (CONFIG). The display shows Password:.
3. Press ÛÜßÝß (ADMIN). The display shows Terminals&Extns.
P0905531 Issue 01 Compact Plus System Administration Guide

108 Programming User preferences
N
4. Press . The display shows Show extn:#.
5. Enter the extension number of the telephone you wish toprogramme. The display shows nnn:nnn.
6. Press . The display shows Capabilities.
7. Press Ô until the display shows User prefernces.
8. Press . The display shows Model: followed by a five-digit code.
9. Press Ô until the display shows Call log optÕns.
10. Press . The display shows No one answered.
11. Press CHANGE to choose No one answered, Unanswerd by me, Log all calls, or No autologging.
12. Press ̈ to exit or Ô to continue programming.
Changing the dialling options
See ‘Dialling mode’ on page 208 for information on using thisfeature.
1. Place the programming overlay on any M7310N or M7324telephone.
2. Press Ä¥¥ÛßßÜÝÝ (CONFIG). The display shows Password:.
3. Press ÛÜßÝß (ADMIN). The display shows Terminals&Extns.
4. Press . The display shows Show extn#:.
5. Enter the extension number of the telephone you wish toprogramme. The display shows nnn:nnn.
6. Press .
7. Press Ô until the display shows User prefernces.
8. Press . The display shows Model: followed by a five-digit code.
9. Press Ô until the display shows Dialling optÕns.
10. Press . The display shows Automatic dial.
11. Press CHANGE to choose Automatic dial, Standard, or Predial.
12. Press ̈ to exit or Ô to continue programming.
Compact Plus System Administration Guide P0905531 Issue 01

Programming User preferences 109
the
N
e
is
N
Changing the display language
The Norstar system supports a Visually Impaired Operator Console (VIOC), which provides computer-based speech synthesis for the programming interface. To use this function, display language needs to be set to Operating.
See ‘Visually Impaired Operator Console’ on page 202 for information on using this feature.
1. Place the programming overlay on any M7310N or M7324telephone.
2. Press Ä¥¥ÛßßÜÝÝ (CONFIG). The display shows Password:.
3. Press ÛÜßÝß (ADMIN). The display shows Terminals&Extns.
4. Press . The display shows Show extn#:.
5. Enter the extension number of the telephone you wish toprogramme. The display shows nnn:nnn.
6. Press . The display shows Capabilities.
7. Press Ô until the display shows User prefernces.
8. Press . The display shows Model: followed by a five-digit code.
9. Press Ô until the display shows Language:.
10. Press CHANGE to choose English or Opratng.
11. Press ¨ to exit or Ô to continue programming.
Changing the display contrast
Display contrast allows you to lighten or darken the telephondisplay to suit the lighting conditions in your office.
See ‘Display contrast’ on page 209 for information on using thfeature.
1. Place the programming overlay on any M7310N or M7324telephone.
2. Press Ä¥¥ÛßßÜÝÝ (CONFIG). The display shows Password:.
3. Press ÛÜßÝß (ADMIN). The display shows Terminals&Extns.
4. Press . The display shows Show extn#:.
5. Enter the extension number of the telephone you wish toprogramme. The display show nnn:nnn.
6. Press . The display shows Capabilities.
P0905531 Issue 01 Compact Plus System Administration Guide

110 Programming User preferences
ne
re.
N
7. Press Ô until the display shows User prefernces.
8. Press . The display shows Model: followed by a five-digit code.
9. Press Ô until the display shows Display cntrst:.
10. Press CHANGE to choose 1, 2, 3, 4, 5, 6, 7, 8, or 9.
11. Press ̈ to exit or Ô to continue programming.
Note: You do not see any change in the display of the telephoyou are using when you are programming User preferences from another telephone.
Changing the Ring type
See ‘Ring type’ on page 210 for information on using this featu
1. Place the programming overlay on any M7310N or M7324telephone.
2. Press Ä¥¥ÛßßÜÝÝ (CONFIG). The display shows Password:.
3. Press ÛÜßÝß (ADMIN). The display shows Terminals&Extns.
4. Press . The display shows Show extn#:.
5. Enter the extension number of the telephone you wish toprogramme. The display shows nnn:nnn.
6. Press . The display shows Capabilities.
7. Press Ô until the display shows User prefernces.
8. Press . The display shows Model: followed by a five-digit code.
9. Press Ô until the display shows Ring type:.
10. Press CHANGE to choose 1, 2, 3, or 4.
11. Press ̈ to exit or Ô to continue programming.
Compact Plus System Administration Guide P0905531 Issue 01
Programming Hunt groups
� Adding or removing members from a group.........113
� Programming Hunt groups.........111
� Moving members of a group.........113
� Assigning or unassigning lines to a group.........114
� Setting the distribution mode.........115
� Setting the hunt delay.........116
� Programming options if all hunt members are busy.........116
� Programming the queue timeout.........117
� Programming the overflow extension.........118
� Setting the name.........118
� Checking hunt group metrics.........119
P0905531 Issue 01 Compact Plus System Administration Guide

112 Programming Hunt groups
to you
f are:
,
nt
ort ing
in a
ore
t a
Programming Hunt Groups
Establish hunt groups in your system to allow incoming calls reach a group of extensions. The hunt groups feature allows to call a group of extensions with a single directory number.
Hunt groups are used in situations where a group of people performing the same task are required to answer a number orelated telephone queries. Some typical uses of hunt groups
• a sales department answering questions on product pricesavailability etc.
• a support department answering questions concerning theoperation of a product
• an emergency department answering calls for help
A company with support services for different products may wato have a hunt group dedicated to each product. Support personnel handling Product A can be in one group, and supppersonnel handling Product B can be in another group. Incomcalls look for the next available extension in the group. If no extension is available, the hunt groups feature places the callqueue or routes it to an overflow extension.
Under the hunt groups sub-heading, you programme:
• members of a group
• member position in a group
• the lines assigned to a group
• the distribution of incoming calls
• the length of time the system looks for available agents befsending the call to the overflow position
• how the system handles calls if all agents are busy
Note: Do not programme videophones as members of a hungroup. Hunt groups allow one B channel connection attime and videophones use two B channels.
Compact Plus System Administration Guide P0905531 Issue 01

Programming Hunt groups 113
ers
et.
he nt
N
e.
N
Adding or removing members from a group
Compact Plus supports 6 groups with a maximum of 60 membsystem-wide. Members of the group can be any Norstar extension, DNA, or ISDN extension. An extension can be in multiple hunt groups but each occurrence increases the totalnumber of members in the system.
There can be one appearance of the same hunt group on a s
The extension number range for hunt groups is 315 to 320. Textension numbers in this range cannot be members of a hugroup.
1. Place the programming overlay on any M7310N or M7324telephone.
2. Press Ä¥¥ÛßßÜÝÝ (CONFIG). The display shows Password:.
3. Press àÛàÞ¡à (SAPLUS). The display shows Terminals&Extns.
4. Press Ô until the display shows System prgrming.
5. Press . The display shows Hunt groups.
6. Press . The display shows Show group:.
7. Enter the hunt group number (1-6) you want to programm
8. Press . The display shows Member extns.
9. Press . The display shows the members for that group.
10. Press ADD to add a member or press REMOVE to remove a member from the group.
11. To program the extension appearance, press . The display shows Appr&Ring.
12. Press CHANGE to select Appr only, Appr&Ring or Ring only.
13. Press ̈ to exit or Ôto continue programming.
Moving members of a group
Member order within a hunt group is important. The memberorder determines how a call is routed through a hunt group.
1. Place the programming overlay on any M7310N or M7324telephone.
2. Press Ä¥¥ÛßßÜÝÝ (CONFIG). The display shows Password:.
P0905531 Issue 01 Compact Plus System Administration Guide

114 Programming Hunt groups
6).
ber
n to nt
N
-6).
3. Press àÛàÞ¡à (SAPLUS). The display shows Terminals&Extns.
4. Press Ô until the display shows System prgrming.
5. Press . The display shows Hunt groups.
6. Press . The display shows Show group:.
7. Enter the hunt group number you want to programme (1 to
8. Press . The display shows Member extns.
9. Press . The display shows the members for that group.
10. Press MOVE to move an existing member to another place within the hunt group. The display shows the member numfollowed by an arrow.
11. Enter the new position number for the extension.
12. Press ̈ to exit or Ôto continue programming.
Assigning or unassigning lines to a groupIt is recommended to set the hunt group’s line Prime extensioNone. Doing so prevents delayed ring transfer of external hugroup calls to the Prime extension before the hunt group canreceive the call.
You can assign a line to only one group.
1. Place the programming overlay on any M7310N or M7324telephone.
2. Press Ä¥¥ÛßßÜÝÝ (CONFIG). The display shows Password:.
3. Press àÛàÞ¡à (SAPLUS). The display shows Terminals&Extns.
4. Press Ô until the display shows System prgrming.
5. Press . The display shows Hunt groups.
6. Press . The display shows Show group:.
7. Enter the Hunt Group number you want to programme (1
8. Press . The display shows Member extns:.
9. Press Ô. The display shows Line assignment.
10. Press . The display shows Show line:.
11. Enter the line number you want to program, press SCAN to go the first line assigned to this group or press LIST to go to the first line in the system.
12. Press CHANGE to programme the line as Unassigned or Assigned.
Compact Plus System Administration Guide P0905531 Issue 01
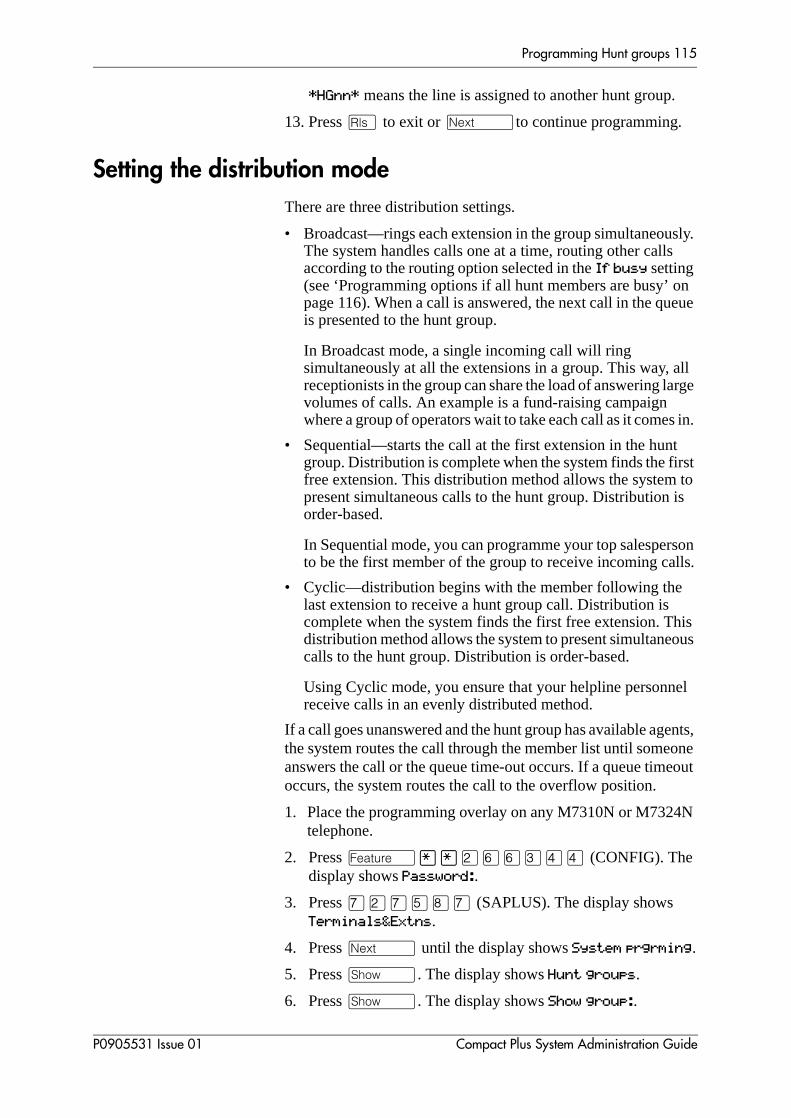
Programming Hunt groups 115
.
sly.
n eue
all rge
s in.
t rst to is
son lls.
his ous
el
ents, one out
N
*HGnn* means the line is assigned to another hunt group
13. Press ̈ to exit or Ôto continue programming.
Setting the distribution mode
There are three distribution settings.
• Broadcast—rings each extension in the group simultaneouThe system handles calls one at a time, routing other callsaccording to the routing option selected in the If busy setting (see ‘Programming options if all hunt members are busy’ opage 116). When a call is answered, the next call in the quis presented to the hunt group.
In Broadcast mode, a single incoming call will ring simultaneously at all the extensions in a group. This way, receptionists in the group can share the load of answering lavolumes of calls. An example is a fund-raising campaign where a group of operators wait to take each call as it come
• Sequential—starts the call at the first extension in the hungroup. Distribution is complete when the system finds the fifree extension. This distribution method allows the systempresent simultaneous calls to the hunt group. Distribution order-based.
In Sequential mode, you can programme your top salesperto be the first member of the group to receive incoming ca
• Cyclic—distribution begins with the member following the last extension to receive a hunt group call. Distribution is complete when the system finds the first free extension. Tdistribution method allows the system to present simultanecalls to the hunt group. Distribution is order-based.
Using Cyclic mode, you ensure that your helpline personnreceive calls in an evenly distributed method.
If a call goes unanswered and the hunt group has available agthe system routes the call through the member list until someanswers the call or the queue time-out occurs. If a queue timeoccurs, the system routes the call to the overflow position.
1. Place the programming overlay on any M7310N or M7324telephone.
2. Press Ä¥¥ÛßßÜÝÝ (CONFIG). The display shows Password:.
3. Press àÛàÞ¡à (SAPLUS). The display shows Terminals&Extns.
4. Press Ô until the display shows System prgrming.
5. Press . The display shows Hunt groups.
6. Press . The display shows Show group:.
P0905531 Issue 01 Compact Plus System Administration Guide
116 Programming Hunt groups
6).
ws up
ber
N
6).
n
-out
N
7. Enter the hunt group number you want to programme (1-
8. Press . The display shows Member extns.
9. Press Ô until the display shows Mode:.
10. Press CHANGE to set the mode: Sequential, Cyclic, Broadcast.
11. Press ̈ to exit or Ôto continue programming.
Setting the hunt delayYou can programme the number of ring cycles the system alloat a hunt group extension before moving to the next hunt groextension.
You can estimate the delay in seconds by multiplying the numof rings by six.
1. Place the programming overlay on any M7310N or M7324telephone.
2. Press Ä¥¥ÛßßÜÝÝ (CONFIG). The display shows Password:.
3. Press àÛàÞ¡à (SAPLUS). The display shows Terminals&Extns.
4. Press Ô until the display shows System prgrming.
5. Press . The display shows Hunt groups.
6. Press . The display shows Show group:.
7. Enter the hunt group number you want to programme (1-
8. Press . The display shows Member extns.
9. Press Ô until the display shows Hunt delay:.
10. Press CHANGE to select the setting: 1,2, 3, 4, 5, 6, 7, 8, 9, or 10.
11. Press ̈ to exit or Ô to continue programming.
Programming options if all hunt members are busyThere are three routing options if all agents are busy:
• BusyTone—the caller gets a busy tone
• Overflow—the call routes to the hunt group overflow positio
• Queue—the call stays in the system for the period of timeprogrammed in Q timeout. Within this period of time, the call presents to an agent if one becomes available. When timeoccurs, the call routes to the hunt group overflow position.
1. Place the programming overlay on any M7310N or M7324telephone.
Compact Plus System Administration Guide P0905531 Issue 01

Programming Hunt groups 117
6).
a to
N
6).
2. Press Ä¥¥ÛßßÜÝÝ (CONFIG). The display shows Password:.
3. Press àÛàÞ¡à (SAPLUS). The display shows Terminals&Extns.
4. Press Ô until the display shows System prgrming.
5. Press . The display shows Hunt groups.
6. Press . The display shows Show group:.
7. Enter the hunt group number you want to programme (1-
8. Press . The display shows Member extns.
9. Press Ô until the display shows If busy:.
10. Press CHANGE to set the mode: BusyTone, Overflow, Queue.
11. Press ̈ to exit or Ôto continue programming.
Programming the queue timeout
This setting allows you to programme the number of secondscall will remain in the hunt group queue before it is also routedthe overflow position.
1. Place the programming overlay on any M7310N or M7324telephone.
2. Press Ä¥¥ÛßßÜÝÝ (CONFIG). The display shows Password:.
3. Press àÛàÞ¡à (SAPLUS). The display shows Terminals&Extns.
4. Press Ô until the display shows System prgrming.
5. Press . The display shows Hunt groups.
6. Press . The display shows Show group:.
7. Enter the hunt group number you want to programme (1-
8. Press . The display shows Member extns.
9. Press Ô until the display shows Q Timeout:.
10. Press CHANGE to set the queue timeout: 15, 30, 45, 60, 120 or 180.
11. Press ̈ to exit or Ôto continue programming.
P0905531 Issue 01 Compact Plus System Administration Guide
118 Programming Hunt groups
. If
ted
N
6).
or
N
6).
Programming the overflow extension
You can programme which extension receives overflow callsthe overflow extension is a hunt group extension, the call is considered a new call and joins the queue.
The overflow extension can be an extension number associawith a voice mailbox.
1. Place the programming overlay on any M7310N or M7324telephone.
2. Press Ä¥¥ÛßßÜÝÝ (CONFIG). The display shows Password:.
3. Press àÛàÞ¡à (SAPLUS). The display shows Terminals&Extns.
4. Press Ô until the display shows System prgrming.
5. Press . The display shows Hunt groups.
6. Press . The display shows Show group:.
7. Enter the hunt group number you want to programme (1-
8. Press . The display shows Member extns.
9. Press Ô until the display shows Overflow:.
10. Press . The display shows Overflow:HGn.
11. Press CHANGE to change the overflow position.
12. Enter the new overflow position.
13. Press ̈ to exit or Ô to continue programming.
Setting the name
You can programme the hunt group name, such as SERVICESALES. The name can be up to seven characters in length.
1. Place the programming overlay on any M7310N or M7324telephone.
2. Press Ä¥¥ÛßßÜÝÝ (CONFIG). The display shows Password:.
3. Press àÛàÞ¡à (SAPLUS). The display shows Terminals&Extns.
4. Press Ô until the display shows System prgrming.
5. Press . The display shows Hunt groups.
6. Press . The display shows Show group:.
7. Enter the hunt group number you want to programme (1-
8. Press . The display shows Member extns.
Compact Plus System Administration Guide P0905531 Issue 01

Programming Hunt groups 119
N
n
the
alls.
k to
the
was
9. Press Ô until the display shows Name:.
10. Press CHANGE.
11. Using the keypad, enter the name of the hunt group.
12. Press Ô to store the name.
13. Press ̈ to exit or Ô to continue programming.
Checking hunt group metrics
This feature provides you with hunt group call information.
1. Place the programming overlay on any M7310N or M7324telephone.
2. Press Ä¥¥ÛßßÜÝÝ (CONFIG). The display shows Password :.
3. Press àÛàÞ¡à (SAPLUS). The display shows Terminals&Extns.
4. Press Ô until the display shows Usage Metrics.
5. Press . The display shows Hunt groups.
6. Press . The display shows Show group:.
7. Enter the number of the hunt group you wish to view. Thedisplay shows HG<n> metrics.
8. Press . The display shows the date the informatiowas last cleared.
9. Press Ô. The display shows TotalCalls:.
The value shown is the total number of calls received by hunt group, to a maximum of 99999.
10. Press Ô. The display shows Ans:.
The values shown are the total number of calls that were answered and the percentage of answered calls to total c
11. Press Ô. The display shows Avg ans: _sec.
The value shown is the average time in seconds that it tooanswer a call, to a maximum of 999.
12. Press Ô. The display shows Abndn:.
The values shown are the number of abandoned calls andpercentage of abandoned calls to total calls.
13. Press Ô. The display shows Busy:.
The values shown are the number of times the hunt group busy and the percentage of busy calls to total calls.
14. Press Ô. The display shows Overfl:.
P0905531 Issue 01 Compact Plus System Administration Guide

120 Programming Hunt groups
low .
l
The values shown are the number of calls sent to the overfposition and the percentage of overflow calls to total calls
15. Press Ô. The display shows Avg Q:_sec.
The value shown is the average time, in seconds, the calwaited in the queue, to a maximum of 999.
16. Press ̈ to exit or Ô to continue programming.
Compact Plus System Administration Guide P0905531 Issue 01

Programming feature settings
� Background music.........122
� On hold.........122
� Receiver volume.........123
� Camp timeout.........123
� Park timeout.........124
� Park mode.........124
� Transfer callback.........125
� Network callback.........126
� Conference tone.........127
� Directed (call) pickup.........128
� Page tone.........128
� Page timeout.........129
� Call log space.........129
� Alarm extension.........130
� Answer extension.........131
P0905531 Issue 01 Compact Plus System Administration Guide
122 Programming feature settings
been sic
g
N
ut on
vate the
N
Background music
This feature allows people to listen to music through their telephone speakers, providing an external music source has installed. The default is No, which means that Background muis disabled.
See ‘Background music’ on page 214 for information on usinthis feature.
1. Place the programming overlay on any M7310N or M7324telephone.
2. Press Ä¥¥ÛßßÜÝÝ (CONFIG). The display shows Password:.
3. Press àÛàÞ¡à (SAPLUS). The display shows Terminals&Extns.
4. Press Ô until the display shows System prgrming.
5. Press . The display shows Hunt groups.
6. Press Ô until the display shows Featr settings.
7. Press . The display shows Backgrnd music:.
8. Press CHANGE to choose Y (Yes) or N (No).
9. Press ̈ to exit or Ô to continue programming.
On hold
You can choose what a caller hears when the call has been phold.
Note: In systems networked with private circuits, it is a good idea to have callers hear tones on all systems on the prinetwork. Otherwise, callers who are transferred acrossprivate network may hear a confusing variety of music,tones, and silence.
1. Place the programming overlay on any M7310N or M7324telephone.
2. Press Ä¥¥ÛßßÜÝÝ (CONFIG). The display shows Password:.
3. Press àÛàÞ¡à (SAPLUS). The display shows Terminals&Extns.
4. Press Ô until the display shows System prgrming.
5. Press . The display shows Hunt groups.
6. Press Ô until the display shows Featr settings.
7. Press . The display shows Backgrnd music:.
Compact Plus System Administration Guide P0905531 Issue 01

Programming feature settings 123
vel hen el
N
ugh or
ped
N
8. Press Ô until the display shows On hold:.
9. Press CHANGE to choose Tones, Music, or Silence.
10. Press ̈ to exit or Ôto continue programming.
Receiver volume
Receiver volume allows you to specify whether the volume leof a receiver or headset returns to the system default level wa call is ended or put on hold, or whether it remains at the levset at the individual telephone.
1. Place the programming overlay on any M7310N or M7324telephone.
2. Press Ä¥¥ÛßßÜÝÝ (CONFIG). The display shows Password:.
3. Press àÛàÞ¡à (SAPLUS). The display shows Terminals&Extns.
4. Press Ô until the display shows System prgrming.
5. Press . The display shows Hunt groups.
6. Press Ô until the display shows Featr settings.
7. Press . The display shows Backgrnd music:.
8. Press Ô until the display shows Receiver volume.
9. Press and use CHANGE to choose Use sys volume or Use extn volume.
10. Press ̈ to exit or Ô to continue programming.
Camp timeout
You can send an external call to another extension, even thoall its lines are busy, using the Camp-on feature. It is useful fpeople who process many calls, such as secretaries or receptionists. Camp timeout specifies the number of secondsbefore an unanswered call returns to the telephone that camthe call.
See ‘Transferring to a busy extension (Call Camping)’ on page 233 for information on using this feature.
1. Place the programming overlay on any M7310N or M7324telephone.
2. Press Ä¥¥ÛßßÜÝÝ (CONFIG). The display shows Password:.
3. Press àÛàÞ¡à (SAPLUS). The display shows Terminals&Extns.
P0905531 Issue 01 Compact Plus System Administration Guide

124 Programming feature settings
d the
that
N
e the e
ult, es
4. Press Ô until the display shows System prgrming.
5. Press . The display shows Hunt groups.
6. Press Ô until the display shows Featr settings.
7. Press . The display shows Backgrnd music.
8. Press Ô until the display shows Camp time-out:.
9. Press CHANGE to choose 30, 45, 60, 90, 120, 150, or 180 seconds.
10. Press ̈ to exit or Ô to continue programming.
Park timeout
The Call Parking feature allows you to place a call on hold anassign it a code so it can be retrieved from any telephone in Compact Plus system. Park timeout specifies the number of seconds before an unanswered call returns to the extension parked the call.
See ‘Call Parking’ on page 230 for information on using this feature.
1. Place the programming overlay on any M7310N or M7324telephone.
2. Press Ä¥¥ÛßßÜÝÝ (CONFIG). The display shows Password:.
3. Press àÛàÞ¡à (SAPLUS). The display shows Terminals&Extns.
4. Press Ô until the display shows System prgrming.
5. Press . The display shows Hunt groups.
6. Press Ô until the display shows Featr settings.
7. Press . The display shows Backgrnd music.
8. Press Ô until the display shows Park time-out:.
9. Press CHANGE to choose 30, 45, 60, 90, 120, 150, 180, 300 or600 seconds.
10. Press ̈ to exit or Ô to continue programming.
Park mode Park mode lets you suspend a call, and lets someone retrievcall by entering a retrieval code at any Norstar extension in thsystem.
The Park mode retrieval code is a three-digit number. By defathe first digit of that number is 1, with the possible retrieval cod
Compact Plus System Administration Guide P0905531 Issue 01

Programming feature settings 125
to
If 1. If
e 06, as
N
call ack
can gs
N
ranging from 101 to 109. You can now programme the systemassign retrieval codes.
Lowest—Norstar assigns the lowest available retrieval code.there is only one parked call on the system, the number is 10there are three calls, they are assigned 101, 102, and 103.
Cycle—Norstar assigns the next available retrieval code in thsequence (101 to 109). If the last parked call was assigned 1then the next one is assigned 107. If the last retrieval code w109, then the next code is 101.
See ‘Call Parking’ on page 230 for information on using this feature.
1. Place the programming overlay on any M7310N or M7324telephone.
2. Press Ä¥¥ÛßßÜÝÝ (CONFIG). The display shows Password:.
3. Press àÛàÞ¡à (SAPLUS). The display shows Terminals&Extns.
4. Press Ô until the display shows System prgrming.
5. Press . The display shows Hunt groups.
6. Press Ô until the display shows Featr settings.
7. Press . The display shows Backgrnd music.
8. Press Ô until the display shows Park Mode:.
9. Press CHANGE to choose Lowest or Cycle.
10. Press ̈ to exit or Ô to continue programming.
Transfer callback
After a specified number of rings, an unanswered transferred returns to the extension that made the transfer. Transfer callbspecifies the number of rings before the call is returned. You estimate the delay in seconds if you multiply the number of rinby three.
See ‘Transferring a call’ on page 233 for information on the Transfer feature.
1. Place the programming overlay on any M7310N or M7324telephone.
2. Press Ä¥¥ÛßßÜÝÝ (CONFIG). The display shows Password:.
3. Press àÛàÞ¡à (SAPLUS). The display shows Terminals&Extns.
4. Press Ô until the display shows System prgrming.
P0905531 Issue 01 Compact Plus System Administration Guide

126 Programming feature settings
all
s
ay
N
riod ine ,
5. Press . The display shows Hunt groups.
6. Press Ô until the display shows Featr settings.
7. Press . The display shows Backgrnd music.
8. Press Ô until the display shows Trnsfr callbk:.
9. Press CHANGE to choose 3, 4, 5, 6, or 12 rings.
10. Press ̈ to exit or Ô to continue programming.
Network callback
If you transfer a call to a private network destination and the cis not answered, it comes back to you after a specified time. Network callback defines the time, in seconds, before a call ireturned to your extension.
Since the time required to transfer a call across the private network varies depending on the complexity of your private network, you may need to experiment to achieve the correct setting.
Note: Depending on how a private network call is routed, it mnot always be possible for the system to return a transferred call.
1. Place the programming overlay on any M7310N or M7324telephone.
2. Press Ä¥¥ÛßßÜÝÝ (CONFIG). The display shows Password:.
3. Press àÛàÞ¡à (SAPLUS). The display shows Terminals&Extns.
4. Press Ô until the display shows System prgrming.
5. Press . The display shows Hunt groups.
6. Press Ô until the display shows Featr settings.
7. Press . The display shows Backgrnd music.
8. Press Ô until the display shows Netwk callbk:.
9. Press CHANGE to choose 15, 30, 45, 60, or 90 seconds.
10. Press ̈ to exit or Ô to continue programming.
Held line reminder and delay
A reminder tone and display message occur at a Norstar telephone when a call has been placed on hold for a certain peof time. The display continues to show the name of the held luntil the call is dealt with. In the case of multiple calls on hold
Compact Plus System Administration Guide P0905531 Issue 01

Programming feature settings 127
the
e es
N
.
call an
n
N
the display shows the name of the line that has been held thelongest. Once that call has been dealt with, the display showsnumber of the next longest held call.
You can switch Held line reminder on or off and set the time before the reminder takes effect.
The Held line reminder emits a double periodic tone. This tondistinguishes the feature from the Call Waiting tone, which usa single periodic tone.
See ‘Holding’ on page 226 for information on this feature.
1. Place the programming overlay on any M7310N or M7324telephone.
2. Press Ä¥¥ÛßßÜÝÝ (CONFIG). The display shows Password:.
3. Press àÛàÞ¡à (SAPLUS). The display shows Terminals&Extns.
4. Press Ô until the display shows System prgrming.
5. Press . The display shows Hunt groups.
6. Press Ô until the display shows Featr settings.
7. Press . The display shows Backgrnd music.
8. Press Ô until the display shows Held reminder:.
9. Press CHANGE to choose Y (Yes) or N (No).
10. Press Ô. The display shows Remind delay:.
11. Press CHANGE to choose 30, 60, 90, 120, 150, or 180 seconds
12. Press ̈ to exit or Ô to continue programming.
Conference tone
This tone may be heard by all parties as soon as a three-wayis established using the Conference or Privacy feature. You cturn Conference tones on and off for the whole system.
See ‘Making a conference call’ on page 237 for information ousing the Conference feature.
1. Place the programming overlay on any M7310N or M7324telephone.
2. Press Ä¥¥ÛßßÜÝÝ (CONFIG). The display shows Password:.
3. Press àÛàÞ¡à (SAPLUS). The display shows Terminals&Extns.
4. Press Ô until the display shows System prgrming.
5. Press . The display shows Hunt groups.
P0905531 Issue 01 Compact Plus System Administration Guide
128 Programming feature settings
hat
d
21
N
s.
g
N
6. Press Ô until the display shows Featr settings.
7. Press . The display shows Backgrnd music.
8. Press Ô until the display shows Confrence tone:.
9. Press CHANGE to choose Y (Yes) or N (No).
10. Press ̈ to exit or Ô to continue programming.
Directed (call) pickup
The Directed pickup feature allows someone to pick up calls tare ringing at another telephone by entering Äàß and the extension number. You can enable or disable Directepickup for the system. The default is Yes, which means that Directed pickup is enabled.
See ‘Answering a telephone using Directed Pickup’ on page 2for information on using this feature.
1. Place the programming overlay on any M7310N or M7324telephone.
2. Press Ä¥¥ÛßßÜÝÝ (CONFIG). The display shows Password:.
3. Press àÛàÞ¡à (SAPLUS). The display shows Terminals&Extns.
4. Press Ô until the display shows System prgrming.
5. Press . The display shows Hunt groups.
6. Press Ô until the display shows Featr settings.
7. Press . The display shows Backgrnd music.
8. Press Ô until the display shows Directd pickup:.
9. Press CHANGE to choose Y (Yes) or N (No).
10. Press ̈ to exit or Ô to continue programming.
Page tone
You can choose whether a tone sounds before a page begin
See ‘Paging’ on page 245 for information on using the Paginfeature.
1. Place the programming overlay on any M7310N or M7324telephone.
2. Press Ä¥¥ÛßßÜÝÝ (CONFIG). The display shows Password:.
3. Press àÛàÞ¡à (SAPLUS). The display shows Terminals&Extns.
Compact Plus System Administration Guide P0905531 Issue 01
Programming feature settings 129
ified
g
N
t of Call ated
.
4. Press Ô until the display shows System prgrming.
5. Press . The display shows Hunt groups.
6. Press Ô until the display shows Featr settings.
7. Press . The display shows Backgrnd music.
8. Press Ô until the display shows Page tone:.
9. Press CHANGE to choose Y (Yes) or N (No).
10. Press ̈ to exit or Ô to continue programming.
Page timeout
The Paging feature is automatically disconnected after a speclength of time.
See ‘Paging’ on page 245 for information on using the Paginfeature.
1. Place the programming overlay on any M7310N or M7324telephone.
2. Press Ä¥¥ÛßßÜÝÝ (CONFIG). The display shows Password:.
3. Press àÛàÞ¡à (SAPLUS). The display shows Terminals&Extns.
4. Press Ô until the display shows System prgrming.
5. Press . The display shows Hunt groups.
6. Press Ô until the display shows Featr settings.
7. Press . The display shows Backgrnd music.
8. Press Ô until the display shows Page timeout:.
9. Press CHANGE to choose 15, 30, 60, 120, 180, 300, 600, 2700 seconds.
10. Press ̈ to exit or Ô to continue programming.
Call log space
Call log space customises how log space is allocated to telephones in the system. Resetting all logs allows you to reallocate the Call log space equally to all telephones in yoursystem.
Use this heading only if you want to allocate an equal amounlog space to all the telephones in your system. There are 250log spaces available in the system. There are no spaces allocby default. Changing the space allocation using log defaults defines the log space available to all telephones in the system
P0905531 Issue 01 Compact Plus System Administration Guide

130 Programming feature settings
l,
g
N
for
es).
e
y s.
N
Any remaining unassigned log space is available in a log pooand can be reallocated under Terminals&Extns.
Reallocating Call log space may destroy call log data at telephones that lose space.
See ‘Call Log’ on page 264 for information on using the Call lofeature.
1. Place the programming overlay on any M7310N or M7324telephone.
2. Press Ä¥¥ÛßßÜÝÝ (CONFIG). The display shows Password:.
3. Press àÛàÞ¡à (SAPLUS). The display shows Terminals&Extns.
4. Press Ô until the display shows System prgrming.
5. Press . The display shows Hunt groups.
6. Press Ô until the display shows Featr settings.
7. Press . The display shows Backgrnd music.
8. Press Ô until the display shows Call log space.
9. Press . The display shows Reset all logs?.
10. Press YES and use the key pad to enter the space allocationthe call log at each extension. You must use a three-digit number (for example, 020 to give each extension 20 spac
11. Press YES to accept the settings and end programming. Thsystem automatically reallocates log space. Press NO to reset the number of spaces allocated to each log.
Alarm extension
An Alarm telephone displays system alarm codes, should theoccur. You can determine which telephone receives the alarmThe default is extension 221.
See ‘Recording and reporting alarm codes’ on page 192 for information on the alarm codes.
1. Place the programming overlay on any M7310N or M7324telephone.
The Alarm telephone must have a two-line display.
The Alarm telephone must be an M7310N or M7324N telephone.
Compact Plus System Administration Guide P0905531 Issue 01
Programming feature settings 131
ts
us pact ot
N
2. Press Ä¥¥ÛßßÜÝÝ (CONFIG). The display shows Password:.
3. Press àÛàÞ¡à (SAPLUS). The display shows Terminals&Extns.
4. Press Ô until the display shows System prgrming.
5. Press . The display shows Hunt groups.
6. Press Ô until the display shows Featr settings.
7. Press . The display shows Backgrnd music.
8. Press Ô until the display shows AlarmExtn:.
9. Press CHANGE.
10. Enter the extension number or press CLR to set the Alarm telephone to None.
11. Press ̈ to exit or Ô to continue programming.
Answer extension
The Answer extns setting in Terminals&Extns programming leyou assign Answer extension numbers to a telephone. The Answer extn setting in Featr settings programming lets you determine what types of calls will alert at the telephone. Yourchoices are: basic, Enhanced, and Extended.
Basic permits the same call coverage allowed in Compact PlRelease 1. Enhanced permits the same call coverage as ComPlus Release 1 as well as overflow call routing calls but will npermit blind transferred calls. Extended permits all call typesexcept priority calls, voice calls and other Answer key calls toalert at the telephone.
1. Place the programming overlay on any M7310N or M7324telephone.
2. Press Ä¥¥ÛßßÜÝÝ (CONFIG). The display shows Password :.
3. Press ÛßßÜÝÝ (CONFIG). The display shows Terminals&Extns.
4. Press Ô until the display shows System prgrming.
5. Press . The display shows Hunt Groups.
6. Press Ô until the display shows Featr settings.
7. Press . The display shows Backgrnd music:.
8. Press Ô until the display shows Ans. extn:.
9. Press CHANGE to select the settings: Basic, Enhanced, and Extended.
P0905531 Issue 01 Compact Plus System Administration Guide

132 Programming feature settings
10. Press ̈ to exit or Ô to continue programming.
Compact Plus System Administration Guide P0905531 Issue 01

Moving and copying
� Extension relocation.........134
� Copying programming for telephones.........135
P0905531 Issue 01 Compact Plus System Administration Guide

134 Moving and copying
om om
n
r
.
A,
Extension relocation
The Extension relocation feature lets you move a telephone frone extension socket to another without losing any of its custprogramming or its assigned extension number. By default Extension relocation is set to No.
Note: Turn Extension relocation to No after the telephone installation and programming are completed, rather thabefore. This provides you with more flexibility in testingequipment. If Extension relocation is set to No while a telephone is moved, that telephone’s extension numbeand data remain with the physical port on the Central Control Unit (CCU); the telephone does not receive theoriginal programming when it is reconnected elsewhere
Remember to record any programming changes in the Programming Record.
See ‘Chart 14: Extension relocation’ on page 299 in Appendixfor a programming overview.
Wait one minute between moves.
After moving a telephone, wait one minute before moving the telephone a second time or changing the telephone�s extension number. The CCU may take up to sixty seconds to recognise a telephone moved to a new location.
Do not connect another telephone to the old socket before relocating the telephone.
When moving a telephone with Extension relocation turned on, do not connect another telephone to the extension socket of the telephone you are moving before connecting that telephone to a new extension socket.
If you connect a telephone of the same type to the vacated extension socket, that telephone receives the programming of the original telephone.
If you connect a telephone of a different type to the vacated extension socket, that telephone receives default programming and the original telephone�s programming is lost.
Compact Plus System Administration Guide P0905531 Issue 01

Moving and copying 135
N
gs ing er
only type
or
or to
1. Place the programming overlay on any M7310N or M7324telephone.
2. Press Ä¥¥ÛßßÜÝÝ (CONFIG). The display shows Password:.
3. Press àÛàÞ¡à (SAPLUS). The display shows Terminals&Extns.
4. Press Ô until the display shows System prgrming.
5. Press . The display shows Hunt groups.
6. Press Ô until the display shows Featr settings.
7. Press . The display shows Backgrnd music.
8. Press Ô until the display shows Extn relocatn:.
9. Press CHANGE to choose Y (Yes) or N (No).
10. Press ̈ to exit or Ô to continue programming.
Copying programming for telephones
During programming, you can copy certain programmed settinfrom one line to another, or from one telephone to another usthe COPY key when it appears on the display. You can copy eithsystem programming, or system programming and personal programming.
Personal programming includes the settings programmed bypeople at their own telephones using feature codes. You can copy personal programming between telephones of the samewhen both are plugged into the system.
See ‘Chart 15: Copying settings’ on page 299 in Appendix A fa programming overview.
Copying system programming to a single extension
Pressing the COPY softkey allows you to copy programming fromone extension to another extension, to a range of extensions,all extensions in the system.
Relocate to extension jacks that are configured for telephones.
When moving extensions from one jack to another, ensure that all jacks support a Norstar telephone. If a fax machine, Analogue Terminal Adapter, analogue telephone, or modem was plugged into the jack, do not plug a Norstar telephone into the jack.
P0905531 Issue 01 Compact Plus System Administration Guide
136 Moving and copying
N
e
N
1. Place the programming overlay on any M7310N or M7324telephone.
2. Press Ä¥¥ÛßßÜÝÝ (CONFIG). The display shows Password:.
3. Press àÛàÞ¡à (SAPLUS). The display shows Terminals&Extns.
4. Press and enter the extension number whose programming you want to copy.
5. Press COPY. The display shows Copy:SYSTEM data.
6. Press CHANGE to toggle between SYSTEM data (to copy the programming of the system) and SYSTEM+USER (to copy the programming of the system and the programming of a particular extension).
7. Press Ô. The display shows Copy:SINGLE.
8. Press Ô. The display shows Copy to:.
9. Enter the extension number of the extension that will be programmed. The display shows nnn>nnn briefly, then returns to Copy to:.
10. Keep entering extension numbers if you have other singlextensions that you wish to programme.
11. Press CANCL when you are finished.
Copying system programming to a range of extensions
1. Place the programming overlay on any M7310N or M7324telephone.
2. Press Ä¥¥ÛßßÜÝÝ (CONFIG). The display shows Password:.
3. Press àÛàÞ¡à (SAPLUS). The display shows Terminals&Extns.
4. Press and enter the extension number whose programming you want to copy.
5. Press COPY. The display shows Copy:SYSTEM data.
6. Press CHANGE to toggle between SYSTEM data (to copy the programming of the system) and SYSTEM+USER (to copy the programming of the system and the programming of a particular extension).
7. Press Ô. The display shows Copy:SINGLE.
8. Press CHANGE to select either a range of extensions or all extensions.
9. Press Ô. The display shows Only equippd Ext.
Compact Plus System Administration Guide P0905531 Issue 01

Moving and copying 137
all
ns.
ay s is
not
ying
10. Press CHANGE to switch between equipped extensions and extensions.
11. Press Ô. The display shows Begin at:.
12. Enter the starting extension number. The display shows End at:.
13. Enter the ending extension number. The display shows nnn>nnn-nnn?.
14. Press OK to copy the programming to the specified extensio
Depending on the activities going on in the system, a copy mnot take effect for a while. The brief display you see once youhave finished a copying session does not indicate the procescomplete.
You can leave the programming session even if the copy hasbeen completed. If you exit programming, copying continuesuninterrupted until it is complete.
Event codes capture both the start and completion of the copprocess.
System settings you can copy
• line assignment
• line pool access
• Prime line designation
• number of intercom keys
• settings programmed under the heading Capabilities
Personal settings you can copy
• the personal programming for dialling modes
• line key positions
• personal speed dial entries
• automatic delivery of call information for outgoing calls
• log settings
• programmed memory keys
Settings you cannot copy
• extension number and name
• log password
• Direct-Dial and Extra-Dial extension designations
• Service mode Control extension designation for a line
• Service mode Ringing extension designation for a line
P0905531 Issue 01 Compact Plus System Administration Guide

138 Moving and copying
ing
• Prime extension designation for a line, or private line appearances
• personal programming for display contrast, ring type, and rvolume
Compact Plus System Administration Guide P0905531 Issue 01

Settings for analogue equipment
� Settings for analogue equipment.........140
� Setting the delay before the ATA/I-ATA answers.........140
� Changing the dial mode of an ATA or an I-ATA.........141
� Setting whether the ATA/I-ATA should receive system tones.........142
� Setting whether an ATA is used on-site or off-site.........142
P0905531 Issue 01 Compact Plus System Administration Guide

140 Settings for analogue equipment
s ed to
l e
e and A
cted
eive
ed
to
ant
s
e
a
is
N
Settings for analogue equipment
Analogue equipment includes answering and fax machines awell as analogue telephones. Analogue equipment is connectthe Compact Plus system through the Integrated Analogue Terminal Adapter (I-ATA) or with an external Analogue TerminaAdapter (ATA). An external ATA responds only to incoming tondialling signals.
The ATA and I-ATA allow analogue telephones to access somNorstar features such as Call Forward, Conference, Transfer,Last Number Redial. Telephones connected to the ATA or I-ATcannot display the time and date. For information on using Norstar features from an external analogue telephone conneto an ATA, refer to Analogue Terminal Adapter User Card.
You can adjust the following settings:
• change the number of rings the analogue equipment waitsbefore answering a call
• change the extension used for analogue equipment to rectone dialling signals
• set whether an external ATA is required and whether it is uson-site or off-site
• change the Dial mode for outgoing data of an external ATAeither tone or pulse
• set whether the ATA should receive confirmation and errortones (only for analogue telephones)
Setting the delay before the ATA/I-ATA answers
To accommodate the device connected to the ATA, you may wto lengthen or shorten the delay before the device is able to receive tones. For example, a modem or fax machine requireonly a short delay.
Refer to ATA Terminal Feature Card for information on using thATA features.
See "Chart 16: ATA settings" on page 300 in Appendix A for programming overview.
The ATA answer timer controls this delay. The default settinga 7 second delay before the speech path is connected.
1. Place the programming overlay on any M7310N or M7324telephone.
2. Press Ä¥¥ÛßßÜÝÝ (CONFIG). The display shows Password:.
3. Press àÛàÞ¡à (SAPLUS). The display shows Terminals&Extns.
Compact Plus System Administration Guide P0905531 Issue 01

Settings for analogue equipment 141
N
4. Press . The display show Show extn#:.
5. Enter the extension number of the telephone you wish toprogramme. The display shows nnn:nnn.
6. Press . The display shows Line access.
7. Press Ô. The display shows Capabilities.
8. Press . The display shows Fwd no answer.
9. Press Ô until the display shows ATA settings.
10. Press . The display shows ATA ans timer:.
11. Press CHANGE to choose 3, 5, 7, or 10 seconds.
12. Press ̈ to exit or Ô to continue programming.
Changing the dial mode of an ATA or an I-ATA
You must tell the system whether the device connected to theATA sends out pulse or Dual Tone Multifrequency (DTMF) signals.
The default signal is tone.
1. Place the programming overlay on any M7310N or M7324telephone.
2. Press Ä¥¥ÛßßÜÝÝ (CONFIG). The display shows Password:.
3. Press àÛàÞ¡à (SAPLUS). The display shows Terminals&Extns.
4. Press . The display show Show extn#:.
5. Enter the extension number of the telephone you wish toprogramme.
6. Press . The display shows Line access.
7. Press Ô. The display shows Capabilities.
8. Press . The display shows Fwd no answer.
9. Press Ô until the display shows ATA settings.
10. Press . The display shows ATA ans timer:.
11. Press Ô. The display shows ATA mode:.
12. Press CHANGE to choose Tone or Pulse.
13. Press ̈ to exit or Ô to continue programming.
P0905531 Issue 01 Compact Plus System Administration Guide

142 Settings for analogue equipment
s
.
.
N
on ect ite.
Setting whether the ATA/I-ATA should receive system tones
You must tell the system whether the device connected to theATA should receive confirmation and error tones. These toneinform a person of call progress, but confuse a modem or faxmachine.
• If the ATA is connected to a telephone, set tones to Y.
• If the ATA is connected to any other device, set tones to N
The default is No.
Note: This setting does not interfere with intrusion and conference tones on a telephone connected to an ATAThese tones are heard through the telephone handset regardless of the ATA tones setting.
1. Place the programming overlay on any M7310N or M7324telephone.
2. Press Ä¥¥ÛßßÜÝÝ (CONFIG). The display shows Password:.
3. Press àÛàÞ¡à (SAPLUS). The display shows Terminals&Extns.
4. Press . The display show Show extn#:.
5. Enter the extension number of the telephone you want toprogramme. The display shows nnn:nnn.
6. Press . The display shows Line access.
7. Press Ô. The display shows Capabilities.
8. Press . The display shows Fwd no answer.
9. Press Ô until the display shows ATA settings.
10. Press . The display shows ATA ans timer:.
11. Press Ô until the display shows ATA tones:.
12. Press CHANGE to choose Y (Yes) or N (No).
13. Press ̈ to exit or Ô to continue programming.
Setting whether an ATA is used on-site or off-site
The external ATA can connect Compact Plus to analogue telephones, modems, or answering machines that are either your premises or at another location. When you want to connextensions at some other location to your system, specify off-s
The default is on-site.
Compact Plus System Administration Guide P0905531 Issue 01

Settings for analogue equipment 143
N
1. Place the programming overlay on any M7310N or M7324telephone.
2. Press Ä¥¥ÛßßÜÝÝ (CONFIG). The display shows Password:.
3. Press àÛàÞ¡à (SAPLUS). The display shows Terminals&Extns.
4. Press . The display show Show extn#:.
5. Enter the extension number of the telephone you wish toprogramme. The display shows nnn:nnn.
6. Press . The display shows Line access.
7. Press Ô. The display shows Capabilities.
8. Press . The display shows Fwd no answer.
9. Press Ô until the display shows ATA settings.
10. Press . The display shows ATA ans timer:.
11. Press Ô until the display shows ATA use:.
12. Press CHANGE to choose On-site or Off-site.
13. Press ̈ to exit or Ô to continue programming.
P0905531 Issue 01 Compact Plus System Administration Guide

144 Settings for analogue equipment
Compact Plus System Administration Guide P0905531 Issue 01

Services
� Using alternate or scheduled services.........146
� Turning services on or off.........146
� Designating alternate routes for calls.........148
� Programming routes.........151
� Programming destination codes.........152
� Turning a manual service on or off with a feature code.........155
� Assigning control extensions.........155
� Changing the name of a schedule.........157
� Changing the time of a schedule.........157
P0905531 Issue 01 Compact Plus System Administration Guide

146 Services
mal alls
that of
, des
ual, nge
rol s, or
ial
of for on
ual
trol fault
Using alternate or scheduled services
Your Compact Plus system is set up to handle calls during norbusiness hours. However, you may wish to handle incoming cdifferently at lunch time, in the evening, at night, or during holidays.
To accommodate changes, Compact Plus provides services let you customise the way calls are handled at different timesthe day. Besides a Normal schedule, there are six additional schedules. Three of the schedules are already named: LunchEvening, and Night. You can assign new names for these moand assign names to the three unnamed schedules.
When Ringing service and Restriction service are set to mana control extension is used to place the extensions and exchalines that it controls into and out of service schedules. A contextension can be assigned to control either lines or extensionboth lines and extensions.
A service schedule activates three aspects of how the systemoperates: Ringing, Restriction, and Routing.
• You can customise the Ringing service so that
— an extra extension rings for calls placed to the Direct-Dextension
— additional extensions ring for incoming calls
— an auxiliary ringer notifies when a line rings
• You can bar long-distance calls by applying Restriction service to a line or extension in a service schedule.
• You can take advantage of alternate route selection by assigning different routes to be used during the different schedules.
Turning services on or off
Ringing service
You can have Ringing service set up to run differently for eachthe six schedules. You may decide you want Ringing servicethe Night schedule to come into effect only when it is turned and off manually.
If you manually call on a service, it remains in effect until youcancel it, regardless of any automatic modes scheduled. Manservice also overrides any automatic mode that is active.
If you programme a service as Manual, you must use the conextension to turn the service on using a feature code. The decontrol extension for all lines and extensions is 221.
Compact Plus System Administration Guide P0905531 Issue 01

Services 147
or
N
be n:
N
er
or
e.
See "Chart 17: Ringing service" on page 301 in Appendix A fa programming overview.
1. Place the programming overlay on any M7310N or M7324telephone.
2. Press Ä¥¥ÛßßÜÝÝ (CONFIG). The display shows Password:.
3. Press àÛàÞ¡à (SAPLUS). The display shows Terminals&Extns.
4. Press Ô twice. The display shows Services.
5. Press . The display shows Ringing service.
6. Press . The display shows Ringing groups.
7. Press Ô until the display shows Sched:Night.
8. Press . The display shows Service:.
9. Press CHANGE to choose Manual, Auto, or Off.
10. Press ̈ to exit or Ô to continue programming.
Add extensions for Ringing serviceYou can add lines within groups to ring for these services on different extensions. For example, you might want the ring toheard at two locations for ease of access. To add an extensio
1. Place the programming overlay on any M7310N or M7324telephone.
2. Press Ä¥¥ÛßßÜÝÝ (CONFIG). The display shows Password:.
3. Press àÛàÞ¡à (SAPLUS). The display shows Terminals&Extns.
4. Press Ô twice. The display shows Services.
5. Press . The display shows Ringing service.
6. Press . The display shows Ringing groups.
7. Press . The display shows Ring grp: 001.
8. Press Ô to cycle through the ring groups until you find the one you want (from 001 to 100). Or, enter the numbdirectly on the keypad.
9. Press . The display shows Show extn#:.
10. Press Ô to cycle through the extensions available, enter the number directly on the keypad. The extension currently assigned to Ringing service will display Assigned.
11. Press CHANGE to assign another extension to ringing servic
12. Press ̈ to exit or Ô to continue in programming.
P0905531 Issue 01 Compact Plus System Administration Guide

148 Services
er ou the
le).
A
N
ally f the
nter rts out
and
Deleting extensions from ringing serviceTo delete an extension from Ringing service, follow the samesteps as for adding. The final CHANGE step will Unassign the extension.
Restriction service
Assigning restriction filters to schedules gives you control ovcalls made outside of normal business hours. For example, ymay allow long-distance calls during the day but bar them in evening (using the Night schedule) and on weekends (using Schedule 5, which you may have renamed Weekend schedu
See "Chart 18: Restriction service" on page 301 in Appendixfor a programming overview.
1. Place the programming overlay on any M7310N or M7324telephone.
2. Press Ä¥¥ÛßßÜÝÝ (CONFIG). The display shows Password:.
3. Press àÛàÞ¡à (SAPLUS). The display shows Terminals&Extns.
4. Press Ô twice. The display shows Services.
5. Press . The display shows Ringing service.
6. Press Ô. The display shows Restrn service.
7. Press . The display shows Sched:Night.
8. Press and use CHANGE to choose Manual, Auto, orOff .
9. Press ̈ to exit or Ô to continue programming.
Routing service
Instead of having to manually decide which routes to use at different times of the day, you can set the routes to automaticbe selected according to the programmed settings for each osix schedules.
Designating alternate routes for calls
The programming for Routing service decides what path an outgoing call takes using the digits that are dialed.
When you select an internal line and dial, the numbers you eare checked against the routes. If the number you dialled stawith a destination code, the system uses the line pool and dialsdigits specified by the route assigned to that destination code,then dials the number that you dialled.
Compact Plus System Administration Guide P0905531 Issue 01
Services 149
e to
e, a
lan th. nd e ion
ing ed up,
all.
lled
ing ing eds
us
Routing service replaces a number of tasks that otherwise havbe done manually, including
• entering a line pool code
• dialling an access code for a long-distance carrier
• accessing an alternate route if the Prime line is busy or unavailable
Uniform numbering plan
Compact Plus can be programmed to provide dialling transparency by using a uniform numbering plan. For examplworker at the head office in London can call a colleague at abranch office in Birmingham as though they were calling an extension in their own office.
Dialling transparency depends on establishing a numbering pwhere all extension numbers are unique and of a uniform lengFor example, if you have three company sites (two in London aone in Birmingham), then all three sites should have the samnumber of digits in their extension numbers, and each extensnumber should be unique.
When performing System Start-up, you can change the startvalue and length of extension numbers as well as the Receivnumber length. If you apply the PBX template at System Start-received numbers and the Received number length are set automatically to match the extension numbers.
How Routing service works
There are two headings for Routing service: Routes and Dest codes. Under Routes, you programme DialOut and Use.
• Dial Out—specifies the digits (up to 24) to be dialled out toreach the called extension.
• Use—defines a specific line pool to be used to make the c
Under Dest codes, you programme the destination route andAbsorbLength.
• Normal—is for assigning the route code to be used duringregular business hours.
• Absorb Length—indicates how many of the digits in the destination code should be absorbed by the system (not diaout to reach the called extension).
When a caller dials a number, Compact Plus checks the leaddigits of the number against the destination codes. If the leaddigits are matched to a destination code, Compact Plus proceto select the route containing the appropriate line pool and dial-out digits. It then adds the digits that the caller dialled (minthe ones that are to be absorbed from the destination code).
P0905531 Issue 01 Compact Plus System Administration Guide

150 Services
n ing
n as a s it is o it
e of For
lar
cess der
for
In the following example, a caller at extension 6625 in Londowants to reach a colleague in Maidenhead. Without the Routservice, the caller would have to select a line and dial 01628 784221 to reach extension 4221 in Maidenhead.
Because the system has an appropriate route and destinatiocode, the caller simply dials 4221. The system recognises 4 destination code. It checks destination code 4, which instructto use Dial Out 01628 78 and Line Pool A from Route 002. Itinstructed not to absorb any digits from the destination code, sadds all of the caller’s digits (4221) to complete the call.
Example of a simple route
Specifying the type of line to be used
Each route lets you programme the line pool, and thus the typline to be used as the outgoing facility to reach a destination. example, if ISDN lines have been placed in Line Pool B, specifying pool B as the line pool to use in a route for a particudestination code ensures that all calls being routed to that destination use ISDN lines.
You must ensure that extensions and ISDN terminals have acto the line pools that they need to make calls (programmed un
Line Access in Lines).
See "Chart 19: Routing service" on page 302 in Appendix A a programming overview.
MaidenheadLondon
(dialled digits 01628 784221)
(dialled digits 4221)
Line pool A
Extn 4221Extn 6625
Routing service settings
Routes (Route 002)DialOut: 01628 78Use: Pool A
Dest codes (DstCode 4)Normal: 002AbsorbLength: 0
Compact Plus System Administration Guide P0905531 Issue 01
Services 151
N
Programming routes
Dial Out
1. Place the programming overlay on any M7310N or M7324telephone.
2. PressÄ¥¥ÛßßÜÝÝ (CONFIG). The display shows Password:.
3. Press àÛàÞ¡à (SAPLUS). The display shows Terminals&Extns.
4. Press Ô until the display shows Services.
5. Press . The display shows Ringing service.
6. Press Ô until the display shows Routing service.
7. Press . The display shows Routes.
8. Press . The display shows Show route:.
9. Enter a three-digit route code or press Ô.
10. Press . The display shows DialOut:.
11. Press CHANGE.
12. Enter the Dial Out digits (up to 24) or press CANCL to choose No number.
You can press Äà¡ to insert a 1.5-second pausein the dialling string, if necessary.
Route 000 shows no DialOut:No numbr by default and cannot be changed.
13. Press OK.
P0905531 Issue 01 Compact Plus System Administration Guide

152 Services
s in the
em.
a for . ed d.
n
Use Pool
1. Begin with DialOut: (step 10 of previous procedure).
2. Press Ô. The display shows Use:
3. Press CHANGE to Pool A, Pool B, or Pool C.
Route 000 uses Pool A by default and cannot be changed.
Programming destination codes
Dest code
When programming destination codes, you can use wild cardthe destination code string. As a result of wild card characters,number of destination codes programmed in the system is reduced, maximizing the use of destination codes in the syst
The wild card character can be used only for the last digit of destination code and represents any digit from 0 to 9, exceptdigits already programmed or used by other numbering plansShould there be a conflict with other digits already programmor used with by numbering plans, the digit will not be displaye
The wild card character can only be used to group destinatiocodes that use the same Route and digit absorb length.
Destination codes without the use of a wild card character
Route Dial Out Line Pool
555 0162 237 625 Line Pool C
565 0173 133 2211 Line Pool A
Destination codes Route Absorb Length Dial Out
0621 555 3 0162 237 6251
0622 555 3 0162 237 6252
0623 555 3 0162 237 6253
0624 555 3 0162 237 6254
0625 555 3 0162 237 6255
0626 555 3 0162 237 6256
0627 565 All 0173 133 2211
0628 555 3 0162 237 6258
0629 555 3 0162 237 6259
Compact Plus System Administration Guide P0905531 Issue 01

Services 153
t of a igits
N
a
he
N
Destination codes with the use of a wild card character
Enter a destination code that is recognised when used as partelephone number for an outgoing call. It can be up to seven dlong.
1. Place the programming overlay on any M7310N or M7324telephone.
2. PressÄ¥¥ÛßßÜÝÝ (CONFIG). The display shows Password:.
3. Press àÛàÞ¡à (SAPLUS). The display shows Terminals&Extns.
4. Press Ô until the display shows Services.
5. Press . The display shows Ringing service.
6. Press Ô until the display shows Routing service.
7. Press . The display shows Routes.
8. Press Ô. The display shows Dest codes.
9. Press . The display shows Show DstCode:.
10. If there are no codes defined, use ADD, the keypad, and OK to enter a new destination code (maximum seven). To enterwild card character (•) in the destination code, press the ANY display key.
11. If there are codes defined, press Ô to select one.
12. Use ADD, FIND, and REMOVE to change the destination code.
Normal rte
Select which route a call using the destination code will take during normal service and for each of the schedules. The automatic schedule times are programmed under Services. Tdefault Normal route is 000, which has no Dial Out digits and uses Line Pool A.
Note: Be sure you have pre-programmed the route. See "Designating alternate routes for calls" on page 148.
1. Place the programming overlay on any M7310N or M7324telephone.
2. PressÄ¥¥ÛßßÜÝÝ (CONFIG). The display shows Password:.
Destination codes Route AbsorbLength Dial Out
062 • 555 3 0162 237 625 •
0627 565 All 0173 133 2211
P0905531 Issue 01 Compact Plus System Administration Guide
154 Services
a
bed
d lect sure rea
ike
3. Press àÛàÞ¡à (SAPLUS). The display shows Terminals&Extns.
4. Press Ô until the display shows Services.
5. Press . The display shows Ringing service.
6. Press Ô until the display shows Routing service.
7. Press . The display shows Routes.
8. Press Ô. The display shows Dest codes.
9. Press . The display shows Show DstCode:.
10. If there are no codes defined, use ADD, the keypad, and OK to enter a new destination code (maximum seven). To enterwild card character (•) in the destination code, press the ANY display key.
11. Press . The display shows Normal:.
12. Press CHANGE to select a different route for the destination code.
13. Enter the three-digit code.
Absorb length
Select the portion of the destination code that is always absorby the system and not used in the dialling sequence.
1. Begin with Normal: (step 11 of the previous procedure).
2. Press . The display shows AbsorbLength:.
3. Press CHANGE.
4. Select the number of digits to be absorbed: 0, All , or any number up to the length of the destination code.
5. Press ̈ to exit or Ô to programme the next schedule.
If a telephone number does not match any of the programmedestination codes, the user must first decide which line to seand then dial the number. To make this task simple and to enthat all long-distance calls are being routed consistently, all acodes in the United Kingdom numbering plan should be programmed as destination codes.
For example, a destination code for Maidenhead might look lthis:
• Destination code: 01628Normal route: 003AbsorbLength: 0
• Route: 003DialOut: No numberUse: Pool C
Compact Plus System Administration Guide P0905531 Issue 01

Services 155
.
nd
es:
ing,
ing,
ual, nge
rol s, or
ol t is
A caller wishing to dial Maidenhead might dial 01628 237625The system would recognise 01628 as a destination code. It would select Pool C, absorb no digits, add no Dial Out digits, adial the remaining digits to complete the call.
Turning a manual service on or off with a feature code
There are separate on and off codes for each of these servicRinging, Routing, and Restriction.
Ä¡àÚ Turn on Ringing service.
Ä£¡àÚ Turn off Ringing service.
Ä¡àÛ Turn on Restriction service.
Ä£¡àÛ Turn off Restriction service.
Ä¡àÜ Turn on Routing service.
Ä£¡àÜ Turn off Routing service.
To turn on a service
From a Control extension, enter the feature code to turn RingRestriction, or Routing service on. If activating Restriction or Routing service, use the password ÛÜßÝß (ADMIN). The display shows Service Modes ON.
To turn off a service
From a Control extension, enter the feature code to turn RingRestriction, or Routing service off. The display shows Normal followed by the name of the service (Ringing, Restr’n, or Routing).
Assigning control extensions
When Ringing service and Restriction service are set to Mana control extension is used to place the extensions and exchalines that it controls into and out of service schedules. A contextension can be assigned to control either lines or extensionboth lines and extensions.
You can also use a control extension to manually override anautomatic schedule.
You may want different lines to be assigned to different contrextensions. For example, if the Customer Service departmen
Routing service modifications.
Changes to routes should only be made during least busy call times or on an idle system. Plan to programme routes when user activity is at a minimum.
P0905531 Issue 01 Compact Plus System Administration Guide

156 Services
vice ent, er a le
N
r
er
N
open during evening hours, you could place the Customer Serlines under a separate control extension. The Sales departmwhich closes at the end of the afternoon, could be placed unddifferent control extension that could call on a service schedufor those lines, while leaving the Customer Service lines unaffected.
Assigning lines to a control extension
1. Place the programming overlay on any M7310N or M7324telephone.
2. PressÄ¥¥ÛßßÜÝÝ (CONFIG). The display shows Password:.
3. Press àÛàÞ¡à (SAPLUS). The display shows Terminals&Extns.
4. Press Ô until the display shows Services.
5. Press . The display shows Ringing service.
6. Press Ô until the display shows Common settings.
7. Press . The display shows Control extns.
8. Press twice. The display shows Show line:.
9. Enter the line number. The display shows the line numbefollowed by the current control extension.
10. Press CHANGE and enter the extension number you want toassign as the control extension for this line.
11. Press ̈ to exit or Ô to continue programming.
Assigning extensions to a control extension
In addition to placing lines into Service modes, a control extension can apply Restriction service (dialling filters) to othextensions.
1. Place the programming overlay on any M7310N or M7324telephone.
2. PressÄ¥¥ÛßßÜÝÝ (CONFIG). The display shows Password:.
3. Press àÛàÞ¡à (SAPLUS). The display shows Terminals&Extns.
4. Press Ô until the display shows Services.
5. Press . The display shows Ringing service.
6. Press Ô until the display shows Common settings.
7. Press . The display shows Control extns.
8. Press . The display shows For lines.
Compact Plus System Administration Guide P0905531 Issue 01

Services 157
sion
N
e
r
me
N
9. Press Ô. The display shows For extns.
10. Press . The display shows Show extn#:.
11. Enter the extension number. The display shows the extennumber followed by the current control extension.
12. Press CHANGE and enter the extension number you want toassign as the control extension for this extension.
13. Press ̈ to exit or Ô to continue programming.
Changing the name of a schedule
1. Place the programming overlay on any M7310N or M7324telephone.
2. PressÄ¥¥ÛßßÜÝÝ (CONFIG). The display shows Password:.
3. Press àÛàÞ¡à (SAPLUS). The display shows Terminals&Extns.
4. Press Ô until the display shows Services.
5. Press . The display shows Ringing service.
6. Press Ô until the display shows Common settings.
7. Press . The display shows Control extns.
8. Press Ô. The display shows Schedule names.
9. Press . The display shows Sched 1:.
10. Press CHANGE and enter the name you want to assign to thschedule.
11. Press ̈ to exit or Ô to continue programming.
Changing the time of a schedule
It is only necessary to programme the start and stop times foschedules that are activated automatically.
If you are programming a schedule to start and stop at the satime each day, use COPY to transfer the settings from one day tothe next.
1. Place the programming overlay on any M7310N or M7324telephone.
2. PressÄ¥¥ÛßßÜÝÝ (CONFIG). The display shows Password:.
3. Press àÛàÞ¡à (SAPLUS). The display shows Terminals&Extns.
4. Press Ô until the display shows Services.
P0905531 Issue 01 Compact Plus System Administration Guide

158 Services
5. Press . The display shows Ringing service.
6. Press Ô until the display shows Common settings.
7. Press . The display shows Control extns.
8. Press Ô twice. The display shows Schedule times.
9. Press . The display shows Monday.
10. Press . The display shows Sched:Night.
11. Press . The display shows Start time:.
12. Press CHANGE and enter the time you want the schedule tostart.
13. Press Ô. The display shows Stop time:.
14. Press CHANGE and enter the time you want the schedule tostop. Press OK to accept a.m. or CHANGE to accept p.m.
15. Press ̈ to exit or Ô to continue programming.
Compact Plus System Administration Guide P0905531 Issue 01

Passwords
� Password security.........160
� Setting the SAPLUS password.........160
� Setting the Administrator password.........160
� Setting the Basic password.........161
� Hospitality passwords.........162
� I-RAD password.........163
P0905531 Issue 01 Compact Plus System Administration Guide
160 Passwords
re kely
ng p the
N
its ,
s
N
Password security
You can, and should, change your passwords regularly for security reasons. Keep a record of your passwords in a secuplace, and remember that the longer the password, the more liit is to be secure.
See "Chart 20: Passwords" on page 303 in Appendix A for a programming overview.
Setting the SAPLUS password
The System Administrator Plus password is one to six digits loand allows you to access all the programming needed to set usystem for your company. The default password is àÛàÞ¡à, which spells SAPLUS on the keypad.
1. Place the programming overlay on any M7310N or M7324telephone.
2. Press Ä¥¥ÛßßÜÝÝ (CONFIG). The display shows Password:.
3. Press àÛàÞ¡à (SAPLUS). The display shows Terminals&Extns.
4. Press Ô four times. The display shows Passwords.
5. Press . The display shows COS pswds.
6. Press Ô until the display shows Progrming pswds.
7. Press . The display shows SysAdmin+:.
8. Press CHANGE and enter the new password.
9. Press OK to accept the new password.
Erasing the SAPLUS password
If you leave the SAPLUS password blank (by entering no digin step 8), the password is erased. If you erase the passwordanyone can enter programming without a password.
Setting the Administrator password
The Administrator password is one to six digits long and allowyou to access programming. The default password is ÛÜßÝß, which spells ADMIN on the keypad.
1. Place the programming overlay on any M7310N or M7324telephone.
2. Press Ä¥¥ÛßßÜÝÝ (CONFIG). The display shows Password:.
Compact Plus System Administration Guide P0905531 Issue 01
Passwords 161
out
o
N
n yone
3. Press àÛàÞ¡à (SAPLUS). The display shows Terminals&Extns.
4. Press Ô four times. The display shows Passwords.
5. Press . The display shows COS pswds.
6. Press Ô. The display shows Progrming pswds ö.
7. Press until the display shows Sys admin:.
8. Press CHANGE and enter the new password.
9. Press OK to accept the new password.
Erasing the Administrator password
If you leave the Administrator password blank (by entering nodigits in step 8), the password is erased. If you erase the password, anyone can enter Administrator programming witha password.
Setting the Basic password
The Basic password is one to six digits long and allows you taccess some programming settings using feature codes. Youcannot enter regular programming with this password. The default is ÛÛàÝÛ, which spells BASIC on the keypad.
1. Place the programming overlay on any M7310N or M7324telephone.
2. Press Ä¥¥ÛßßÜÝÝ (CONFIG). The display shows Password:.
3. Press àÛàÞ¡à (SAPLUS). The display shows Terminals&Extns.
4. Press Ô four times. The display shows Passwords.
5. Press . The display shows COS pswds.
6. Press Ô until the display shows Progrming pswds.
7. Press . The display shows SysAdmin+:.
8. Press Ô until the display shows Basic:.
9. Press CHANGE and enter the new password.
10. Press OK to accept the new password.
Erasing the Basic password
If you leave the Basic password blank (by entering no digits istep 9), the password is erased. If you erase the password, ancan enter Basic programming without a password.
P0905531 Issue 01 Compact Plus System Administration Guide
162 Passwords
ure n
is:
r.
the
. To
r.
Hospitality passwords
The Hospitality passwords are one to six digits long and allowyou to access some or all of the Hospitality Services feature programming. There are two types of Hospitality services featpasswords, the Desk admin password and the Room conditiopassword.
Setting the Desk admin passwordThe Desk admin password is used to access all Hospitality Services admin features. The default Desk admin password î¯ê¸ (4677). To change the default Desk admin password:
1. Press Ä¥¥�¯öìéí. The display reads Password:.
2. Press àÛàÞ¡à (SAPLUS). The display shows Terminals&Extns.
3. Press Ô until the display reads Passwords.
4. Press . The display reads COS pswds.
5. Press Ô until the display reads Hospitality.
6. Press . The display reads Desk pswd:4677.
7. Press the CHANGE display key. Enter a one to six digit numbePress OK.
Room condition passwordThe Room condition password controls the ability to change room condition with Ä¡àß. The default room condition password is: None. Different from the Desk admin password, the room condition password can remain as Nonechange the default Room condition password:
1. Press Ä¥¥�¯öìéí. The display reads Password:.
2. Press àÛàÞ¡à (SAPLUS). The display shows Terminals&Extns.
3. Press Ô until the display reads Passwords.
4. Press . The display reads COS pswds.
5. Press Ô until the display reads Hospitality.
6. Press . The display reads Desk pswd:4677.
7. Press Ô. The display reads Cond pswd:None.
8. Press the CHANGE display key. Enter a one to six digit numbePress OK.
Compact Plus System Administration Guide P0905531 Issue 01

Passwords 163
ote
y
fter
s
s d d s
N
rd.
ion.
I-RAD password
The ability to do remote programming using the Internal RemAccess Device (I-RAD) is protected by a password.
The default password is the eight-digit System ID number. However, this password is not usable. It must be initialised bBritish telecom (BT) with the Remote Access to Customer’s Equipment (RACE). BT sets the password, then grants the customer access once the customer registers their system. Athis, you are able to change the password as required. The password is represented on the display by asterisks (*) and inever displayed directly.
The remote administration software used with the I-RAD allowyou to use a password up to10 digits long. A longer passwordoes not work with the software. Your I-RAD password shoulalways match the password used with your Remote Set Toolsoftware.
Changing the I-RAD password
1. Place the programming overlay on any M7310N or M7324telephone.
2. Press Ä¥¥ÛßßÜÝÝ (CONFIG). The display shows Password:.
3. Press àÛàÞ¡à (SAPLUS). The display shows Terminals&Extns.
4. Press Ô until the display shows Passwords.
5. Press . The display shows COS pswds.
6. Press Ô until the display shows IRAD pswd:*****
(displayed only after BT has initialised the system throughRACE with a password).
7. Press CHANGE and use the keypad to enter the old passwo
8. Use the keypad to enter the new password.
9. Press OK to accept the new password.
10. Use the keypad to re-enter the new password for verificat
11. The display shows IRAD pswd********.
12. Press ̈ to exit or Ô to continue programming.
P0905531 Issue 01 Compact Plus System Administration Guide

164 Passwords
Compact Plus System Administration Guide P0905531 Issue 01

Call services
� Erasing a forgotten Call log password.........166
� Programming Call services.........166
� 1st Display.........166
� Auto called ID.........167
P0905531 Issue 01 Compact Plus System Administration Guide

166 Call services
ne. all
A
N
a
is ne.
of
N
Erasing a forgotten Call log password
If someone forgets their Call log password, you can reset it toNone so that they can set a new one. You cannot set a new password using this method. You can only erase an existing oSee "Call Log" on page 264 for information on setting a new Clog password.
See "Chart 21: Call Log passwords" on page 304 in Appendixfor a programming overview.
1. Place the programming overlay on any M7310N or M7324telephone.
2. Press Ä¥¥ÛßßÜÝÝ (CONFIG). The display shows Password:.
3. Press àÛàÞ¡à (SAPLUS). The display shows Terminals&Extns.
4. Press Ô until the display shows Passwords.
5. Press . The display shows COS pswds.
6. Press Ô. The display shows Call log pswd:.
7. Press . The display shows Show extn:_.
8. Enter an extension number.
9. Press . The display shows Log pswd:nnnnn.
10. Press CLR to erase the current Call log password.
11. Press ̈ to exit or Ô to continue programming.
Programming Call services
See "Chart 22: Call Services" on page 305 in Appendix A forprogramming overview.
1st Display
The 1st Display option lets you choose what call information first displayed on that extension. The options are Number or LiThe default is Numbr.
Depending on the services you subscribe to, Call Display information may contain the number of the caller, or the namethe line in your Compact Plus system that the call is on.
1. Place the programming overlay on any M7310N or M7324telephone.
2. Press Ä¥¥ÛßßÜÝÝ (CONFIG). The display shows Password:.
Compact Plus System Administration Guide P0905531 Issue 01

Call services 167
.
ls d
on.
N
3. Press àÛàÞ¡à (SAPLUS). The display shows Terminals&Extns.
4. Press . The display shows Show extn#:.
5. Enter the extension number of the telephone you wish toprogramme. The display shows nnn:nnn.
6. Press . The display shows Line access.
7. Press Ô until the display shows Call services.
8. Press . The display shows Auto call info.
9. Press Ô. The display shows 1st Display.
10. Press CHANGE to choose Numbr or Line.
On an incoming call, the display may show Unknown number if the information is not available from your telephone companyYou may see Private number on the display if the caller blocksthat information.
Auto called ID
This setting applies to Norstar extensions only. ISDN terminacan receive calling line identification automatically if supporteby the terminal.
The Auto called ID (identification) momentarily shows the number of the called party on the display of a Norstar extensiThe default is No, the Auto called ID is not displayed.
1. Place the programming overlay on any M7310N or M7324telephone.
2. Press Ä¥¥ÛßßÜÝÝ (CONFIG). The display shows Password:.
3. Press àÛàÞ¡à (SAPLUS). The display shows Terminals&Extns.
4. Press . The display shows Show extn#:.
5. Enter the extension number of the telephone you wish toprogramme. The displays shows nnn:nnn.
6. Press . The display shows Line access.
7. Press Ô until the display shows Call services.
8. Press . The display shows Auto call info.
9. Press Ô until the display shows Auto called ID:.
10. Press CHANGE to choose N (No) or Y (Yes).
11. Press ̈ to exit or Ô to continue programming.
P0905531 Issue 01 Compact Plus System Administration Guide

168 Call services
Compact Plus System Administration Guide P0905531 Issue 01

Remote access
� Programming lines and features for remote access.........170
P0905531 Issue 01 Compact Plus System Administration Guide
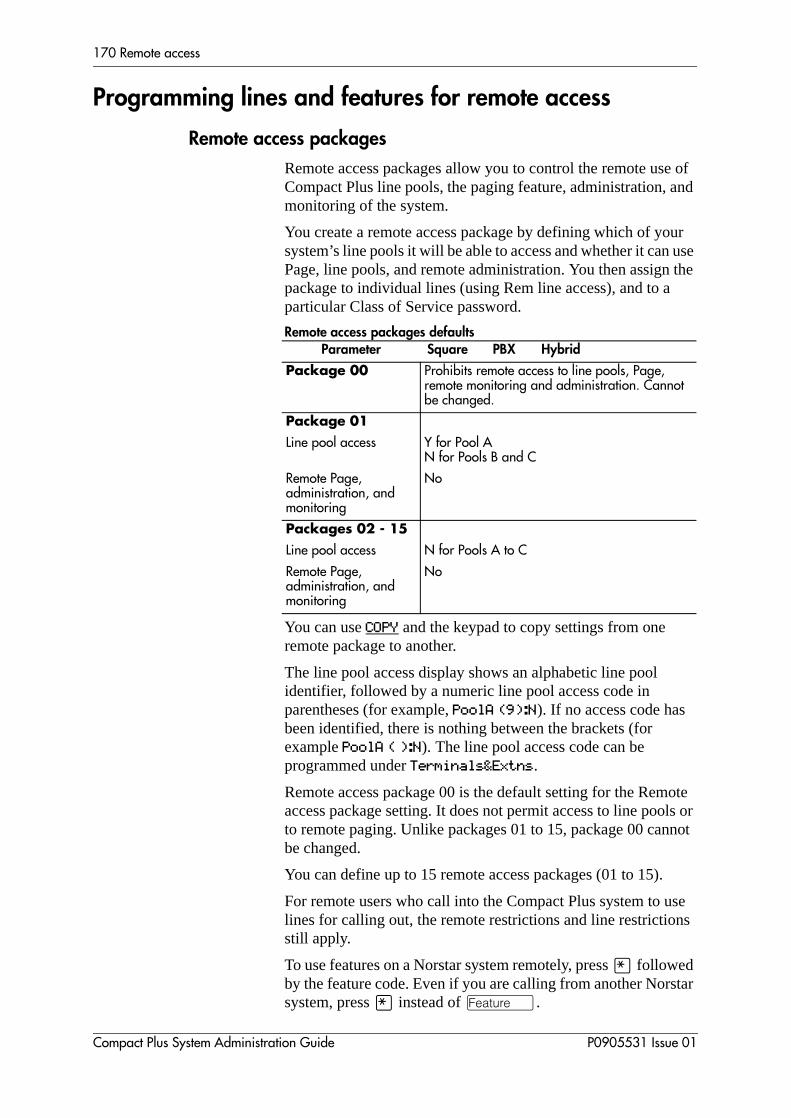
170 Remote access
e of nd
ur use the
ote ls or not
se s
tar
Programming lines and features for remote access
Remote access packages
Remote access packages allow you to control the remote usCompact Plus line pools, the paging feature, administration, amonitoring of the system.
You create a remote access package by defining which of yosystem’s line pools it will be able to access and whether it canPage, line pools, and remote administration. You then assignpackage to individual lines (using Rem line access), and to aparticular Class of Service password.
Remote access packages defaults
You can use COPY and the keypad to copy settings from one remote package to another.
The line pool access display shows an alphabetic line pool identifier, followed by a numeric line pool access code in parentheses (for example, PoolA (9):N). If no access code has been identified, there is nothing between the brackets (for example PoolA ( ):N). The line pool access code can be programmed under Terminals&Extns.
Remote access package 00 is the default setting for the Remaccess package setting. It does not permit access to line pooto remote paging. Unlike packages 01 to 15, package 00 canbe changed.
You can define up to 15 remote access packages (01 to 15).
For remote users who call into the Compact Plus system to ulines for calling out, the remote restrictions and line restrictionstill apply.
To use features on a Norstar system remotely, press ¥ followed by the feature code. Even if you are calling from another Norssystem, press ¥ instead of Ä.
Parameter Square PBX Hybrid
Package 00 Prohibits remote access to line pools, Page, remote monitoring and administration. Cannot be changed.
Package 01
Line pool access Y for Pool AN for Pools B and C
Remote Page, administration, and monitoring
No
Packages 02 - 15
Line pool access N for Pools A to C
Remote Page, administration, and monitoring
No
Compact Plus System Administration Guide P0905531 Issue 01
Remote access 171
N
N
Line Pool access
1. Place the programming overlay on any M7310N or M7324telephone.
2. Press Ä¥¥ÛßßÜÝÝ (CONFIG). The display shows Password:.
3. Press àÛàÞ¡à (SAPLUS). The display shows Terminals&Extns.
4. Press Ô until the display shows System prgrming.
5. Press . The display shows Hunt groups.
6. Press Ô until the display shows Remote access.
7. Press . The display shows Remote access pkgs.
8. Press again. The display shows Show pkg:.
9. Enter the number of the package (00 to 15).
10. Press . The display shows LinePool access:.
11. Press again. The display shows Pool A:.
12. Press CHANGE to choose N (No) or Y (Yes).
13. Press ̈ to exit or Ô to move to the next line pool.
Remote page
1. Place the programming overlay on any M7310N or M7324telephone.
2. Press Ä¥¥ÛßßÜÝÝ (CONFIG). The display shows Password:.
3. Press àÛàÞ¡à (SAPLUS). The display shows Terminals&Extns.
4. Press Ô until the display shows System prgrming.
5. Press . The display shows Hunt groups.
6. Press Ô until the display shows Remote access.
7. Press . The display shows Remote access pkgs.
8. Press again. The display shows Show pkg:_.
9. Enter the number of the package (00 to 15).
10. Press . The display shows LinePool access:.
11. Press Ô. The display shows Remote page:.
12. Press CHANGE to choose N (No) or Y (Yes).
13. Press ̈ to exit or Ô to continue programming.
P0905531 Issue 01 Compact Plus System Administration Guide
172 Remote access
N
N
Remote admin
1. Place the programming overlay on any M7310N or M7324telephone.
2. Press Ä¥¥ÛßßÜÝÝ (CONFIG). The display shows Password:.
3. Press àÛàÞ¡à (SAPLUS). The display shows Terminals&Extns.
4. Press Ô until the display shows System prgrming.
5. Press . The display shows Hunt groups.
6. Press Ô until the display shows Remote access.
7. Press . The display shows Remote access pkgs.
8. Press again. The display shows Show pkg:.
9. Enter the number of the package (00 to 15).
10. Press . The display shows LinePool access:.
11. Press Ô until the display shows Remote admin:.
12. Press CHANGE to choose N (No) or Y (Yes).
13. Press ̈ to exit or Ô to continue programming.
Remote monitor
1. Place the programming overlay on any M7310N or M7324telephone.
2. Press Ä¥¥ÛßßÜÝÝ (CONFIG). The display shows Password:.
3. Press àÛàÞ¡à (SAPLUS). The display shows Terminals&Extns.
4. Press Ô until the display shows System prgrming.
5. Press . The display shows Hunt groups.
6. Press Ô until the display shows Remote access.
7. Press . The display shows Remote access pkgs.
8. Press again. The display shows Show pkg:.
9. Enter the number of the package (00 to 15).
10. Press . The display shows LinePool access:.
11. Press Ô until the display shows Remote monitor:.
12. Press CHANGE to choose N (No) or Y (Yes).
13. Press ̈ to exit or Ô to continue programming.
Compact Plus System Administration Guide P0905531 Issue 01

Remote access 173
e to
N
the
Rem line access
Remote line access lets you assign a different remote packageach line in your system.
L001 Rem pkg
1. Place the programming overlay on any M7310N or M7324telephone.
2. Press Ä¥¥ÛßßÜÝÝ (CONFIG). The display shows Password:.
3. Press àÛàÞ¡à (SAPLUS). The display shows Terminals&Extns.
4. Press Ô until the display shows System prgrming.
5. Press . The display shows Hunt groups.
6. Press Ô until the display shows Remote access.
7. Press . The display shows Remote access pkgs.
8. Press Ô. The display shows Rem line access.
9. Press . The display shows Show line:.
10. Enter the line number or press LIST to see line 001.
11. Press CHANGE.
12. Enter the number for the remote package that will apply toline whenever it is used by a remote caller.
13. Press ̈ to exit or Ô to continue programming.
P0905531 Issue 01 Compact Plus System Administration Guide

174 Remote access
Compact Plus System Administration Guide P0905531 Issue 01

Auto Attendant
� Auto Attendant.........176
� System Answer.........176
� Custom Call Routing (CCR).........176
� CCR groups.........177
� Direct extension dialling.........177
� Customising System Answer and CCR.........178
� Turning System Answer on or off.........178
� Turning CCR on or off.........179
� Choosing the attendant telephone.........179
� Setting the number of rings before System Answer answers a call.....179
� Setting the number of rings before a caller hears the CCR greeting.....180
� Adding or removing extensions from a CCR group.........180
� Using the pre-recorded greetings.........181
� Using customised greetings for System Answer and CCR.........182
� Recording customised greetings for System Answer and CCR.........183
� Programming or changing CCR destinations.........184
� Testing your custom System Answer and CCR.........184
P0905531 Issue 01 Compact Plus System Administration Guide
176 Auto Attendant
s r
to all
ur e
r a
lls s. tem ers
il
is ber
n
r tem ame t
r by
llers
Auto Attendant
The built-in Auto Attendant automatically answers and directincoming calls, which can reduce or eliminate the workload fothe person who answers incoming calls for an office. The AuAttendant carries out three tasks: System Answer, Custom CRouting (CCR), and direct extension dialling. The Auto Attendant can transfer calls to a hunt group.
The System Administrator enables the Auto Attendant for yoCompact Plus and programs the lines answered by CCR. ThAuto Attendant is only enabled after you enter Software Keys(supplied by BT). See "Software Keys" on page 54 for information about this feature.
See "Chart 23: Auto Attendant" on page 306 in Appendix A foprogramming overview.
System Answer
The System Answer feature simplifies the job of answering caby ensuring all calls are answered within a set number of ringWhen calls go unanswered at the telephone monitored by Sysanswer (called the attendant extension), System Answer answthe call and plays a greeting. It then puts the call on hold untsomeone retrieves it.
If the caller knows the internal number they want to reach or using the Compact Plus remote feature, they can dial the numduring the System Answer greeting. If the caller dials the extension number of the attendant telephone, the call is put ohold. The greeting is not repeated.
System Answer monitors all external calls that appear as a flashing line key on the attendant telephone, including answekeys and external calls that have been transferred. After SysAnswer has played the greeting, the call is put on hold at the sline indicator where it first appeared. System Answer does noanswer calls from internal extensions.
Custom Call Routing (CCR)
The job of answering and transferring calls can be taken oveCCR. When someone calls on lines monitored by CCR, the system answers the call and plays your recorded greeting. Causing a tone dial set can then
• direct their call by pressing a digit as instructed by your greeting (for example, ‘to reach our salespeople, press 4’)
• enter an internal telephone number (a fast way for regularcallers to reach someone directly)
Compact Plus System Administration Guide P0905531 Issue 01
Auto Attendant 177
sfer
o is
ual ing,
a ups
s
ing
he r
CR
e, st
to uch do
• access remote features
• reach an attendant by pressing a single digit (a way to tranout of CCR and talk to someone who can direct their call)
Callers can also dial an internal number to reach someone whworking after hours. If CCR forwards a call and it goes unanswered because
• the caller entered an invalid extension number
• no one is there to answer the call
• the caller entered the extension number of the attendant telephone
the call is redirected to ring at the Prime extension after the usCallback delay. Once a caller has dialled out of the CCR greetthey cannot make another selection.
CCR groups
CCR allows callers to reach groups of telephones by diallingsingle digit selected from an audio menu. Create the CCR grounder the System programming heading.
When a call is sent to a CCR group in which all the telephonehave the same call forward programming, the call goes to thetelephone with the lowest internal number.
If the telephones in a CCR group have different call forward programming, the call is handled by the telephone programmthat takes effect first. For example, if a telephone in a group forwards after two rings, it forwards the call from CCR before ttelephones in the group that are programmed to forward aftethree rings.
A CCR call is also forwarded by Forward on Busy, the Call Forward feature code, and Callback programming. Be sure tokeep this in mind when programming the telephones in your Cgroups.
When a call that was handled by CCR rings at your telephoncall information appears automatically on the display. You musubscribe to a Call Display service and have the proper equipment installed in your system for this feature to work.
Direct extension dialling
Both System Answer and CCR give the caller the opportunitydial an internal extension number or to use remote features sas Direct Inward System Access (DISA). This means callers
P0905531 Issue 01 Compact Plus System Administration Guide

178 Auto Attendant
the
o
er
ld).
e
ber d ipt
r l
wer
our
ine
the
t
not have to wait to reach the person they are calling, and onlyperson they are calling handles the call.
Customising System Answer and CCR
You enable System Answer and CCR for your system and programme which lines can be answered with CCR (usually incoming lines). System Answer is available to answer calls tthe attendant telephone (usually the reception telephone).
It is a good idea to plan how you will customise System Answand CCR before you start programming.
• Decide which telephone will be the attendant telephone (where calls can be answered automatically and put on ho
• Write down the greetings or scripts that you will record (seexamples in “Recording customised greetings for System Answer and CCR” on page 183).
• Organise your telephones into groups and decide what numa caller will use to reach each group. Using the groups annumbers you have created, write down the greeting or scrthat the CCR will play.
• Decide how many times a call rings before System Answeand CCR answer. Be sure it will not conflict with voice maior other Auto Attendant applications you may be using. If CCR lines ring at the attendant set, CCR and System Anscan also conflict.
• Use a programming session and feature codes to create ycustom System Answer and CCR.
• Test both System Answer and CCR to make sure they areworking properly.
• Make sure you programme your system to use the Held LReminder tone. This will provide another indication that System Answer has placed a call on hold.
Turning System Answer on or off
System Answer can be turned on and off at any telephone insystem. System Answer only handles calls that ring at the attendant extension.
1. Press Ä¥¡ÜÚ. The display shows the currenstatus of System Answer.
2. Press CHANGE or £.
3. Press ÛÜßÝß (ADMIN) or any password, including the Basic password.
4. Press CHANGE to choose On or Off.
5. Press OK or ¥ to confirm the change.
Compact Plus System Administration Guide P0905531 Issue 01

Auto Attendant 179
n
wer e hen
t
is
N
).
n
em
Because System Answer answers calls and then puts them ohold, the feature should be turned off when no one is at the telephone to retrieve the calls.
You can programme the feature code for turning System Ansand CCR on or off on a memory button with an indicator at thattendant telephone. You know that the feature is turned on wthe indicator is lit at the attendant set.
Turning CCR on or off
1. Press Ä¥¡ÜÛ. The display shows the currenstatus of CCR.
2. Press CHANGE or £.
3. Press ÛÜßÝß (ADMIN) or any password, including the Basic password.
4. Press change to choose Off , Bus. Open, or Bus. Closed.
5. Press OK or ¥ to confirm the change.
Choosing the attendant telephone
Programming allows you to choose a telephone to be the attendant telephone. External calls that go unanswered at thtelephone are handled by System Answer.
1. Place the programming overlay on an M7310N or M7324telephone.
2. Press Ä¥¥ÛßßÜÝÝ (CONFIG). The display shows Password:.
3. Press ÛÜßÝß (ADMIN). The display shows Terminals&Extns.
4. Press Ô until the display shows System prgrming.
5. Press twice. The display shows Attd extn: nnn (the extension number of the current attendant telephone
6. Press CHANGE and enter the internal number of the extensioyou want to assign as the attendant telephone.
7. Press ̈ to exit or Ô to continue programming.
Setting the number of rings before System Answer answers a call
If the system is busy answering calls, the line rings until SystAnswer can retrieve the call.
P0905531 Issue 01 Compact Plus System Administration Guide

180 Auto Attendant
N
an
N
ber s
1. Place the programming overlay on an M7310N or M7324telephone.
2. Press Ä¥¥ÛßßÜÝÝ (CONFIG). The display shows Password:.
3. Press ÛÜßÝß (ADMIN). The display shows Terminals&Extns.
4. Press Ô until the display shows System prgrming.
5. Press . The display shows Auto Attendant.
6. Press . The display shows Attd extn:.
7. Press Ô. The display shows System answer.
8. Press . The display shows After:.
9. Press CHANGE to choose 2, 3, 4, 5, 6, 7, 8, 9, 10, 11, or 12 rings.
10. Press ̈ to exit or Ô to continue programming.
Setting the number of rings before a caller hears the CCR greeting
If the system is busy answering calls, the line rings until CCR cretrieve the call.
1. Place the programming overlay on an M7310N or M7324telephone.
2. Press Ä¥¥ÛßßÜÝÝ (CONFIG). The display shows Password:.
3. Press ÛÜßÝß (ADMIN). The display shows Terminals&Extns.
4. Press Ôuntil the display shows System prgrming.
5. Press . The display shows Auto Attendant.
6. Press . The display shows Attd extn:.
7. Press Ô until the display shows CCR.
8. Press . The display shows After:.
9. Press CHANGE to choose 2, 3, 4, 5, 6, 7, 8, 9, 10, 11, or 12 rings.
10. Press ̈ to exit or Ô to continue programming.
Adding or removing extensions from a CCR group
The greeting you create for CCR tells a caller to press a numto reach a group of extensions. You add or remove extensionfrom these groups (CCR groups) programming.
Compact Plus System Administration Guide P0905531 Issue 01
Auto Attendant 181
ude
N
add
er or (not
res
e that rded
You can have a total of nine CCR groups. Each group can inclup to 20 extensions.
1. Place the programming overlay on an M7310N or M7324telephone.
2. Press Ä¥¥ÛßßÜÝÝ (CONFIG). The display shows Password:.
3. Press ÛÜßÝß (ADMIN). The display shows Terminals&Extns.
4. Press Ô until the display shows System prgrming.
5. Press . The display shows Auto Attendant.
6. Press . The display shows Attd extn:.
7. Press Ô until the display shows CCR.
8. Press . The display shows After:.
9. Press Ô until the display shows CCR groups.
10. Press . The display shows Show group:.
11. Enter the number of the group to which you want to makechanges. The display shows CCR grp 1.
12. Press . The display shows Show extn#:.
13. Enter the extension number of the extension you want to or remove from the group.
14. Press CHANGE to select the status of the extension in the group: Assigned or Unassgnd.
15. Press ̈ to exit or Ô to continue programming.
Using the pre-recorded greetings
Pre-recorded greetings can be used whenever System AnswCCR are turned on. Pre-recorded greetings can be turned offerased) and/or replaced with user-recorded substitutes.
If a pre-recorded greeting is turned off, all SA and CCR featuthat use that greeting will be affected.
When pre-recorded greetings are used, incoming callers at thattendant telephone hear the System Answer greetings. Linesare set up to be answered by CCR play one of these pre-recogreetings. They are:
• All of our operators are busy.
• If you know the extension that you want, and are using a touch-tone telephone, please dial it now.
• Or, hold the line and your call will be answered as soon aspossible.
• Thank you for calling.
P0905531 Issue 01 Compact Plus System Administration Guide
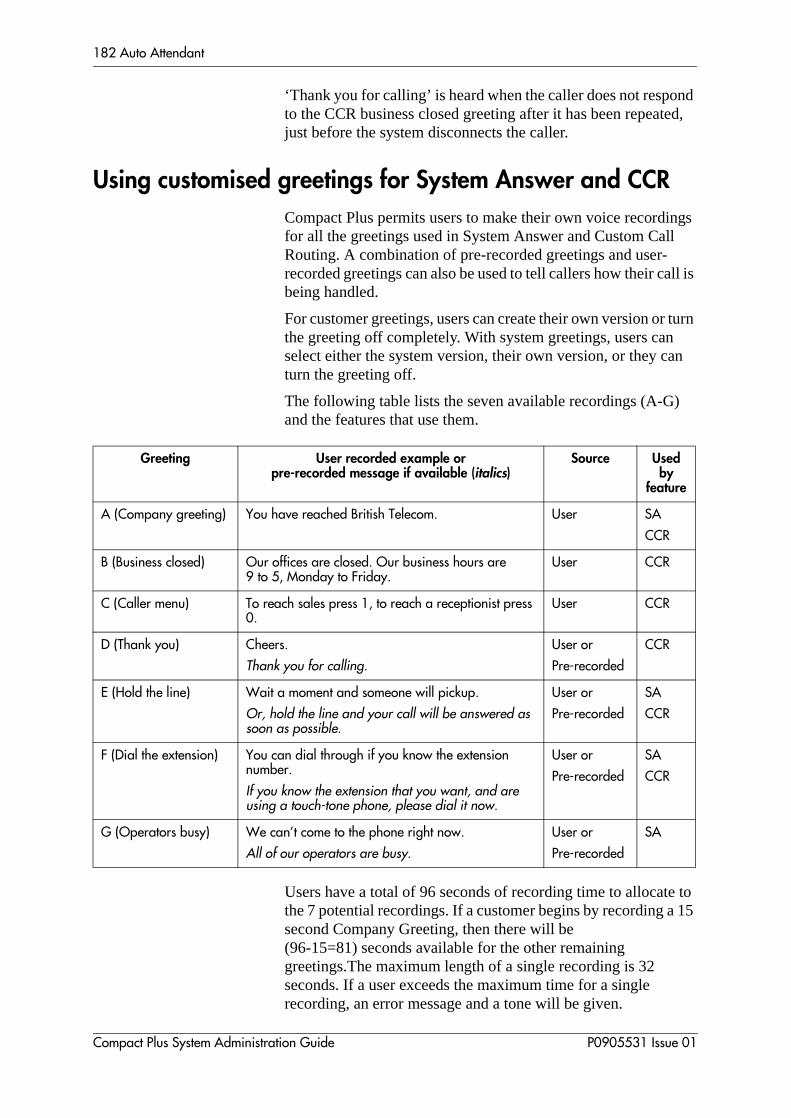
182 Auto Attendant
nd ed,
ngs l
ll is
turn n
to 15
‘Thank you for calling’ is heard when the caller does not respoto the CCR business closed greeting after it has been repeatjust before the system disconnects the caller.
Using customised greetings for System Answer and CCR
Compact Plus permits users to make their own voice recordifor all the greetings used in System Answer and Custom CalRouting. A combination of pre-recorded greetings and user-recorded greetings can also be used to tell callers how their cabeing handled.
For customer greetings, users can create their own version orthe greeting off completely. With system greetings, users canselect either the system version, their own version, or they caturn the greeting off.
The following table lists the seven available recordings (A-G)and the features that use them.
Users have a total of 96 seconds of recording time to allocatethe 7 potential recordings. If a customer begins by recording asecond Company Greeting, then there will be (96-15=81) seconds available for the other remaining greetings.The maximum length of a single recording is 32 seconds. If a user exceeds the maximum time for a single recording, an error message and a tone will be given.
Greeting User recorded example orpre-recorded message if available (italics)
Source Used by
feature
A (Company greeting) You have reached British Telecom. User SA
CCR
B (Business closed) Our offices are closed. Our business hours are 9 to 5, Monday to Friday.
User CCR
C (Caller menu) To reach sales press 1, to reach a receptionist press 0.
User CCR
D (Thank you) Cheers.
Thank you for calling.
User or
Pre-recorded
CCR
E (Hold the line) Wait a moment and someone will pickup.
Or, hold the line and your call will be answered as soon as possible.
User or
Pre-recorded
SA
CCR
F (Dial the extension) You can dial through if you know the extension number.
If you know the extension that you want, and are using a touch-tone phone, please dial it now.
User or
Pre-recorded
SA
CCR
G (Operators busy) We can�t come to the phone right now.
All of our operators are busy.
User or
Pre-recorded
SA
Compact Plus System Administration Guide P0905531 Issue 01
Auto Attendant 183
he
ings ved e to ture
hat e the
tly.
f the ut
pre-ded
ting
ss
a
A greeting that is turned off is not erased. The time used by tgreeting will not be returned to the 96 second time pool.
User recordings are stored on the feature card and the recordwill be erased if the card is replaced. If the same card is remoand reinserted, the greetings are preserved. The user will havre-record all user greetings when they upgrade to the new feacard.
System greetings are permanent and can never be erased.
FLASH memory degrades slightly each time a message is recorded. Typically, messages can be erased and written thousands of times. However, care must be taken to plan out wmessages are to be recorded and how often, in order to reducnumber of re-recordings made over a long period of time. A warning will be given when the card has degraded significanThis warning indicates that a new card should be obtained.
The pre-recorded system messages do not use any portion o96 seconds of total recording time. They cannot be erased, bthey can be turned off or replaced with a user substitute.
For clear sound quality in your greetings, use the handset forrecording greetings (not the handsfree microphone).
Recording customised greetings for System Answer and CCR
You can record your own versions of any user greetings and recorded greetings. You can also turn off any user or pre-recorgreeting.
1. Press Ä¥¡ÜÜand enter ÛÜßÝß (ADMIN).
2. The display shows Auto att. grtngs.
3. Press CHANGE if you want to turn the greeting off. A greetingthat is turned off is not erased. The time used by the greewill not be returned to the 96 second time pool.
4. Press . The display shows Grtg A mode: User.
5. Press PLAY to play the company greeting (A).
6. Press REC to record a company greeting. As soon as you preREC the previous recording will be erased. Making a recording of less than 2 seconds duration will also erase greeting.
7. Press OK when you have completed your recording.
A company greeting is the first greeting your callers hear.
P0905531 Issue 01 Compact Plus System Administration Guide
184 Auto Attendant
ay
tact s 0.
ed. d
r
he can in
ar to
8. To continue recording messages, press NEXT, then REC to record the business closed greeting (B).
9. Press OK when you have completed your recording.
Example: ‘Our business hours are 8 a.m. to 5 p.m., Mondthrough Friday’.
10. To continue recording messages, press NEXT, then REC to record the caller menu greeting (C).
The greeting used with the caller menu indicates the destinations you have chosen for each digit.
Example:‘To reach one of our sales agents, press 1. To conour accounting office, press 2. To talk to an attendant, presTo repeat this menu, press *’.
11. Continue recording the remaining messages (D-G) if desirRemember that some greetings are shared by both SA anCCR. Ensure that the recording is appropriate for both features.
12. Press ̈ to exit or Ô to continue programming.
Programming or changing CCR destinations
1. Press Ä¥¡ÜÜand enter ÛÜßÝß (ADMIN).
2. The display shows Auto att. grtngs.
3. Press NEXT. The display shows CCR Tree.
4. Press SHOW. The display shows Dial 0: Att.
5. Press CHANGE if you want to choose Attendant, None, CCR ogrp. Press NEXT until the display shows Dial 0: and the current destination when the caller presses zero.
6. Press CHANGE to select the appropriate destination.
Each number from zero to nine and * can direct a call to tattendant telephone or one of the nine CCR groups. The * be set up to make the system play the CCR greeting aga(Repeat). If a digit is set to None, it has no destination.
7. Using NEXT and CHANGE, select the destinations for the remaining digits.
Testing your custom System Answer and CCR
If you have more than one external line, you can call in to heyour greetings by dialling the number used by external callerscall the attendant set or a line that is answered using CCR.
Compact Plus System Administration Guide P0905531 Issue 01

Auto Attendant 185
a
To call systems with only one external line, you have to go totelephone that is not connected to your system.P0905531 Issue 01 Compact Plus System Administration Guide

186 Auto Attendant
Compact Plus System Administration Guide P0905531 Issue 01

Maintenance
� Beginning a Maintenance session.........188
� Checking the system version of the software.........188
� System Administration Log record.........189
� Clearing a hung line.........193
P0905531 Issue 01 Compact Plus System Administration Guide

188 Maintenance
ay
r n
t to
n:
N
in a e
se rite ords.
N
Beginning a Maintenance session
Maintenance overview
A Maintenance session helps you diagnose problems that moccasionally arise within the Compact Plus system.
The Maintenance section of programming has four headingsavailable for System Administrator programming.
You can run a Maintenance session from any working NorstaM7310N or M7324N telephone. Only one person at a time caaccess a Maintenance session. Photocopy the System Administration Log found at the end of this chapter, and use irecord maintenance information.
Follow these steps any time you enter a Maintenance sessio
1. Release all calls on your telephone.
2. Place the programming overlay on an M7310N or M7324telephone.
3. Press Ä¥¥ÛßßÜÝÝ (CONFIG). The display shows Password:.
4. Press àÛàÞ¡à (SAPLUS). The display shows Terminals&Extns.
5. Press Ô until the display shows Maintenance.
When necessary, refer back to these five steps on how to begMaintenance programming session. Only one person at a timcan access a Maintenance session.
Checking the system version of the software
System version tells you the version number of the system processor software found in the Feature cartridge. The releaversion can be used to trace a software fault if one occurs. Wthe system processor version number in the maintenance rec
1. Place the programming overlay on any M7310N or M7324telephone.
System version Displays the version number of the System Processor software.
Clear lines Clears a hung line. See "Clearing a hung line" on page 193
Sys admin log Displays a list of system initialisations, programming sessions, invalid password attempts, and password changes.
Remote montr Allows a technical specialist from a remote location to monitor the Norstar system. It is not a regular part of system installation or maintenance.
Compact Plus System Administration Guide P0905531 Issue 01

Maintenance 189
f
iate
N
2. Press Ä¥¥ÛßßÜÝÝ (CONFIG). The display shows Password:.
3. Press àÛàÞ¡à (SAPLUS). The display shows Terminals&Extns.
4. Press Ô until the display shows Maintenance.
5. Press . The display shows System version.
6. Press . The display shows the version number othe system processor.
7. Write the system processor version number in the approprmaintenance record.
8. Press ̈ to exit or Ô to continue programming.
System Administration Log record
You can check under the Sys admin log heading to find a list of administrative events performed on Compact Plus. Use the following table to record these log items whenever you run aMaintenance session.
1. Place the programming overlay on any M7310N or M7324telephone.
2. Press Ä¥¥ÛßßÜÝÝ (CONFIG). The display shows Password:.
3. Press àÛàÞ¡à (SAPLUS). The display shows Terminals&Extns.
4. Press Ô until the display shows Maintenance.
5. Press . The display shows System version.
6. Press Ô until the display shows Sys admin log.
7. Press . The display shows Items in log:.
8. Press Ô and Ò to move down or up the list of event codes.
9. Press ̈ to exit or Ô to continue programming.
P0905531 Issue 01 Compact Plus System Administration Guide
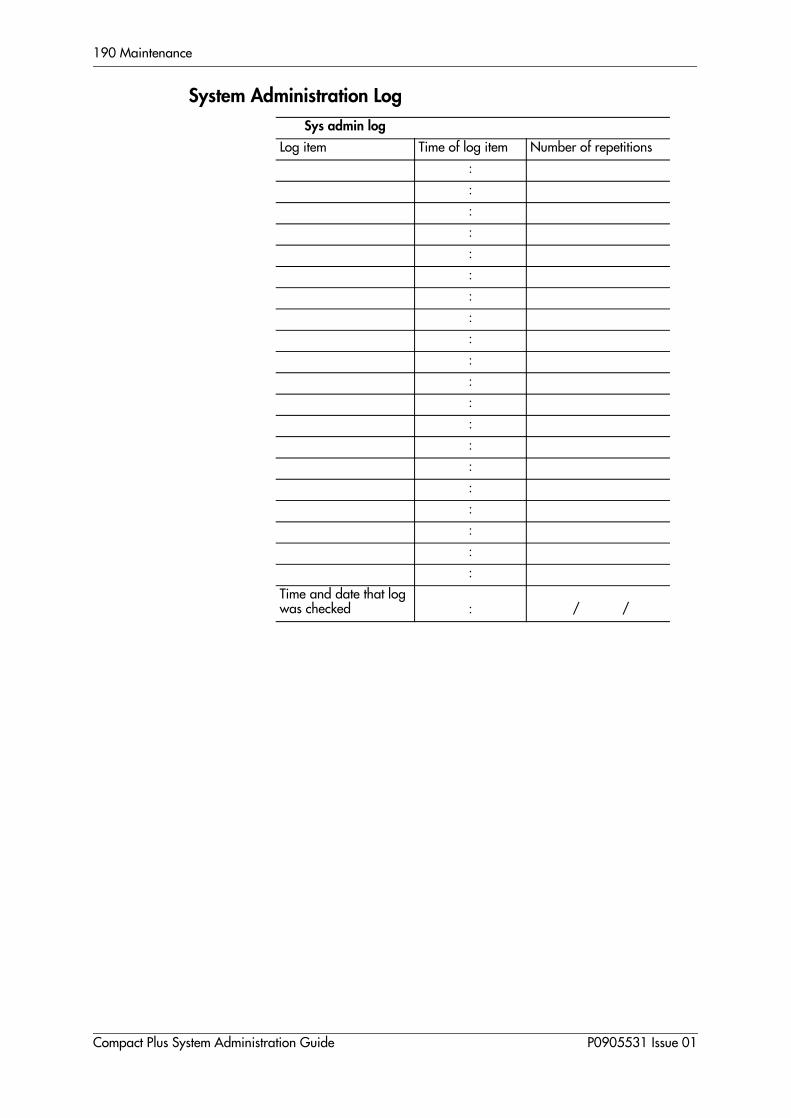
190 Maintenance
System Administration Log
Sys admin log
Log item Time of log item Number of repetitions
:
:
:
:
:
:
:
:
:
:
:
:
:
:
:
:
:
:
:
:
Time and date that log was checked : / /
Compact Plus System Administration Guide P0905531 Issue 01

Troubleshooting
� Recording and reporting alarm codes.........192
� Clearing lines.........192
� Power failure.........193
� Power-fail telephone.........194
P0905531 Issue 01 Compact Plus System Administration Guide

192 Troubleshooting
act
re
s a sign
ion
n s
r ext
of e e
one ons
Recording and reporting alarm codes
Occasionally, you may encounter a problem with your CompPlus system either from internal or external causes.
You need to know the following:
• the alarm extension that displays messages when there aproblems
• how to recognise and clear hung lines
• when a power failure occurs and what happens with the system
When there is a problem, the Compact Plus system generatemessage called an alarm code on the Alarm extension. You asa Norstar telephone with a two-line display (M7310N or M7324N) to be the alarm extension.
If an alarm code appears on the Alarm extension’s display
1. Record the alarm code.
2. Press TIME and record the time displayed.
3. Call the Advice Line and report the alarm code.
4. After speaking to the support person, press CLEAR.
Clearing lines
A line is hung when it remains busy, even when no conversator data communication is taking place and it cannot be disconnected by normal means. Lines can become hung wheexchange lines are connected to AC15A private circuits. Lineconnected to a device such as an answering machine, a fax machine, or a modem can also become hung.
It is a matter of judgement to decide whether a line is hung osimply in use. When a line is busy, you see a solid indicator nto the line key and the message, Line in use, when you attempt to select the line.
If a line is the only line in a line pool, and it is busy, a solid indicator appears next to the line pool key and the message,No free lines, appears on the display. For a line that is one several lines in a line pool, there is no direct indication that thline is busy as long as other lines in the line pool are free. Thindicator next to the line pool key and the No free lines message appear only when all lines in a line pool are busy. If or more lines in a line pool become hung, these busy indicatiappear with greater frequency than usual.
Compact Plus System Administration Guide P0905531 Issue 01

Troubleshooting 193
ar is ung
he
e rk
N
t nes,
at
p t to
Note: If you ensure that all lines assigned to line pools appeindividually on at least one telephone in the system, it much easier to detect hung lines.When lines become has a result of a call being directed into or through your system on a private circuit, they become hung in pairs. Thung line pair consists of one private circuit and one exchange line or private circuit. If network lines becomhung regularly, this indicates a problem with your netwoconfiguration.
Clearing a hung line
1. Place the programming overlay on an M7310N or M7324telephone.
2. Check the line number of the hung line using Ä ¥â (the Key Inquiry feature).
3. Press Ä¥¥ÛßßÜÝÝ (CONFIG). The display shows Password:.
4. Press àÛàÞ¡à (SAPLUS).The display shows Terminals&Extns.
5. Press Ô until the display shows Maintenance.
6. Press . The display shows System version.
7. Press Ô. The display shows Clear lines.
8. Press . The display shows the number of the firsbusy line in the system, followed by the time in hours andminutes that the line has been busy. If there are no hung lithe display shows No busy lines for a short time, then Clear lines.
9. If this is not the line you want to clear, press Ô until the line you want to clear is displayed.
10. Press CLEAR to disconnect the line. The display confirms ththe line has been cleared.
11. Press ̈ to exit or Ô to continue programming.
Power failure
If the power fails, your Compact Plus system maintains its programming for a period of three days. Telephones also keetheir personal programming. The clock always needs to be sethe correct time after a power failure.
P0905531 Issue 01 Compact Plus System Administration Guide

194 Troubleshooting
star r fail ere
ted
p.
er
Power-fail telephone
Each analogue line card, installed in either the Compact PlusCentral Control Unit (CCU) or a Line Module, provides one power-fail telephone connection at the Box Connection.
The power-fail telephone is an analogue telephone (not a Nortelephone) that functions independently of the Compact Plussystem. You can use the power-fail telephone only when youNorstar system is disconnected or without power. The power-telephone is usually located near the Compact Plus CCU. If this no power-fail telephone next to the CCU, plug a standard analogue telephone into the power-fail telephone socket locanear the CCU.
The power-fail telephone facility is not supported on a BRI looNorstar customers with digital exchange lines who require power-fail telephones, have the following options:
• Add analogue exchange lines to the system.
• Install an uninterruptable power supply (UPS) stand-by powunit for the Compact Plus.
Compact Plus System Administration Guide P0905531 Issue 01
SECTION III: Using telephone features
P0905531 Issue 01 Compact Plus System Administration Guide

196
P0905531 Issue 01 Compact Plus System Administration Guide

About Norstar telephones
� About Norstar telephones.........198
� M7324N telephone.........198
� M7310N telephone.........199
� M7208N telephone.........200
� M7100N telephone.........200
� M7000 telephone.........201
� Release key.........202
� Visually Impaired Operator Console.........202
� Central Answering Position.........203
� Common feature display messages.........204
P0905531 Issue 01 Compact Plus System Administration Guide
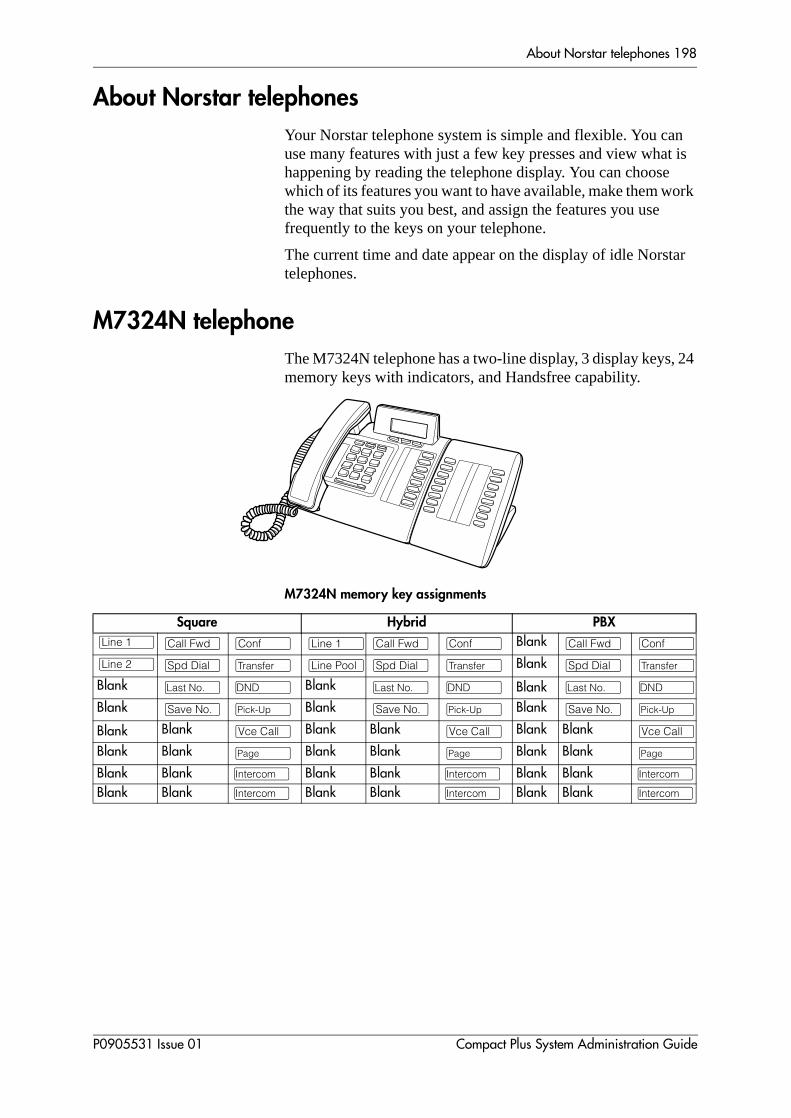
About Norstar telephones 198
n t is ork
tar
24
About Norstar telephones
Your Norstar telephone system is simple and flexible. You cause many features with just a few key presses and view whahappening by reading the telephone display. You can choosewhich of its features you want to have available, make them wthe way that suits you best, and assign the features you use frequently to the keys on your telephone.
The current time and date appear on the display of idle Norstelephones.
M7324N telephone
The M7324N telephone has a two-line display, 3 display keys,memory keys with indicators, and Handsfree capability.
M7324N memory key assignments
Square Hybrid PBX
ºLine 1 ºCall Fwd ºConf ºLine 1 ºCall Fwd ºConf Blank ºCall Fwd ºConf
ºLine 2 ºSpd Dial ºLine Pool ºSpd Dial Blank ºSpd Dial
Blank µ ¶ Blank µ ¶ Blank µ 
Blank ºSave No. Ï Blank ºSave No. Ï Blank ºSave No. Ï
Blank Blank ºVce Call Blank Blank ºVce Call Blank Blank ºVce Call
Blank Blank ¹ Blank Blank ¹ Blank Blank ¹
Blank Blank Æ Blank Blank Æ Blank Blank Æ
Blank Blank Æ Blank Blank Æ Blank Blank Æ
P0905531 Issue 01 Compact Plus System Administration Guide

About Norstar telephones 199
10
M7310N telephone
The M7310N telephone has a two-line display, 3 display keys,memory keys with indicators, 12 dual-memory keys without indicators, and Handsfree capability.
M7310N memory key assignments
M7310N key assignments for dual-memory keys (all templates)
Square Hybrid PBX
ºLine 1 ºLine 1 ºLine Pool
ºLine 2 ºLine Pool ºConf/tran
ºCall Fwd ºCall Fwd ºCall Fwd
Ï Ï Ï
ºSpd Dial ºSpd Dial ºSpd Dial
¶ ¶ 
µ µ µ
¹ ¹ ¹
Æ Æ Æ
Æ Æ Æ
8 x 24 system 8 x 16 system
The defaults shown may not actually occur on any telephone, as no telephone has an Autodial key for itself. The extension number for each telephone appears as a blank key on that telephone.
Extension number 238 does not appear because it is assigned to the I-RAD.
ºExtn 233ºExtn 221
ºExtn 240ºExtn 227
ºExtn 233ºExtn 221
BlankºExtn 227
ºExtn 234ºExtn 222
ºExtn 241ºExtn 228
ºExtn 234ºExtn 222
BlankºExtn 228
ºExtn 235ºExtn 223
ºExtn 242ºExtn 229
ºExtn 235ºExtn 223
BlankºExtn 229
ºExtn 236ºExtn 224
ºExtn 243ºExtn 230
ºExtn 236ºExtn 224
BlankºExtn 230
ºExtn 237ºExtn 225
ºExtn 244ºExtn 231
ºExtn 237ºExtn 225
BlankºExtn 231
ºExtn 239ºExtn 226
ºExtn 245ºExtn 232
BlankºExtn 226
BlankºExtn 232
P0905531 Issue 01 Compact Plus System Administration Guide
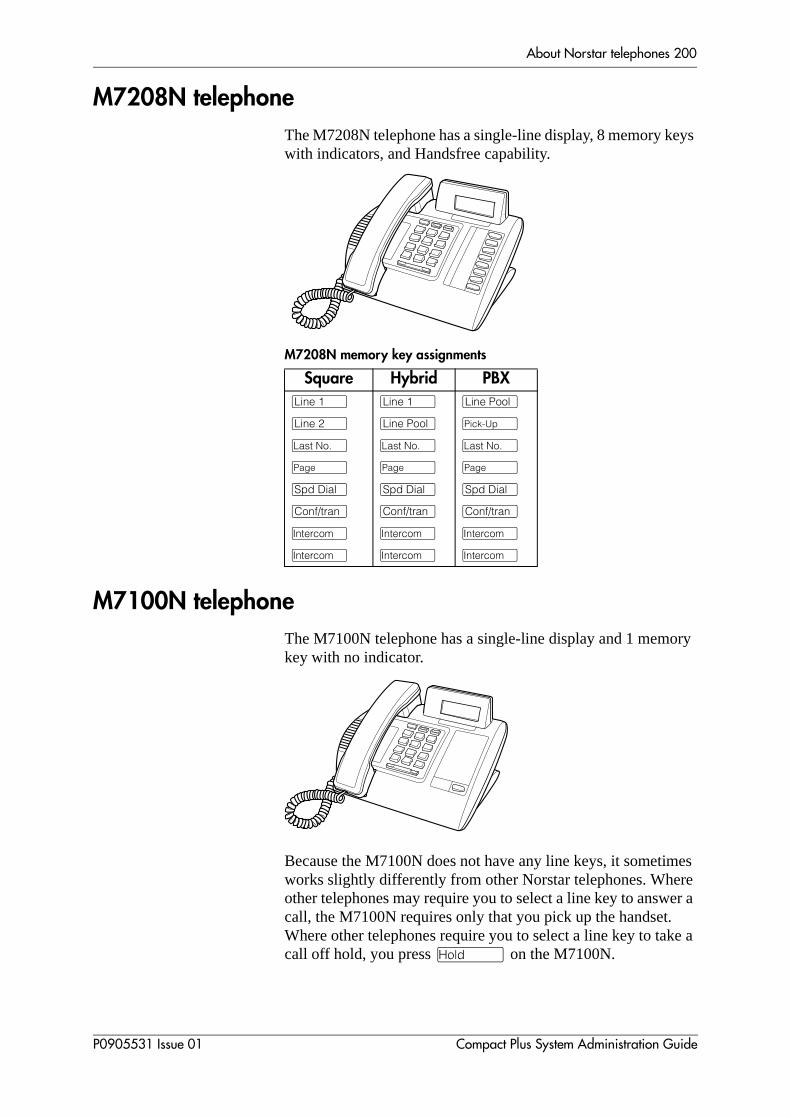
About Norstar telephones 200
eys
ory
es re er a
ke a
M7208N telephone
The M7208N telephone has a single-line display, 8 memory kwith indicators, and Handsfree capability.
M7208N memory key assignments
M7100N telephone
The M7100N telephone has a single-line display and 1 memkey with no indicator.
Because the M7100N does not have any line keys, it sometimworks slightly differently from other Norstar telephones. Wheother telephones may require you to select a line key to answcall, the M7100N requires only that you pick up the handset. Where other telephones require you to select a line key to tacall off hold, you press ú on the M7100N.
Square Hybrid PBXºLine 1 ºLine 1 ºLine Pool
ºLine 2 ºLine Pool Ï
µ µ µ
¹ ¹ ¹
ºSpd Dial ºSpd Dial ºSpd Dial
ºConf/tran ºConf/tran ºConf/tran
Æ Æ Æ
Æ Æ Æ
P0905531 Issue 01 Compact Plus System Administration Guide

About Norstar telephones 201
d ns.
er a on
e a
ave
The M7100N cannot have a Handsfree/Mute key. You will finspecial instructions for the M7100N in some feature descriptio
M7100N key assignment (all templates)
M7000 telephone
The M7000 telephone does not have any line keys. To answcall with the M7000 telephone, lift the handset. To place a callhold you press the ³ key and press ³ key again to connect the call. The M7000 telephone does not havHandsfree/Mute key.
The M7000 telephone is commonly used with the HospitalityServices feature.
Programming memory keys
The M7000 telephone has 4 programmable keys. Features programmed on the M7000 telephone’s programmable keys hthe following restrictions:
• do not have a display for information or instructions
• do not have line or extension keys
To program standard features:
External autodial
1. Press ²¥Ú.
2. Press the key you want to programme.
3. Enter the telephone number.
4. Press the ³ key.
Internal autodial (DSS)
1. Press ²¥Û.
2. Press the key you want to programme.
3. Enter the telephone number.
Feature access key
1. Press ²¥Ü.
2. Press the key you want to program.
3. Press ² and the code you wish to programme.
µ
P0905531 Issue 01 Compact Plus System Administration Guide

About Norstar telephones 202
ear
a
a ,
tor ing ice
l
o a s, tus
Personal Speed Dial programming
1. Press ²¥Ý.
2. Enter the speed dial code.
3. Enter the telephone number.
4. Press the ³ key.
Ring Type programming
1. Press ²¥ß.
2. Press 1, 2, 3 or 4 to select the Ring type desired.
3. Press the ³ key.
M7000 tones
Since the M7000 telephone does not have a display you will hthe following tones:
• stuttered dialtone for Do Not Disturb and Call Forward
• single, low frequency command input tone
• single, high frequency confirmation tone
Note: The lamp shows a solid light if there is a message fromDirect-Dial extension or a Voicemail message for an M7000 telephone.
Release key
Pressing ̈ ends a call. You do not have to put the handsetdown. ̈ also ends feature programming. While you are oncall, do not press ̈ to end a feature you are using. If you doyou disconnect the call. Press Ä instead.
Visually Impaired Operator Console
The Compact Plus system supports a Visually Impaired OperaConsole (VIOC) for the visually impaired attendant. The VIOCprovides computer-based speech synthesis for the programminterface. A VIOC consists of an M7324N telephone, a CAPNmodule, an IBM-compatible PC, a PCI-B card, a PC-based vosynthesizer card, and an analogue mixer card.
The PC uses the PCI-B to obtain information from the CentraControl Unit (CCU) and controls the voice synthesizer to generate audible prompts. The synthesizer output is routed theadset where it is coupled with the telephone call in progresenabling the operator to respond to the caller and to hear stainformation at the same time.
P0905531 Issue 01 Compact Plus System Administration Guide

About Norstar telephones 203
ns
nel
able d of
he the t is not
et to for
N
line 4N
l
All
The PCI-B is an add-on card for the PC that allows applicatiorunning on the PC to access the Compact Plus D-channel signalling and B-2 data channels. The VIOC requires D-chansignals.
The voice synthesizer card is an add-on for the PC that is capof performing text-to-speech synthesis. The volume and speethe synthesized speech can be adjusted by the user.
The analogue mixer card is an add-on for the PC that takes tanalogue signal from the voice synthesizer and mixes it with headset audio output from the M7324N extension. The resulsent to the headset port of the mixer card. The mixer card doesprovide any volume control.
To use the VIOC function, the display language needs to be sOperating. See ‘Changing the display language’ on page 109instructions.
Central Answering Position
The Central Answering Position (CAPN) is a Norstar M7324Ntelephone with at least one CAPN module attached. The CAPmodule is an add-on device that provides 48 extra memory or keys. You can connect one or two CAPN modules to an M732telephone.
The CAPN is usually the Prime extension and the Direct-Diatelephone for the lines and telephones it serves.
The CAPN module key mapping is the same for all templates.keys are blank keys by default.
CAPN module
M7324N telephone
P0905531 Issue 01 Compact Plus System Administration Guide

About Norstar telephones 204
Common feature display messages
You may see the following displays when using a feature.
Access denied Someone is already using programming, or the feature you are trying to use is not compatible with the configuration of the telephone or line.
Denied in admin You have tried to use a feature, but you have not been given access to it in programming.
Feature timeout You have taken more than 15 seconds to press a button in response to a display.
Inactive feature You have entered a feature code that is used by an application programme that your system does not have.
Invalid code You have entered an invalid feature code.
Not available You have tried to use a feature that is not available in the present set-up of your Compact Plus system.
Set locked You cannot use the feature you have chosen because your telephone is locked. See �Locking an extension� on page 86.
1234567890123É
VIEWâ OK
Press £ or press VIEWâor áVIEW to view a number that is too long to fit on the display. Press ú or OK when you are finished.
¤ This indicates a long-distance call. (May be available with Call Display services.)
239>221 Either you are receiving an internal call from telephone 239 forwarded by telephone 221, or you have an answer button for telephone 221 and an internal call from 239 is ringing on 221.
221
TRANSFER
You are connected to an internal call. Press TRANSFER to transfer the call.
221 calling You are receiving a call from telephone 221.
Call 221?
YES NO
You have received a Ring Again offer for a call to an internal telephone. Press the flashing internal line button or YES to call the number again. On the M7100N telephone, just lift the receiver. Otherwise, press NO or wait 30 seconds for the Ring Again offer to expire. For an explanation of Ring Again, see �Using Ring Again� on page 260.
Camped: 221
CALLBACK
The person to whom you camped the call did not answer it. The call has come back to you. Press the line button or CALLBACK to
reconnect to the call.
Line001
TRANSFER
You are connected to an external call. Press TRANSFER to transfer the call.
P0905531 Issue 01 Compact Plus System Administration Guide
About Norstar telephones 205
Line001>221 Either you are receiving an external call forwarded from telephone 221, or you have an answer button for telephone 221 and an external call is ringing on that telephone.
Line001 transfer The call on line 001 is being transferred to you by someone else in your Compact Plus system.
Line001 waiting A camped call is waiting. Press the line button or use Call Queuing to answer the call. Press ú if you have an M7100N telephone.
No calls waiting You tried to use Call Queuing but no call was ringing at your telephone.
No line selected There is no call ringing at your telephone. If you have a flashing line button but your telephone is not ringing, press the line button to answer the call on that line.
Not in service The telephone to which you directed a call is not in service or is otherwise unavailable. The call is returned to your telephone.
Parked call
CALLBACK
No one answered the call you parked. The call has come back to you.
Pick up receiver You have used the Call Queuing feature without picking up the receiver. Auto Handsfree has not been assigned to your telephone. You must use the receiver or © to answer a call.
Priority>221
BLOCK
You are receiving a Priority call. If you are on another call, inform the person you are speaking to that the call is about to be put on hold. Press the flashing line indicator of the Priority call or wait until the call connects automatically (in 8 seconds). The Priority call goes through when you hear the next beep. Your active call is placed on Exclusive Hold. It is reconnected automatically when the Priority call ends (unless you transfer the Priority call, in which case you must press the line button of your original call to reconnect). Use DND (Ä¡Þ) or press BLOCK to reject a Priority call.
Release a call You have no free line buttons on which to receive a call. Release one of your current calls and try to answer the incoming call again.
Use line pool?
YES NO
You have received a Ring Again offer for a line pool. Press the flashing internal line button or YES to use the line pool. On the M7100N telephone, just lift the receiver. Otherwise, press NO or wait 30 seconds for the Ring Again offer to expire.
Hold or release You cannot programme a feature button while you are on a call.
P0905531 Issue 01 Compact Plus System Administration Guide
About Norstar telephones 206
Release calls You have tried to use a feature while you were on a call or had calls on hold. Release the call, or calls, before using the feature.
Line in use The line is in use. Make the call using normal methods or wait until the line is free.
No button free You have tried to make, receive, or pick up a call when no line button was available. Some features also require you to have a button free. Releasing calls can free up line buttons.
Make calls first The feature you tried to use requires you to be on an active call at your telephone. This display also appears when information about a call has been cleared by a system reset.
No free lines All the lines or line pools available to the telephone are in use. This display also appears when you have tried to dial an external number or use a feature that conflicts with the lines, line pools, or Prime line used by the telephone.This must be corrected by your Customer Service representative or installer.
No line selected The telephone has been set up to dial an external number on a Prime line but the telephone does not have a prime line. This must be corrected by your Customer Service representative or installer.
In use: 221 You have tried to programme redirection while someone else is programming redirection. Only one person can programme line redirection at a time.
Incoming only The line you are trying to use for redirecting calls is for incoming calls only. Choose an outgoing line.
9_
QUIT BKSP OK
Continue entering digits. PressÃ
or BKSP to delete incorrect digits. Press ú or OK when you are finished.
Invalid number You have entered an invalid line pool code or an invalid destination code.
Line denied You have selected a line that is private to another telephone.
Restricted call The destination you have chosen for Line redirection is restricted.
P0905531 Issue 01 Compact Plus System Administration Guide

Customising a Norstar telephone
� Dialling mode.........208
� Display contrast.........209
� Key Inquiry.........209
� Moving line keys.........210
� Ring type.........210
� Ring volume.........211
P0905531 Issue 01 Compact Plus System Administration Guide

Customising a Norstar telephone 208
e e
ng
s
se
it, ot
st, l) ur
. If
e 0N r
d to
Dialling mode
Norstar telephones support three dialling modes. All three methods let you dial a call without picking up the handset. Thspecial features of the Automatic dial and Pre-dial settings aravailable only when you dial without picking up the handset.
• Standard dial—You make a call by selecting a line and diallithe number. If you have a prime line, it is selected automatically when you lift the handset or press ©.
• Automatic dial—If you have a Prime line assigned to your telephone, you can dial a number without selecting a line.Your prime line is selected as soon as you start dialling a number. Automatic dial does not work if your telephone hano prime line or if the prime line is in use. Telephones connected to an Analogue Terminal Adapter (ATA) cannot uAutomatic dial.
• Pre-dial—Allows you to enter a telephone number, check then change it before actually making the call. The call is ndialled until you select a line or line pool or pick up the handset.
You can pre-dial external and extension numbers. You muhowever, select the correct type of line (external or internafor the type of number you have entered. If all the lines on yotelephone are busy, you cannot enter a telephone numberyour telephone starts ringing while you are pre-dialling a number, you can stop the ringing by turning on Do Not Disturb (Ä¡Þ). This does not affect numbers you are entering.
Setting the dialling mode of your telephone
1. Press Ä¥¡Û
2. Press £ or NEXT to choose Automatic dial, Predial, or Standard dial.
3. Press ú or OK to select the displayed dial mode.
Note: Standard dial does not support dialling without lifting thhandset of an M7100N telephone. If you have an M710telephone, use the Automatic dial or Pre-dial modes fodialling without lifting the handset.
Note: The dialling modes feature code cannot be programmea memory key.
P0905531 Issue 01 Compact Plus System Administration Guide

Customising a Norstar telephone 209
e it
ant;
g e er .
re
ou
a
Display contrast
You can adjust the contrast on your telephone display to makeasier to read.
1. Press Ä¥à. The display shows Contrast level
4.
2. Press a number on the keypad for the contrast level you wor if you have a two-line telephone, press UP and DOWN to adjust the contrast.
3. Press ú or OK to set the new contrast level.
Key Inquiry
Ensure that the function of a key matches its label by pressinÄ¥â and then the key to display its function. On thM7100N telephone, Key Inquiry shows your extension numbfollowed by the function assigned to your single-memory key
To find out your extension number, use the Key Inquiry featu(Ä¥â) on an intercom key.
Displays
Labelling keys on the telephone
After programming a key on your telephone, you may wish tolabel it or cap it with one of the pre-labelled key caps. When yare labelling or removing a key cap, activate Key Inquiry (Ä¥â) first so that you do not accidentally activate feature.
Note: On the M7100N, Key Inquiry shows your extension number followed by the function assigned to your single- memory key.
001 Line001
SHOW OK
The display shows the number and name of the line. Press SHOW to view the redirection status of the line.
123456789012345É
VIEWâ OK
Press £ or press VIEWâ or áVIEW to view a number that is too long to fit on the display. Press ú or OK when you are done.
21 <SETNAME>
NEXT VIEWâ
The display shows the directory number of the telephone and the assigned name. Press NEXT to see the first line assigned to ring at the intercom key.
<Feature name>
SHOW OK
The name of the feature assigned to a key is displayed when you press the key. Press £ or SHOW for additional information.
Press a key
EXIT
Press the key you want to check. Press Ä or EXIT when you are finished.
P0905531 Issue 01 Compact Plus System Administration Guide

Customising a Norstar telephone 210
s ou ame
ne.
To remove a key cap, slip the fingernails of your index fingerunder each end of the key cap and pull up until it pops off. If ydo not have a printed key cap to replace it, you can write the nin the blank label space beside the key (on the M7324N, M7208N, and M7100N telephones).
Moving line keys
You can move exchange lines to different keys on your telephoUse this feature to arrange your lines as you prefer.
1. Press Ä¥¡Ú.
2. Press the key you want to move the line from.
3. Press the key you want to move the line to.
4. Press Ä or QUIT when you are finished moving lines.
Displays
Ring type
To help you recognise which telephone is ringing in an open office, you can choose one of four distinctive rings for your telephone.
1. Press Ä¥ß.
2. Press 1, 2, 3, 4, or NEXT. You hear the selected ring for 2 seconds.
3. Repeat until you hear the ring you prefer, then press
ú or OK. The display briefly shows New ring stored.
Exchanged The two keys you selected have exchanged position.
Invalid location You have tried to move a line to a key that cannot be used as a line key, such as an intercom key, Handsfree/Mute key, or an Answer key.
Move line from:
QUIT
Press the key of the line you want to move. Press Ä or QUIT when you have finished moving lines.
Move line to:
QUIT
Press the key you want to move the line to. Neither of the keys is erased. The lines, or the line and feature, simply switch places.
Press a line The key you are trying to move is not a line key. If you are trying to switch a line and a feature, move the line to the Feature key and not the Feature key to the line.
P0905531 Issue 01 Compact Plus System Administration Guide
Customising a Norstar telephone 211
Ring volume
1. Press Ä¥¡â to make the telephone ring.
2. Press à to adjust the volume up or down.
P0905531 Issue 01 Compact Plus System Administration Guide

Customising a Norstar telephone 212
P0905531 Issue 01 Compact Plus System Administration Guide
Using personal features
� Background music.........214
� Do Not Disturb.........214
� Personal Speed Dial codes.........215
� Using Speed Dial.........215
P0905531 Issue 01 Compact Plus System Administration Guide
Using personal features 214
pact
y s
all
the me
.
Background music
If an external music source has been connected to your ComPlus system, this feature allows you to play music over your telephone speaker.
Press Ä¡ß.
The music pauses while you are making or answering a call.
To cancel, press Ä£¡ß.
Do Not Disturb
Extensions that are members of a hunt group can temporarilleave a hunt group by activating this feature. Hunt group callarriving while an extension is in Do Not Disturb mode will be forwarded to the next member in the hunt group.
Stopping calls from ringing at your telephone using Do Not Disturb (DND)
You can stop calls from ringing at your telephone by pressingÄ¡Þ. The display shows Do not disturb.
Only Priority calls ring at your telephone. A line key will flashwhen you receive a call, but your telephone does not ring.
Refusing to answer a call
While you are on a call, you can refuse to answer a second c(including a Priority call).
Press Ä¡Þ while your telephone is ringing.
Cancelling Do Not Disturb
Press Ä£¡Þ. The display briefly shows Allow
calls. Your telephone now receives calls normally.
Using Do Not Disturb
Once you turn Do Not Disturb on, calls are forwarded to the Prime extension only if there is no other telephone on which line appears. If there is another telephone that shares the saline, the call may be answered by that person.
Do Not Disturb also prevents voice calls from alerting at yourtelephone. Voice calls are presented as normal intercom calls
P0905531 Issue 01 Compact Plus System Administration Guide

Using personal features 215
een
can
at
nd ign
ed
as d
es.
sign See 8.
ial u
or ine
ne
Personal Speed Dial codes
You can quickly dial external telephone numbers that have bprogrammed onto Speed Dial codes. Speed Dial codes
• 01 to 70 are programmed for the entire system by you and be used on any telephone in the Compact Plus system
• 71 to 94 are personal and may be programmed differentlyeach Norstar telephone by the user
Speed dial numbers are generally subject to any call barring restrictions that have been programmed in the Compact Plussystem.
Using Speed Dial
Compact Plus provides two types of speed dialling: system apersonal. System Speed Dial programming allows you to asstwo-digit Speed Dial codes to the external numbers your colleagues call most frequently. Personal Speed Dial programming allows individuals to programme their own SpeDial numbers.
Speed Dial numbers are subject to the same restriction filtersregularly dialled numbers. You can programme system SpeeDial numbers to bypass dialling restrictions.
Speed Dial numbers may include host system signalling cod
System Speed Dial codes are numbered from 01 to 70. You asnumbers to System Speed Dial codes for the entire system. ‘Assigning a number to a System speed dial code’ on page 5
Note: There is no difference between using Personal Speed Dand using System Speed Dial. They differ only in how yoprogramme them.
Adding or changing Personal Speed Dial
1. Press Ä¥Ý.
2. Enter a two-digit code from 71 to 94 that you want to associate with a telephone number.
3. To include a line selection for this number, press the line intercom key. To select a line pool, press a programmed lpool key, or press Æ and enter a line pool access code. For the M7100N telephone, you can only select a lipool.
4. Enter the number you want to programme.
5. Press ú or OK.
P0905531 Issue 01 Compact Plus System Administration Guide

Using personal features 216
Displays storing and dialling a Personal Speed Dial number
Making a Speed Dial call
To make a call using a personal or System Speed Dial code:
1. Press Äâ.
2. Enter the appropriate two-digit Speed Dial code (01–94).
9_
CANCL BKSP OK
Continue entering the number you wish to programme. You can change the number by pressing BKSP or Ã. When you are finished, press ú or OK.
Enter digits
QUIT OK
Enter the telephone number you wish to programme exactly as you would if you were dialling it normally. When you are finished, press ú or OK. This message appears only after you select a line or line pool.
Error code: Enter a two-digit number between 71 and 94 to select the code for programming.
No number stored There is no number stored on the speed dial code you have dialled.
Program and HOLD On the M7100N or M7208N only, if you want to programme a line or line pool selection for this speed dial number, select the line or line pool. Otherwise, enter the telephone number exactly as you would if you were dialling it normally. When you are finished, press ú.
Program and OK
QUIT OK
If you want to programme a line or line pool selection for this speed dial number, select the line or line pool. Otherwise, enter the telephone number you wish to programme exactly as you would if you were dialling it normally. When you are finished, press OK.
Select a line There is no line associated with the speed dial number you are trying to use. Select a free exchange line or line pool, and enter the speed dial feature code again.
Unknown number The system cannot dial the number stored. Re-programme the number.
Speed dial> Enter a two-digit number between 01 and 94 to select the code for dialling.
No free lines
LATER
All lines are busy. Press LATER, then YES to have the system notify you when a line is free.
P0905531 Issue 01 Compact Plus System Administration Guide

Answering calls
� Answering a call.........218
� Privacy feature (external calls only).........218
� Answering the next queued call.........218
� Answering hunt group calls.........219
� Multiple appearances of DIA lines.........219
� Using Handsfree.........219
� Answering a telephone using Directed Pickup.........221
� Answering a telephone using Pickup Group.........221
� Answer keys.........222
� Listening in a group.........223
� Disconnecting accidentally.........223
P0905531 Issue 01 Compact Plus System Administration Guide

Answering calls 218
ess
ed r
call
ill
ce
in ble ead nce
r
an
Call is een t
Answering a call
When a call rings at the telephone, pick up the handset or pr© to connect the call.
Privacy feature (external calls only)
Lines in your system can be programmed to have AutomaticPrivacy. If a line is programmed with Automatic Privacy, onlyone person at a time can use the line. If a line is not programmwith Automatic Privacy, anyone with the line assigned to theitelephone can join your call by pressing the line key. Should another telephone join your call, you hear a tone and see a message on the telephone display. A telephone cannot join awithout this tone being heard.
If a line is not programmed with Automatic Privacy, you can stuse the Privacy feature by pressing Ä¡Ü after connecting an external call.
Note: Privacy control cannot be used on internal or conferencalls.
Creating a conference by releasing Privacy
If a line is programmed with Automatic Privacy, you can turn privacy off to allow another person with the same line to join your conversation and form a conference. All the rules applicato a conference apply, except there is only one line in use instof the normal two. This means that you cannot split a conferethat was set up by releasing Privacy.
1. After connecting an external call, press Ä¡Ü.
2. Tell the other person to press the line button and join youconversation.
Only two Norstar telephones in addition to the external caller ctake part in this kind of conference.
Answering the next queued call
An attendant who has many calls coming in at once can use Queuing to help them answer the calls in order. When there more than one call ringing, you can answer the call that has bringing longest. If you are already on an incoming call, it is puon hold and the next longest waiting call is automatically connected.
1. After you pick up the handset, press Ä¡âÚ.
P0905531 Issue 01 Compact Plus System Administration Guide

Answering calls 219
ise
ce
an
at gh ame
g 23, nt e
g
n s of er IA
Answering hunt group calls
The three hunt group distribution modes allow you to customhow hunt group calls are distributed in your office.
In Broadcast mode, a single incoming call will ring simultaneously at all the extensions in a group. In a busy offiyou might have three receptionists in a hunt group. Each receptionist has a hunt group button on their telephone so incoming calls alert at all three telephones, if available, and cbe answered by any one of the receptionists. The other two telephones do not track the call.
The sequential distribution mode follows the programmed member order when distributing calls. The incoming call startsthe first extension in the hunt group and directs the call throuthe hunt group members in order until a hunt group memberanswers the call. The next hunt group call goes through the sdistribution process.
In this mode, you can programme your most experienced personnel to be the first members of the group to receive incoming calls.
The cyclical distribution starts the call at the extension followinthe one which was last presented with a call. So if extension 2224 and 225 are members 01,02 and 03 respectively of a hugroup and the last call was answered by 224 (member 02), thnext incoming call will start with extension 225 (member 03).
This way, you can ensure that all your personnel are receivincalls, rather than one person receiving the majority of calls.
Multiple appearances of DIA lines
DIA lines can be assigned to one or more telephones. Calls oDIA lines alert at all telephones programmed with appearancethe DIA line. Once the DIA call is answered, the call is no longtracked by any other telephone with the appearance of the Dline, leaving the other telephones free to receive subsequentincoming calls.
Using Handsfree
Norstar telephones allow you to make calls without using thehandset. The M7100N telephone does not support handsfreeoperation.
P0905531 Issue 01 Compact Plus System Administration Guide
Answering calls 220
e,
the
r e. on
one
Making calls without lifting the handset
1. If you do not have a Prime line assigned to your telephonpress a line key.
2. Press ©. The telephone’s internal microphone andspeaker are automatically turned on.
3. Dial your call and speak at a normal level.
Answering calls without lifting the handset
1. Press the line key for the ringing call. (This step is not necessary if you have a Prime line assigned to your telephone.)
2. When your telephone rings, press © and speak normally.
Direct your voice toward the telephone. The closer you are totelephone, the easier it is for the microphone to transmit yourvoice clearly to your listener.
Muting a Handsfree call
You can switch off the telephone microphone so that you canspeak privately while you are on a Handsfree call.
Press ©. The microphone is turned off.
To turn the microphone back on again and continue your Handsfree call, press ©.
Note: The indicator next to © is solid when you are in Handsfree mode. It flashes when you mute the microphone.
Changing a handset call to a Handsfree call
Press © and hang up the handset.
Changing a Handsfree to a regular call
Lift the handset.
Hints for using Handsfree
Wait for your caller to finish talking before you speak. The microphone and speaker cannot be on at the same time. Youcaller's voice may be cut off if you both speak at the same timNoises such as a tapping pencil could be loud enough to turnyour microphone and cut off your caller’s speech.
To prevent a possible echo, keep the area around your telephfree of paper and other objects that might screen your microphone. Turning down the microphone’s volume (press
P0905531 Issue 01 Compact Plus System Administration Guide

Answering calls 221
u
h as
free ring
ct
g
a n red key.
ion
m
up
ll.
up
al
à while speaking) also prevents echoes. When yochange the volume level, both the microphone and speaker volume are adjusted to prevent feedback problems.
Place the telephone so that any unavoidable local noise (sucan air conditioner) is behind it. This limits the amount of disruptive background noise being transmitted.
In open-concept environments, use the handset when Handscommunication is not necessary or when you need privacy dua call. Another option is to use a headset.
Answering a telephone using Directed Pickup
You can answer any telephone that is ringing in your CompaPlus system using Directed Pickup or Group Pickup.
1. Press Äàß.
2. Enter the extension number of the ringing telephone.
Directed Pickup cannot be used to answer private lines.
To use Directed Pickup, the telephone must be ringing. If, forexample, the auxiliary ringer is ringing but the call is not ringinat a telephone, the call cannot be answered using Directed Pickup. It must be answered normally at a telephone that hasflashing indicator for the call or by using Trunk Answer. You caalso answer a call that is ringing when someone has transferthe call to a telephone and the call is ringing on an intercom
Directed Pickup can also retrieve calls that are ringing on anAnswer extension number. Although you may enter the extensnumber of the telephone you hear ringing, it may be calls froanother telephone you are answering.
Answering a telephone using Pickup Group
Your Compact Plus system can be divided into four Pickup Groups. If you are a member of a Pickup Group, you can picka call that is ringing at any telephone in your Pickup Group.
PressÄàÞ.
Note: Group Pickup cannot be used to retrieve a camped ca
If there is more than one incoming call at a telephone in a PickGroup, a call ringing on an exchange line is answered first, followed by calls on the Prime line and, finally, calls on internlines.
P0905531 Issue 01 Compact Plus System Administration Guide
Answering calls 222
he at
ive
hat
on
ther o
set g
Displays
Trunk Answer
The Trunk Answer feature lets you answer a ringing call anywhere in the system from any telephone in the system. Tline you are answering does not have to appear or ring at thetelephone you are using. Trunk Answer works only with calls thare ringing on lines for which a Ringing service schedule is actand if Trunk Answer is enabled.
Answering a call using Trunk Answer
Press Ä¡ââ.
If there is more than one incoming call on lines in a Ringing service, the Trunk Answer feature picks up the external call thas been ringing the longest.
Displays
Note: Trunk Answer does not pick up calls that are coming in a private line.
Answer keys
An Answer key lets a telephone answer calls intended for anotelephone. For example, an Answer key allows an assistant tanswer incoming calls to a manager’s telephone.
When installing your Compact Plus system, you assign telephones to have Answer keys for other extensions. You alsowhether the incoming call for the monitored extension will rinat the Answer key or simply activate the key indicator (» or ¼).
Already joined You are already connected to the telephone that made the call you are trying to pick up. This can happen if you are on a call to a colleague, your colleague dials the number of a telephone in your Pickup Group, and you attempt to pick up that call.
Pickup denied There is no call that you can pick up or the call that was ringing has already been answered.
You have tried to pick up a call on someone else’s private line.
Pickup: Enter the extension number of the telephone that is ringing. (You may use an internal autodial key to do this.)
If you decide not to answer a ringing call after you have activated Directed Pickup, press Ä.
Line denied You have tried to pick up a call on someone else�s private line.
Pickup denied The call that is ringing is on a line that is not in a Ringing Service.
P0905531 Issue 01 Compact Plus System Administration Guide
Answering calls 223
itor
irst alls
le for r
e
e
ear
the
A Norstar telephone may have up to four Answer keys to monother extensions.
M7100N telephones and ISDN terminals cannot be assignedAnswer keys to monitor other extensions, but they can be monitored.
Each Answer key should be clearly labelled with the name ornumber of the extension it monitors.
You cannot make calls using Answer keys.
If more than one call is ringing at someone’s telephone, the fcall appears on the attendant’s Answer key. Any subsequent cappear on intercom keys, if they are available.
More than one attendant may have an Answer key for a singtelephone. This allows two or more attendants to handle callsa busy person. Each telephone can handle calls for up to fouother people using separate Answer keys for each person.
Listening in a group
The Group Listen feature allows other people in your office tolisten in on a call without the caller hearing any noise from thoffice by turning the telephone’s external microphone off.
1. Press Ä¡âÛ. You hear the caller’s voice through your telephone’s speaker.
2. Speak to the caller through the telephone handset.
To cancel the Group Listen feature during your call, press Ä£¡âÛ.
Group Listen is cancelled automatically when you hang up thcall.
You can switch a Group Listen call to Handsfree by pressing©. To switch back to Group Listen, enter the Group Listen feature code again.
Note: Keep the handset away from the speaker or you may hfeedback. Press ̈ to prevent feedback when hangingup.
Disconnecting accidentally
If you accidentally drop the handset into the telephone cradlewhile answering a call, you can retrieve the call by picking up handset. The system calls on the © feature, which keeps the call active.
P0905531 Issue 01 Compact Plus System Administration Guide

Answering calls 224
P0905531 Issue 01 Compact Plus System Administration Guide

Holding calls
� Holding.........226
� Listening on hold.........226
P0905531 Issue 01 Compact Plus System Administration Guide

Holding calls 226
ins our
ved
ith .
t
ring
all.
ent
d
the
you d.
Holding
When you put a call on hold, the Compact Plus system maintathe connection to the caller but the call is no longer active at ytelephone. The indicator flashes on all telephones that have access to the line with the call on hold. The call can be retriefrom any of these telephones.
If the call comes in on a DIA line, the indicator flashes at the telephone that answered the call, leaving other telephones wappearances of that DIA line free to take other incoming callsThe call can be retrieved at the answering extension.
On the M7100N telephone, ú alternates between two lines: one active, one on hold. The M7100N telephone cannoretrieve a call placed on hold by another telephone.
Answered hunt group calls can be placed on hold at the answeextension.
To put a call on hold, press ú.
To retrieve a held call, press the flashing line key of the held c
Automatic Hold
If you are on a call and want to pickup another call at your telephone, use Automatic Hold.
Press the line key of the caller you want to speak to. Your currcaller is put on hold automatically.
Exclusive Hold
You can put a call on Exclusive Hold so that it can be retrieveonly at your telephone.
Press Äàá or Äú. The line appears busy on all other telephones, and the call cannot bepicked up by anyone else in the office.
Display
Listening on hold
If you have been put on hold, Listen on Hold lets you replace handset and wait to hear when the other person speaks.
If Automatic Handsfree has been assigned to your telephone,can use the Handsfree/Mute feature instead of Listen on Hol
On hold: LINENAM You have placed one or more lines on hold. The name of the line that has been held the longest is displayed. This feature works with external calls only.
P0905531 Issue 01 Compact Plus System Administration Guide

Holding calls 227
m ic). nd
em .
Without Handsfree
1. Press ú.
2. Hang up the handset.
3. Press the line key of the call. You may hear indications frothe far end that you are on hold (for example, tones or musYour telephone’s microphone is off so no one at the other ecan hear anything in your office.
4. When the person you were talking to returns, you hear ththrough your telephone speaker. Lift the handset and talk
With Handsfree
1. If using the handset, press ©.
2. Hang up the handset.
3. Press © again. Your microphone is off but you canhear when the caller returns.
4. When the caller returns, press © or lift the handset.
P0905531 Issue 01 Compact Plus System Administration Guide

Holding calls 228
P0905531 Issue 01 Compact Plus System Administration Guide

Routing calls
� Call Parking.........230
� DIA calls.........231
� Making a Priority call.........232
� Transferring a call.........233
� Transferring to a busy extension (Call Camping).........233
P0905531 Issue 01 Compact Plus System Administration Guide
Routing calls 230
lse m. ny
for
l al
re y of right
9) m
ore al d to
s
Call Parking
Call Parking allows you to suspend a call so that someone ecan retrieve it from any telephone in the Compact Plus systeYou retrieve a parked call by dialling the retrieval code. As maas nine calls can be parked at one time on the Compact Plussystem.
When you park a call, the system assigns one of nine codes retrieval of the call. These codes consist of the Call Parking prefix, which may be any digit from 0 to 9, and a two-digit calnumber between 01 and 09. For example, if the Call Parkingprefix is 4, the first parked call is assigned Call Parking retrievcode 401.
The Compact Plus system assigns Call Parking codes in sequence, from the lowest to the highest, until all the codes aused. This round-robin approach means that a greater varietcodes are used, which makes it easier for a call to reach the person when more than one incoming call is parked.
The highest call number (the Call Parking prefix followed by 0is used only by telephones or devices connected to the systeusing an Analogue Terminal Adapter (integrated or external).
You programme the Call Parking prefix and the time delay befparked calls are returned to the originating telephone. Externcalls parked for longer than the programmed delay are returnethe Prime extension.
Answered hunt group calls are parked in the same manner aother calls.
Call Parking can be disabled by your system administrator.
Parking a call
1. While on a call, press ÄàÝ. The display shows the Call Parking retrieval code.
2. Use Äßâ (the Page feature) or press PAGE to announce the retrieval code displayed by your telephone.
Retrieving a parked call
1. Select an internal line on any Norstar telephone. (On the M7100N telephone, pick up the handset.)
2. Dial the Call Parking retrieval code (the default retrieval codes are 101 to 109).
P0905531 Issue 01 Compact Plus System Administration Guide
Routing calls 231
lls on. he
es
ion
ere
alls
DIA
th The A
n to
the
r,
ine.
ved the ny
DIA calls
Direct Inward Access (DIA) allows BRA lines to use internal lines to route incoming calls from the public exchange; the capass directly to a Norstar extension without operator interventiThe internal lines 101 to 140 between the Norstar CCU and textensions are called DIA lines.
BRA lines must have Answer Mode programmed to Auto for DIA. Outgoing calls can also be made on auto-answer BRA linif they are assigned to a line pool or appear on an extension.
The Compact Plus system handles simultaneous calls on DIAlines. The number of appearances of a DIA line on an extensdepends on the Line assignment setting for that extension.
If the DIA line is programmed to Appr&Ring or Appr only, then the extension can have as many simultaneous DIA calls as thare DIA key appearances. If the DIA line is programmed to Ring only then the extension can have as many simultaneous DIA cas there are Intercom keys.
Number of appearances
The installer programs the number of appearances for each line assigned to the extension. When an extension with an appearance of a DIA line answers a call, other extensions wiappearances of that DIA line do not track the state of that call. other extensions are free to receive additional calls on the DIline while the first call is still in progress.
By default the number of DIA line appearances is one. The secondary appearance of a DIA line, is any appearance givean extension after the first appearance. There is a limit to thenumber of secondary target line appearances in the system.
Automatically, the first DIA line (101) is assigned to the first Start extension number of 5001, DIA line 102 is assigned to next extension number 5002, and so on. Also, the Received numbers, as well as the Originating Line Identification numbeare automatically set to the extension number.
Received number
When the system automatically answers an incoming call onauto-answer ISDN BRA lines, it matches these digits to a Received number, and routes the call to the appropriate DIA l
The installer programs the Received number length. A Receinumber cannot be the same as another Received number orAuto number. It also cannot start with the same first digit as aline pool code.
P0905531 Issue 01 Compact Plus System Administration Guide
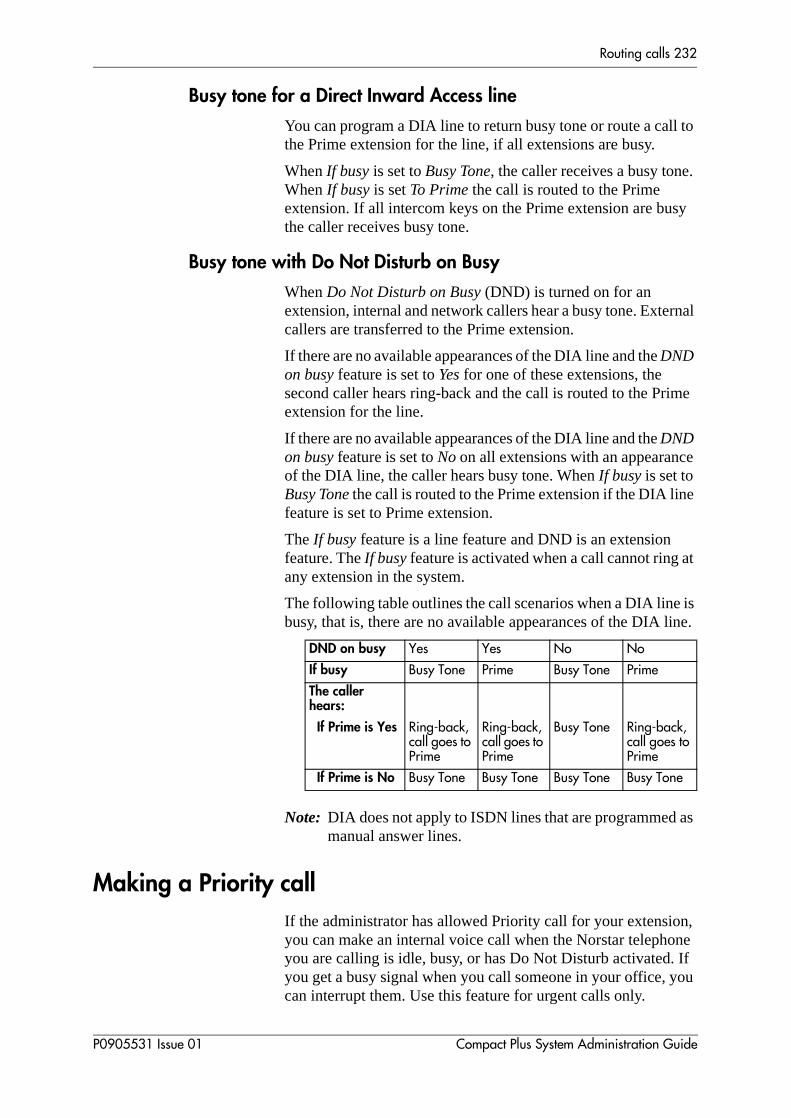
Routing calls 232
l to
.
sy
rnal
ime
e
e
at
is ine.
as
n,
If ou
Busy tone for a Direct Inward Access line
You can program a DIA line to return busy tone or route a calthe Prime extension for the line, if all extensions are busy.
When If busy is set to Busy Tone, the caller receives a busy toneWhen If busy is set To Prime the call is routed to the Prime extension. If all intercom keys on the Prime extension are buthe caller receives busy tone.
Busy tone with Do Not Disturb on Busy
When Do Not Disturb on Busy (DND) is turned on for an extension, internal and network callers hear a busy tone. Extecallers are transferred to the Prime extension.
If there are no available appearances of the DIA line and the DND on busy feature is set to Yes for one of these extensions, the second caller hears ring-back and the call is routed to the Prextension for the line.
If there are no available appearances of the DIA line and the DND on busy feature is set to No on all extensions with an appearancof the DIA line, the caller hears busy tone. When If busy is set to Busy Tone the call is routed to the Prime extension if the DIA linfeature is set to Prime extension.
The If busy feature is a line feature and DND is an extension feature. The If busy feature is activated when a call cannot ring any extension in the system.
The following table outlines the call scenarios when a DIA linebusy, that is, there are no available appearances of the DIA l
Note: DIA does not apply to ISDN lines that are programmed manual answer lines.
Making a Priority call
If the administrator has allowed Priority call for your extensioyou can make an internal voice call when the Norstar telephone you are calling is idle, busy, or has Do Not Disturb activated.you get a busy signal when you call someone in your office, ycan interrupt them. Use this feature for urgent calls only.
DND on busy Yes Yes No No
If busy Busy Tone Prime Busy Tone Prime
The caller hears:
If Prime is Yes Ring-back, call goes to Prime
Ring-back, call goes to Prime
Busy Tone Ring-back, call goes to Prime
If Prime is No Busy Tone Busy Tone Busy Tone Busy Tone
P0905531 Issue 01 Compact Plus System Administration Guide
Routing calls 233
the uts all.
to
put
, o
all
re lete.
ugh g
all.
Press Äßá or press PRIORITY. Wait for a connection, then speak.
Note: A person who receives a Priority call while they are onanother call has 8 seconds to accept or reject the call. Ifperson does not take the call, the Priority call feature ptheir active call on Exclusive Hold and connects your c
If Call Forward is active at the telephone you are trying reach, your call is forwarded.
If the telephone receiving the Priority call is in a conference call, the other two parties are automatically on hold when the Priority call is accepted.
If the extension is a hunt group, the Priority call is rejected.
Transferring a call
You can transfer a call to any internal or external number. Depending on how the installer has programmed your systemyou may not be able to transfer a call on one exchange line tanother exchange line.
1. Press Äàâ or press TRANSFER.
2. Call the person you want to transfer the call to.
3. If you want to talk to the person you are transferring the cto, wait for them to answer before proceeding.
4. When you are ready to complete the transfer, press OK or hang up. (You do not have to wait for the person to answer.)
You can cancel a transfer and re-connect with the party you aattempting to transfer at any time before the transfer is comp
1. Press Ä£àâ or press CANCL.
2. If you are not re-connected, press ̈ and then press the linekey of the original call, which is now on hold.
Transferring to a busy extension (Call Camping)
You can send an external call to another extension, even thoall of its lines are busy, by camping the call. The Call Campinfeature is useful for people who process many calls, such assecretaries or receptionists.
1. After answering an external call, press Ä¡Û.
2. Dial the extension number that is the destination for the c
P0905531 Issue 01 Compact Plus System Administration Guide

Routing calls 234
e, if a
ey , ed
Camped calls appear on a line key on the receiving telephonone is available. If there is no line key available, you receive message on the display and hear camp tones. Each Norstar telephone can handle only one camped call at a time.
Displays
Answering a camped call
While you are on a call, you hear a beep whenever there is acamped call waiting. Press the flashing line key or intercom kthat the call is camped on. If your extension has no free linesfinishing one of your active calls releases a line for the campcall.
21 Camp max
CALLBACK
You tried to camp a call to a telephone that already has a camped call. The call has come back to you. Press CALLBACK or the line key to re-connect to the call. On the M7100N telephone, just pick up the handset.
21 DND
CALLBACK
The person to whom you redirected a call has Do Not Disturb activated. The call has come back to you. Press CALLBACK or the line key to re-connect to the call. On the M7100N telephone, just pick up the handset.
Camp denied You have tried to camp an internal call. You can only camp external calls.
Camp to:
CANCEL
Dial the number of the internal telephone to which the call is to be sent.
Camped: 21
CALLBACK
The telephone to which you camped a call did not answer the call. The call has come back to you. Press CALLBACK or the line key to re-connect to the call. On the M7100N telephone, just pick up the handset.
Line001 hung up A call you camped has come back to you, but the caller hung up before you could re-connect.
Not in service
CALLBACK
The telephone to which you have camped a call is out of service or is being used for programming. The call has come back to you. Press CALLBACK or the line key to re-connect to the call. On the M7100N telephone, just pick up the handset.
Release a call The line that the camped call is on is in use, or that line does not appear at your telephone. Release the line or release an internal line.
P0905531 Issue 01 Compact Plus System Administration Guide
Making external calls
� Using an exchange code.........236
� Using line pools.........236
� Making a conference call.........237
� Using Class of Service passwords.........240
P0905531 Issue 01 Compact Plus System Administration Guide

Making external calls 236
g the
n the gue
y n
can
l. ou ring
ss
ne
in
ou e
the
Using an exchange code
You can access exchange lines to make external calls by usinintercom key and dialling the exchange code (the default exchange code is 9).
The exchange code is generally used to make external calls oM7100N telephone and on telephones connected to an AnaloTerminal Adapter.
Using line pools
A line pool is a group of exchange lines that can be shared bmany telephones. You can use a line in a line pool to make aexternal call.
The Compact Plus can have three line pools, and a telephonebe programmed to access any of them.
A line pool access code is a number you dial to get a line pooThe access code can be up to four digits long. You can haveseveral different line pools for your system, each one giving yaccess to a different set of exchange lines. It is one way of shalines across telephones in a system.
You programme the line pool access codes and give each telephone access to a line pool.
Everyone in the office should have a list of the line pool accecodes for the line pools their telephones can use.
Using a line pool to make a call
1. Press ÄßÝ.
2. Enter a line pool access code.
If you have a free internal line, you can make a call using a lipool without entering the feature code first.
1. Select an internal line (intercom).
2. Dial the line pool access code.
If no lines are available in the line pool, you can use Ring Agaat the busy tone. You are notified when a line in the line poolbecomes available. See ‘Using Ring Again’ on page 260.
Programming a memory key with a line pool feature code
When you programme a key with the line pool feature code, ymust enter a line pool access code after the feature code. Thprogrammed line pool key accesses a specific line pool, not
P0905531 Issue 01 Compact Plus System Administration Guide

Making external calls 237
l ine s
ys DN e or
al) any ted, e, if
wo
line
es, eys ove
N
ll ss
line pool feature. See ‘Using line pools’ on page 236 for moreinformation.
If you programme a key with an indicator to access a line poowhen all the lines in a line pool are busy, the indicator for the lpool key turns on. The indicator turns off when a line becomeavailable.
Making calls from an ISDN terminal
Note that ISDN terminals do not have line keys or intercom keas do Norstar telephones. To make an outgoing call from an ISterminal, access an exchange line by entering a line pool coda destination code.
Making a conference call
You can share a call with two other people (internal or externby forming a conference. Once a conference is established, one of the parties can hang up, leaving the other two connecunless the two other parties are on exchange lines. In this casthe person who created the conference hangs up, the other tparties may be disconnected, or they may remain connecteddepending on the equipment in use.Your system may be programmed to prevent connections between one exchangeand another.
To establish a conference call with two other Norstar telephona telephone must have two intercom keys assigned to it. The kappear starting at the lowest right-hand position, or one key abthat if the Handsfree feature is assigned to the telephone.
The M7100N telephone does not have keys for intercom keyassignment.
Forming a conference
1. Make or answer the call with the first party.
2. Place that call on hold.
3. Make the call to the second party.
4. Press ÄÜ.
5. Take the held call off hold. This is automatic on the M7100telephone.
Allowing a colleague to join your conference
Normally your calls are private.You can turn Privacy off for a caallowing another person in your office with the same line to prethe line key and join in a conference or a two-way call.
1. While on a call, press Ä¡Ü.
P0905531 Issue 01 Compact Plus System Administration Guide
Making external calls 238
an
e
he
ng
d.
ch
k to
er
e
can so
2. Tell the other person to press the line key and join your conversation.
Only two Norstar telephones in addition to the external caller ctake part in this kind of conference.
Disconnecting one person from the conference
You can disconnect one party from a conference and continutalking to the other.
On an M7208N, M7310N, or M7324N telephone
1. Press the line key of the call that you want to disconnect. Tcall that you want to keep is automatically put on hold.
2. Press ̈ . The call is disconnected.
3. Press the line key of the held call to speak to the remainiperson.
On an M7100N telephone
1. Press Ä£Ü to place one caller on hold. Press ú again to put the caller you want to keep on hol
2. Press ̈ . The call is disconnected.
3. Press ú to speak to the remaining party.
Using Hold on a conference
If you use Hold on a conference, you can
• put the two other people on hold (they cannot speak to eaother)
• put the conference on hold (the other two people can speaeach other)
• put one person on hold while you continue to talk to the othperson
You can re-connect to the conference by pressing either of thheld line keys. For the M7100N telephone, press ú.
Separately holding two calls
For all Norstar telephones except the M7100N telephone, youput the two people in a conference call on hold independentlythat they cannot talk to each other.
1. Press the line key of one person. The other person is automatically put on hold.
2. Press ú. The second person is put on hold.
You can re-establish the conference.
1. Take one call off hold.
P0905531 Issue 01 Compact Plus System Administration Guide

Making external calls 239
ple
e
ld.
her
ther
fer the , or
2. Press ÄÜ.
3. Take the other call off hold.
Putting a conference on hold
You can put a conference on hold, allowing the other two peoto continue speaking to each other.
Press ú.
You can re-connect to the conference by pressing either of thheld line keys.
Splitting a conference
You can talk with one person while the other person is on ho
On an M7000, M7208N, M7310N, or M7324N telephone:
Press the line key of the person you want to speak to. The otperson is automatically put on hold.
On an M7100N telephone:
1. Press Ä£Ü. The first party is on hold.
2. Press ú, if necessary, to switch parties.
Re-establishing the conference.
Press ÄÜ.
Removing yourself from a conference
You can remove yourself from a conference and connect the otwo callers through your Compact Plus system.
Press Äàâ (the Transfer feature code).
When you remove yourself from a conference using the Transfeature and both callers are from outside your system, one ofcallers must have called you on a disconnect supervised linethe call is disconnected.
Displays3 parties only You are trying to add a fourth party to your
conference call or to join two conferences together. Release one call from the conference before adding another, or keep the two conferences separate.
Conf. on hold You have put a conference call on hold.
Conference busy You have tried to make a conference call, but your system is already handling its maximum of four conference calls.
P0905531 Issue 01 Compact Plus System Administration Guide
Making external calls 240
to a nter ted
ion on te an
port
ing hen can
a
ed
ou tem.
Using Class of Service passwords
Class of Service (COS) passwords permit controlled access system’s resources by internal and remote users. When you ea COS password at a telephone, the restriction filters associawith your COS password apply, rather than the normal restrictfilters. Similarly, when a remote user enters a COS passwordan incoming Auto-answer line, the restriction filters and remopackage associated with their COS password apply, rather ththe normal restriction filters and remote package. The COS passwords are programmed by either your customer sales supofficer or installer.
Users should memorise their COS passwords instead of writthem down. Employees’ COS passwords should be deleted wthey leave the company. Typically, each user has a separatepassword. Several users can share a password or one user have several passwords.
Changing your COS password
You must enter a COS password each time you wish to makecall that is normally restricted on a line or telephone.
Changing the restriction filters on a line or telephone
1. Press Äß¡.
2. Enter your six-digit COS password.
The COS passwords let you define individual passwords anddetermine the restriction filters and remote package associatwith each.
If you use your Compact Plus system from outside the office, ymay have to enter a COS password to gain access to the sys
Displays
Line001 21
TRANSFER
You are on a conference with the two lines or telephones shown. You can drop out of the conference and leave the other two parties connected (Unsupervised Conference) by pressing TRANSFER or entering the Transfer feature code.
Press held line You have activated the Conference feature with one call active and another on hold. Press the line of the call on hold to bring that person into the conference.
(Blank display) Enter your password. It is not shown on the display.
Invalid Password You have entered a password that is not programmed into your system.
P0905531 Issue 01 Compact Plus System Administration Guide
Making internal calls
� Making an internal call.........242
� Making a conference call.........242
� Accessing a Direct-Dial extension.........242
� Leaving messages.........242
� Paging.........245
� Remote paging.........245
� Voice call.........246
P0905531 Issue 01 Compact Plus System Administration Guide

Making internal calls 242
k ge
t.
es,
act ve
a t.
it
e in r ho pact
hem.
Making an internal call
When you want to make or receive internal or private networcalls, make calls to hunt group extensions, or access exchanlines through line pools, use Æ. A telephone may be assigned up to eight intercom keys.
1. Press an intercom key or, on the M7100N, lift the handse
2. Dial the extension number or a line pool access code.
Making a conference call
To establish a conference call with two other Norstar telephona telephone must have two intercom keys assigned to it.
1. Make or answer a call with one extension.
2. Put the call on hold.
3. Press the remaining intercom key and dial the second extension.
4. Press ÄÜ.
5. Press the held intercom key (step 2) to connect.
Accessing a Direct-Dial extension
Direct-Dial lets you dial designated telephones in your CompPlus system or private network with a single digit. You can haone Direct-Dial extension in your Compact Plus system. A person whose extension is a Direct-Dial extension is usually receptionist for your entire office or for a particular departmen
To access the Direct-Dial extension, enter the Direct-Dial dig(the default Direct-Dial number is 0).
Note that ISDN terminals cannot use the Direct-Dial digit to reach a Direct-Dial extension.
Leaving messages
You can leave a message on the display of another telephonyour Compact Plus system. Messages appear on the Norstatelephone display informing the recipient to call the person wsent the message. Messages can only be sent within the ComPlus system. The message sent reads MSG. Analogue telephones attached to an ATA cannot receive messages, but can send t
P0905531 Issue 01 Compact Plus System Administration Guide

Making internal calls 243
.)
the
es.
e
sent
er g
to
Sending a message
1. Press ÄÚ.
2. On a telephone with a two-line display, press ADD. (This step is not necessary on a telephone with a single-line display
3. Enter the extension number of the person you want to sendmessage to. The person’s display shows MSG.
Cancelling a message
1. Press Ä£Ú.The display shows Cancel for:.
2. Enter the extension number of the person you sent the message to.
Viewing received messages
You can receive up to four messages from different telephon
On a telephone with a two-line display
1. Press MSG. The display shows nnn called (where nnn represents the extension number of the caller).
2. Press NEXT to move through your messages.
On a telephone with a single-line display
1. Press ÄßÞ. The display shows the first messagyou received.
2. Press ¥ or £ to move through your messages.
Replying to a message
You can call the person (or your voice message centre) who a message while you are viewing the message.
On a telephone with a one-line display
Press â.
On a telephone with a two-line display
Press CALL.
If you wish to call your voice message centre using a line oththan the programmed line, exit your message list and dial thevoice message centre telephone number using normal diallinmethods.
Viewing the messages you have sent
On a telephone with a two-line display, you can view the messages you have sent. You can send up to four messagesdifferent extensions. Each extension, including the prime extension, can receive up to four messages from different extensions, but only one message from any one extension.
P0905531 Issue 01 Compact Plus System Administration Guide

Making internal calls 244
can
ther s on
1. Press ÄÚ.
2. Press SHOW to display your first sent message.
3. Press NEXT to move through your sent messages.
Displays
Erasing messages
You can erase a message while you are viewing it in your message list.
On a telephone with a one-line display
Press ú.
On a telephone with a two-line display
Press ERASE.
The Direct-Dial extension can receive up to 4 messages andsend up to 30 messages.
If your reply to a message is forwarded or is answered at anoextension using the Call Pickup feature, the message remainyour extension until you cancel it or successfully contact the extension that sent the message.
Cancel denied You have entered an invalid number when attempting to cancel a message.
In use: 21 You are trying to call from your message waiting list. The line that you are trying to use is being used by the identified Norstar user.
Message denied You have tried to send a message to an invalid extension number or to a telephone that is out of service.
Message list
SHOW ADD EXIT
SHOW appears only if you have outstanding messages. Press SHOW to review messages you have sent. Press ADD to send a new message.
Message to: Enter the extension number of the telephone to which you want to send a message.
Messages & Calls
MSG CALLS
You have one or more messages and one or more new Call Logs. Press Ä¡âß to change the first line of the display to the current time and date.
No key free You have no line key free with which to reply to a message.
Start of list
NEXT
Your are at the beginning of your list of messages. Press NEXT to move through your messages.
Their list full You are trying to send a message to a user whose message waiting list is full.
Your list full You have tried to send a message but your telephone’s list of sent messages is full. Cancel one of the messages you have sent, if possible, or wait until you have received a reply to one of those messages.
P0905531 Issue 01 Compact Plus System Administration Guide

Making internal calls 245
ct er
e)
)
ent.
ge
er
e)
Paging
Paging allows you to make announcements over the CompaPlus system using the telephone speakers or your loudspeaksystem, if one is available.
The administrator can assign extensions to one of three pagezones.
Making a page announcement
1. Press Äßâ.
2. Choose a page type:
Ú or EXTNS through the telephone speakers (internal pag
Û or SPKR through an external speaker (external page)
Ü or BOTH for both internal and external (combined page
3. If necessary, choose a zone (0 to 3).
4. Speak clearly into the handset and make your announcem
5. Press ̈ .
Paging shortcuts
Instead of entering the Page feature code followed by the patype, you can enter the following shortcut codes:
• Internal (EXTNS)—ÄßÚ and zone (1 to 3)
• External (SPKR)—ÄßÛ (no zones)
• Combined (BOTH)—ÄßÜ and zone (1 to 3)
Remote paging
To use features on a Compact Plus system remotely, press ¥ followed by the feature code. Even if you are calling from anothCompact Plus system, press ¥ instead of Ä.
Making a remote page announcement
1. Dial the number to access your Compact Plus system.
2. Enter your Class of Service password.
3. Press ¥ßâ.
4. Choose a page type:
Ú or EXTNS through the telephone speakers (internal pag
Û or SPKR through an external speaker (external page)
P0905531 Issue 01 Compact Plus System Administration Guide
Making internal calls 246
)
ent.
n a he re
very
can ree
g.
call.
Ü or BOTH for both internal and external (combined page
5. If necessary, choose a zone (0 to 3).
6. Speak clearly into the handset and make your announcem
7. Hang up.
Voice call
Voice call allows you to make a voice announcement or begiconversation through the speaker of one other telephone in tCompact Plus system. The person you call hears a tone befoyour voice call comes through.
Making a voice call
1. Press Äßß.
2. Dial the extension for the person you want to speak to.
3. Wait for the beep, then speak.
Muting voice call tones
When a voice call begins at your telephone, you hear a beep e15 seconds as a reminder that the microphone is on.
To stop the beeping, pick up the handset or press ©.
Preventing voice calls to your telephone
You can use Voice Call Deny to prevent your telephone fromreceiving voice calls.
Press Ä¡¡. Voice calls ring as do regular internal calls. Your other calls proceed normally.
To cancel, press Ä£¡¡.
Answering a voice call without touching your telephone
If Handsfree Answerback is assigned to your telephone, you respond to a voice call without touching the telephone. HandsfAnswerback is not available to the M7100N telephone.
When someone makes a voice call to you, simply start talkinYour telephone’s microphone picks up your voice.
Once you have answered a voice call, you treat it as a normal
DisplaysDial voice call Dial the extension number or press the
internal autodial key of the person to whom you want to speak.
P0905531 Issue 01 Compact Plus System Administration Guide

Making internal calls 247
Microphone muted Your Handsfree microphone is muted. Press © or pick up your handset to respond to the voice call.
No voice call The telephone receiving the call cannot accept voice calls for one of the following reasons: it is active or ringing with another call; Call Forward is turned on; Do Not Disturb is turned on; Voice Call Deny is turned on; it is not a Norstar telephone.
Your call proceeds automatically as a regular ringing call.
Voice call The line is open for you to speak.
P0905531 Issue 01 Compact Plus System Administration Guide

Making internal calls 248
P0905531 Issue 01 Compact Plus System Administration Guide

Forwarding calls
� Forwarding all calls.........250
� Line redirection.........252
P0905531 Issue 01 Compact Plus System Administration Guide

Forwarding calls 250
in
ve alls
es he
ir ps
ot
ct u a
our ay
ard
rd
Forwarding all calls
You can temporarily forward your calls to another telephone the Compact Plus system by using the Call Forward All Callsfeature.
If the telephone to which you forwarded your calls does not hathe same exchange lines as your telephone, the forwarded cappear on intercom keys.
If a call is forwarded, it does not ring but the line indicator flashon your telephone. You can still answer the call by pressing tkey next to the flashing indicator.
If you are one of a group of people who regularly forward thecalls to one another, be aware that it is possible to set up loowhere a call is forwarded from one telephone to another in acircle, but it is not answered anywhere.
1. Press ÄÝ.
2. Enter the extension number of the telephone you want toforward your calls to. The display shows Forward>nnn.
To cancel, press Ä£Ý or press CANCEL.
Note: You can also set the system to forward your calls to another telephone when your telephone is busy or is nanswered.
Note the differences between Line redirection and CallForward. Call Forward forwards all calls that arrive at your telephone to another telephone within the CompaPlus system. Line redirection redirects only the lines yospecify, no matter which telephones they appear on, totelephone outside the Compact Plus system. Line redirection takes precedence over Call Forward.
Overriding Call Forward
If you telephone someone who has their calls forwarded to yextension, your call rings at that person’s telephone. In this wyou can still communicate with the forwarded extension.
External Call forward
Users can set individual extensions to forward calls using Call ForwAll Calls (CFAC).
You can also program to enable extensions to automatically ForwaBusy (CFB) or Forward No Answer (CFNA).
P0905531 Issue 01 Compact Plus System Administration Guide
Forwarding calls 251
F,
ave me.
ar
m n”
al
a
External Call Forward (ECF) is a feature that allows the same call forwarding features to forward to external destinations. To allow ECthe individual extensions must:
• have access to a line pool
• be programmed to Allow Redirect: Y under Terminals&Extns/Restrictions (extns).
ISDN and Network Call Diversion
On a Norstar system with ETSI ISDN lines, Call Forward features ha slight variation in naming convention. The functions remain the saFeatures are labelled as follows:
• Call Forward Unconditional (CFU)—implemented on Norstar CFAC ÄÝ.
• Call Forward on Busy (CFoB)—implemented on Norstar CFB.
• Call Forward on No Response (CFNR)—implemented on NorstCFNA.
ISDN external lines use external Call Diversion if this is available frothe local exchange. If it is auto-invoked, see “Network Call Diversioon page 48.
User Programming
Users cannot program individual extensions for CFB or CFNA.
Users can program their own extension to CFAC, as follows:
Internal Call Forward—Press ÄÝ at any extension, followedby the internal number to which you want calls forwarded.
External Call Forward—Press ÄÝ at any extension, followed by the route or line-pool code number, and then the externnumber.
Note: The destination or line pool code and dialing digits cannot exceed 24 digits. The set must have access toline pool and be programmed to Allow Redirect: Y under Terminals&Extns/Restrictions(extns) to allow external destination programming usingÄÝ.
Cancelling Call Forward
To cancel Call Forward, press Ä£Ý.
P0905531 Issue 01 Compact Plus System Administration Guide

Forwarding calls 252
ice.
,
me n
are r
em. r r
are
a
are
tar . If quit
Line redirection
In a networked system, Line redirection lets you redirect callscoming in on your external lines to a telephone outside the offYou can redirect exchange lines to AC15A private circuits, AC15A private circuits to either exchange lines or private circuits, and exchange lines to exchange lines.
Compact Plus supports simultaneous redirection of DIA callssubject to the same barring rules and depending on the availability of outgoing resources.
You may choose to redirect all your exchange lines or only soof them. The incoming trunk must have disconnect supervisioand the outgoing trunk must be answer supervised for Line Redirection to perform properly.
You cannot use the Line redirection feature code at either anM7100N telephone or a telephone connected to an AnalogueTerminal Adapter.
You redirect lines at a telephone, but once redirected, the linesredirected for the entire system. You can only redirect lines fowhich there are line keys on the telephone you are using.
How Line redirection is different from Call Forward
Call Forward forwards all calls that arrive at a particular telephone to another telephone within the Compact Plus systLine redirection redirects only the lines you specify, no mattewhich telephones they appear on, to a telephone outside theCompact Plus system. Line redirection takes precedence oveCall Forward.
Using Line redirection
You redirect lines at a telephone, but once redirected, the linesredirected for the entire system.
You can only redirect lines that appear at line keys on your telephone.
When redirecting DIA lines, ensure the outgoing resource is line pool with sufficient lines to support redirected traffic. Thenumber of appearances for a DIA line is not limited to the number of appearances on that extension. As many DIA callsredirected as the outgoing resource permits.
You can answer the telephone if it rings while you are in the middle of programming Line redirection, but none of the Norscall handling features are available until the feature times outyou need to use a Compact Plus feature to process the call, Line redirection programming by pressing Ä. Do not
P0905531 Issue 01 Compact Plus System Administration Guide
Forwarding calls 253
ve ne.
ct ts
els
ing
oes
en
id line
, n
t up
press ̈ or you will disconnect the call you are trying to process.
While you are programming Line redirection, you do not receiany indication of calls that do not actually ring at your telepho
Be careful to avoid redirection loops. If for example, you redireyour lines to your branch office and your branch office redirecits lines to you, you can create a redirection loop.
In certain situations, callers may experience lower volume levwhen you redirect calls to an external location.
Redirecting your lines
1. Press Ä¡Ý.
2. Select the outgoing line to be used for redirected calls.
3. Enter the number to which calls will be redirected by pressan external Autodial key or entering an external telephonenumber (using no more than 24 digits), then pressing ú or OK, or doing nothing (if the line you have chosen as the outgoing line is a private network line that dnot require you to dial digits).
4. Select the lines to be redirected using ALL or individual line keys.
5. Wait until the line indicators for the selected lines are lit, thpress ú or OK.
Note: If you press ú or OK before all the lines light up, those lines not lit are not redirected.
The line chosen for redirecting calls on other lines can still beused normally when it is not busy on a redirected call. To avoredirection failing because the chosen line is in use, choose apool with several lines in it.
The system does not check that the number you give for Lineredirection is a valid one. If you redirect to an invalid numberredirection fails. Using an Autodial key to enter the redirectionumber helps avoid this possibility. An Autodial key used for Line redirection must be programmed to use a specific line.
Cancelling Line redirection
1. Press Ä£¡Ý.
2. Select the lines you no longer want to be redirected.
If a telephone has Redirect ring enabled, it rings briefly for redirected calls on one of its lines even if another telephone sethe line redirection.
P0905531 Issue 01 Compact Plus System Administration Guide

Forwarding calls 254
Displays while redirecting lines
Displays while cancelling redirection
Intercom You selected the intercom key as the facility to place the call on. Enter a line pool code or a destination code.
Line redirection
QUIT ADD REMOVE
Press ¥ or ADD to begin redirection. Press £ or REMOVE to cancel a previous redirection.
No line to use You have one exchange line on your telephone, but you need a second line to perform Line redirection. Redirect your exchange line using a line pool as the outgoing line.
Outgoing line You are attempting to redirect a line and the line you have chosen is the outgoing line you have selected as a destination. You cannot redirect a line to itself. Select another line.
Pool code: _
QUIT
Enter a valid line pool access code.
Redir by 221
OVERRIDE
You have attempted to redirect a line, but someone else has already redirected that line. Press ¥ or OVERRIDE to override the previous redirection and redirect the line as you wish.
Redirect denied You can only redirect calls on individual lines.
Select line out
QUIT
Select the line that will be used to redirect calls out of the system.
Select line(s)
QUIT ALL
Press the lines to be redirected. To undo a line selection, press it again. Press ALL to redirect all your lines.
Select line(s)
ALL OK
Continue to press the lines to be redirected. Press ú or OK when you are finished.
Unequipped line The line you are attempting to redirect cannot be redirected because the hardware does not support redirection.
Select line(s)
QUIT ALL
Press the lines that are no longer to be redirected. The lines light up as you press them. Once you cancel redirection for a line, you cannot restore it by pressing the line again. Press ALL to cancel redirection for all your lines. When you are finished, press ú or OK.
Select line(s)
ALL OK
Continue to press the lines that are no longer to be redirected. Press ú or OK when you are finished.
P0905531 Issue 01 Compact Plus System Administration Guide
Saving time with features
� Using System Speed Dial.........256
� Using Autodial.........256
� Using Redial.........258
� Programming memory keys.........258
� Using Ring Again.........260
� Using Hotline.........260
P0905531 Issue 01 Compact Plus System Administration Guide

Saving time with features 256
a te
).
t
d as
Using System Speed Dial
Frequently dialled numbers can be programmed with SystemSpeed Dial codes so that they can be accessed quickly with two-digit code. After programming Speed Dial codes, distribua list of System Speed Dial codes for your office.
1. Press Äâ.
2. Enter the appropriate two-digit Speed Dial code (01 to 94
Note: To programme Personal Speed Dial codes (71 to 94) ayour extension, see ‘Personal Speed Dial codes’ on page 215
Using Autodial
You can programme memory keys for one-touch dialling of internal or external telephone numbers.
Keys used for lines, answer or Handsfree/Mute cannot be useAutodial keys.
If the power to your Compact Plus system is off for more thanthree days, Autodial numbers (as well as some other systemprogramming) may be lost from the memory.
Autodial key for an external number
1. Press Ä¥Ú. The display briefly shows Externl
autodial then Press a key.
2. Press the key you want to programme. (This step is not necessary on the M7100N telephone which has only onememory key.)
3. If you want this Autodial key to use a particular line or linepool, select that line or line pool.
4. Enter the number. Press ú or OK when you are finished. The display shows Programmed.
Autodial key for an extension number
1. Press Ä¥Û. The display briefly shows Internl
autodial then Press a key.
2. Press the key you want to programme. (This step is not necessary on the M7100N telephone which has only onememory key.) The display shows Extn#:_.
3. Enter the number. The display shows Programmed.
P0905531 Issue 01 Compact Plus System Administration Guide

Saving time with features 257
ys e
e
he
es as
Note: Autodial numbers must be programmed to memory keand not to line keys, intercom keys, the Handsfree/Mutkey, or Answer keys.
When programming a line pool as part of an Autodial number, press Æ and enter the line pool access code, or choose a programmed line pool key.
For the M7100N telephone, an external autodialler can only bprogrammed using a line and not a line pool.
If you do not include a line selection in an Autodial number, tcall uses your Prime line (if you have one).
Using Intercom as the line for Autodial
If you press Æ as the line for an external Autodial number, you must include a valid line pool access code or a destination code. If line pool access codes or destination codare changed, remember to re-programme Autodial numbers well.
Displays
987_
QUIT BKSP OK
Continue to enter digits until the number is complete. Press à or BKSP to erase an incorrect digit. Press ú or OK when you are finished.
Autodial full The memory allotted to Autodial numbers in your Compact Plus system is full.
key erased While programming external Autodial, you erased the key by pressing ú or OK before entering any digits.
Enter digits
QUIT OK
Enter the number you wish to programme (choosing the line first if necessary) exactly as you would if you were making a call.
Intercom #: _
QUIT
Enter the internal telephone number you wish to programme.
Invalid number You are programming an internal Autodial key and have entered a number that is not an extension number on your system. Enter a valid extension number. If the number you are entering is a destination code, use external Autodial.
Press a key
QUIT
Press the memory key you want to programme.
Program and HOLD Enter the number you want to programme to the key, then press ú.
Program and OK
QUIT OK
Enter the number you want to programme to the key, then press ú or OK. You may include a line or line pool selection in an Autodial sequence by selecting the line before entering any digits.
Programmed The number is stored on the key.
P0905531 Issue 01 Compact Plus System Administration Guide
Saving time with features 258
call u
n r
use
this ory
time
wer,
Using Redial
You can save the number of any external call you dialled and it again later. You can also redial the last external number yodialled.
Saving a number to redial later
While you are still on the call, press Äßà.
Saved Number Redial records a maximum of 24 digits.
Redialling a saved number
Press Äßà when you are not on a call.
If you have a programmed Saved Number Redial key, you cause Ä¥â(Key Inquiry), then press the Last NumbeRedial key followed by £ to check the last number before youdial it.
Last Number Redial
Press ÄÞ.
Last Number Redial records a maximum of 24 digits.
If you have a programmed Last Number Redial key, you can Ä¥â (Key Inquiry), then press the Last Number Redial key followed by £ to check the last number before youdial it.
Programming memory keys
You can programme a feature code to a memory key. When guide tells you to enter a feature code, you can press the memkey as a shortcut. In some cases, pressing the key a secondcancels the feature.
Any memory key not programmed as an external or internal target line, intercom, Answer key, or Handsfree/Mute key is available for programming features.
You can erase a memory key; however, you cannot erase AnsHandsfree/Mute, Intercom, or line keys.
Feature moved You have programmed an Autodial number to a key that had a feature code programmed. The feature has moved to another key. Use Ä¥â(Key Inquiry feature) to locate it.
P0905531 Issue 01 Compact Plus System Administration Guide

Saving time with features 259
ory
g
ou e
the
is
You cannot programme the following feature codes to a memkey:
• Long tones for signalling remote devices (see ‘Setting Lontones’ on page 272)
• Any code beginning with ¥ except Ä¥ÞâÚ (Language Choice) and Ä¥à (Contrast Adjustment).
When you programme a key with the line pool feature code, ymust enter a line pool access code after the feature code. Thprogrammed line pool key accesses a specific line pool, not line pool feature.
Programming a memory key
1. Press Ä¥Ü.
2. Press the key you want to programme with a feature. (Thstep is not necessary on the M7100N which has only onememory key.)
3. Enter the feature code you want to assign to the key.
Erasing a key
1. Press Ä¥Ú.
2. Press the feature key.
3. Press ú or OK to erase the key.
Displays
<Feature name>
SHOW OK
The name of the feature assigned to a key is displayed when you press the key. SHOW
appears when there is more information available. Press £ or SHOW for additional information.
Enter code: If you are checking a Speed Dial key, enter the two-digit Speed Dial code that you want to check.
F_
QUIT CLEAR
Enter the feature code, or press ¨ or QUIT
to quit programming or CLEAR to clear the numbers you have entered. The system accepts the entry as soon as you enter a valid feature code.
Feature code:
QUIT
Press Ä and enter the feature code you want to assign to the key. You cannot enter invalid codes.
Feature moved You have programmed a key with a feature that was already programmed to another key. The feature has moved to the key you just programmed. Its original key is now blank.
Press a key
EXIT
Press the key you want to check. Press Ä or EXIT when you are finished.
P0905531 Issue 01 Compact Plus System Administration Guide

Saving time with features 260
, you or ture
ne (or
r
Using Ring Again
If you cannot get through to someone on your Compact Plussystem because their telephone is busy or there is no answercan use the Ring Again feature to tell you when they hang upnext use their telephone. You can also use the Ring Again feato tell you when a busy line pool becomes available.
The Ring Again feature cannot be used with a hunt group.
1. Dial the extension number you want to reach.
2. Before you hang up, press ÄÛ.
Cancelling Ring Again
Press Ä£Û.
Displays
Using Hotline
Hotline
A Hotline telephone calls a pre-set internal or external telephonumber when you pick up the handset of a Hotline telephonepress ©).
Label the telephone to inform anyone using it that Hotline is active.
Bypassing a Hotline
Press a line key, use the Pre-Dial or Automatic Dial feature, opress © before you pick up the handset on a hotline telephone. Refer to your Telephone Feature Card.
Program and HOLD Enter the number you want to programme and press ú. To erase the key, just press ú.
Program and OK
QUIT OK
Enter the number you want to programme and press OK. To erase the key, press ú or OK.
Can't ring again You cannot use Ring Again on your current call. You can only use Ring Again while you have a busy signal on an internal call or line pool request, or while an internal call is ringing.
Ring Again? YES
NO EXIT
Press YES to use Ring Again. Press NO if you prefer to send a message.
P0905531 Issue 01 Compact Plus System Administration Guide
Using display features
� Time and Date.........262
� Static Time.........262
� Call Duration Timer.........262
� Call Information.........262
� Call Log.........264
� Autobumping.........269
P0905531 Issue 01 Compact Plus System Administration Guide

Using display features 262
act inal
on
ne ture
t on l.
d s to
one
e
Time and Date
The current time and date appear on the display of idle CompPlus telephones. Telephones connected to an Analogue TermAdapter cannot display the time and date.
Checking the current time and date while on a call
You can briefly display the current time and date while you area call by pressing Ä¡âÜ.
Static Time
When you have a message or a Call Log item on the telephodisplay, the time and date are not shown. The Static Time feaallows the time and date to be displayed at all times.
• Press Ä¡âß to turn Static Time on.
• Press Ä£¡âß to turn Static Time off.
Call Duration Timer
Use the Call Duration Timer feature to see how long you spenyour last call or how long you have been on your present cal
By pressing Äàà, you can see how long
• you spent on your last call
• you have been on your present call
Displays
Call Information
Call Information is an optional supplementary service provideby the public telephone company. If your business subscribethis service, you can view the name, number, or both, of an external caller unless the caller has blocked the information.
Lines in your Compact Plus system may appear at more thanextension. However, only one extension can receive Call Information automatically for an incoming call. You programm
21 02:47 The display shows the last call you made or the current call, and the total elapsed time in minutes and seconds.
Line001 01:45 You parked your last call. The display shows the length of time the call was parked. You cannot see the length of time a call was parked unless the call is active at your telephone or has just been released by your telephone.
P0905531 Issue 01 Compact Plus System Administration Guide
Using display features 263
o you
rily or on
s. nd on in
es
on e ng xit
which Norstar extension will automatically receive Call Information. If Call Information is not delivered automatically tyour extension and your company subscribes to the service, can view Call Information using Ä¡ÚÚ (the Call Information feature code).
ISDN terminals receive Call Information automatically if supported by the terminal. Not all calls on ISDN lines necessaprovide Call Information because of the way the call is routed,because the information was lost or corrupted. Call Informatigives you information about your active call or the highest priority ringing call.
Call Information is more detailed than the Call Display information you can receive without subscribing to Call Information. For external calls, you can display the caller’s telephone number, line name, or a combination of these itemFor an internal call, it is possible to display the caller’s name atheir extension number. It is also possible to display informatifor ringing, answered, or held calls. Call Information displayseven if the call has been transferred, forwarded, or re-routedsome way.
Call Log displays the same information as Call Information, along with the date and time of the call, and the number of timthe caller called.
Note: You may continue to press line keys to get information other calls. If you press the same line key twice, you arconnected to that call. If you press any other key includikeys used to show more information about a call, you ethe Call Information feature, and the key you pressed performs its normal function.
Call Information symbols
Only incoming calls can be logged. Calls preceded by + are outgoing and cannot be logged.
Symbol Description
+ Indicates the number of the telephone you called (not an incoming call).
É Press ¥ or VIEW to see the rest of the number.
ö You cannot use another feature until you exit the Call Information feature.
x The number is incomplete (missing digits).
/ The number shown is too long. The last 14 digits are shown following the /.
ø The call shown in the Call Log has been answered.
P0905531 Issue 01 Compact Plus System Administration Guide
Using display features 264
d by
ed
sily
h
ay es
cal
Call Log
If your system is equipped with the appropriate equipment anyou have subscribed to the Call Information feature suppliedyour service provider, you can capture information about incoming callers in your Call Log. The same feature is suppliby an ISDN service package that comes with Calling Line Identification (CLID).
You can protect the privacy of your Call Log by assigning a password. A handy feature of the Call Log is that you can eause it to place calls to the numbers recorded.
Call Log creates a record of incoming external calls. For eaccall, the log could contain the following:
• sequence number in the Call Log
• number of the caller
• indication if the call was long-distance
• indication if the call was answered (and identity of who answered it)
• time and date of the call
• number of repeated calls from the same source
• name of the line that the call came in on
Call Log can help you to
• keep track of abandoned or unanswered calls
• track patterns for your callers (for example, volume of callsand geographical location of calls)
• record caller information quickly and accurately
• build a personal telephone directory from log items
The long-distance indicator, as well as the caller’s number, mnot be shown in the log, depending on the Call Display servicprovided by your local telephone company and the caller’s lotelephone company.
Setting which calls are logged at an extension
You can set which types of incoming calls are logged at yourextension. The options are
• No autologging
• No one answered (only for autologging extensions)
• Unanswered by me (only for autologging extensions) but answered elsewhere in the system
P0905531 Issue 01 Compact Plus System Administration Guide
Using display features 265
l
that
our ew
s
s
ss
• Log all calls (including those you answer)—applies to allines capable of providing Call Information, even if your extension is not assigned as an autologging extension for line
The default is No one answered.
1. Press Ä¥¡Ý.
2. Press £ or NEXT to change the options.
3. Press ú or OK to select the display option.
Setting your Call Log password
You can set a password for access to your Call Log to keep ylog private. From then on, you must enter this password to viyour Call Log.
1. Press Ä¥¡Þ. The displays shows
New passwrd:.
2. Enter your four-digit password. The display shows Repeat New:.
3. Re-enter your four-digit password. The display shows
Password changed, which confirms that your password habeen assigned.
To enter Call Log using your password
1. Press Ä¡ÚÛ to enter the Call Log. If you haveprogrammed a password, the display shows Password:.
2. Enter your four-digit password.
If you forget your Call Log password, it can be removed in programming.
Changing your Call Log password
1. Press Ä¥¡Þ. The display shows Old passwrd:.
2. Enter your old password. The display shows New passwrd:.
3. Enter your new four-digit password. The display shows
Repeat New:.
4. Re-enter your password. The display shows Password changed, which confirms that your password habeen changed.
Removing your Call Log password
When you remove your Call Log password, anyone can acceyour Call Log.
P0905531 Issue 01 Compact Plus System Administration Guide

Using display features 266
s
og
y
d
Log
ry e
h
1. Press Ä¥¡Þ. The display shows Old passwrd:.
2. Enter your old password. The display shows New passwrd:.
3. Press ú or OK. The display shows No pswd assigned, which confirms that your password habeen deleted.
Logging an incoming call (Logit)
If your calls are not automatically logged, you can manually lCall Information when you are connected to an external call. Storing information for your current call can be helpful in mansituations. For example, you may want to
• record a caller’s name and number without using paper anpencil
• record only calls that you choose, as opposed to using Call automatically
• quickly record caller information before a caller hangs up.
To log an external call manually:
Press Ä¡ÚÜ.
Note: If you programme the Call Log feature code to a memokey with an indicator, the indicator lights when there arnew items in the log.
Viewing your Call Log
New items are shown with the first character underlined.
Press Ä¡ÚÛ.
Use either the display keys or your keypad to navigate througthe log.
P0905531 Issue 01 Compact Plus System Administration Guide
Using display features 267
. ype BX re
to
n
ate
Placing a call to a number in the Call Log
You may find it helpful to place calls from within your Call LogThe number stored for each call may vary depending on the tof call. For example, if the call was placed from a Centrex or Psystem, the first few numbers may need to be shortened befoyou can make the call. If the number you want to call is long-distance, or if you want to use a line pool, you may needadd numbers.
To place a call
1. Display the log item for the call you want to place.
2. Display the associated telephone number.
3. Dial any extra digits required.
4. Press an exchange line or line pool key.
5. Lift the handset. (This is not necessary if Handsfree is programmed at your telephone). The displayed number isdialled.
While viewing the log, you can place a call to the number displayed in the log.
1. If the number begins with digits that you do not need whecalling from your location, press the left side of Ã
or TRIM once for every digit that you want to remove.
2. Add any digits required to route this number to an appropriline (for example, 9 to get an outside line, if your system requires it). Use the left side of à or BKSP to erase
Action Key Display key
On entering the log
View log items you have viewed before ¥ OLD
View the last item you viewed â RESUME
View new items in the log £ NEW
When viewing an item
View the next item in the log £ NEXT
Erase the item you are viewing ú ERASE
View more information on this item Right side of Ã
MORE
Trim digits from the beginning of the number you are viewing prior to dialling the number
Left side of Ã
TRIM
Go back to the previous item ¥
P0905531 Issue 01 Compact Plus System Administration Guide

Using display features 268
a e, .
he
incorrect digits. You cannot enter host system signalling codes.
3. Select a line for the call as you normally would for makingcall of this type (for example, by pressing an appropriate linIntercom or Handsfree/Mute key, or by lifting the handset)
4. The displayed number is dialled.
Note: When you edit a number in the log to call that number, tedits you make are not saved in the log.
Programming a telephone to log calls automatically
Your installer or sales support officer can programme each telephone to log calls coming in on a line automatically.
Displays
1:Unknown number The caller’s number is unavailable.
12_1234567890123
NEXT ERASE MORE
_ indicates a new item.
12ø1234567890123
NEXT ERASE MORE
ø indicates that the call was answered.
12¤1234567890123
NEXT ERASE MORE
¤ indicates a long-distance call.
49/1234567890123
NEXT ERASE MORE
/ indicates that the stored number has been shortened to its final 11 digits. Press à or MORE to display additional information about the call.
Call(s) bumped One or more log entries have been deleted by the Autobumping feature while you are looking at the Call Log.
Hold or release Hold or release your active call before entering Call Log.
In use: SETNAME The exchange line is in use.
Jan 4 9:00a 3X
NEXT ERASE MORE
The repeat call counter, shown along with time and date, indicates the number of calls you have received from the same caller.
Line001 ø227
NEXT ERASE MORE
This call was answered at another telephone (227).
Line001 øLogit
NEXT ERASE MORE
This call was logged manually.
Line001
NEXT ERASE MORE
This call was not answered.
Messages & Calls
MSG CALLS
There are one or more items in your Message Waiting list, and there are one or more new items in your Call Log. Press Ä¡âß to change the first line of the display to the current time and date.
New calls begin You have viewed your last old log item and can now view your new log items.
P0905531 Issue 01 Compact Plus System Administration Guide
Using display features 269
ull, nd
Autobumping
Deleting log items
Your log has a set number of items that it can hold. When it becomes full, new calls cannot be logged. When your log is fAutobumping automatically deletes the oldest Call Log item alogs the new call.
To enable Autobumping
Press Ä¡ÚÞ. The display shows Autobump ON.
To disable Autobumping
Press Ä£¡ÚÞ. The display shows Autobump
OFF.
No info to log No information is available for the call.
No log assigned No log space has been assigned to the telephone.
No resume item The resume item has been removed because of Autobumping. Repeat Call Update or log reallocation while you are looking at the Call Log.
P0905531 Issue 01 Compact Plus System Administration Guide

Using display features 270
P0905531 Issue 01 Compact Plus System Administration Guide
Special dialling features
� Special dialling features.........272
� Inserting a pause.........272
� Setting Long tones.........272
� Programmed Release.........273
� Recall.........273
� Run/Stop.........273
� Wait for Dial Tone.........274
P0905531 Issue 01 Compact Plus System Administration Guide

Special dialling features 272
mber ch as res
o dial
ence h to
dial
g
.
an key.
that hich
one
ce
to
Plus
Special dialling features
Norstar telephones can access a remote system or dial a nuon a private network by using host system access features suRecall, Pause, Wait for Dial Tone, and Run/Stop. These featueither send a special signal to the host system or allow you tprogramme delays required by host systems to external Autokeys or Speed Dial codes.
Inserting a pause
The Pause feature enters a 3.5-second delay in a dialling sequon an exchange line. You may need this for signalling remotedevices, such as answering machines, or when dialling througPBX features or host systems.
You can programme more than one pause in an external Autoor Speed Dial sequence.
For pulse dialling, ¥ inserts a 1.5-second pause into the diallinsequence.
The pause symbol (Ý) uses one of the 24 spaces in a dialling sequence.
Press Äà¡ while programming a dialling sequence
Note: You can obtain a pause with one key press if you programme the feature code to a memory key. More thone pause can be programmed to an external Autodial
Setting Long tones
The Long tones feature lets you control the length of a tone soyou can signal devices such as fax or answering machines, wrequire tones longer than the standard 120 milliseconds.
1. While on a call, press Ä¡â¡.
2. Use the keypad to produce the appropriate tones. Each tsounds for as long as you hold down the key.
Note: Long tones can be used on any call except a conferencall.
You can use internal lines of the Compact Plus systemactivate a device connected to an Analogue Terminal Adapter (ATA) in another area of your office or to exchange lines to access devices outside the Compact system.
P0905531 Issue 01 Compact Plus System Administration Guide

Special dialling features 273
e em tops
s
use l to a
red The ce.
a call
and
s
l a
u then e ar ial
al
Programmed Release
The Programmed Release feature performs the function of th¨ key in a programmed dialling sequence. When the systencounters a Programmed Release in a dialling sequence, it sdialling and hangs up the call.
The Programmed Release symbol (Þ) takes up2 of the 24 spacein a programmed dialling sequence.
The system ignores any digits or commands that follow a Programmed Release in a programmed dialling sequence.
Press Ä¥¡á while programming a dialling sequence.
Recall
If your Compact Plus system is connected to a PBX, you can a Recall signal to access special features. Programme Recalmemory key for one-touch access.
The Recall signal can also be included as part of a longer stosequence on an external Autodial key or in a speed dial code.Recall symbol (Û) uses 2 of the 24 spaces in a dialling sequen
If your Compact Plus system is connected to a host system, private branch exchange (PBX) for example, you can use a Resignal to access special features such as PBX Call Forward PBX Transfer.
While you are on a call or programming an Autodial key, presÄàÚ.
Run/Stop
Run/Stop inserts a break point into an Autodial or Speed Dianumber. This may be necessary when you are connecting toPBX or similar host system.
For example, you may call a company with an automated receptionist that instructs you to dial the extension number yoneed. You can programme the company number, a Run/Stop,the extension number on one external Autodial key. Press thAutodial key once to dial the company number. When you hethe automated receptionist, press the Autodial key again to dthe extension number.
The Run/Stop symbol (ß) uses 1 of the 24 spaces in an Autodior Speed Dial sequence.
P0905531 Issue 01 Compact Plus System Administration Guide
Special dialling features 274
or
.
ntil is ne
n
te as
You can include up to three Run/Stop commands in a diallingstring. The system ignores a fourth Run/Stop, and any digits commands that follow it in a programmed dialling sequence.
Press Ä¥á while programming a dialling sequence
Wait for Dial Tone
Wait for Dial Tone causes a sequence of numbers to pause udial tone is present on the line before continuing to dial. Thisuseful if you must dial a remote system and then wait for dial tofrom that system before dialling the rest of your number.
The Wait for Dial Tone symbol (à) uses 2 of the 24 spaces in aAutodial or Speed Dial sequence.
1. Press Ä¡âÝ while programming a dialling sequence.
Displays
Using pulse dialling for a call
If your external telephone lines use pulse dialling, you can temporarily switch to tone dialling by pressing £ after selecting the line. Tone dialling lets your Norstar telephone communicawith devices and services that respond to tone signals, such automatic switchboards and fax or answering machines.
Invalid code You have entered a code that can only be used in a programmed Autodial or Speed Dial sequence, not on a call you dial directly. Programmed Release and Run/Stop are for use in programmed dialling sequences only.
P0905531 Issue 01 Compact Plus System Administration Guide
Integrated Services Digital Network (ISDN)
� ISDN services.........276
� Digital Network Adapter.........278
P0905531 Issue 01 Compact Plus System Administration Guide

Integrated Services Digital Network (ISDN) 276
em.
up te or
r
ess
edit ile
or em.
ible ess
ed ent
ISDN services
Integrated Services Digital Network (ISDN) provides a fast, accurate, and reliable means of sending and receiving data, image, text, and voice information through the telephone syst
The Compact Plus system can support up to two Basic RateInterface (BRI) cards, each of which allows the connection of to four BRI loops. Each of these loops consists of two separaB-channels that can be used to make two simultaneous voicedata calls, or one data call and one voice call. A video call requires the use of both B-channels on the loop. Your installeconfigures the BRI loops for the Compact Plus system.
ISDN applications
Using the appropriate ISDN terminal equipment, you can acca wide range of business applications.
Videoconferencing and video telephony
Videoconferencing offers instant visual and audio contact between distant parties using either studio-based or desktopISDN terminals.
Desktop conferencing
ISDN allows computer users in distant locations to share and any image, data, or text file on their own computer screen, whsimultaneously discussing the information.
File transfer
ISDN allows you to transfer files containing data, text, image,audio clips, faster and cheaper than with a conventional mod
Home working
Convenient retrieval, processing, and storage of files is possfor the home worker, using ISDN lines to give high-speed accto information held in the office.
Group 4 fax
ISDN fax applications pride cost savings by increasing transmission speed and quality of resolution.
Remote LAN access
ISDN provides an affordable and fast means for workers in remote sites (at home or branch offices) to access local-areanetworks (LANs).
Leased circuit back-up
Essential back-up for leased KiloStream circuits can be providusing ISDN as required, rather than duplicating costly permancircuits.
P0905531 Issue 01 Compact Plus System Administration Guide

Integrated Services Digital Network (ISDN) 277
n
sic,
es.
eo
e
An that le,
p for
LAN to LAN bridging
LAN bridge/routers allow flexible interconnection between LANs using ISDN, with charges only incurred when informatiois actually transmitted.
Broadcasting
Using ISDN and digital codecs, broadcasters can convey munews, and commentaries with absolute clarity.
Video surveillance
Dial-up access using videocodecs provides advanced surveillance on demand.
Accessing information services
The fast call set-up and high bandwidth of ISDN are ideal foraccessing information services such as Internet and databas
ISDN supported services
Compact Plus supports the following ISDN services:
• basic incoming calls
• basic outgoing calls
• Direct Inward Access
• Calling Line Identification presentation
• Multiple Subscriber Numbering
• sub-addressing
• bearer capabilities
• teleservices
The Call Forward All Calls and Transfer features can be usedfrom ISDN terminals connected to Compact Plus.
Note that Norstar extensions can accept voice calls only. Vidand data calls do not alert at a Norstar extension.
Although an ISDN S-loop can support up to eight devices, thloop has a limit of two B-channels. An ISDN data or voice terminal uses one B-channel for an incoming or outgoing call. ISDN video terminal uses two B-channels for an incoming oroutgoing call. If both B-channels are in use, other devices on loop cannot make or receive calls until a B-channel is availabor until both B-channels are available in the case of a video terminal. Thus, the number of terminals installed on an S-loomust take into account whether you require dedicated accessthe terminals on that loop.
P0905531 Issue 01 Compact Plus System Administration Guide
Integrated Services Digital Network (ISDN) 278
Call
ial l.
e p
our as -to-
oint-s
ess ame e
ble
is e the
all
Services not available
Compact Plus does not support the following ISDN services:
• Terminating Line Identification
• Three-Party Service
• Malicious Call Identification
• Incoming/Outgoing Calls Barred Service
• Night Busy
• Fixed Destination
• Administration Controlled Call Diversion
• Reasons for Release
• Separate Channel Numbering
Note that Norstar extension features, other than Transfer and Forward All Calls, are not available to ISDN terminals. In addition, you cannot retrieve a parked call, or reach a Direct-Dextension by using the Direct-Dial digit from an ISDN termina
Digital Network Adapter
The Digital Network Adapter (DNA) is an optional device for uswith the Compact Plus CCU. It provides an integrated desktosolution for voice, data, and Computer Telephony Integration(CTI) services. You can also telecommute over a digital telephone line to access high-speed network features from yhome by connecting to a DNA in your office. The DNA serves a terminal adapter (TA) and provides reliable high-speed endend digital connectivity between a personal computer and a remote data server through the CCU and public network.
The DNA uses standard communication protocols such as Pto-Point (PPP) and Multi-link PPP (MP) in applications such aInternet access and remote LAN access.
A Norstar telephone can also be connected to a DNA, to accNorstar voice services. You can have a conversation at the stime that your computer is connected to the Internet or remotLAN, with no loss of CCU features.
This sharing of voice and data communication is made possiby software in the CCU that provides dynamic bandwidth allocation across the two channels of the connection. What thmeans is both channels are used for data traffic. When you ustelephone that is connected to the DNA, one channel of the connection is for the voice conversation, while the data connection continues on the other channel. When the voice cends, the extra bandwidth is once again available to the datatraffic.
P0905531 Issue 01 Compact Plus System Administration Guide

Feature quick reference
� Compact Plus feature codes.........280
� ISDN terminal features.........283
� ATA extension features.........284
P0905531 Issue 01 Compact Plus System Administration Guide
Feature quick reference 280
ter
eo
Compact Plus feature codes
Using Norstar features
1. Press Ä and enter the desired feature code on thekeypad. OR
Press the programmed memory key.
2. Follow the display messages.
If you change your mind while entering a feature code, pressÄ to cancel. If you use the ̈ key to end a feature, you may drop an active call.
To display what has been programmed on a memory key, enÄ¥â (the Key Inquiry feature code) and press thememory key.
Note that Norstar extensions can accept voice calls only. Vidand data calls do not alert at a Norstar extension.
Feature To activate To cancel
Autobumping (Call Logs) Ä¡ÚÞ Ä£¡ÚÞ
Auto Attendant
Custom Call Routing (CCR) Ä¥¡ÜÛ
Greetings Ä¥¡ÜÜ
System Answer Ä¥¡ÜÚ
Background music Ä¡ß Ä£¡ß
Call Camp-on Ä¡Û
Call Duration Timer Äàà
Call Forward All Calls ÄÝ Ä£Ý
Call Log Ä¡ÚÛ
Call Log options Ä¥¡Ý
Call Log password Ä¥¡Þ
Call Parking ÄàÝ
Call Pickup Directed Äàß
Call Pickup Group ÄàÞ
Call Queuing Ä¡âÚ
Class of Service password Äß¡
Conference ÄÜ ¨
Contrast adjustment Ä¥à
Dialling modes Ä¥¡Û
P0905531 Issue 01 Compact Plus System Administration Guide
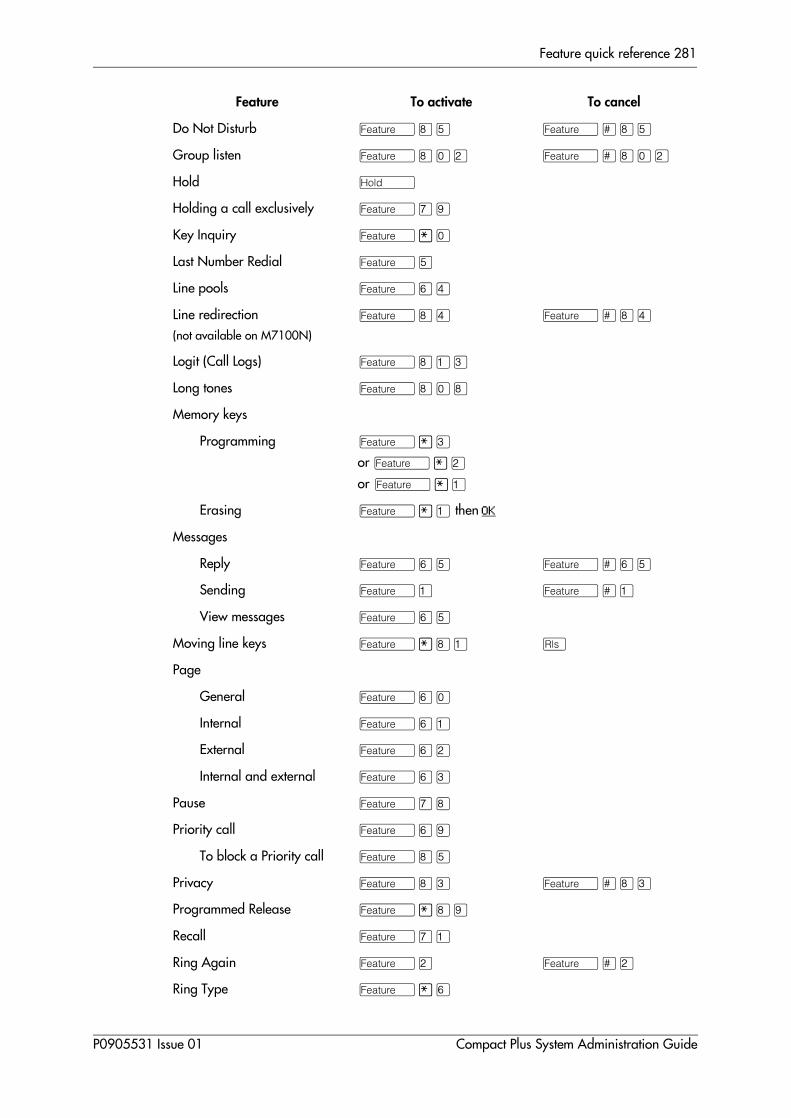
Feature quick reference 281
Do Not Disturb Ä¡Þ Ä£¡Þ
Group listen Ä¡âÛ Ä£¡âÛ
Hold ú
Holding a call exclusively Äàá
Key Inquiry Ä¥â
Last Number Redial ÄÞ
Line pools ÄßÝ
Line redirection
(not available on M7100N)
Ä¡Ý Ä£¡Ý
Logit (Call Logs) Ä¡ÚÜ
Long tones Ä¡â¡
Memory keys
Programming Ä¥Ü
or Ä¥Û
or Ä¥Ú
Erasing Ä¥Ú then OK
Messages
Reply ÄßÞ Ä£ßÞ
Sending ÄÚ Ä£Ú
View messages ÄßÞ
Moving line keys Ä¥¡Ú ¨
Page
General Äßâ
Internal ÄßÚ
External ÄßÛ
Internal and external ÄßÜ
Pause Äà¡
Priority call Äßá
To block a Priority call Ä¡Þ
Privacy Ä¡Ü Ä£¡Ü
Programmed Release Ä¥¡á
Recall ÄàÚ
Ring Again ÄÛ Ä£Û
Ring Type Ä¥ß
Feature To activate To cancel
P0905531 Issue 01 Compact Plus System Administration Guide

Feature quick reference 282
Ring Volume Ä¥¡â
Run/Stop Ä¥á
Saved Number Redial Äßà
Services
Ringing service Ä¡àÚ Ä£¡àÚ
Restriction service Ä¡àÛ Ä£¡àÛ
Routing service Ä¡àÜ
Show Time and Date Ä¡âÜ
Static Time Ä¡âß Ä£¡âß
Move clock forward by 1 hour Ä¥¥ÜáÜ
Move clock back by 1 hour Ä¥¥ÛÛÛÞ
Speed Dial
Making a call Äâ
Storing a Speed Dial code Ä¥Ý
Transfer Äàâ Ä£àâ
Transfer to I-RAD Ä¡ Úà
Trunk Answer Ä¡ââ
Voice call Äßß
Voice Call Deny Ä¡¡ Ä£¡¡
Wait for Dial Tone Ä¡âÝ
Feature To activate To cancel
P0905531 Issue 01 Compact Plus System Administration Guide

Feature quick reference 283
ture . To the
the
to
d
ss ions
call
ISDN terminal features
The Call Forward All Calls and Transfer features can be usedfrom an ISDN terminal connected to Norstar. On most ISDN terminals, you need to press one or more keys to access feaservices before you enter the feature code for these featuressee what keys to press, consult the instructions that came withISDN terminal.
Note: Although ISDN terminals may have Transfer and Call Forward keys or display prompts, these keys do not activate Compact Plus features. Always use the appropriate procedure to access feature services, thenenter the feature code as described below.
Other Norstar extension features are not available to ISDN terminals. In addition, you cannot retrieve a parked call or useDirect-Dial digit to reach a Direct-Dial extension from an ISDNterminal.
Call Forward All Calls
Using the Call Forward All Calls feature
The Call Forward All Calls feature lets you forward your calls another telephone in your Compact Plus system.
1. Press ¥Ý¥.
2. Enter the number of the extension you want your calls forwarded to, followed by £.
3. Enter the appropriate key to send.
Cancelling Call Forward
1. Press £Ý£.
2. Enter the appropriate key to send.
Transfer
Using the Transfer feature
The Transfer feature lets you transfer a call to an internal or external telephone. Depending on how you have programmeyour system, you may not be able to transfer a call on one exchange line to another exchange line.
Depending on the type of ISDN terminal, you may have to prea service key to access feature services (consult the instructthat came with your ISDN terminal).
1. Press ¥àâ¥.
2. Enter the number of the extension you want to transfer theto, followed by £.
3. Enter the appropriate key to send.
P0905531 Issue 01 Compact Plus System Administration Guide

Feature quick reference 284
ss ions
ys an ol
, ber.
the that
ar t e.
Cancelling Transfer
Depending on the type of ISDN terminal, you may have to prea service key to access feature services (consult the instructfor your terminal).
1. Press £àâ£.
2. Enter the appropriate key to send.
Line access from an ISDN terminal
Note that ISDN terminals do not have line keys or intercom keas does a Norstar telephone. To make an outgoing call from ISDN terminal, access an exchange line by entering a line pocode or a destination code.
Making or receiving calls involving two B-channels
For incoming calls that require two simultaneous B-channelsCompact Plus requires that calls be made sequentially to twodistinct numbers, rather than simultaneously to the same num
In the case of a DIA call, the same DIA line can be used but ISDN extension needs to have the number of appearances forDIA line to 2.
For example, in the case of a Presence video terminal, the first call establishes a 1B video connection and the second call establishes the 2B video connection.
ATA extension features
The Analogue Terminal Adapter (ATA) connects a digital Norsttelephone port to a standard analogue voice device. It is moscommonly used to attach to a single-line telephone or a datacommunication device such as a modem or facsimile machin
Refer to the ATA Terminal Feature Card for complete information.
Feature To activate To cancel
Alternate line ûÛ
Call Forward û¥Ý û£Ý
Call parking û¥àÝ
Call pick-up (Directed) û¥àß
Call pick-up (Group) û¥àÞ
Call Queuing û¥¡âÚ
Call Waiting û¥¡âÚ
Camp-on û¥¡Û
P0905531 Issue 01 Compact Plus System Administration Guide
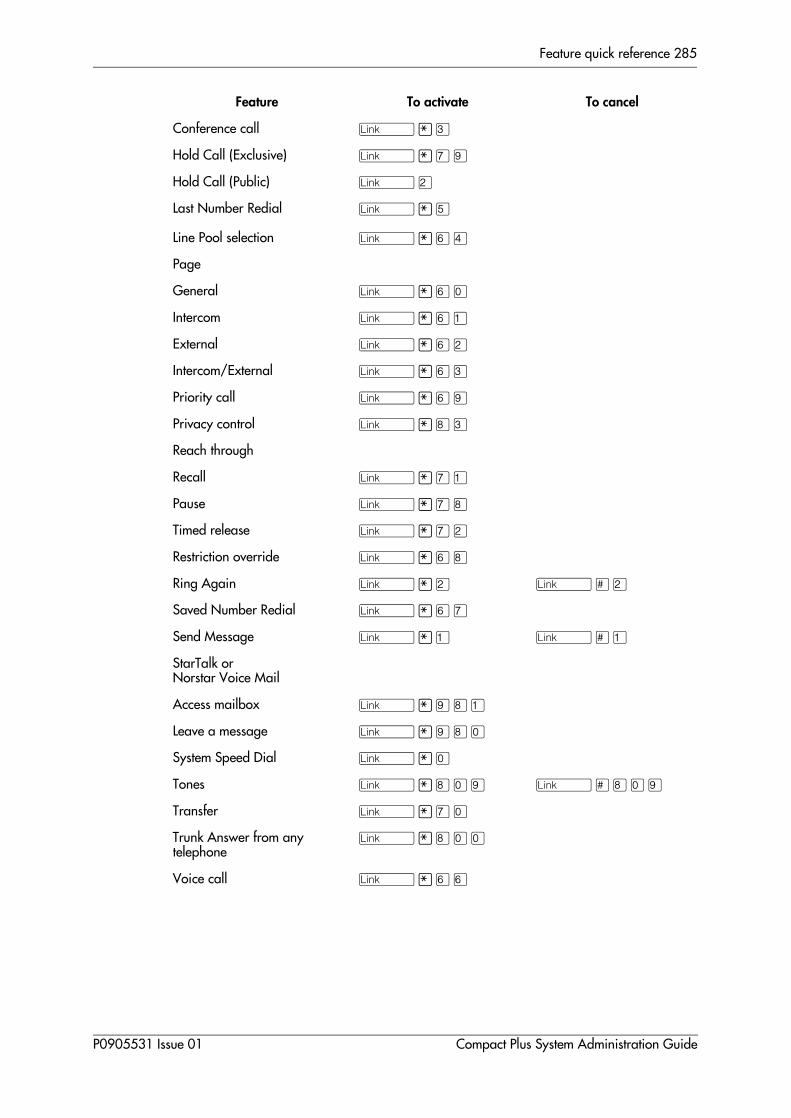
Feature quick reference 285
Conference call û¥Ü
Hold Call (Exclusive) û¥àá
Hold Call (Public) ûÛ
Last Number Redial û¥Þ
Line Pool selection û¥ßÝ
Page
General û¥ßâ
Intercom û¥ßÚ
External û¥ßÛ
Intercom/External û¥ßÜ
Priority call û¥ßá
Privacy control û¥¡Ü
Reach through
Recall û¥àÚ
Pause û¥à¡
Timed release û¥àÛ
Restriction override û¥ß¡
Ring Again û¥Û û£Û
Saved Number Redial û¥ßà
Send Message û¥Ú û£Ú
StarTalk or Norstar Voice Mail
Access mailbox û¥á¡Ú
Leave a message û¥á¡â
System Speed Dial û¥â
Tones û¥¡âá û£¡âá
Transfer û¥àâ
Trunk Answer from any telephone
û¥¡ââ
Voice call û¥ßß
Feature To activate To cancel
P0905531 Issue 01 Compact Plus System Administration Guide

Feature quick reference 286
P0905531 Issue 01 Compact Plus System Administration Guide

P0905531 Issue 01 Compact Plus System Administration Guide

288
Appendix A: Programming overviews
Chart 1: System Speed Dial
Chart 2: Naming extensions
Speed dial #: __
Use prime line
Display digits:
Name:
Press CHANGE to choose between Y (Yes) and N (No).
Use prime line Use line: ___ (enter line)Pool code: __ (enter pool access code)Use routing tabl
Press CHANGE to select outgoing facility:
Enter a System Speed Dial number 01 to 70.
Appears only if Display digits is set to N (No).Enter a name.
NEXT
SHOW
SHOW
SHOW
Bypass restr'n: Press CHANGE to choose between Y (Yes) and N (No).
NEXT
Sys speed dial
The number is displayed. Press NEXT.
Show extn#:
Terminals&Extns Press CHANGE and enter new name. Press NEXT.
Enter extension number. SHOWCapabilities
SHOW
NEXT
Name:
Line access
NEXT
Compact Plus System Administration Guide P0905531 Issue 01
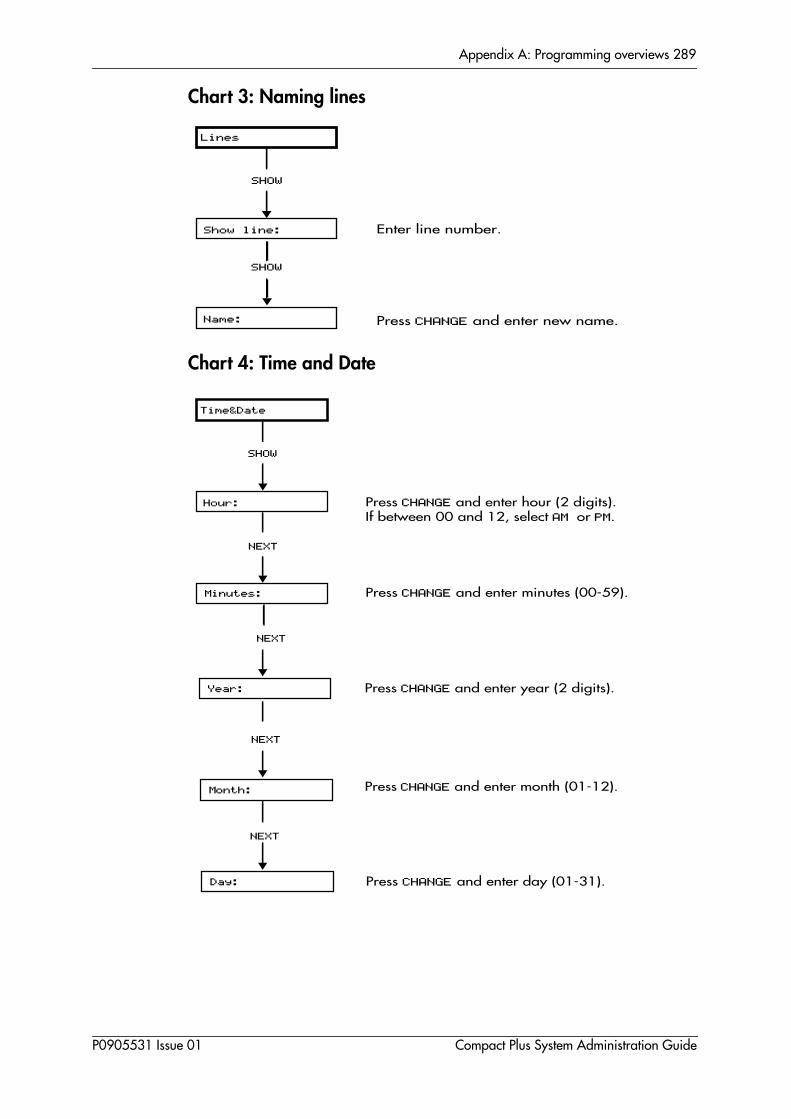
Appendix A: Programming overviews 289
Chart 3: Naming lines
Chart 4: Time and Date
Show line:
Lines Press CHANGE and enter new name.
Enter line number. SHOWName:
SHOW
Hour:
Time&Date
Minutes: Press CHANGE and enter minutes (00-59).
Press CHANGE and enter hour (2 digits).If between 00 and 12, select AM or PM.
NEXT
SHOW Day:
Month:
Year:
NEXT
Press CHANGE and enter year (2 digits).
NEXT
NEXT
Press CHANGE and enter month (01-12).
Press CHANGE and enter day (01-31).
P0905531 Issue 01 Compact Plus System Administration Guide

290
Appendix A: Programming overviews
Chart 5: Direct-Dial
Featr settings
System prgrming
Direct-dial
D-Dial 1:
Intrnl#:
Press CHANGE to select Intrnl, Extrnl, or None.
SHOW
SHOW
NEXT
SHOW
If Intrnl or Extrnl #, press CHANGE and enter number.
Hunt groups
NEXT
Compact Plus System Administration Guide P0905531 Issue 01
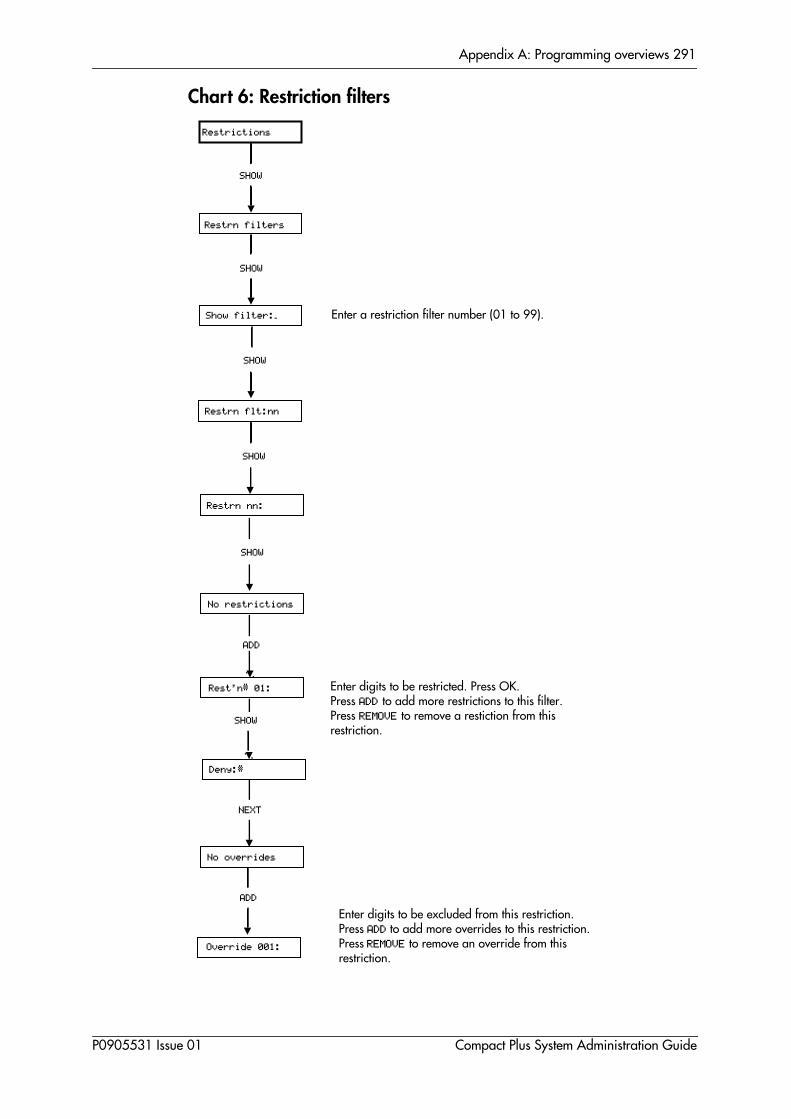
Appendix A: Programming overviews 291
Chart 6: Restriction filters
Restrn filters
Restrictions
Show filter:_ Enter a restriction filter number (01 to 99).
SHOW
SHOW Rest'n# 01:
No restrictions
Restrn nn:
SHOW
SHOW
ADD
Enter digits to be restricted. Press OK.Press ADD to add more restrictions to this filter.Press REMOVE to remove a restiction from thisrestriction.
Override 001:
No overrides
SHOW
ADD
Enter digits to be excluded from this restriction.Press ADD to add more overrides to this restriction.Press REMOVE to remove an override from this restriction.
Restrn flt:nn
SHOW
Deny:#
NEXT
P0905531 Issue 01 Compact Plus System Administration Guide

292
Appendix A: Programming overviews
Chart 7: Remote Access Packages
Hunt groups
Remote access
Rem access pkgs
Rem line access
Press ≠ and enter pkg#. Press ≠ to see settings: LinePool access, Remote page, Remote admin, and Remote monitor.Press CHANGE to choose between Y (Yes) and N (No).
Press ≠ and enter line number.Press CHANGE and enter remote package number.
NEXT
SHOW
NEXT (4 times)
SHOW
System prgrming
Compact Plus System Administration Guide P0905531 Issue 01

Appendix A: Programming overviews 293
Chart 8: Extension restrictions Terminals&Extns
Capabilities SHOW
ExtnLock:
Filters
Restrictions
SHOW
Press CHANGE to select None, Full, orPartial.
Allow saved no:
Allow last no:
NEXT
NEXT
Press CHANGE to choose between Y (Yes)and N (No).
(3 times)
Enter extension number.
Press CHANGE to choose between Y (Yes)and N (No).
Allow recall:
NEXT
Press CHANGE to chooose between Y (Yes) and N (No).
Allow redirect:
SHOW
Show extn#:_
NEXT
Press CHANGE to choose between Y (Yes) and N (No).
NEXT
Line access
NEXT
Restrn filters
NEXT
Extn restrn
SHOW
NEXT
P0905531 Issue 01 Compact Plus System Administration Guide

294
Appendix A: Programming overviews
Chart 9: Extension capabilities 1
Show extn#:_
Terminals&Extns
Capabilities
Fwd no answer
Forward delay
Press ≠ to see the setting.Press CHANGE to enter an extension number.
Enter extension number.
(If Fwd no answer is set to an extension)Press CHANGE to select 2, 3, 4, 6, or 10 rings.
NEXT
SHOW
SHOW
Fwd on busy:
DND on busy: Press CHANGE to choose between Y (Yes) and N (No).
Press ≠ to see the setting.Press CHANGE to enter an extension number.
NEXT
NEXT
SHOW
Line access
NEXT
Fwd no answer
HEADING
Fwd on busy
Compact Plus System Administration Guide P0905531 Issue 01
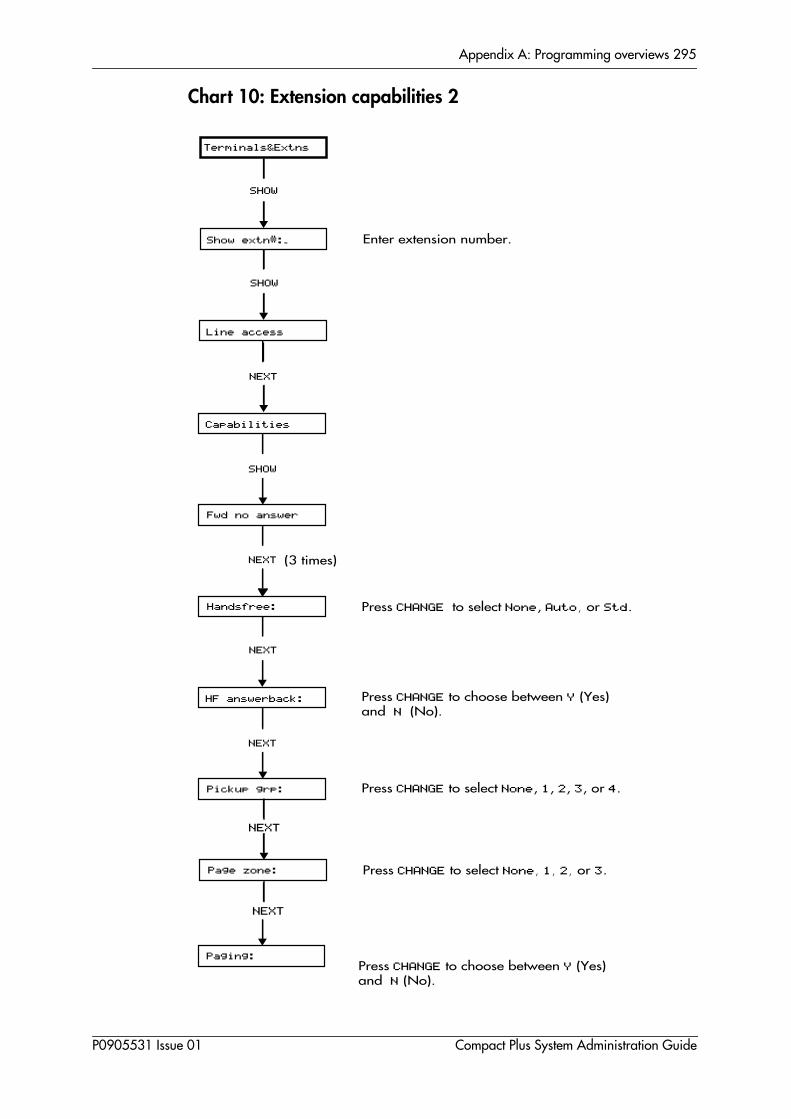
Appendix A: Programming overviews 295
Chart 10: Extension capabilities 2
Show extn#:_
Terminals&Extns
Capabilities
Fwd no answer
Handsfree:
Enter extension number.
Press CHANGE to select None, Auto, or Std.
NEXT
SHOW
SHOW
HF answerback: Press CHANGE to select None, 1, 2, 3, or 4.
Press CHANGE to choose between Y (Yes) and N (No).
Pickup grp: NEXTNEXT
SHOW
(3 times)
Page zone:
Paging:
NEXT
NEXT
Press CHANGE to select None, 1, 2, or 3.
Press CHANGE to choose between Y (Yes) and N (No).
Line access
NEXT
P0905531 Issue 01 Compact Plus System Administration Guide
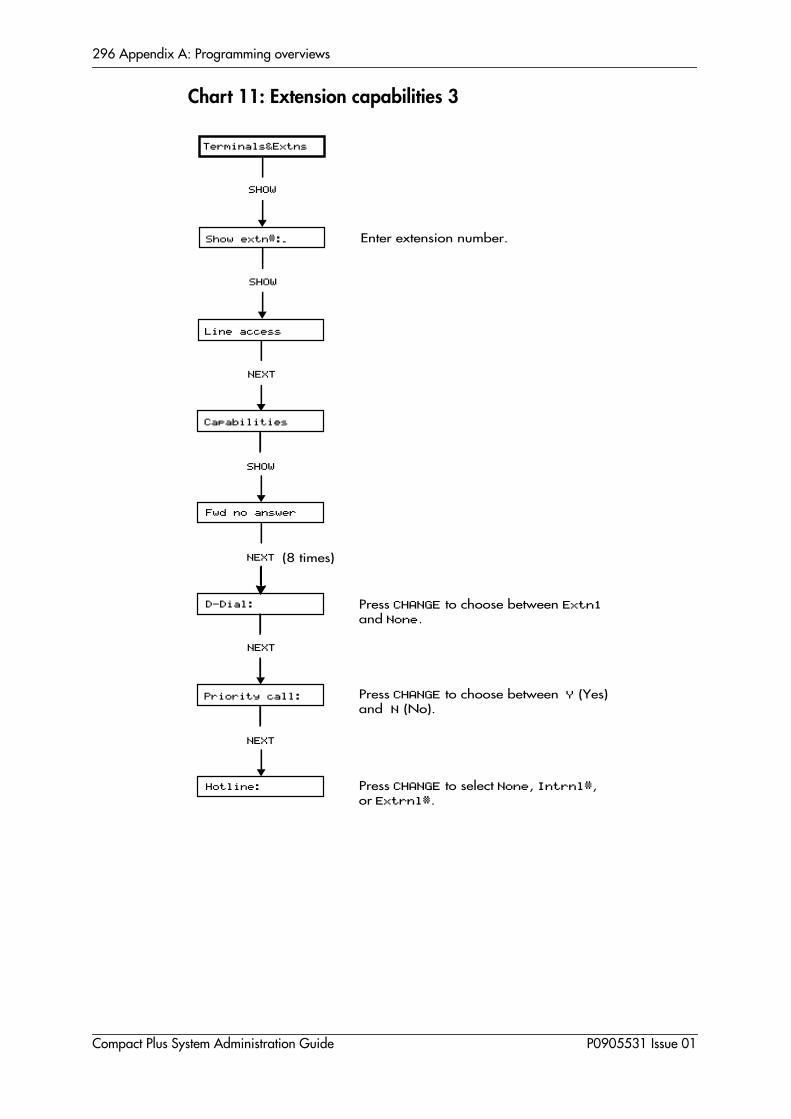
296
Appendix A: Programming overviews
Chart 11: Extension capabilities 3
Show extn#:_
Terminals&Extns
Capabilities
Fwd no answer
D-Dial:
Enter extension number.
Press CHANGE to choose between Extn1and None.
NEXT
SHOW
SHOW
Priority call:
Press CHANGE to select None, Intrnl#,or Extrnl#.
Press CHANGE to choose between Y (Yes) and N (No).
Hotline:
NEXT
NEXT
SHOW
(8 times)
Line access
NEXT
Compact Plus System Administration Guide P0905531 Issue 01

Appendix A: Programming overviews 297
Chart 12: Extension capabilities 4
Show extn#:_
Terminals&Extns
Capabilities
Fwd no answer
Aux. ringer:
Enter extension number.
Press CHANGE to choose between Y (Yes) and N (No).
NEXT
SHOW
SHOW
Redirect ring:
Press CHANGE to choose between Y (Yes) and N (No).
Press CHANGE to choose between Y (Yes) and N (No).
Receive tones:
NEXT
NEXT
SHOW
(11 times)
Line access
NEXT
ATA settings
NEXT
P0905531 Issue 01 Compact Plus System Administration Guide

298
Appendix A: Programming overviews
Chart 13: User preferences
Model
User prefernces
Key prgrming
User speed dial
Call log opt'ns
Press ≠ to see settings.
Press ≠ to see the setting.
Press ≠ to see settings. Press CHANGE to select from No one answered, Unanswerd by me,Log all calls, and No autologging.
NEXT
NEXT
NEXT
Dialling opt'ns Press CHANGE to choose between English and Opratng.
Press ≠ to see settings. Press CHANGE to select from Automatic dial, Standard dial,and Pre-Dial.
Language NEXTNEXT
SHOW
Display cntrst:
Ring type:
NEXT
NEXT
Press CHANGE to select level.
Press CHANGE to select ring type (1-4).
Press ≠ to see speed dial codes.
Compact Plus System Administration Guide P0905531 Issue 01
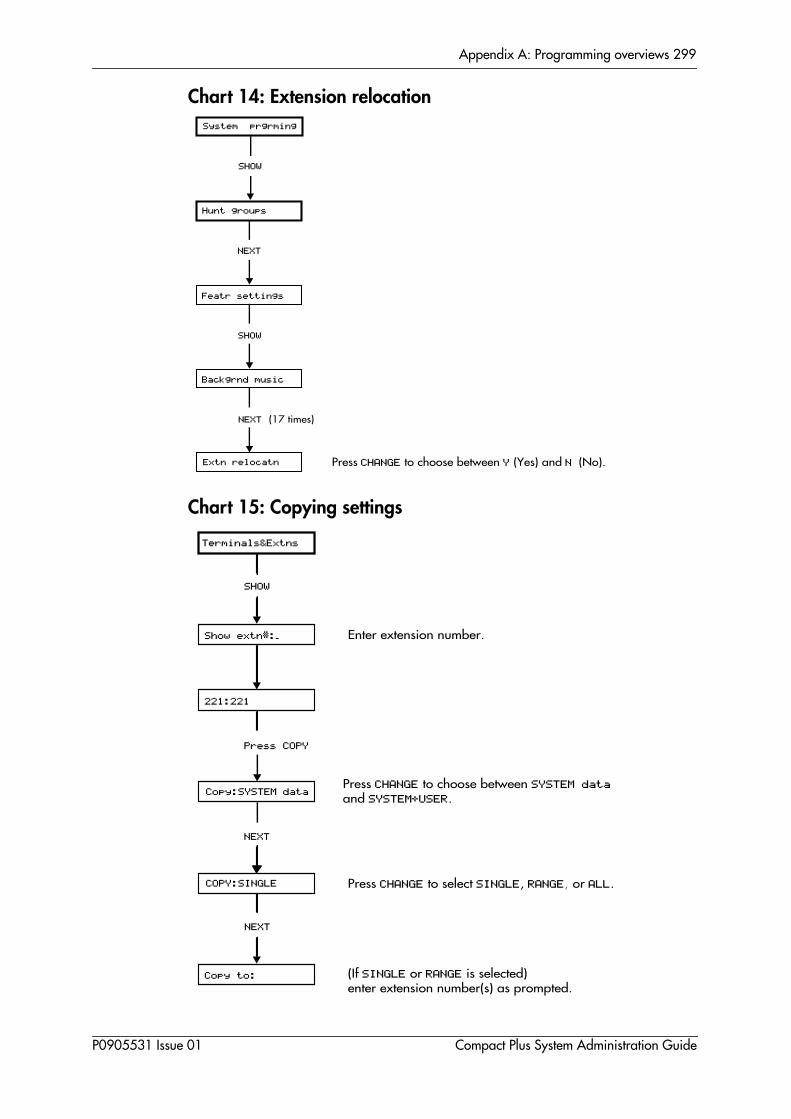
Appendix A: Programming overviews 299
Chart 14: Extension relocation
Chart 15: Copying settings
Featr settings
Backgrnd music
Extn relocatn Press CHANGE to choose between Y (Yes) and N (No).
NEXT
SHOW
NEXT
Hunt groups
(17 times)
SHOW
System prgrming
Show extn#:_
Terminals&Extns
221:221
Copy:SYSTEM data
COPY:SINGLE
Enter extension number.
Press CHANGE to select SINGLE, RANGE, or ALL.
NEXT
Press COPY
Copy to: (If SINGLE or RANGE is selected)enter extension number(s) as prompted.
NEXT
SHOW
Press CHANGE to choose between SYSTEM data and SYSTEM+USER.
P0905531 Issue 01 Compact Plus System Administration Guide
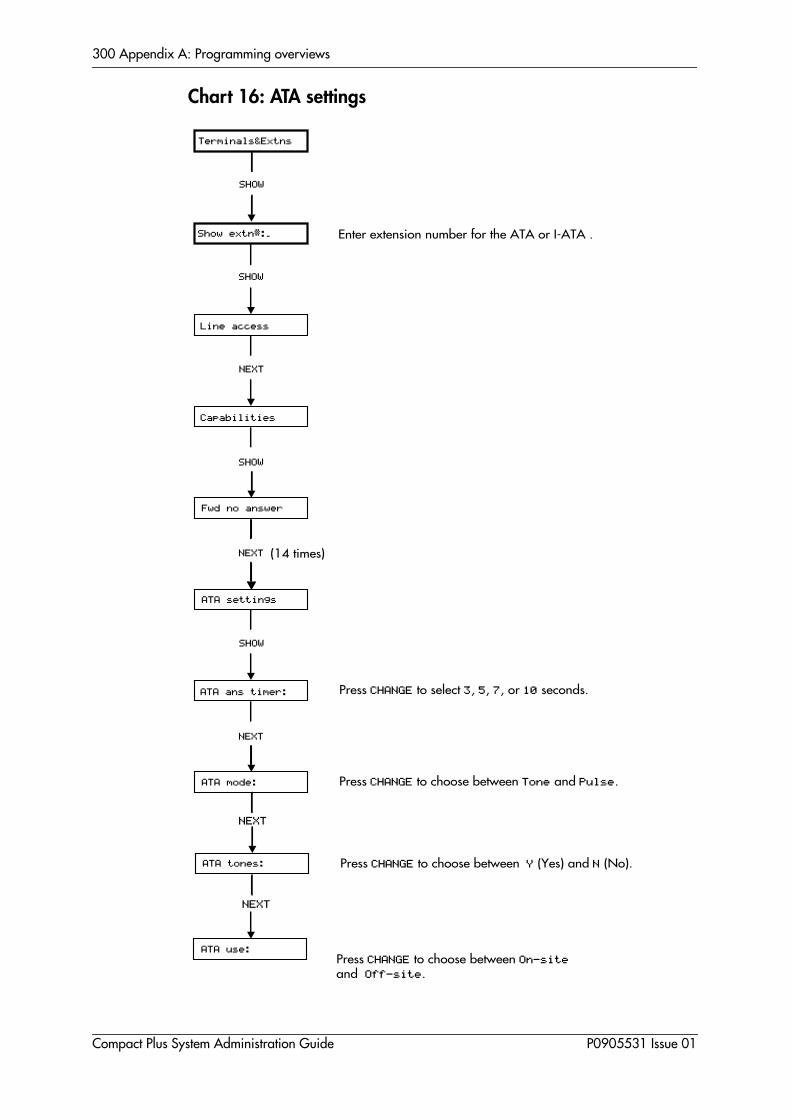
300
Appendix A: Programming overviews
Chart 16: ATA settings
Line access
Show extn#:_
Capabilities
Fwd no answer
ATA settings
Enter extension number for the ATA or I-ATA .
NEXT
SHOW
NEXT
ATA ans timer:
Press CHANGE to choose between Tone and Pulse.
Press CHANGE to select 3, 5, 7, or 10 seconds.
ATA mode:
NEXT
SHOW
SHOW
(14 times)
ATA tones:
ATA use:
NEXT
NEXT
Press CHANGE to choose between Y (Yes) and N (No).
Press CHANGE to choose between On-site and Off-site.
Terminals&Extns
SHOW
Compact Plus System Administration Guide P0905531 Issue 01

Appendix A: Programming overviews 301
Chart 17: Ringing service
Chart 18: Restriction service
Ringing service
Services
Sched:Night
SHOW
SHOW
Service:
SHOW
Press CHANGE to select from Manual,Auto, and Off.
Ringing groups
NEXT
Ringing service
Services
Restrn service
Sched:Night
Service: Press CHANGE to select from Manual, Auto, and Off.
SHOW
SHOW
NEXT
SHOW
P0905531 Issue 01 Compact Plus System Administration Guide

302
Appendix A: Programming overviews
Chart 19: Routing service
Ringing service
Services
Routing service
Sched:Night Press CHANGE to select from Manual, Auto, and Off.
SHOW
NEXT
SHOW
(2 times)
Routes
Dest codes
NEXT
NEXT
Compact Plus System Administration Guide P0905531 Issue 01

Appendix A: Programming overviews 303
Chart 20: Passwords
COS pswds
Passwords
Call log pswds
Progrming pswds
SysCoord+:
(Appears only if using SAPLUS password).Press ≠ and enter password #.Then press ≠ to enter new password.
(Appears only if using SAPLUS password).Press CHANGE to enter new password.
SHOW
NEXT
NEXT
Sys coord:
Press CHANGE to enter new password.
Press CHANGE to enter new password.
Basic:
NEXT
NEXT
SHOW
Progrming pswds
IRAD pswd
HEADING
NEXT
Press CHANGE to enter new password.
P0905531 Issue 01 Compact Plus System Administration Guide
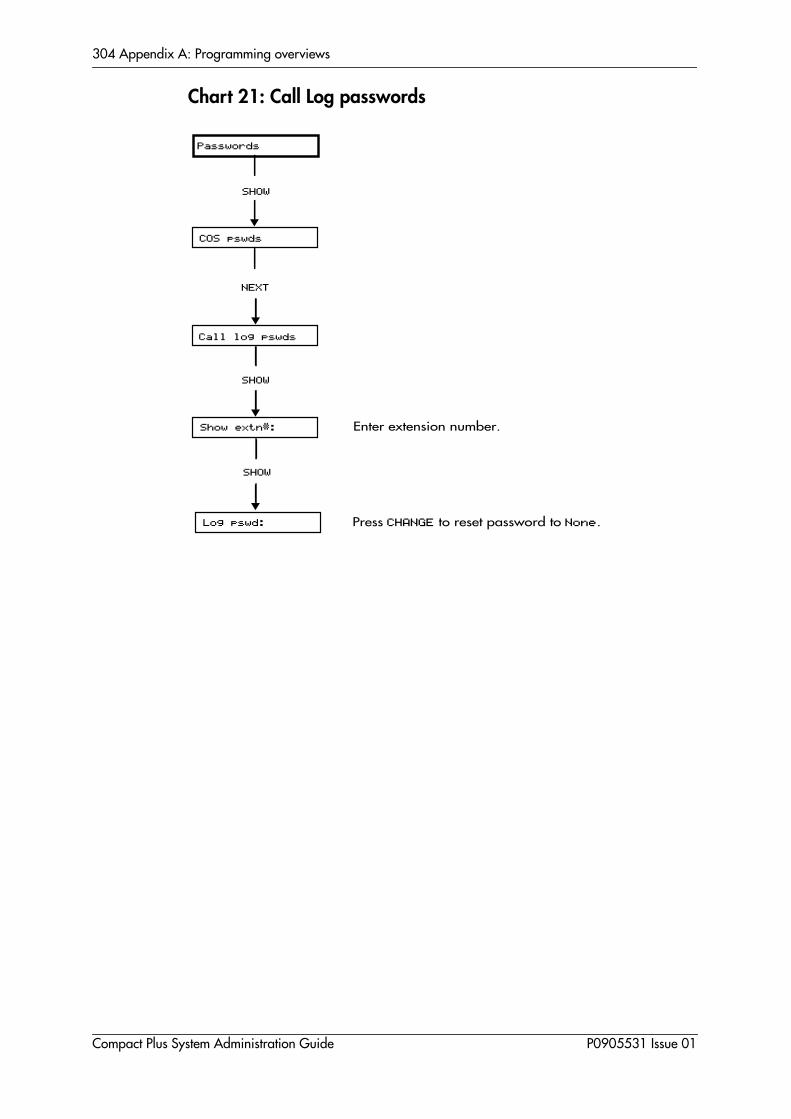
304
Appendix A: Programming overviews
Chart 21: Call Log passwords
Call log pswds
Passwords
Show extn#: Enter extension number.
SHOW
NEXT
Log pswd:
SHOW
Press CHANGE to reset password to None.
COS pswds
SHOW
Compact Plus System Administration Guide P0905531 Issue 01
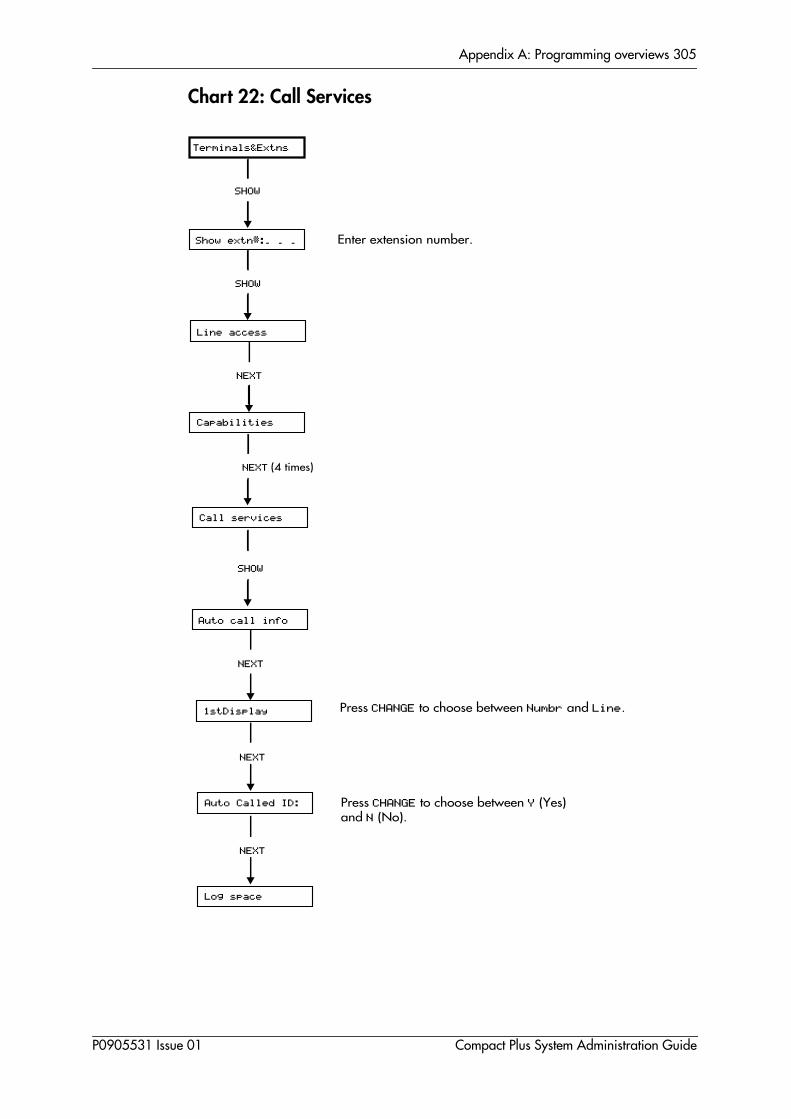
Appendix A: Programming overviews 305
Chart 22: Call Services
Show extn#:_ _ _
Terminals&Extns
Capabilities
Enter extension number.
SHOW
SHOW
Auto Called ID:
1stDisplay
Call services
NEXT
SHOW
NEXT
Press CHANGE to choose between Numbr and Line.
Press CHANGE to choose between Y (Yes)and N (No).
(4 times)
Line access
NEXT
Auto call info
NEXT
Log space
NEXT
P0905531 Issue 01 Compact Plus System Administration Guide

306 Appendix A: Programming overviews
Chart 23: Auto Attendant
Hunt groups
System prgrming
Auto Attendant
NEXT
SHOW
CCR
System answer
Attd Extn:
SHOW
NEXT
NEXT
Press ≠ to see the setting for After:.Press CHANGE to select number of rings (2 to 12).
Press ≠ to see the setting for After:.Press CHANGE to select number of rings (2 to 12).
(3 times)
Press CHANGE to enter new extension number.
CCR groups
NEXT
Press ≠ and enter group number.Press ≠ to see extensions in group.Press CHANGE to choose between Assigned andUnassgnd.
Auto Attend
NEXT
CCR lines
NEXT
Compact Plus System Administration Guide P0905531 Issue 01
Index 307
Index
AAbsorbLength 154AC15A
assigning a filter 83Administration password
erasing 161setting up 161
Advice Line 30Alarm extension 130Analogue equipment
settings 140Analogue Terminal Adapter
delay before answering 140dial mode 141feature codes 284system tones 142used off-site 142used on-site 142
Answer keysassigning 36using 222
answering callsCall Pickup 221external 218hunt group calls 219internal 218queued 218Trunk Answer 222
ATASee Analogue Terminal Adapter
attendant phonechoosing 179
Auto Attendant 176Autobumping
feature 269Autodial
external number 256internal number 256using intercom key 257
Automatic Telephone Relocation 134auxiliary ringer
programming 101
P0905531 Issue 01
BBackground Music
On hold 122programming 122using 214
Barring callsusing restriction filters 74
Basic password 161British Telecom
address 30Broadcast 115
CCall barring
using restriction filters 74Call Camping
feature 233Call capture
settings that enhance 24Call Duration Timer 262Call Forward All Calls 27Call Forward All Calls (ISDN) 283Call Forward No Answer
setting up 92Call Forward on Busy
setting up 94Call holding 226Call Information
symbols 263viewing 262
Call LogAutobumping 269erasing password 166feature 264Logit 266password 265programming 268selecting options 107setting extension 264viewing 266
Call Park 230Call Pickup
directed 221group 221
Call Pickup Directedprogramming 128
Call queuing 218Call Routing 148Call Services
Compact Plus System Administration Guide
Index 308
Auto Called ID 1671st Display 166
Camp timeoutprogramming 123
CAPNSee Central Answering Position
CCR customised greetings 183CCR destinations 184CCR group
adding or removing extensions 180Central Answering Position
feature 203line assignment 33
Class of Service passwordchanging 85, 240changing dialling filter 85erasing 86feature 240setting up 84using 240
Conference Callfeature 237
Conference tone 127contrast adjustment 109Control extensions
definition 146programming 155
copyingprogramming 135
COSSee Class of service password
Custom Call Routingcustomising 178greetings 176testing 184turning on and off 179
Cyclical 115
Ddestination code 153Dialling
setting 208dialling features
long tones 272pause 272Programmed Release 273Recall 273Run/Stop 273Wait for dialtone 274
Compact Plus System Administration Guide
Dialling filtersAC15A private circuit 74AC15A private circuits 83extensions 74lines 74overriding 80
dialling modes 208dialling options 108dialling restriction
defaults 75Digital Network Adapter
features 278Direct-Dial extension
assigning a telephone 70, 98external extension 71internal extension 70programming 70using 242
disconnecting accidentally 223display
common feature messages 204contrast 109, 209keys 8language 109VIOC 109
DNASee Digital Network Adapter
DNDSee Do Not Disturb
Do Not Disturbfeature 214
Do Not Disturb on Busycancelling 95setting up 94, 95
Eexchange code 236extension
Alarm 130locking off 86locking on 86naming 62programming 92relocation 134restriction filters 77
Ffeature 202
Analogue Terminal Adapter feature
P0905531 Issue 01
Index 309
codes 284Autobumping 269Autodial 256Automatic hold 226Background Music 214Call Camping 233Call Duration Timer 262Call Forward All Calls 250Call Forward All Calls (ISDN) 283Call Forward No Answer 92Call Forward on Busy 94Call Information services 262Call Park 230Call Pickup, directed 221Call Pickup, group 221Call queuing 218Class of Service passwords 240Conference Call 237Contrast adjustment 109Dialling modes 208Do Not Disturb 214Exclusive hold 226Group Listen 223Hold 226hunt groups 219Key Inquiry 209Last Number Redial 87Line Pool 236Line redirection 252Logit 266Long tones 272Messages 242Paging 245Pause 272Personal Speed Dial 215Priority Call 232Privacy 218Programmed Release 273Recall 273Remote access packages 170Ring Again 260Ring type 210Ring volume 211Ringing service 146Run/Stop 273Saved Number Redial 88Services 146Show time 262Static Time 262
P0905531 Issue 01
System Speed Dial 256Time and Date 262Transfer 233Trunk Answer 222Voice Call 246Voice Call deny 246Wait for dialtone 274
feature display messages 204
Ggreetings
customised 182pre-recorded 181
Group Listen 223
HHandsfree
answerback 96muting 220programming 95using 219
Held line reminder 127Hold
automatic 226exclusive 226
Hotlineassigning a telephone 100bypassing 101, 260cancelling 100using 260
hunt group calls 219Hunt groups
adding and removing members 113and videophones 112assigning and unassigning lines 114checking metrics 119hunt delay 116if line is busy 116member order 113method of distribution 115overflow extension 118queue timeout 117
Iintercom keys
programming 35using for Autodial 257
interrupting a callSee Priority Call
Compact Plus System Administration Guide

Index 310
I-RAD password 163ISDN terminals
Call Forward All Calls 283feature codes 283features 276line access 237supported services 277transfer call 283using 237
Kkey assignments
M7100N telephone 201M7208N telephone 200M7310N telephone 199
Key Inquiry 209keys
Autodial 257Call Log 267display 8keypad 7, 8labelling 209moving 210telephone 7
Llanguage
display 109VIOC 109
Last Number Redailpreventing 87
Lineassigning filters 78assignment 32naming 63
line accessISDN terminals 284
Line Poolfeature 236
Line pool accessprogramming 34
Line redirectioncancelling 253feature 252using 252
line redirection 49Line Ringing
See Line assignmentlines
Compact Plus System Administration Guide
assigning to a hunt group 114Listen on hold 226listening in a group 223locking
an extension 86log calls
See Call Loglog space
allocation 129Logit 266long tones
feature 272
MMaintenance
overview 188map, programming 11Memory keys
erasing 259feature code 258programming 258
Messageserasing 244feature display 204replying 243sending 242viewing 243
moving telephones 134music
background 122On hold 122
M7100N telephone 200M7208N telephone 200M7310N telephone 199M7324N telephone 198
NNetwork callback 126Night Service
See ServicesNight service 146Norstar feature codes 280numbering plan 149
OONN blocking (CLIR) 48Originating Line Identification 231overlay, programming 6overriding
P0905531 Issue 01
Index 311
Call Forward 250
PPage timeout 129Page tone 128Page zone
setting up 97Paging
features 245programming 98remote 245
Park Modeprogramming 124
Park timeoutprogramming 124
Parking a call 230Passwords
Admin 161Basic 161Call Log 265erasing 166I-RAD 163SAPLUS 160using 22
Personal Speed Dialfeature 215
Pickup groupsetting up 97
Prime line 34Priority Call
allowing 99feature 232
Privacy 218programming
Call Log 268Call Pickup 221Control extensions 155copying 135Do Not Disturb on Busy 94extensions 92map of Administrator Plus programming 1maps of 11memory keys 258overlay 6
programming basicsentering passwords 9
programming system featuresPage timeout 129Page tone 128
P0905531 Issue 01
0
pulse dialling 274
Qqueued call 218
Rre-allocating log space 129Recall
setting up 89Receive tones 102receiver volume
programming 123redialling a number 258Redirect ring
setting up 101turning off 101
regulatory information 4relocation of extension 134Remind delay 127Remote access
defaults for packages 170filter 83packages 170
Remote paging 245ring
Ringing service 146Ring Again
cancelling 260feature 260
Ring typechanging 110feature 210
Ring volumefeature 211
Ringing service 146activating 146cancelling 146feature 146
routingDIA calls 231
Routing serviceprogramming 148
Run/Stop 273
SSAPLUS password 160Saved Number Redial
preventing 88Sequential 115
Compact Plus System Administration Guide

Index 312
r
,
ServicesControl extensions 155Restriction service 146, 148Ringing service 146Routing 148schedule 146Trunk Answer 222turning off with a feature code 155
Show time 262Software Keys 54Speed Dial
personal 107, 215system 58using 215
Static Timefeature 262
Symbolskeys 263
System Answer 176customised greetings 182pre-recorded greetings 181testing 184turning on and off 178
System ID 54System Speed Dial
assigning a number 58bypassing restrictions 60feature 256setting up 58
system version number 188
Ttelephone
moving 134M7100N 200M7208N 200M7310N 199M7324N 198
telephone keys 7testing
Custom Call Routing 184System Answer 184
Time and Datechanging 65–68feature 262Show 262
timing a call 262Transfer Callback delay
programming 125
Compact Plus System Administration Guide
transferring a callfeature 233ISDN 283
Troubleshooting 191–194Trunk Answer
using 222
Vversion number
system software 188VIOC
See Visually Handicapped OperatoConsole
Visually Impaired Operator Console 109202
Voice Callanswering 246features 246making 246muting tones 246preventing 246
WWait for dialtone
feature 274
Symbols£ 251› 251
P0905531 Issue 01


![M Series Compact Excavator Literature 1st Release 2009 [1]](https://static.documents.pub/doc/80x56/577cc67a1a28aba7119e56b3/m-series-compact-excavator-literature-1st-release-2009-1.jpg)


