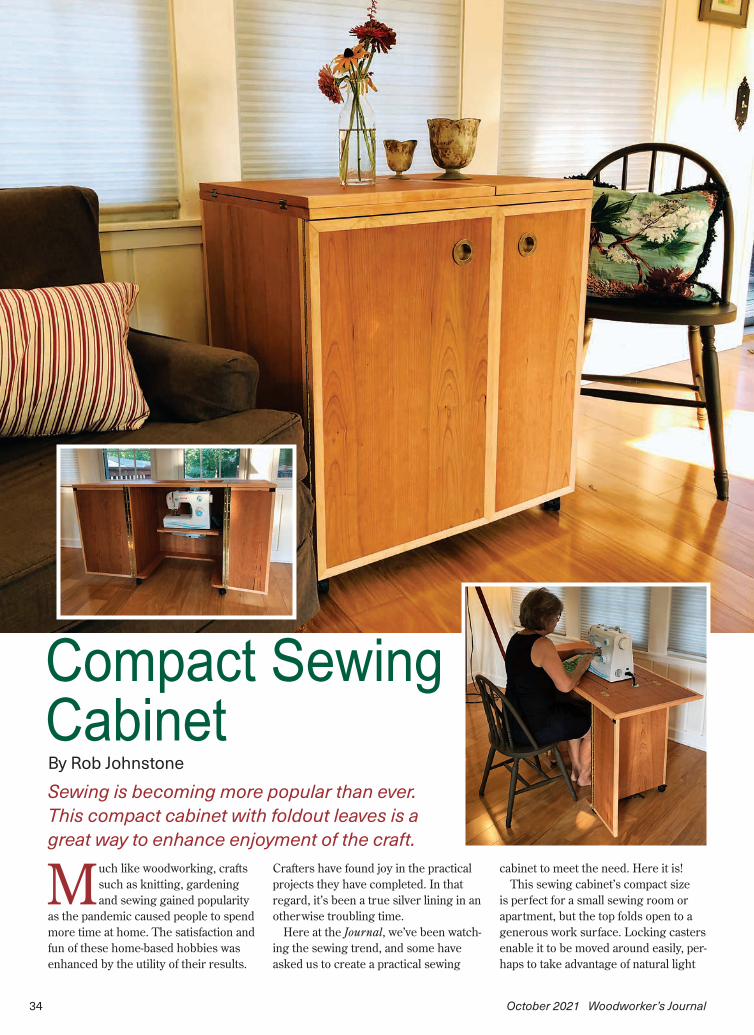
October 2021 Woodworker’s Journal 34 Compact Sewing Cabinet By Rob Johnstone M uch like woodworking, crafts such as knitting, gardening and sewing gained popularity as the pandemic caused people to spend more time at home. The satisfaction and fun of these home-based hobbies was enhanced by the utility of their results. Sewing is becoming more popular than ever. This compact cabinet with foldout leaves is a great way to enhance enjoyment of the craft. Crafters have found joy in the practical projects they have completed. In that regard, it’s been a true silver lining in an otherwise troubling time. Here at the Journal, we’ve been watch- ing the sewing trend, and some have asked us to create a practical sewing cabinet to meet the need. Here it is! This sewing cabinet’s compact size is perfect for a small sewing room or apartment, but the top folds open to a generous work surface. Locking casters enable it to be moved around easily, per- haps to take advantage of natural light
Transcript
October 2021 Woodworker’s Journal34
Compact Sewing CabinetBy Rob Johnstone
Much like woodworking, crafts such as knitting, gardening and sewing gained popularity
as the pandemic caused people to spend more time at home. The satisfaction and fun of these home-based hobbies was enhanced by the utility of their results.
Sewing is becoming more popular than ever. This compact cabinet with foldout leaves is a great way to enhance enjoyment of the craft.
Crafters have found joy in the practical projects they have completed. In that regard, it’s been a true silver lining in an otherwise troubling time.
Here at the Journal, we’ve been watch-ing the sewing trend, and some have asked us to create a practical sewing
cabinet to meet the need. Here it is!This sewing cabinet’s compact size
is perfect for a small sewing room or apartment, but the top folds open to a generous work surface. Locking casters enable it to be moved around easily, per-haps to take advantage of natural light
269.034-039 P2 Sewing Cabinet.indd 34 8/5/21 10:06 AM
Woodworker’s Journal October 2021 35
the Drawings for details.) Glue and clamp the edging in place. When the glue joints cured, I trimmed their ends flush with a fine-toothed saw.
Install edging all around the top panel, then cross-cut it into the large center panel and two leaves.
For both the top and door panels, I miter-cut the trim at 45 degrees to create a tidy and profes-sional look. Take your time with this task. I cut and dry-fitted the four pieces of mitered trim for each panel one at a time to check the fit of the corner joints be-fore gluing them in place.
Now lay out the foot recess in the bottom panel, using the Drawing on page 37, and cut out this contour with a jigsaw. Sand the cut edge smooth. Apply peel-and-stick cherry veneer edging to
Break down the cherry veneered plywood, ripping and cutting it into the seven panels that compose the cabinet’s carcass. Processing 4' x 8' sheets of plywood can easily be done with a shop partner, or precut the sheets into smaller pieces with a handheld circular saw instead.
The bottom (Piece 2) has a large foot recess to cut away. Lay out this shape using the Drawing on page 37. Common shop supply containers like cans or glue bottles can provide the curves you need to draw the shape easily. Cut the recess with a jigsaw (inset).
Secure the edging to the plywood panels by gluing and clamping it in place. Miter-cut this trim to detail the top and doors. The back- and side-panel trim is just cut flush to the plywood (inset).
coming through a window. It features a retractable sewing machine lift from Rockler that is fully adjustable. Even so, we designed the project so its construc-tion is bread-and-butter woodworking — nothing too fancy or overly complicated. But you can certainly soup it up with all the upgrades that come to mind!
Cutting the PlywoodThe cabinet is made mostly of 3/4" plywood (you’ll need two 4' x 8' sheets) laid up in a cherry veneer, although the choice of veneer species is entirely up to you. The many solid lumber accents on our cabinet are made of maple, which evokes a Scandinavian design motif.
Take a close look at the Material List on page 37 for the length and width of the various plywood panels. One import-ant detail to note is that the top (Piece 1) is eventually cut into three panels. After you cut it to size and wrap it with maple edging, you will then crosscut it on the table saw to form the folding top leaves. One benefit to this approach is that it allows for the figure of the hardwood plywood to flow all across the work sur-face when the leaves are extended.
Rip and crosscut all seven of the proj-ect’s primary plywood panels. (I broke them down in advance using a handheld circular saw so that I could manage them more safely on the table saw.) For best results, use a sharp blade designed for cutting plywood. When you’ve com-pleted that task, surface enough maple stock to prepare all the 3/4" x 3/4" edging you’ll need.
Starting with the back and side panels, cut strips of this trim extra long. The back panel receives two pieces of edging (photo, right) and the side panels get one piece each on their front edges. (See
cover this curved edge and the other exposed plywood edges that remain. Then it’s time to sand the edging flush to the plywood, being careful not to sand through the hardwood veneer.
269.034-039 P2 Sewing Cabinet.indd 35 8/5/21 10:06 AM
October 2021 Woodworker’s Journal
Carcass AssemblyI decided to assemble the cabinet parts using pock-et holes and screws. It is a fast, easy and strong joinery method that works particularly well for casework construc-tion like this.
Bore the pocket holes and then, with a thin coat of glue on both faces of the joints, screw the back and side panels together. If you are working by yourself as I do, wrangling these three large panels into proper alignment could be a bit frustrating, especially with glue spread on the joints. To prevent that problem, I used a pair of Rockler’s Clamp-It® Corner Clamping Jigs to align the panels and act as a “third hand” during the process. I also used my table saw’s perfectly fl at top to align the top of the plywood panels (the panels are upside down in the left center photo). Work smart, not hard!
I debated about whether to attach the casters at this point. Chasing the cabinet around the shop on its wheels as I con-tinued to work on it would have been comical and frustrating. But the casters all lock, and the fact that I wanted them mounted before I hung the doors con-vinced me that now was the time.
Speaking of timing, with the cabinet carcass assembled, now was also the time to make the lift supports. I used plywood for these parts, but you could use solid cherry lumber instead if you have some around your shop. Either way, these supports need to fi t perfectly between the sides of the cabinet. Rip the supports to width and then measure their lengths off of the cabinet itself before cutting them to length.
If the supports fi t well, bore two pock-et holes into each of their ends. Then grab your pressure-sensitive edging and apply it to one long edge of one of the supports. Set them both aside for now.
Hanging the DoorsYou’ve come a long way on this proj-ect, and next up we’ll hang the doors. Before doing that, lay out locations for the brass inset door pulls (see the Pull Location Drawing, next page). Bore stopped holes for this hardware using a 13⁄4"-diameter Forstner bit, as shown in the top left photo on page 38.
To purchase these and other products online, visit www.woodworkersjournal.com/hardware
Or, call 800-610-0883 (code WJ1577).
Kreg’s new 720 Pocket Hole Jig made short work of bor-ing the pocket holes used to assemble the cabinet panels. Pocket-hole joinery is strong, fast and easy.
The author used his table saw’s top to align the top edges of the plywood panels. Rockler Clamp-It Corner Clamping Jigs held the assembly in position while he drove in the attachment screws.
Mount the locking casters with screws. Note that the side panels set back from the front edge of the bottom. This offset accommodates the piano hinges you’ll mount later.
36
269.034-039 P2 Sewing Cabinet.indd 36 8/5/21 10:54 AM
1 Top Panel (1) 3/4" x 201⁄4" x 523⁄4"* 2 Bottom (1) 3/4" x 251⁄2" x 201⁄4" 3 Side Panels (2) 3/4" x 191⁄4" x 27" 4 Back Panel (1) 3/4" x 251⁄2" x 27" 5 Left Door Panel (1) 3/4" x 147⁄8" x 251⁄2" 6 Right Door Panel (1) 3/4" x 91⁄ 8" x 251⁄2" 7 Lift Supports (2) 3/4" x 2" x 251⁄2" 8 Edging (1) 3/4" x 3/4" x 454"* This panel will be cut down to size to form the leaves
1
1
1
2
3
3
45
6
7
7
8
8
8
8
Exploded View
1
10
2
3
4
5
6
7
8
9
11
12
13
14
15
16
17
18
19
20
21
22
23
24
253/4"
3/4"
115/16"4"
21/4"
15/16"
1
1 1 1
10
2
3
4
5
6
7
8
88
9
11
12
13
14
15
16
17
18
19
20
21
22
23
24
25
3/4" 3/4"
1/8" 1/8"
115/16"
1
10
2
3
4
5
6
7
9
11
12
13
14
15
16
17
18
19
20
21
22
23
24
25
3/4" 3/4"
115/16"
1
10
2
3
45
6
7
9
11
12
13
14
15
16
17
18
19
20
21
22
23
24
25
3/4" 3/4"
115/16"
31/4"13/4" Dia
31/4"
105/8"27"
2"
163/8"
213/4"
4"
4"
4"
191/4"
541/4"
43/4"
11"
3/4"
4"
21/4"
31/4"
13/16" R
15/8" R
15/16"
4"
31/4"
1
10
2
3
4
6
7
7
7
9
11
12
13
14
15
16
17
18
19
20
21
22
23
24
25
3/4" 3/4"
115/16"
3/4"
4"
191/4"
141/4"
15/16"
1
10
2
3
4
5
6
7
8
9
11
12
13
14
15
16
17
18
19
20
21
22
23
24
253/4"
3/4"
115/16"4"
21/4"
15/16"
1
1 1 1
10
2
3
4
5
6
7
8
88
9
11
12
13
14
15
16
17
18
19
20
21
22
23
24
25
3/4" 3/4"
1/8" 1/8"
115/16"
1
10
2
3
4
5
6
7
9
11
12
13
14
15
16
17
18
19
20
21
22
23
24
25
3/4" 3/4"
115/16"
1
10
2
3
45
6
7
9
11
12
13
14
15
16
17
18
19
20
21
22
23
24
25
3/4" 3/4"
115/16"
31/4"13/4" Dia
31/4"
105/8"27"
2"
163/8"
213/4"
4"
4"
4"
191/4"
541/4"
43/4"
11"
3/4"
4"
21/4"
31/4"
13/16" R
15/8" R
15/16"
4"
31/4"
1
10
2
3
4
6
7
7
7
9
11
12
13
14
15
16
17
18
19
20
21
22
23
24
25
3/4" 3/4"
115/16"
3/4"
4"
191/4"
141/4"
15/16"
Top Construction Details (Top View)
Bottom(Top View)
Hinge Routing Template(Top View)
Lift Support Locations(Front View)
Pull Location(Front View)
The sewing machine platform is cut from the Top (Piece 1). The location and size of the Platform shown below will accommodate most sewing machines. If your machine is extra large, you may need to enlarge the platform. Check your machine dimensions in advance.
269.034-039 P2 Sewing Cabinet.indd 37 8/5/21 10:06 AM
October 2021 Woodworker’s Journal
The doors are mounted to the cabinet on piano hinges. That’s because the top’s fold-up leaves are supported by the doors when the sewing cabinet is in use. And piano hinges, with their many, many screws are just the sturdy ticket
for this task. But there is one inescapable fact about piano hinges: once fully mounted, they allow zero adjustment for door alignment. Zero.
The way I made certain the doors hung properly was by following these steps. First, I mounted the hinges to the doors with the hinge knuckle just past the front face of the door. I could then measure the exposed margin of the edge that remained uncovered by the hinge. Using that measure-ment, I marked a line down the edging on the cabinet sides.
Now, using that mark to locate the hinge on the cabinet (and this is a place where a shop helper can be very helpful), I drilled one
screw hole at the top of the hinge and one at the bottom. I then mounted the door with only two screws. I followed the same procedure on the other door.
If the doors are properly aligned, you should go out and buy a lottery ticket. If not, you can remove one of the screws holding the door in place, adjust the alignment and drill another screw hole. Do the same on the other door. Repeat until the doors align properly and then, using a self-centering drill bit, bore all the remaining screw holes. I finished up mounting the door by driving home all of the attachment screws. But if you pre-fer to apply finish first, you can remove the doors now and rehang them later.
Work Surface DetailsThere are a few machining tasks to be done to the top/work surface next. First, install the sewing machine hinges. To do that, make a jig that helps you rout out the hinge mortises accurate-ly. Using the Hinge Routing Template Drawing on page 37, lay out and cut the mortise shape into the edge of a piece of 3/8" MDF. Then mount a 3/4" x 3/4" guide to the edge of the MDF with screws. Install a 5/16" O.D. guide collar and a 1/4" straight bit in your router. Test the jig’s accuracy on some scrap. If the hinge fits, you are good. If not, adjust the jig’s opening as needed.
When the jig works correctly, rout the mortises in the top face of the center panel and leaves. Then chisel out the recesses for the hinge knuckles. Take your time with this, as the knuckle recesses will be visible when the top is folded up. I chose to mount the top to the cabinet at this point.
Remember those lift supports you made a while ago? Now is the time to mount them in the cabinet. Using the locations shown in the Drawings, first glue and screw the top support (without the edge tape) in place. Then, with the covered edge oriented to the top of the
Boring the holes for the inset door pulls is best done on a drill press, so the Forstner bit can drill straight down, evenly into the plywood.
Mounting and aligning doors on piano hinges is a fussy but achievable task. A self-centering drill bit (inset) makes in-stalling the hinges’ many screws easier.
The author created a jig (left) to mortise for the sew-ing machine hinges. These hinges must be flush to the top of the work surface.After the hinge mortises are routed out, use a sharp chisel to create a deeper recess for the hinge knuck-les (inset).
38
269.034-039 P2 Sewing Cabinet.indd 38 8/5/21 10:06 AM
Woodworker’s Journal October 2021 39
Rob Johnstone is publisher of Woodworker's Journal.
cabinet, secure the second support with glue and screws. Attach the sewing machine lift hardware to the supports. The lift is adjustable; see the directions that come with it to fine-tune it.
Next, you need to cut the sewing ma-chine platform out of the center section of the top/work surface by routing a large opening in the center panel. Lay out this opening using the Top Con-struction Details Drawing on page 37. Grab another piece of 3/8" MDF and cut an 111⁄8" x 193⁄8" rectangle out of it, as shown in the photo at right, to create a cutting guide for the router. Then with the same router setup you just used on the hinges, rout down through the plywood to create the platform piece. I did this in several deepening passes.
Finishing UpYou are in the home stretch of the build-ing process now! There is a need for the power cord and foot control cord to have access to the inside of the cabinet when the sewing machine is in use. To do that, I chose to drill a hole and cover it with a brass grommet. It’s a two-step process, as you need to sink the grom-met’s top flush with the work surface. Use a 13⁄4"-diameter Forstner bit to bore a shallow recess for the grommet top, then switch to a 15⁄8"-diameter bit to drill the grommet’s through hole.
With that done, mount the magnetic catch that holds the doors closed. Leave off installing the inset door pulls until after you apply finish to the project. Sand the edges of the sewing machine platform and its opening smooth and break their edges with sandpaper.
Go ahead and mount the sewing machine plat-form to the lift, and you have completed this proj-ect’s construction steps. Give the entire cabinet a good sanding, working up to at least 180-grit.
I chose Watco® Natural oil finish for this cabinet, and here’s why: few finishes pop the figure of cherry lumber or veneer like an oil finish. Four coats of Watco will create a beautiful finish. And if it should get scratched or distressed — this is a workstation, after all — it can easily be touched up.
Install a pair of plywood lift supports inside the cabinet (left). Then attach the sewing machine lift hardware to the supports (right). The lift is adjustable to accommodate almost all sewing machines. Here the cabinet’s top work surface is removed for clarity.
Rout out the sewing machine platform from the top/work surface using a 1/4" straight bit. An MDF cutting guide provides a refer-ence edge for the router’s 5/16" guide collar to follow.
The cabinet’s brass grommet must sit flush to the work surface, which requires a two-step machining process and two Forstner bit sizes.
269.034-039 P2 Sewing Cabinet.indd 39 8/5/21 10:07 AM