• Include in order given. If you use capital letters for any file or directory, use them in your include statement also.
Using Open-GL (3)
• Changing project settings: Visual C++ 6.0– Project menu, Settings entry– In Object/library modules move to the end of
the line and add glui32.lib glut32.lib glu32.lib opengl32.lib (separated by spaces from last entry and each other)
– In Project Options, scroll down to end of box and add same set of .lib files
– Close Project menu and save workspace
Using Open-GL (3)
• Changing Project Settings: Visual C++ .NET 2003– Project, Properties, Linker, Command Line– In the white space at the bottom, add
glui32.lib glut32.lib glu32.lib opengl32.lib – Close Project menu and save your solution
Getting Started Making Pictures
• Graphics display: Entire screen (a); windows system (b); [both have usual screen coordinates, with y-axis down]; windows system [inverted coordinates] (c)
Basic System Drawing Commands
• setPixel(x, y, color)– Pixel at location (x, y) gets color specified by
color– Other names: putPixel(), SetPixel(), or
drawPoint()• line(x1, y1, x2, y2)
– Draws a line between (x1, y1) and (x2, y2)– Other names: drawLine() or Line().
Alternative Basic Drawing
• current position (cp), specifies where the system is drawing now.
• moveTo(x,y) moves the pen invisibly to the location (x, y) and then updates the current position to this position.
• lineTo(x,y) draws a straight line from the current position to (x, y) and then updates the cp to (x, y).
• Allows same graphics program to be run on many different machine types with nearly identical output.– .dll files must be with program
• OpenGL is an API: it controls whatever hardware you are using, and you use its functions instead of controlling the hardware directly.
• OpenGL is open source (free).
Event-driven Programs• Respond to events, such as mouse click
or move, key press, or window reshape or resize. System manages event queue.
• Programmer provides “call-back” functions to handle each event.
• Call-back functions must be registered with OpenGL to let it know which function handles which event.
• Registering function does *not* call it!
Skeleton Event-driven Program// include OpenGL librariesvoid main(){
glutDisplayFunc(myDisplay); // register the redraw function glutReshapeFunc(myReshape); // register the reshape function glutMouseFunc(myMouse); // register the mouse action functionglutMotionFunc(myMotionFunc); // register the mouse motion function glutKeyboardFunc(myKeyboard); // register the keyboard action function…perhaps initialize other things…glutMainLoop(); // enter the unending main loop
}…all of the callback functions are defined here
Callback Functions• glutDisplayFunc(myDisplay);
– (Re)draws screen when window opened or another window moved off it.
• glutReshapeFunc(myReshape);– Reports new window width and height for reshaped
window. (Moving a window does not produce a reshape event.)
• glutIdleFunc(myIdle);– when nothing else is going on, simply redraws display
– Handles case where mouse enters the window with no buttons pressed.
• glutKeyboardFunc(myKeyboardFunc);– Handles key presses and releases. Knows which
key was pressed and mouse location.• glutMainLoop()
– Runs forever waiting for an event. When one occurs, it is handled by the appropriate callback function.
Libraries to Include• GL, for which the commands begin with GL;• GLUT, the GL Utility Toolkit, opens windows,
develops menus, and manages events. • GLU, the GL Utility Library, which provides high
level routines to handle complex mathematical and drawing operations.
• GLUI, the User Interface Library, which is completely integrated with the GLUT library.– The GLUT functions must be available for GLUI to
operate properly. – GLUI provides sophisticated controls and menus to
OpenGL applications.
A GL Program to Open a Window // appropriate #includes go here – see Appendix 1void main(int argc, char** argv){
glutInit(&argc, argv); // initialize the toolkitglutInitDisplayMode(GLUT_SINGLE |
GLUT_RGB); // set the display modeglutInitWindowSize(640,480); // set window sizeglutInitWindowPosition(100, 150);
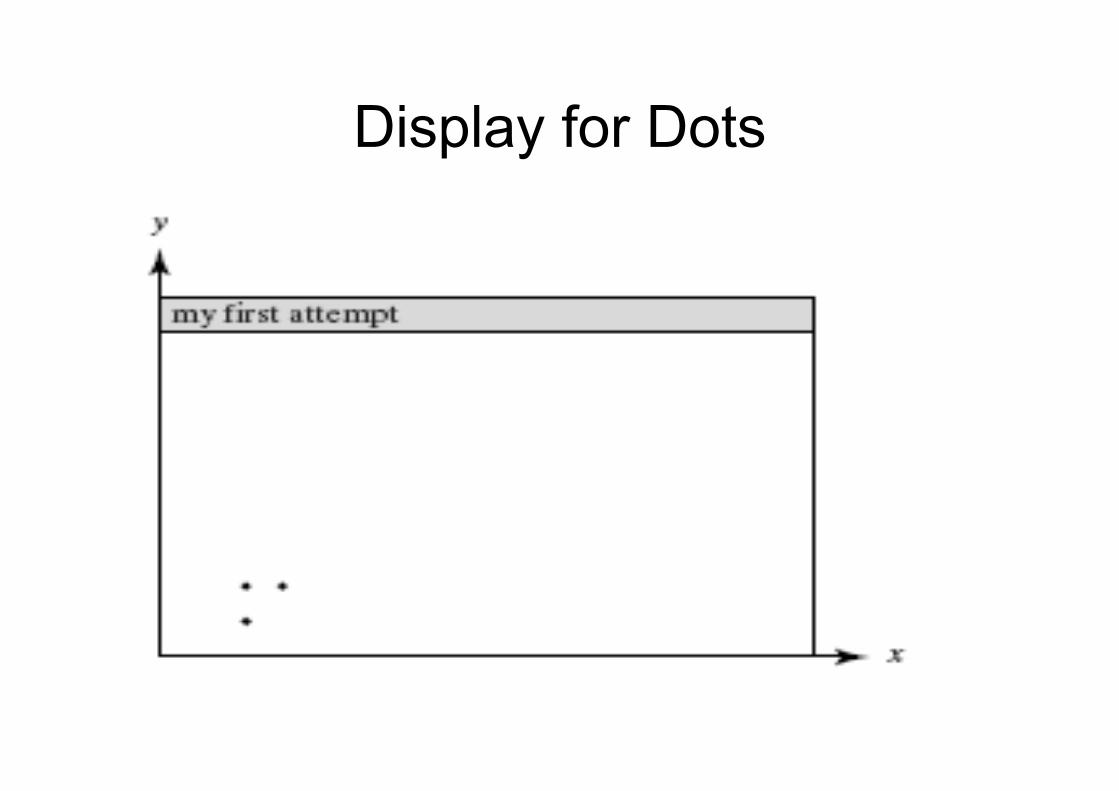
// set window upper left corner position on screenglutCreateWindow("my first attempt");
// open the screen window (Title: my first attempt)// continued next slide
Part 2 of Window Program // register the callback functions
glutDisplayFunc(myDisplay); glutReshapeFunc(myReshape); glutMouseFunc(myMouse); glutKeyboardFunc(myKeyboard); myInit(); // additional initializations as necessaryglutMainLoop(); // go into a perpetual loop
• glutInitDisplayMode (GLUT_SINGLE | GLUT_RGB) allocates a single display buffer and uses colors to draw
• glutInitWindowSize (640, 480) makes the window 640 pixels wide by 480 pixels high
What the Code Does (2)
• glutInitWindowPosition (100, 150) puts upper left window corner at position 100 pixels from left edge and 150 pixels down from top edge
• glutCreateWindow (“my first attempt”) opens and displays the window with the title “my first attempt”
• Remaining functions register callbacks
What the Code Does (3)
• The call-back functions you write are registered, and then the program enters an endless loop, waiting for events to occur.
• When an event occurs, GL calls the relevant handler function.
Effect of Program
Drawing Dots in OpenGL• We start with a coordinate system based
on the window just created: 0 to 679 in x and 0 to 479 in y.
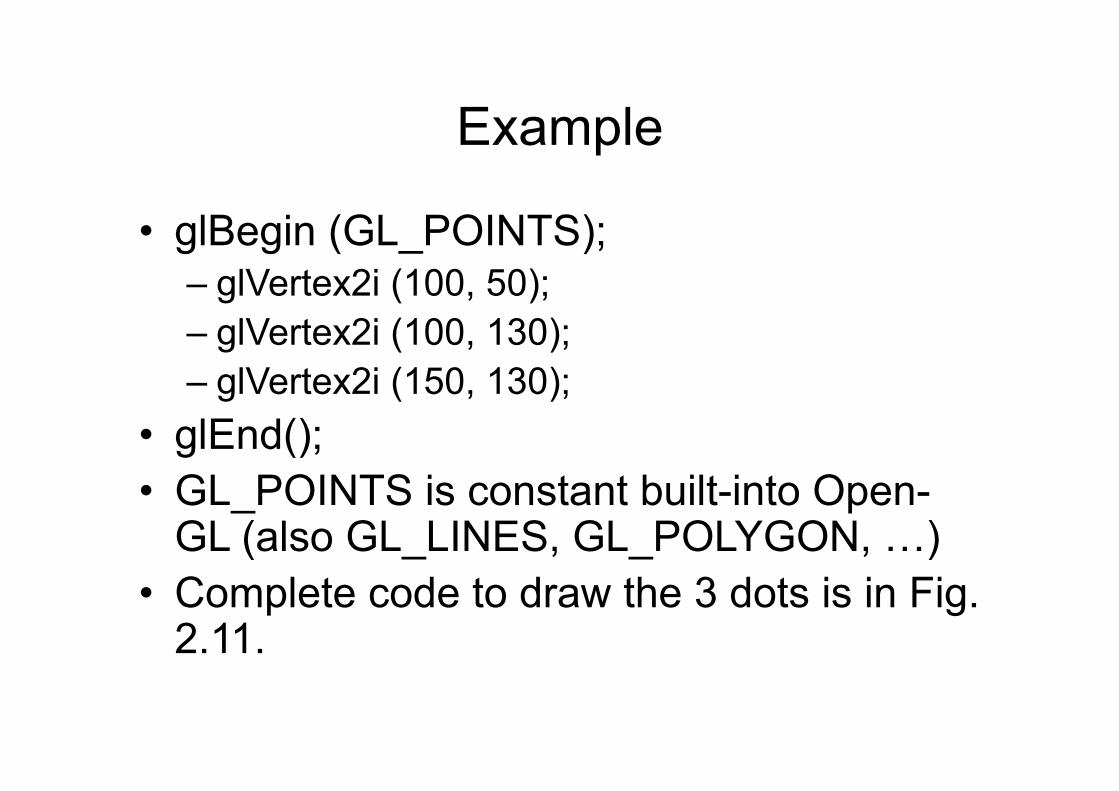
• OpenGL drawing is based on vertices (corners). To draw an object in OpenGL, you pass it a list of vertices.– The list starts with glBegin(arg); and ends with
glEnd();– Arg determines what is drawn.– glEnd() sends drawing data down the
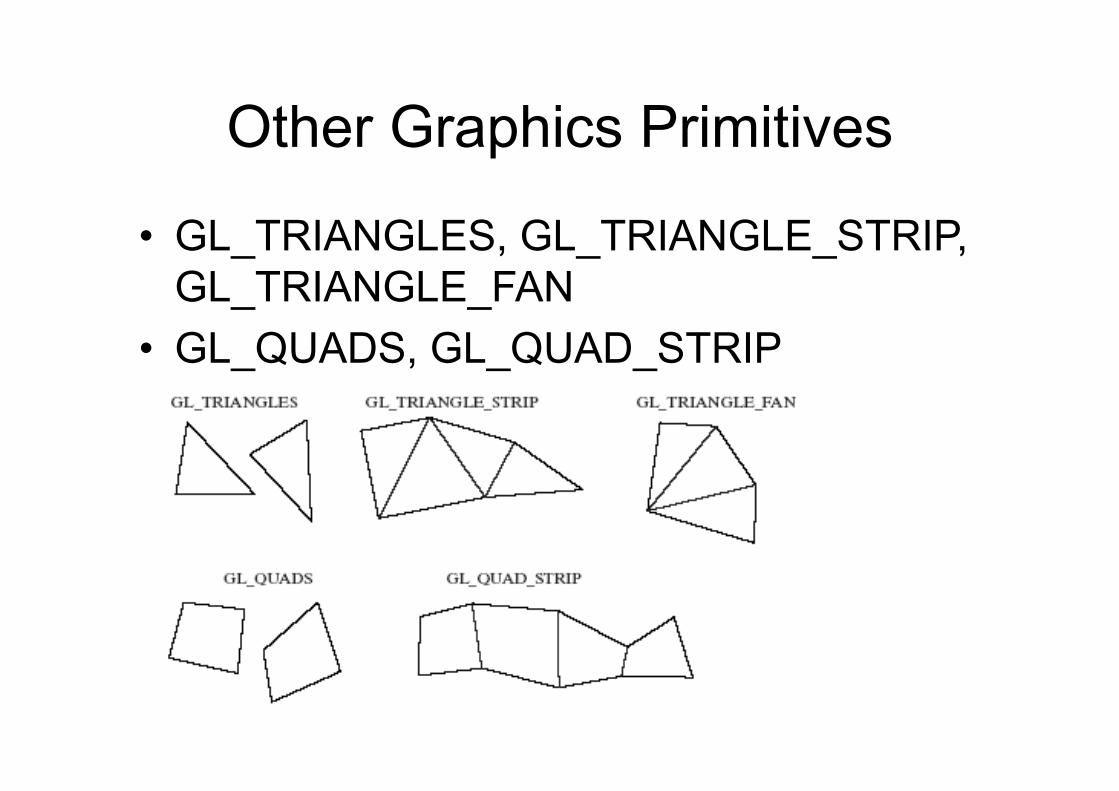
• glEnd ();• glFlush();• If more than two vertices are specified
between glBegin(GL_LINES) and glEnd() they are taken in pairs, and a separate line is drawn between each pair.
Line Attributes• Color, thickness, stippling.• glColor3f() sets color. • glLineWidth(4.0) sets thickness. The default
thickness is 1.0.
a). thin lines b). thick lines c). stippled lines
Setting Line Parameters
• Polylines and Polygons: lists of vertices.• Polygons are closed (right); polylines need
not be closed (left).
Polyline/Polygon Drawing
• glBegin (GL_LINE_STRIP); • // GL_LINE_LOOP to close polyline (make
it a polygon)– // glVertex2i () calls go here
• glEnd ();• glFlush ();• A GL_LINE_LOOP cannot be filled with
color
Examples
• Drawing line graphs: connect each pair of (x, f(x)) values
• Must scale and shift
Examples (2)
• Drawing polyline from vertices in a file– # polylines– # vertices in first polyline– Coordinates of vertices, x y, one pair per line– Repeat last 2 lines as necessary
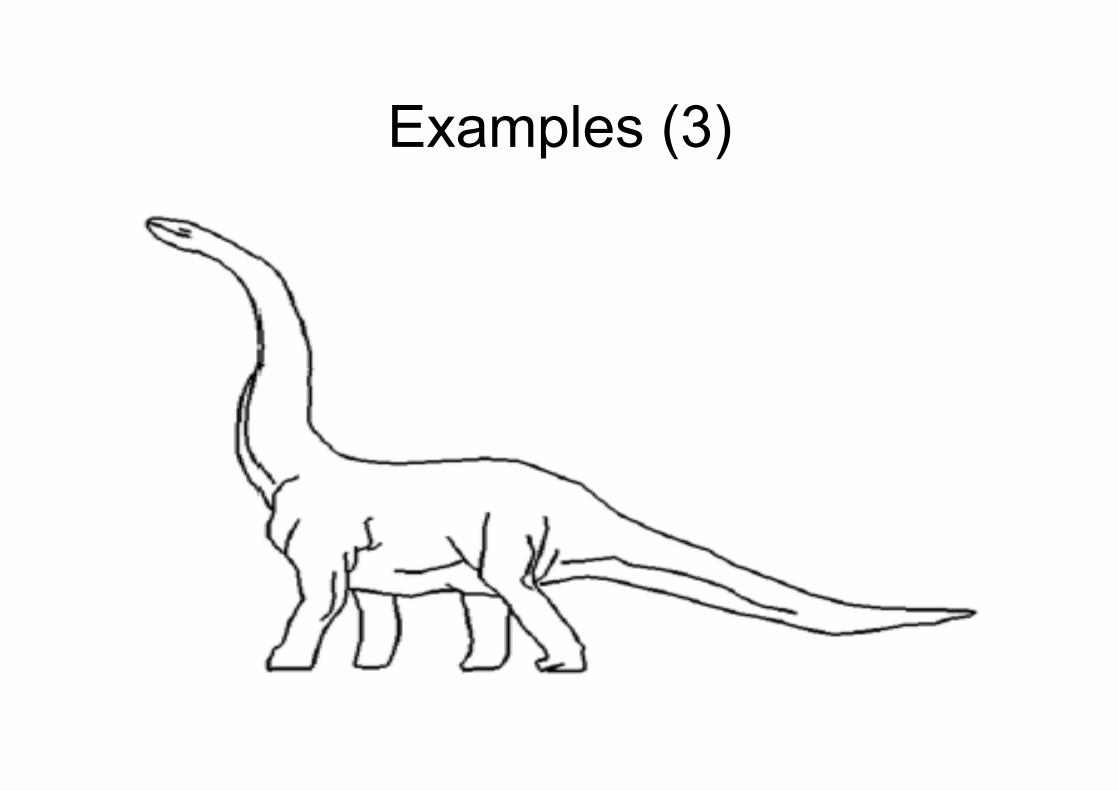
• File for dinosaur available from Web site• Code to draw polylines/polygons in Fig.
2.24.
Examples (3)
Examples (4)
• Parameterizing Drawings: allows making them different sizes and aspect ratios
• Code for a parameterized house is in Fig. 2.27.
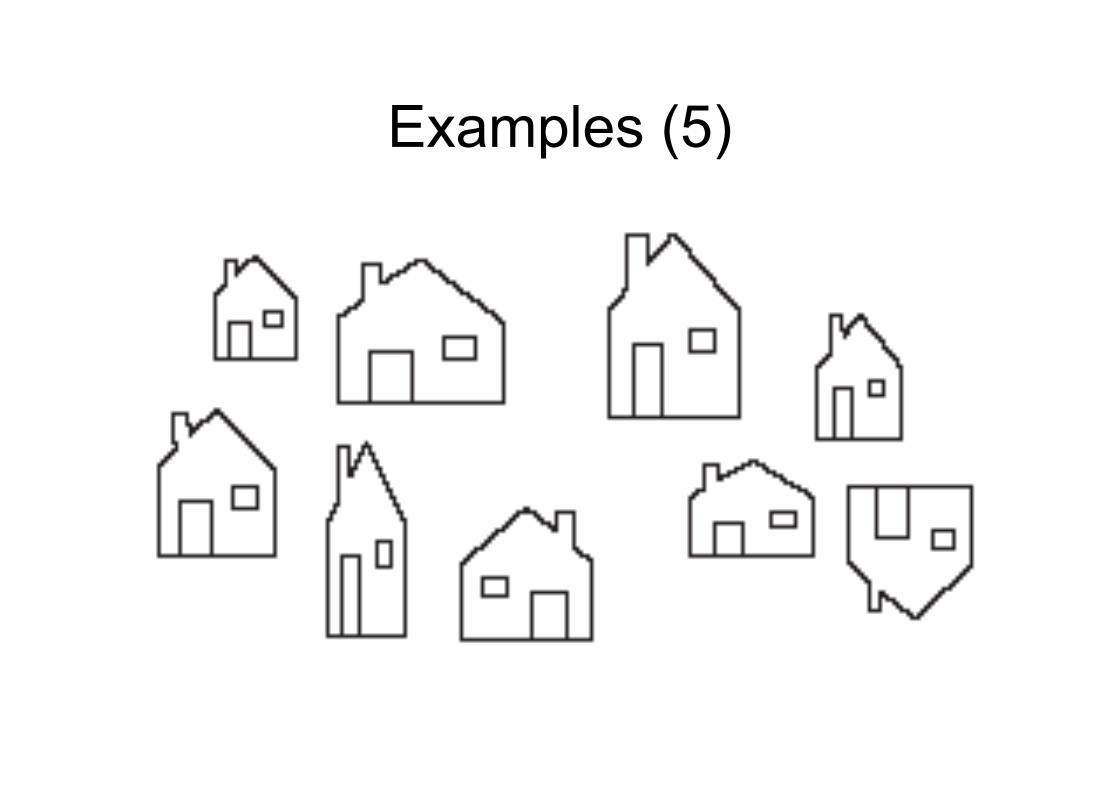
Examples (5)
Examples (6)
• Polyline Drawing• Code to set up an array of vertices is in
Fig. 2.29.• Code to draw the polyline is in Fig. 2.30.
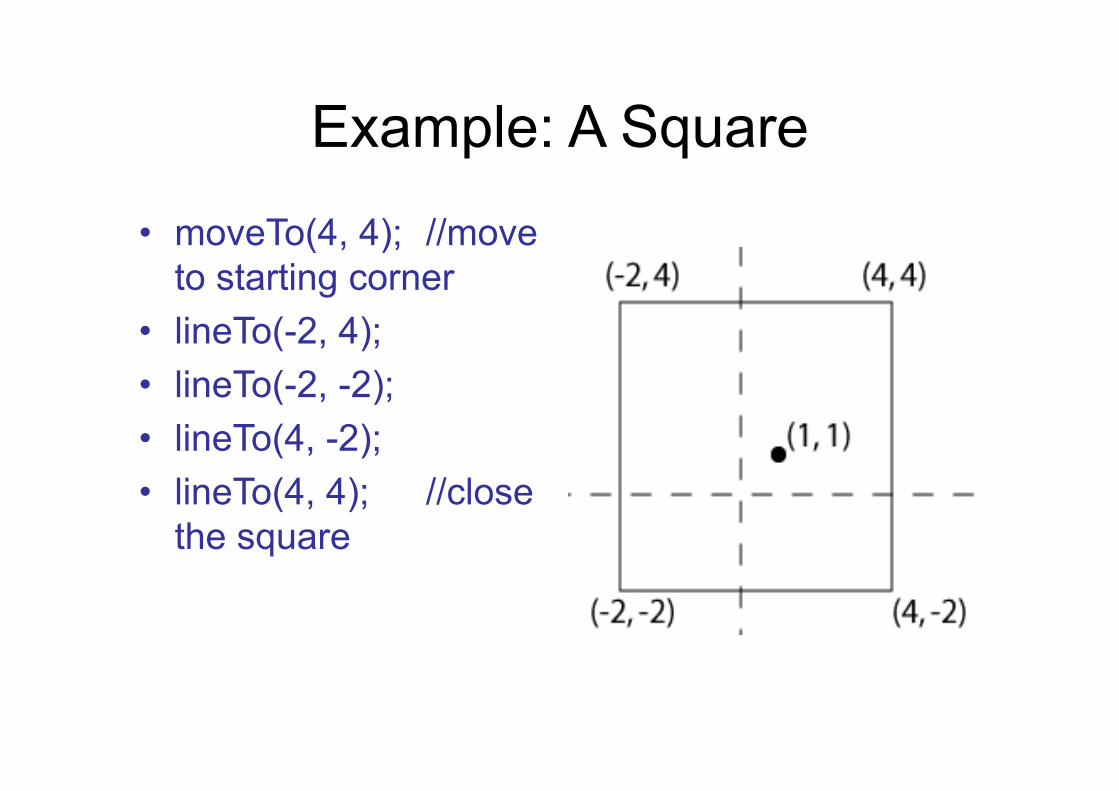
Relative Line Drawing• Requires keeping track of current position on
screen (CP).• moveTo(x, y); set CP to (x, y)• lineTo(x, y); draw a line from CP to (x, y), and
then update CP to (x, y).• Code is in Fig. 2.31.• Caution! CP is a global variable, and therefore
vulnerable to tampering from instructions at other points in your program.
Drawing Aligned Rectangles
• glRecti (GLint x1, GLint y1, GLint x2, GLint y2); // opposite corners; filled with current color; later rectangles are drawn on top of previous ones
Aspect Ratio of Aligned Rectangles
• Aspect ratio = width/height
Filling Polygons with Color
• Polygons must be convex: any line from one boundary to another lies inside the polygon; below, only D, E, F are convex
Filling Polygons with Color (2)
• glBegin (GL_POLYGON);– //glVertex2f (…); calls go here
• glEnd ();• Polygon is filled with the current drawing
• Write the function(s)• NOTE that any drawing you do when you
use these functions must be done IN the mouse or keyboard function (or in a function called from within mouse or keyboard callback functions).
Example Mouse Function
• void myMouse(int button, int state, int x, int y);
• Button is one of GLUT_LEFT_BUTTON, GLUT_MIDDLE_BUTTON, or GLUT_RIGHT_BUTTON.
• State is GLUT_UP or GLUT_DOWN.• X and y are mouse position at the time of
the event.
Example Mouse Function (2)• The x value is the number of pixels from the left
of the window.• The y value is the number of pixels down from
the top of the window.• In order to see the effects of some activity of the
mouse or keyboard, the mouse or keyboard handler must call either myDisplay() or glutPostRedisplay().
• Code for an example myMouse() is in Fig. 2.40.
Polyline Control with Mouse
• Example use:
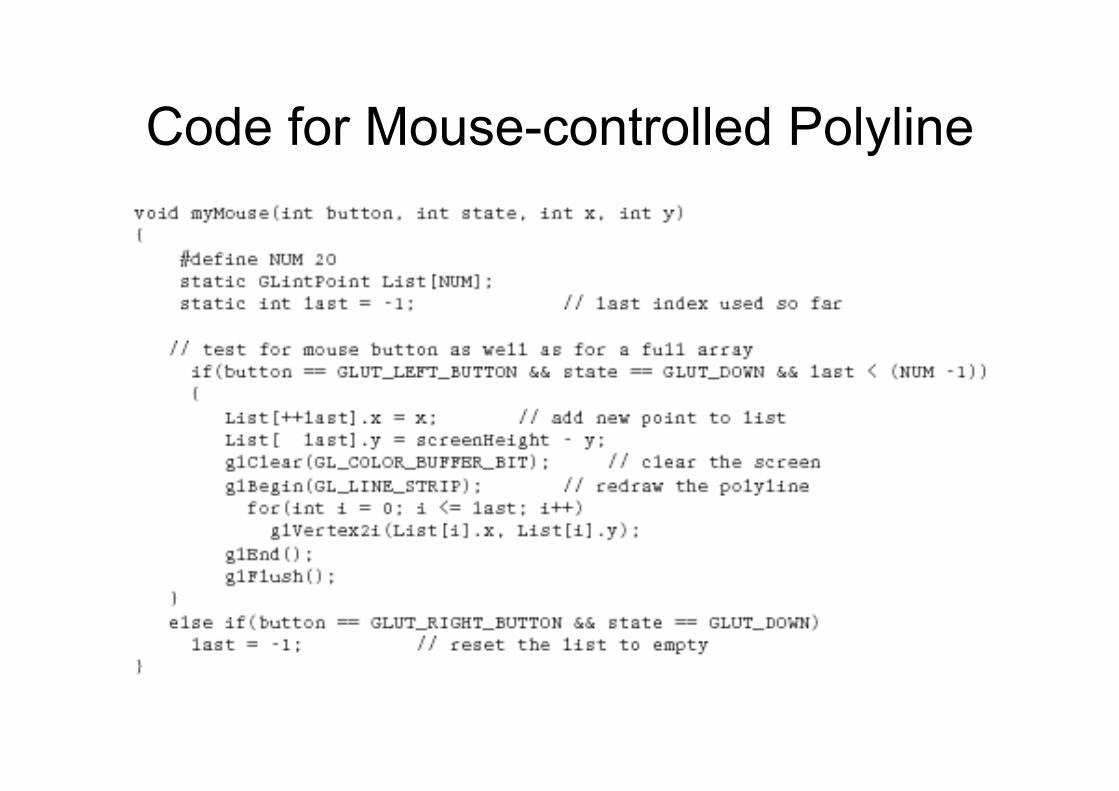
Code for Mouse-controlled Polyline
Using Mouse Motion Functions• glutMotionFunc(myMovedMouse); //
moved with button held down• glutPassiveMotionFunc(myMovedMouse);
// moved with buttons up• myMovedMouse(int x, int y); x and y are
the position of the mouse when the event occurred.
• Code for drawing rubber rectangles using these functions is in Fig. 2.41.
Example Keyboard Functionvoid myKeyboard(unsigned char theKey, int
mouseX, int mouseY){
GLint x = mouseX;GLint y = screenHeight - mouseY; // flip y value switch(theKey){case ‘p’: drawDot(x, y); break;
// draw dot at mouse positioncase ‘E’: exit(-1); //terminate the programdefault: break; // do nothing
}}
Example Keyboard Function (2)
• Parameters to the function will always be (unsigned char key, int mouseX, int mouseY).
• The y coordinate needs to be flipped by subtracting it from screenHeight.
• Body is a switch with cases to handle active keys (key value is ASCII code).
• Remember to end each case with a break!
Using Menus
• Both GLUT and GLUI make menus available.
• GLUT menus are simple, and GLUI menus are more powerful.
• We will build a single menu that will allow the user to change the color of a triangle, which is undulating back and forth as the application proceeds.
GLUT Menu Callback Function• Int glutCreateMenu(myMenu); returns menu ID• void myMenu(int num); //handles choice num• void glutAddMenuEntry(char* name, int value); //
value used in myMenu switch to handle choice• void glutAttachMenu(int button); // one of
GLUT_RIGHT_BUTTON, GLUT_MIDDLE_BUTTON, or GLUT_LEFT_BUTTON– Usually GLUT_RIGHT_BUTTON
GLUT subMenus• Create a subMenu first, using menu commands,
then add it to main menu.– A submenu pops up when a main menu item is
selected.• glutAddSubMenu (char* name, int menuID); //
menuID is the value returned by glutCreateMenu when the submenu was created
• Complete code for a GLUT Menu application is in Fig. 2.44. (No submenus are used.)
GLUI Interfaces and Menus
GLUI Interfaces
• An example program illustrating how to use GLUI interface options is available on book web site.
• Most of the work has been done for you; you may cut and paste from the example programs in the GLUI distribution.