Page 1
R. G. Sparber January 13, 2018 Page 1 of 27
Computer Numerical Control for my RF-30 Mill/Drill, version 2.2
By R. G. Sparber Copyleft protects this document.
1
About 8 months ago, I
bought a Computer
Numerical Control
(CNC) add on kit for
my RF-30. It came
with all of the parts
necessary to interface
between a PC with a
parallel port and my
mill's 3 axes. Recently
I added a forth axis to
rotate the part. After a
few adjustments, it
drove my machine just
fine using Mach3
software.
Of course, this was just the starting point for me. I had circuits to add and wanted
to repackage the existing parts into my own enclosure.
This article details what I did and why I did it. And yes, that is a roll of toilet paper
to the right of my mill.
1 You are free to distribute this article but not to change it.
Page 2
R. G. Sparber January 13, 2018 Page 2 of 27
Table of Contents
System Overview ....................................................................................................... 3
The Enclosure ............................................................................................................ 4
A Tour of the Box ...................................................................................................... 5
AC Power ................................................................................................................................................... 5
Stepper Motor Drivers .............................................................................................................................. 5
Break Out Board and Interface Board ....................................................................................................... 6
The Datum Tree ......................................................................................................... 7
CNC System Block Diagram ...................................................................................14
Overview ................................................................................................................................................. 14
Power ...................................................................................................................................................... 15
The Personal Computer .......................................................................................................................... 16
X, Y, Z, and A Axis Signals ........................................................................................................................ 17
DQ542MA Microstep Driver ...................................................................................19
Stepper Motors .........................................................................................................20
Spindle Motor Control .............................................................................................21
Limit and Stop ..........................................................................................................22
Overview ................................................................................................................................................. 22
Circuit Description ................................................................................................................................... 23
The VFD Interface Circuit .......................................................................................26
Acknowledgments ....................................................................................................27
Page 3
R. G. Sparber January 13, 2018 Page 3 of 27
System Overview
A Personal Computer running Windows XP® has a Computer Numerical Control
program called Mach3 loaded on it. Mach3 receives set up information about the
various motors plus a g-code file. The g-code file specifies how each axis is to
move.
This PC is connected to a Break Out Board (BOB) which translates signals from
Mach3 to signals that control the four motor drivers. The X, Y, and Z drive/motor
paths are identical. The A driver/motor path receives signals from two places on
the BOB.
Signals driving the X, Y, and Z axes move the cutter relative to the table specified
distances. The A axis rotates the workpiece. When driven by the normal distance
signal, it rotates a specified number of degrees either clockwise or
counterclockwise. However, it can also be driven by the spindle RPM signal. This
causes the A axis to rotate continuously. This simplifies the g-code.
Not shown in this system block diagram are the few signals that go from the BOB
back to the PC, the fault detection circuit, and spindle control.
Page 4
R. G. Sparber January 13, 2018 Page 4 of 27
The Enclosure The enclosure is hung on the wall and is
wired to the axis motors and PC.
Originally I thought it would be useful to
have a power outlet that was controlled by
the box's power switch. Not only has this
turned out not to be true, the exposed outlet
has become a liability. I now keep plug
covers in place to prevent swarf from
entering.
The box hangs on the wall on
two aluminum channels.
Access requires me to lift the
box off of these channels, place
it on the mill table, and remove
9 screws.
The cover then lifts off leaving
all components supported by
the back and top plates.
Page 5
R. G. Sparber January 13, 2018 Page 5 of 27
A Tour of the Box All components are bolted to a 0.1" thick aluminum plate. Not shown here is a
second plate that bolts on the front. The left and right sides are perforated 20 gage
sheet steel. I wanted plenty of air flow. The enclosure hangs on the wall behind the
mill in an area that does not get pelted with swarf.
AC Power
AC power is distributed
via a large barrier strip at
the top. It feeds a 10 amp
fast blow fuse (green
arrow), a power switch
(blue arrow), and all AC
loads. A duplex outlet
(yellow arrow) is on the
top. It feeds my touch
screen PC. Below this
outlet is a second outlet
that feeds my 5V power
supply.
Stepper Motor Drivers
My four DQ542MA Wantai
stepper motor drives (yellow
arrows) are side by side. Note
that heat generated by these
drivers rises and then exits the
enclosure via the perforated
side panels. Nothing except the
barrier strip sits above them.
Each driver has its own wires
to the output terminals of the
36v supply. This minimizes the
voltage drop between the
supply and any driver.
Page 6
R. G. Sparber January 13, 2018 Page 6 of 27
Break Out Board and Interface Board
The Break Out Board (BOB), a
DB25-1205, sits below the drivers.
It feeds both the drivers and an
interface board. This interface board
is fully connectorized and can be
removed by unscrewing 4 screws and
pulling 4 plugs. Most of this board is
empty so there is plenty of room for
growth.
Page 7
R. G. Sparber January 13, 2018 Page 7 of 27
The Datum Tree
With all of these
off the shelf parts,
it was a challenge
to ground them
correctly. The
goal was to
prevent noise and
fault currents
from flowing into
sensitive circuits and undersized conductors. Noise might just cause random errors
during normal operation. Fault currents could cause damage to narrow trace on a
circuit board or thin wires tied to ground.
Let me start by explaining the difference between ground and a datum. Any
arbitrary point in a circuit can be defined as "ground". There can be only one
ground in a circuit. All other points that connect to this ground are called datums.
In my application here, ground is the 0.1 inch thick back plate. My ground wire
from the 120V line cord bonds to it.
I am assuming that this plate has zero volts across it while it carries any non-fault,
low frequency current. I furthermore assume that during a fault, the voltage drop
across the plate will be harmless to all electronics that are exposed to it. Any fault
current large enough to trip the 120V breaker should not cause a significant voltage
drop across this plate. However, if this fault current passed through a circuit tied to
the ground, it might fry conductors in that circuit. The goal is to minimize or
eliminate such paths.
Starting at the bottom of my tree, you can see my two connections to safety
ground. On the left is the green ground wire in the 120v AC power cable. It
connects to everything in my enclosure. On the right is the green ground wire that
connects to my Variable Frequency Drive. There is no conductive path between
the circuits in my enclosure and my VFD.
Page 8
R. G. Sparber January 13, 2018 Page 8 of 27
My first ground connection is from the green safety wire
(green arrow) to my enclosure. A heavy copper wire is
clamped in place with bolts. If AC power faults to the
case, I want a solid path for the current to flow until the
breaker trips. I do not want the enclosure to ever give me
a shock.
Page 9
R. G. Sparber January 13, 2018 Page 9 of 27
My AC power outlet bolt to the case and picks up safety ground through a separate
ground wire.
Page 10
R. G. Sparber January 13, 2018 Page 10 of 27
My 36v supply bolts to the enclosure and picks up
safety ground.
Grounding of the negative output (36v output datum)
of this supply is via a wire on its barrier strip.
Page 11
R. G. Sparber January 13, 2018 Page 11 of 27
My PC is powered from a supply that does not
have ground. This was very fortunate because I
was then able to define ground via the PC's
parallel port cable.
The parallel port connector is bonded to the
BOB's datum.
The BOB is grounded to the case via a
single wire.
In the case where a circuit fault
connects 120V to PC datum, the BOB
would likely carry many tens of amps
from the parallel port connector to this
single ground wire. The BOB datum
would then be at a voltage other than
zero until the fault cleared. Circuits
connected to the BOB use its datum so
would not see this change. In no case
should this fault current flow into these circuits.
Page 12
R. G. Sparber January 13, 2018 Page 12 of 27
This DB25-1205 BOB must have been designed by someone that did not fully
understand its function. Every signal path is blessed with an opto isolator which
has the potential of providing excellent isolation between the parallel port and the
CNC circuits. Too bad they connected all of the opto isolators to the same ground!
They could have saved money and just installed NPN transistors.
This design error was not as serious as it might sound. The motor drivers have their
own opto isolators. I did add isolation to the VFD interface but later realized this
was not necessary.
5 volt power for the BOB has its return connected directly to the BOB ground.
Page 13
R. G. Sparber January 13, 2018 Page 13 of 27
The Interface Board connects to the BOB datum.
By connecting the datums of the various elements in this way, we prevent
unwanted ground currents from upsetting and possibly frying circuit.
There is one exception to proper grounding practices which will be explained in
the Limit and Stop section.
Page 14
R. G. Sparber January 13, 2018 Page 14 of 27
CNC System Block Diagram Overview
I do realize this diagram is impossible to read. I will zoom in on sections of it but
you may want to refer back to this diagram for context.
Page 15
R. G. Sparber January 13, 2018 Page 15 of 27
Power
Starting in the lower left corner, we have the AC power cord. Power is first fed
through a 10 amp fast blow fuse. A common misconception is that the fuse protects
electronics. Fuses take many milliseconds to blow and electronics can be gone in
microseconds. So fuses are around 1000 times too slow to protect electronics.
Fuses protect wiring with the goal of reducing the chance of a fire while the
breaker trips.
Note that the first component in the power chain is the fuse. The connection from
black wire in the power cable and the fuse is the only unprotected node in the
system. A ground fault there would cause excessive current to flow in the power
cable. However, this cable is designed to withstand the surge.
Next comes the main power switch. The AC power feeds the 5v "wall wart" used
to run the BOB and my 36v supply which feeds the drivers.
My touch screen PC gets power from an external power strip. This was done
because the PC must be powered up and stable before the motors are turned on.
Otherwise, random outputs from the PC at start up can cause unpredictable
behavior.
Ground (the one and only!)
Page 16
R. G. Sparber January 13, 2018 Page 16 of 27
The Personal Computer
The touch screen PC has no ground connection which lets me define its datum at
the BOB Datum (BG).
Signals from the PC flow through the parallel port and out to such circuits as the
motor drivers. One signal flow from a circuit on the Interface Board, through the
parallel port, and into the PC.
In the future I plan to add an electronic edge finder so a second signal will flow
from the Interface Board to the PC.
I can control the PC with a keyboard, optical
mouse, and an X Box Controller. This controller
lets me move joy sticks to move all axes, set zero
on the X, Y, or Z axes, plus control the spindle
motor.
G-code programs are generated in my home PC and stored on a thumb drive. I then
plug the thumb drive into the shop PC. This eliminates direct internet access to my
shop PC.
Page 17
R. G. Sparber January 13, 2018 Page 17 of 27
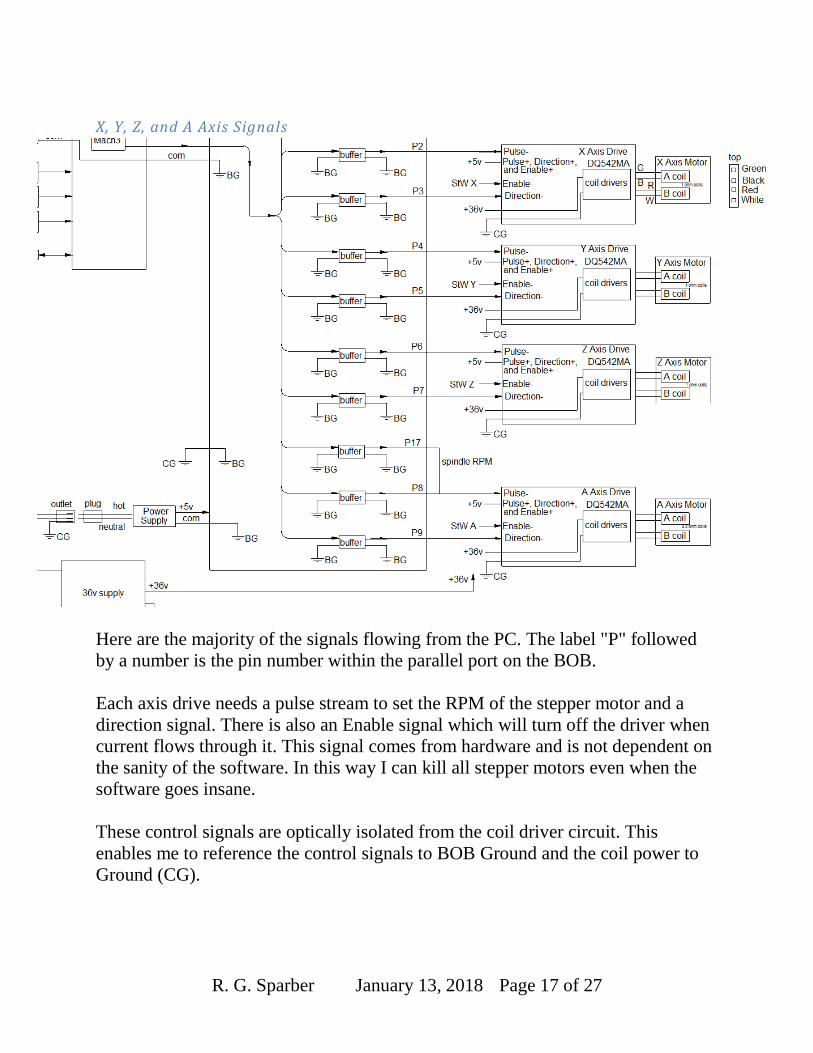
X, Y, Z, and A Axis Signals
Here are the majority of the signals flowing from the PC. The label "P" followed
by a number is the pin number within the parallel port on the BOB.
Each axis drive needs a pulse stream to set the RPM of the stepper motor and a
direction signal. There is also an Enable signal which will turn off the driver when
current flows through it. This signal comes from hardware and is not dependent on
the sanity of the software. In this way I can kill all stepper motors even when the
software goes insane.
These control signals are optically isolated from the coil driver circuit. This
enables me to reference the control signals to BOB Ground and the coil power to
Ground (CG).
Page 18
R. G. Sparber January 13, 2018 Page 18 of 27
The A axis is driven from two BOB outputs. P8 and P9 are similar to the other
axes. They provide pulses and direction. But I have also wired P17, spindle RPM,
to the pulse input of the drive.
Using g-codes, I am able to both index the A axis and have it freely turning at a
specified rate. After I issue a "S0" (S zero) command, I can specify an "Addd"
command where ddd is the number of degrees to move. For example, if we start at
zero, A156 rotates the A axis clockwise 156°. A-156 moves it back to the starting
point.
When I want to turn the A axis continuously, I first set its direction with the A
command. Then I specify the rotational speed with the S command. At the present
time, S2336 gives me 1 RPM. I hope to change this so S10 gives me 1.0 RPM. The
A axis starts to turn when the spindle's motor is turned on via the M3 command.
Both turn off with the M5 command.
Page 19
R. G. Sparber January 13, 2018 Page 19 of 27
DQ542MA Microstep Driver The X, Y, and Z drivers are configured to output 2.84 amps peak and produce 1600
pulses per revolution. When the motor is not being turned, the current is lowered to
1.42 amps. (dip switch set to [SW1-SW8] 11000011)
Looking at the spec sheet, I see a maximum input current of less than 4 amps and
an output current of 1 to about 4.2 amps. This tells me that the output current must
be total current and not current per coil.
Looking at a typical pair of coil signals, I see that
they are offset from each other by 90°.
At 0° the sum is 0 - I = -I where I is the current limit.
At 90° the sum is I + 0 = I. At 180° we are at 0 + I =
I and at 270° we are at -I + 0 = -I. The magnitude of
the current never exceeds I.
The A driver is configured to output 1.46 amps peak while turning the stepper.
When the motor is not being turned, the current is cut in half so is 0.73 amps. (dip
switch set to [SW1-SW8] 01100011)
If all 4 axes moved at the same time, the peak current could be as large as 2.84
amps 3 motors + 1.46 amps = 10 amps. However, only two axes move at the
same time while the others are at idle. This gives us a peak current of 2.84 amps
2 motors + 1.42 amps + 0.72 amps = 7.8 amps. In either case, the 36 volt 10 amp
power supply can handle the load.
0° 90° 180° 270°
Page 20
R. G. Sparber January 13, 2018 Page 20 of 27
Stepper Motors I found the explanation of stepper motors at
https://en.wikipedia.org/wiki/Stepper_motor#cite_note-
5 very helpful.
A very basic fact not so clear to me in this Wiki entry is
that the faster you send pulses into the driver, the faster
the stepper turns.
The signals into the two stepper coils do not change
shape, they just take less time to repeat.
To see how stepper motors are incremented by a specified number of degrees, I
recommend http://electronics.stackexchange.com/questions/70643/how-to-reverse-
rotation-direction-of-stepper-motor
The X, Y, and Z stepper motors have a coil resistance of
1 ohm. Averaged over time, the output current is evenly
split between the two coils. The driver is set to output a
peak of 1.42 amps per coil. The power dissipation per
coils is no more than Since we have two coils, total dissipation is no more
than 4 watts per motor. When at idle, total dissipation is
about 0.5 watts.
The A stepper motor has a coil resistance of 4.3
ohms. Since the driver is set to output a peak of
1.46 amps, the current per coil is 0.73 amps. The
power dissipation per coils is no more than
Since we have
two coils, total dissipation is no more than 4.6
watts per motor. When at idle, total dissipation is
no more than 1.1 watts.
Page 21
R. G. Sparber January 13, 2018 Page 21 of 27
Spindle Motor Control
Note that I have labeled each opto isolator as a buffer. This was done to emphasis
that there is no isolation in the BOB.
At the present time, there is one more output from the PC. It controls the
Variable Frequency Drive (VFD) which powers my spindle motor.
When an M3 g-code is encountered, an output (green arrow) of the PC
goes to a logic high. That causes current to flow into an opto on the
Interface Board. The output of this opto feeds a current amplifier (blue
arrow). This amplifier pulls a control line on the VFD down from about
+24v to about +1v (orange arrow). The VFD responds by driving the
spindle motor in a clockwise direction.
I have partially wired the ability to cause the VFD to drive the spindle motor in a
counterclockwise direction (BR5) but do not have a need at this time. I could have
added the ability to control the RPM of this motor via g-code (BR6). However, I
have since stolen this signal to drive the A axis as explained on page 18.
Details of the current amplifier will be presented later.
When I designed this interface, I assumed that VFD COM was tied to VFD ground
so used isolation to protect my circuits. I later measured the resistance between
these two datum and discovered they are not connected so the isolation on the
Interface Board is not needed.
Page 22
R. G. Sparber January 13, 2018 Page 22 of 27
Limit and Stop Overview
The one path from the hardware to the PC carries the Stop the World (StW) signal.
I generate this signal in the Limit and Stop Monitor. More on this later.
Not shown is the eStop circuit. All AC power passes through this circuit. When the
eStop button is pushed, all power except that to the PC is removed. eStop is only
engaged when there is risk to either machine or people.
Page 23
R. G. Sparber January 13, 2018 Page 23 of 27
Circuit Description
If any stop switch is
toggled or a limit switch hit,
all motors turn off and
Mach3 is told to stop. The
same thing happens if our
alarm wire either breaks or
is shorted to ground. Note
that I do not involve the
software in stopping the
motors.
Lets walk thorough all known hardware and software fault conditions and how the
circuit handles them:
1. Hardware has no faults, software is sane, g-code is wrong: a drive hits
a limit and all motors stop due to hardware only shut down of all
motors.
2. Hardware has no faults, software goes insane: drive hits a limit and all
stepper motors stop due to hardware only shut down of all motors.
The spindle may keep turning.
3. Software is sane. Hardware has a fault that causes a drive to hit a
limit: all stepper motors stop due to hardware only shut down of all
motors. Mach3 turns off the spindle.
4. Hardware has a double fault that causes a drive to hit a limit but the
limit switch does not detect the collision: on my machine the drive
will miss steps; no guarantee that the spinning cutter won’t cause
damage. Since I will be sitting at the machine, I can minimize damage
by turning off power to both the drives and spindle motor via the
eSTOP button.
Next we will look at how the circuit works and how hardware faults are handled.
Page 24
R. G. Sparber January 13, 2018 Page 24 of 27
This circuit enables me
to run a single wire
through all limit and
Stop switches. If any
limit switch or Stop
toggle switch is hit, all
stepper motors turns off
and the software is sent a
Stop signal. This
shutdown of the steppers
does not depend on the
software to be sane.
The circuit also detects
physical faults to this
single wire. If the wire
breaks, all will be shut down. If the wire shorts to "ground", all will be shut down.
The most likely "ground" that will contact the wire is the VFD Safety ground. This
ground is bonded to the body of the mill/drill. An LED indicates if the alarm wire
is OK, broken, or shorted.
I chose to kill all axis motors if any limit switch is hit because I figure more
damage could be done if the (possibly insane) software moved a remaining active
axis when one hit a limit.
Optionally, I can attach piezoelectric beepers (circles with P inside) to the micro
switch fingers. They will sound before the switch operates to give an early warning
of being too close.
Page 25
R. G. Sparber January 13, 2018 Page 25 of 27
Note that I have individual wires from the collector of Q2 to each axis Enable. If I
later decide I want to disable only one axis driver without killing the rest or
causing a Stop signal to be sent to Mach3, I can add isolation diodes on the
Interface Board. There are spare pins in its connectors.
Resistors R4, R5, and the 100 uf capacitor provide noise immunity. Any limit or
Stop signal less than about 10 milliseconds will be ignored. Experience will tell me
if this is enough filtering.
Resistor R7 and Q3 invert the alarm signal so that under
normal conditions we present a normally closed Stop signal to
the BOB's P15. Originally I ran without this inverter so had
normally open. Noise getting into the cable between the BOB
and the PC could pull the line low and give a false stop signal.
I never saw this situation but decided to be on the safe side. R7
was chosen to give plenty of drive to Q3 without causing any of the stepper motor
drives to see a disable signal.
Note that this shut down circuit does not kill the spindle motor. At the present time
only Mach3 and the eStop circuit can do that. Given a software failure, I figure
that stopping all X,Y, Z, and A movement is enough. No need to automatically
stop rotation. Time will tell if I am right.
Page 26
R. G. Sparber January 13, 2018 Page 26 of 27
The VFD Interface Circuit
When the software in the PC processes an M3 g-code, pin 16 in the parallel port
goes high. That causes P16 (red arrow) to rise relative to BG until the diode in the
NTE3042 opto conducts. The resulting light from this diode shines on a
phototransistor causing pin 5 to fall from about +24v down to about +0.2v. As
current flows out of the VFD drive via barrier strip terminal BR4, a voltage is first
developed across R1. When about
flows, Q1 turns on and pulls
BR4 down to about +1v. That is good enough to cause a valid Forward command
to appear at VFD pin S1. The spindle motor runs clockwise. Without this current
amplifier, the opto was only able to pull S1 down to about +15v and that wasn't
low enough to start the motor.
When the software processes an M5 g-code, pin 16 goes low. This turns off the
NTE3042 opto which halts current flowing from S1. The VFD stops the spindle
motor from turning.
If implemented, Reverse/Stop would work the same way using a second NTE3042
opto and PNP transistor.
The AIN (Analog IN) input is able to accept a DC voltage that can control the
spindle motor's RPM. The software can generate a Pulse Width Modulated signal
which would be fed through yet another NTE3042, be filtered by a yet to be added
circuit, and present the proper DC voltage to the AIN pin.
Page 27
R. G. Sparber January 13, 2018 Page 27 of 27
Acknowledgments
Thanks to Paul Thompson for selling me the hardware and helping me through my
"rank newbie" period. Thanks also to Dan Benoit for similar support. And finally,
thanks to the many members of the mach1mach2cnc yahoo group for their help on
numerous occasions.
Thanks to Graham Bowes in pointing out design and documentation errors related
to grounding which have now been corrected.
Thanks to "Druid Noibn" for seeing that my AC outlets were not grounded
correctly. They are now.
Thanks to Dan Mauch for explaining to me that the 36v stepper motor power
should be point to point and not daisy chained. Fixed now.
Thanks to Andy Wander to helping me to improve the Limit and Stop circuit. It
isn't bullet proof yet but has certainly been improved.
Thanks to Brenden (from the UK) and Jeff Birt for helping me understand what
was missing from the Limit and Stop circuit.
I welcome your comments and questions.
If you wish to be contacted each time I publish an article, email me with just
"Article Alias" in the subject line.
Rick Sparber
[email protected]
Rick.Sparber.org