Instruction Z-Wave XML Editor User Guide Document No.: INS10680 Version: 5 Description: Description of the Z-Wave XML Editor used to create a XML file containing the Z- Wave devices and command classes which can be used by the Z-Wave Zniffer for interpretation of the above mentioned classes. Written By: JFR;SRO;MVO;BBR Date: 2018-04-05 Reviewed By: JRM Restrictions: Public Approved by: Date CET Initials Name Justification 2018-04-05 13:05:25 NTJ Niels Thybo Johansen This document is the property of Silicon Labs. The data contained herein, in whole or in part, may not be duplicated, used or disclosed outside the recipient for any purpose. This restriction does not limit the recipient's right to use information contained in the data if it is obtained from another source without restriction.
Transcript
Instruction
Z-Wave XML Editor User Guide
Document No.: INS10680
Version: 5
Description: Description of the Z-Wave XML Editor used to create a XML file containing the Z-Wave devices and command classes which can be used by the Z-Wave Zniffer for interpretation of the above mentioned classes.
Written By: JFR;SRO;MVO;BBR
Date: 2018-04-05
Reviewed By: JRM
Restrictions: Public
Approved by:
Date CET Initials Name Justification
2018-04-05 13:05:25 NTJ Niels Thybo Johansen
This document is the property of Silicon Labs. The data contained herein, in whole or in part, may not be duplicated, used or disclosed outside the recipient for any purpose. This restriction does not limit the recipient's right to use information contained in the data if it is obtained from another source without restriction.
INS10680-5 Z-Wave XML Editor User Guide 2018-04-05
silabs.com | Building a more connected world. Page ii of iv
REVISION RECORD
Doc. Rev
Date By Pages affected
Brief description of changes
1 20070919 JFR IHM
Initial draft
2 20070928 IHM All Content and screenshots have been added to chapter 4. Proof-reading.
3 20071004 IHM All Most chapters and sections have been revised.
3 20071119 IHM All Some abbreviations have been added. Figures and figure captions have been updated. New menu items – “Move Parameter Down” and “Move Parameter Up” have been described. A note for “SPECIFIC_TYPE_NOT_USED” name for Specific Device has been added. Description of the Add Parameter dialog has been enhanced.
3 20090427 DDA All Revised and updated in respect of version 1.09
4 20110117 DDA Appendix Minor errors fixed, changed fancy quotes to regular quotes.
2.1 Purpose .............................................................................................................................................. 1 2.2 Audience and prerequisites ................................................................................................................ 1
3 GETTING STARTED ............................................................................................................................ 2
3.1 Check the prerequisites ...................................................................................................................... 2 3.2 Install the XML Editor application ....................................................................................................... 2 3.3 Start the Z-Wave XML Editor ............................................................................................................. 6 3.4 Remove Z-Wave XML Editor .............................................................................................................. 7
4 USER INTERFACE ............................................................................................................................... 9
4.1 Layout of the XML Editor main window .............................................................................................. 9 4.2 Menu bar ..........................................................................................................................................10
4.2.1 File menu................................................................................................................................11 4.2.2 Edit menu ...............................................................................................................................11 4.2.3 View menu..............................................................................................................................12 4.2.4 Tools menu.............................................................................................................................12 4.2.5 Help menu ..............................................................................................................................12
5 WORKING WITH Z-WAVE XML TAGS AND ATTRIBUTES .............................................................13
5.2 Generic and Specific Device Handling .............................................................................................15 5.2.1 Add Generic and Specific Device ..........................................................................................15 5.2.2 Edit Generic and Specific Device ...........................................................................................16 5.2.3 Remove Generic and Specific Device ...................................................................................17
5.3 Command Class and Command Handling .......................................................................................17 5.3.1 Add Command Class and Command ....................................................................................17 5.3.2 Edit Command Class and Command .....................................................................................18 5.3.3 Remove Command Class and Command .............................................................................19 5.3.4 Add Command Parameters....................................................................................................19 5.3.5 Edit Command Parameters ....................................................................................................25 5.3.6 Remove Command Parameters ............................................................................................26
5.4 File generation from the existing XML file ........................................................................................27 5.4.1 Generate C# class file ............................................................................................................27 5.4.2 Generate C header file ...........................................................................................................27 5.4.3 Generate Node info ................................................................................................................27 5.4.4 Edit XML Editor options ..........................................................................................................27
APPENDIX A Z-WAVE XML FORMAT ..................................................................................................31
Appendix A.1 Hierarchy ...........................................................................................................................31 Appendix A.2 XML Tags ..........................................................................................................................32
(a) Basic Devices .........................................................................................................................32 (b) Generic and Specific Devices ................................................................................................33 (c) Command Classes, Commands, and Parameters ................................................................34
INS10680-5 Z-Wave XML Editor User Guide 2018-04-05
Silicon Labs Inc. Abbreviations Page 1 of 44
1 ABBREVIATIONS
Abbreviation Explanation
CD Compact Disk – a digital, optical-based computer data storage medium
R&D Research and Development – all activities related to the evolution of new products and services
XML Extensible Markup Language (http://www.w3.org/XML/)
XSD XML Schema Definition – a language for specifying the grammar of the markup allowed in an XML file. XSD file describes the structure of an XML document.
2 INTRODUCTION
2.1 Purpose
The Z-Wave XML Editor is used to define approved Z-Wave devices and command classes [1] used by the application layer of the Z-Wave protocol in the XML document that can be used by the Z-Wave Zniffer [2] for interpretation of the above mentioned devices and command classes. Beside a XML file containing all the information is it also possible to generate a C# class file and C header file as foundation for application development. The Z-Wave XML Editor enables also the customer to define devices and command classes under development or proprietary command class structures.
2.2 Audience and prerequisites
The audience is external R&D software application programmers.
INS10680-5 Z-Wave XML Editor User Guide 2018-04-05
Silicon Labs Inc. Page 2 of 44
Getting started
3 GETTING STARTED
3.1 Check the prerequisites
The following components should be pre-installed on the machine that you need to use Z-Wave XML Editor:
1. .NET Framework, version 2.0 or later
Important: Make sure you have the latest service pack and critical updates for the version of Windows that you are running. To find recent security updates, visit Windows Update.
3.2 Install the XML Editor application
1. Exit all programs.
2. In Microsoft Windows, click the Start button, and then click Control Panel.
3. In Classic view, double-click Add or Remove Programs.
4. Click Add New Programs, and then click CD or Floppy.
5. Locate the “setup.exe” that should be placed in the <drive name>\DevKit_x_xx\Tools\XMLEditor\folder on your hard drive in case you installed Z-Wave Developer’s Kit.
Figure 1. Location of the installation program
6. After double clicking the “Setup.exe” file, the following dialog appears.Please note the copyright notification and click Next button.
INS10680-5 Z-Wave XML Editor User Guide 2018-04-05
Silicon Labs Inc. Page 3 of 44
Getting started
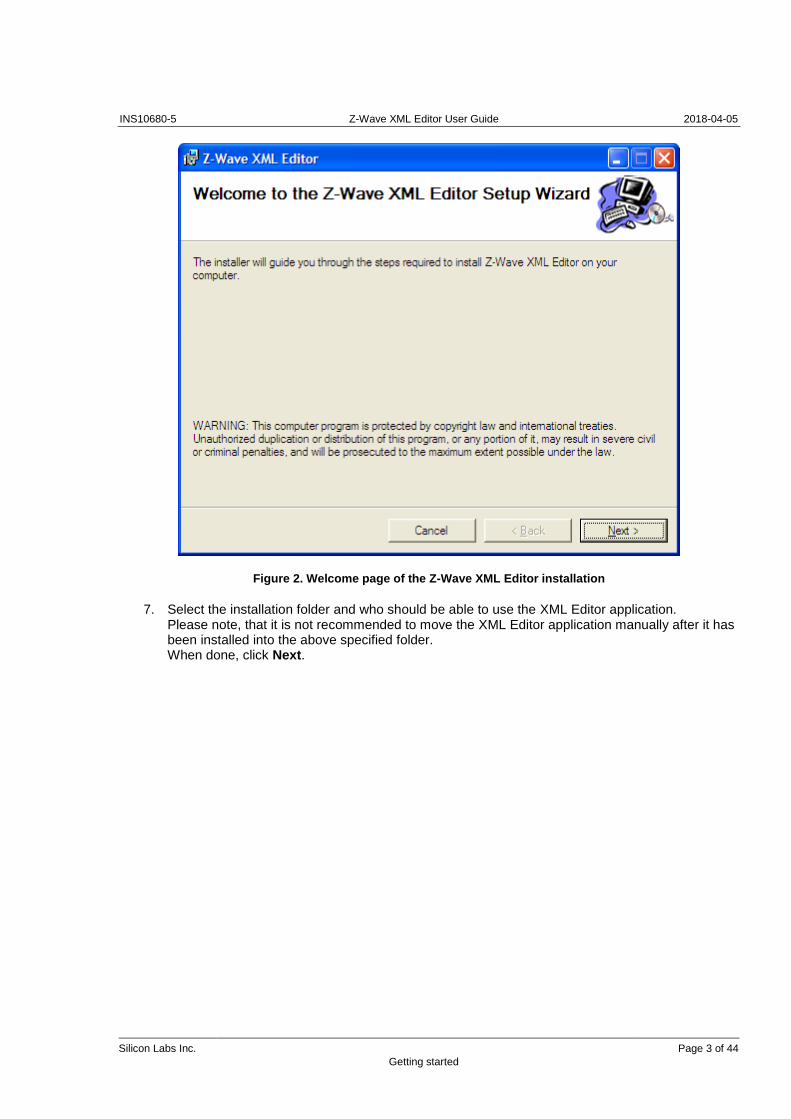
Figure 2. Welcome page of the Z-Wave XML Editor installation
7. Select the installation folder and who should be able to use the XML Editor application.Please note, that it is not recommended to move the XML Editor application manually after it hasbeen installed into the above specified folder.When done, click Next.
INS10680-5 Z-Wave XML Editor User Guide 2018-04-05
Silicon Labs Inc. Page 4 of 44
Getting started
Figure 3. Installation folder
8. An installation confirmation appears. Click Next again to confirm and start the installation.
INS10680-5 Z-Wave XML Editor User Guide 2018-04-05
Silicon Labs Inc. Page 5 of 44
Getting started
Figure 4. Confirmation page of the Z-Wave XML Editor installation
9. An actual installation procedure will pass with progress indicator and final confirmation appears.Click Close to complete the installation.
INS10680-5 Z-Wave XML Editor User Guide 2018-04-05
Silicon Labs Inc. Page 6 of 44
Getting started
Figure 5. XML Editor Installation complete.
3.3 Start the Z-Wave XML Editor
You can start the Z-Wave XML Editor using the Start menu. To open the Start menu, click the Start button in the lower-left corner of your screen. Or, press the Windows logo key on your keyboard. The Start menu appears.
To open Z-Wave XML Editor, click its icon shown in the left pane of the Start menu that displays the most frequently used programs list. If you don't see its icon there, click All Programs at the bottom of the left pane. Instantly, the left pane displays a long list of programs in alphabetical order, followed by a list of folders. Click Zensys folder, then Z-Wave XML Editor folder and finally click the Z-Wave XML Editor item as shown at the next figure.
INS10680-5 Z-Wave XML Editor User Guide 2018-04-05
Silicon Labs Inc. Page 7 of 44
Getting started
Figure 6. Start menu with Z-Wave XML Editor group
Each time you start Z-Wave XML Editor, you are actually running the “C:\Program Files\Zensys\Z-Wave XML Editor\ZWaveXMLEditor.exe” executable file, although you do not usually type its name or even see it.
3.4 Remove Z-Wave XML Editor
You can uninstall Z-Wave XML Editor from your computer if you no longer use it.
1. Open Add or Remove Programs in Control Panel.To do it, click Start, then click Control Panel (in Classical View – click Start, then point toSettings, and click Control Panel), and then double-click Add or Remove Programs.
2. Click the program in the list and then click the Remove button as shown at the picture below.You can sort programs by selecting different options in Sort by.
INS10680-5 Z-Wave XML Editor User Guide 2018-04-05
Silicon Labs Inc. Page 8 of 44
Getting started
Figure 7. Add or Remove Programs window
3. Standard confirmation dialog appears. Click Yes to continue the removal of the XML Editorapplication.
Figure 8. Confirmation message for Z-Wave XML Editor removal
4. Z-Wave XML Editor and its settings will be completely removed without prompting you further.
INS10680-5 Z-Wave XML Editor User Guide 2018-04-05
Silicon Labs Inc. Page 9 of 44
USER INTERFACE
4 USER INTERFACE
4.1 Layout of the XML Editor main window
The figure below shows the Z-Wave XML Editor window as it usually looks after opening an appropriate XML file.
Figure 9. Main window
The main application window has the same basic parts as other Windows applications:
Title bar displays the name of the program. It may display also the name of opened/saved XMLfile.
Menu bar contains items that you can click to make choice in a program. For more details, seeSection 4.2.
Toolbar. The row of buttons which represents tasks that you can do within a program. It providesquick access to common tasks frequently accessed from the menus. For more details, seeSection 5.
Tree-view pane displays the structure of the current XML file as expandable tree on the left ofthe main window.
INS10680-5 Z-Wave XML Editor User Guide 2018-04-05
Silicon Labs Inc. Page 10 of 44
USER INTERFACE
Info pane displays the details for the current element in the Tree-view pane. It is top-right panein the main window.
Log pane displays the log of the operations that XML Editor performs. It is bottom-right pane inthe main window.
4.2 Menu bar
On top of the main window is the application menu bar. It has the following items:
File. This menu contains items to create new, open and save the XML files, and to quit fromZ-Wave XML Editor.
Edit. This menu contains items to do the main actions (Add, Edit or Remove) with the definitionsof devices, command classes, commands and parameters. It contains also items to operate theversions of the command classes.
View. This menu contains two commands to change the appearance of the nodes in the Tree-view pane.
Tools. This menu contains items to view/edit the application options and run the generation ofthe C# class file and C header file as foundation for application development.
Help. This menu contains items to help the user – it displays the information about the currentapplication and opens online manual.
INS10680-5 Z-Wave XML Editor User Guide 2018-04-05
Silicon Labs Inc. Page 11 of 44
USER INTERFACE
4.2.1 File menu
This menu contains items to create new, open and save the XML files, and to quit from Z-Wave XML Editor. The File menu has the following items:
Menu item Keyboard Shortcut Description
New Ctrl+N Clears the current XML file and initiate a new one.
Open… Ctrl+O Opens a standard File Open dialog to open the XML file.
Save Ctrl+S Saves the current XML to a file.
Save As… – Saves the current XML with a new name.
Exit – Exits the application.
4.2.2 Edit menu
This menu contains items to do the main actions with the nodes in the Tree-view pane (definitions of devices, device classes, command classes, commands and command parameters). The Edit menu has the following items:
Menu item Keyboard Shortcut Description
Add… – Adds new device, device class, command class, command, or command parameter (depending on the active cursor position in the Tree-view pane).
Edit – Edits the current node in the Tree-view pane.
Remove – Removes the current node in the Tree-view pane.
Add new version… – Add new version of the command class.
Read only – Marks the current command class definition as read-only.
Truncate System Commands – Removes the definitions of the parameters for all system (protocol) commands.
Move down parameter – Moves the selected command parameter down. This menu item is inactive if the parent command has less than two parameters or the active (highlighted) parameter is the last one already.
Move up parameter – Moves the selected command parameter up. This menu item is inactive if the parent command has less than two parameters or the active (highlighted) parameter is the first one
INS10680-5 Z-Wave XML Editor User Guide 2018-04-05
Silicon Labs Inc. Page 12 of 44
USER INTERFACE
already.
4.2.3 View menu
This menu contains two commands to change the appearance of the nodes in the Tree-view pane. The View menu has the following items:
Menu item Keyboard Shortcut Description
Expand All – Shows all the existing child elements in the Tree-view pane.
Collapse All – Hides all child elements except the active one in the Tree-view pane so the parent nodes remain visible in it.
4.2.4 Tools menu
This menu contains items to view/edit the application options and run the generation of the C# class file, C header file, and Node Info as foundation for application development. The Tools menu has the following items:
Menu item Keyboard Shortcut Description
Options… – Opens a dialog with Z-Wave XML Editor options.
Generate C# – Generates .CS file with class definitions in C#.
Generate C Header – Generates .H file with definitions in C.
Generate Node Info – Generates Node Info for the XML file if changes have been done to the Command and Device Classes using the XML Editor.
4.2.5 Help menu
This menu contains items to help the user. The Help menu has the following items:
Menu item Keyboard Shortcut Description
About – Opens a standard about dialog with the information about the current application.
Help – This item is dedicated to opening the online application-specific manual.
INS10680-5 Z-Wave XML Editor User Guide 2018-04-05
Silicon Labs Inc. Page 13 of 44 Working with Z-Wave XML tags and
attributes
5 WORKING WITH Z-WAVE XML TAGS AND ATTRIBUTES
5.1 Basic Device Handling
The basic device class determines the available functionality of the Z-Wave protocol depending on the library used.
Initially, a new XML file in Z-Wave XML Editor has three empty top-level nodes in the Tree-view pane on the left of the main application window:
Basic Device Classes
Device Classes
Command Classes
As any other XML file element, the Basic Device definitions are presented as elements or nodes in the Tree-view pane. All the Basic Device definitions in the current XML are grouped under the Basic Device Classes parent node.
Using Z-Wave XML Editor you can do the standard actions with Basic Device definitions - add, edit and remove.
5.1.1 Add Basic Device
To add a new Basic Device definition, select Basic Device Classes top-level node in the Tree-view pane, and then click Add item button at the toolbar. Or click Edit menu, then click Add… item.
Add Basic Device dialog appears as shown at the figure below.
Figure 10. Add Basic Device dialog
Add Basic Device dialog provides you with the following entry fields:
Name for the Basic Device that will be automatically translated to the correct format (all capscharacters, underscore signs instead of the spaces, etc.). A name for the Basic Device in thisgenerated format is shown dynamically right below the entry field;
INS10680-5 Z-Wave XML Editor User Guide 2018-04-05
Silicon Labs Inc. Page 14 of 44 Working with Z-Wave XML tags and
attributes
Hexadecimal value for hexadecimal identifier (key).Please note, that definitions you do in XML file should have precedence over the header fileZW_classcmd.h distributed as part of the Z-Wave Developer’s Kit. However, the assignment ofall hex identifiers should be synchronized with the values in the header file ZW_classcmd.h;
Comment for the text string with any needed extended names, explanations, notes, etc.
To save the entered values and create a new Device Class definition, click Ok button. To discard the entered values, click Cancel.
5.1.2 Edit Basic Device
To edit the existing Basic Device definition, select it in the tree below the Basic Device Classes top-level node, and then click Edit item button at the toolbar. Or click Edit menu, then click Edit… item. Or just double-click it in the Tree-view pane.
Edit Basic Device dialog appears as shown at the figure below.
Figure 11. Edit Basic Device dialog
Edit Basic Device dialog provides the same entry fields as Add Basic Device dialog described above.
To save your changes, click Ok button. To discard the changes, click Cancel.
5.1.3 Remove Basic Device
To remove an existing Basic Device definition, select it in the tree below the Basic Device Classes top-level node, and then click Remove item button at the toolbar. Or click Edit menu, then click Remove item.
A confirmation dialog with the name of the selected node appears as shown at the figure below.
INS10680-5 Z-Wave XML Editor User Guide 2018-04-05
Silicon Labs Inc. Page 15 of 44 Working with Z-Wave XML tags and
attributes
Figure 12. Removal confirmation dialog for Basic Device
To confirm the removal, click Yes button. To reject the removal and left the Basic Device definition, click No.
5.2 Generic and Specific Device Handling
The Generic Device Class definition allows describing the main functionality of a device on a very high level. While Generic Device Class only defines the absolute minimum of functionality of a given type of device, the Generic Device definition is typically extended with a Specific Device Class definition.
As any other XML file element, all the Generic Device and Specific Device definitions are presented as nodes in the Tree-view pane. All the Generic Device definitions in the current XML are grouped under the Device Classes top-level node, while all the Specific Device definitions are presented as child nodes for the appropriate Generic Device definition.
Using Z-Wave XML Editor you can do the following standard actions with Generic Device and Specific Device definitions – add, edit and remove.
5.2.1 Add Generic and Specific Device
To add a new Generic Device Class definition, select Device Classes top-level node in the Tree-view pane, and then click Add item button at the toolbar. Or click Edit menu, then click Add… item.
Add Generic Device dialog appears as shown at the figure below.
Figure 13. Add Generic Device dialog
INS10680-5 Z-Wave XML Editor User Guide 2018-04-05
Silicon Labs Inc. Page 16 of 44 Working with Z-Wave XML tags and
attributes
Add Generic Device dialog provides you with the same entry fields as Add Basic Device dialog which has been described above:
Name for the Generic Device that will be automatically translated to the correct format (all capscharacters, underscore signs instead of the spaces, etc.). A name for the Generic Device in thisgenerated format is shown dynamically right below the entry field;
Hexadecimal value for hexadecimal identifier (key).Please note, that definitions you do in XML file should have precedence over the header fileZW_classcmd.h distributed as part of the Z-Wave Developer’s Kit. However, the assignment ofall hex identifiers should be synchronized with the values in the header file ZW_classcmd.h;
Comment for the text string with any needed extended names, explanations, notes, etc.
To save the entered values and create a new Generic Device Class definition, click Ok button. To discard the entered values, click Cancel.
To add a new Specific Device Class definition, select an appropriate Generic Device node in the Tree-view pane first, and then repeat the routine of adding the new Generic Device definition.
Warning! Note please that the name for the Specific Device must be unique within all the Specific Devices (not for the current Generic Device only). The only exclusion is “SPECIFIC_TYPE_NOT_USED” name for the Specific Device that could repeat for every Generic Device.
5.2.2 Edit Generic and Specific Device
To edit the existing Generic Device or Specific Device definition, select it in the tree below the Device Classes top-level node, and then click Edit item button at the toolbar. Or click Edit menu, then click Edit… item. Or just double-click it in the Tree-view pane.
Edit Generic Device dialog appears as shown at the figure below.
Figure 14. Edit Generic Device dialog
Edit Generic Device dialog provides the same entry fields as Add Generic Device dialog which has been described above.
To save your changes, click Ok button. To discard the changes, click Cancel.
INS10680-5 Z-Wave XML Editor User Guide 2018-04-05
Silicon Labs Inc. Page 17 of 44 Working with Z-Wave XML tags and
attributes
5.2.3 Remove Generic and Specific Device
To remove an existing Generic Device or Specific Device definition, select it in the tree below the Device Classes top-level node, and then click Remove item button at the toolbar. Or click Edit menu, then click Remove item.
A confirmation dialog with the name of the selected node appears as shown at the figure below.
Figure 15. Removal confirmation dialog for Specific Device
To confirm the removal, click Yes button. To reject the removal and left the Device definition, click No.
Warning! Please note, that during the Generic Device removal you also automatically remove all child Specific Device definitions without additional warning or confirmation message.
5.3 Command Class and Command Handling
The commands are used by devices when communicating with other devices. These commands are organized into functionally related groups called command classes. Each command class contains the commands associated with a given functionality.
As any other XML file element, all the Command Classes and Commands definitions are presented as nodes in the Tree-view pane. All the Command Classes definitions in the current XML are grouped under the Command Classes top-level node, while all the Commands definitions are presented as child nodes for the appropriate Command Class definition.
Using Z-Wave XML Editor you can do the following standard actions with Command Classes and Commands – add, edit and remove.
5.3.1 Add Command Class and Command
To add a new Command Class definition, select Command Classes top-level node in the Tree-view pane, and then click Add item button at the toolbar. Or click Edit menu, then click Add… item.
Add Command Class dialog appears as shown at the figure below.
INS10680-5 Z-Wave XML Editor User Guide 2018-04-05
Silicon Labs Inc. Page 18 of 44 Working with Z-Wave XML tags and
attributes
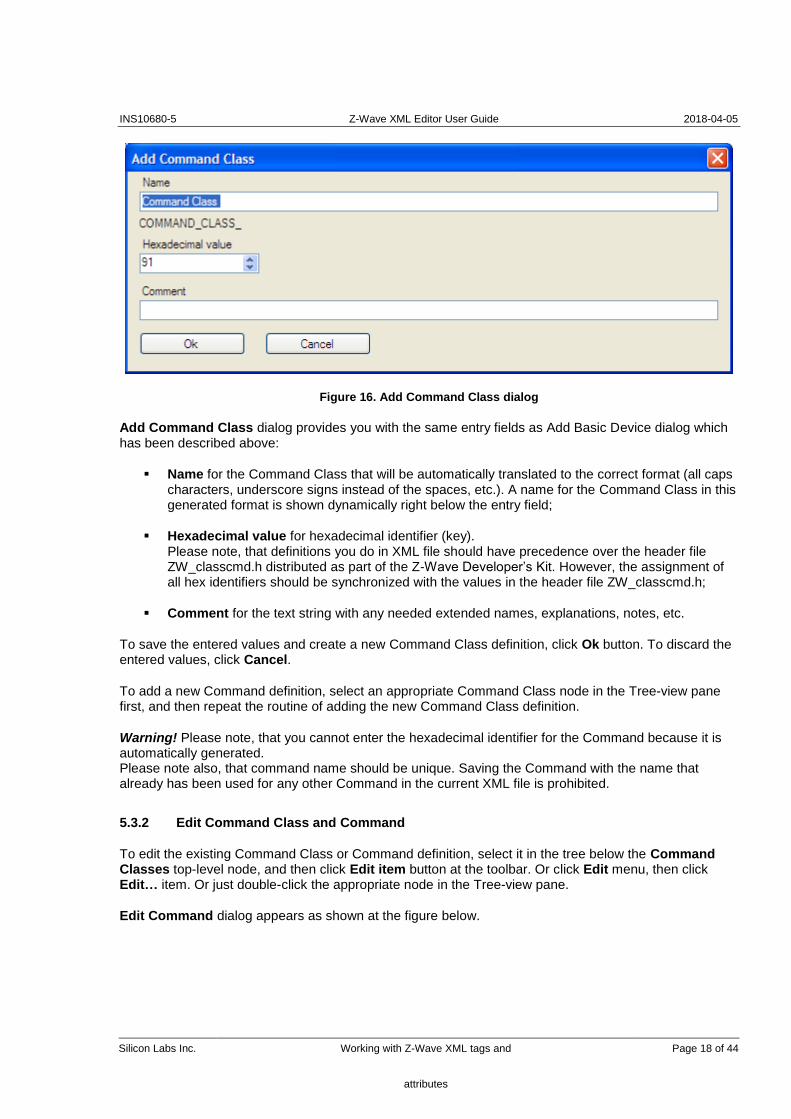
Figure 16. Add Command Class dialog
Add Command Class dialog provides you with the same entry fields as Add Basic Device dialog which has been described above:
Name for the Command Class that will be automatically translated to the correct format (all capscharacters, underscore signs instead of the spaces, etc.). A name for the Command Class in thisgenerated format is shown dynamically right below the entry field;
Hexadecimal value for hexadecimal identifier (key).Please note, that definitions you do in XML file should have precedence over the header fileZW_classcmd.h distributed as part of the Z-Wave Developer’s Kit. However, the assignment ofall hex identifiers should be synchronized with the values in the header file ZW_classcmd.h;
Comment for the text string with any needed extended names, explanations, notes, etc.
To save the entered values and create a new Command Class definition, click Ok button. To discard the entered values, click Cancel.
To add a new Command definition, select an appropriate Command Class node in the Tree-view pane first, and then repeat the routine of adding the new Command Class definition.
Warning! Please note, that you cannot enter the hexadecimal identifier for the Command because it is automatically generated. Please note also, that command name should be unique. Saving the Command with the name that already has been used for any other Command in the current XML file is prohibited.
5.3.2 Edit Command Class and Command
To edit the existing Command Class or Command definition, select it in the tree below the Command Classes top-level node, and then click Edit item button at the toolbar. Or click Edit menu, then click Edit… item. Or just double-click the appropriate node in the Tree-view pane.
Edit Command dialog appears as shown at the figure below.
INS10680-5 Z-Wave XML Editor User Guide 2018-04-05
Silicon Labs Inc. Page 19 of 44 Working with Z-Wave XML tags and
attributes
Figure 17. Edit Command dialog
Edit Command dialog provides the same entry fields as other similar dialog described above.
Warning! Please note that you cannot edit the hexadecimal identifier for the Command because it is automatically generated.
To save your changes, click Ok button. To discard the changes, click Cancel.
5.3.3 Remove Command Class and Command
To remove an existing Command Class or Command definition, select it in the tree below the Command Classes top-level node, and then click Remove item button at the toolbar. Or click Edit menu, then click Remove item.
A confirmation dialog with the name of the selected node appears as shown at the figure below.
Figure 18. Removal confirmation dialog for Command Class
To confirm the removal, click Yes button. To reject the removal to keep the Command Class definition, click No.
Warning! Please note, that during the Command Class removal you also automatically remove all child Command and Parameter definitions without additional warning or confirmation message.
5.3.4 Add Command Parameters
To add a new Parameter for the Command, select an appropriate element for that Command in the Tree-view pane, and then click Add item button at the toolbar. Or click Edit menu, then click Add… item.
Attention! Note please that the position for new parameter depends on the active (highlighted) element in the main tree-view pane. Select the command itself to insert the new parameter as the first one with
INS10680-5 Z-Wave XML Editor User Guide 2018-04-05
Silicon Labs Inc. Page 20 of 44 Working with Z-Wave XML tags and
attributes
shifting the existing parameters down (if any). Select any existing parameter to add the new parameter right the next after the selected one.
Short Create Parameter dialog appears as shown at the figure below.
Figure 19. Create Parameter dialog
Click Yes to create VARIANT_GROUP parameter or No to create the usual parameter.
Add Parameter dialog then appears as shown at the figure below.
Figure 20. Add Parameter dialog with Value parameter type
Every Add Parameter dialog provides you with the following entry fields:
Name for the Parameter;
INS10680-5 Z-Wave XML Editor User Guide 2018-04-05
Silicon Labs Inc. Page 21 of 44 Working with Z-Wave XML tags and
attributes
Is Optional indicates whether the parameter is optional for this command. If this is checked,Optional parameter offset and Optional parameter mask parameters become active.
Optional parameter offset indicates the command byte where activation of the optionalparameter is specified.
Optional parameter mask indicates the bit of the offset byte which enables the optionalparameter.
Parameter Type that consists of the drop-down list on the left to select the width of theparameter (with “1 Byte”, “2 Bytes”, “3Bytes”, “4Bytes”, “Array” and “Bitmask” as the possiblevalues) and radio buttons on the right to define the possible values within selected type;
Comment for the text string with any needed extended names, explanations, notes, etc.
Add Parameter dialog also provides other entry fields that are dynamically added to the dialog and removed from the dialog depending on the selection of the Parameter Type. Available Parameter Types are described in more details in Appendix A.2.
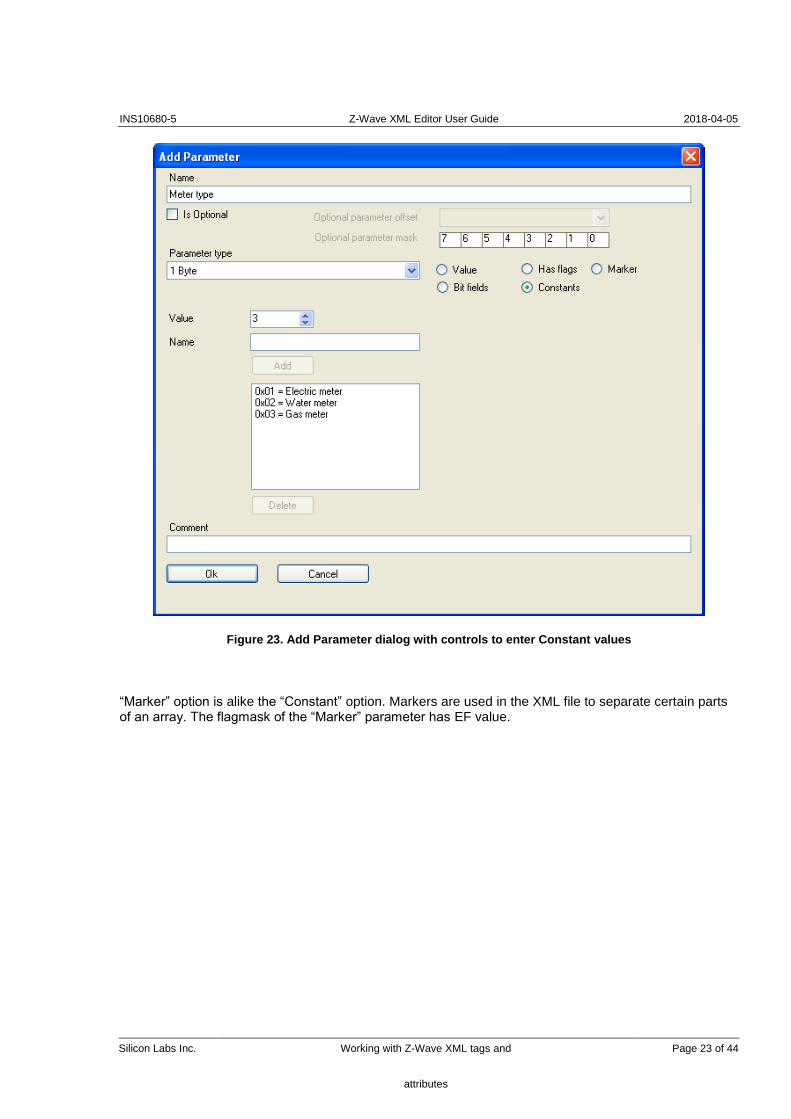
For the Byte parameters radio buttons on the right provides the following options: “Value”, “Bit Fields”, “Has Flags”, “Constants” and “Marker”.
“Bit Fields” option provides the controls to enter several fields that are sent within one byte as shown at the figure below.
Figure 21. Add Parameter dialog with Bit fields controls
INS10680-5 Z-Wave XML Editor User Guide 2018-04-05
Silicon Labs Inc. Page 22 of 44 Working with Z-Wave XML tags and
attributes
Use the drag-and-drop selection control to define the bits (from 0 to 7). Note please that the bits are displayed with the different background color:
dark grey color is used for the bits you already entered into the list of the bit fields;
white color is used for the available bits
light grey color is used for the selected bits (you are going to enter with the name entered in thetext box below).
“Has Flags” option provides controls to enter the list of the named values as shown at the figure below. If the parameter value of incoming command is equal to some value in the list then the name for this value will be displayed; otherwise the value itself will be displayed.
Figure 22. Add Parameter dialog with Flag controls
“Constants” option provides the controls to enter the strictly defined list of the values as shown at the figure below. The parameter value of incoming command should be one of the values from the list.
INS10680-5 Z-Wave XML Editor User Guide 2018-04-05
Silicon Labs Inc. Page 23 of 44 Working with Z-Wave XML tags and
attributes
Figure 23. Add Parameter dialog with controls to enter Constant values
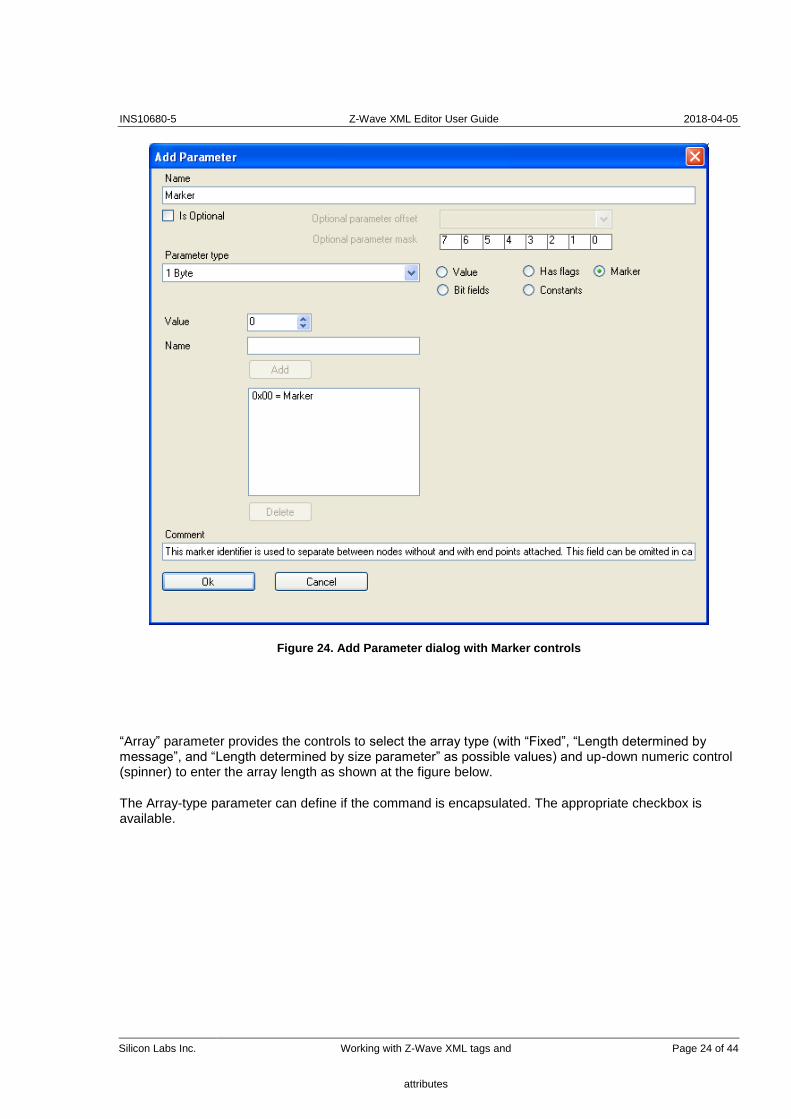
“Marker” option is alike the “Constant” option. Markers are used in the XML file to separate certain parts of an array. The flagmask of the “Marker” parameter has EF value.
INS10680-5 Z-Wave XML Editor User Guide 2018-04-05
Silicon Labs Inc. Page 24 of 44 Working with Z-Wave XML tags and
attributes
Figure 24. Add Parameter dialog with Marker controls
“Array” parameter provides the controls to select the array type (with “Fixed”, “Length determined by message”, and “Length determined by size parameter” as possible values) and up-down numeric control (spinner) to enter the array length as shown at the figure below.
The Array-type parameter can define if the command is encapsulated. The appropriate checkbox is available.
INS10680-5 Z-Wave XML Editor User Guide 2018-04-05
Silicon Labs Inc. Page 25 of 44 Working with Z-Wave XML tags and
attributes
Figure 25. Add Parameter dialog for Array parameter
To save the entered values and create a new Parameter definition, click Ok button. To discard the entered values, click Cancel.
5.3.5 Edit Command Parameters
To edit the existing Parameter for the Command, select the node that represents this Parameter in the tree, and then click Edit item button at the toolbar. Or click Edit menu, then click Edit… item. Or just double-click the appropriate node in the Tree-view pane.
Edit Parameter dialog appears as shown at the figure below.
INS10680-5 Z-Wave XML Editor User Guide 2018-04-05
Silicon Labs Inc. Page 26 of 44 Working with Z-Wave XML tags and
attributes
Figure 26. Edit Parameter dialog
Edit Parameter dialog provides the same entry fields as Add Parameter dialog described above.
To save your changes, click Ok button. To discard the changes, click Cancel.
5.3.6 Remove Command Parameters
To remove an existing Command Parameter, select the node that represents this Parameter in the tree, and then click Remove item button at the toolbar. Or click Edit menu, then click Remove item.
A confirmation dialog with the name of the selected node appears as shown at the figure below.
Figure 27. Removal confirmation dialog for Command Parameter
INS10680-5 Z-Wave XML Editor User Guide 2018-04-05
Silicon Labs Inc. Page 27 of 44 Working with Z-Wave XML tags and
attributes
To confirm the removal, click Yes button. To reject the removal and keep the Command Parameter, click No.
5.4 File generation from the existing XML file
All the Basic Devices, Generic Devices, Specific Devices, Command Classes, Commands and Command Parameters definitions that have been entered into the XML file could be used to automatically generate a C# class file and C header file with the same definitions as foundation for application development.
5.4.1 Generate C# class file
To generate C# class file for all the definitions in the current XML file, click Tools menu and then click Generate C sharp item. It will generate a C# file, a default path is “C:\Program Files\Zensys\Z-Wave XML Editor\”, default file name for the output file is “generated.cs”.
To modify the elements that generation program includes into the output filke, edit the template file By default, Z-Wave XML Editor uses “C:\Program Files\Zensys\Z-Wave XML Editor\zw_classtemplate.cs” file.
To edit the filename for the generated C# file, location for that output file, and full file path (filename and location) for the template file, use Options dialog that is described below.
5.4.2 Generate C header file
To generate C header file.for all the definitions in the current XML file, click Tools menu and then click Generate C header item. It will generate a C header file, a default path is “C:\Program Files\Zensys\Z-Wave XML Editor\”, default file name for the output file is “generated.h”.
To modify the elements that generation program includes into the output filke, edit the template file By default, Z-Wave XML Editor uses “C:\Program Files\Zensys\Z-Wave XML Editor\zw_cheadertemplate.h” file.
To edit the filename for the generated C header file, location for that output file, and full file path (filename and location) for the template file, use Options dialog that is described below.
5.4.3 Generate Node info
To generate Node Info for all definitions in the current XML file, click Tools menu and then click Generate Node Info item. It will generate Node Info based on the latest changes done to the XML file using the XML Editor.
The output is shown in a modal window, and the user can copy the appropriate lines into the XML file as required.
5.4.4 Edit XML Editor options
To edit the Z-Wave XML Editor options, click Tools menu and then click Options… item.
Options dialog appears. It contains three tabs:
INS10680-5 Z-Wave XML Editor User Guide 2018-04-05
Silicon Labs Inc. Page 28 of 44 Working with Z-Wave XML tags and
attributes
C# Generation;
C Generation;
XML Validation.
C# Generation tab is shown at the figure below. It provides with the controls to edit the filename for the generated C# file, location for that output file, and full file path (filename and location) for the template file.
Figure 28. Options dialog with C# Generation tab
C Generation tab is shown at the figure below. It provides with the controls to edit the filename for the generated C header file, location for that output file, and full file path (filename and location) for the template file.
Figure 29. Options dialog with C Generation tab
XML Validation tab is shown at the figure below. It provides with the single control to edit the filename for the XSD file that is used for the XML validation. XSD file contains all the definitions for the possible tags and attributes as described in Appendix A.2.
INS10680-5 Z-Wave XML Editor User Guide 2018-04-05
Silicon Labs Inc. Page 29 of 44 Working with Z-Wave XML tags and
attributes
Figure 30. Options dialog with XML Validation tab
INS10680-5 Z-Wave XML Editor User Guide 2018-04-05
Silicon Labs Inc. Page 30 of 44 Working with Z-Wave XML tags and
attributes
INS10680-5 Z-Wave XML Editor User Guide 2018-04-05
Silicon Labs Inc. Appendix A Z-WAVE XML FORMAT Page 31 of 44
APPENDIX A Z-WAVE XML FORMAT
This Appendix describes the XML format used with respect to Z-Wave XML tags and attributes. All tags are listed which are known by the Editor, how the tags are handled (read/write or only read) and a short explanation of each tag. For a description of the Z-Wave device and command class hierarchy refer to [1].
The tags and attributes used in the Z-Wave XML format is listed in the following
(a) Basic Devices
Tag
<bas_gen> Basic Device. The Editor can read and edit Basic Devices.
Attributes
key Unique value of Basic Device
name Unique name of Basic Device for code generation
help Name of Basic Device in plain text. Help and name will always be equal after editing.
Ex.:
name=”BASIC_TYPE_CONTROLLER”
help=”Basic Type Controller”
comment Comment for this Basic Device entered in the Editor. Used in code generation.
read_only true or false set in the Editor.
INS10680-5 Z-Wave XML Editor User Guide 2018-04-05
Silicon Labs Inc. Page 33 of 44 Appendix A Z-WAVE XML
FORMAT
(b) Generic and Specific Devices
Tag
<gen_dev> Generic Device. The Editor can read and edit Generic Devices.
Attributes
key Unique value of Generic Device
name Unique name of Generic Device for code generation
help Name of Generic Device in plain text. help and name will always be equal after editing.
Ex.:
name=”GENERIC_TYPE_STATIC_CONTROLLER”
help=”Generic Type Static Controller”
comment Comment for this Generic Device entered in the Editor. Used in code generation.
read_only true or false set in the Editor. Applies to the Generic Device as well as all Specific Devices contained.
A Generic Device can contain one or more Specific Devices:
Tag
<spec_dev> Specific Device. The Editor can read and edit Specific Devices.
Attributes
key Unique value of Specific Device
name Unique name of Specific Device for code generation
help Name of Specific Device in plain text. help and name will always be equal after editing.
Ex.:
name=”SPECIFIC_TYPE_PC_CONTROLLER”
help=” Specific Type PC Controller”
comment Comment for this Specific Device entered in the Editor. Used in code generation.
INS10680-5 Z-Wave XML Editor User Guide 2018-04-05
Silicon Labs Inc. Page 34 of 44 Appendix A Z-WAVE XML
FORMAT
(c) Command Classes, Commands, and Parameters
Tag
<cmd_class> Command Class. The Editor can read and edit Command Classes.
Attributes
key Value of Command Class. This must be unique with the exception that different versions of a Command Class can exist.
version The version of this Command Class. More versions of Command Classes can exist with same value and name.
name Name of Command Class for code generation. This must be unique with the exception that different versions of a Command Class can exist.
help Name of Command Class in plain text. help and name will always be equal after editing.
Ex.:
name=”COMMAND_CLASS_ALARM”
help=” Command Class Alarm”
comment Comment for this Command Class entered in the Editor. Used in code generation.
read_only true or false set in the Editor. Applies to the Command Class as well as all Command and Parameters contained.
INS10680-5 Z-Wave XML Editor User Guide 2018-04-05
Silicon Labs Inc. Page 35 of 44 Appendix A Z-WAVE XML
FORMAT
A Command Class can contain one or more Commands:
Tag
<cmd> Command. The Editor can read and edit Commands.
Attributes
key Value of Command
name Name of Command for code generation. The Command name must be unique for all Commands, except that Commands with the same name and key value can exist in different versions of a Command Class.
help Name of Command Class in plain text. help and name will always be equal after editing.
Ex.:
name=”ALARM_GET”
help=” Alarm Get”
comment Comment for this Command Class entered in the Editor. Used in code generation.
A Command can contain one or more Parameters.
Tag
<param> Parameter for Command. For some Parameter types the Editor can read and edit – for some only read.
Attributes
key Value of Parameter. Within a Command, Parameters must be numbered from 0 and up. The editor will make sure that Parameters a numbered correctly.
name Name of Parameter.
type Type of Parameter – see next section.
typehashcode Type number of Parameter – see next section.
comment Comment for this Command Class entered in the Editor. Used in code generation.
INS10680-5 Z-Wave XML Editor User Guide 2018-04-05
Silicon Labs Inc. Page 36 of 44 Appendix A Z-WAVE XML
FORMAT
(i) Parameter Types
The possible Parameter types will be listed in the following with their possible Parameter Fields.
type=”BYTE” typehashcode=”0x01”
1 byte parameter. Can contain a 0-255 value or can contain a number of discretely defined values. BYTE can be read and edited by the Editor (select 1 byte as value or as has defines).
Possible Parameter Fields
<valueattrib> Tag must exist.
key Should be 0
hasdefines true if this BYTE uses discsrete value – has defines values (declared in <bitflag>).
showhex Flag used by Z-Wave protocol Zniffer application. Can be set in the Editor.
<bitflag> Optional. Used if BYTE has discretely defined values.
key Count from 1.
flagname Name of defined value.
flagmask Value of define.
type=”WORD” typehashcode=”0x02”
2 bytes parameter. Can contain a 0-65535 value. WORD can be read and edited by the Editor (select 2 bytes).
Possible Parameter Fields
<word> Tag must exist.
key Should be 0
hasdefines Not used. Should be false.
showhex Flag used by Z-Wave protocol Zniffer application. Can be set in the Editor.
INS10680-5 Z-Wave XML Editor User Guide 2018-04-05
Silicon Labs Inc. Page 37 of 44 Appendix A Z-WAVE XML
FORMAT
type=”DWORD” typehashcode=”0x03”
4 bytes parameter. Can contain a 0-4294967295 value. DWORD can be read and edited by the Editor (select 4 bytes).
Possible Parameter Fields
<dword> Tag must exist.
key Should be 0
hasdefines Not used. Should be false.
showhex Flag used by Z-Wave protocol Zniffer application. Can be set in the Editor.
type=”BIT_24” typehashcode=”0x04”
2 bytes parameter. Can contain a 0- 16777216 value. BIT_24 can be read and edited by the Editor (select 3 bytes).
Possible Parameter Fields
<bit_24> Tag must exist.
key Should be 0
hasdefines Not used. Should be false.
showhex Flag used by Z-Wave protocol Zniffer application. Can be set in the Editor.
INS10680-5 Z-Wave XML Editor User Guide 2018-04-05
Silicon Labs Inc. Page 38 of 44 Appendix A Z-WAVE XML
FORMAT
type=”ARRAY” typehashcode=”0x05”
Array of bytes parameter. ARRAY can be read and edited by the Editor for fixed length arrays. ARRAY with variable length can be read, but will be saved as VARIANT if changed.
Possible Parameter Fields
<arrayattriib> Tag must exist.
key Should be 0
is_ascii Flag used by Z-Wave protocol Zniffer application. Can be set in the Editor.
len 0-254. Fixed length of array. 255: <arraylen> field is used for length definition.
<arraylen> Optional. Can be read by the Editor.
key Should be 1
paramoffs Key value of Parameter holding size information for this array.
lenmask Bit mask for size information in above size Parameter.
lenoffs Shift result right this number of times when masked out of size Parameter using lenmask.
type=”BITMASK” typehashcode=”0x06”
Array of bytes parameter used for masking. BITMASK can be read and edited by the Editor. BITMASK has always a variable length determined by size parameter or by message length.
Possible Parameter Fields
<bitmask> Tag must exist.
key Should be 0.
paramoffs 0-254: key value of Parameter holding size information for this array. 255: Length is determined by message length.
lenmask Bit mask for size information in above size Parameter.
lenoffs Shift result right this number of times when masked out of size Parameter using lenmask.
INS10680-5 Z-Wave XML Editor User Guide 2018-04-05
Silicon Labs Inc. Page 39 of 44 Appendix A Z-WAVE XML
FORMAT
type=”STRUCT_BYTE” typehashcode=”0x07”
1 byte parameter. Contains bit fields. STRUCT_BYTE can be read and edited by the Editor (select 1 byte as bit fields).
Possible Parameter Fields
<bitfield> Optional. Used when more than one bit in this STRUCT_BYTE contains a value.
key Numbered from 0 and up.
fieldname Name of bit field.
fieldmask Mask for bit field. Gives the bits used in this field.
shifter Number of times to shift the masked value to the right to get the value of the bit field.
<bitflag> Optional. Used when one bit contains a value (eg. on/off or true/false).
key Numbered from 0 and up.
flagname Name of bit value.
flagmask Value of bit.
<fieldenum> Optional. Used when more than one bit in this STRUCT_BYTE contains defined values from 0 and up.
key Numbered from 0 and up.
fieldname Name of fieldenum.
fieldmask Mask for bits. Gives the bits used in this field.
shifter Number of times to shift the masked value to the right to get the value of the fieldenum.
<fieldenum> Contains one or more fieldenum tags to give the names of the defined values. The defined values are always from 0 and up.
value Name of defined value.
INS10680-5 Z-Wave XML Editor User Guide 2018-04-05
Silicon Labs Inc. Page 40 of 44 Appendix A Z-WAVE XML
FORMAT
type=”ENUM” typehashcode=”0x08”
1 byte with discretely defined values. ENUM can be read by the Editor but will be changed to CONST if edited.
Possible Parameter Fields
<enum> One or more.
key Gives the value of the define.
name Name of the define.
type=”ENUM_ARRAY” typehashcode=”0x09”
byte array with discretely defined values. The length of the array is defined by the number of defined values. ENUM_ARRAY can be read by the Editor but not changed.
Possible Parameter Fields
<enum> One or more.
key Gives the value of the define.
name Name of the define.
INS10680-5 Z-Wave XML Editor User Guide 2018-04-05
Silicon Labs Inc. Page 41 of 44 Appendix A Z-WAVE XML
FORMAT
type=”MULTI_ARRAY” typehashcode=”0x0A”
byte array with index selected in different (ENUM) parameter. The length of the array is defined by the number of <multi_array> tag containing <bitflag>. MULTI_ARRAY can be read by the Editor but not changed.
Possible Parameter Fields
<multi_array> One or more exist. Contains <paramdescloc> or <bitflag> tags
<paramdescloc> Information of (ENUM) parameter containing possible indexes
key Must be 0.
param Key of Parameter containing possible indexes.
paramdesc 255
paramstart = param
<bitflag> One for each possible selection for each possible index in parameter contaning possible indexes.
key Equals values of possible indexes in parameter contaning possible indexes.
flagname Name of defined value.
flagmask Value
type=”CONST” typehashcode=”0x0B”
1 byte with discretely defined values. CONST can be read and edited by the Editor.
Possible Parameter Fields
<const> One or more.
key Numbered from 0 and up.
flagname Name of the define.
flagmask Value.
INS10680-5 Z-Wave XML Editor User Guide 2018-04-05
Silicon Labs Inc. Page 42 of 44 Appendix A Z-WAVE XML
FORMAT
type=”VARIANT” typehashcode=”0x0C”
Array of bytes. VARIANT can be read and edited by the Editor. VARIANT has always a variable length determined by size parameter or by message length.
Possible Parameter Fields
<variant> Tag must exist.
key Should be 0.
paramoffs 0-254: key value of Parameter holding size information for this array. 255: Length is determined by message length.
sizemask Bit mask for size information in above size Parameter.
sizeoffs Shift result right this number of times when masked out of size Parameter using sizemask.
showhex Not used.
signed Not used.
INS10680-5 Z-Wave XML Editor User Guide 2018-04-05
silabs.com | Building a more connected world. Page 43 of 44
Silicon Laboratories Inc.400 West Cesar ChavezAustin, TX 78701USA
Smart. Connected. Energy-Friendly.
Productswww.silabs.com/products
Qualitywww.silabs.com/quality
Support and Communitycommunity.silabs.com
DisclaimerSilicon Labs intends to provide customers with the latest, accurate, and in-depth documentation of all peripherals and modules available for system and software implementers using or intending to use the Silicon Labs products. Characterization data, available modules and peripherals, memory sizes and memory addresses refer to each specific device, and "Typical" parameters provided can and do vary in different applications. Application examples described herein are for illustrative purposes only. Silicon Labs reserves the right to make changes without further notice and limitation to product information, specifications, and descriptions herein, and does not give warranties as to the accuracy or completeness of the included information. Silicon Labs shall have no liability for the consequences of use of the information supplied herein. This document does not imply or express copyright licenses granted hereunder to design or fabricate any integrated circuits. The products are not designed or authorized to be used within any Life Support System without the specific written consent of Silicon Labs. A "Life Support System" is any product or system intended to support or sustain life and/or health, which, if it fails, can be reasonably expected to result in significant personal injury or death. Silicon Labs products are not designed or authorized for military applications. Silicon Labs products shall under no circumstances be used in weapons of mass destruction including (but not limited to) nuclear, biological or chemical weapons, or missiles capable of delivering such weapons.
Trademark InformationSilicon Laboratories Inc.® , Silicon Laboratories®, Silicon Labs®, SiLabs® and the Silicon Labs logo®, Bluegiga®, Bluegiga Logo®, Clockbuilder®, CMEMS®, DSPLL®, EFM®, EFM32®, EFR, Ember®, Energy Micro, Energy Micro logo and combinations thereof, "the world’s most energy friendly microcontrollers", Ember®, EZLink®, EZRadio®, EZRadioPRO®, Gecko®, ISOmodem®, Micrium, Precision32®, ProSLIC®, Simplicity Studio®, SiPHY®, Telegesis, the Telegesis Logo®, USBXpress®, Zentri, Z-Wave and others are trademarks or registered trademarks of Silicon Labs. ARM, CORTEX, Cortex-M3 and THUMB are trademarks or registered trademarks of ARM Holdings. Keil is a registered trademark of ARM Limited. All other products or brand names mentioned herein are trademarks of their respective holders.