https://support.industry.siemens.com/cs/ww/en/view/109479599 Configuration Example 09/2015 Setting up a secure VPN Connection between SINEMA Remote Connect Client, SCALANCE S615 and SINEMA Remote Connect Server SINEMA Remote Connect, SCALANCE S615
Setting up a secure VPN Connection between SINEMA Remote Connect Client, SCALANCE S615 and SINEMA Remote Connect Server SINEMA Remote Connect, SCALANCE S615
Note The Application Examples are not binding and do not claim to be complete regarding the circuits shown, equipping and any eventuality. The Application Examples do not represent customer-specific solutions. They are only intended to provide support for typical applications. You are responsible for ensuring that the described products are used correctly. These Application Examples do not relieve you of the responsibility to use safe practices in application, installation, operation and maintenance. When using these Application Examples, you recognize that we cannot be made liable for any damage/claims beyond the liability clause described. We reserve the right to make changes to these Application Examples at any time without prior notice. If there are any deviations between the recommendations provided in this Application Example and other Siemens publications – e.g. Catalogs – the contents of the other documents shall have priority.
We do not accept any liability for the information contained in this document.
Any claims against us – based on whatever legal reason – resulting from the use of the examples, information, programs, engineering and performance data etc., described in this Application Example shall be excluded. Such an exclusion shall not apply in the case of mandatory liability, e.g. under the German Product Liability Act (“Produkthaftungsgesetz”), in case of intent, gross negligence, or injury of life, body or health, guarantee for the quality of a product, fraudulent concealment of a deficiency or breach of fundamental contractual obligations (“wesentliche Vertragspflichten”). The damages for a breach of a substantial contractual obligation are, however, limited to the foreseeable damage, typical for the type of contract, except in the event of intent or gross negligence or injury to life, body or health. The above provisions do not imply a change of the burden of proof to your detriment.
Any form of duplication or distribution of these Application Examples or excerpts hereof is prohibited without the expressed consent of Siemens AG.
Security informati
on
Siemens provides products and solutions with industrial security functions that support the secure operation of plants, solutions, machines, equipment and/or networks. They are important components in a holistic industrial security concept. With this in mind, Siemens' products and solutions undergo continuous development. Siemens recommends strongly that you regularly check for product updates.
For the secure operation of Siemens products and solutions, it is necessary to take suitable preventive action (e.g. cell protection concept) and integrate each component into a holistic, state-of-the-art industrial security concept. Third-party products that may be in use should also be considered. For more information about industrial security, visit http://www.siemens.com/industrialsecurity.
To stay informed about product updates as they occur, sign up for a product-specific newsletter. For more information, visit http://support.industry.siemens.com.
Table of Contents Warranty and Liability ................................................................................................. 2
1 Task and Solution .............................................................................................. 4
1.1 Task ...................................................................................................... 4 1.2 Possible solution .................................................................................. 4 1.2.1 Complete overview ............................................................................... 4 1.2.2 SINEMA Remote Connect.................................................................... 6 1.3 Characteristics of the solution .............................................................. 8
2 Configuration and Project Engineering ........................................................... 9
2.1 Setting up the environment .................................................................. 9 2.1.1 Required components and IP address overview ................................. 9 2.1.2 Routers on the VPN clients ................................................................ 12 2.1.3 PC (SINEMA Remote Connect Client) ............................................... 12 2.1.4 SCALANCE S615 ............................................................................... 13 2.1.5 Router on the VPN server .................................................................. 17 2.1.6 SINEMA Remote Connect Server ...................................................... 18 2.2 Setting up the remote connection on the SINEMA Remote
Connect Server .................................................................................. 21 2.2.1 Defining participants and communication relationships ..................... 22 2.2.2 Exporting certificates and user configuration ..................................... 32 2.3 Setting up the remote connection on the S615 .................................. 34 2.3.1 Enabling access to the SINEMA Remote Connect Server ................ 34 2.3.2 Loading the certificate ........................................................................ 35 2.3.3 Configuring the VPN connection ........................................................ 36 2.4 Setting up the remote connection on the SINEMA Remote
The task is to provide a service employee with secure remote access to the SINEMA Remote Connect Server and lower-level devices for maintenance, control and diagnostic purposes. SINEMA Remote Connect is used for secure, central management of the tunnel connections.
The following customer requirements have to be considered:
Prevention of unauthorized access to the SINEMA Remote Connect Server and lower-level devices.
Prevention of the unauthorized execution of functions through the assignment of rights.
Access control to the lower-level devices.
Protection against data manipulation and spying.
Flexible access for the service employee (regardless of the user’s location).
1.2 Possible solution
1.2.1 Complete overview
The figure below shows one way of implementing the customer requirements:
VPN Server
Service Technician
VPN Tunnel
Industrial EthernetVPN Client
SINEMA Remote Connect
Server
S615Automation
Cell
Control Center
VPN Client1
2
Static
WAN IP Address
Internet
Router
Internet
Router
Internet
Router
WAN
An automation cell (nodes such as SIMATIC stations, panels, drives, PCs) is connected with the aid of the SCALANCE S615. The service technician uses a mobile device (e.g., a notebook computer).
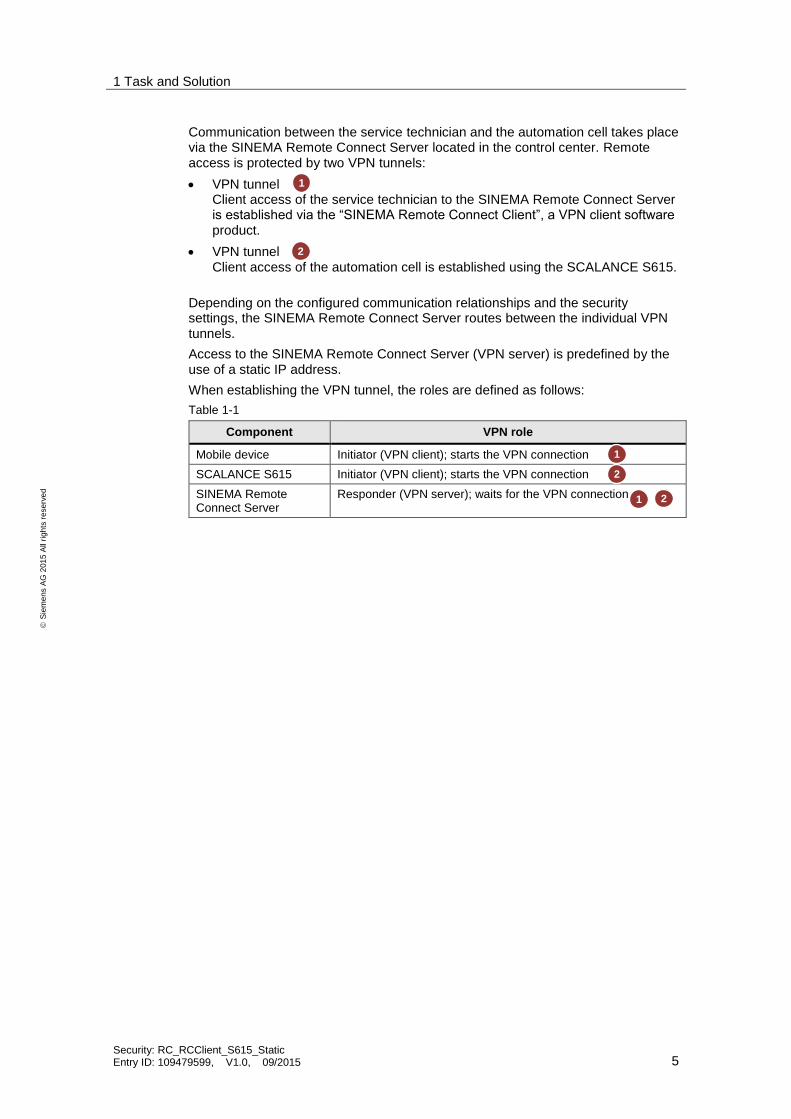
Communication between the service technician and the automation cell takes place via the SINEMA Remote Connect Server located in the control center. Remote access is protected by two VPN tunnels:
VPN tunnel Client access of the service technician to the SINEMA Remote Connect Server is established via the “SINEMA Remote Connect Client”, a VPN client software product.
VPN tunnel Client access of the automation cell is established using the SCALANCE S615.
Depending on the configured communication relationships and the security settings, the SINEMA Remote Connect Server routes between the individual VPN tunnels.
Access to the SINEMA Remote Connect Server (VPN server) is predefined by the use of a static IP address.
When establishing the VPN tunnel, the roles are defined as follows:
Table 1-1
Component VPN role
Mobile device Initiator (VPN client); starts the VPN connection
SCALANCE S615 Initiator (VPN client); starts the VPN connection
SINEMA Remote Connect Server
Responder (VPN server); waits for the VPN connection
SINEMA Remote Connect is a management platform for remote networks that centrally manages secure tunnel connections. It allows convenient and secure maintenance of widely distributed plants or machines via remote access. Even if the machines are integrated in third-party networks. For example, in the plants of end customers of machine manufacturers.
Parts of a solution with SINEMA Remote Connect are:
SINEMA Remote Connect as the VPN server
Terminal units (VPN client):
– SCALANCE S615 (with KEY-PLUG)
– SCALANCE M-800 (with KEY-PLUG)
– SINEMA Remote Connect Client
– OpenVPN Client
SINEMA Remote Connect Server
SINEMA Remote Connect Server is a server application that provides integrated connection management of distributed networks via the Internet. It coordinates secure connection establishment between users, widely distributed plants and machines.
The SINEMA Remote Connect Server performs the following functions:
Management and establishment of encrypted connections using OpenVPN.
Verification via CA certificate or fingerprint.
User management with rights configuration.
Establishment of permanent or event-based connections (established via a wake-up SMS text message or a signal at the digital input).
Support of routing and NAT to connect subnets behind the SCALANCE S615.
Provision of secure remote access to lower-level networks for maintenance, control and diagnostic purposes.
Web Based Management (WBM) to configure the server.
The SCALANCE S615 is a security module for the protection of devices, automation cells or network segments in Ethernet networks against internal and external threats.
It offers the same functionalities and features as the previous SCALANCE M variants. It additionally provides a number of specific LAN functions that allow optimum connection to SINEMA Remote Connect.
Among other things, the SCALANCE S615 is characterized by the following functions:
Support of VPN for secure authentication of network users, data encryption and data integrity check.
– IPSec VPN tunnel (server and client functionality)
– OpenVPN for connection to SINEMA Remote Connect (Client function)
Stateful inspection firewall with filtering of IP-based data traffic and communications protocols.
Support of NAT/NAPT; also in conjunction with IPSec and OpenVPN.
VLAN support.
Flexible, reaction-free and protocol-independent protection.
Support of multiple VPN tunnels at a time.
Easiest connection to SINEMA Remote Connect via the auto-configuration interface (can be activated with the KEY-PLUG SINEMA REMOTE CONNECT).
SINEMA Remote Connect Client
The SINEMA Remote Connect Client is an OpenVPN client software product for optimum connection to SINEMA Remote Connect.
Among other features, it provides the following functions:
Support of VPN (OpenVPN) for secure authentication of network users, data encryption and data integrity check.
Easiest connection to SINEMA Remote Connect via the auto-configuration interface.
Phone book with all the devices assigned to a user.
Proxy server for communication with networks behind a proxy server infrastructure.
This solution is based on SINEMA Remote Connect Appliance and requires the SINEMA Remote Connect Server as software.
Install this software on a PC without an operating system. Please consider the requirements necessary for the installation. During the installation, you have to enter the server’s IP address. Use the IP address from Table 2-1.
The service technician’s PC requires the SINEMA Remote Connect Client software. Install this software on your PC.
NOTICE The installation of the SINEMA Remote Connect Server includes its own operating system. If you are using a PC on which an operating system already exists, the hard disk will be formatted and stored data will be lost.
Required devices/components:
To set up the environment, use the following components:
A control center PC on which the “SINEMA Remote Connect Server” is installed.
A service technician PC on which the “SINEMA Remote Connect Client” is installed.
A SCALANCE S615.
A KEY-PLUG SINEMA REMOTE CONNECT.
DSL access with a dynamic WAN IP address and a DSL router with WLAN functionality.
DSL access with a dynamic WAN IP address and a DSL router.
DSL access with a static WAN IP address and a DSL router.
A configuration PC on which a web browser is installed.
The necessary network cables, TP cables (twisted pair) according to the IE FC RJ45 standard for Industrial Ethernet.
Note You can also use a different Internet access method (e.g., UTMS). The configuration described below refers explicitly to the components listed in “Required devices/components”.
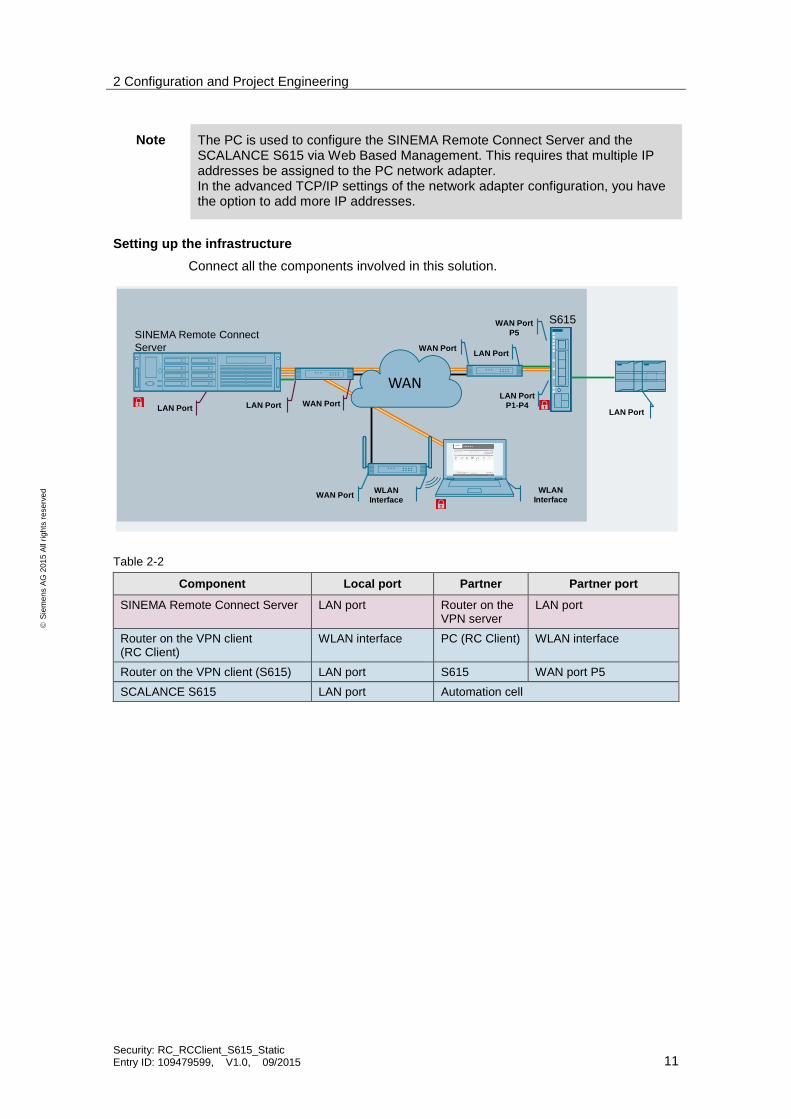
Note The PC is used to configure the SINEMA Remote Connect Server and the SCALANCE S615 via Web Based Management. This requires that multiple IP addresses be assigned to the PC network adapter. In the advanced TCP/IP settings of the network adapter configuration, you have the option to add more IP addresses.
Setting up the infrastructure
Connect all the components involved in this solution.
SINEMA Remote Connect
Server
S615
WAN
WAN PortWLAN
Interface
LAN Port
WLAN
Interface
WAN PortLAN Port
LAN Port WAN PortLAN Port
P1-P4
WAN Port
P5
LAN Port
Table 2-2
Component Local port Partner Partner port
SINEMA Remote Connect Server LAN port Router on the VPN server
LAN port
Router on the VPN client (RC Client)
WLAN interface PC (RC Client) WLAN interface
Router on the VPN client (S615) LAN port S615 WAN port P5
To make sure that no old configurations and certificates are stored in the SCALANCE S, reset the module to factory default.
KEY-PLUG
The “KEY-PLUG SINEMA REMOTE CONNECT” is required for the SCALANCE S615. The KEY-PLUG enables the connection between the SCALANCE S615 and SINEMA Remote Connect.
Make sure that a valid KEY-PLUG is inserted in the SCALANCE S.
Opening Web Based Management
Connect the configuration PC to a LAN port of the SCALANCE S615 (e.g., port 2).
By factory default, the device has IP address 192.168.1.1/24.
Use address http://192.168.1.1 to open Web Based Management.
Web Based Management login
When you log in for the first time or after setting to factory default, the login data is defined as follows: Name: admin Password: admin
1. Enter the name and password in the appropriate text boxes. Click the “Login” button.
2. When you log in for the first time or after setting to factory default, you are prompted to change the password.
3. Enter the old and new password. In “Password Confirmation”, repeat the password to confirm it. Both entries must match.
4. Click the “Set Values” button to complete the operation and activate the new password.
5. After successful login, the start page appears.
Result The password for the “admin” user has been changed. From now on, log in with the changed password.
Setting the time
To establish secure communication, it is essential that the current date and time are always set on the SCALANCE. Otherwise, the certificates used are interpreted as invalid and secure VPN communication is not possible.
1. In the navigation bar, navigate to “System” > “System Time”.
2. Click the “Use PC Time” button to apply the time setting of the PC.
3. Apply the setting with “Set Values”.
Result The date and time are applied and displayed in the “System Time” field.
Note You also have the option to have the system time automatically synchronized with an NTP time server. A number of time servers from which the exact current time can be retrieved can be found on the Internet.
To integrate the SCALANCE S615 into the network of the sample configuration, change the LAN interface accordingly.
1. In the navigation pane, click “Layer 3” > “Subnet” and in the content pane, click the “Configuration” tab.
2. Enter the IP address for “vlan1” as shown in Table 2-1.
3. Click “Set Values”.
Result The IP address is automatically changed in the web browser’s address bar. Due to the assignment of multiple IP addresses, the PC can still access Web Based Management.
WAN access of the VPN clients to the SINEMA Remote Connect Server (VPN server) is implemented using a fixed public IP address. This IP address must be requested from the provider and then stored in the DSL router.
Port forwarding on the DSL router
To allow smooth exchange of tunnel packets between the PC (SINEMA Remote Connect Client), SCALANCE S615 and SINEMA Remote Connect Server, make sure that PORT forwarding for OpenVPN and https with TCP and UDP (TCP/443,UDP/1194,TCP/5443,TCP/6220) is enabled and forwarding to the SINEMA Remote Connect Server is possible.
Note In the SINEMA Remote Connect Server, these ports can be changed; therefore, the port numbers are only correct if you keep the default settings. Either only UDP or TCP is used for OpenVPN. Where possible, always prefer UDP as it is faster/performs better.
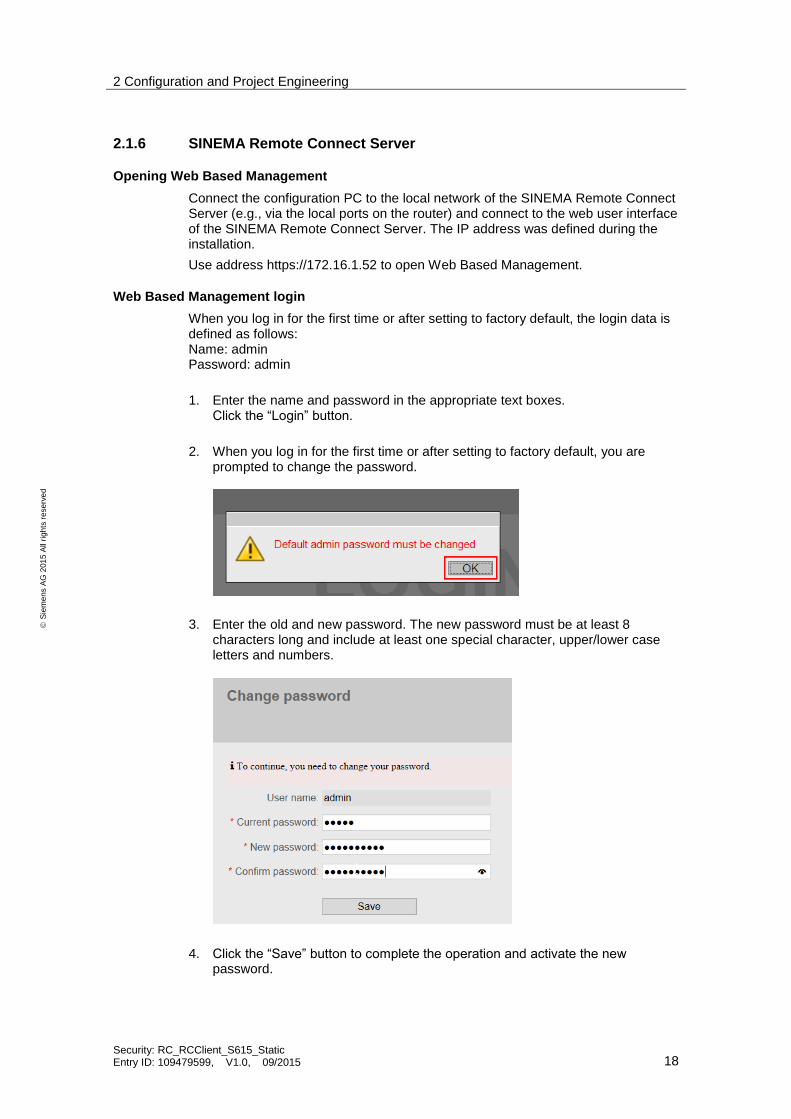
Connect the configuration PC to the local network of the SINEMA Remote Connect Server (e.g., via the local ports on the router) and connect to the web user interface of the SINEMA Remote Connect Server. The IP address was defined during the installation.
Use address https://172.16.1.52 to open Web Based Management.
Web Based Management login
When you log in for the first time or after setting to factory default, the login data is defined as follows: Name: admin Password: admin
1. Enter the name and password in the appropriate text boxes. Click the “Login” button.
2. When you log in for the first time or after setting to factory default, you are prompted to change the password.
3. Enter the old and new password. The new password must be at least 8 characters long and include at least one special character, upper/lower case letters and numbers.
4. Click the “Save” button to complete the operation and activate the new password.
5. After successful login, the start page appears.
Result The password for the “admin” user has been changed. From now on, log in with the changed password.
Setting the time
To establish secure communication, it is essential that the current date and time are always set on the SINEMA Remote Connect Server. Otherwise, the certificates used are interpreted as invalid and secure VPN communication is not possible.
1. In the navigation bar, navigate to “System” > “System Time”.
2. Click the “Use PC time” button to apply the time setting of the PC.
Result The date and time are applied and displayed in the “System time” field.
Note You also have the option to have the system time automatically synchronized with an NTP time server so that the exact current time can be retrieved.
1. In the navigation pane, click “Security” > “Network” and in the content pane, click the “Interfaces” tab.
2. In “Port”, select “WAN”. The port configuration is displayed. Check the WAN port settings. Check “SINEMA RC is located behind a NAT device” to enter the required external WAN IP address for the router. In “WAN IP address”, enter the WAN IP address of the router.
3. Click “Save” to save the settings.
Note Keep the default settings if the SINEMA Remote Connect Server is in a local network.
2.2 Setting up the remote connection on the SINEMA Remote Connect Server
To allow the service technician’s PC to access the automation cell via the SINEMA Remote Connect Server, the terminal units (SINEMA Remote Connect Client and SCALANCE S615) must log on to the server. The respective VPN tunnel between the terminal unit and the SINEMA Remote Connect Server is established only after successful authentication.
Depending on the configured communication relationships and the security settings, the SINEMA Remote Connect Server interconnects the individual VPN tunnels and therefore allows access.
This requires the following configuration steps:
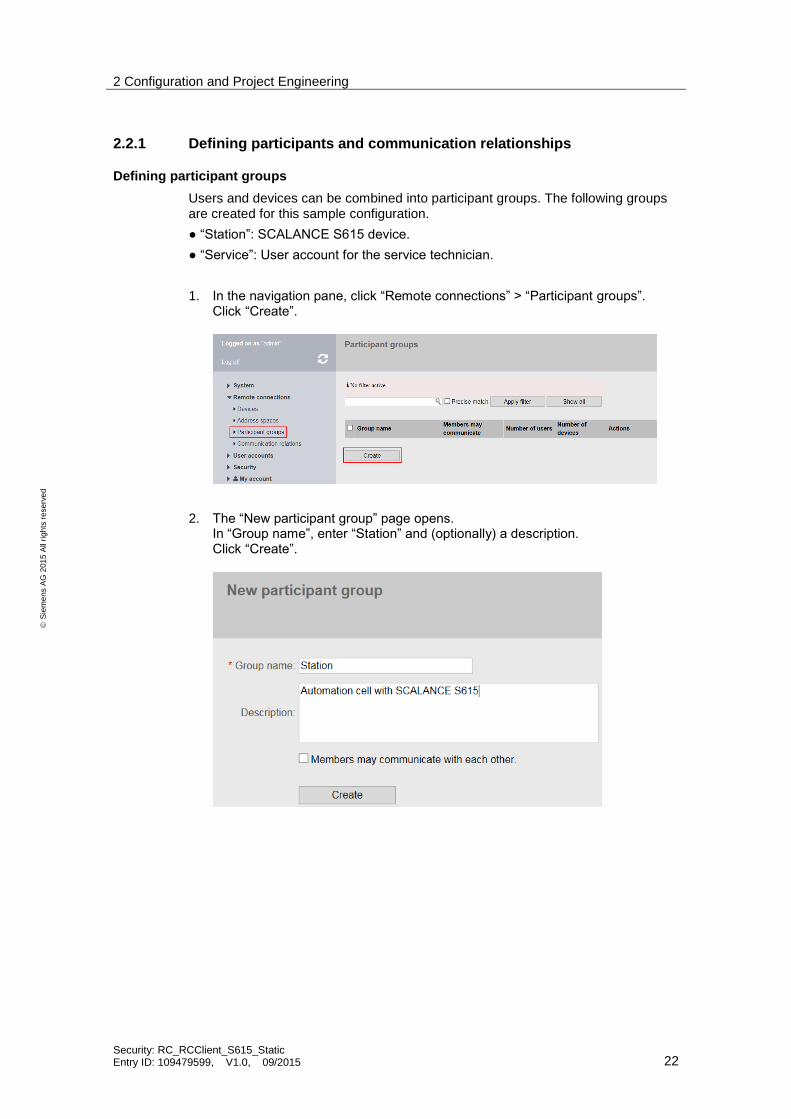
Define participant groups.
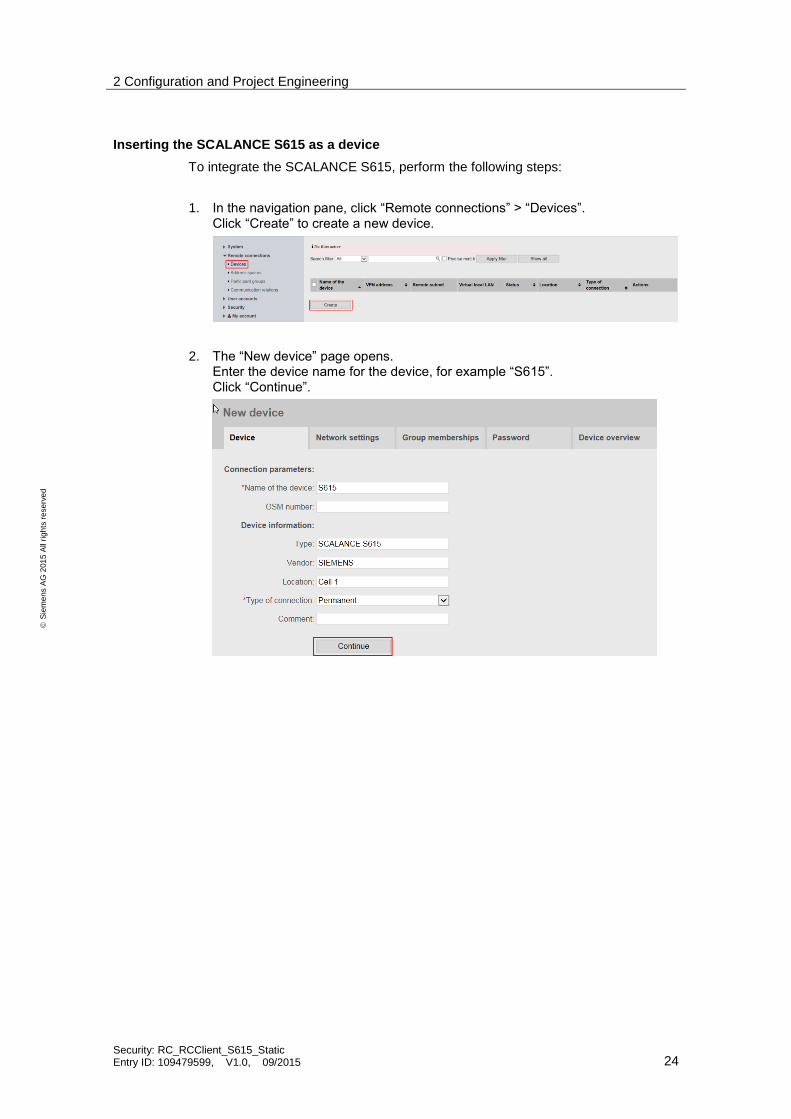
Implement the SCALANCE S615 as a device.
Create the service technician as a user.
Define communication relationships.
Load certificates and user configuration.
Opening Web Based Management
Connect the configuration PC to the local network of the SINEMA Remote Connect Server (e.g., via the local ports on the router) and use address “https://172.16.1.52” to open Web Based Management. Log in with the “admin” user and the appropriate password. Note: Only the “admin” user type has write access to the configuration in the SINEMA Remote Connect Server.
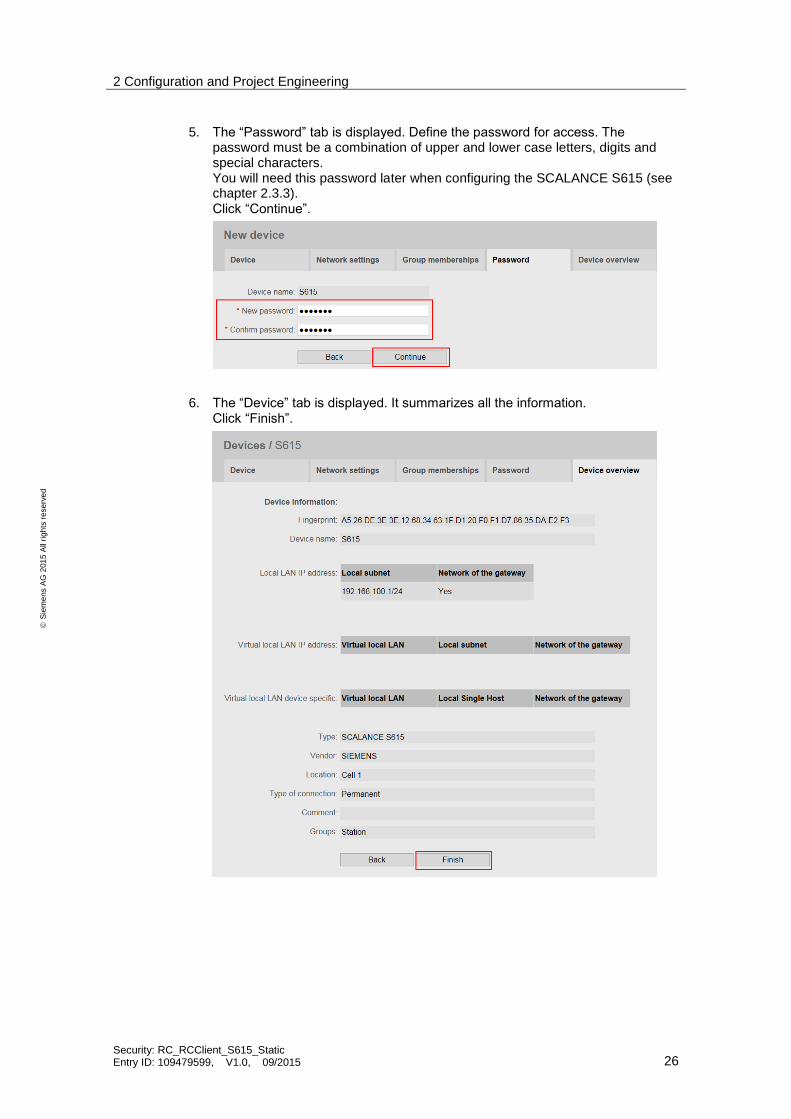
5. The “Password” tab is displayed. Define the password for access. The password must be a combination of upper and lower case letters, digits and special characters. You will need this password later when configuring the SCALANCE S615 (see chapter 2.3.3). Click “Continue”.
6. The “Device” tab is displayed. It summarizes all the information. Click “Finish”.
Result The SCALANCE S615 is stored in the SINEMA Remote Connect Server as a new device.
Determining the device ID
The device ID and – if no CA certificate is used – the fingerprint are pieces of information the SCALANCE S615 uses for authentication on the SINEMA Remote Connect Server during connection establishment.
As this example uses the CA certificate, only the device ID is of interest.
1. In the navigation pane, click “Remote connections” > “Devices”. The SCALANCE S615 is displayed.
2. In “Actions”, click the icon to open the device information.
3. The “Device information” is displayed. Note down the Device ID entry or copy it and save the value to a text file in your local directory.
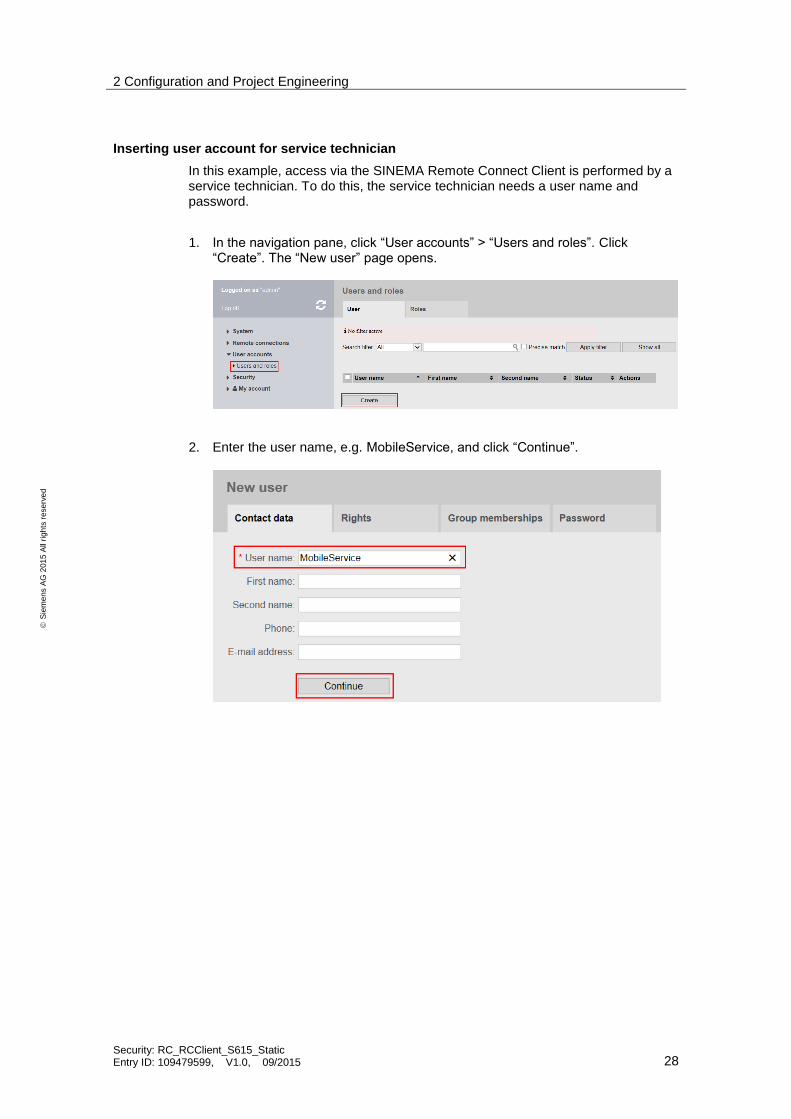
In this example, access via the SINEMA Remote Connect Client is performed by a service technician. To do this, the service technician needs a user name and password.
1. In the navigation pane, click “User accounts” > “Users and roles”. Click “Create”. The “New user” page opens.
2. Enter the user name, e.g. MobileService, and click “Continue”.
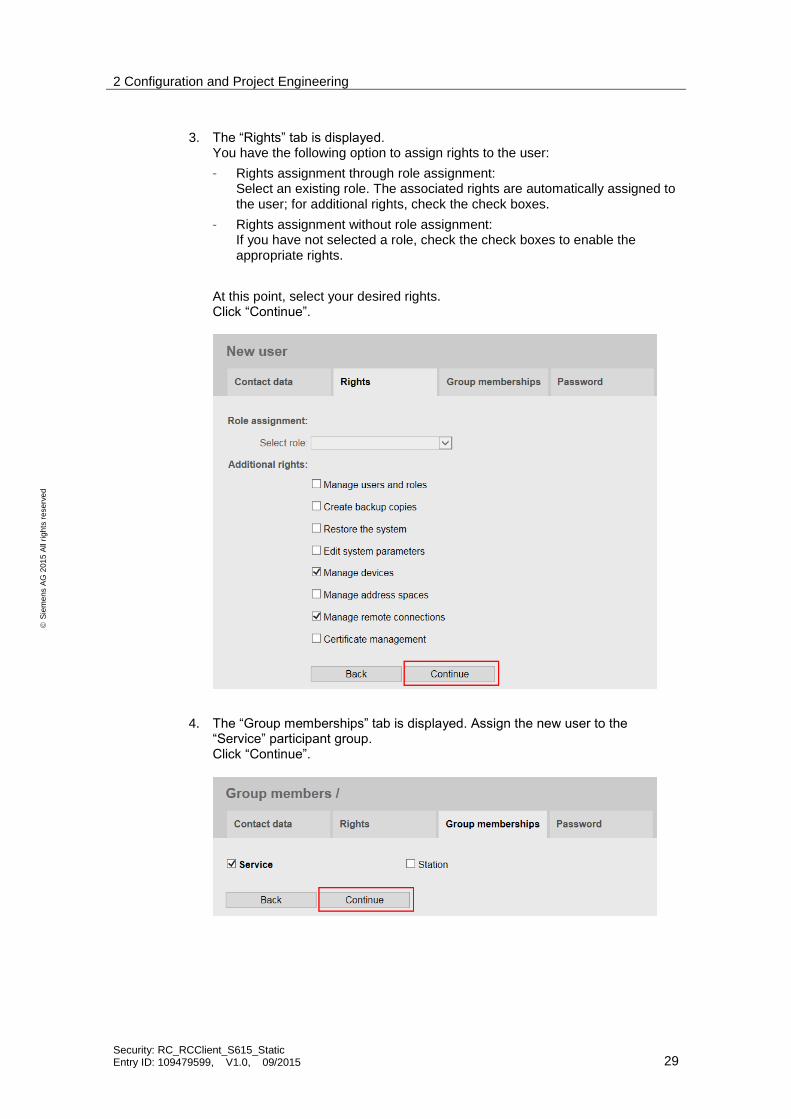
3. The “Rights” tab is displayed. You have the following option to assign rights to the user:
– Rights assignment through role assignment: Select an existing role. The associated rights are automatically assigned to the user; for additional rights, check the check boxes.
– Rights assignment without role assignment: If you have not selected a role, check the check boxes to enable the appropriate rights.
At this point, select your desired rights. Click “Continue”.
4. The “Group memberships” tab is displayed. Assign the new user to the “Service” participant group. Click “Continue”.
5. The next step is to define the password for the new user. The password must be at least 8 characters long and include at least one special character, upper/lower case letters and numbers. You will need this password later when configuring the SINEMA Remote Connect Client (see chapter 2.4). Select “Finish” to complete the user creation process.
Note: The new user can change the assigned password later.
Result The “MobileService” user has been created and appears as a new user.
To enable the participant groups to communicate with each other, communication relationships are required. A communication relationship can be created for each direction.
In this configuration example, communication only takes place from the “Service” group to the “Station” group. Communication in the opposite direction is not possible.
To enable this, perform the following steps:
1. In the navigation pane, click “Remote connections” > “Participant groups”. The content pane lists the participant groups that have already been created. In the “Actions” column, “Service”, click the arrow icon.
2. The “Destination groups” page opens. Check “Station” and click “Save”.
3. Click “Exit dialog”.
Result
Now the participants of the “Service” group can communicate with the participants of the “Station” group – not vice versa.
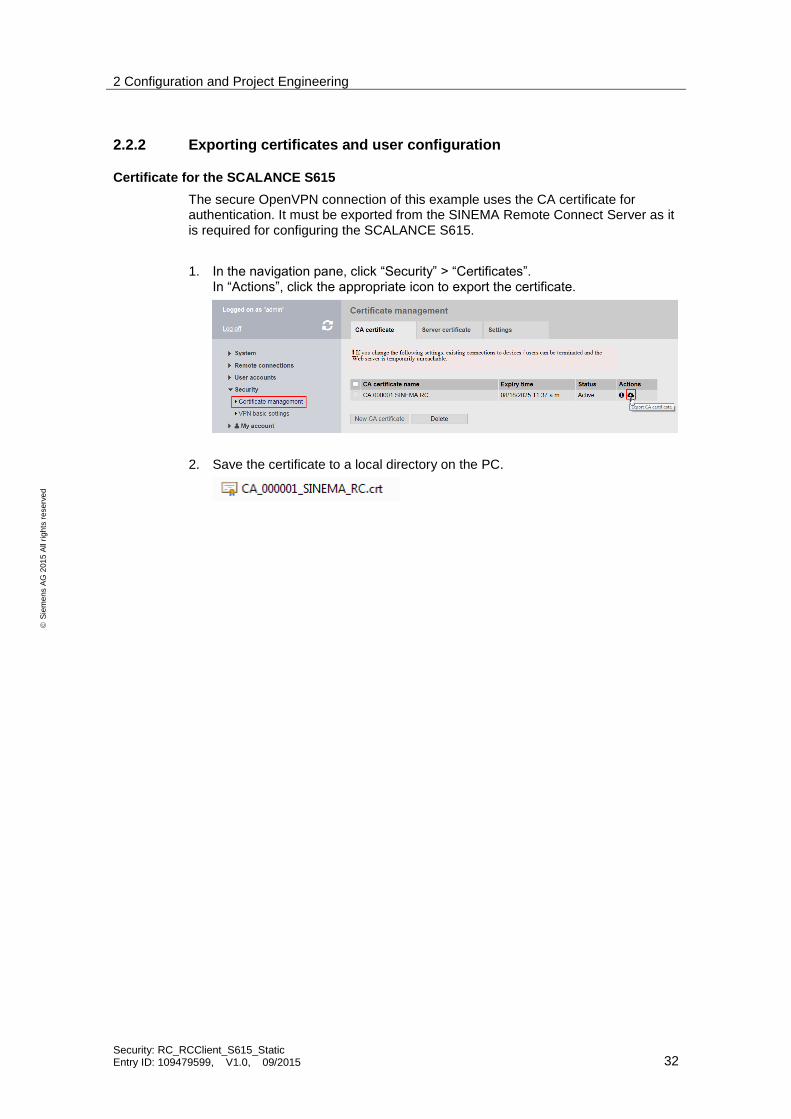
2.2.2 Exporting certificates and user configuration
Certificate for the SCALANCE S615
The secure OpenVPN connection of this example uses the CA certificate for authentication. It must be exported from the SINEMA Remote Connect Server as it is required for configuring the SCALANCE S615.
1. In the navigation pane, click “Security” > “Certificates”. In “Actions”, click the appropriate icon to export the certificate.
2. Save the certificate to a local directory on the PC.
User configuration for service technician (SINEMA Remote Connect Client)
Creating a user automatically generates a configuration file with the *.ovpn extension. The file contains different parameters that are necessary for a connection to the server. The file must be loaded to the participant in the remote network that establishes a VPN connection to the SINEMA Remote Connect Server.
1. Log off of Web Based Management as the administrator and log back on with the new user data you have just created.
2. In the navigation pane, click “My account” > “User certificate”. Go to the “Exports” tab.
3. Click the appropriate format to load all the displayed certificates to a local directory on your PC. The certificates include:
a. PKCS#12: Container in Personal Information Exchange format (PFX).
b. PEM: Certificate and key as Base64-coded ASCII text.
c. OVPN: OpenVPN configuration for user.
Result All required certificates have been saved in the local directory.
Successful establishment of the VPN tunnel between the SCALANCE S615 and the SINEMA Remote Connect Server requires the following configuration steps:
Enable the connection between the VLANs.
Load the certificate to the device.
Configure the VPN connection.
Opening Web Based Management
Connect the configuration PC to a LAN port of the SCALANCE S615 (e.g., port 2) and use address “https://192.168.100.1” to open Web Based Management. Log in with the “admin” user and the appropriate password.
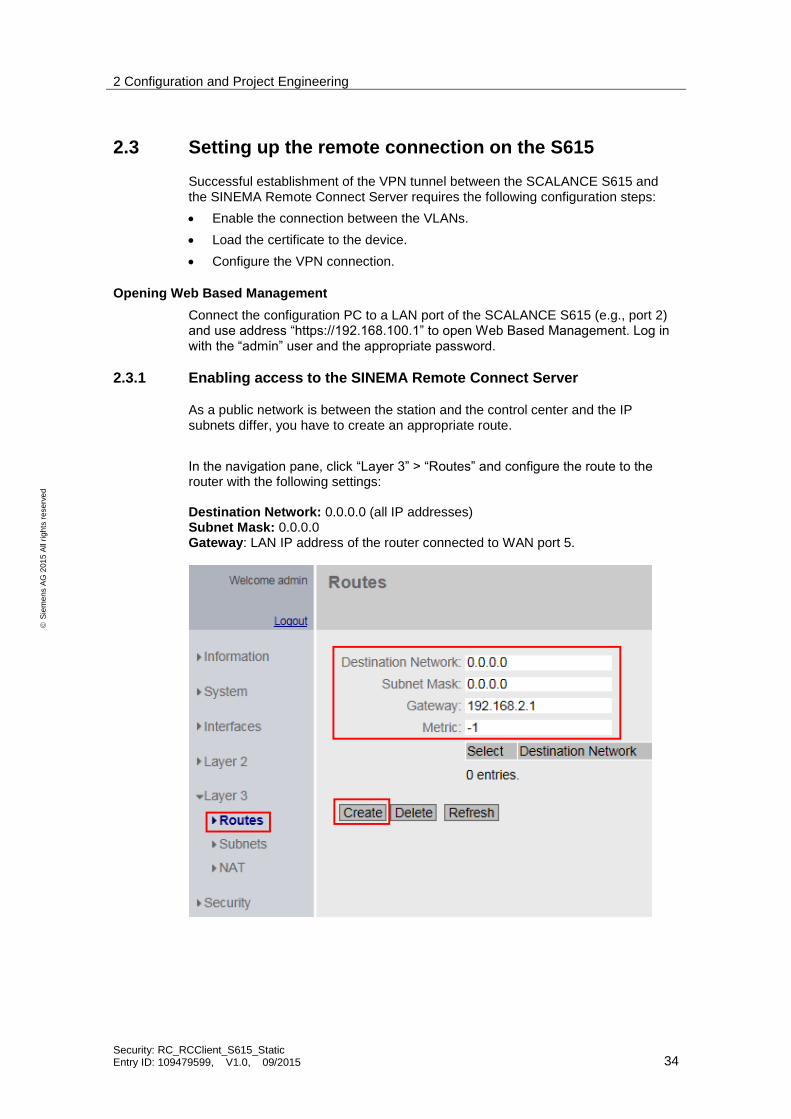
2.3.1 Enabling access to the SINEMA Remote Connect Server
As a public network is between the station and the control center and the IP subnets differ, you have to create an appropriate route.
In the navigation pane, click “Layer 3” > “Routes” and configure the route to the router with the following settings: Destination Network: 0.0.0.0 (all IP addresses) Subnet Mask: 0.0.0.0 Gateway: LAN IP address of the router connected to WAN port 5.
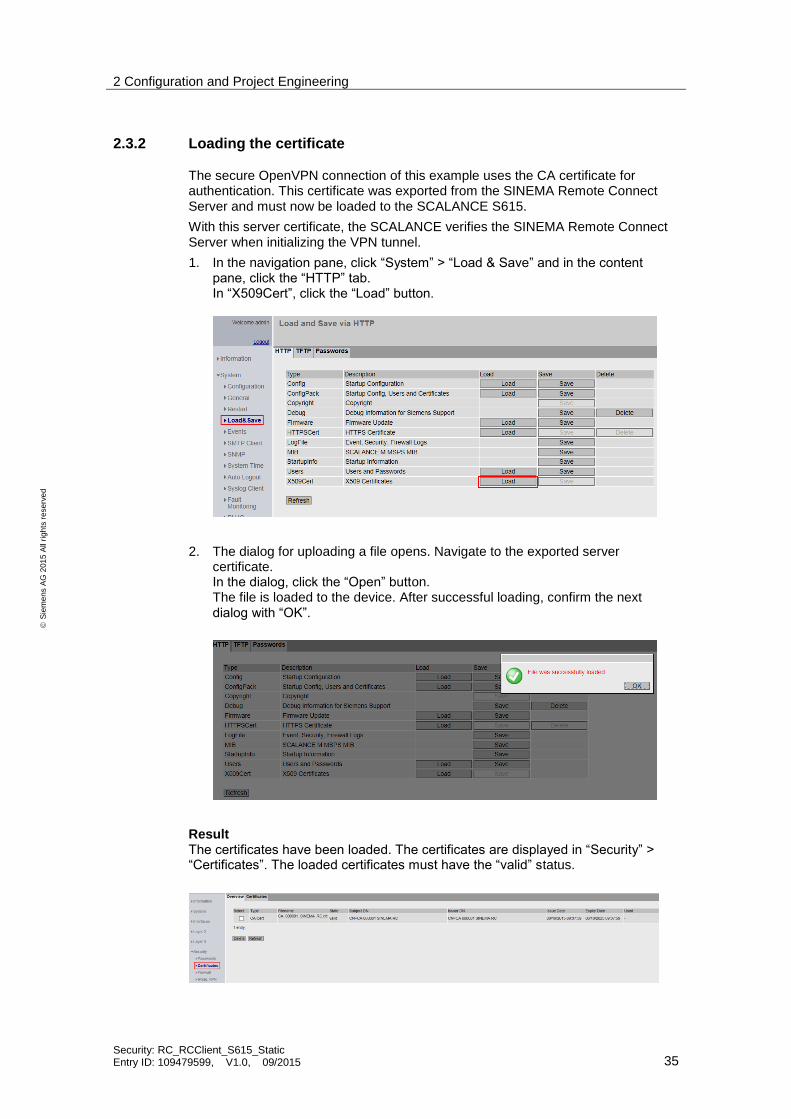
The secure OpenVPN connection of this example uses the CA certificate for authentication. This certificate was exported from the SINEMA Remote Connect Server and must now be loaded to the SCALANCE S615.
With this server certificate, the SCALANCE verifies the SINEMA Remote Connect Server when initializing the VPN tunnel.
1. In the navigation pane, click “System” > “Load & Save” and in the content pane, click the “HTTP” tab. In “X509Cert”, click the “Load” button.
2. The dialog for uploading a file opens. Navigate to the exported server certificate. In the dialog, click the “Open” button. The file is loaded to the device. After successful loading, confirm the next dialog with “OK”.
Result The certificates have been loaded. The certificates are displayed in “Security” > “Certificates”. The loaded certificates must have the “valid” status.
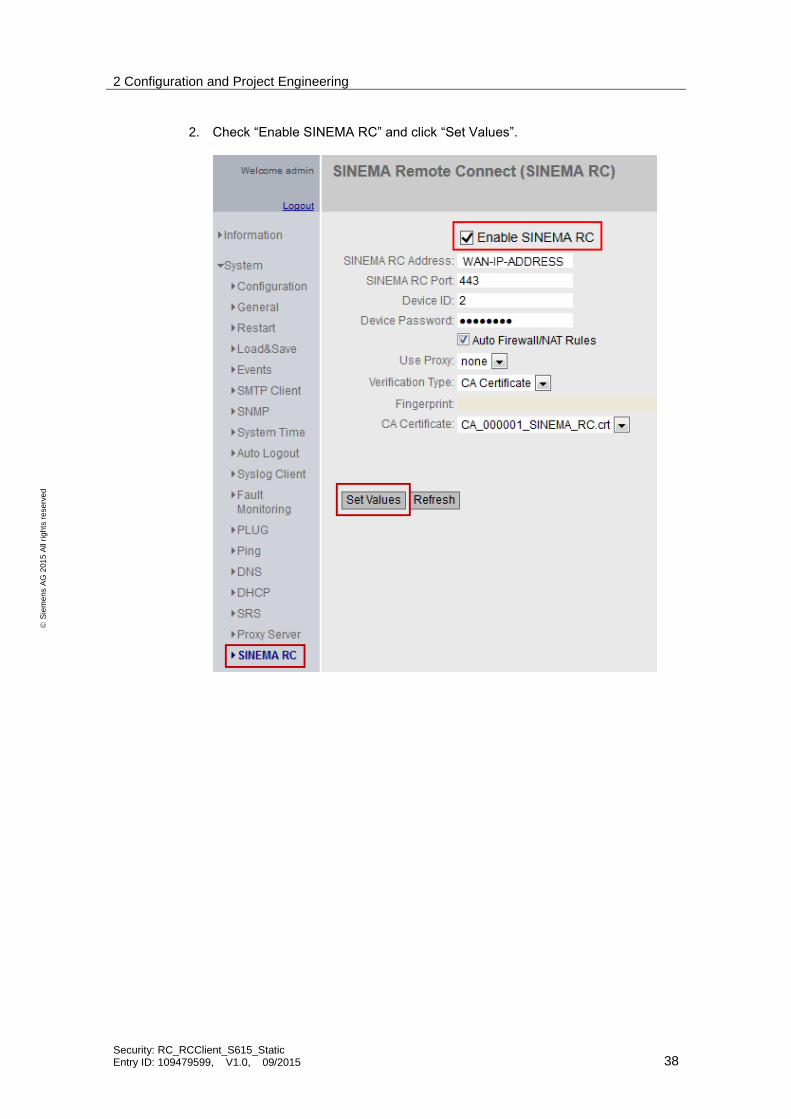
The use of a valid KEY-PLUG activates the auto-configuration interface and enables easy connection configuration to SINEMA Remote Connect.
1. In the navigation pane, click “System” > “SINEMA RC”.
– In “SINEMA RC Address”, enter the IP address of the SINEMA Remote Connect Server. Note: If the SINEMA Remote Connect Server can only be accessed via a public network, enter the router’s static WAN IP address in this field.
– In “Device ID”, enter the “device ID” value assigned to the SCALANCE S615 in the SINEMA Remote Connect Server (see chapter 2.2.1).
– In “Device Password”, enter the password you have configured for access (see chapter 2.2.1).
– Check “Auto Firewall / NAT Rules” to automatically create the appropriate NAT and firewall rules.
– In “Verification Type”, select “CA Certificate”.
Result The device establishes an OpenVPN tunnel to the SINEMA Remote Connect Server. In WBM, “Information” > “SINEMA RC” allows you to check whether the connection has been successfully established.
2.4 Setting up the remote connection on the SINEMA Remote Connect Client
Thanks to the auto-configuration interface, it is not necessary to explicitly configure the remote connection in the SINEMA Remote Connect Client.
Only the user logon data and the server’s WAN IP address must be transferred to the software.
After successful logon, the SINEMA Remote Connect Client downloads the OpenVPN file from the SINEMA Remote Connect Server. This file contains the parameters that are necessary for the VPN connection to the SINEMA Remote Connect Server. After downloading, the SINEMA Remote Connect Client uses these parameters to establish the VPN connection.
To do this, proceed as follows:
1. On the PC, double-click the desktop icon to open the “SINEMA Remote Connect Client”. The client starts.
2. In “SINEMA RC URL”, enter the WAN IP address of the SINEMA Remote Connect Server. In “SINEMA RC user name”, enter the “MobileService” user name and in “SINEMA RC Password”, enter the appropriate password. This logon data is the data defined when creating the user account for the service technician in the SINEMA Remote Connect Server (see chapter 2.2.1).
5. After successful logon, the start page is displayed. The SINEMA Remote Connect Client has automatically loaded the configuration profile of the logged in user from the SINEMA Remote Connect Server. The “Device list” displays all devices with which the user has a communication relationship.
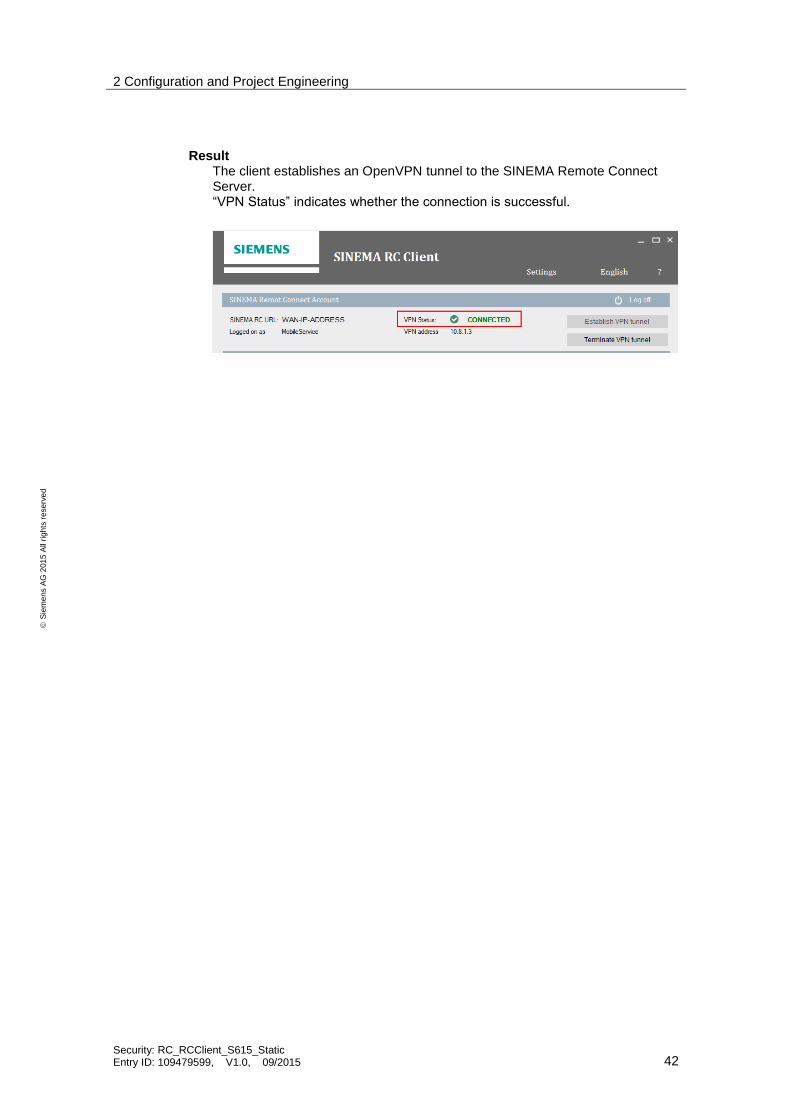
6. Click the “Establish VPN tunnel” button to initialize an OpenVPN tunnel to the SINEMA Remote Connect Server.
3 Testing the Tunnel Function Chapter 2 completes the commissioning of the configuration and the SCALANCE S615 and the SINEMA Remote Connect Client have each established a VPN tunnel to the SINEMA Remote Connect Server for secure communication.
The SINEMA Remote Connect Server interconnects these tunnels according to the configuration.
By defining the communication relationships and rights, the service technician now has the option to access the devices behind the SCALANCE S615 (not vice versa).
You can test the established tunnel connection, for example, by opening the internal web page of a PROFINET CPU in the LAN of the SCALANCE S615.