30
TD 92641GB 2010-01-28/ Ver. D Configuration Manual Ascom d41 DECT Handset
TD 92641GB
2010-01-28/ Ver. D
Configuration ManualAscom d41 DECT Handset
TD 92641GBConfiguration ManualAscom d41 DECT Handset
Contents
1 Introduction............................................................................................................. 1
1.1 Abbreviations and Glossary ................................................................................ 1
1.2 Functionality matrix ............................................................................................ 2
2 Getting started with Configuration of the d41 Handset ..................................... 3
2.1 PDM Windows Version ....................................................................................... 3
2.2 IMS2 .................................................................................................................. 3
2.2.1 Via Chargers .............................................................................................. 4
2.2.2 Over-the-air via IP-DECT ............................................................................. 4
3 Installation of Handsets.......................................................................................... 5
3.1 Preparing PDM Windows Version or IMS2 for handling of d41 ........................... 5
3.2 Installation of a new Handset ............................................................................. 5
3.2.1 Handset installation, Scenario 1 (Recommended) ....................................... 6
3.2.2 Handset installation, Scenario 2 ................................................................. 6
4 Maintenance............................................................................................................ 8
4.1 Definitions ......................................................................................................... 8
4.2 Upgrade handset software ................................................................................. 8
4.3 View licenses of handset .................................................................................... 8
4.4 Upgrade handset by license ............................................................................... 8
4.4.1 Automatic license upgrade ......................................................................... 9
4.4.2 License upgrade using import/export .......................................................... 9
4.4.3 Manual license upgrade ............................................................................. 9
4.4.4 Move License ........................................................................................... 10
4.5 Perform a Factory reset .................................................................................... 10
4.6 Replacement procedure choice guide ............................................................... 11
4.7 Replacement of handset with the IMS2 ............................................................ 11
4.7.1 Data included in a replacement transfer ................................................... 11
4.7.2 Handset replacement with IMS2, Scenario 1 ............................................ 12
4.7.3 Handset replacement with IMS2, Scenario 2 ............................................ 12
4.8 Replacement of the handset with the PDM Windows Version ........................... 12
4.8.1 Handset replacement with Win-PDM, Scenario 1 ..................................... 13
4.8.2 Handset replacement with Win-PDM, Scenario 2 ..................................... 13
4.9 Brazil or other Latin America countries – DECT frequency configuration ........... 13
5 Handset Configuration ......................................................................................... 15
5.1 Configure a Handset with a Template .............................................................. 15
5.1.1 Create a template .................................................................................... 15
5.1.2 Apply a template ..................................................................................... 15
5.1.3 Save a handset configuration as a template ............................................. 16
2010-01-28/ Ver. D
TD 92641GBConfiguration ManualAscom d41 DECT Handset
5.1.4 Synchronizing a handset with PDM .......................................................... 16
5.2 Voice Mail ........................................................................................................ 16
5.3 Central Phonebook .......................................................................................... 16
5.4 Company Phonebook ...................................................................................... 17
5.4.1 Create a phonebook file .......................................................................... 17
5.4.2 Upload a phonebook file .......................................................................... 17
5.5 Call Services ..................................................................................................... 17
5.6 In Call Menu .................................................................................................... 18
5.7 Own Line Settings ............................................................................................ 18
5.8 Uploadable Language ...................................................................................... 18
5.9 Clear Lists when inserted in Charger ................................................................ 19
5.10 Disable Homebase GAP Registration .............................................................. 20
5.11 Require Encrypted Base Station ...................................................................... 20
5.12 Protect registration from user deletion ........................................................... 20
5.13 Emergency Call Number ................................................................................. 20
5.14 Audio adjustment .......................................................................................... 20
5.15 Headset configuration .................................................................................... 21
5.16 Owner identification in the idle display. .......................................................... 21
5.17 Import Contacts ............................................................................................. 21
6 Administration ...................................................................................................... 22
6.1 Admin Menu Tree ............................................................................................ 22
6.2 Quick Access to the handset’s Device Information ............................................ 23
6.3 Quick Access to the Handset’s Input Menus ..................................................... 23
6.4 LED indications ................................................................................................ 23
7 Troubleshooting .................................................................................................... 24
7.1 Fault Symptoms ............................................................................................... 24
7.2 Display Information .......................................................................................... 24
8 Related Documents ............................................................................................... 26
9 Document History ................................................................................................. 26
Index ....................................................................................................................... 27
2010-01-28/ Ver. D
TD 92641GBConfiguration ManualAscom d41 DECT Handset
1 Introduction
This document is a guide for installing, configuring and maintaining functionality of the d41 handsets.
The d41 can be used straight away in your system but it is highly recommended to install the Portable Device Manager (PDM) Windows Version or the Integrated Wireless Messaging and Services application (IMS2). This enables customization of the behaviour of the handset to suite each user profile and the specific PBX used in the system.
The PDM Windows Version is aimed for smaller sites where the handsets are within reach. The IMS2 makes it possible to administrate the handsets centrally via a web interface without the need to collect the handsets.
It is recommended that the reader has basic knowledge of the Ascom system and basic knowledge of subscribing handsets to the PBX.
1.1 Abbreviations and Glossary
DECT Digital Enhanced Cordless Telecommunications:global standard for cordless telephony.
IMS Integrated Wireless Messaging and ServicesAn application running on an ELISE module, that enables wireless services to and from portable devices and chargers.
IPDI International Portable DAM IdentityDAM (DECT Authentication Module)See IPEI for more information.
IPEI International Portable Equipment Identity:IPEI/IPDI is needed to enable network subscription of the handset. At delivery of the handset, IPEI and IPDI are the same and either can be used for network subscription. If one handset is replaced with another using the Easy replacement procedure the IPDI will be exchanged and IPEI and IPDI will no longer be the same. If the IPEI and the IPDI differ, the IPDI shall be used for network subscription.
OTA Over The Air
PBX Private Branch Exchange:Telephone system within an enterprise that switches calls between local lines and allows all users to share a certain number of external lines.
PDM Portable Device ManagerAn application, running on a PC, for management of portable devices, charging racks, etc.
Unite Generic term for messaging system that unites different systems, for example System 900, System 9d, and teleCARE M.
User ID User ID identifies the set of user parameters possible to save and administrate via PDM. It can be moved together with user parameters between handsets. It is normally set automatically at DECT subscription to be equal to call number.
2010-01-28/ Ver. D 1
TD 92641GBConfiguration ManualAscom d41 DECT Handset
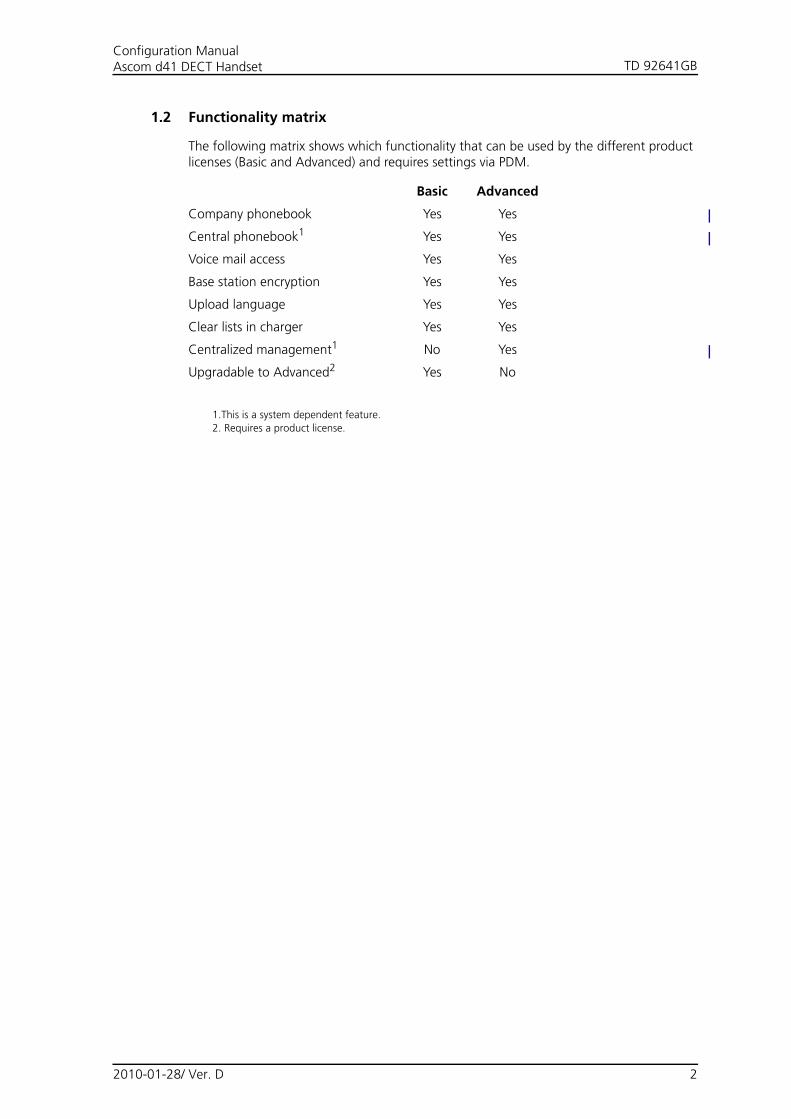
1.2 Functionality matrix
The following matrix shows which functionality that can be used by the different product licenses (Basic and Advanced) and requires settings via PDM.
Basic Advanced
Company phonebook Yes Yes
Central phonebook1 Yes Yes
Voice mail access Yes Yes
Base station encryption Yes Yes
Upload language Yes Yes
Clear lists in charger Yes Yes
Centralized management1
1.This is a system dependent feature.
No Yes
Upgradable to Advanced2
2. Requires a product license.
Yes No
2010-01-28/ Ver. D 2
TD 92641GBConfiguration ManualAscom d41 DECT Handset
2 Getting started with Configuration of the d41 Handset
It is possible to configure the d41 Handset by inserting it into a desktop charger (DC4) or rack charger (CR3). The charger is connected via USB or ethernet to the PDM Windows Version or the IMS2.
In the case of IP-DECT, it is possible to configure the d41 over the air.
This chapter describes how to configure handsets in three different system setups:
• with PDM Windows Version
• with IMS2 via chargers
• with IMS2 over-the air
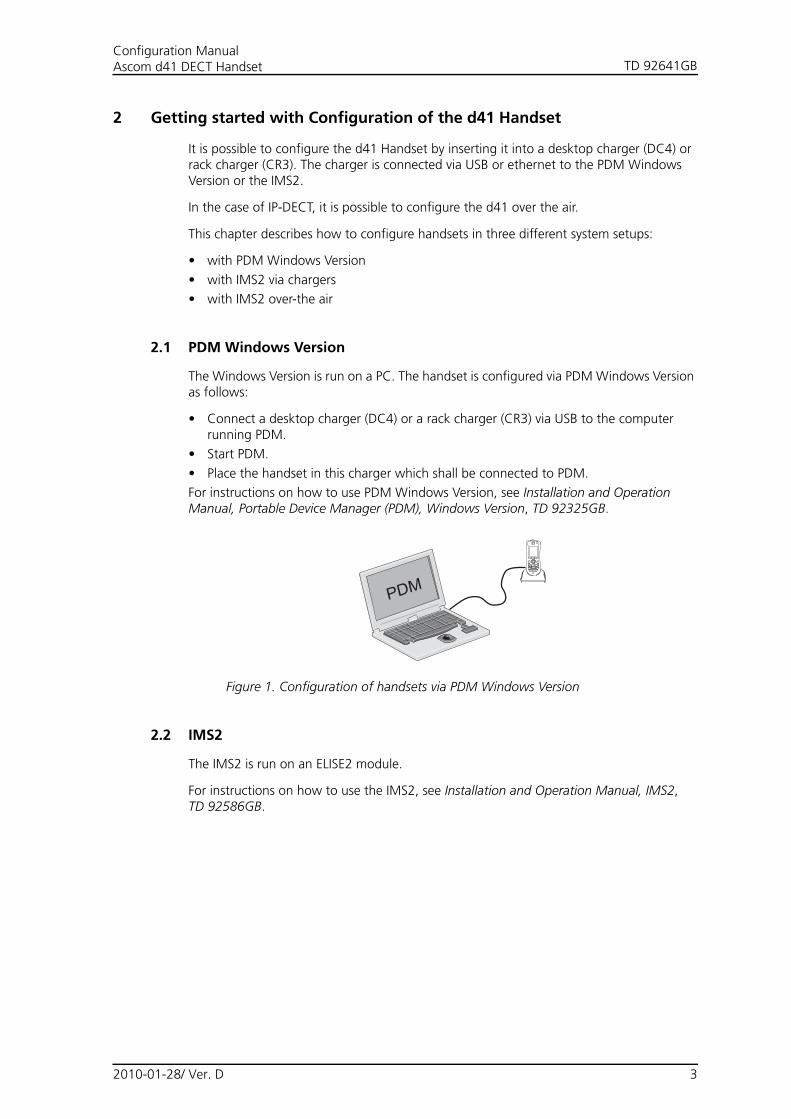
2.1 PDM Windows Version
The Windows Version is run on a PC. The handset is configured via PDM Windows Version as follows:
• Connect a desktop charger (DC4) or a rack charger (CR3) via USB to the computer running PDM.
• Start PDM.
• Place the handset in this charger which shall be connected to PDM.
For instructions on how to use PDM Windows Version, see Installation and Operation Manual, Portable Device Manager (PDM), Windows Version, TD 92325GB.
Figure 1. Configuration of handsets via PDM Windows Version
2.2 IMS2
The IMS2 is run on an ELISE2 module.
For instructions on how to use the IMS2, see Installation and Operation Manual, IMS2, TD 92586GB.
Figure 1.
PDM
2010-01-28/ Ver. D 3
TD 92641GBConfiguration ManualAscom d41 DECT Handset
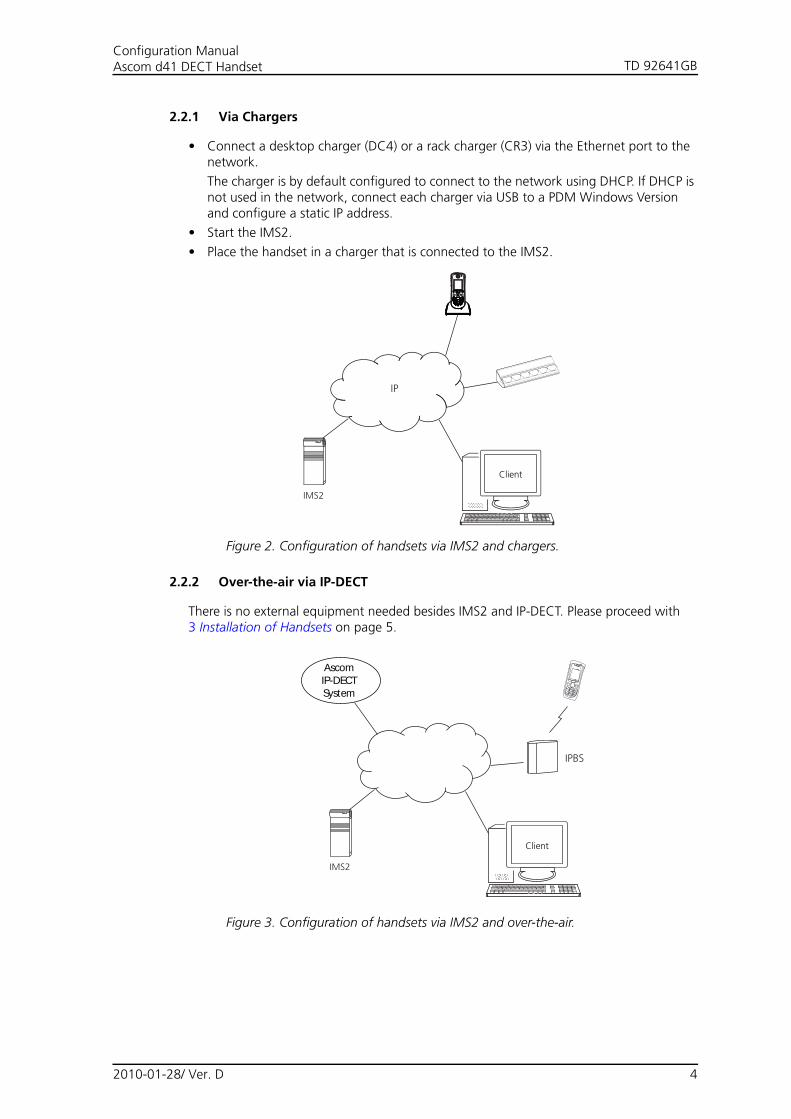
2.2.1 Via Chargers
• Connect a desktop charger (DC4) or a rack charger (CR3) via the Ethernet port to the network.
The charger is by default configured to connect to the network using DHCP. If DHCP is not used in the network, connect each charger via USB to a PDM Windows Version and configure a static IP address.
• Start the IMS2.
• Place the handset in a charger that is connected to the IMS2.
Figure 2. Configuration of handsets via IMS2 and chargers.
2.2.2 Over-the-air via IP-DECT
There is no external equipment needed besides IMS2 and IP-DECT. Please proceed with3 Installation of Handsets on page 5.
Figure 3. Configuration of handsets via IMS2 and over-the-air.
Figure 2.
Figure 3.
Client
IMS2
IP
Client
IMS2
IPBS
AscomIP-DECTSystem
2010-01-28/ Ver. D 4
TD 92641GBConfiguration ManualAscom d41 DECT Handset
3 Installation of Handsets
This section describes the recommended procedure for installing and configuring handsets. There are several ways to install a handset but the procedures described here guarantees simple maintenance of the system.
It is recommended to use the IMS2 to install and maintain handsets in a large system. The reason is that it enables to install, upgrade and configure a large amount of handsets simultaneously. Another benefit is that the collection of the handsets from the user is not needed. They can be maintained while placed in network connected desktop chargers (DC4) on the users desks. Network connected rack chargers (CR3) can also be used, or over the air in the case of IP-DECT.
The PDM Windows Version enables administration of handsets inserted in a Desktop Charger (DC4) or Rack Charger (CR3) connected via USB to the administrator’s computer.
For PDM, see Installation and Operation Manual, Portable Device Manager (PDM), Windows Version, TD 92325GB or Installation and Operation Manual, IMS2, TD 92586GB.
3.1 Preparing PDM Windows Version or IMS2 for handling of d41
If the parameter definition file (.def file) for the handset is not present in the PDM Windows Version or IMS2, it can be added by following the procedure below. The parameter definition file and software files are delivered as a package file with the extension '.pkg'. Note that template files (.tpl) may also be included in a package file.
1 Open the PDM Windows Version or the IMS2.
2 In the File menu, select Import > Packages.
3 Select the package and click "OK".
The package will imported and the files will be created; one definition file with the extension .def and one software file with the extension .bin. Template files may also be created.
File extensions are further explained in an appendix in Installation and Operation Manual, Portable Device Manager (PDM), Windows Version, TD 92325GB and Installation and Operation Manual, IMS2, TD 92586GB.
3.2 Installation of a new Handset
The installation basically contains three steps:
• Subscription towards the DECT-system – needed to be able to make calls and send messages (Mandatory).
• Create an identity for the handset in the PDM – needed to be able to configure the behaviour of the handset and take backups of the handset configuration (Recommended).
• Configure the handset using PDM – customize the behaviour of the handset to suite each user profile and the specific PBX used in the system (Recommended).
The installation is described in two different scenarios, see below. Before starting, check which scenario that suits best.
2010-01-28/ Ver. D 5
TD 92641GBConfiguration ManualAscom d41 DECT Handset
3.2.1 Handset installation, Scenario 1 (Recommended)
Note: If the handset shall be subscribed towards an IP-DECT system, the IP-DECT software version must be 3.1.X or higher. If that is not the case, use Scenario 2.
Note: The handset to be installed must not have any previous valid registrations. If it has a valid registration, unsubscribe the handset or use Scenario 2.
Subscribe and create an identity
1 Assign an extension number in the DECT system for the handset. See the corresponding manual for the DECT system.
2 Subscribe the handset towards the DECT system. The subscription procedure is described in User Manual, Ascom d41 DECT Handset, TD 92582GB.
During the subscription procedure, the Number in PDM/IMS2 will automatically be set to be the same as the extension number.
Note: The User ID can be viewed by navigating to the menu:Admin menu > Device info > User IDTo find the Admin menu, see 6.1 Admin Menu Tree on page 22.
See also examples of handset configurations that can be made in chapter 5 Handset Configuration on page 15.
3.2.2 Handset installation, Scenario 2
Create an identity
Note: The handset may not have a User ID. If a User ID exists, it can be removed by performing a facory reset, see 4.5 Perform a Factory reset on page 10. In addition, a valid .def file for the handset has been imported to the PDM/IMS2.
1 Insert the handset in a desktop charger or rack charger connected to PDM/IMS2.
2 In PDM/IMS2, navigate to the "Devices" tab and locate the handset in the list of devices. The handset is identified by finding the IPDI of the handset in the Device ID column.
3 Select the handset, make a right-click, select "Assign number..." and preferably enter the extension number for the handset.
The number that is assigned must not be present under the "Numbers" tab. If this is the case, it is recommended to delete the number before "Assign number..." is performed.
The User ID can be viewed in the handset by navigating to the menu:Admin menu > Device info > User ID
See also examples of handset configurations that can be made in chapter 5 Handset Configuration on page 15.
Subscribe the handset
1 Assign an extension number in the DECT system for the handset. See the corresponding manual for the DECT system.
2010-01-28/ Ver. D 6
TD 92641GBConfiguration ManualAscom d41 DECT Handset
2 Subscribe the handset towards the DECT system.
The subscription procedure is described in User Manual, Ascom d41 DECT Handset, TD 92582GB.
In order to easily identify the handset, both the IPDI and the User ID are shown in the handset when initiating the subscription procedure.
2010-01-28/ Ver. D 7
TD 92641GBConfiguration ManualAscom d41 DECT Handset
4 Maintenance
4.1 Definitions
In the replacement descriptions, the handsets are defined as:
• "old handset" is the handset to be replaced, possibly damaged but still working
• "new handset" is the replacement handset that will get the settings used in the old handset
4.2 Upgrade handset software
It is possible to upgrade or reinstall the software on a handset. When upgrading the software of the handset, any data (for example, call list) may be deleted
See also Installation and Operation Manual, Portable Device Manager (PDM), Windows Version, TD 92325GB, or Installation and Operation Manual, IMS2, TD 92586GB.
1 Open the PDM Windows Version or the Device Manager in the IMS2.
2 Open the Devices tab and select the handset you want to upgrade/reinstall.
3 Make a right-click and click "Upgrade software...".
4 A list of software files with a ".bin" extension will be presented under "Available software". Select the desired software file and click "OK".
Note: It is also possible to upgrade several handsets of the same device type (d41) simultaneously using the Baseline function in the IMS2. See Installation and Operation Manual, IMS2, TD 92586GB.
4.3 View licenses of handset
The license(s) of a handset can be viewed as follows;
• In idle mode, press *#34# and select "License", or • View the license(s) via the Admin menu in the handset, see 6.1 Admin Menu Tree on
page 22, or• In the PDM, select the "License" tab and select handset in the list. In the bottom of the
work area, the license options of the device are listed, and whether the options are enabled or not.
4.4 Upgrade handset by license
Note: It is recommended to read the Function Description, Product Licensing Overview, TD 92677GB before reading this section. The document describes how to view current license(s), purchase license(s) and the technical solution of the upgrading alternatives described below.
It is possible to upgrade a d41 Basic to a d41 Advanced by adding a procuct license.
There are three alternatives for upgrading a handset:
• Automatic upgrade, see 4.4.1 Automatic license upgrade on page 9.
• License upgrade using import/export, see 4.4.2 License upgrade using import/export on page 9.
• Manual upgrade, see 4.4.3 Manual license upgrade on page 9.
2010-01-28/ Ver. D 8
TD 92641GBConfiguration ManualAscom d41 DECT Handset
Note: A handset can be re-licensed up to 99 times.
4.4.1 Automatic license upgrade
Use this option if the PDM has an internet connection to the License Server.
1 Place the handset in a charger connected to the PDM.
First time the handset logs on the PDM, the license key will automatically be downloaded to the handset, go to step 3.
2 If the handset has been logged on to the PDM before, no automatic check for licenses will be done. The PDM and License Server must be synchronized as follows;
• Open the PDM Windows Version. • Select the "Licenses" tab.• Right-click the handset in the list.• Select "Refresh".The license key will now be downloaded to the handset.
3 The handset will be restarted. See also 4.3 View licenses of handset on page 8 for viewing the handset’s license option(s).
4.4.2 License upgrade using import/export
Use this option if the PDM has no internet connection to the License Server. A device information file (.XML) must first be exported from the PDM, and then imported to the License Web.
1 Place the handset in a charger connected to the PDM.
2 Open the PDM Windows Version.
• Select the "Licences" tab.• Right-click the handset(s) in the list.• Select "Export".• Save the file on a computer with internet connection to access the License Web
later on.3 Access the License Web by entering the address "https://ascom-ws.com/licenses" in
a browser. The License Web is used for;
• Importing the device information file• Viewing/Purchasing the license(s) for the handset(s)• Downloading the license file containing the license key(s) for the handset(s)
See the online help on the License Web, or Function Description, Product Licensing Overview, TD 92677GB for information on how to use the License Web.
4 When the license file (.XML) containing the license key(s) has been downloaded from the License Web, select File > Import > Licences in the PDM to import the file.
5 When the file is imported, the license key(s) is dowloaded to the handset(s), and the handset will be restarted. See also 4.3 View licenses of handset on page 8 for viewing the handset’s license option(s).
4.4.3 Manual license upgrade
Use this option if the serial numbers of the devices cannot be exported to a file due to a PDM is not in use. The serial number(s) must be manually entered in the License Web to get the corresponding license key for the handset. The license key must also be manually entered in the handset. See the online help on the License Web or the Function Description, Product Licensing Overview, TD 92677GB for information on how to get a license key.
2010-01-28/ Ver. D 9
TD 92641GBConfiguration ManualAscom d41 DECT Handset
2010-01-28/ Ver. D 10
Note: If several handsets shall be upgraded, it is recommended to use 4.4.2 License upgrade using import/export on page 9.
The license key is added via the Admin menu in the handset, see 6.1 Admin Menu Tree on page 22 for information on how to activate the Admin menu.
Note: It is also possible to press *#35# in idle mode for quick access to the "Enter license key" menu.
1 Press the soft key "Menu".
2 Select "Calls".
3 Select "Admin menu".
4 Select "Enter license key".
5 Enter the license key without any spaces between the digits.
6 Press "OK".
If the license key is valid, a dialog window "License key accepted" is shown. The handset will now be restarted.
4.4.4 Move License
Note: This feature requires IMS2 that supports the move license feature, and a connection to the license server.
It is possible to move a license from one device to another device of the same device type (d41).
A move license command can only be done to an unlicensed handset of a device type supporting licensing, that is, d41 Basic.
An example of when to use the Move licence command is when there is an unused d41 Basic and a d41 Advanced with a broken display. Use the Move licence command to move the Advanced licence to the d41 Basic which becomes a d41 Advanced. Then the broken handset (which is now a d41 Basic) can be sent for service.
1 Select the “Licences” tab.
2 Select the device whose licence shall be moved. The selected row is highlighted.
3 In the Licence menu, select “Move licence...” or right-click and select “Move licence...”. The Move licence window appears.
4 Select the device that shall receive the licence. Click "OK".
If no devices are shown in the Move licence window, there are no devices that are selectable to move the licence to.
See also 4.7 Replacement of handset with the IMS2 on page 11 for information on how to move user parameters and contacts to another handset.
4.5 Perform a Factory reset
When a factory reset is done on a handset, all configuration settings will be restored to default values, PBX subscriptions will be removed and all data are removed. This includes contacts, messages etc. The software will be left intact.
Factory reset is activated from the Admin menu. See chapter 6.1 Admin Menu Tree on page 22 to see how to activate the Admin menu, and figure 4 on page 22 to see where in the menu to find "Factory reset".
After a factory reset, follow the steps under 3.2 Installation of a new Handset on page 5.
TD 92641GBConfiguration ManualAscom d41 DECT Handset
4.6 Replacement procedure choice guide
Depending on situation, two different replacement procedures can be chosen; replacement via PDM/IMS2 and Easy Replacement. Use the following list as a guide to choose which procedure to use.
• If a handset needs to be replaced due to for example a broken display, see User Manual, Ascom d41 DECT Handset, TD 92582GB.
• If the electrical connection is damaged, it might not be possible to follow the Easy Replacement procedure. Depending on fault, it might work to do a replacement via PDM/IMS2, see 4.7 Replacement of handset with the IMS2 on page 11 or 4.8 Replacement of the handset with the PDM Windows Version on page 12.
• If two handsets and their settings shall be switched between two users, follow 4.7 Replacement of handset with the IMS2 on page 11 or 4.8 Replacement of the handset with the PDM Windows Version on page 12.
4.7 Replacement of handset with the IMS2
Both the old handset and the new handset must be of the same device type (d62 or d41). The same extension number is assigned to the new handset.
Make sure that the old handset is saved in the IMS2. Start the Device Manager in the IMS2 and navigate to the "Numbers" tab. There shall be a tick in the "Saved" column for the old handset.
If the handset is not saved, insert it into a desktop charger or rack charger connected to IMS2 and perform a save, see Installation and Operation Manual, IMS2, TD 92586GB.
If it would be impossible to save the old handset settings, stop this replacement procedure. Instead unsubscribe the old handset from the PBX, register the new handset and follow the instructions for installing a handset, see 3.2 Installation of a new Handset on page 5. When the handset is saved, unsubscribe the old handset from the PBX.The following steps are described in two different scenarios, check which one suits the best before proceeding.
4.7.1 Data included in a replacement transfer
The following data is replaced during a replacement with IMS2:
• User parameters (including User ID)
• Contacts (entered by the user)
Note that the following data is not replaced:
• DECT registration
• Call list
• Company phonebook
• Downloaded Language
• Licenses1
1. A handset’s product license (that is, d41 Advanced) can be moved to a d41 Basic using the Move license function in the IMS2.
2010-01-28/ Ver. D 11
TD 92641GBConfiguration ManualAscom d41 DECT Handset
4.7.2 Handset replacement with IMS2, Scenario 1
Note: If the handset shall be subscribed towards an IP-DECT system, the IP-DECT software version must be 3.1.X or higher. If that is not the case, use Scenario 2.
Note: The handset to be installed must not have any previous valid registrations. If it has a valid registration, unsubscribe the handset or use Scenario 2.
1 Subscribe the new handset with the same extension number as the old handset. During the subscription procedure, the IMS2 identity (User ID) will automatically be set to be the same as the extension number.
Note: The User ID can be viewed in the handset by navigating to the menuAdmin menu > Device info > User ID
2 Insert the handset into a desktop charger or rack charger connected to IMS2 (not needed if an over the air connection is used). Navigate to the Numbers tab in IMS2 Device Manager.
The new handset now has the same User ID as the old handset. It will automatically be synchronized and data and parameter settings from the old handset will be transferred to the new handset.
The synchronization will take a while if the Contacts in the original handset contains a large number of contacts.
4.7.3 Handset replacement with IMS2, Scenario 2
1 Make a note of the IPDI of the new handset. It is found by pressing *#06# on the handset.
2 Insert the new handset into a desktop charger or rack charger connected to the IMS2 and navigate to the Numbers tab in the Device Manager in IMS2.
3 Select the old handset in the list and make a right-click. Click "Associate with device...". Select the device with an IPDI that matches your new handset from the list that appears.
The new handset is automatically sýnchronized and all data and parameter settings will be transferred to the new handset.
The synchronization will take a while if the Contacts in the original handset contains a large number of contacts.
4 Subscribe the new handset.
4.8 Replacement of the handset with the PDM Windows Version
To see which data that is replaced during this process, see 4.7.1 Data included in a replacement transfer on page 11.
Both the old handset and the new handset must be of the same device type (d62 or d41). The same extension number is assigned to the new handset.
The new handset should not be subscribed towards the PBX yet.
1 Perform a factory reset, see 4.5 Perform a Factory reset on page 10, if the new handset has been previously used.
2 Make sure that the old handset is saved in the PDM by starting PDM and navigating to the Numbers tab. There shall be a tick in the "Saved" column for the old handset.
2010-01-28/ Ver. D 12
TD 92641GBConfiguration ManualAscom d41 DECT Handset
If the handset is not saved, insert it into a desktop charger or rack charger connected to the PDM and perform a save.
Note: If it would be impossible to save the old handset settings, stop this replacement procedure. Instead register the new handset and follow the instructions for installing a handset, see 3.2 Installation of a new Handset on page 5.
The following steps are described in two different scenarios, check which one suits the best before proceeding.
4.8.1 Handset replacement with Win-PDM, Scenario 1
Subscribe the new handset with the same extension number as the old handset. During the subscription procedure the PDM identity (User ID) will automatically be set to be the same as the extension number.
Note: The User ID can be viewed by navigating to the menu Admin menu > Device info > User ID.
1 Insert the new handset into a desktop charger or rack charger connected to the PDM.
2 A pop-up dialogue appears, asking the user to decide whether to use the Number settings in PDM or the Number settings in the device. Select PDM.
The handset will automatically be synchronized and all data and parameter settings will be transferred to the new handset. The synchronization will take a while if the Contacts in the original handset contains a large number of contacts.
Note: If subscribing towards an IP-DECT system, the IP-DECT software version must be 3.1.X or higher. If not, use Scenario 2.
Note: The handset to be installed must not have any previous valid registrations. Unsubscribe handset or use Scenario 2.
4.8.2 Handset replacement with Win-PDM, Scenario 2
1 Insert the new handset into a desktop charger or rack charger connected to the PDM.
2 A pop-up will be displayed. Select the option "Associate with number". Follow the instructions and select the number of the old handset, see Installation and Operation Manual, Portable Device Manager (PDM), Windows Version, TD 92325GB.
The handset will automatically be synchronized and all data and parameter settings will be transferred to the new handset. The synchronization will take a while if the Contacts in the original handset contains a large number of contacts.
3 Subscribe the new handset.
4.9 Brazil or other Latin America countries – DECT frequency configuration
Note: This chapter is only applicable if the handset is used in Brazil or other Latin American countries.
In order to change the operating frequency band, the following preconditions must be fulfilled:
2010-01-28/ Ver. D 13
TD 92641GBConfiguration ManualAscom d41 DECT Handset
• The frequency set to "Not initiated". This can be checked by entering the Admin menu, see 6 Administration on page 22, follow the path:Admin menu > Device info > Hardware.Scroll down to “Frequency band”.
• The handset must not have a DECT registration. If it already has, perform a Factory reset, see 4.5 Perform a Factory reset on page 10.
1 Enter the Admin Menu, see 6 Administration on page 22.
2 Select "Frequency band" and select the desired band.
• LA (Latin America): 1910-1930 MHz• Brazil: 1910-1920 MHz
3 Restart the handset.
4 Register the handset.
5 The frequency band option will no longer be available.
Note: The selection is persistent and will stand a factory reset.
2010-01-28/ Ver. D 14
TD 92641GBConfiguration ManualAscom d41 DECT Handset
5 Handset Configuration
Note: This chapter describes settings in parameter definition files (.def). These files are regularly updated and settings may change slightly. For example "On" to "Enable" or a parameter can be moved to another directory.
5.1 Configure a Handset with a Template
It is possible to select a handset in the PDM and directly change one or more configuration parameters. By using a template, the same configuration can easily be applied to many handsets simultaneously. Templates are also an efficient way to give good control over which changes that are applied to each handset.
Templates enables configuration of all aspects of a handset from sound volume to keypad shortcuts.
Your supplier can provide example templates for different PBX:s. The handset will have full functionality towards the PBX even without such a template. By using such a template, though, the handset will be customized for that PBX with menu options for PBX specific functions such as Callback.
5.1.1 Create a template
1 Open the PDM Windows version or the Device Manager in the IMS2.
2 Select the Templates tab and open the menu "Template > New...". The Create Template window is opened.
3 Select the device d41 and parameter version that matches the software version installed on the handset. Give the template a descriptive name.
The parameters that are not part of the template will be left unchanged on the handset.
The parameter version of an installed handset is visible under the "Numbers" tab or the "Devices" tab.
4 Select the checkbox of each parameter that you want to be part of this template and enter the proper value.
5 Click "OK" to save your template.
5.1.2 Apply a template
1 Open the PDM Windows Version or the Device Manager in the IMS2
2 Open the Numbers tab and select the handsets you want to apply the template to.
3 Make a right-click and select "Run template...".
Only templates with a parameters version matching the selected handsets will be shown. Select the template you want to apply and click "OK".
4 The template is applied. The number of parameters in the template will affect the time it takes to apply the template to the selected handsets.
When looking at a handset under the Numbers tab, the column "Last run template" will show the name of the most recently applied template.
Note: It is also possible to apply a template on several handsets of the same device type (d41) simultaneously using the Baseline function in the IMS2. See Installation and Operation Manual, IMS2, TD 92586GB.
2010-01-28/ Ver. D 15
TD 92641GBConfiguration ManualAscom d41 DECT Handset
5.1.3 Save a handset configuration as a template
It is possible to save all settings of a handset as template. Please note that this does not include contacts and other personal data. The template will only contain configuration data.
This template can be used as a backup if you want to restore the configuration of the handset at a later stage or as a template that can be applied to a number of handsets.
1 Open PDM Windows version or the Device Manager in the IMS2.
2 Open the Numbers tab and select the handset you want to save as a template.
3 Make a right-click and select "Use as a template...". Enter a descriptive name for the template.
4 The Edit template window is opened. By default, all parameters are selected and are saved when clicking on "OK".
If one or more parameters should be excluded, remove them by clearing the checkbox next to the parameter.
Some parameters are user specific. If it is decided to apply this type of template to several handsets, it is recommended to exclude the following parameters:
• Owner ID - A text string displayed in idle mode. The parameter is located directly under "Settings".
• Phone lock PIN code - The security code used to unlock the keypad. The parameter is located under under Settings > Locks.
5 Click "OK".
5.1.4 Synchronizing a handset with PDM
After installing and saving a handset, it will be synchronized each time it is connected to the PDM. The synchronization transfers parameter changes between the handset and the PDM and vice versa as follows:
• If a parameter has been changed in the handset, it will be transferred to the PDM/IMS2.
• If a parameter has been changed in the PDM/IMS2 while the telehone was disconnected, it will be transferred to the handset.
If the same parameter has been changed in both the PDM/IMS2 and the handset, the value in PDM/IMS2 will be transferred to the handset.
5.2 Voice Mail
In some systems it is needed to assign the handset number of the Voice Mail service. The parameter can be set specifically for each PBX subscription on the handset and is accessed from Systems > System x > PBX Settings > Numbers. "System x" is replaced with the subscription (System A - System H) that is configured.
5.3 Central Phonebook
If the system is equipped with a messaging server with a phonebook service, the Central Phonebook on that server can be accessed from the handset. The number to be used is set to default 999999. It can be changed by editing parameters in a Number or a template.
If the system is not equipped with a Central Phonebook, this menu option can be removed from the handset by entering an empty value for the corresponding parameter.
2010-01-28/ Ver. D 16
TD 92641GBConfiguration ManualAscom d41 DECT Handset
The parameter can be set specifically for each PBX subscription on the handset and is accessed from Systems > System x > PBX Settings > Numbers. "System x" is replaced with the subscription (System A - System H) that is configured.
5.4 Company Phonebook
It is possible to create a phonebook that is administered centrally and uploaded to the handset from PDM. If this feature is used, entries from Contacts and Company Phonebook are merged. The Company Phonebook entries are locked and cannot be edited in the handset.
5.4.1 Create a phonebook file
The phonebook file (.cpb) is normally created from an Excel file using a script to extract the information and create to the phonebook file (.cpb). The Excel file, "Company Phonebook.xls" is delivered from your supplier.
The format of the rows in the phonebook file is:<Name><tab><phone number><carriage return>follwed by additional rows for each entry.
The handset supports a maximum length of 24 characters in each field, additional characters are truncated when the phonebook file is created. The following characters are accepted in the handset number field in the phonebook file, but are ignored when the phonebook file is created: "(", ")", "-" and " "(space).
Phonebook files created for OfficeM may be used, but an additional field may be included after the "phone number" field in the file. The information in this field is ignored in the handset from the user point of view. The extra information limits the number of entries that can be saved in the handset and the file may be to big to be uploaded to the handset.
5.4.2 Upload a phonebook file
In PDM, go to the devices tab and select device(s). In the Device menu, select Upload phonebook.
See also Installation and Operation Manual, Portable Device Manager (PDM), Windows Version, TD 92325GB, or Installation and Operation Manual, IMS2, TD 92586GB.
5.5 Call Services
Call services is a configurable menu in the handset. The purpose of the Call services menu is to provide a user friendly access to system dependent functionality such as absence handling and call diversion.
The menu is described in User Manual, Ascom d41 DECT Handset, TD 92582GB.
Besides the default Call services functions, it is possible to define 10 extra system specific call services by codes. The codes can be programmed with pause (P) and auto disconnection (H). Both Name and Data must be defined for the option to be displayed. Possible values: Digits 0-9, #, *, 'P' – pause, H – hook.
The programming of the menu is done with PDM. For instructions on how to work with PDM, see Installation and Operation Manual, Portable Device Manager (PDM), Windows Version, TD 92325GB.
Using the PDM and the "Edit template" feature, the parameter can be found atSystems > Common > Call Services > General Service X
2010-01-28/ Ver. D 17
TD 92641GBConfiguration ManualAscom d41 DECT Handset
Note: Your supplier may have a template example that will configure the call services menu for the PBX.
5.6 In Call Menu
In Call Menu is a configurable menu in the handset. The purpose of the In Call Menu is to provide a user friendly access to system dependent functionality during a call such as:
• Start a new call during a conversation
• Switch between calls
• End a call
• Transfer a call
• Transfer to a new call
• Make a conference call
• Activate call back
• Sending call waiting
The menu is described in User Manual, Ascom d41 DECT Handset, TD 92582GB.
The programming of the menu is done with PDM. For instructions on how to work with PDM, see Installation and Operation Manual, Portable Device Manager (PDM), Windows Version, TD 92325GB.
Ask your supplier for example templates that will configure the in call menu for your PBX.
5.7 Own Line Settings
Use the own line settings when it is desired to use the same phonebook in different systems and in different countries.
The own line settings enables:
• Calling numbers stored with a "+" sign for the international access code. The same phonebook can be used in different countries.
• Recognizing incoming internal or external calls as numbers stored on international format in the phonebook. The same phonebook can be used in different systems.
In order for this feature to work, numbers must be stored in the phonebook in international format with a "+" sign for the international access code. Also, the Own Line parameters must be configured via PDM/IMS2.
For instructions on how to work with PDM/IMS2, see Installation and Operation Manual, Portable Device Manager (PDM), Windows Version, TD 92325GB, or Installation and Operation Manual, IMS2, TD 92586GB.
5.8 Uploadable Language
It is possible to upload one additional language to the handset. The language file is generated via an Excel file. The Excel file used to generate language files is delivered from your supplier.
Note: If another language file is uploaded, the first additional language is overwritten.
2010-01-28/ Ver. D 18
TD 92641GBConfiguration ManualAscom d41 DECT Handset
Certain special characters are allowed when generating the language file, see information in the Excel file.
To upload an additional language, the PDM or IMS2 is used, go to the devices tab and select device(s). In the Device menu, select "Upload language...".
A parameter can be altered to match the uploaded language: The parameter controls:
• The characters available for text input
• The sort order in the phonebook.
This parameter is only used when Language is set. The Parameter can be found in the "Settings" folder.
Note: It is also possible to upload additional language on several handsets of the same device type (d41) simultaneously using the Baseline function in the IMS2. See Installation and Operation Manual, IMS2, TD 92586GB.
See also Installation and Operation Manual, Portable Device Manager (PDM), Windows Version, TD 92325GB.
5.9 Clear Lists when inserted in Charger
The handset can be configured to clear lists when placed in a charger. The following call lists will then be cleared:
• Call list
• Missed calls
Using the PDM and the "Edit template" feature, the parameter can be found atConnections > In_Charger > Clear_Lists_In_Chargerin a template or parameter definition file (.def).
The default setting for "Clear list in charger" is "Off". The feature is activated by changing the parameter value to "On". When the feature is enabled, the lists are cleared when the handset is placed in the charger.
2010-01-28/ Ver. D 19
TD 92641GBConfiguration ManualAscom d41 DECT Handset
5.10 Disable Homebase GAP Registration
When the feature is enabled, it is not possible to register to a home base.
Using the "Edit template" feature in the PDM, the parameter can be found atSystems > Home_Base_Subscription.
The parameter shall be set to "Enable" for registration of a new base station. The default value is "Disable".
5.11 Require Encrypted Base Station
The handset can be configured to establish calls via encrypted base stations only. This is used to avoid snooping in the telephony network.
Requirements:
• The encryption is enabled in the base station. See corresponding manual for the base station.
• If Ascom´s base station is used, the software version must be 3.1.x or greater.
• The handset software version must be 2.9.7 or greater.
Using the "Edit template" feature in the PDM, the parameter can be found atSystems > Encryption required.
When the parameter is set to "Yes", it is only possible to establish calls via encrypted base stations. The default value is "No".
5.12 Protect registration from user deletion
It is possible to protect or unprotect a registration from deletion via the handset menu by altering the parameter “Protected flag”. In a template/Number in PDM/IMS2, the parameter is found at:Systems > System X > Registration data.
5.13 Emergency Call Number
This is a phone number for emergency calls. It is always possible to call this number, regardless of whether phone-lock or key-lock are active or not. The Parameter is found in a template/Number in PDM/IMS2 in the "Settings" folder.
5.14 Audio adjustment
It is possible to adjust the side tone level, i.e. how much of the speakers voice that is fed back to the speaker. The side tone level is set via PDM by adjusting the parameter:
Audio > Normal > Normal side tone adjustment
The parameter affects the “normal” mode, i.e. not wired headset, not Bluetooth headset and not the handsfree/loudspeaking mode.
For configuration of headset audio see, 5.15 Headset configuration on page 21.
Note: Changing this parameter may result in lower sound quality and high sound level. Evaluate carefully before applying.
2010-01-28/ Ver. D 20
TD 92641GBConfiguration ManualAscom d41 DECT Handset
5.15 Headset configuration
A headset is recommended if you frequently use the handset and/or want to have both hands free. The headset comes in two versions; microphone integrated in the cable, and microphone on a boom.
In order to achieve optimal audio quality with the different headset types, it is recommended to set the corresponding headset profile.
The default setting is "microphone on a boom", which means that the audio is optimized for using a headset with microphone on a boom. The headset profile can be changed in the handset menu or in a template/Number via PDM/IMS2 in:
Connections > Headset > Headset type
If the preconfigured headset profiles does not match the headset or the audio performance is bad, it is possible to configure a headset profile. In PDM/IMS2, this is done under:
Connections > Headset > Headset type > User headset profile
When a name has been configured for the profile it will be visible and selectable in the handset menu.
The following parameters can be set:
• microphone gain
• speaker gain
Note: Changing these parameters may result in a very high sound level which can cause hearing damage.
Note: Changing these parameters may result in lower sound quality such as noise and echo. If the audio problems occur, it is noticable for the person listening on the conversation. Evaluate carefully before applying.
5.16 Owner identification in the idle display.
It is possible to add owner identification in standby mode of the handset. In a template or Number in PDM/IMS2, the parameter is found at:
Settings > Owner ID
Note: It is also possible to configure the Owner ID via the handset menu. See User Manual, Ascom d41 DECT Handset, TD 92582GB.
5.17 Import Contacts
It is possible to import a phonebook file (that is, local phonebook) to a handset. The phonebook file is a tab-separated .txt file, and contains two items per row; number and name. The PDM is used to import the phonebook file to the handset.
See Import Contacts in Installation and Operation Manual, Portable Device Manager (PDM), Windows Version, TD 92325GB for more information.
See also 5.3 Central Phonebook on page 16 and 5.4 Company Phonebook on page 17.
2010-01-28/ Ver. D 21
TD 92641GBConfiguration ManualAscom d41 DECT Handset
6 Administration
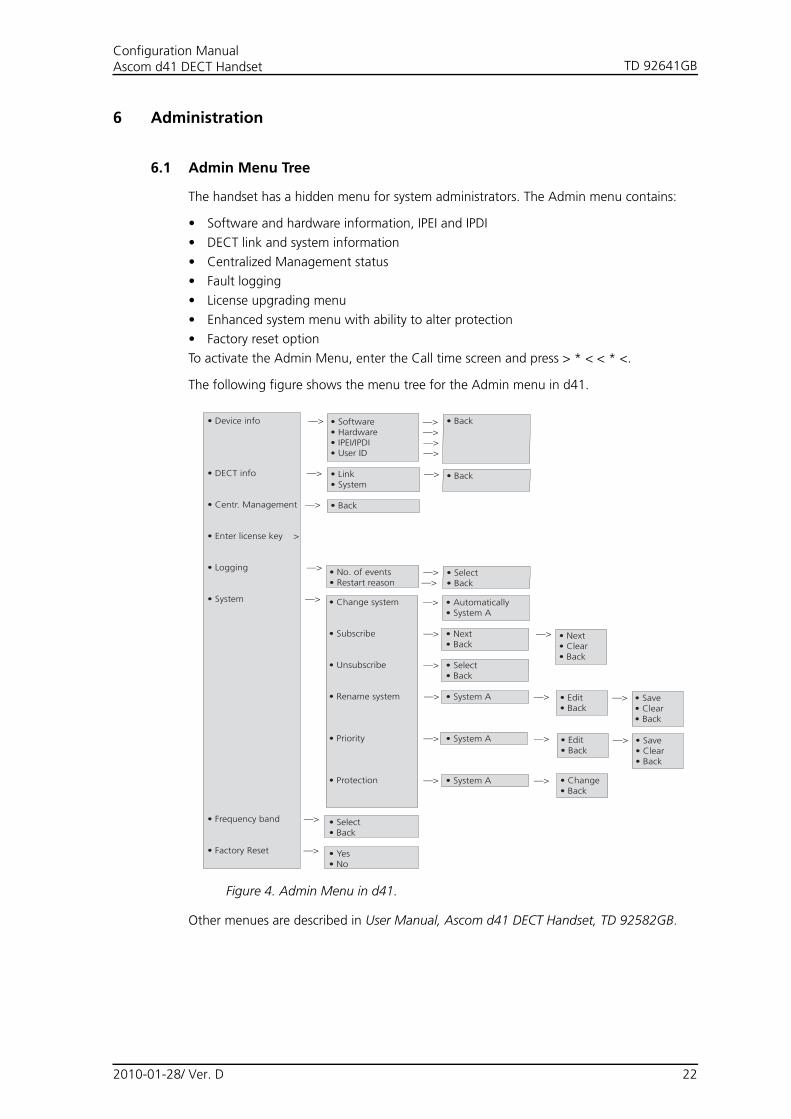
6.1 Admin Menu Tree
The handset has a hidden menu for system administrators. The Admin menu contains:
• Software and hardware information, IPEI and IPDI
• DECT link and system information
• Centralized Management status
• Fault logging
• License upgrading menu
• Enhanced system menu with ability to alter protection
• Factory reset option
To activate the Admin Menu, enter the Call time screen and press > * < < * <.
The following figure shows the menu tree for the Admin menu in d41.
Figure 4. Admin Menu in d41.
Other menues are described in User Manual, Ascom d41 DECT Handset, TD 92582GB.
Figure 4.
• Device info —>
• DECT info —>
• Centr. Management —>
• Enter license key >
• Logging —>
• System —>
• Frequency band —>
• Factory Reset —>
• Software —>• Hardware —>• IPEI/IPDI —>• User ID —>
• Link —>• System
• Back
• No. of events —>• Restart reason —>
• Change system —>
• Subscribe —>
• Unsubscribe —>
• Rename system —>
• Priority —>
• Protection —>
• Select• Back
• Yes• No
• Automatically• System A
• Next —>• Back
• Select• Back
• System A —>
• System A —>
• System A —>
• Next• Clear• Back
• Back
• Select• Back
• Change• Back
• Edit —>• Back
• Save• Clear• Back
• Edit —>• Back
• Save• Clear• Back
• Back
2010-01-28/ Ver. D 22
TD 92641GBConfiguration ManualAscom d41 DECT Handset
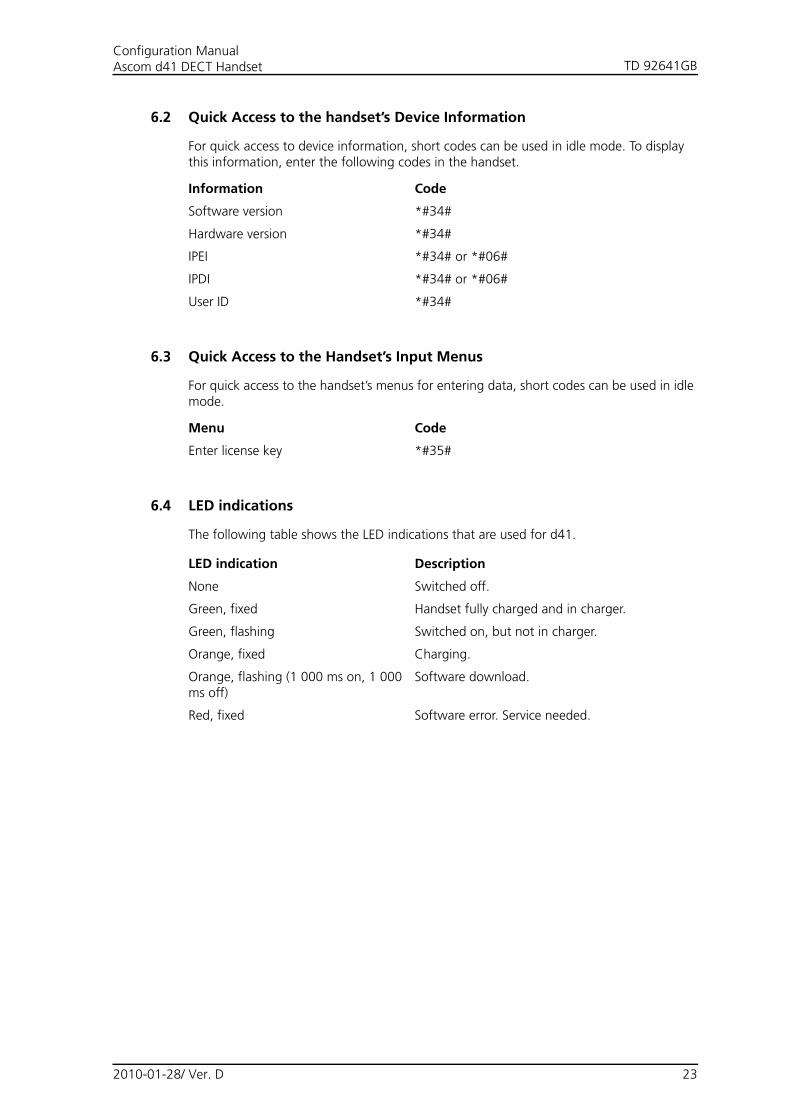
6.2 Quick Access to the handset’s Device Information
For quick access to device information, short codes can be used in idle mode. To display this information, enter the following codes in the handset.
6.3 Quick Access to the Handset’s Input Menus
For quick access to the handset’s menus for entering data, short codes can be used in idle mode.
6.4 LED indications
The following table shows the LED indications that are used for d41.
Information Code
Software version *#34#
Hardware version *#34#
IPEI *#34# or *#06#
IPDI *#34# or *#06#
User ID *#34#
Menu Code
Enter license key *#35#
LED indication Description
None Switched off.
Green, fixed Handset fully charged and in charger.
Green, flashing Switched on, but not in charger.
Orange, fixed Charging.
Orange, flashing (1 000 ms on, 1 000 ms off)
Software download.
Red, fixed Software error. Service needed.
2010-01-28/ Ver. D 23
TD 92641GBConfiguration ManualAscom d41 DECT Handset
7 Troubleshooting
This section contains information on how to solve common operational problems, and information on warnings you may receive.
Go through the following lists if you encounter any problems. If this checklist does not solve the problem, contact the system administrator.
If other users have similar problems, there may be a system error.
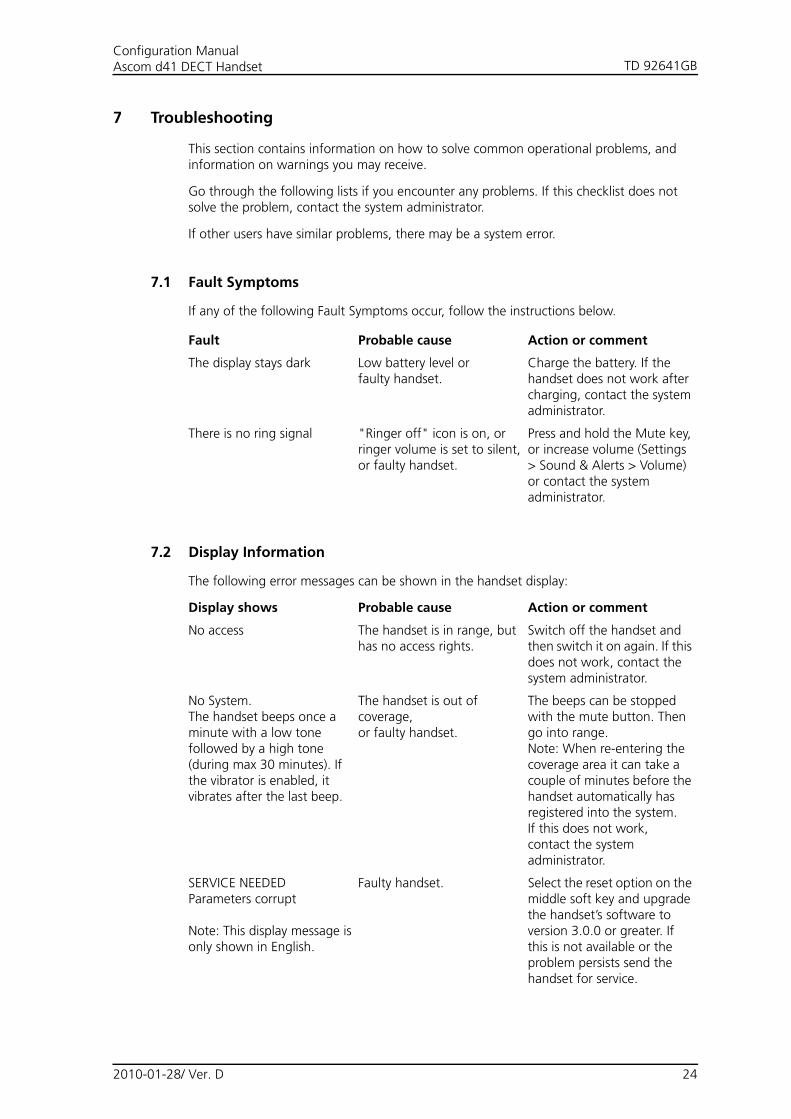
7.1 Fault Symptoms
If any of the following Fault Symptoms occur, follow the instructions below.
7.2 Display Information
The following error messages can be shown in the handset display:
Fault Probable cause Action or comment
The display stays dark Low battery level orfaulty handset.
Charge the battery. If the handset does not work after charging, contact the system administrator.
There is no ring signal "Ringer off" icon is on, or ringer volume is set to silent, or faulty handset.
Press and hold the Mute key, or increase volume (Settings > Sound & Alerts > Volume) or contact the system administrator.
Display shows Probable cause Action or comment
No access The handset is in range, but has no access rights.
Switch off the handset and then switch it on again. If this does not work, contact the system administrator.
No System.The handset beeps once a minute with a low tone followed by a high tone (during max 30 minutes). If the vibrator is enabled, it vibrates after the last beep.
The handset is out of coverage,or faulty handset.
The beeps can be stopped with the mute button. Then go into range.Note: When re-entering the coverage area it can take a couple of minutes before the handset automatically has registered into the system.If this does not work, contact the system administrator.
SERVICE NEEDED Parameters corrupt
Note: This display message is only shown in English.
Faulty handset. Select the reset option on the middle soft key and upgrade the handset’s software to version 3.0.0 or greater. If this is not available or the problem persists send the handset for service.
2010-01-28/ Ver. D 24
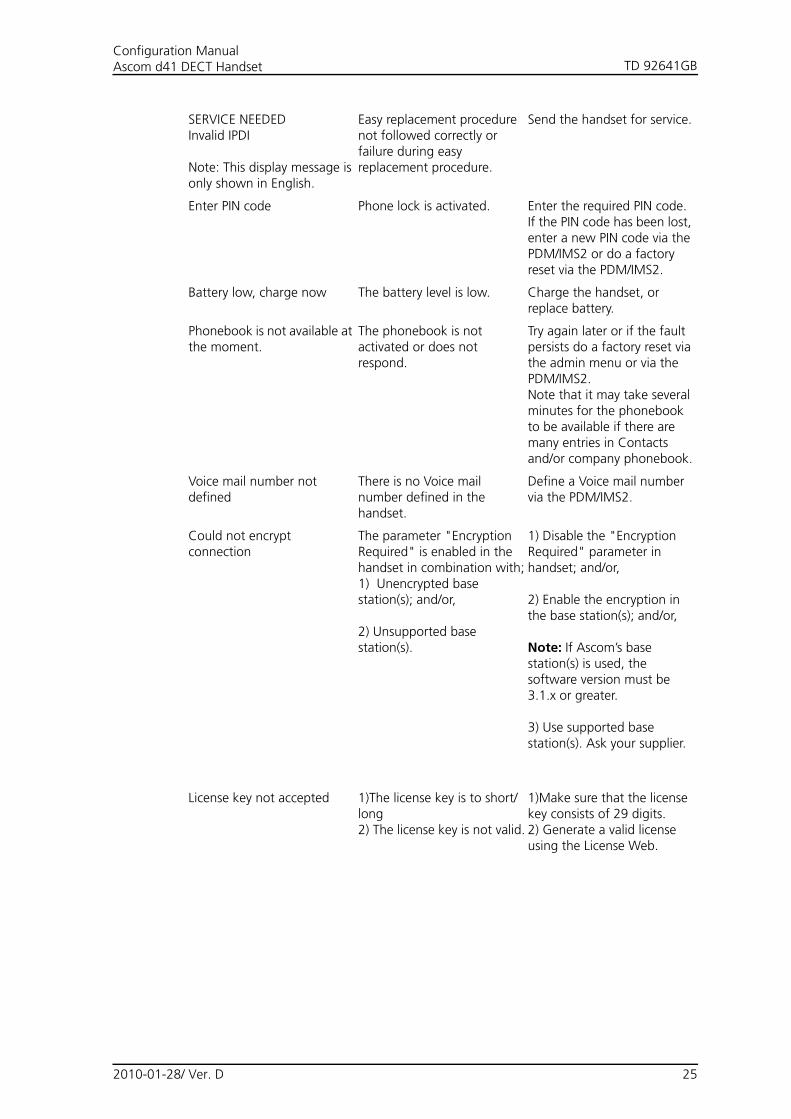
TD 92641GBConfiguration ManualAscom d41 DECT Handset
SERVICE NEEDED Invalid IPDI
Note: This display message is only shown in English.
Easy replacement procedure not followed correctly or failure during easy replacement procedure.
Send the handset for service.
Enter PIN code Phone lock is activated. Enter the required PIN code. If the PIN code has been lost, enter a new PIN code via the PDM/IMS2 or do a factory reset via the PDM/IMS2.
Battery low, charge now The battery level is low. Charge the handset, or replace battery.
Phonebook is not available at the moment.
The phonebook is not activated or does not respond.
Try again later or if the fault persists do a factory reset via the admin menu or via the PDM/IMS2.Note that it may take several minutes for the phonebook to be available if there are many entries in Contacts and/or company phonebook.
Voice mail number not defined
There is no Voice mail number defined in the handset.
Define a Voice mail number via the PDM/IMS2.
Could not encrypt connection
The parameter "Encryption Required" is enabled in the handset in combination with;1) Unencrypted base station(s); and/or,
2) Unsupported base station(s).
1) Disable the "Encryption Required" parameter in handset; and/or,
2) Enable the encryption in the base station(s); and/or, Note: If Ascom’s base station(s) is used, the software version must be 3.1.x or greater.
3) Use supported base station(s). Ask your supplier.
License key not accepted 1)The license key is to short/long2) The license key is not valid.
1)Make sure that the license key consists of 29 digits.2) Generate a valid license using the License Web.
2010-01-28/ Ver. D 25
TD 92641GBConfiguration ManualAscom d41 DECT Handset
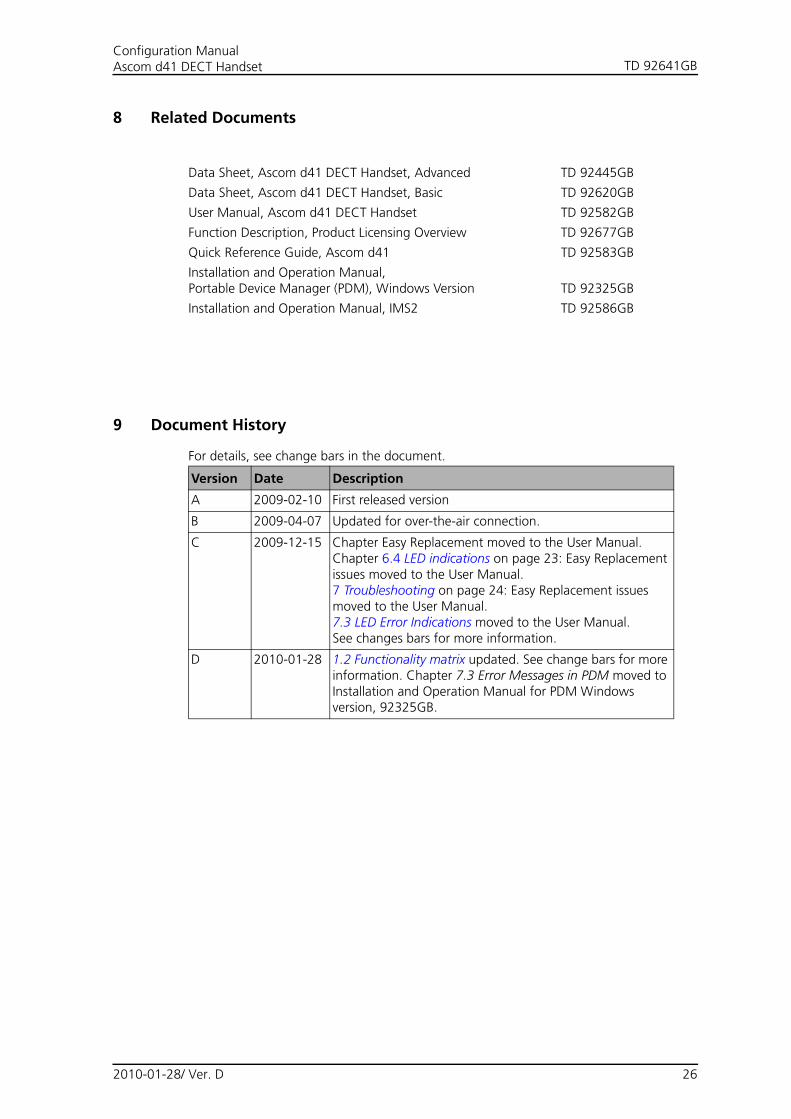
8 Related Documents
9 Document History
For details, see change bars in the document.
Data Sheet, Ascom d41 DECT Handset, Advanced TD 92445GB
Data Sheet, Ascom d41 DECT Handset, Basic TD 92620GB
User Manual, Ascom d41 DECT Handset TD 92582GB
Function Description, Product Licensing Overview TD 92677GB
Quick Reference Guide, Ascom d41 TD 92583GB
Installation and Operation Manual, Portable Device Manager (PDM), Windows Version TD 92325GB
Installation and Operation Manual, IMS2 TD 92586GB
Version Date Description
A 2009-02-10 First released version
B 2009-04-07 Updated for over-the-air connection.
C 2009-12-15 Chapter Easy Replacement moved to the User Manual.Chapter 6.4 LED indications on page 23: Easy Replacement issues moved to the User Manual.7 Troubleshooting on page 24: Easy Replacement issues moved to the User Manual.7.3 LED Error Indications moved to the User Manual.See changes bars for more information.
D 2010-01-28 1.2 Functionality matrix updated. See change bars for more information. Chapter 7.3 Error Messages in PDM moved to Installation and Operation Manual for PDM Windows version, 92325GB.
2010-01-28/ Ver. D 26
TD 92641GBConfiguration ManualAscom d41 DECT Handset
Index
AAdmin menu................................................. 22Audio adjustment.......................................... 20CCall services................................................... 17Central Phonebook ....................................... 16Clear lists ...................................................... 19Company Phonebook.................................... 17EEmergency Call Number ................................ 20FFactory reset.................................................. 10HHardware version .......................................... 23Headset configuration................................... 21IImport Contacts ............................................ 21IMS ................................................................. 1In Call Menu ................................................. 18Installation ...................................................... 5IPDI ........................................................... 1, 23IPEI............................................................ 1, 23LLED indications.............................................. 23License upgrade .............................................. 8OOver-the-air..................................................... 4Own Line Settings ......................................... 18Owner identification...................................... 21PPDM ............................................................... 1Protect registration........................................ 20RReplacement ................................................. 11SSoftware version ........................................... 23
2010-01-28/ Ver. D 27


