Page 1
Configure 6in4 Tunnel in pfSense
Lawrence E. Hughes
18 November 2017
pfSense is a powerful, Dual Stack (IPv4 + IPv6) open source firewall/router for x86 platforms. You can
install it on a variety of platforms, including VirtualBox for building virtual multi subnet networks. It can
function as a fully operational dual stack router, but it has sophisticated controls over traffic flows, so it
is also a firewall.
Free documentation is available online at https://doc.pfsense.org/index.php/Main_Page
Features (from website)
Firewall with stateful packet inspection
Easy to use Web Based Graphical Interface
Installation Setup Wizard
Configurable Dashboard with many available widgets
IPv4 and IPv6 support
Wireless Access Point (must install a wireless interface which supports hostap mode), including VAP/MBSS support on certain chips.
Wireless Client Support (802.11 and 3G/4G with supported devices)
Ability to setup and filter/isolate multiple interfaces (LAN, DMZ, etc.)
Traffic Shaping (ALTQ, Limiters, 802.1p match/set, DiffServ/DSCP matching)
State Table controls (per-rule / per-host limits, timers, etc.)
NAT (Port Forwards, 1:1 NAT, Outbound NAT, NPt)
Redundancy/High Availability - CARP+pfsync+XMLRPC Config sync allows for hardware failover. Two or more firewalls can be configured as a failover cluster.
Multi-WAN Support
Server Inbound Load Balancing
Network diagnostic utilities such as ping, traceroute, port tests via the GUI (more with packages, such as nmap)
VPN - IPsec (including Phase 2 NAT), OpenVPN, L2TP
PPPoE Server
RRD Graphs
Real-time interface traffic graphs
Dynamic DNS
Captive Portal
DHCP Server and Relay (IPv4 and IPv6)
Command line shell access (Via console and SSH)
Wake on LAN
Built in packet capture / sniffer
Ability to backup and restore the firewall configuration via the web GUI
Edit files via the web GUI
Virtual interfaces for VLAN, LAGG/LACP, GIF*, GRE, PPPoE/PPTP/L2TP/PPP WANs, QinQ, and Bridges
Caching DNS Forwarder/Resolver
Page 2
Can be run in many virtualization environments
Proxy Server (using packages)
* the support for GIF pseudo interfaces includes 6in4 tunneling from Hurricane Electric, which requires a
public IPv4 address on the WAN interface of the firewall.
This writeup assumes you:
Have installed pfSense on your firewall device (once this is done, you can remove any video
display, keyboard and CDROM drive used during the install).
Have an ISP account with a public IPv4 address
Have configured your ISP Customer Premises Equipment (modem, router, etc) in bridge mode
(no NAT, no DHCP, no firewalling), where the public IPv4 address is available on the customer
side of the interface.
Have configured a static IPv4 address on the LAN node of your firewall (e.g. 172.21.0.1/16). No
LAN IPv6 address is needed at this point.
Have configured a DHCPv4 server on your firewall to allow a client node connected to the LAN
interface of your firewall to configure with an address that can access the LAN interface of the
firewall (e.g. 172.21.3.1 / 255.255.0.0. The default gateway of the client node should be the LAN
address of your firewall (e.g. 172.21.0.1). No DNS configuration is required at this time. You can
point it to the LAN interface of the firewall for now.
Have connected an Ethernet cable from the customer side of the ISP CPE to the WAN port on
your firewall.
Have connected another Ethernet cable from the LAN port on your firewall to the Ethernet
interface of a client node (e.g. notebook running Windows). The client node should do network
configuration via DHCPv4.
Can ping the firewall LAN interface from the client node (e.g. ping 172.21.0.1)
On my network, the ISP account looks like the following (as documented by ISP). Since my address is
static and configured via ISP DHCPv4, I don’t really need to know these things.
IPv4 public address: 101.100.162.253/24 configured via ISP DHCPv4
IPv4 upstream gateway (101.100.162.1), configured via ISP DHCPv4
IPv4 addresses of DNS (101.100.188.23, 103.7.200.10), configured via ISP DHCPv4
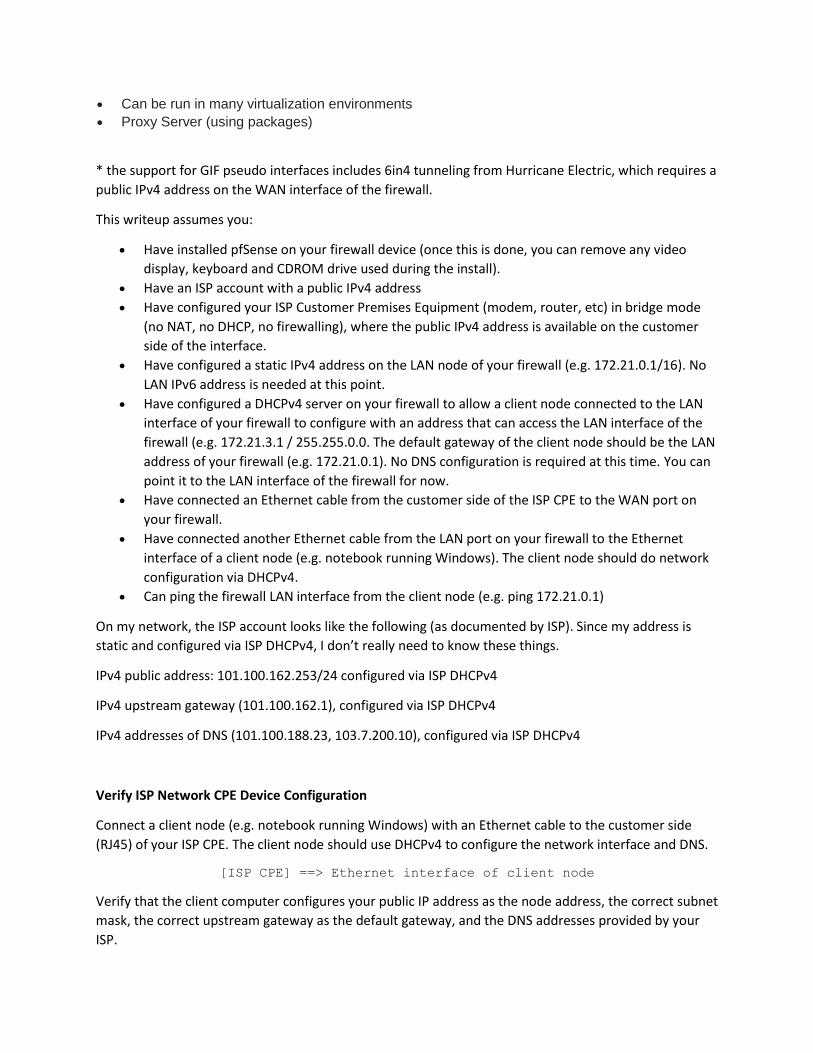
Verify ISP Network CPE Device Configuration
Connect a client node (e.g. notebook running Windows) with an Ethernet cable to the customer side
(RJ45) of your ISP CPE. The client node should use DHCPv4 to configure the network interface and DNS.
[ISP CPE] ==> Ethernet interface of client node
Verify that the client computer configures your public IP address as the node address, the correct subnet
mask, the correct upstream gateway as the default gateway, and the DNS addresses provided by your
ISP.
Page 3
If your ISP does not use DHCPv4, do manual configuration of your client node as per their information
on connecting (e.g. static IPv4 address).
Check network configuration on the client node with ipconfig:
C:\Users\lhughes>ipconfig /all
Windows IP Configuration
Host Name . . . . . . . . . . . . : LEHNB10
Primary Dns Suffix . . . . . . . : hughesnet-sg.org
Node Type . . . . . . . . . . . . : Hybrid
IP Routing Enabled. . . . . . . . : No
WINS Proxy Enabled. . . . . . . . : No
DNS Suffix Search List. . . . . . : hughesnet-sg.org
ph.sixscape.net
Ethernet adapter Ethernet:
Connection-specific DNS Suffix . : ph.sixscape.net
Description . . . . . . . . . . . : Realtek PCIe GBE Family Controller
Physical Address. . . . . . . . . : 54-EE-75-98-A4-BF
DHCP Enabled. . . . . . . . . . . : Yes
Autoconfiguration Enabled . . . . : Yes
Link-local IPv6 Address . . . . . : fe80::4000:a636:10cb:36a9%11(Preferred)
IPv4 Address. . . . . . . . . . . : 172.21.3.1(Preferred)
Subnet Mask . . . . . . . . . . . : 255.255.0.0
Lease Obtained. . . . . . . . . . : Saturday, November 18, 2017 1:36:51 PM
Lease Expires . . . . . . . . . . : Saturday, November 18, 2017 3:20:49 PM
Default Gateway . . . . . . . . . : fe80::1:1%11
172.21.0.1
DHCP Server . . . . . . . . . . . : 172.21.0.1
DHCPv6 IAID . . . . . . . . . . . : 257224309
DHCPv6 Client DUID. . . . . . . . : 00-01-00-01-1F-E2-B5-17-54-EE-75-98-A4-BF
DNS Servers . . . . . . . . . . . : 172.21.0.1
NetBIOS over Tcpip. . . . . . . . : Enabled
Connection-specific DNS Suffix Search List :
ph.sixscape.net
Try pinging an external IPv4 address from the client node:
C:\Users\lhughes>ping 172.21.0.1
Pinging 172.21.0.1 with 32 bytes of data:
Reply from 172.21.0.1: bytes=32 time<1ms TTL=64
Reply from 172.21.0.1: bytes=32 time<1ms TTL=64
Reply from 172.21.0.1: bytes=32 time<1ms TTL=64
Reply from 172.21.0.1: bytes=32 time<1ms TTL=64
Ping statistics for 172.21.0.1:
Packets: Sent = 4, Received = 4, Lost = 0 (0% loss),
Approximate round trip times in milli-seconds:
Minimum = 0ms, Maximum = 0ms, Average = 0ms
You should also be able to surf to an IPv4 website using any browser on your client node (e.g.
http://www.whatismyipaddress.com)
Page 4
Insert the pfSense Firewall Between the ISP CPE and the Client Node
Disconnect the Ethernet cable from the Ethernet interface of the client node and insert that cable into
the WAN interface of the firewall (e.g. em0).
[ISP CPE] ==> [FW WAN Interface]
Connect another Ethernet cable from the LAN interface of the firewall to the Ethernet interface of the
client node.
[FW LAN Interface] ==> Ethernet interface of client node
Use ipconfig on the client node to verify that the client node still does valid private network
configuration using DHCPv4, e.g. node address 172.21.3.1, subnet 255.255.0.0, default gateway
172.21.0.1, and some DNS addresses.
Surf to the pfSense web configurator from the client node: https://172.21.0.1 (or whatever you
configured as your LAN IP address). It will complain that the server cert is untrusted (it is self-signed) –
connect anyway (how you do this depends on the browser you are using).
You should see the login page:
Login as admin, using the password configured during pfSense install.
Page 5
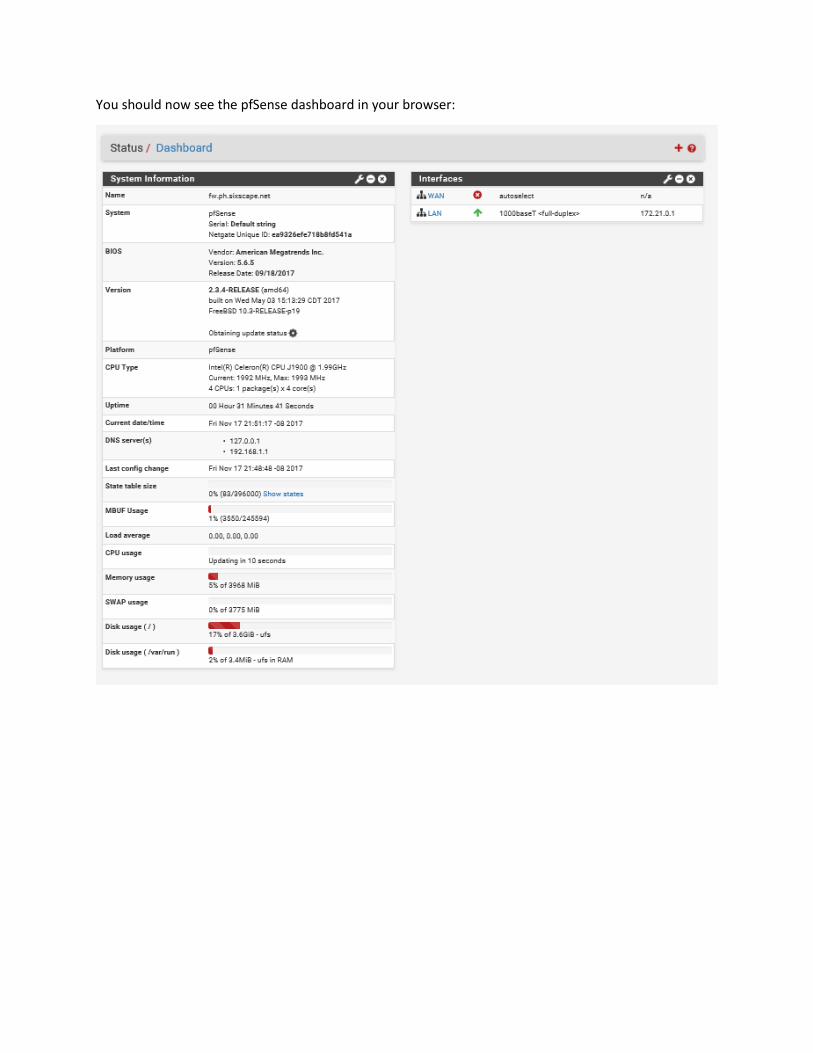
You should now see the pfSense dashboard in your browser:
Page 6
View the WAN Interface configuration: Interfaces / WAN:
Click Save then Apply Changes
Page 7
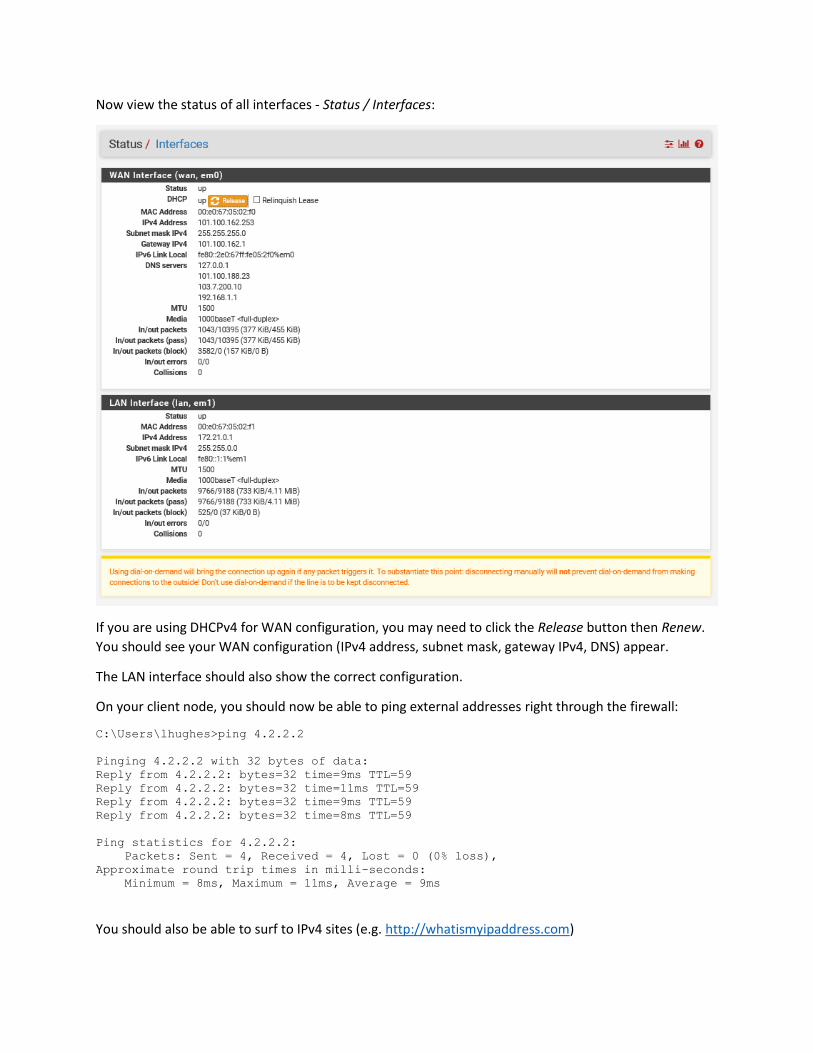
Now view the status of all interfaces - Status / Interfaces:
If you are using DHCPv4 for WAN configuration, you may need to click the Release button then Renew.
You should see your WAN configuration (IPv4 address, subnet mask, gateway IPv4, DNS) appear.
The LAN interface should also show the correct configuration.
On your client node, you should now be able to ping external addresses right through the firewall:
C:\Users\lhughes>ping 4.2.2.2
Pinging 4.2.2.2 with 32 bytes of data:
Reply from 4.2.2.2: bytes=32 time=9ms TTL=59
Reply from 4.2.2.2: bytes=32 time=11ms TTL=59
Reply from 4.2.2.2: bytes=32 time=9ms TTL=59
Reply from 4.2.2.2: bytes=32 time=8ms TTL=59
Ping statistics for 4.2.2.2:
Packets: Sent = 4, Received = 4, Lost = 0 (0% loss),
Approximate round trip times in milli-seconds:
Minimum = 8ms, Maximum = 11ms, Average = 9ms
You should also be able to surf to IPv4 sites (e.g. http://whatismyipaddress.com)
Page 8
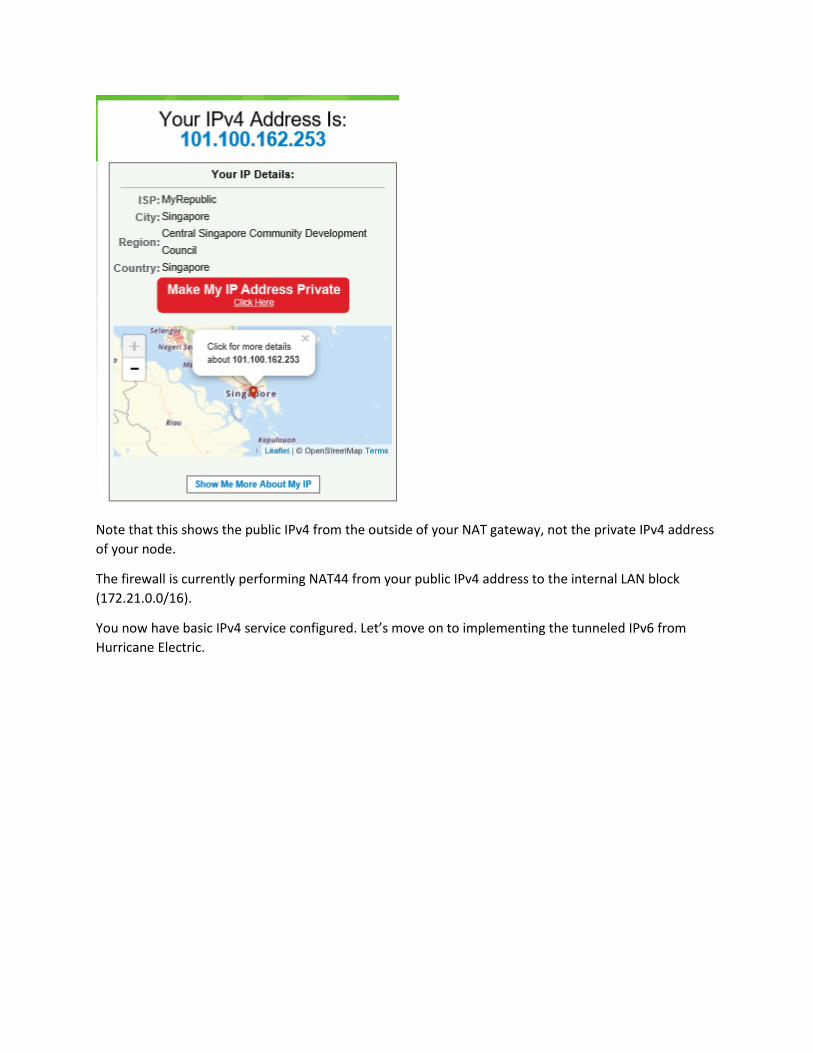
Note that this shows the public IPv4 from the outside of your NAT gateway, not the private IPv4 address
of your node.
The firewall is currently performing NAT44 from your public IPv4 address to the internal LAN block
(172.21.0.0/16).
You now have basic IPv4 service configured. Let’s move on to implementing the tunneled IPv6 from
Hurricane Electric.
Page 9
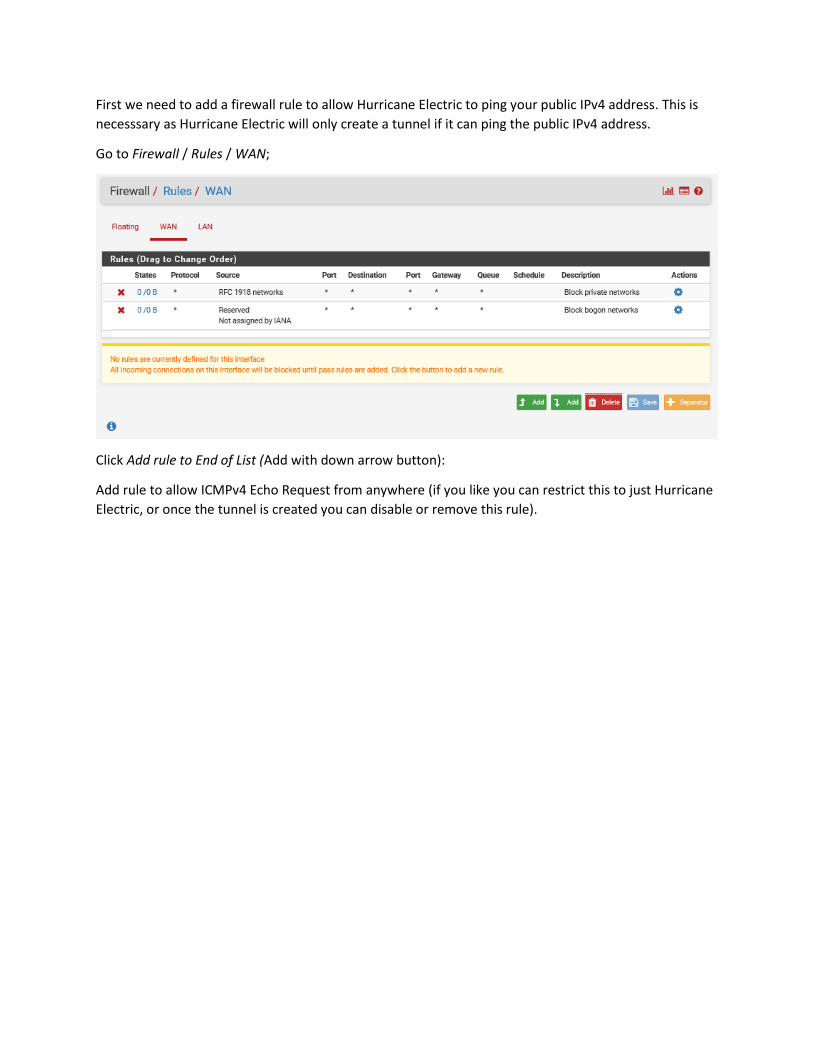
First we need to add a firewall rule to allow Hurricane Electric to ping your public IPv4 address. This is
necesssary as Hurricane Electric will only create a tunnel if it can ping the public IPv4 address.
Go to Firewall / Rules / WAN;
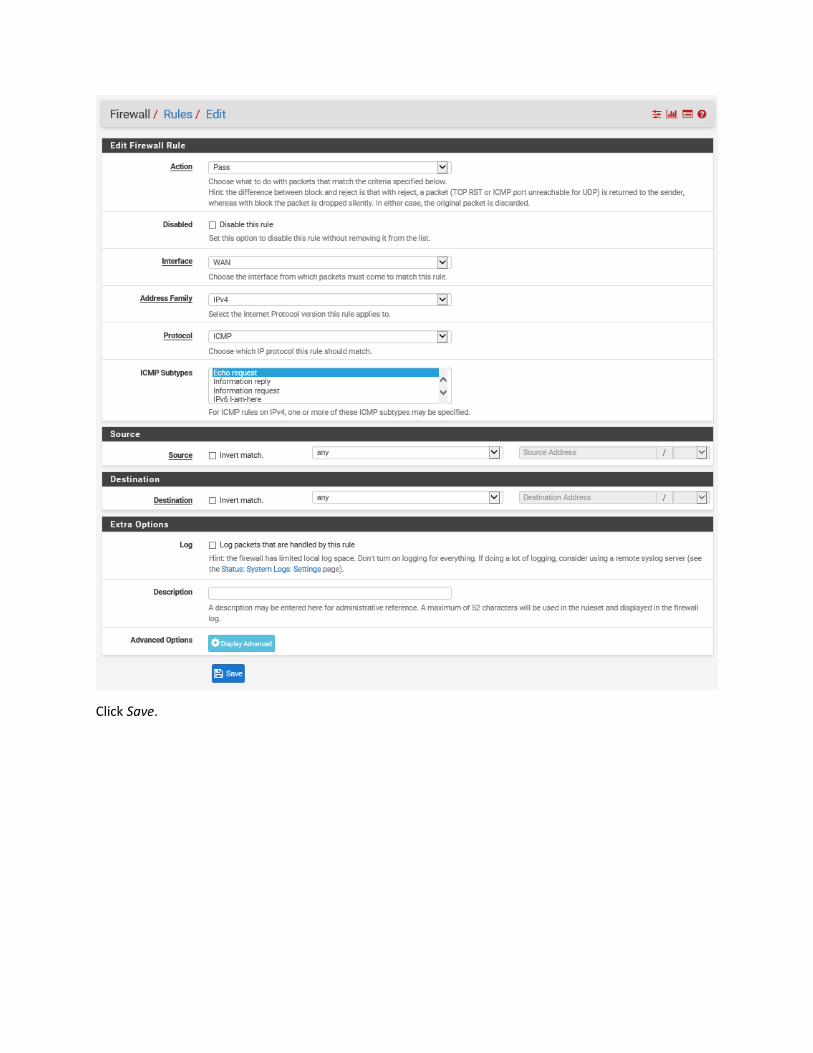
Click Add rule to End of List (Add with down arrow button):
Add rule to allow ICMPv4 Echo Request from anywhere (if you like you can restrict this to just Hurricane
Electric, or once the tunnel is created you can disable or remove this rule).
Page 11
Click Apply Changes button.
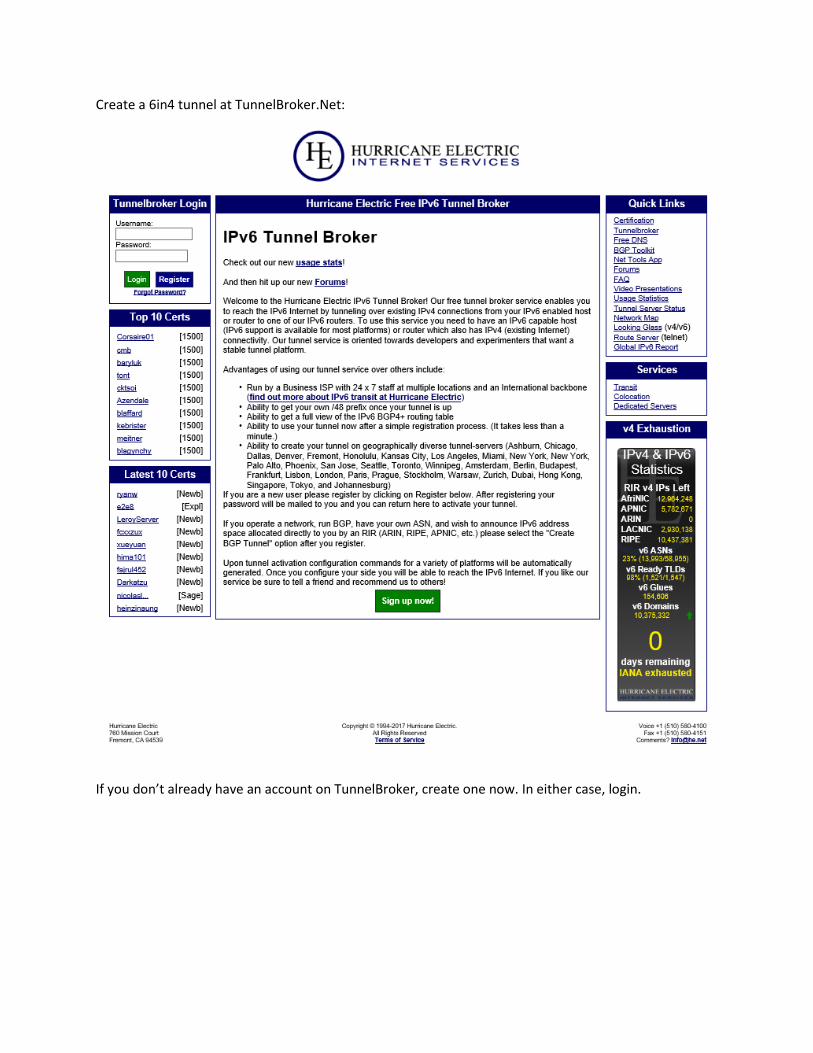
Now surf to http://tunnelbroker.com with any browser (from your client node):
Page 12
Create a 6in4 tunnel at TunnelBroker.Net:
If you don’t already have an account on TunnelBroker, create one now. In either case, login.
Page 13
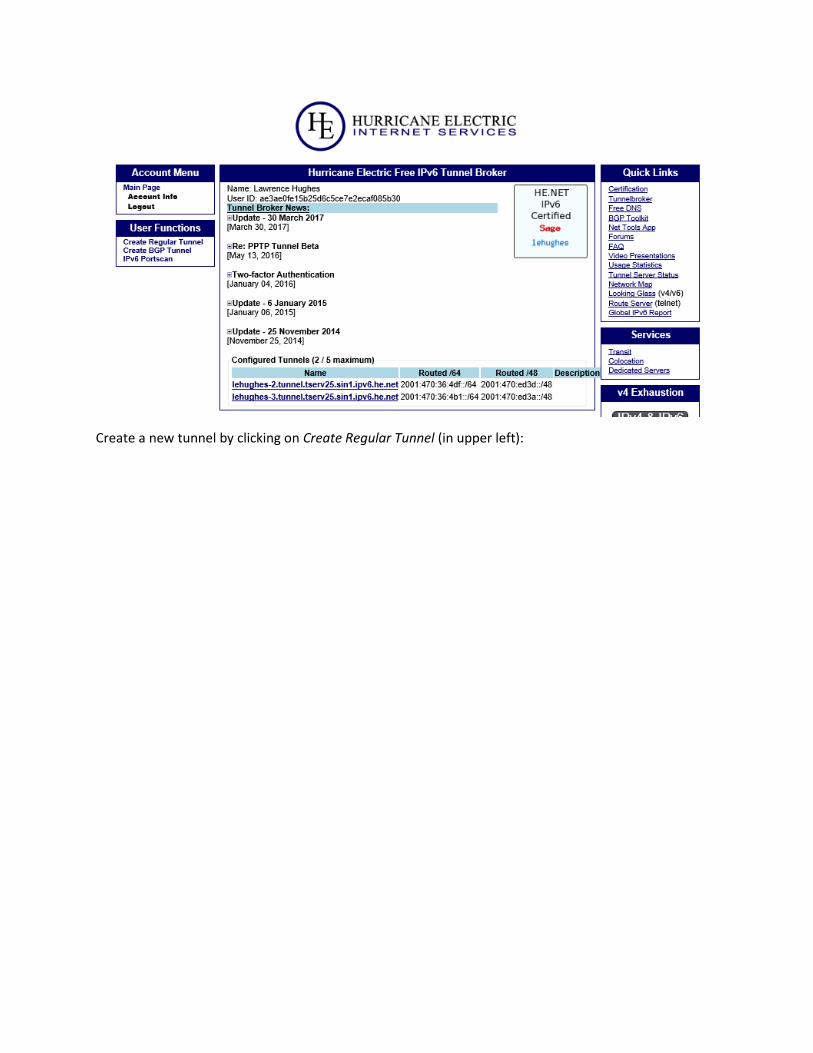
Create a new tunnel by clicking on Create Regular Tunnel (in upper left):
Page 14
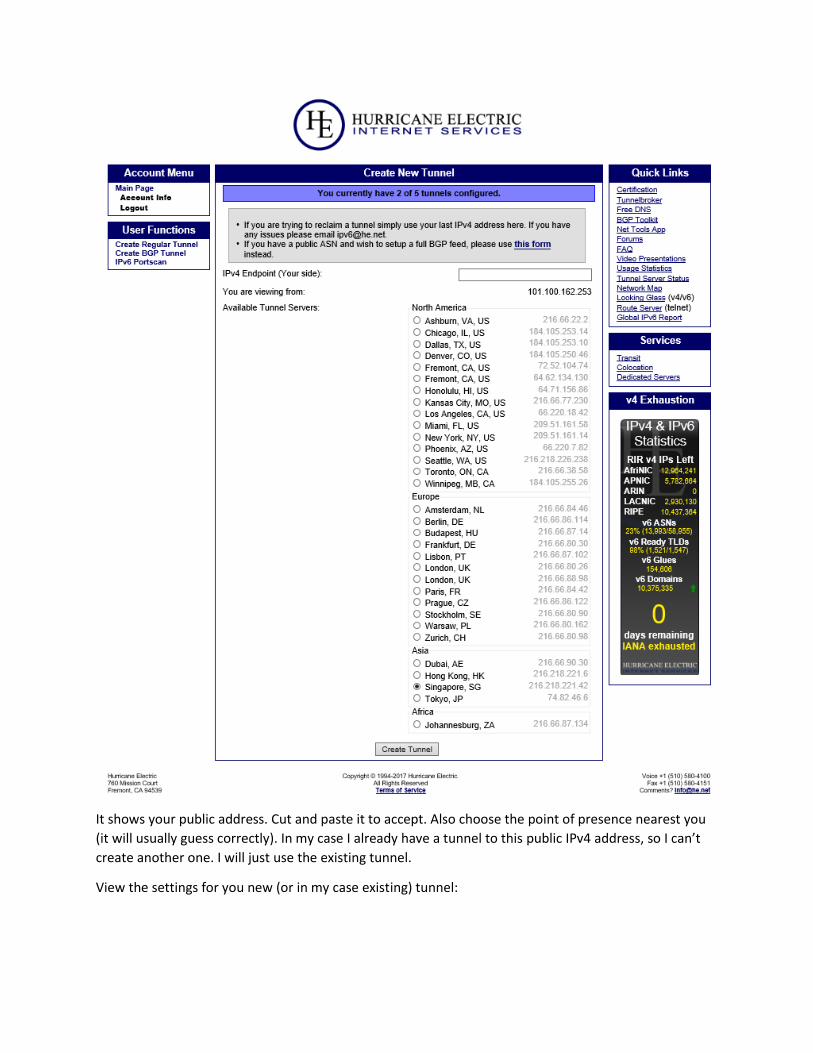
It shows your public address. Cut and paste it to accept. Also choose the point of presence nearest you
(it will usually guess correctly). In my case I already have a tunnel to this public IPv4 address, so I can’t
create another one. I will just use the existing tunnel.
View the settings for you new (or in my case existing) tunnel:
Page 15
You will need the above info to configure your 6in4 tunnel. Print it.
Create the GIF Interface
Click Interfaces / Assign / GIFs.
Now click + Add
Page 16
Do not include a “/64” after the IPv6 addresses. Now click Save
Page 17
Configure GIF Interface (HENETv6)
Click on OPT1 and modify it as follows:
Page 18
Now assign the GIF interface. Select the GIF interface for HENETv6.
Click on Save. It will now look like this:
Page 19
Now setup the Gateway for the HENET tunnel (System / Routing / Gateways)
Save, Apply Changes. Your gateways will now look like this:
Page 20
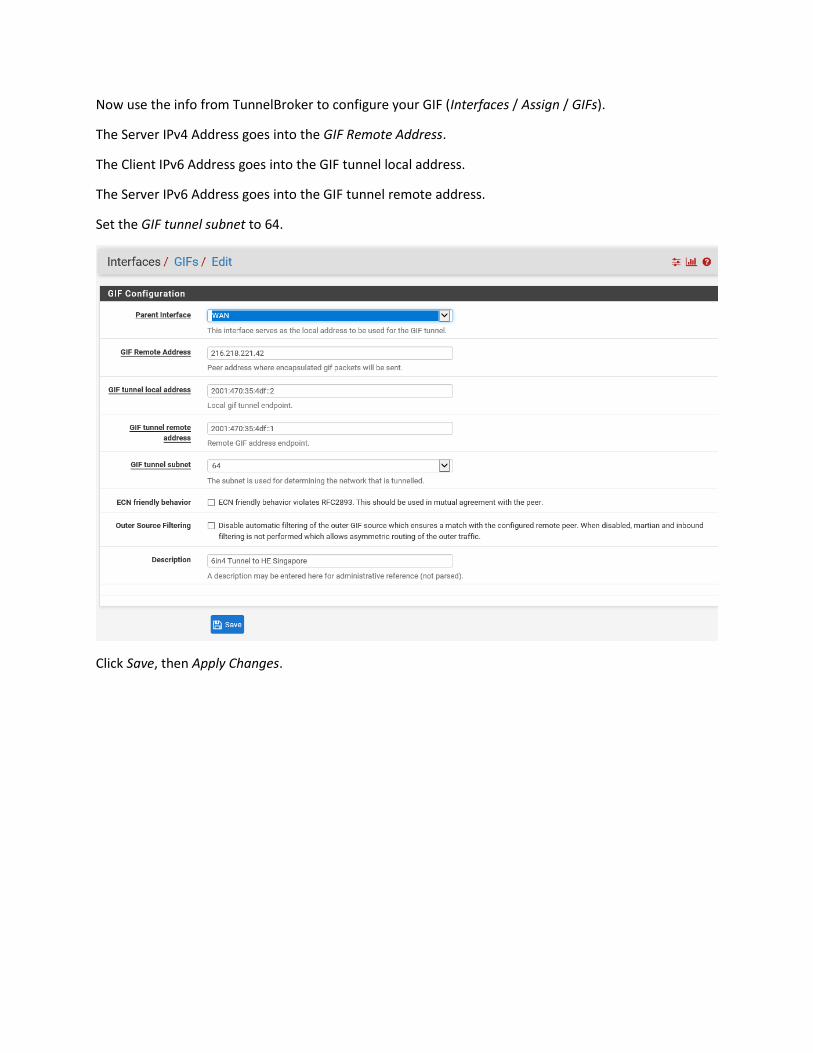
Now use the info from TunnelBroker to configure your GIF (Interfaces / Assign / GIFs).
The Server IPv4 Address goes into the GIF Remote Address.
The Client IPv6 Address goes into the GIF tunnel local address.
The Server IPv6 Address goes into the GIF tunnel remote address.
Set the GIF tunnel subnet to 64.
Click Save, then Apply Changes.
Page 21
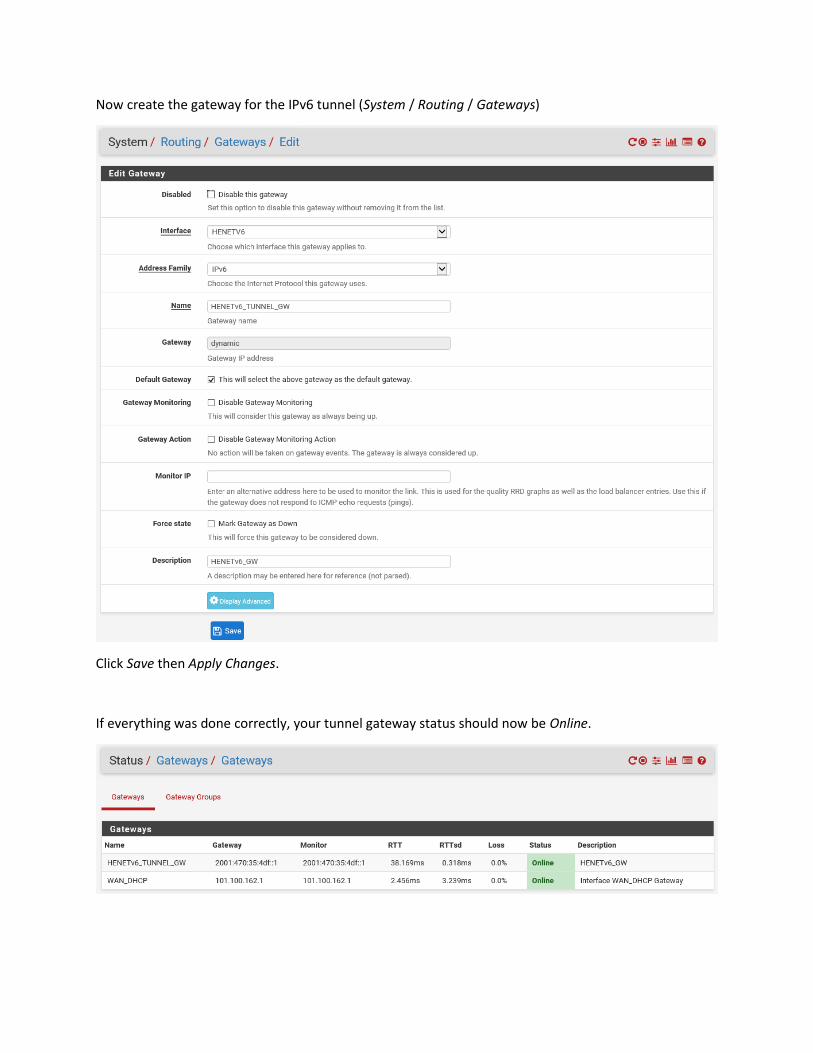
Now create the gateway for the IPv6 tunnel (System / Routing / Gateways)
Click Save then Apply Changes.
If everything was done correctly, your tunnel gateway status should now be Online.
Page 22
Now view your interfaces (Status / Interfaces). The HENETv6 interface is now present. There is still no
IPv6 address for the LAN interface:
Page 23
Configure LAN IPv6 Address
Set the IPv6 address type to Static IPv6. Enter a nice address (e.g. ::1 in the LAN subnet) for the LAN IPv6
address. Set the prefix length to 64. No upstream gateway is configured.
Page 24
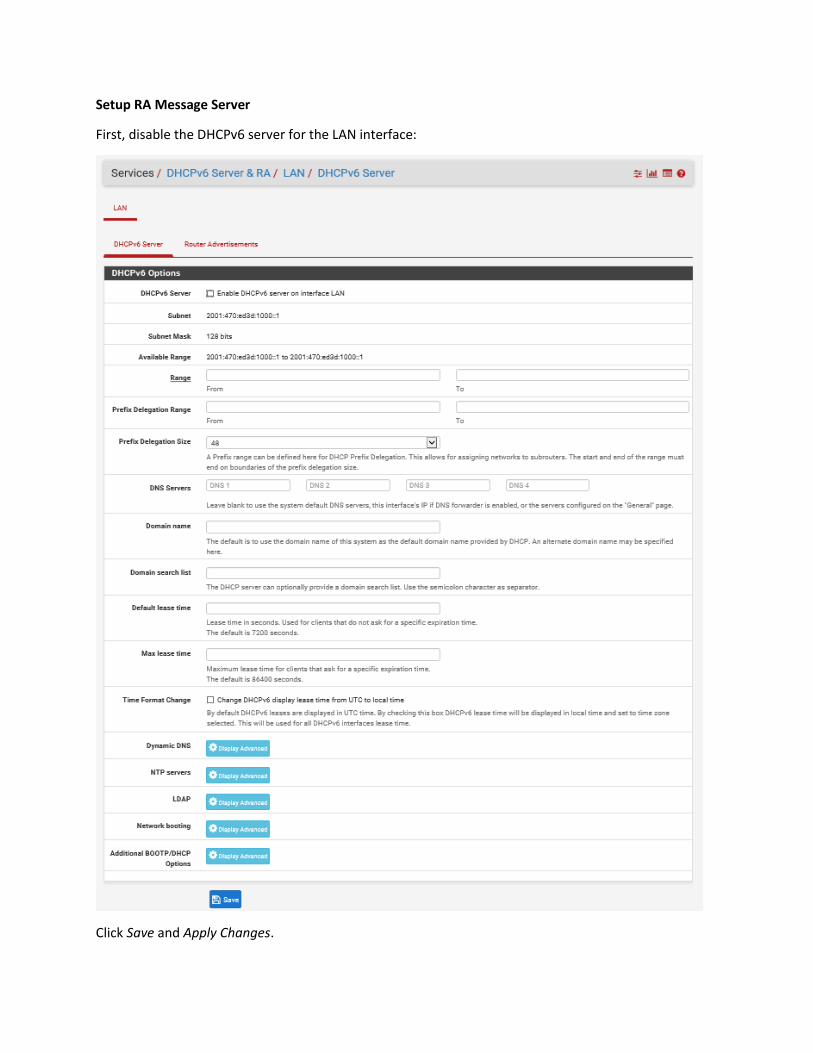
Setup RA Message Server
First, disable the DHCPv6 server for the LAN interface:
Click Save and Apply Changes.
Page 25
Now configure the Router Advertisement message:
Set the subnet prefix and any DNS servers and search list. Click Save and Apply Changes.
Page 26
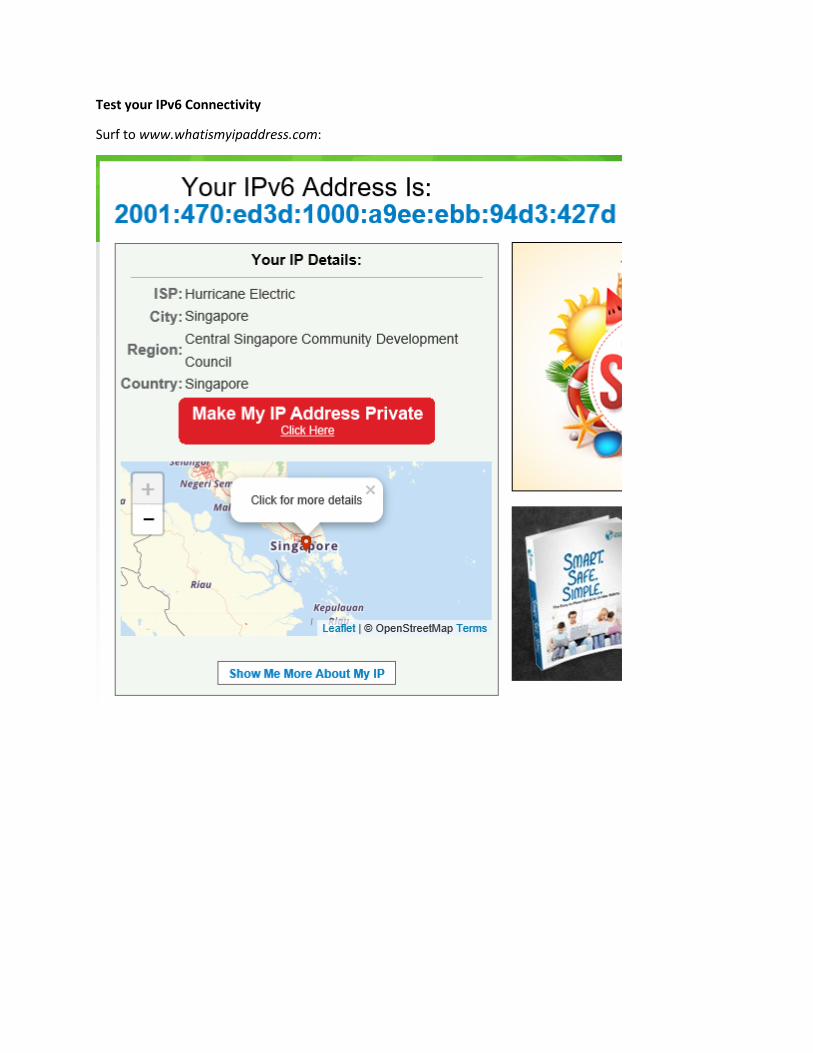
Test your IPv6 Connectivity
Surf to www.whatismyipaddress.com:
Page 27
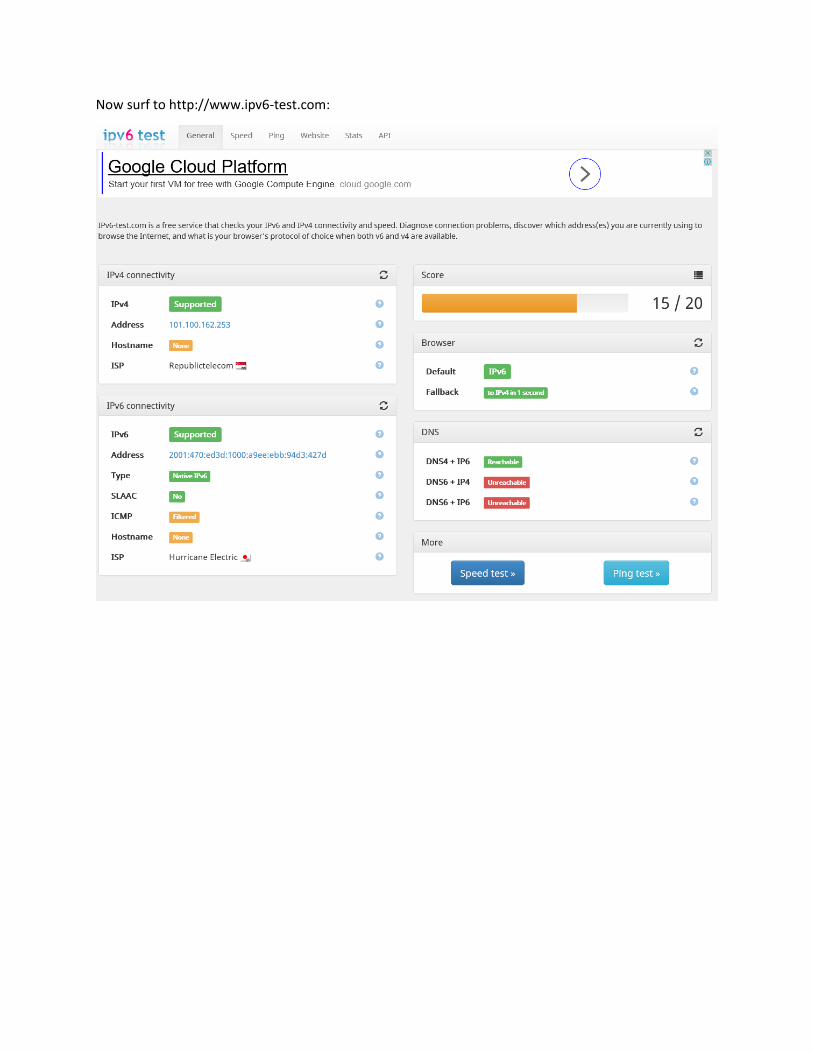
Now surf to http://www.ipv6-test.com:
Page 28
And www.test-ipv6.com
Page 29
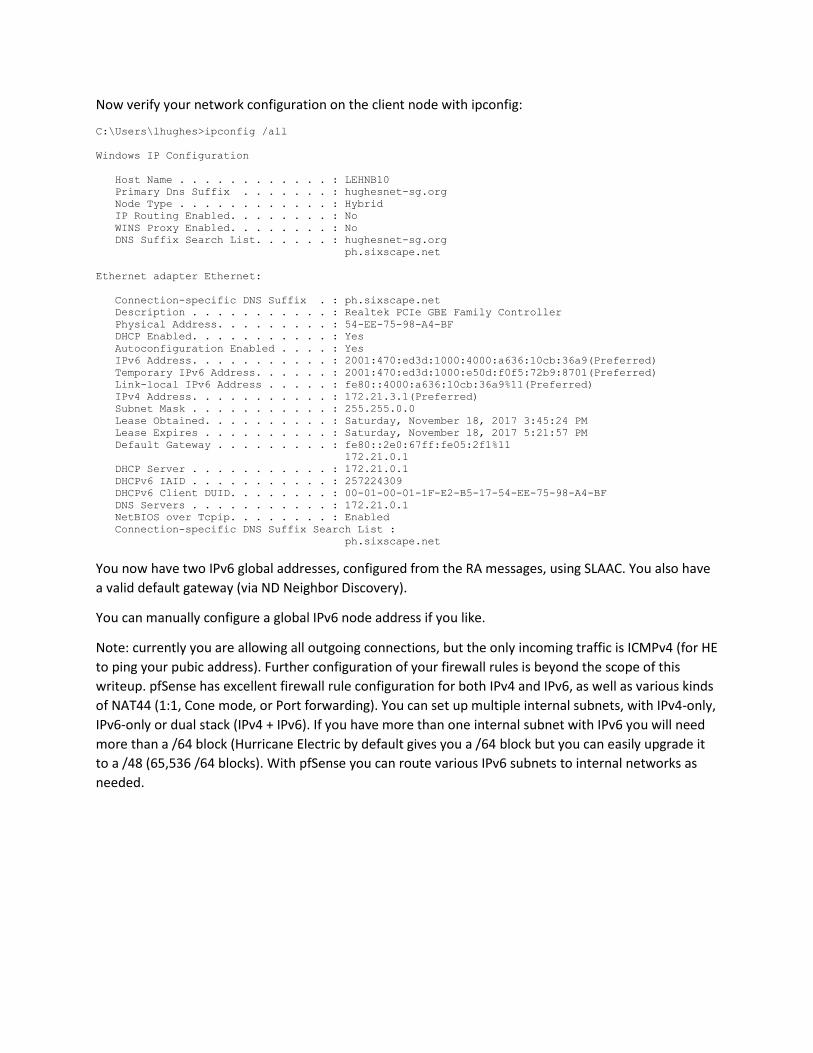
Now verify your network configuration on the client node with ipconfig:
C:\Users\lhughes>ipconfig /all
Windows IP Configuration
Host Name . . . . . . . . . . . . : LEHNB10
Primary Dns Suffix . . . . . . . : hughesnet-sg.org
Node Type . . . . . . . . . . . . : Hybrid
IP Routing Enabled. . . . . . . . : No
WINS Proxy Enabled. . . . . . . . : No
DNS Suffix Search List. . . . . . : hughesnet-sg.org
ph.sixscape.net
Ethernet adapter Ethernet:
Connection-specific DNS Suffix . : ph.sixscape.net
Description . . . . . . . . . . . : Realtek PCIe GBE Family Controller
Physical Address. . . . . . . . . : 54-EE-75-98-A4-BF
DHCP Enabled. . . . . . . . . . . : Yes
Autoconfiguration Enabled . . . . : Yes
IPv6 Address. . . . . . . . . . . : 2001:470:ed3d:1000:4000:a636:10cb:36a9(Preferred)
Temporary IPv6 Address. . . . . . : 2001:470:ed3d:1000:e50d:f0f5:72b9:8701(Preferred)
Link-local IPv6 Address . . . . . : fe80::4000:a636:10cb:36a9%11(Preferred)
IPv4 Address. . . . . . . . . . . : 172.21.3.1(Preferred)
Subnet Mask . . . . . . . . . . . : 255.255.0.0
Lease Obtained. . . . . . . . . . : Saturday, November 18, 2017 3:45:24 PM
Lease Expires . . . . . . . . . . : Saturday, November 18, 2017 5:21:57 PM
Default Gateway . . . . . . . . . : fe80::2e0:67ff:fe05:2f1%11
172.21.0.1
DHCP Server . . . . . . . . . . . : 172.21.0.1
DHCPv6 IAID . . . . . . . . . . . : 257224309
DHCPv6 Client DUID. . . . . . . . : 00-01-00-01-1F-E2-B5-17-54-EE-75-98-A4-BF
DNS Servers . . . . . . . . . . . : 172.21.0.1
NetBIOS over Tcpip. . . . . . . . : Enabled
Connection-specific DNS Suffix Search List :
ph.sixscape.net
You now have two IPv6 global addresses, configured from the RA messages, using SLAAC. You also have
a valid default gateway (via ND Neighbor Discovery).
You can manually configure a global IPv6 node address if you like.
Note: currently you are allowing all outgoing connections, but the only incoming traffic is ICMPv4 (for HE
to ping your pubic address). Further configuration of your firewall rules is beyond the scope of this
writeup. pfSense has excellent firewall rule configuration for both IPv4 and IPv6, as well as various kinds
of NAT44 (1:1, Cone mode, or Port forwarding). You can set up multiple internal subnets, with IPv4-only,
IPv6-only or dual stack (IPv4 + IPv6). If you have more than one internal subnet with IPv6 you will need
more than a /64 block (Hurricane Electric by default gives you a /64 block but you can easily upgrade it
to a /48 (65,536 /64 blocks). With pfSense you can route various IPv6 subnets to internal networks as
needed.