26
Vineet Sharda 1 Configure the resources to connect to a PI Server without sending explicit credentials
Vineet Sharda 1
Configure the resources to connect to a PI Server without
sending explicit credentials

Vineet Sharda 2
Table of contents
Contents
History................................................................................................................................. 3
Introduction ......................................................................................................................... 4
Terminology ........................................................................................................................ 6
Using PI machine authentication for PI-API calls .............................................................. 8 Install PI-API .............................................................................................................. 8 PI Tags ........................................................................................................................ 8 Application Name ....................................................................................................... 9 IP Address ................................................................................................................... 9 Trust ............................................................................................................................ 9 Connect from application .......................................................................................... 10
Using PI windows authentication for PI-OleDb calls ....................................................... 11 Establish a WAD account ......................................................................................... 11 Share Credentials with WinServerAdmin ................................................................. 13
Share Credentials with PiServerAdmin .................................................................... 13
PI Tags ...................................................................................................................... 13 PI Identity.................................................................................................................. 14 Dummy PI User ........................................................................................................ 15 Install PI-SDK ........................................................................................................... 15 Install PI-OleDb ........................................................................................................ 15 Connect from application .......................................................................................... 17
Appendix A: Run a Windows Service as a particular user ............................................... 18
Specify that a user will run this Windows Service ................................................... 18
Installation................................................................................................................. 19 Permissions ............................................................................................................... 20 Exception .................................................................................................................. 20
Appendix B: Run a Web Application or a Web Service as a particular user ................... 21
Encrypted Credentials on Registry ........................................................................... 21 Registry Permissions ................................................................................................. 23 Folder Permissions .................................................................................................... 25 Impersonation ........................................................................................................... 26

Vineet Sharda 3
History First Draft – Nov 25, 2009 Base Document – Dec 7, 2009 Edit 1 – Dec 9, 2009
1. Put PI-SDK installation before PI-OleDb installation for more clarity. 2. Gave details about the PI System Management Tools. 3. Explained creation of PIIdentity. 4. Removed Install Application step from the Using PI machine authentication for
PI-API calls section. Edit 2 – Dec 14, 2009 Added Exception to the Using PI windows authentication for PI-OleDb calls section Edit 3- Feb 23, 2010 Updated the Appendix B: Run a Web Application as a particular user for ASP.Net Framework 2.0. Updated the title of Appendix B to Appendix B: Run a Web Application or a Web Service as a particular user. Edit 4 – Dec 21, 2011 Updated the Encrypted Credentials on Registry action of Appendix B. Edit 5 – Aug 8, 2013
1. Updated the Encrypted Credentials on Registry action of Appendix B. 2. Updated the Registry Permissions action of Appendix B. 3. Updated the Folder Permissions action of Appendix B.
Edit 6 – Nov 26, 2013 1. Rectified the Trust step of the Using PI machine authentication for PI-API calls
section. 2. Updated the Encrypted Credentials on Registry step of Appendix B. 3. Updated the Registry Permissions step of Appendix B. 4. Updated the Impersonation step of Appendix B.
Vineet Sharda 4
Introduction The motivation of this document came from the fact that System Operations forwarded a notification from NERC as follows:
Recently NERC put out a "CIP: OSIsoft PI Enterprise Server Authentication" Industry advisory that stated the following (part of it): "The ES-ISAC and ICS-CERT strongly encourage users of PI Enterprise Server configure authentication via PI Trust records, which is not affected by this vulnerability. All types of PI Trusts avoid the exchange of unsecure PI passwords. The newest PI Enterprise Server version (3.4.380) if configured with the default authentication settings is not affected by this vulnerability. It is recommended that these users verify server authentication policy is set to “explicit login disabled”.
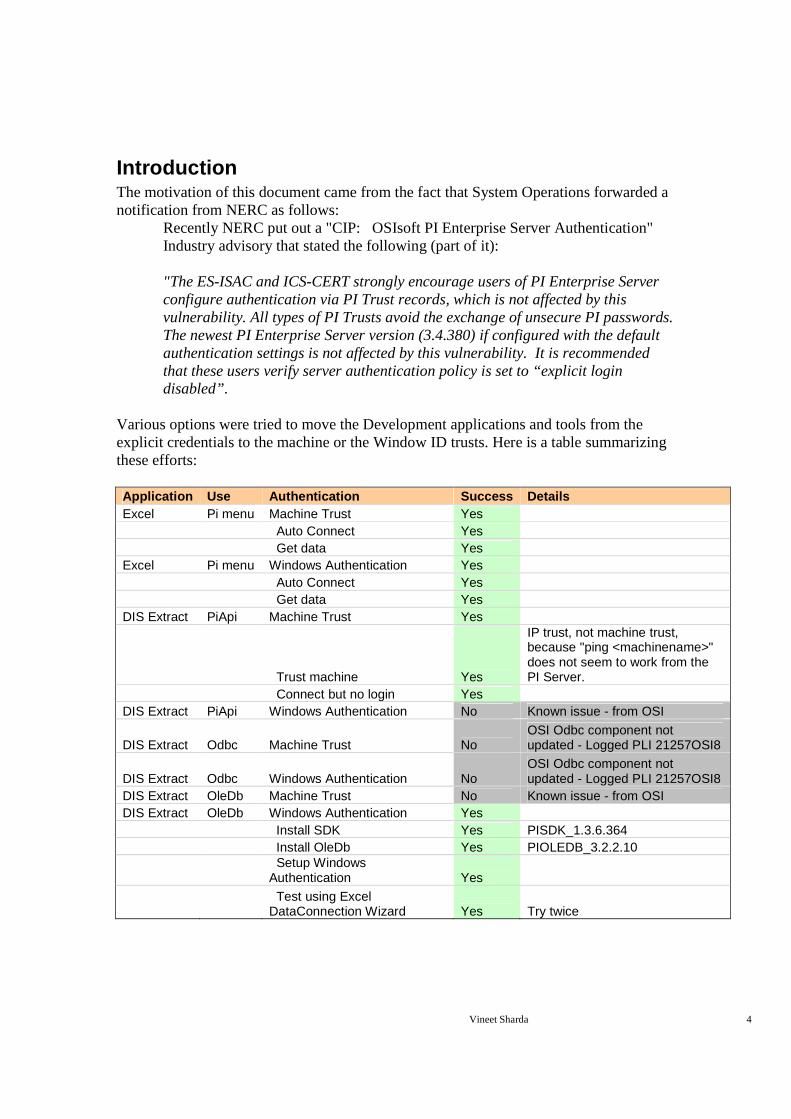
Various options were tried to move the Development applications and tools from the explicit credentials to the machine or the Window ID trusts. Here is a table summarizing these efforts: Application Use Authentication Success Details Excel Pi menu Machine Trust Yes Auto Connect Yes Get data Yes Excel Pi menu Windows Authentication Yes Auto Connect Yes Get data Yes DIS Extract PiApi Machine Trust Yes
Trust machine Yes
IP trust, not machine trust, because "ping <machinename>" does not seem to work from the PI Server.
Connect but no login Yes DIS Extract PiApi Windows Authentication No Known issue - from OSI
DIS Extract Odbc Machine Trust No OSI Odbc component not updated - Logged PLI 21257OSI8
DIS Extract Odbc Windows Authentication No OSI Odbc component not updated - Logged PLI 21257OSI8
DIS Extract OleDb Machine Trust No Known issue - from OSI DIS Extract OleDb Windows Authentication Yes Install SDK Yes PISDK_1.3.6.364 Install OleDb Yes PIOLEDB_3.2.2.10
Setup Windows Authentication Yes
Test using Excel DataConnection Wizard Yes Try twice

Vineet Sharda 5
The options which resulted in a failure were logged with the OSI Soft Inc. The options which succeeded were further refined to be used for Production. This document gives the details of these steps.

Vineet Sharda 6
Terminology Developer Programmer working with the PI-API or PI-OleDb. PI-API A component which is used by the PIAPIWrapper to communicate with a PI server. It is possible that Pi-SDK is needed to make the PI-API to work. This hypothesis or its negation has not been tested yet. In case of any issue, please refer to the PI-SDK and PiSdkInstallationKit in this section. PiApiInstallationKit An installation kit containing the PI-API. At the time of writing of this document, the installation kit containing the latest API version is PI Buffer Subsystem Install Kit, Version 3.4.375.84, Release Date 21-Sep-09. It has the PI-API version 1.6.1.15. PiApiSnap The application used to quick test the connection of PI-API to the PI Server. Usually, it is C:\Program Files\PIPC\bin\apisnap.exe. PI-OleDb A universal OleDb data access provider component to access a Pi Server. Also note that PI-SDK is needed to use the Pi-OleDb. PiOledbInstallationKit An installation kit containing the PI-OleDb. At the time of writing of this document, the installation kit containing the latest PiOleDb provider version is PI OLEDB Provider Install Kit, Version 3.3.0.1, Release Date 13-Jul-09. It has the PI-OleDb version 3.3.0.1. PiOledbTester A windows application to test the connection from WinServer to PiServer using the Pi-OleDb provider. It is usually installed as a part of the PiOleDbInstallationKit. This application is usually opened by double clicking C:\Program Files\PIPC\OLEDB\Tools\PI OLEDB Tester\PIOLEDBTester.exe. PI-SDK A component required to make the PI-OleDb work. Although it is called an SDK, it also serves the PI-OleDb component. In other words, PI-OleDb will not work without PI-SDK being installed on the same machine. PiSdkInstallationKit An installation kit containing the PI-SDK. At the time of writing of this document, the installation kit containing the latest PiSdk version is PI SDK Install Kit, Version 1.3.6.364, Release Date 25-Mar-09. It has the PI-

Vineet Sharda 7
SDK version 1.3.6.363. PiServer The PI Server, which is to be used, for example, eccpi.coned.com. PiServerAdmin The administrator of the PiServer. PiTags PI tags which will be accessed by using PI-API. PiSMT This is an application containing the PI System Management Tools. At the time of writing of this document, the latest PiSMT version is 3.3.1.3. WAD Windows Active Directory WadAdmin The administrator of the Windows Active Directory. WinServer The machine which will run the Windows service or application that will be sending the PI-API requests to the PiServer. WinServer is just the short form of the Windows Server. This term will also be used for the server that will host web applications. WinServerAdmin The administrator of WinServer.

Vineet Sharda 8
Using PI machine authentication for PI-API calls
Install PI-API Install the PI-API on the WinServer, using the PiApiInstallationKit. Please refer to the Terminology section for details about this kit. Actor WinServerAdmin Result PI-API is installed on the WinServer Test
1. Open a command window on the WinServer 2. Run apisnap <PiServer>apisnap <PiServer>apisnap <PiServer>apisnap <PiServer>, as shown:
Getting the message: Enter tagname:Enter tagname:Enter tagname:Enter tagname: denotes success. Please refer to the Terminology section for details of the PiApiSnap application.
PI Tags Provide the PiTags to the PiServerAdmin. Also provide the access level required for each tag. Actor Developer Result The PiServerAdmin has the PiTags, along with the access level for each of them.
Vineet Sharda 9
Application Name Provide a 4-character string, uniquely identifying the application, to the PiServer. Actor Developer Result The PiServerAdmin has the application name.
IP Address Provide the IP address of the WinServer, to the PiServerAdmin. Actor WinServerAdmin Result The PiServerAdmin has the IP address of the WinServer.
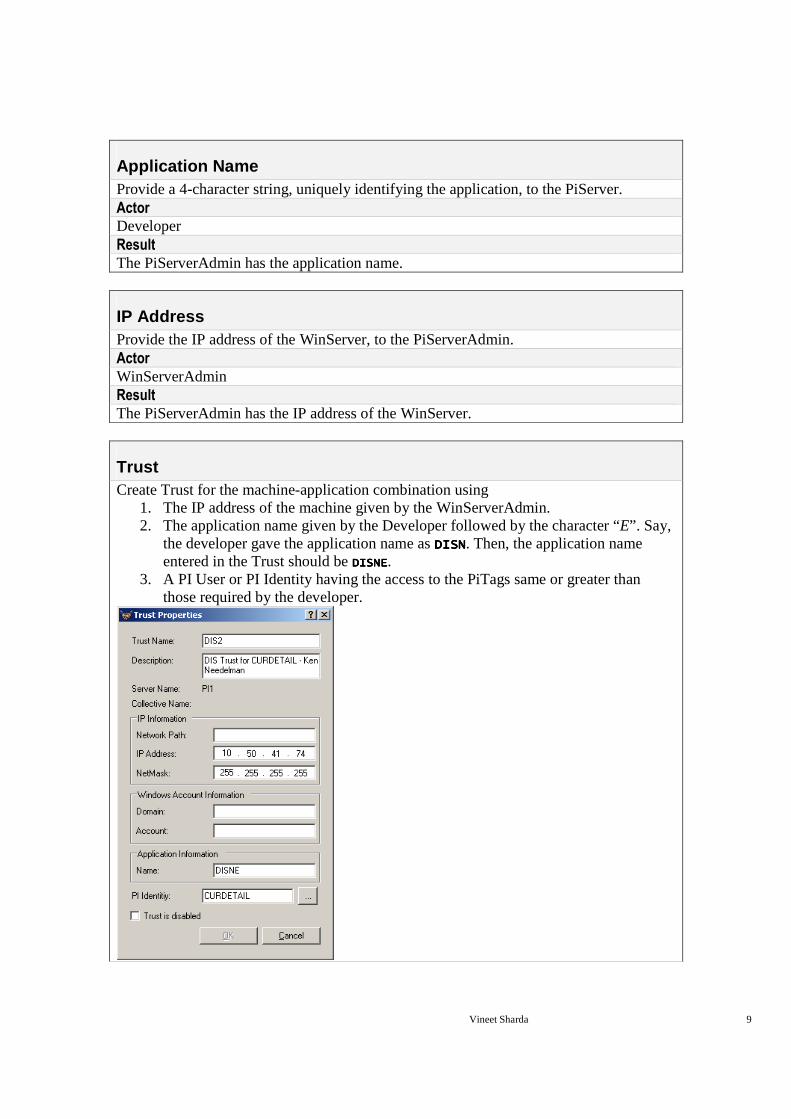
Trust Create Trust for the machine-application combination using
1. The IP address of the machine given by the WinServerAdmin. 2. The application name given by the Developer followed by the character “E”. Say,
the developer gave the application name as DISNDISNDISNDISN. Then, the application name entered in the Trust should be DISNEDISNEDISNEDISNE.
3. A PI User or PI Identity having the access to the PiTags same or greater than those required by the developer.

Vineet Sharda 10
Actor PiServerAdmin Result Trust for this machine with the application is created. The application can now access the tags as required.
Connect from application Use the following syntax to connect from the application: PIAPI32.piut_connect( <string: application name > ) PIAPI32.piut_setservernode( <string: server nam e> )
For example: PIAPI32.piut_connect(“ DISN”) PIAPI32.piut_setservernode(“ eccpi.coned.com”)
Actor Developer Result The application will connect to the server Test Check the Network Manager Statistics in the PiSMT. An entry with this application name, IP, the PI user to which the Trust was mapped and the Trust name will appear.

Vineet Sharda 11
Using PI windows authentication for PI-OleDb calls
Establish a WAD account Establish an account on the WAD, with the following settings:
1. User must change passwordUser must change passwordUser must change passwordUser must change password at next logon is unchecked. 2. Password never expiresPassword never expiresPassword never expiresPassword never expires is checked. 3. Account is disabledAccount is disabledAccount is disabledAccount is disabled is unchecked (for WAD 2008, in the Account ExpiresAccount ExpiresAccount ExpiresAccount Expires
section, the radiobutton NeverNeverNeverNever should be chosen.). For reference in this handbook, let’s call this user CONEDCONEDCONEDCONED\\\\IrPiElectricIrPiElectricIrPiElectricIrPiElectric and let its password be DumPwd768DumPwd768DumPwd768DumPwd768. Actor WadAdmin

Vineet Sharda 12
Result This is how it will look in WAD (just observe the options since the author does not have access to the WAD and got this image from the internet):
This is how it will look in WAD 2008 (just observe the options since the author does not have access to the WAD and got this image from the internet):
Vineet Sharda 13
Share Credentials with WinServerAdmin Provide the newly created username and its password to the WinServerAdmin Actor WADAdmin Result The WinServerAdmin has the newly created username and its password.
Share Credentials with PiServerAdmin Provide the newly created username (but not its password) to the PiServerAdmin Actor WADAdmin Result The PiServerAdmin has the newly created username.
PI Tags Provide the PiTags to the PiServerAdmin. Also provide the access level required for each tag. Actor Developer Result The PiServerAdmin has the PiTags, along with the access level for each of them.

Vineet Sharda 14
PI Identity Take the following steps to create a PIIdentity:
1. Open PiSMT. 2. Log onto the PiServer. 3. Go to the Security group of PiSMT. 4. Click on the Identities, Users and Groups section. 5. Click the PiIdentities tab. Create a new PI Identity. Map this identity to the WAD
account, provided by the WadAdministrator. 6. Provide this PiIdentity the access to the PiTags same or greater than those
required by the developer. This is how it will look like:
Actor PiServerAdmin Result Trust for this WAD Identity is created. The application can now access the tags as required.
Vineet Sharda 15
Dummy PI User Provide the credentials of a dummy PI user to the WinServerAdmin to test the installation of the PI-OleDb. This user should be able to access the PiServer. Note: A PiUser is different from a PIIdentity. Actor PiServerAdmin Result WinServerAdmin has the credentials of a dummy PI user.
Install PI-SDK Install the PI-SDK on the WinServer, using the PiSdkInstallationKit. Please refer to the Terminology section for details about this kit. Actor WinServerAdmin Result PI-SDK is installed on the WinServer.
Install PI-OleDb Install the PI-OleDb on the WinServer, using the PiOledbInstallationKit. Please refer to the Terminology section for details about this kit. Actor WinServerAdmin Result PI-OleDb is installed on the WinServer.

Vineet Sharda 16
Test 1 1. Open the PiOledbTester application. Please refer to the Terminology section for
details about this application. 2. In the login window that opens up, choose the server. To be sure that you are
opening the correct server, go to the PiLogin.iniPiLogin.iniPiLogin.iniPiLogin.ini (usually in the C:\Program Files\PIPC\dat folder) and do the appropriate setup. A better alternative is to open the Connections in the PI menu in Microsoft Excel and check / setup the Connections appropriately. This is how the login window shows up:
3. Enter the credentials of the dummy PI user provided by the PIServerAdmin. Hit
the OKOKOKOK button. 4. The PiOleDbTester application should open up. This denotes that the installation
was successful. Any other window (error / warning / information window) means that the installation was not successful. This is how it looks like:
Test 2
1. Log on to the WinServer with the credentials of the newly created WAD account. 2. Carry out steps 1 and 2 from the last test. 3. Check the Use Trusted ConnectionUse Trusted ConnectionUse Trusted ConnectionUse Trusted Connection box. Hit the OKOKOKOK button.

Vineet Sharda 17
4. The PiOleDbTester application should open up. If the last test was successful, then opening up of this window denotes that the PiIdentity for the WAD account was established successfully. If the last test installation was successful, then opening up of any other error / warning / information window, at this point, means that the PiIdentity for the WAD account was not established properly. The PiOleDbTester application window is shown in the last test.
Note: If the last test was not successful, then carrying out this test is meaningless.
Connect from application 1. The application should be run with the credentials of the WAD account created
earlier. This is done in different ways. This is shown in the Appendix A: Run a Windows Service as a particular user and in the Appendix B: Run a Web Application as a particular user.
2. Use the OleDb classes in the System.Data.OleDb namespace (OleDbConnection, OleDbDataAdapter, OleDbDataReader , etc.).
3. Use the following code to create a connection to the PiServer: New OleDbConnection("Provider=PIOLEDB; Data Source=<Se rver>; Integrated Security=SSPI;")
For example: New OleDbConnection("Provider=PIOLEDB; Data Source=eccpi.coned.com; Integrated Security=SSPI;")
Actor Developer Result The application will connect to the server Test Check the Network Manager Statistics in the PiSMT. An entry with the name of the application, IP from where the application is being run, the PiIdentity that was created and the WAD account for which this PiIdentity was created will appear.

Vineet Sharda 18
Appendix A: Run a Windows Service as a particular user
Specify that a user will run this Windows Service 1. In the Project Installer, select the Service Process Installer. 2. In the Properties section, make sure that the AccountAccountAccountAccount property is selected as UserUserUserUser
(it is the default).
Actor Developer Result This windows Service will now be run by a user. This user has to be specified at the time of installation. This specification can be changed later using the Services Snap-In in the Control Panel � Administrative Tools

Vineet Sharda 19
Installation At the time of installation of the Windows Service, provide the user, under whose account, the service should be run. This can also be done from the Services Snap-In in the Control Panel � Administrative Tools.
Make sure that the domain name is prefixed to the username, as shown above. Actor WinServerAdmin Result The service will run as the specified user.

Vineet Sharda 20
Permissions Allow Read & ExecuteRead & ExecuteRead & ExecuteRead & Execute permissions to this user to the folder and the files which contain the Windows Service. This is how it will look like:
On granting the Read & ExecuteRead & ExecuteRead & ExecuteRead & Execute permission, the List Folder ContentsList Folder ContentsList Folder ContentsList Folder Contents and ReadReadReadRead permissions are granted automatically. Note: The WAD account will have to be added to the Group or User Group or User Group or User Group or User namesnamesnamesnames section. This is done by clicking the AAAAddddd…d…d…d… button, entering the <WADDomain><WADDomain><WADDomain><WADDomain>\\\\<WADUsername><WADUsername><WADUsername><WADUsername> (ConEdConEdConEdConEd\\\\IrPiElectricIrPiElectricIrPiElectricIrPiElectric in our example) and clicking the OKOKOKOK button. Actor WinServerAdmin Result The specified user can now run the Windows Service.
Exception A program using the PI-OleDb, when scheduled from SQL Server 2000 does not work. The same program when ran from SQL Server 2005 worked. But in this case, a PI Trust was created for the machine and the user, rather than a PI Identity.
Vineet Sharda 21
Appendix B: Run a Web Application or a Web Service as a particular user
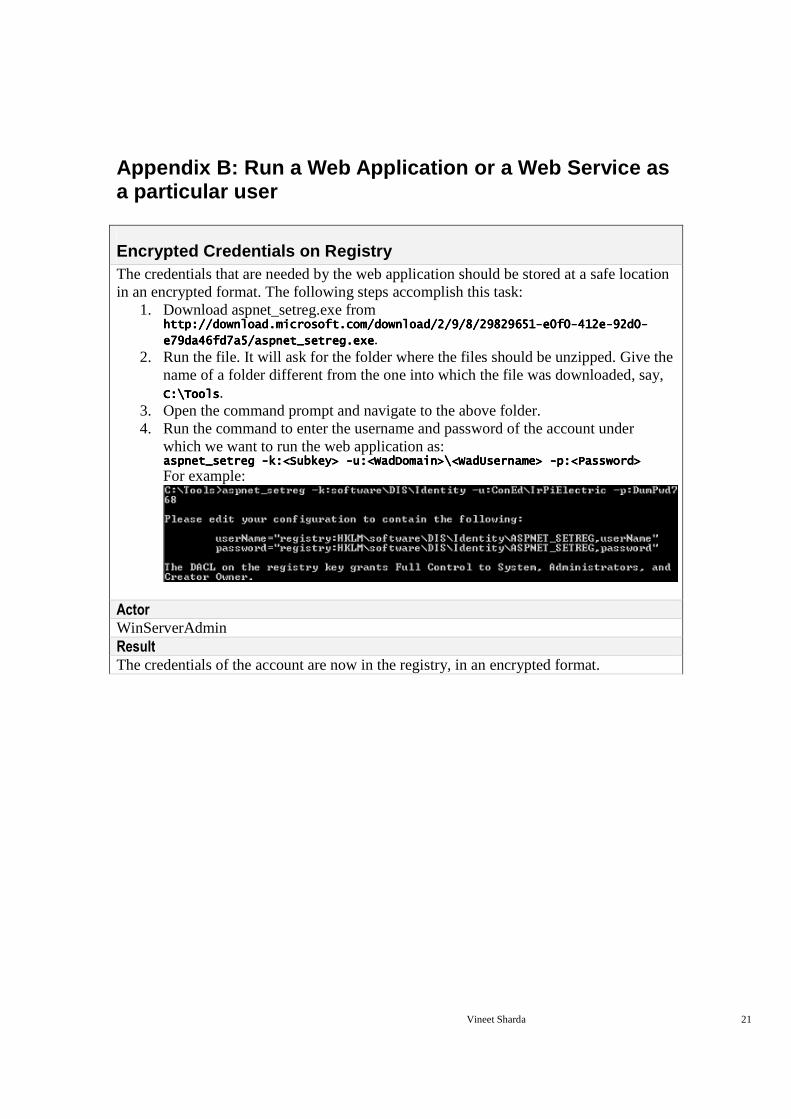
Encrypted Credentials on Registry The credentials that are needed by the web application should be stored at a safe location in an encrypted format. The following steps accomplish this task:
1. Download aspnet_setreg.exe from http://download.microsoft.com/download/2/9/8/29829651http://download.microsoft.com/download/2/9/8/29829651http://download.microsoft.com/download/2/9/8/29829651http://download.microsoft.com/download/2/9/8/29829651----e0f0e0f0e0f0e0f0----412e412e412e412e----92d092d092d092d0----
e79da46fd7a5/aspnet_setreg.exee79da46fd7a5/aspnet_setreg.exee79da46fd7a5/aspnet_setreg.exee79da46fd7a5/aspnet_setreg.exe. 2. Run the file. It will ask for the folder where the files should be unzipped. Give the
name of a folder different from the one into which the file was downloaded, say, C:C:C:C:\\\\ToolsToolsToolsTools.
3. Open the command prompt and navigate to the above folder. 4. Run the command to enter the username and password of the account under
which we want to run the web application as: aspnet_setreg aspnet_setreg aspnet_setreg aspnet_setreg ----k:k:k:k:<<<<SubkeySubkeySubkeySubkey> > > > ----u:<WadDomain>u:<WadDomain>u:<WadDomain>u:<WadDomain>\\\\<WadUsername> <WadUsername> <WadUsername> <WadUsername> ----p:<Password>p:<Password>p:<Password>p:<Password> For example:
Actor WinServerAdmin Result The credentials of the account are now in the registry, in an encrypted format.

Vineet Sharda 22
Test 1. Click Start � Run 2. Type RegERegERegERegEdt32dt32dt32dt32.
3. Press OK button. The machine registry should open up. 4. Navigate to the registry subkey that was specified earlier. In our example, we go
to My My My My ComputerComputerComputerComputer\\\\HKEY_LOCAL_MACHINEHKEY_LOCAL_MACHINEHKEY_LOCAL_MACHINEHKEY_LOCAL_MACHINE\\\\SOFTWARESOFTWARESOFTWARESOFTWARE\\\\DISDISDISDIS\\\\IdentityIdentityIdentityIdentity\\\\ASPNET_SETREGASPNET_SETREGASPNET_SETREGASPNET_SETREG. In the Windows 7, 64 bit machine, the path is ComputerComputerComputerComputer\\\\HKEY_LOCAL_MACHINEHKEY_LOCAL_MACHINEHKEY_LOCAL_MACHINEHKEY_LOCAL_MACHINE\\\\SOFTWARESOFTWARESOFTWARESOFTWARE\\\\Wow6432NodeWow6432NodeWow6432NodeWow6432Node\\\\DISDISDISDISNGNGNGNG\\\\IdentityIdentityIdentityIdentity\\\\ASPNET_SASPNET_SASPNET_SASPNET_SETREGETREGETREGETREG
If you are able to navigate to your subkey and see the passwordpasswordpasswordpassword and userNameuserNameuserNameuserName entries, then the entries have been made correctly, otherwise this step failed.

Vineet Sharda 23
Registry Permissions This action can be skipped for Windows 7. The registry should be accessible to the AspNet process. This process uses the machine AspNet account till it is impersonated as the account that we want it to run as. So the registry entries made earlier should be made accessible to the AspNet. We accomplish this with the following steps:
1. Go to the subkey in the registry created in the last step, by opening up the Registry Editor and navigating to that subkey, as shown in the Test section of the last step.
2. Right click on this subkey and click PPPPermissionsermissionsermissionsermissions………….
3. Allow Read permission to this <MachineName><MachineName><MachineName><MachineName>\\\\AspNetAspNetAspNetAspNet account. This is how it will
look like:

Vineet Sharda 24
4. Click the Apply button.
Note: The AspNetAspNetAspNetAspNet machine account will have to be added to the Group or User namesGroup or User namesGroup or User namesGroup or User names section. This is done by clicking the AAAAddddd…d…d…d… button and then entering the <MachineName><MachineName><MachineName><MachineName>\\\\AspNetAspNetAspNetAspNet (CeBxr3Vg1CeBxr3Vg1CeBxr3Vg1CeBxr3Vg1\\\\AspNetAspNetAspNetAspNet in our example) and clicking the OKOKOKOK button. In Windows 7 machine, the access needs to be given to <MachineName><MachineName><MachineName><MachineName>\\\\IIS_UsrsIIS_UsrsIIS_UsrsIIS_Usrs user group (CeBxr3Vg1CeBxr3Vg1CeBxr3Vg1CeBxr3Vg1\\\\IIS_UsrsIIS_UsrsIIS_UsrsIIS_Usrs in our example). Actor WinServerAdmin Result The machine AspNet account can now access the user credentials. For the Windows 7 machine, the IIS_Usrs user group can now access the user credentials. In other words, any web application can now access these credentials.
Vineet Sharda 25
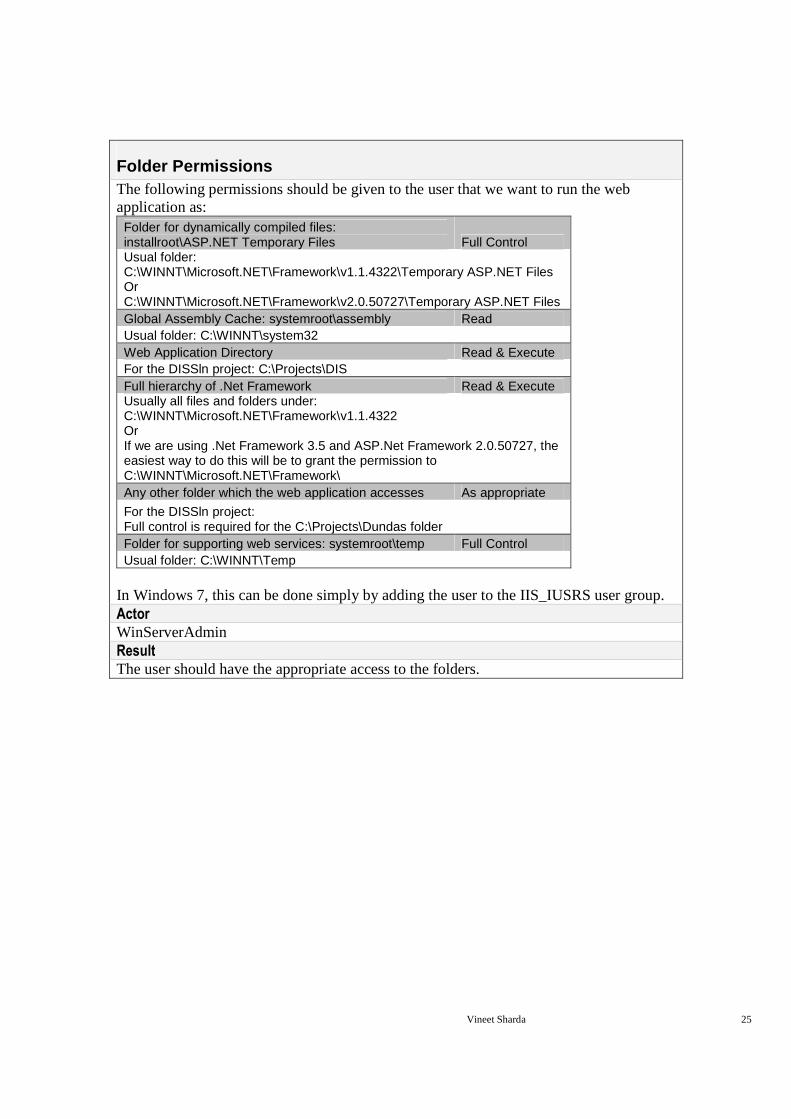
Folder Permissions The following permissions should be given to the user that we want to run the web application as:
Folder for dynamically compiled files: installroot\ASP.NET Temporary Files Full Control Usual folder: C:\WINNT\Microsoft.NET\Framework\v1.1.4322\Temporary ASP.NET Files Or C:\WINNT\Microsoft.NET\Framework\v2.0.50727\Temporary ASP.NET Files Global Assembly Cache: systemroot\assembly Read Usual folder: C:\WINNT\system32 Web Application Directory Read & Execute For the DISSln project: C:\Projects\DIS Full hierarchy of .Net Framework Read & Execute Usually all files and folders under: C:\WINNT\Microsoft.NET\Framework\v1.1.4322 Or If we are using .Net Framework 3.5 and ASP.Net Framework 2.0.50727, the easiest way to do this will be to grant the permission to C:\WINNT\Microsoft.NET\Framework\ Any other folder which the web application accesses As appropriate
For the DISSln project: Full control is required for the C:\Projects\Dundas folder Folder for supporting web services: systemroot\temp Full Control Usual folder: C:\WINNT\Temp
In Windows 7, this can be done simply by adding the user to the IIS_IUSRS user group. Actor WinServerAdmin Result The user should have the appropriate access to the folders.

Vineet Sharda 26
Impersonation Specify that the web application will run with the impersonation credentials specified in the registry subkey that we have made. This is done by putting the following entry in the Web.config file of the web application: <identity impersonate ="true" userName ="registry:<subkey>,userName" password ="registry: <subkey>,password" />
This entry must be made under the <system.web > section. Here is an example: <configuration > <system.web > <! -- AUTHENTICATION This section sets the authentication policies of the application. Possible modes are "Windows", "Forms", "Passport" a nd "None" -- > <authentication mode="Windows" /> <identity impersonate ="true" userName = "registry:HKLM\SOFTWARE\DIS\Identity\ASPNET _SETREG,userName" password = "registry:HKLM\SOFTWARE\DIS\Identity\ASPNET _SETREG,password" /> <! -- OTHER system.web SETTINGS -- > </ system.web > <! -- OTHER configuration SETTINGS -- > </ configuration >
As expected, the entry for a Windows 7, 64 bit machine with our example will be: <configuration > <system.web > <! -- AUTHENTICATION This section sets the authentication policies of the application. Possible modes are "Windows", "Forms", "Passport" a nd "None" -- > <authentication mode="Windows" /> <identity impersonate ="true" userName = " registry:HKLM\SOFTWARE\Wow6432Node\DISNG\Identity\ASPNET_SETREG,userName" password=
"registry:HKLM\SOFTWARE\Wow6432Node\DISNG\Identity\ASPNET_SETREG,password" /> <! -- OTHER system.web SETTINGS -- > </ system.web > <! -- OTHER configuration SETTINGS -- > </ configuration >
Actor Developer Result The web application will now run under the credentials given at the specified machine registry subkey.


