Net2 1 APN-1197-ZA Configuring Net2 Occupancy Management • Net2 Access control v6.04 or higher • Requires Net2 Pro software • System Engineer or Supervisor operator permissions • Unless a one-way system is being operated, perimeter doors to any given area must have both an in and out reader in order for this feature to function correctly • See < www.paxton.info/720 > for the minimum PC specifications and compatibility statement Requirements About Activating the feature The Net2 Occupancy Management feature allows you to set a maximum occupancy level for any given area. This allows you to maintain control of the density of people in an area and encourage social distancing. In order to use the Occupancy Management feature, areas and area groups must be setup as outlined in:- AN1023 Configuring areas and area groups <www.paxton.info/6323 > Once you have defined the areas and groups in your building you are ready to setup the Occupancy Management feature. 1. Open the Net2 Configuration utility 2. Select the features tab and check the ‘Occupancy Management’ box 3. Now select ‘Apply’ for the feature to be activated
Transcript
Net2
1
APN-1197-ZA
Configuring Net2 Occupancy Management
• Net2 Access control v6.04 or higher• Requires Net2 Pro software• System Engineer or Supervisor operator permissions• Unless a one-way system is being operated, perimeter doors to any given area must have both an in and out reader in order for this feature to function correctly• See < www.paxton.info/720 > for the minimum PC specifications and compatibility statement
Requirements
About
Activating the feature
The Net2 Occupancy Management feature allows you to set a maximum occupancy level for any given area. This allows you to maintain control of the density of people in an area and encourage social distancing.
In order to use the Occupancy Management feature, areas and area groups must be setup as outlined in:- AN1023 Configuring areas and area groups <www.paxton.info/6323 >
Once you have defined the areas and groups in your building you are ready to setup the Occupancy Management feature.
1. Open the Net2 Configuration utility
2. Select the features tab and check the ‘Occupancy Management’ box
3. Now select ‘Apply’ for the feature to be activated
4. Reports will automatically be generated and stored in the folder shown under the ‘HTML Reports’ tab. If you wish to change this default location or turn off the generation of these reports, this can be done within this tab
5. You can also change how often the HTML report will be refreshed. By default, this is set to 15 seconds
6. For privacy purposes, if you do not wish to display the user table in the report, check the box next to ‘Hide user table in reports’
APN-1197-ZANet2
3
7. Once complete, click apply, followed by Ok to close the utility
Setting up the software
1. Open the Net2 Pro software
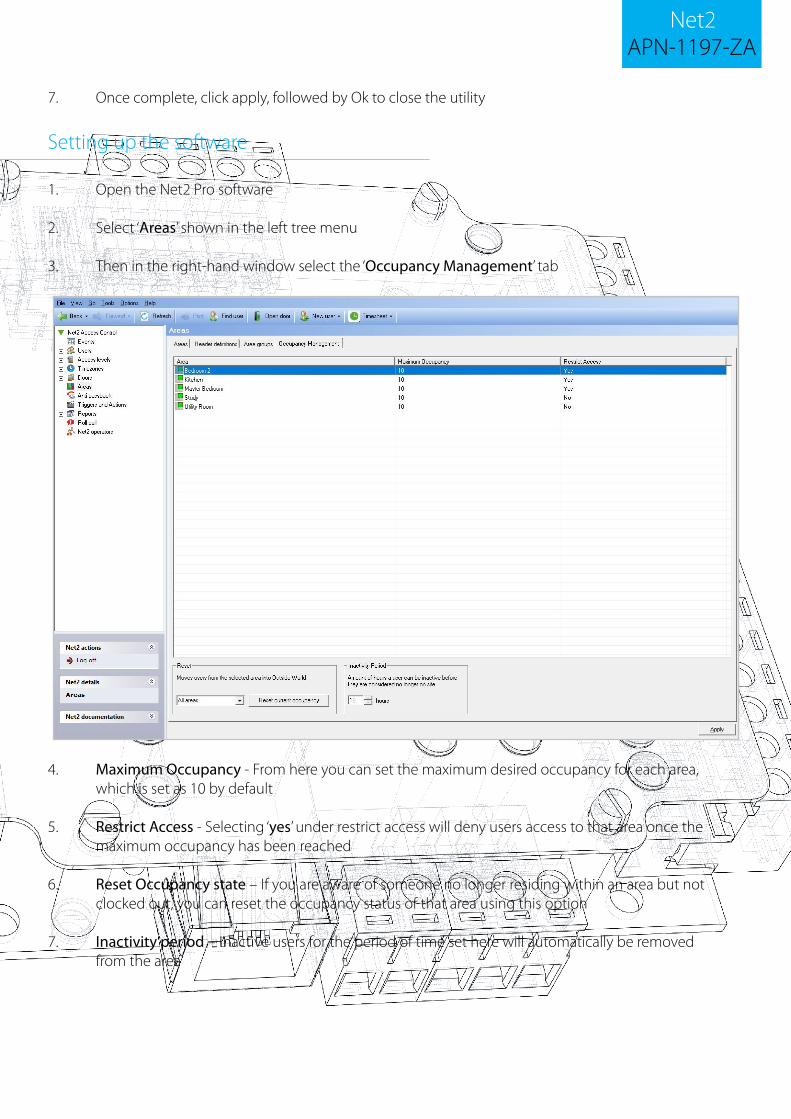
2. Select ‘Areas’ shown in the left tree menu
3. Then in the right-hand window select the ‘Occupancy Management’ tab
4. Maximum Occupancy - From here you can set the maximum desired occupancy for each area, which is set as 10 by default
5. Restrict Access - Selecting ‘yes’ under restrict access will deny users access to that area once the maximum occupancy has been reached
6. Reset Occupancy state – If you are aware of someone no longer residing within an area but not clocked out, you can reset the occupancy status of that area using this option
7. Inactivity period – Inactive users for the period of time set here will automatically be removed from the area
APN-1197-ZANet2
4
Manually removing users from an area
Creating alerts based on the Occupancy level
If you are aware of a user having left an area but not having badged out, they can be manually removed from that area by following these steps:
1. Select ‘Users’ in the left-hand tree menu and choose the user you wish to remove from an area
2. Then in the right-hand window select the ‘Occupancy Management’ tab
3. Click the reset button and they will be removed from all areas
1. Make sure you can see Trigger and Actions in the left-hand tree view by selecting ‘View’ and ‘Triggers and actions’
2. Select the Triggers and Actions menu in the tree menu
3. Select the ‘Add’ button
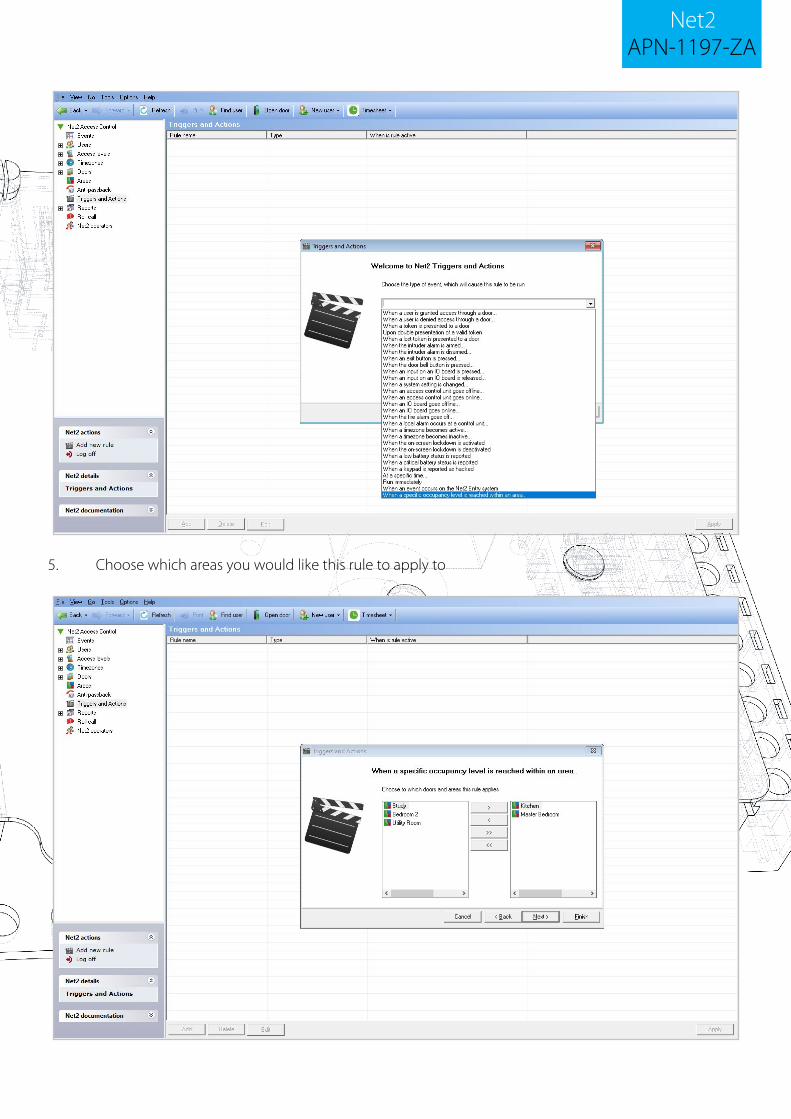
4. Select ‘When a specific occupancy level is reached within an area…’
APN-1197-ZANet2
5
5. Choose which areas you would like this rule to apply to
APN-1197-ZANet2
6
7. Select when the rule will be active
6. Now select the occupancy level criteria to trigger the action
APN-1197-ZANet2
7
8. Choose if you would like a time delay between the trigger and the action(s)
9. Finally, choose the action you would like to take place
10. Once complete, select ‘Finish’
APN-1197-ZANet2
8
Occupancy Management.html Report
Once the Occupancy Management feature is setup, Net2 will generate a separate HTML report for each area. By default, these reports are stored in the following location:
To view the HTML reports copy the report location into any standard web browser in the URL field.
The last seen column shows when the user was last seen by the system in this area. If the user is seen in any other area, they will be added to that area report and automatically removed from the area they have left.
Note: The Occupancy Management features requires a live connection with the Net2 server to be present. If this connection is lost, all ACUs within a controlled area will resume standard, permission based operation.