Configuring SIP Connectivity between the Avaya Meeting Exchange S6200 Conferencing Server and Cisco Unified CallManager - Issue 1.0
Abstract These Application Notes present the procedures for configuring SIP connectivity between the Avaya Meeting Exchange S6200 Conferencing Server and Cisco Unified CallManager. SIP connectivity is enabled via directly connected SIP trunking between Avaya Meeting Exchange and Cisco Unified CallManager. This configuration provides endpoints registered with Cisco Unified CallManager a rich set of conferencing options available on Avaya Meeting Exchange.
1. Introduction These Application Notes present the procedures for configuring SIP connectivity between the Avaya Meeting Exchange S6200 Conferencing Server and Cisco Unified CallManager. SIP connectivity is enabled via directly connected SIP trunking between Avaya Meeting Exchange and Cisco Unified CallManager. This configuration provides endpoints registered with Cisco Unified CallManager a rich set of conferencing options available on Avaya Meeting Exchange. The following conferencing features have been verified:
• Dial-In Conferencing: o DNIS direct call function, where conference participants enter a conference as
moderator without entering a participant-access-code (passcode). o Scan call function, where conference participants enter a conference with a valid
passcode. • Dial-Out Conferencing from Avaya Meeting Exchange:
o Blast dial Auto, where a conference participant enters a conference via a DNIS
direct call function and autonomously invokes a Blast dial to a pre-provisioned dial list of one or more participants.
Manual, where a conference participant is already in a conference as moderator and invokes a Blast dial to a pre-provisioned dial list of one or more participants.
o Originator Dial-Out, where a conference participant is already in a conference as moderator and invokes a Dial-Out to a single participant
o Operator Fast Dial, where an operator can Dial-Out to a pre-provisioned dial list of one or more participants e participants.
• Operator Dial-Out to establish an Audio Path. • Operator Dial-In to establish an Audio Path. • Dial-Out to an FDAPI channel for audio recording. • Line Transfer initiated from Avaya Bridge Talk. • Conference Transfer initiated from Avaya Bridge Talk.
The following CODECS were verified:
• G711MU. • G.711A.
The following SIP feature testing was verified:
• Call Hold/Resume, invoked from and endpoint registered with Cisco Unified CallManager participating in an active conference call.
• Call Transfer, imitated from an endpoint registered with Cisco Unified CallManager participating in an active conference call, transferred to an endpoint registered with Cisco Unified CallManager.
These Application Notes provide the administrative steps for configuring the Avaya Meeting Exchange S6200 Conferencing Server to interoperate with Cisco Unified CallManager via direct SIP trunking (see Figure 1). This configuration enables endpoints registered with Cisco Unified CallManager (for these Application Notes, Cisco 7960 phones) access to Avaya Meeting Exchange. The Avaya Bridge Talk application is utilized for provisioning, scheduling and managing conferences.
Figure 1: Network Configuration
2. Equipment and Software Validated The following equipment and software versions were used for the configuration:
Equipment Software Avaya Meeting Exchange S6200 Conferencing Server
3. Avaya Meeting Exchange Configuration This section describes the steps for configuring Avaya Meeting Exchange to interoperate with Cisco Unified CallManager via direct SIP trunking (see Figure 1). Step Description
3.1 Log in to the Avaya Meeting Exchange Server console to access the Command Line Interface (CLI) with the appropriate credentials.
3.2 Configure settings that enable SIP connectivity between Avaya Meeting Exchange and other SIP User Agents by editing the system.cfg file as follows:
• cd to /usr/ipcb/config • Edit the system.cfg file with a text editor, e.g., vi. • Add a line to identify the IP address of Avaya Meeting Exchange (as defined in the
/etc/hosts file), e.g., o IPAddress=192.168.13.211
• Add a line to populate the From Header Field in SIP INVITE messages from Avaya Meeting Exchange, e.g.,
o MyListener=sip:[email protected] Note: The string “S6200” is arbitrarily chosen.
• Add a line to provide User Agents a Contact address to use for Acknowledging SIP messages from Avaya Meeting Exchange, e.g.,
o respContact=<sip:[email protected]:5060;transport=tcp> Note: The string “S6200” is arbitrarily chosen.
• Add the following lines to set the Min-SE timer to 86400 seconds in SIP INVITE messages from Avaya Meeting Exchange, e.g.,
o sessionRefreshTimerValue=86400 o minSETimerValue=86400
Note: The values for the sessionRefreshTimerValue and the minSETimerValue are defined in seconds and must be provisioned to a value greater than or equal to 1800 seconds (1800 seconds is the value for the Min-SE used by Cisco Unified CallManager). This setting is necessary to enable Dial-Out from Avaya Meeting Exchange to Cisco Unified CallManager.
3.3 To associate incoming calls to Avaya Meeting Exchange with different call flows, edit the UriToTelnum.tab file to extract Direct Inward Dial (DID, also referred to as DDI in some regions) values as follows:
• cd to /usr/ipcb/config • Edit the UriToTelnum.tab file with a text editor, e.g., vi. • Add a line to match the pattern of the To Header Field in SIP INVITE messages from
Cisco Unified CallManager to Avaya Meeting Exchange. If a match occurs, the DID is extracted from the To header field, e.g.,
o "*<sip:*@*" $2 where "*<sip:*@*" matches: To: <sip:[email protected]> and $2 utilizes the variable contained in the second * as the DID value for the call.
• Enable an undefined caller to receive a prompt for operator assistance by administering for the condition of an unmatched SIP INVITE message by adding a wildcard entry as the last line in this file, e.g.,
o * $0 Note: Entries in this file are read sequentially, therefore, the line * $0 must be the last line in the file. Otherwise, all calls to Avaya Meeting Exchange would match the wildcard and thus receive a prompt for operator assistance.
3.4 To enable Dial-Out from Avaya Meeting Exchange to Cisco Unified CallManager via SIP trunking, edit the telnumToUri.tab file as follows:
• cd to /usr/ipcb/config • Edit the telnumToUri.tab file with a text editor, e.g., vi. • Add a line to route outbound calls from Avaya Meeting Exchange to Cisco Unified
Where the route pattern 5???? matches any five digit number with a leading “5” and routes the call to Cisco Unified CallManager (192.45.130.105) via SIP/TCP. To enable SIP connectivity utilizing TCP, the entry contains: 5060 and transport=tcp. Avaya Meeting Exchange will substitute “$0” with the dialed number in outgoing SIP INVITE messages, e.g., if 56011 is dialed, Avaya Meeting Exchange will send a SIP INVITE message with: sip:[email protected]:5060;transport=tcp in the SIP URI and To header field.
Note: Alternatively, routing to Cisco Unified CallManager could have been enabled as a default gateway with a wildcard entry, e.g., * sip:[email protected]:5060;transport=tcp where * routes any dialed digits to Cisco Unified CallManager (192.45.130.105) via SIP/TCP.
3.5 To configure Avaya Meeting Exchange as software media server (softms, which utilizes software based DSP resources), edit the processTable.cfg file as follows:
• cd to /usr/ipcb/config • Edit the processTable.cfg file with a text editor, e.g., vi.
Note: The processTable.cfg for these Application Notes contains IP Addresses of 0.0.0.0, which are equivalent to the IP address (192.168.13.211) of Avaya Meeting Exchange. # processes file, enumerates the number of processes in the network. # will have the name of the process Key ID and the IP address proccessName ipcKeyNumber ProcessExe ipAddress route ProcessArgs initipcb 110 noexecute 0.0.0.0 bridget700 100 noexecute 0.0.0.0 dspEvents/msDispatcher,netEvents/sipAgent commsProcess 111 /usr/dcb/bin/serverComms 0.0.0.0 sipAgent 101 /usr/dcb/bin/sipagent 0.0.0.0 dspEvents/msDispatcher,appEvents/bridget700 msDispatcher 102 /usr/dcb/bin/msdispatcher 0.0.0.0 netEvents/sipAgent,appEvents/bridget700,dspEvents/mediaServer mediaServer 103 /usr/dcb/bin/softms 0.0.0.0 appEvents/msDispatcher,netEvents/msDispatcher 1 snmpAgent 120 noexecute 0.0.0.0
3.6 Reboot Avaya Meeting Exchange for changes to take effect. Note: Rebooting Avaya Meeting Exchange is service impacting. [S6200]> init 6
CBUTIL Utility The following steps provide examples of how to provision DIRECT and SCAN call functions by utilizing the cbutil utility on Avaya Meeting Exchange. DID values (obtained from procedures in the previous section) are associated with call functions to access conferences provisioned on Avaya Meeting Exchange. Step Description
3.7 To map DID values obtained in Step 3.3 to DNIS entries, run the cbutil utility as follows: • If not already logged on, log in to the Avaya Meeting Exchange Server console to
access the CLI with the appropriate credentials. • At the command prompt enter tcsh to set the UNIX shell on Avaya Meeting Exchange. • At the command prompt run the cbutil utility to verify DNIS entries provisioned on
Avaya Meeting exchange. Note: A command line utility, cbutil enables administrators to assign a specific annunciator message, line name, company name, system function, reservation group and prompt sets to a maximum of 30,000 DNIS or DID patterns. Each reservation group may use one passcode to enter a conference. In this way, administrators can create different reservation groups on Avaya Meeting Exchange, rather than relying on a single, bridge-wide passcode. Avaya Meeting Exchange stores this assignment information in the Call Branding table of the database. Avaya Meeting Exchange sorts the information in the Call Branding table in ascending order of the DNIS or DID number with the wildcard character “?” last in a series. For example, 129? follows 1299. The last entry in the table consists entirely of wildcard characters. The number of characters in this entry corresponds to the number of DNIS/DID digits specified in the Digit Parameters configuration. S6200>cbutil cbutil Copyright 2004 Avaya, Inc. All rights reserved. Usage: cbutil <command> [command-specific args...] where <command> may be one of: add Add an entry to the Call Branding table remove Remove an entry from the Call Branding table update Update an entry in the Call Branding table lookup Display an entry in the Call Branding table count Display the number of entries in the Call Branding table list List entries in the Call Branding table dnissize Set system configured max dnis length (1-16) Note: This command should only be used when the bridge is not running. Use "cbutil<command> -help" to get help on a specific command
3.8 Enable Dial-In access (via passcode) to conferences provisioned on Avaya Meeting Exchange as follows:
• Add a DNIS entry for a scan call function corresponding to DID 501 by entering the following command at the command prompt: cbutil add <dnis> <rg> <msg> <ps> <ucps> <func> [-l <ln> -c <cn>], where the variables for add command is defined as follows:
o <dnis> DNIS o <rg> Reservation Group o <msg> Annunciator message number o <ps> Prompt Set number (0-20) o <ucps> Use Conference Prompt Set (y/n) o <func> One of: DIRECT/SCAN/ENTER/HANGUP/AUTOVL/FLEX o -l <"ln"> Optional line name to associate with caller o -c <"cn"> Optional company name to associate with caller
S6200>cbutil add 501 0 1 1 n scan cbutil Copyright 2004 Avaya, Inc. All rights reserved.
3.9 Enable Dial-In access (as moderator without entering a passcode) to conferences provisioned on Avaya Meeting Exchange by adding a DNIS entry for a direct call function corresponding to DID 556. S6200>cbutil add 556 0 301 1 n direct cbutil Copyright 2004 Avaya, Inc. All rights reserved.
3.10 At the command prompt enter cbutil list to verify the DNIS entries provisioned in Steps 3.8 and 3.9 were provisioned and entered correctly. Note: The last entry in the call brand table is the wild card entry “???”. This entry captures any wrong number (e.g., unmatched DID values) and places the call into enter queue for operator assistance. S6200>cbutil list cbutil Copyright 2004 Avaya, Inc. All rights reserved. DNIS Grp Msg PS CP Function Line Name Company Name ---------------- --- --- --- -- -------- -------------------- ----------------- 501 0 1 1 N SCAN 556 0 301 1 N DIRECT ??? 0 208 1 N ENTER
Bridge Talk The following steps provide an example of how to provision a conference on Avaya Meeting Exchange from the Avaya Bridge Talk application. This sample conference is utilized in conjunction with the DIRECT and SCAN call functions (provisioned in the previous steps) to enable both Dial-In and Dial-Out access to audio conferencing for endpoints registered to Cisco Unified CallManager. Note: If any of the features shown in the Avaya Bridge Talk screen captures are not present, contact an authorized Avaya sales representative to make the appropriate changes. Step Description
3.11 Open the Avaya Bridge Talk application and log in to Avaya Meeting Exchange with the appropriate credentials.
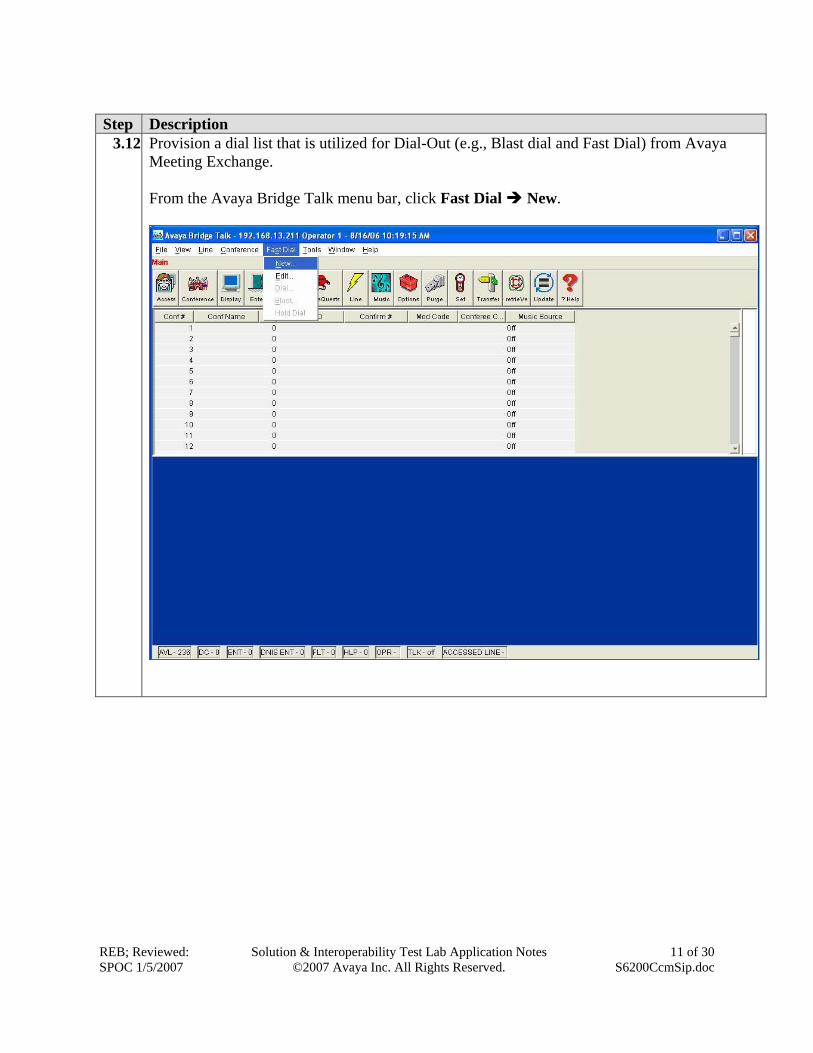
3.12 Provision a dial list that is utilized for Dial-Out (e.g., Blast dial and Fast Dial) from Avaya Meeting Exchange. From the Avaya Bridge Talk menu bar, click Fast Dial New.
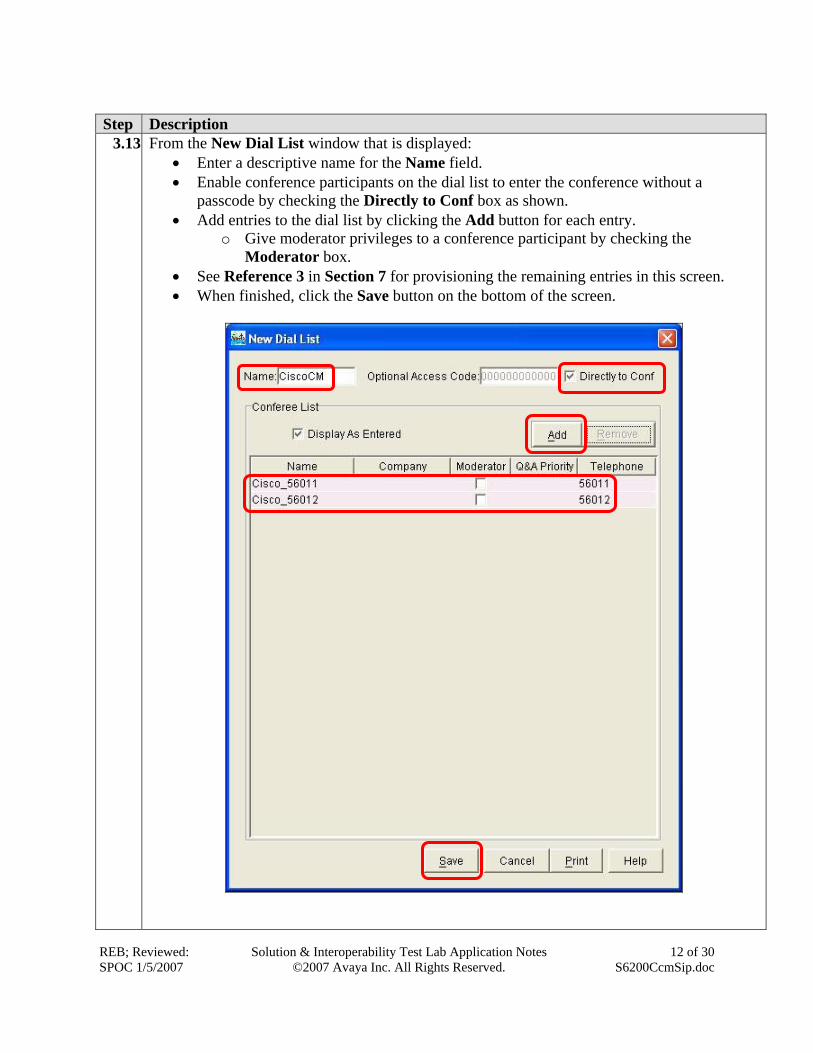
3.13 From the New Dial List window that is displayed: • Enter a descriptive name for the Name field. • Enable conference participants on the dial list to enter the conference without a
passcode by checking the Directly to Conf box as shown. • Add entries to the dial list by clicking the Add button for each entry.
o Give moderator privileges to a conference participant by checking the Moderator box.
• See Reference 3 in Section 7 for provisioning the remaining entries in this screen. • When finished, click the Save button on the bottom of the screen.
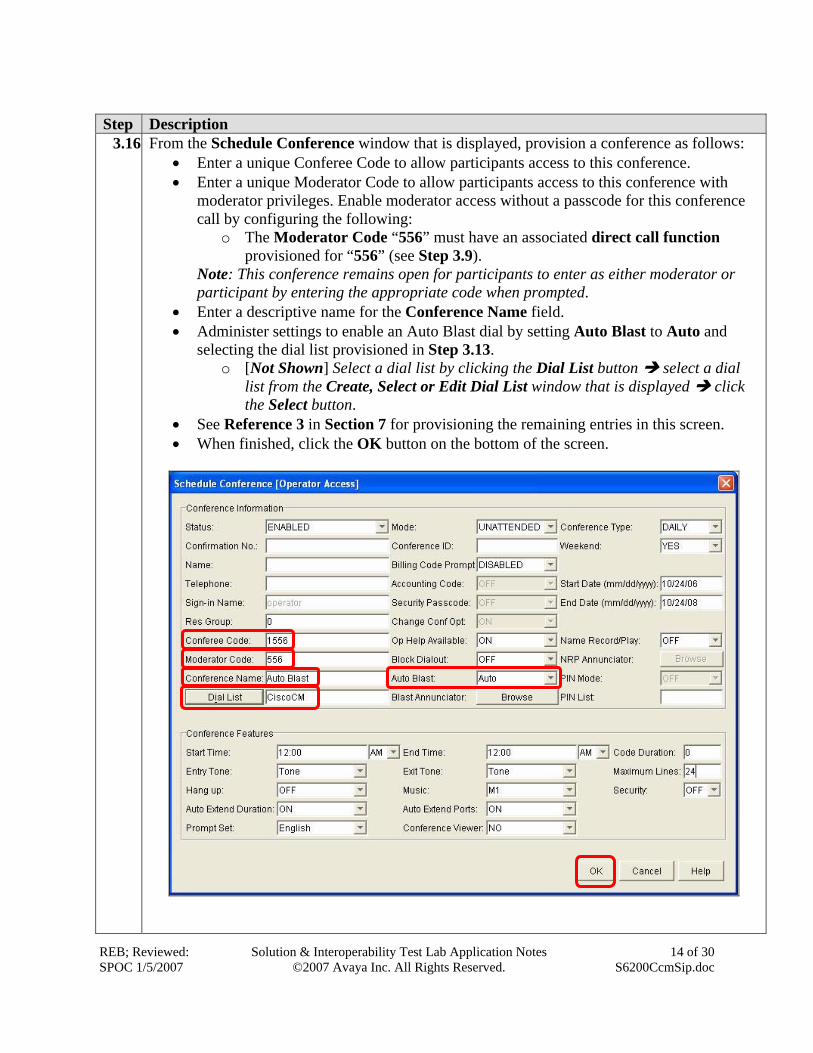
3.16 From the Schedule Conference window that is displayed, provision a conference as follows: • Enter a unique Conferee Code to allow participants access to this conference. • Enter a unique Moderator Code to allow participants access to this conference with
moderator privileges. Enable moderator access without a passcode for this conference call by configuring the following:
o The Moderator Code “556” must have an associated direct call function provisioned for “556” (see Step 3.9).
Note: This conference remains open for participants to enter as either moderator or participant by entering the appropriate code when prompted.
• Enter a descriptive name for the Conference Name field. • Administer settings to enable an Auto Blast dial by setting Auto Blast to Auto and
selecting the dial list provisioned in Step 3.13. o [Not Shown] Select a dial list by clicking the Dial List button select a dial
list from the Create, Select or Edit Dial List window that is displayed click the Select button.
• See Reference 3 in Section 7 for provisioning the remaining entries in this screen. • When finished, click the OK button on the bottom of the screen.
4. Cisco Unified Call Manager Configuration This section describes the steps for configuring Cisco Unified CallManager to interoperate with Avaya Meeting Exchange via direct SIP trunking (see Figure 1). Step Description
4.1 Administer settings for Cisco Unified CallManager as follows: • Open a web browser and enter the following URL:
https://<IP Address of Cisco Unified CallManager> • Log in to Cisco Unified CallManager with the appropriate credentials.
4.2 The following screen shows the SIP Trunk Security Profile settings that are utilized for these Application Notes.
• View settings by clicking System Security Profile SIP Trunk Security Profile. • Click the Find button [Not Shown] to initiate a search for SIP Trunk Security
Profiles. • When the search is complete, select the appropriate SIP Trunk Security Profile from
4.3 The following screen shows the SIP Profile settings that are utilized for these Application Notes.
• View settings by clicking Device Device Settings SIP Profile. • Click the Find button [Not Shown] to initiate a search for SIP Profiles. • When the search is complete, select the appropriate SIP Profile from the search results.
4.4 The following screen shows the Media Resource Group settings that are utilized for these Application Notes.
• View settings by clicking Media Resources Media Resource Group. • Click the Find button [Not Shown] to initiate a search for Media Resource Groups. • When the search is complete, select the appropriate Media Resource Group from the
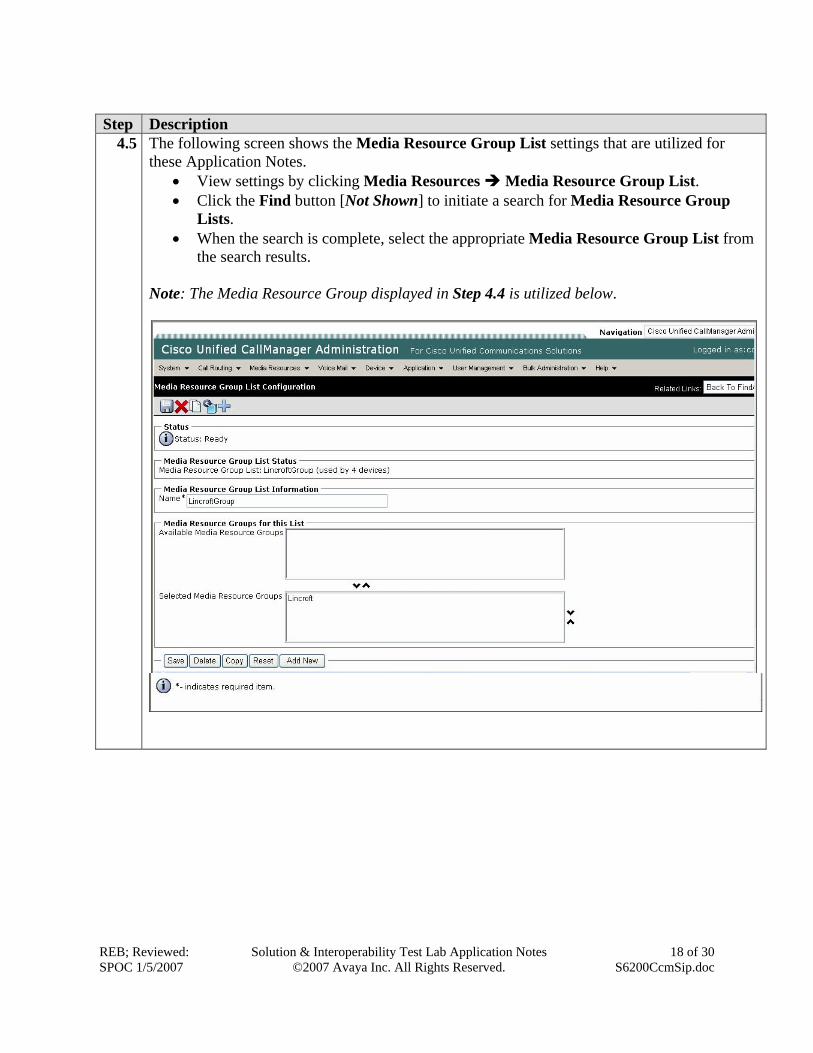
4.5 The following screen shows the Media Resource Group List settings that are utilized for these Application Notes.
• View settings by clicking Media Resources Media Resource Group List. • Click the Find button [Not Shown] to initiate a search for Media Resource Group
Lists. • When the search is complete, select the appropriate Media Resource Group List from
the search results. Note: The Media Resource Group displayed in Step 4.4 is utilized below.
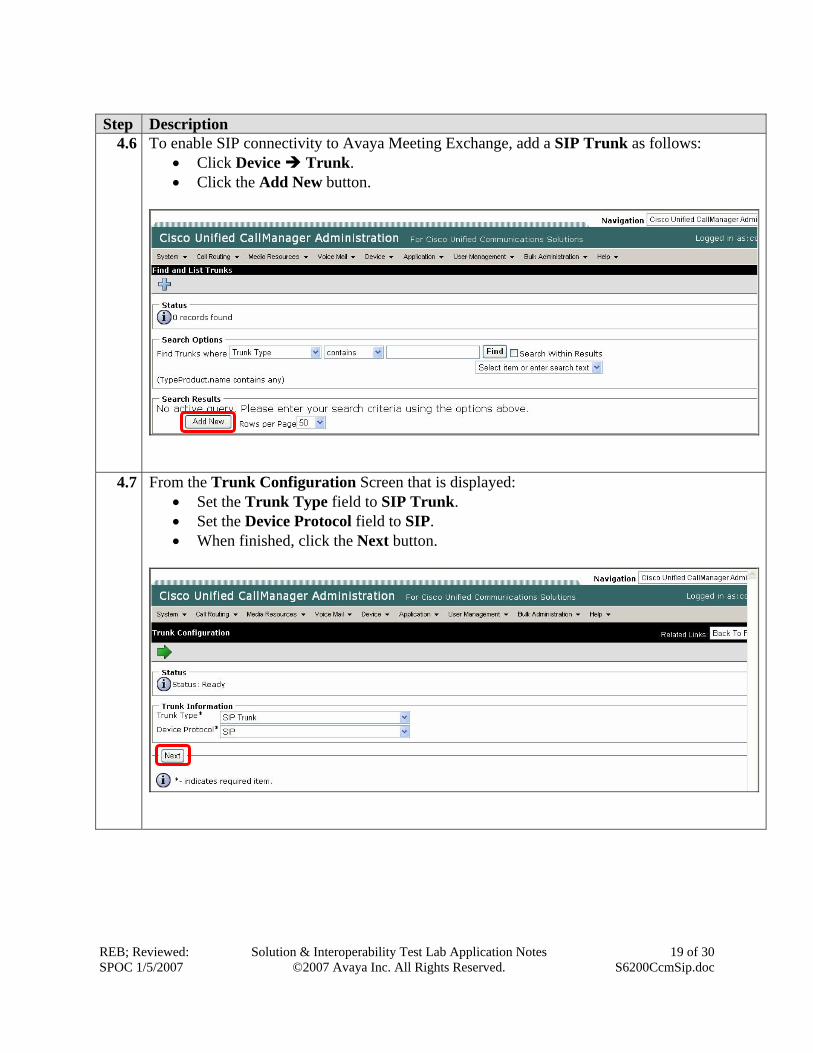
4.6 To enable SIP connectivity to Avaya Meeting Exchange, add a SIP Trunk as follows: • Click Device Trunk. • Click the Add New button.
4.7 From the Trunk Configuration Screen that is displayed: • Set the Trunk Type field to SIP Trunk. • Set the Device Protocol field to SIP. • When finished, click the Next button.
4.8 From the Trunk Configuration Screen that is displayed, administer settings for the SIP Trunk as follows, when finished, click the Save button.
• Utilize the Media Resource Group List from Step 4.5.
• Configure the Destination Address field to the IP address for Avaya Meeting Exchange.
• Configure the MTP Preferred Originating Codec to a Codec that is supported on Avaya Meeting Exchange. For these Application Notes, G.711ulaw was selected
• Utilize the SIP Trunk Security Profile from Step 4.2.
• Utilize the SIP Profile from Step 4.3.
• Configure the DTMF Signaling Method to interoperate with Avaya Meeting Exchange.
• Enter a descriptive name for the Device Name field.
4.12 To enable routing from Cisco Unified CallManager to Avaya Meeting Exchange utilizing the SIP Trunk provisioned in Step 4.8, add a Route Pattern as follows:
• Click Call Routing Route/Hunt Route Pattern. • Click the Add New button.
4.13 From the Route Pattern Configuration Screen, administer settings for a Route Pattern as follows, when finished, click the Save button.
• Configure the Route Pattern to match the DNIS entries provisioned on Avaya Meeting exchange in Steps 3.8 and 3.9. Note: X is a wildcard and represents any digit 0 through 9.
• Configure the Gateway/Route List to utilize the SIP Trunk provisioned in Steps 4.8.
• Configure the Route Option to route “5XX” to
Avaya Meeting Exchange by selecting Route this pattern.
4.14 The Require Forced Authorization Code option was not enabled in Step 4.13, click the OK button to proceed and activate authorization at a later time.
5. Verification Steps The following steps can be used to verify the configuration described in these Application Notes. Step Description
5.1 Log in to the Avaya Meeting Exchange Server console to access the CLI with the appropriate credentials. Run the dcbps script to verify all conferencing related processes are running on Avaya Meeting Exchange.
• cd to /usr/dcb/bin • At the command prompt, run the dcbps script and confirm all processes are running by
5.2 The primary focus of this step is to verify SIP trunking between Avaya Meeting Exchange and Cisco Unified CallManager. This is accomplished by placing calls to and from Avaya Meeting Exchange. This step utilizes the Avaya Bridge Talk application to verify calls to and from Avaya Meeting Exchange are managed correctly, e.g., callers are added/removed from conferences. This step will also verify conferencing applications provisioned in Section 3.
• From an endpoint registered to Cisco Unified CallManager, Dial 556 to enter an conference as Moderator (without passcode) while simultaneously invoking the associated Auto Blast dial feature for this conference (see Step 3.16).
• If not already logged on, log in to the Avaya Bridge Talk application with the appropriate credentials.
• Double-Click the highlighted Conf # to open a Conference Room window. • Verify conference participants are added/removed from conferences by observing the
5.3 Below is a SIP trace of the scenario invoked in Step 5.2. This trace is intended to display the provisioning presented in these Application Notes.
• An endpoint registered to Cisco Unified CallManager (192.45.130.105) Dials-In (e.g., sends an INVITE, message No. 136 in the SIP trace) to Avaya Meeting Exchange (192.168.13.211).
o The Route Pattern “5XX” configured for Cisco Unified CallManager in Step 4.13 matches both the Request Line and To fields in the SIP trace. Request-Line: INVITE sip:[email protected] To: <sip:[email protected]>
• There is a 422 Session Timer Too Small response from Avaya Meeting Exchange to the initial INVITE from Cisco Unified CallManager. This is due to setting the minSETimerValue to 86400 seconds on Avaya Meeting Exchange in Step 3.2. This value is greater that the Min-SE (1800 seconds) used by Cisco Unified CallManager and thus the 422 response from Avaya Meeting Exchange to negotiate a new value for the Min-SE.
• The ACK from Cisco Unified CallManager (message No. 148 in the SIP trace) uses the respContact provisioned on Avaya Meeting Exchange in Step 3.2.
• Avaya Meeting Exchange sends two INVITES (messages No. 582 and No. 586 in the SIP trace) to endpoints registered to Cisco Unified CallManager.
o The Request Line in both INVITE messages utilize the parameters in the telnumToUri.tab file configured in Step 3.4.
6. Conclusion These Application Notes provide administrators with the procedures to configure connectivity between the Avaya Meeting Exchange S6200 Conferencing Server and Cisco Unified CallManager utilizing direct SIP trunking.
7. Additional References Avaya references, available at http://support.avaya.com
1. Meeting Exchange 4.1 Administration and Maintenance S6200/S6800 Media Server, Issue 1, Doc ID 04-601168, July 2006.
2. Meeting Exchange 4.1 Configuring S6200, S6500, and S6800 Conferencing Servers, Issue 1, Doc ID 04-601338, July 2006.
3. Avaya Meeting Exchange Groupware Edition Version 4.1 User’s Guide for Bridge Talk, Doc ID 04-600878, Issue 2, July 2006.
Cisco reference, available at http://www.cisco.com/techsupport
4. Cisco CallManager System Guide Release 5.0(1), Document #: OL-8140-01.