CHAPTER Configuring Small Office to ISP Networks 4-1 4 Configuring Small Office to ISP Networks This chapter describes how to configure three small-office-to-Internet service provider (ISP) networks, which Table 4-1 presents. Note Cisco Systems strongly recommends that inexperienced network administrators use the Cisco 805 Fast Step software to configure sample networks 1 and 3. The Cisco 805 Fast Step software might configure the sample networks differently than is described in this guide. Table 4-1 Sample Networks No. WAN Options WAN Encapsulation Routed Protocols Other Features Configuration Options 1 Synchronous leased line PPP IP Static IP route • Cisco 805 Fast Step software • CLI 2 Asynchronous dial-up line PPP IP • Static IP route • Easy IP (Phase 1) – Network Address Translation (NAT) and Point-to-Point Protocol/IP Control Protocol (PPP/IPCP) • Firewall • Cisco 805 Fast Step software (template option) • CLI 3 Frame Relay Frame Relay IP • Static IP route • NAT overload • Firewall • Cisco 805 Fast Step software • CLI
Transcript
C H A P T E R
Configuring Small Office to ISP Network
4
Configuring Small Office to ISP Networks
This chapter describes how to configure three small-office-to-Internet service provider (ISP) networks, which Table 4-1 presents.
Note Cisco Systems strongly recommends that inexperienced network administrators use the Cisco 805 Fast Step software to configure sample networks 1 and 3. The Cisco 805 Fast Step software might configure the sample networks differently than is described in this guide.
Table 4-1 Sample Networks
No.WAN Options
WAN Encapsulation
Routed Protocols Other Features
Configuration Options
1 Synchronous leased line
PPP IP Static IP route • Cisco 805 Fast Step software
• CLI
2 Asynchronous dial-up line
PPP IP • Static IP route
• Easy IP (Phase 1) – Network Address Translation (NAT) and Point-to-Point Protocol/IP Control Protocol (PPP/IPCP)
• Firewall
• Cisco 805 Fast Step software (template option)
• CLI
3 Frame Relay Frame Relay IP • Static IP route
• NAT overload
• Firewall
• Cisco 805 Fast Step software
• CLI
s 4-1
Before Configuring Networks
The Cisco 805 Fast Step software is a Windows 95, Windows NT, and Windows 98 based configuration tool included with the Cisco 805 router. For more information, refer to the Cisco 805 Fast Step CD-ROM.
For more information on configuring your router using the CLI, continue reading this chapter.
Before Configuring NetworksRefer to Table 4-2 to determine what you need to do before configuring each network.
Table 4-2 Before Configuring Networks
Number WAN Options What You Must Do
1 Leased line, PPP • Set up IP address scheme.
• Buy a range of registered IP addresses for your router Ethernet interface and your LAN devices that require Internet access from the ISP. (If you plan to configure this sample network using the Cisco 805 Fast Step software, you must also buy a registered IP address for your router serial interface.)
• Order leased line from your WAN service provider.
2 Dial-up line, PPP • Set up IP address scheme.
• Ask your ISP to provide the following information:
— PPP client name that the ISP assigns as your login name.
— PPP password to access your ISP account.
— ISP telephone number to dial when you want to establish Internet connection.
— PPP authentication protocol used by ISP. (Challenge Handshake Authentication Protocol [CHAP] or Password Authentication Protocol [PAP]1.)
• Buy one registered IP address for router dialer interface.
• Order dial-up line from WAN service provider.
Cisco 805 Router Software Configuration Guide4-2
Network 1: Leased Line, PPP
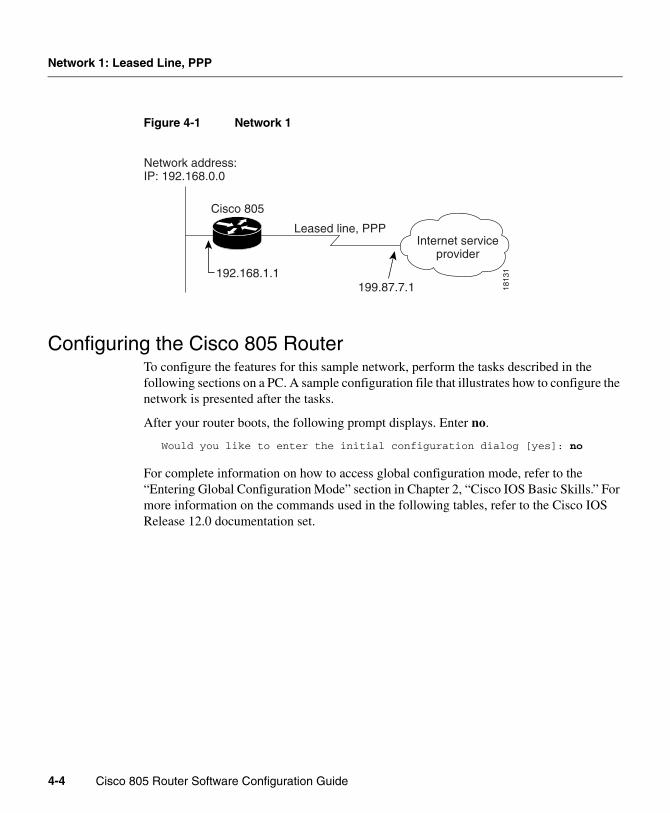
Network 1: Leased Line, PPPFigure 4-1 shows a sample small office network connected to an ISP with a synchronous leased line. This sample network uses IP as the only routed protocol. Instead of using a dynamic routing protocol such as RIP to learn the route to the ISP, this network uses a static IP route, which is a user-defined route to the ISP.
This network uses registered IP addresses on the router Ethernet interface and on the LAN devices that require Internet access. (You can buy a range of registered IP addresses from your ISP.) To save the cost of buying a registered IP address for the router serial interface, this interface uses the IP address assigned to the Ethernet interface. (If you configure this sample network using the Cisco 805 Fast Step software, you must buy a registered IP address for the router serial interface.)
3 Frame Relay • Set up IP address scheme.
• Do the following with the ISP:
— Buy one registered IP address for router serial interface.
— Ask ISP to provide IP address and subnet mask of ISP serial interface.
• Do the following with the WAN service provider:
— Order one PVC.
— Ask WAN service provider to provide LMI type.
1 For more information on CHAP and PAP, refer to Appendix C, “Concepts.”
Table 4-2 Before Configuring Networks (continued)
Number WAN Options What You Must Do
Configuring Small Office to ISP Networks 4-3
Network 1: Leased Line, PPP
Figure 4-1 Network 1
Configuring the Cisco 805 RouterTo configure the features for this sample network, perform the tasks described in the following sections on a PC. A sample configuration file that illustrates how to configure the network is presented after the tasks.
After your router boots, the following prompt displays. Enter no.
Would you like to enter the initial configuration dialog [yes]: no
For complete information on how to access global configuration mode, refer to the “Entering Global Configuration Mode” section in Chapter 2, “Cisco IOS Basic Skills.” For more information on the commands used in the following tables, refer to the Cisco IOS Release 12.0 documentation set.
Cisco 805
Network address:IP: 192.168.0.0
199.87.7.1
Internet serviceprovider
Leased line, PPP
1813
1192.168.1.1
Cisco 805 Router Software Configuration Guide4-4
Configuring the Cisco 805 Router
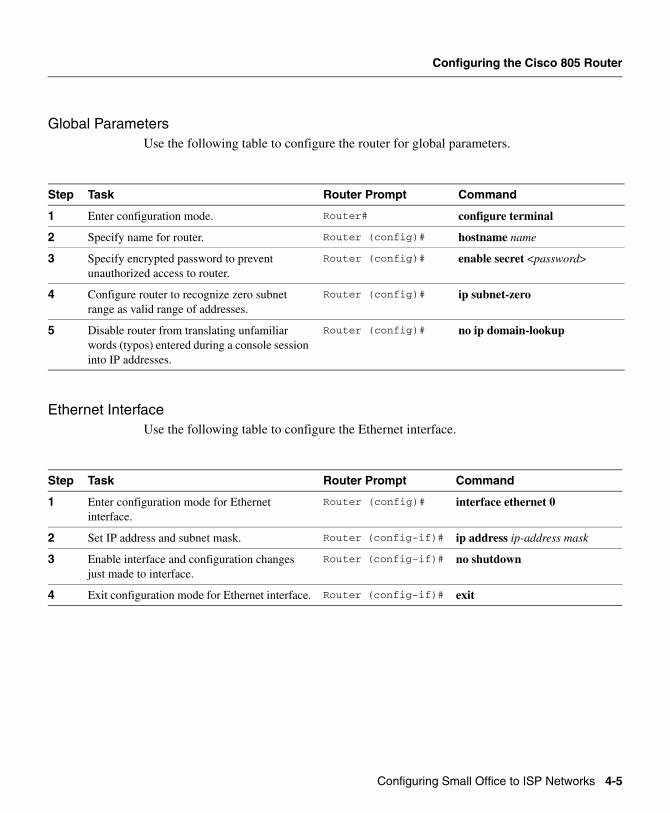
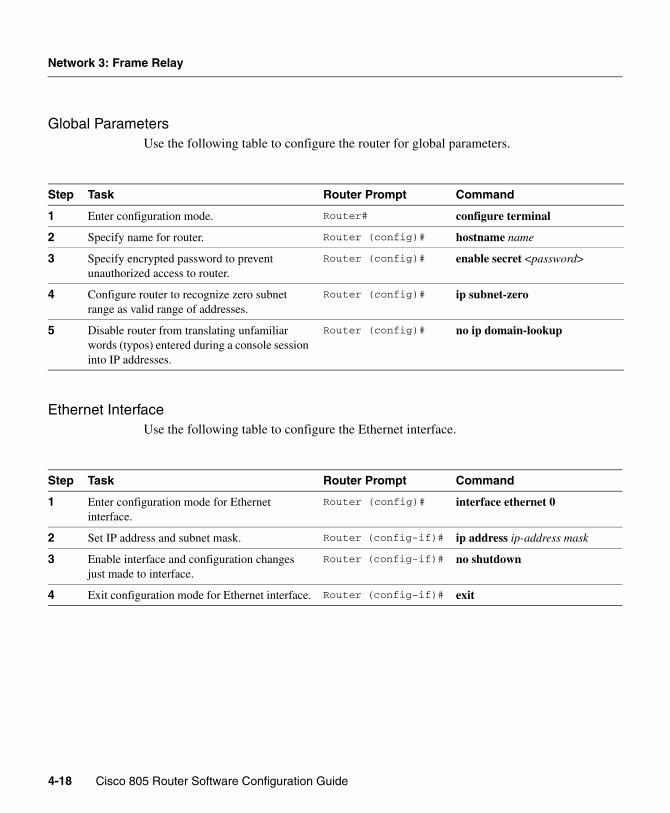
Global ParametersUse the following table to configure the router for global parameters.
Ethernet InterfaceUse the following table to configure the Ethernet interface.
Step Task Router Prompt Command
1 Enter configuration mode. Router# configure terminal
2 Specify name for router. Router (config)# hostname name
3 Specify encrypted password to prevent unauthorized access to router.
Router (config)# enable secret <password>
4 Configure router to recognize zero subnet range as valid range of addresses.
Router (config)# ip subnet-zero
5 Disable router from translating unfamiliar words (typos) entered during a console session into IP addresses.
Router (config)# no ip domain-lookup
Step Task Router Prompt Command
1 Enter configuration mode for Ethernet interface.
Router (config)# interface ethernet 0
2 Set IP address and subnet mask. Router (config-if)# ip address ip-address mask
3 Enable interface and configuration changes just made to interface.
Router (config-if)# no shutdown
4 Exit configuration mode for Ethernet interface. Router (config-if)# exit
Configuring Small Office to ISP Networks 4-5
Network 1: Leased Line, PPP
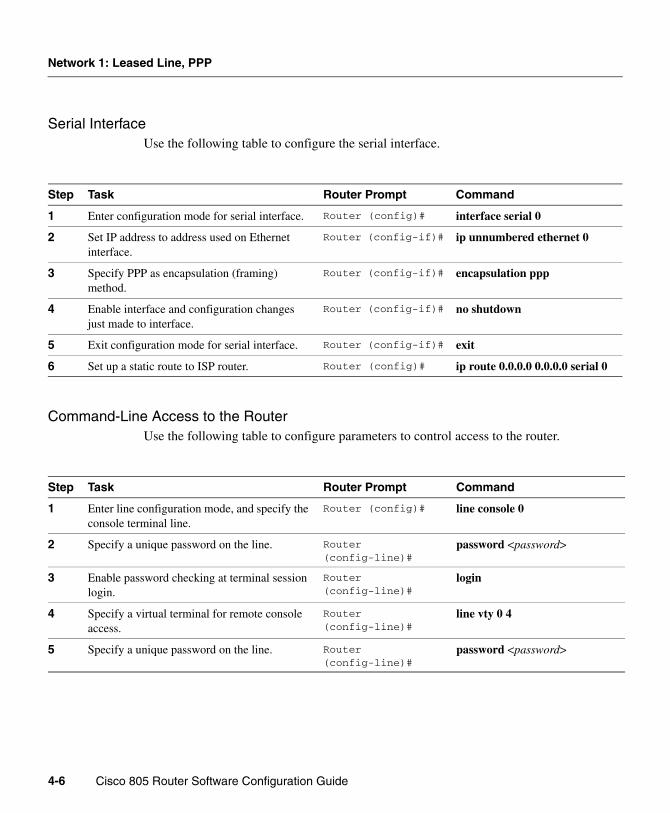
Serial InterfaceUse the following table to configure the serial interface.
Command-Line Access to the RouterUse the following table to configure parameters to control access to the router.
Step Task Router Prompt Command
1 Enter configuration mode for serial interface. Router (config)# interface serial 0
2 Set IP address to address used on Ethernet interface.
Router (config-if)# ip unnumbered ethernet 0
3 Specify PPP as encapsulation (framing) method.
Router (config-if)# encapsulation ppp
4 Enable interface and configuration changes just made to interface.
Router (config-if)# no shutdown
5 Exit configuration mode for serial interface. Router (config-if)# exit
6 Set up a static route to ISP router. Router (config)# ip route 0.0.0.0 0.0.0.0 serial 0
Step Task Router Prompt Command
1 Enter line configuration mode, and specify the console terminal line.
Router (config)# line console 0
2 Specify a unique password on the line. Router (config-line)#
password <password>
3 Enable password checking at terminal session login.
Router (config-line)#
login
4 Specify a virtual terminal for remote console access.
Router (config-line)#
line vty 0 4
5 Specify a unique password on the line. Router (config-line)#
password <password>
Cisco 805 Router Software Configuration Guide4-6
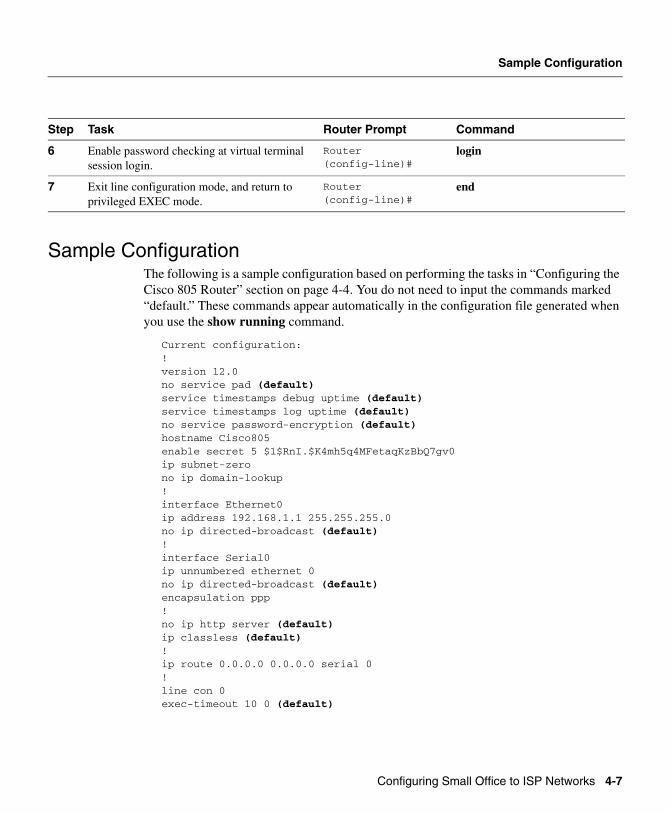
Sample Configuration
Sample ConfigurationThe following is a sample configuration based on performing the tasks in “Configuring the Cisco 805 Router” section on page 4-4. You do not need to input the commands marked “default.” These commands appear automatically in the configuration file generated when you use the show running command.
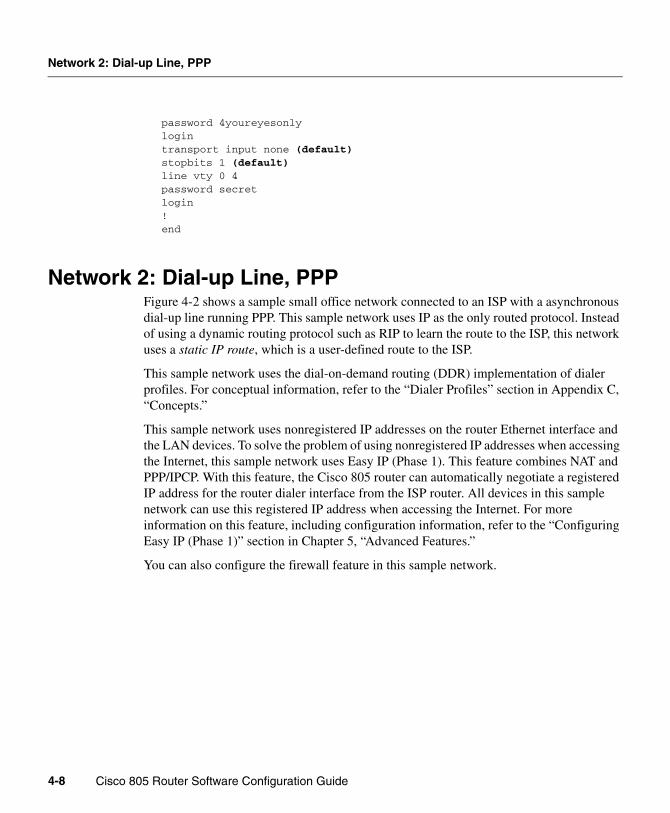
Current configuration:!version 12.0no service pad (default)service timestamps debug uptime (default)service timestamps log uptime (default)no service password-encryption (default)hostname Cisco805enable secret 5 $1$RnI.$K4mh5q4MFetaqKzBbQ7gv0ip subnet-zerono ip domain-lookup!interface Ethernet0ip address 192.168.1.1 255.255.255.0no ip directed-broadcast (default)!interface Serial0ip unnumbered ethernet 0no ip directed-broadcast (default)encapsulation ppp!no ip http server (default)ip classless (default)!ip route 0.0.0.0 0.0.0.0 serial 0!line con 0exec-timeout 10 0 (default)
6 Enable password checking at virtual terminal session login.
Router (config-line)#
login
7 Exit line configuration mode, and return to privileged EXEC mode.
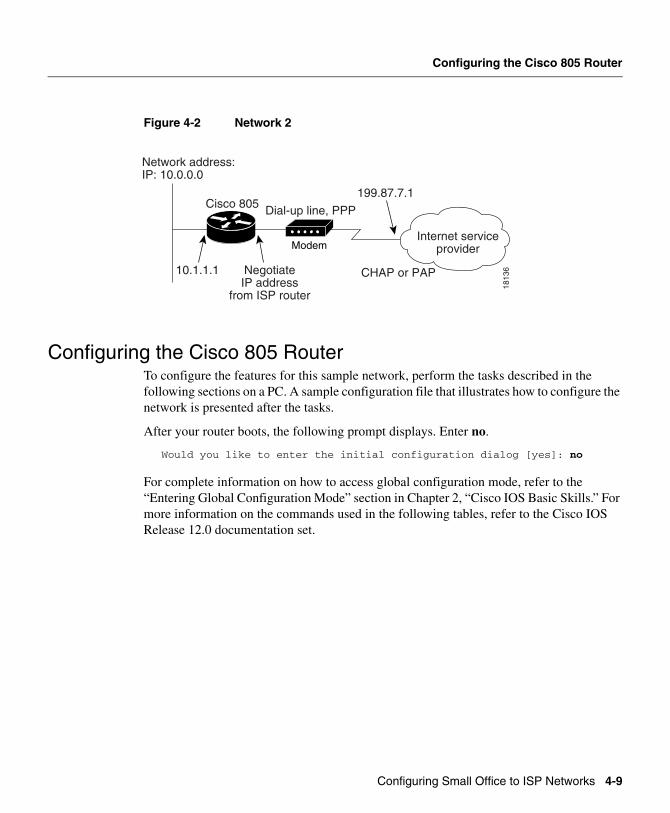
Network 2: Dial-up Line, PPPFigure 4-2 shows a sample small office network connected to an ISP with a asynchronous dial-up line running PPP. This sample network uses IP as the only routed protocol. Instead of using a dynamic routing protocol such as RIP to learn the route to the ISP, this network uses a static IP route, which is a user-defined route to the ISP.
This sample network uses the dial-on-demand routing (DDR) implementation of dialer profiles. For conceptual information, refer to the “Dialer Profiles” section in Appendix C, “Concepts.”
This sample network uses nonregistered IP addresses on the router Ethernet interface and the LAN devices. To solve the problem of using nonregistered IP addresses when accessing the Internet, this sample network uses Easy IP (Phase 1). This feature combines NAT and PPP/IPCP. With this feature, the Cisco 805 router can automatically negotiate a registered IP address for the router dialer interface from the ISP router. All devices in this sample network can use this registered IP address when accessing the Internet. For more information on this feature, including configuration information, refer to the “Configuring Easy IP (Phase 1)” section in Chapter 5, “Advanced Features.”
You can also configure the firewall feature in this sample network.
Cisco 805 Router Software Configuration Guide4-8
Configuring the Cisco 805 Router
Figure 4-2 Network 2
Configuring the Cisco 805 RouterTo configure the features for this sample network, perform the tasks described in the following sections on a PC. A sample configuration file that illustrates how to configure the network is presented after the tasks.
After your router boots, the following prompt displays. Enter no.
Would you like to enter the initial configuration dialog [yes]: no
For complete information on how to access global configuration mode, refer to the “Entering Global Configuration Mode” section in Chapter 2, “Cisco IOS Basic Skills.” For more information on the commands used in the following tables, refer to the Cisco IOS Release 12.0 documentation set.
Cisco 805
CHAP or PAP
Network address:IP: 10.0.0.0
10.1.1.1
199.87.7.1
NegotiateIP address
from ISP router
Dial-up line, PPP
1813
6
ModemInternet service
provider
Configuring Small Office to ISP Networks 4-9
Network 2: Dial-up Line, PPP
Global ParametersUse the following table to configure the router for global parameters.
Ethernet InterfaceUse the following table to configure the Ethernet interface.
Step Task Router Prompt Command
1 Enter configuration mode. Router# configure terminal
2 Specify name for router. Router (config)# hostname name
3 Specify encrypted password to prevent unauthorized access to router.
Router (config)# enable secret <password>
4 Configure router to recognize zero subnet range as valid range of addresses.
Router (config)# ip subnet-zero
5 Disable router from translating unfamiliar words (typos) entered during a console session into IP addresses.
Router (config)# no ip domain-lookup
Step Task Router Prompt Command
1 Enter configuration mode for Ethernet interface.
Router (config)# interface ethernet 0
2 Set IP address and subnet mask. Router (config-if)# ip address ip-address mask
3 Enable interface and configuration changes just made to interface.
Router (config-if)# no shutdown
4 Exit configuration mode for Ethernet interface. Router (config-if)# exit
Cisco 805 Router Software Configuration Guide4-10
Configuring the Cisco 805 Router
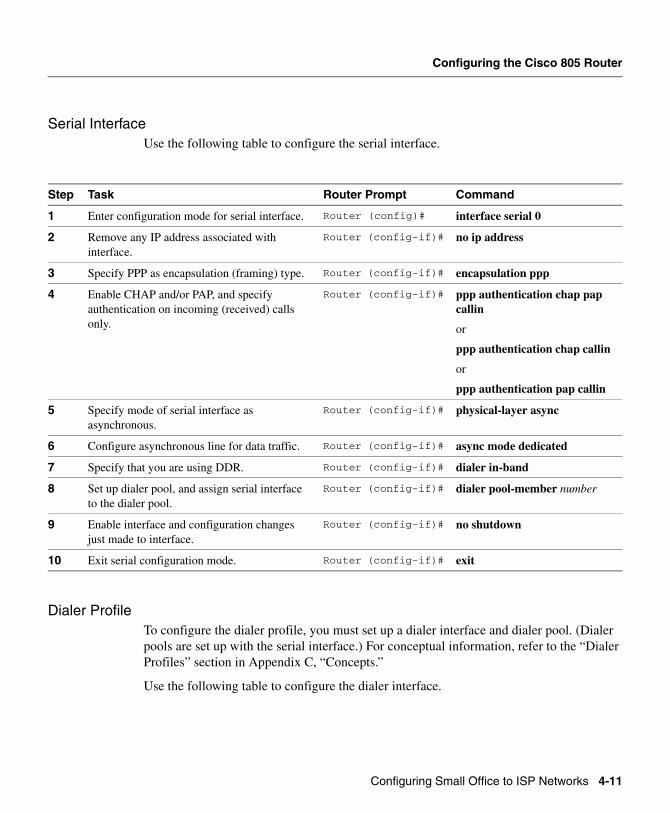
Serial InterfaceUse the following table to configure the serial interface.
Dialer ProfileTo configure the dialer profile, you must set up a dialer interface and dialer pool. (Dialer pools are set up with the serial interface.) For conceptual information, refer to the “Dialer Profiles” section in Appendix C, “Concepts.”
Use the following table to configure the dialer interface.
Step Task Router Prompt Command
1 Enter configuration mode for serial interface. Router (config)# interface serial 0
2 Remove any IP address associated with interface.
4 Specify amount of idle time before calls are disconnected.
Router (config-if)# dialer idle-timeout seconds either
5 Specify telephone number of ISP router. Router (config-if)# dialer string string modem-script chat-script-name
6 Specify dialer pool to use for calls to ISP. (Dialer pool was set up in “Serial Interface” section on page 4-11.)
Router (config-if)# dialer pool number
7 Assign dialer interface to a dialer group. Router (config-if)# dialer-group number
8 Enable CHAP and/or PAP, and specify authentication on incoming (received) calls only.
Router (config-if)# ppp authentication chap pap callin
or
ppp authentication chap callin
or
ppp authentication pap callin
9 Set up CHAP hostname and password. Router (config-if)# ppp chap hostname hostname
ppp chap password <secret>
10 Set up PAP username and password. Router (config-if)# ppp pap sent-username username password <password>
11 Disable CDP. Router (config-if)# no cdp enable
12 Enable interface and configuration changes just made to interface.
Router (config-if)# no shutdown
13 Exit configuration mode for dialer interface. Router (config-if)# exit
14 Set up static route to ISP router. Router (config)# ip route 0.0.0.0 0.0.0.0 dialer 1
Cisco 805 Router Software Configuration Guide4-12
Configuring the Cisco 805 Router
For information on controlling the types of traffic that can activate your dial-up line and increase your monthly dial-up line cost, refer to the “Controlling Dial-up Line Activation” section in Chapter 5, “Advanced Features.”
Asynchronous LineUse the following table to configure the asynchronous line.
15 Create script that causes connected modem to place call to ISP router.
16 Set up dialer list that determines that IP triggers a call.
Router (config)# dialer-list dialer-group protocol ip permit
Step Task Router Prompt Command
1 Enter configuration mode for asynchronous line (line 1).
Router (config)# line 1
2 Specifies that router should send and listen to flow control information from attached serial device.
Router (config-line)#
flowcontrol hardware
3 Specify that all protocols can connect to line 1. Router (config-line)#
transport input all
4 Configure line 1 for both incoming and outgoing calls.
Router (config-line)#
modem inout
5 Set baud rate. Router (config-line)#
speed 115200
6 Set stop bits. Router (config-line)#
stopbits 1
7 Exit configuration mode for serial interface. Router (config-if)# exit
Step Task Router Prompt Command
Configuring Small Office to ISP Networks 4-13
Network 2: Dial-up Line, PPP
Easy IP (Phase 1)For information on configuring Easy IP (Phase 1), refer to the “Configuring Easy IP (Phase 1)” section in Chapter 5, “Advanced Features.”
Firewall FeatureFor information on configuring a firewall, refer to the Cisco IOS Firewall Feature Set feature module, which appears on Cisco Connection Online (CCO) only.
Command-Line Access to the RouterUse the following table to configure parameters to control access to the router.
Sample ConfigurationThe following is a sample configuration based on performing the tasks in “Configuring the Cisco 805 Router” section on page 4-9. It does not show firewall-related commands. For a sample configuration of the firewall feature, refer to the Cisco IOS Firewall Feature Set feature module, which appears on Cisco Connection Online (CCO) only.
Step Task Router Prompt Command
1 Enter line configuration mode, and specify the console terminal line.
Router (config)# line console 0
2 Specify a unique password on the line. Router (config-line)# password <password>
3 Enable password checking at terminal session login.
Router (config-line)# login
4 Specify a virtual terminal for remote console access.
Router (config-line)# line vty 0 4
5 Specify a unique password on the line. Router (config-line)# password <password>
6 Enable password checking at virtual terminal session login.
Router (config-line)# login
7 Exit line configuration mode, and return to privileged EXEC mode.
Router (config-line)# end
Cisco 805 Router Software Configuration Guide4-14
Sample Configuration
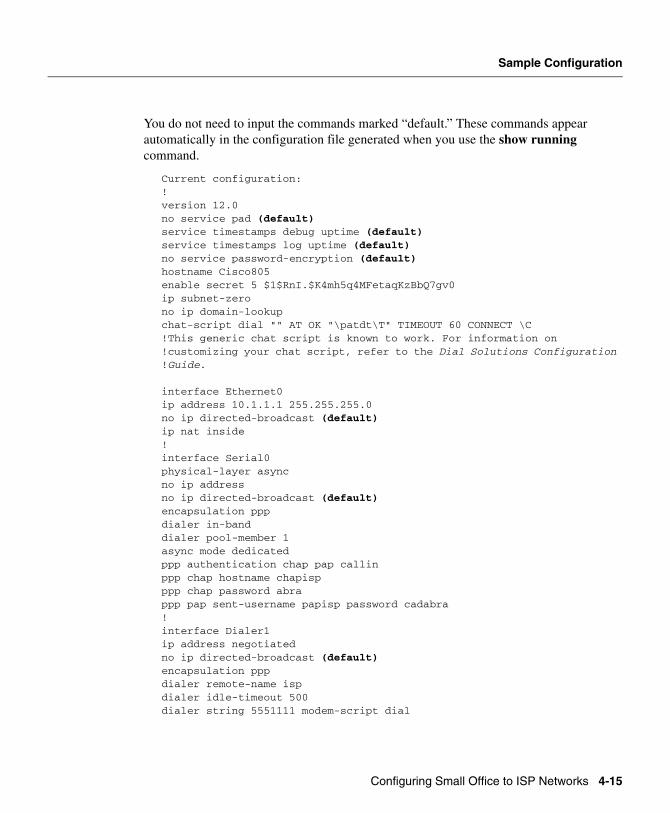
You do not need to input the commands marked “default.” These commands appear automatically in the configuration file generated when you use the show running command.
Current configuration:!version 12.0no service pad (default)service timestamps debug uptime (default)service timestamps log uptime (default)no service password-encryption (default)hostname Cisco805enable secret 5 $1$RnI.$K4mh5q4MFetaqKzBbQ7gv0ip subnet-zerono ip domain-lookupchat-script dial "" AT OK "\patdt\T" TIMEOUT 60 CONNECT \C!This generic chat script is known to work. For information on !customizing your chat script, refer to the Dial Solutions Configuration !Guide.
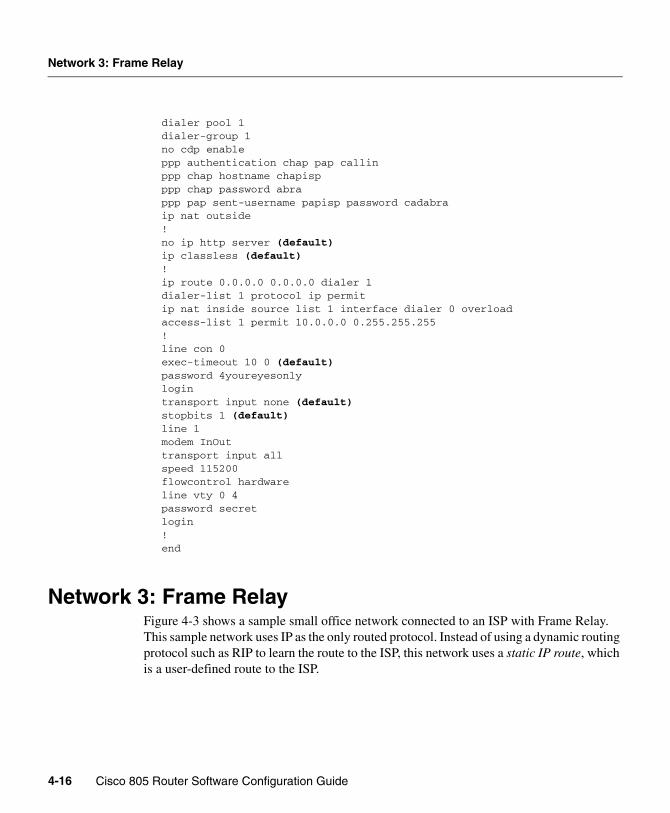
interface Ethernet0ip address 10.1.1.1 255.255.255.0no ip directed-broadcast (default)ip nat inside!interface Serial0physical-layer asyncno ip addressno ip directed-broadcast (default)encapsulation pppdialer in-banddialer pool-member 1async mode dedicatedppp authentication chap pap callinppp chap hostname chapispppp chap password abrappp pap sent-username papisp password cadabra!interface Dialer1ip address negotiatedno ip directed-broadcast (default)encapsulation pppdialer remote-name ispdialer idle-timeout 500dialer string 5551111 modem-script dial
Configuring Small Office to ISP Networks 4-15
Network 3: Frame Relay
dialer pool 1dialer-group 1no cdp enableppp authentication chap pap callinppp chap hostname chapispppp chap password abrappp pap sent-username papisp password cadabraip nat outside!no ip http server (default)ip classless (default)!ip route 0.0.0.0 0.0.0.0 dialer 1dialer-list 1 protocol ip permitip nat inside source list 1 interface dialer 0 overloadaccess-list 1 permit 10.0.0.0 0.255.255.255!line con 0exec-timeout 10 0 (default)password 4youreyesonlylogintransport input none (default)stopbits 1 (default)line 1modem InOuttransport input allspeed 115200flowcontrol hardwareline vty 0 4password secretlogin!end
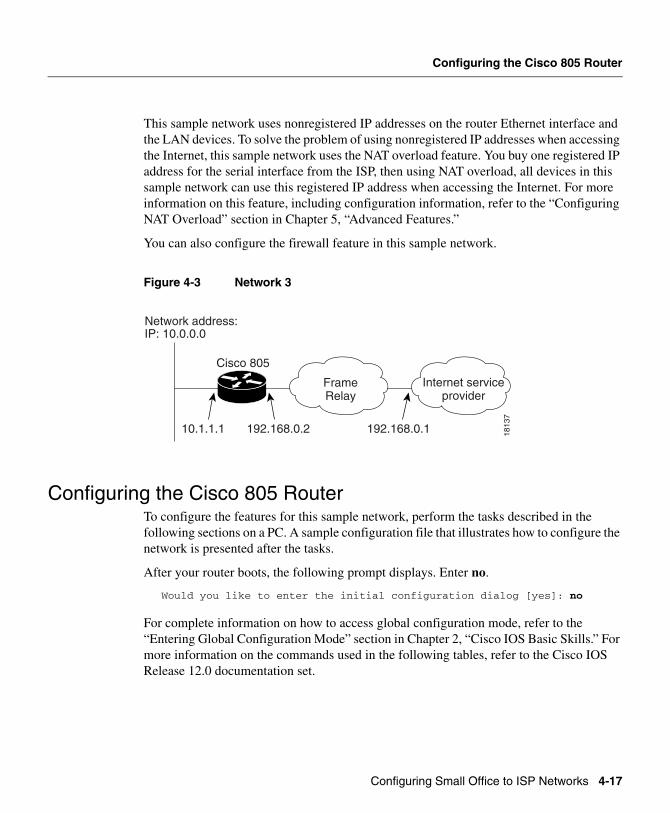
Network 3: Frame RelayFigure 4-3 shows a sample small office network connected to an ISP with Frame Relay. This sample network uses IP as the only routed protocol. Instead of using a dynamic routing protocol such as RIP to learn the route to the ISP, this network uses a static IP route, which is a user-defined route to the ISP.
Cisco 805 Router Software Configuration Guide4-16
Configuring the Cisco 805 Router
This sample network uses nonregistered IP addresses on the router Ethernet interface and the LAN devices. To solve the problem of using nonregistered IP addresses when accessing the Internet, this sample network uses the NAT overload feature. You buy one registered IP address for the serial interface from the ISP, then using NAT overload, all devices in this sample network can use this registered IP address when accessing the Internet. For more information on this feature, including configuration information, refer to the “Configuring NAT Overload” section in Chapter 5, “Advanced Features.”
You can also configure the firewall feature in this sample network.
Figure 4-3 Network 3
Configuring the Cisco 805 RouterTo configure the features for this sample network, perform the tasks described in the following sections on a PC. A sample configuration file that illustrates how to configure the network is presented after the tasks.
After your router boots, the following prompt displays. Enter no.
Would you like to enter the initial configuration dialog [yes]: no
For complete information on how to access global configuration mode, refer to the “Entering Global Configuration Mode” section in Chapter 2, “Cisco IOS Basic Skills.” For more information on the commands used in the following tables, refer to the Cisco IOS Release 12.0 documentation set.
Cisco 805
1813
7
FrameRelay
Internet serviceprovider
Network address:IP: 10.0.0.0
10.1.1.1 192.168.0.2 192.168.0.1
Configuring Small Office to ISP Networks 4-17
Network 3: Frame Relay
Global ParametersUse the following table to configure the router for global parameters.
Ethernet InterfaceUse the following table to configure the Ethernet interface.
Step Task Router Prompt Command
1 Enter configuration mode. Router# configure terminal
2 Specify name for router. Router (config)# hostname name
3 Specify encrypted password to prevent unauthorized access to router.
Router (config)# enable secret <password>
4 Configure router to recognize zero subnet range as valid range of addresses.
Router (config)# ip subnet-zero
5 Disable router from translating unfamiliar words (typos) entered during a console session into IP addresses.
Router (config)# no ip domain-lookup
Step Task Router Prompt Command
1 Enter configuration mode for Ethernet interface.
Router (config)# interface ethernet 0
2 Set IP address and subnet mask. Router (config-if)# ip address ip-address mask
3 Enable interface and configuration changes just made to interface.
Router (config-if)# no shutdown
4 Exit configuration mode for Ethernet interface. Router (config-if)# exit
Cisco 805 Router Software Configuration Guide4-18
Configuring the Cisco 805 Router
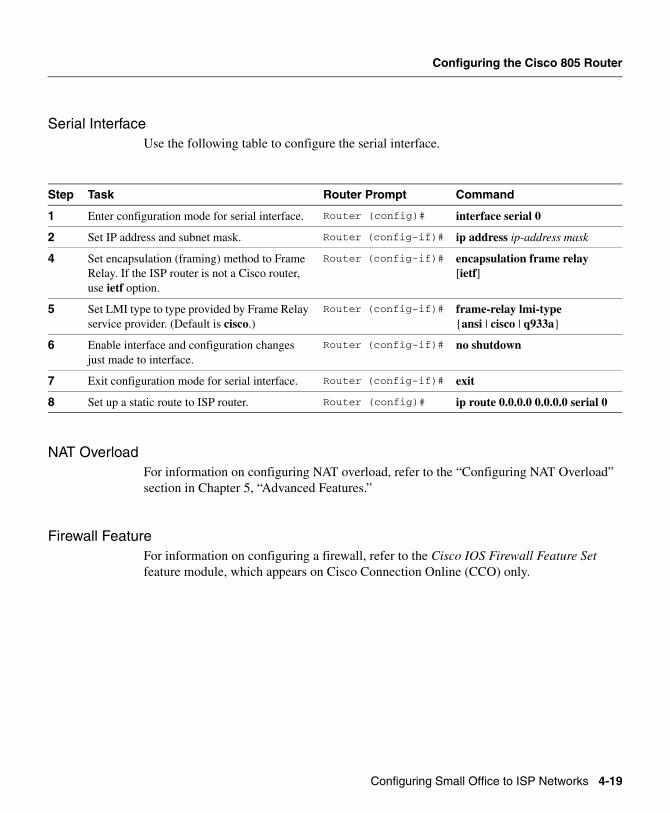
Serial InterfaceUse the following table to configure the serial interface.
NAT OverloadFor information on configuring NAT overload, refer to the “Configuring NAT Overload” section in Chapter 5, “Advanced Features.”
Firewall FeatureFor information on configuring a firewall, refer to the Cisco IOS Firewall Feature Set feature module, which appears on Cisco Connection Online (CCO) only.
Step Task Router Prompt Command
1 Enter configuration mode for serial interface. Router (config)# interface serial 0
2 Set IP address and subnet mask. Router (config-if)# ip address ip-address mask
4 Set encapsulation (framing) method to Frame Relay. If the ISP router is not a Cisco router, use ietf option.
6 Enable interface and configuration changes just made to interface.
Router (config-if)# no shutdown
7 Exit configuration mode for serial interface. Router (config-if)# exit
8 Set up a static route to ISP router. Router (config)# ip route 0.0.0.0 0.0.0.0 serial 0
Configuring Small Office to ISP Networks 4-19
Network 3: Frame Relay
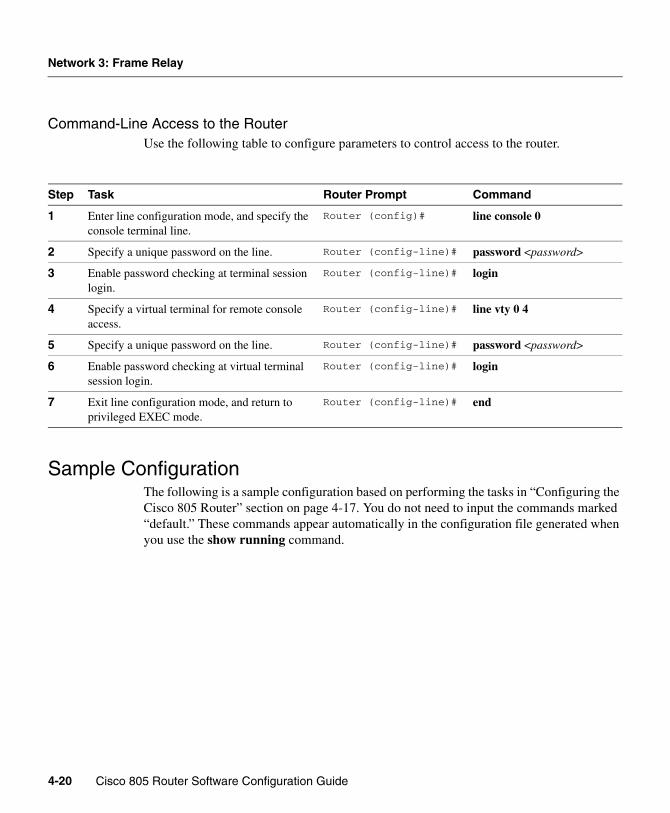
Command-Line Access to the RouterUse the following table to configure parameters to control access to the router.
Sample ConfigurationThe following is a sample configuration based on performing the tasks in “Configuring the Cisco 805 Router” section on page 4-17. You do not need to input the commands marked “default.” These commands appear automatically in the configuration file generated when you use the show running command.
Step Task Router Prompt Command
1 Enter line configuration mode, and specify the console terminal line.
Router (config)# line console 0
2 Specify a unique password on the line. Router (config-line)# password <password>
3 Enable password checking at terminal session login.
Router (config-line)# login
4 Specify a virtual terminal for remote console access.
Router (config-line)# line vty 0 4
5 Specify a unique password on the line. Router (config-line)# password <password>
6 Enable password checking at virtual terminal session login.
Router (config-line)# login
7 Exit line configuration mode, and return to privileged EXEC mode.
Router (config-line)# end
Cisco 805 Router Software Configuration Guide4-20
Sample Configuration
Current configuration:!version 12.0no service pad (default)service timestamps debug uptime (default)service timestamps log uptime (default)no service password-encryption (default)hostname Cisco805enable secret 5 $1$RnI.$K4mh5q4MFetaqKzBbQ7gv0ip subnet-zerono ip domain-lookup!interface Ethernet0ip address 10.1.1.1 255.255.255.0no ip directed-broadcast (default)ip nat inside!interface Serial0ip address 192.168.0.2 255.255.255.0no ip directed-broadcast (default)no ip mroute-cache (default)encapsulation frame-relay ietfframe-relay lmi-type ansiip nat outside!no ip http server (default)ip classless (default)!ip route 0.0.0.0 0.0.0.0 serial 0ip nat inside source list 1 interface serial 0 overloadaccess-list 1 permit 10.0.0.0 0.255.255.255!line con 0exec-timeout 10 0 (default)password 4youreyesonlylogintransport input none (default)stopbits 1 (default)line vty 0 4password secretlogin!end