Configuring the AudioCodes Mediant 2000 Media Gateway to Provide Connectivity between the PSTN and the Avaya Meeting Exchange S6800 Conferencing Server - Issue 1.0
Abstract These Application Notes describe a compliance tested solution comprised of the Avaya Meeting Exchange S6800 Conferencing Server and the AudioCodes Mediant 2000 Media Gateway. The AudioCodes Mediant 2000 Media Gateway is utilized to enable connectivity between the Avaya Meeting Exchange S6800 Conferencing Server and the PSTN. This configuration provides a rich set of conferencing options available on the Avaya Meeting Exchange S6800 Conferencing Server to participants associated with the PSTN. Information in these Application Notes has been obtained through DeveloperConnection compliance testing and additional technical discussions. Testing was conducted via the DeveloperConnection Program at the Avaya Solution and Interoperability Test Lab.
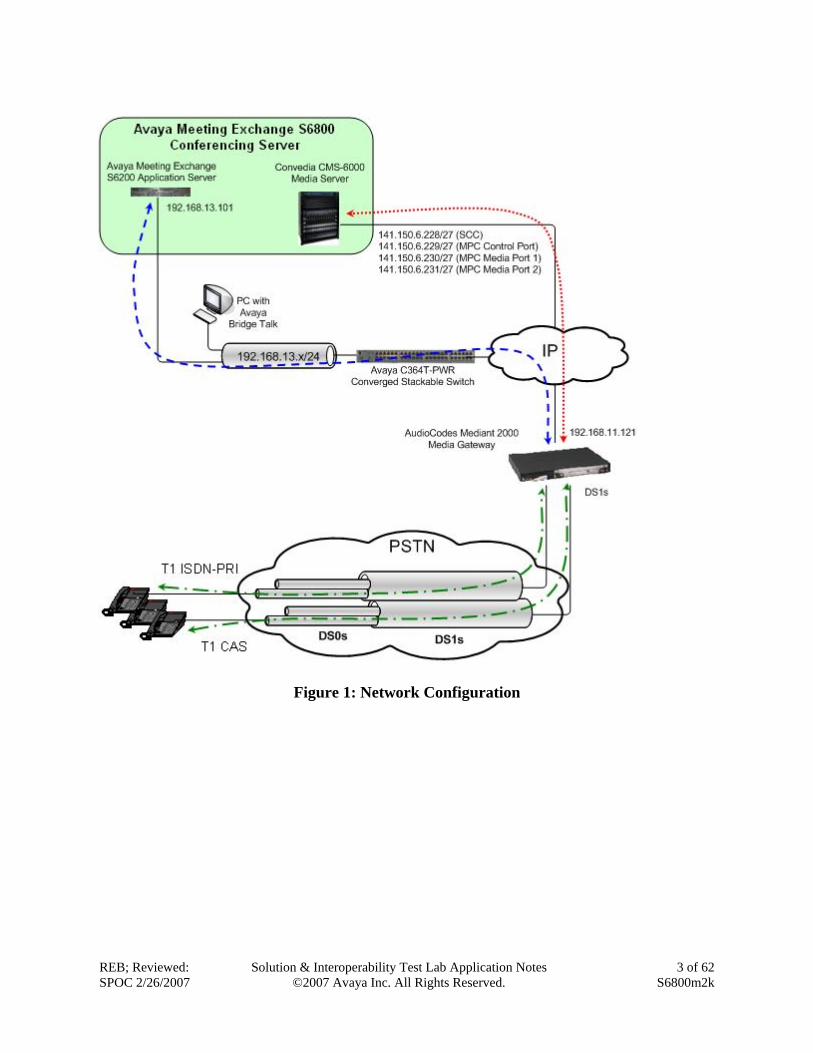
1. Introduction These Application Notes describe a compliance tested solution comprised of the Avaya Meeting Exchange S6800 Conferencing Server and the AudioCodes Mediant 2000 Media Gateway. The AudioCodes Mediant 2000 Media Gateway is utilized to enable connectivity between the Avaya Meeting Exchange S6800 Conferencing Server and the PSTN. The end to end signaling connectivity between the Avaya Meeting Exchange S6800 Conferencing Server and the PSTN was as follows: SIP/UDP between Avaya Meeting Exchange and the AudioCodes Mediant 2000 Media Gateway and either T1 ISDN-PRI/DS0/DS1 or T1 CAS/DS0/DS1 (Channel Associated Signaling) between the AudioCodes Mediant 2000 Media Gateway and the PSTN. This configuration provides a rich set of conferencing options available on the Avaya Meeting Exchange S6800 Conferencing Server to participants associated with the PSTN. Figure 1 illustrates the network configuration utilized for this compliance tested solution. Signaling connectivity between the PSTN and the Avaya Meeting Exchange S6800 Conferencing Server traversed the following path.
• T1 CAS (robbed-bit, e.g., 8k “robbed” from each of the 24 channels comprising the T1 signal) multiplexed over a DS1 from the PSTN to the AudioCodes Mediant 2000 Media Gateway (green dashed/dotted line).
• T1 ISDN-PRI (D-channel on channel 24) multiplexed over a DS1 from the PSTN to the AudioCodes Mediant 2000 Media Gateway (green dashed/dotted line).
• SIP/UDP between the AudioCodes Mediant 2000 Media Gateway and the Avaya Meeting Exchange S6200 Application Server (blue dashed line).
Media connectivity between the PSTN and the Avaya Meeting Exchange S6800 Conferencing Server traversed the following Path.
• T1 CAS (24 56k channels) multiplexed over a DS1 from the PSTN to the AudioCodes Mediant 2000 Media Gateway (green dashed/dotted line).
• T1 ISDN-PRI (23 B-channels) multiplexed over a DS1 from the PSTN to the AudioCodes Mediant 2000 Media Gateway (green dashed/dotted line).
• RTP/UDP between the AudioCodes Mediant 2000 Media Gateway and the Convedia CMS-6000 Media Server (red dotted line).
1.1. Avaya Meeting Exchange S6800 Conferencing Server The Avaya Meeting Exchange S6800 Conferencing Server is a SIP-based voice conferencing solution that extends Avaya's conferencing applications including reservation-less, attended, event, mobile to support various IP network implementations. The following capabilities are supported by the Avaya Meeting Exchange S6800 Conferencing Server:
• RFC 2833 DTMF support. • In-band DTMF support. • Up to 2016-user and 115-operator conferences. • Support for up to four digitally recorded music sources. • Support for one recorded music channel and up to four connection based (FDAPI) music
channels. • Any combination of G.711 a-law or u-law, G.729, G723, G726-16, G726-24, G726-32,
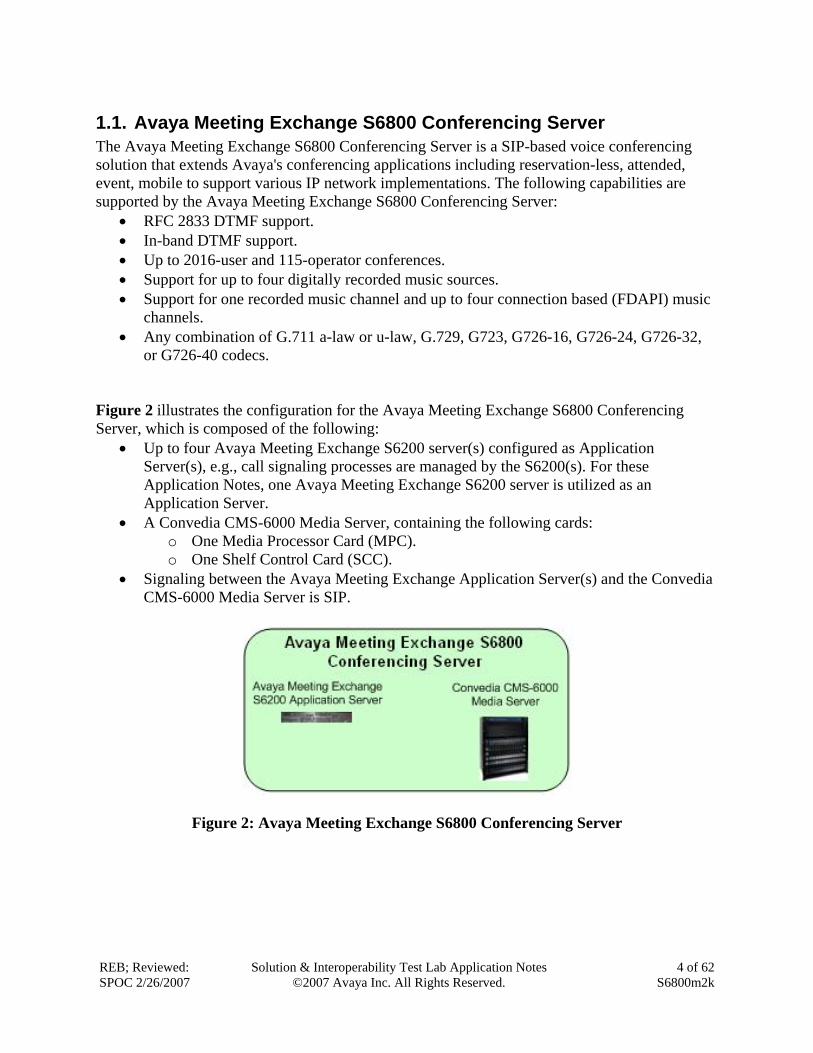
or G726-40 codecs. Figure 2 illustrates the configuration for the Avaya Meeting Exchange S6800 Conferencing Server, which is composed of the following:
• Up to four Avaya Meeting Exchange S6200 server(s) configured as Application Server(s), e.g., call signaling processes are managed by the S6200(s). For these Application Notes, one Avaya Meeting Exchange S6200 server is utilized as an Application Server.
• A Convedia CMS-6000 Media Server, containing the following cards: o One Media Processor Card (MPC). o One Shelf Control Card (SCC).
• Signaling between the Avaya Meeting Exchange Application Server(s) and the Convedia CMS-6000 Media Server is SIP.
Figure 2: Avaya Meeting Exchange S6800 Conferencing Server
1.2. AudioCodes Mediant 2000 Media Gateway The AudioCodes Mediant 2000 Media Gateway is a SIP-based VoIP gateway, offering integrated voice gateway functionality over IP networks. This solution addresses mid-density applications deployed in IP networks by delivering up to 480 simultaneous Voice over IP (VoIP) or Fax over IP (FoIP) calls. The AudioCodes Mediant 2000 Media Gateway routes calls over the IP network using SIP signaling protocol, enabling the deployment of Voice over Packet solutions to PSTN subscribers.
2. Equipment and Software Validated The following equipment and software versions were used for the sample configuration provided in these Application Notes.
Equipment Software Avaya Meeting Exchange S6800 Conferencing Server
• Avaya Meeting Exchange S6200 Application Server o Software version o IPCB build version
• Convedia CMS-6000 Media Server o SCC2 (slot 1) o MPC2 (slot 2)
3. Configure the Avaya Meeting Exchange S6800 Conferencing Server
This section describes the steps for configuring the Avaya Meeting Exchange S6800 Conferencing Server to interoperate with the PSTN via the AudioCodes Mediant 2000 Media Gateway (see Section 1, Figure 1).
3.1. Configure the Avaya Meeting Exchange S6200 Application Server The following steps describe the administrative procedures for configuring the Avaya Meeting Exchange S6200 Application Server to originate/terminate calls utilizing the Convedia CMS-6000 Media Server. Step Description
3.1 Log in to the Avaya Meeting Exchange S6200 Application Server console to access the Command Line Interface (CLI) with the appropriate credentials.
3.2 Configure settings that enable SIP connectivity between the Avaya Meeting Exchange S6200 Application Server and other SIP User Agent(s) by editing the system.cfg file as follows:
• cd to /usr/ipcb/config • Edit the system.cfg file with a text editor, e.g., vi. • Add a line to identify the IP address of the Avaya Meeting Exchange S6200
Application Server (as defined in the /etc/hosts file): o IPAddress=192.168.13.101
• Add a line to populate the From Header Field in SIP INVITE messages from the Avaya Meeting Exchange S6200 Application Server:
o MyListener=sip:[email protected] Note: The user field 001s6800, defined for this SIP URI must conform to the RFC 3261. For consistency, it is selected to match the user field provisioned for the respContact entry (see below).
• Add a line to provide SIP User Agent(s) a Contact address to use for Acknowledging SIP messages from the Avaya Meeting Exchange S6200 Application Server:
o respContact=<sip:[email protected]:5060;transport=udp> Note: The user field 001s6800, defined for this SIP URI must conform to the RFC 3261 and is selected to uniquely identify this server. E.g., the user field 001s6800 will be inserted in the From header field of SIP INVITE messages from this Avaya Meeting Exchange S6200 Application Server (see Step 6.11). The intention is for 001s6800 to display on a participant’s User Agent Client (UAC) when Dial-Out procedures from the Avaya Meeting Exchange S6200 Application Server are invoked. This allows end-user’s to identify a call from this server.
• Add the following lines to set the Min-SE timer to 1800 seconds in SIP INVITE messages from the Avaya Meeting Exchange S6200 Application Server:
o sessionRefreshTimerValue= 1800 o minSETimerValue= 1800
Note: The values for the sessionRefreshTimerValue and the minSETimerValue are defined in seconds and should be provisioned to be greater than or equal to the value used by SIP User Agent(s) connecting to the Avaya Meeting Exchange S6200 Application Server, e.g., the AudioCodes Mediant 2000 Media Gateway. This setting is necessary to enable Dial-Out from the Avaya Meeting Exchange S6200 Application Server to the PSTN via the AudioCodes Mediant 2000 Media Gateway.
3.3 To associate incoming calls to the Avaya Meeting Exchange S6200 Application Server with different call flows, edit the UriToTelnum.tab file to extract both Automatic Number Identification (ANI) and Direct Inward Dial (DID, also known as DDI in Europe) values as follows:
• cd to /usr/ipcb/config • Edit the UriToTelnum.tab file with a text editor, e.g., vi. • Add a line to match the pattern of the To header field in SIP INVITE messages from
the AudioCodes Mediant 2000 Media Gateway to the Avaya Meeting Exchange S6200 Application Server. If a match occurs, the DID is extracted from the To header field and the ANI is extracted from the From header field:
o "*<sip:*@*" $2 Where the pattern "*<sip:*@*" matches: To: <sip:[email protected];user=phone> and $2 utilizes 777 (the
variable contained in the second *) as the DID value for the call. From: <sip:75001@M2000> and $2 utilizes 75001 (the variable
contained in the second *) as the ANI for the call (see Step 6.9). • Enable an undefined caller to receive a prompt for operator assistance by administering
for the condition of an unmatched SIP INVITE message by adding a wildcard entry as the last line in this file:
o * $0 Note: Entries in this file are read sequentially, therefore, the line * $0 must be the last line in the file. Otherwise, all calls to the Avaya Meeting Exchange S6200 Application Server would match the wildcard and thus receive a prompt for operator assistance.
3.4 To enable Dial-Out from the Avaya Meeting Exchange S6200 Application Server to the PSTN via the AudioCodes Mediant 2000 Media Gateway, edit the telnumToUri.tab file as follows:
• cd to /usr/ipcb/config • Edit the telnumToUri.tab file with a text editor, e.g., vi. • Add a line to the file to route outbound calls from the Avaya Meeting Exchange S6200
Application Server to the AudioCodes Mediant 2000 Media Gateway: o 3???? sip:[email protected]:5060;transport=udp
Where the pattern 3???? matches any five digit number with a leading “3” and routes the call to the AudioCodes Mediant 2000 Media Gateway (192.168.11.121) via SIP/UDP. To enable SIP connectivity utilizing UDP, the entry contains: 5060 and transport=udp. The Avaya Meeting Exchange S6200 Application Server will substitute $0 with the dialed number in outgoing SIP INVITE messages, e.g., if 31001 is dialed, the Avaya Meeting Exchange S6200 Application Server will send a SIP INVITE message with: sip:[email protected]:5060;transport=udp in the SIP URI and To header field (see Step 6.11).
Note: Alternatively, routing to the AudioCodes Mediant 2000 Media Gateway could have been enabled with a wildcard entry:
• sip:[email protected]:5060;transport=udp Where * routes any dialed digits to the AudioCodes Mediant 2000 Media Gateway (192.168.11.121) via SIP/UDP.
3.5 To configure the Avaya Meeting Exchange S6200 Application Server to utilize MPC resources on the Convedia CMS-6000 Media Server, edit the processTable.cfg file as follows:
• cd to /usr/ipcb/config • Edit the processTable.cfg file with a text editor, e.g., vi. • Add an ipAddress for each corresponding proccessName in this file.
Note: The processTable.cfg for these Application Notes contains IP Addresses of 0.0.0.0, where 0.0.0.0 is defined as a global IP address on the Avaya Meeting Exchange S6200 Application Server. Alternatively, the IP address of the Avaya Meeting Exchange S6200 Application Server (as defined in the /etc/hosts file) could have been entered in the ipAddress for each proccessName.
# processes file, enumerates the number of processes in the network. # will have the name of the process Key ID and the IP address # # The default configuration is a single MPC board system. There are # two commented out entries for a second and third MPC board. If more # than 1 board is needed for the system then uncomment out the appropriate # line(s). The last thing on the line correlates to the _* entry in the # mediaServerInterface.cfg. For example, for the 1st mediaServer line that # ends with a 1. The _1 entries in the mediaServerInterface.cfg are used. # proccessName ipcKeyNumber ProcessExe ipAddress route ProcessArgs initipcb 110 noexecute 0.0.0.0 bridget700 100 noexecute 0.0.0.0 dspEvents/msDispatcher,netEvents/sipAgent commsProcess 111 /usr/dcb/bin/serverComms 0.0.0.0 sipAgent 101 /usr/dcb/bin/sipagent 0.0.0.0 dspEvents/msDispatcher,appEvents/bridget700 msDispatcher 102 /usr/dcb/bin/msdispatcher 0.0.0.0 netEvents/sipAgent,appEvents/bridget700,dspEvents/mediaServer mediaServer 103 /usr/dcb/bin/convMS 0.0.0.0 appEvents/msDispatcher,netEvents/msDispatcher 1 #mediaServer 104 /usr/dcb/bin/convMS 0.0.0.0 appEvents/msDispatcher,netEvents/msDispatcher 2 #mediaServer 105 /usr/dcb/bin/convMS 0.0.0.0 appEvents/msDispatcher,netEvents/msDispatcher 3
3.2. Configure the Convedia CMS-6000 Media Server The following steps describe the administrative procedures for configuring the Convedia CMS-6000 Media Server to enable collaboration with the Avaya Meeting Exchange S6200 Application Server. For additional information regarding configuring the Convedia CMS-6000 Media Server, see Section 8, Reference 2. Step Description
3.6 Provision the SCC on the Convedia CMS-6000 Media Server as follows: • Establish an RS-232 connection from a services PC to the Convedia CMS-6000 Media
Server by connecting a serial cable to the front of the SCC card (slot 1). • Start a terminal server application, e.g., HyperTerminal on the services PC with the
following settings: o Speed: 9600 bps. o Data bits: 8 bits. o Parity: No parity. o Stop bit: 1 bit. o Flow control: none.
• Wait for the system to establish the connection, or press <Enter>.
Step Description
3.7 From the RS-232 Interface login screen that is displayed, log in to the Convedia CMS-6000 Media Server craft interface with the appropriate credentials.
3.9 From the RS-232 Interface Date and Time Menu that is displayed, configure settings for the date and time as follows.
• Set the Date to the current date. • Set the Time to the current time. • Set the UTC Offset to compensate for the location of the Convedia CMS-6000 Media
Server relative to the Universal Time Clock (UTC) or Greenwich Mean Time (GMT). Note: The UTC Offset is derived from the location of Convedia CMS-6000 Media Server relative to the UTC/GMT. Format is +|–hh:mm, where + represents the number of hours ahead of UTC, – is the number of hours behind UTC. For example, Moscow is +3:00, London is +0:00, New York is –5:00 and Los Angeles is –8:00.
• Save the settings by using <Tab> to navigate down to Save and Quit and press <Enter>.
Rs-232 Interface
Date and Time Menu
Date (YYYY/MM/DD): 2006/10/15Time (HH:MM): 14:27 UTC Offset:(+/-HH:MM): -5:00 Cancel Save and Quit
3.11 From the RS-232 Interface Network Topology Menu that is displayed, configure the network topology as follows.
• Set the Control Network to External by using the spacebar to toggle between values and press <Enter> to accept the value.
Note: An External Control Network is where MPC control interfaces have IP addresses on the external control subnet. The control agent communicates directly with an MPC through its control interface.
• Set the Topology Type to Flat by using the spacebar to toggle between values and press <Enter> to accept the value.
Note: A Flat Topology Type is where control and media share a single network segment.
• Save the settings by using <Tab> to navigate down to Save and Quit and press <Enter>.
Rs-232 Interface
Network Topology Menu
Control Network: External Topology Type: Flat Cancel Save and Quit
3.13 From the RS-232 Interface Network Menu that is displayed, configure network settings as follows.
• Administer network parameters used for control and management traffic on the Convedia CMS-6000 Media Server by specifying:
o A Hostname for the Convedia CMS-6000 Media Server. o An IP Address and Netmask for Port 1.
• Administer routing parameters used for remote control or management networks on the Convedia CMS-6000 Media Server by specifying:
o A Network IP address, Netmask and Gateway for Rte 1. Note: To indicate the default gateway, leave the Network IP address and Netmask blank (0.0.0.0). The Gateway must be on a directly connected network.
• Save the settings by using <Tab> to navigate down to Save and Quit and press <Enter>.
Hostname: ATAVAYA Port 1 (Ethernet 0) IP Address: 141.150.6.228 Port 1 (Ethernet 0) Netmask: 255.255.255.224 Rte 1 Network: 0.0.0.0 Rte 2 Network: 0.0.0.0 Rte 1 Netmask: 0.0.0.0 Rte 2 Netmask: 0.0.0.0 Rte 1 Gateway: 141.150.6.225 Rte 2 Gateway: 0.0.0.0 Cancel Save and Quit
3.14 From the RS-232 Interface Main Menu screen that is displayed, preserve the configuration administered in the previous steps by rebooting the Convedia CMS-6000 Media Server.
• Select Reboot and press <Enter>. o [Not Shown] A confirmation message displays to confirm the reboot. o [Not Shown] Use the <Tab> key to toggle to the YES option and press
<Enter>. o [Not Shown] Use the spacebar to toggle to the Choose the Restart with Current
Configuration option. o [Not Shown] A confirmation message displays to confirm the reboot. o [Not Shown] Use the <Tab> key to toggle to the YES option and press
<Enter>. • The media server restarts and the network settings are enabled.
Rs-232 Interface
Main Menu
Date and Time Network Settings Network Services Network Topology Reboot Quit
3.16 Administer settings for Audio Codec(s) on the Convedia CMS-6000 Media Server as follows: • Click Configuration Slot Configuration Configure Audio Codec List. • Select either the Slot Number for the MPC card or all (MPC cards) to which this
Audio Codec List will be applied. • Click Execute.
Note: Audio Codecs in the Audio Codec List are prioritized from First codec to Tenth codec.
3.17 Administer settings for MPC(s) on the Convedia CMS-6000 Media Server as follows: • Click Configuration Slot Configuration Configure MPC. • Select the Slot Number for the MPC. For these Application Notes, the MPC was
3.18 Configure the MPC in slot 2 on the Convedia CMS-6000 Media Server as displayed: • Enter a Hostname and IP Address for the Control Interface. • Enter IP Address, Subnet Mask, Connection Mode and Default Gateway
information for Media Ports 1 and 2. • Click on the Save Settings button when finished.
Note: Repeat from Step 3.17 to configure each MPC on the Convedia CMS-6000 Media Server. For these Application Notes, there is only one MPC.
3.3. Network File System The following steps describe the administrative procedures to enable Network File System (NFS) sharing between the Avaya Meeting Exchange S6200 Application Server and the Convedia CMS-6000 Media Server. In this configuration, the Avaya Meeting Exchange S6200 Application Server will function as the NFS server. This will allow playback of audio conference(s) recorded on the Convedia CMS-6000 Media Server from the Avaya Meeting Exchange S6200 Application Server.
3.3.1. Configure NFS on the Avaya Meeting Exchange S6200 Application Server
The following steps describe the administrative procedures to provision NFS on the Avaya Meeting Exchange S6200 Application Server. Step Description
3.19 Log in to the Avaya Meeting Exchange S6200 Application Server console to access the CLI with the appropriate credentials.
3.20 The NFS server communicates with the control interface on the Convedia CMS-6000 Media Server MPC. To resolve the IP address for the control interface on the Convedia CMS-6000 Media Server MPC, edit the hosts file as follows:
• cd to /etc • Edit the hosts file with a text editor, e.g., vi. • Add a line to the file to resolve the IP address of the control interface to the Convedia
CMS-6000 Media Server MPC in slot 2: o 141.150.6.229 mpc2
Where 141.150.6.229 and mpc2 are the IP address and hostname of the control interface assigned to the Convedia CMS-6000 Media Server MPC in Step 3.18.
3.21 To allow the Convedia CMS-6000 Media Server MPC to mount the /usr3/ipcb directory on the Avaya Meeting Exchange S6200 Application Server, edit the dfstab file as follows:
• cd to /etc/dfs • Edit the dfstab file with a text editor, e.g., vi. • Add a line to the file to assign read/write (rw) privileges to the directory /usr3/ipcb for
the Convedia CMS-6000 Media Server: o /usr/sbin/share -F nfs -o rw=mpc2 /usr3/ipcb
Where mpc2 is the hostname assigned to the Convedia CMS-6000 Media Server MPC in Step 3.20.
3.22 To configure the Avaya Meeting Exchange S6200 Application Server as an NFS server, edit the mediaServerInterface.cfg file as follows:
• cd to /usr/ipcb/config • Edit the mediaServerInterface.cfg file with a text editor, e.g., vi. • Add a line to the file to assign the Avaya Meeting Exchange Application Server as the
NFS server: o NFSServerIPAddress=192.168.13.101
Where 192.168.13.101 is the IP address assigned to the Avaya Meeting Exchange Application Server.
• Add a line to the file to assign the Convedia CMS-6000 Media Server as a media server:
o MediaServerIP_1=141.150.6.229 Where 141.150.6.229 is the IP address of the control interface assigned to the Convedia CMS-6000 Media Server MPC in Step 3.18.
Note: Multiple MPC cards on the Convedia CMS-6000 Media Server would each require an entry in the mediaServerInterface.cfg file. The requirement for successive entries is to increment the MediaServerIP_X variable by 1, e.g., MediaServerIP_2 would correspond to a second MPC, MediaServerIP_3 to a third, etc..
• Add a line to the file to assign a port to the Convedia CMS-6000 Media Server: o MediaServerInterfaceSipListenPort_1=5050
Note: Multiple MPC cards on the Convedia CMS-6000 Media Server would each require an entry for a unique port in the mediaServerInterface.cfg file. The requirement for the successive port entries are to decrease the port number by ten for each MPC card, e.g., the port number for a second MPC would be 5040, a third MPC would have a port entry of 5030, etc..
# This file contains the configuration information for the # Media Server Interface. This information includes the # IP Address for the NFS Server (where recordings are stored), # the IP address of the Media Server(may be more than 1), and # the udp port that the Media Server Interface code should # listen for SIP responses. # # NFS Server NFSServerIPAddress=192.168.13.101 # # MPC 1 on Convedia CMS-6000 Media Server (Control Port) MediaServerIP_1=141.150.6.229 MediaServerInterfaceSipListenPort_1=5050
3.23 From the /usr3 directory on the Avaya Meeting Exchange S6200 Application Server, verify the following symbolic link is present: confrp -> /usr3/ipcb/usr3/confrp. S6200App->pwd /usr3 S6200App->ls -l total 4 drwxr-xr-x 3 root dcb 1024 Jan 17 04:20 BACKUPS lrwxrwxrwx 1 root sys 22 Nov 30 19:01 confrp -> /usr3/ipcb/usr3/confrp drwxr-xr-x 5 root sys 96 Jun 29 2006 ipcb drwxrwxrwx 20 root root 1024 Nov 6 19:03 runtime drwxrwxr-x 2 root dcb 96 Oct 5 2005 savedroster
3.24 Reboot the Avaya Meeting Exchange S6200 Application Server for changes to take effect. Note: Rebooting the Avaya Meeting Exchange S6200 Application Server is service impacting. [S6800]> init 6
3.3.2. Configure NFS on the Convedia CMS-6000 Media Server The following steps describe the administrative procedures to provision NFS on the Convedia CMS-6000 Media Server. Step Description
3.25 Administer settings for NFS on the Convedia CMS-6000 Media Server MPC(s) via the web GUI as follows:
• Click Configuration Slot Configuration Configure NFS. • Select the Slot Number for the MPC to administer settings for NFS. For these
Application Notes, the MPC was placed in Slot number 2.
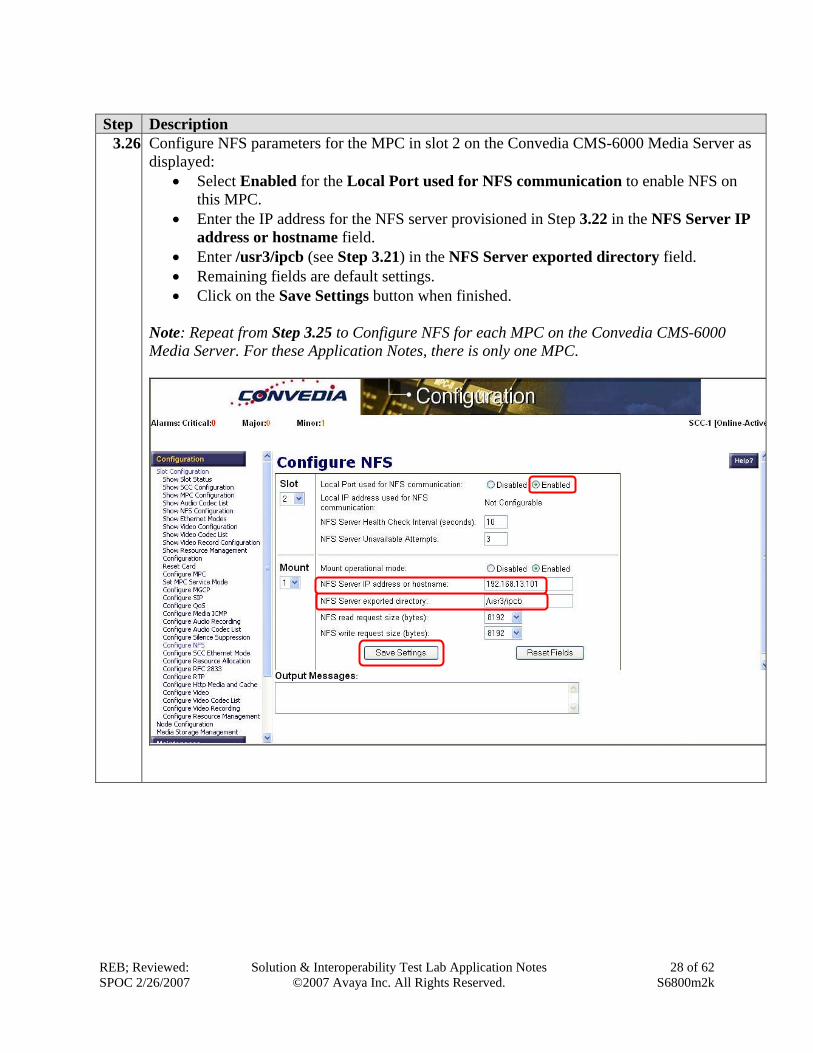
3.26 Configure NFS parameters for the MPC in slot 2 on the Convedia CMS-6000 Media Server as displayed:
• Select Enabled for the Local Port used for NFS communication to enable NFS on this MPC.
• Enter the IP address for the NFS server provisioned in Step 3.22 in the NFS Server IP address or hostname field.
• Enter /usr3/ipcb (see Step 3.21) in the NFS Server exported directory field. • Remaining fields are default settings. • Click on the Save Settings button when finished.
Note: Repeat from Step 3.25 to Configure NFS for each MPC on the Convedia CMS-6000 Media Server. For these Application Notes, there is only one MPC.
3.27 Reset the Convedia CMS-6000 Media Server MPC in slot 2 for changes to take effect as follows:
• Click Configuration Reset Card. • Select the slot number for the MPC to reset. For these Application Notes, the MPC was
placed in slot number 2. • Select Forced for the Type of reset operation. • Click Execute.
Note: If there is only one MPC in the Convedia CMS-6000 Media Server chassis, resetting the MPC is service impacting. If more than one MPC is present, resetting a single MPC would not be service impacting, as all traffic on the MPC being reset would fail over to an active MPC.
3.4. CBUTIL Utility The following steps provide examples of how to provision DIRECT and SCAN call functions by utilizing the cbutil utility on the Avaya Meeting Exchange S6200 Application Server. DID values (obtained from procedures in Step 3.3) are associated with call functions to access conferences provisioned on the Avaya Meeting Exchange S6200 Application Server. Step Description
3.28 To map DID values obtained in Step 3.3 to DNIS entries, run the cbutil utility as follows: • If not already logged on, log in to the Avaya Meeting Exchange S6200 Application
Server console to access the CLI with the appropriate credentials. • At the command prompt enter tcsh to set the UNIX shell on the Avaya Meeting
Exchange S6200 Application Server. • At the command prompt run the cbutil utility to verify DNIS entries provisioned on the
Avaya Meeting Exchange S6200 Application Server. Note: A command line utility, cbutil enables administrators to assign a specific annunciator message, line name, company name, system function, reservation group and prompt sets to a maximum of 30,000 DNIS or DID entries. The Avaya Meeting Exchange S6200 Application Server parses these entries in numerically ascending order, with the wildcard character “?” last in a series. For example, 129? follows 1299. The last entry in the table consists entirely of wildcard characters. S6200App->cbutil cbutil Copyright 2004 Avaya, Inc. All rights reserved. Usage: cbutil <command> [command-specific args...] where <command> may be one of: add Add an entry to the Call Branding table remove Remove an entry from the Call Branding table update Update an entry in the Call Branding table lookup Display an entry in the Call Branding table count Display the number of entries in the Call Branding table list List entries in the Call Branding table dnissize Set system configured max dnis length (1-16) Note: This command should only be used when the bridge is not running. Use "cbutil<command> -help" to get help on a specific command
3.29 Enable Dial-In access (via passcode) to conferences provisioned on the Avaya Meeting Exchange S6200 Application Server as follows:
• Add a DNIS entry for a scan call function corresponding to DID 710 by entering the following command at the command prompt: cbutil add <dnis> <rg> <msg> <ps> <ucps> <func> [-l <ln> -c <cn>], where the variables for add command is defined as follows:
o <dnis> DNIS o <rg> Reservation Group o <msg> Annunciator message number o <ps> Prompt Set number (0-20) o <ucps> Use Conference Prompt Set (y/n) o <func> One of: DIRECT/SCAN/ENTER/HANGUP/AUTOVL/FLEX o -l <"ln"> Optional line name to associate with caller o -c <"cn"> Optional company name to associate with caller
S6200App->cbutil add 710 0 1 1 n scan cbutil Copyright 2004 Avaya, Inc. All rights reserved.
3.30 Enable Dial-In access (as moderator, without entering a passcode) to conferences provisioned on the Avaya Meeting Exchange S6200 Application Server by adding a DNIS entry for a direct call function corresponding to DID 777. S6200App->cbutil add 777 0 301 1 n direct cbutil Copyright 2004 Avaya, Inc. All rights reserved.
3.31 At the command prompt enter cbutil list to verify the DNIS entries provisioned in Step 3.29 and Step 3.30 were provisioned and entered correctly. Note: The last entry in the call brand table is the wild card entry “???”. This entry captures any wrong number (e.g., unmatched DID values) and places the call into enter queue for operator assistance. S6200App->cbutil list cbutil Copyright 2004 Avaya, Inc. All rights reserved. DNIS Grp Msg PS CP Function Line Name Company Name ---------------- --- --- --- -- -------- -------------------- ----------------- 710 0 1 1 N SCAN 777 0 301 1 N DIRECT ??? 0 208 1 N ENTER
3.5. Bridge Talk The following steps utilize the Avaya Bridge Talk application to provision a sample conference on the Avaya Meeting Exchange S6200 Application Server. This sample conference is utilized in conjunction with the DIRECT and SCAN call functions provisioned in Section 3.4 to enable both Dial-In and Dial-Out access to audio conferencing for endpoints on the PSTN. Note: If any of the features displayed in the Avaya Bridge Talk screen captures are not present, contact an authorized Avaya sales representative to make the appropriate changes. Step Description
3.32 Invoke the Avaya Bridge Talk application as follows: • [Not Shown] Double-click on the desktop icon from a PC loaded with the Avaya Bridge
Talk application and with network connectivity to the Avaya Meeting Exchange S6200 Application Server.
• Enter the IP address of the Avaya Meeting Exchange S6200 Application Server (192.168.13.101) in the Bridge field.
• Enter the appropriate credentials in the Sign-In and Password fields.
3.33 Provision a dial list that is utilized for Dial-Out (e.g., Blast dial and Fast Dial) from the Avaya Meeting Exchange S6200 Application Server. From the Avaya Bridge Talk Menu Bar, click Fast Dial New.
3.34 From the New Dial List window that is displayed: • Enter a descriptive label in the Name field. • Enable conference participants on the dial list to enter the conference without a
passcode by checking the Directly to Conf box as displayed. • Add entries to the dial list by clicking on the Add button for each participant.
o [Optional] Moderator privileges may be granted to a conference participant by checking the Moderator box.
• See Section 8, Reference 3 for provisioning the remaining fields in this screen. • When finished, click on the Save button on the bottom of the screen.
3.37 From the Schedule Conference window that is displayed, provision a conference as follows: • Enter a unique Conferee Code to allow participants access to this conference. • Enter a unique Moderator Code to allow participants access to this conference with
moderator privileges. Enable moderator access without a passcode for this conference call by configuring the following:
o The Moderator Code “777” must have an associated direct call function provisioned for “777” (see Step 3.30).
Note: This conference remains open for participants to enter as either moderator or participant by entering the appropriate code when prompted.
• Enter a descriptive label in the Conference Name field. • Administer settings to enable an Auto Blast dial by setting Auto Blast to Auto and
selecting the dial list provisioned in Step 3.34. o [Not Shown] Select a dial list by clicking on the Dial List button select a
dial list from the Create, Select or Edit Dial List window that is displayed click on the Select button.
• See Section 8, Reference 3 for provisioning the remaining fields in this screen. • When finished, click on the OK button on the bottom of the screen.
4. Configure the AudioCodes Mediant 2000 Media Gateway The following sections describe the steps for configuring the SIP and PSTN trunks and call routing for the AudioCodes Mediant 2000 Media Gateway. This configuration will enable the AudioCodes Mediant 2000 Media Gateway to interoperate with both the Avaya Meeting Exchange S6800 Conferencing Server and the PSTN (see Section 1, Figure 1). Configuration is performed using the embedded web server, which supports gateway configuration, including loading of configuration files. The Embedded Web Server can be accessed from a standard web browser. Specifically, users can employ this facility to set up the gateway configuration parameters. Users also have the option to remotely reset the gateway and to permanently apply the new set of parameters. Step Description
4.1 Access the embedded web server as follows: • Open a web browser and enter the following URL:
http://< IP address of the AudioCodes Mediant 2000 Media Gateway> • Log in to the AudioCodes Mediant 2000 Media Gateway with the appropriate
4.1. Configure DS1/T1 Trunking The following steps describe the administrative procedures for configuring DS1/T1 trunking between the AudioCodes Mediant 2000 Media Gateway and the PSTN. Step Description
4.2 Administer Trunk Settings for the DS1 interface(s) to enable connectivity to the PSTN as displayed:
• Click on Advanced Configuration. • Click on PSTN Settings. • Click the Trunk Number to provision. • [Not Shown] Click the Stop Trunk button to modify the selected trunk’s parameters.
o The status of the parameter ‘Trunk Configuration State’ changes to Inactive. o The parameters are no longer grayed and can be modified. o The Apply Trunk Settings button appears at the bottom of the screen.
• Configure Trunk Settings for this DS1 interface to enable T1 CAS connectivity to the PSTN according to requirements defined by the PSTN service provider.
• Click on the Apply Trunk Settings button to apply changes to this trunk.
4.3 Administer Trunk Settings for the T1 interface(s) to enable connectivity to the PSTN as displayed:
• Click on Advanced Configuration. • Click on PSTN Settings. • Click the Trunk Number to provision. • [Not Shown] Click the Stop Trunk button to modify the selected trunk’s parameters.
o The status of the parameter ‘Trunk Configuration State’ changes to Inactive. o The parameters are no longer grayed and can be modified. o The Apply Trunk Settings button appears at the bottom of the screen.
• Configure Trunk Settings for this DS1 interface to enable T1 ISDN-PRI connectivity to the PSTN according to requirements defined by the PSTN service provider.
• Click on the Apply Trunk Settings button to apply changes to this trunk.
4.4 Administer Media Settings to enable CAS connectivity to the PSTN as displayed: • Click on Advanced Configuration. • Click on Media Settings Voice Settings. • Configure Media Settings for to enable T1 CAS connectivity to the PSTN according to
requirements defined by the PSTN service provider. • Click on the Submit button to apply changes.
4.2. Configure SIP and T1 Trunking The following steps describe the administrative procedures for configuring SIP and T1 trunking, as well as the call routing rules to enable signaling/media connectivity between the Avaya Meeting Exchange S6800 Conferencing Server and the PSTN. Step Description
4.5 To enable IP connectivity between the AudioCodes Mediant 2000 Media Gateway and the Avaya Meeting Exchange S6800 Conferencing Server, administer IP Settings as displayed:
• Click on Advanced Configuration. • Click on Network Settings IP Settings. • Set the IP Address, Subnet Mask and Default Gateway Address accordingly. • Remaining fields are default settings. • Click on the Submit button to apply changes.
4.6 To enable SIP connectivity with the Avaya Meeting Exchange S6200 Application Server, administer General Parameters as displayed:
• Click on Protocol Management. • Click on Protocol Definition General Parameters. • Set the SIP Transport Type, SIP UDP Local Port and SIP Destination Port to
enable SIP/UDP connectivity with the Avaya Meeting Exchange S6200 Application Server (see Step 3.2 and Step 3.4).
• Remaining fields are default settings. • Click on the Submit button to apply changes.
4.7 Administer settings for Proxy & Registration as displayed: • Click on Protocol Management. • Click on Protocol Definition Proxy & Registration. • Select Don't Use Proxy for the Enable Proxy entry.
Note: SIP connectivity between the AudioCodes Mediant 2000 Media Gateway and the Avaya Meeting Exchange S6200 Application Server is direct.
• Remaining fields are default settings. • Click on the Submit button to apply changes.
4.8 Administer codec preferences and attributes for the SIP trunk between the AudioCodes Mediant 2000 Media Gateway and the Avaya Meeting Exchange S6200 Application Server as follows:
• Click on Protocol Management. • Click on Protocol Definition Coders. • Add entries for codecs that are supported on the Convedia CMS-6000 Media Server
(see Step 3.16) as displayed: o Select a Coder Name that is compatible with the Convedia CMS-6000 Media
Server. o Remaining fields are default settings.
• Click on the Submit button to apply changes. Note: The first coder is the highest priority coder and is used by the AudioCodes Mediant 2000 Media Gateway whenever possible. If the far end SIP User Agent cannot use the coder assigned as the first coder, the gateway attempts to use the next coder and so forth.
4.9 Administer Trunk Group(s) to assign profiles to the AudioCodes Mediant 2000 Media Gateway’s T1 B-channels as follows:
• [Not Shown] Click on Protocol Management. • [Not Shown] Click on Trunk Group. • Add an entry for a trunk group corresponding to a T1 ISDN-PRI connection between
the AudioCodes Mediant 2000 Media Gateway and the PSTN as displayed: o Set the From Trunk to 1 (first T1) and the To Trunk to 1 (last T1); thus,
logically provisioning this trunk with all available B-channels for this T1 interface.
o Set the Channels range from 1-23 (first-last B-channel on this T1). o The Phone Number field is optional. The logical numbers defined in this field
are used when an incoming PSTN/PBX call does not contain the calling number or called number. In this case, the entry in the Phone Number field is used to replace them.
o Set the Trunk Group ID to 1. • Add an entry for a trunk group corresponding to a T1 CAS connection between the
AudioCodes Mediant 2000 Media Gateway and the PSTN as displayed: o Set the From Trunk to 2 and the To Trunk to 2. o Set the Channels range from 1-24. o Set the Trunk Group ID to 2.
• [Button Not Shown] Click on the Submit button to apply changes. Note: These profiles are logical entities referred to as trunk group(s) that are used for routing IP to telephone calls with common rules, e.g., methods in which new calls are assigned to B-channels within each trunk group.
4.10 Administer Trunk Group Settings to determine the method in which new calls are assigned to B-channels within a trunk group as follows:
• [Not Shown] Click on Protocol Management. • [Not Shown] Click on Trunk Group Settings. • Add an entry for trunk group settings corresponding to the T1 ISDN-PRI trunk group
provisioned in Step 4.9 as displayed: o Set the Trunk Group ID to the Trunk Group ID assigned to the T1 ISDN-PRI
trunk provisioned in Step 4.9. o Set the Channel Select Mode to determine the method in which new calls are
assigned to B-channels within a trunk group. For these Application Notes, this trunk group is administered to select B-channels in Ascending mode (which supplants the global setting for the Channel Select Mode in Step 4.6), while the PSTN selects B-channels in a descending fashion.
Note: To reduce the probability of glare (glare occurs when both sides of a trunk group select the same B-channel for call initiation) on this trunk, the network needs to be administered so both sides of the interface select B-channels from opposite ends of the trunk group. This is called linear hunting, ascending or descending. For example, on a 24B (or 23B+D for ISDN-PRI) trunk group, the user side could be administered to select B-channels starting at channel 1 (ascending) while the network side (PSTN) would be administered to start selecting B-channels at channel 24 (or 23 for ISDN-PRI).
• Add an entry for trunk group settings corresponding to the T1 CAS trunk group provisioned in Step 4.9 as displayed:
o Set the Trunk Group ID to the Trunk Group ID assigned to the T1 CAS trunk provisioned in Step 4.9.
o Set the Channel Select Mode to Ascending. • [Button Not Shown] Click on the Submit button to apply changes.
4.11 Administer call routing rule(s) that are applied to calls originating from the PSTN to the Avaya Meeting Exchange S6800 Conferencing Server by adding Tel to IP Group Routing rule(s) to as follows:
• [Not Shown] Click on Protocol Management. • [Not Shown] Click on Routing Tables Tel to IP Group Routing. • Add an entry to enable Dial-In to the Avaya Meeting Exchange S6800 Conferencing
Server from the PSTN as displayed: o Enter a rule in the Dest. Phone Prefix field that matches the pattern of
incoming calls to the Avaya Meeting Exchange S6800 Conferencing Server from the PSTN. For these Application Notes, the rule * is utilized, where * is a wildcard and will match any digit(s), thus routing all calls to the Avaya Meeting Exchange S6800 Conferencing Server from the PSTN.
o Enter an * in the Source Phone Prefix field to allow routing for any source telephone number Dialing-In to the Avaya Meeting Exchange S6800 Conferencing Server from the PSTN.
o Enter the IP address of the Avaya Meeting Exchange S6200 Application Server (see Step 3.2) in the Dest. IP Address field.
• [Button Not Shown] Click on the Submit button to apply changes.
4.12 Administer call routing rule(s) that are applied to calls originating from the Avaya Meeting Exchange S6800 Conferencing Server to the PSTN by adding IP to Hunt Group Routing rule(s) to as follows:
• [Not Shown] Click on Protocol Management. • [Not Shown] Click on Routing Tables IP to Hunt Group Routing. • Add an entry to enable Dial-Out from the Avaya Meeting Exchange S6800
Conferencing Server to the PSTN over the T1 ISDN-PRI trunk group administered in Step 4.9 as displayed:
o Enter a rule in the Dest. Phone Prefix field that matches the pattern of outgoing calls from the Avaya Meeting Exchange S6800 Conferencing Server to the PSTN via the T1 ISDN-PRI trunk group. For these Application Notes, all calls from the Avaya Meeting Exchange S6800 Conferencing Server to the PSTN via ISDN-PRI trunking are placed to telephone numbers with the leading digits 31. The rule 31* is utilized, where * is a wildcard and will match any remaining digit(s).
o Enter an * in the Source Phone Prefix and Source IP Address fields to allow routing for any party Dialing-Out from the Avaya Meeting Exchange S6800 Conferencing Server to the PSTN.
o Enter the Trunk Group ID for the T1 ISDN-PRI trunk group provisioned in Step 4.9 in the Trunk Group ID field.
• Add an entry to enable Dial-Out from the Avaya Meeting Exchange S6800 Conferencing Server to the PSTN over the T1 CAS trunk group administered in Step 4.9 as displayed:
o Enter a rule in the Dest. Phone Prefix field that matches the pattern of outgoing calls from the Avaya Meeting Exchange S6800 Conferencing Server to the PSTN via the T1 CAS trunk group. For these Application Notes, all calls from the Avaya Meeting Exchange S6800 Conferencing Server to the PSTN via CAS trunking are placed to telephone numbers with the leading digits 32. The rule 32* is utilized, where * is a wildcard and will match any remaining digit(s).
o Enter an * in the Source Phone Prefix and Source IP Address fields. o Enter the Trunk Group ID for the T1 CAS trunk group provisioned in Step 4.9
in the Trunk Group ID field. • [Button Not Shown] Click on the Submit button to apply changes.
5.1. General Test Approach The general test approach was to place calls between the Avaya Meeting Exchange S6800 Conferencing Server and the PSTN via the AudioCodes Mediant 2000 Media Gateway utilizing the network configuration displayed in Section1, Figure 1. The main objectives were to verify the following:
• Dial-In Conferencing: o DNIS direct call function, where conference participants enter a conference as
moderator, without entering a participant-access-code (passcode). o Scan call function, where conference participants enter a conference with a valid
passcode. • Dial-Out Conferencing:
o Blast dial Auto, where a conference participant enters a conference via a DNIS
direct call function and autonomously invokes a Blast dial to a pre-provisioned dial list of one or more participants.
Manual, where a conference participant is already in a conference as moderator and invokes a Blast dial (by entering *92) to a pre-provisioned dial list of one or more participants.
o Originator Dial-Out, where a conference participant is already in a conference as moderator and invokes a Dial-Out (by entering *1) to a single participant
o Operator Fast Dial, where an operator can Dial-Out to a pre-provisioned dial list of one or more participants.
• Operator Dial-Out to establish an Audio Path. • Operator Dial-In to establish an Audio Path. • Dial-Out to an FDAPI channel for audio recording. • Line Transfer invoked from Avaya Bridge Talk. • Conference Transfer invoked from Avaya Bridge Talk. • Touchtone commands {*0 Request Help, *2 Start/stop conference recording, *3
Start/stop playback of conference recording, *5 Toggle lecture on/off, *6 Toggle mute on/off, *7 Toggle conference security on/off, *8 Play the roster of participant name(s) during a conference, *93X (Where X is defined from 1 to 9) to invoke a subconference, *930 (Entered from a subconference) to rejoin the main conference, *93# (Entered from a subconference) to bring all conference participants back to the main conference, ## End the conference}.
• The following codecs were verified: o G711MU, G.711A, G.729.
5.2. Test Results o All test cases, as defined by the general test approach, passed successfully.
6. Verification Steps The following steps were used to verify the administrative steps presented in these Application Notes and are applicable for similar configurations in the field. The verification steps in this section validated the following:
• The Avaya Meeting Exchange S6800 Conferencing Server configuration as displayed in Section 1, Figure 2 (verified in Step 6.1 and Step 6.2).
• NFS between the Avaya Meeting Exchange S6200 Application Server and the Convedia CMS-6000 Media Server MPC (verified in Step 6.3 - Step 6.5).
• Bi-directional end to end layer-3 connectivity between the MPC in slot 2 on the Convedia CMS-6000 Media Server and the AudioCodes Mediant 2000 Media Gateway (verified in Step 6.6).
• Verify that the DS1 trunks are up on the AudioCodes Mediant 2000 Media Gateway by verifying the icons for those entries on the Trunk & Channel Status screen are green (verified in Step 6.10).
• Verify successful inbound and outbound calls between the Avaya Meeting Exchange S6800 Conferencing Server and the PSTN (verified in Step 6.7 - Step 6.12).
6.1 Verify all conferencing related processes are running on the Avaya Meeting Exchange S6800 Conferencing Server as follows:
• Log in to the Avaya Meeting Exchange S6200 Application Server console to access the CLI with the appropriate credentials.
• cd to /usr/dcb/bin • At the command prompt, run the script dcbps and confirm all processes are running by
verifying an associated Process ID (PID) for each process. Note: The process, convMS is running, verifying the Convedia CMS-6000 is functioning as a media server in the Avaya S6800 Conferencing Server architecture (see Section 1, Figure 2).
6.2 Verify SIP connectivity between the Avaya Meeting Exchange S6800 Conferencing Server and the Convedia CMS-6000 Media Server. The call flow was captured from a mirrored port of the Avaya Meeting Exchange S6200 Application Server’s Ethernet interface, utilizing a network protocol analyzer and shows the “keep alive” SIP message set that is exchanged between the Avaya Meeting Exchange S6200 Application Server (192.168.13.101) and the control port on the Convedia CMS-6000 Media Server MPC in slot 2 (141.150.6.229).
6.3 Verify that the NFS server is mounted on the Convedia CMS-6000 Media Server MPC as follows:
• Telnet to the Convedia SCC console (141.150.6.228, provisioned in Step 3.13) and log in to access the SCC CLI with the appropriate credentials.
• From the Convedia SCC CLI command prompt: o [Not Shown] Enter the command, telnet mpc2 (the hostname for control
interface on the MPC card in slot 2 provisioned in Step 3.18) and log in to the console to access the MPC CLI with the appropriate credentials.
• From the Convedia MPC CLI command prompt, change directory to /mnt and list files to verify the NFS server is mounted on this Convedia CMS-6000 Media Server MPC.
[mpc2]$ cd /mnt [mpc2]$ ls -l total 1 lrwxrwxrwx 1 root 23 Jan 16 10:32 192.168.13.101 -> /mnt/pfa_192.168.13.101 drwxrwxrwx 7 root 512 Dec 31 1999 flashdisk drwxrwxrwx 16 root 512 Dec 20 2005 nvramdisk drwxr-xr-x 5 root 96 Jun 29 2006 pfa_192.168.13.101 drwxrwxrwx 14 root 512 Nov 6 2006 ramdisk
6.4 Verify write privileges to the NFS server from the mount point on the Convedia CMS-6000 Media Server MPC as follows:
• [Not Shown] From /mnt, change directory to pfa_192.168.13.101/usr3/confrp and list files to verify the directory is empty.
• Create a file that does not already exist on the on the NFS server. • List the files in pfa_192.168.13.101/usr3/confrp and verify newly created file is
present. [mpc2]$ touch test.NFS [mpc2]$ ls -l -rw-r--r-- 1 admin 0 Jan 16 15:11 test.NFS
6.5 From the NFS server, verify the file created in Step 6.4 from the mount point on the Convedia CMS-6000 Media Server MPC is present in /usr3/ipcb/usr3/confrp. S6200App->pwd /usr3/ipcb/usr3/confrp S6200App->ls -l total 0 -rw-r--r-- 1 500 500 0 Jan 16 15:11 test.NFS
6.6 Verify bi-directional end to end layer-3 connectivity between the MPC in slot 2 on the Convedia CMS-6000 Media Server and the AudioCodes Mediant 2000 Media Gateway using ping or another network diagnostic tool. Bi-directional end to end layer-3 connectivity between the MPC in slot 2 on the Convedia CMS-6000 Media Server and the AudioCodes Mediant 2000 Media Gateway implies a bi-directional audio path, e.g., layer-3 connectivity in one direction may imply one-way audio. Verify bi-directional layer-3 connectivity between the MPC in slot 2 on the Convedia CMS-6000 Media Server and the AudioCodes Mediant 2000 Media Gateway as follows:
• From the MPC in slot 2 on the Convedia CMS-6000 Media Server, verify layer-3 connectivity to the AudioCodes Mediant 2000 Media Gateway.
• From the AudioCodes Mediant 2000 Media Gateway verify layer-3 connectivity to the MPC in slot 2 on the Convedia CMS-6000 Media Server.
6.1. Verify Call Routing The following steps utilize the network configuration displayed in Section1, Figure 1 to verify the general test approach defined in Section 6. Step Description
6.7 The purpose of this step (and Step 6.8) is to obtain a baseline for the number of ports created on the MPC in slot 2 on the Convedia CMS-6000 Media Server prior to the scenario invoked in Step 6.9. Verify port utilization on the Convedia CMS-6000 Media Server MPC in slot 2 via the web GUI as follows:
• [Optional, Not Shown] Reset statistics for the MPC card in slot 2 as follows: o Click Configuration Performance Mgt Reset Statistics. o Select the Slot Number for the MPC. For these Application Notes, the MPC
was placed in Slot number 2. o Click Execute and wait for the message Statistics for card in slot 2 have been
reset to display in the Output Messages window. • Click Configuration Performance Mgt Show Real-Time Statistics. • Select the Slot Number for the MPC. For these Application Notes, the MPC was
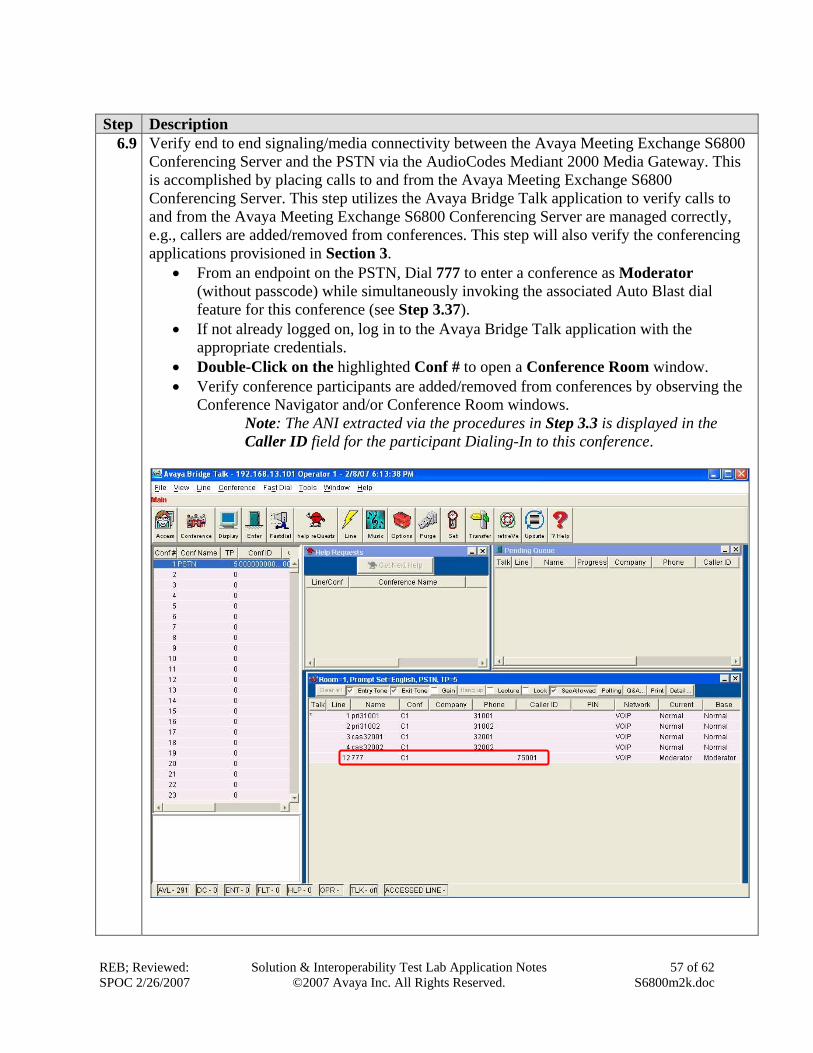
6.9 Verify end to end signaling/media connectivity between the Avaya Meeting Exchange S6800 Conferencing Server and the PSTN via the AudioCodes Mediant 2000 Media Gateway. This is accomplished by placing calls to and from the Avaya Meeting Exchange S6800 Conferencing Server. This step utilizes the Avaya Bridge Talk application to verify calls to and from the Avaya Meeting Exchange S6800 Conferencing Server are managed correctly, e.g., callers are added/removed from conferences. This step will also verify the conferencing applications provisioned in Section 3.
• From an endpoint on the PSTN, Dial 777 to enter a conference as Moderator (without passcode) while simultaneously invoking the associated Auto Blast dial feature for this conference (see Step 3.37).
• If not already logged on, log in to the Avaya Bridge Talk application with the appropriate credentials.
• Double-Click on the highlighted Conf # to open a Conference Room window. • Verify conference participants are added/removed from conferences by observing the
Conference Navigator and/or Conference Room windows. Note: The ANI extracted via the procedures in Step 3.3 is displayed in the Caller ID field for the participant Dialing-In to this conference.
6.10 Verify ISDN Trunk & Channel Status on the AudioCodes Mediant 2000 Media Gateway as follows:
• Open a web browser and enter the following URL: http://< IP address of the AudioCodes Mediant 2000 Media Gateway>
• Log in to the AudioCodes Mediant 2000 Media Gateway with the appropriate credentials.
• Click on the icon to view Trunk & Channel Status. Note: The Trunk & Channel Status displays Active – OK for the DS1s provisioned in Section 4.
• This screen capture also depicts the channel selection pattern for the five Active channels on this trunk that are associated with the scenario invoked in Step 6.9.
Note: The PSTN is administered to select channels in a descending pattern over the ISDN-PRI trunk between the PSTN and the AudioCodes Mediant 2000 Media Gateway. This display shows Channel 23 on Trunk 1 is selected by the PSTN for Dial-In to the Avaya Meeting Exchange S6800 Conferencing Server. Channels 1 and 2 on Trunk 1 are selected by the AudioCodes Mediant 2000 Media Gateway to Dial-Out to the PSTN over the T1 ISDN-PRI trunk administered in Step 4.9. Channels 1 and 2 on Trunk 2 are selected by the AudioCodes Mediant 2000 Media Gateway to Dial-Out to the PSTN over the T1 CAS trunk administered in Step 4.9.
6.11 The following SIP call flow displays the moderator Dial-In plus Auto Blast dial scenario invoked in Step 6.9. The call flow was captured from a mirrored port of the Avaya Meeting Exchange S6200 Application Server’s Ethernet interface, utilizing a network protocol analyzer and shows SIP signaling between:
• The AudioCodes Mediant 2000 Media Gateway (192.168.11.121). • The Avaya Meeting Exchange S6200 Application Server (192.168.13.101). • The control port on the Convedia CMS-6000 Media Server MPC in slot 2
(141.150.6.229). Note: For brevity, the Blast dial to only one of the endpoints in the Dial List provisioned in Step 3.34 is displayed. The user field 001s6800 provisioned in Step 3.2 present in the From header field. The dialed number 31001 is present in the To header field (see Step 3.4).
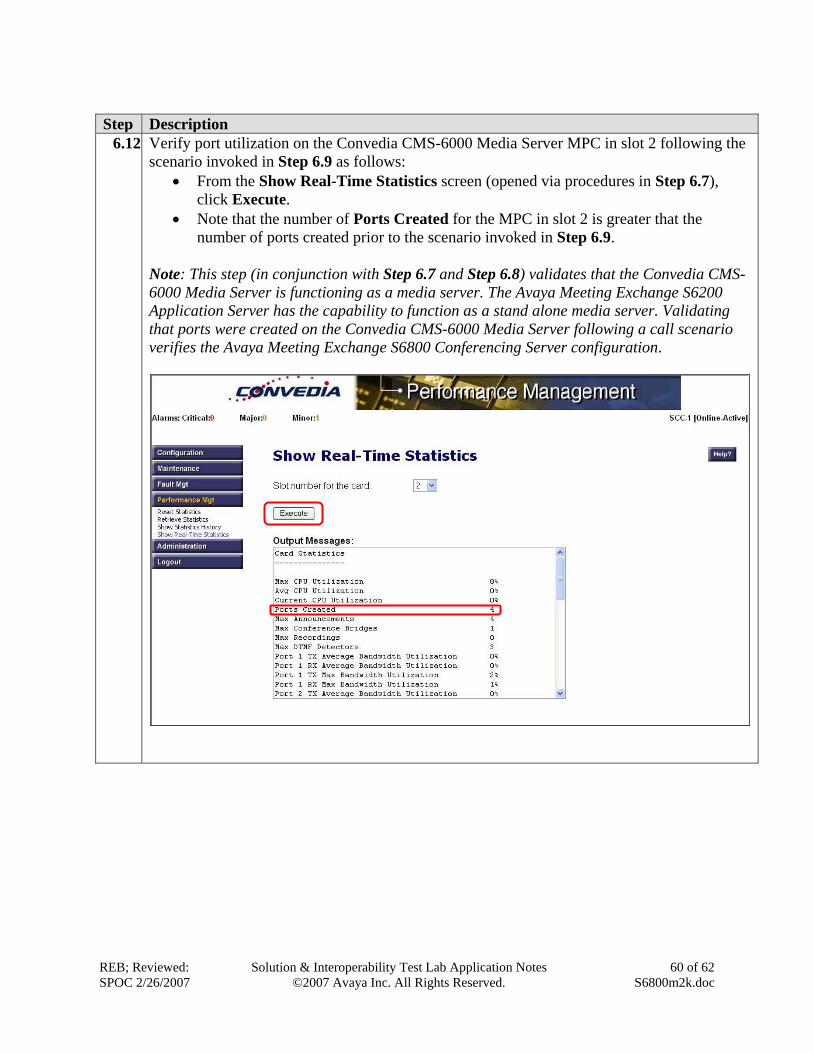
6.12 Verify port utilization on the Convedia CMS-6000 Media Server MPC in slot 2 following the scenario invoked in Step 6.9 as follows:
• From the Show Real-Time Statistics screen (opened via procedures in Step 6.7), click Execute.
• Note that the number of Ports Created for the MPC in slot 2 is greater that the number of ports created prior to the scenario invoked in Step 6.9.
Note: This step (in conjunction with Step 6.7 and Step 6.8) validates that the Convedia CMS-6000 Media Server is functioning as a media server. The Avaya Meeting Exchange S6200 Application Server has the capability to function as a stand alone media server. Validating that ports were created on the Convedia CMS-6000 Media Server following a call scenario verifies the Avaya Meeting Exchange S6800 Conferencing Server configuration.
7. Conclusion These Application Notes presented a compliance-tested solution comprised of the Avaya Meeting Exchange S6800 Conferencing Server and the AudioCodes Mediant 2000 Media Gateway. This solution enables connectivity between the Avaya Meeting Exchange S6800 Conferencing Server and the PSTN via the AudioCodes Mediant 2000 Media Gateway.
8. Additional References Avaya references, available at http://support.avaya.com
1. Meeting Exchange 4.1 Administration and Maintenance S6200/S6800 Media Server, Issue 1, Doc ID 04-601168, July 2006.
2. Meeting Exchange 4.1 Configuring S6200, S6500, and S6800 Conferencing Servers, Issue 1, Doc ID 04-601338, July 2006.
3. Avaya Meeting Exchange Groupware Edition Version 4.1 User’s Guide for Bridge Talk, Doc ID 04-600878, Issue 2, July 2006.
AudioCodes references, available at http://www.audiocodes.com