Abstract These Application Notes describe the procedure required for configuring the Avaya one-X G10 PSTN Gateway to support the provisioning and management of Avaya one-X Quick Edition IP Telephones as a small office/retail store solution for locations with up to 10 employees. Procedures for the staging of Avaya IP Telephones configured with the Avaya one-X Quick Edition software will also be discussed in these Application Notes.
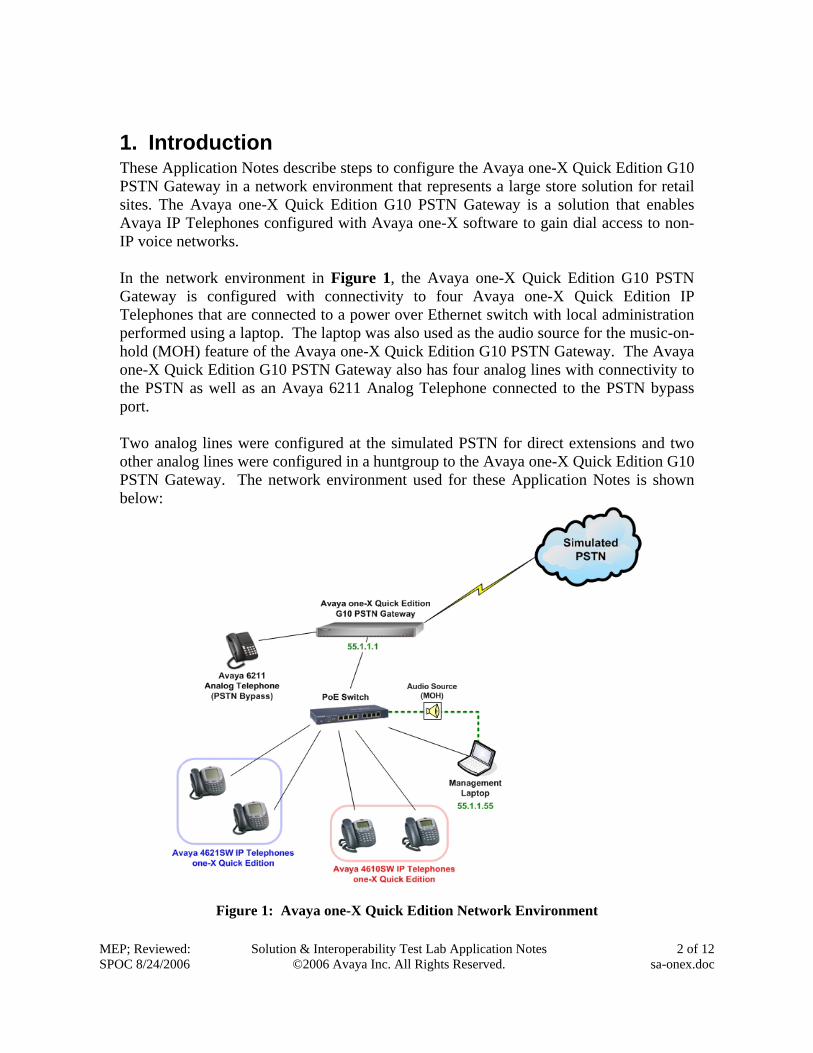
1. Introduction These Application Notes describe steps to configure the Avaya one-X Quick Edition G10 PSTN Gateway in a network environment that represents a large store solution for retail sites. The Avaya one-X Quick Edition G10 PSTN Gateway is a solution that enables Avaya IP Telephones configured with Avaya one-X software to gain dial access to non-IP voice networks. In the network environment in Figure 1, the Avaya one-X Quick Edition G10 PSTN Gateway is configured with connectivity to four Avaya one-X Quick Edition IP Telephones that are connected to a power over Ethernet switch with local administration performed using a laptop. The laptop was also used as the audio source for the music-on-hold (MOH) feature of the Avaya one-X Quick Edition G10 PSTN Gateway. The Avaya one-X Quick Edition G10 PSTN Gateway also has four analog lines with connectivity to the PSTN as well as an Avaya 6211 Analog Telephone connected to the PSTN bypass port. Two analog lines were configured at the simulated PSTN for direct extensions and two other analog lines were configured in a huntgroup to the Avaya one-X Quick Edition G10 PSTN Gateway. The network environment used for these Application Notes is shown below:
2. Equipment and Software Validated The following equipment and software from the above network configuration were used in these Application Notes for validation:
Equipment Software
Avaya one-X Quick Edition G10 PSTN Gateway 6.0.3
Avaya 4621SW IP Telephone - Avaya one-X Quick Edition 6.0.2
Avaya 4610SW IP Telephone - Avaya one-X Quick Edition 6.0.2
Avaya 6211 Analog Telephone n/a
3. Avaya one-X Quick Edition IP Telephone Approach The Avaya one-X Quick Edition IP Telephones use broadcast messages to discover other local Avaya one-X peers and establish association with an Avaya one-X Quick Edition G10 PSTN Gateway. All Avaya one-X Quick Edition IP Telephones were given a static IP configuration in the network environment illustrated in Figure 1. Listed below are steps to manually change the network address settings for the Avaya one-X Quick Edition IP Telephone:
1. From the main screen on the Avaya one-X Quick Edition IP Telephone, select the softkey for System Options > Network Options.
2. From the Network Options menu, select IP Address.
3. Select the Chg softkey and assign an IP address that will have local connectivity
to the Avaya one-X Quick Edition G10 PSTN Gateway and select the Next softkey.
4. Enter the network mask and select the Next softkey.
5. Enter the IP address of the default gateway and select the Next softkey.
6. (Optional) Enter the IP address of the DNS server and select the Next softkey
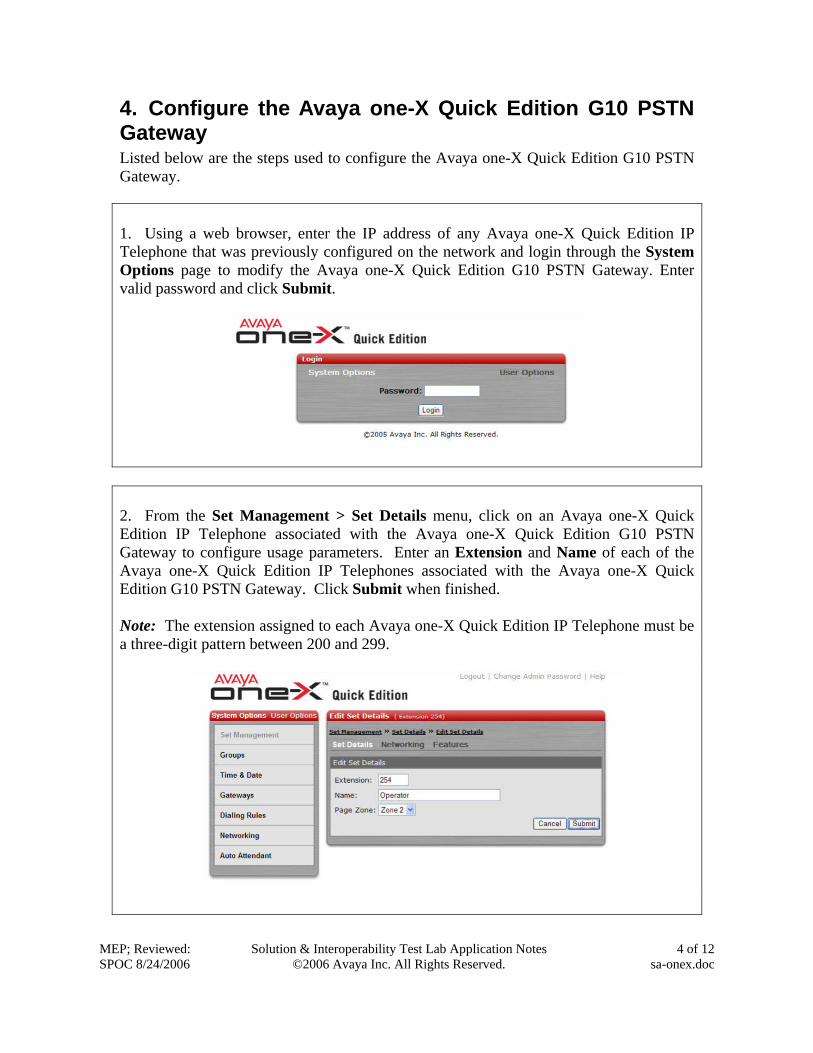
4. Configure the Avaya one-X Quick Edition G10 PSTN Gateway Listed below are the steps used to configure the Avaya one-X Quick Edition G10 PSTN Gateway. 1. Using a web browser, enter the IP address of any Avaya one-X Quick Edition IP Telephone that was previously configured on the network and login through the System Options page to modify the Avaya one-X Quick Edition G10 PSTN Gateway. Enter valid password and click Submit.
2. From the Set Management > Set Details menu, click on an Avaya one-X Quick Edition IP Telephone associated with the Avaya one-X Quick Edition G10 PSTN Gateway to configure usage parameters. Enter an Extension and Name of each of the Avaya one-X Quick Edition IP Telephones associated with the Avaya one-X Quick Edition G10 PSTN Gateway. Click Submit when finished. Note: The extension assigned to each Avaya one-X Quick Edition IP Telephone must be a three-digit pattern between 200 and 299.
3. From the Groups menu, click on the Add Group link to configure an access group of Avaya one-X Quick Edition IP Telephones on the Avaya one-X Quick Edition G10 PSTN Gateway. Enter a Group Name and an Extension for the group of designated Avaya one-X Quick Edition IP Telephones. Click Submit when finished. Note: The extension assigned to the group of Avaya one-X Quick Edition IP Telephones must be a three-digit pattern between 400 and 499.
4. From the Groups > Members menu, check the dialog box for each Avaya one-X Quick Edition IP Telephone that will be assigned to the group. In the example below, three Avaya one-X Quick Edition IP Telephones are selected as group members and can be bound to forwarding and dial access rules. Click Submit when finished.
5. From the Groups > Forwarding menu, check the box for Enable Forwarding to send unattended calls by the group of Avaya one-X Quick Edition IP Telephones to a specific extension or to the Operator Assist feature after a defined number of telephone rings. Click Submit when finished.
6. From the Groups > Dialing Rules menu, click on the Add Rule link to configure a dialing rule for the group created previously. Under Add Rule, scroll to Local – 9* and select the Allow option. This dialing rule will allow PSTN access for the Avaya one-X Quick Edition IP Telephones configured under the corresponding group by dialing 9 first. Click Submit when finished.
7. From the Gateways > Details menu, click on the Change Details link to configure an extension for the Avaya one-X Quick Edition G10 PSTN Gateway. Enter an Extension for the Avaya one-X Quick Edition G10 PSTN Gateway that is not in use by any of the Avaya one-X Quick Edition IP Telephones. Click Submit when finished. Note: The extension assigned to the Avaya one-X Quick Edition G10 PSTN Gateway must be a three-digit pattern between 200 and 299.
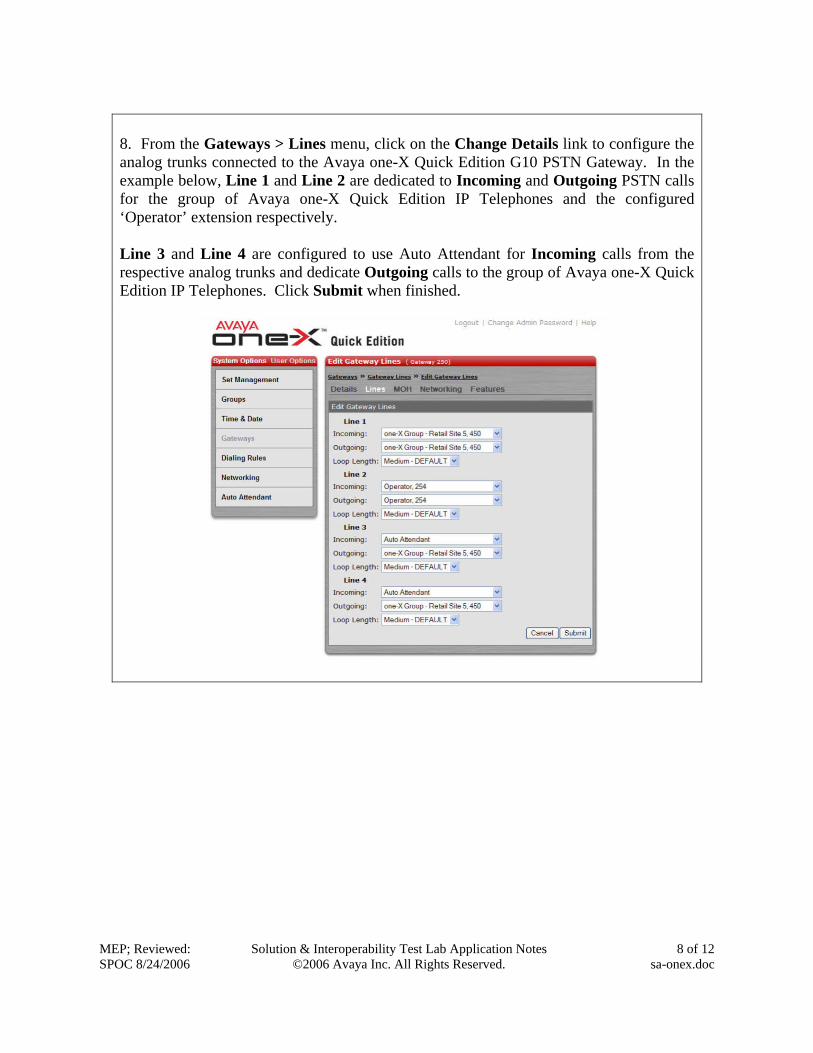
8. From the Gateways > Lines menu, click on the Change Details link to configure the analog trunks connected to the Avaya one-X Quick Edition G10 PSTN Gateway. In the example below, Line 1 and Line 2 are dedicated to Incoming and Outgoing PSTN calls for the group of Avaya one-X Quick Edition IP Telephones and the configured ‘Operator’ extension respectively. Line 3 and Line 4 are configured to use Auto Attendant for Incoming calls from the respective analog trunks and dedicate Outgoing calls to the group of Avaya one-X Quick Edition IP Telephones. Click Submit when finished.
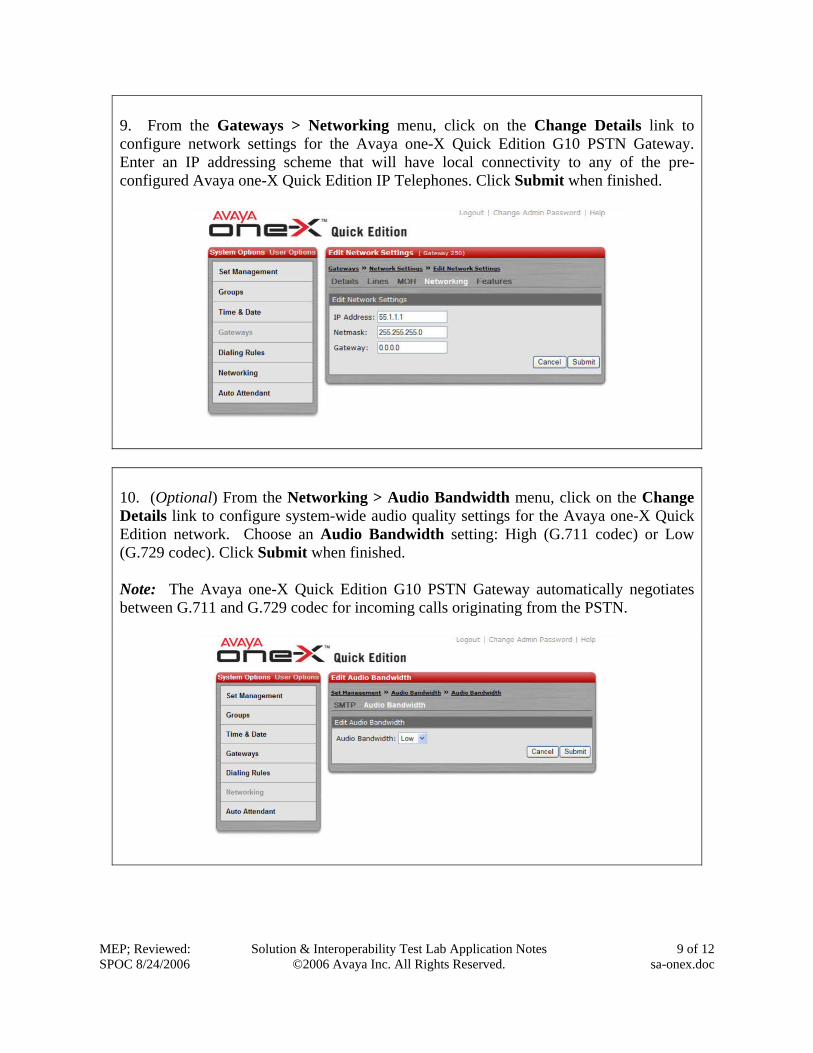
9. From the Gateways > Networking menu, click on the Change Details link to configure network settings for the Avaya one-X Quick Edition G10 PSTN Gateway. Enter an IP addressing scheme that will have local connectivity to any of the pre-configured Avaya one-X Quick Edition IP Telephones. Click Submit when finished.
10. (Optional) From the Networking > Audio Bandwidth menu, click on the Change Details link to configure system-wide audio quality settings for the Avaya one-X Quick Edition network. Choose an Audio Bandwidth setting: High (G.711 codec) or Low (G.729 codec). Click Submit when finished. Note: The Avaya one-X Quick Edition G10 PSTN Gateway automatically negotiates between G.711 and G.729 codec for incoming calls originating from the PSTN.
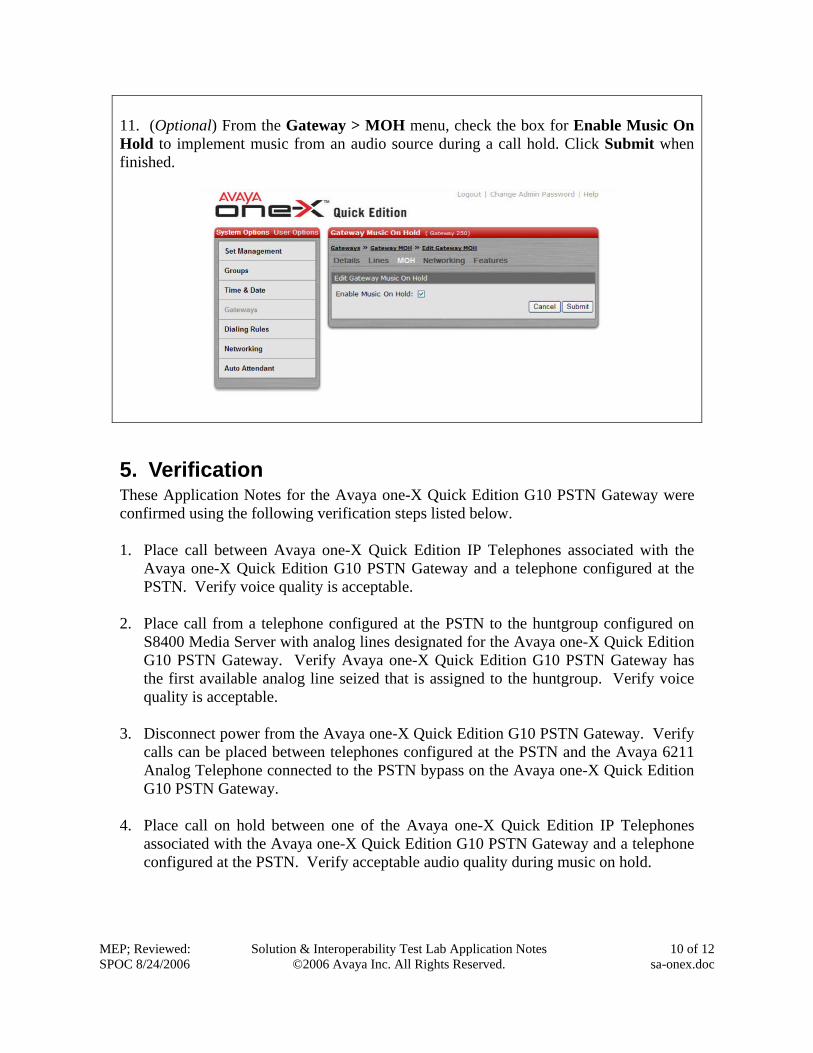
11. (Optional) From the Gateway > MOH menu, check the box for Enable Music On Hold to implement music from an audio source during a call hold. Click Submit when finished.
5. Verification These Application Notes for the Avaya one-X Quick Edition G10 PSTN Gateway were confirmed using the following verification steps listed below. 1. Place call between Avaya one-X Quick Edition IP Telephones associated with the
Avaya one-X Quick Edition G10 PSTN Gateway and a telephone configured at the PSTN. Verify voice quality is acceptable.
2. Place call from a telephone configured at the PSTN to the huntgroup configured on
S8400 Media Server with analog lines designated for the Avaya one-X Quick Edition G10 PSTN Gateway. Verify Avaya one-X Quick Edition G10 PSTN Gateway has the first available analog line seized that is assigned to the huntgroup. Verify voice quality is acceptable.
3. Disconnect power from the Avaya one-X Quick Edition G10 PSTN Gateway. Verify
calls can be placed between telephones configured at the PSTN and the Avaya 6211 Analog Telephone connected to the PSTN bypass on the Avaya one-X Quick Edition G10 PSTN Gateway.
4. Place call on hold between one of the Avaya one-X Quick Edition IP Telephones
associated with the Avaya one-X Quick Edition G10 PSTN Gateway and a telephone configured at the PSTN. Verify acceptable audio quality during music on hold.
5. Place call from a telephone configured at the PSTN to an extension on the Avaya one-X Quick Edition G10 PSTN Gateway configured for Auto Attendant. Verify Auto Attendant answers incoming calls after specified number of rings and transfers incoming calls to appropriate extensions.
6. Place a call between two one-X Quick Edition IP Telephones. Perform transfer of the
existing call to a third telephone connected to the simulated PSTN. Verify successful transfer and two-way talk path exists between the one-X Quick Edition IP Telephone and the telephone connected to the simulated PSTN upon transfer.
7. Place a call between two one-X Quick Edition IP Telephones. Place another call to a
third telephone connected to the simulated PSTN and perform a 3-way conference. Verify three-way call path exists between the two one-X Quick Edition IP Telephones and the telephone connected to the simulated PSTN.
8. Place a call from a telephone connected to the simulated PSTN to a one-X Quick
Edition IP Telephone without answering. Verify voicemail coverage and message waiting indication (MWI) on the one-X Quick Edition IP Telephone.
6. Conclusion As depicted by these Application Notes, the Avaya one-X Quick Edition G10 PSTN Gateway can be implemented as a small office solution in a network environment designed for retail configurations with Avaya one-X Quick Edition IP Telephones. Avaya one-X environments are limited to four PSTN calls and will need another Avaya one-X Quick Edition G10 PSTN Gateway if the number of Avaya one-X Quick Edition IP Telephones exceeds the number of analog lines connected to the PSTN.
7. References The following references can be found at http://support.avaya.com: