15
Configuring the Roku HD1000 to use a Wi-Fi Adapter with Security (WEP) Roku HD1000 Helpful Tips Revision 1.2 | September 10, 2004

Configuring the Roku HD1000 to use a Wi-Fi Adapter with Security (WEP)
Roku HD1000 Helpful Tips
Revision 1.2 | September 10, 2004

Introduction Your Roku HD1000 can be used on password-protected wireless home computer networks. Connecting to such a network requires the use of a "key" (which is a different form of the password). This document provides general instructions for finding the key for your wireless network and instructions for setting up your HD1000 to use this key. In addition, it gives step-by-step instructions for finding the key on several popular wireless access points.
Start by reading the Background and General Instructions sections to become familiar with the process. If your access point is covered in detail in one of the examples, you can then move on to that section.
Background The Roku HD1000 can connect to 802.11b or 802.11g wireless networks via a compatible USB 802.11b Wi-Fi adapter. If you would like to take advantage of the full speed of your 802.11g network, please use an 802.11g bridge connected to your wireless access point. Wireless networks use a key to keep the network secure. That key is generated by the wireless access point, using the user-supplied password. There is no standard way to convert a password to the key that is used to keep the network secure -- every brand of wireless access point is different.
Section 1: Overview
The popular 802.11 (WiFi) protocol enables devices to network wirelessly. In order to help keep data on the wireless network private, WiFi networks can optionally encrypt the data sent across them. The method used to encrypt this data is called WEP (Wired Equivalent Privacy). The HD1000, when used with a supported USB adapter, can connect to WiFi networks and make use of WEP to help keep your data secure*.
Section 2: General Instructions To set up the wireless network, you will need two pieces of information. The first is the name of the network. This is also known as the SSID or ESSID. The second piece of information you will need is the WEP encryption key, also known as the password. Many access points allow you to enter a passphrase and then generate the encryption key based on the passphrase. Unfortunately, manufacturers are inconsistent with the method by which they convert the passphrase to the encryption key. Because of this, we will need the key itself which is represented as a string of hexadecimal characters (0-9 and A-F).
If you do not know the hexadecimal key for your wireless network, you can usually get it from your access point. This usually involves accessing the Access Point’s configuration interface. Accessing configuration interfaces typically involve either accessing a web page on the device or running a piece of software designed exclusively for the access point. Please use the method appropriate for your access point.
After connecting to the configuration interface, you will need to locate the portion of the interface dedicated to the wireless settings. It may be labeled “Wireless Settings” or may be contained within a more general “Setup” section. Once you’ve located this, look for an entry labeled “SSID”, “ESSID” or “Network Name”. This is what you will enter into your HD1000’s wireless setup panel’s “ESSID” field. Pay attention to the uppercase/lowercase of the network name, as the ESSID field is case-sensitive. Also, please note that the HD1000 does not currently support networks with a space in the network name, for instance “My Network” would not be supported currently.
Next, you will need to locate the WEP settings. Typically, this will be under a section called “Security settings” , “Encryption”, “WEP Settings” or something similar. If WEP is disabled, you do not need to enter a password on your HD1000 and you can skip ahead to section 3.
Access the WEP settings and you should see a number of fields, including a “Passphrase” or “Password” field, several “Key” fields as well as a “Default Key” field.
If you can see the contents of the “Key” fields, -- that is they contain numbers and letters and not just “***********” or “##########”-- then make a note of the “Key” field that corresponds to the value of the “Default Key”, typically key 1. This is the value that you will enter into the “Password” field of the HD1000’s wireless setup.
If you can not see the contents of the “Key” fields, then you will need to enter your existing passphrase into the “passphrase” field and click the “Generate” button. This should regenerate the hexadecimal keys and allow you to view them. Make a note of the “key” field that corresponds to the value of the “Default Key” field.
*Note: Even with WEP enabled, Roku cannot ensure the security of your wireless network. For further information about securing wireless networks, please see http://www.securityfocus.com/guest/5479 .
© 2003 Roku, LLC. All rights reserved. ROKU and the ROKU logo are trademarks of Roku, LLC in the United States and other countries.
3

Section 3: Configuring the HD1000 to Use WEP Now that you’ve determined your network name and the password for the WEP encryption, you can configure your HD1000 to connect to this network.
First, choose “Setup” from the bottom of the main menu:
Next, scroll down to “Wireless”:
© 2003 Roku, LLC. All rights reserved. ROKU and the ROKU logo are trademarks of Roku, LLC in the United States and other countries.
4

Highlight “ESSID” and press select. You will now be able to enter the name of the network using the onscreen keyboard. Remember, the network name is case-sensitive. Also, the HD1000 does not support networks with a space in the network name. If you network has a space in the name, you will need to remove the space it if you want the HD1000 to be able to access the network,
Once you have entered the name correctly, select “done” on the keyboard:
© 2003 Roku, LLC. All rights reserved. ROKU and the ROKU logo are trademarks of Roku, LLC in the United States and other countries.
5

If your network has a password, highlight and choose “Password”. You may now enter the hexadecimal WEP key that you previously found. Enter it the same way you entered the Network name.
If you have entered the name and password correctly and have a supported USB Wireless adapter connected to your HD1000 you can now select “Done” to activate your wireless connection.
If it fails to connect, please check your network name and password and try again. If again it fails to connect, please reboot your HD1000 and try again.
© 2003 Roku, LLC. All rights reserved. ROKU and the ROKU logo are trademarks of Roku, LLC in the United States and other countries.
6

The following pages contain instructions for three popular wireless access point products: The Linksys WAP54G, the Apple Airport and the Netgear WG602. If you have one of these, please use the instructions provided for obtaining your hexadecimal wireless password. Even if you don’t own one of these specific products, the instructions may still be of use since vendors often reuse configuration interfaces with multiple products. If your particular device or vendor is not represented here, please contact the manufacturer of your access point for information on obtaining the needed information.
© 2003 Roku, LLC. All rights reserved. ROKU and the ROKU logo are trademarks of Roku, LLC in the United States and other countries.
7
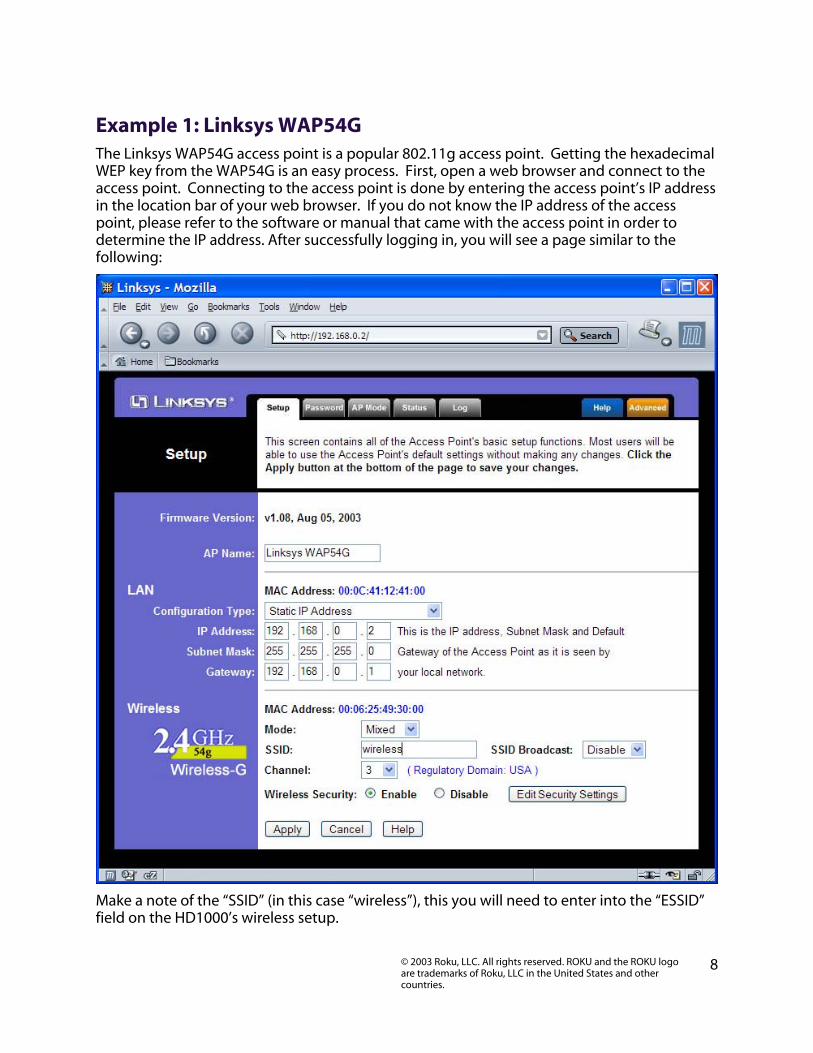
Example 1: Linksys WAP54G The Linksys WAP54G access point is a popular 802.11g access point. Getting the hexadecimal WEP key from the WAP54G is an easy process. First, open a web browser and connect to the access point. Connecting to the access point is done by entering the access point’s IP address in the location bar of your web browser. If you do not know the IP address of the access point, please refer to the software or manual that came with the access point in order to determine the IP address. After successfully logging in, you will see a page similar to the following:
Make a note of the “SSID” (in this case “wireless”), this you will need to enter into the “ESSID” field on the HD1000’s wireless setup.
© 2003 Roku, LLC. All rights reserved. ROKU and the ROKU logo are trademarks of Roku, LLC in the United States and other countries.
8

As you can see, “Wireless Security” is enabled. Click on “Edit Security Settings” to access the WEP setup page:
This Linksys access point allows you to easily view the keys. The default key is key number 1, so make a note of the value of the “Key 1” field (“49774B692D” in this case). This is the value you will enter into the HD1000’s wireless setup’s “Password” field. You now have the information necessary to configure your HD1000 to connect to your network. You may close you web browser.
© 2003 Roku, LLC. All rights reserved. ROKU and the ROKU logo are trademarks of Roku, LLC in the United States and other countries.
9

Example 2: Apple AirPort The Apple Airport is a very popular access point. To configure it, access your AirPort Admin Utility on your Mac (it is in the Utilities folder).
Select your AirPort and choose “Configure”. Once you’ve successfully connected to your AirPort, you will be presented with the following screen:
© 2003 Roku, LLC. All rights reserved. ROKU and the ROKU logo are trademarks of Roku, LLC in the United States and other countries.
10

The value of the “Wireless Network Name:” is the ESSID, and the “Wireless Hex Equivalent Password:” is the value you will enter into the HD1000’s wireless setup password field.
© 2003 Roku, LLC. All rights reserved. ROKU and the ROKU logo are trademarks of Roku, LLC in the United States and other countries.
11

Example 3: Netgear WG602 The Netgear WG602 is an 802.11g Wireless Access Point. It is accessed with a web browser. First, open a web browser and connect to the access point by entering the access point’s IP address in the location bar of your web browser. If you do not know the IP address of the access point, please refer to the software or manual that came with the access point in order to determine the IP address. After successfully logging in, you will see a page similar to the following:
::
© 2003 Roku, LLC. All rights reserved. ROKU and the ROKU logo are trademarks of Roku, LLC in the United States and other countries.
12

The value of “Wireless Network Name (SSID)” is the ESSID that you will enter into the HD1000’s wireless setup. Click on “Security Settings” on the left side to access the WEP settings:
If “WEP” is set to “Disable”, then you do not need to enter a password to access your wireless network. If “WEP” is set to “Enable”, you will need to obtain the hexadecimal key for your
© 2003 Roku, LLC. All rights reserved. ROKU and the ROKU logo are trademarks of Roku, LLC in the United States and other countries.
13

network. Netgear unfortunately, does not allow you to view the current passphrase or keys. However, if you re-enter the known passphrase and press “Generate Keys”, then it will regenerate the keys as before and allow you to view the keys:
Make a note of the value of the key with the active radio button (the default key, in this case “Key 1”: “562E7FF0A0”). This is the password that you will need to enter into your HD1000’s
© 2003 Roku, LLC. All rights reserved. ROKU and the ROKU logo are trademarks of Roku, LLC in the United States and other countries.
14
© 2003 Roku, LLC. All rights reserved. ROKU and the ROKU logo are trademarks of Roku, LLC in the United States and other countries.
15
wireless setup “Password” field. You now have the information necessary to access your wireless network from your HD1000. You may close you web browser.


