52
Qseven ® conga-QMX6 Freescale ® i.MX6 ARM ® Cortex A9 processor with Ultra Low Power Consumption Software User’s Guide Revision 0.2 (Preliminary)
Qseven® conga-QMX6Freescale® i.MX6 ARM® Cortex A9 processor with Ultra Low Power Consumption
Software User’s Guide
Revision 0.2 (Preliminary)
Copyright © 2013 congatec AG QMX6ms02 2/52
Revision HistoryRevision Date (yyyy.mm.dd) Author Changes0.1 2013.08.12 AEM • Preliminary release0.2 2014.02.28 AEM • Added Yocto and Android sections.
• Added section 5.2 "IOMUX Configuration".• Restructured and updated the whole document.
Copyright © 2013 congatec AG QMX6ms02 3/52
PrefaceThis user’s guide provides information on how to set up and install the congatec Linux BSP on the conga-QMX6. It is one of four documents that should be referred to when designing an i.MX6 based Qseven® application for the conga-QMX6. The other reference documents that should be used include the following:
Qseven® Design GuideQseven® Specificationi.MX6 Applications Processor Reference Manual (available at www.freescale.com)
The links to these documents can be found on the congatec AG website at www.congatec.com. For the list of sources of information, see section 6.
Disclaimer
The information contained within this user’s guide, including but not limited to any product specification, is subject to change without notice.
congatec AG provides no warranty with regard to this user’s guide or any other information contained herein and hereby expressly disclaims any implied warranties of merchantability or fitness for any particular purpose with regard to any of the foregoing. congatec AG assumes no liability for any damages incurred directly or indirectly from any technical or typographical errors or omissions contained herein or for discrepancies between the product and the user’s guide. In no event shall congatec AG be liable for any incidental, consequential, special, or exemplary damages, whether based on tort, contract or otherwise, arising out of or in connection with this user’s guide or any other information contained herein or the use thereof.
Intended Audience
This user’s guide is intended for technically qualified personnel. It is not intended for general audiences.
Lead-Free Designs (RoHS)
All congatec AG designs are created from lead-free components and are completely RoHS compliant.
Copyright © 2013 congatec AG QMX6ms02 4/52
Electrostatic Sensitive Device
All congatec AG products are electrostatic sensitive devices and are packaged accordingly. Do not open or handle a congatec AG product except at an electrostatic-free workstation. Additionally, do not ship or store congatec AG products near strong electrostatic, electromagnetic, magnetic, or radioactive fields unless the device is contained within its original manufacturer’s packaging. Be aware that failure to comply with these guidelines will void the congatec AG Limited Warranty.
Symbols
The following symbols are used in this user’s guide:
Warning
Warnings indicate conditions that, if not observed, can cause personal injury.
Caution
Cautions warn the user about how to prevent damage to hardware or loss of data.
Note
Notes call attention to important information that should be observed.
Copyright Notice
Copyright © 2013, congatec AG. All rights reserved. All text, pictures and graphics are protected by copyrights. No copying is permitted without written permission from congatec AG.
congatec AG has made every attempt to ensure that the information in this document is accurate yet the information contained within is supplied “as-is”.

Copyright © 2013 congatec AG QMX6ms02 5/52
Trademarks
Product names, logos, brands, and other trademarks featured or referred to within this user’s guide, or the congatec website, are the property of their respective trademark holders. These trademark holders are not affiliated with congatec AG, our products, or our website.
Warranty
congatec AG makes no representation, warranty or guaranty, express or implied regarding the products except its standard form of limited warranty (“Limited Warranty”) per the terms and conditions of the congatec entity, which the product is delivered from. These terms and conditions can be downloaded from www.congatec.com. congatec AG may in its sole discretion modify its Limited Warranty at any time and from time to time.
The products may include software. Use of the software is subject to the terms and conditions set out in the respective owner’s license agreements, which are available at www.congatec.com and/or upon request.
Beginning on the date of shipment to its direct customer and continuing for the published warranty period, congatec AG represents that the products are new and warrants that each product failing to function properly under normal use, due to a defect in materials or workmanship or due to non conformance to the agreed upon specifications, will be repaired or exchanged, at congatec’s option and expense.
Customer will obtain a Return Material Authorization (“RMA”) number from congatec AG prior to returning the non conforming product freight prepaid. congatec AG will pay for transporting the repaired or exchanged product to the customer.
Repaired, replaced or exchanged product will be warranted for the repair warranty period in effect as of the date the repaired, exchanged or replaced product is shipped by congatec, or the remainder of the original warranty, whichever is longer. This Limited Warranty extends to congatec’s direct customer only and is not assignable or transferable.
Except as set forth in writing in the Limited Warranty, congatec makes no performance representations, warranties, or guarantees, either express or implied, oral or written, with respect to the products, including without limitation any implied warranty (a) of merchantability, (b) of fitness for a particular purpose, or (c) arising from course of performance, course of dealing, or usage of trade.
congatec AG shall in no event be liable to the end user for collateral or consequential damages of any kind. congatec shall not otherwise be liable for loss, damage or expense directly or indirectly arising from the use of the product or from any other cause. The sole and exclusive remedy against congatec, whether a claim sound in contract, warranty, tort or any other legal theory, shall be repair or replacement of the product only.
Certification
congatec AG is certified to DIN EN ISO 9001:2008 standard.
CERTIFICATION
ISO 9001
TM
Copyright © 2013 congatec AG QMX6ms02 6/52
Technical Support
congatec AG technicians and engineers are committed to providing the best possible technical support for our customers so that our products can be easily used and implemented. We request that you first visit our website at www.congatec.com for the latest documentation, utilities and drivers, which have been made available to assist you. If you still require assistance after visiting our website then contact our technical support department by email at [email protected]
Terminology
Term DescriptionPCI Express (PCIe) Peripheral Component Interface Express – next-generation high speed Serialized I/O busPCI Express Lane One PCI Express Lane is a set of 4 signals that contains two differential lines for transmitting and two differential lines for Receiving.
Clocking information is embedded into the data stream.LTIB Linux Target Image BuilderPCI Express Mini Card PCI Express Mini Card add-in card is a small size unique form factor optimized for mobile computing platforms.eMMC Embedded Multi Media Card is a non-volatile memory system, which frees the processor from low level flash memory management.SDIO card SDIO (Secure Digital Input Output) is a non-volatile memory card format developed for use in portable devices.USB Universal Serial BusSATA Serial AT Attachment: serial-interface standard for hard disksHDA High Definition AudioHDMI High Definition Multimedia Interface. HDMI supports standard, enhanced, or high-definition video, plus multi-channel digital audio on a
single cable.BSP Board Support PackageOTP One Time ProgrammableUSB OTG USB On-The-Go. A USB specification that allows USB devices to act as host.SPI Bus Serial Peripheral Interface is a synchronous serial data link standard named by Motorola that operates in full duplex mode.IOMUX Input Output MultiplexerGbE Gigabit EthernetLVDS Low-Voltage Differential Signaling
Copyright © 2013 congatec AG QMX6ms02 7/52
Contents1 INTRODUCTION ....................................................................... 8
2 LTIB Based Linux BSP ............................................................... 9
2.1 Development Platform ............................................................... 92.1.1 Update sources.list .................................................................... 92.1.2 Upgrade to Latest Packages .................................................... 102.1.3 Update The Repository ............................................................ 112.1.4 Install Host Packages Needed by LTIB .................................... 112.1.5 Packages Required for 64-bit Ubuntu ...................................... 112.1.6 Create or Modify Fuse Rules ................................................... 112.1.7 Edit Sudoers File ...................................................................... 112.1.8 Required Resources ................................................................ 122.2 LTIB Setup and Build ............................................................... 132.2.1 Setup: ....................................................................................... 132.2.2 Installation ................................................................................ 132.2.3 Complete LTIB Installation ....................................................... 152.3 Kernel and U-boot Preparation ................................................ 202.3.1 Prepare Kernel: ........................................................................ 202.3.1.1 Update the Kernel Source Code .............................................. 212.3.2 Prepare U-boot ........................................................................ 212.3.2.1 Update the U-boot Source Code .............................................. 222.4 Image Deployment ................................................................... 232.4.1 Configure TFTP........................................................................ 232.4.2 Configure NFS ......................................................................... 242.4.3 Transfer Rootfs To Micro SD Card ........................................... 242.4.4 Transfer Rootfs To eMMC ........................................................ 262.4.5 Transfer Rootfs To SATA .......................................................... 282.5 Additional Information .............................................................. 302.5.1 Kernel and U-boot In Standalone Environment ....................... 302.5.2 Prepare micro-SD card with oneiric.qmx6.tgz Image ............... 31
3 Yocto Based Linux BSP ........................................................... 32
3.1 Setting up and building Yocto ................................................... 323.1.1 Update The Repository ............................................................ 323.1.2 Install Host Packages Needed by Yocto .................................. 323.1.3 Obtain Yocto Recipes ............................................................... 32
3.1.4 Set GUI Image Environment Variable for conga-QMX6 ........... 323.1.5 Specify Target conga-QMX6 Variant ........................................ 333.1.6 Build the GUI Image ................................................................. 333.2 Image Deployment ................................................................... 333.2.1 Transfer Root File System to Micro-SD ................................... 333.2.2 Transfer Root File System to eMMC ........................................ 343.3 U-boot ...................................................................................... 34
4 Android ..................................................................................... 35
4.1 Development Platform ............................................................. 354.1.1 Update sources.list and Latest Packages ................................ 354.1.2 Install the Sun Java6 SDK ....................................................... 354.1.3 Install Required Packages ...................................................... 354.1.4 Obtain the Android Source Code ............................................. 364.1.5 Obtain the Kernel Source Code ............................................... 364.1.6 Obtain the U-boot Source Code ............................................... 364.1.7 Specify Target conga-QMX6 Variant ........................................ 364.1.8 Apply congatec Patch .............................................................. 374.1.9 Build the System ...................................................................... 374.1.10 Transfer Images to Micro-SD ................................................... 384.1.11 U-Boot ...................................................................................... 38
5 Boot Process ............................................................................ 39
5.1 Boot fuses ................................................................................ 395.2 IOMUX configuration ................................................................ 405.3 Bootloader ................................................................................ 405.3.1 Changing The U-boot Environment ......................................... 465.3.2 Restore Default Settings .......................................................... 475.3.3 Bootloader scripts .................................................................... 475.3.4 Setting up the bootloader ......................................................... 485.3.5 Updating the bootloader ........................................................... 495.3.5.1 Windows Host Set up ............................................................... 50
6 Sources of Information ............................................................. 52
6.1 Industry Specification ............................................................... 52
Copyright © 2013 congatec AG QMX6ms02 8/52
1 INTRODUCTION
Qseven® Concept
The Qseven® concept is an off-the-shelf, multi vendor, Single-Board-Computer that integrates all the core components of a common PC and is mounted onto an application specific carrier board. Qseven® modules have a standardized form factor of 70mm x 70mm and a specified pinout based on the high speed MXM system connector. The pinout remains the same regardless of the vendor. The Qseven® module provides the functional requirements for an embedded application. These functions include, but are not limited to graphics, sound, mass storage, network interface and multiple USB ports.
A single ruggedized MXM connector provides the carrier board interface to carry all the I/O signals to and from the Qseven® module. This MXM connector is a well known and proven high speed signal interface connector that is commonly used for high speed PCI Express graphics cards in notebooks.
Carrier board designers can utilize as little or as many of the I/O interfaces as deemed necessary. The carrier board can therefore provide all the interface connectors required to attach the system to the application specific peripherals. This versatility allows the designer to create a dense and optimized package, which results in a more reliable product while simplifying system integration.
The Qseven® evaluation carrier board provides carrier board designers with a reference design platform and the opportunity to test all the Qseven® I/O interfaces available and then choose what are suitable for their application. Qseven® applications are scalable, which means once a carrier board has been created there is the ability to diversify the product range through the use of different performance class Qseven® modules. Simply unplug one module and replace it with another; no need to redesign the carrier board.
This document describes the features available on the Qseven® evaluation carrier board. Additionally, the schematics for the Qseven® evaluation carrier board can be found on the congatec website.
Board Support Package
congatec AG provides developers with various BSPs as startup framework for building applications that run on conga-QMX6. The BSPs offered are linux, android and WEC7. The linux and android BSPs are provided directly by congatec while the WEC7 is provided via Adeneo Embedded. The WEC7 BSP and documentation can be obtained from Adeneo Embedded at http://www.adeneo-embedded.com/Products/Board-Support-Packages/Congatec-conga-QMX6-BSPs.
The linux and android BSPs are based on u-boot bootloader and the linux kernel. The build environments for the linux BSP are the Freescale Linux Target Image Builder (LTIB) and the Yocto project. congatec supports the following development hosts: Ubuntu 11.04 for LTIB and android, Ubuntu 12.04 for Yocto project. These distributions are tested and verified as suitable for conga-QMX6.
Copyright © 2013 congatec AG QMX6ms02 9/52
2 LTIB Based Linux BSPThis section describes how to set up the development platform and build the LTIB for conga-QMX6 linux BSP.
2.1 Development PlatformTo develop software for conga-QMX6, an x86 based Linux system with installed cross compile toolchain is necessary. This can either be a dedicated system or a virtual machine that boots and runs Linux. A physical PC installed with Ubuntu 11.04 is however preferred to a virtual machine.
Note
The conga-QMX6 supports Ubuntu 11.04 as development host. The host should have a serial port to access the debug console and an SD card reader to create bootable SD card.
2.1.1 Update sources.list
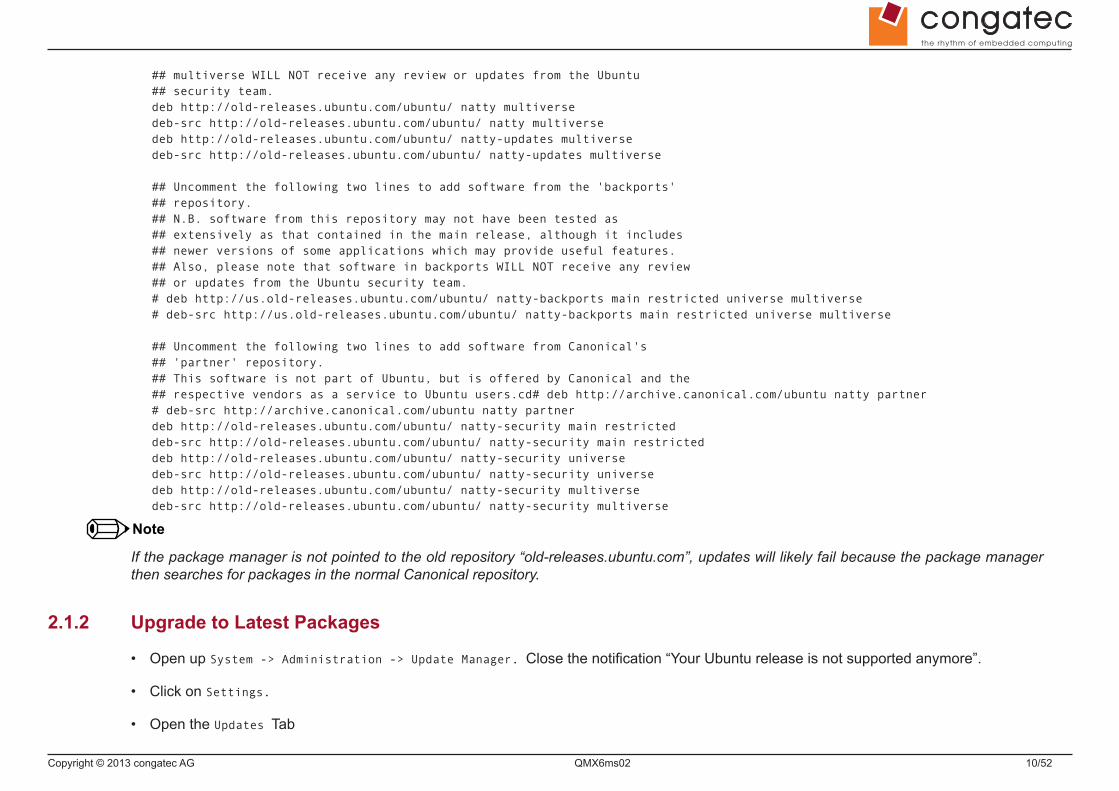
Because the conga-QMX6 development host (Ubuntu 11.04) is not the latest Ubuntu release, the package manager can not obtain packages from the normal canonical repository. It is therefore necessary to update the sources.list file. To update the sources.list file, overwrite the sources.list file in /etc/apt/ with the following lines:
deb http://old-releases.ubuntu.com/ubuntu/ natty main restricteddeb-src http://old-releases.ubuntu.com/ubuntu/ natty main restricted## Major bug fix updates produced after the final release of the## distribution.deb http://old-releases.ubuntu.com/ubuntu/ natty-updates main restricteddeb-src http://old-releases.ubuntu.com/ubuntu/ natty-updates main restricted
## N.B. software from this repository is ENTIRELY UNSUPPORTED by the Ubcd &cduntu## team. Also, please note that software in universe WILL NOT receive any## review or updates from the Ubuntu security team.deb http://old-releases.ubuntu.com/ubuntu/ natty universedeb-src http://old-releases.ubuntu.com/ubuntu/ natty universedeb http://old-releases.ubuntu.com/ubuntu/ natty-updates universedeb-src http://old-releases.ubuntu.com/ubuntu/ natty-updates universe
## N.B. software from this repository is ENTIRELY UNSUPPORTED by the Ubuntu## team, and may not be under a free licence. Please satisfy yourself as to## your rights to use the software. Also, please note that software in
Copyright © 2013 congatec AG QMX6ms02 10/52
## multiverse WILL NOT receive any review or updates from the Ubuntu## security team.deb http://old-releases.ubuntu.com/ubuntu/ natty multiversedeb-src http://old-releases.ubuntu.com/ubuntu/ natty multiversedeb http://old-releases.ubuntu.com/ubuntu/ natty-updates multiversedeb-src http://old-releases.ubuntu.com/ubuntu/ natty-updates multiverse
## Uncomment the following two lines to add software from the 'backports'## repository.## N.B. software from this repository may not have been tested as## extensively as that contained in the main release, although it includes## newer versions of some applications which may provide useful features.## Also, please note that software in backports WILL NOT receive any review## or updates from the Ubuntu security team.# deb http://us.old-releases.ubuntu.com/ubuntu/ natty-backports main restricted universe multiverse# deb-src http://us.old-releases.ubuntu.com/ubuntu/ natty-backports main restricted universe multiverse
## Uncomment the following two lines to add software from Canonical's## 'partner' repository.## This software is not part of Ubuntu, but is offered by Canonical and the## respective vendors as a service to Ubuntu users.cd# deb http://archive.canonical.com/ubuntu natty partner# deb-src http://archive.canonical.com/ubuntu natty partnerdeb http://old-releases.ubuntu.com/ubuntu/ natty-security main restricteddeb-src http://old-releases.ubuntu.com/ubuntu/ natty-security main restricteddeb http://old-releases.ubuntu.com/ubuntu/ natty-security universedeb-src http://old-releases.ubuntu.com/ubuntu/ natty-security universedeb http://old-releases.ubuntu.com/ubuntu/ natty-security multiversedeb-src http://old-releases.ubuntu.com/ubuntu/ natty-security multiverse
Note
If the package manager is not pointed to the old repository “old-releases.ubuntu.com”, updates will likely fail because the package manager then searches for packages in the normal Canonical repository.
2.1.2 Upgrade to Latest Packages
• Open up System -> Administration -> Update Manager. Close the notification “Your Ubuntu release is not supported anymore”.
• Click on Settings.
• Open the Updates Tab
Copyright © 2013 congatec AG QMX6ms02 11/52
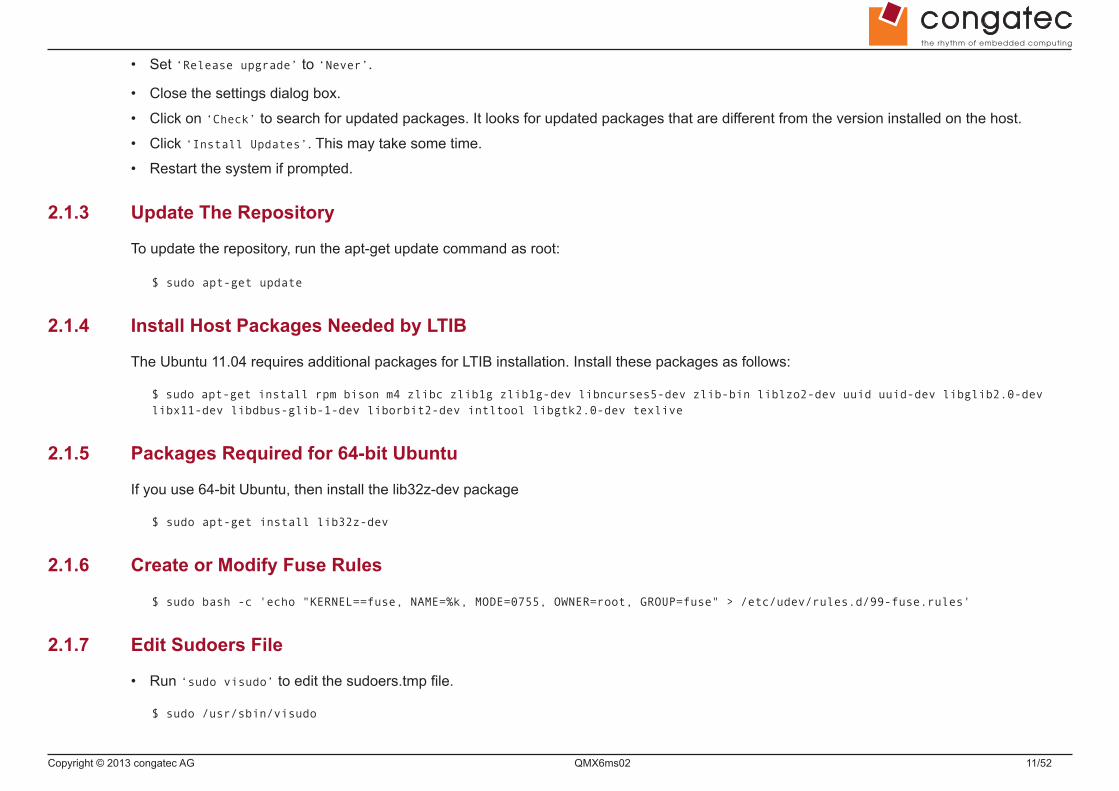
• Set ‘Release upgrade’ to ‘Never’.
• Close the settings dialog box.
• Click on ‘Check’ to search for updated packages. It looks for updated packages that are different from the version installed on the host.
• Click ‘Install Updates’. This may take some time.
• Restart the system if prompted.
2.1.3 Update The Repository
To update the repository, run the apt-get update command as root:
$ sudo apt-get update
2.1.4 Install Host Packages Needed by LTIB
The Ubuntu 11.04 requires additional packages for LTIB installation. Install these packages as follows:
$ sudo apt-get install rpm bison m4 zlibc zlib1g zlib1g-dev libncurses5-dev zlib-bin liblzo2-dev uuid uuid-dev libglib2.0-dev libx11-dev libdbus-glib-1-dev liborbit2-dev intltool libgtk2.0-dev texlive
2.1.5 Packages Required for 64-bit Ubuntu
If you use 64-bit Ubuntu, then install the lib32z-dev package
$ sudo apt-get install lib32z-dev
2.1.6 Create or Modify Fuse Rules
$ sudo bash -c 'echo "KERNEL==fuse, NAME=%k, MODE=0755, OWNER=root, GROUP=fuse" > /etc/udev/rules.d/99-fuse.rules'
2.1.7 Edit Sudoers File
• Run ‘sudo visudo’ to edit the sudoers.tmp file.
$ sudo /usr/sbin/visudo
Copyright © 2013 congatec AG QMX6ms02 12/52
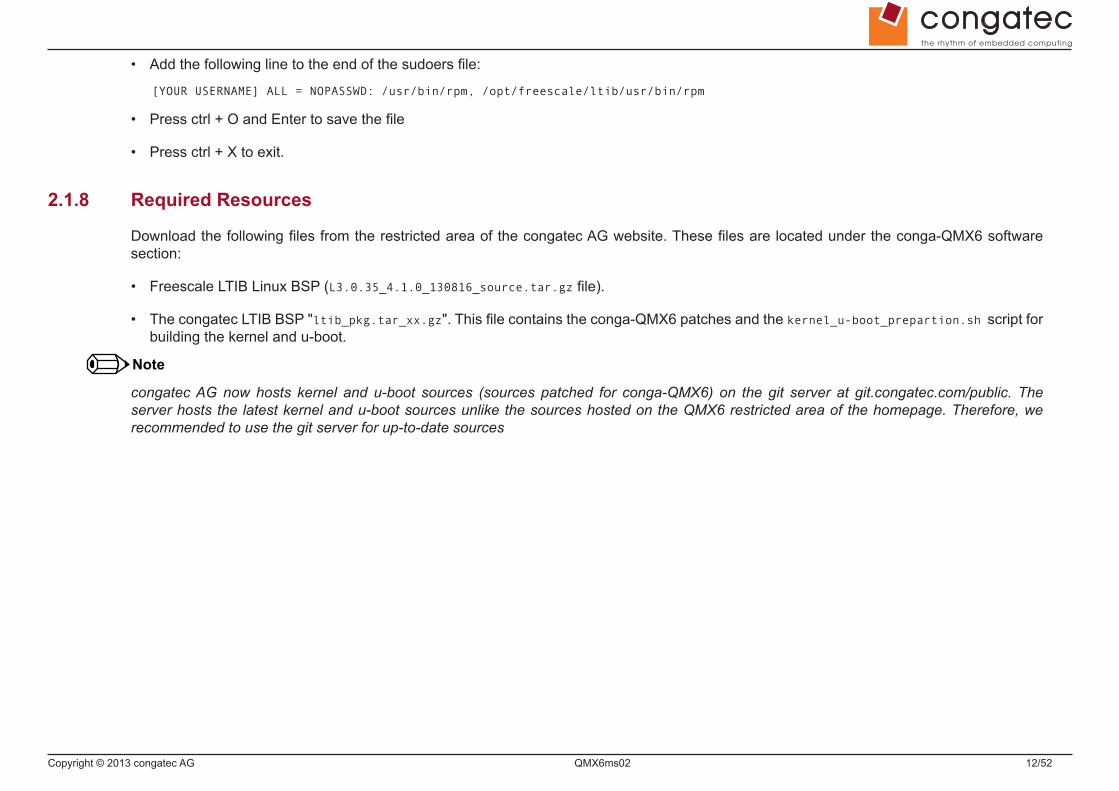
• Add the following line to the end of the sudoers file:
[YOUR USERNAME] ALL = NOPASSWD: /usr/bin/rpm, /opt/freescale/ltib/usr/bin/rpm
• Press ctrl + O and Enter to save the file
• Press ctrl + X to exit.
2.1.8 Required Resources
Download the following files from the restricted area of the congatec AG website. These files are located under the conga-QMX6 software section:
• Freescale LTIB Linux BSP (L3.0.35_4.1.0_130816_source.tar.gz file).
• The congatec LTIB BSP "ltib_pkg.tar_xx.gz". This file contains the conga-QMX6 patches and the kernel_u-boot_prepartion.sh script for building the kernel and u-boot.
Note
congatec AG now hosts kernel and u-boot sources (sources patched for conga-QMX6) on the git server at git.congatec.com/public. The server hosts the latest kernel and u-boot sources unlike the sources hosted on the QMX6 restricted area of the homepage. Therefore, we recommended to use the git server for up-to-date sources
Copyright © 2013 congatec AG QMX6ms02 13/52
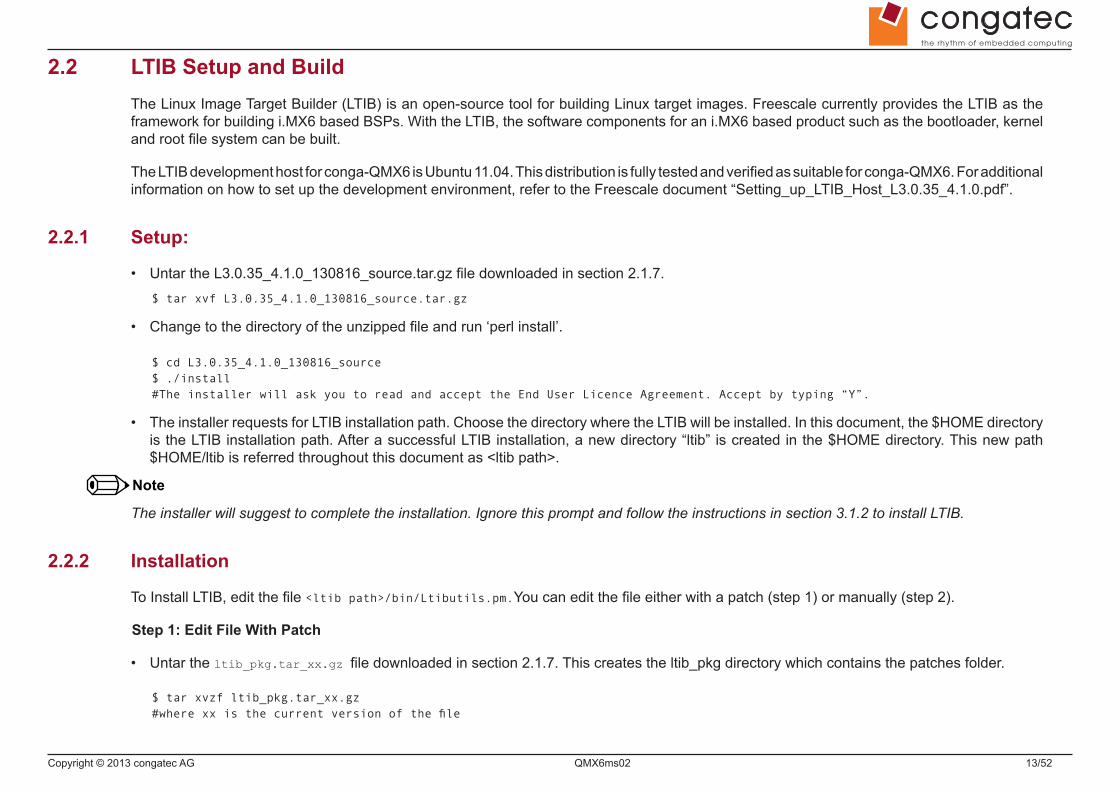
2.2 LTIB Setup and BuildThe Linux Image Target Builder (LTIB) is an open-source tool for building Linux target images. Freescale currently provides the LTIB as the framework for building i.MX6 based BSPs. With the LTIB, the software components for an i.MX6 based product such as the bootloader, kernel and root file system can be built.
The LTIB development host for conga-QMX6 is Ubuntu 11.04. This distribution is fully tested and verified as suitable for conga-QMX6. For additional information on how to set up the development environment, refer to the Freescale document “Setting_up_LTIB_Host_L3.0.35_4.1.0.pdf”.
2.2.1 Setup:
• Untar the L3.0.35_4.1.0_130816_source.tar.gz file downloaded in section 2.1.7.$ tar xvf L3.0.35_4.1.0_130816_source.tar.gz
• Change to the directory of the unzipped file and run ‘perl install’.
$ cd L3.0.35_4.1.0_130816_source$ ./install#The installer will ask you to read and accept the End User Licence Agreement. Accept by typing “Y”.
• The installer requests for LTIB installation path. Choose the directory where the LTIB will be installed. In this document, the $HOME directory is the LTIB installation path. After a successful LTIB installation, a new directory “ltib” is created in the $HOME directory. This new path $HOME/ltib is referred throughout this document as <ltib path>.
Note
The installer will suggest to complete the installation. Ignore this prompt and follow the instructions in section 3.1.2 to install LTIB.
2.2.2 Installation
To Install LTIB, edit the file <ltib path>/bin/Ltibutils.pm.You can edit the file either with a patch (step 1) or manually (step 2).
Step 1: Edit File With Patch
• Untar the ltib_pkg.tar_xx.gz file downloaded in section 2.1.7. This creates the ltib_pkg directory which contains the patches folder.
$ tar xvzf ltib_pkg.tar_xx.gz#where xx is the current version of the file
Copyright © 2013 congatec AG QMX6ms02 14/52
• Change to the ltib_pkg directory and execute the following commands:
$ cp patches/patch_ltibutils.patch <ltib path># This copies the patch to the LTIB directory.
$ cd <ltib path>$ patch -p1 <patch_ltibutils.patch# The patch_ltibutils.patch is in the ltib_pkg/patches directory.
• Go to section 3.1.2.1 to complete the LTIB installation
Step 2: Edit File Manually
• Open the file for editing
$ sudo nano <ltib path>/bin/Ltibutils.pm
• In the <ltib path>/bin/Ltibutils.pm file, search for the $app_checks variable definition.
• Below the glibc => 'ldd --version 2>/dev/null line, replace the following lines:
'glibc-devel' => sub { -f '/usr/lib/libm.so' || -f '/usr/lib64/libm.so' || -f '/usr/lib32/libm.so' || -f '/usr/lib/x86_64-linux-gnu/libm.so' || -f '/usr/lib/i386-linux-gnu/libm.so' },
with the following lines:
'glibc-devel' => sub { -f '/usr/lib/libm.so' || -f '/usr/lib64/libm.so' || -f '/usr/lib32/libm.so' || -f '/usr/lib/x86_64-linux-gnu/libm.so' || -f '/usr/lib/i386-linux-gnu/libm.so' || -f '/usr/lib64/libz.so' },
• Search for the line glob('/lib64/libz.so*'),
• Below this line, insert
glob('/lib/i386-linux-gnu/libz.so*'), ## for 32 bit system
Or glob('/lib/x86_64-linux-gnu/libz.so*'), ## for 64 bit system
• Go to section 3.1.2.1 to complete the LTIB installation

Copyright © 2013 congatec AG QMX6ms02 15/52
2.2.3 Complete LTIB Installation
To build the ltib enviroment, execute:$ cd <ltib path> $ ./ltib## This will take a long time to complete installation
In the configuration window:
• Select platform choice [Freescale iMX reference boards]. Use the arrow key to select ‘Exit’ and hit Enter.
• Select Yes to save the configuration file.
Copyright © 2013 congatec AG QMX6ms02 16/52
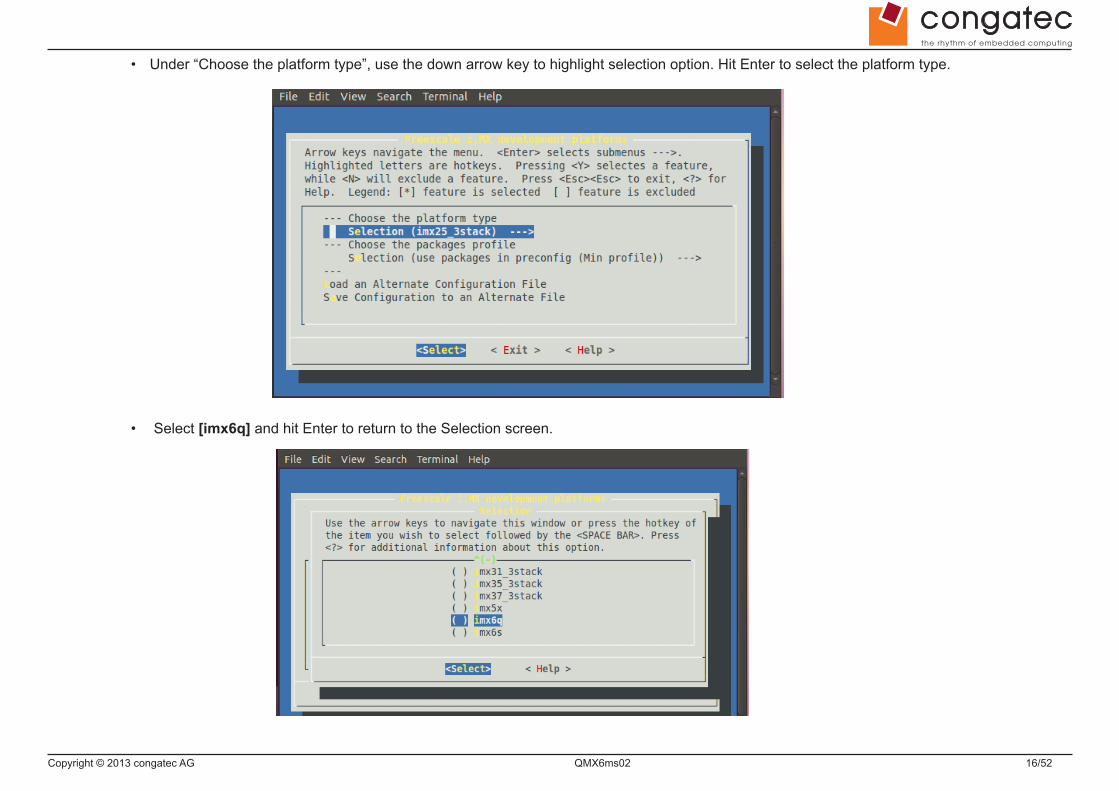
• Under “Choose the platform type”, use the down arrow key to highlight selection option. Hit Enter to select the platform type.
• Select [imx6q] and hit Enter to return to the Selection screen.
Copyright © 2013 congatec AG QMX6ms02 17/52
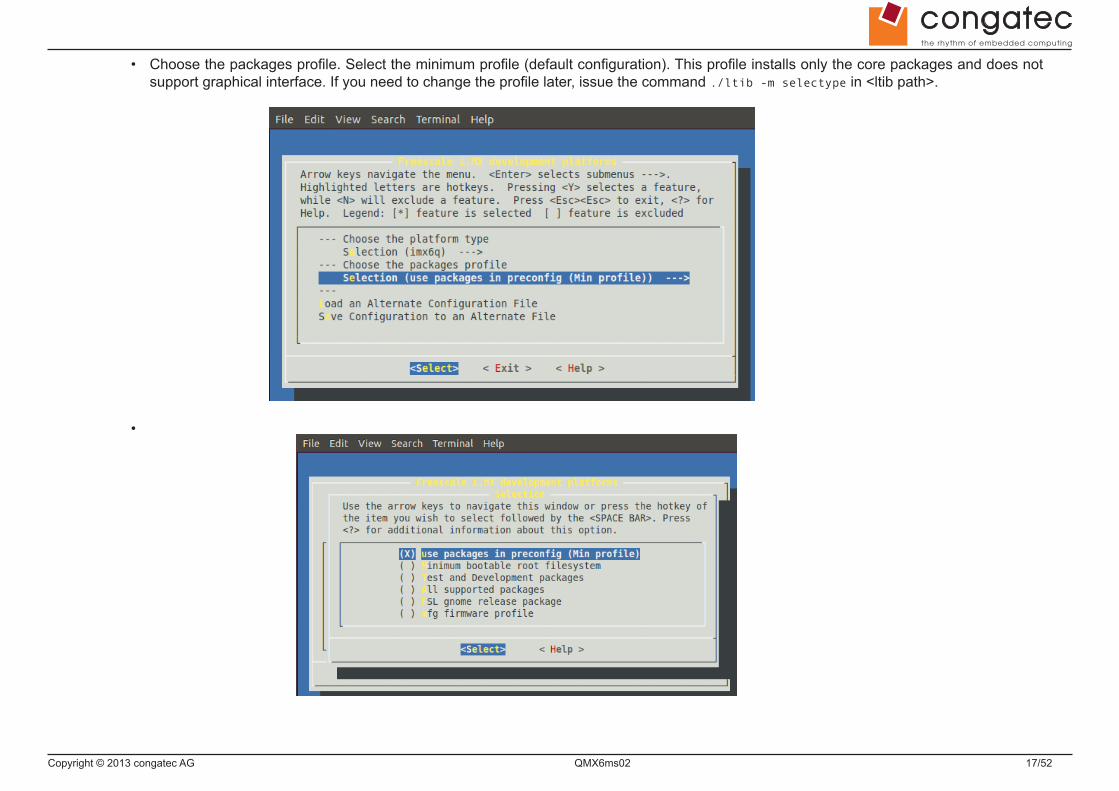
• Choose the packages profile. Select the minimum profile (default configuration). This profile installs only the core packages and does not support graphical interface. If you need to change the profile later, issue the command ./ltib -m selectype in <ltib path>.
•
Copyright © 2013 congatec AG QMX6ms02 18/52
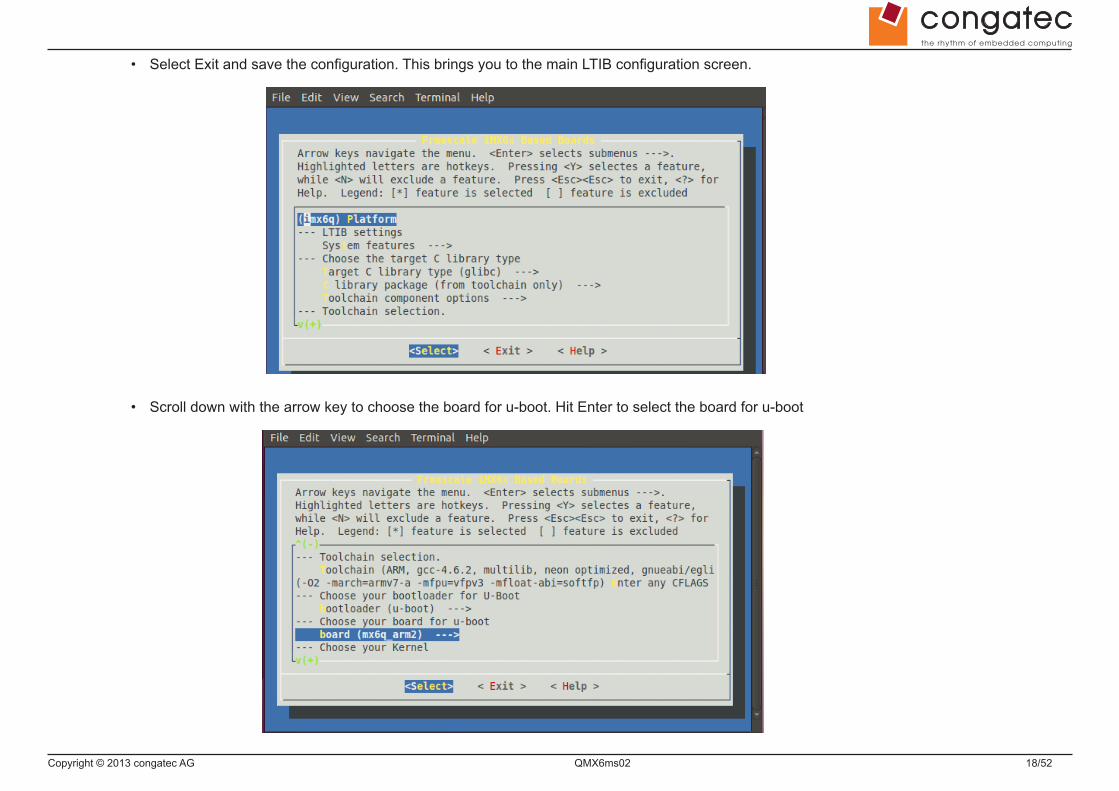
• Select Exit and save the configuration. This brings you to the main LTIB configuration screen.
• Scroll down with the arrow key to choose the board for u-boot. Hit Enter to select the board for u-boot
Copyright © 2013 congatec AG QMX6ms02 19/52
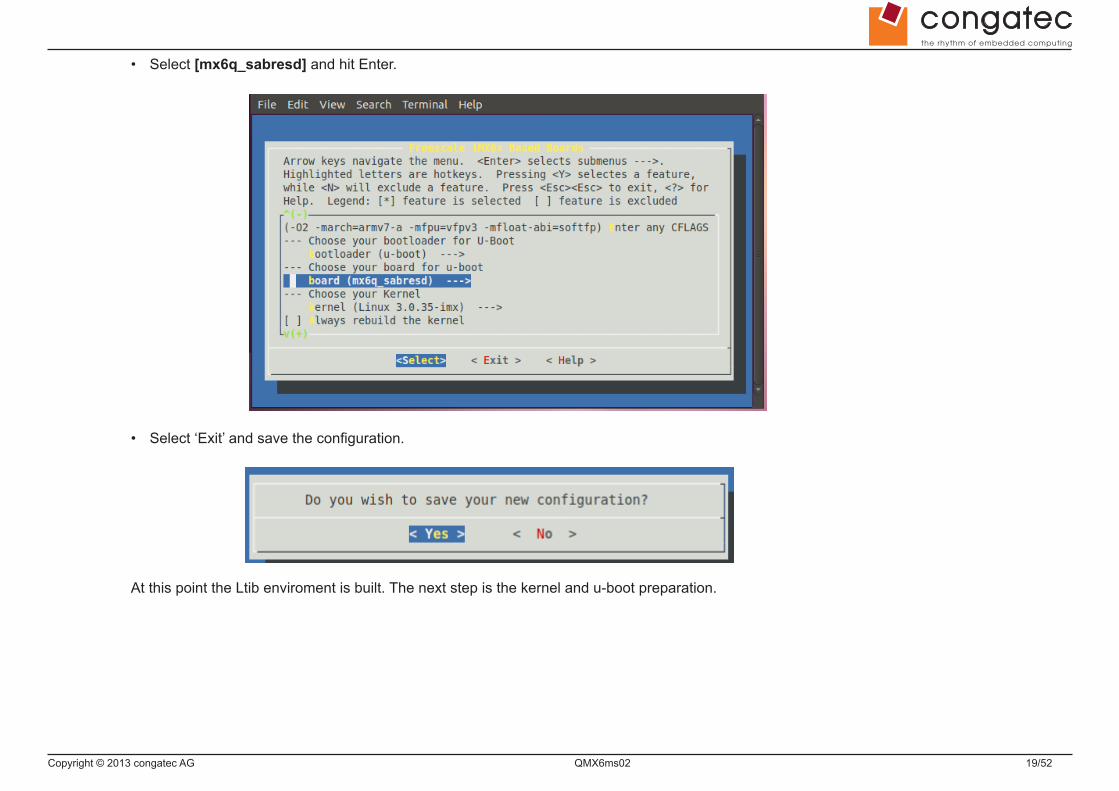
• Select [mx6q_sabresd] and hit Enter.
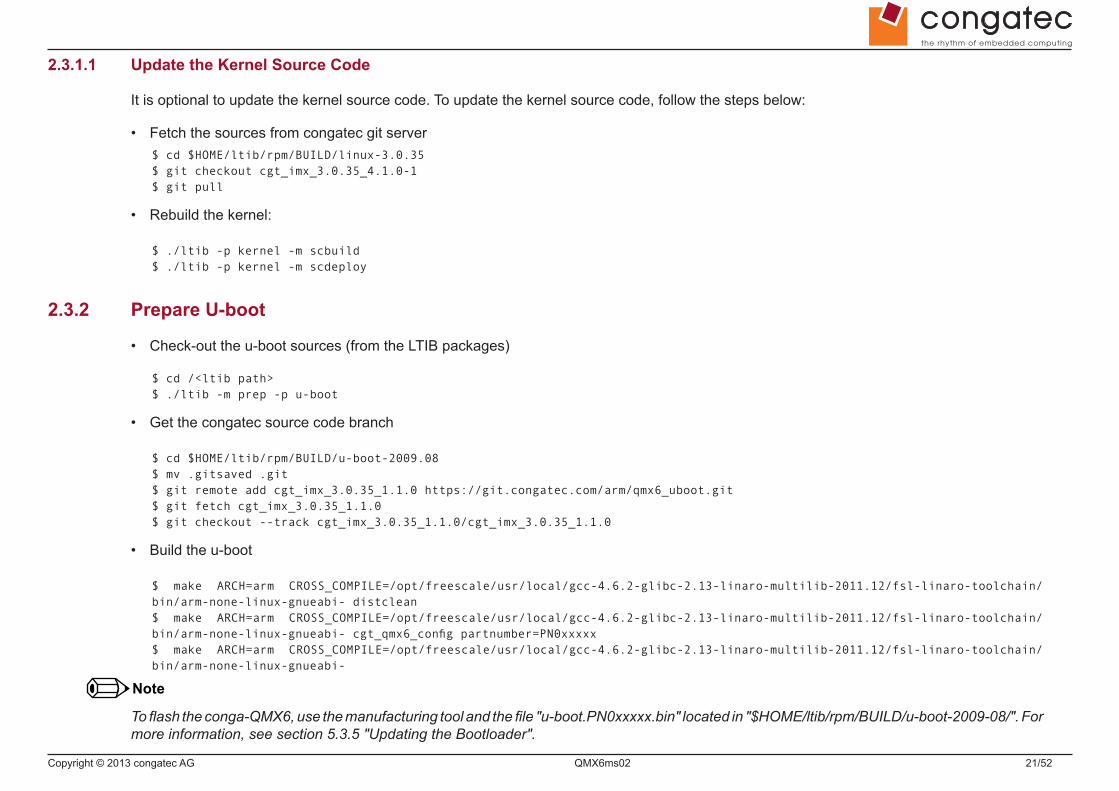
• Select ‘Exit’ and save the configuration.
At this point the Ltib enviroment is built. The next step is the kernel and u-boot preparation.

Copyright © 2013 congatec AG QMX6ms02 20/52
2.3 Kernel and U-boot PreparationAt this point the LTIB environment is built. The next step is to prepare the kernel and u-boot. The kernel and u-boot sources will be cloned from the git server to the local machine.
2.3.1 Prepare Kernel:
• Check-out the kernel sources (from the LTIB packages)
$ cd <ltib path>$ ./ltib -p kernel -m prep
• Get the congatec source code branch
$ cd rpm/BUILD/linux-3.0.35$ mv .gitsaved .git$ git remote add cgt_imx_3.0.35_4.1.0-1 https://git.congatec.com/arm/qmx6_kernel.git$ git fetch cgt_imx_3.0.35_4.1.0-1$ git checkout --track cgt_imx_3.0.35_4.1.0-1/cgt_imx_3.0.35_4.1.0-1
• Currently the kernel for conga-QMX6 can not be built directly with LTIB. To build a kernel for conga-QMX6, adjust the kernel source as shown below:
$ cd /<ltib path>$ mv config/platform/imx/imx6_defconfig.dev imx6_devconfig.dev.bak$ cp rpm/BUILD/linux-3.0.35/arch/arm/configs/qmx6_defconfig config/platform/imx/imx6_defconfig.dev
• Rebuild the modified kernel source
$ ./ltib -p kernel -m scbuild
• Install the kernel in the root filesystem
$ ./ltib -p kernel -m scdeploy
Copyright © 2013 congatec AG QMX6ms02 21/52
2.3.1.1 Update the Kernel Source Code
It is optional to update the kernel source code. To update the kernel source code, follow the steps below:
• Fetch the sources from congatec git server$ cd $HOME/ltib/rpm/BUILD/linux-3.0.35$ git checkout cgt_imx_3.0.35_4.1.0-1$ git pull
• Rebuild the kernel:
$ ./ltib -p kernel -m scbuild$ ./ltib -p kernel -m scdeploy
2.3.2 Prepare U-boot
• Check-out the u-boot sources (from the LTIB packages)
$ cd /<ltib path>$ ./ltib -m prep -p u-boot
• Get the congatec source code branch
$ cd $HOME/ltib/rpm/BUILD/u-boot-2009.08$ mv .gitsaved .git$ git remote add cgt_imx_3.0.35_1.1.0 https://git.congatec.com/arm/qmx6_uboot.git$ git fetch cgt_imx_3.0.35_1.1.0$ git checkout --track cgt_imx_3.0.35_1.1.0/cgt_imx_3.0.35_1.1.0
• Build the u-boot
$ make ARCH=arm CROSS_COMPILE=/opt/freescale/usr/local/gcc-4.6.2-glibc-2.13-linaro-multilib-2011.12/fsl-linaro-toolchain/bin/arm-none-linux-gnueabi- distclean$ make ARCH=arm CROSS_COMPILE=/opt/freescale/usr/local/gcc-4.6.2-glibc-2.13-linaro-multilib-2011.12/fsl-linaro-toolchain/bin/arm-none-linux-gnueabi- cgt_qmx6_config partnumber=PN0xxxxx$ make ARCH=arm CROSS_COMPILE=/opt/freescale/usr/local/gcc-4.6.2-glibc-2.13-linaro-multilib-2011.12/fsl-linaro-toolchain/bin/arm-none-linux-gnueabi-
Note
To flash the conga-QMX6, use the manufacturing tool and the file "u-boot.PN0xxxxx.bin" located in "$HOME/ltib/rpm/BUILD/u-boot-2009-08/". For more information, see section 5.3.5 "Updating the Bootloader".
Copyright © 2013 congatec AG QMX6ms02 22/52
The PN0xxxxx refers to the part number of your particular conga-QMX6 module. For the list of conga-QMX6 variants, see below:
conga-QMX6 variants// PN0XXXXX refers to the part number of your particular conga-QMX6 module. See below for the complete conga-QMX6 variants:// PN016100 (for conga-QMX6 equipped with i.MX6 1GHz SingleCore, 1GByte onboard DDR3 memory)// PN016110 (for conga-QMX6 equipped with i.MX6 1GHz SingleCore, 1GByte onboard DDR3 memory, extended temperature)// PN016101 (for conga-QMX6 equipped with i.MX6 1GHz DualCore Lite, 1GByte onboard DDR3 memory)// PN016102 (for conga-QMX6 equipped with i.MX6 1GHz DualCore, 1GByte onboard DDR3 memory)// PN016112 (for conga-QMX6 equipped with i.MX6 1GHz DualCore, 1GByte onboard DDR3 memory, extended temperature)// PN016103 (for conga-QMX6 equipped with i.MX6 1GHz QuadCore, 1GByte onboard DDR3 memory)// PN016113 (for conga-QMX6 equipped with i.MX6 1GHz QuadCore, 1GByte onboard DDR3 memory, extended temperature)// PN016104 (for conga-QMX6 equipped with i.MX6 1GHz QuadCore, 2GByte onboard DDR3 memory)// PN016105 (for conga-QMX6 equipped with i.MX6 1GHz QuadCore, 2GByte onboard DDR3 memory)// PN016106 (for conga-QMX6 equipped with i.MX6 1GHz QuadCore, 1GByte onboard DDR3 memory)
2.3.2.1 Update the U-boot Source Code
It is optional to update the U-boot source code. To update the u-boot, follow the steps below:
• Fetch the sources from congatec git server
$ cd $HOME/ltib/rpm/BUILD/u-boot-2009.08$ git checkout cgt_imx_3.0.35_1.1.0$ git pull
• Rebuild the u-boot
$ make ARCH=arm CROSS_COMPILE=/opt/freescale/usr/local/gcc-4.6.2-glibc-2.13-linaro-multilib-2011.12/fsl-linaro-toolchain/bin/arm-none-linux-gnueabi- distclean$ make ARCH=arm CROSS_COMPILE=/opt/freescale/usr/local/gcc-4.6.2-glibc-2.13-linaro-multilib-2011.12/fsl-linaro-toolchain/bin/arm-none-linux-gnueabi- cgt_qmx6_config partnumber=PN0XXXXX$ make ARCH=arm CROSS_COMPILE=/opt/freescale/usr/local/gcc-4.6.2-glibc-2.13-linaro-multilib-2011.12/fsl-linaro-toolchain/bin/arm-none-linux-gnueabi-
Note
To flash the conga-QMX6, use the manufacturing tool and the file "u-boot.PN0xxxxx.bin" located in "$HOME/ltib/rpm/BUILD/u-boot-2009-08/". For more information, see section 5.3.5 "Updating the Bootloader".
The PN0xxxxx refers to the part number of your particular conga-QMX6 module. For the list of conga-QMX6 variants, see section 2.3.2 "Prepare U-boot".
Copyright © 2013 congatec AG QMX6ms02 23/52
2.4 Image DeploymentThis section explains how to transfer the rootfs to micro-SD card, eMMC or SATA and how to configure TFTP and NFS if network boot during application development is desired.
2.4.1 Configure TFTP
• Install the necessary packages:
$ sudo apt-get install xinetd tftpd tftp -y
• Create a configuration file:
$ sudo nano /etc/xinetd.d/tftp
• Copy the content below into the configuration file:
service tftp{ protocol = udp port = 69 socket_type = dgram wait = yes user = nobody server = /usr/sbin/in.tftpd server_args = var/lib/tftpboot -s disable = no}
• Save the configuration file.
• Create /tftpboot directory:
$ sudo mkdir /var/lib/tftpboot$ sudo chown -R nobody:nogroup /var/lib/tftpboot$ sudo chmod -R 777 /var/lib/tftpboot
• Start the TFTP service:
$ sudo service xinetd stop$ sudo service xinetd start
Copyright © 2013 congatec AG QMX6ms02 24/52
Note
To boot from network, the uImage in <ltib path>/rpm/BUILD/linux-3.0.35/arch/arm/boot/uImage generated in section 3.1.3 must be placed in the tftp folder: /var/lib/tftpboot.
2.4.2 Configure NFS
• Install the required packages:
sudo apt-get install nfs-kernel-server portmap
• Change the ownership of the folder rootfs
sudo chown -R nobody:nogroup <ltib path>/rootfs
• Edit the file /etc/exports:
sudo nano /etc/exports
• Copy the lines below to the file:
<ltib path>/rootfs *(rw,sync,no_root_squash,no_subtree_check)## Use the absolute path of the rootfs
• Save the file.
• Make the changes effective by issuing the command:
sudo exportfs -a
The folder is now accessible.
2.4.3 Transfer Rootfs To Micro SD Card
After ltib installation, a root file system is generated in the [LTIB FOLDER]. Follow the steps below to transfer rootfs to micro-SD card:
• Get, build and install essential sources/packages
$ cd $HOME/ltib$ ./ltib -m prep -p e2fsprogs
Copyright © 2013 congatec AG QMX6ms02 25/52
$ ./ltib -m scbuild -p e2fsprogs$ ./ltib -m scdeploy -p e2fsprogs$ ./ltib -m prep -p util-linux$ ./ltib -m scbuild -p util-linux$ ./ltib -m scdeploy -p util-linux
• Create a file "boot.scr"
$ touch boot.scr
• Copy the following commands to the boot.scr file:
set bootargs $bootargs root=/dev/mmcblk0p1 rootwait rw fixrtc ;ext2load mmc ${disk}:1 10800000 /boot/uImage && bootm 10800000 ;echo "Error loading kernel image"//This configures the system to boot from micro-SD card. If micro-SD card and eMMC are present on the board, then the bootarg //variables for micro-SD card and eMMC are mmcblk0 and mmcblk1 respectively.
• Execute the bootscriptPrep.sh script located in ltib_pkg/tools folder. The script and the boot.scr file must be in the same folder.
$ ./bootscriptPrep.sh//After execution, the 6q_bootscript file is generated.
• Copy the file "6q_bootscript" (generated in the working directory) to /rootfs
$ cp 6q_bootscript /<ltib path>/rootfs
• Compress the rootfs into a tar.gz file
$ cd $HOME/ltib/rootfs$ tar cvfz ../rootfs.qmx6.tgz .
• Copy the compressed file to the directory that contains the "sdprep.sh" script. The "sdprep.sh" script is located in ltib_pkg/tools.
$ cd ..$ cp rootfs.qmx6.tgz [TOOLS FOLDER]$ cd [TOOLS FOLDER]//The [TOOLS FOLDER] is the folder that contains the "sdprep.sh" script.
• Unmount the device if mounted and transfer the files to micro-SD card
$ sudo umount /dev/sdX
Copyright © 2013 congatec AG QMX6ms02 26/52
//Replace the character "X" with the character for your device$ sudo ./sdprep.sh -d /dev/sdX
The micro SD-card is now ready.
2.4.4 Transfer Rootfs To eMMC
To transfer the rootfs to eMMC, the micro-SD card is required as a bridge for the eMMC.
Step 1
• Prepare the micro-SD card by performing the steps in section 2.4.3 "Transfer Rootfs to micro-SD card".
Step 2
This step is only required if the final system uses both eMMC and micro-SD card as storage devices. Skip this step if the final system does not use micro-SD card as storage device
• Create a file "boot.scr"
$ touch boot.scr
• Copy the following commands to the boot.scr file :
set bootargs $bootargs root=/dev/mmcblk1p1 rootwait rw fixrtc ;ext2load mmc ${disk}:1 10800000 /boot/uImage && bootm 10800000 ;echo "Error loading kernel image"
Note
The configuration above assumes the final system has both micro-SD and eMMC onboard (bootarg variable "root=/dev/mmcblk1p1").
• Execute the bootscriptPrep.sh script
$ ./bootscriptPrep.sh//This generates the 6q_bootscript required for the SD card
• Rename the 6q_bootscript created above and copy the renamed script to /rootfs
mv 6q_bootscript 6q_bootscript_emmc$ cp 6q_bootscript_emmc $HOME/rootfs
Copyright © 2013 congatec AG QMX6ms02 27/52
Step 3
• Unmount the device if mounted and transfer the files to micro-SD card
$ sudo umount /dev/sdX//Replace the character "X" with the character for your device$ sudo ./sdprep.sh -d /dev/sdX
• Boot up the system. After system boot up, clear the master boot record of the target device and create a valid partition
$ dd if=/dev/zero of=/dev/mmcblk1 bs=512 count=1000 conv=fsync//clear the MBR of the target device$ sfdisk --force -uM /dev/mmcblk1 <<EOF 10,,83 EOF//create valid partition
• Create filesystem and mount the filesystem
$ mkfs.ext3 -j /dev/mmcblk1p1 $ mkdir /mnt/emmc$ mount /dev/mmcblk1p1 /mnt/emmc
• Copy image
$ cd /$ tar xvf rootfs.qmx6.tgz -C /mnt/emmc $ cp 6q_bootscript_emmc /mnt/emmc/6q_bootscript$ sync
Step 4
This step is only required if the final system uses both eMMC and micro-SD card as storage devices. Skip this step if the final system does not use micro-SD card as storage device
• Reformat the micro-SD card if the final system will use it as storage device.
$ (echo o; echo n; echo p; echo 1; echo ; echo; echo w) | fdisk /dev/mmcblk0$ reboot
Copyright © 2013 congatec AG QMX6ms02 28/52
2.4.5 Transfer Rootfs To SATA
To transfer the rootfs to eMMC, the micro-SD card is required as a bridge for SATA.
• Prepare the micro-SD card by performing the steps in section 2.4.3 "Transfer Rootfs to micro-SD card".
• Create a file boot.scr
$ touch boot.scr
• Copy the following commands to the boot.scr file:
set bootargs $bootargs root=/dev/sda1 rootwait rw fixrtc ;ext2load mmc ${disk}:1 10800000 /boot/uImage && bootm 10800000 ;echo "Error loading kernel image"
• Execute the bootscriptPrep.sh script
$ ./bootscriptPrep.sh//The bootscriptPrep.sh script must be executed in the same folder where the boot.scr file is saved. This script creates the //file "6q_bootscript" required for the SD card
• Rename the 6q_bootscript created above and mount the micro-SD card. Copy the rootfs and the renamed file "6q_bootscript_sata" to micro-SD card.
$ mv 6q_bootscript 6q_bootscript_sata$ sudo mkdir /media/uSD$ sudo mount /dev/sdX1 /media/uSD$ cp $HOME/ltib/rootfs.qmx6.tgz /media/uSD$ cp 6q_bootscript_sata /media/uSD
• Boot up the system. After system boot up, clear the master boot record of the target device and create a valid partition. The SATA drive is assumed as /dev/sda
$ dd if=/dev/zero of=/dev/sda bs=512 count=1000 conv=fsync//clear the MBR of the target device.$ sfdisk --force -uM /dev/sda <<EOF 10,,83 EOF//create valid partition
Copyright © 2013 congatec AG QMX6ms02 29/52
• Create and mount the filesystem
$ mkfs.ext3 -j /dev/sda1$ mkdir /mnt/hd$ mount /dev/sda1 /mnt/hd
• Copy image and reboot the system
$ tar -zxvf rootfs.qmx6.tgz -C /mnt/hd$ cp /6q_bootscript_sata /mnt/hd/6q_bootscript$ sync$ reboot
• Now press any key to stop the bootloader's auto boot. Copy the lines below to the command prompt and hit "Enter".
setenv bootcmd_sata 'run bootargs_base; sata init; sata dev 0; ext2load sata 0:1 10008000 /6q_bootscript && source 10008000'setenv bootcmd 'run bootcmd_sata'saveboot//This sets the appropriate environment variables.
• Reformat the micro-SD card if the final system will use micro-SD card as storage device.
$ umount /dev/mmcblk0p1$ mkfs.ext3 /dev/mmcblk0p1
Copyright © 2013 congatec AG QMX6ms02 30/52
2.5 Additional Information
2.5.1 Kernel and U-boot In Standalone Environment
If you need to make changes or adapt the kernel and/or u-boot to your target system, the kernel and/or u-boot must be recompiled and transferred to the storage device. In the explanation below, the assumed storage device is micro-SD card.
Prepare Kernel In Standalone Environment
We assume the kernel sources are present and the configuration steps of section 2.2 and 2.3 were carried out.
• To build the kernel in the standalone environment, do the following:
Note: If the kernel has not been patched, then patch it $ cd /<ltib path>/rpm/BUILD/linux$ make ARCH=arm CROSS_COMPILE=/opt/freescale/usr/local/gcc-4.6.2-glibc-2.13-linaro-multilib-2011.12/fsl-linaro-toolchain/bin/arm-none-linux-gnueabi- qmx6_defconfig$ make ARCH=arm CROSS_COMPILE=/opt/freescale/usr/local/gcc-4.6.2-glibc-2.13-linaro-multilib-2011.12/fsl-linaro-toolchain/bin/arm-none-linux-gnueabi- uImage
• Transfer the kernel and modules to the micro-SD card.
$ sudo mkdir /media/uSD$ sudo mount /dev/sdX1 /media/uSD$ sudo cp arch/arm/boot/uImage /media/uSD/boot$ sudo make ARCH=arm CROSS_COMPILE=/opt/freescale/usr/local/gcc-4.6.2-glibc-2.13-linaro-multilib-2011.12/fsl-linaro-toolchain/bin/arm-none-linux-gnueabi- modules_install INSTALL_MOD_PATH=/media/uSD$ sync$ sudo umount /dev/sdX1//Replace the character "X1" with the character for your device
Prepare U-boot In Standalone Environment
We assume the u-boot sources are present and the configuration steps of section 2.2 and 2.3 were carried out.
• To build u-boot in a standalone environment, perform the following actions in u-boot sources root directory:
$ cd /<ltib path>/rpm/BUILD/u-boot-2009.08$ make ARCH=arm CROSS_COMPILE=/opt/freescale/usr/local/gcc-4.6.2-glibc-2.13-linaro-multilib-2011.12/fsl-linaro-toolchain/bin/arm-none-linux-gnueabi- distclean$ make ARCH=arm CROSS_COMPILE=/opt/freescale/usr/local/gcc-4.6.2-glibc-2.13-linaro-multilib-2011.12/fsl-linaro-toolchain/
Copyright © 2013 congatec AG QMX6ms02 31/52
bin/arm-none-linux-gnueabi- cgt_qmx6_config$ make ARCH=arm CROSS_COMPILE=/opt/freescale/usr/local/gcc-4.6.2-glibc-2.13-linaro-multilib-2011.12/fsl-linaro-toolchain/bin/arm-none-linux-gnueabi-
2.5.2 Prepare micro-SD card with oneiric.qmx6.tgz Image
• Obtain the oneiric image from the restricted conga-QMX6 software page of the congatec website
• Copy the image to the directory that contains the "sdprep.sh" script. The "sdprep.sh" script is located in ltib_pkg/tools.
$ cp oneiric.qmx6-3.0.35-4.1.0.tgz [TOOLS FOLDER]$ cd [TOOLS FOLDER]//The [TOOLS FOLDER] is the folder that contains the "sdprep.sh" script.
• Unmount the device if mounted and transfer the files to micro-SD card
$ sudo umount /dev/sdX//Replace the character "X" with the character for your device$ sudo ./sdprep.sh -d /dev/sdX -i oneiric.qmx6-3.0.35-4.1.0.tgz
The micro SD-card is now ready.
Copyright © 2013 congatec AG QMX6ms02 32/52
3 Yocto Based Linux BSPThe tested and verified development host for conga-QMX6 is the 64bit Ubuntu 12.04.3. The host should have a serial port to access the debug console and an SD card reader to create bootable SD card.
3.1 Setting up and building Yocto
3.1.1 Update The Repository
To update the repository, run the apt-get update command as root:
$ sudo apt-get update
3.1.2 Install Host Packages Needed by Yocto
The Ubuntu 12.04 requires additional packages for Yocto installation. Install these packages as follows:
$ sudo apt-get update$ sudo apt-get install gawk wget git-core diffstat unzip texinfo build-essential chrpath libsdl1.2-dev xterm make xsltproc \docbook-utils fop dblatex xmlto autoconf automake libtool libglib2.0-dev curl cifs-utils nfs-kernel-server vim uboot-mkimage//The backslash at the end of the line indicates that the command continues on the next line.
3.1.3 Obtain Yocto Recipes
$ mkdir ~/yocto$ cd ~/yocto$ git clone https://git.congatec.com/yocto-1-5/bsp-scripts.git .$ ./cgt-yocto_fetch.sh
3.1.4 Set GUI Image Environment Variable for conga-QMX6
$ MACHINE=cgtqmx6 source setup-environment build_cgtqmx6//You need to accept the EULA before proceeding to the next step.
Copyright © 2013 congatec AG QMX6ms02 33/52
3.1.5 Specify Target conga-QMX6 Variant
• Run ‘gedit’ to edit the conf/local.conf file.$ gedit conf/local.conf
• Add the following line to the end of the local.conf file:
PARTNUMBER = "PN016xxx" //Replace PN016xxx with the part number of your target conga-QMX6 module.
• Save the file and exit.
3.1.6 Build the GUI Image
$ bitbake fsl-image-gui//The process takes hours. When the build completes, the image will be located in ~/yocto/build_cgtqmx6/tmp/deploy/images/cgtqmx6/
3.2 Image Deployment
3.2.1 Transfer Root File System to Micro-SD$ cd ~/yocto/build_cgtqmx6/tmp/deploy/images/cgtqmx6/$ sudo dd if=/dev/zero of=/dev/sdX count=1000 bs=512$ sudo sfdisk --force -uM /dev/sdX <<EOF 10,,83 EOF$ sudo mkfs.ext3 -j /dev/sdX1//Replace the character "X1" with the appropriate character for the detected device$ sudo mount /dev/sdX1 /mnt$ sudo tar -xjvf fsl-image-gui-cgtqmx6-xxxxxxxxxxxxxx.tar.bz2 -C /mnt$ sync$ sudo umount /dev/sdX1
Copyright © 2013 congatec AG QMX6ms02 34/52
3.2.2 Transfer Root File System to eMMC
To transfer the rootfs to eMMC, the micro-SD card is required as a bridge for SATA.
• Prepare the micro-SD card by performing the steps in section 2.4.3 "Transfer Rootfs to micro-SD card"
• Transfer the tar.bz2 file to the micro-SD card
$ cd ~/yocto/build_cgtqmx6/tmp/deploy/images/cgtqmx6/$ sudo mount /dev/sdX1 /mnt$ sudo cp fsl-image-gui-cgtqmx6-xxxxxxxxxxxxxx.tar.bz2 /mnt$ sudo cp [BSP-FOLDER]/tools/fdisk.input$ sync$ sudo umount /dev/sdX1
• Boot up the system. After system boot up, clear the master boot record of the target device. Create and mount ext3 filesystem
$ sudo dd if=/dev/zero of=/dev/mmcblk1 count=1000 bs=512$ fdisk /dev/mmcblk1 < fdisk.input$ sudo mkfs.ext3 -j /dev/mmcblk1p1$ sudo mount /dev/mmcblk1p1 /mnt$ sudo tar -xjvf fsl-image-gui-cgtqmx6-xxxxxxxxxxxxxx.tar.bz2 -C /mnt$ sync
• Shutdown the system and remove the microSD card.
3.3 U-bootTo flash the conga-QMX6, use the manufacturing tool and the file "u-boot.bin" located in "~/yocto/build_cgtqmx6/tmp/deploy/images/cgtqmx6/".
See section 5.3.5 "Updating the Bootloader" for more information.
Copyright © 2013 congatec AG QMX6ms02 35/52
4 Android
4.1 Development PlatformTo develop software for conga-QMX6, an x86 based Linux system with installed cross compile toolchain is necessary. This can either be a dedicated system or a virtual machine that boots and runs Linux. A physical PC installed with Ubuntu 11.04 is however preferred to a virtual machine.
Note
The conga-QMX6 supports Ubuntu 11.04 as development host. The host should have a serial port to access the debug console and an SD card reader to create bootable SD card.
4.1.1 Update sources.list and Latest Packages
Follow the steps in section 2.1.1 and 2.1.2 to update the sources.list file and the packages respectively.
4.1.2 Install the Sun Java6 SDK
$ sudo apt-get purge openjdk*$ sudo apt-get autoremove$ sudo add-apt-repository ppa:ferramroberto/java$ sudo apt-get update$ sudo apt-get install sun-java6-jre sun-java6-plugin sun-java6-fonts// During the installation of the java-jre if the end-user agrees with the terms and conditions must select <OK> and accept the DLJ selection <Yes>$ sudo apt-get install sun-java6-jdk
4.1.3 Install Required Packages
$ sudo apt-get install git-core gnupg flex bison gperf build-essential zip curl zlib1g-dev libc6-dev lib32ncurses5-dev \ia32-libs x11proto-core-dev libx11-dev lib32readline5-dev lib32z-dev libgl1-mesa-dev g++-multilib mingw32 tofrodos python-markdown libxml2-utils xsltproc uboot-mkimage liblzo2-dev uuid-dev//the "\" sign at the end of the line is not part of the command. It only indicates that the command continues on the line.
Copyright © 2013 congatec AG QMX6ms02 36/52
4.1.4 Obtain the Android Source Code$ cd$ mkdir myandroid$ cd myandroid$ curl http://commondatastorage.googleapis.com/git-repo-downloads/repo > repo$ chmod a+x repo$ ./repo init -u https://android.googlesource.com/platform/manifest -b android-4.2.2_r1$ ./repo sync
4.1.5 Obtain the Kernel Source Code
$ cd myandroid$ git clone git://git.freescale.com/imx/linux-2.6-imx.git kernel_imx $ cd kernel_imx$ git checkout jb4.2.2_1.1.0-ga
4.1.6 Obtain the U-boot Source Code
$ cd myandroid/bootable$ cd bootloader$ git clone git://git.freescale.com/imx/uboot-imx.git uboot-imx$ cd uboot-imx$ git checkout imx-android-13.4.1$ git remote add cgt_imx_3.0.35_1.1.0 https://git.congatec.com/arm/qmx6_uboot.git$ git fetch cgt_imx_3.0.35_1.1.0$ git checkout --track cgt_imx_3.0.35_1.1.0/cgt_imx_3.0.35_1.1.0
4.1.7 Specify Target conga-QMX6 Variant
• Run ‘gedit’ to edit the cgt_qmx6_android.h file.
$ gedit include/configs/cgt_qmx6_android.h
• Uncomment one of these lines (choose the variant that applies to you):
//#define CONFIG_QMX6_PN016100 (for conga-QMX6, 1GHz SingleCore, 1GByte onboard DDR3 memory)//#define CONFIG_QMX6_PN016110 (for conga-QMX6, 1GHz SingleCore, 1GByte onboard DDR3 memory, extended temperature)//#define CONFIG_QMX6_PN016101 (for conga-QMX6, 1GHz DualCore Lite, 1GByte onboard DDR3 memory)//#define CONFIG_QMX6_PN016102 (for conga-QMX6, 1GHz DualCore, 1GByte onboard DDR3 memory)
Copyright © 2013 congatec AG QMX6ms02 37/52
//#define CONFIG_QMX6_PN016112 (for conga-QMX6, 1GHz DualCore, 1GByte onboard DDR3 memory, extended temperature)//#define CONFIG_QMX6_PN016103 (for conga-QMX6, 1GHz QuadCore, 1GByte onboard DDR3 memory)//#define CONFIG_QMX6_PN016113 (for conga-QMX6, 1GHz QuadCore, 1GByte onboard DDR3 memory, extended temperature)//#define CONFIG_QMX6_PN016104 (for conga-QMX6, 1GHz QuadCore, 2GByte onboard DDR3 memory)//#define CONFIG_QMX6_PN016105 (for conga-QMX6, 1GHz QuadCore, 2GByte onboard DDR3 memory)//#define CONFIG_QMX6_PN016106 (for conga-QMX6, 1GHz QuadCore, 1GByte onboard DDR3 memory)
4.1.8 Apply congatec Patch
$ source [android_jb4.2.2_1.1.0-ga_source_FOLDER]/code/jb4.2.2_1.1.0-ga/and_patch.sh$ c_patch [android_jb4.2.2_1.1.0-ga_source_FOLDER]/code/jb4.2.2_1.1.0-ga imx_jb4.2.2_1.1.0-ga$ cd$ cd myandroid/device/fsl$ git apply [android_JB_422-pkg]/patches/bsp-files/*.patch$ cd ~/myandroid$ cd kernel_imx$ git apply [android_JB_422-pkg]/patches/kernel/*.patch$ cd ~/myandroid$ cd hardware/imx$ git apply [android_JB_422-pkg]/patches/hardware_imx/*.patch
4.1.9 Build the System
$ export ARCH=arm$ export CROSS_COMPILE=~/myandroid/prebuilts/gcc/linux-x86/arm/arm-eabi-4.6/bin/arm-eabi-$ cd ~/myandroid$ source build/envsetup.sh$ lunch qmx6-eng$ cd kernel_imx$ make qmx6_android_defconfig$ make$ cd ..$ make
Copyright © 2013 congatec AG QMX6ms02 38/52
4.1.10 Transfer Images to Micro-SD
After compilation, four images are generated under the folder "~/myandroid/out/target/product/qmx6". The images are boot.img, system.img, recovery.img and userdata.img.
Transfer these images to the micro-SD card. The storage drive is named here as: '/dev/sdX'. Change the character 'X' to the appropriate character for your device.
$ sudo chmod +x ~/myandroid/device/fsl/common/tools/fsl-sdcard-partition.sh $ sudo ~/myandroid/device/fsl/common/tools/fsl-sdcard-partition.sh /dev/sdX$ cd ~/myandroid/out/target/product/qmx6$ sudo dd if=boot.img of=/dev/sdX1; sync$ sudo dd if=system.img of=/dev/sdX5; sync$ sudo dd if=recovery.img of=/dev/sdX2; sync$ sudo dd if=userdata.img of=/dev/sdX4 ; sync
4.1.11 U-Boot
• Flash the conga-QMX6 with the manufacturing tool and the file "u-boot.bin" located in "$HOME/myandroid/bootable/bootloader/uboot-imx/". See section 5.3.5 "Updating the Bootloader" for more information.
• Now press any key to stop the bootloader's auto boot. Copy the lines below to the command prompt and hit "Enter".
setenv bootcmd 'run bootargs_base; booti mmc0'setenv bootargs_base 'setenv bootargs ${bootargs} video=mxcfb0:dev=${vid_dev0} vmalloc=400M fbmem=28M androidboot.console=ttymxc1 ldo_active=enable enable_wait_mode=off ldo_active=on androidboot.hardware=congatec' save boot//This sets the appropriate environment variables.
Copyright © 2013 congatec AG QMX6ms02 39/52
5 Boot ProcessThe conga-QMX6 boot process starts at Power On Reset (POR) where the processor executes the code in the boot ROM. In normal operation (in contrast to the alternative boot mode), the Boot ROM uses the state of the BOOT_MODE register and eFUSEs of the processor to determine the boot device.
The i.MX6 boot eFUSEs on conga-QMX6 are preconfigured to fetch the bootloader from the onboard SPI flash. The bootloader after loading, executes and performs basic system initialization such as system memory and serial console initialization. Thereafter, the environment settings are parsed and the system boots as specified.
To interrupt autoboot, press any key during startup. This redirects you to the u-boot console. At the u-boot console, use the “print” command to display the environment settings. Additional functions such as memory dump, SPI access, I2C system are also available. To see the list of supported commands, use the “help” command.
If no key is pressed during startup, the boot process continues without interruption and the module boots the Linux operating system or any other operating system installed on the µSD card. By default, the environment variables are set up to search for the boot script “6q_bootscript” on any of the mass storage devices (µSD card, external SD card and onboard eMMC card). If the boot script is found, it is sourced and executed. The “6q_bootscript” script then loads and executes the Linux kernel.
5.1 Boot fusesThe i.MX6 processor provides an array of One Time Programmable (OTP) bootfuses. The boot fuses store configuration and data permanently and can be programmed to fetch the bootloader from different locations such as SPI flash, eMMC, SATA or SD card. They are basically used for boot, security and MAC address configuration and can only be programmed once. If a boot fuse blows, it can not be restored to its original state.
On the conga-QMX6, the boot fuses are preconfigured so that the boot ROM fetches the bootloader from the onboard SPI flash. The boot fuses can also be configured to determine whether the boot ROM boots in a standard mode or in a secured mode. In secured boot mode, only certified boot images are accepted by the internal boot ROM. If you attempt to boot an image that is not certified, the boot flow jumps to the serial downloader mode. In this mode, you have to pass certified boot images to the system via serial USB connection.
The hash keys which are used in secured boot mode to authenticate a certified image are also stored at certain locations in the OTP boot fuse array. For more information on how to use and implement secured boot mode, refer to the Freescale i.MX6 Security Reference Manual and the Freescale application note AN4581.
Note
In extremely rare case, the boot ROM may fetch the bootloader from a different location such as SD card interface. To resolve this, you need a customized conga-QMX6. Contact the congatec technical support for additional information.
Copyright © 2013 congatec AG QMX6ms02 40/52
Caution
The boot fuses on the conga QMX6 are not write-protected in order to allow the customers choose the functions that are specific to their applications. If the boot fuses were write-protected, some functional decisions such as whether to allow or disallow JTAG debugging would be made in advance, thereby reducing the functions available to the customer.
Because the boot fuses are not write-protected, it is possible to adversely alter the settings of the boot fuses, thereby rendering the system inoperable. congatec AG therefore recommends that the customer write-protect the bootfuses against alteration in the final production. If the bootfuses are altered, the customer is solely responsible for any damage that occurs. Damage on the module due to improper handling, altering or configuring of the boot fuses is not the responsibility of congatec AG.
5.2 IOMUX configurationThe iMX6 processor has limited number of pins, most of which have multiple signal options. With IOMUX configuration, the user can define the signals the multiplexed pin will be assigned.
The conga-QMX6 IOMUX routing configuration can be found in the kernel files directories shown below:/arch/arm/mach-mx6/board-mx6q_qmx6.c/arch/arm/mach-mx6/board-mx6q_qmx6.h/arch/arm/mach-mx6/board-mx6dl_qmx6.h
5.3 BootloaderThe standard conga-QMX6 bootloader is u-boot version 2009.08. The u-boot bootloader is a GNU GPL open source software and requires a serial terminal connection to display the boot process and to modify the boot behaviour. The boot behaviour is controlled via environment variables.
On the conga-QMX6, the u-boot bootloader outputs the serial console on the UART2 Interface. The UART2 and UART5 interfaces are available via connector X6 onboard the conga-QMX6. The signal level on connector X6 conforms to the RS232 specification whereas the UART signals on the Q7 edge connector are provided with 3.3V levels.
Connect the serial port UART2 with the host PC as shown in the table below:
Copyright © 2013 congatec AG QMX6ms02 41/52
Serial Port connection (UART2) with the host PC
conga-QMX6 Connection Host PC (DTE), 9 Pol. DSUBConnector X6, Pin 3 (GND) DSUB, Pin 5 (GND)Connector X6, Pin 4 (UART2, TX) DSUB, Pin 2 (RxD)Connector X6, Pin 5 (UART2, RX) DSUB, Pin 3 (TxD)
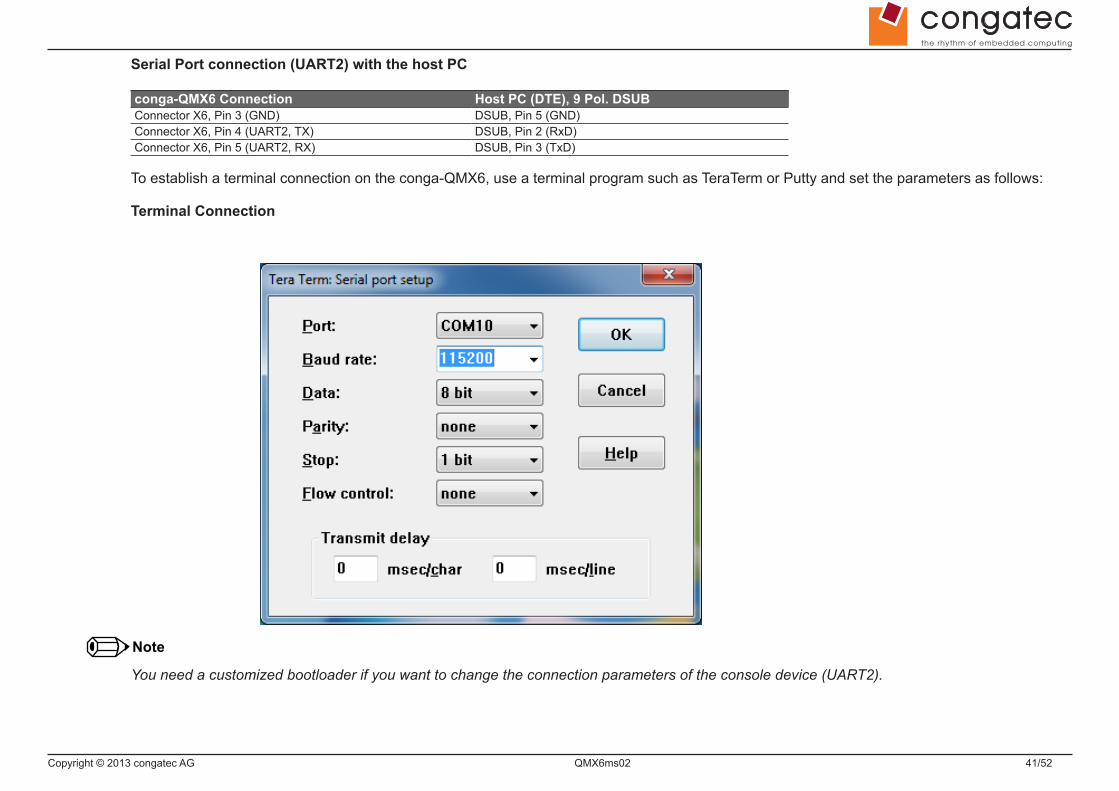
To establish a terminal connection on the conga-QMX6, use a terminal program such as TeraTerm or Putty and set the parameters as follows:
Terminal Connection
Note
You need a customized bootloader if you want to change the connection parameters of the console device (UART2).
Copyright © 2013 congatec AG QMX6ms02 42/52
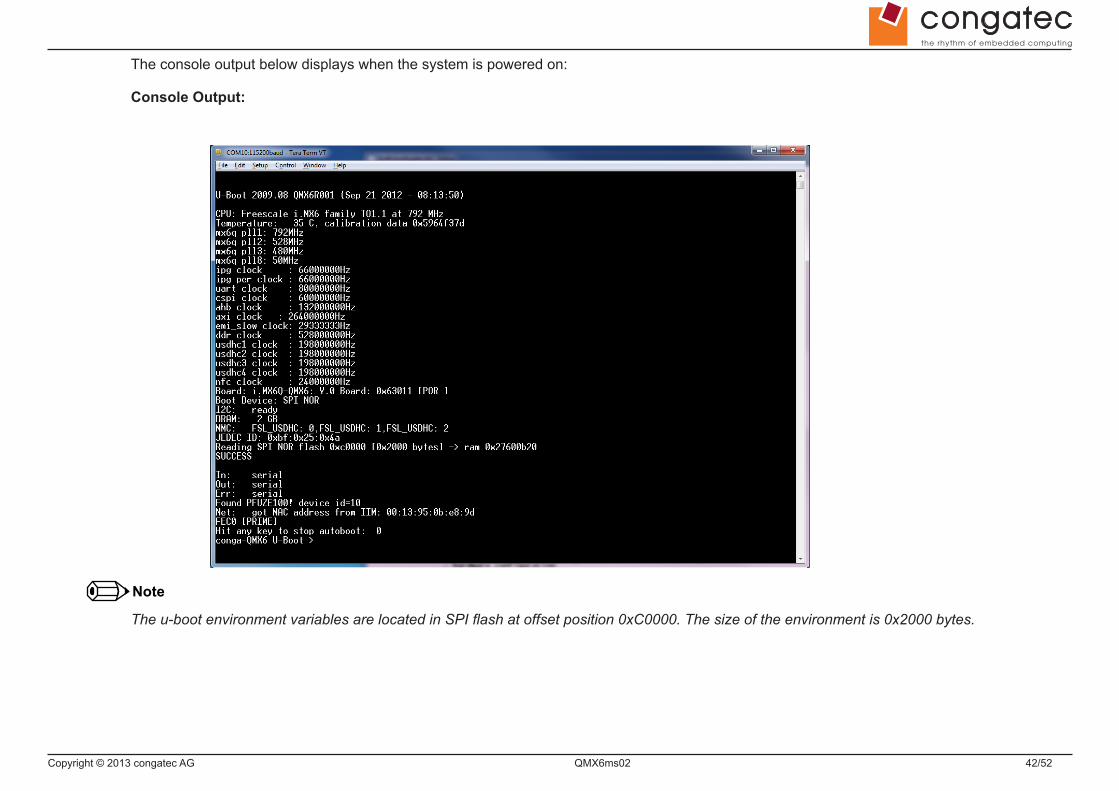
The console output below displays when the system is powered on:
Console Output:
Note
The u-boot environment variables are located in SPI flash at offset position 0xC0000. The size of the environment is 0x2000 bytes.
Copyright © 2013 congatec AG QMX6ms02 43/52
One of the benefits of the u-boot bootloader is the possibility to specify its run time configuration using environment variables. To display the u-boot environment variables, use the printenv or the print command. The following environment variables are predefined in conga-QMX6:
bootdelay=3baudrate=115200ipaddr=192.168.1.103serverip=_SERVER_IP_ADDR_netmask=255.255.255.0loadaddr=0x10800000rd_loadaddr=0x11000000netdev=eth0ethprime=FEC0ethaddr=00:00:00:00:00:00uboot=u-boot.binkernel=uImagevid_dev0=hdmi,1920x1080M@60,if=RGB24vid_dev1=ldb,LDB-XGA,if=RGB666bootargs=console=ttymxc1,115200bootargs_base=setenv bootargs ${bootargs} video=mxcfb0:dev=${vid_dev0} video=mxcfb1:dev=${vid_dev1}bootargs_mmc=setenv bootargs ${bootargs} rootwait enable_wait_mode=onbootargs_nfs=setenv bootargs ${bootargs} root=/dev/nfs ip=dhcp nfsroot=${serverip}:${nfsroot},v3,tcpenable_wait_mode=offbootcmd_net=dhcp; run bootargs_base bootargs_nfs;bootmbootcmd_mmc=run bootargs_base bootargs_mmc;for disk in 0 1 2; do mmc dev ${disk};for fs in fat ext2 ; do ${fs}load mmc ${disk}:1 10008000 /6q_bootscript && source 10008000 ; done ; donebootcmd=run bootcmd_mmcclearenv=sf probe 1 && sf erase 0xc0000 0x2000 && echo restored environment to factory defaultupgradeu=for disk in 0 1 2; do mmc dev ${disk} ;for fs in fat ext2 ; do ${fs}load mmc ${disk}:1 10008000 /6q_upgrade && source 10008000 ; done ; donebootfile=_BOOT_FILE_PATH_IN_TFTP_nfsroot=_ROOTFS_PATH_IN_NFS_stdin=serialstdout=serialstderr=serialethact=FEC0
During the boot process, the bootloader evaluates the “bootcmd” variable and executes it. In particular, the script that is stored in “bootcmd_mmc” variable will be executed. It is used to setup the kernel command line parameters (via “run bootargs_base bootargs_mmc) and to enumerate through the disks in order to find and to execute the “6q_bootscript”.
Copyright © 2013 congatec AG QMX6ms02 44/52
Detailed description of the environment variables with default values:
• bootdelay=3
This is the number of seconds the u-boot waits before it executes the contents of the bootcmd variable. During this time, the boot can be interrupted by pressing any key.
• baudrate=115200
The baudrate of the console in bps.
• Ipaddr=192.168.1.103
IP address, when using tftp to fetch the bootfile.
• serverip=_SERVER_IP_ADDR_
The server IP address, when using tftp to fetch the bootfile.
• netmask=255.255.255.0
The subnet mask,when using tftp to fetch the bootfile.
• loadaddr=0x10800000
The memory location where the bootfile is loaded to.
• rd_loadaddr=0x11000000
The memory location where the initial RAMDisk is loaded to.
• netdev=eth0
The ethernet interface.
• ethprime=FEC0
The primary Ethernet interface
• ethaddr=00:00:00:00:00:00
The Ethernet interface MAC address. Usually, there is no need to modify this value because the i.MX6 OTP configuration provides the MAC address.
Copyright © 2013 congatec AG QMX6ms02 45/52
• uboot=u-boot.bin
The u-boot binary.
• kernel=uImage
The kernel image.
• nfsroot=_ROOTFS_PATH_IN_NFS_
Specifies the path to the NFS root filesystem for network/NFS boot.
• bootargs=console=ttymxc1,115200• bootargs_base=setenv bootargs ${bootargs} video=mxcfb0:dev=${vid_dev0}video=mxcfb1:dev=${vid_dev1}
The basic boot arguments that are passed to the Linux kernel. These arguments are expanded during the boot process to establish different boot behaviour (e.g. for standard boot or boot via NFS)
• bootargs_nfs=setenv bootargs ${bootargs} root=/dev/nfs ip=dhcp nfsroot=${serverip}:${nfsroot},v3,tcp
The boot arguments passed to the Linux kernel when booting from network. Note that executing ‘runbootargs_nfs’ will expand the default bootargs.
• bootcmd_net=dhcp; run bootargs_base bootargs_nfs;bootm.
This variable/script sets up network boot. Address resolution is performed by DHCP and the file specified by ‘bootfile’ will load. Afterwards, the ‘bootfile’ is executed with the ‘bootm’ command.
• bootargs_mmc=run bootargs_base bootargs_mmc;for disk in 0 1 2; do mmc dev ${disk};for fs in fat ext2 ; do ${fs}load mmc ${disk}:1 10008000 /6q_bootscript && source 10008000 ; done ; done
This variable/script performs standard boot from SD card or eMMC.
• bootcmd=run bootcmd_mmc
The start-point of the boot process.
• clearenv=sf probe 1 && sf erase 0xc0000 0x2000 && echo restored environment to factory default
This variable/script erases the current environment and restores default values.
• bootfile=_BOOT_FILE_PATH_IN_TFTP_
Copyright © 2013 congatec AG QMX6ms02 46/52
Specifies the file loaded using the tftp command. If you will use a TFTP server, then this variable should be specified properly.
• ethact=FEC0
Specifies the Ethernet interface when booting via network (TFTP/NFS). Usually, this value does not need to be changed.
• vid_dev0=hdmi,1920x1080@60,if=RGB24
The configuration for the first frame buffer device. In the default configuration, this device maps to the HDMI port, provides full high definition resolution and provides a RGB24 color mapping.
• vid_dev1=ldb,LDB-XGA,if=RGB666
The configuration for the second frame buffer device. In the default configuration, this device maps to the LVDS port (ldb), provides XGA resolution and a RGB666 (18-bit) color mapping.
• stdin=serial• stdout=serial• stderr=serial
Maps all standard text input/output/error consoles to the serial port.
5.3.1 Changing The U-boot Environment
There are several commands to change the behavior of the bootloader and to customize the boot process. To display the list of available commands, use the help command.
Below is a list of the most useful commands:
Command Descriptionhelp Prints a help text for each commandprint Prints a list of the current environment variablessetenv Sets the value of an environment variablesave Saves the current u-boot environment to SPI flashbootm Boots an application image that is stored in memory. If booting a linux image, this command accepts arguments.dhcp Invokes a DHCP request in order to obtain IP/boot parameters and boots an image via networkrun Runs a script stored in an environment variablespi Used for managing the SPI subsystem e.g to select, read and program devicesmmc used for managing the MMC subsystemsata used for managing the SATA interface and connected devices.i2c used for managing the I2C interface and connected devices.
Copyright © 2013 congatec AG QMX6ms02 47/52
5.3.2 Restore Default Settings
To restore the environment to default settings, just execute the predefined script “clearenv” at bootloader console:conga-QMX6 U-Boot > run clearenv
Hint:
If the “clearenv” script has been deleted, execute an alternative command as shown below. What this does is that it erases the storage location of the environment variables in the SPI flash.
conga-QMX6 U-Boot > sf probe 1 && sf erase 0xc0000 0x2000
5.3.3 Bootloader scripts
Environment variables do not always contain ordinary values only but also complete small script that can be executed with the ‘run’ command (see also variable “bootcmd_mmc” and variable “clearenv”). The u-boot variables likewise load and execute scripts stored on a storage media. For example during boot, the 6q_bootscript loads and executes (see environment variable bootcmd_mmc).
For the bootloader to notice a script as executable,you have to prepare the script with the mkimage tool. For instance, to setup the 6q_bootscript, perform the following steps on the development workstation:
setup the source script (it modifies the boot arguments, loads and executes the kernel)$ cat > 6q_bootscript.src << EOF> set bootargs $bootargs root=/dev/mmcblk0p1 rootwait rw fixrtc ;> ext2load mmc ${disk}:1 10800000 /boot/uImage && bootm 10800000 ;> echo “Error loading kernel image”> EOF
Convert the script to u-boot script:
$ mkimage -A arm -O linux -T script -C none -a 0 -e 0 -n “boot script” -d 6q_bootscript.src 6q_bootscript
The bootloader can then execute the resulting script 6q_bootscript with the load and source command, e.g.
conga-QMX6 U-Boot > extload mmc 0:1 10008000 /6q_bootscript && source 10008000
In the command above, the 6q_booscript loads from the first partition of mmc device 0 to storage location 0x10008000 of the system memory. Afterwards it executes with the “source” command.
Copyright © 2013 congatec AG QMX6ms02 48/52
5.3.4 Setting up the bootloader
The bootloader functions can be enhanced with the bootloader source code provided; for example, to create a bootloader that is dedicated to a specific application.
The bootloader source code is provided with the LTIB environment. However, the bootloader requires a patch to support conga-QMX6 module. The patch supports the conga-QMX6 commercial variants (PN 016100 - PN 016106). To get the exact version of the u-boot code the patch is intended for, refer to the readme file included in the bootloader patch.
To rebuild the bootloader with the development environment:
• Check-out the u-boot sources (from the LTIB packages)
$ cd /<ltib path>$ ./ltib -m prep -p u-boot
• Get the congatec source code branch
$ cd $HOME/ltib/rpm/BUILD/u-boot-2009.08$ mv .gitsaved .git$ git remote add cgt_imx_3.0.35_1.1.0 https://git.congatec.com/arm/qmx6_uboot.git$ git fetch cgt_imx_3.0.35_1.1.0$ git checkout --track cgt_imx_3.0.35_1.1.0/cgt_imx_3.0.35_1.1.0
• Configure the patch. The patch supports various variants of the conga-QMX6 board. Therefore, the correct board type needs to be configured in the configuration file. For conga-QMX6, there are three different configuration files in the source code tree:include/configs/cgt_qmx6.h (select this configuration to build a standard QMX6 bootloader) include/configs/cgt_qmx6_mfg.h (select this configuration to build a bootloader optimized for production purposes)include/configs/cgt_qmx6_android.h (select this configuration to build a bootloader optimized for android operating system)
• Build the u-boot
$ make ARCH=arm CROSS_COMPILE=/opt/freescale/usr/local/gcc-4.6.2-glibc-2.13-linaro-multilib-2011.12/fsl-linaro-toolchain/bin/arm-none-linux-gnueabi- distclean$ make ARCH=arm CROSS_COMPILE=/opt/freescale/usr/local/gcc-4.6.2-glibc-2.13-linaro-multilib-2011.12/fsl-linaro-toolchain/bin/arm-none-linux-gnueabi- cgt_qmx6_config partnumber=PN0xxxxx$ make ARCH=arm CROSS_COMPILE=/opt/freescale/usr/local/gcc-4.6.2-glibc-2.13-linaro-multilib-2011.12/fsl-linaro-toolchain/bin/arm-none-linux-gnueabi-
The bootloader binary (u-boot.bin) is then created in the build directory. See section 5.2.5 for detailed information on how to update/flash the bootloader on the conga-QMX6 module.
Copyright © 2013 congatec AG QMX6ms02 49/52
Note
To flash the conga-QMX6, use the manufacturing tool and the file "u-boot.PN0xxxxx.bin" located in "$HOME/ltib/rpm/BUILD/u-boot-2009-08/". For more information, see section 5.3.5 "Updating the Bootloader".
The PN0xxxxx refers to the part number of your particular conga-QMX6 module. For the list of conga-QMX6 variants, see below:
conga-QMX6 variants// PN0XXXXX refers to the part number of your particular conga-QMX6 module. See below for the complete conga-QMX6 variants:// PN016100 (for conga-QMX6 equipped with i.MX6 1GHz SingleCore, 1GByte onboard DDR3 memory)// PN016110 (for conga-QMX6 equipped with i.MX6 1GHz SingleCore, 1GByte onboard DDR3 memory, extended temperature)// PN016101 (for conga-QMX6 equipped with i.MX6 1GHz DualCore Lite, 1GByte onboard DDR3 memory)// PN016102 (for conga-QMX6 equipped with i.MX6 1GHz DualCore, 1GByte onboard DDR3 memory)// PN016112 (for conga-QMX6 equipped with i.MX6 1GHz DualCore, 1GByte onboard DDR3 memory, extended temperature)// PN016103 (for conga-QMX6 equipped with i.MX6 1GHz QuadCore, 1GByte onboard DDR3 memory)// PN016113 (for conga-QMX6 equipped with i.MX6 1GHz QuadCore, 1GByte onboard DDR3 memory, extended temperature)// PN016104 (for conga-QMX6 equipped with i.MX6 1GHz QuadCore, 2GByte onboard DDR3 memory)// PN016105 (for conga-QMX6 equipped with i.MX6 1GHz QuadCore, 2GByte onboard DDR3 memory)// PN016106 (for conga-QMX6 equipped with i.MX6 1GHz QuadCore, 1GByte onboard DDR3 memory)
Additional hints
If the type of the board is not correctly specified in the configuration file, an error “ERROR: No CONFIG_QMX6_PN0161xx entry found.” will occur. If this happens, make sure that only one “#define CONFIG_QMX6_PN0161xx” entry is enabled.
5.3.5 Updating the bootloader
To update the bootloader on conga-QMX6, use the Freescale manufacturing toolkit which can be downloaded for free on Freescale webpage. Additionally, select a suitable profile for conga-QMX6. The profile contains a manufacturing kernel, a manufacturing bootloader, a ramdisk and a description file that controls the update process.
Also set the bootstrap signal BOOT_ALT# to low. This forces the module to Serial downloader mode (Alternative boot mode). Set also the USB OTG port of the module to client mode.
In alternative boot mode, the CPU module acts as USB client and fetches the bootloader from a USB host computer (in contrast to the standard boot mode, where the bootloader is fetched from SPI eeprom). A standard Windows host based on Windows XP or Windows 7 can be used to serve the bootloader and all the other files which are required for updating the bootloader.
A USB host/client connection between the Windows host and the USB OTG port of the conga-QMX6 module is required. Additionally, the standard serial terminal connection, as described in section 4.2 can be used to observe the update process. If you want to perform the
Copyright © 2013 congatec AG QMX6ms02 50/52
bootloader update with the conga-QEVAL evaluation backplane, set the jumper CN31 to position 1-2 (alternative boot mode) and CN55 to position 2-3 (USB port 1 as Client).
Connect USB client port (CN20) to the Windows host with a standard USB Type A to B cable.
5.3.5.1 Windows Host Set up
To set up the Windows host, the following software packages are required:Mfgtools-Rel-L3.0.35_1.0.1_MX6Q_UPDATER.tar.gz (available on Freescale webpage)Mfgtools-Add-On-QMX6-L3.0.15_1359.tar.gz (provided by congatec)
Installation steps
• Extract the content of Mfgtools-Rel-L3.0.35_1.0.1_MX6Q_UPDATER.tar.gz to the desired location
• Extract the content of Mfgtools-Add-On-QMX6-L3.0.15_1359.tar.gz to the same directory
• In the tool directory, setup the tool configuration file (cfg.ini) according to the product you want to update. For example, replace the original cfg.ini file with cfg_pn016104.ini if you are updating a conga-QMX6/QC-2G with part number 016104. Likewise replace the original cfg.ini file with cfg_pn016101.ini if you are updating a conga-QMX6/DCL-1G with part number 016101
• Copy the bootloader binary (uboot.bin) to the product specific “files” directory of the profiles directory (Profiles\pn0161XX\OS Firmware\files)
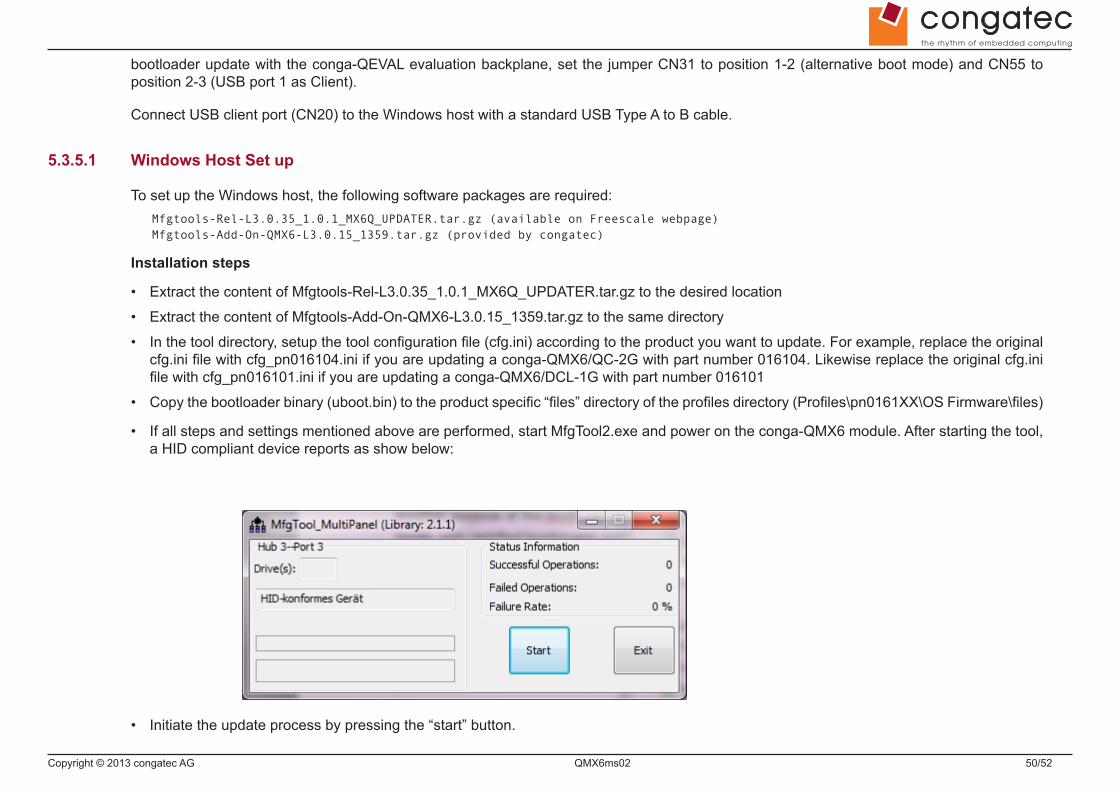
• If all steps and settings mentioned above are performed, start MfgTool2.exe and power on the conga-QMX6 module. After starting the tool, a HID compliant device reports as show below:
• Initiate the update process by pressing the “start” button.
Copyright © 2013 congatec AG QMX6ms02 51/52
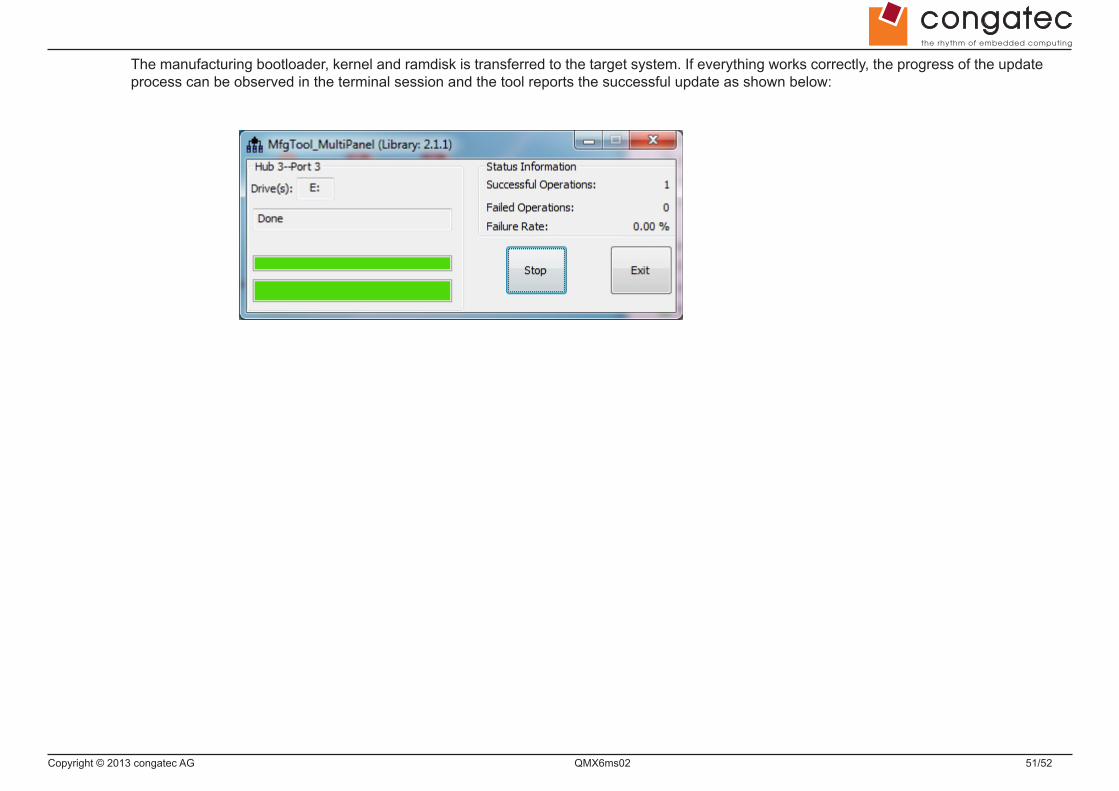
The manufacturing bootloader, kernel and ramdisk is transferred to the target system. If everything works correctly, the progress of the update process can be observed in the terminal session and the tool reports the successful update as shown below:
Copyright © 2013 congatec AG QMX6ms02 52/52
6 Sources of InformationFor detailed information about the i.MX6 processor and the available software board packages/tools, consult the documents listed below. These documents are available at http://www.freescale.com. A registered account is required to download some of the files.
• i.MX 6Dual/6Quad Automotive and Infotainment Applications Processors (IMXDQAEC.pdf)
• i.MX 6Dual/6Quad Applications Processors for Consumer Products (IMXDQCEC.pdf)
• i.MX 6Dual/6Quad Applications Processors for Industrial Products (IMXDQIEC.pdf)
• i.MX 6Solo/6DualLite Automotive and Infotainment Applications Processors (IMX6SDLAEC.pdf)
• i.MX 6Solo/6DualLite Applications Processors for Consumer Products(IMX6SDLCEC.pdf)
• i.MX 6Solo/6DualLite Applications Processors for Industrial Products(IMX6SDLIEC.pdf)
• i.MX 6Dual/6Quad Applications Processors Reference Manual (IMX6DQRM.pdf)
• i.MX 6Solo/6DualLite Applications Processors Reference Manual (IMX6SDLRM.pdf)
• Chip Errata for the i.MX 6Dual/6Quad (IMX6DQCE.pdf)
• Chip Errata for the i.MX 6Solo/6DualLite (IMX6SDLCE.pdf)
• LTIB documentation available at http://ltib.org/pages/LTIB_generic_v1.4_-_version_6.4.1.pdf
• i.MX6 datasheets that covers all features and electrical characteristics of the processor
• The Freescale Linux BSP documentation (including the Linux BSP Reference Manual) found at the Freescale LEIMX project page
• Freescale community at https://community.freescale.com/welcome
6.1 Industry SpecificationThe list below provides links to industry specifications that apply to congatec AG modules.
Specification LinkQseven® Specification http://www.qseven-standard.org/Qseven® Design Guide http://www.qseven-standard.org/Low Pin Count Interface Specification, Revision 1.0 (LPC) http://developer.intel.com/design/chipsets/industry/lpc.htmUniversal Serial Bus (USB) Specification, Revision 2.0 http://www.usb.org/homeSerial ATA Specification, Revision 1.0a http://www.serialata.orgPCI Express Base Specification, Revision 2.0 http://www.pcisig.com/specificationsFreescale website http://www.freescale.com


