1 Find more information at ElectrumSabers.com/Resources Congratulations on your new Electrum Smart Saber ® ! Your new saber is powered by the Diatium3 Saber Core, and features these components in your package. Confirm upon receipt that these components are included. If your package is missing any of these components, contact the Electrum Sabercrafts team at [email protected]DO NOT attempt the remove the internal electronics saber chassis or pommel cap! Doing so could damage the electronics and void your warranty. The saber requires a charge source of 5V (Volt) 2A (Amps) or higher. When charging the saber, ensure your power source is at least 5V 2A. When charging the saber, be sure to place the saber in a position where the saber cannot fall/be knocked onto the floor. The hilt could land on the charge cord itself and damage the charge port. 3-Point Touch Switch Saber Pommel Saber Pommel Cap DO NOT remove unless instructed by ES staff, or for replacement. Saber Speaker Micro USB Charge Cord Set Screw Hex Wrenchs (2 Sizes Provided*) * 3/32 Hex Key - for button screws * 5/64 Hex Key - for blade retention screws *Saber Drawing is an example. Your Saber Model may differ.
Transcript
1Find more information at ElectrumSabers.com/Resources
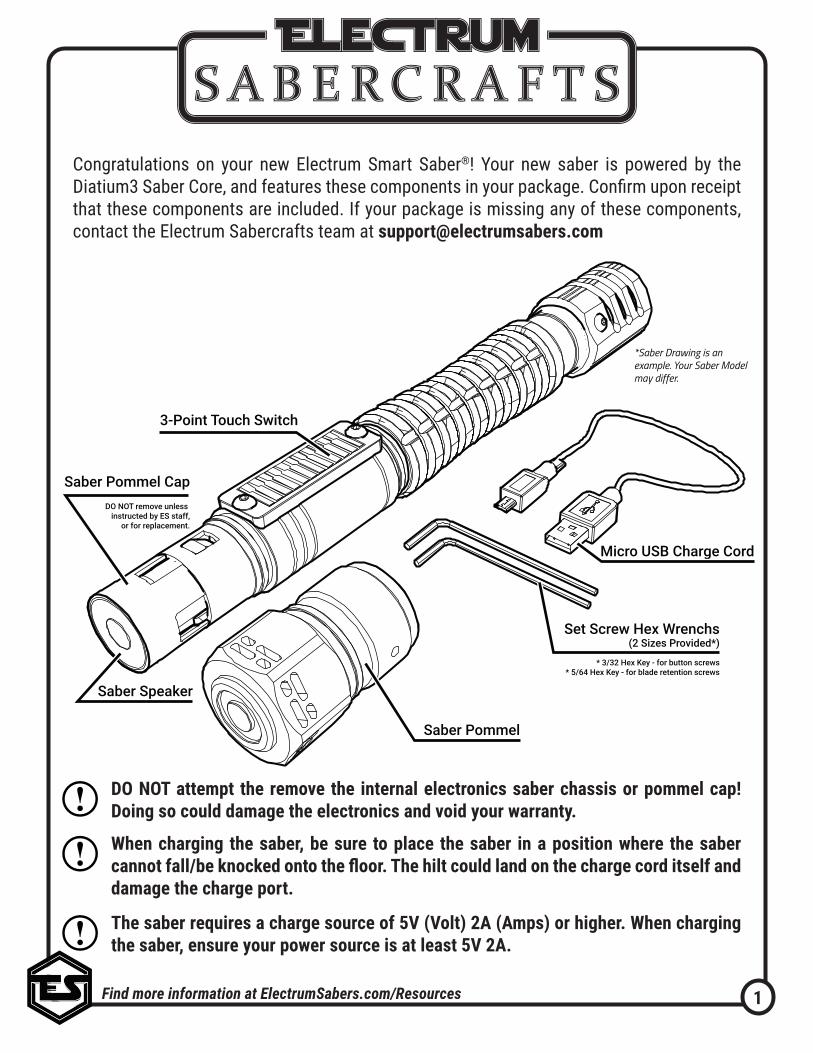
Congratulations on your new Electrum Smart Saber®! Your new saber is powered by the Diatium3 Saber Core, and features these components in your package. Confirm upon receipt that these components are included. If your package is missing any of these components, contact the Electrum Sabercrafts team at [email protected]
DO NOT attempt the remove the internal electronics saber chassis or pommel cap! Doing so could damage the electronics and void your warranty.
The saber requires a charge source of 5V (Volt) 2A (Amps) or higher. When charging the saber, ensure your power source is at least 5V 2A.
When charging the saber, be sure to place the saber in a position where the saber cannot fall/be knocked onto the floor. The hilt could land on the charge cord itself and damage the charge port.
3-Point Touch Switch
Saber Pommel
Saber Pommel CapDO NOT remove unless
instructed by ES staff,or for replacement.
Saber Speaker
Micro USB Charge Cord
Set Screw Hex Wrenchs(2 Sizes Provided*)
* 3/32 Hex Key - for button screws* 5/64 Hex Key - for blade retention screws
*Saber Drawing is an example. Your Saber Model may differ.
2Find more information at ElectrumSabers.com/Resources
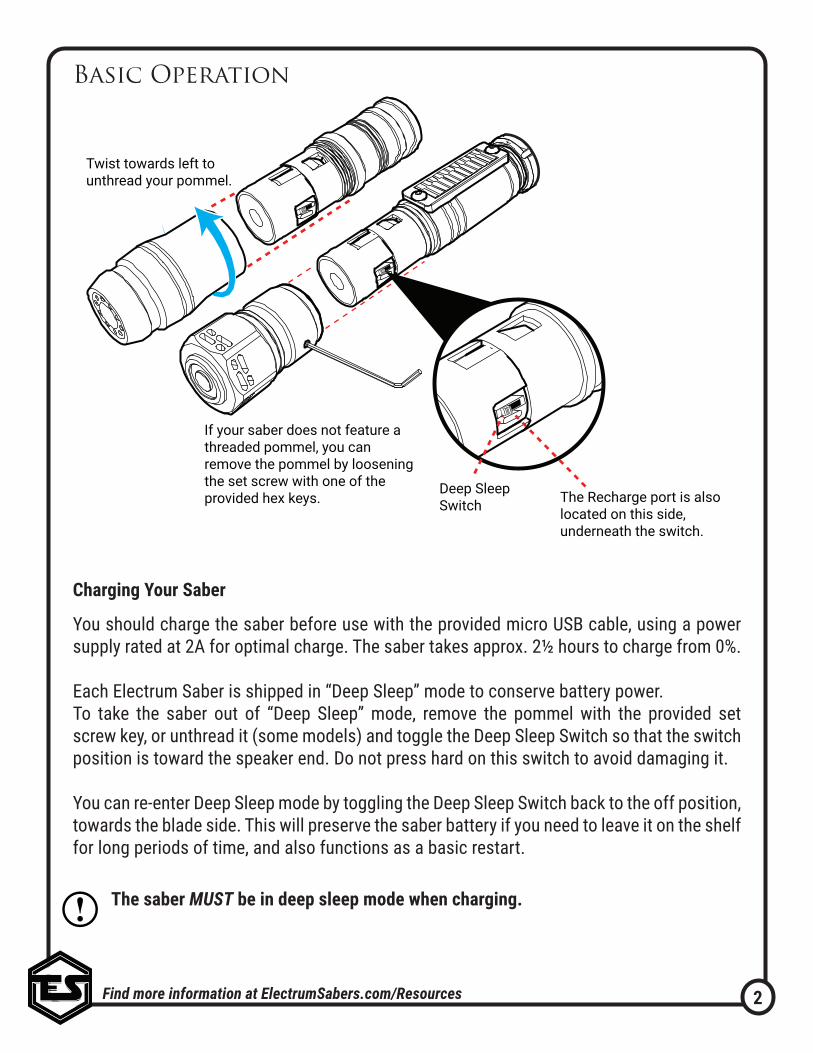
If your saber does not feature a threaded pommel, you can remove the pommel by loosening the set screw with one of the provided hex keys.
Twist towards left to unthread your pommel.
Deep Sleep Switch The Recharge port is also
located on this side, underneath the switch.
Charging Your Saber
You should charge the saber before use with the provided micro USB cable, using a power supply rated at 2A for optimal charge. The saber takes approx. 2½ hours to charge from 0%.
Each Electrum Saber is shipped in “Deep Sleep” mode to conserve battery power.To take the saber out of “Deep Sleep” mode, remove the pommel with the provided set screw key, or unthread it (some models) and toggle the Deep Sleep Switch so that the switch position is toward the speaker end. Do not press hard on this switch to avoid damaging it.
You can re-enter Deep Sleep mode by toggling the Deep Sleep Switch back to the off position, towards the blade side. This will preserve the saber battery if you need to leave it on the shelf for long periods of time, and also functions as a basic restart.
The saber MUST be in deep sleep mode when charging.
Basic Operation
3Find more information at ElectrumSabers.com/Resources
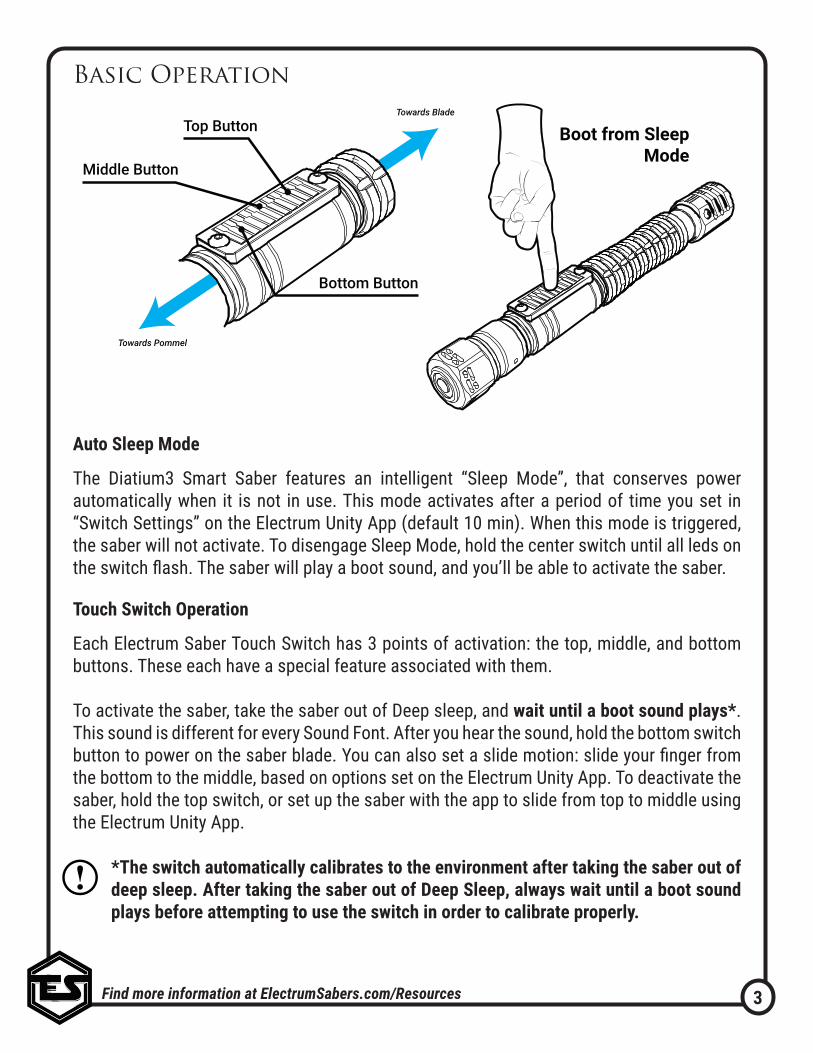
Auto Sleep Mode
The Diatium3 Smart Saber features an intelligent “Sleep Mode”, that conserves power automatically when it is not in use. This mode activates after a period of time you set in “Switch Settings” on the Electrum Unity App (default 10 min). When this mode is triggered, the saber will not activate. To disengage Sleep Mode, hold the center switch until all leds on the switch flash. The saber will play a boot sound, and you’ll be able to activate the saber.
Touch Switch Operation
Each Electrum Saber Touch Switch has 3 points of activation: the top, middle, and bottom buttons. These each have a special feature associated with them.
To activate the saber, take the saber out of Deep sleep, and wait until a boot sound plays*. This sound is different for every Sound Font. After you hear the sound, hold the bottom switch button to power on the saber blade. You can also set a slide motion: slide your finger from the bottom to the middle, based on options set on the Electrum Unity App. To deactivate the saber, hold the top switch, or set up the saber with the app to slide from top to middle using the Electrum Unity App.
*The switch automatically calibrates to the environment after taking the saber out of deep sleep. After taking the saber out of Deep Sleep, always wait until a boot sound plays before attempting to use the switch in order to calibrate properly.
Basic Operation
Boot from SleepMode
Middle Button
Top Button
Bottom Button
Towards Blade
Towards Pommel
4Find more information at ElectrumSabers.com/Resources
Blaster Mode Activation
Blaster EffectMotion
Force EffectMotion
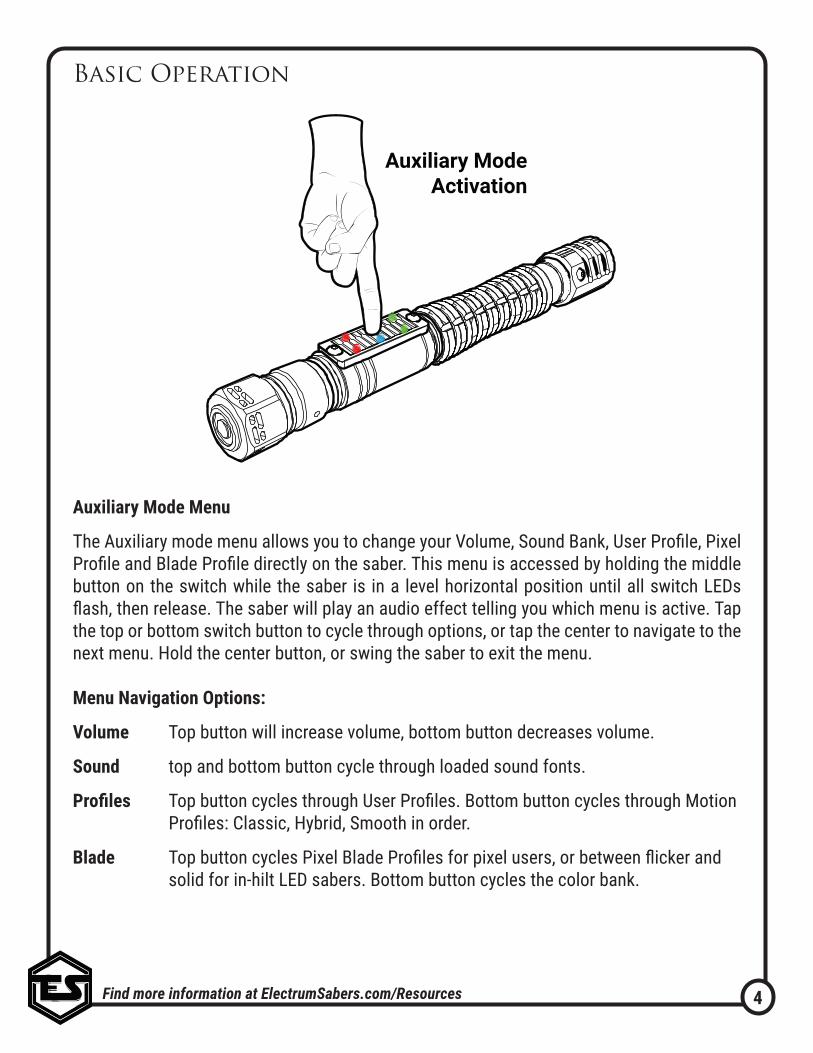
Auxiliary Mode Activation
Auxiliary Mode Menu
The Auxiliary mode menu allows you to change your Volume, Sound Bank, User Profile, Pixel Profile and Blade Profile directly on the saber. This menu is accessed by holding the middle button on the switch while the saber is in a level horizontal position until all switch LEDs flash, then release. The saber will play an audio effect telling you which menu is active. Tap the top or bottom switch button to cycle through options, or tap the center to navigate to the next menu. Hold the center button, or swing the saber to exit the menu.
Menu Navigation Options:
Volume Top button will increase volume, bottom button decreases volume.
Sound top and bottom button cycle through loaded sound fonts.
Profiles Top button cycles through User Profiles. Bottom button cycles through Motion Profiles: Classic, Hybrid, Smooth in order.
Blade Top button cycles Pixel Blade Profiles for pixel users, or between flicker and solid for in-hilt LED sabers. Bottom button cycles the color bank.
Basic Operation
5Find more information at ElectrumSabers.com/Resources
Blaster Mode Activation
Blaster EffectMotion
Force EffectMotion
Auxiliary Mode Activation
Blaster Mode
To enter Blaster Mode, hold the saber in a vertical position (blade up) within the range you set in the Unity App (Default 70°). While in this position, hold the bottom switch button until the LEDs on the plate flash to activate the mode. Once Blaster Mode is active, swing the saber to create blaster effects. To toggle a “Force Effect”, push the saber in a straight line outward. Hold the saber still outside of the range to deactivate, or hold the bottom button again while in a vertical position.
Using the Unity App, you can set the saber to use “Manual Blaster” This will default to the bottom switch button, and will activate effects when you tap the bottom switch button.
Basic Operation
Blaster Mode and Force Effects will only activate if the sound font in use contains blaster sound files or force files. If they are not present, the saber will not enter Blaster Mode.
Manual Blaster cannot be activated if Auto Lockup is set to OFF in the Electrum Unity App.
6Find more information at ElectrumSabers.com/Resources
Sound Fonts
Adding Sound Fonts
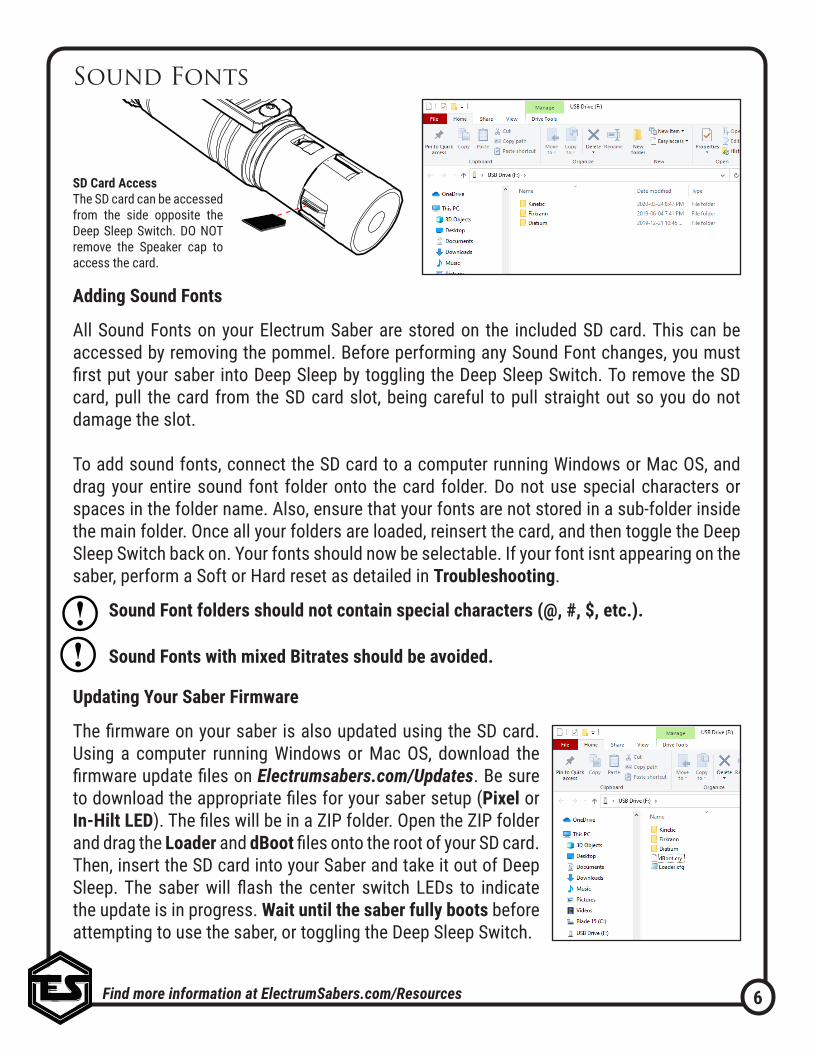
All Sound Fonts on your Electrum Saber are stored on the included SD card. This can be accessed by removing the pommel. Before performing any Sound Font changes, you must first put your saber into Deep Sleep by toggling the Deep Sleep Switch. To remove the SD card, pull the card from the SD card slot, being careful to pull straight out so you do not damage the slot.
To add sound fonts, connect the SD card to a computer running Windows or Mac OS, and drag your entire sound font folder onto the card folder. Do not use special characters or spaces in the folder name. Also, ensure that your fonts are not stored in a sub-folder inside the main folder. Once all your folders are loaded, reinsert the card, and then toggle the Deep Sleep Switch back on. Your fonts should now be selectable. If your font isnt appearing on the saber, perform a Soft or Hard reset as detailed in Troubleshooting.
Sound Font folders should not contain special characters (@, #, $, etc.).
Sound Fonts with mixed Bitrates should be avoided.
Updating Your Saber Firmware
The firmware on your saber is also updated using the SD card. Using a computer running Windows or Mac OS, download the firmware update files on Electrumsabers.com/Updates. Be sure to download the appropriate files for your saber setup (Pixel or In-Hilt LED). The files will be in a ZIP folder. Open the ZIP folder and drag the Loader and dBoot files onto the root of your SD card. Then, insert the SD card into your Saber and take it out of Deep Sleep. The saber will flash the center switch LEDs to indicate the update is in progress. Wait until the saber fully boots before attempting to use the saber, or toggling the Deep Sleep Switch.
SD Card AccessThe SD card can be accessed from the side opposite the Deep Sleep Switch. DO NOT remove the Speaker cap to access the card.
7Find more information at ElectrumSabers.com/Resources
Blade Overview & Operation
Pixel Blades
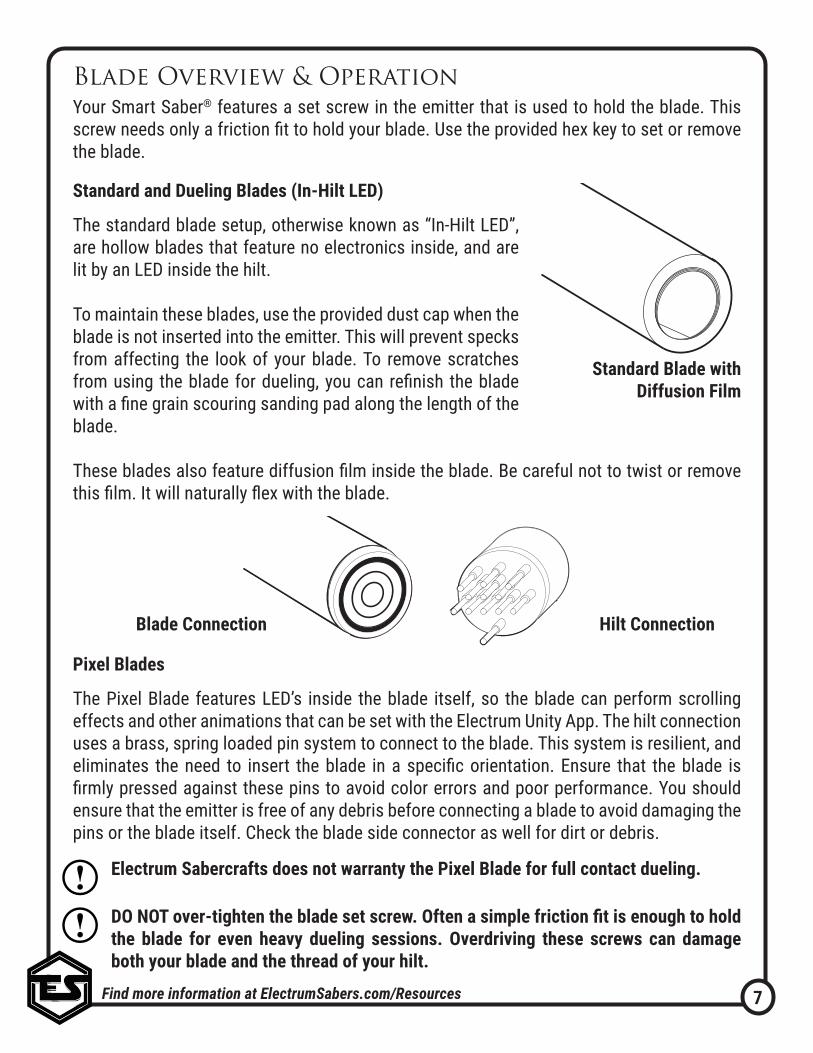
The Pixel Blade features LED’s inside the blade itself, so the blade can perform scrolling effects and other animations that can be set with the Electrum Unity App. The hilt connection uses a brass, spring loaded pin system to connect to the blade. This system is resilient, and eliminates the need to insert the blade in a specific orientation. Ensure that the blade is firmly pressed against these pins to avoid color errors and poor performance. You should ensure that the emitter is free of any debris before connecting a blade to avoid damaging the pins or the blade itself. Check the blade side connector as well for dirt or debris.
Blade Connection Hilt Connection
Standard and Dueling Blades (In-Hilt LED)
The standard blade setup, otherwise known as “In-Hilt LED”, are hollow blades that feature no electronics inside, and are lit by an LED inside the hilt.
To maintain these blades, use the provided dust cap when the blade is not inserted into the emitter. This will prevent specks from affecting the look of your blade. To remove scratches from using the blade for dueling, you can refinish the blade with a fine grain scouring sanding pad along the length of the blade.
These blades also feature diffusion film inside the blade. Be careful not to twist or remove this film. It will naturally flex with the blade.
Your Smart Saber® features a set screw in the emitter that is used to hold the blade. This screw needs only a friction fit to hold your blade. Use the provided hex key to set or remove the blade.
Electrum Sabercrafts does not warranty the Pixel Blade for full contact dueling.
DO NOT over-tighten the blade set screw. Often a simple friction fit is enough to hold the blade for even heavy dueling sessions. Overdriving these screws can damage both your blade and the thread of your hilt.
Standard Blade with Diffusion Film
8Find more information at ElectrumSabers.com/Resources
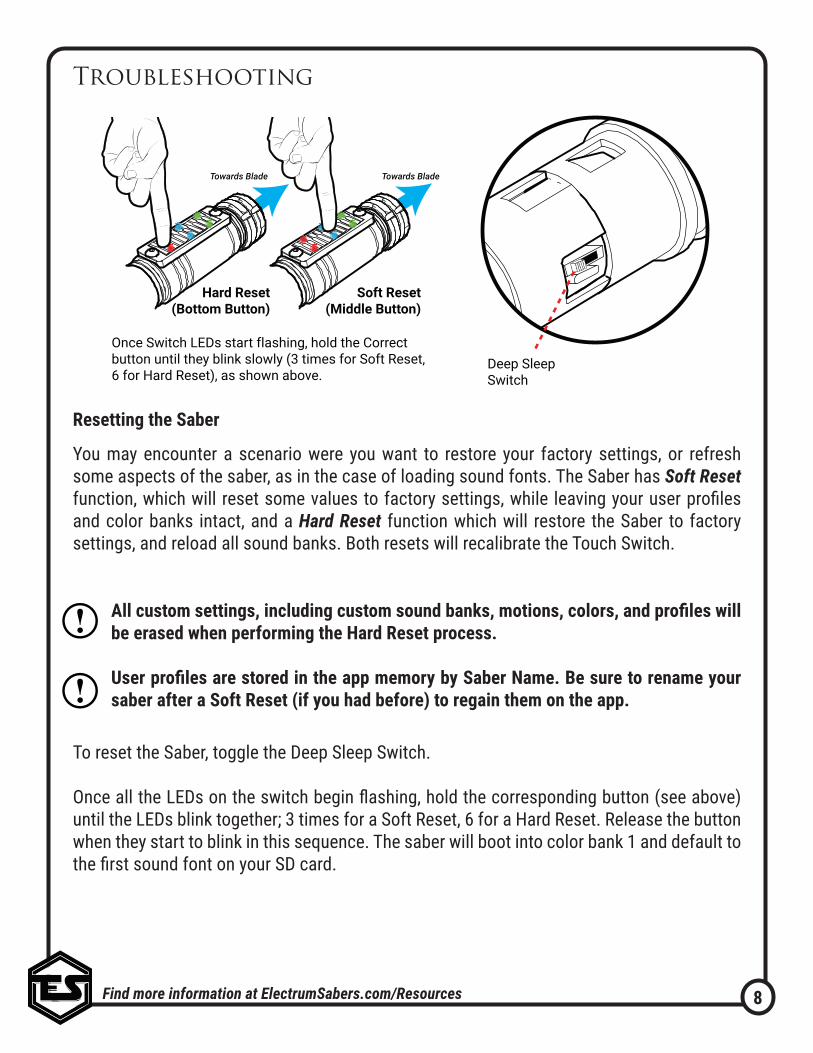
Resetting the Saber
You may encounter a scenario were you want to restore your factory settings, or refresh some aspects of the saber, as in the case of loading sound fonts. The Saber has Soft Reset function, which will reset some values to factory settings, while leaving your user profiles and color banks intact, and a Hard Reset function which will restore the Saber to factory settings, and reload all sound banks. Both resets will recalibrate the Touch Switch.
To reset the Saber, toggle the Deep Sleep Switch.
Once all the LEDs on the switch begin flashing, hold the corresponding button (see above) until the LEDs blink together; 3 times for a Soft Reset, 6 for a Hard Reset. Release the button when they start to blink in this sequence. The saber will boot into color bank 1 and default to the first sound font on your SD card.
Towards Blade
Once Switch LEDs start flashing, hold the Correct button until they blink slowly (3 times for Soft Reset, 6 for Hard Reset), as shown above.
Soft Reset(Middle Button)
Hard Reset(Bottom Button)
Deep Sleep Switch
Towards Blade
Troubleshooting
All custom settings, including custom sound banks, motions, colors, and profiles will be erased when performing the Hard Reset process.
User profiles are stored in the app memory by Saber Name. Be sure to rename your saber after a Soft Reset (if you had before) to regain them on the app.
9Find more information at ElectrumSabers.com/Resources
Getting Started with Electrum Unity
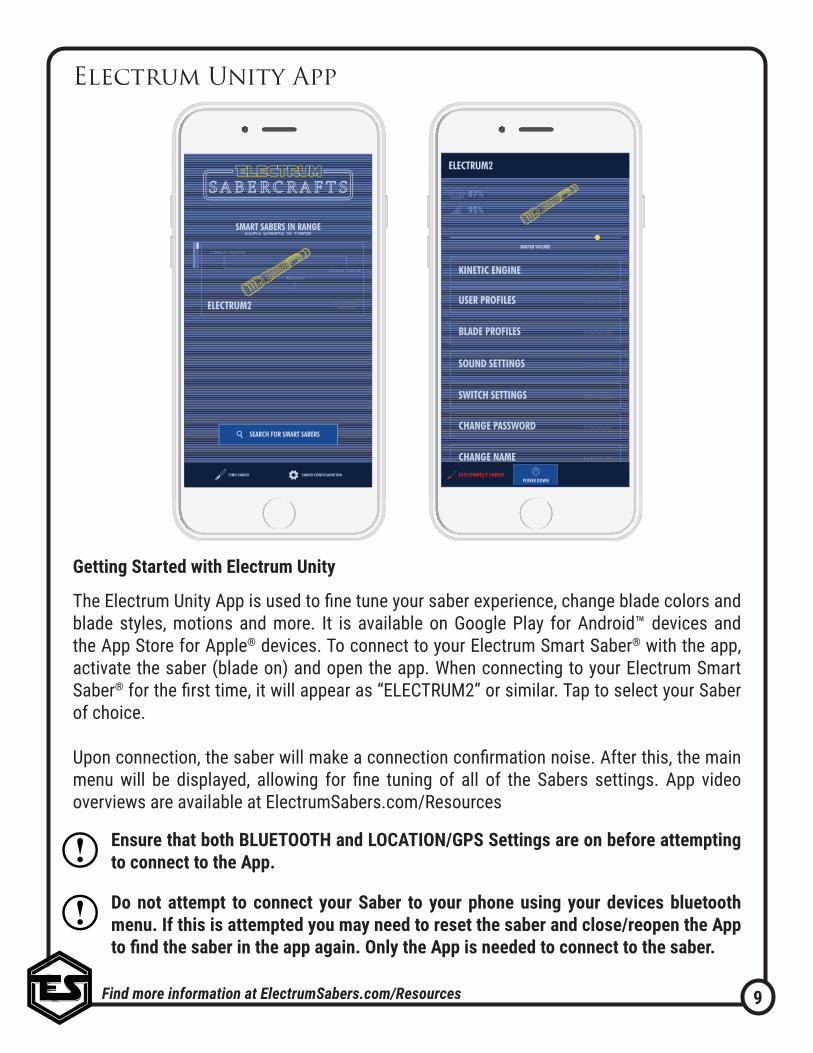
The Electrum Unity App is used to fine tune your saber experience, change blade colors and blade styles, motions and more. It is available on Google Play for Android™ devices and the App Store for Apple® devices. To connect to your Electrum Smart Saber® with the app, activate the saber (blade on) and open the app. When connecting to your Electrum Smart Saber® for the first time, it will appear as “ELECTRUM2” or similar. Tap to select your Saber of choice.
Upon connection, the saber will make a connection confirmation noise. After this, the main menu will be displayed, allowing for fine tuning of all of the Sabers settings. App video overviews are available at ElectrumSabers.com/Resources
Electrum Unity App
Ensure that both BLUETOOTH and LOCATION/GPS Settings are on before attempting to connect to the App.
Do not attempt to connect your Saber to your phone using your devices bluetooth menu. If this is attempted you may need to reset the saber and close/reopen the App to find the saber in the app again. Only the App is needed to connect to the saber.
100%9:41 AM
ELECTRUM2
SMART SABERS IN RANGESMART SABERS IN RANGE
REMNANT
Switch Plate
Emitter
Kinetic Engine
Remnant
FIND SABER SABER CONFIGURATION
SEARCH FOR SMART SABERS
ELECTRUM2
SMART SABERS IN RANGESMART SABERS IN RANGE
REMNANT
Switch Plate
Emitter
Kinetic Engine
Remnant
FIND SABER SABER CONFIGURATION
SEARCH FOR SMART SABERS
ELECTRUM2
SMART SABERS IN RANGESMART SABERS IN RANGE
REMNANT
Switch Plate
Emitter
Kinetic Engine
Remnant
FIND SABER SABER CONFIGURATION
SEARCH FOR SMART SABERS
100%9:41 AM
USER PROFILES CONFIGURE...
BLADE PROFILES CONFIGURE...
SOUND SETTINGS CONFIGURE...
SWITCH SETTINGS CONFIGURE...
CHANGE PASSWORD CONFIGURE...
CHANGE NAME CONFIGURE...
MASTER VOLUME
87%
95%
AURORA
KINETIC ENGINE CONFIGURE...
POWER DOWNDISCONNECT SABER
USER PROFILES CONFIGURE...
BLADE PROFILES CONFIGURE...
SOUND SETTINGS CONFIGURE...
SWITCH SETTINGS CONFIGURE...
CHANGE PASSWORD CONFIGURE...
CHANGE NAME CONFIGURE...
MASTER VOLUME
87%
95%
ELECTRUM
KINETIC ENGINE CONFIGURE...
POWER DOWNDISCONNECT SABER
USER PROFILES CONFIGURE...
BLADE PROFILES CONFIGURE...
SOUND SETTINGS CONFIGURE...
SWITCH SETTINGS CONFIGURE...
CHANGE PASSWORD CONFIGURE...
CHANGE NAME CONFIGURE...
MASTER VOLUME
87%
95%
ELECTRUM2
KINETIC ENGINE CONFIGURE...
POWER DOWNDISCONNECT SABER
10Find more information at ElectrumSabers.com/Resources
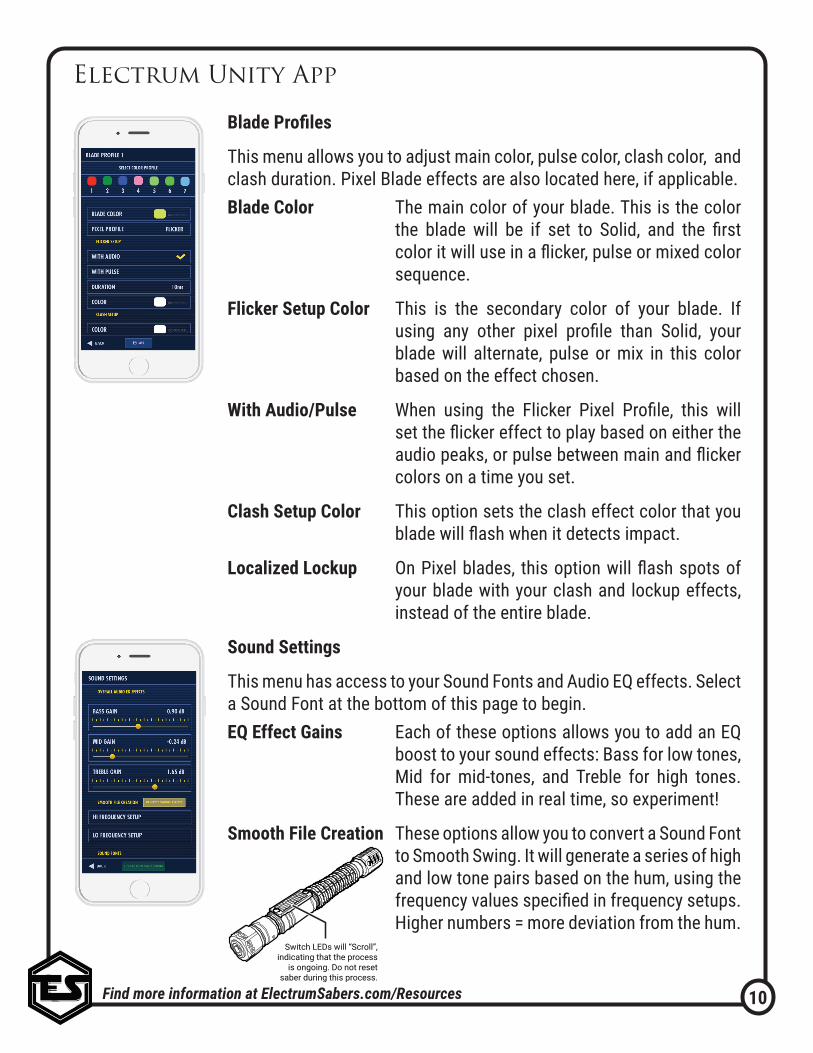
Blade Profiles
This menu allows you to adjust main color, pulse color, clash color, and clash duration. Pixel Blade effects are also located here, if applicable.Blade Color The main color of your blade. This is the color
the blade will be if set to Solid, and the first color it will use in a flicker, pulse or mixed color sequence.
Flicker Setup Color This is the secondary color of your blade. If using any other pixel profile than Solid, your blade will alternate, pulse or mix in this color based on the effect chosen.
With Audio/Pulse When using the Flicker Pixel Profile, this will set the flicker effect to play based on either the audio peaks, or pulse between main and flicker colors on a time you set.
Clash Setup Color This option sets the clash effect color that you blade will flash when it detects impact.
Localized Lockup On Pixel blades, this option will flash spots of your blade with your clash and lockup effects, instead of the entire blade.
Sound Settings
This menu has access to your Sound Fonts and Audio EQ effects. Select a Sound Font at the bottom of this page to begin.EQ Effect Gains Each of these options allows you to add an EQ
boost to your sound effects: Bass for low tones, Mid for mid-tones, and Treble for high tones. These are added in real time, so experiment!
Smooth File Creation These options allow you to convert a Sound Font to Smooth Swing. It will generate a series of high and low tone pairs based on the hum, using the frequency values specified in frequency setups. Higher numbers = more deviation from the hum.
Electrum Unity App
100%9:41 AM100%9:41 AM 100%9:41 AM
100%9:41 AM100%9:41 AM 100%9:41 AM
100%9:41 AM100%9:41 AM 100%9:41 AM
100%9:41 AM100%9:41 AM 100%9:41 AM
Switch LEDs will “Scroll”, indicating that the process
is ongoing. Do not reset saber during this process.
11Find more information at ElectrumSabers.com/Resources
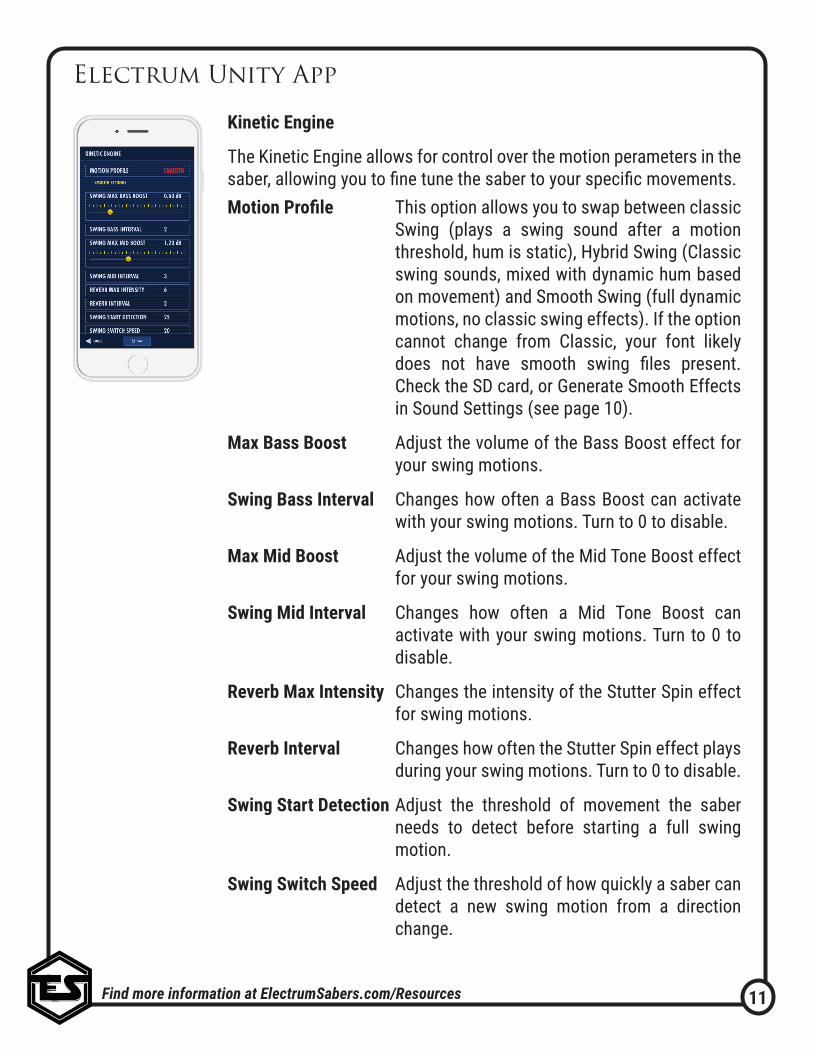
Kinetic Engine
The Kinetic Engine allows for control over the motion perameters in the saber, allowing you to fine tune the saber to your specific movements.Motion Profile This option allows you to swap between classic
Swing (plays a swing sound after a motion threshold, hum is static), Hybrid Swing (Classic swing sounds, mixed with dynamic hum based on movement) and Smooth Swing (full dynamic motions, no classic swing effects). If the option cannot change from Classic, your font likely does not have smooth swing files present. Check the SD card, or Generate Smooth Effects in Sound Settings (see page 10).
Max Bass Boost Adjust the volume of the Bass Boost effect for your swing motions.
Swing Bass Interval Changes how often a Bass Boost can activate with your swing motions. Turn to 0 to disable.
Max Mid Boost Adjust the volume of the Mid Tone Boost effect for your swing motions.
Swing Mid Interval Changes how often a Mid Tone Boost can activate with your swing motions. Turn to 0 to disable.
Reverb Max Intensity Changes the intensity of the Stutter Spin effect for swing motions.
Reverb Interval Changes how often the Stutter Spin effect plays during your swing motions. Turn to 0 to disable.
Swing Start Detection Adjust the threshold of movement the saber needs to detect before starting a full swing motion.
Swing Switch Speed Adjust the threshold of how quickly a saber can detect a new swing motion from a direction change.
Electrum Unity App
100%9:41 AM100%9:41 AM 100%9:41 AM
100%9:41 AM100%9:41 AM 100%9:41 AM
12Find more information at ElectrumSabers.com/Resources
Kinetic Engine (Cont.)
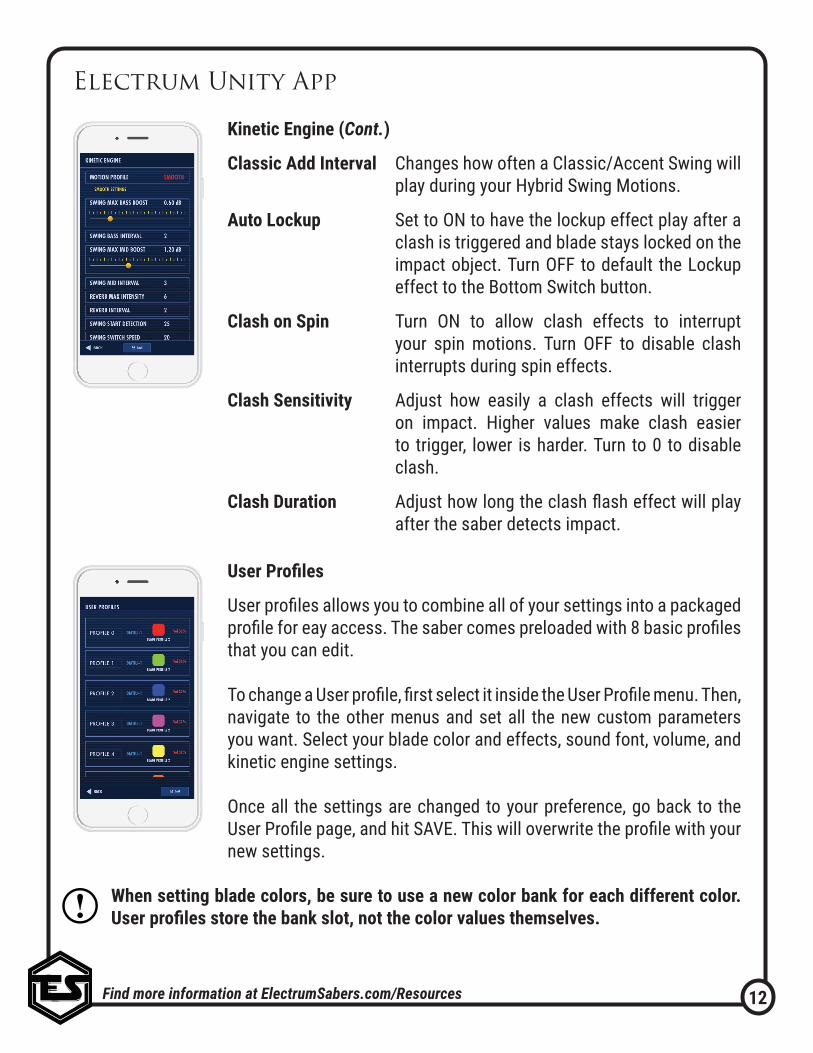
Classic Add Interval Changes how often a Classic/Accent Swing will play during your Hybrid Swing Motions.
Auto Lockup Set to ON to have the lockup effect play after a clash is triggered and blade stays locked on the impact object. Turn OFF to default the Lockup effect to the Bottom Switch button.
Clash on Spin Turn ON to allow clash effects to interrupt your spin motions. Turn OFF to disable clash interrupts during spin effects.
Clash Sensitivity Adjust how easily a clash effects will trigger on impact. Higher values make clash easier to trigger, lower is harder. Turn to 0 to disable clash.
Clash Duration Adjust how long the clash flash effect will play after the saber detects impact.
User Profiles
User profiles allows you to combine all of your settings into a packaged profile for eay access. The saber comes preloaded with 8 basic profiles that you can edit.
To change a User profile, first select it inside the User Profile menu. Then, navigate to the other menus and set all the new custom parameters you want. Select your blade color and effects, sound font, volume, and kinetic engine settings.
Once all the settings are changed to your preference, go back to the User Profile page, and hit SAVE. This will overwrite the profile with your new settings.
Electrum Unity App
100%9:41 AM100%9:41 AM 100%9:41 AM
100%9:41 AM100%9:41 AM 100%9:41 AM
100%9:41 AM100%9:41 AM 100%9:41 AM
100%9:41 AM100%9:41 AM 100%9:41 AM
When setting blade colors, be sure to use a new color bank for each different color. User profiles store the bank slot, not the color values themselves.
13Find more information at ElectrumSabers.com/Resources
What types of sounds does the saber support?
The Saber supports 16 bit WAV files, 22.1 kHz and 44.1 kHz. The Saber “Interlaces” sound effects, so sounds that are designed with the hum effect built into the effects (e.x. Plecter optimized) are best. Also Supported are CFX optimized fonts and Proffie/Opensource fonts. Note that not all fonts are created equal, so some fonts maybe missing swing files or have mixed frequencies, causing undesirable results. How many Sound Banks can the saber have?
The saber can support any combination of SD card sound banks and custom created banks via the app, to a maximum of 50.How many color banks does the saber have?
You can set up to 12 color banks.My new SD card sound bank doesn’t load on the saber. What do I do?
First, make sure you are using the proper font structure. If you are purchasing a font from another site, use the “Plecter” version of the font. Second, ensure that no spaces or special characters (@,#,$, etc.) are used in the folder name.If your saber is still not recognizing the sound font, perform a hard reset. This will read the entirety of the SD card to ensure it loads correctly.How do I know when my saber is charged?
The saber takes approx. 2½ hours to charge from 0 to 100%, when using a 2a charger. The switchplate on the saber will indicate charge level while plugged in: bottom means charging, top means its fully charged.Do I need to turn the Sleep Switch to off when charging?
Yes, it is required to put the saber in Deep Sleep while charging.I’m having trouble with the touch switch. How can I calibrate it?
The touch switch calibrates itself on power down. There are 4 ways to recalibrate the switch if desired:
1. Power down the saber, either through the switch itself or the Unity app.2. Adjusting Switchplate sensitivity with the Unity App.3. Toggle the sleep switch inside the pommel4. Perform a hard reset. (see page 8)
F.A.Q.
14Find more information at ElectrumSabers.com/Resources
Can I swap between a pixel blade and regular dueling blade?
No, the pixel setup required a special pin connection that replaces the in-hilt LED. As such, using a regular blade in a pixel equipped saber would result in an unlit blade.I’m having trouble connecting to my Saber with my Android device.
Try these troubleshooting steps:1. Make sure the saber is activated (blade on)2. When installing make sure that you accept all permissions, including location services,
when the app requests them3. Ensure that both Bluetooth and GPS/Location services are on4. Ensure you have no other bluetooth apps running or connected to other devicesIf these steps do not solve the issue, try this:1. Open your phones Settings2. Open “apps”3. Using the top right 3 dot menu, select “Show System Apps”4. Scroll down the apps list until you reach Bluetooth, select it5. Open Storage6. Select Clear DataThen, ensure both Bluetooth and Location/GPS services are active, and try again.Where can update my firmware for my Electrum Smart Saber®?
You can find the latest updates and instructions here - ElectrumSabers.com/Updates
For additional information on your Electrum Saber, and for the Electrum Unity App overview, visit www.ElectrumSabers.com
F.A.Q.
15Find more information at ElectrumSabers.com/Resources
Limited Warranty covers defects in workmanship for the Product for a period of 1 year from the original date of Receipt from Electrum Sabercrafts.
This limited Warranty does not cover any damage due to (1) acts of God, accident, misuse, abuse, negligence, improper handling, commercial use or modifications of this Product, or normal wear and tear; (2) improper operation or maintenance of this Product; or (3) attempted repair by any party other than Electrum Sabercrafts.
This Limited Warranty does not apply where it is determined by Electrum Sabercrafts that there is no fault with the Product itself. Repairs not covered by the Limited Warranty may, at Electrum Sabercrafts’ discretion, be carried out at the owner’s expense.
Warranty Service, within the applicable warranty period, may be obtained by contacting Electrum Sabercrafts and requesting a Return Material Authorization Number (RMA #). Proof of purchase in the form a dated invoice/receipt must be provided to expedite the issuance of a Factory RMA.
After an RMA number has been issued, the defective product must be packaged securely in the original or other suitable shipping package to ensure that it will not be damaged in transit. The RMA number must be visible on the outside of the package and a copy included inside the package. The package must be mailed or otherwise shipped back to Electrum Sabercrafts with all costs of mailing/shipping/insurance prepaid by the warranty claimant. Customs and Brokerage charges billed to Electrum Sabercrafts as a result of return shipments must be paid by the warranty claimant before repaired/replaced product can be shipped back to the claimant.
If you attempt to repair it yourself, the warranty is VOID. We will repair, but it will be at the buyer’s expense.
Warranty is non transferable.
Electrum Sabercrafts Return Policy
Electrum Sabercrafts offers a 3 day return policy. All returns are subject to a 30% restocking fee. The customer is responsible for cost of shipping. This only applies to product that is in brand new condition. The product must be packed in a similar way it was received. Once we have received the product and determined the condition we will issue the refund, minus the original shipping cost and 30% restocking fee.
Electrum Sabercrafts Repair (RMA)
Before returning any product for repair you need an RMA number. To discuss an RMA number, please email us at [email protected] or reach out through our chat. Please have your name and order# available.
Limited Warranty
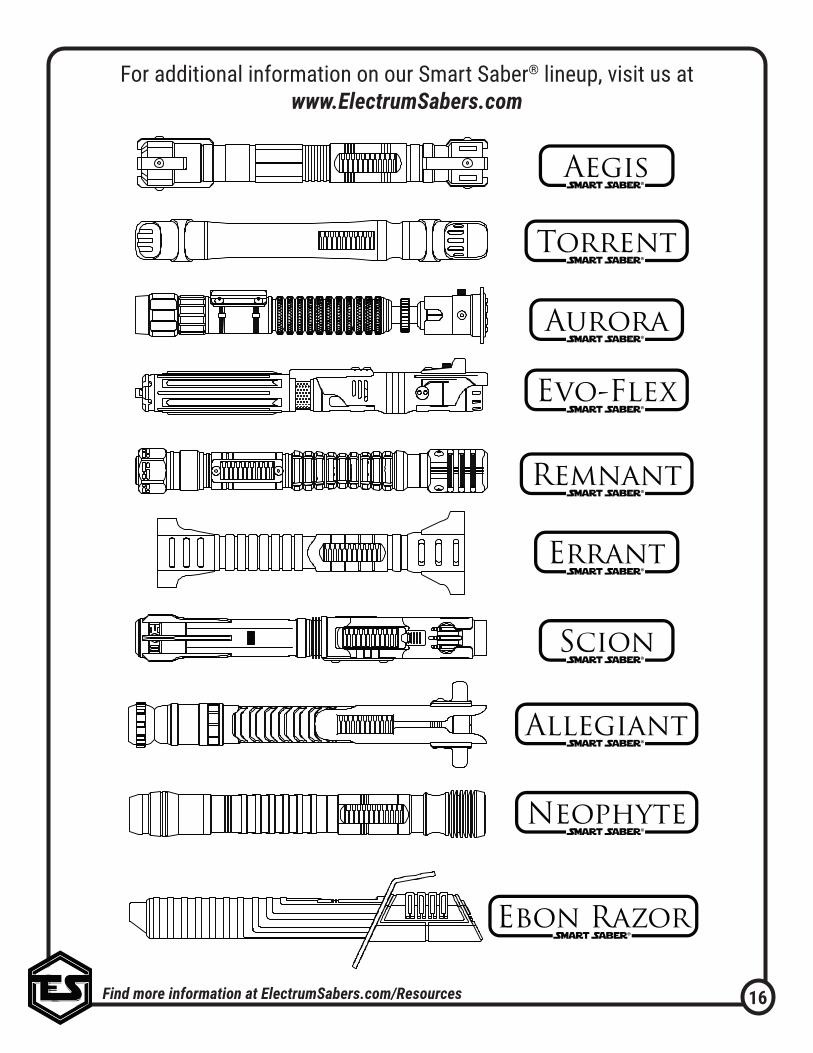
16Find more information at ElectrumSabers.com/Resources
Evo-FlexSmart Saber®
RemnantSmart Saber®
AllegiantSmart Saber®
NeophyteSmart Saber®
Ebon RazorSmart Saber®
AuroraSmart Saber®
TorrentSmart Saber®
AegisSmart Saber®
ScionSmart Saber®
ErrantSmart Saber®
For additional information on our Smart Saber® lineup, visit us atwww.ElectrumSabers.com


![Electrum coins and their specific gravity / [Barclay V. Head]](https://static.documents.pub/doc/80x56/547f8192b37959442b8b5917/electrum-coins-and-their-specific-gravity-barclay-v-head.jpg)
