Microsoft Dynamics ® Connector for Microsoft Dynamics Configuration Guide for Microsoft Dynamics® SL Revised August, 2012 Find updates to this documentation at the following location: http://www.microsoft.com/download/en/details.aspx?id=10381
Transcript
Microsoft Dynamics®
Connector for Microsoft Dynamics Configuration
Guide for Microsoft
Dynamics® SL
Revised August, 2012
Find updates to this documentation at the following location:
CONNECTOR FOR MICROSOFT DYNAMICS CONFIGURATION GUIDE FOR MICROSOFT DYNAMICS® SL
Microsoft Dynamics is a line of integrated, adaptable business management solutions that enables you and your
people to make business decisions with greater confidence. Microsoft Dynamics works like and with familiar
Microsoft software, automating and streamlining financial, customer relationship and supply chain processes in a
way that helps you drive business success.
U.S. and Canada Toll Free 1-888-477-7989
Worldwide +1-701-281-6500
www.microsoft.com/dynamics
Information in this document, including URL and other Internet Web site references, is subject to change without notice. Unless otherwise noted, the companies, organizations, products, domain names, email addresses, logos, people, places, and events depicted in examples herein are fictitious. No association with any real company, organization, product, domain name, email address, logo, person, place, or event is intended or should be inferred. Complying with all applicable copyright laws is the responsibility of the user. Without limiting the rights under copyright, no part of this document may be reproduced, stored in or introduced into a retrieval system, or transmitted in any form or by any means (electronic, mechanical, photocopying, recording, or otherwise), or for any purpose, without the express written permission of Microsoft Corporation.
Microsoft may have patents, patent applications, trademarks, copyrights, or other intellectual property rights covering subject matter in this document. Except as expressly provided in any written license agreement from Microsoft, the furnishing of this document does not give you any license to these patents, trademarks, copyrights, or other intellectual property.
Microsoft, Active Directory, Microsoft Dynamics, the Microsoft Dynamics logo, SQL Server, Windows, Windows Live, and Windows Server are trademarks of the Microsoft group of companies.
All other trademarks are property of their respective owners.
CONNECTOR FOR MICROSOFT DYNAMICS CONFIGURATION GUIDE FOR MICROSOFT DYNAMICS® SL
Table of Contents
Introduction ................................................................................................ 4 Common terminology .......................................................................................................... 5
Installation requirements and prerequisites ............................................... 6 System requirements .......................................................................................................... 6 System prerequisites ........................................................................................................... 7
Create the ERP integration account .................................................................................... 7 Create a Microsoft Dynamics SL Web Services User .............................................................. 7 Setup the Web Service Lookup Security .............................................................................. 8
Updating Microsoft Dynamics SL ........................................................................................... 9
Installation and configuration ................................................................... 10 Install Connector for Microsoft Dynamics ............................................................................... 10 Configure adapter settings .................................................................................................. 10 Create an integration ......................................................................................................... 11 Required Customizations ..................................................................................................... 12
Run initial data synchronization ........................................................................................... 13
Initial data synchronization ...................................................................... 14 Prepare the system ............................................................................................................ 15
Verify customizations for Microsoft Dynamics CRM ............................................................... 15 Verify map modifications .................................................................................................. 15
Synchronize the data .......................................................................................................... 16 Initial data synchronization procedures .............................................................................. 16
Map customers and accounts ............................................................................................... 17 Mapping customers to accounts ........................................................................................ 17
Microsoft Dynamics SL to Microsoft Dynamics CRM .............................................................. 22 Microsoft Dynamics CRM to Microsoft Dynamics SL .............................................................. 22
Microsoft Dynamics CRM to Microsoft Dynamics SL maps ......................................................... 23 Account to Customer ....................................................................................................... 23 Contact to Customer Contact ............................................................................................ 24
Microsoft Dynamics SL to Microsoft Dynamics CRM maps ......................................................... 25 Customer to Account ....................................................................................................... 25 Shipping Address in Microsoft Dynamics SL ........................................................................ 25 Customer Contact to Contact ............................................................................................ 25
4
CONNECTOR FOR MICROSOFT DYNAMICS CONFIGURATION GUIDE FOR MICROSOFT DYNAMICS® SL
Introduction
Use Connector for Microsoft Dynamics® to integrate Microsoft Dynamics CRM and Microsoft Dynamics
SL data. For example, you can integrate Microsoft Dynamics SL customers with Microsoft Dynamics CRM accounts, and have access to up-to-date customer/account information in both systems.
Connector for Microsoft Dynamics is intended to be used in an implementation where Microsoft Dynamics CRM is used to manage business contacts, track leads, and perform other sales and
marketing activities, and where Microsoft Dynamics SL is used to perform accounting functions, manage your company’s chart of accounts, and maintain customer, vendor, item, employee, orders and other records.
Within Connector for Microsoft Dynamics, separate adapters are used to identify a source system (where data is read from) and a destination system (where data is written to). The source adapter reads data from the source system. The destination adapter writes the data to the destination system.
Record types that are integrated are referred to as “entities.” The enties that are currently available are Customer and Customer Contact.
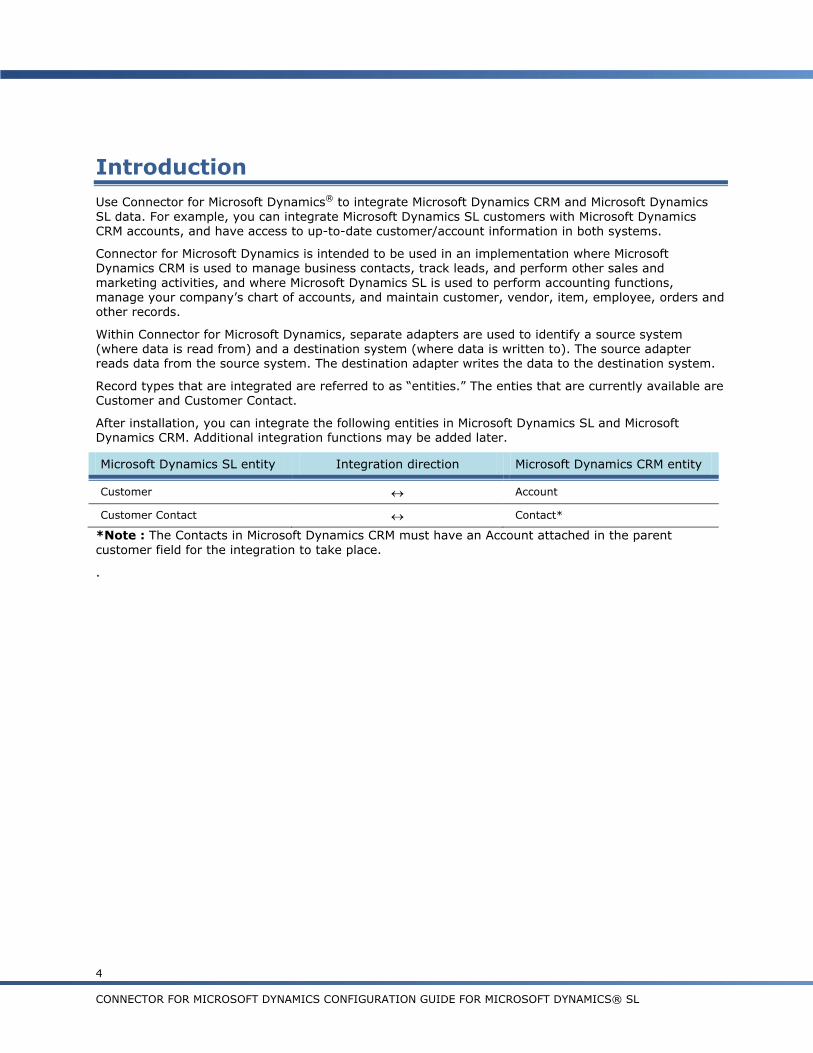
After installation, you can integrate the following entities in Microsoft Dynamics SL and Microsoft Dynamics CRM. Additional integration functions may be added later.
Microsoft Dynamics SL entity Integration direction Microsoft Dynamics CRM entity
Customer Account
Customer Contact Contact*
*Note : The Contacts in Microsoft Dynamics CRM must have an Account attached in the parent
customer field for the integration to take place.
.
5
CONNECTOR FOR MICROSOFT DYNAMICS CONFIGURATION GUIDE FOR MICROSOFT DYNAMICS® SL
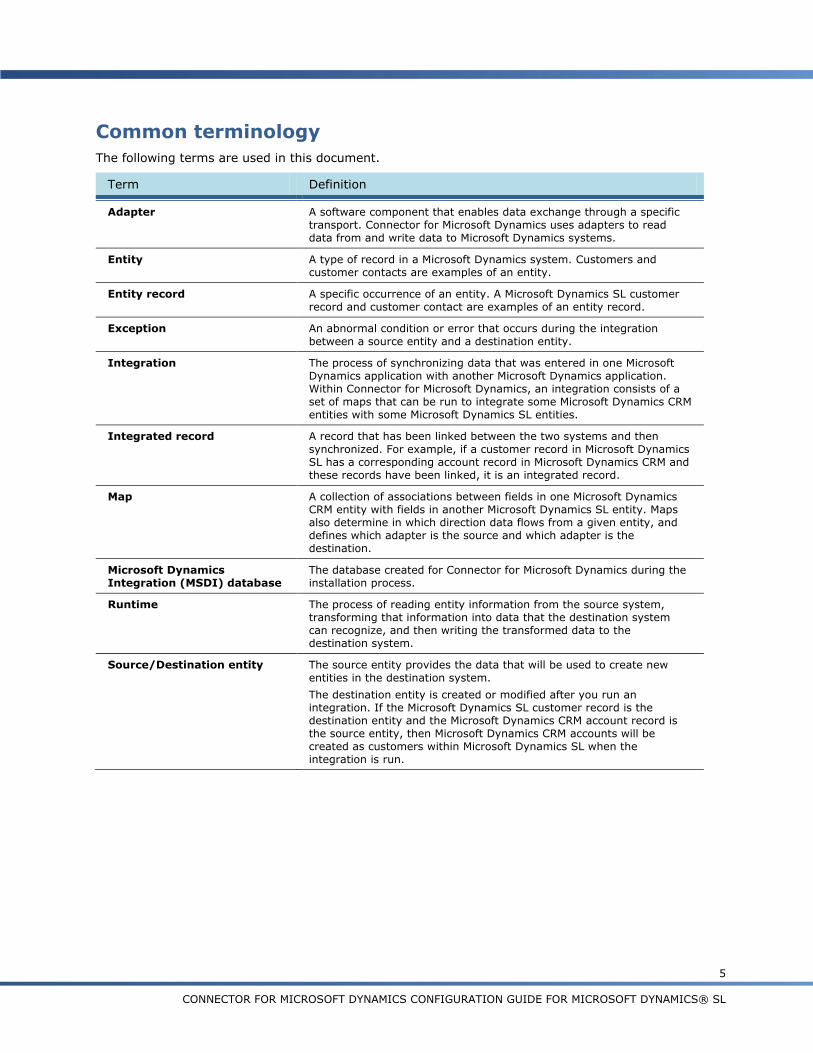
Common terminology
The following terms are used in this document.
Term Definition
Adapter A software component that enables data exchange through a specific
transport. Connector for Microsoft Dynamics uses adapters to read
data from and write data to Microsoft Dynamics systems.
Entity A type of record in a Microsoft Dynamics system. Customers and
customer contacts are examples of an entity.
Entity record A specific occurrence of an entity. A Microsoft Dynamics SL customer
record and customer contact are examples of an entity record.
Exception An abnormal condition or error that occurs during the integration
between a source entity and a destination entity.
Integration The process of synchronizing data that was entered in one Microsoft
Dynamics application with another Microsoft Dynamics application.
Within Connector for Microsoft Dynamics, an integration consists of a
set of maps that can be run to integrate some Microsoft Dynamics CRM
entities with some Microsoft Dynamics SL entities.
Integrated record A record that has been linked between the two systems and then
synchronized. For example, if a customer record in Microsoft Dynamics
SL has a corresponding account record in Microsoft Dynamics CRM and
these records have been linked, it is an integrated record.
Map A collection of associations between fields in one Microsoft Dynamics
CRM entity with fields in another Microsoft Dynamics SL entity. Maps
also determine in which direction data flows from a given entity, and
defines which adapter is the source and which adapter is the
destination.
Microsoft Dynamics
Integration (MSDI) database
The database created for Connector for Microsoft Dynamics during the
installation process.
Runtime The process of reading entity information from the source system,
transforming that information into data that the destination system
can recognize, and then writing the transformed data to the
destination system.
Source/Destination entity The source entity provides the data that will be used to create new
entities in the destination system.
The destination entity is created or modified after you run an
integration. If the Microsoft Dynamics SL customer record is the
destination entity and the Microsoft Dynamics CRM account record is
the source entity, then Microsoft Dynamics CRM accounts will be
created as customers within Microsoft Dynamics SL when the
integration is run.
6
CONNECTOR FOR MICROSOFT DYNAMICS CONFIGURATION GUIDE FOR MICROSOFT DYNAMICS® SL
Installation requirements and prerequisites
The following sections contain information and steps to help you with the installation.
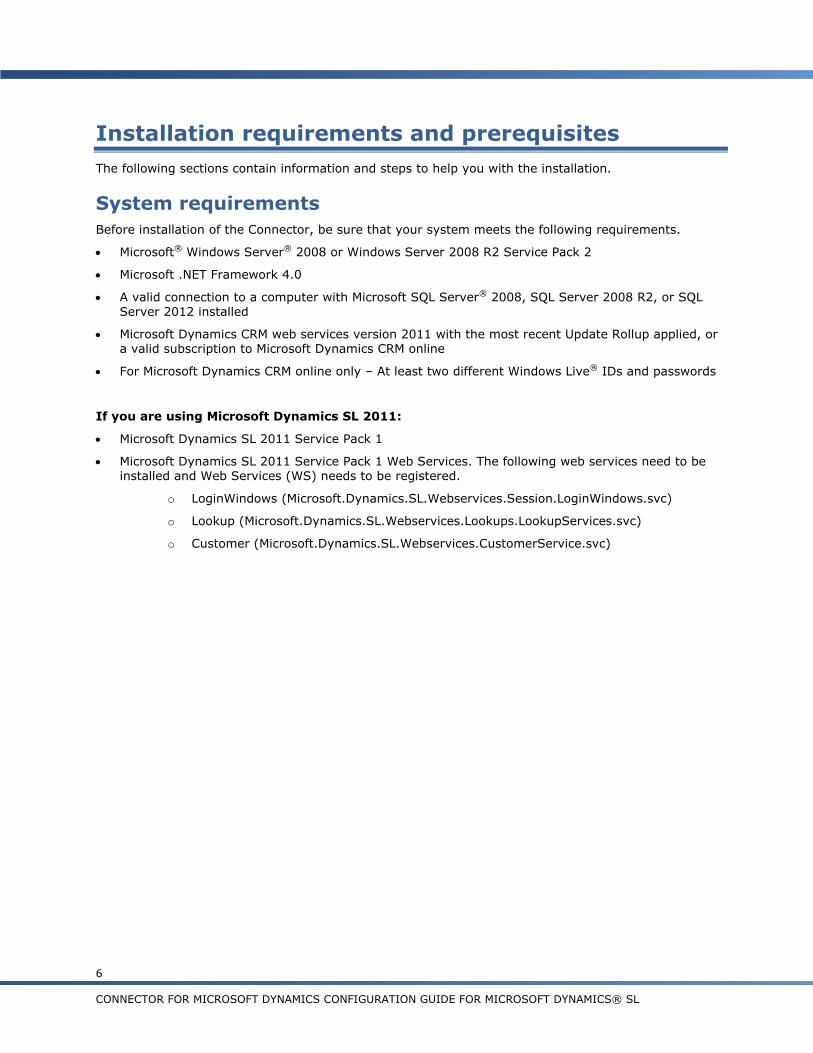
System requirements
Before installation of the Connector, be sure that your system meets the following requirements.
Microsoft® Windows Server® 2008 or Windows Server 2008 R2 Service Pack 2
Microsoft .NET Framework 4.0
A valid connection to a computer with Microsoft SQL Server® 2008, SQL Server 2008 R2, or SQL Server 2012 installed
Microsoft Dynamics CRM web services version 2011 with the most recent Update Rollup applied, or a valid subscription to Microsoft Dynamics CRM online
For Microsoft Dynamics CRM online only – At least two different Windows Live® IDs and passwords
If you are using Microsoft Dynamics SL 2011:
Microsoft Dynamics SL 2011 Service Pack 1
Microsoft Dynamics SL 2011 Service Pack 1 Web Services. The following web services need to be installed and Web Services (WS) needs to be registered.
o LoginWindows (Microsoft.Dynamics.SL.Webservices.Session.LoginWindows.svc)
o Lookup (Microsoft.Dynamics.SL.Webservices.Lookups.LookupServices.svc)
o Customer (Microsoft.Dynamics.SL.Webservices.CustomerService.svc)
7
CONNECTOR FOR MICROSOFT DYNAMICS CONFIGURATION GUIDE FOR MICROSOFT DYNAMICS® SL
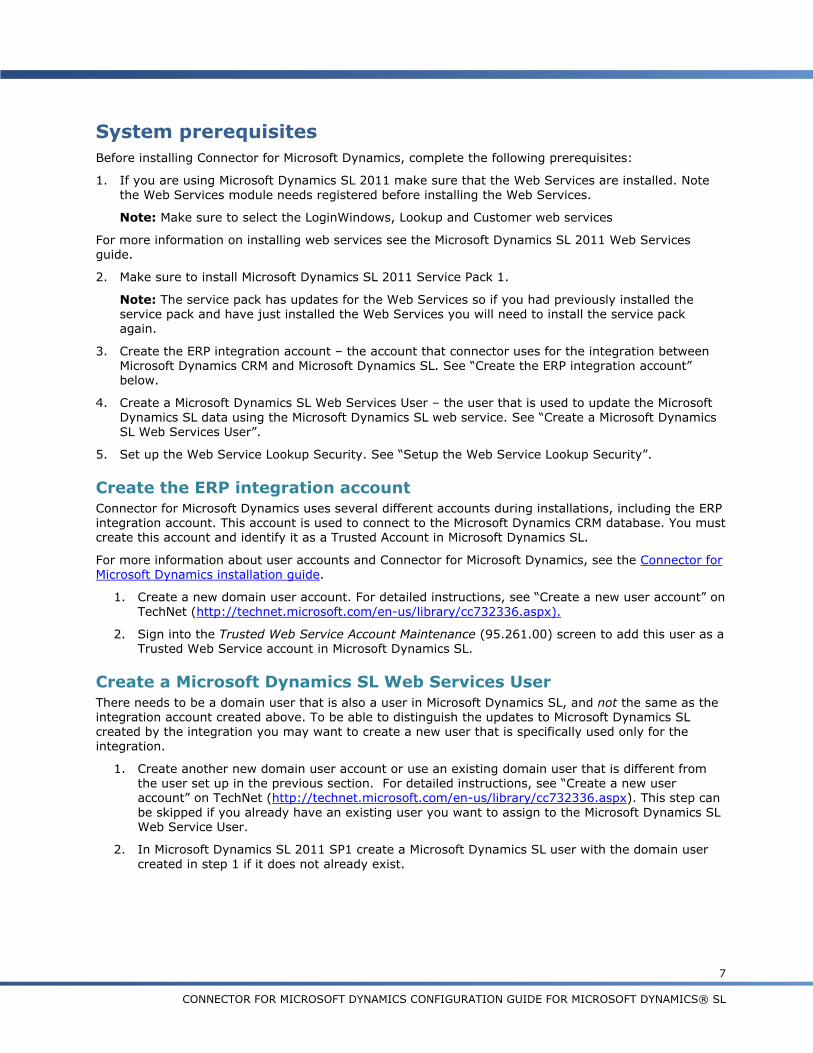
System prerequisites
Before installing Connector for Microsoft Dynamics, complete the following prerequisites:
1. If you are using Microsoft Dynamics SL 2011 make sure that the Web Services are installed. Note
the Web Services module needs registered before installing the Web Services.
Note: Make sure to select the LoginWindows, Lookup and Customer web services
For more information on installing web services see the Microsoft Dynamics SL 2011 Web Services guide.
2. Make sure to install Microsoft Dynamics SL 2011 Service Pack 1.
Note: The service pack has updates for the Web Services so if you had previously installed the service pack and have just installed the Web Services you will need to install the service pack again.
3. Create the ERP integration account – the account that connector uses for the integration between Microsoft Dynamics CRM and Microsoft Dynamics SL. See “Create the ERP integration account” below.
4. Create a Microsoft Dynamics SL Web Services User – the user that is used to update the Microsoft
Dynamics SL data using the Microsoft Dynamics SL web service. See “Create a Microsoft Dynamics SL Web Services User”.
5. Set up the Web Service Lookup Security. See “Setup the Web Service Lookup Security”.
Create the ERP integration account Connector for Microsoft Dynamics uses several different accounts during installations, including the ERP integration account. This account is used to connect to the Microsoft Dynamics CRM database. You must create this account and identify it as a Trusted Account in Microsoft Dynamics SL.
For more information about user accounts and Connector for Microsoft Dynamics, see the Connector for Microsoft Dynamics installation guide.
1. Create a new domain user account. For detailed instructions, see “Create a new user account” on
2. Sign into the Trusted Web Service Account Maintenance (95.261.00) screen to add this user as a Trusted Web Service account in Microsoft Dynamics SL.
Create a Microsoft Dynamics SL Web Services User
There needs to be a domain user that is also a user in Microsoft Dynamics SL, and not the same as the integration account created above. To be able to distinguish the updates to Microsoft Dynamics SL created by the integration you may want to create a new user that is specifically used only for the integration.
1. Create another new domain user account or use an existing domain user that is different from the user set up in the previous section. For detailed instructions, see “Create a new user account” on TechNet (http://technet.microsoft.com/en-us/library/cc732336.aspx). This step can
be skipped if you already have an existing user you want to assign to the Microsoft Dynamics SL Web Service User.
2. In Microsoft Dynamics SL 2011 SP1 create a Microsoft Dynamics SL user with the domain user
CONNECTOR FOR MICROSOFT DYNAMICS CONFIGURATION GUIDE FOR MICROSOFT DYNAMICS® SL
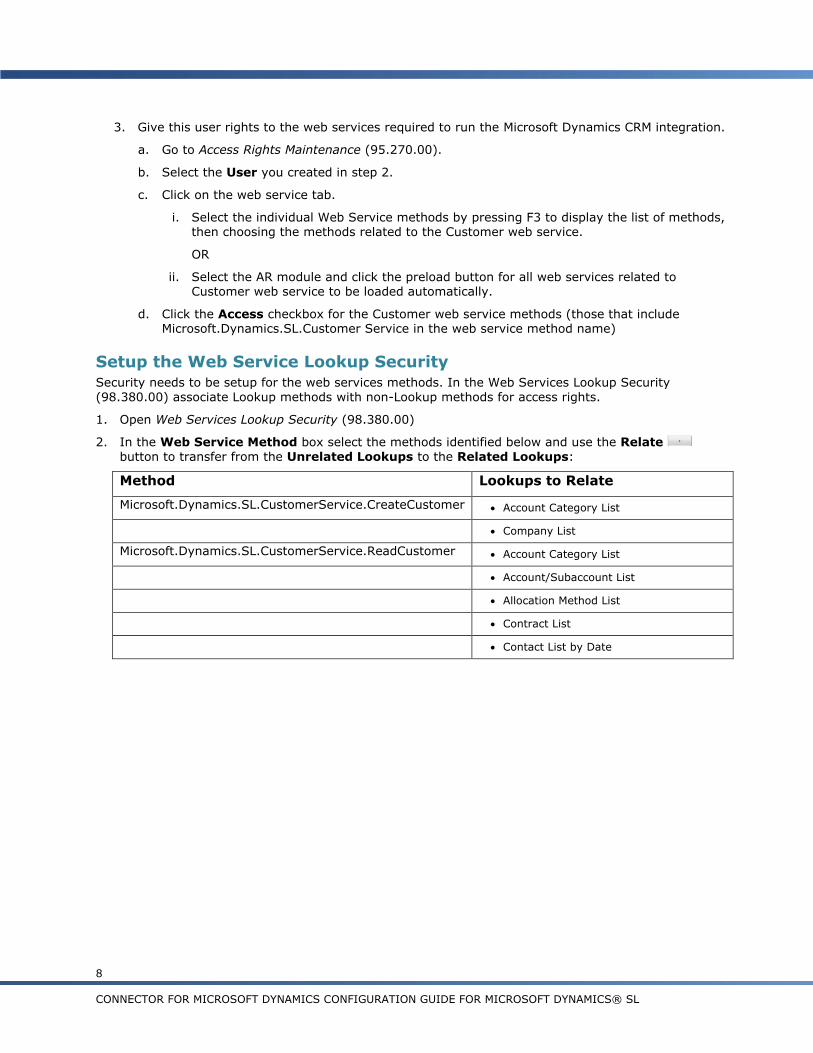
3. Give this user rights to the web services required to run the Microsoft Dynamics CRM integration.
a. Go to Access Rights Maintenance (95.270.00).
b. Select the User you created in step 2.
c. Click on the web service tab.
i. Select the individual Web Service methods by pressing F3 to display the list of methods, then choosing the methods related to the Customer web service.
OR
ii. Select the AR module and click the preload button for all web services related to Customer web service to be loaded automatically.
d. Click the Access checkbox for the Customer web service methods (those that include Microsoft.Dynamics.SL.Customer Service in the web service method name)
Setup the Web Service Lookup Security Security needs to be setup for the web services methods. In the Web Services Lookup Security
(98.380.00) associate Lookup methods with non-Lookup methods for access rights.
1. Open Web Services Lookup Security (98.380.00)
2. In the Web Service Method box select the methods identified below and use the Relate
button to transfer from the Unrelated Lookups to the Related Lookups:
Method Lookups to Relate
Microsoft.Dynamics.SL.CustomerService.CreateCustomer Account Category List
Company List
Microsoft.Dynamics.SL.CustomerService.ReadCustomer Account Category List
Account/Subaccount List
Allocation Method List
Contract List
Contact List by Date
9
CONNECTOR FOR MICROSOFT DYNAMICS CONFIGURATION GUIDE FOR MICROSOFT DYNAMICS® SL
Updating Microsoft Dynamics SL
When performing maintenance on Microsoft Dynamics SL, we recommend that you deactivate all maps and stop the Connector for Microsoft Dynamics service. After your maintenance is completed, start the Connector for Microsoft Dynamics service again and activate your maps. This ensures that the
Connector for Microsoft Dynamics is not querying into your ERP system during maintenance.
This includes installation of hot fixes and running Database Maintenance.
10
CONNECTOR FOR MICROSOFT DYNAMICS CONFIGURATION GUIDE FOR MICROSOFT DYNAMICS® SL
Installation and configuration
The following steps explain the basic installation of Connector for Microsoft Dynamics. Settings can be
further configured or customized during or after the installation process.
Note: These procedures must be completed in order, or Connector for Microsoft Dynamics will not
operate correctly and data will not be synchronized between Microsoft Dynamics CRM and Microsoft Dynamics SL.
1. Install Connector for Microsoft Dynamics
2. Configure adapter settings.
3. Create an integration.
4. Required Customizations
5. Run initial data synchronization.
Review the System requirements before you begin the installation process. Only one instance can be installed on a system at any time.
Install Connector for Microsoft Dynamics
The Connector for Microsoft Dynamics must be installed before you can configure it for your Microsoft Dynamics ERP system. For instructions, see the Connector for Microsoft Dynamics installation guide.
Note: The Connector for Microsoft Dynamics does not need to be installed on the same computer or server as either Microsoft Dynamics CRM or Microsoft Dynamics SL, though it does need a network connection that will allow it to communicate with the web services exposed by these systems.
Configure adapter settings
Before you can run an integration, you must provide settings for the adapters that the integration process will use. The first time you start the client application, the Adapter Settings window is
displayed so that you can enter settings for the adapters that were installed.
1. Open Connector for Microsoft Dynamics. (Start > All Programs > Microsoft Dynamics > Microsoft Dynamics Adapter > Connector for Microsoft Dynamics)
2. If the Adapter Settings window did not open automatically, click Adapter Settings.
3. In the left pane of the Adapter Settings window, select Microsoft Dynamics CRM 2011.
4. Configure the Microsoft Dynamics CRM adapter as explained in the Connector for Microsoft Dynamics installation guide.
Note: When you integrate with Microsoft Dynamics CRM 2011, certain customizations will be imported to help ensure compatibility and functionality with the Connector for Microsoft Dynamics.
5. In the left pane of the Adapter Settings window, select the Microsoft Dynamics SL 2011
adapter.
6. Enter the name of the domain that the Microsoft Dynamics SL server belongs to.
7. Enter the user name and password for the Microsoft Dynamics SL web services account. For more
information about this account, see “Create a Microsoft Dynamics SL Web Services User”.
8. Enter the URL for all three of the Microsoft Dynamics SL web services (customer, login, and lookups.lookup.
Note: At the time the Adapter Setting screen appears the URL defaults “/Host Name/” in the URL.
That needs to be replaced with your actual URL name for the Microsoft Dynamics SL web services.
Make the same edits for Microsoft.Dynamics.SL. WebServices.Session.LoginWindows.svc and Microsoft.Dynamics.SL. WebServices.Lookups.LookupService.svc.
9. Click Test Settings to connect to the Microsoft Dynamics SL web service using the information that
you entered.
10. Click Apply.
Create an integration
An integration is a collection of active or inactive maps for one source/destination system combination. You must create an integration and activate maps before you can synchronize data between two
Microsoft Dynamics applications. For more information about activating maps, see “Configure map settings”.
1. Open Connector for Microsoft Dynamics. (Start > All Programs > Microsoft Dynamics > Microsoft Dynamics Adapter > Connector
for Microsoft Dynamics)
2. Click New Integration.
3. Select one of the following options.
Blank – Create a blank integration where you must create maps manually. Skip to step 5.
From Template – Create a new integration from an integration template.
4. Select Dynamics SL 2011/Dynamics CRM 2011template which will fill in the Application 1
(contains Microsoft Dynamics SL 2011) and Application 2 (contains Microsoft Dynamics CRM 2011)
fields.
5. Select the Microsoft Dynamics SL company to integrate. If the company name list is empty, verify that you entered your Microsoft Dynamics SL adapter settings correctly and click Refresh to
attempt to retrieve the list of companies again. For more information, see to Configure adapter settings.
6. Select the Microsoft Dynamics CRM company to integrate. If the company list is empty, verify that
you entered your Connector for Microsoft Dynamics settings correctly and you have completed the Microsoft Dynamics CRM Configuration utility for each organization that you want to integrate. Click Refresh to attempt to retrieve the list of companies again. For more information, see to Configure
adapter settings.
7. Click Create. This will import the maps that will be available for use with the integration.
Note: The default Check for data modified after date is set to 1/1/1900 12:00 AM UTC (displayed as the local time zone) for all maps.
For more information, see Change the data modification date in the Installation Guide.
CONNECTOR FOR MICROSOFT DYNAMICS CONFIGURATION GUIDE FOR MICROSOFT DYNAMICS® SL
Required Customizations
To elimate the possibility of getting errors from data that is not the same between Microsoft Dynamics CRM and Microsoft Dynamics SL.
Customize Terms
Terms may be different in Microsoft Dynamics CRM and Microsoft Dynamics SL. The terms that will be
used are those that are in Microsoft Dynamics SL. Every time you add or change terms in Microsoft Dynamics SL you must make the same change in Microsoft Dynamics CRM. To customize the Microsoft Dynamics CRM terms list to be consistent with Microsoft Dynamics SL, follow these steps:
1. In Microsoft Dynamics CRM navigate to Workplace |Account |Customers |Accounts
2. Click on the New button to load the Account:New page.
3. Click on the Customize tab at the top of the page.
4. Click Form.
5. Scroll down until the Payment Terms box is in view.
6. Click on the Payment Terms box.
7. Click Change Properties.
8. In the Field Properties dialog window, click the Details tab, and then click Edit.
9. In the Option section, click the Add button.
10. Change the value in the Label box to one of the valid Microsoft Dynamics SL payment terms.
11. Complete steps 9 and 10 for each Microsoft Dynamics SL payment terms that have been set up for use by customers in Shared Information Terms Maintenance (21.270.00).
12. Click Save and Close on the Field:Payment Terms of Account page.
13. Click OK on the Field Properties dialog window.
14. Click Save at the top of the Form:Account page.
15. Once saved click Publish at the top of the Form:Account page
Customize Account Number
The Customer ID to Account Number fields that are integrated are set to be 15 characters long.
However, if a user does not have the Flexkey Definition set to 15 characters, then they will not integrate if the field exceeds the Flexkey Definition that is set up in your database.
You must customize your CRM Account screen to only accept the Customer ID flexkey definition length for the Account Number field. To determine this length open the Microsoft Dynamics SL FlexKey Definition (21.320.00) screen in Shared Information. Select the CUSTOMERID Field Type. Find the
Total Length. This is the maximum value to which you can set the Customer ID field.
To prevent an error, you must customize the Account Screen in CRM by putting a size restriction on the field. Follow these steps:
1. Open the Microsoft Dynamics CRM Account screen.
2. On the Customize tab, click Form to customize the form.
4. Click the Account Number field to put the focus on that field, and then click Change Properties.
5. Once Field Properties appears, click Edit on the Details tab.
6. Change the Maximum Length to equal to the Microsoft Dynamics Flexkey Definition Total Length for CUSTOMERID.
13
CONNECTOR FOR MICROSOFT DYNAMICS CONFIGURATION GUIDE FOR MICROSOFT DYNAMICS® SL
7. Click Save and Close.
8. Click Ok to close the Field Properties screen.
9. Click Save in the Account Customize Screen.
10. Then, click Publish.
11. Close the screen.
Optional Customizations
State - In Microsoft Dynamics SL the State/Province ID box in the address can be up to 3 characters. In Microsoft Dynamics CRM the State field is a text field of 50 characters. To avoid issues when submitting from Microsoft Dynamics CRM to Microsoft Dynamics SL the data entered in Microsoft Dynamics CRM must be exactly the same as the states are set up in Microsoft Dynamics SL. You may
want to customize the Microsoft Dynamics CRM state field in the Contact and Account screens to correspond to the options available in State/Province Maintenance (21.290.00) in Microsoft Dynamics SL.
Address Name – The Address Name field must be set to “PRIMARY” in CRM. It will be set to “PRIMARY” if it is blank or will be changed to “PRIMARY” when the Microsoft Dynamics SL Main Address is integrated. It is recommended that the Address Name field be disabled so that it is set to
“PRIMARY” from the start of the integration.
Run initial data synchronization
After Connector for Microsoft Dynamics is installed and the adapters are configured, data needs to be
synchronized between Microsoft Dynamics CRM and Microsoft Dynamics SL before you can run integrations on a regular schedule. The next section, Initial data synchronization, will guide you through this process.
14
CONNECTOR FOR MICROSOFT DYNAMICS CONFIGURATION GUIDE FOR MICROSOFT DYNAMICS® SL
Initial data synchronization
Connector for Microsoft Dynamics is designed to integrate data between Microsoft Dynamics SL and
Microsoft Dynamics CRM in the following scenarios:
New Microsoft Dynamics SL and Microsoft Dynamics CRM application installations
Existing Microsoft Dynamics SL installation and new Microsoft Dynamics CRM installation or existing Microsoft Dynamics CRM installation and new Microsoft Dynamics SL installation
Existing Microsoft Dynamics SL and Microsoft Dynamics CRM installations
Data could exist in one or both applications. You must synchronize this data prior to running the integration on a regular schedule. If you are using the Connector for Microsoft Dynamics with existing installations of the applications, this affects some of the maps that you will use during the initial data synchronization process.
Example: Customer Contacts cannot be synchronized prior to Customers being synchronized.
In the scenerio where both the Microsoft Dynamics SL and Microsoft Dynamics CRM are new installations there is no need to synchronize data since there are only new customers/accounts and
their contacts being entered.
In the scenerio that there is data in both Microsoft Dynamics CRM and Microsoft Dynamics SL, Microsoft Dynamics SL will be considered the master data.
Initial synchronization should be from Microsoft Dynamics SL to Microsoft Dynamics CRM. Any Account or Contact that is in Microsoft Dynamics CRM can only be moved to Microsoft Dynamics SL by submitting it using the submit button.
Note: If you have existing installations of the applications, you should set up duplicate detection in
Microsoft Dynamics CRM before synchronizing the data. For more information, see “Setting up duplicate detection” in the Connector for Microsoft Dynamics installation guide. Duplicate detection may not find
all of your duplicates if the field set up for duplicate detection is not exactly the same.
CONNECTOR FOR MICROSOFT DYNAMICS CONFIGURATION GUIDE FOR MICROSOFT DYNAMICS® SL
Prepare the system
There are specific steps that you should complete after installation to ensure a smooth implementation. This section explains the two system preparation steps.
Verify customizations for Microsoft Dynamics CRM Verify that the customizations have been deployed by selecting settings in Microsoft Dynamics CRM,
then select solutions under the customization section. Verify that the ConnectorForMicrosoftDynamicsSl is listed. Operation will be impaired if these special Microsoft Dynamics CRM customizations are not deployed in your Microsoft Dynamics CRM installation.
Verify that Connector for Microsoft Dynamics customizations for Microsoft Dynamics CRM have been
properly installed.
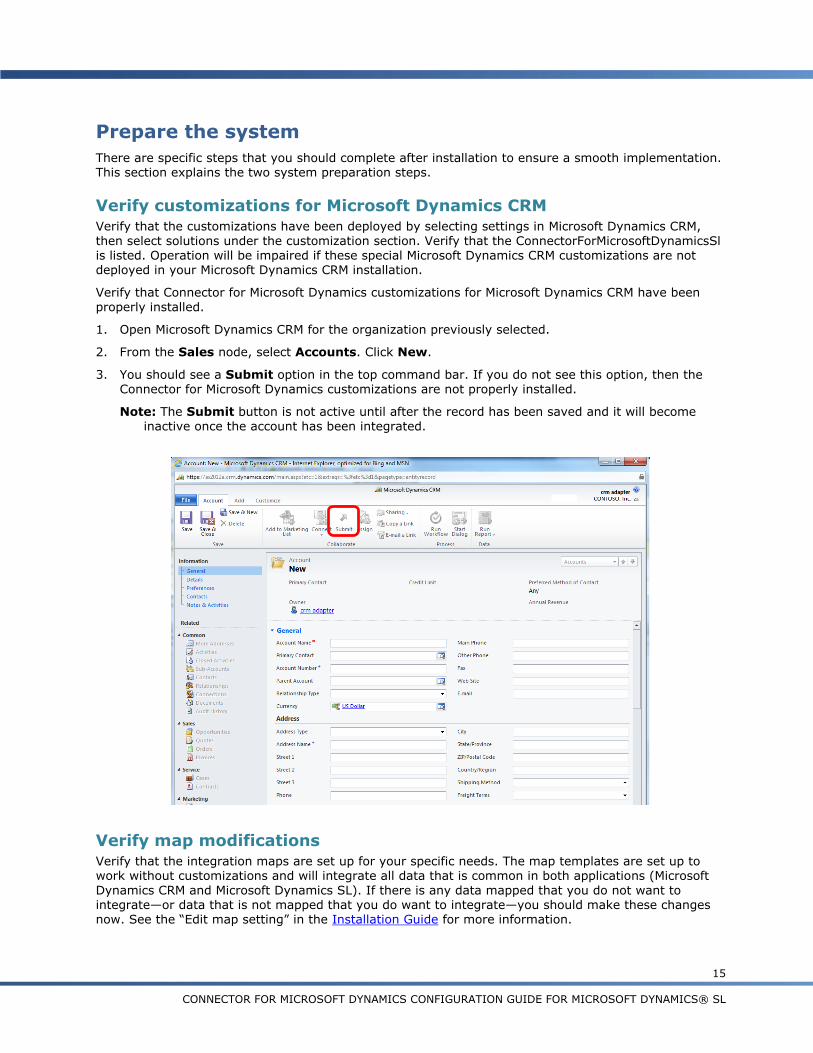
1. Open Microsoft Dynamics CRM for the organization previously selected.
2. From the Sales node, select Accounts. Click New.
3. You should see a Submit option in the top command bar. If you do not see this option, then the Connector for Microsoft Dynamics customizations are not properly installed.
Note: The Submit button is not active until after the record has been saved and it will become
inactive once the account has been integrated.
Verify map modifications Verify that the integration maps are set up for your specific needs. The map templates are set up to work without customizations and will integrate all data that is common in both applications (Microsoft
Dynamics CRM and Microsoft Dynamics SL). If there is any data mapped that you do not want to integrate—or data that is not mapped that you do want to integrate—you should make these changes now. See the “Edit map setting” in the Installation Guide for more information.
CONNECTOR FOR MICROSOFT DYNAMICS CONFIGURATION GUIDE FOR MICROSOFT DYNAMICS® SL
Synchronize the data
The initial data synchronization process follows several steps to set up integrated data between Microsoft Dynamics SL and Microsoft Dynamics CRM. The recommended map run order is listed below,
and the synchronization procedures provide additional details about each map.
Initial data synchronization procedures
The optimal way to initially synchronize your data is to customize the fields necessary in Microsoft Dynamics CRM (see Required Customizations) (and then run the integration maps individually, starting with the Customer to Account map. To alleviate flooding the log files and avoid multiple dependency scenarios, maps should be run in the following order:
1. Map customer accounts (Microsoft Dynamics SL to Microsoft Dynamics CRM)
2. Map customer contact information. (Microsoft Dynamics SL to Microsoft Dynamics CRM)
If the maps are run in a different order than suggested, or if they are run simultaneously, the log file
may end up with an excess of exceptions due to multiple retries because of certain data dependencies. Running the maps in the suggested order will integrate the data in an order that will provide the least amount of exceptions due to dependent data. The suggested map run order also keeps the log file as
clean as possible, makes it easier to troubleshoot errors, and helps some errors resolve themselves.
Note: During the initial data synchronization process, exceptions may appear. Initial data synchronization exceptions are common due to data that has not been integrated yet. The system is set up to automatically retry exceptions due to missing data.
If duplicate detection is turned on and have a published rule, during the data synchronization, if the SL customer is the same as an account that exists in Microsoft CRM it will be updated instead of creating a new account.
Example 1: If you use the same account number in Microsoft Dynamics CRM as is the Microsoft Dynamics SL Customer ID the detection should be based on the Account Number.
Example 2 – If the Account name is the same as the Microsoft Dynamics SL Customer name you should
have duplicate detection based on the Account name/Customer name. Otherwise, a new account will be created when the data synchronization takes place.
17
CONNECTOR FOR MICROSOFT DYNAMICS CONFIGURATION GUIDE FOR MICROSOFT DYNAMICS® SL
Map customers and accounts
Microsoft Dynamics CRM supports both customer account information and customer contact information, but Microsoft Dynamics SL manages only customer information and handles contact
information differently. The Microsoft Dynamics CRM accounts will be the only integration to Microsoft Dynamics SL customers. Due to this, you will only have access to the Account to Customer and
Customer to Account set of maps. Mapping of the Microsoft Dynamics CRM contacts will be to the Customer contact in Microsoft Dynamics SL.
Note: If you decide to enter your initial customer data in Microsoft Dynamics CRM, you must click on
the Submit button for each Microsoft Dynamics CRM account that you integrate to Microsoft Dynamics SL. This allows you to keep Microsoft Dynamics CRM account records in Microsoft Dynamics CRM and not in Microsoft Dynamics SL.
Mapping customers to accounts 1. Note: If you have existing installations of both Microsoft Dynamics SL and Microsoft Dynamics
CRM, the Microsoft Dynamics SL customer records take priority and should be integrated before the Microsoft Dynamics CRM records. Make sure that duplicate detection is turned on in Microsoft
Dynamics CRM so that duplicate customers are not created in Microsoft Dynamics CRM. Verify that that you have entered all your customers in either Microsoft Dynamics SL or Microsoft Dynamics CRM (accounts).
If there are accounts in Microsoft Dynamics CRM that you want to move to Microsoft Dynamics SL,
open the Microsoft Dynamics CRM account form for each account to integrate and click Submit at the top of the form. Only accounts that have been submitted will be integrated to Microsoft Dynamics SL.
2. Open Connector for Microsoft Dynamics.
3. Navigate to the integration to work with and click the Maps node in the left pane.
4. Select the correct map depending on where you entered your initial customer data:
If you entered your initial customer data in Microsoft Dynamics SL, select Customer to Account.
If you entered your initial customer data in Microsoft Dynamics CRM, select Account to Customer.
If you do not want to change any of the default settings for the maps, continue to step 5. To change the map settings, see “Edit map settings” in the Connector for Microsoft Dynamics installation guide.
5. In the Status area, click Activate.
6. Click the Edit link next to the Check for changes area to open the Map Run Schedule window and change it if necessary (it is set to run every 45 seconds). Make sure that the Start Date is
before the date that you first entered data into Microsoft Dynamics SL or Microsoft Dynamics CRM. Click OK to close the Map Run Schedule window.
If your business needs require a longer run time, you can set the map run schedule to any duration.
7. Verify that the date listed in the Check for data modified after area is before the date you entered your Microsoft Dynamics SL customers or Microsoft Dynamics CRM accounts. To change this date, stop the Connector for Microsoft Dynamics service. Click the Edit link next to the Check
for data modified after area to open the Check for data modified after window. Enter the new value and click OK. Start the Connector for Microsoft Dynamics service again.
8. Click Save on the top command bar.
In the Status section of the Map page, the Last run status is displayed. While the integration is running, the Last run status is displayed as Currently running and displays the numbers of
CONNECTOR FOR MICROSOFT DYNAMICS CONFIGURATION GUIDE FOR MICROSOFT DYNAMICS® SL
changes found, changes written, deletions found, records deleted, and failures. Wait until the Currently running status is no longer displayed and the Last run status is displayed to allow the
integration to run and move the Microsoft Dynamics SL customers to Microsoft Dynamics CRM accounts.
Note: The amount of time required to integrate your Microsoft Dynamics SL customers with your Microsoft Dynamics CRM accounts depends on the number of customers in your Microsoft Dynamics
SL and/or Microsoft Dynamic CRM data set.
9. Verify that all the customers and accounts have been fully integrated.
10. Click the View log for this map link at the top of the Status section. Review any events that are
displayed and fix any issues before proceeding. For more information, see “Reviewing the log file” in the Connector for Microsoft Dynamics installation guide.
11. To change the map run schedule for ongoing integration, repeat step 6 and change the map run
schedule to the appropriate settings for this map.
Map customer contacts and contacts
Microsoft Dynamics CRM contact information will be integrated only to customer contact information in
Microsoft Dynamics SL. To do this you will only have access to the Contact to Customer Contact and Customer Contact to Contact set of maps.
Mapping customer contacts to contacts Note: If you have existing installations of both Microsoft Dynamics SL and Microsoft Dynamics CRM,
the Microsoft Dynamics SL customer contact records take priority and should be integrated before the Microsoft Dynamics CRM records. Make sure that duplicate detection is turned on in Microsoft Dynamics CRM so that duplicate customer contacts are not created in Microsoft Dynamics CRM.
1. Verify that that you have entered all your customer contacts in either Microsoft Dynamics SL or
Microsoft Dynamics CRM (contacts).
If there are contacts in Microsoft Dynamics CRM that you want to move to Microsoft Dynamics SL,
you must first make sure that the Parent Customer is entered. Only those contacts that have a Parent Customer will be integrated. Open the Microsoft Dynamics CRM contact form for each contact to integrate and click Submit at the top of the form. Only contacts that have been submitted will be integrated to Microsoft Dynamics SL.
2. Open Connector for Microsoft Dynamics.
3. Navigate to the integration to work with and click the Maps node in the left pane.
4. Select the correct map depending on where you entered your initial contact data:
If you entered your initial customer contact data in Microsoft Dynamics SL, select Customer Contact to Contact.
If you entered your initial customer contact data in Microsoft Dynamics CRM, select Contact to
Customer Contact.
If you do not want to change any of the default settings for the maps, continue to step 5. To change the map settings, see “Edit map settings” in the Connector for Microsoft Dynamics installation guide.
5. In the Status area, click Activate.
6. Click the Edit link next to the Check for changes area to open the Map Run Schedule window and change it if necessary (it is set to run every 45 seconds). Make sure that the Start Date is
before the date that you first entered data into Microsoft Dynamics SL or Microsoft Dynamics CRM. Click OK to close the Map Run Schedule window.
CONNECTOR FOR MICROSOFT DYNAMICS CONFIGURATION GUIDE FOR MICROSOFT DYNAMICS® SL
If your business needs require a longer run time, you can set the map run schedule to any duration.
7. Verify that the date listed in the Check for data modified after area is before the date you entered your Microsoft Dynamics SL customer contacts or Microsoft Dynamics CRM contacts. To
change this date, stop the Connector for Microsoft Dynamics service. Click the Edit link next to the Check for data modified after area to open the Check for data modified after window. Enter
the new value and click OK. Start the Connector for Microsoft Dynamics service again.
8. Click Save on the top command bar.
In the Status section of the Map page, the Last run status is displayed. While the integration is
running, the Last run status is displayed as Currently running and displays the numbers of changes found, changes written, deletions found, records deleted, and failures. Wait until the Currently running status is no longer displayed and the Last run status is displayed to allow the
integration to run and move the Microsoft Dynamics SL contacts to Microsoft Dynamics CRM contacts.
Note: The amount of time required to integrate your Microsoft Dynamics SL customer contacts with your Microsoft Dynamics CRM contacts depends on the number of customer contacts in your
Microsoft Dynamics SL and/or Microsoft Dynamic CRM data set.
9. Verify that all the customer contacts and contacts have been fully integrated.
10. Click the View log for this map link at the top of the Status section. Review any events that are
displayed and fix any issues before proceeding. For more information, see “Reviewing the log file” in the Connector for Microsoft Dynamics installation guide.
11. To change the map run schedule for ongoing integration, repeat step 6 and change the map run
schedule to the appropriate settings for this map.
CONNECTOR FOR MICROSOFT DYNAMICS CONFIGURATION GUIDE FOR MICROSOFT DYNAMICS® SL
Connector configuration
The following sections contain information about how to configure Connector for Microsoft Dynamics.
For more information, see the Connector for Microsoft Dynamics installation guide.
Deleting entities
When you delete a Customer or Customer Contact in Microsoft Dynamics SL the Customer or Customer Contact will be deleted, however the CRM account or contact will not be deleted. However, if an
Account or Contact in CRM is deleted then deletion will take place in Microsoft Dynamics SL for the Customer and/or Customer Contact. The only exception is when the Customer has open balances. The Customer cannot be deleted until the balances are zero.
Configure map settings
If you created an integration from a template, maps have already been imported for you. For more information, see “Configuring map settings” in the Connector for Microsoft Dynamics installation guide.
If you have not created an integration from a template, you must add maps. A map is a collection of associations between one entity’s fields in one Microsoft Dynamics system with another entity’s fields in another Microsoft Dynamics system. For example, to integrate the Microsoft Dynamics CRM account
entity with the Microsoft Dynamics SL customer entity, you must add and activate the Account to Customer map and the Customer to Account map.
Maintenance
The Connector for Microsoft Dynamics has several options for maintaining your integrations. For more
information, see the Connector for Microsoft Dynamics installation guide.
CONNECTOR FOR MICROSOFT DYNAMICS CONFIGURATION GUIDE FOR MICROSOFT DYNAMICS® SL
Appendix
The following sections are provided for your reference.
Map dependencies
Microsoft Dynamics CRM to Microsoft Dynamics SL maps
Microsoft Dynamics SL to Microsoft Dynamics CRM maps
22
CONNECTOR FOR MICROSOFT DYNAMICS CONFIGURATION GUIDE FOR MICROSOFT DYNAMICS® SL
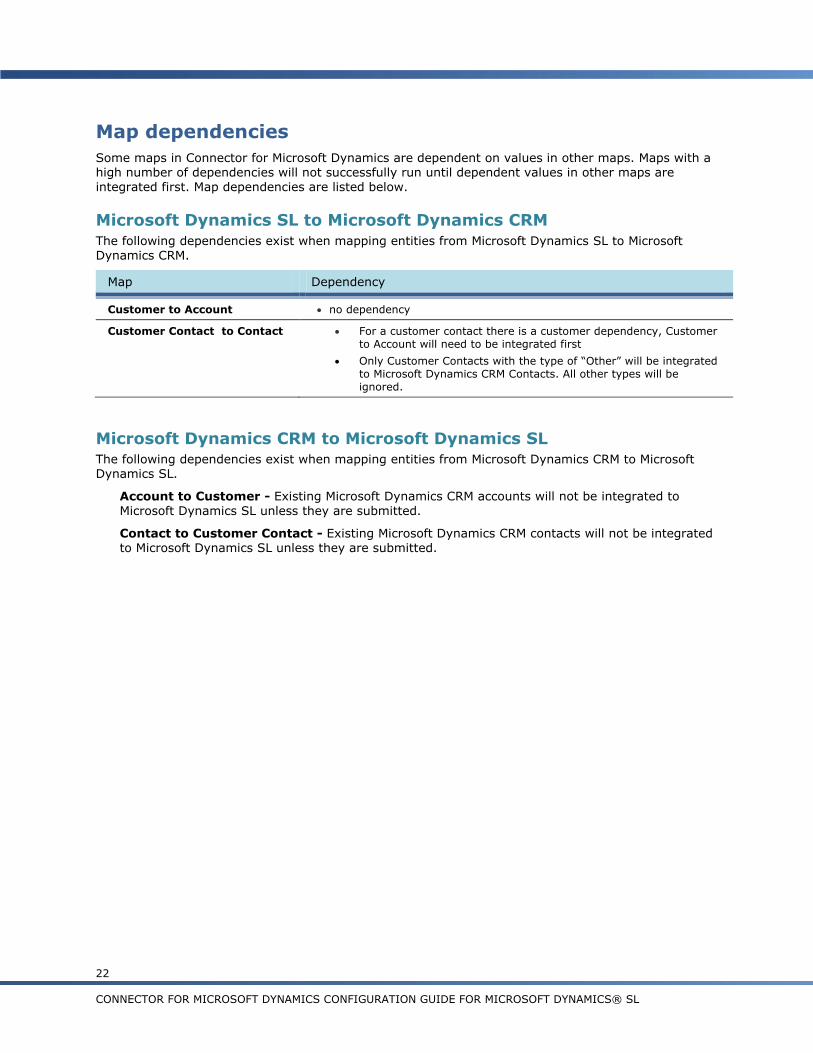
Map dependencies
Some maps in Connector for Microsoft Dynamics are dependent on values in other maps. Maps with a high number of dependencies will not successfully run until dependent values in other maps are
integrated first. Map dependencies are listed below.
Microsoft Dynamics SL to Microsoft Dynamics CRM
The following dependencies exist when mapping entities from Microsoft Dynamics SL to Microsoft Dynamics CRM.
Map Dependency
Customer to Account no dependency
Customer Contact to Contact
For a customer contact there is a customer dependency, Customer
to Account will need to be integrated first
Only Customer Contacts with the type of “Other” will be integrated
to Microsoft Dynamics CRM Contacts. All other types will be
ignored.
Microsoft Dynamics CRM to Microsoft Dynamics SL The following dependencies exist when mapping entities from Microsoft Dynamics CRM to Microsoft Dynamics SL.
Account to Customer - Existing Microsoft Dynamics CRM accounts will not be integrated to
Microsoft Dynamics SL unless they are submitted.
Contact to Customer Contact - Existing Microsoft Dynamics CRM contacts will not be integrated to Microsoft Dynamics SL unless they are submitted.
23
CONNECTOR FOR MICROSOFT DYNAMICS CONFIGURATION GUIDE FOR MICROSOFT DYNAMICS® SL
Microsoft Dynamics CRM to Microsoft Dynamics SL maps
The following sections provide additional information about how data is mapped from Microsoft Dynamics CRM to Microsoft Dynamics SL. Detailed information about each map is listed.
Account to Customer In the Account to Customer map, the Microsoft Dynamics CRM account entity is the source entity and
the Microsoft Dynamics SL customer entity is the destination entity. This map provides the field associations that are necessary to read data from an account record and write that data to the correct fields in the customer record.
This map should not be scheduled to run at the same time that the Customer to Account map
runs during initial data synchronization. For more information about the order in which maps should be run, see Initial data synchronization procedures.
New accounts will not be integrated until you click Submit on the Account form in Microsoft
Dynamics CRM.
The requirement level of the Account Number field on the Account form is noted as Business Recommended. When integrating Microsoft Dynamics CRM accounts to Microsoft Dynamics SL
customer accounts, you should enter an account number in order to avoid inconsistent generation of the ERP key used for integration.
Updates to the Dynamics CRM account address fields of Address 1 will update the Microsoft Dynamics SL customer’s Main Address.
Updates to Microsoft Dynamics CRM account More Addresses fields will integrate with Microsoft Dynamics SL Shipping Addresses.
24
CONNECTOR FOR MICROSOFT DYNAMICS CONFIGURATION GUIDE FOR MICROSOFT DYNAMICS® SL
Contact to Customer Contact In the Contact to Customer Contact map, the Microsoft Dynamics CRM contact entity is the source entity and the Microsoft Dynamics SL customer entity is the destination entity. This map provides the
field associations that are necessary to read data from a contact record and write that data to the
correct fields in the customer contact record.
This map should not be scheduled to run at the same time that the Customer to Account map
runs during initial data synchronization. For more information about the order in which maps should be run, see Initial data synchronization procedures. After the initial synchronization is completed these maps can run at the same time.
New Microsoft Dynamics CRM contacts will not be integrated until you click Submit on the Contact
form.
If a contact in Microsoft Dynamics CRM has a parent assigned to it and then it is integrated into Microsoft Dynamics SL using the Contact to Customer Contact map, it will be created as one of
the contacts for the account it has as its parent. In Microsoft Dynamics SL it will show up as one of the customer contacts
If you create a Microsoft Dynamics CRM contact , then Submit, the ERP key is created by combining the Parent Customer ERP key plus the first five characters of the Last Name field value,
plus a random 3 digit number.
25
CONNECTOR FOR MICROSOFT DYNAMICS CONFIGURATION GUIDE FOR MICROSOFT DYNAMICS® SL
Microsoft Dynamics SL to Microsoft Dynamics CRM maps
The following sections provide additional information about how data is mapped from Microsoft Dynamics SL to Microsoft Dynamics CRM. Detailed information about each map is listed.
Customer to Account In the Customer to Account map, the Microsoft Dynamics SL customer entity is the source entity and
the Microsoft Dynamics CRM account entity is the destination entity. This map provides the field associations that are necessary to read data from a customer record and write that data to the correct fields in the account record.
This map should not run at the same time that the Account to Customer map runs during initial
synchronization. For more information about the order in which maps should be run, see Initial data synchronization procedures. After initial synchronization these maps can run at the same time.
Shipping Address in Microsoft Dynamics SL In Microsoft Dynamics CRM, when an address is added to the Account form using the Address 1
Name or Address 2 Name entities, the same address name cannot also be added to the More Addresses form for that account.
Customer Contact to Contact In the Customer Contact to Contact map, the Microsoft Dynamics SL customer contact entity is the
source entity and the Microsoft Dynamics CRM contact entity is the destination entity. This map provides the field associations that are necessary to read data from a customer contact record and write that data to the correct fields in the contact record.
This map should not be scheduled to run at the same time that the Account to Customer map runs during initial data synchronization. For more information about the order in which maps should
be run, see Initial data synchronization procedures.
Only Customer Contacts with the type of “Other” will be integrated to Microsoft Dynamics CRM
Contacts. All other types will be ingnored.
For customer contact records have parent customer dependencies, the Customer Contact to Contact map is dependent on whether the parent customer record has been integrated.
If you create a Microsoft Dynamics SL customer contact and save. The ERP key is created by combining the Cutomer ID plus the Contact ID.