STUDENT REPORT
Conservation of Wall Paintings at Suuremõisa Manor
Hiiumaa, Estonia
Nordplus Intensive Course, 24 – 29 August 2015
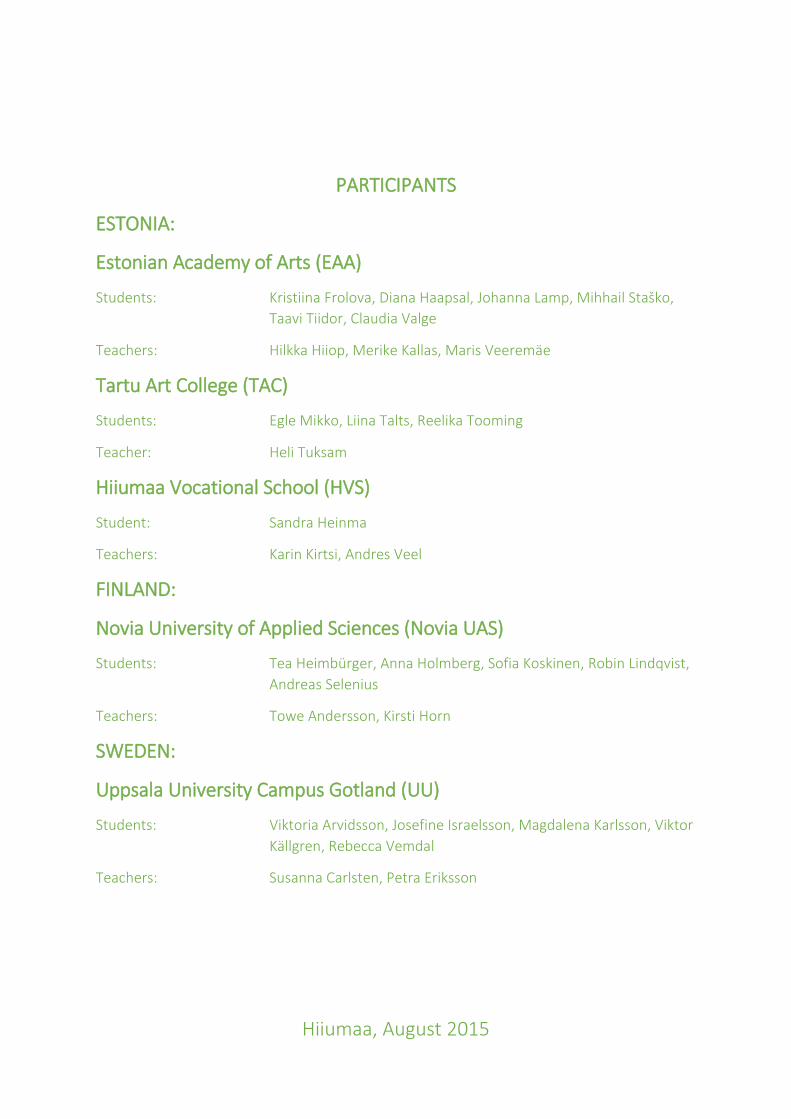
Participants:
ESTONIA: Estonian Academy of Arts (EAA), Tartu Art College (TAC),
Hiiumaa Vocational School (HVS)
FINLAND: Novia University of Applied Sciences (Novia UAS)
SWEDEN: Uppsala University Campus Gotland (UU)
Monday, 24 August By Robin Lindqvist, Andreas Selenius (Novia UAS)
When we arrived to Suuremõisa we had a briefing about the manor and its surroundings. It is a
baroque-rococo building. The construction works started in 1755 and were completed by 1760. The
owner of that time was Ebba Margaretha von Stenbock. In 1772 the main house was extended by
adding two one-floor wings to both sides of the building which now had 64 rooms in total. The
building was made of local limestone and it is said that the stones were transported to Suuremõisa
by a human chain from Hilleste limestone mine a few kilometers away.
Suuremõisa manor. Photo: Andreas Selenius
The Basement
The basement was built in vaults of limestone. The higher ranked paid servants were living in the
basement which was also used as a working space and storage area.
Basement. Photo: Robin Lindqvist.
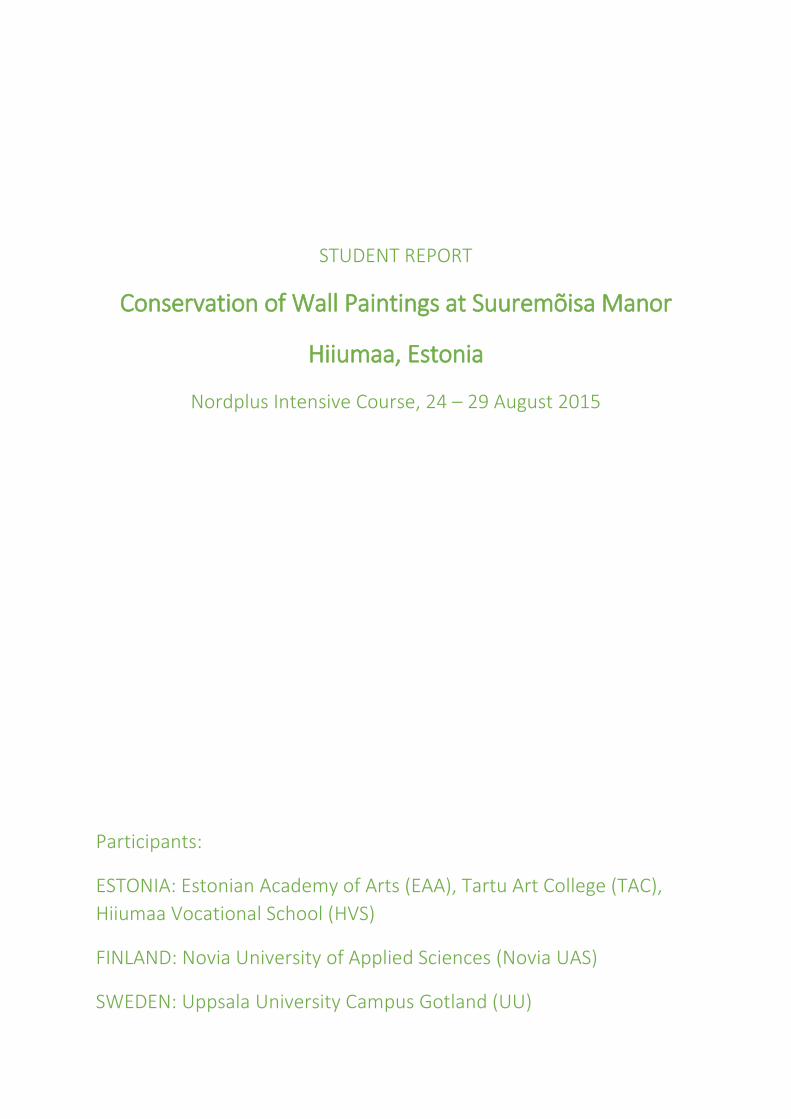
The basement was renovated in 2015 when the new ventilation system and electrical wiring were
also installed. The ceilings and walls were painted white. Some of the floors got new tiles.
Ventilation machine. Photo: Robin Lindqvist. New flooring in the basement. Photo: Andreas Selenius.
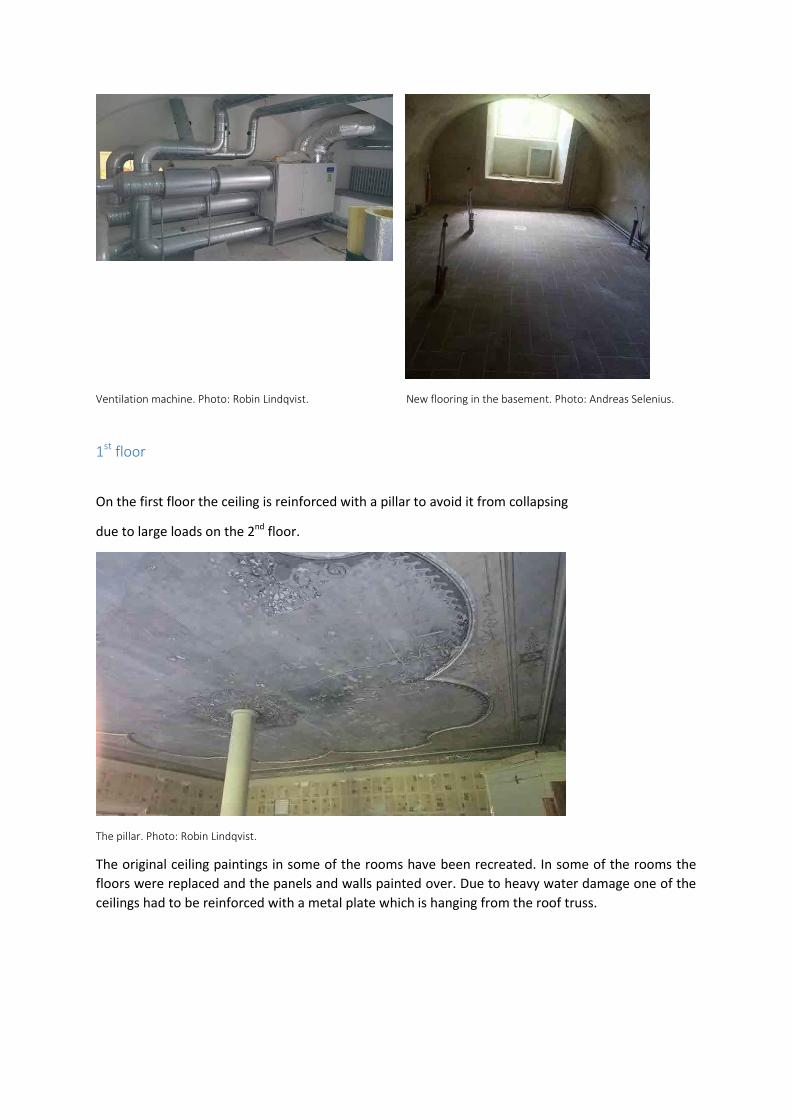
1st floor
On the first floor the ceiling is reinforced with a pillar to avoid it from collapsing
due to large loads on the 2nd floor.
The pillar. Photo: Robin Lindqvist.
The original ceiling paintings in some of the rooms have been recreated. In some of the rooms the
floors were replaced and the panels and walls painted over. Due to heavy water damage one of the
ceilings had to be reinforced with a metal plate which is hanging from the roof truss.
Recreated painting. Photo: Andreas Selenius. The carved oak staircase leading up to the 2nd
floor right from
the entrance. Photo: Andreas Selenius
Staircase seen from the 2nd
floor. Photo: Robin Lindqvist
2nd floor On the second floor there is a wall which is made of wood and is constructed later. The rest of the
walls are made of stone. The metal beams leading from the roof truss to the metal plate reinforcing
the floor on can be found inside the wooden wall.
The wooden wall. Photos: Robin Lindqvist.
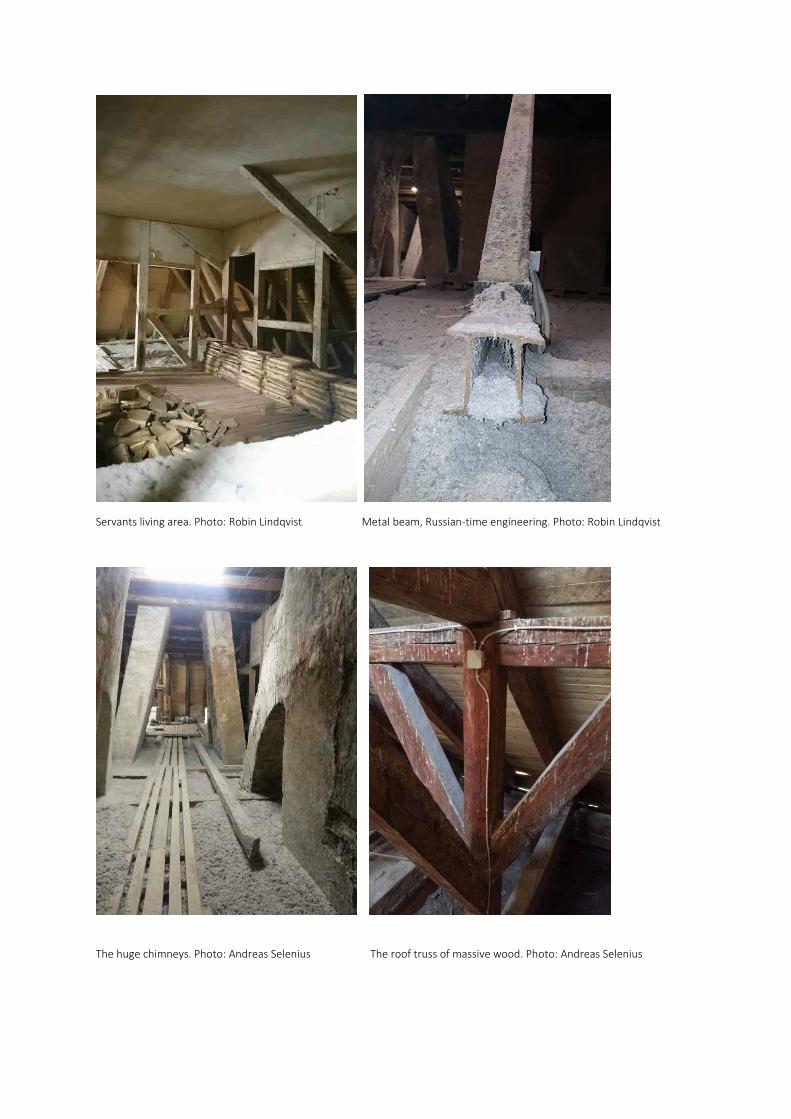
Attic
The attic was used as the living area for servants. The small rooms are made of wood and bricks. The
filling material in the roof is renewed. The roof truss is made of massive wood. The huge chimneys
worked also as ventilation and are connected to most rooms in the manor. Some of the ceiling
constructions had to be renewed and reconstructed due to damages caused by fire and old age.
There were 4-6 windows but they were removed due to leakage. The three roof-windows are
original and are locally made in Hiiumaa.
Servants living area. Photo: Robin Lindqvist Metal beam, Russian-time engineering. Photo: Robin Lindqvist
The huge chimneys. Photo: Andreas Selenius The roof truss of massive wood. Photo: Andreas Selenius
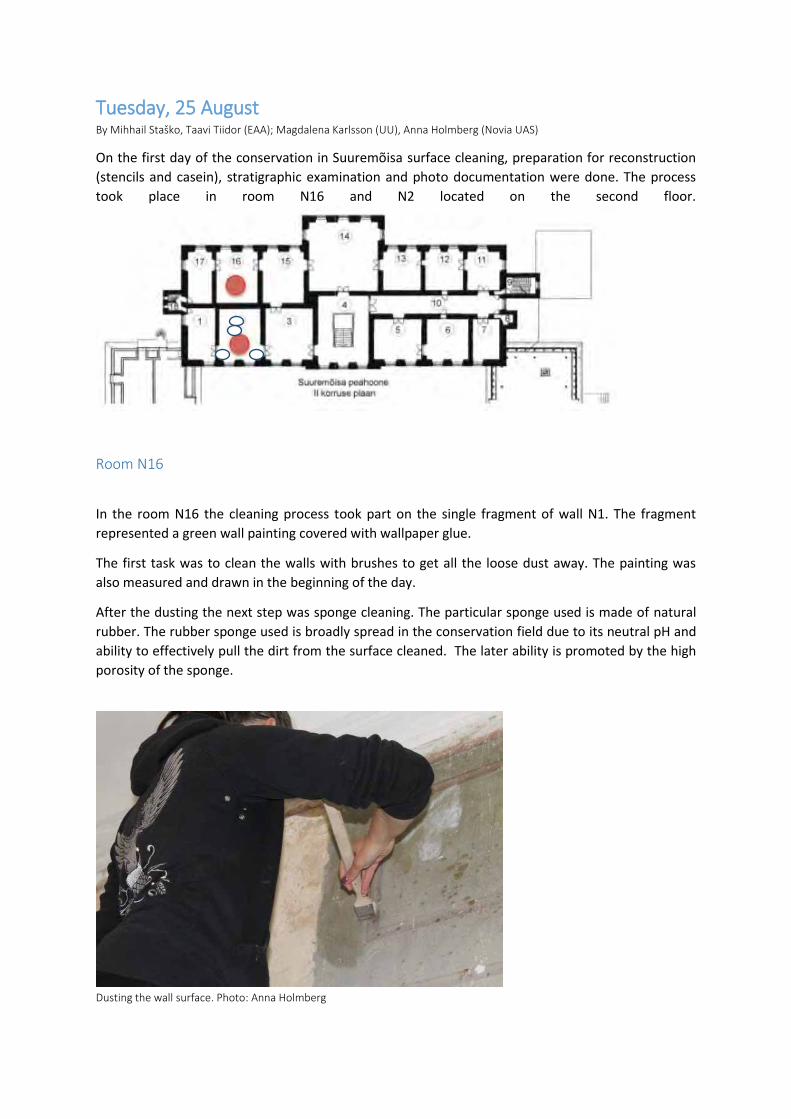
Tuesday, 25 August By Mihhail Staško, Taavi Tiidor (EAA); Magdalena Karlsson (UU), Anna Holmberg (Novia UAS)
On the first day of the conservation in Suuremõisa surface cleaning, preparation for reconstruction
(stencils and casein), stratigraphic examination and photo documentation were done. The process
took place in room N16 and N2 located on the second floor.
Room N16
In the room N16 the cleaning process took part on the single fragment of wall N1. The fragment
represented a green wall painting covered with wallpaper glue.
The first task was to clean the walls with brushes to get all the loose dust away. The painting was
also measured and drawn in the beginning of the day.
After the dusting the next step was sponge cleaning. The particular sponge used is made of natural
rubber. The rubber sponge used is broadly spread in the conservation field due to its neutral pH and
ability to effectively pull the dirt from the surface cleaned. The later ability is promoted by the high
porosity of the sponge.
Dusting the wall surface. Photo: Anna Holmberg
The next task was to remove the glue using wet
mechanical method. The glue was firstly
moistened using water and after cautiously
removed using scalpel blade.
In the result of the first day the superficial dirt
was removed and the wallpaper glue was
partially removed from the wall painting.
Kautchuck sponge cleaning. Photo: Anna Holmberg
Wallpaper glue residues test cleaning.
Photo: Anna Holmberg
Room N2
The first task was to perform the surface cleaning which was done using scalpels, then to clean the
surface using natural rubber sponge to remove the loosen parts of the superficial dirt. The dirt
layers irremovable with dry mechanical method were partially removed using a swab moistened in
acetone.
In Room N2 the cleaning took place on wall 1, wall 2 and wall 3. In the upper section of the wall 1
certain layers were discovered.
These were:
1. Base
2. Plaster /Lime wash
3. Brownish red paint layer
4. Plaster /lime wash
5. Light green colour
6. Plaster/ lime wash
7. Brown paint layer
8. Plaster / Lime wash
9. Red paint layer
10. Plaster/ Lime wash Wall 1 fragment. Photo: Anna Holmberg
11. Wallpaper fragments
As one of the oldest and best preserved colour layers the green paint layer was decided to be overly
revealed. The lost parts of the
green paint layer on the wall 1
were decided to be reconstructed
in order to obtain the visual
integrity of the room. The walls 2
and 3 were decided to be left
unreconstructed due to the
conservation work relied on the
principle of possibly minimal
interpretation and intervention.
Photos depicting the process of revealing
the green paint layer.
Photos: Anna Holmberg
Reconstruction preparations
In the green room there were ornaments on the top of the walls that were going to be reconstructed
and in some places renewed. To perform the reconstruction the reproduction of the green ornament
was needed. The first task was to duplicate the ornament on transparent piece of paper using plain
graphite pencil.
The next task was to make a stencil
preparation. The preparation phase
consisted of sizing of the thick piece of
paper with linseed oil. After the sizing
preformed on the paper, it was left to
dry for a day. The linseed oil sizing was
made to prevent the stencil from
deformation during the process of paint
application.
Reproduction of the ornament outlines trough transparent paper. Photo: Anna Holmberg
The next step of reconstruction preparation was to make a casein medium which will be used as a
paint binder. The casein paint medium consisted of dry casein powder, water and borax. Casein is
normally a protein extracted from cottage cheese. Borax is a material of mineral descent. Its use
allows the casein medium to obtain neutral pH and use it with all kinds of pigments.1
Recipe:
Ingredients by weight:
2 1/2 oz. (80g) Casein Powder
9 fl. oz. (ca 250ml) cold water
1 oz. (32g) Crystalline Borax
9 fl. oz. (ca 250ml) hot water
Preparation:
1. The dry casein powder is soaked in cold water for
approximately one night
2. Borax powder dissolved in warm water
3. Borax solution is added to casein solution and stirred
4. The mixture is left to cool down
Preparation of the casein medium.
Photo: Anna Holmberg
1 Sinopia Pigments, http://www.sinopia.com/-Casein-Milk-Paint-Recipe_c_41.html [15-09-03]
Wednesday, 26 August By Sofia Koskinen (Novia UAS), Johanna Lamp (EAA), Josefine Israelsson (UU), Liina Talts (TAC);
Room N16
Today we continued with cleaning the W-wall painting. We finished scraping out a part of the flower
ornament above the green wall painting.
For the green surface we used clean water and toothbrushes to get off the wallpaper glue residues.
Karin cleaning the W-wall painting Picture of all the tools to clean and plaster the holes
Photo: Josefine Israelsson Photo: Liina Talts
When we were satisfied with the result of the cleaning, we started filling the holes. We used an air
pump to get the loose particles away from the cavity so the plaster could stick better. The plaster
consisted of ¾ sand and of ¼ lime, the filler was cattail fluff (kaveldun).
Air pumping the dirt away from the holes. Pictures of holes on the W-wall painting and holes filled up with plaster. Photos: Josefine Israelsson
Room N2
Also in room N2 we continued cleaning the wall painting (mint-green walls and two different stencil
ornaments on the upper part of the wall). We worked on every wall but we focused on the S-wall
since it was supposed to serve as an example in the end. The residues of plaster and putty were
removed mechanically with scalpels and for soot deposits we used water and sponges or sand paper.
Ugly yellowish brushstrokes were removed with acetone. When we considered the wall to be clean
enough, we consolidated the wall painting of the S-wall with transparent layer of casein using spray
bottles.
Cleaning the example wall. Photo: Josefine Israelsson
Concurrently with cleaning the visible paint layer we continued with exposing little sample areas of
the wall painting under it. We discovered that in the first paint layer, there was probably some kind
of vessel on tripod painted on the upper part of the wall and large panels with ornamented borders
in the lower parts of the wall.
Exposing sample areas of the first wall painting. Photos: Taavi
Tiidor
We also continued with preparations for reconstructing the ornaments on the S-wall, where it was
missing since there used to be a fireplace.
We used two techniques to transfer the image on the wall to paper. The first technique was to
punctuate with a needle the outlines of the ornament. The second one was to cut out the ornament
and thus creating a stencil.
Magdalena using the needle to punctuate the outlines of the ornament and a close-up of the ornament. Photos: Josefine Israelsson
Rebecca cutting out the ornament and a close-up of the stencil. Photos: Josefine Israelsson
Room N2. Schematic reconstruction of the 1. wall painting layer on the East and South walls
by Johanna Lamp (EAA)
Close-up of the flower ornament on the brownish-red frame.
Little fragments of bluish-green paint inbetween two painted panels.
Sondage on the upper part of the wall. Supposedly some kind of a vessel on tripod.
Room N2. Schematic reconstruction of the 1. wall painting layer on the West and North wall
by Johanna Lamp (EAA)
Close-up of the ornament on the ocher
yellow frame
A thin blue line on the border of the
brownish-red frame
Thursday, 27 August By Viktoria Arvidsson, Rebecca Vemdal (UU); Sandra Heinma (HVS), Kristiina Frolova (EAA)
Room N2
During the morning gathering it was decided that the work in room N2, the green room, should be
concentrated on the south wall to give it a finished look. This decision was partly due to the
reconstruction which will take place in the southeast corner of the room. Some students continued
the work filling holes with the coarse plaster that was made the previous day.
Work with filling holes with plaster continued. Mixing of pallets to get Photo: Rebecca Vemdal right hue of colour.
Photo: Rebecca Vemdal
Pallets were mixed to match the existing historical colour on the walls. The pigments used together
with the kasein mixture included chrome oxide, yellow ocher, iron oxide black and chalk white, all of
these together came as close as it could to the original colour. Aquarelle colours were also used
during the process of
painting, to give the
finished result a more
transparent hue, and not
to interfere with the
historic feel. Another
reason for the use of
watercolours is because
the result will be more
reversible than it would
be with a pure casein
based colour.
Student being shown how to mix the watercolour with the kasein. Photo: Viktoria Arvidsson
Retouching of stains and blemishes on the south wall. Photo: Rebecca Vemdal
Right: Student scraping paint to reveal flower ornaments on the east wall. Photo: Viktoria Arvidsson
Retouching of the red/brown ornaments along the walls was made and work also started on the
homogenous green by retouching stains and blemishes on the south wall.
The southeast corner was prepared for reconstructing the paint and ornament for the following day.
The cleaning of the ornaments with scalpels continued, and during this process another blue
ornament was discovered above the door.
The cleaning and revealing of the flower ornament continued on the east wall, traces of the same
ornament where found on the north wall as well, also the pattern of the ornament became clear. A
test stencil was made of that very same ornament.
Room N16
Work continued with filling holes with fine plaster. Excess plaster was removed carefully with
sponges and water. Tests were made to find the right palate to fit with the historical color of the
wall. In this room casein based paint was also used, the same process of mixing the pigment base
with aquarelle colours for reversibility was also applied.
When the right colour was found retouching of the spots on the panel commenced. The frame of the
panel also had work done, same as the border with a small flowery pattern.
Day three of the project was only a half day due to the afternoon excursion, hence the works
finished after lunch and were to commence the next day.
Dried plastered holes ready for retouching with paint. Filling of small holes in room N16 Photo: Vikoria Arvidsson Photo: Rebecca Vemdal
Friday, 28 August By Claudia Valge, Diana Haapsal (EAA); Viktor Källgren (UU), Tea Heimbürger (Novia UAS)
On Friday the group concentrated on finishing work in the room N2 of the manor house. The main
aim of the workshop was to conserve the south wall of this room since it hosted the best preserved
stencil paintings. Therefore, most of the participants focused on filling in the uncoloured, and
discoloured spots on the south wall. In order to give the south wall a more homogeneous
appearance, casein colour mixed with several pigments or various watercolours were used.
It was a time-consuming process to mix a perfect-toned green casein colour to match the green
finishing of the walls. First, a trial batch of green casein colour was made to try out on the western
side of the south wall which was later to be replastered. The green colour was mixed using a variety
of pigments: Chalk White, Chrome Green, Pine Needle Green, Turquoise, Deer Brown, Iron Oxide
Black, Zinc White and Yellow Ocre.
Rebecca filling in blank spots. The green casein colour drying.
Photo: Viktor Källgren Photo: Diana Haapsal
The finished product was then applied with either a brush or a sponge to all the noticeably
discoloured patches on the walls. In some discoloured areas it was needed to remove the dark paint
layers or soot prior to the recolouring.
Some continued previous day’s work by cleaning out the stencil paintings hidden underneath
smudgy wallpaper paste or secondary paint layers.
Claudia cleaning out the amphora with a scalpel. Kirsti cleaning out the earlier wall painting.
Photo: Diana Haapsal Photo: Diana Haapsal
Due to the colours being badly preserved in certain areas, it was also necessary to fill in minor
lacunae in the stencil paintings. This was done using the aqua sporca technique with much diluted
watercolours. The aforementioned method, which is also called “flat on surface” technique, consists
of covering the lacunae with neutral colours similar in hue to the painting, in order to create an
aesthetic whole. In doing so the original painting becomes more visible whilst retaining its authentic
essence.
Magdalena doing neutral retouch with a brush. Egle making greyish spot even with white chalk.
Photo: Diana Haapsal Photo: Diana Haapsal
Similar in principle is the method of negative retouching which was applied on the even earlier
painting layer revealed on the west and south wall. Since these red and yellow toned panel paintings
were significantly less preserved, it was often impossible to trace their exact patterns. Therefore,
negative retouching was used to fade the white plaster background and bring forth the painting. This
was achieved by using neutral coloured chalks: light beige for greenish parts, light grey for yellowish
parts and white for grey and darkened parts.
After retouching, the paintings were also consolidated using a 1:10 mixture of casein and water. This
enabled to readhere the loose pigments of the paintings to the wall. Due to the time limit some
stencil paintings were left to be retouched by the students of traditional building at Hiiumaa
Vocational School.
In order to complete the finishing of the south wall, some minor holes from nails and other damages
had to be filled with fine plaster. The plaster which consisted of lime, sand, water and typha was
applied with a spatula and a wet sponge to blend its surface with the surroundings. The plaster
corrections were later toned with the green casein colour to match the colour of the conserved
walls.
Viktor fixing holes with plaster. Recently placed plaster in 3 damaged spots on the south wall.
Photo: Diana Haapsal Photo: Viktor Källgren
In the re-plastered top left corner of the south wall Mihhail and Egle used previously made stencils
to reconstruct the painting. Using stencils eased the continuation of the original ornaments on the
left side of the wall. The first stencil was made by copying the herbal ornament on the top of the
wall to some tracing paper. Then it was applied to a thicker paper by pricking through the lines of
the ornament using a pin. This method enabled to copy the pattern on the wall by fixing the stencil
to the desired location and sponging the ornament on the wall with a subtle loose pigment. As the
guidelines of the ornament were therefore visible on the wall, it was easy to complete it by hand.
Heli is using a sachet with pigment to attach it to the wall using the pinned through stencil.
Photo: Viktor Källgren Photo: Diana Haapsal
The lower ornament was cut out of a traced copy of the original and applied directly on the wall,
dabbing pigment through the fixed stencil. The two different colours of the newly made ornaments
were tried out by Mihhail and Egle to fit the colour of the original ornaments. The new ornaments
were painted with a slightly weaker-pigmented colour than the original to be identifiable as
secondary additions.
In order to give every participant a chance to practice creating stencil paintings, the three groups of
students from Sweden, Finland and Estonia were each allotted a piece of masonite to make their
own try-outs of the two different stencils.
Rebecca is filling in the shadows of one of the ornaments made on masonite. Photo: Viktor Källgren
Saturday, 29 August By Egle Mikko, Reelika Tooming (TAC)
Finishing room N2
South Wall
On Saturday 28th of august we started to finish works on the south wall in the main room of focus.
By that time, works in the second room N16 had been finished to a satisfactory outcome. Mainly the
S-walls reconstruction of a continuous part of the original ornament was being touched up by
Mihhail to add shadow, light and also lighten the gray color of the background (background color
was lightened with pastels). Most of the works, cleaning and retouching to the original ornaments
were completed. Some finishing touches with watercolors to the S-walls original ornaments were
given by Merike Kallas and Hilkka Hiiop. Also on the S-wall, the doors portal, Claudia was completing
her cleaning of the victory chalice giving it a minimal retouch of color. The outcome of victory
chalices cleaning came to be entirely different from the vision of what had been first retraced on
paper. In the first retracing (made on Tuesday 24.08.15) there was a guess that, what came out later
to be torches, were a crossed feather and sword at the foot of the chalice. This new discovery was at
the same time corrected on the reproduction of the chalice (Friday 27.08.15).
Mihhail adding shadow. Claudia and her model the chalice.
Photo: Egle Mikko Photo: Egle Mikko
The rest of the South wall was also done in aqua-sporca technique, last touches for the green wall
were given, and the scaffoldings were removed from the room. Both N2 and N16 were given a
thorough Scandinavian style speed cleaning, with Kirsti running the forces of students in this
process.
Merike doing some last touches. Photo: Viktor Källgren
Finished look of the south wall. Photo: Merike Kallas
North, West and East Wall
The works on the other walls were left unfinished due to the fact that there was no time to give
them the proper attention needed. But a lot of information from the earlier paintings that were
revealed on all of the three walls was properly framed, cleaned and retouched. Findings on these
walls gave us a better idea of what lays beneath the green layer of paint and also a better idea what
to do with the information next.
Satisfied Uppsala student Viktoria standing next to her foundings
Photo: Egle Mikko
Summary
Since Saturday was also our last day in Suuremõisa manor house we finished up our works and
cleaning of the room by 10:30 am, and gave reflections and feedback of our stay and intensive
course at Suuremõisa.
Hilkka gave a speech of our discoveries and of the importance of the work we had done in those two
rooms. Also addressing the need of people in the same profession, all with a different take on the
subject, to be able to communicate through the conserving of these historical places, so it could be
done to its fullest potential. Our contribution to these rooms will be continued using the same
techniques, materials and knowledge we used by Hiiumaa Vocational School and their attentive
teachers Karin Kirtsi and Andres Veel.
Even though room N2 wasn’t completed, and that in a very aesthetic way, we gained a lot of
information of the history that was hiding beneath the wall and also the skills required to get it out
to the open and give it a new life.
Hilkka talking in her loud voice. Photo: Viktor Källgren
PARTICIPANTS
ESTONIA:
Estonian Academy of Arts (EAA)
Students: Kristiina Frolova, Diana Haapsal, Johanna Lamp, Mihhail Staško,
Taavi Tiidor, Claudia Valge
Teachers: Hilkka Hiiop, Merike Kallas, Maris Veeremäe
Tartu Art College (TAC)
Students: Egle Mikko, Liina Talts, Reelika Tooming
Teacher: Heli Tuksam
Hiiumaa Vocational School (HVS)
Student: Sandra Heinma
Teachers: Karin Kirtsi, Andres Veel
FINLAND:
Novia University of Applied Sciences (Novia UAS)
Students: Tea Heimbürger, Anna Holmberg, Sofia Koskinen, Robin Lindqvist,
Andreas Selenius
Teachers: Towe Andersson, Kirsti Horn
SWEDEN:
Uppsala University Campus Gotland (UU)
Students: Viktoria Arvidsson, Josefine Israelsson, Magdalena Karlsson, Viktor
Källgren, Rebecca Vemdal
Teachers: Susanna Carlsten, Petra Eriksson
Hiiumaa, August 2015