1. CONSOLE OF EXTERNAL USER (NETP) 1.1 Pro-Rata Rate Adjustment Through this form user is able to create and submit a Pro-Rata Rate Adjustment. Companies or institutions with ‘mixed businesses’ (that is, companies that carry out both operations that are subject to VAT and deductible, as well as operations that are tax exempted and/or not deductible) can only deduct VAT at a percentage corresponding to the volume of deductible operations. These companies therefore have to apply the pro-rata VAT method in order to determine tax deduction. To Create and Submit a new Pro-Rata Rate Adjustment: • Fill the fields o Adjusted Value (minimum 1%, maximum 100%, no decimals allowed) o Period From and Period To, which is the period of the Pro-Rata Rate Adjustment Application • Press Submit Button. It should be noted that Applicant Data are pre-completed from the login process. After successful Submission, user gets a success confirmation message, otherwise gets a list of errors (ex. Invalid Period). Figure 1: Submission of Pro-Rata Rate Adjustment 1.2 Vat Refund Application Through this form Cyprus Enterprises which are liable to register under Cyprus VAT law can claim the VAT paid for business expenses made in other European Countries by submitting an electronic application. The application will be scrutinized by Cyprus VAT Authority and will be formed to the tax authority of the EU country that the business expenses have been
Transcript
1. CONSOLE OF EXTERNAL USER (NETP)
1.1 Pro-Rata Rate Adjustment
Through this form user is able to create and submit a Pro-Rata Rate Adjustment. Companies or institutions with ‘mixed businesses’ (that is, companies that carry out both operations that are subject to VAT and deductible, as well as operations that are tax exempted and/or not deductible) can only deduct VAT at a percentage corresponding to the volume of deductible operations. These companies therefore have to apply the pro-rata VAT method in order to determine tax deduction.
To Create and Submit a new Pro-Rata Rate Adjustment:
• Fill the fields o Adjusted Value (minimum 1%, maximum 100%, no decimals allowed) o Period From and Period To, which is the period of the Pro-Rata Rate
Adjustment Application
• Press Submit Button.
It should be noted that Applicant Data are pre-completed from the login process.
After successful Submission, user gets a success confirmation message, otherwise gets a list of errors (ex. Invalid Period).
Figure 1: Submission of Pro-Rata Rate Adjustment
1.2 Vat Refund Application Through this form Cyprus Enterprises which are liable to register under Cyprus VAT law can claim the VAT paid for business expenses made in other European Countries by submitting an electronic application. The application will be scrutinized by Cyprus VAT Authority and will be formed to the tax authority of the EU country that the business expenses have been
made for further check prior to the refund. The tax authority of the EU country that the
business expenses have been made is the responsible authority to refund the entrepreneur1.
1.2.1 Step 1 – Basic Vat Refund Application Data
Figure 2: Vat Refund Application - Step 1
In the first Step of Vat Refund Application fill:
o Refunding Country o Refunding Period of the Application
After selecting Refunding Country, system auto-completes the Currency which the selected European Country accepts VAT Refund Applications.
Temporary Save: You can Temporary Save the Application by pressing the corresponding button in any Step of Vat Refund Application. After success of Temporary Save, you can find the Application in Pending messages to continue filling it or delete it.
It should be noted that Applicant Data are pre-completed from the login process.
After filling the previous mentioned data press Next button to continue to “Step 2”. If you continue to “Step 2” the Refunding Country could not be changed later.
1 http://www.mof.gov.cy
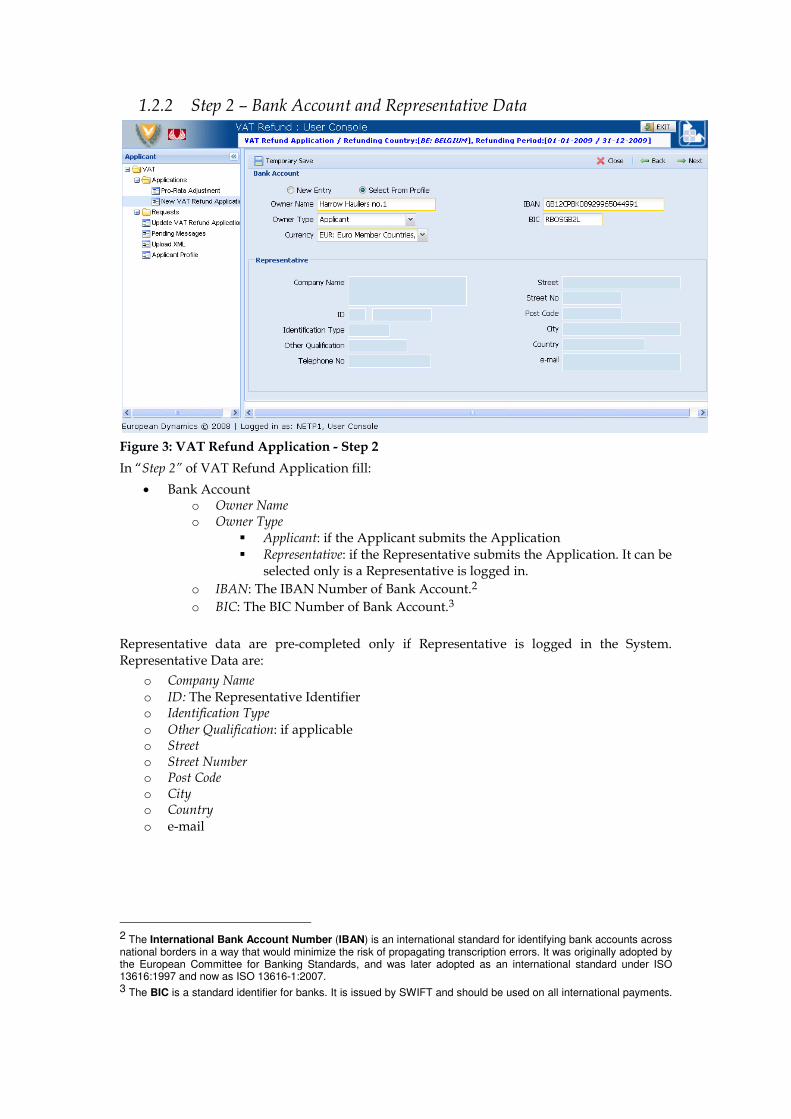
1.2.2 Step 2 – Bank Account and Representative Data
Figure 3: VAT Refund Application - Step 2
In “Step 2” of VAT Refund Application fill:
• Bank Account o Owner Name o Owner Type
� Applicant: if the Applicant submits the Application � Representative: if the Representative submits the Application. It can be
selected only is a Representative is logged in.
o IBAN: The IBAN Number of Bank Account.2
o BIC: The BIC Number of Bank Account.3
Representative data are pre-completed only if Representative is logged in the System. Representative Data are:
o Company Name o ID: The Representative Identifier o Identification Type o Other Qualification: if applicable o Street o Street Number o Post Code o City o Country o e-mail
2 The International Bank Account Number (IBAN) is an international standard for identifying bank accounts across national borders in a way that would minimize the risk of propagating transcription errors. It was originally adopted by the European Committee for Banking Standards, and was later adopted as an international standard under ISO 13616:1997 and now as ISO 13616-1:2007. 3 The BIC is a standard identifier for banks. It is issued by SWIFT and should be used on all international payments.
1.2.2.1 Select Bank Account from Profile / Save Bank Account into Profile
This option allows user to select an already saved Bank Account from Profile or to save it in the Profile in order to use it in another Application
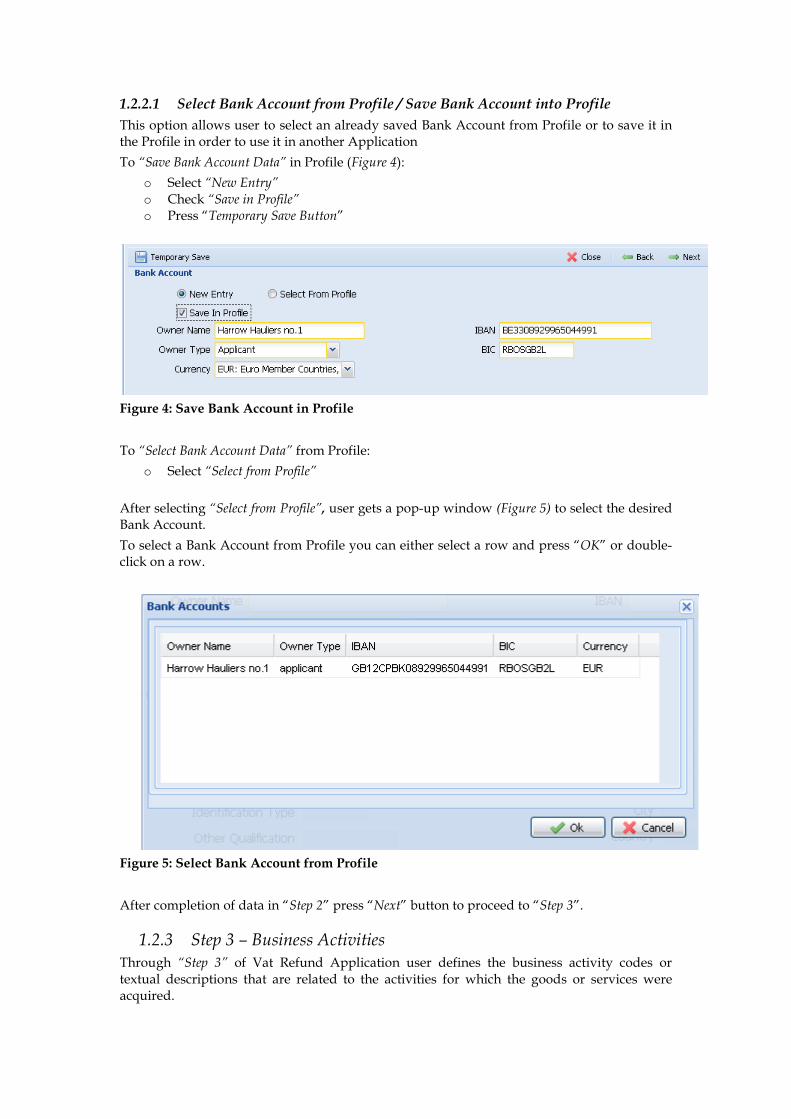
To “Save Bank Account Data” in Profile (Figure 4):
o Select “New Entry” o Check “Save in Profile” o Press “Temporary Save Button”
Figure 4: Save Bank Account in Profile
To “Select Bank Account Data” from Profile:
o Select “Select from Profile”
After selecting “Select from Profile”, user gets a pop-up window (Figure 5) to select the desired Bank Account.
To select a Bank Account from Profile you can either select a row and press “OK” or double-click on a row.
Figure 5: Select Bank Account from Profile
After completion of data in “Step 2” press “Next” button to proceed to “Step 3”.
1.2.3 Step 3 – Business Activities Through “Step 3” of Vat Refund Application user defines the business activity codes or textual descriptions that are related to the activities for which the goods or services were acquired.
Figure 6: VAT Refund Application - Step 3
To “Add” a business activity code press “Add” button.
Figure 7: Add / Edit Business Activity
You can either complete a business activity code or a free textual description depending on the preferences of the Refunding Country. System will enable automatically only one of two.
1.2.3.1 Business Activities Code
If the refunding country accepts business activity codes press magnifying glass icon in the Business Activity code field.
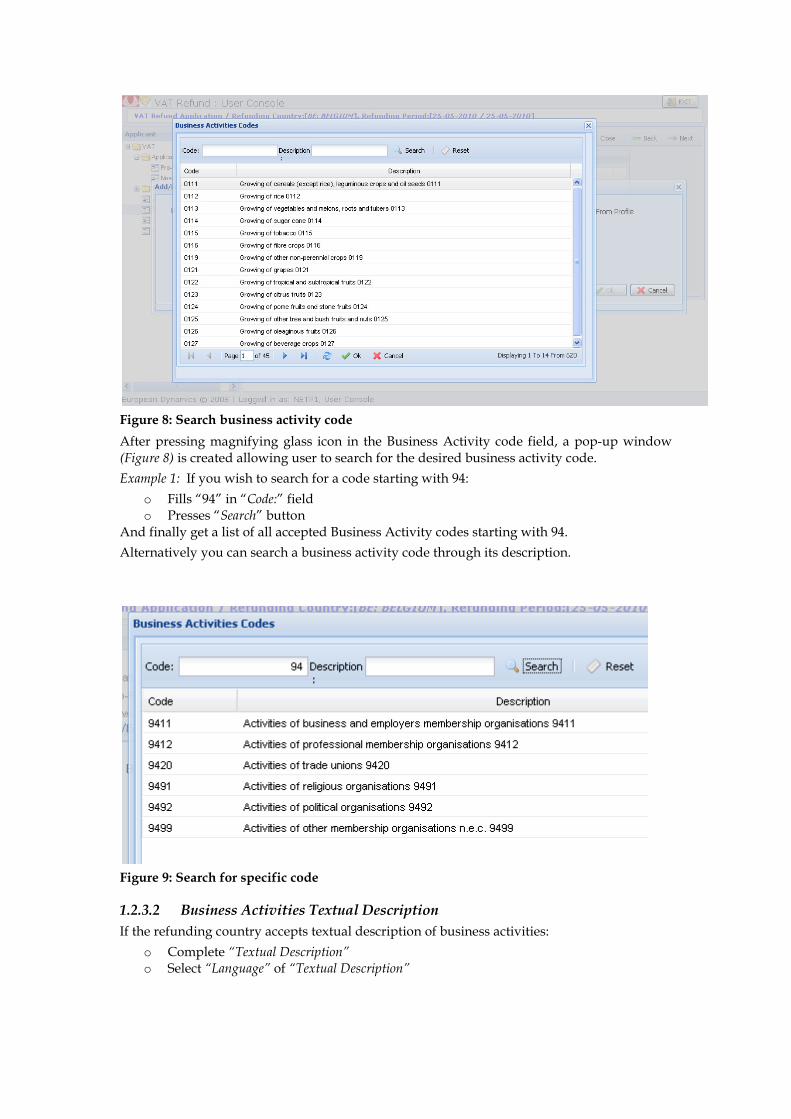
Figure 8: Search business activity code
After pressing magnifying glass icon in the Business Activity code field, a pop-up window (Figure 8) is created allowing user to search for the desired business activity code.
Example 1: If you wish to search for a code starting with 94:
o Fills “94” in “Code:” field o Presses “Search” button
And finally get a list of all accepted Business Activity codes starting with 94.
Alternatively you can search a business activity code through its description.
Figure 9: Search for specific code
1.2.3.2 Business Activities Textual Description
If the refunding country accepts textual description of business activities:
o Complete “Textual Description” o Select “Language” of “Textual Description”
1.2.3.3 Select Business Activity from Profile / Save Business Activity into Profile
This option allows user to select an already saved Business Activity Code or Textual Description from his Profile or to save it in the Profile in order to use it in another Application
To “Save Business Activity” in Profile (Figure 10):
o Select “New Entry” o Check “Save in Profile” o Press “OK” button
Figure 10: Save Business Activity in Profile
To “Select Business Activity” from Profile:
o Select “Select from Profile”
After selecting “Select from Profile”, user gets a pop-up window (Figure 11) to select the desired Business Activity Code or Textual Description from his Profile.
To select a Business Activity Code or Textual Description from Profile you can either select a row and press “OK” or double-click on a row.
Figure 11: Select Business Activity from Profile
After adding the desired Business Activity Code or Textual Description press “OK” button. The business activity has been added to VAT Refund Application.
To continue to “Step 4” press “Next” button.
Note: In order to continue in “Step 4” at least one Business Activity Code or Textual Description should be completed. Otherwise an error-message is displayed.
Figure 12: Error Message - Business Activity
Note: When selecting “Back”, you can go back to a previous screen. With “Temporary Save” option you can store all data entered so far but with no submission taking place.
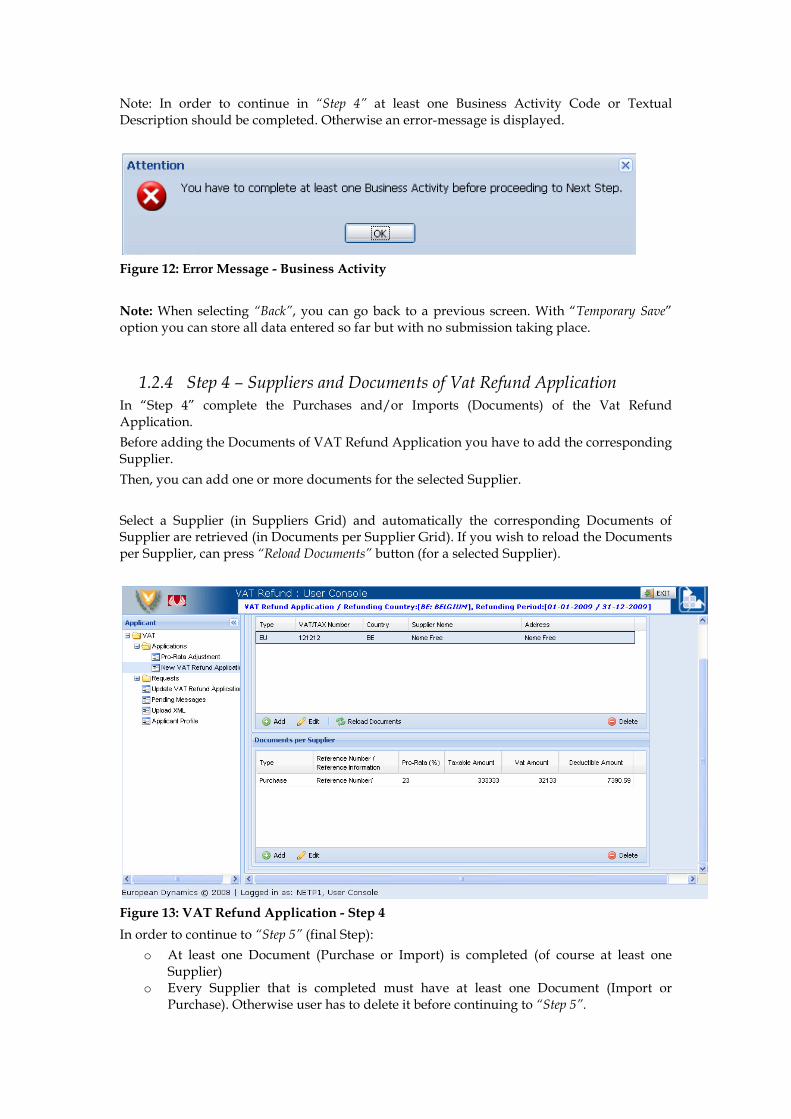
1.2.4 Step 4 – Suppliers and Documents of Vat Refund Application In “Step 4” complete the Purchases and/or Imports (Documents) of the Vat Refund Application.
Before adding the Documents of VAT Refund Application you have to add the corresponding Supplier.
Then, you can add one or more documents for the selected Supplier.
Select a Supplier (in Suppliers Grid) and automatically the corresponding Documents of Supplier are retrieved (in Documents per Supplier Grid). If you wish to reload the Documents per Supplier, can press “Reload Documents” button (for a selected Supplier).
Figure 13: VAT Refund Application - Step 4
In order to continue to “Step 5” (final Step):
o At least one Document (Purchase or Import) is completed (of course at least one Supplier)
o Every Supplier that is completed must have at least one Document (Import or Purchase). Otherwise user has to delete it before continuing to “Step 5”.
If the above requirements are not met you get the following error message:
Figure 14: Error Message - Integrity of Supplier / Document
Useful Note: If you wish to “Delete” a Supplier all the corresponding documents (if exist) will be deleted.
1.2.4.1 Add Supplier
To add a new “Supplier” press “Add” Button in Suppliers Grid. After pressing “Add” Button you will get a prompt screen (Figure 15) to select the Type of Supplier.
Figure 15: Select Supplier Type
Select Type of Supplier:
o European: in case of Purchases from a European Union Country o Non- European: in case of Imports from a non-European Country
Press “OK” button to continue.
Note: Selection of Type of Supplier is final. No changes to Type can be applied in the future for an already registered Supplier.
1.2.4.1.1 Add European Supplier
If you have selected “European” in Figure 15 then the window in Figure 16 is displayed.
Figure 16: Add European Supplier
“Country” of Supplier is pre-completed and has to be the same as the Refunding Country.
• In Personal Data Area: o Complete “First Name” and “Last Name” or “Name Free” o Complete “Street”, “Post Code” and “City” or “Address”
• Optionally complete: o “Telephone Number” o “Street Number” o “District” o “VAT Number” or “Tax Number”
Note 1: “VAT Number” or “Tax Number” has to be completed if you wish to add later a non-Simplified Invoice. If no “VAT Number” or “Tax Number” is provided you would only add Simplified Invoices.
Note 2:
o If you complete “First Name” and “Last Name”, “Name Free” field will be disabled. o If you complete “Name Free” field, “First Name” and “Last Name” fields will be
disabled. o If you complete “First Name” and “Last Name” and later wish to complete “Name
Free”, values in “First Name” and “Last Name” have to be deleted in order to enable the “Name Free” field.
o If you complete “Address” all other address fields will be disabled. o If you complete s “Street”, “Post Code” and “City”, then “Address” field will be
disabled.
After completion of Supplier Data press “OK” Button.
1.2.4.1.1.1 Select Supplier from Profile / Save Supplier into Profile
This option allows user to select an already saved Supplier from his Profile or to save it in the Profile in order to use it in another Application.
A. To “Save Supplier” in Profile:
o Select “New Entry” o Check “Save in Profile” o Press “OK” button
B. To “Select Supplier” from Profile:
o Select “Select from Profile”
After selecting “Select from Profile”, you will get a pop-up window Figure 11 to select the desired Supplier.
To select a Supplier from Profile you can either select a row and press “OK” or double-click on a row.
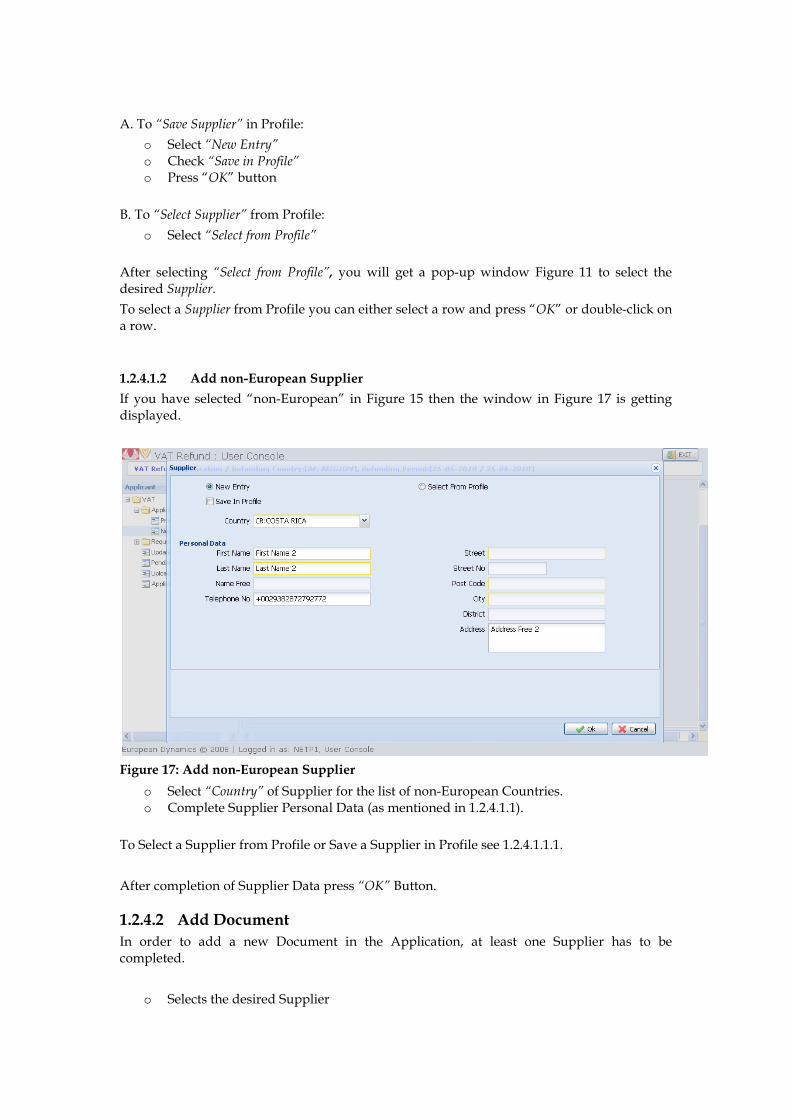
1.2.4.1.2 Add non-European Supplier
If you have selected “non-European” in Figure 15 then the window in Figure 17 is getting displayed.
Figure 17: Add non-European Supplier
o Select “Country” of Supplier for the list of non-European Countries. o Complete Supplier Personal Data (as mentioned in 1.2.4.1.1).
To Select a Supplier from Profile or Save a Supplier in Profile see 1.2.4.1.1.1.
After completion of Supplier Data press “OK” Button.
1.2.4.2 Add Document
In order to add a new Document in the Application, at least one Supplier has to be completed.
o Selects the desired Supplier
o Presses “Add” button in “Documents per Supplier” Grid.
If Supplier is European then a Purchase will be added (1.2.4.2.1), else if Supplier is non-European an import (1.2.4.2.1.1) will be added.
1.2.4.2.1 Add Purchase
Figure 18: Purchase Form
In Figure 18, are displaying the data of a Purchase.
o Select “Type” of Purchase: � Simplified � Non-Simplified (can be selected only if VAT ID or TAX No is provided for the
corresponding Supplier). o Complete “Issuing Date”. If “Issuing Date” of Purchase is not in Refunding Period of
Application, you will get a Warning Message. o Complete “Reference Number” of Purchase o Complete “Amounts”:
� “Taxable” � “VAT” � “Deductible”
o Add at least one Good (1.2.4.2.1.1).
Optionally:
o Complete “Pro-Rata Rate (%)”. If “Pro-Rata Rate (%)” is completed, the “Deductible”
Amount is automatically calculated4. o If “Pro-Rata Rate (%)” is not completed VAT Amount equals Deductible Amount.
After completion of Purchase Data press “OK” button.
1.2.4.2.1.1 Add Good
To Add a Good press “Add” button, then:
4 [Deductible Amount] = [VAT Amount] x [Pro-Rata Rate]
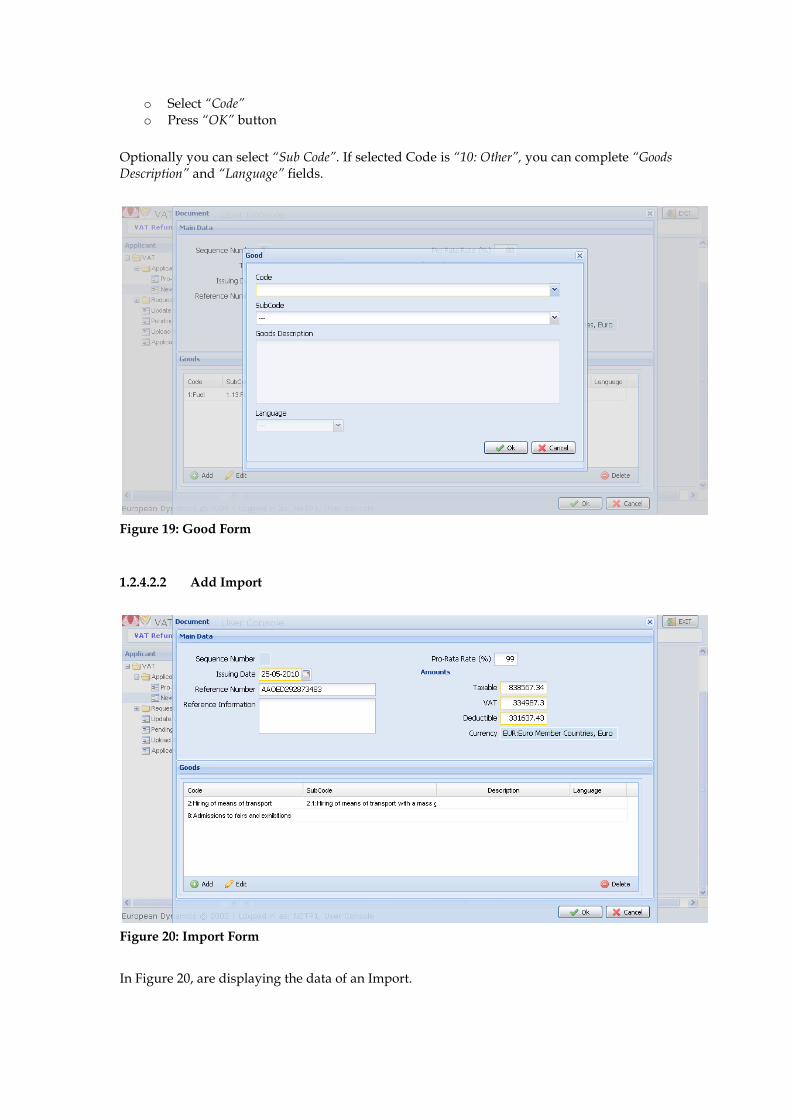
o Select “Code” o Press “OK” button
Optionally you can select “Sub Code”. If selected Code is “10: Other”, you can complete “Goods Description” and “Language” fields.
Figure 19: Good Form
1.2.4.2.2 Add Import
Figure 20: Import Form
In Figure 20, are displaying the data of an Import.
o Complete “Issuing Date” of Import. If “Issuing Date” of Import is not in Refunding Period of Application, you will get a Warning Message.
o Complete “Reference Number” or “Reference Information” of Import. o Complete “Amounts”:
� “Taxable” � “VAT” � “Deductible”
o Add at least one Good (1.2.4.2.1.1).
Optionally:
o Complete “Pro-Rata Rate (%)”. If “Pro-Rata Rate (%)” is completed, the “Deductible”
Amount is automatically calculated5. o If “Pro-Rata Rate (%)” is not completed VAT Amount equals Deductible Amount.
After completion of Import Data press “OK” button.
1.2.5 Step 5 – Documents Copies / Attachments
In the final Step of VAT Refund Application, optionally add one or more document copies of the previously added documents.
The “File Attachment” has to be in any of the following encoding formats: “PDF”, “JPEG” or “TIFF”.
Furthermore, the “ZIP” format is also allowed. Nevertheless, all the files contained in a zip file will have to comply with the list of encoding formats allowed for a file.
Furthermore the total size of attached files must not exceed 5 MB.
Figure 21: VAT Refund Application - Step 5
5 [Deductible Amount] = [VAT Amount] x [Pro-Rata Rate]
Figure 22: Upload an Attachment
If you wish to add an attachment:
o Press Add Button (Figure 21) o Press again Add Button (Figure 22) o Select the File from the local disk
The upload process automatically starts.
After successful upload of an attachment you can optionally add a File Description by:
o Selecting the uploaded file o Pressing “Add Description” button
Figure 23: Add Attachment Description
1.2.6 Submission of VAT Refund Application
To Submit the VAT Refund Application:
o Press “Submit” Button o In the following confirmation message press “OK”.
After successful submission of VAT Refund Application from external user, the application is forwarded to the local authority which is responsible to check it and to send it to the Member State of Refund.
1.3 Requests
• In “Requests” screen all requests send by user appear.
• In the list the following data of each request appear: o Refunding Country o Period o Created o Last Message o Date of Last Message o Status
Figure 24: Requests Screen
User is able to search the requests by the following criteria:
o Refunding Country o Period
o From o To
User is also able to see details of each request:
o Select request o Select “Request Details” from Actions.
or simply by “double-click” in a request.
Figure 25: Request Details
In “Request Details” screen all the involved messages of the corresponding request appear. User can view each one by selecting it and pressing “View” button.
1.4 Update VAT Refund Application In screen “VAT Refund Application” appear all submitted VAT Refund Applications that user can update by sending a new Version. It shall be mentioned that when user Updates an already sent VAT Refund Application, can only perform the following actions:
o Edit a Document (Purchase / Import) o Delete a Document (Purchase / Import) o Modify Attached Documents
Figure 26: Update VAT Refund Application
To update a VAT Refund Application:
o Select an Application from the list
o Select “Update VAT Refund Application” from Actions
Figure 27: Update VAT Refund Application - Step 1
In “Step 1” of Update of a VAT Refund Application appear the basic VAT Refund Application Data:
o Reference Number o Country (Refunding) o Applicant Name o Reference Number of Applicant and Details o Representative Name o Reference Number of Representative and Details o Start Date of Application o End Date of Application o Bank Account Data of Application
• IBAN
• BIC
• Owner Name
• Owner Type � Applicant � Representative
• Currency
Full Data of Applicant and Representative are also available by pressing the corresponding “Details” button.
Figure 28: Detailed Applicant Data
The detailed Applicant Data include:
o Country o E-mail o Name o Vat Number and Issuing Authority o Telephone Number o Street o Street Number o Post Code o City
Figure 29: Update VAT Refund Application - Step 2
In “Step 2” of Update VAT Refund Application appear all the Documents that user can Edit or Delete.
1.4.1 Delete a Document To Delete a document:
o Select the desired document from Import or Invoices Grid o Press Delete button o In the Confirmation Window press “OK” button
1.4.2 Edit a Document
To Edit a document:
o Select the desired document from Import or Invoices Grid o Press Edit Button
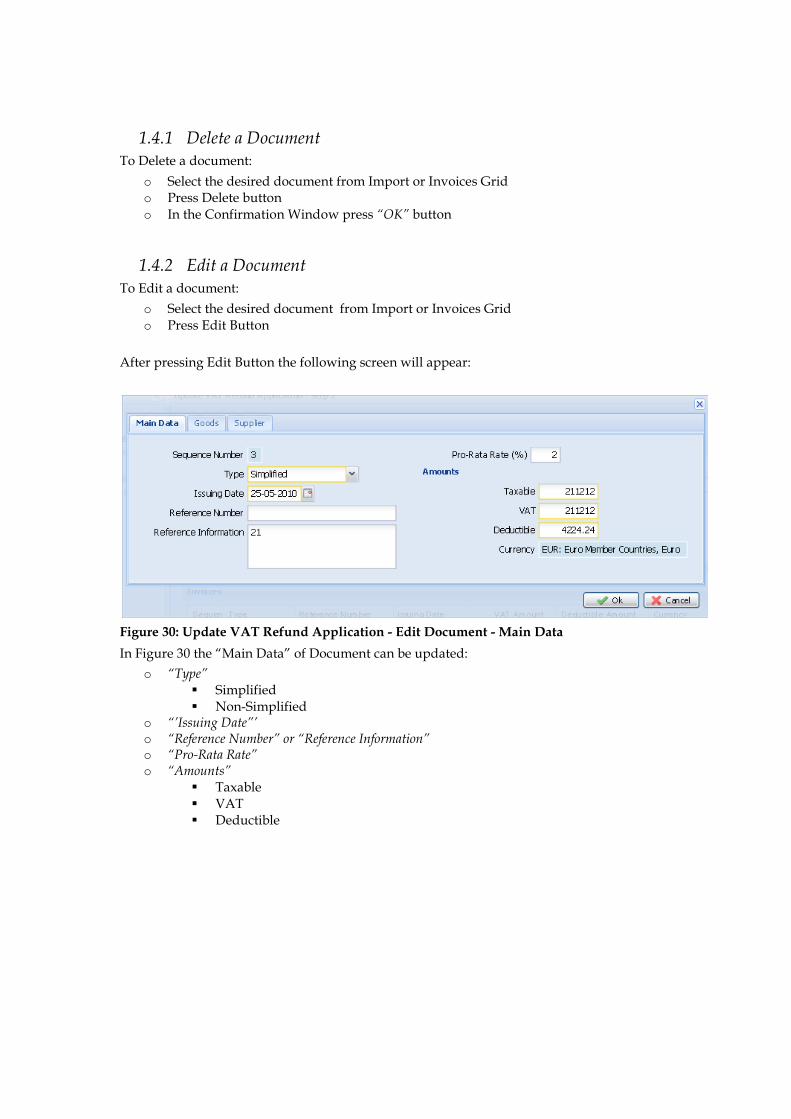
After pressing Edit Button the following screen will appear:
Figure 30: Update VAT Refund Application - Edit Document - Main Data
In Figure 30 the “Main Data” of Document can be updated:
o “Type” � Simplified � Non-Simplified
o “’Issuing Date”’ o “Reference Number” or “Reference Information” o “Pro-Rata Rate” o “Amounts”
o “Country” o “First Name” o “Last Name” o “Name Free” o “Telephone Number” o “Street” o “Street Number” o “Post Code”
o “City” o “District” o “Address”
After Updating all desired data press “OK” Button.
Figure 33: Update VAT Refund Application - Step 3
In Figure 33 appears the “Step 3” of Update of a VAT Refund Application.
User:
o Views Business Activities o Updates Documents Copies – Attachments (see also 1.2.5)
1.5 Pending Messages
• In “Pending Messages” screen all Temporary Saved messages of user appear.
• In the list the following data of each request appear: o Type o Period
� Start Date � End Date
o Origin Country o Destination Country o Date
Figure 34: Pending Messages Screen
User is able to search the Pending Messages by the following criteria:
o Refunding Country o Period
o From o To
The following Actions are available after selection of a pending message:
o View Message
• User views the selected message and can continue editing it by the corresponding screen. For example if pending message is “VAT Refund Application” user will be redirected to Figure 2.
o Delete Message
• User Deleted the Selected Pending Message
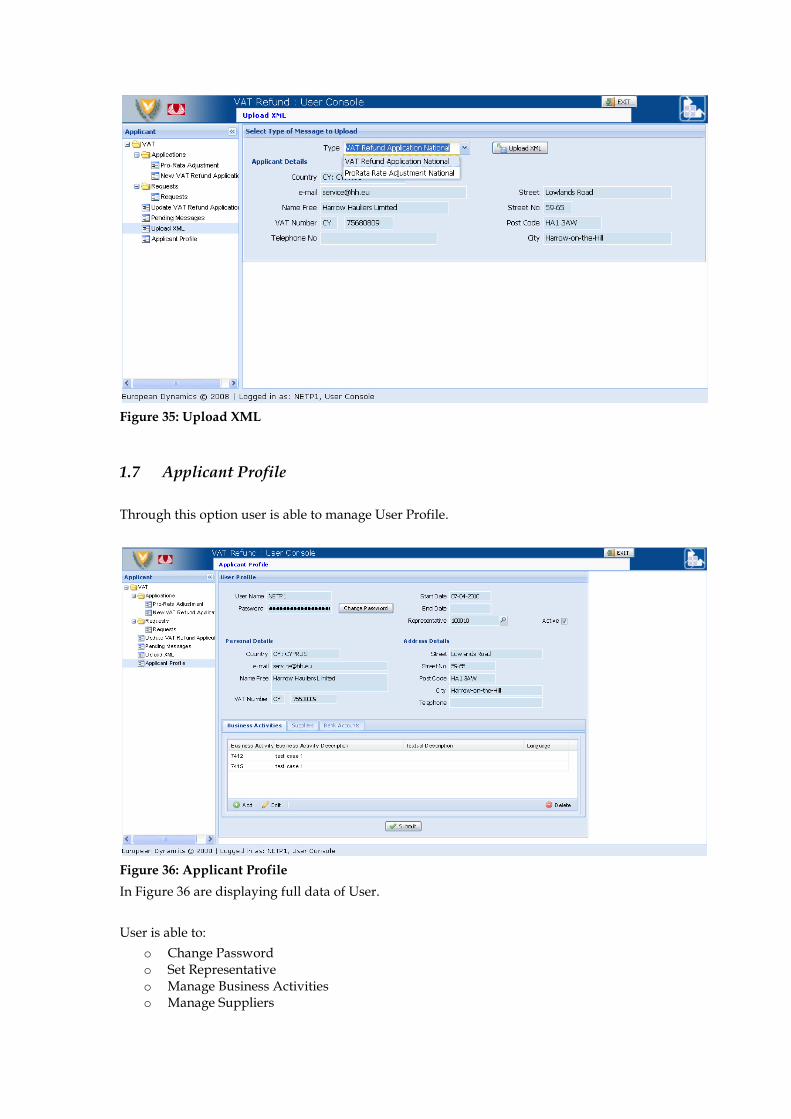
1.6 Upload XML
The application allows the uploading of messages in XML file format. The messages must be of a type (VAT Refund Application National, Pro-Rata Rate Adjustment National). The files must be valid in all its forms (syntactic, semantic, etc.). Otherwise the corresponding error messages appear.
o Click Upload XML from Console o Click Message Type for Upload o Click Upload XML o Click Add and click file to Upload o Click Upload
Figure 35: Upload XML
1.7 Applicant Profile
Through this option user is able to manage User Profile.
Figure 36: Applicant Profile
In Figure 36 are displaying full data of User.
User is able to:
o Change Password o Set Representative o Manage Business Activities o Manage Suppliers
o Manage Bank Accounts
1.7.1 Change Password
User presses “Change Password” button and Figure 37 appears.
Figure 37: Change Password Window
Password has to be at least 6 characters length.
1.7.2 Set Representative User presses magnifying glass icon in the Representative field and Figure 38 appears.
Figure 38: Set Representative
o Complete “Unique Identification” of Representative o Press “OK” button
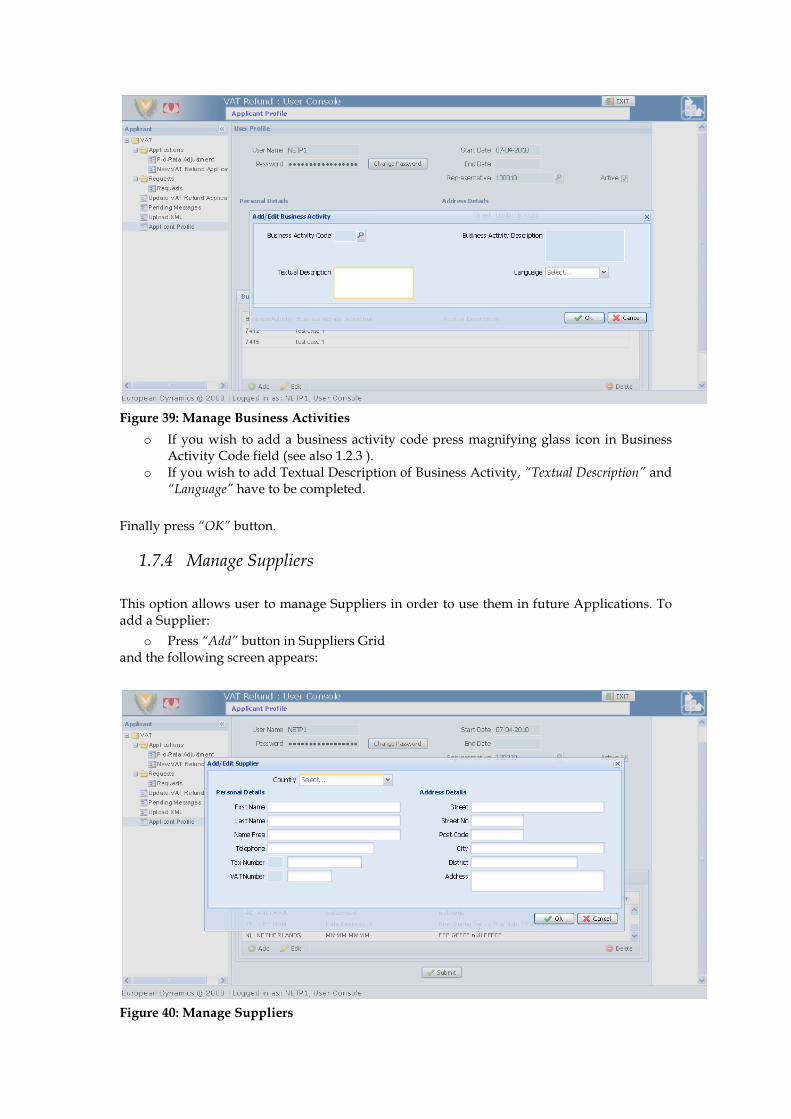
1.7.3 Manage Business Activities
This option allows user to manage Business Activities in order to use them in future Applications. To add a Business Activity:
o Press “Add” button in Business Activities Grid and the following screen appears:
Figure 39: Manage Business Activities
o If you wish to add a business activity code press magnifying glass icon in Business Activity Code field (see also 1.2.3 ).
o If you wish to add Textual Description of Business Activity, “Textual Description” and “Language” have to be completed.
Finally press “OK” button.
1.7.4 Manage Suppliers
This option allows user to manage Suppliers in order to use them in future Applications. To add a Supplier:
o Press “Add” button in Suppliers Grid and the following screen appears:
Figure 40: Manage Suppliers
o Select Country o Complete “First Name”, “Last Name” or alternatively “Name Free” o Complete optionally “Telephone Number” o If the selected country is European “Tax Number” or “VAT Number” can be provided o Complete “Address” or
o “Street” o “Street No” o “Post Code” o “City” o “District”
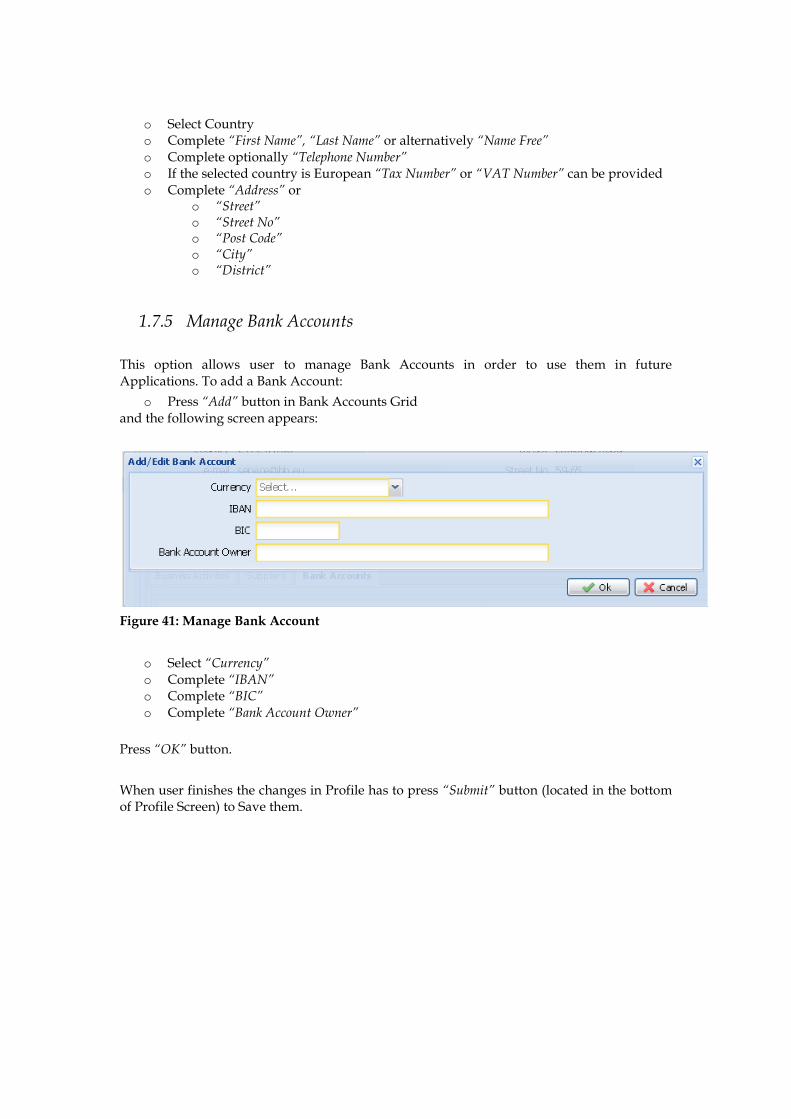
1.7.5 Manage Bank Accounts
This option allows user to manage Bank Accounts in order to use them in future Applications. To add a Bank Account:
o Press “Add” button in Bank Accounts Grid and the following screen appears:
Figure 41: Manage Bank Account
o Select “Currency” o Complete “IBAN” o Complete “BIC” o Complete “Bank Account Owner”
Press “OK” button.
When user finishes the changes in Profile has to press “Submit” button (located in the bottom of Profile Screen) to Save them.