+ All Categories
Home > Documents > Consolidated Storage Configuration Document for Unix...

Consolidated Storage Configuration Document for Unix...

Date post: 30-Mar-2018
Category:
Upload: buituong
View: 237 times
Download: 2 times
Share this document with a friend
4
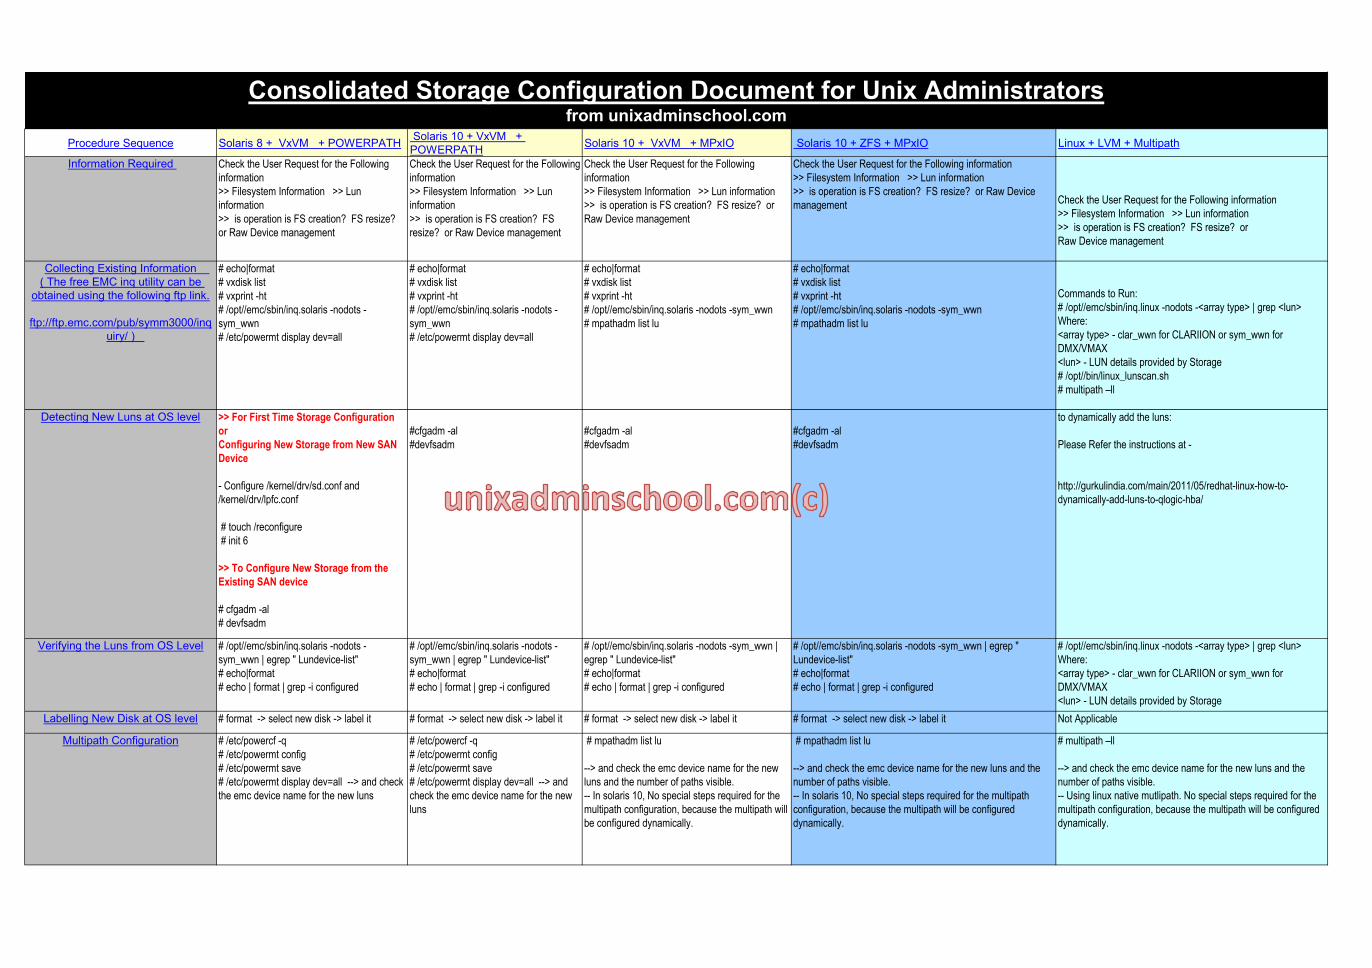
Procedure Sequence Solaris 8 + VxVM + POWERPATH Solaris 10 + VxVM + POWERPATH Solaris 10 + VxVM + MPxIO Solaris 10 + ZFS + MPxIO Linux + LVM + Multipath Consolidated Storage Configuration Document for Unix Administrators from unixadminschool.com Detecting New Luns at OS level Collecting Existing Information ( The free EMC inq utility can be obtained using the following ftp link. ftp://ftp.emc.com/pub/symm3000/inq uiry/ ) Information Required Labelling New Disk at OS level Multipath Configuration Verifying the Luns from OS Level #cfgadm -al #devfsadm >> For First Time Storage Configuration or Configuring New Storage from New SAN Device - Configure /kernel/drv/sd.conf and /kernel/drv/lpfc.conf # touch /reconfigure # init 6 >> To Configure New Storage from the Existing SAN device # cfgadm -al # devfsadm # format -> select new disk -> label it #cfgadm -al #devfsadm #cfgadm -al #devfsadm # /opt//emc/sbin/inq.solaris -nodots -sym_wwn | egrep " Lundevice-list" # echo|format # echo | format | grep -i configured # /opt//emc/sbin/inq.solaris -nodots - sym_wwn | egrep " Lundevice-list" # echo|format # echo | format | grep -i configured # /opt//emc/sbin/inq.solaris -nodots - sym_wwn | egrep " Lundevice-list" # echo|format # echo | format | grep -i configured # /etc/powercf -q # /etc/powermt config # /etc/powermt save # /etc/powermt display dev=all --> and check the emc device name for the new luns # /etc/powercf -q # /etc/powermt config # /etc/powermt save # /etc/powermt display dev=all --> and check the emc device name for the new luns # echo|format # vxdisk list # vxprint -ht # /opt//emc/sbin/inq.solaris -nodots - sym_wwn # /etc/powermt display dev=all # echo|format # vxdisk list # vxprint -ht # /opt//emc/sbin/inq.solaris -nodots - sym_wwn # /etc/powermt display dev=all # echo|format # vxdisk list # vxprint -ht # /opt//emc/sbin/inq.solaris -nodots -sym_wwn # mpathadm list lu Check the User Request for the Following information >> Filesystem Information >> Lun information >> is operation is FS creation? FS resize? or Raw Device management Check the User Request for the Following information >> Filesystem Information >> Lun information >> is operation is FS creation? FS resize? or Raw Device management Check the User Request for the Following information >> Filesystem Information >> Lun information >> is operation is FS creation? FS resize? or Raw Device management Check the User Request for the Following information >> Filesystem Information >> Lun information >> is operation is FS creation? FS resize? or Raw Device management Commands to Run: # /opt//emc/sbin/inq.linux -nodots -<array type> | grep <lun> Where: <array type> - clar_wwn for CLARIION or sym_wwn for DMX/VMAX <lun> - LUN details provided by Storage # /opt//bin/linux_lunscan.sh # multipath –ll to dynamically add the luns: Please Refer the instructions at - http://gurkulindia.com/main/2011/05/redhat-linux-how-to- dynamically-add-luns-to-qlogic-hba/ # /opt//emc/sbin/inq.linux -nodots -<array type> | grep <lun> Where: <array type> - clar_wwn for CLARIION or sym_wwn for DMX/VMAX <lun> - LUN details provided by Storage Check the User Request for the Following information >> Filesystem Information >> Lun information >> is operation is FS creation? FS resize? or Raw Device management # echo|format # vxdisk list # vxprint -ht # /opt//emc/sbin/inq.solaris -nodots -sym_wwn # mpathadm list lu # /opt//emc/sbin/inq.solaris -nodots -sym_wwn | egrep " Lundevice-list" # echo|format # echo | format | grep -i configured Not Applicable # multipath –ll --> and check the emc device name for the new luns and the number of paths visible. -- Using linux native mutlipath. No special steps required for the multipath configuration, because the multipath will be configured dynamically. # mpathadm list lu --> and check the emc device name for the new luns and the number of paths visible. -- In solaris 10, No special steps required for the multipath configuration, because the multipath will be configured dynamically. # mpathadm list lu --> and check the emc device name for the new luns and the number of paths visible. -- In solaris 10, No special steps required for the multipath configuration, because the multipath will be configured dynamically. # format -> select new disk -> label it # format -> select new disk -> label it # format -> select new disk -> label it
Transcript

Procedure Sequence Solaris 8 +  VxVM   + POWERPATH Solaris 10 + VxVM   +

POWERPATHSolaris 10 +  VxVM   + MPxIO  Solaris 10 + ZFS + MPxIO Linux + LVM + Multipath

Consolidated Storage Configuration Document for Unix Administratorsfrom unixadminschool.com

Detecting New Luns at OS level

Collecting Existing Information

( The free EMC inq utility can be

obtained using the following ftp link.

ftp://ftp.emc.com/pub/symm3000/inq

uiry/ )

Information Required

Labelling New Disk at OS level

Multipath Configuration

Verifying the Luns from OS Level

#cfgadm -al

#devfsadm

>> For First Time Storage Configuration

or

Configuring New Storage from New SAN

Device

- Configure /kernel/drv/sd.conf and

/kernel/drv/lpfc.conf

# touch /reconfigure

# init 6

>> To Configure New Storage from the

Existing SAN device

# cfgadm -al

# devfsadm

# format -> select new disk -> label it

#cfgadm -al

#devfsadm

#cfgadm -al

#devfsadm

# /opt//emc/sbin/inq.solaris -nodots -sym_wwn |

egrep " Lundevice-list"

# echo|format

# echo | format | grep -i configured

# /opt//emc/sbin/inq.solaris -nodots -

sym_wwn | egrep " Lundevice-list"

# echo|format

# echo | format | grep -i configured

# /opt//emc/sbin/inq.solaris -nodots -

sym_wwn | egrep " Lundevice-list"

# echo|format

# echo | format | grep -i configured

# /etc/powercf -q

# /etc/powermt config

# /etc/powermt save

# /etc/powermt display dev=all --> and check

the emc device name for the new luns

# /etc/powercf -q

# /etc/powermt config

# /etc/powermt save

# /etc/powermt display dev=all --> and

check the emc device name for the new

luns

# echo|format

# vxdisk list

# vxprint -ht

# /opt//emc/sbin/inq.solaris -nodots -

sym_wwn

# /etc/powermt display dev=all

# echo|format

# vxdisk list

# vxprint -ht

# /opt//emc/sbin/inq.solaris -nodots -

sym_wwn

# /etc/powermt display dev=all

# echo|format

# vxdisk list

# vxprint -ht

# /opt//emc/sbin/inq.solaris -nodots -sym_wwn

# mpathadm list lu

Check the User Request for the Following

information

>> Filesystem Information >> Lun

information

>> is operation is FS creation? FS resize?

or Raw Device management

Check the User Request for the Following

information

>> Filesystem Information >> Lun

information

>> is operation is FS creation? FS

resize? or Raw Device management

Check the User Request for the Following

information

>> Filesystem Information >> Lun information

>> is operation is FS creation? FS resize? or

Raw Device management

Check the User Request for the Following information

>> Filesystem Information >> Lun information

>> is operation is FS creation? FS resize? or

Raw Device management

Commands to Run:

# /opt//emc/sbin/inq.linux -nodots -<array type> | grep <lun>

Where:

<array type> - clar_wwn for CLARIION or sym_wwn for

DMX/VMAX

<lun> - LUN details provided by Storage

# /opt//bin/linux_lunscan.sh

# multipath –ll

to dynamically add the luns:

Please Refer the instructions at -

http://gurkulindia.com/main/2011/05/redhat-linux-how-to-

dynamically-add-luns-to-qlogic-hba/

# /opt//emc/sbin/inq.linux -nodots -<array type> | grep <lun>

Where:

<array type> - clar_wwn for CLARIION or sym_wwn for

DMX/VMAX

<lun> - LUN details provided by Storage

Check the User Request for the Following information

>> Filesystem Information >> Lun information

>> is operation is FS creation? FS resize? or Raw Device

management

# echo|format

# vxdisk list

# vxprint -ht

# /opt//emc/sbin/inq.solaris -nodots -sym_wwn

# mpathadm list lu

# /opt//emc/sbin/inq.solaris -nodots -sym_wwn | egrep "

Lundevice-list"

# echo|format

# echo | format | grep -i configured

Not Applicable

# multipath –ll

--> and check the emc device name for the new luns and the

number of paths visible.

-- Using linux native mutlipath. No special steps required for the

multipath configuration, because the multipath will be configured

dynamically.

# mpathadm list lu

--> and check the emc device name for the new

luns and the number of paths visible.

-- In solaris 10, No special steps required for the

multipath configuration, because the multipath will

be configured dynamically.

# mpathadm list lu

--> and check the emc device name for the new luns and the

number of paths visible.

-- In solaris 10, No special steps required for the multipath

configuration, because the multipath will be configured

dynamically.

# format -> select new disk -> label it # format -> select new disk -> label it # format -> select new disk -> label it

Volume Management For file

systems

Adding disk to a pool:

syntax : zpool add <pool> <LUN>

where:

<pool> - name of the pool (oracle_pool in this example)

<LUN> - new disk to be added

(c0t60000970000292601527533030463830d0 in this example)

# zpool add oracle_pool

c0t60000970000292601527533030463830d0

# zpool list ( SIZE must increase)

# zpool status –v (to verify)

-- new disk should be visible in output

>> Add all new luns to proper Volume Group

# vgextend <volumegroup-name> /dev/mapper/mpath<xxx>

>> Create New LV for Filesystems

# lvcreate -L <Size> -n /dev/<VGname>/<raw_volumentname>

<VG-name> <new LUN Device>

Example: lvcreate -L 1000m -n

/dev/sybasevg_T3/SNFXTPASS_master /dev/mapper/mpath9

Filesystem Creation for new volumes

>> Create Filesystem in New Volume

Example: # mkfs -t ext3 /dev/sybasevg_T3/SNFXTPASS_master

>> Increase a Filesystem ( using the device

/dev/mapper/volume-name) size by 2.5GB

Note: LVM version must be >=2.2

# lvresize -L +2.5 gb /dev/<VG-name>/<volume>

# resize2fs -p /dev/mapper/<volume-device>

>> Update the /etc/fstab with the new volume - mount

information

# vi /etc/fstab

a. Create Filesystem on Raw volume Device

# mkfs -F vxfs -o largefiles /dev/vx/rdsk/oracledg/exportdata15

b. Create a mount point for new Volume

# mkdir -p /exportdata/15

C. Add entry to /etc/vfstab for the new Volume

e.g. /dev/vx/dsk/oracledg/exportdata15 /dev/vx/rdsk/oracledg/exportdata15 /exportdata/15 vxfs 1 yes -

d. Mount the new volume

# mount /exportdata/15

Detect New Disks at

Volumemanager

>> for VxVM

# vxdisk scandisks new or # vxdisk -f scandisks new

# vxdisk -o alldgs list

# /etc/vx/bin/vxdisksetup -i <NewPowerpath Device> format=cdsdisk

>>> Creating New Disk Group with new Storage Luns

syn: vxdg init <diskgroup name> <Vx diskname>=<emcdevice>

# vxdg -g oracledg2 init EMC-DISK1=emcpower25a

>>> Adding New Storage Luns to existing DiskGroup

#vxdg -g oracledg adddisk <VxDiskName>=<Emc Device>

>>> Create New concat volumes

# vxdg free <-- check the Free Space

# vxassist -g oracledg2 make data_vol 204800m <Dedicated-LunDevices>

>>> Create New Stripe volume with 4 columns

#vxassist make appdata07 120g layout=stripe,nolog nstripe=4 stripeunit=32k emc-dev-1 emc-dev-2 emc-dev-3 emc-dev-4

>>> Managing Existing Volumes

# vxassist maxgrow <volumename> <-- find the maximum size that a volume can grow

# /etc/vx/bin/vxresize -g oracledg2 -F vxfs <volumename> +<Size you want to add>g

Example: Below command will add 70Gig space to appdump01 volume in oradg Diskgroup.

# /etc/vx/bin/vxresize -g oradg -F vxfs appdump01 +70g

# zpool list

# zpool status –v

# lvmdiskscan| grep mpath >> note down the

/dev/mapper/mpath device names for the new luns

# multipath –ll >. Note down the new multipath device names

>> Initialise New LUNS for LVM usage

# Pvcreate /dev/mapper/mpathXXX

Example: pvcreate /dev/mapper/mpath9

# zfs get all | egrep " quota| reservation"

--(to verify the current size allocation settings)

# zfs create -o mountpoint=<mountpoint> <pool>/<volume>

Where: <mountpoint> - new mountpoint

<pool> - zfs pool (oracle_pool in this example)

<volume> - new zfs volume

Note: See User Request for mount point and quota details.

Zfs volume name can be derived from the mount point.

(Standard approach) .

In this example, mount point is given as /db/data11 thus, new

volume name will be data11_v . Quota is the total amount of

space for the dataset/volume and usage can’t be exceeded

from the given value.

Reservation of space from the pool that is guaranteed to be

available to a dataset/volume. (This is not set by default; as per

user requirement)

Example:

# zfs get all | egrep " quota| reservation"

------------- output truncated ----------------------

oracle_pool/rdct02_v quota 10G local

oracle_pool/rdct02_v reservation none default

As root run,

# zfs create -o mountpoint=/db/data11 oracle_pool/data11_v

# zfs set quota=40g oracle_pool/data11_v

Volume Management for Raw-

volumes

NA >> Create New LV for the Raw Volumes ( Remember to use

the keywoird " sybraw " in the volume, inorder let the Udev

rule to set the user:group to Sybase)

Example: # lvscreate -L 1000m -n

/dev/sybasevg_T3/SNFXTPASS_sybraw_master sybasevg_T3

/dev/mapper/mpath10

Provide New Volume Information to

user

# df -h /db/data11

# cd /db/data11 ; touch <new file> ; ls -l <new

file>

# rm <new file>

# df -h /db/data11

# cd /db/data11 ; touch <new file> ; ls -l

<new file>

# rm <new file>

# df -h /db/data11

# cd /db/data11 ; touch <new file> ; ls -l <new file>

# rm <new file>

# df -h /db/data11

# cd /db/data11 ; touch <new file> ; ls -l <new file>

# rm <new file>

#df -h -- output for filesystems newly created and extended

# ls -l /dev/mapper/<raw_vol_name" -- check link information

and the owner:group information

a. Create Filesystem on Raw volume Device

# mkfs -F vxfs -o largefiles /dev/vx/rdsk/oracledg/exportdata15

b. Create a mount point for new Volume

# mkdir -p /exportdata/15

C. Add entry to /etc/vfstab for the new Volume

e.g. /dev/vx/dsk/oracledg/exportdata15 /dev/vx/rdsk/oracledg/exportdata15 /exportdata/15 vxfs 1 yes -

d. Mount the new volume

# mount /exportdata/15

Click on Each Book to Read Related Unix Administration Articles

# vxassist -g oracledg2 -Ugen make rdata_vol 10000m <Dedicated-LunDevices>

#vxedit -g oracledg2 -v set user=oracle group=dba rdata_ora_vol <-- oracle devices

#vxedit -g oracledg2 -v set user=sybase group=sybase rdata_syb_vol <-- sybase devices

# zfs get all | egrep " quota| reservation"

--(to verify the current size allocation settings)

# zfs create -o mountpoint=<mountpoint> <pool>/<volume>

Where: <mountpoint> - new mountpoint

<pool> - zfs pool (oracle_pool in this example)

<volume> - new zfs volume

Note: See User Request for mount point and quota details.

Zfs volume name can be derived from the mount point.

(Standard approach) .

In this example, mount point is given as /db/data11 thus, new

volume name will be data11_v . Quota is the total amount of

space for the dataset/volume and usage can’t be exceeded

from the given value.

Reservation of space from the pool that is guaranteed to be

available to a dataset/volume. (This is not set by default; as per

user requirement)

Example:

# zfs get all | egrep " quota| reservation"

------------- output truncated ----------------------

oracle_pool/rdct02_v quota 10G local

oracle_pool/rdct02_v reservation none default

As root run,

# zfs create -o mountpoint=/db/data11 oracle_pool/data11_v

# zfs set quota=40g oracle_pool/data11_v


Recommended