42
Information Technology Department Page 1 Version 1.4
| Date post: | 12-Apr-2015 |
| Category: |
Documents |
| Upload: | jess-villarin-quijano |
| View: | 282 times |
| Download: | 10 times |
Information Technology Department Page 1
Version 1.4

Information Technology Department Page 2
DOCUMENT VERSION HISTORY
DATE AUTHOR Description Version
January 31, 2013 SMBR Document Creation
1.0
February 16, 2013 SMBR Added Introduction and Module
descriptions and funcions 1.2
February 18, 2013 SMBR Added Instruction for Back-Up
results, printing a report, Load CCS and PCOS results
1.3
February 22, 2013 SMBR Table of Contents& Glossary 1.4
• Reference: SMARTMATIC Consolidating and Canvassing System( CCS) Operators Manual Version 4.3
Information Technology Department Page 3
Contents Introduction ................................................................................................................................................. 4
What is in this Manual ............................................................................................................................ 4
Target Audience ...................................................................................................................................... 4
CHAPTER 1: Consolidation and Canvassing System ............................................................................... 5
Administration Module ......................................................................................................................... 7
Canvassing Module ............................................................................................................................... 8
Monitoring Module ............................................................................................................................... 9
Event Log Module ............................................................................................................................... 10
Security Token(s) ................................................................................................................................. 11
ACCESSING THE CCS .......................................................................................................................... 12
CHAPTER 2: Using Consolidation and Canvassing System .................................................................. 17
Initialization ........................................................................................................................................... 17
Generate Initialization Report ............................................................................................................ 18
To Print the Report ............................................................................................................................. 20
Monitoring .............................................................................................................................................. 21
Importing Result from PCOS (MBOC/CBOC only) ............................................................................... 21
Importing un-transmitted result from the CCS (PBOC/DBOC/NBOC only) ......................................... 22
Monitoring Results Transmission ........................................................................................................ 22
Generation of CCS Reports .................................................................................................................. 26
Generate Canvass Report ................................................................................................................... 26
Generate Grouped Certificate of Canvass (COC) ................................................................................ 28
Generate Certificate of Canvass and Proclamation (COCP) ................................................................ 30
Generate Consolidated Statements of Votes (SOV) ........................................................................... 34
Administration ....................................................................................................................................... 35
Transmission of Results ......................................................................................................................... 35
BACK-UP RESULTS ............................................................................................................................... 37
PRINT LOGS .......................................................................................................................................... 38
SHUTTING DOWN THE CCS ............................................................................................................. 39
Glossary ....................................................................................................................................................... 41
Information Technology Department Page 4
Introduction Welcome to the Operators Manual for the Consolidation and Canvassing System (CCS). This manual will be used to guide the CCS operator in the training process.
What is in this Manual This manual is created to give an in detail understanding on the Consolidation and Canvassing System (CCS).
This manual is divided into the following chapters:
• Chapter 1: Consolidation and Canvassing System presents an overview of the CCS that is implemented on the election event
• Chapter 2: Using Consolidation and Canvassing System (CCS) explains the application of CCS.
Target Audience The CCS Operators Manual is to be used by the CCS operator in the technical support of the 2013 Automated National and Local Elections in the Philippines.
Information Technology Department Page 5
CHAPTER 1: Consolidation and Canvassing System
Set-Up Procedure
Before proceeding with the canvassing process, the set-up of the canvassing should be done.
The canvassing station is composed of the following:
• Laptop with CCS installed • Printer • Transmission Medium (USB modem, BGAN, DSL Modem or VSAT)
The following activities explain how to set-up the canvassing station:
• Place the laptop and printer on top of a table • Plug the power cable to the laptop and to the electrical outlet. • Press the power button of the laptop to turn on and make sure that the Welcome page
appears. • Connect the Transmission medium of the laptop.
Information Technology Department Page 6
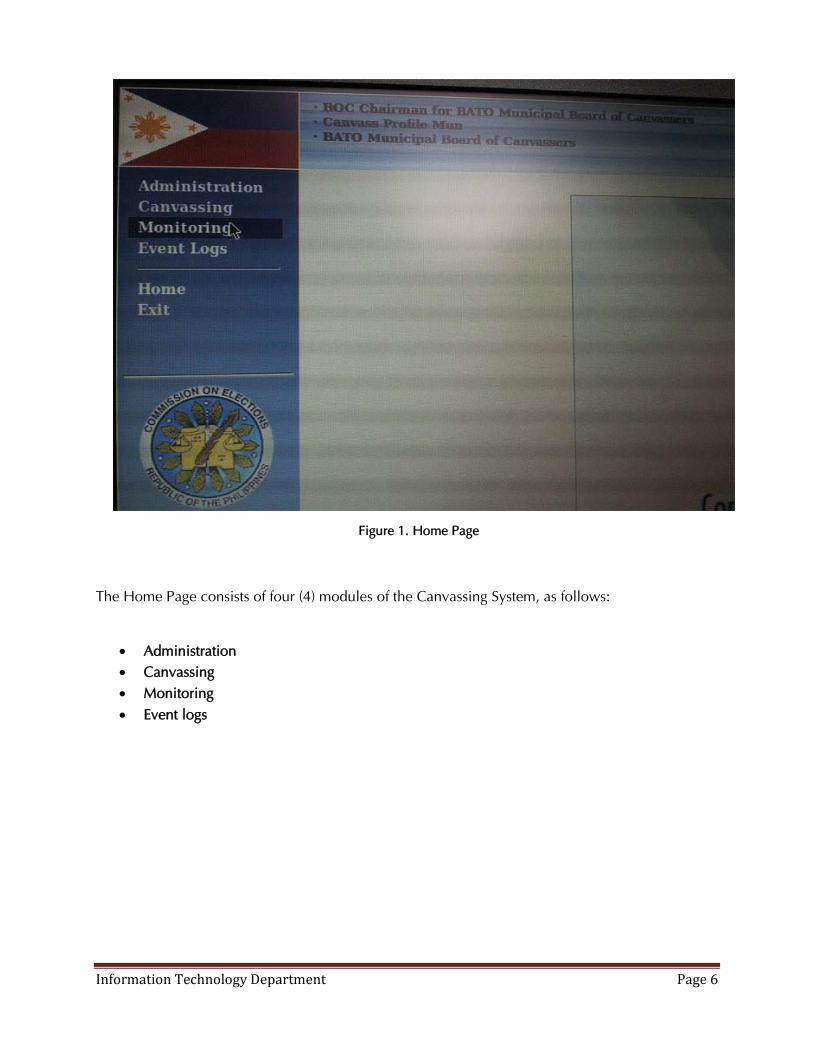
Figure 1. Home Page
The Home Page consists of four (4) modules of the Canvassing System, as follows:
• Administration • Canvassing • Monitoring • Event logs

Information Technology Department Page 7
Administration Module These are the several functions of the Administration Module:
• Transmit Results –send canvass results to upper level canvassing systems • Back-up results – creates a back-up of all file received and generated in the machine • Load PCOS results – loads the result from PCOS (MBOC/CBOC only) using the main
memory card from the PCOS machine
Note: For DBOC/PBOC/NBOC, the function “Load CCS Results” will be visible instead of the “Load PCOS Results” This will load results from the lower level CCS using the CD used for the back-up results process.
Figure 2. Administration Module
Information Technology Department Page 8
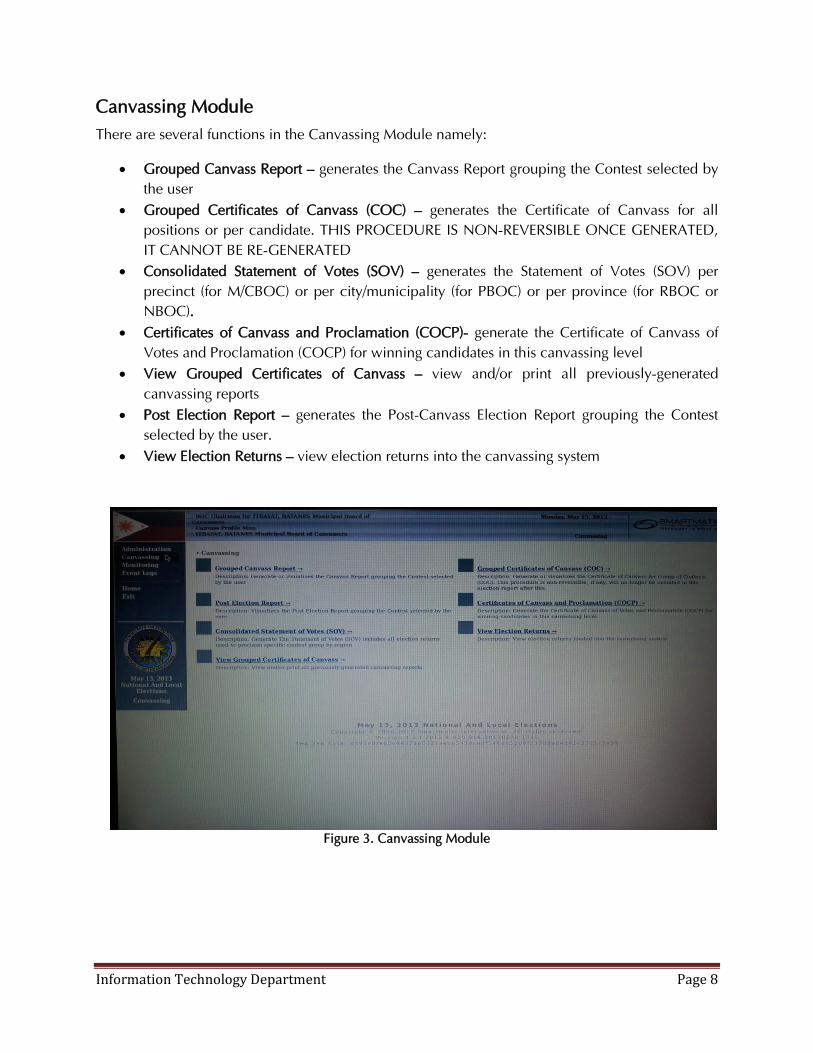
Canvassing Module There are several functions in the Canvassing Module namely:
• Grouped Canvass Report – generates the Canvass Report grouping the Contest selected by the user
• Grouped Certificates of Canvass (COC) – generates the Certificate of Canvass for all positions or per candidate. THIS PROCEDURE IS NON-REVERSIBLE ONCE GENERATED, IT CANNOT BE RE-GENERATED
• Consolidated Statement of Votes (SOV) – generates the Statement of Votes (SOV) per precinct (for M/CBOC) or per city/municipality (for PBOC) or per province (for RBOC or NBOC).
• Certificates of Canvass and Proclamation (COCP)- generate the Certificate of Canvass of Votes and Proclamation (COCP) for winning candidates in this canvassing level
• View Grouped Certificates of Canvass – view and/or print all previously-generated canvassing reports
• Post Election Report – generates the Post-Canvass Election Report grouping the Contest selected by the user.
• View Election Returns – view election returns into the canvassing system
Figure 3. Canvassing Module
Information Technology Department Page 9
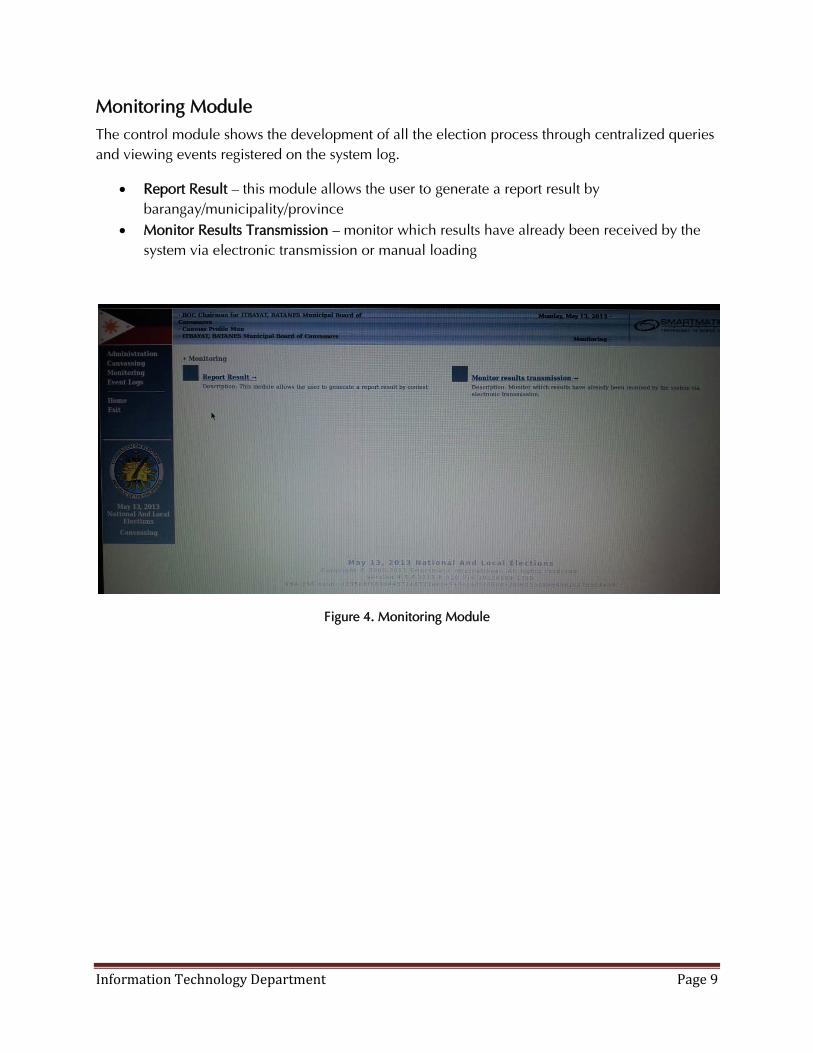
Monitoring Module The control module shows the development of all the election process through centralized queries and viewing events registered on the system log.
• Report Result – this module allows the user to generate a report result by barangay/municipality/province
• Monitor Results Transmission – monitor which results have already been received by the system via electronic transmission or manual loading
Figure 4. Monitoring Module

Information Technology Department Page 10
Event Log Module The Event Log Module consists of the following functions:
• System Logs – View all logs of system –related events/activities that have been registered in the system
• Error Logs – view all logs of error messages registered in the machine • Transmission Logs – view all logs of system related events/activities related to the
electronic transmission of election results to and from this machine • View/Print Logs Report - view and/or print previously generated log reports.
Figure 5. Event Log Module

Information Technology Department Page 11
Security Token(s) The Consolidation and Canvassing System features a physical protection and security against unauthorized access. This utilizes USB device with associated user/password combination as security token.
The system can be configured to restrict certain function and grants access only when token is used. A verify Certificate dialog box may be have one (1) to three (3) security tokens.
The system prompts a Verify Certificate dialog box for restricted function.
Restricted function can be accessed by following the steps below:
Step 1 : Insert the USB token in the USB port.
Step 2 : Enter appropriate information in the User and Password fields.
Step 3: Click the OK button make sure that the number of users needed to validate decreases by one before removing the token. Else, repeat the process from step 1.
Figure 6. Verify Certificate Dialog Box
Note: Perform steps 1 to 3 if more than one (1) token is required. The system reverts to the Home page after ten (10) minutes of inactivity. The verify Certificates process must be performed again.
Information Technology Department Page 12
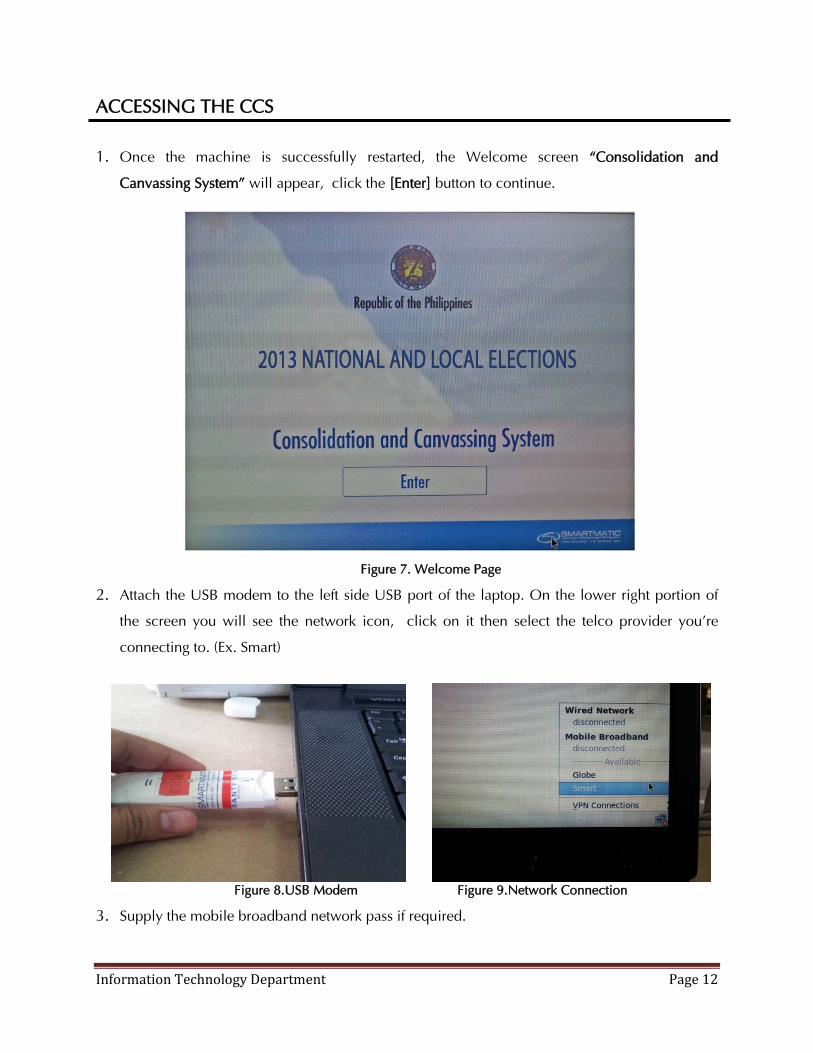
ACCESSING THE CCS
1. Once the machine is successfully restarted, the Welcome screen “Consolidation and
Canvassing System” will appear, click the [Enter] button to continue.
Figure 7. Welcome Page
2. Attach the USB modem to the left side USB port of the laptop. On the lower right portion of
the screen you will see the network icon, click on it then select the telco provider you’re
connecting to. (Ex. Smart)
Figure 8.USB Modem Figure 9.Network Connection
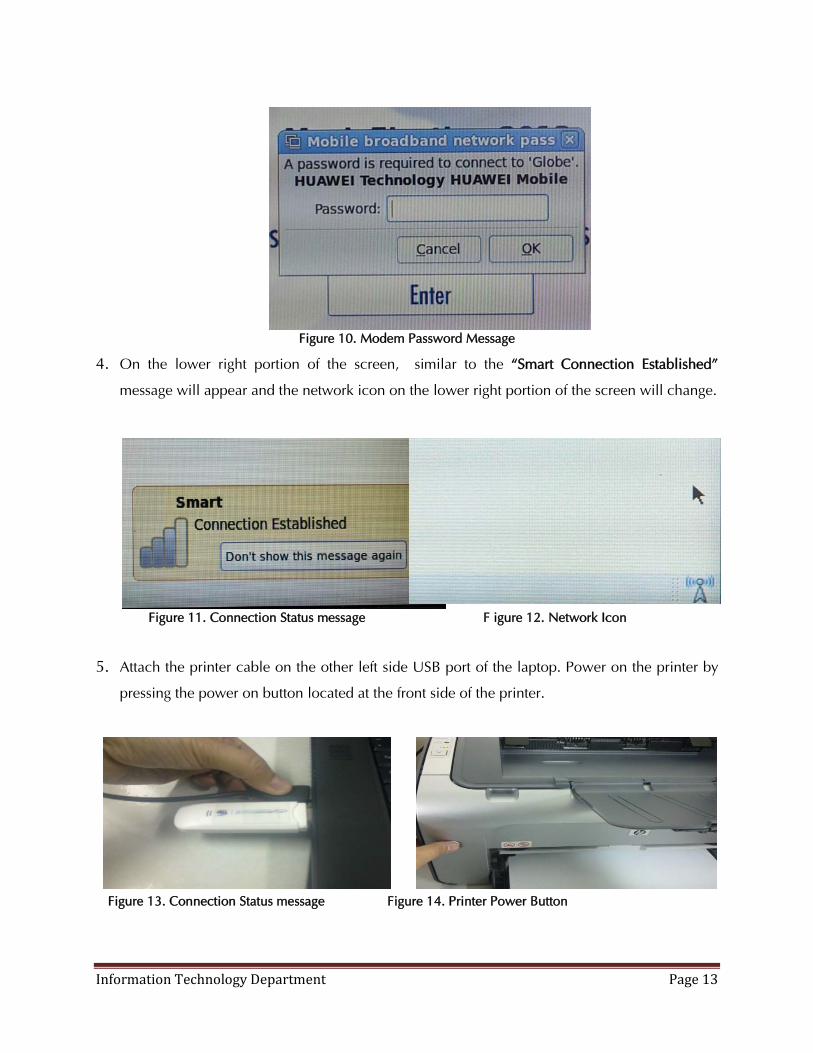
3. Supply the mobile broadband network pass if required.
Information Technology Department Page 13
Figure 10. Modem Password Message
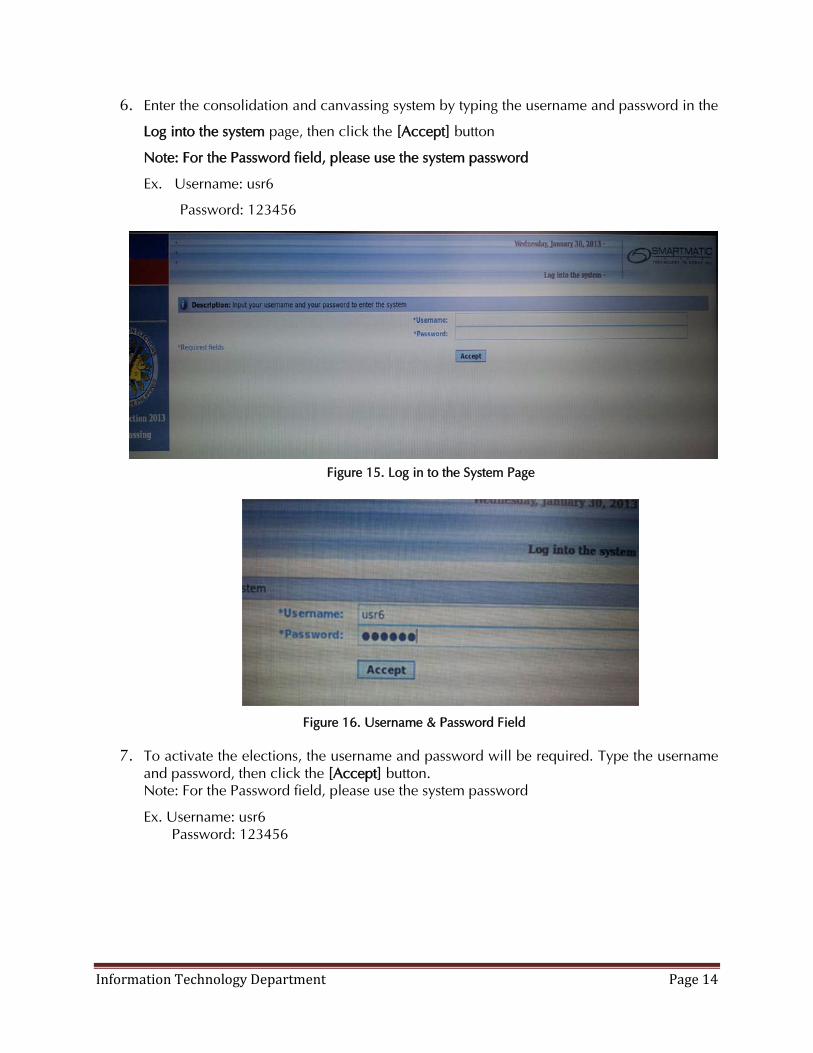
4. On the lower right portion of the screen, similar to the “Smart Connection Established”
message will appear and the network icon on the lower right portion of the screen will change.
Figure 11. Connection Status message F igure 12. Network Icon
5. Attach the printer cable on the other left side USB port of the laptop. Power on the printer by
pressing the power on button located at the front side of the printer.
Figure 13. Connection Status message Figure 14. Printer Power Button
Information Technology Department Page 14
6. Enter the consolidation and canvassing system by typing the username and password in the
Log into the system page, then click the [Accept] button
Note: For the Password field, please use the system password
Ex. Username: usr6
Password: 123456
Figure 15. Log in to the System Page
Figure 16. Username & Password Field
7. To activate the elections, the username and password will be required. Type the username and password, then click the [Accept] button. Note: For the Password field, please use the system password
Ex. Username: usr6 Password: 123456
Information Technology Department Page 15
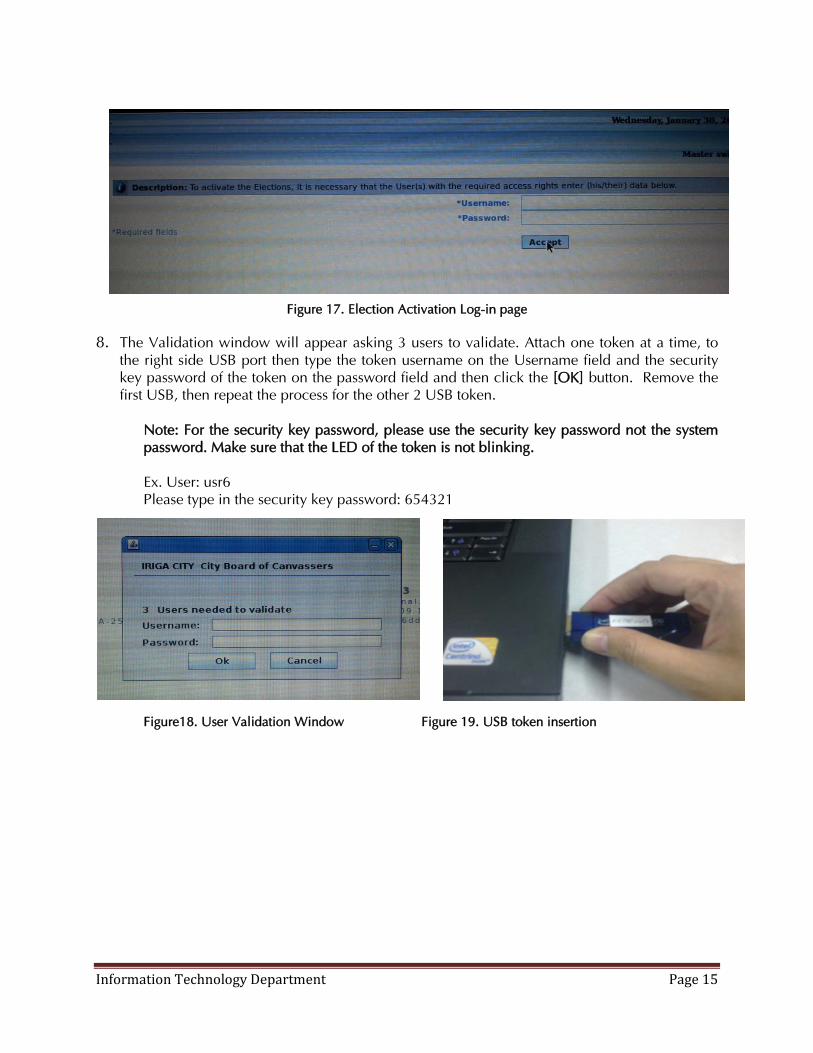
Figure 17. Election Activation Log-in page
8. The Validation window will appear asking 3 users to validate. Attach one token at a time, to the right side USB port then type the token username on the Username field and the security key password of the token on the password field and then click the [OK] button. Remove the first USB, then repeat the process for the other 2 USB token.
Note: For the security key password, please use the security key password not the system password. Make sure that the LED of the token is not blinking. Ex. User: usr6 Please type in the security key password: 654321
Figure18. User Validation Window Figure 19. USB token insertion
Information Technology Department Page 16
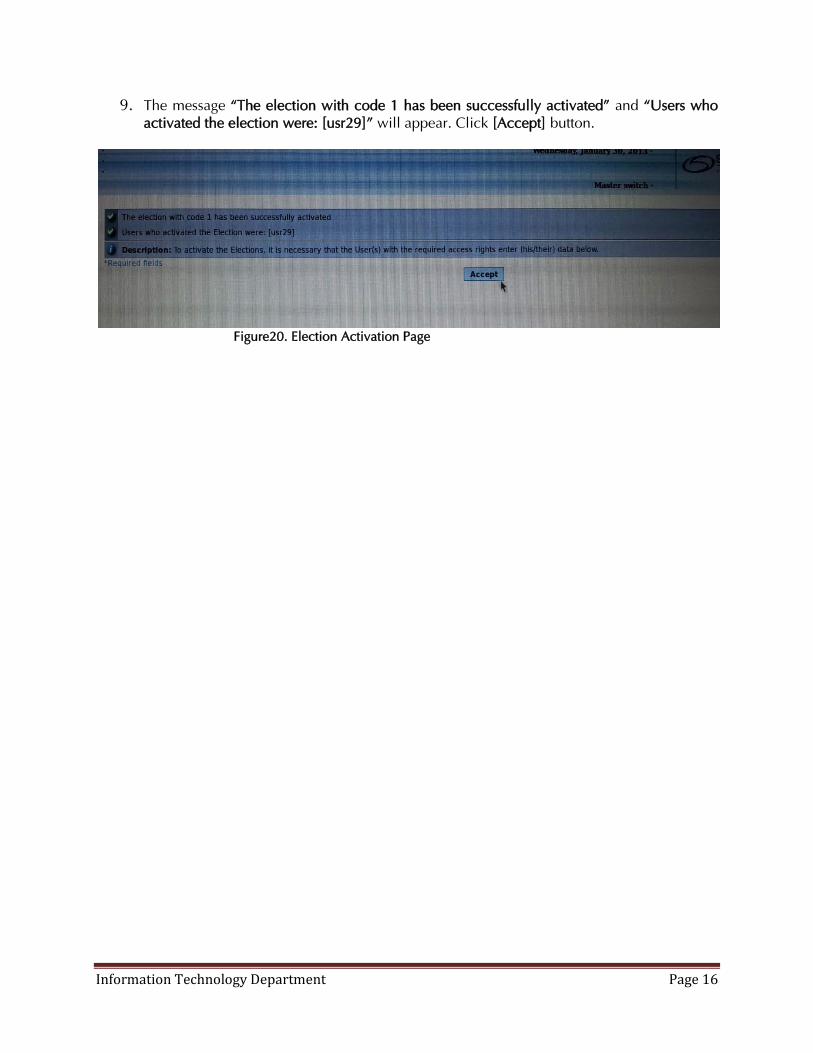
9. The message “The election with code 1 has been successfully activated” and “Users who activated the election were: [usr29]” will appear. Click [Accept] button.
Figure20. Election Activation Page
Information Technology Department Page 17
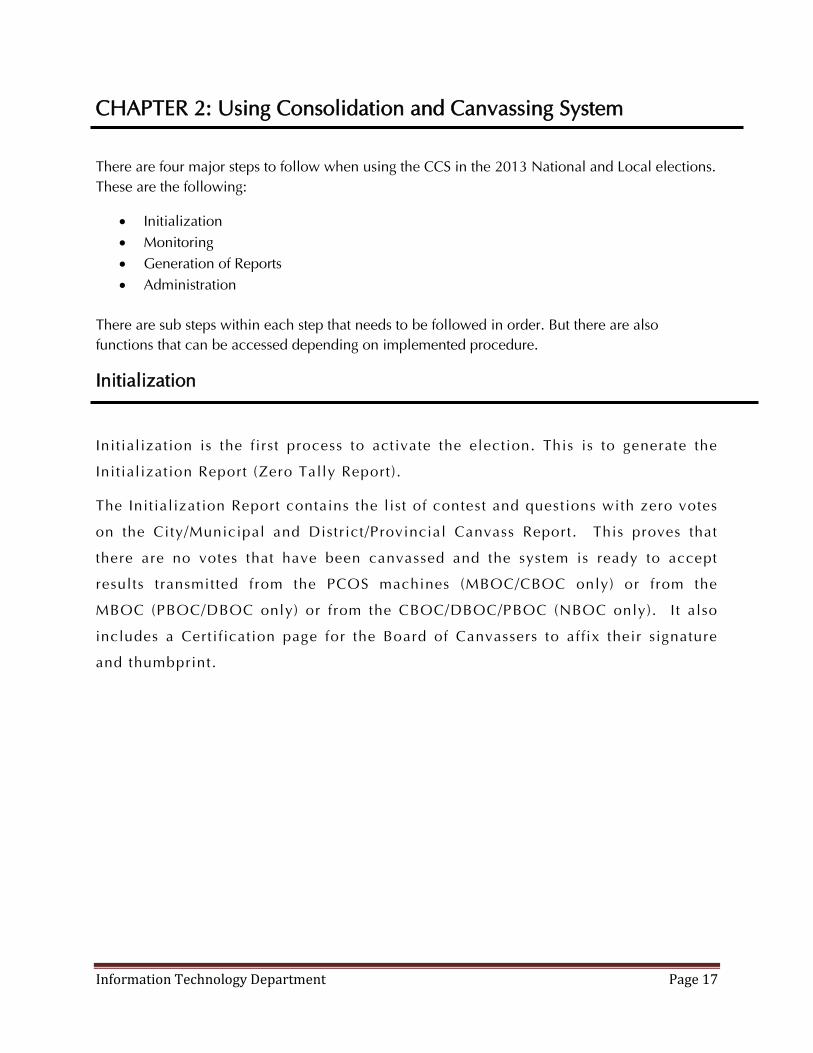
CHAPTER 2: Using Consolidation and Canvassing System
There are four major steps to follow when using the CCS in the 2013 National and Local elections. These are the following:
• Initialization • Monitoring • Generation of Reports • Administration
There are sub steps within each step that needs to be followed in order. But there are also functions that can be accessed depending on implemented procedure.
Initialization
Initialization is the f irst process to activate the election. This is to generate the
Initial ization Report (Zero Tally Report) .
The Init ialization Report contains the l ist of contest and questions with zero votes
on the City/Municipal and Distr ict /Provincial Canvass Report. This proves that
there are no votes that have been canvassed and the system is ready to accept
results transmitted from the PCOS machines (MBOC/CBOC only) or from the
MBOC (PBOC/DBOC only) or from the CBOC/DBOC/PBOC (NBOC only). I t also
includes a Certi f ication page for the Board of Canvassers to affix their signature
and thumbprint.
Information Technology Department Page 18
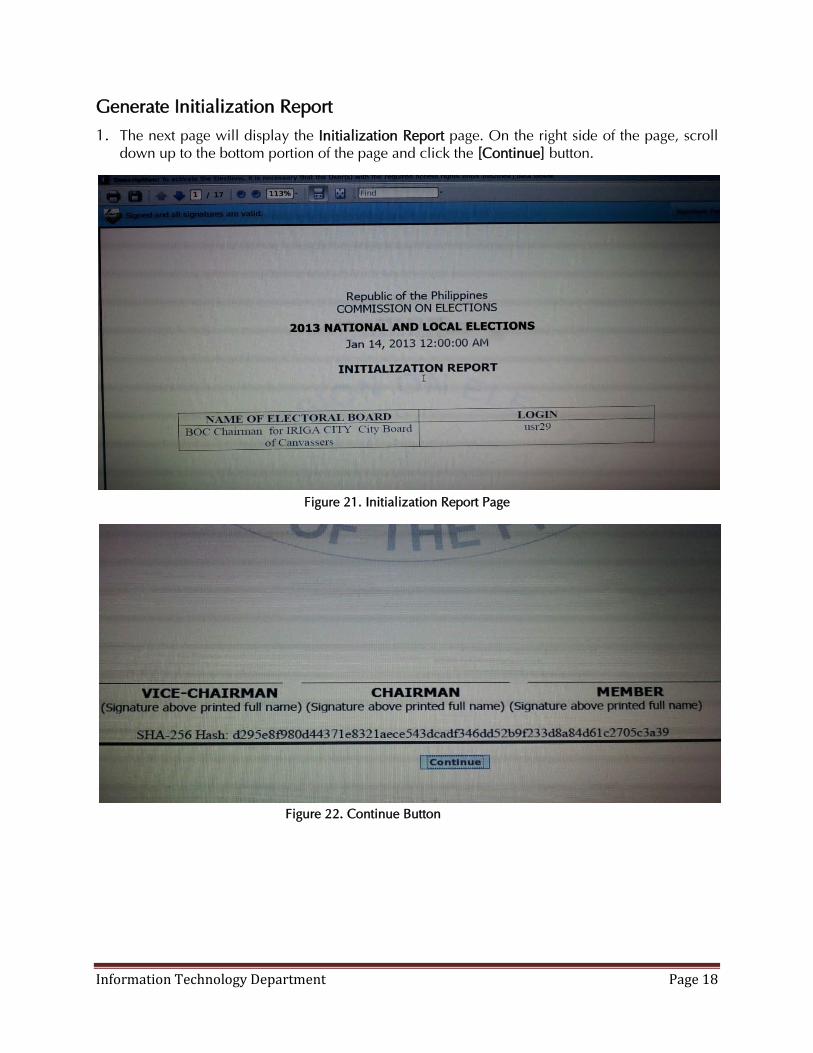
Generate Initialization Report 1. The next page will display the Initialization Report page. On the right side of the page, scroll
down up to the bottom portion of the page and click the [Continue] button.
Figure 21. Initialization Report Page
Figure 22. Continue Button
Information Technology Department Page 19
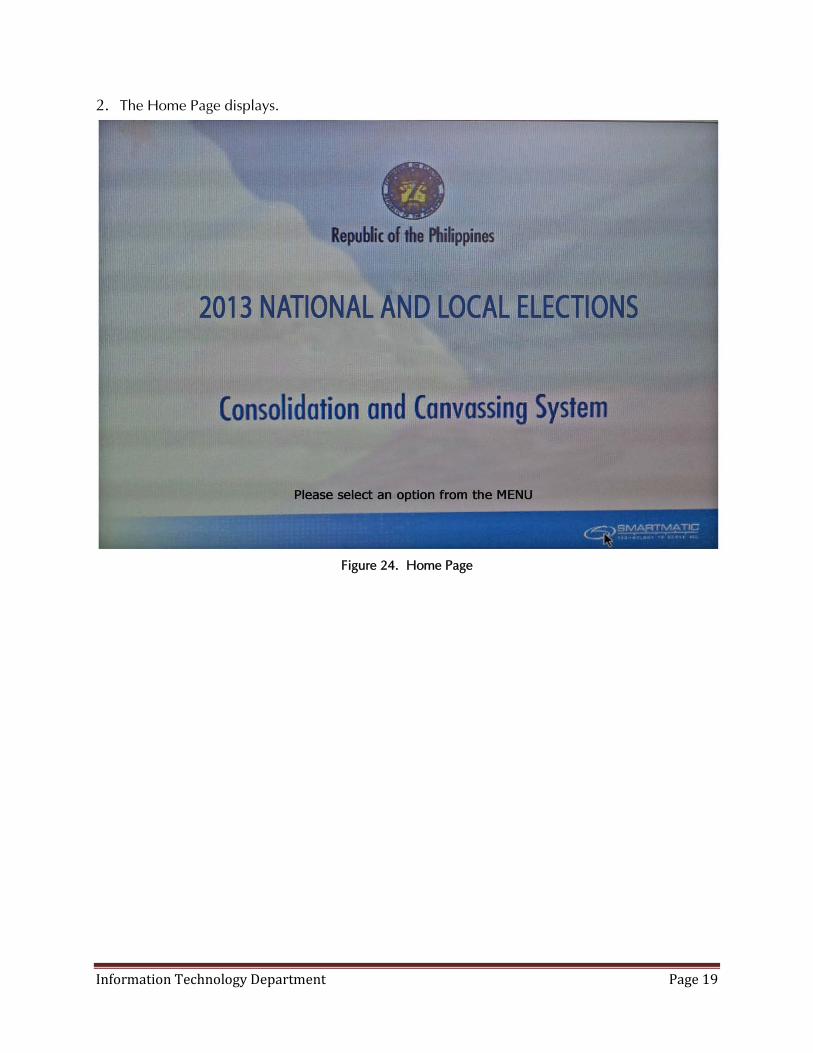
2. The Home Page displays.
Figure 24. Home Page
Information Technology Department Page 20
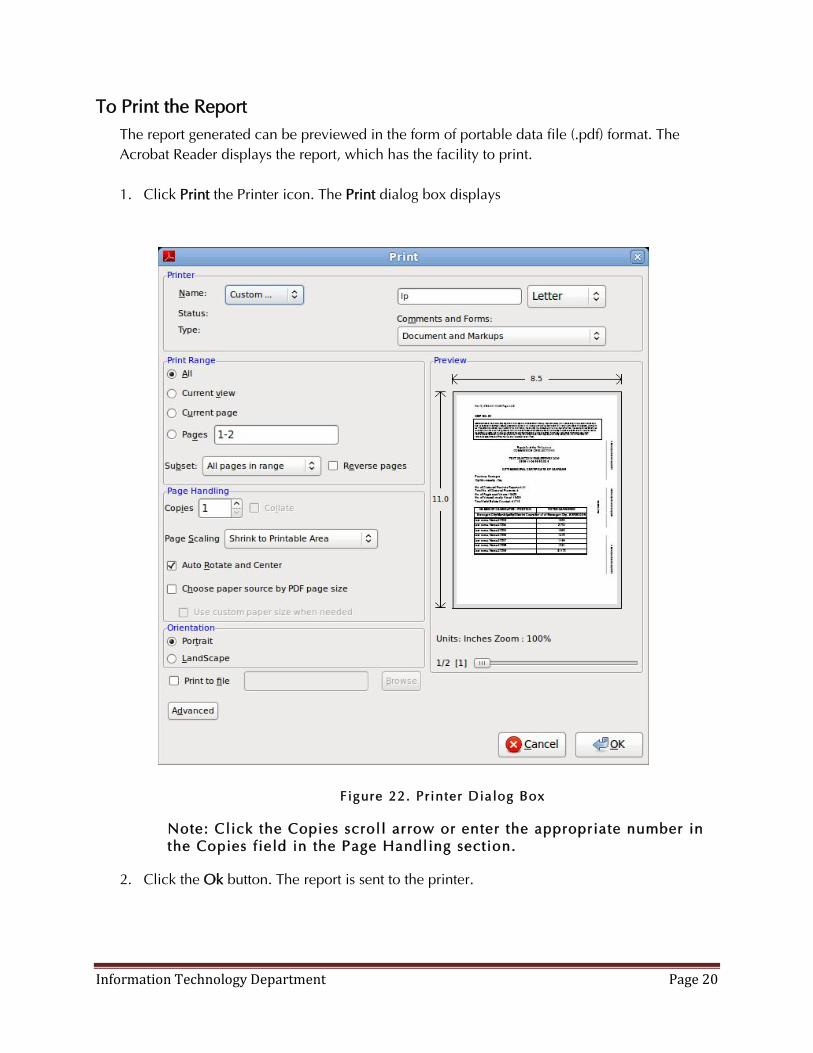
To Print the Report The report generated can be previewed in the form of portable data file (.pdf) format. The Acrobat Reader displays the report, which has the facility to print.
1. Click Print the Printer icon. The Print dialog box displays
Figure 22. Pr inter Dialog Box
Note: Click the Copies scroll arrow or enter the appropriate number in the Copies f ield in the Page Handling section.
2. Click the Ok button. The report is sent to the printer.
Information Technology Department Page 21
Monitoring
The Monitor ing module shows the development of all the election process
through centralized queries and viewing events regis tered on the system log. The
development is indicated by s tatus of transmission as represented by the
following color code in the leftmost side:
Importing Result from PCOS (MBOC/CBOC only) 1. Connect the memory card reader from the CCS box and attach to the available USB port of
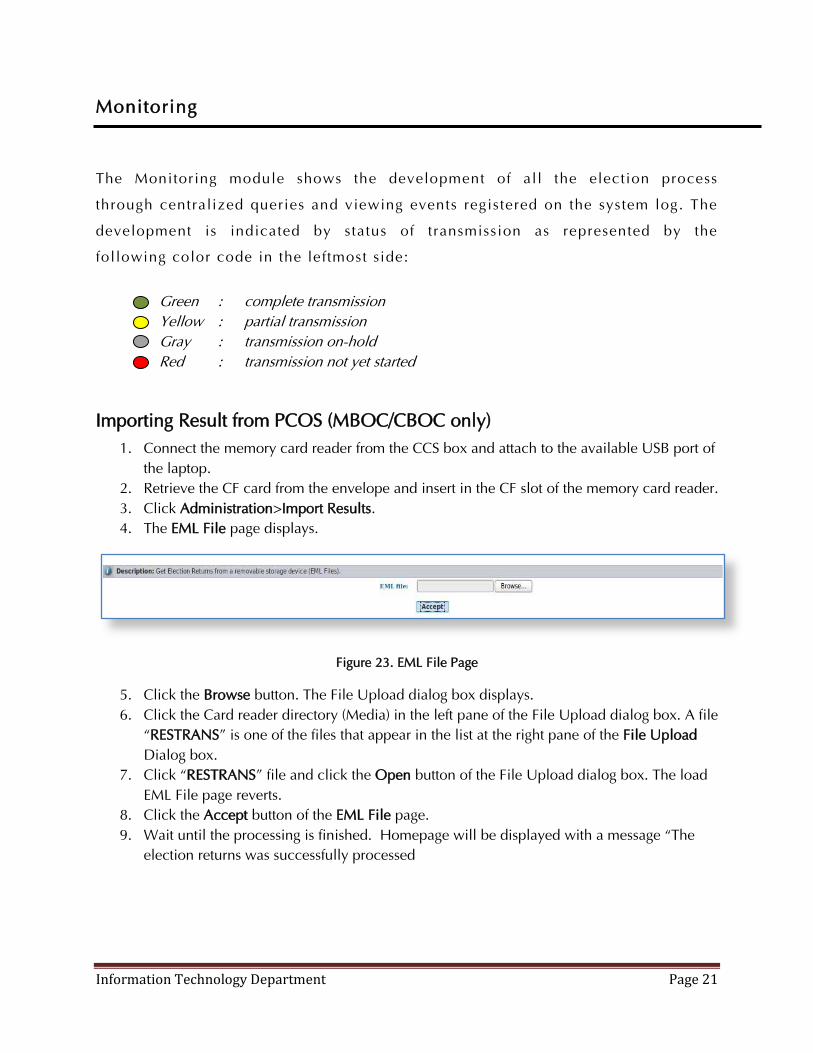
the laptop. 2. Retrieve the CF card from the envelope and insert in the CF slot of the memory card reader. 3. Click Administration>Import Results. 4. The EML File page displays.
Figure 23. EML File Page
5. Click the Browse button. The File Upload dialog box displays. 6. Click the Card reader directory (Media) in the left pane of the File Upload dialog box. A file
“RESTRANS” is one of the files that appear in the list at the right pane of the File Upload Dialog box.
7. Click “RESTRANS” file and click the Open button of the File Upload dialog box. The load EML File page reverts.
8. Click the Accept button of the EML File page. 9. Wait until the processing is finished. Homepage will be displayed with a message “The
election returns was successfully processed
Green : complete transmission Yellow : partial transmission Gray : transmission on-hold Red : transmission not yet started
Information Technology Department Page 22
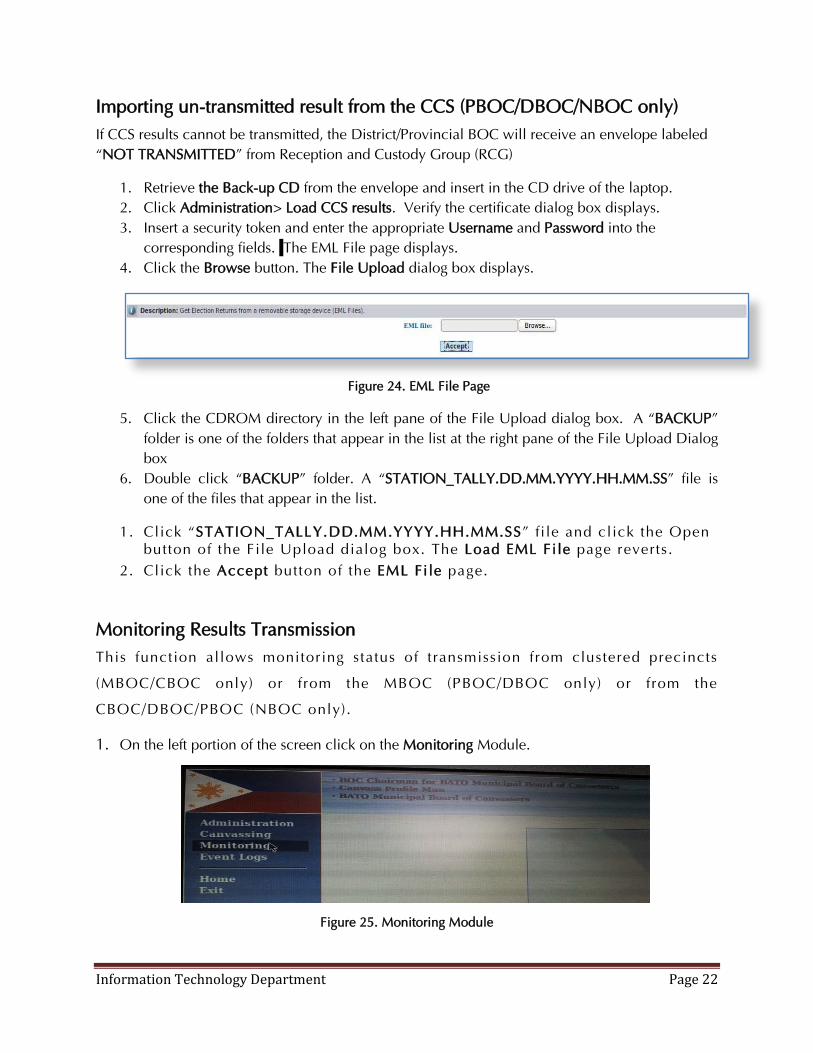
Importing un-transmitted result from the CCS (PBOC/DBOC/NBOC only) If CCS results cannot be transmitted, the District/Provincial BOC will receive an envelope labeled “NOT TRANSMITTED” from Reception and Custody Group (RCG)
1. Retrieve the Back-up CD from the envelope and insert in the CD drive of the laptop. 2. Click Administration> Load CCS results. Verify the certificate dialog box displays. 3. Insert a security token and enter the appropriate Username and Password into the
corresponding fields. The EML File page displays. 4. Click the Browse button. The File Upload dialog box displays.
Figure 24. EML File Page
5. Click the CDROM directory in the left pane of the File Upload dialog box. A “BACKUP” folder is one of the folders that appear in the list at the right pane of the File Upload Dialog box
6. Double click “BACKUP” folder. A “STATION_TALLY.DD.MM.YYYY.HH.MM.SS” file is one of the files that appear in the list.
1. Click “STATION_TALLY.DD.MM.YYYY.HH.MM.SS” fi le and click the Open button of the File Upload dialog box. The Load EML File page reverts .
2. Click the Accept button of the EML File page.
Monitoring Results Transmission This function allows monitor ing s tatus of transmission from clustered precincts
(MBOC/CBOC only) or from the MBOC (PBOC/DBOC only) or from the
CBOC/DBOC/PBOC (NBOC only).
1. On the left portion of the screen click on the Monitoring Module.
Figure 25. Monitoring Module

Information Technology Department Page 23
Figure 26. Monitoring Menus
2. Under the Monitoring Menu, click on Monitor results transmission link.
Figure 27. Monitor results transmission Link
3. The next page will show the status of the transmissions from clustered precincts. The colors of the dots in the leftmost side represents the status of transmission as follows:
4. On the bottom portion of the page click the [Update Transmission Report] button from time to time to refresh the page.
Green : complete transmission Yellow : partial transmission Gray : transmission on-hold Red : transmission not yet started
Information Technology Department Page 24
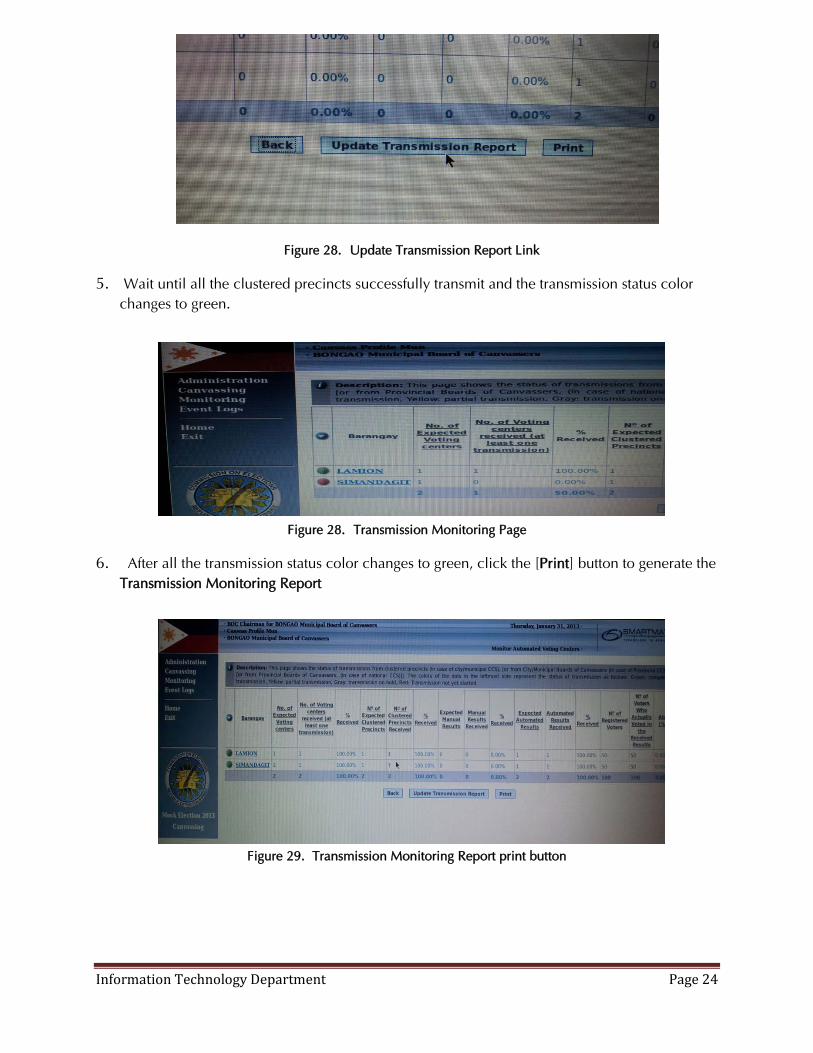
Figure 28. Update Transmission Report Link
5. Wait until all the clustered precincts successfully transmit and the transmission status color changes to green.
Figure 28. Transmission Monitoring Page
6. After all the transmission status color changes to green, click the [Print] button to generate the Transmission Monitoring Report
Figure 29. Transmission Monitoring Report print button
Information Technology Department Page 25
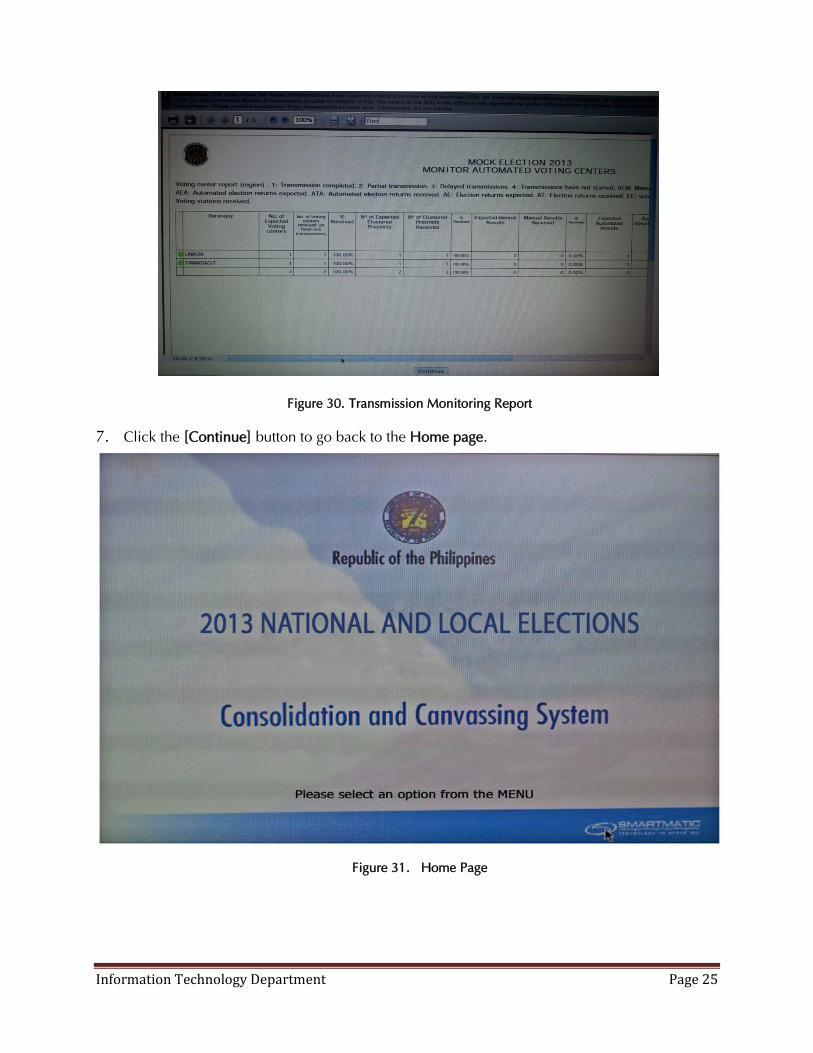
Figure 30. Transmission Monitoring Report
7. Click the [Continue] button to go back to the Home page.
Figure 31. Home Page
Information Technology Department Page 26
Generation of CCS Reports
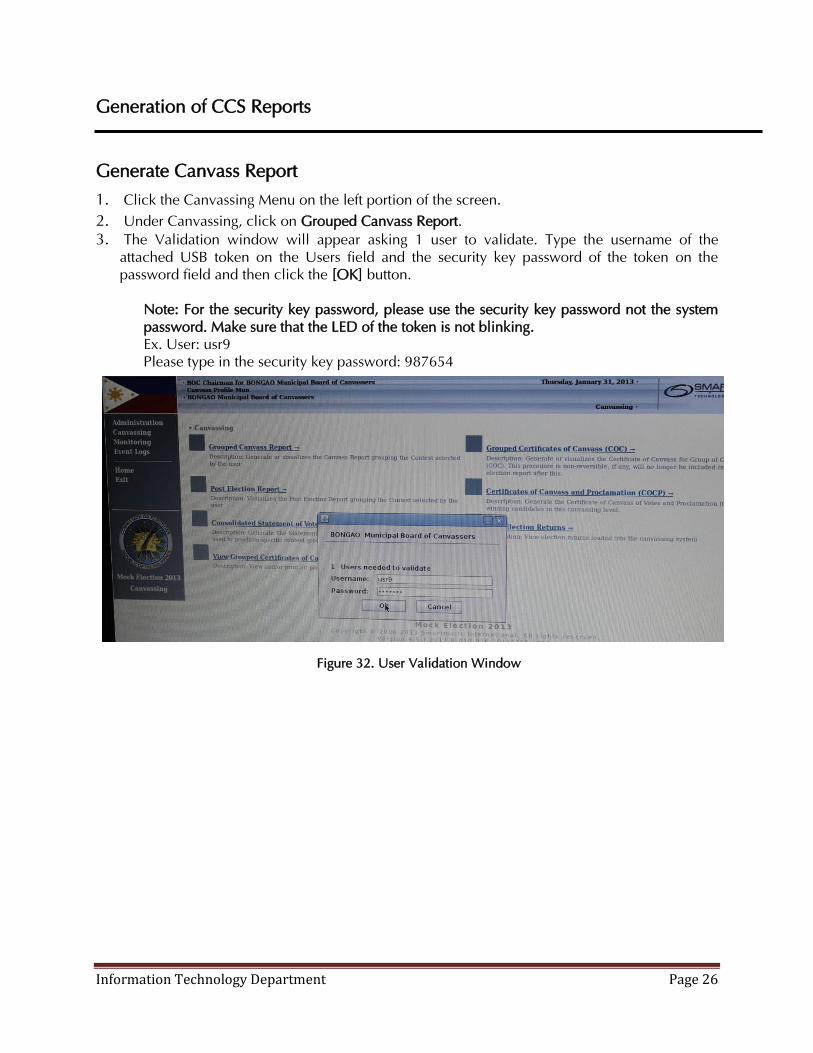
Generate Canvass Report 1. Click the Canvassing Menu on the left portion of the screen. 2. Under Canvassing, click on Grouped Canvass Report. 3. The Validation window will appear asking 1 user to validate. Type the username of the
attached USB token on the Users field and the security key password of the token on the password field and then click the [OK] button.
Note: For the security key password, please use the security key password not the system password. Make sure that the LED of the token is not blinking. Ex. User: usr9 Please type in the security key password: 987654
Figure 32. User Validation Window
Information Technology Department Page 27
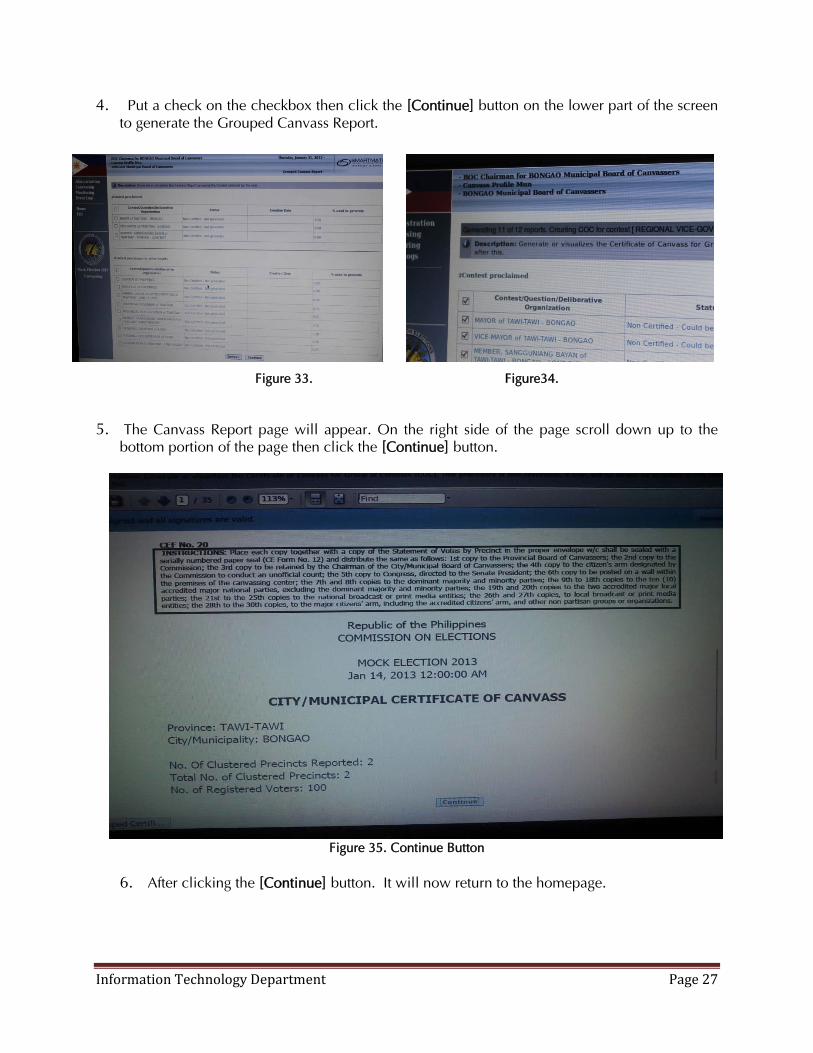
4. Put a check on the checkbox then click the [Continue] button on the lower part of the screen to generate the Grouped Canvass Report.
Figure 33. Figure34.
5. The Canvass Report page will appear. On the right side of the page scroll down up to the bottom portion of the page then click the [Continue] button.
Figure 35. Continue Button
6. After clicking the [Continue] button. It will now return to the homepage.
Information Technology Department Page 28
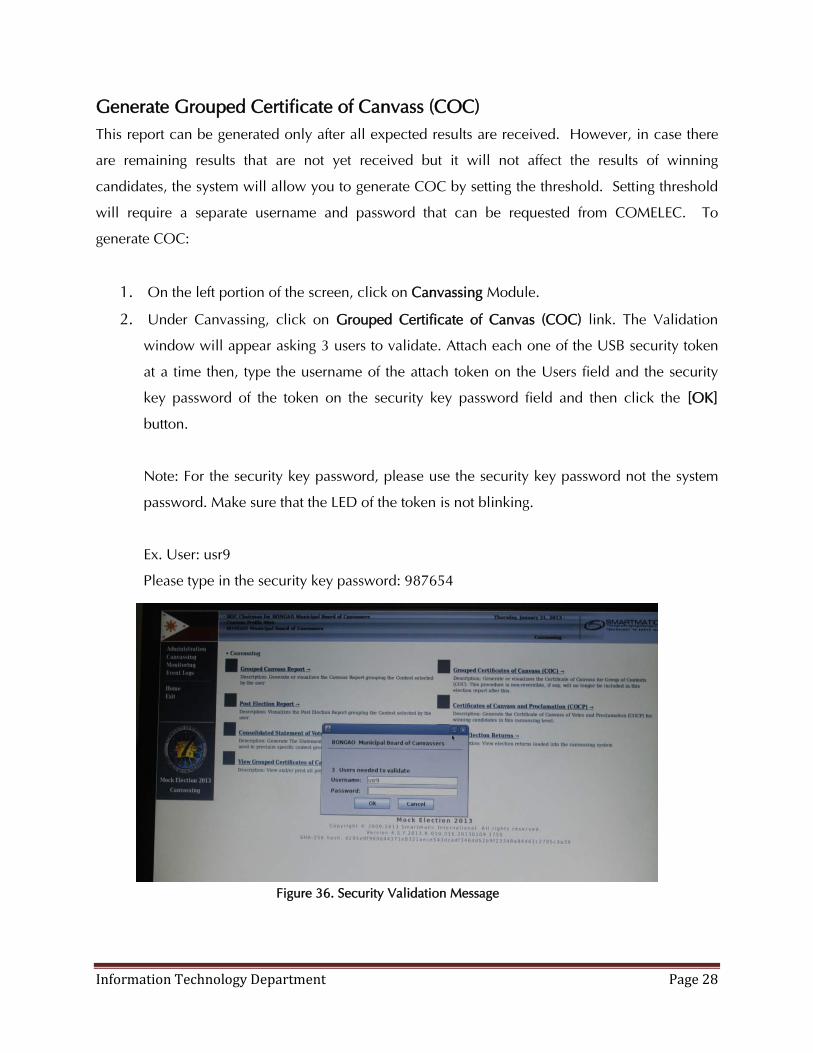
Generate Grouped Certificate of Canvass (COC) This report can be generated only after all expected results are received. However, in case there
are remaining results that are not yet received but it will not affect the results of winning
candidates, the system will allow you to generate COC by setting the threshold. Setting threshold
will require a separate username and password that can be requested from COMELEC. To
generate COC:
1. On the left portion of the screen, click on Canvassing Module.
2. Under Canvassing, click on Grouped Certificate of Canvas (COC) link. The Validation
window will appear asking 3 users to validate. Attach each one of the USB security token
at a time then, type the username of the attach token on the Users field and the security
key password of the token on the security key password field and then click the [OK]
button.
Note: For the security key password, please use the security key password not the system
password. Make sure that the LED of the token is not blinking.
Ex. User: usr9
Please type in the security key password: 987654
Figure 36. Security Validation Message
Information Technology Department Page 29
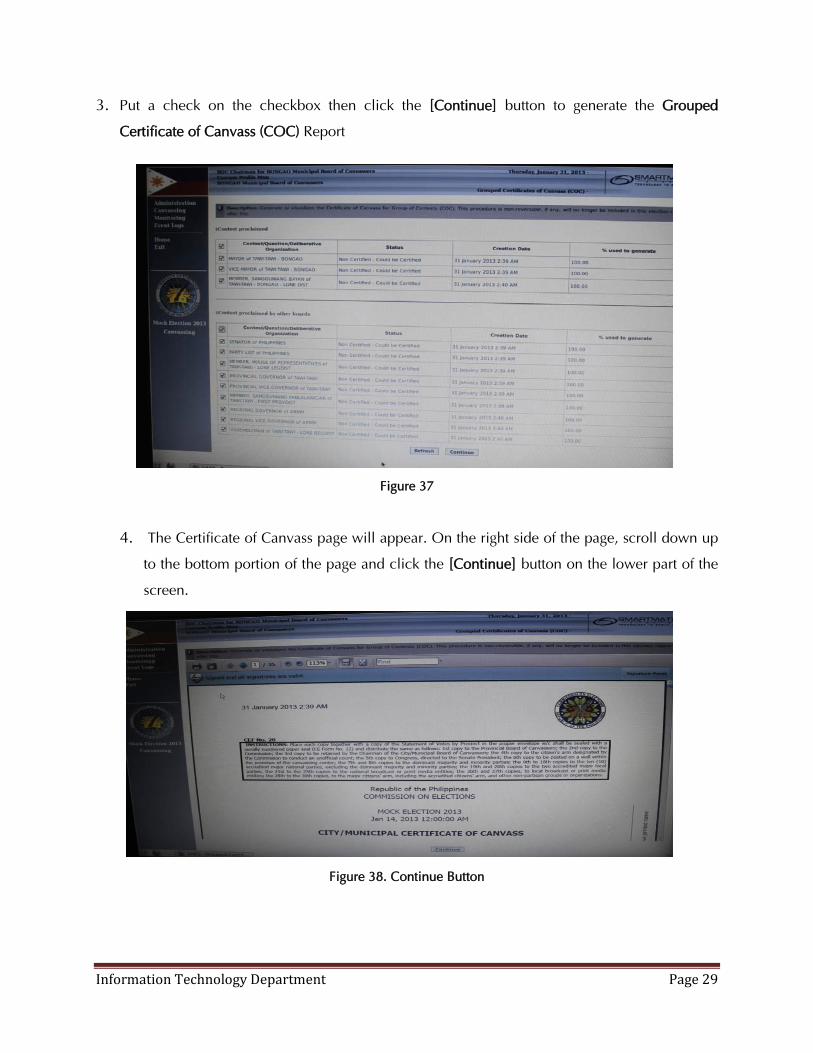
3. Put a check on the checkbox then click the [Continue] button to generate the Grouped
Certificate of Canvass (COC) Report
Figure 37
4. The Certificate of Canvass page will appear. On the right side of the page, scroll down up
to the bottom portion of the page and click the [Continue] button on the lower part of the
screen.
Figure 38. Continue Button
Information Technology Department Page 30
5. The Validation window will appear asking 3 users to validate. Attach each one of the USB
security token at a time then, type the username of the attach token on the Users field and the
security key password of the token on the security key password field and then click the [OK]
button.
Note: For the security key password, please use the security key password not the system
password. Make sure that the LED of the token is not blinking.
Ex. User: usr9
Please type in the security key password: 987654
6. It will now return to the homepage.
Generate Certificate of Canvass and Proclamation (COCP)
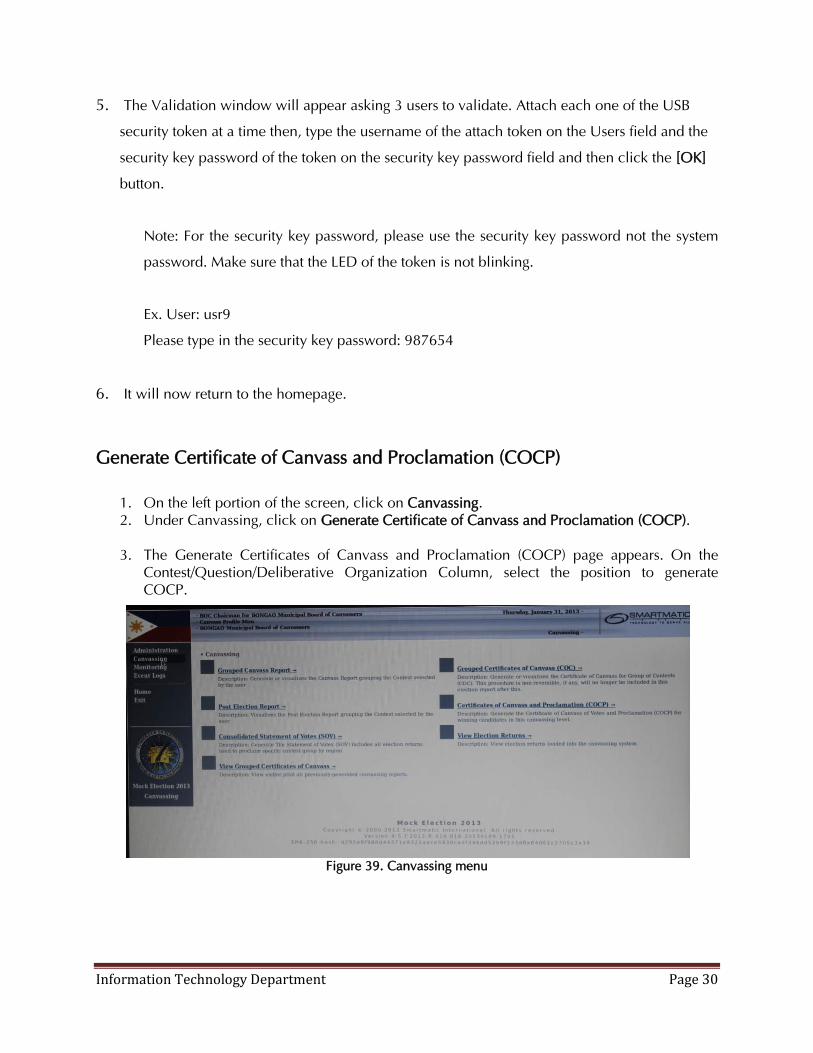
1. On the left portion of the screen, click on Canvassing. 2. Under Canvassing, click on Generate Certificate of Canvass and Proclamation (COCP).
3. The Generate Certificates of Canvass and Proclamation (COCP) page appears. On the
Contest/Question/Deliberative Organization Column, select the position to generate COCP.
Figure 39. Canvassing menu
Information Technology Department Page 31
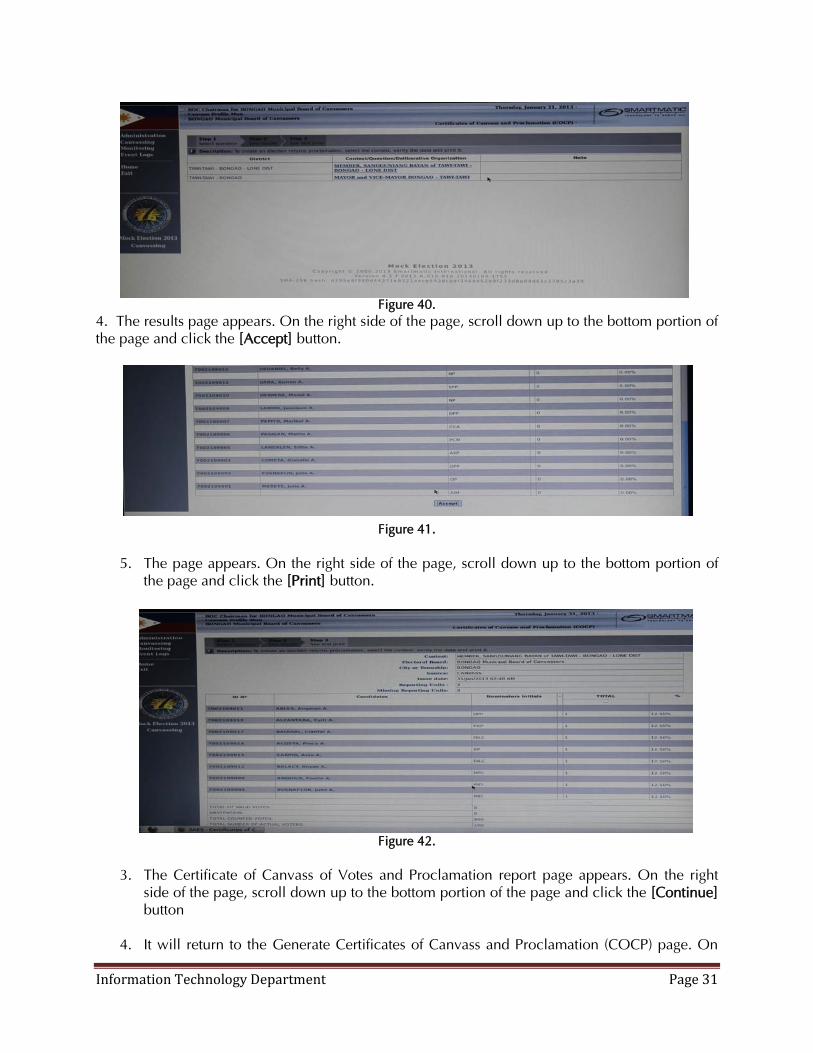
Figure 40. 4. The results page appears. On the right side of the page, scroll down up to the bottom portion of the page and click the [Accept] button.
Figure 41.
5. The page appears. On the right side of the page, scroll down up to the bottom portion of the page and click the [Print] button.
Figure 42.
3. The Certificate of Canvass of Votes and Proclamation report page appears. On the right side of the page, scroll down up to the bottom portion of the page and click the [Continue] button
4. It will return to the Generate Certificates of Canvass and Proclamation (COCP) page. On

Information Technology Department Page 32
the Contest/Question/Deliberative Organization Column, select the next question.
Figure 43.
5. The nominal proclamations page appears. On the right side of the page, scroll down up to the bottom portion of the page and click the [Accept] button.
Figure 44
6. The print page appears. On the right side of the page, scroll down up to the bottom portion of the page and click the [Print] button.
Figure 45
Information Technology Department Page 33
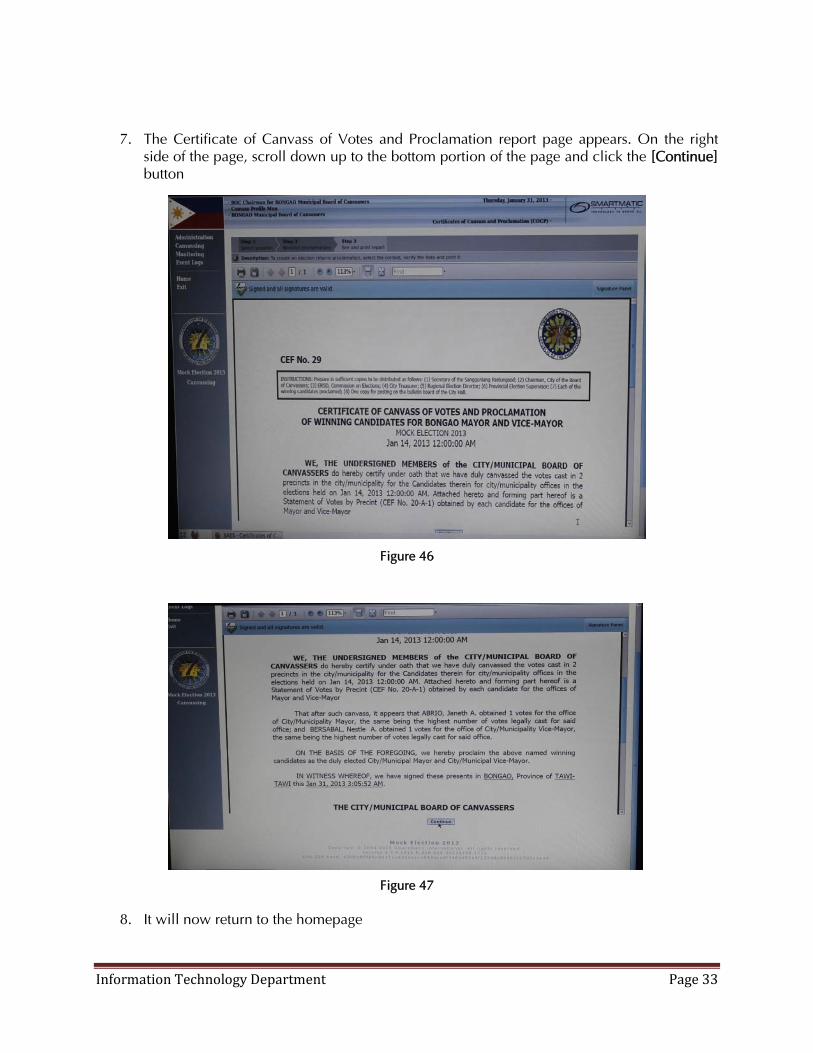
7. The Certificate of Canvass of Votes and Proclamation report page appears. On the right side of the page, scroll down up to the bottom portion of the page and click the [Continue] button
Figure 46
Figure 47
8. It will now return to the homepage
Information Technology Department Page 34
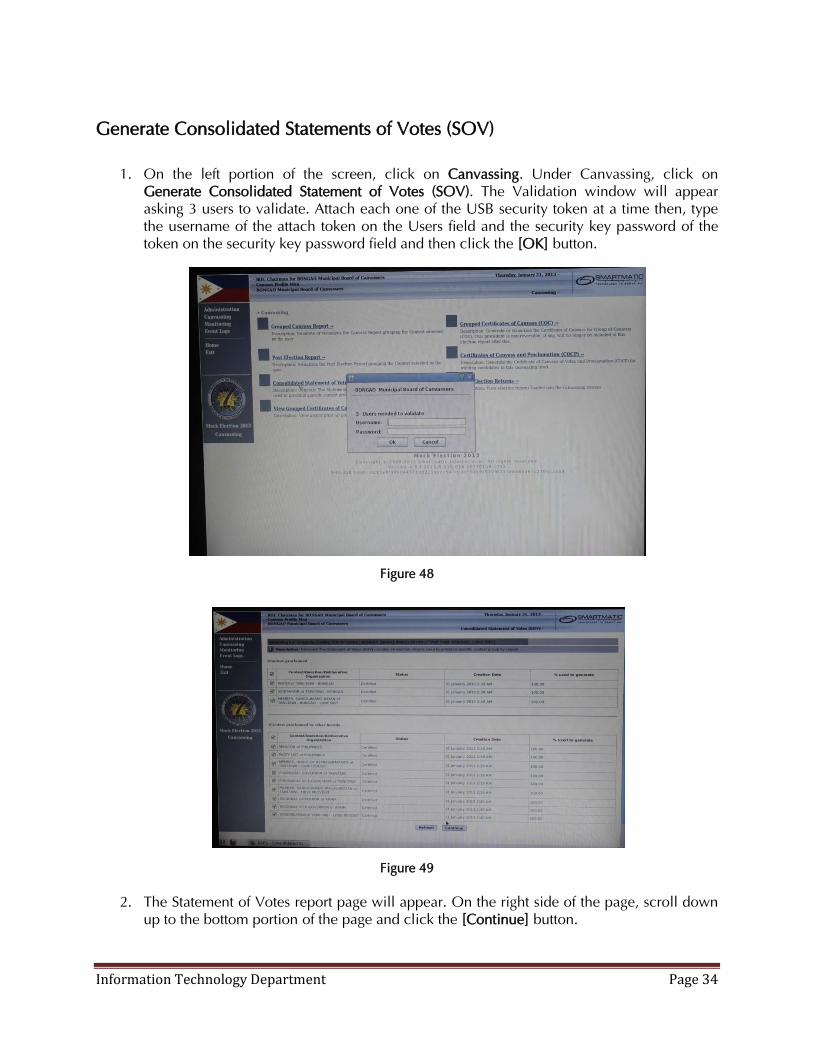
Generate Consolidated Statements of Votes (SOV)
1. On the left portion of the screen, click on Canvassing. Under Canvassing, click on Generate Consolidated Statement of Votes (SOV). The Validation window will appear asking 3 users to validate. Attach each one of the USB security token at a time then, type the username of the attach token on the Users field and the security key password of the token on the security key password field and then click the [OK] button.
Figure 48
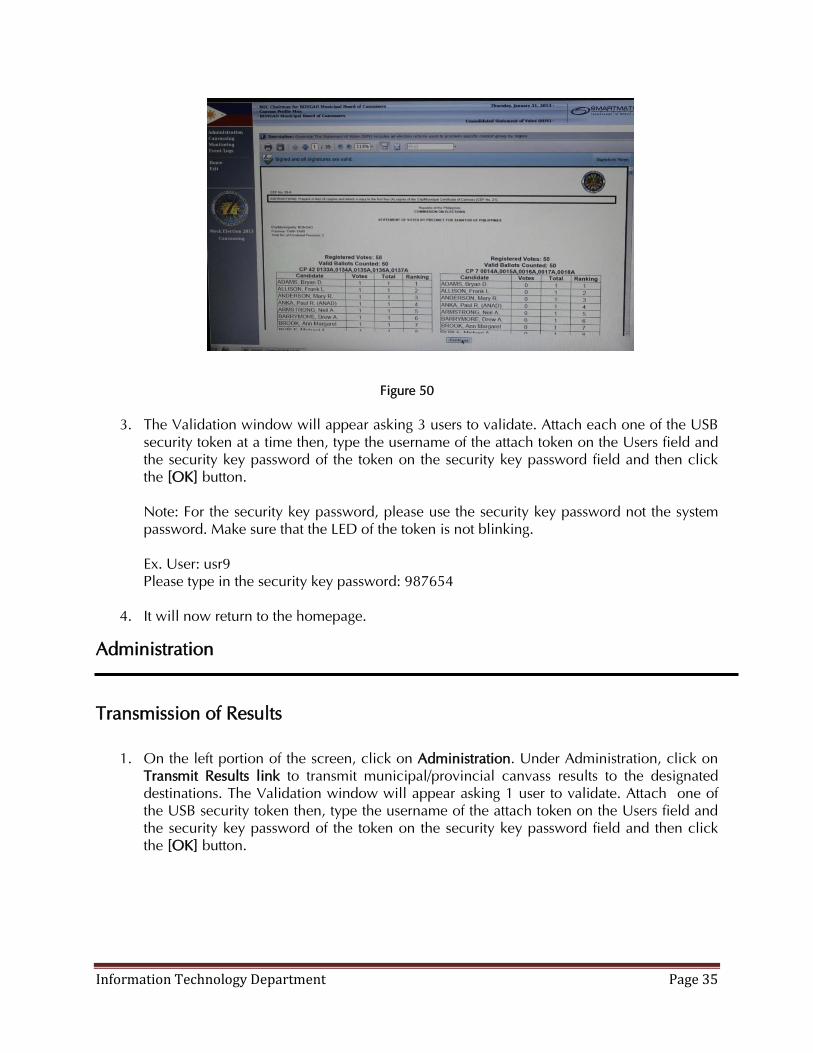
Figure 49 2. The Statement of Votes report page will appear. On the right side of the page, scroll down
up to the bottom portion of the page and click the [Continue] button.
Information Technology Department Page 35
Figure 50
3. The Validation window will appear asking 3 users to validate. Attach each one of the USB
security token at a time then, type the username of the attach token on the Users field and the security key password of the token on the security key password field and then click the [OK] button. Note: For the security key password, please use the security key password not the system password. Make sure that the LED of the token is not blinking. Ex. User: usr9 Please type in the security key password: 987654
4. It will now return to the homepage.
Administration
Transmission of Results
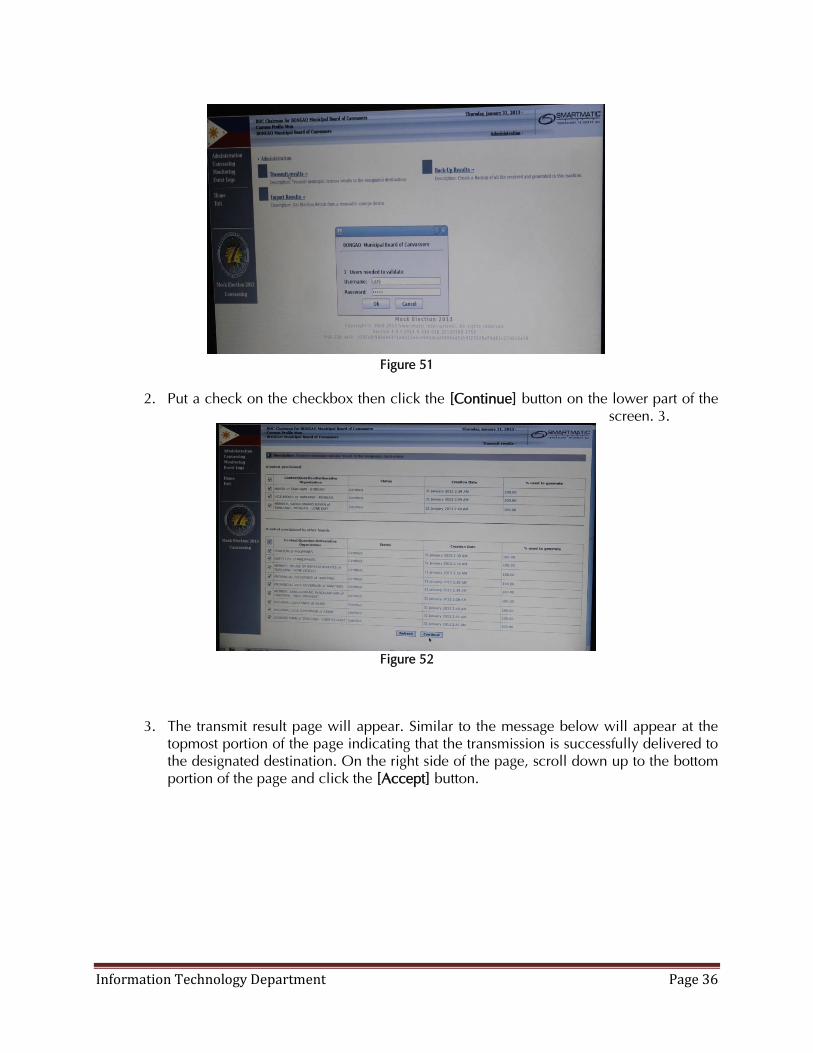
1. On the left portion of the screen, click on Administration. Under Administration, click on Transmit Results link to transmit municipal/provincial canvass results to the designated destinations. The Validation window will appear asking 1 user to validate. Attach one of the USB security token then, type the username of the attach token on the Users field and the security key password of the token on the security key password field and then click the [OK] button.
Information Technology Department Page 36
Figure 51
2. Put a check on the checkbox then click the [Continue] button on the lower part of the screen. 3.
Figure 52
3. The transmit result page will appear. Similar to the message below will appear at the topmost portion of the page indicating that the transmission is successfully delivered to the designated destination. On the right side of the page, scroll down up to the bottom portion of the page and click the [Accept] button.
Information Technology Department Page 37
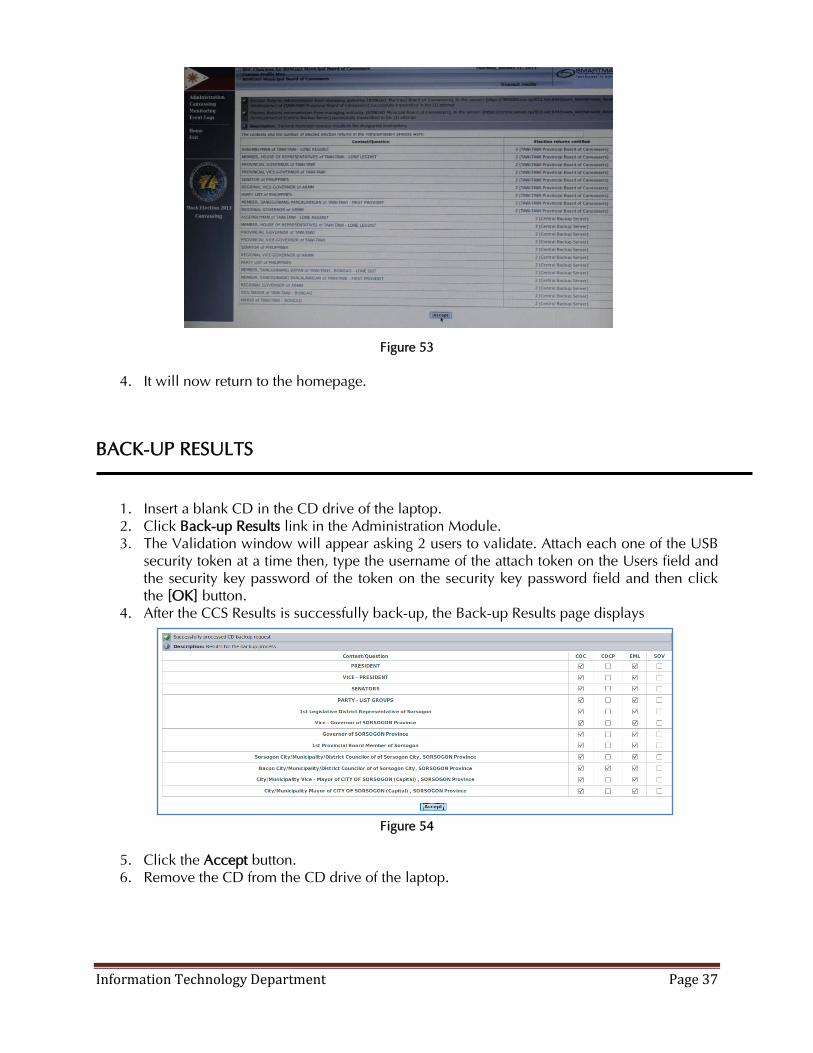
Figure 53
4. It will now return to the homepage.
BACK-UP RESULTS
1. Insert a blank CD in the CD drive of the laptop. 2. Click Back-up Results link in the Administration Module. 3. The Validation window will appear asking 2 users to validate. Attach each one of the USB
security token at a time then, type the username of the attach token on the Users field and the security key password of the token on the security key password field and then click the [OK] button.
4. After the CCS Results is successfully back-up, the Back-up Results page displays
Figure 54
5. Click the Accept button. 6. Remove the CD from the CD drive of the laptop.
Information Technology Department Page 38
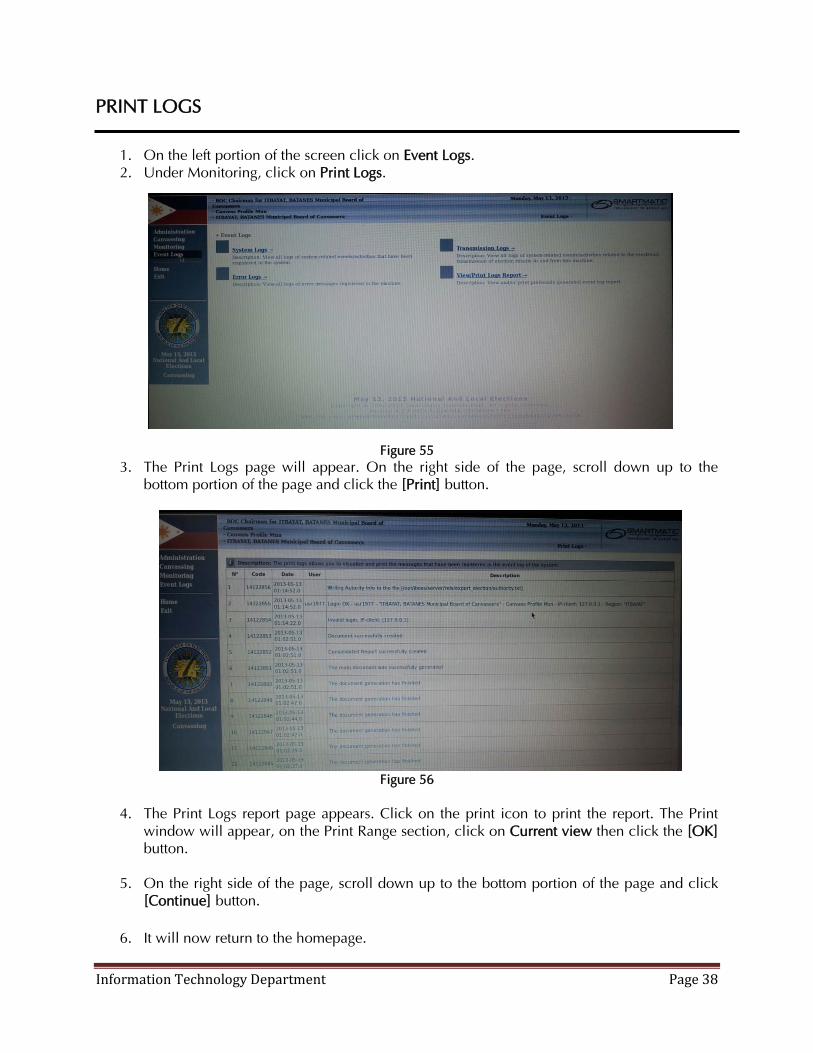
PRINT LOGS
1. On the left portion of the screen click on Event Logs. 2. Under Monitoring, click on Print Logs.
Figure 55 3. The Print Logs page will appear. On the right side of the page, scroll down up to the
bottom portion of the page and click the [Print] button.
Figure 56 4. The Print Logs report page appears. Click on the print icon to print the report. The Print
window will appear, on the Print Range section, click on Current view then click the [OK] button.
5. On the right side of the page, scroll down up to the bottom portion of the page and click [Continue] button.
6. It will now return to the homepage.

Information Technology Department Page 39
SHUTTING DOWN THE CCS
3. On the left portion of the screen, click on Exit to exit the Consolidation and Canvassing System.
4. Detached the printer cable to the left side USB port of the laptop. Power off the printer by
pressing the power button located at the front side of the printer.
Figure 57 Figure 58
5. On the lower right portion of the screen you will see the network icon, click on it then
select Disconnect.
Figure 59
6. Press the Power button of the laptop. The Shut Down Computer dialog box displays.

Information Technology Department Page 40
Figure 60
7. Detached the USB modem on the left side USB port of the laptop.
Figure 61
8. Pack the CCS
Information Technology Department Page 41
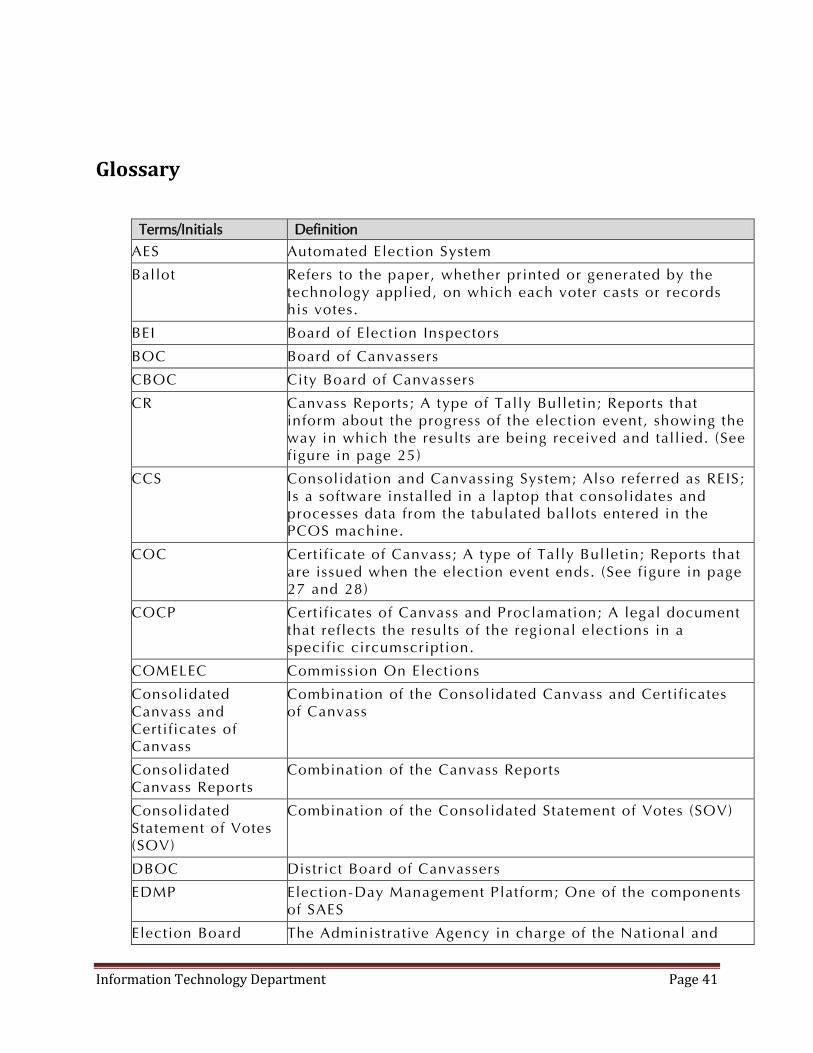
Glossary
Terms/Initials Definition
AES Automated Election System
Ballot Refers to the paper, whether pr inted or generated by the technology applied, on which each voter casts or records his votes.
BEI Board of Election Inspectors
BOC Board of Canvassers
CBOC City Board of Canvassers
CR Canvass Reports ; A type of Tally Bulletin; Reports that inform about the progress of the election event, showing the way in which the results are being received and tall ied. (See figure in page 25)
CCS Consolidation and Canvassing System; Also referred as REIS; Is a software installed in a laptop that consolidates and processes data from the tabulated ballots entered in the PCOS machine.
COC Certi ficate of Canvass; A type of Tally Bulletin; Reports that are issued when the election event ends. (See figure in page 27 and 28)
COCP Certi ficates of Canvass and Proclamation; A legal document that reflects the results of the regional elections in a specif ic circumscription.
COMELEC Commission On Elections
Consolidated Canvass and Certi ficates of Canvass
Combination of the Consolidated Canvass and Certif icates of Canvass
Consolidated Canvass Reports
Combination of the Canvass Reports
Consolidated Statement of Votes (SOV)
Combination of the Consolidated Statement of Votes (SOV)
DBOC Distr ict Board of Canvassers
EDMP Election-Day Management Platform; One of the components of SAES
Election Board The Administrative Agency in charge of the National and
Information Technology Department Page 42
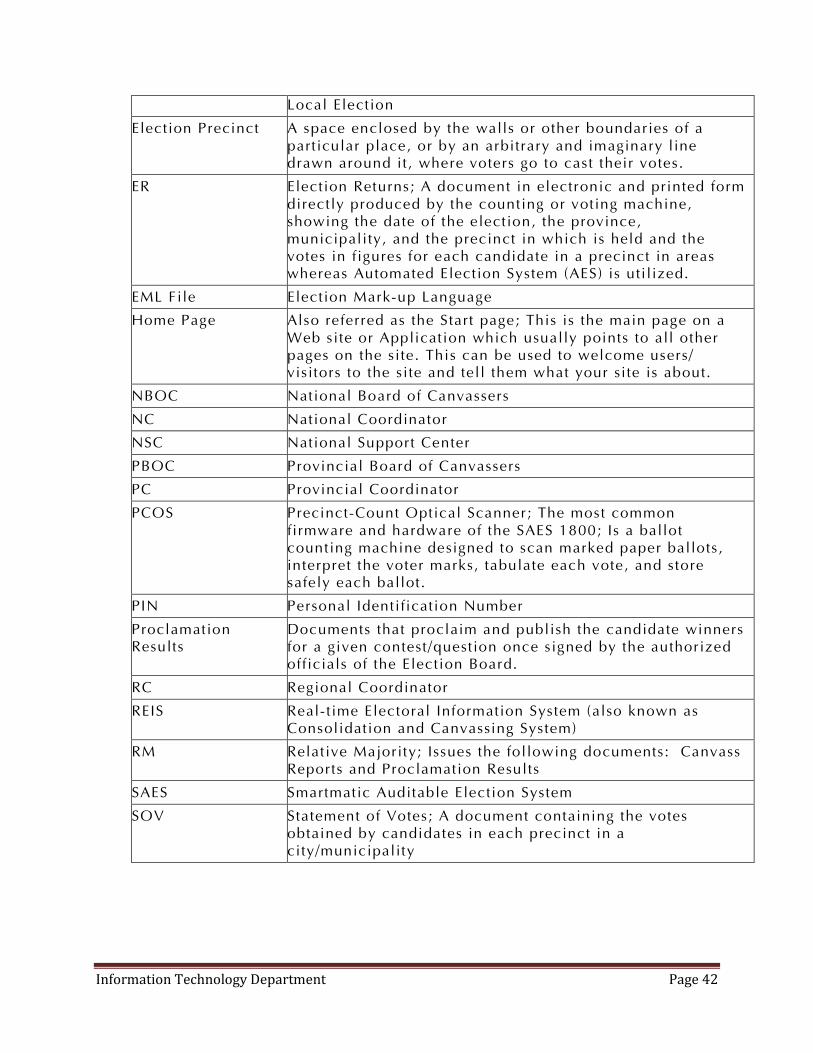
Local Election
Election Precinct A space enclosed by the walls or other boundaries of a particular place, or by an arbitrary and imaginary l ine drawn around it, where voters go to cast their votes.
ER Election Returns; A document in electronic and printed form directly produced by the counting or voting machine, showing the date of the election, the province, municipali ty, and the precinct in which is held and the votes in f igures for each candidate in a precinct in areas whereas Automated Election System (AES) is uti l ized.
EML File Election Mark-up Language
Home Page Also referred as the Start page; This is the main page on a Web site or Application which usually points to all other pages on the s i te. This can be used to welcome users/ vis itors to the s i te and tell them what your si te is about.
NBOC National Board of Canvassers
NC National Coordinator
NSC National Support Center
PBOC Provincial Board of Canvassers
PC Provincial Coordinator
PCOS Precinct-Count Optical Scanner; The most common firmware and hardware of the SAES 1800; Is a ballot counting machine designed to scan marked paper ballots , interpret the voter marks, tabulate each vote, and store safely each ballot.
PIN Personal Identi fication Number
Proclamation Results
Documents that proclaim and publish the candidate winners for a given contest/question once s igned by the authorized off icials of the Election Board.
RC Regional Coordinator
REIS Real- t ime Electoral Information System (also known as Consolidation and Canvassing System)
RM Relative Majority; Issues the following documents: Canvass Reports and Proclamation Results
SAES Smartmatic Auditable Election System
SOV Statement of Votes; A document containing the votes obtained by candidates in each precinct in a city/municipality


