126
ContentCenter Standard User’s Guide Version 7.2 Document Revision 0 May 2011

ContentCenter StandardUser’s Guide
Version 7.2Document Revision 0
May 2011
Notice
This documentation is a proprietary product of Autonomy and is protected by copyright laws and international treaty. Information in this documentation is subject to change without notice and does not represent a commitment on the part of Autonomy. While reasonable efforts have been made to ensure the accuracy of the information contained herein, Autonomy assumes no liability for errors or omissions. No liability is assumed for direct, incidental, or consequential damages resulting from the use of the information contained in this documentation.
The copyrighted software that accompanies this documentation is licensed to the End User for use only in strict accordance with the End User License Agreement, which the Licensee should read carefully before commencing use of the software. No part of this publication may be reproduced, transmitted, stored in a retrieval system, nor translated into any human or computer language, in any form or by any means, electronic, mechanical, magnetic, optical, chemical, manual or otherwise, without the prior written permission of the copyright owner.
This documentation may use fictitious names for purposes of demonstration; references to actual persons, companies, or organizations are strictly coincidental.
Trademarks and Copyrights
Copyright 2011 Autonomy Corporation plc and all its affiliates. All rights reserved. Advise, AudioLogger, Autonomy etalk, ContentServices, ControlHub, DataDeploy, etalk PRO, etalk, e-talk, Expert, Explore, Interwoven, LiveSite, Media Aggregation Service, MediaBin, MetaTagger, Observe, OpenDeploy, Optimost, Qfiniti Enterprise 3, Qfiniti, Recorder, SoftSound, SoftSound Analysis Plug-in, Survey, TeamSite, Virage ControlCenter, Virage Encoder, Virage SmartEncode, Virage VideoLogger, Virage, VisualAnnotate, VS Archive, VS Broadcast Monitoring, and all related titles and logos are trademarks of Autonomy Corporation plc and its affiliates.
Microsoft is a registered trademark, and MS-DOS, Windows, Windows 95, Windows NT, SharePoint, and other Microsoft products referenced herein are trademarks of Microsoft Corporation.
UNIX is a registered trademark of The Open Group.
AvantGo is a trademark of AvantGo, Inc.
Epicentric Foundation Server is a trademark of Epicentric, Inc.
Documentum and eRoom are trademarks of Documentum, a division of EMC Corp.
FileNet is a trademark of FileNet Corporation.
Lotus Notes is a trademark of Lotus Development Corporation.
mySAP Enterprise Portal is a trademark of SAP AG.
Oracle is a trademark of Oracle Corporation.
Adobe is a trademark of Adobe Systems Incorporated.
Novell is a trademark of Novell, Inc.
Stellent is a trademark of Stellent, Inc.
All other trademarks are the property of their respective owners.
Notice to Government End Users
If this product is acquired under the terms of a DoD contract: Use, duplication, or disclosure by the Government is subject to restrictions as set forth in subparagraph (c)(1)(ii) of 252.227-7013. Civilian agency contract: Use, reproduction or disclosure is subject to 52.227-19 (a) through (d) and restrictions set forth in the accompanying end user agreement. Unpublished-rights reserved under the copyright laws of the United States. Autonomy, Inc., One Market Plaza, Spear Tower, Suite 1900, San Francisco, CA. 94105, US.
May 2011
Copyright Notice

•
Contents
About This Book 11Intended Audience. . . . . . . . . . . . . . . . . . . . . . . . . . . . . . . . . . . . . . . . . . . . . . . . . . 11Notation Conventions . . . . . . . . . . . . . . . . . . . . . . . . . . . . . . . . . . . . . . . . . . . . . . . 11Manual Organization . . . . . . . . . . . . . . . . . . . . . . . . . . . . . . . . . . . . . . . . . . . . . . . . 12
Chapter 1: ContentCenter Overview 15Overview . . . . . . . . . . . . . . . . . . . . . . . . . . . . . . . . . . . . . . . . . . . . . . . . . . . . . . . . . 16Key ContentCenter Terms . . . . . . . . . . . . . . . . . . . . . . . . . . . . . . . . . . . . . . . . . . . . 17Welcome to ContentCenter Standard . . . . . . . . . . . . . . . . . . . . . . . . . . . . . . . . . . . . 19Displaying Login and Version Information . . . . . . . . . . . . . . . . . . . . . . . . . . . . . . . 22First-Time Use. . . . . . . . . . . . . . . . . . . . . . . . . . . . . . . . . . . . . . . . . . . . . . . . . . . . . 22
Log In . . . . . . . . . . . . . . . . . . . . . . . . . . . . . . . . . . . . . . . . . . . . . . . . . . . . . . . . . 23Enable Local File Editing . . . . . . . . . . . . . . . . . . . . . . . . . . . . . . . . . . . . . . . . . . 23
Using the How Do I Module . . . . . . . . . . . . . . . . . . . . . . . . . . . . . . . . . . . . . . . . . . 23Using the My Workareas Module . . . . . . . . . . . . . . . . . . . . . . . . . . . . . . . . . . . . . . 24
Preview and Edit Files . . . . . . . . . . . . . . . . . . . . . . . . . . . . . . . . . . . . . . . . . . . . 24Browse Workarea Contents . . . . . . . . . . . . . . . . . . . . . . . . . . . . . . . . . . . . . . . . 25
Using the My Favorites Module . . . . . . . . . . . . . . . . . . . . . . . . . . . . . . . . . . . . . . . 25View and Edit Files in My Favorites . . . . . . . . . . . . . . . . . . . . . . . . . . . . . . . . . 26Browse Folders in My Favorites. . . . . . . . . . . . . . . . . . . . . . . . . . . . . . . . . . . . . 26
Adding a Favorite . . . . . . . . . . . . . . . . . . . . . . . . . . . . . . . . . . . . . . . . . . . . . . . . . . 27Additional File Actions in My Favorites . . . . . . . . . . . . . . . . . . . . . . . . . . . . . . 27Remove Items from My Favorites . . . . . . . . . . . . . . . . . . . . . . . . . . . . . . . . . . . 28Rename Items in My Favorites . . . . . . . . . . . . . . . . . . . . . . . . . . . . . . . . . . . . . . 29
Using the Search Module . . . . . . . . . . . . . . . . . . . . . . . . . . . . . . . . . . . . . . . . . . . . 29Using the Saved Searches Module. . . . . . . . . . . . . . . . . . . . . . . . . . . . . . . . . . . . . . 29Using the Tasks Module . . . . . . . . . . . . . . . . . . . . . . . . . . . . . . . . . . . . . . . . . . . . . 29
Job and Task Concepts . . . . . . . . . . . . . . . . . . . . . . . . . . . . . . . . . . . . . . . . . . . . 30Using the Work in Progress Module . . . . . . . . . . . . . . . . . . . . . . . . . . . . . . . . . . . . 31
Additional File Actions in Work in Progress . . . . . . . . . . . . . . . . . . . . . . . . . . . 32Using the New Forms Module. . . . . . . . . . . . . . . . . . . . . . . . . . . . . . . . . . . . . . . . . 33Using VisualPreview . . . . . . . . . . . . . . . . . . . . . . . . . . . . . . . . . . . . . . . . . . . . . . . . 34
Modify a File with VisualPreview . . . . . . . . . . . . . . . . . . . . . . . . . . . . . . . . . . . 35Create New Form Entries with VisualPreview . . . . . . . . . . . . . . . . . . . . . . . . . . 36
ContentCenter Standard User’s Guide 3• • •••

Contents
4
Import a File with VisualPreview . . . . . . . . . . . . . . . . . . . . . . . . . . . . . . . . . . . . 37Edit a File with VisualPreview . . . . . . . . . . . . . . . . . . . . . . . . . . . . . . . . . . . . . . 37Perform More File Actions with VisualPreview . . . . . . . . . . . . . . . . . . . . . . . . . 37Check Links . . . . . . . . . . . . . . . . . . . . . . . . . . . . . . . . . . . . . . . . . . . . . . . . . . . . 39
Browsing Files and Folders . . . . . . . . . . . . . . . . . . . . . . . . . . . . . . . . . . . . . . . . . . . 39Using the Current Folder Area . . . . . . . . . . . . . . . . . . . . . . . . . . . . . . . . . . . . . . . . 41Using the Files Area . . . . . . . . . . . . . . . . . . . . . . . . . . . . . . . . . . . . . . . . . . . . . . . . 42
Use the File Actions Menu . . . . . . . . . . . . . . . . . . . . . . . . . . . . . . . . . . . . . . . . . 43Sort the File List . . . . . . . . . . . . . . . . . . . . . . . . . . . . . . . . . . . . . . . . . . . . . . . . . 44
Chapter 2: Working With Forms 45Forms Overview . . . . . . . . . . . . . . . . . . . . . . . . . . . . . . . . . . . . . . . . . . . . . . . . . . . 45Selecting a Form . . . . . . . . . . . . . . . . . . . . . . . . . . . . . . . . . . . . . . . . . . . . . . . . . . . 46Filling In a Form . . . . . . . . . . . . . . . . . . . . . . . . . . . . . . . . . . . . . . . . . . . . . . . . . . . 46
Create a New Form Entry File . . . . . . . . . . . . . . . . . . . . . . . . . . . . . . . . . . . . . . 48Formatting Information in Forms . . . . . . . . . . . . . . . . . . . . . . . . . . . . . . . . . . . . . . 49
Edit an Existing Form Entry File . . . . . . . . . . . . . . . . . . . . . . . . . . . . . . . . . . . . 51Save Your Entries . . . . . . . . . . . . . . . . . . . . . . . . . . . . . . . . . . . . . . . . . . . . . . . . 53Preview a Form . . . . . . . . . . . . . . . . . . . . . . . . . . . . . . . . . . . . . . . . . . . . . . . . . 54Generate an Output File . . . . . . . . . . . . . . . . . . . . . . . . . . . . . . . . . . . . . . . . . . . 55
Selecting a File Name and Location . . . . . . . . . . . . . . . . . . . . . . . . . . . . . . . . . . . . 55Specifying Form Settings . . . . . . . . . . . . . . . . . . . . . . . . . . . . . . . . . . . . . . . . . . . . 56Selecting a Presentation Template . . . . . . . . . . . . . . . . . . . . . . . . . . . . . . . . . . . . . . 58
Chapter 3: Importing, Editing, and Submitting Files 59Overview . . . . . . . . . . . . . . . . . . . . . . . . . . . . . . . . . . . . . . . . . . . . . . . . . . . . . . . . . 59Importing a File . . . . . . . . . . . . . . . . . . . . . . . . . . . . . . . . . . . . . . . . . . . . . . . . . . . . 60Selecting Import Locations, Options, and Tasks . . . . . . . . . . . . . . . . . . . . . . . . . . . 62
Import File Name Conflicts . . . . . . . . . . . . . . . . . . . . . . . . . . . . . . . . . . . . . . . . 64Create New Content . . . . . . . . . . . . . . . . . . . . . . . . . . . . . . . . . . . . . . . . . . . . . . 64
Editing a File . . . . . . . . . . . . . . . . . . . . . . . . . . . . . . . . . . . . . . . . . . . . . . . . . . . . . . 64Import a File . . . . . . . . . . . . . . . . . . . . . . . . . . . . . . . . . . . . . . . . . . . . . . . . . . . . 65Delete a File . . . . . . . . . . . . . . . . . . . . . . . . . . . . . . . . . . . . . . . . . . . . . . . . . . . . 66
Selecting a Next Action . . . . . . . . . . . . . . . . . . . . . . . . . . . . . . . . . . . . . . . . . . . . . . 66Preview an Edited File . . . . . . . . . . . . . . . . . . . . . . . . . . . . . . . . . . . . . . . . . . . . 67
Adding Task Comments within a Wizard . . . . . . . . . . . . . . . . . . . . . . . . . . . . . . . . 67Selecting a Workflow . . . . . . . . . . . . . . . . . . . . . . . . . . . . . . . . . . . . . . . . . . . . . . . 68Submitting Work in Progress . . . . . . . . . . . . . . . . . . . . . . . . . . . . . . . . . . . . . . . . . 69When a Task is Finished . . . . . . . . . . . . . . . . . . . . . . . . . . . . . . . . . . . . . . . . . . . . . 70
Chapter 4: Other File Operations 71Overview . . . . . . . . . . . . . . . . . . . . . . . . . . . . . . . . . . . . . . . . . . . . . . . . . . . . . . . . . 71Tagging a File Using TagUI. . . . . . . . . . . . . . . . . . . . . . . . . . . . . . . . . . . . . . . . . . . 72
Enter Tags Manually in TagUI . . . . . . . . . . . . . . . . . . . . . . . . . . . . . . . . . . . . . . 73Generate Tags Automatically in TagUI . . . . . . . . . . . . . . . . . . . . . . . . . . . . . . . 75Use the Suggest and Suggest All Buttons. . . . . . . . . . . . . . . . . . . . . . . . . . . . . . 76Use the Add/Edit Button. . . . . . . . . . . . . . . . . . . . . . . . . . . . . . . . . . . . . . . . . . . 76
ContentCenter Standard User’s Guide
• • • •••

Contents
•
Tagging a File using Metadata Capture Tagging . . . . . . . . . . . . . . . . . . . . . . . . . . . 77Enter Tags Manually. . . . . . . . . . . . . . . . . . . . . . . . . . . . . . . . . . . . . . . . . . . . . . 78Generate Tags Automatically . . . . . . . . . . . . . . . . . . . . . . . . . . . . . . . . . . . . . . . 79Use the Re-Tag Link. . . . . . . . . . . . . . . . . . . . . . . . . . . . . . . . . . . . . . . . . . . . . . 80Use the Re-Tag All Link. . . . . . . . . . . . . . . . . . . . . . . . . . . . . . . . . . . . . . . . . . . 80Use the Add/Edit Link . . . . . . . . . . . . . . . . . . . . . . . . . . . . . . . . . . . . . . . . . . . . 81TeamSite Search Metadata Screen - Version 1 . . . . . . . . . . . . . . . . . . . . . . . . . . 81TeamSite Search MetaData Screen - Version 2. . . . . . . . . . . . . . . . . . . . . . . . . . 82Use the Suggest Link . . . . . . . . . . . . . . . . . . . . . . . . . . . . . . . . . . . . . . . . . . . . . 83Use the Browse Vocabulary Screen . . . . . . . . . . . . . . . . . . . . . . . . . . . . . . . . . . 84
Assigning Files to a New Job . . . . . . . . . . . . . . . . . . . . . . . . . . . . . . . . . . . . . . . . . 84Deleting a File . . . . . . . . . . . . . . . . . . . . . . . . . . . . . . . . . . . . . . . . . . . . . . . . . . . . . 86Copying a File . . . . . . . . . . . . . . . . . . . . . . . . . . . . . . . . . . . . . . . . . . . . . . . . . . . . . 88Renaming a File. . . . . . . . . . . . . . . . . . . . . . . . . . . . . . . . . . . . . . . . . . . . . . . . . . . . 89Moving a File . . . . . . . . . . . . . . . . . . . . . . . . . . . . . . . . . . . . . . . . . . . . . . . . . . . . . 91Viewing File Properties . . . . . . . . . . . . . . . . . . . . . . . . . . . . . . . . . . . . . . . . . . . . . . 93Viewing File Versions . . . . . . . . . . . . . . . . . . . . . . . . . . . . . . . . . . . . . . . . . . . . . . . 95Creating a New Folder. . . . . . . . . . . . . . . . . . . . . . . . . . . . . . . . . . . . . . . . . . . . . . . 96
Chapter 5: Searching Content 97Search Overview . . . . . . . . . . . . . . . . . . . . . . . . . . . . . . . . . . . . . . . . . . . . . . . . . . . 97
Case Sensitivity . . . . . . . . . . . . . . . . . . . . . . . . . . . . . . . . . . . . . . . . . . . . . . . . . 98Performing Simple Searches . . . . . . . . . . . . . . . . . . . . . . . . . . . . . . . . . . . . . . . . . . 99Performing Advanced Searches. . . . . . . . . . . . . . . . . . . . . . . . . . . . . . . . . . . . . . . . 99
Search Keywords and Phrases . . . . . . . . . . . . . . . . . . . . . . . . . . . . . . . . . . . . . 101Search Specific Content Types . . . . . . . . . . . . . . . . . . . . . . . . . . . . . . . . . . . . . 102Search File Attributes . . . . . . . . . . . . . . . . . . . . . . . . . . . . . . . . . . . . . . . . . . . . 103
Saved Searches . . . . . . . . . . . . . . . . . . . . . . . . . . . . . . . . . . . . . . . . . . . . . . . . . . . 104Understanding Search Results . . . . . . . . . . . . . . . . . . . . . . . . . . . . . . . . . . . . . . . . 104Troubleshooting. . . . . . . . . . . . . . . . . . . . . . . . . . . . . . . . . . . . . . . . . . . . . . . . . . . 105
Chapter 6: Working With Tasks 107Tasks Overview . . . . . . . . . . . . . . . . . . . . . . . . . . . . . . . . . . . . . . . . . . . . . . . . . . . 107Using the Task Details Screen . . . . . . . . . . . . . . . . . . . . . . . . . . . . . . . . . . . . . . . . 108
Edit and Delete Attached Files . . . . . . . . . . . . . . . . . . . . . . . . . . . . . . . . . . . . . 109Detach Files . . . . . . . . . . . . . . . . . . . . . . . . . . . . . . . . . . . . . . . . . . . . . . . . . . . 110Preview Attached Files . . . . . . . . . . . . . . . . . . . . . . . . . . . . . . . . . . . . . . . . . . . .111Review and Compare File Versions . . . . . . . . . . . . . . . . . . . . . . . . . . . . . . . . . .111View File Differences . . . . . . . . . . . . . . . . . . . . . . . . . . . . . . . . . . . . . . . . . . . . .111Review and Add File Comments . . . . . . . . . . . . . . . . . . . . . . . . . . . . . . . . . . . 112Review and Add File Tags . . . . . . . . . . . . . . . . . . . . . . . . . . . . . . . . . . . . . . . . 112Review and Add Task Comments . . . . . . . . . . . . . . . . . . . . . . . . . . . . . . . . . . . 113Perform Task-Specific Actions . . . . . . . . . . . . . . . . . . . . . . . . . . . . . . . . . . . . . 113
Attaching Files to a Task . . . . . . . . . . . . . . . . . . . . . . . . . . . . . . . . . . . . . . . . . . . . 114Adding Comments to a Task . . . . . . . . . . . . . . . . . . . . . . . . . . . . . . . . . . . . . . . . . 115
ContentCenter Standard User’s Guide 5• • •••

Contents
6
Chapter 7: Additional File Actions 117Installing the VisualAnnotate Tool Bar . . . . . . . . . . . . . . . . . . . . . . . . . . . . . . . . . 117Approving a File through Email . . . . . . . . . . . . . . . . . . . . . . . . . . . . . . . . . . . . . . 117Editing a File through Email . . . . . . . . . . . . . . . . . . . . . . . . . . . . . . . . . . . . . . . . 118
Index 121
ContentCenter Standard User’s Guide
• • • •••
•
Figures
Figure 1 ContentCenter Standard home page .......................................................................... 20Figure 2 The Check Links screen ............................................................................................. 39Figure 3 Screen showing folders and files in workarea............................................................. 40Figure 4 Folder area showing open subfolders......................................................................... 41Figure 5 Form entry................................................................................................................... 47Figure 6 The Form Settings screen........................................................................................... 56Figure 7 Selecting a presentation template............................................................................... 58Figure 8 Import File screen ....................................................................................................... 61Figure 9 Screen to set import location and options................................................................... 62Figure 10 Submitting files from the Work in Progress module .................................................... 69Figure 11 Example of a Tag File form in TagUI .......................................................................... 73Figure 12 Tagging multiple files .................................................................................................. 75Figure 13 Tag File form............................................................................................................... 78Figure 14 Assign Files to New Job screen.................................................................................. 84Figure 15 Assign Existing (or Modified) Files screen .................................................................. 85Figure 16 Deleting a file .............................................................................................................. 86Figure 17 Copying a file .............................................................................................................. 88Figure 18 Renaming a file ........................................................................................................... 90Figure 19 Moving a file................................................................................................................ 92Figure 20 File Properties screen ................................................................................................. 94Figure 21 File Versions screen ................................................................................................... 95Figure 22 Advanced Search screen.......................................................................................... 100Figure 23 Task Details screen .................................................................................................. 109Figure 24 Task File Comments screen ..................................................................................... 112
ContentCenter Standard User’s Guide 7• • •••

Figures
8
•
ContentCenter Standard User’s Guide• • •••

•
Tables
Table 1 Notation Conventions............................................................................................... 11Table 2 TinyMCE icons in TeamSite..................................................................................... 50
ContentCenter Standard User’s Guide 9• • •••

Tables
10
ContentCenter Standard User’s Guide• • • •••

About This Book
This manual documents the out-of-the box ContentCenter Standard user interface.
Intended AudienceThis manual is intended for users of the ContentCenter Standard user interface. This interface is designed for business users and provides wizards to accomplish standard TeamSite functions
Notation ConventionsThis manual uses the following notation conventions:
Table 1 Notation Conventions
Convention Definition and Usage
Bold Text that appears in a GUI element such as, a menu item, button, or element of a dialog box, and command names are shown in bold. For example:
Click Edit File in the Button Bar.
Italic Book titles appear in italics.
Terms are italicized the first time they are introduced.
Important information may be italicized for emphasis.
Monospace Commands, command-line output, and file names are in monospace type. For example:
The iwextattr command-line tool allows you to set and look up extended attributes on a file.
ContentCenter Standard User’s Guide 11
• • • •••

12
This guide also uses the following conventions:
The term “Windows” indicates any supported version of the Microsoft Windows operating system, such as Windows® 2000.
Directory paths use UNIX conventions. These conventions mandate using forward slashes (/) in path names. (Windows systems use backward slashes.) The Windows convention is used when referring to a Windows-specific directory. For example: UNIX: docroot/news/front.html
Windows: docroot\news\front.html
Manual OrganizationThis manual is organized as follows:
Chapter 1, “ContentCenter Overview,” introduces you to ContentCenter and describes the ContentCenter Standard modules.
Chapter 2, “Working With Forms,” describes how to fill out forms to generate content using the FormsPublisher capability.
Monospaced italic
Monospaced italics are used for command-line variables.For example:iwckrole role user
This means that you must replace role and user with your values.
Monospaced bold Monospaced bold represents information you enter in response to system prompts. The character that appears before a line of user input represents the command prompt, and should not be typed. For example:iwextattr -s project=proj1 //IWSERVER/default/main/dev/WORKAREA/andre/products/index.html
Monospaced bold italic
Monospaced bold italic text is used to indicate a variable in user input. For example:iwextattr -s project=projectname workareavpath
means that you must insert the values of projectname and workareavpath when you enter this command.
[] Square brackets surrounding a command-line argument mean that the argument is optional.
| Vertical bars separating command-line arguments mean that only one of the arguments can be used.
Table 1 Notation Conventions
Convention Definition and Usage
ContentCenter Standard User’s Guide
• • • •••
Chapter 3, “Importing, Editing, and Submitting Files,” describes how to import files, edit files, and submit files.
Chapter 4, “Other File Operations,” describes how to tag files, convert files, and perform standard file operations such as copying and renaming files.
Chapter 5, “Searching Content,” describes how to perform simple and advanced searches of content and save search queries.
Chapter 6, “Working With Tasks,” explains how to respond to assigned tasks.
Chapter 7, “Additional File Actions,” explains how other activities such as Visual Annotate and email approvals.
ContentCenter Standard User’s Guide 13
• • • •••

14
ContentCenter Standard User’s Guide• • • •••

Chapter 1
ContentCenter Overview
This chapter contains information on the following topics:
Overview
Key ContentCenter Terms
Welcome to ContentCenter Standard
Displaying Login and Version Information
First-Time Use
Using the How Do I Module
Using the My Workareas Module
Using the My Favorites Module
Using the Search Module
Using the Tasks Module
Using the Work in Progress Module
Using the New Forms Module
Using VisualPreview
Modify a File with VisualPreview
Browsing Files and Folders
Using the Current Folder Area
Using the Files Area
ContentCenter Standard User’s Guide 15
• • • •••

16
OverviewImagine an enterprise where individuals create and store business-critical content on their own local computers. How can they know which version of a document is the most current? How can they share content with their peers, or merge their work with that of others? How can they ensure their content is protected, backed-up, and always accessible?
These are the kinds of problems that content management systems solve. “Content management” refers to the coordination of human and automated activities that manage content throughout its life cycle, from development to distribution to “live”, or production, environments.
At various points in its life cycle, content might be edited, enhanced, categorized, versioned, reviewed, integrated, archived, or distributed. Many contributors throughout an organization might handle content in different phases of that life cycle. A content management system describes, automates, and manages the activities of each phase of the content life cycle.
ContentCenter is your window into the features of the Interwoven content management platform. That platform is designed on several key concepts. To use ContentCenter effectively, you should be familiar with these concepts, which are described in “Key ContentCenter Terms” on page 17.
Scenario
Pat works in the Marketing department of a large enterprise and is instructed to create a press release. Pat authors the press release according to a standard format and gives the document to his supervisor, Chris, for approval. Chris requests a revision. Pat revises the press release, then submits the revision to Chris for review. The revision is approved and released to the production environment.
A content management system might aide the process described above by:
Providing a workflow to ensure that Pat’s work goes through the review processes his organization requires.
Automatically notifying Pat and Chris of new tasks.
Providing Pat with a predefined form for entering content for press releases.
Providing predefined templates that control the appearance of the content when it is presented in a production environment.
Saving a record of each version of the press release so that Pat can restore a previous version if necessary.
Protecting the system and the content it stores from users who have not been given access to it.
ContentCenter Standard User’s Guide
• • • •••

Related Information
“Key ContentCenter Terms”
“Welcome to ContentCenter Standard”
“Displaying Login and Version Information”
“First-Time Use”
Key ContentCenter TermsThere are several terms and concepts that you should understand as you work with ContentCenter:
Publish. The publishing of finished content to environments beyond the one where it was created. For example, you could create a press release from within ContentCenter, submit the final version for approval and inclusion in a ContentCenter workarea, and then publish the finished version to a production system that lets the general population access it. Not all ContentCenter users have the ability to publish content; permission to do so is controlled by your ContentCenter administrator.
Form. A template that guides the creation and controls the appearance of content. Forms are set up and maintained by ContentCenter administrators. You can select a form to fill in from the ContentCenter home page New Forms module. After you select a form, a blank version of it appears on your screen so that you can fill it in with form entries. Form entry files are saved to the templatedata/form_category/form_type/data folder in your workarea. For example, your form entries for a press release might be saved in:
contentarea/templatedata/intranet/pr/data
Form Entry. The information you enter in a blank form. When you save and submit your form entries, after they are approved they are stored as files in a workarea. You can select the form entry’s exact location within the templatedata/form_category/form_type/data folder in your workarea. Following submission and approval, form entry files are available for you and others to recall and use as necessary.
Presentation Template. A template that defines how your form entries will appear when displayed. For example, a presentation template could specify the size, color, and layout of a Web page. If you have multiple presentation templates, you can display the same form entries in multiple ways.
Output File. A file that you generate by combining a form entry file with a presentation template. The output file is typically in html format for use as a Web page. You can generate Web pages using any combination of form entries and presentation templates that your ContentCenter administrator has made available to you. If you generate an output file and then want to change its appearance, you can generate a new output file with a different presentation template. Output file generation might be done through a workflow at your site.
ContentCenter Standard User’s Guide 17
• • • •••

18
Preview. Viewing your content prior to submitting or publishing it. Previewing typically pertains to Web sites that you are working on. For example, before you begin work on a Web site, you can preview it to assess its current look and feel. Previewing is also useful after you have finished working on a Web site to ensure that your changes appear as you intended prior to making the Web site publicly available.
Workarea. A general term for the area where ContentCenter stores your files for documents, images, Web sites, form entries, and any other items that are controlled by ContentCenter. Workareas are set up and controlled by ContentCenter administrators and are what you access from the ContentCenter interface. You can access the files in one or more workareas after a ContentCenter administrator sets your access permissions. After your permissions are set up, you can perform a variety of actions on files in a workarea, such as edit, move, rename, copy, delete, and so on.
Submit. After you perform an action on a file, you must submit the file for approval. Following approval by one or more reviewers of your work, the new version is entered into a workarea, at which time the new version is available to other users. For example, if you edit a file residing in a workarea and save your changes in the editing program, they are not registered with ContentCenter until you submit the file for approval and the changes are approved. Before the file is approved and added to the workarea, the changed version of the file is available only to you.
Tag. When you tag a file, you specify additional descriptive information that remains with the file indefinitely (this information is also called metadata). For example, you could tag a press release file by adding a title such as “Press Release,” keywords such as “July” and “Acquisition,” a region such as “California,” and so on. These tags do not appear in the text of the file, so they are not displayed when the file is viewed through a browser or editing application. Instead, they appear when you view the file’s tags using a compatible search engine or other product such as Interwoven MetaTagger.
Task. A single step that is part of a job. There are two types of tasks: individual and group.
Individual tasks are assigned to a specific person. If an individual task is assigned to you, it appears under My Tasks in the Tasks module of your ContentCenter home page. From there you can take whatever action is necessary to complete the task.
Group tasks are assigned to a group of people, any one of whom can perform the task. (Groups are defined and maintained by ContentCenter administrators.) If a group task is assigned to your group, it appears under Group Tasks in the Tasks module of your ContentCenter home page. From there you can take ownership of the task and complete it.
After you perform a task, the job proceeds to the next task in its predefined sequence. When all of the tasks in a job are done, the job is complete.
Job. A set of tasks assigned to one or more people. All jobs are based on predefined workflows. When you start a job based on a workflow, you specify who should perform each task, and then you initiate the job. The person who is to perform each task is notified through the Tasks module on the ContentCenter home page (and optionally through email) that there is a task to perform. After a task is completed, the job proceeds to the next task in
ContentCenter Standard User’s Guide
• • • •••

its sequence that was defined by the workflow. When all of the tasks in a job are done, the job is complete.
Workflow. A sequence of tasks that can be assigned to one or more people. For example, a workflow could define three tasks: to edit some text, to add an image, and to review the work. Whenever you start a job, it must be based on a predefined workflow. Workflows are defined by ContentCenter administrators and other maintainers of your ContentCenter system.
Version. A numbered iteration of a content file. Whenever you submit a file and it is approved, ContentCenter saves the new version of the file containing your changes and retains the original, pre-edited version. Because previous versions are not deleted, you can view all previous versions of the file, see when and by whom each version was modified, and if necessary revert the current file to an earlier version.
Welcome to ContentCenter StandardThis is the ContentCenter Standard home page.
ContentCenter Standard User’s Guide 19
• • • •••

20
Figure 1 ContentCenter Standard home page
This is the first screen you see after you log into the ContentCenter system. From here you can:
Get answers to commonly asked questions in the How Do I module (see “Using the How Do I Module”).
Browse to and preview any of the workareas listed in the My Workareas module (see “Using the My Workareas Module”).
Go directly to any of the files in the My Favorites module and open them for editing or viewing (see “Using the My Favorites Module”).
Search for text in a file (see “Searching Content”).
View or modify tasks belonging to you or groups you belong to from the Tasks module (see “Using the Tasks Module”).
From the Work in Progress module, view or modify files that you are working on but have not yet been approved by a reviewer (see “Using the Work in Progress Module”).
Call up forms for content entry and display from the New Forms module (see “Using the New Forms Module”).
ContentCenter Standard User’s Guide
• • • •••

NOTE
All of the files, folders, and workareas shown in this screen are on the ContentCenter system that you logged into to reach this page. This screen does not show files and folders that are on your local system (such as the C: drive on your computer). See “Importing a File” for details about moving files and folders from your local system onto the ContentCenter system.
If you are authorized to use both ContentCenter Professional and ContentCenter Standard, a CCPro link displays in the top right side of the screen.
Icons
The following icons are used in file listings throughout ContentCenter:
The file is not locked or restricted in any other way. It has not been modified since its last
submission to the content area. You and others can modify the file.
The file has been modified; it differs from the most recently submitted and approved version in the content area. The file is not locked; you and others can modify it.
The file is locked by you but has not been modified; you can modify it and submit it.
The file is locked by you and you have modified it. You can continue to modify it.
The file is locked by someone else but has not been modified. You cannot modifiy it.
The file is locked by someone else and has been modified. You cannot modify it.
The file is private and is not available to other users.
The file has been deleted, but the deletion has not been submitted and approved.
The file is missing. This situation occurs when you create a new file in your content area and then add the file to My Favorites or attach it to a task. You then delete the file from your content area, but do not delete it from My Favorites or detach it from the task.
Related Information
“Key ContentCenter Terms”
ContentCenter Standard User’s Guide 21
• • • •••

22
“Displaying Login and Version Information”
“First-Time Use”
Displaying Login and Version InformationClick About to see the About ContentCenter Standard screen, which displays the following information about the current login session:
User name
Server name
Version number
Date installed
Date of last update
To return to the previous screen, click Close.
Click the View User link to see the User Details screen, which shows:
User id with which the user logged into TeamSite.
User’s email address.
Groups in which this user is a member.
Preferred ContentCenter interface.
Whether the user is a Master user.
Roles this user has in TeamSite.
You can also hover over the About link to display the role you have for the current branch.
First-Time UseThere are some actions that you must be familiar with and/or perform the first time you use ContentCenter:
“Log In”
“Enable Local File Editing”
“Installing the VisualAnnotate Tool Bar”
ContentCenter Standard User’s Guide
• • • •••

“Installing the VisualAnnotate Tool Bar”
Log In
ContentCenter protects content by requiring users to log in. ContentCenter verifies the user name and password you enter against configuration files set up by your ContentCenter administrator.
To log in to ContentCenter:
1. Point a browser to http://server_name/iw-cc.
2. In the form that displays, enter your user name and password.
3. Click Login.
Enable Local File Editing
The first time you edit or download files, ContentCenter prompts you to install Local File Manager, which is software that manages your local ContentCenter files. The software is installed as a component of your browser; after it is installed you do not need to install the software again when you use that browser to edit or download content.
To install the software, follow the instructions in the prompt.
Using the How Do I ModuleThis module contains commonly asked questions about ContentCenter. Click on a question to display its answer.
In addition to the questions shown in this module, many of the ContentCenter wizards contain specific help topics phrased as questions. You can click on those questions to display their answers and find out how to complete your tasks.
ContentCenter Standard User’s Guide 23
• • • •••
24
Using the My Workareas ModuleThis area contains links to all of the workareas where you have access. You can use this area as a starting point for:
Previewing and editing the files, if previewing is enabled at your site (see “Preview and Edit Files”).
Browsing workarea contents (see “Browse Workarea Contents”).
Your ContentCenter administrator may configure ContentCenter so that users can edit the list of workareas displayed in My Workareas. If your ContentCenter administrator has done so, a
pencil icon displays in the title bar of your My Workareas module.
To edit the list of workareas displayed in My Workareas:
1. On the ContentCenter home page, click in the title bar of your My Workareas Module.
The Edit My Workareas screen displays. You can check or uncheck the box next to Name to select or deselect all workareas.
2. Place a check mark next to the workareas you want listed in My Workareas.
3. Click Save.
Preview and Edit Files
Previewing typically pertains to Web sites that you are working on. For example, before you begin work on a Web site, you can preview it to assess its current look and feel, and to test its links to ensure that they are valid. Previewing also provides an easy way to find a Web site’s content to edit, and is useful after you have finished working on a Web site to ensure that your changes appear as you intended prior to making the Web site publicly available.
If previewing is enabled at your site, there are two ways to preview and optionally edit a file from the workarea:
Click the name of the workarea. If previewing is enabled, the Web site displays together with the VisualPreview tool bar. From there you can end the preview session or use VisualPreview to perform a variety actions on the file as described in “Using VisualPreview”.
NOTE
If your ContentCenter administrator has not designated which file type should open during a preview session, or if the workarea does not contain a file of the designated type, some other
ContentCenter Standard User’s Guide
• • • •••

type of information displays depending on your site-specific configuration. If this occurs, contact your ContentCenter administrator.
Click Browse to the right of the workarea name. The ContentCenter file browser window displays. From there you can click File Actions > Preview (or click the file name itself) to display the Web site together with the VisualPreview tool bar (see “Using VisualPreview” and “Sort the File List”).
Browse Workarea Contents
To browse the contents of a workarea, click Browse to the right of the workarea name. The workarea contents display in the file browser as described in “Browsing Files and Folders”.
Using the My Favorites ModuleThis module contains links to files, folders, or both. Files or folders appear in this module after you add them as described in “Use the File Actions Menu”. Up to 50 items can be stored in My Favorites.
From this module you can:
View or edit any file shown in this module (see “View and Edit Files in My Favorites”).
Browse any folder shown in this module (see “Browse Folders in My Favorites”).
Perform a variety of additional actions on the files shown in this module (see “Additional File Actions in My Favorites”).
Remove a file or folder from the My Favorites module (see “Remove Items from My Favorites”).
Rename an item in the My Favorites module (see “Rename Items in My Favorites”).
NOTE
If a file is deleted from a workarea by you or someone else, it still appears in your My Favorites
list until you remove it. Such files are represented by a icon.
ContentCenter Standard User’s Guide 25
• • • •••
26
View and Edit Files in My Favorites
To view a file without editing it:
Click the file name, or
Click the down arrow to the right of the file name, and then click Preview in the menu that appears. (To make the menu disappear without selecting any of its items, click the down arrow a second time.)
The screen displays either:
The file rendered in a browser window together with the VisualPreview tool bar, or
The VisualPreview tool bar and a message saying that the file cannot be displayed in a browser window. If this occurs you can still perform a variety of actions on the file from the VisualPreview tool bar, and optionally download the file to your local system.
To edit a file:
Click Edit to the right of the file name, or
Click the down arrow to the right of the file name, and then click Edit in the menu that appears, or
Click the file name to display it in a browser window together with the VisualPreview tool bar, and then click More > Edit in the VisualPreview tool bar.
If the file is edited with a separate editing application, it opens in the editing application and the ContentCenter file editing wizard appears. From there you can edit the file (see “Editing a File”), attach it to a task (see “Submitting Work in Progress”), submit it (see “Selecting a File Name and Location”), and so on.
If the file is a form entry file, its contents display in the Edit Form screen. From there you can proceed as described in “Edit an Existing Form Entry File”.
Browse Folders in My Favorites
To browse a folder, click Browse to the right of the folder name. The folder is displayed in the file browser window as described in “Browsing Files and Folders”.
ContentCenter Standard User’s Guide
• • • •••

Adding a FavoriteTo add a file or folder to the My Favorites module of the ContentCenter home page, click Add to My Favorites from any of the following locations:
The menu next to a file name in the Work in Progress module of the ContentCenter home page (see “Using the Work in Progress Module”).
The More menu in the VisualPreview tool bar (see “Using VisualPreview”).
The File Actions menu to the right of a file name in the file browser screen (see “Browsing Files and Folders”).
The link in the top-right corner of the file browser screen (see “Browsing Files and Folders”).
Additional File Actions in My Favorites
The down arrow to the right of each file name in My Favorites lets you perform many additional actions on the file. The following list describes all possible actions you can perform on a file. Some of these actions might not be available for all files. Factors such as file locks, access permissions, and so on could make some of these actions unavailable to you. If an action is unavailable, it either displays in gray in the menu or it does not display there at all.
Home. Returns you to the ContentCenter home page (see “Welcome to ContentCenter
Standard”).
Browse Folders. Displays the ContentCenter file browser screen (see “Browsing Files and Folders”).
Undo Changes. If you have edited the file but have not yet submitted it, clicking Undo Changes reverts the file to the most recently submitted version. Any changes you made to the file are discarded.
Edit. Starts the file edit wizard so that you can edit the displayed file (see “Editing a File”).
Preview. Displays the file together with the VisualPreview toolbar (see “Using VisualPreview”).
Check Links. Verifies the validity of links in the displayed file (see “Check Links”).
View Differences. Displays two versions of the same file side by side. The file on the left side is the most recent iteration containing any changes you recently made; the file on the right is the most recently submitted (that is, pre-edited) version (see “View File Differences”).
Submit. Starts the submit wizard, from which you can specify how the file is submitted for approval (see “Selecting a Next Action”).
ContentCenter Standard User’s Guide 27
• • • •••

28
Copy. Starts the file copy wizard, from which you can copy the file to a new file name or a new folder, assign the file to a task, or set submit options that run when you are through working on the file. After you copy a file to a new name or location, the original file still exists in its original location (see “Copying a File”).
Move. Starts the file move wizard, from which you can move the file to a new folder, assign the file to a task, or set submit options that run when you are through working on the file. After you move a file to a new location, it no longer exists in its original location (see “Moving a File”).
Delete. Starts the file delete wizard, from which you can delete the file, assign the file to a task, or set submit options that run when you are through working on the file (see “Deleting a File”).
Rename. Starts the file rename wizard, from which you can rename the file, assign the file to a task, or set submit options that run when you are through working on the file. After you rename a file, its original file name no longer exists (see “Renaming a File”).
Properties. Displays file properties such as size, location, creator, modification date, and so on (see “Viewing File Properties”).
Tag. Displays additional information (“tags”) about the file, and lets you add, modify, or remove tags (see “Tagging a File using Metadata Capture Tagging”).
Versions. Displays a file’s version history. From that display you can revert a file to an earlier version and perform a variety of actions on the current version of the file (see “Viewing File Versions”).
Assign Task. Displays the Assign File(s) to a New Job screen, from which you can assign the current and additional files to a new job (see “Assigning Files to a New Job”).
Add to My Favorites. Adds the file to the My Favorites area on the ContentCenter homepage. A dialog box displays so you can change the name of the item as it is listed in the My Favorites section.
Remove Items from My Favorites
To remove an item from the My Favorites module:
Click the down arrow to the right of the file name.
Click Remove Favorite in the menu that appears.
To delete an item from the My Favorites module that has already been removed from the workarea, click the X to the right of the folder name.
ContentCenter Standard User’s Guide
• • • •••

Rename Items in My Favorites
To rename an item in the My Favorites module:
Click the down arrow to the right of the file name.
Click Rename Favorite in the menu that appears.
Enter the new name in the dialog box.
NOTE
Renaming an item in the My Favorites module does not rename the item in its original location.
Using the Search ModuleThe search module lets you perform a simple search by entering a term and clicking the search icon. You can also click Advanced Search to display a dialog box. See “Searching Content” for information on searches.
Using the Saved Searches ModuleYou can save your search queries and then reuse the query or edit or delete it. See “Saved Searches” for information on saved searches.
Using the Tasks ModuleThis module shows the tasks requiring some kind of action by you.
To view a list of individual tasks that are assigned specifically to you, click My Tasks. To view a list of group tasks assigned to a group to which you belong, click Group Tasks.
The task list is separated into four columns:
The priority of the task:
ContentCenter Standard User’s Guide 29
• • • •••

30
Very high
High
Medium
Low
Very low
Task - The task number, which is generated automatically by ContentCenter when the job containing the task is initiated. If a task could cause a conflict with the workarea (for example, if approving changes to a file would conflict with other changes to the file that were approved earlier), this symbol displays next to the task number:
Task Description - A brief summary of the task entered by the creator of the job.
Due Date - The date by which you must complete the task.
Click a task number to see information and instructions about that task. The ContentCenter Task Details screen appears. From there you can edit, preview, or attach task files; approve or reject changes; change task properties; and so on (see “Using the Task Details Screen”).
Click a column heading to sort the task list entries by that heading. The heading used for sorting is indicated by an up or down arrow to the right of the column name. An up arrow ( ) indicates that tasks are displayed in ascending order. A down arrow ( ) indicates descending sort order.
Click New Job in the Tasks area to create a new job. The Select a Workflow screen displays.
Related Information
“Using the Work in Progress Module”
“Using the Tasks Module”
“Job and Task Concepts”
Job and Task Concepts
A job is a sequence of predefined tasks, each assigned to one or more people. There are many different kinds of tasks that you can perform as part of a job. For example, a task might require you to edit some text, add an image, review someone else’s work, and so on.
After you perform a task, the job proceeds to the next task in its predefined sequence. These subsequent tasks could be assigned to you or to someone else. If they are assigned to you, they
ContentCenter Standard User’s Guide
• • • •••

appear in your Tasks module. If they are assigned specifically to someone else, they do not appear in your Tasks module.
When all of the tasks in a job are done, the job is complete. At that time the job ceases to exist, and the status of the job and its tasks are no longer shown in any ContentCenter modules.
Using the Work in Progress ModuleThis module shows your workareas and all of the files in them that:
You have modified and not yet submitted for approval.
You have modified and submitted, but that have not yet been approved by a reviewer.
NOTE
Only one workarea’s contents can be displayed at a time. If you have access to more than one workarea, a list labeled Content lets you select which one displays. When you select a workarea, all of its work-in-progress contents appear in this area.
From the Work in Progress module you can:
Import files from your local system (such as your C: drive) into one of your workareas. To do this, click Import and follow the instructions in “Importing a File”.
Submit some or all of the files in the Work in Progress module. To do this, click Submit and follow the instructions in “Submitting Work in Progress”.
Edit a file by clicking Edit to the right of the file name. If the file is edited with a separate editing application, it opens in the editing application and the ContentCenter file editing wizard appears. From there you can edit the file (see “Editing a File”), attach it to a task (see “Submitting Work in Progress”), submit it (see “Selecting a File Name and Location”), and so on. If the file is a form entry file, its contents are displayed in the Edit Form screen. From there you can proceed as described in “Edit an Existing Form Entry File”.
Perform a variety of actions on a file such as copy, move, rename, delete, and so.
The following icons are used in file listings throughout ContentCenter:
The file is not locked or restricted in any other way. It has not been modified since its last
submission to the content area. You and others can modify the file.
The file has been modified; it differs from the most recently submitted and approved version in the content area. The file is not locked; you and others can modify it.
ContentCenter Standard User’s Guide 31
• • • •••
32
The file is locked by you but has not been modified; you can modify it and submit it.
The file is locked by you and you have modified it. You can continue to modify it.
The file is locked by someone else but has not been modified. You cannot modifiy it.
The file is locked by someone else and has been modified. You cannot modify it.
The file is private and is not available to other users.
The file has been deleted, but the deletion has not been submitted and approved.
The file is missing. This situation occurs when you create a new file in your content area and then add the file to My Favorites or attach it to a task. You then delete the file from your content area, but do not delete it from My Favorites or detach it from the task.
Additional File Actions in Work in Progress
The down arrow ( ) to the right of a file name in the Work in Progress module lets you perform many additional actions on the file. Refer to “Using the My Favorites Module” for a description of the actions.
Home. Returns you to the ContentCenter home page (see “Welcome to ContentCenter
Standard”).
Browse Folders. Displays the ContentCenter file browser screen (see “Browsing Files and Folders”).
Undo Changes. If you have edited the file but have not yet submitted it, clicking Undo Changes reverts the file to the most recently submitted version. Any changes you made to the file are discarded.
Edit. Starts the file edit wizard so that you can edit the displayed file (see “Editing a File”).
Preview. Displays the file together with the VisualPreview toolbar (see “Using VisualPreview”).
Check Links. Verifies the validity of links in the displayed file (see “Check Links”).
View Differences. Displays two versions of the same file side by side. The file on the left side is the most recent iteration containing any changes you recently made; the file on the right is the most recently submitted (that is, pre-edited) version (see “View File Differences”).
ContentCenter Standard User’s Guide
• • • •••

Submit. Starts the submit wizard, from which you can specify how the file is submitted for approval (see “Selecting a Next Action”).
Copy. Starts the file copy wizard, from which you can copy the file to a new file name or a new folder, assign the file to a task, or set submit options that run when you are through working on the file. After you copy a file to a new name or location, the original file still exists in its original location (see “Copying a File”).
Move. Starts the file move wizard, from which you can move the file to a new folder, assign the file to a task, or set submit options that run when you are through working on the file. After you move a file to a new location, it no longer exists in its original location (see “Moving a File”).
Delete. Starts the file delete wizard, from which you can delete the file, assign the file to a task, or set submit options that run when you are through working on the file (see “Deleting a File”).
Rename. Starts the file rename wizard, from which you can rename the file, assign the file to a task, or set submit options that run when you are through working on the file. After you rename a file, its original file name no longer exists (see “Renaming a File”).
Properties. Displays file properties such as size, location, creator, modification date, and so on (see “Viewing File Properties”).
Tag. Displays additional information (“tags”) about the file, and lets you add, modify, or remove tags (see “Tagging a File using Metadata Capture Tagging”).
Versions. Displays a file’s version history. From that display you can revert a file to an earlier version and perform a variety of actions on the current version of the file (see “Viewing File Versions”).
Assign Task. Displays the Assign File(s) to a New Job screen, from which you can assign the current and additional files to a new job (see “Assigning Files to a New Job”).
Add to My Favorites. Adds the file to the My Favorites area on the ContentCenter homepage. A dialog box displays so you can change the name of the item as it is listed in the My Favorites section.
Using the New Forms Module This module shows the forms that are available for you to fill in. If you have access to more than one workarea, a list labeled Workareas lets you select which workarea’s forms display.
When you fill in a form and save it, a file containing all of the information (that is, your form entries) is created. For example, if you fill in a Press Release form, it would be available for further use in a variety of ways after you save your work. You could attach the file to a task so others could review your work, you could format the file for display on a Web site, and so on.
ContentCenter Standard User’s Guide 33
• • • •••
34
The New Forms module provides a convenient way to open a blank form to fill in. Workareas
containing forms are shown in bold and are designated by this icon: . The forms themselves
are shown as links under the workarea name and are designated by this icon: To open a form, click its name or the New link to the right of the name. The form edit wizard appears, from which you can add form entries, save them in a file, attach the file to a task, and so on (see “Filling In a Form”).
If the list of forms is too long to fit on one screen, a set of links in the bottom-right corner of the screen lets you page forward and backward to additional screens, or reset the current screen so that all forms are displayed on one scrollable list.
Related Information
“Using the My Workareas Module”
Using VisualPreviewWhen you click the name of a file in the Content or My Favorites module of the ContentCenter home page, the file displays with the VisualPreview tool bar. VisualPreview lets you view the contents of a file and check the file’s links before performing some other action on the file (such as editing, moving, renaming, and so on).
If you decide not to perform any actions on the file, you can close VisualPreview without changing the file by clicking your browser’s Back button. Or, to make the VisualPreview toolbar disappear while the file stays open for viewing, click the X in the top-right corner of the VisualPreview toolbar.
If you decide to perform some action on the file, select an action from the VisualPreview toolbar.
NOTE
Some file types cannot be previewed in a browser window because their extension settings are not recognized by Local File Manager. If you try to preview such a file, VisualPreview displays a message stating so. If this happens, you can try viewing the contents of the file by opening it in an editing program. To do this, click either the download link in the message or Edit in the VisualPreview toolbar. In some situations, the file still might not be viewable. If that happens, contact your ContentCenter administrator.
The most common use for VisualPreview is viewing and editing Web page and image files in context with other files from a workarea. For example, you could use VisualPreview to view and
ContentCenter Standard User’s Guide
• • • •••

optionally edit a Web page file named index.html. In that situation, the following would take place:
The page defined by index.html would display in a browser together with the VisualPreview toolbar.
Links to other files would be live, so you could navigate to them from index.html by clicking them just as you normally would in a Web page. When you reached a page that you wanted to change, you could select a file action from the VisualPreview toolbar and perform that action on the file (such as editing the file, importing additional files or graphics, browsing other folders to find items to import, viewing file properties and versions, assigning the file to a task, and so on).
See “Modify a File with VisualPreview” for details about performing these and other file actions.
Related Information
“Modify a File with VisualPreview”
“Create New Form Entries with VisualPreview”
“Import a File with VisualPreview”
“Edit a File with VisualPreview”
“Perform More File Actions with VisualPreview”
Modify a File with VisualPreview
From the VisualPreview toolbar you can:
Create a new form entry file by filling in a blank form (see “Create New Form Entries with VisualPreview”).
Import files into a workarea from your local computer (see “Import a File with VisualPreview”).
Edit the displayed file (see “Edit a File with VisualPreview”).
Perform a variety of other actions on the file, such as moving, copying, adding to My Favorites, and so on (see “Perform More File Actions with VisualPreview”).
NOTE
The buttons on the VisualPreview toolbar might be customized for your site; therefore, your VisualPreview toolbar might not contain all of them, or it could contain additional ones not described here.
ContentCenter Standard User’s Guide 35
• • • •••

36
The following icons are used in file listings throughout ContentCenter:
The file is not locked or restricted in any other way. It has not been modified since its last
submission to the content area. You and others can modify the file.
The file has been modified; it differs from the most recently submitted and approved version in the content area. The file is not locked; you and others can modify it.
The file is locked by you but has not been modified; you can modify it and submit it.
The file is locked by you and you have modified it. You can continue to modify it.
The file is locked by someone else but has not been modified. You cannot modifiy it.
The file is locked by someone else and has been modified. You cannot modify it.
The file is private and is not available to other users.
The file has been deleted, but the deletion has not been submitted and approved.
The file is missing. This situation occurs when you create a new file in your content area and then add the file to My Favorites or attach it to a task. You then delete the file from your content area, but do not delete it from My Favorites or detach it from the task.
Create New Form Entries with VisualPreview
To create new form entries with VisualPreview, click New Form in the VisualPreview toolbar.
If ContentCenter can determine what form was used originally to create the file you are viewing, a blank, untitled version of that form displays. This is typically the case when you are viewing Web page files (those ending in .html or .htm) that were generated by combining form entries with a presentation template.
If ContentCenter cannot determine what form to use, the Select a Form screen displays. Click the radio button next to the form to use and click Next.
Fill in the form as described in “Create a New Form Entry File”.
ContentCenter Standard User’s Guide
• • • •••
Import a File with VisualPreview
To import a file from your local computer (for example, from your C: drive), click Import in the VisualPreview toolbar. The Select Local Files to Import screen appears.
Proceed as described in “Importing a File”. From there you can select the file to import and its destination in a workarea.
Edit a File with VisualPreview
When you edit a file by clicking Edit or selecting Edit from a menu, the Edit a File screen appears, and ContentCenter opens the file in an editing program. The extension after the final period in the file name determines what editing program is used. For example, files ending in
.doc might open in Microsoft® Word; files ending in .html might open in Dreamweaver™; and so on. Which editing program is associated with which file name extension depends on the Local File Manager settings at your site. These settings are usually controlled by your ContentCenter administrator. Therefore, the editing programs that open at your site might be different from this example.
After a file opens for editing, make whatever changes you need and save them as you normally would in the editing program. After you save your changes, you can close the editing program. When you do, the Edit a File screen moves to the foreground. From this screen you can choose what happens next to the file (see “Selecting a Next Action”). With some types of files, you also have the option of previewing the file as described in “Preview an Edited File”.
Perform More File Actions with VisualPreview
The More link in the VisualPreview tool bar lets you perform many additional actions on the displayed file. Refer to “Using the My Favorites Module” for a description of the actions.
Home. Returns you to the ContentCenter home page (see “Welcome to ContentCenter
Standard”).
Browse Folders. Displays the ContentCenter file browser screen (see “Browsing Files and Folders”).
Undo Changes. If you have edited the file but have not yet submitted it, clicking Undo Changes reverts the file to the most recently submitted version. Any changes you made to the file are discarded.
Edit. Starts the file edit wizard so that you can edit the displayed file (see “Editing a File”).
ContentCenter Standard User’s Guide 37
• • • •••

38
Preview. Displays the file together with the VisualPreview toolbar (see “Using VisualPreview”).
Check Links. Verifies the validity of links in the displayed file (see “Check Links”).
View Differences. Displays two versions of the same file side by side. The file on the left side is the most recent iteration containing any changes you recently made; the file on the right is the most recently submitted (that is, pre-edited) version (see “View File Differences”).
Submit. Starts the submit wizard, from which you can specify how the file is submitted for approval (see “Selecting a Next Action”).
Copy. Starts the file copy wizard, from which you can copy the file to a new file name or a new folder, assign the file to a task, or set submit options that run when you are through working on the file. After you copy a file to a new name or location, the original file still exists in its original location (see “Copying a File”).
Move. Starts the file move wizard, from which you can move the file to a new folder, assign the file to a task, or set submit options that run when you are through working on the file. After you move a file to a new location, it no longer exists in its original location (see “Moving a File”).
Delete. Starts the file delete wizard, from which you can delete the file, assign the file to a task, or set submit options that run when you are through working on the file (see “Deleting a File”).
Rename. Starts the file rename wizard, from which you can rename the file, assign the file to a task, or set submit options that run when you are through working on the file. After you rename a file, its original file name no longer exists (see “Renaming a File”).
Properties. Displays file properties such as size, location, creator, modification date, and so on (see “Viewing File Properties”).
Tag. Displays additional information (“tags”) about the file, and lets you add, modify, or remove tags (see “Tagging a File using Metadata Capture Tagging”).
Versions. Displays a file’s version history. From that display you can revert a file to an earlier version and perform a variety of actions on the current version of the file (see “Viewing File Versions”).
Assign Task. Displays the Assign File(s) to a New Job screen, from which you can assign the current and additional files to a new job (see “Assigning Files to a New Job”).
Add to My Favorites. Adds the file to the My Favorites area on the ContentCenter homepage. A dialog box displays so you can change the name of the item as it is listed in the My Favorites section.
ContentCenter Standard User’s Guide
• • • •••

Check Links
From the More menu, you can check to see whether the links in the file are valid. When you select Check Links, the following screen displays:
Figure 2 The Check Links screen
The possible results are:
The link is valid.
The link is broken.
The link cannot be validated as correct or broken by this link checker.
Clicking a link in the list displays the linked page or image together with the VisualPreview toolbar.
Browsing Files and FoldersThis screen contains two main areas:
One labeled with the name of the current ContentCenter folder, showing the full path that you took to get to the current folder and the names of all of the subfolders in the current folder (see “Using the Current Folder Area”).
One labeled Files, containing a list of all files in the current folder (see “Using the Files Area”).
ContentCenter Standard User’s Guide 39
• • • •••

40
Figure 3 Screen showing folders and files in workarea
From this screen you can:
Navigate to existing folders and files (see “Using the Current Folder Area”).
Add new folders (see “Using the Current Folder Area” and “Using the Files Area”).
Add a folder or file to the My Favorites module on the ContentCenter homepage (see “Use the File Actions Menu”).
Import a file from your local computer (see “Using the Files Area”).
Perform a variety of file actions such as edit, rename, copy, move, delete, and so on (see “Use the File Actions Menu”).
Sort the file list (see “Sort the File List”).
The following icons are used in file listings throughout ContentCenter:
The file is not locked or restricted in any other way. It has not been modified since its last
submission to the content area. You and others can modify the file.
The file has been modified; it differs from the most recently submitted and approved version in the content area. The file is not locked; you and others can modify it.
The file is locked by you but has not been modified; you can modify it and submit it.
The file is locked by you and you have modified it. You can continue to modify it.
ContentCenter Standard User’s Guide
• • • •••

The file is locked by someone else but has not been modified. You cannot modifiy it.
The file is locked by someone else and has been modified. You cannot modify it.
The file is private and is not available to other users.
The file has been deleted, but the deletion has not been submitted and approved.
The file is missing. This situation occurs when you create a new file in your content area and then add the file to My Favorites or attach it to a task. You then delete the file from your content area, but do not delete it from My Favorites or detach it from the task.
Using the Current Folder AreaThis area is labeled with the name of the current folder.
To browse to a subfolder, click the folder name in the list of subfolders.
Figure 4 Folder area showing open subfolders
To navigate back to a preceding folder, click the folder name in the path shown at the top of the area. For example, if this path were displayed at the top of the area, you could return to the intranet folder by clicking intranet:
ContentCenter Standard User’s Guide 41
• • • •••

42
intranet > weather > data
To add a new folder to the current folder, click the New Folder link located on the right side of the Folder title bar. The Create a New Folder wizard appears, from which you can specify a folder name as described in “Creating a New Folder”.)
To add the current folder to the My Favorites module on the ContentCenter homepage, click the Add to My Favorites link located on the right side of the Folder title bar.
Using the Files AreaThis area contains an Import Files link and a list of all files in the current folder.
Use the Import Files link to import files into the current ContentCenter folder from your local system (such as the C: drive on your computer). See “Importing a File” for details.
The file list shows all of the files in the current folder. If the file list is too long to fit on one screen, a set of links in the bottom-right corner of the screen lets you page forward and backward to additional screens, or reset the current screen so that all files are displayed on one scrollable list.
The file list is separated into five columns (see Figure 3):
Name – The name of the file and an icon showing the file’s status as described in “Browsing Files and Folders”.
Size – The size of the file in megabytes (MB), kilobytes (kB), or bytes (no unit designation shown).
Modified – The date of the file’s most recent modification.
Modified By – The user name of the person who last modified the file.
File Actions – This column contains a File Actions menu. This column also contains an Edit link if it is possible for you to edit the file (that is, if you have access permission, the file is not locked by someone else, and so on). See “Use the File Actions Menu” for details about what you can do from the File Actions menu. See “Editing a File” for details about using the Edit link.
You can sort the file list by the entries in any column; see “Sort the File List” for details.
Related Information
“Using the Work in Progress Module”
ContentCenter Standard User’s Guide
• • • •••

Use the File Actions Menu
The File Actions links in the file list let you perform many additional actions. Refer to “Using the My Favorites Module” for a description of the actions.
Home. Returns you to the ContentCenter home page (see “Welcome to ContentCenter
Standard”).
Browse Folders. Displays the ContentCenter file browser screen (see “Browsing Files and Folders”).
Undo Changes. If you have edited the file but have not yet submitted it, clicking Undo Changes reverts the file to the most recently submitted version. Any changes you made to the file are discarded.
Edit. Starts the file edit wizard so that you can edit the displayed file (see “Editing a File”).
Preview. Displays the file together with the VisualPreview toolbar (see “Using VisualPreview”).
Check Links. Verifies the validity of links in the displayed file (see “Check Links”).
View Differences. Displays two versions of the same file side by side. The file on the left side is the most recent iteration containing any changes you recently made; the file on the right is the most recently submitted (that is, pre-edited) version (see “View File Differences”).
Submit. Starts the submit wizard, from which you can specify how the file is submitted for approval (see “Selecting a Next Action”).
Copy. Starts the file copy wizard, from which you can copy the file to a new file name or a new folder, assign the file to a task, or set submit options that run when you are through working on the file. After you copy a file to a new name or location, the original file still exists in its original location (see “Copying a File”).
Move. Starts the file move wizard, from which you can move the file to a new folder, assign the file to a task, or set submit options that run when you are through working on the file. After you move a file to a new location, it no longer exists in its original location (see “Moving a File”).
Delete. Starts the file delete wizard, from which you can delete the file, assign the file to a task, or set submit options that run when you are through working on the file (see “Deleting a File”).
Rename. Starts the file rename wizard, from which you can rename the file, assign the file to a task, or set submit options that run when you are through working on the file. After you rename a file, its original file name no longer exists (see “Renaming a File”).
Properties. Displays file properties such as size, location, creator, modification date, and so on (see “Viewing File Properties”).
ContentCenter Standard User’s Guide 43
• • • •••

44
Tag. Displays additional information (“tags”) about the file, and lets you add, modify, or remove tags (see “Tagging a File using Metadata Capture Tagging”).
Versions. Displays a file’s version history. From that display you can revert a file to an earlier version and perform a variety of actions on the current version of the file (see “Viewing File Versions”).
Assign Task. Displays the Assign File(s) to a New Job screen, from which you can assign the current and additional files to a new job (see “Assigning Files to a New Job”).
Add to My Favorites. Adds the file to the My Favorites area on the ContentCenter homepage. A dialog box displays so you can change the name of the item as it is listed in the My Favorites section.
Sort the File List
Click a column heading to sort the file list entries by that heading. The heading used for sorting
is indicated by an up or down arrow to the right of the column name. An up arrow ( ) indicates
that tasks are displayed in ascending order. A down arrow ( ) indicates descending sort order.
ContentCenter Standard User’s Guide
• • • •••
Chapter 2
Working With Forms
This chapter contains information on the following topics:
Forms Overview
Selecting a Form
Filling In a Form
Selecting a File Name and Location
Specifying Form Settings
Selecting a Presentation Template
Forms OverviewA form is a template that allows you to enter data without regard to the appearance of the finished content. You can create all new form entries, or you can edit existing form entries to update some or all of the information in forms. When you are through entering information in a form, you submit it for approval. After it is approved, it is permanently stored as a form entry file in a workarea. Each form entry file can then be reused by others, modified, combined with a presentation template for display, and so on.
To fill in a new form, select one from the ContentCenter home page New Forms module. After you select a form, a blank version of it appears on your screen so that you can fill it in.
To edit an existing form entry file, navigate to it through one of the following:
The My Workareas module on the ContentCenter home page.
The My Favorites module on the ContentCenter home page.
The Work in Progress module on the ContentCenter home page.
The Task Details screen.
ContentCenter Standard User’s Guide 45
• • • •••

46
When you locate the form entry file you want to edit, click Edit to the right of its name. To view the form entry file without editing it, click the file name.
For details about filling in a new form, see “Create a New Form Entry File”. For details about editing an existing form, see “Edit an Existing Form Entry File”.
For details about previewing and generating output with presentation templates, see “Preview a Form” and “Generate an Output File”.
The blank forms available to you from the New Forms module are created and maintained by ContentCenter administrators. These forms are unique to your site, and are designed to gather information appropriate to your activities. For example, an insurance company might have forms for gathering billing and claims information. These forms would be completely different than the forms for a financial institution or other type of firm.
Selecting a Form If you are creating a form entry file, you must first select a form to enter information into. The blank forms available to you from the New Forms module are created and maintained by ContentCenter administrators.
This form list shows all of the forms available to you. It is the same as the form list in the New Forms module of the ContentCenter home page. To select a form, click its radio button and then click Next.
Filling In a FormFrom this screen you can:
Create a new form entry file by entering information in a blank template (see “Create a New Form Entry File”).
Edit an existing form entry file by changing any of the fields in a filled-in template (see “Edit an Existing Form Entry File”).
Save a form entry file using the existing file name or a new file name (see “Save Your Entries”).
Select a new presentation template or output file to display the form you are filling in (see “Specifying Form Settings”).
ContentCenter Standard User’s Guide
• • • •••

Preview how the information will look when combined with a presentation template before you submit your form entry file for approval (see “Preview a Form”).
Generate an output file by combining your form entry file with a presentation template (see “Generate an Output File”).
Figure 5 Form entry
NOTE
The ability to preview and generate is controlled by your ContentCenter administrator. If you cannot do these things, contact your administrator.
Related Information
“Working With Forms”
ContentCenter Standard User’s Guide 47
• • • •••
48
Create a New Form Entry File
If the Form Entry screen contains a form with all blank fields and says “Untitled” in the upper left corner, it means that you arrived here by clicking New or New Form from the New Forms module of the ContentCenter home page.
NOTE
Depending on how the form is set up, it might contain two or more tabs that organize input fields into groups. If the form contains tabs, click a tab name to display the input fields in that tab.
From here you can enter information to create a new form entry file as follows:
For text fields, place the mouse pointer in the field, single-click, and type the text you want
to enter. You can click in a field name to move the cursor to that field. The tab key also moves you to the next field.
Fields marked with an asterisk (*) are required fields. Some fields, such as a date, might require a specific format. That format or other information about the field is available by clicking the question mark next to the field name, when it is available. If you enter invalid data in a field with a specific format or do not provide required data, the field turns red when you try to save the form entries and a message also displays to indicate the error.
Depending on how your installation is set up, you may be able to save incomplete forms. When you do not enter data in a required field and click Save or Next, you are warned that the form is incomplete and asked if you still want to save it. If you have incomplete forms, they are marked with the message (incomplete form) following the file name in file lists.
Some fields have expand/collapse icons on the left side of the form. These fields can be expanded to show the entire contents of the field or collapsed to show only the field label. You can also collapse or expand all fields by clicking the Collapse All Items or Expand All Items links.
Some fields have the following icons in the top-right corner:
Creates a duplicate empty field in the form.
Moves the field up one level in the form.
Moves the field down one level in the form.
Removes the field from the form.
Some fields might have a Browse button next to them. Use this button to locate a file by:
Clicking the Browse button; the Select File dialog box displays. The directory that displays was set up when the form was defined.
ContentCenter Standard User’s Guide
• • • •••

Navigating to the file you want to use. The path to the file displays in the field in the form.
When you finish entering information in the form, take any of the following actions:
Click Next to display the Pick a File screen. From there you can continue naming, saving, and submitting your form entry file as described in “Selecting a File Name and Location”.
Click Save or Save As to save the form entry file to an existing name or to a new file name of your choice (see “Save Your Entries”).
Click Form Settings to select a presentation template or output file to display the form entries see “Generate an Output File”).
Click Preview to see how the information will look when combined with a presentation template before you submit your form entry file for approval (see “Preview a Form”).
Click Generate to create an output file by combining your form entry file with a presentation template (see “Generate an Output File”).
The Data Record Search and Replace feature provides a Search and Replace area at the bottom of the form. Enter the text you want to search for. You can also indicate that you want to match the case of the text by clicking Match Case. Click the Search icon. You can use the Previous and Next arrows to move through the search results. If you click Replace, the area expands to alow you to enter replacement text. You can change all matching text at once or change them one at a time. The Replace feature does not work for text entered in fields using TinyMCE and VisualFormat text editors.
The links at the top of the form (Save, Save As, and so on) can be customized at your site; therefore, your screen might not contain all of them.
Formatting Information in FormsDepending on how your forms have been set up, you may be able to use Tiny MCE to edit and format the text in your forms. When this option is available, editing icons display in the field.
ContentCenter Standard User’s Guide 49
• • • •••

50
TinyMCE Icons
The icons used by TinyMCE when integrated with TeamSite differ from the icons used in standalone TinyMCE installations. The following table shows the icons and their descriptions. For documentation on TinyMCE, visit the Moxiecode Website.
Table 2 TinyMCE icons in TeamSite
Icon Description Icon Description
Cut.
Copy.
Paste.
Paste a Microsoft Word document.
Bold style text. Italic style text.
Underline style text. Select all.
Align left. Align center.
Align right. Align full.
Make the selection subscript.
Make the selection superscript.
Ordered list/numbered list. Unordered list/bullet list.
Indent/increase indentation. Outdent/decrease indentation.
Undo the last operation. Redo the last operation.
Insert the new link.
Unlink the current selection/removes all selected links.
Inserts a new image. Inserts a new anchor.
Insert date. Insert time.
Open HTML source code editor.
Show this help window.
Search. Insert a table.
ContentCenter Standard User’s Guide
• • • •••

Edit an Existing Form Entry File
If the Form Entry screen contains a form with some or all of the fields filled in and has a form name in the upper left corner, it means that this is an existing form entry file.
NOTE
Depending on how the form is set up, it might contain two or more tabs that organize input fields into groups. If the form contains tabs, click a tab name to display the input fields in that tab.
From here you can edit or add to the current form entries in this file as described in “Create a New Form Entry File” on page 48.
For text fields, place the mouse pointer in the field, single-click, and type the text you want to enter. You can click in a field name to move the cursor to that field. The tab key also moves you to the next field.
Add a row above the current one.
Add a row under the current one.
Removes the row. Add a column before the current one.
Add a column after the current one.
Remove the current column.
Show table cell properties. Show row properties.
Split selected cells. Merge selected cells.
Insert a new horizontal ruler. Remove formatting from the selection.
Color. Background color.
Spell check. Find and replace.
Language is written/read left-to-right.
Language is written/read right-to-left.
Map a character. Show/hide outline of selection.
Table 2 TinyMCE icons in TeamSite
ContentCenter Standard User’s Guide 51
• • • •••

52
Fields marked with an asterisk (*) are required fields. Some fields, such as a date, might require a specific format. That format or other information about the field is available by clicking the question mark next to the field name, when it is available. If you enter invalid data in a field with a specific format or do not provide required data, the field turns red when you try to save the form entries and a message also displays to indicate the error.
Depending on how your installation is set up, you may be able to save incomplete forms. When you do not enter data in a required field and click Save or Next, you are warned that the form is incomplete and asked if you still want to save it. If you have incomplete forms, they are marked with the message (incomplete form) following the file name in file lists.
Some fields have expand/collapse icons on the left side of the form. These fields can be expanded to show the entire contents of the field or collapsed to show only the field label. You can also collapse or expand all fields by clicking the Collapse All Items or Expand All Items links.
Some fields have the following icons in the top-right corner:
Creates a duplicate empty field in the form.
Moves the field up one level in the form.
Moves the field down one level in the form.
Removes the field from the form.
Some fields might have a Browse button next to them. Use this button to locate a file by:
Clicking the Browse button; the Select File dialog box displays. The directory that displays was set up when the form was defined.
Navigating to the file you want to use. The path to the file displays in the field in the form.
When you finish entering information in the form, take any of the following actions:
Click Next to display the Pick a File screen. From there you can continue naming, saving, and submitting your form entry file as described in “Selecting a File Name and Location”.
Click Save or Save As to save the form entry file to an existing name or to a new file name of your choice (see “Save Your Entries”).
Click Form Settings to select a presentation template or output file to display the form entries see “Generate an Output File”).
Click Preview to see how the information will look when combined with a presentation template before you submit your form entry file for approval (see “Preview a Form”).
Click Generate to create an output file by combining your form entry file with a presentation template (see “Generate an Output File”).
ContentCenter Standard User’s Guide
• • • •••

The Data Record Search and Replace feature provides a Search and Replace area at the bottom of the form. Enter the text you want to search for. You can also indicate that you want to match the case of the text by clicking Match Case. Click the Search icon. You can use the Previous and Next arrows to move through the search results. If you click Replace, the area expands to alow you to enter replacement text. You can change all matching text at once or change them one at a time. The Replace feature does not work for text entered in fields using TinyMCE and VisualFormat text editors.
The links at the top of the form (Save, Save As, and so on) can be customized at your site; therefore, your screen might not contain all of them.
Save Your Entries
If this form entry file already has a name, click Save to update the file with the current entries.
If you have not yet saved this form entry file, click Save or Save As to display the Save Form As screen. Or, if you have already saved this form entry file and want to save it under a different name, click Save As. Fill in the screen as follows:
1. The current folder field (the first field in the screen) contains the name of the current folder, a down arrow, and an up arrow. To save the file in the current folder, you do not need to take any action in this field. To save the file in a different folder:
Single-click the down-arrow button to display all of the parent folders leading to the current folder.
Single-click a parent folder name to move into it and display its contents.
Double-click a subfolder name to move into it and display its contents.
Single-click the Up button to move up one folder level.
2. The folder contents field (the second field in the screen), shows the name, owner, and modification date of each file in the selected folder. If you are saving the current file to a new file name, use this file list as a reference to ensure that you are not selecting and overwriting an existing file name. To intentionally replace (overwrite) an existing file, single-click its name. This file name appears in the Name field, and will be used for the name of the file that you are in the process of saving. The contents of the original file having this name will be lost.
3. In the File name field, enter the name of the file you are saving. If you are saving to a name that already exists, when you click OK you will see a dialog box asking you to confirm that you intend to overwrite that file.
4. Click OK to proceed to the Select Next Action screen (see “Selecting a Next Action”), or Cancel to go back to the previous screen.
ContentCenter Standard User’s Guide 53
• • • •••

54
NOTE
If you changed a form entry since the last time you saved the form entry file, clicking Cancel prompts you to save the form.
The form entry screen now displays the file name you selected in the upper-left corner. You can make additional changes to the form entries, or click Next to pick your next action for this form entry file.
NOTE
Saving your form entries to a file does not automatically create a Web page. You will need to generate an output file to create the Web page. Output files are sometimes generated as part of a workflow, depending on workflow availability at your site.
Related Information
“Selecting a Presentation Template”
“Create a New Form Entry File”
“Specifying Form Settings”
“Preview a Form”
“Generate an Output File”
Preview a Form
Click Preview to see how your form entries will look when combined with the presentation template you selected under Form Settings. If you have not yet selected a presentation template, a dialog box displays from which you can select one. Previewing combines your form entries with the presentation template for viewing but does not save the output file.
Related Information
“Selecting a Presentation Template”
“Create a New Form Entry File”
“Save Your Entries”
“Specifying Form Settings”
“Generate an Output File”
ContentCenter Standard User’s Guide
• • • •••

Generate an Output File
Your form entries are not directly viewable as publishable content. You must generate publishable content by combining the form entry file with a presentation template. The file that you generate is called an output file. Because the form entry file and the output file are two distinct files, you must regenerate the published content if you change the form entries (that is, if you modify the form entry file).
You can generate publishable content using any combination of form entry files and presentation templates that your ContentCenter administrator has made available to you. If you generate an output file and then want to change the template, just generate a new output file with a different presentation template and optionally delete the old output file.
To generate an output file, click Generate. The Generate Options screen appears. See “Specifying Form Settings” for further details about naming an output file.
Related Information
“Selecting a File Name and Location”
“Selecting a Presentation Template”
“Create a New Form Entry File”
“Save Your Entries”
“Specifying Form Settings”
“Preview a Form”
Selecting a File Name and Location The Save Form As screen contains three fields: current folder, folder contents, and file name. To set a name and location for the file:
1. The current folder field (the first field in the screen) contains the name of the current folder, a down arrow, and an up arrow. To save the file in the current folder, you do not need to take any action in this field. To save the file in a different folder:
Single-click the down-arrow button to display all of the parent folders leading to the current folder.
Single-click a parent folder name to move into it and display its contents.
Double-click a subfolder name to move into it and display its contents.
Single-click the Up button to move up one folder level.
ContentCenter Standard User’s Guide 55
• • • •••

56
2. The folder contents field (the second field in the screen), shows the name, owner, and modification date of each file in the selected folder. If you are saving the current file to a new file name, use this file list as a reference to ensure that you are not selecting and overwriting an existing file name. To intentionally replace (overwrite) an existing file, single-click its name. This file name appears in the Name field, and will be used for the name of the file that you are in the process of saving. The contents of the original file having this name will be lost.
3. In the File name field, enter the name of the file you are saving. If you are saving to a name that already exists, when you click OK you will see a dialog box asking you to confirm that you intend to overwrite that file.
4. Click OK to save the form entries and return to the form screen.
Specifying Form SettingsFrom the Form Entry screen you can:
Specify a form entry file name and location.
Choose a presentation template (if more than one template exists).
Specify an output file name and location.
Figure 6 The Form Settings screen
To specify a form entry file name:
ContentCenter Standard User’s Guide
• • • •••

Enter the name in the Save Form Entry field. You can optionally use the Browse link to save the file to a different folder or a new file name. If you click Browse:
1. The current folder field (the first field in the screen) contains the name of the current folder, a down arrow, and an up arrow. To save the file in the current folder, you do not need to take any action in this field. To save the file in a different folder:
Single-click the down-arrow button to display all of the parent folders leading to the current folder.
Single-click a parent folder name to move into it and display its contents.
Double-click a subfolder name to move into it and display its contents.
Single-click the Up button to move up one folder level.
2. The folder contents field (the second field in the screen), shows the name, owner, and modification date of each file in the selected folder. If you are saving the current file to a new file name, use this file list as a reference to ensure that you are not selecting and overwriting an existing file name. To intentionally replace (overwrite) an existing file, single-click its name. This file name appears in the Name field, and will be used for the name of the file that you are in the process of saving. The contents of the original file having this name will be lost.
3. In the File name field, enter the name of the file you are saving. If you are saving to a name that already exists, when you click OK you will see a dialog box asking you to confirm that you intend to overwrite that file.
4. Click OK.
To choose a presentation template:
Click the radio button next to the presentation template name. The presentation template will be used together with this form entry file when you generate an output file.
To specify an output file name:
Enter the name in the Select an Output file field. You can optionally use the Browse link to save the output file to a different folder or a new file name. If you click Browse, follow the instructions above for specifying a form entry file name. The output file that you specify will be generated when the form entry file and the presentation template are combined as described in “Generate an Output File”.
Related Information
“Selecting a File Name and Location”
“Selecting a Presentation Template”
“Create a New Form Entry File”
“Save Your Entries”
ContentCenter Standard User’s Guide 57
• • • •••

58
“Preview a Form”
Selecting a Presentation TemplateThe Select a Presentation Template screen displays if a presentation template was not selected in the Form Settings dialog box, and you select Preview or Generate. From this screen you can select which presentation template will be combined with the current form entry file to generate an output file. To select a presentation template, click its radio button and then click OK.
Figure 7 Selecting a presentation template
ContentCenter Standard User’s Guide
• • • •••

Chapter 3
Importing, Editing, and Submitting Files
The following topics are discussed in this chapter:
Overview
Importing a File
Selecting Import Locations, Options, and Tasks
Editing a File
Selecting a Next Action
Adding Task Comments within a Wizard
Selecting a Workflow
Submitting Work in Progress
When a Task is Finished
OverviewYou can import, edit, and submit content from many locations in the ContentCenter interface. These features, like many other ContentCenter features, are context-sensitive. That is, your ability to import files into a workarea or to edit certain files depends on many factors including your file locking and access permissions.
You might want to import content if you:
Have content on your local system (such as your C: drive) that needs to be reviewed, versioned, published, or otherwise managed through ContentCenter.
ContentCenter Standard User’s Guide 59
• • • •••

60
Need to place content from one network location (such as another ContentCenter system, or some other workarea) into another.
You might want to edit content if you:
Have received a task requesting you to edit content.
Submit content in conflict with the workarea and want to resolve the conflict by manually editing the content in conflict.
You will need to submit content when you:
Finish creating, editing, or importing a file and must have your changes approved by a reviewer.
Want to put any content into a workarea so that it is available to other users.
NOTE
Most file operations are performed through wizards. Depending on which step a wizard is in, a Cancel link could be displayed at the bottom of the screen. Clicking Cancel only cancels the currently displayed step; it does not cancel the entire wizard. For example, if you are working with the Edit wizard, the edit operation occurs after you click Next in the first wizard screen. If you click Cancel in a subsequent screen, your changes to the file are not cancelled because they were done in a previous step.
Related Information
“Importing a File”
“Selecting Import Locations, Options, and Tasks”
“Editing a File”
“Selecting a Next Action”
“Adding Task Comments within a Wizard”
“Submitting Work in Progress”
Importing a FileFrom this screen, you select one or more files to import from your local system (such as your C: drive) into a folder in a workarea. The screen contains three fields showing (in this order):
The name of the current folder on your local computer.
The contents of the current folder (this field is labeled Name).
ContentCenter Standard User’s Guide
• • • •••

The list of files to import (this field is labeled File Path).
Figure 8 Import File screen
To import a file:
1. In the current folder field (the first field in the screen), navigate to the folder on your local system containing the file you want to import:
Click the down-arrow to display all of the parent folders leading to the current folder.
Click a parent folder name to move into it and display its contents.
Double-click a subfolder name to move into it and display its contents.
Click the Up link to move up one folder level.
2. In the folder contents field (the second field in the screen, labeled Name), click the name of the file you want to import and click Add. The file name appears in the import list shown in the next field.
To import an entire subfolder, click the subfolder name and click Add.
To display the contents of a subfolder in the folder contents field, double-click the subfolder name. From there you can select individual files to import.
To add a continuous range of files to the import list, click the first file name, hold the Shift key down, and click the last file name. The entire range of file names is highlighted. Click Add to move the entire range to the import list.
To add more than one file to the import list if the files are not in a continuous range, click each file name while you hold the Control key down. Each file name is highlighted. Click Add to move all of the highlighted files to the import list.
ContentCenter Standard User’s Guide 61
• • • •••

62
3. When the import list in the last field on the screen contains all of the files you want to import, click Import and then click Next. The Import File screen appears. See “Selecting Import Locations, Options, and Tasks” to continue the import process.
NOTE
The files that you select to import will all be imported into the same folder in the workarea. To import files to different folders, you must perform a separate import operation for each destination folder, or import an entire batch of files into one folder and then move the files into other folders in the workarea as described in “Moving a File”.
Selecting Import Locations, Options, and TasksFrom this screen you select the location in a workarea that the file is imported into, and specify what will happen next to the file.
Figure 9 Screen to set import location and options
1. In the Content Folder field, select the folder that the file will be imported into. In some cases, this field is already filled in with the name of the folder from which you initiated the import process. If you enter just a slash (/) here, the file will be imported into the top level of the workarea. If the field is not filled in, or if the file should be imported into a different folder, click Browse and navigate to the destination folder of your choice.
2. In the Next Action field, select one of the following actions. Depending on how ContentCenter is customized for your site, some of these actions might not be available, or you might be limited to just one choice.
ContentCenter Standard User’s Guide
• • • •••

To submit the file for approval right away, select Submit from the menu.
To submit this file and any others in your Work in Progress module for approval, select Submit Work in Progress from the menu.
To save the file without immediately submitting it for approval, select Keep as Work in Progress from the menu.
To tag a file with descriptive information (also known as metadata) without submitting the fie for approval, select Add Metadata and Exit. In many cases Add Metadata and Exit is pre-selected for you in the menu as part of the system configuration.
3. If you are submitting the file, you must select a task or create a new job to process the submission of the imported file. In the Attach to existing task or new job field, select the task with which to associate the submission. If no tasks are displayed, select New Job to start a job specifically to execute the submit process.
4. After making your selections, click Next.
If you selected Submit, either the Tag File screen or the Select a Workflow screen is displayed. Continue as described in “Tagging a File using Metadata Capture Tagging” or “Selecting a Workflow”.
If you selected Submit Work in Progress, the Submit Work in Progress screen is displayed, which allows you to select additional work in progress files to submit. Continue as described in “Submitting Work in Progress”.
If you selected Keep as Work in Progress, the file remains in the Work in Progress module in the ContentCenter home page and is not submitted. You are returned to the screen that was displayed before you invoked the import wizard.
If you selected Add Metadata and Exit (or if it was pre-selected for you), the file is not submitted and the Tag File screen displays, which allows you to add metadata tags.
NOTE
An error message displays if a file with the same name already exists in the import location. You can either cancel the import process to retain the original version of the file, or overwrite the original version with the version you are importing by clicking the check box next to the file to import and clicking Next.This screen reports the number of files that you are importing; it does not include folders in that total. Folders that you selected in the previous screen are imported even though they might not be listed here.
ContentCenter Standard User’s Guide 63
• • • •••

64
Import File Name Conflicts
An error message displays if a file with the same name already exists in the import location. You can either cancel the import process to retain the original version of the file, or overwrite the original version with the version you are importing by clicking the check box next to the file to import and clicking Next.
Create New Content
To create new content, go to the New Forms module in the ContentCenter home page. There you will see a list of all the blank forms available to you. When you click a form name, a blank version of it appears on your screen so that you can fill it in with new content. See “Filling In a Form” for more information.
An alternative is to create new content on your local system (as opposed to from within ContentCenter), and then import it into ContentCenter. For example, you could create an HTML file locally with the editing application of your choice, and then import it into ContentCenter as described in “Importing a File”.
Editing a FileWhen you edit a file by clicking Edit or selecting Edit from a menu, the Edit a File screen appears, and ContentCenter opens the file in an editing program. The extension after the final period in the file name determines what editing program is used. For example, files ending in .doc might open in Microsoft® Word; files ending in .html might open in Dreamweaver™; and so on. Which editing program is associated with which file name extension depends on the Local File Manager settings at your site. These settings are usually controlled by your ContentCenter administrator. Therefore, the editing programs that open at your site might be different from this example.
After a file opens for editing, make whatever changes you need and save them as you normally would in the editing program. After you save your changes, you can close the editing program. When you do, the Edit a File screen moves to the foreground. From this screen you can choose what happens next to the file (see “Selecting a Next Action”). With some types of files, you also have the option of previewing the file as described in “Preview an Edited File”.
The following icons are used in file listings throughout ContentCenter:
ContentCenter Standard User’s Guide
• • • •••
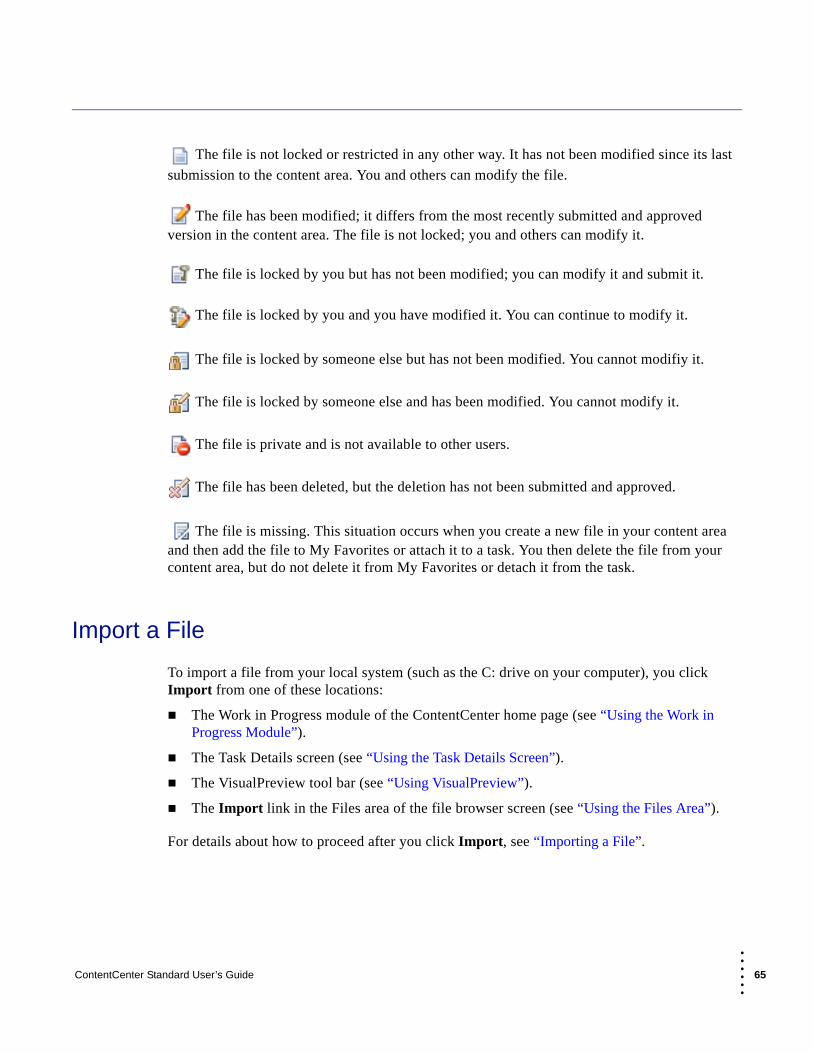
The file is not locked or restricted in any other way. It has not been modified since its last
submission to the content area. You and others can modify the file.
The file has been modified; it differs from the most recently submitted and approved version in the content area. The file is not locked; you and others can modify it.
The file is locked by you but has not been modified; you can modify it and submit it.
The file is locked by you and you have modified it. You can continue to modify it.
The file is locked by someone else but has not been modified. You cannot modifiy it.
The file is locked by someone else and has been modified. You cannot modify it.
The file is private and is not available to other users.
The file has been deleted, but the deletion has not been submitted and approved.
The file is missing. This situation occurs when you create a new file in your content area and then add the file to My Favorites or attach it to a task. You then delete the file from your content area, but do not delete it from My Favorites or detach it from the task.
Import a File
To import a file from your local system (such as the C: drive on your computer), you click Import from one of these locations:
The Work in Progress module of the ContentCenter home page (see “Using the Work in Progress Module”).
The Task Details screen (see “Using the Task Details Screen”).
The VisualPreview tool bar (see “Using VisualPreview”).
The Import link in the Files area of the file browser screen (see “Using the Files Area”).
For details about how to proceed after you click Import, see “Importing a File”.
ContentCenter Standard User’s Guide 65
• • • •••

66
Delete a File
You can delete a file from a workarea by selecting Delete from the following menus:
The menu next to a file name in the My Favorites and Work in Progress modules of the ContentCenter home page (see “Using the My Favorites Module” and “Using the Work in Progress Module”).
The More menu in the VisualPreview tool bar (see “Using VisualPreview”).
The File Actions menu to the right of a file name in the file browser window (see “Browsing Files and Folders”).
For details about how to proceed after you select Delete, see “Deleting a File”.
Selecting a Next ActionThe actions available from this screen depend on how ContentCenter is customized for your site. Some of these actions might not be available, or you might be limited to just one choice. From this screen you can perform at least one of the following:
Submit the file(s) for approval.
Keep the file as work in progress.
Attach the file to an existing task or create a new job to process the file.
Tag the file with descriptive information (also known as metadata) without immediately submitting it for approval. Depending on your system’s configuration, this might be the only choice available to you.
To submit:
In the Next Action field, choose one of the following actions:
To submit the file for approval right away, select Submit from the menu.
To submit this file and any others in your Work in Progress module for approval, select Submit Work in Progress from the menu.
To keep as work in progress without submitting:
Select Keep as Work in Progress from the menu.
To attach to a task or new job:
ContentCenter Standard User’s Guide
• • • •••

If you are submitting the file, you must select a task or create a new job to process the submission. In the Attach to existing task or new job field, select the task with which to associate the files and submission. If no tasks are displayed, select New Job to start a job specifically to handle the submit process.
To tag without submitting:
Select Add Metadata and Exit from the menu. On some systems, this might be your only choice. In that case, Add Metadata and Exit is pre-selected for you in the menu.
Next steps:
After making your selections, click Next.
If you selected Submit, the Tag File screen may display. Continue the submit process by adding or modifying tags as described in “Tagging a File using Metadata Capture Tagging”.
If you selected Submit Work in Progress, the Submit Work in Progress screen appears, which allows you to select additional work in progress files to submit. Continue with the submit process as described in “Submitting Work in Progress”.
If you selected Keep as Work in Progress, the file remains in the Work in Progress module in the ContentCenter home page and is not submitted. You are returned to the screen that was displayed before you invoked the current wizard.
If you selected Add Metadata and Exit (or if it was pre-selected for you) the file is not submitted and the Tag File screen appears, which allows you to add metadata tags.
Preview an Edited File
If the file you edited is previewable (that is, if it has certain extensions such as .htm or .html and can be viewed in a browser), you have the option of previewing it before submitting it. Click Preview to open the file for previewing. To end the preview session, close the preview browser window.
Adding Task Comments within a WizardYou can add information to a task in the form of comments, which remain linked to the task over its life span and can be viewed by others working on the task. You can also call up a screen that provides details about the task and lets you perform a variety of actions on the task.
ContentCenter Standard User’s Guide 67
• • • •••

68
To add comments to the current task, enter them in the Task Comments field and click Next. Depending on how your workflow is designed, you might need to choose how to transition to the next step. If that is case, you see a Select an Option field from which you can choose a transition appropriate for this task.
NOTE
If you enter task comments and then perform another file action (such as import, add, detach, and so on) before clicking Next, the Task Comments screen is refreshed, and you must retype your comments. Therefore, you should enter task comments as the last step before clicking Next.
To view details about the task or perform actions on the task, click Show Task Details. The Task Details screen is displayed; see “Using the Task Details Screen” for information about the information and actions associated with that screen.
Selecting a WorkflowA workflow defines a sequence of tasks that can be assigned to one or more people. Whenever you start a job, it must be based on a predefined workflow (workflows themselves are defined by your ContentCenter administrator). When you start a job based on a workflow, the tasks defined in the workflow are assigned to one or more people.
For example, a workflow could define three tasks: to edit some text, to add an image, and to review someone else’s work. If you start a job based on that workflow, you specify who should perform each task, and then you initiate the job. When the job starts, the person who is to perform each task is notified through the Tasks module on the ContentCenter home page (and optionally through email) that there is a task to perform. After a task is completed, the job proceeds to the next task in its sequence that was defined by the workflow. When all of the tasks in a job are done, the job is complete.
NOTE
The submit process, one of the more common workflow-based activities, is configured on an individual site basis. Typically, it requires that you initiate a submit job which might involve one or more review cycles. When you initiate a submit job, you could be prompted to specify job parameters such as reviewers, submit and individual file comments, and so on. After a submit job is initiated, all of the selected files are attached to tasks and can be viewed from the Task Details screen. Administrators can make multiple submit workflows available to users. Therefore, the workflow list you choose from and parameters you are asked to specify can vary from site to site.
ContentCenter Standard User’s Guide
• • • •••

From this screen you can select a workflow to define a job that you want to initiate. To select a workflow, single-click the radio button to the left of the workflow name and then click Next. If the workflow requires information from you before it can proceed, a form for that information is displayed. Fill in the form as necessary (required fields are marked with an asterisk) and click Next.
Submitting Work in Progress From this screen you can submit some or all of the files in your Work in Progress module. To select a file or folder for submission, click the check box next its name. To select all of the files and folders in Work in Progress, click the check box next to Name at the top of the list.
Figure 10 Submitting files from the Work in Progress module
In the Attach to list, select the task with which to associate the submission. If no tasks are displayed, select New Job to start a job specifically to execute the submit process.
NOTE
If a file is already attached to a task and you select New Job in the Attach to: list, the file is attached to both the original task and a task in the new job.
To view the Task Details screen for the task(s) to which a file is attached, click the task number in the Attached to Task(s) column. See “Using the Task Details Screen” for more information.
To detach a file from one or more tasks, click Detach. The Select a Task screen appears. Click the check box next to the task(s) from which to detach the file. To select all of the tasks, click the check box next to Task at the top of the list.
ContentCenter Standard User’s Guide 69
• • • •••
70
To undo all of the changes that you made to a file since the last time it was submitted, click Undo Changes. You see a dialog box confirming that you intend to do this. If you click Yes, you will lose all of the changes that you made to the file since its last submission. To cancel Undo Changes, click No.
When you have selected all of the files you intend to submit, click Next to continue.
When a Task is FinishedThis screen summarizes the actions that took place when the current task executed. When you see this screen, it indicates that the task is finished. In some cases, you can perform a final action (for example, adding submitted files to your My Favorites module). In other cases, this screen is informational only and does not require any input from you other than clicking Done.
ContentCenter Standard User’s Guide
• • • •••

Chapter 4
Other File Operations
The following topics are described in this chapter:
Overview
Tagging a File using Metadata Capture Tagging
Assigning Files to a New Job
Deleting a File
Deleting a File
Copying a File
Renaming a File
Moving a File
Viewing File Properties
Viewing File Versions
Creating a New Folder
OverviewWhen you are logged into the ContentCenter system, you can perform nearly all the same file operations that you can perform on your local system. For example, you can delete, copy, rename, and move files within a workarea. When you perform any of these operations and then submit your new or edited content for approval, ContentCenter tracks your changes by logging a new version of each file. You can view each version of a file, and if necessary revert to a previous version.
You can also tag content files with additional information (also called metadata) that can be used with optional products such as Interwoven MetaTagger to categorize and search files. Tags are
ContentCenter Standard User’s Guide 71
• • • •••

72
recorded separately from more traditional file properties (also viewable from ContentCenter) such as owner, modification date, and so on.
NOTE
Most file operations are performed through wizards. Depending on which step a wizard is in, a Cancel link could display at the bottom of the screen. Clicking Cancel only cancels the currently displayed step; it does not cancel the entire wizard. For example, if you are working with the Rename wizard, file renaming occurs after you click Next in the first wizard screen. If you click Cancel in a subsequent screen, the renaming is not undone because it was done in a previous step.
Related Information
“Tagging a File Using TagUI”
“Tagging a File using Metadata Capture Tagging”
“Deleting a File”
“Copying a File”
“Renaming a File”
“Moving a File”
“Viewing File Properties”
“Viewing File Versions”
“Creating a New Folder”
Tagging a File Using TagUIThe information in this section describes completing forms when using the new TagUI feature.
When you tag a file, you specify additional descriptive information that remains with the file indefinitely (this information is also called metadata). For example, you could tag a press release file by adding a title such as “Press Release,” keywords such as “July” and “Acquisition,” a region such as “California,” and so on. These tags do not appear in the text of the file, so they are not displayed when the file is viewed through a browser or editing application. Instead, they appear when you view the file’s tags using a compatible search engine or other product such as Interwoven MetaTagger. Tags are different than file properties because they are searchable, can contain far more information than properties, and can be manually edited by users.
Enter tags manually in the Tag File form (see “Enter Tags Manually in TagUI”).
ContentCenter Standard User’s Guide
• • • •••

Use MetaTagger to have your system automatically generate tags for a file (see “Generate Tags Automatically in TagUI”).
NOTE
MetaTagger is a separate product and might not be available on your system.
Enter Tags Manually in TagUI
The Tag File form in TagUI contains fields that you fill in with information of your choice. If you selected multiple files to tag, the Tag File form contains fields for all selected files. The appearance of the Tag File form is controlled by your ContentCenter administrator and is specific to the type of tagging information that is needed at your site. For example, the Tag File form for an insurance claim could contain fields for claim type, accident date, and so on.
Figure 11 Example of a Tag File form in TagUI
Your Tag File form could have any number of fields and field names, and the fields could require you to enter text, select an item from a drop-down menu, or check a box or click a button. In this example, the Tag File form contains tabs that organize the fields by type. In some cases, the Tag File form could contain a text editor that lets you format your text field entries.
To tag a file, simply enter text, check a box, or select a drop-down menu item in the fields of the Tag File form. The information that you enter should describe the file as specifically and accurately as possible. If a field is marked with an asterisk, you must enter something in it. If there is no asterisk by the field, you do not have to fill it in. Some text fields require that you
ContentCenter Standard User’s Guide 73
• • • •••
74
enter information in a specific format; in these cases, the format is shown in the field or when you click on the icon.
The Data Record Search and Replace feature provides a Search and Replace area at the bottom of the form. Enter the text you want to search for. You can also indicate that you want to match the case of the text by clicking Match Case. Click the Search icon. You can use the Previous and Next arrows to move through the search results. If you click Replace, the area expands to allow you to enter replacement text. You can change all matching text at once or change them one at a time. The Replace feature does not work for text entered in fields using TinyMCE.
If fields in the Tag File screen contain Suggest or Add/Edit buttons, MetaTagger can generate tags for these fields automatically. See “Generate Tags Automatically in TagUI” on page 75 for more information.
To save your changes and remain in the Tag File screen so that you can edit or add more tags, click Save.
When you finish filling in the Tag File form, click Next. If you do not fill in a required field or if you use a wrong format, the incorrect fields are highlighted in red when you click Next. In that case, correct the entries and click Next again.
If you selected multiple files to tag, the file names are all listed in the form. The left side of the listing shows the fields in which you can enter information. Each file has a Copy to All link. You can enter information for one file and then click the corresponding Copy to All to copy the same information to all files. To enter a different type of information, click on a different field name. The form changes so you can enter values for the new field. You can use Copy to All or you can enter values for each file separately.
When you are tagging multiple files, you may have a limitation on the number of files that can be tagged on one screen. If TagUI is configured to limit the number of files and your tagging request exceeds the number, files are automatically grouped. Your Tag Files screen displays the first group of files. A message above the field names on the left side of the screen tells you that you are “Tagging x to y of z taggable files”. The Next button changes to a Next Group button. After you tag the first screen of files, click Next Group to save the current group of files and display the next group of files to be tagged. Continue this procedure until all the files are tagged.
ContentCenter Standard User’s Guide
• • • •••

Figure 12 Tagging multiple files
If the last group of files only contains one file, that file is appended to the previous group instead of displaying a single file screen. For example, if the user is tagging 201 files and the group size is 200, all 201 files display on one screen as a group instead of 200 files in the first group and 1 file on the second group.
Related Information
“Generate Tags Automatically in TagUI” on page 75
Generate Tags Automatically in TagUI
If Interwoven MetaTagger is available through your ContentCenter system, you can set it up to generate tags automatically. If fields in the Tag File screen in TagUI contain Add/Edit or Suggest buttons, MetaTagger generates tags for these fields automatically. See the following information for details about using these features:
“Use the Suggest and Suggest All Buttons” on page 76
“Use the Add/Edit Button” on page 76
ContentCenter Standard User’s Guide 75
• • • •••

76
Related Information
“Enter Tags Manually in TagUI” on page 73
Use the Suggest and Suggest All Buttons
When you click the Suggest button for a field or the Suggest All button for a form, MetaTagger projects are scanned for keywords pertaining to the current field in the data form. Which MetaTagger projects are scanned is controlled by your ContentCenter administrator. The terms suggested by MetaTagger display in the content form. Clicking the Suggest or Suggest All buttons removes any information you may have already entered in the field. If necessary, you can fine-tune the tag list(s) by adding or deleting terms manually through the Add/Edit button. When you are satisfied with the tag list(s), click Next to save the list(s).
NOTE
The tags currently displayed in the data form will overwrite any pre-existing tags after you click Next.
Related Information
“Use the Add/Edit Button” on page 76
Use the Add/Edit Button
The Add/Edit button lets you search or browse a list of predefined tags and select which ones to use in a given field. When you click Add/Edit, the TeamSite Search Metadata screen appears.
Browse Mode
Browse mode is enabled by default and is indicated by the Browse button being selected. In this mode, the left-hand pane lets you browse through levels of categories. You can highlight individual categories. Click the Copy button to move your selected projects and folders to the Selected Items list, or click the Copy All button to move all of the categories from the left pane to the Selected Items list. To remove an item from the Selected Items list, highlight the item and click the Remove button. To remove all items, click the Remove All button.
The Show Level button lets you see the hierarchy. This feature is useful if you want to select additional terms from a previously used location without having to navigate through a long hierarchy to reach that location. In the Selected Items list, highlight the item whose location you
ContentCenter Standard User’s Guide
• • • •••

want to determine by clicking it. Click the Show Level button. The item’s location displays in the left-hand pane.
When you are satisfied with the list of selected items, click OK. The projects from the Selected Items list appear in the field on the data from which you originally clicked the Add/Edit button.
Search Mode
If you click the Search button, the left pane is divided into two sections: Search Hierarchy and Search Results. The Search Hierarchy section lets you search for categories from the MetaTagger project hierarchy. To do this, enter a keyword that you would like to use as a tag in the Search Hierarchy field and click Search.
Categories matching the search criteria you entered display in the Search Results screen. From that list you can highlight one or more projects and click the Select button to move your selected projects to the Selected Items list, or click the Select All button to move all of the projects from the Search Results screen to the Selected Items list. To remove an item from the Selected Items list, highlight the item and click the Remove button. To remove all items, click the Remove All button.
When you are satisfied with the list of selected items, click OK. The projects from the Selected Items list appear in the field on the data form from which you originally clicked the Add/Edit button.
Related Information
“Use the Suggest and Suggest All Buttons” on page 76
Tagging a File using Metadata Capture Tagging
When you tag a file, you specify additional descriptive information that remains with the file indefinitely (this information is also called metadata). For example, you could tag a press release file by adding a title such as “Press Release,” keywords such as “July” and “Acquisition,” a region such as “California,” and so on. These tags do not appear in the text of the file, so they are not displayed when the file is viewed through a browser or editing application. Instead, they appear when you view the file’s tags using a compatible search engine or other product such as Interwoven MetaTagger. Tags are different than file properties because they are searchable, can contain far more information than properties, and can be manually edited by users.
ContentCenter Standard User’s Guide 77
• • • •••

78
Figure 13 Tag File form
From this screen you can:
Enter tags manually in the Tag File form (see “Enter Tags Manually”).
Use MetaTagger to have your system automatically generate tags for a file (see “Generate Tags Automatically”).
NOTE
MetaTagger is a separate product and might not be available on your system.
Enter Tags Manually
The Tag File form contains fields that you fill in with information of your choice. The appearance of the Tag File form is controlled by your ContentCenter administrator, and is specific to the type of tagging information that is needed at your site. For example, the Tag File form for an insurance claim could contain fields for claim type, accident date, and so on.
Your Tag File form could have any number of fields and field names, and the fields could require you to enter text, select an item from a menu, or check a box or a button. In some cases, the Tag File form could also have tabs that organize the fields by type.
To tag a file, simply enter text, check a box, or select a menu item in the fields of the Tag File form. The information that you enter should describe the file as specifically and accurately as possible. If a field is marked with an asterisk, you must enter something in it. If there is no asterisk by the field, you do not have to fill it in. Some text fields require that you enter information in a specific format; in these cases, click the question mark next to the field for details about the format requirements.
ContentCenter Standard User’s Guide
• • • •••

If the form you selected enables you to replicate input fields, you can use the following buttons in the input field’s title bar to add, delete, move up, and move down input fields. When a button is grey, that functionality is not available.
Performs different functions depending on how ContentCenter is set up. Either 1) Adds an input field below the current field, or 2) Displays a list of items. When you choose an item, information specific to that item is displayed in the form.
Deletes the current input field.
Moves the current input field up one level.
Moves the current input field down one level.
If an area within a form contains multiple input fields, each area contains a or button in
the left margin next to the area name. Click to expand the area to show all of its input fields.
Click to collapse the area to show only the area name. The Tag File screen can also contain Expand All Items or Collapse All Items links in the top-right corner. Clicking Expand All Items is the same as clicking the button for every area in the screen. Clicking Collapse All
Items is the same as clicking the button for every area in the screen.
When you are done filling in the Tag File form, click Next. If you filled in the form correctly, you advance to the next step in the file tagging wizard.
If you do not fill in a required field or if you use a wrong format, the incorrect fields are highlighted in red when you click Next. In that case, correct the entries and click Next again.
Generate Tags Automatically
If Interwoven MetaTagger is available through your ContentCenter system, your ContentCenter administrator can set it up to generate tags automatically. If fields in the Tag File screen contain Re-Tag, Re-Tag All, Add/Edit, or Suggest links, MetaTagger will generate tags for these fields automatically.
NOTE
Depending on how your ContentCenter administrator has set up your system, some of these links might not appear in the Tag File screen.
See the following for details about using these features:
“Use the Re-Tag Link”
ContentCenter Standard User’s Guide 79
• • • •••

80
“Use the Re-Tag All Link”
“Use the Add/Edit Link”
Use the Re-Tag Link
The Re-Tag link next to a field lets you regenerate one or more tags for just that field. When you click Re-Tag, MetaTagger scans the file and generates a list of tags based on criteria set up by your ContentCenter administrator. The new generated tags appear in the field. If you need to, you can edit the tags manually after they are generated.
NOTE
If you click Re-Tag after editing a tag, your edits are overwritten and replaced by the new generated tag(s).
If you are done generating tags, click Next to submit your changes for approval and subsequent entry into the workarea. To use additional generated tag features, see “Use the Add/Edit Link”.
Use the Re-Tag All Link
The Re-Tag All link at the bottom of the screen regenerates tags for all generated fields in the screen (that is, all fields having a Re-Tag button). If you or other users manually edited tags in these fields, those edits are overwritten and are lost permanently. Fields that do not have a Re-Tag button are not overwritten by Re-Tag All.
Depending on the size and number of files involved in retagging, this operation might take a long time to complete.
If you are done generating tags, click Next to submit your changes to the ContentCenter repository.
NOTE
If you click Re-Tag after editing a tag, your edits are overwritten and replaced by the new generated tag(s).
Related Information
“Use the Add/Edit Link”
“Use the Re-Tag All Link”
ContentCenter Standard User’s Guide
• • • •••

Use the Add/Edit Link
The Add/Edit link lets you search or browse a list of predefined tags and select which ones to use in a given field. When you click Add/Edit, the TeamSite Search Metadata screen appears. What is displayed in this screen depends on how your ContentCenter administrator has set up your system:
If the screen contains a Category field and a Search field, see “TeamSite Search Metadata Screen - Version 1”.
If the screen contains Browse and Search buttons in the top-left corner, a left-hand pane showing MetaTagger projects, and a right-hand pane labelled Selected Items, see “TeamSite Search MetaData Screen - Version 2”.
TeamSite Search Metadata Screen - Version 1
This screen contains a Category field and a Search field.
The Category field contains tags that have been assigned to the file by a ContentCenter administrator, and also any terms that have been added manually by users.
To search for terms related to a specific term in the list, double-click that term (in Internet Explorer). The Browse Vocabulary screen appears, allowing you to search for related terms. (See “Use the Browse Vocabulary Screen”.)
To remove terms from the list, select those terms and click Remove Term(s).
The Search field lets you search for and add other terms from the tag list. To do this, enter a keyword in the Search field and click Search Term or Enter. Keywords that you choose for the Tag File field should be related to the name of the field that you are filling in. If your keyword does not match a term in the tag list, you get an error message. In that case, try a keyword that is more likely to be included in the tag list.
If you enter more than one term in the Search field, the results contain matches for all the terms you entered. Search results display in a list under the Search field.
To add a term from the search results to your Tag File field, click Add next to the term.
To browse for other related terms, click Refine next to a term in the search results and follow the instructions in “Use the Browse Vocabulary Screen”.
If you are done generating tags, click Next to submit your changes for approval and subsequent entry into the workarea.
ContentCenter Standard User’s Guide 81
• • • •••

82
Related Information
“Use the Re-Tag Link”
“Use the Re-Tag All Link”
“Use the Suggest Link”
“Use the Browse Vocabulary Screen”
TeamSite Search MetaData Screen - Version 2
This screen contains Browse and Search buttons in the top-left corner, a left-hand pane showing MetaTagger projects, and a right-hand pane labelled Selected Items showing MetaTagger projects that you select.
Browse mode is enabled when you first click the Add/Edit link or when you click the Browse radio button in the TeamSite Search MetaData screen (see “Browse Mode”). To enter Search mode, you must click the Search radio button (see “Search Mode”).
Related Information
“Use the Re-Tag All Link”
“Use the Re-Tag All Link”
“Use the Suggest Link”
“Use the Browse Vocabulary Screen”
Browse Mode
Browse mode is enabled by default and is indicated by the Browse radio button being selected. In this mode, the left-hand pane lets you browse through levels of MetaTagger projects just as you would navigate through normal folders and files. You can highlight an individual MetaTagger project, an entire project folder, or combinations of projects and folders. Click the Copy >> button to move your selected projects and folders to the Selected Items list, or click the Copy All button to move all of the projects and folders from the left-hand pane to the Selected Items list. To remove an item from the Selected Items list, highlight the item and click the Remove button. To remove all items, click the Remove All button.
The Show Level button lets you see which folder or MetaTagger project contains a previously selected term. This feature is useful if you want to select additional terms from a previously used location without having to navigate through a long hierarchy of folders to reach that location. In the Selected Items list, highlight the item whose location you want to determine by clicking it. Click the Show Level button. The item’s location is displayed in the left-hand pane.
ContentCenter Standard User’s Guide
• • • •••

When you are satisfied with the list of selected items, click OK. The projects from the selected items list appear in the field on the data from which you originally clicked the Add/Edit button. You can now use the Suggest button to have MetaTagger scan the list of projects and create a list of suggested tags (see “Use the Suggest Link”).
Search Mode
If you click the Search radio button, the left-hand pane is divided into two sections: Search Hierarchy and Search Results. The Search Hierarchy section lets you search for and add other tags from the MetaTagger project hierarchy. To do this, enter a keyword that you would like to use as a tag in the Search Hierarchy field and click Search.
Projects (or folders containing projects) matching the search criteria you entered are displayed in the Search Results screen. From that list you can highlight one or more projects and click the Select >> button to move your selected projects to the Selected Items list, or click the Select All >> button to move all of the projects from the Search Results screen to the Selected Items list. To remove an item from the Selected Items list, highlight the item and click the Remove button. To remove all items, click the Remove All button.
When you are satisfied with the list of selected items, click OK. The projects from the selected items list appear in the field on the data form from which you originally clicked the Add/Edit button. You can now use the Suggest button to have MetaTagger scan the list of projects and create a list of suggested tags (see “Use the Suggest Link”).
Use the Suggest Link
When you click the Suggest button, MetaTagger projects are scanned for keywords pertaining to the current field in the data form. Which MetaTagger projects are scanned is controlled by your ContentCenter administrator. The terms suggested by MetaTagger are displayed in the content form. If necessary, you can fine-tune the tag list(s) by adding or deleting terms manually. When you are satisfied with the tag list(s), click Next to submit your changes for approval and subsequent entry into the workarea.
NOTE
The tags currently displayed in the data form will overwrite any pre-existing tags after you submit the data form for approval.
Related Information
“Use the Add/Edit Link”
ContentCenter Standard User’s Guide 83
• • • •••

84
Use the Browse Vocabulary Screen
The Browse Vocabulary screen contains information about terms that appear as search results in the Search Metadata screen (see “Use the Add/Edit Link”. The following information is displayed:
Term definition
Alternate terms
Relevant terms, which show the term’s place in the overall tag list
You can click any of the terms in the Relevant Terms list to see a Browse Vocabulary screen for that term. To add the term from the Browse Vocabulary screen to the Tag File field, click Add > OK. To close the Browse Vocabulary screen, click Close.
If you are done generating tags, click Next to submit your changes for approval and subsequent entry into the workarea. To use additional generated tag features, see “Use the Re-Tag Link”.
Assigning Files to a New JobFrom this screen you can select files to assign to a new job.
Figure 14 Assign Files to New Job screen
First you select the file(s), and then additional screens let you set up and initiate the job. The files that will be attached to the new job are shown under Assigned File(s). To attach additional
ContentCenter Standard User’s Guide
• • • •••
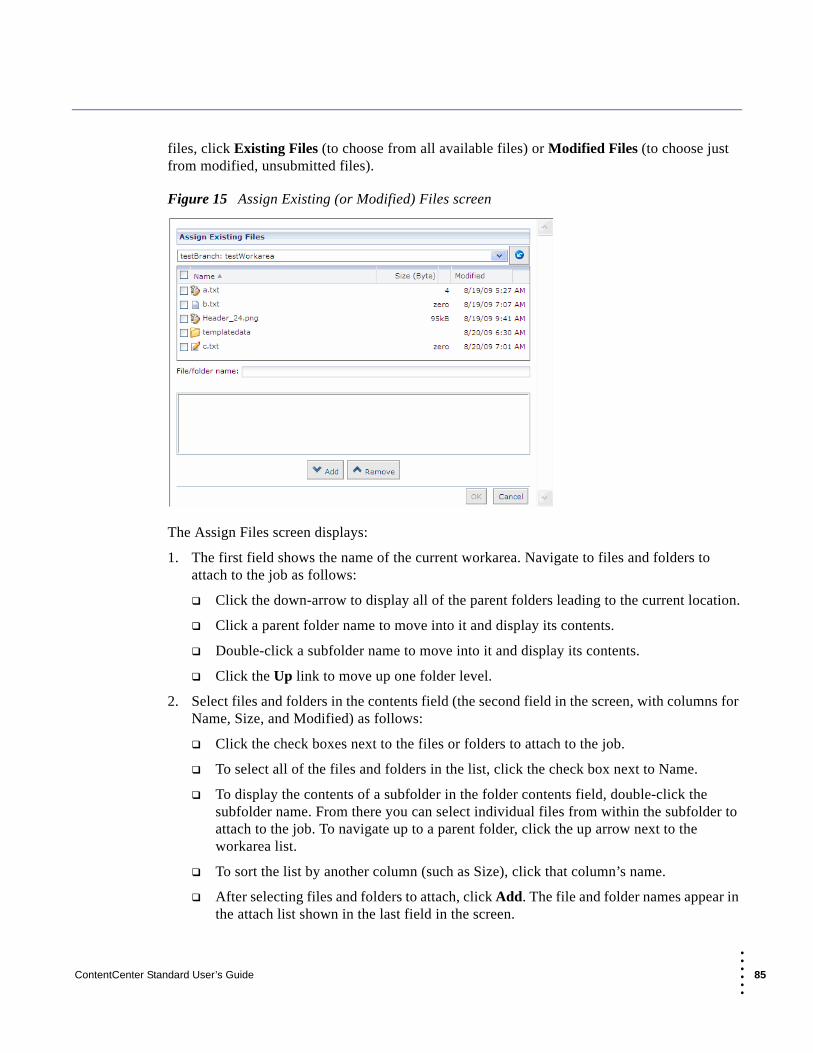
files, click Existing Files (to choose from all available files) or Modified Files (to choose just from modified, unsubmitted files).
Figure 15 Assign Existing (or Modified) Files screen
The Assign Files screen displays:
1. The first field shows the name of the current workarea. Navigate to files and folders to attach to the job as follows:
Click the down-arrow to display all of the parent folders leading to the current location.
Click a parent folder name to move into it and display its contents.
Double-click a subfolder name to move into it and display its contents.
Click the Up link to move up one folder level.
2. Select files and folders in the contents field (the second field in the screen, with columns for Name, Size, and Modified) as follows:
Click the check boxes next to the files or folders to attach to the job.
To select all of the files and folders in the list, click the check box next to Name.
To display the contents of a subfolder in the folder contents field, double-click the subfolder name. From there you can select individual files from within the subfolder to attach to the job. To navigate up to a parent folder, click the up arrow next to the workarea list.
To sort the list by another column (such as Size), click that column’s name.
After selecting files and folders to attach, click Add. The file and folder names appear in the attach list shown in the last field in the screen.
ContentCenter Standard User’s Guide 85
• • • •••

86
3. To remove a file or folder from the attach list shown in the last field in the screen, single click its name and then click Remove.
Shortcuts:
If you know the name of the file or folder to attach, you can avoid scrolling through the file list in the contents field by typing the name in the File/folder name field and then clicking Add.
You can avoid clicking Add by double-clicking a file name in the contents field to add it directly to the attach list.
4. Click OK. You are returned to the Assign File(s) to a New Job screen. The additional files or folders you just attached are shown under Assigned Files. To detach any of them, click Detach to the right of the file or folder name.
5. Click Next to continue the job setup procedure.
Deleting a FileFrom this screen you can delete a file and select how and when to submit the deletion.
Figure 16 Deleting a file
NOTE
If a file resides in a workarea (that is, it was previously submitted and approved) and you delete the file as described here, it is still listed as an existing file in the Work in Progress module and when you view the contents of the directory containing the file. This is because the deletion is
ContentCenter Standard User’s Guide
• • • •••

not recorded in the workarea until you submit the deleted file and the reviewer of your work approves the deletion.
NOTE
After you delete a file, any links to the it will be broken.
To delete a file:
1. Under Delete Options, click the Delete radio button.
1. In the Next Action field, choose one of the following actions. Depending on how ContentCenter is customized for your site, some of these actions might not be available, or you might be limited to just one choice.
To submit the file for approval right away, select Submit from the drop-down menu.
To submit this file and any others in your Work in Progress area for approval, select Submit Work in Progress from the drop-down menu.
To save the file without immediately submitting it for approval, select Keep as Work in Progress from the drop-down menu.
To tag a file with descriptive information (also known as metadata) without submitting the file for approval, select Add Metadata and Exit. In many cases, Add Metadata and Exit is pre-selected for you in the drop-down menu as part of the system configuration.
2. If you are submitting the file, you must select a task or create a new job to process the submission. In the Attach to existing task or new job field, select the task with which to associate the submit process. If no tasks are displayed, select New Job to start a job specifically to execute the submit process.
3. After making your selections, click Next.
If you selected Submit and the file had not been previously submitted and approved (that is, it had only existed as work in progress), the deletion is complete and you are returned to the file browser screen.
If you selected Submit and the file had been previously submitted and approved (that is, it had existed in the workarea), you must submit the deletion for approval. The Select a Workflow screen displays; continue as described in “Selecting a Workflow”.
If you selected Submit Work in Progress, the Submit Work in Progress screen appears, which allows you to select additional work in progress files to submit. Continue with the submit process as described in “Submitting Work in Progress”.
If you selected Keep as Work in Progress, the file remains in the Work in Progress module in the ContentCenter home page and is not submitted. You will have to submit the deletion later for approval and entry into a workarea.
ContentCenter Standard User’s Guide 87
• • • •••

88
If Add Metadata and Exit is set, a form displays so you can enter metadata. After you exit, the file remains in the Work in Progress module.
Copying a FileFrom this screen you can:
Copy a file to a new file name, keeping both the original file and the copy in the same folder.
Copy a file to a new folder without changing the file name.
Copy a file to a new folder and with a new file name.
NOTE
After you copy a file to a new name or location, the original file still exists in its original folder.
Figure 17 Copying a file
To copy a file:
1. To copy the file to a new name, type the new name in the blank field in Item 1. If the copy will reside in the same folder as the original file, you must give the copy a name that is different from the original. If you designate a different folder location for the copy as described in the next step, the copy and the original can have the same name or different names.
ContentCenter Standard User’s Guide
• • • •••
2. To keep the copy in the current folder, leave the field in Item 2 as-is and proceed to Item 3. To put the copy in a different folder, either enter the name of the folder in the field in Item 2, or click Browse and browse to the desired folder.
1. In the Next Action field, choose one of the following actions. Depending on how ContentCenter is customized for your site, some of these actions might not be available, or you might be limited to just one choice.
To submit the file for approval right away, select Submit from the drop-down menu.
To submit this file and any others in your Work in Progress area for approval, select Submit Work in Progress from the drop-down menu.
To save the file without immediately submitting it for approval, select Keep as Work in Progress from the drop-down menu.
To tag a file with descriptive information (also known as metadata) without submitting the file for approval, select Add Metadata and Exit. In many cases, Add Metadata and Exit is pre-selected for you in the drop-down menu as part of the system configuration.
2. If you are submitting the file, you must select a task or create a new job to process the submission. In the Attach to existing task or new job field, select the task with which to associate the submit process. If no tasks are displayed, select New Job to start a job specifically to execute the submit process.
3. After making your selections, click Next.
If you selected Submit, either the Tag File screen or the Select a Workflow screen is displayed. Continue as described in “Tagging a File using Metadata Capture Tagging” or “Selecting a Workflow”.
If you selected Submit Work in Progress, the Submit Work in Progress screen is displayed, which allows you to select additional work in progress files to submit. Continue as described in “Submitting Work in Progress”.
If you selected Keep as Work in Progress, the file remains in the Work in Progress module in the ContentCenter home page and is not submitted. Even though the file copy appears on your system, it is not available to other users until you submit it and it is approved.
If Add Metadata and Exit is set, a form displays so you can enter metadata. After you exit, the file remains in the Work in Progress module.
Renaming a FileFrom this screen you can rename a file and select how and when to submit it.
ContentCenter Standard User’s Guide 89
• • • •••

90
NOTE
After you rename a file, it no longer exists under its original name. Therefore, any links to the file as originally named will be broken. To retain a copy of the file under its original name, you must copy the file rather than move it (see “Copying a File”).
NOTE
When you rename a file, ContentCenter creates a copy of the file under a new name and deletes the old file. You must submit both files.
Figure 18 Renaming a file
To rename a file:
1. Enter the new name in the Rename field.
1. In the Next Action field, choose one of the following actions. Depending on how ContentCenter is customized for your site, some of these actions might not be available, or you might be limited to just one choice.
To submit the file for approval right away, select Submit from the drop-down menu.
To submit this file and any others in your Work in Progress area for approval, select Submit Work in Progress from the drop-down menu.
To save the file without immediately submitting it for approval, select Keep as Work in Progress from the drop-down menu.
ContentCenter Standard User’s Guide
• • • •••

To tag a file with descriptive information (also known as metadata) without submitting the file for approval, select Add Metadata and Exit. In many cases, Add Metadata and Exit is pre-selected for you in the drop-down menu as part of the system configuration.
2. If you are submitting the file, you must select a task or create a new job to process the submission. In the Attach to existing task or new job field, select the task with which to associate the submit process. If no tasks are displayed, select New Job to start a job specifically to execute the submit process.
3. After making your selections, click Next.
If you selected Submit, either the Tag File screen or the Select a Workflow screen is displayed. Continue as described in “Tagging a File using Metadata Capture Tagging” or “Selecting a Workflow”.
If you selected Submit Work in Progress, the Submit Work in Progress screen is displayed, which allows you to select additional work in progress files to submit. Continue as described in “Submitting Work in Progress”.
If you selected Keep as Work in Progress, the file remains in the Work in Progress module in the ContentCenter home page and is not submitted. Even though the file appears with its new name on your system, it still has its old name on other users’ systems. Its new name is not available to other users until you submit the file and it is approved.
If Add Metadata and Exit is set, a form displays so you can enter metadata. After you exit, the file remains in the Work in Progress module.
Moving a FileFrom this screen you can move a file to a different folder and select how and when to submit it.
NOTE
After you move a file to a new folder, it no longer exists in the original folder. Therefore, any links to the file in its original location will be broken. To retain a copy of the file in the original folder, you must copy the file rather than move it (see “Copying a File”).
ContentCenter Standard User’s Guide 91
• • • •••

92
Figure 19 Moving a file
To move a file:
1. Enter the destination folder name in the Select a New Folder field, or click Browse and browse to the desired folder.
1. In the Next Action field, choose one of the following actions. Depending on how ContentCenter is customized for your site, some of these actions might not be available, or you might be limited to just one choice.
To submit the file for approval right away, select Submit from the drop-down menu.
To submit this file and any others in your Work in Progress area for approval, select Submit Work in Progress from the drop-down menu.
To save the file without immediately submitting it for approval, select Keep as Work in Progress from the drop-down menu.
To tag a file with descriptive information (also known as metadata) without submitting the file for approval, select Add Metadata and Exit. In many cases, Add Metadata and Exit is pre-selected for you in the drop-down menu as part of the system configuration.
2. If you are submitting the file, you must select a task or create a new job to process the submission. In the Attach to existing task or new job field, select the task with which to associate the submit process. If no tasks are displayed, select New Job to start a job specifically to execute the submit process.
3. After making your selections, click Next.
If you selected Submit, either the Tag File screen or the Select a Workflow screen is displayed. Continue as described in “Tagging a File using Metadata Capture Tagging” or “Selecting a Workflow”.
ContentCenter Standard User’s Guide
• • • •••

If you selected Submit Work in Progress, the Submit Work in Progress screen is displayed, which allows you to select additional work in progress files to submit. Continue as described in “Submitting Work in Progress”.
If you selected Keep as Work in Progress, the file remains in the Work in Progress module in the ContentCenter home page and is not submitted. Even though the file appears in its new location on your system, it still resides in its old location on other users’ systems. It does not appear in its new location on other users’ systems until you submit the file and it is approved.
If Add Metadata and Exit is set, a form displays so you can enter metadata. After you exit, the file remains in the Work in Progress module.
NOTE
After you move a file to a new folder, it no longer exists in the original folder. Therefore, any links to the file in its original location will be broken. To retain a copy of the file in the original folder, you must copy the file rather than move it (see “Copying a File”).
Viewing File PropertiesFrom this screen you can view file properties, jump to the File Version screen, and tag the file with additional information.
ContentCenter Standard User’s Guide 93
• • • •••

94
Figure 20 File Properties screen
The main area of this screen displays the following file properties:
URL: A link to the file. Clicking this link opens a preview version of the file so you can see how it will appear on a Web site prior to submitting it. See “Using VisualPreview” for more information.
Folder: The name of the folder containing the file.
Size: The size of the file in megabytes (MB), kilobytes (kB), or bytes (no unit designation shown).
Owner: The name of the user who owns the file.
Version: A link showing the file’s version number. Click the version number to see a list of all file versions as described in “Viewing File Versions”.
Modified By: The name of the user who last modified the file.
Modified: The date of the most recent file modifications.
This screen also contains links for Versions and Tag in the top-right corner:
Click Versions to view file versions as described in “Viewing File Versions”.
Click Tag to add additional information to the file as described in “Tagging a File using Metadata Capture Tagging”.
ContentCenter Standard User’s Guide
• • • •••

Viewing File VersionsWhen you submit a file and a reviewer approves it, ContentCenter saves the new version of the file containing your changes and retains the original, pre-edited version. Because previous versions are not deleted, you can view all previous versions of the file, see when and by whom each version was modified, and if necessary revert the current file to an earlier version. Note that versioning only occurs when a file is approved after you submit it. If you just edit a file and save your changes, a new version is not created until it is approved.
Figure 21 File Versions screen
This screen shows the last few versions of a file. The version at the top of the list is the current version. A numeral just to the right of the file name shows the file’s version number; the higher the number, the older the version. A plus (+) next to the current version number indicates that you have modified the file but are keeping it as work in progress or have not yet received approval for your changes.
All of the file names on the version list are links; that is, you can click any version’s file name to open that version of the file in VisualPreview. See “Using VisualPreview” for more information.
Immediately below the file name there might be optional comments about the file entered when the file was submitted. These comments typically describe the changes associated with a given version.
Every file version shows information about who modified the file, the modification date, and file size. Additionally, the current version contains links that let you perform a variety of actions on the file:
The Edit link lets you edit the file as described in “Editing a File”.
ContentCenter Standard User’s Guide 95
• • • •••

96
The Undo Changes link lets you take back any changes you made to the file since its last submission. For example, if a file has a version number of 3+ and you click Undo Changes, it goes back to version 3, and the file is unlocked.
The Properties link lets you view the current version’s properties as described in “Viewing File Properties”.
The Submit link lets you submit the current version as described in “Selecting a Next Action”. When you submit the current version and it is approved, it receives a unique version number without a plus suffix.
Older versions of the file contain a Revert link. When you click Revert, that version becomes the current one after you submit the file and it is approved. If you do not submit the file, the revert action does not take place.
Creating a New FolderTo create a new folder, type the name in the Name field and click Finish. If you enter a name that is already used, an error message is displayed and you must enter a new name. Do not use the following characters in folder names:
/ (slash)
\ (backslash)
: (colon)
* (asterisk)
? (question mark)
“ (quotation mark)
< (less than)
> (greater than)
| (bar)
ContentCenter Standard User’s Guide
• • • •••

Chapter 5
Searching Content
The following topics are discussed in this chapter:
Search Overview
Performing Simple Searches
Performing Advanced Searches
Understanding Search Results
Troubleshooting
Search OverviewThere are two search methods: simple and advanced.
When you search for content, you send a query to the search subsystem. The search subsystem scans a search index for files that match your query, and returns a results page. The results page lists matching files in order of relevance.
Because search queries are compared to a search index and that index is updated on a schedule set by your ContentCenter administrator, your search results might not always be accurate.
For example, let’s say that your ContentCenter administrator has specified that search indices be updated at midnight every night. Let’s say, also, that you create a new document with the word “kitten” in it, that the document is submitted and approved, and that you initiate a search for documents containing the word “kitten” all before midnight. Under those conditions, your document will not be displayed among the search results. If you perform the same search again after midnight, then your document will be included among the results. If you experience problems searching, contact your ContentCenter administrator.
ContentCenter Standard User’s Guide 97
• • • •••

98
NOTE
If your search includes workareas, modified content that has been indexed will be included in the search results.
You can search content in one workarea at a time. You cannot search content across areas.
NOTE
Search is case-sensitive only when you enter search terms in mixed case; search does not consider case when terms are entered using all lower-case characters or all upper-case characters. See “Case Sensitivity” for details.
Related Information
“Performing Simple Searches”
“Performing Advanced Searches”
Case Sensitivity
Search is case-sensitive only when you enter search terms in mixed case; search does not consider case when terms are entered using all lower-case characters or all upper-case characters.
That is because the search subsystem “assumes” that when you enter terms in mixed case you are looking for results that match the search terms exactly as you entered them.
When you enter search terms in all lower-case characters or in all upper-case characters, the search subsystem assumes that you are not looking for an exact match and returns documents that contain your terms regardless of case.
For example, if you enter “ContentCenter” as a search term, the search subsystem assumes that you are looking for exactly “ContentCenter” and not “contentcenter”, “conTentcenTer”, or any other permutation. Only documents containing “ContentCenter” are returned.
If you enter “contentcenter”, the search subsystem assumes that you are looking for any permutation of that term and returns documents that contain the term in any case combination, such as “ContentCenter”, “conTentcenTer”, “CONTENTcenter”, and so on.
This also applies when the user is searching file attributes, such as the file owner in the form domain\\user. Specifying Domain\\User would result in a case-sensitive search being attempted.
ContentCenter Standard User’s Guide
• • • •••

Related information
“Performing Simple Searches”
“Performing Advanced Searches”
Performing Simple SearchesYou can perform a “simple” search from any of these locations:
ContentCenter home page Search section
Advanced Search page
Search Results page
Simple search returns documents that contain any of your keywords. Phrase matching, wild cards, and Boolean logic—the use of “and”, “+”, “not”, “-”, and other operators in a search query—are not supported by simple search. See “Performing Advanced Searches” for information about creating complex queries that include phrases, Boolean logic, and other parameters.
To perform a simple search:
1. Select the area you want to search.
2. Enter keywords.
3. Click .
Related Information
“Performing Advanced Searches”
“Searching Content”
“Troubleshooting”
Performing Advanced SearchesTo display the Advanced Search screen:
Click Advanced Search in the Search section of the ContentCenter home page.
ContentCenter Standard User’s Guide 99
• • • •••
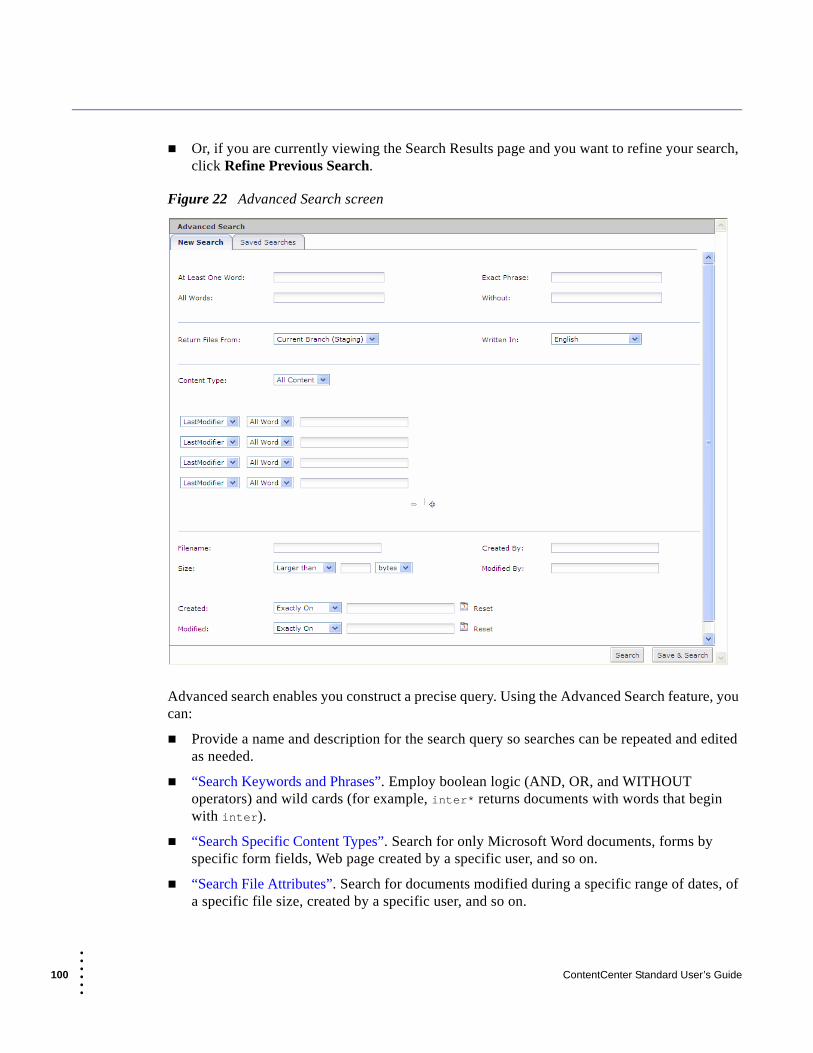
10
Or, if you are currently viewing the Search Results page and you want to refine your search, click Refine Previous Search.
Figure 22 Advanced Search screen
Advanced search enables you construct a precise query. Using the Advanced Search feature, you can:
Provide a name and description for the search query so searches can be repeated and edited as needed.
“Search Keywords and Phrases”. Employ boolean logic (AND, OR, and WITHOUT operators) and wild cards (for example, inter* returns documents with words that begin with inter).
“Search Specific Content Types”. Search for only Microsoft Word documents, forms by specific form fields, Web page created by a specific user, and so on.
“Search File Attributes”. Search for documents modified during a specific range of dates, of a specific file size, created by a specific user, and so on.
0 ContentCenter Standard User’s Guide
• • • •••

Related information
“Performing Simple Searches”
“Searching Content”
“Troubleshooting”
“Saved Searches”
Search Keywords and Phrases
You can enter search terms in the following text fields in the Search Text area of the Advanced Search screen.
At least one word. Content containing any of the words or phrases entered in this field is returned among the search results.
All Words. Content containing all of the words and phrases entered this field is returned among the search results.
Without. Content containing any of the words and phrases entered in this field is excluded from the search results.
Exact Phrase. Content containing the phrase entered in this field is returned among the search results. Enter a single phrase only; multiple phrases are not supported. Do not enclose the phrase in quotation marks.
Return Files From. When doing an advanced search, you can search all content on in workareas. A list of your workareas displays, with the current workarea selected. You can change the selected workareas.
Written in. Content written in the selected language is returned among the search results.
You can enter multiple words in any text field (except the Exact Phrase field) by simply leaving a space between words. Enclose phrases in quotation marks: for example, laptop 2400 “new product”.
You can enter wild cards by using an asterisk (*). For example, inter* returns documents with words that begin with inter; *able returns documents with words that end in able.
You can use a question mark (?) to match exactly one character; it is a placeholder for a single letter. For example, the query ‘h?tp’, will find the string “http”.
NOTE
Search is case-sensitive only when you enter search terms in mixed case; search does not consider case when terms are entered using all lower-case characters or all upper-case characters. See “Case Sensitivity” for details.
ContentCenter Standard User’s Guide 101
• • • •••

10
Related Information
“Performing Advanced Searches”
“Search Specific Content Types”
“Search File Attributes”
Search Specific Content Types
You can further narrow your search by specifying the type of content you want to find. You can choose from one of the following content types.
Forms. Returns matching content that was entered into ContentCenter forms.
Microsoft Word. Returns matching content generated with Microsoft Word (.doc files only by default. Your ContentCenter administrator can configure your system to search for other file types generated by this Microsoft application).
Microsoft Excel. Returns matching content generated with Microsoft Excel (.xls files only by default. Your ContentCenter administrator can configure your system to search for other file types generated by this Microsoft application).).
Microsoft PowerPoint. Returns matching content generated with Microsoft PowerPoint (.ppt files only by default. Your ContentCenter administrator can configure your system to search for other file types generated by this Microsoft application).
Adobe PDF. Returns matching content that has a .pdf file extension.
Text files. Returns matching content that has a .txt file extension.
HTML. Returns matching content that has a .html or .htm extension.
XML. Returns matching content that has a .xml extension.
NOTE
Some forms contain menus, such as drop-down menus. ContentCenter administrators can configure menus so that a value different from the displayed text is what is actually saved. For example, your ContentCenter administrator configures a form. The form contains a menu with a list of states: California, Florida, Washington. The menu is configured so that the abbreviation for the selected state is saved, not the full name. So, if a user selects California and saves the form, the value “CA” is what is actually saved.Under those conditions, a search for “California” will not return the form; a search for “CA” would. If you experience problems searching forms, contact your ContentCenter administrator.
The menus in the Content Type section are context-sensitive. That is, when you select a content type, the options in the other menus change to suit the type of content you selected. For example, if you select Forms, a new menu where you can select the type of form is added and
2 ContentCenter Standard User’s Guide
• • • •••

the other menus are populated with form field names. Use the + and - buttons in the lower right corner of the section to add more menus.
Related Information
“Performing Advanced Searches”
“Search Keywords and Phrases”
“Search File Attributes”
Search File Attributes
You can search any combination of file name, file size, created by (user who originally created the file), modified by (user who last modified the file), creation date, and modification date.
To search by file name, enter the name of the file you want and include the extension or use filename.*, where filename is the name of the file you want, to look for any type of file with the name you specify.
To search for files by the user who owns them, enter the name of the user in the Created by field. Enter domain qualified user names with a double backslash: interwoven\\chris, for example (Windows).
To search for files by the user who last modified them, enter the name of the user in the Modified by field. Enter domain qualified user names with a double backslash: interwoven\\chris, for example (Windows).
To search for files by file size, select the options you want from the Size menus and enter a numerical value in the text field.
To search for files by creation date or modification date, select the option you want from the
menu and use the calendar widget to select a date.
Related Information
“Performing Advanced Searches”
“Search Keywords and Phrases”
“Search Specific Content Types”
ContentCenter Standard User’s Guide 103
• • • •••

10
Saved SearchesThe Saved Searches area displays all search queries that you created and specifically saved. You can save a maximum of 20 search queries.
Click on the search name or the Search link to run that query. Click Edit to display the Advanced Search screen so you can make modifications to that search query. Once you edit a query, you can save it with the same name or select a new name. You can also delete saved queries.
When a search query is saved, the location where the search was performed is also saved. When a saved query is selected, the search is performed in the original location, regardless of where the user is working when the query is selected.
Understanding Search ResultsSearch results are listed in order of relevance. Documents that most closely match your search criteria are listed first.
If you are not satisfied with the results of your search, click Refine Previous Search. The Advanced Search screen displays so you can refine your search criteria so that your search is more narrow or more broad.
Save the search query that generated these results by clicking Save Search Criteria. The dialog box displays so you can enter a search name and description. From here, click Save and Search to save the query and run the search again or Save and View Saved Searches to save the query and display the Saved Searches screen.
You may see different results when performing a saved search in ContentCenter Standard compared to the results from the same search in ContentCenter Professional. ContentCenter Standard returns the results from entire workarea while ContentCenter Professional may search a specific folder or branch.
NOTE
Search is case-sensitive only when you enter search terms in mixed case; search does not consider case when terms are entered using all lower-case characters or all upper-case characters. See “Case Sensitivity” for details.
4 ContentCenter Standard User’s Guide
• • • •••

Related Information
“Searching Content”
“Troubleshooting”
TroubleshootingIf you are having trouble finding what you are looking for, consider the following:
Ensure that you correctly spell your search terms.
The search subsystem relies on a search index. Recently submitted content might not be indexed immediately. Check with your ContentCenter administrator to find out when content is indexed.
Only submitted content is searchable. You cannot search unsubmitted content.
The modification date displayed in ContentCenter refers to the date when the content of the file was last updated. If only the file’s metadata is modified, the modification date displayed in ContentCenter will not change. Search considers a file modified if either its content or its metadata has been changed. Therefore, searches that employ Last Modified Date as a criterion could return unexpected results.
Some forms contain menus, such as drop-down menus. ContentCenter administrators can configure menus so that a value different from the displayed text is what is actually saved. For example, your ContentCenter administrator configures a form. The form contains a menu with a list of states: California, Florida, Washington. The menu is configured so that the abbreviation for the selected state is saved, not the full name. So, if a user selects California and saves the form, the value “CA” is what is actually saved. Under those conditions, a search for “California” will not return the form; a search for “CA” would. If you experience problems searching forms, contact your ContentCenter administrator.
When search subsystem indexes content, it attempts to identify the languages in which the content is written. If some content does not contain enough natural-language text for the indexing engine to determine its language, then it is not indexed. This can be a problem for forms, which often contain non-natural-language text, such as part numbers.
For example, let’s say you fill out a form that has only two fields: Item number and Minimum bid amount. You enter 123 for the item number and 20.00 for the minimum bid amount. You submit the form, and the search subsystem attempts to index it. Because the form entries do not contain any natural-language text, the indexing engine can not determine the language in which the form is written and fails to index it. A search for “123” or “20.00” might yield results, but this form will not be included among them. As a best practice, ContentCenter administrators should ensure that forms contain some natural-language text.
ContentCenter Standard User’s Guide 105
• • • •••

10
Related Information
“Searching Content”
6 ContentCenter Standard User’s Guide
• • • •••
Chapter 6
Working With Tasks
The following topics are discussed in this chapter:
Tasks Overview
Using the Task Details Screen
Attaching Files to a Task
Adding Comments to a Task
Tasks OverviewA task is a single step that is part of a workflow-based job. There are two types of tasks: individual and group.
Individual tasks are assigned to a specific person. If an individual task is assigned to you, it appears under My Tasks in the Tasks module of your ContentCenter home page. From there you can take whatever action is necessary to complete the task.
Group tasks are assigned to a group of people, any one of whom can perform the task. (Groups are defined and maintained by ContentCenter administrators and other maintainers of your ContentCenter system.) If a group task is assigned to your group, it appears under Group Tasks in the Tasks module of your ContentCenter home page. From there you can take ownership of the task and complete it.
When a job is started, the person initiating it specifies who should perform each task. Each person who is to perform a task is notified through the Tasks module on the ContentCenter home page (and optionally through email) that there is a task to perform. After a task is performed, the job proceeds to the next task in its predefined sequence. When all of the tasks in a job are done, the job is complete.
You work with tasks primarily through the Tasks module of the ContentCenter home page. From there, you can click a task name or number to display the Task Details screen. From the Task Details screen you can take a variety of actions on the task. For example, if you are a reviewer of
ContentCenter Standard User’s Guide 107
• • • •••

10
someone else’s content, you approve or reject the content from the Task Details screen. You can perform numerous other operations from the Task Details screen, such as attaching and detaching a task’s files, reviewing and adding comments, comparing file versions, and so on.
NOTE
Under some circumstances, it is possible for a user to submit file modifications that conflict with changes made earlier to the same file. When this happens, the reviewer named in the submit workflow must resolve the conflicts as part of the submission process. Unless a custom workflow is implemented at your site, users who originally made the conflicting modifications are not notified of the conflict.
Related Information
“Using the Task Details Screen”
“Using the Tasks Module”
Using the Task Details ScreenThe Task Details screen shows information and instructions about a single task and lets you perform a variety of actions related to that task:
Edit or delete files that are already attached to the task (see “Edit and Delete Attached Files”).
Detach files from the task without deleting them (see “Detach Files”).
Preview files attached to the task before you submit the task for approval (see “Preview Attached Files”).
Review an attached file’s version history and compare different versions side by side (see “Review and Compare File Versions”).
View file comments from other users and add additional comments to an attached file (see “Review and Add File Comments”).
Review file tags and add additional tags to an attached file (see “Review and Add File Tags”).
Review task comments from other users and add additional comments to a task (see “Review and Add Task Comments”).
Attach more files to the task (see “Attaching Files to a Task”).
Perform an action specified by the task. For example, approving or rejecting content changes, tagging a file, and so on (see “Perform Task-Specific Actions”).
8 ContentCenter Standard User’s Guide
• • • •••
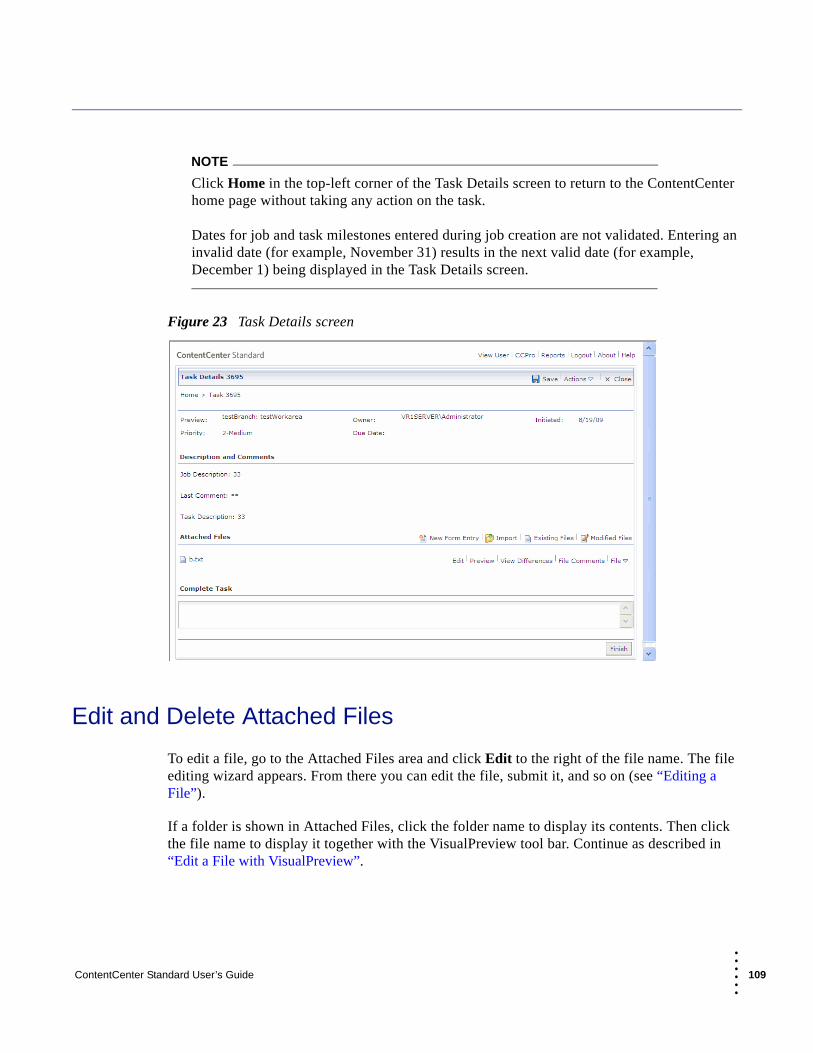
NOTE
Click Home in the top-left corner of the Task Details screen to return to the ContentCenter home page without taking any action on the task.Dates for job and task milestones entered during job creation are not validated. Entering an invalid date (for example, November 31) results in the next valid date (for example, December 1) being displayed in the Task Details screen.
Figure 23 Task Details screen
Edit and Delete Attached Files
To edit a file, go to the Attached Files area and click Edit to the right of the file name. The file editing wizard appears. From there you can edit the file, submit it, and so on (see “Editing a File”).
If a folder is shown in Attached Files, click the folder name to display its contents. Then click the file name to display it together with the VisualPreview tool bar. Continue as described in “Edit a File with VisualPreview”.
ContentCenter Standard User’s Guide 109
• • • •••

11
To delete a file, go to the Attached Files area and click File to the right of the file name. Select Delete from the menu. The file delete wizard appears, from which you can finish the deletion (see “Deleting a File”).
NOTE
Submitting a deleted file removes it from the workarea after the deletion is approved. If you want to detach the file from the current task without deleting it from the workarea, follow the steps in “Detach Files”.
The following icons are used in file listings throughout ContentCenter:
The file is not locked or restricted in any other way. It has not been modified since its last
submission to the content area. You and others can modify the file.
The file has been modified; it differs from the most recently submitted and approved version in the content area. The file is not locked; you and others can modify it.
The file is locked by you but has not been modified; you can modify it and submit it.
The file is locked by you and you have modified it. You can continue to modify it.
The file is locked by someone else but has not been modified. You cannot modifiy it.
The file is locked by someone else and has been modified. You cannot modify it.
The file is private and is not available to other users.
The file has been deleted, but the deletion has not been submitted and approved.
The file is missing. This situation occurs when you create a new file in your content area and then add the file to My Favorites or attach it to a task. You then delete the file from your content area, but do not delete it from My Favorites or detach it from the task.
Detach Files
To detach a file, go to the Attached Files area and click File on the right side of the screen. Select Detach from the menu. A dialog box is displayed confirming that you want to proceed. Click OK to continue detaching, or click Cancel to stop and return to the Task Details screen.
0 ContentCenter Standard User’s Guide
• • • •••

After the file is detached, the Task Details screen is refreshed and the file no longer appears in the Attached Files area.
Preview Attached Files
Previewing a file lets you see what it looks like before you submit it. To preview an attached file, go to the Attached Files area and click Preview to the right of the file name. The file is displayed together with the VisualPreview tool bar. VisualPreview lets you view the contents of a file and optionally perform some other action on the file (such as editing, moving, renaming, and so on). See “Using VisualPreview” for more information.
If you decide not to perform any actions on the file, you can close VisualPreview without changing the file by clicking your browser’s Back button. Or, to make the VisualPreview toolbar disappear while the file stays open for viewing, click the X in the top-right corner of the VisualPreview toolbar.
Review and Compare File Versions
Whenever you submit a file and it is approved, ContentCenter saves the new version of the file containing your changes and retains the original, pre-edited version. Because previous versions are not deleted, you can view all previous versions of the file, see when and by whom each version was modified, and if necessary revert the current file to an earlier version. Note that versioning only occurs when you submit a file and it is approved.
To see a file’s version history, go to the Attached Files area and click File to the right of the file name. Select Versions from the menu. The File Versions screen appears. From there you can review version information and perform a variety of operations on the current version of the file as described in “Viewing File Versions”.
To compare a modified file to a previous version side by side, go to the Attached Files area and click View Differences to the right of the file name (see “View File Differences”).
View File Differences
When you click View Differences, two versions of the same file are displayed side by side on your screen as they would appear in a browser.
The file on the left side is the most recent iteration containing any changes you made; the file on the right is the most recently submitted and approved version. For example, if you edited a file
ContentCenter Standard User’s Guide 111
• • • •••

11
named index.html, the edited file is displayed on the left showing the results of any changes you made during your editing session. The version on the right shows the file in its pre-edited state.
When you are done viewing the files, close the browser window displaying them.
Review and Add File Comments
Files attached to tasks can contain descriptive comments added by anyone working on the task. Files can also be tagged with additional information such as keywords. File comments differ from task comments in that they pertain just to a specific file, not to the entire task. If you detach a file from a task, or if the job containing the task finishes, the file comments are discarded.
Figure 24 Task File Comments screen
The Task File Comments screen is accessed by clicking File Comments next to a file in the Attached Files area. This screen contains all previous comments and a field where you can enter new comments. After entering your comments, click Save.
Review and Add File Tags
To review existing tags or to add new tags, go to the Attached Files area and click File to the right of the file name and select Tag from the menu. The Tag File screen appears, from which you can review, add, and edit file tags as described in “Tagging a File using Metadata Capture Tagging”.
2 ContentCenter Standard User’s Guide
• • • •••

Review and Add Task Comments
Tasks can contain descriptive comments added by anyone who has worked on the task. Task comments differ from task file comments in that they stay attached to the task over its entire life span, independent of any files that are attached to or detached from the task.
Task comments appear in the Job Description and Comments area toward the center of the Task Details screen. The Last Comment or Comments field shows the most recent comment attached to the task. If there are additional comments, a link to them appears at the end of the Last Comment field. For example, a link labeled + view 2 previous indicates that there are two earlier comments that you can view by clicking the link. When you click the link, all task comments are displayed. To switch the display back to just showing the most recent comment, click View Last Comment.
To add more task comments, type them in the Task Comments area at the bottom of the Task Details screen. The comments are attached to the task:
When you are through viewing the task and you transition out of the Task Details screen by clicking one of the transition links in the lower-right corner (such as Done, Accept, Reject, and so on), or
When you click Save in the top-right corner of the Task Details screen.
NOTE
The transition links in the lower-right corner have different names depending on which type of task is displayed. The labels Done, Accept, and Reject shown here are examples; the links in your screen could be different.
Perform Task-Specific Actions
Different types of tasks require different types of action. The type of action that is required in turn dictates what happens when you transition out of Task Details by clicking a link in the bottom-right corner of the screen. The action required by each task is determined by the workflow defining the job containing the current tasks.
For example, suppose that someone selected a workflow requiring that a file be edited and then subjected to two review cycles. In this situation:
The person selected as the editor would receive a task requiring that he edit the file. When this task is displayed in Task Details, the label of the link at the bottom of the screen reflects the action that takes place when the link selected upon task completion. In this case, the label is Done. After the editor edits the file (by selecting Edit from the Task Details screen), he clicks Done, and the job transitions to the next task.
ContentCenter Standard User’s Guide 113
• • • •••

11
After the editor clicks Done, the first reviewer receives a task requiring her to approve or reject the editor’s changes. When this task is displayed in Task Details, the links at the bottom of the screen are labeled Approve and Reject. The reviewer selects one of these links, and the job transitions to the next task.
The second reviewer receives a similar Approve/Reject task and selects the appropriate link. The job continues as defined by the workflow until the edited file is added to the workarea.
Because workflows are set up by ContentCenter administrators and are site-specific, the transition links out of the Task Details screen—those that reflect the actions required by a task—could have any number of different labels.
As a general rule, the links in the bottom-right corner of the Task Details screen start the process of transitioning to the next task in the job. In some cases, this transition process consists just of clicking the link. That is, when you click the link, the transition is complete. In other cases, clicking the link leads you through other required steps as part of the transition process. If you have questions about what specifically happens during transitions in any given workflow, contact your ContentCenter administrator.
Attaching Files to a TaskYou can attach any number of additional files to the current task. The files can come from either the current ContentCenter repository or your local system (such as the C: drive on your computer).
NOTE
If you have access to more than one ContentCenter repository, you can only add files from the current repository through this screen.
To attach files from the ContentCenter repository:
1. Click either the Existing Files or Modified Files button to the right of the Attached Files section. Clicking Existing Files displays a list of all files and folders in the ContentCenter repository. Clicking Modified Files displays only the files and folders that have been modified since their last submission.
2. In the Attach Files To Task screen, click the checkboxes next to the file or folder names to add. To select the entire file list, click the checkbox next to Name. To select individual items from within a folder, double-click the folder name. Doing so displays the folder contents rather than placing the entire folder on the add list. After the desired files or folders are checked, click the Add button. The file or folder names are placed on the add list in the
4 ContentCenter Standard User’s Guide
• • • •••

bottom area of the screen. Continue to place files or folders on the add list as necessary. If necessary, use the down and up arrow buttons in the top-right corner to navigate to other folders in the repository.
3. When the add list contains all of the files or folders you want to add to the task, click Attach File.
To attach files from your local system:
1. Click the Import button to the right of the Attached Files section.
2. Follow the instructions in “Importing a File”.
Adding Comments to a TaskTasks can contain descriptive comments added by anyone who has worked on the task. Task comments differ from file comments in that they stay attached to the task over its entire life span, independent of any files are attached or detached to the task.
Task comments appear in the Description and Comments area toward the center of the Task Details screen. The Last Comment field shows the most recent comment attached to the task. If there are additional comments, a link to them appears at the end of the Last Comment field. For example, a link labeled + view 2 previous indicates that there are two earlier comments that you can view by clicking the link. When you click the link, all task comments are displayed. To switch the display back to just showing the most recent comment, click View Last Comment.
To add more task comments, type them in the Task Comments area at the bottom of the Task Details screen. The comments are attached to the task when you click the link in the bottom-right corner of Task Details to transition to the next task in the job.
ContentCenter Standard User’s Guide 115
• • • •••

11
6 ContentCenter Standard User’s Guide• • • •••

Chapter 7
Additional File Actions
When you begin to use TeamSite, you may be asked to install the VisualAnnotate tool bar. You can also edit files through email.
The following topics are described in this chapter:
Installing the VisualAnnotate Tool Bar
Approving a File through Email
Editing a File through Email
Installing the VisualAnnotate Tool BarVisualAnnotate lets you add review comments and other annotations to a file. You can add “sticky notes,” insert and format text, or write directly on the file using a pen tool. See the Installing VisualAnnotate help screen for details about installing the VisualAnnote tool bar.
NOTE
Using third-party toolbars, such as the Yahoo toolbar, may interfere with the VisualAnnotate toolbar.
Approving a File through EmailYou have the following options when you receive email requesting approval of one or more files. In most cases, clicking an option takes you to a ContentCenter screen, from which you can click Help for further details about how to proceed. If you are not already logged into ContentCenter, you will be required to do so at that time.
ContentCenter Standard User’s Guide 117
• • • •••

11
Task number. Click the task number in the top-left corner to display the Task Details screen for that task.
Preview. Click the workarea name to the right of Preview to display the area’s contents in the File Browser screen.
Take (For group tasks only). Assigns the task to you.
View Previous. Displays previous task comments.
File names. Click a file name to display it in a browser together with the VisualPreview tool bar.
Folder names. Click a folder name to display a list of its contents in a browser together with the VisualPreview tool bar.
Preview. Displays the file together with the VisualPreview tool bar.
Properties. Displays file properties such as size, location, creator, modification date, and so on.
File Comments. Displays comments added by other users about the file and lets you add additional comments. An asterisk indicates that the file has at least one comment.
Finish. Displays the Add Comments for Task screen, from which you perform the task’s next steps.
NOTE
The options available to you depend on several factors such as file permissions, file type, and so on. Therefore, some of these options might not be available to you for all files.
Editing a File through Email You have the following options when you receive email requesting that you edit one or more files. In most cases, clicking an option takes you to a ContentCenter screen, from which you can click Help for further details about how to proceed. If you are not already logged into ContentCenter, you will be required to do so at that time.
Task number. Click the task number in the top-left corner to display the Task Details screen for that task.
Preview. Click the workarea name to the right of Preview to display the area’s contents in the File Browser screen.
Take (For group tasks only). Assigns the task to you.
View Previous. Displays previous task comments.
8 ContentCenter Standard User’s Guide
• • • •••

File names. Click a file name to display it in a browser together with the VisualPreview tool bar.
Folder names. Click a folder name to display a list of its contents in a browser together with the VisualPreview tool bar.
Edit. Opens the file for editing prior to approval.
Preview. Displays the file together with the VisualPreview tool bar.
View Differences. Displays two versions of the same file side by side. The file on the left side is the most recent iteration containing any changes you recently made; the file on the right is the most recently submitted (that is, pre-edited) version.
Properties. Displays file properties such as size, location, creator, modification date, and so on.
File Comments. Displays comments added by other users about the file and lets you add additional comments. An asterisk indicates that the file has at least one comment.
Finish. Displays the Add Comments for Task screen, from which you perform the task’s next steps.
NOTE
The options available to you depend on several factors such as file permissions, file type, and so on. Therefore, some of these options might not be available to you for all files.
ContentCenter Standard User’s Guide 119
• • • •••

12
0 ContentCenter Standard User’s Guide• • • •••

Index
A
Adobe PDF documents, searching 102
B
boolean, searching 101
Browse button 49, 52
browsing
content areas 25
files and folders 39
workareas 24
C
cancel 60, 72
case sensitivity 98
changes
undoing 27
comments
file 112
task 67, 113, 115
comparing file versions 111
conflicts
file 108
content
browsing 25, 39
search by type 102
searching 97
copying
files 88
D
deleting
files 86
detaching files from tasks 69, 110
details
task 68, 108
E
editing
files 24, 64
local 23
Excel documents, searching 102
F
favorites
adding 28, 33, 38, 44
file actions 27
preview and edit 26
removing 28
renaming 29
fields 48, 52
File Actions menu 43
file attributes
searching 103
files
approval through email 117
attached to tasks 109
attaching to tasks 67, 114
browsing 39
comments 112
comparing 111
conflicts 108
copying 88
creating new job 84
deleting 86
differences 111
editing 24, 26, 27, 31, 35, 37, 64
through email 118
favorites 25
ContentCenter Standard User’s Guide 121
• • • •••

12
icons 21, 31, 36, 40, 42, 64, 110
importing 31, 37, 60
listing 42
miscellaneous actions 31
moving 91
name extensions 34, 37, 64
previewing 24, 25, 27, 34, 67
properties 28, 33, 38, 43, 93
reverting 95, 96
searching 97
setting name and location 55
sorting list 44
submitting 31, 66
tagging 27, 77
versions 95, 111
first-time use 22
folders
browsing 26, 39
creating 42, 96
illegal name characters 96
form entry
defined 17
form entry file
creating 33, 35, 45, 46, 48
displaying 55, 58
editing existing 51
naming 57
previewing 54
saving 53
forms
defined 17, 45
fields
duplicating 48, 52
filling in 48
filling in 33, 46
formatting 49
icons 34
searching 102
selecting 46
G
group task 107
H
How Do I module 23
HTML files, searching 102
I
icons
file 21, 31, 36, 40, 42, 64, 110
form 34
link 39
task 29
import
file name conflicts 64
files from local computer 37, 60
setting destination location 62
individual task 107
J
job
attaching files 84
defined 18, 30
task transitions 113
K
keywords, searching 101
L
links
checking 39
Local File Manager 34, 37
local files
editing 23
logging in 23
login information 22
M
metadata 77
Microsoft Office documents, search by type 102
moving
files 91
2 ContentCenter Standard User’s Guide
• • • •••

•
My Favorites module 25
My Workareas module 24
N
navigating
folders 41
New Forms module 33
O
output file
defined 17
generating 55
overview
ContentCenter 19
P
phrases, searching 101
PowerPoint documents, searching 102
presentation template
combining with form entry 55
defined 17
selecting 58
preview
defined 18
previewing
files 24
files attached to tasks 67, 108, 111
forms 54
properties
file 28, 33, 38, 43, 93
publish
defined 17
R
regenerate tags 80
rename
files 89
results, search 104
reverting files 95, 96
S
saved search 104
saved searches module 29
search
advanced 99
boolean 101
by content type 102
case sensitivity 98
file attributes 103
keywords and phrases 101
overview 97
results page 104
saved 29
saving queries 104
simple 99
troubleshooting 105
wild cards 101
search module 29
submit
defined 18
modified files 66, 86, 89, 91
options 66
Work in Progress 31, 69
suggesting tags 76, 83
system information 22
T
tagging
automatic 79
defined 18
example 77
files 93
attached to tasks 112
manual entry 78
overview 77
re-tag 80
reviewing tags 112
selecting terms 84
tags
adding to 76, 81
entering manually 73
generating automatically 75
regenerating 80
ContentCenter Standard User’s Guide 123• • •••

12
searching predefined 76, 81
suggesting 76, 83
tasks
assigning 66
attached files
comparing 111
attaching files 67, 114
comments 67, 113, 115
completion 70, 113
defined 18, 30, 107
detaching files 69, 110
details 31, 68, 108
file conflicts 108
group 29, 107
icons 29
individual 29, 107
modifying attached files 109
module 29
previewing attached files 111
transition 113
unattaching files 108
viewing 29
terms 17
entering search 101
form 17
form entry 17, 18, 19
job 18
output file 17
presentation template 17
preview 18
publish 17
submit 18
tag 18
task 18
version 19
workarea 18
workflow 19
text files, searching 102
Tiny MCE 49
transition between tasks 113
U
undo changes 27
V
versions
defined 19
file 95
attached to task 111
VisualAnnotate
installing 117
VisualPreview 34
available actions 35
example 34
file actions 37
W
wild cards, searching 101
Word documents, searching 102
Work in Progress
file actions 32
module 31
submitting 69
workarea
defined 18
workflow
defined 19, 68
example 68
selecting 68
4 ContentCenter Standard User’s Guide
• • • •••


