Copyright: all rights reserved.This manual may be copied for use within the premises of the Licensee on condition that it is not loaned, sold or usedoutside the Licensee’s premises.
Data Harvest’s policy is to continually improve products and services, so we reserve the right to make changes without notice. It is acknowledged that there may be error or omissions in this publication for which responsibility cannot be assumed. No liability will be accepted for loss or damage resulting from use of information contained in thismanual or from uses as described.
Document No: DO160
1
2
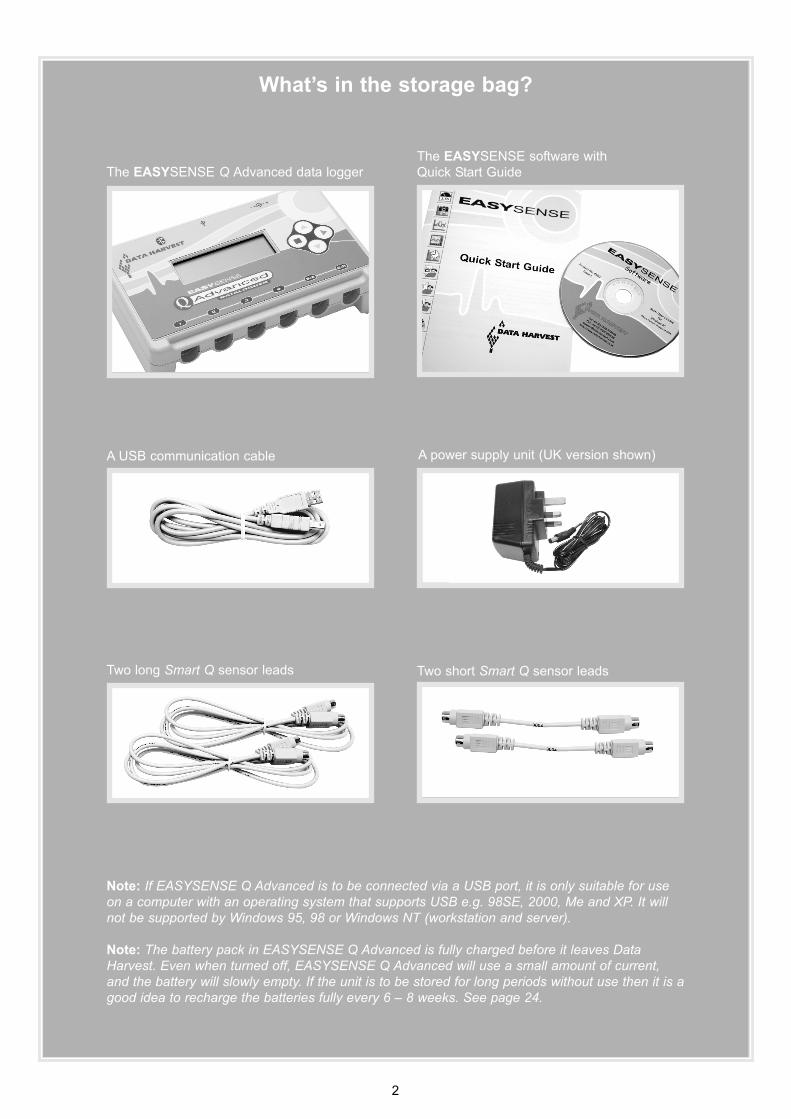
The EASYSENSE Q Advanced data logger
A USB communication cable A power supply unit (UK version shown)
Two long Smart Q sensor leads Two short Smart Q sensor leads
The EASYSENSE software with Quick Start Guide
What’s in the storage bag?
Note: If EASYSENSE Q Advanced is to be connected via a USB port, it is only suitable for useon a computer with an operating system that supports USB e.g. 98SE, 2000, Me and XP. It willnot be supported by Windows 95, 98 or Windows NT (workstation and server).
Note: The battery pack in EASYSENSE Q Advanced is fully charged before it leaves DataHarvest. Even when turned off, EASYSENSE Q Advanced will use a small amount of current,and the battery will slowly empty. If the unit is to be stored for long periods without use then it is agood idea to recharge the batteries fully every 6 – 8 weeks. See page 24.
The EASYSENSE Q Advanced data loggerEASYSENSE Q Advanced is a fully self-contained portable data logger, which can be used:
1. As an interface connected to a computer
2. As a stand alone instrument
In its stand alone mode EASYSENSE Q Advanced can:!! Display meter readings of the sensor attached
!! Record the data from sensors in its memory for transferring later to a computer for analysis
EASYSENSE Q Advanced buttonsThe green triangle (ENTER) button is used to start data collection, to confirm a choice or take a sample.
The red square (STOP) button is used to stop data being recorded or return to the previous screen.
The blue triangle buttons (SCROLL) are used to scroll through menus on the LCD screen or to browse measurements during data logging.
To wake up EASYSENSE Q Advanced, press any of the buttons on the top panel.
3
Bluetooth LED indicator
LCD Display
USB input
Power Light
Power Socket
Blue triangle(scroll up) button
Green triangle(enter or select) button
Blue triangle(scroll down) button
Red square(stop or back) button
Inputs for plug-in sensors(Note: Input 5 and 6 dual labelled as A and B for Timing operations)
Bluetooth Logo (on Bluetooth enabled loggers only)
4
Smart Q Sensors Smart Q Sensors are each equipped with a sophisticated microprocessor that greatly improves thesensor’s accuracy, precision and consistency. The auto-identification circuitry dramatically simplifiesset up procedures and allows for greater flexibility when logging data.
The six inputs on Q Advanced may be used with analogue and digital sensors. Both will be recordedside by side during logging operations e.g. whilst recording with traditional analogue sensors, a digital sensor can be used to create a ‘blip’ on the graph to mark an event. Once a Smart Q Sensoris connected it will automatically be detected and displayed on the LCD display.
To maintain consistency with existing software, sensor inputs 5 and 6 are duallabelled as A and B. These inputs for are use with digital sensors which must be connected to either Input 5:A or Input 5:A and 6:B during Timing operations.
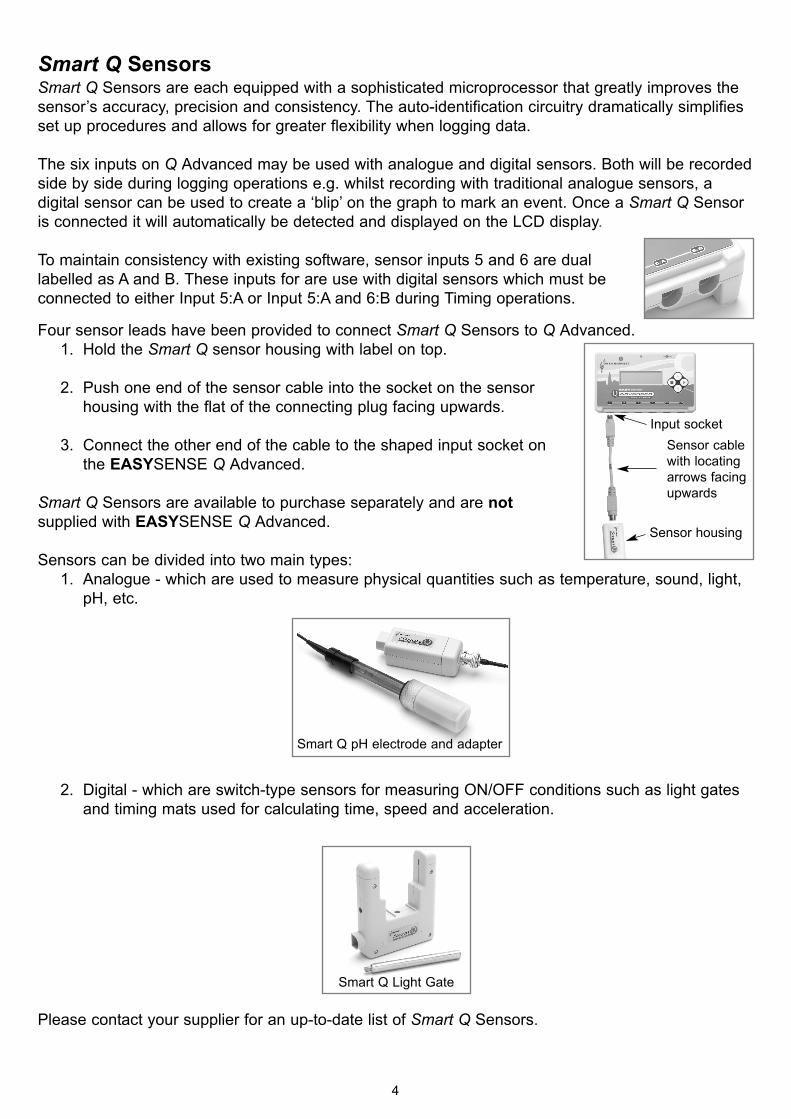
Four sensor leads have been provided to connect Smart Q Sensors to Q Advanced.1. Hold the Smart Q sensor housing with label on top.
2. Push one end of the sensor cable into the socket on the sensor housing with the flat of the connecting plug facing upwards.
3. Connect the other end of the cable to the shaped input socket on the EASYSENSE Q Advanced.
Smart Q Sensors are available to purchase separately and are not supplied with EASYSENSE Q Advanced.
Sensors can be divided into two main types:1. Analogue - which are used to measure physical quantities such as temperature, sound, light,
pH, etc.
2. Digital - which are switch-type sensors for measuring ON/OFF conditions such as light gates and timing mats used for calculating time, speed and acceleration.
Please contact your supplier for an up-to-date list of Smart Q Sensors.
Input socket
Sensor housing
Sensor cable with locatingarrows facingupwards
Smart Q pH electrode and adapter
Smart Q Light Gate
Ways to capture data with EASYSENSE Q Advanced There are different ways that EASYSENSE Q Advanced can be used to collect data.
1. Real time. In this mode EASYSENSE Q Advanced is entirely driven by the software on the host computer. The data from the sensors is transmitted immediately to the computer and displayed on the computers screen using the applications in the EASYSENSE software. This method of collection is useful for many classroom-based experiments.
2. Remote. In this mode EASYSENSE Q Advanced is used to collect and store data while disconnected from the computer. Data collection can either be:
a) Setup using EASYSENSE Q Advanced menu options (e.g. Easy Log, Snapshot, Logging or Time & Motion – see stand-alone operation on page 9). or
b) Setup via Setup Remote in the EASYSENSE software to log data for a set time period.
The data collected in remote mode is stored in the memory of EASYSENSE Q Advanced to beretrieved later by the computer.
Using EASYSENSE Q Advanced connected to a computer for the firsttimeStep 1: Install the EASYSENSE software, if it is not already on your computer. For details of how to installand operate this program, please refer to the instructions provided with the EASYSENSE software.
Note: DO NOT CONNECT EASYSENSE Q Advanced to the USB port before the EASYSENSE software isinstalled.
Step 2: a) If EASYSENSE Q Advanced is to be connected via the USB port, the USB drivers will need to
be installed.
Note for Windows 2000 and XP users: You need to be logged on as administrator (or with equivalent access rights) to install the EASYSENSE Q Advanced USB drivers.
!! Connect the ‘square’ USB plug of the USB cable to the USB input on the side of EASYSENSE Q Advanced.
!! Connect the ‘flat’’ USB plug to a USB port on your computer.
!! Windows will automatically detect that a new device has been connected and a Wizard will be generated to aid installation.
Windows XP Users: Select to install the software automatically. You may be warned that the drivers have not passed Windows Logo signing, please ‘continue anyway’ at this point.
Window Me users: With the EASYSENSE CD ROM still in the CD Drive, select ‘Specify a location’ and search for the best driver on removable media, click on OK. Next.
Window 2000 users: Select ‘Search for a suitable driver for my device’. Windows 2000 has a habit of ‘remembering’ the install path for USB drivers so it is best to install from the local drive rather than search on the EASYSENSE CD ROM. Select ‘Specify a location’, click on the Browse button and browse for the USB Drivers folder [default location is C Program Files Dhg Drivers and select the USB Drivers folder]. Click on OK.
Window 98 users: With the EASYSENSE CD ROM still in the CD Drive, select ‘Search for the best driver for your device’, Next. Select ‘Specify a location’, click on the Browse button and browse for the EASYSENSE CD ROM Drivers folder select the USB Drivers and click on OK. Click Next. Click on Next and the driver information database will be built.
5
Note: Connect the EASYSENSE Q Advanced unit to each USB port on the computer that maybe used so that the drivers can be installed.
b) If EASYSENSE Q Advanced is to be ‘connected’ via Bluetooth™ use the instructions provided on page 41.
Notes:!! To ‘connect’ via Bluetooth your EASYSENSE Q Advanced unit must have Bluetooth built-in. This will be
indicated by a Bluetooth symbol above the Data Harvest logo.
!! If you wish to add Bluetooth functionality to your EASYSENSE Q Advanced unit, please contact Data Harvest for information about a Bluetooth upgrade.
Step 3:!! Check that the LCD screen on EASYSENSE Q Advanced is displaying
the ‘Main Menu’.
Note: In most circumstances EASYSENSE Q Advanced will not communicate with the PC if it is taking samples. If the LCD screen shows samples being taken press the red square button and then the green triangle to stop the recording.
!! Open the EASYSENSE software program.
Step 4: The first time the EASYSENSE program is opened a ‘Select Program Level’ window will automatically open. Select a suitable user’s level.!! Level 1 is aimed at ‘start’ level (e.g. up to 9 years old).
!! Level 2 is aimed at ‘mid’ level (e.g. 9 – 15 years old)
!! Level 3 is aimed at ‘exam’ level (e.g.15 years plus).
Note: The program level can be altered at anytime using the Level icon once a logging option has been opened.
Step 5: An Interface option window will open. 1. Select the Interface as EASYSENSE Range.
2. Select the method of connection.!! If you are connecting via the USB port select ‘USB port’.
!! If you are using Bluetooth, select Serial port and then the serial (COM) port configured for Bluetooth from the drop down menu.
3. If you use different interfaces or methods of connection, tick the ‘Show at startup’ option so you can check your current selection and make any adjustments as necessary each time EASYSENSE opens.
4. Click on OK. The program will save your selection so it will be automatically configured when next used.
When a connection is established the Home page will open. Select one of the New experimentmodes i.e. EasyLog, Graph, Meters, Scope, Snapshot or Timing.
6
Using EASYSENSE Q Advanced with the computer after initial setup!! Connect EASYSENSE Q Advanced to the computer.
!! Open the EASYSENSE software program.
!! Select one of the recording modes e.g. EasyLog from the Home page. The sensors connected will automatically be recognised and calibrated.
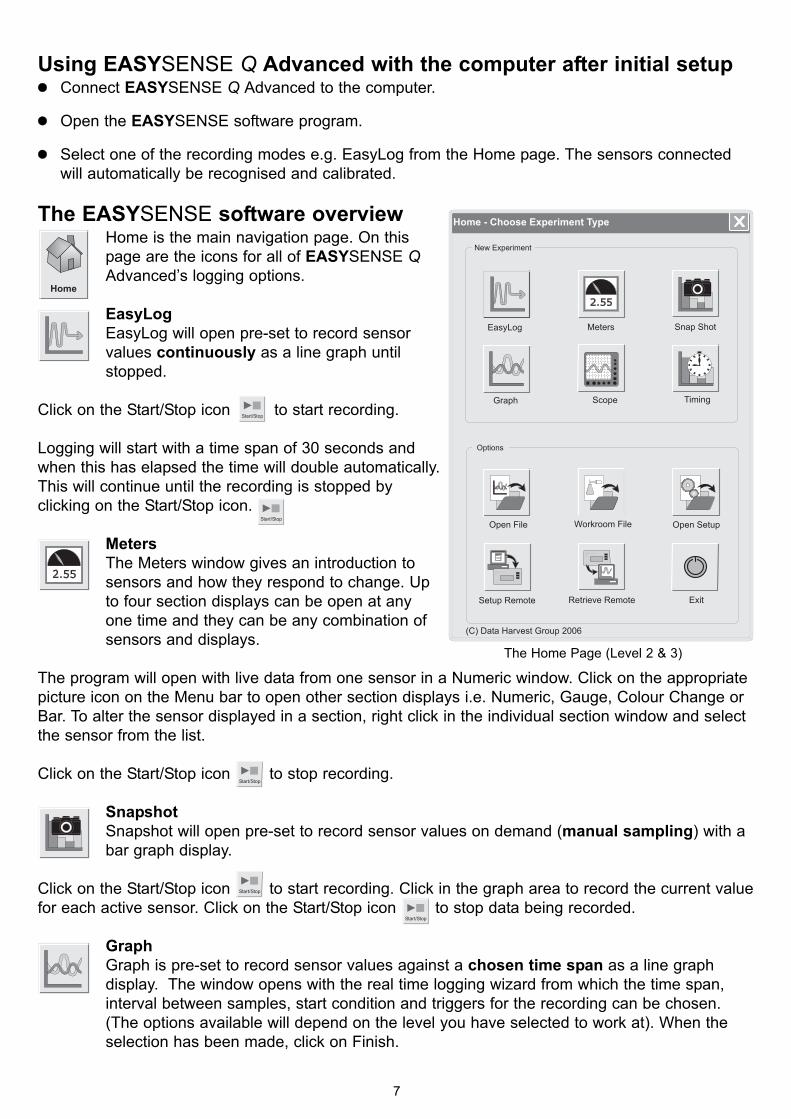
The EASYSENSE software overviewHome is the main navigation page. On this page are the icons for all of EASYSENSE QAdvanced’s logging options.
EasyLogEasyLog will open pre-set to record sensor values continuously as a line graph until stopped.
Click on the Start/Stop icon to start recording.
Logging will start with a time span of 30 seconds andwhen this has elapsed the time will double automatically.This will continue until the recording is stopped by clicking on the Start/Stop icon.
MetersThe Meters window gives an introduction to sensors and how they respond to change. Up to four section displays can be open at any one time and they can be any combination of sensors and displays.
The program will open with live data from one sensor in a Numeric window. Click on the appropriatepicture icon on the Menu bar to open other section displays i.e. Numeric, Gauge, Colour Change orBar. To alter the sensor displayed in a section, right click in the individual section window and selectthe sensor from the list.
Click on the Start/Stop icon to stop recording.
SnapshotSnapshot will open pre-set to record sensor values on demand (manual sampling) with a bar graph display.
Click on the Start/Stop icon to start recording. Click in the graph area to record the current valuefor each active sensor. Click on the Start/Stop icon to stop data being recorded.
GraphGraph is pre-set to record sensor values against a chosen time span as a line graph display. The window opens with the real time logging wizard from which the time span, interval between samples, start condition and triggers for the recording can be chosen. (The options available will depend on the level you have selected to work at). When the selection has been made, click on Finish.
7
The Home Page (Level 2 & 3)
Click on the Start/Stop icon and the recording will start when the start condition you haveselected is met e.g. if None was the selected trigger then the recording will start as soon as theStart/Stop icon is clicked. The recording will stop when the selected time span has passed.
ScopeClick on the Start/Stop icon. The data from the sensor is redrawn continuously on the screen in an oscilloscope type display.
TimingTiming is used to allow students to study Time, Velocity, Acceleration, Momentum and Kinetic Energy relationships using switch-type (digital) sensors such as light gates. Arecording wizard will open with these options available to select before recording data. Sensors are connected to inputs 5:A or 5:A & 6:B. (The options available will depend on the level you have selected to work at). When the selection has been made, click on Finish.
Click on the Start/Stop icon and a reading will be displayed when a change is detected in signalfrom the digital sensors.
Open File Used to load a previously saved .sid or .ssl file. Locate the correct file and click on open.
Open Worksheet To select and open a worksheet and its accompanying experimental set up file.
Open SetupTo select and open an experimental set up file. This will pre-set the software for a specific operation.
Set up RemoteUsed to set up the available options for capturing data while disconnected from the computer (remote). These options can include the duration of a recording, the time between each sample, and the trigger event. (The options available will depend on the level you have selected to work at).
Retrieve RemoteUse this option to retrieve a data set stored in your EASYSENSE Q Advanced unit’s memory for display and analysis.
8
9
Using EASYSENSE Q Advanced without a computerEASYSENSE Q Advanced has a menu of different options available, which are displayed on thebuilt-in LCD screen.
A menu option is selected by using the blue triangle buttons to move the list up or down until the pointer is pointing at the required option (thepointer stays in the same position). Press the green triangle button to select.
EASYSENSE Q Advanced has no ON switch. To ‘switch’ EASYSENSE Q Advanced on press anybutton on the top panel.
If EASYSENSE Q Advanced is not being used, it will automatically switch itself off after two minutes. Press any button to resume operation.
MeterIn this mode EASYSENSE Q Advanced will display measurements from the active sensors on theLCD screen but will not store any data. The display is updated every half second.
The range of a Smart Q sensor can be altered whilst in Meter mode.
!! Connect the sensors. If the display is turned off, press any button to wake up EASYSENSE Q Advanced.
!! Use the blue up/down buttons to scroll the list until the pointer is pointing at Meter.
!! Press the green button to select Meter. The blue up/down buttons can be used to scroll and view data from the active sensors.
!! Press the red button to exit Meter mode and return to the main menu.
Use the green triangle button (enter) to select the mode required
Use the blue triangle (scroll) button to move the list down
Use the blue triangle (scroll) button to move the list up
Use the red square as a stop/back button (to return to the previous screen)
Use the blue up/downbuttons to scroll andview data from theattached sensors
Set sensor range Some Smart Q sensors have multiple ranges e.g. sound can be in decibels (dBA) or milli volts (mV).The range of a sensor can be altered whilst in Meter mode.
!! Whilst in Meter use the blue up/down buttons to scroll through the list until the pointer is pointing at the appropriate sensor.
!! Press the green button to view the ranges available.
Note: If there isn’t a choice of range available for the selected sensor then pressing enter will have no effect.
!! An asterisk * will indicate the present range selected. Use the blueup/down buttons to scroll the list until the pointer is pointing at therequired range.
!! Press the green button to select the range and return to Meter.
SnapshotSnapshot mode enables you to capture sensor readings every time the green button is pressed,rather than at a regular time intervals. The readings are stored as a data set in EASYSENSE QAdvanced’s memory.
!! Connect the sensors. If the display is turned off, press any button to wake up EASYSENSE Q Advanced.
!! Use the blue up/down buttons to scroll through the menu until thepointer is pointing at Snapshot.
!! Press the green button to select Snapshot.
!! Each data sample can be given a name/number e.g. the location at which the sample was taken.Use the blue up/down buttons to select from either yes or no for this option.
10
11
!! From now on each time you press the green button on EASYSENSE Q Advanced; a reading will be taken from all sensors connected. EASYSENSE Q Advanced will display the number of samples taken so far and the current value from the sensors.
The blue up/down buttons can be used to scroll and view data from the list of sensors.
If yes to ‘name each sample’ was selected a window will open for adding a comment to the sample. Use the blue up/down buttons to scroll through the letters and numbers. Press the green button to select as appropriate.
The list starts each time at the same point; use the up button to go through the numbers, and the down button to go through the alphabet.
Select the symbol (two presses up from ‘a’) to delete a mistake.
Press the red button when you have finished entering your comment. This will take you back to the ‘samples taken’ window ready to take the next sample.
Note: If more than 2 minutes have elapsed between readings, EASYSENSE Q Advanced will go into ‘sleep’ mode. Press any button to wake up the unit and then press to take a reading.
!! When you have finished sampling press the red button to close the data set, then green to confirm your choice and enter the Recording finished menu.
!! Press the green button to return to the Main Menu, or scroll to Repeat the experiment or Name the data set.
Repeat experiment will take you direct to the Samples taken window (the choice of whether to name or not name each sample will still apply).
Name data set will open a window in which text or numbers can be selected for the name of the data set. Use the blue up/down buttons to scroll through the letters and numbers. Press the greenbutton to select as appropriate.
Press the red button to finish and go to the recording finished menu.
!! The readings taken will be stored as a data set. Over 1000 samples can be stored in one data set. The data set can be downloaded to the computer for display and analysis using Retrieve remote from the Home page in the EASYSENSE program.
)(#/=*_+%0987654321.
a b c d e f g h i j k l
m n o pqrstuvwxyz‘:?&@/()
deletespace
Easy LogIn Easy Log it is not necessary to set the duration of the recording – EASYSENSE Q Advanced willcapture data until stopped (up to a maximum of 41 days). The data set will then be stored in EASYSENSE Q Advanced’s memory.
!! Connect the sensors. If the display is turned off, press any button to wake up EASYSENSE Q Advanced.
!! Use the blue up/down buttons to scroll though the menu until the pointer is pointing at EasyLog.
!! Press the green button to select EasyLog and automatically begin recording. The bottom line of the LCD screen is a visual indicator of the logging as it takes place.
The blue up/down buttons can be used to scroll and view the values from the sensors on the LCD screen whilst still logging.
Note: If more than 2 minutes have elapsed between readings, EASYSENSE Q Advanced will go into ‘sleep’ mode. Press any button to wake up the unit.
!! When the experiment is complete press the red button. Q Advanced will continue to log data until you press the green button to confirm your choice and go to the Recording finished . menu.
Note: If the Stop button was not pressed intentionally, press the red button to continue logging.
!! Press the green button to return to the Main Menu, or scroll to Repeat . the experiment or Name the data set.
Repeat experiment will take you back to EasyLog in the Main Menu.
Name data set will open a window in which text or numbers can be selected for the name of the data set. Use the blue up/downbuttons to scroll through the letters and numbers. Press the green button to select as appropriate.
Press the red button to finish and go to the recording finished menu.
12
13
!! The data recorded will be stored as a data set. The data set can be downloaded to thecomputer for display and analysis using Retrieve remote from the Home page in the EASYSENSE software.
EASYSENSE Q Advanced records data at a rate of 40 samples per second until it has captured1000 samples. At this point, the sample rate halves (i.e. 20 samples per second) and alternate samples are discarded (leaving 500 samples). It will continue at this speed until it has capturedanother 500 samples (1000 total), then the sample rate halves again (i.e. 10 samples per second)and it discards half the stored data, and so on. See page 28 for full details.
In EasyLog mode the EASYSENSE Q Advanced will stay awake until the interval between readingsreaches 5 seconds or greater – at this point it will begin to sleep between samples to conserve battery power. When EASYSENSE Q Advanced is asleep, sensor readings can be viewed by pressing any button to ‘wake’ it up.
Press the green button while still logging to see a logging summary i.e.samples taken, elapsed time, current logging interval and the time started.Press again to return to the normal screen.
When the sample interval is greater than or equal to one second (i.e. after logging for 8 minutes and20 seconds), it is possible to download data from EASYSENSE Q Advanced to a computer (withoutinterrupting the recording) using Retrieve remote from the Home page in the EASYSENSE software.
The maximum duration of any one Easy Log recording is 41 days (1000 hours - 1000 readings at a1 hour interval).
Note: If you would prefer to record for a specified time span then set up Q Advanced using Logging (see below) or theSetup remote option in the EASYSENSE software.
Logging In Logging mode, the total recording time, interval between readings and trigger condition can beset. The data set collected will be stored in EASYSENSE Q Advanced’s memory.
Example of logging using enter as the trigger - see page 33 for the full menu.
!! Connect the sensors. If the display is turned off, press any button to wake up EASYSENSE Q Advanced.
!! Use the blue up/down buttons to scroll though the menu until the pointer is pointing at Logging. Press the green button to select.
!! Line 2 - Scroll through the choices to find a suitable duration of recording from those available (a full list of the choices is on page 29-32).Press the green button to select.
!! Line 3 - Scroll through the choices to find a suitable interval betweeneach sample. Press the green button to select.
The number of samples will automatically alter as the time duration and interval between samples are selected.
!! Select the start condition required from the following choices:
1. ‘When pressed’ – logging will be started by pressing the green button.
2. ‘at date & time’ – the recording will start at the time and date specified.
3. ‘sensor rises’ - logging will not start until the value from a sensor rises above a set level.
4. ‘sensor falls’ - logging will not start until the value from a sensor falls below a set level.
When pressedUse the blue up/down buttons to scroll though the menu until the pointer is pointing at ‘When
pressed’. Press the green button to select.
Press the green button on the EASYSENSE Q Advanced unit and logging will start.
At date & time Note: When you select this option the LCD screen will show time, date, and the date format currently set. If these are not correct change the settings in the System menu (see page 21).
Use the blue up/down buttons to scroll though the menu until the pointer is pointing at ‘at date & time’. Press the green button to select.
Set the time and date that you want the recording to start:
!! Use the blue up/down buttons to select the correct hour (using the24 hour clock), press to select, repeat for minutes and then seconds.
!! Use the blue up/down buttons to select the correct day, press to select, repeat for monthand then year.
Logging will not start until the date and time selected have been reached.
14
Sensor rises above or falls below
Use the blue up/down buttons to scroll though the menu until the pointer is pointing at ‘sensor rises’ or ‘sensor falls’ as appropriate. Press the green button to select.
Scroll though the connected sensors until the pointer is pointing at the sensor that will be used as a trigger. Press the green button to select.
Enter the level at which the sensor will trigger the start - use the blue buttons to scroll up or down through the numbers. Press the green button to select a number. When the trigger level is selected press the red button.
Note: The list starts each time at the same point (a space); use the up button to go through the numbers, and the down button to delete ( ), decimal place and minus sign.
Press the green button to confirm your choice.
Logging will not start until the value rises above or falls below the set level as appropriate.
Pre-triggerIf ‘sensor rises’ or ‘sensor falls’ has been selected as the trigger event and the selected logging duration/interval is fast enough, an option to set a pre-trigger will be available [None, 25%, 50%, 75%, and 100%].
Pre-trigger will cause a percentage of samples to be taken before the trigger condition is met andthe remainder to be taken afterwards e.g. if 1,000 readings are to be taken and a 25% pre-triggeris selected, 249 readings will be taken before the trigger condition is met.
If pre-trigger readings are not required leave the selection as None.
Scroll through the choices and press the green button to select.
!! Recording will start as soon as the trigger condition is reached. The bottom line of the LCD . screen is a visual indicator as logging progresses (each square takes a 20th of the selected duration to fill in).
15
Rises aboveLogging will not start until the value rises to above the set level.
Falls belowLogging will not start until the value falls to below the set level.
Delete a mistake
9876543210
.-
!! When the recording is complete the LCD will show the ‘recording finished’menu and the data recorded will be stored as a data set.
Either press the green button to return to the Main Menu, or scroll to Repeat the experiment or Name the data set.
Repeat experiment will enable you to repeat the experiment with the same settings. If a date & time trigger was selected, you will return to the ‘start when’ window so you can set a new time.
Name data set will open a window in which text or numbers can be selected for the name of the data set. Use the blue up/down buttons to scroll through the letters and numbers. Press the green button to select as appropriate.
The list starts each time at the same point; use the up button to go through the numbers, and thedown button to go through the alphabet.
Press the red button to finish and go to the recording finished menu.
!! The data set can be downloaded to the computer for display and analysis using Retrieve remote from the Home page in the EASYSENSE software.
While recording with a sampling interval of 20ms or more, the blue up/down buttons can be usedto scroll and view the sensor readings on the LCD screen whilst still logging.
If recording over a long duration EASYSENSE Q Advanced will sleep between samples to conservebattery power. Press any of the buttons to ‘wake up’ the unit so the current value from the sensorscan be viewed.
While logging press the green button to see a logging summary i.e. samples taken, the time elapsed since the recording was started, the currentlogging interval and the time started (using the date and time set in the QAdvanced’s clock as a reference). Press again to return to the normalscreen.
To stop logging before the duration is complete, press and then to confirm.
When the sample interval is greater than or equal to one second, it is possible to download datafrom EASYSENSE Q Advanced (without interrupting the recording) using the Retrieve remote optionin the EASYSENSE software.
For very fast sample rates there is a limit to the number of sensors that can be connected, this isindicated in the maximum sensors column. For slower rates the internal temperature sensor and upto six external sensors can be used.
The following Smart Q Sensors are not able to provide readings at intervals of less than 20ms (50Hz): Ohaus Scout Pro Top-pan Balance Adapter (Product No. 3060), Carbon Dioxide Gas Sensor(Product No. 3152), Drop Counter and Bubble Sensor (Product No. 3266), Geiger Muller Sensor(Product No. 3265), Heart Rate and Pulse Waveform (Product No. 3147), Motion Sensor (ProductNo.3705 or 3270) and the Polar Heart Rate Exercise Sensor (Product No. 3148).
16
Time & Motion Used to setup and store time measurement from either one digital sensor connected to Input 5:A, ortwo connected to Input 5:A and Input 6:B.
Digital switch type sensors e.g. Light Gates, have two states ON (low) or OFF (high).
For EASYSENSE Q Advanced to be able to calculate Speed, Velocity or Acceleration, it needsinformation about the dimensions of the interrupt used in an investigation. The choice of interruptand its dimensions are preset in EASYSENSE Q Advanced’s memory. See page 18 for the list ofinterrupts and the choice of preset dimensions e.g. a single interrupt card can be 30, 40, 50, 95, 100or 120 mm in length.
Example using Time at A - see page 34 - 40 for further details.
!! Either connect a digital sensor to Input 5:A or a pair of digital sensors to Input 5: A and 6:B. If thedisplay is turned off, press any button to wake up EASYSENSE Q Advanced.
!! Use the blue up/down buttons to scroll the menu until the pointer ispointing at Time & Motion. Press the green button to select.
!! Use the blue up/down buttons to scroll the menu until the pointer is pointing at Time, Speed or Acceleration as appropriate. Press the green
button to select.
!! Use the blue up/down buttons to scroll the sub menu until the pointer is pointing at the option required. Press the green button to select.
17
Speed at A = Length of single interrupt card Time
—-Time menu —Stopwatch A to A
Time at ATime at A or BTime from A to BPeriod at A
-Acceleration menu-
Accel. at AAccel. A to B
—-Speed menu —Speed from A to B Speed at ASpeed at A or B3 Speeds at A or B
!! If Speed or Acceleration is selected, the choice of interrupt and its measurement will be:
See page 34 - 40 for further information.
Line 2 - If you are measuring Speed or Velocity at A, scroll through the list of interrupters to find the type you are going to use. Press the green
button to select.
Line 3 - Scroll through the list of dimensions and select the one to be the used. Press the greenbutton to select.
!! EASYSENSE Q Advanced will be ready to start taking measurements. When a signal change from the digital sensor/sensors is received, the timing measurement will be displayed in seconds (s) on the LCD screen.
Example:
18
Line 1 – What is being measured Line 2 – Interrupter Line 3 – Measurements available to select
Speed at A 1 Interrupt card Length of card = 30, 40, 50, 95, 100 or 120 mm
2 Interrupt card Length of segment = 30, 40, 50, 95, 100 or 120 mm
Picket fence Pitch (width of black + clear stripe) = 10, 20, 40, 60 or 80 mm
10 Spoked pulley For use with the Data Harvest Spoked pulley (Product No 3177), which has a 47 mm diameter
Speed at A or B 1 Interrupt card Length of card = 30, 40, 50, 95, 100 or 120 mm
3 Speeds at A or B 1 Interrupt card Length of card = 30, 40, 50, 95, 100 or 120 mm
Speed from A to B Distance A to BDistance between A and B = 100, 200, 300, 400, 500, 600, 700, 800, 900 mm, 1.0, 2.0,3.0, 4.0, 5.0, 6.0 m
Accel. at A 2 Interrupt card Length of segment = 30, 40, 50, 95, 100 or 120 mm
Picket fencePitch (width of black + clear stripe) = 10, 20, 40, 60 or 80 mm
10 Spoked pulley For use with the Data Harvest Spoked pulley (Product No 3177), which has a 47 mm diameter
Accel. A or B 1 Interrupt card Length of card = 30, 40, 50, 95, 100 or 120 mm
The second line shows the current reading, the # number indicates the number of the reading. The blue up/down buttons can be used to scroll back and forward through the readings already taken, the # number will indicate the reading number of the measurement shown.
The bottom line shows the average measurement and number of readings used to calculate this average.
Note: Whilst recording in this mode, EASYSENSE Q Advanced will stay awake.
!! Press the red button to finish or cancel timing.
!! The LCD will show the ‘recording finished’ menu and the data set will be stored.
Either press the green button to return to the Main Menu, or scroll to Repeat the experiment or Name the data set.
Repeat experiment will take you direct back to the recording window.
Name data set will open a window in which text or numbers can be selected for the name of the data set. Use the blue up/down buttons to scroll through the letters and numbers. Press the green button to select as appropriate. The list starts each time at the same point; use the up button to go through the numbers, and thedown button to go through the alphabet
Press the red button to finish and go to the recording finished menu.
!! The data set can be downloaded to the computer for display and analysis using Retrieve remotefrom the Home page in the EASYSENSE software.
19
Downloading stored data sets into the EASYSENSE software!! Connect the EASYSENSE Q Advanced unit to the
computer and open the EASYSENSE program.
!! Select the Retrieve remote option from the Home page.
!! Select the data set from the list and click on Retrieve.
Note: The most recent data set is first in the list.
System MenuUse the blue up/down buttons to scroll the menu until the pointer is pointing at System. Press the green button to select.
!! Use the blue up/down buttons to scroll the menu until the pointer is pointing to the appropriate system menu item. Press the green button to select.
1. No Bluetooth or Bluetooth If Bluetooth has been built-in it will show listed as Bluetooth. If not then the System menu will show‘No Bluetooth’.
Bluetooth On/Off:Shows the status of Bluetooth. Use the blue up/down buttons to scroll between ON and OFF. When the Bluetooth device is active the Bluetooth indicator LED will blink (a fast blink indicates data is being transferred).
Note: Bluetooth cannot be switched on until EASYSENSE Q Advanced has been paired with a computer.
Pair Blue tooth (See page 43).This will initiate the blue tooth pairing process on the logger. The logger will attempt to pair with another Bluetooth device for 2 minutes, giving time for the PC Bluetooth services to be started.
During the Pairing process the screen will show;1. ID: this is the EASYSENSE Q Advanced’s serial number.
2. Passkey: All EASYSENSE Q Advanced units have a passkey of 1234. The pass key must be used and cannot be changed.
20
Most recent
Older data sets
3. Pairing message: displays the point in the pairing process that the logger has reached.Powered/Discovering – this is shown when the Bluetooth module in EASYSENSE Q Advanced is initialised.Pairing enabled - EASYSENSE Q Advanced is transmitting pairing information that can bereceived by a Bluetooth receiver (the Bluetooth USB adapter or the PC).Paired: xxxxxxxxxx (e.g. 000B0D6904AE) – the pairing between EASYSENSE Q Advanced andthe computer is complete; the number displayed is the electronic identity of the Bluetooth device it is paired with.
Once connected the pairing menu can be left by pressing the red button to return to the Bluetooth menu.
2. Battery life:
Note: If EASYSENSE Q Advanced has been on charge, disconnect the power supply and/or USB cable for at least 15seconds to obtain a true value.
EASYSENSE Q Advanced will determine the power requirements of the sensors connected andcompare this with the charge level of the batteries. The LCD will display:
Line 2. The Battery Life awake – the number of hours EASYSENSE Q Advanced could continuously operate without a power supply attached.
Line 3. Battery Life EasyLog - some methods of logging i.e. EasyLog or Logging with a long duration, will switch EASYSENSE Q Advanced automatically into ‘sleep’ mode between samples to reduce power consumption. Battery Life EasyLog will indicate the theoretical number of days that EASYSENSE Q Advanced could record in this mode.
Line 4. Will indicate the capacity level of the battery.
The LCD display will show ‘Battery is charging’ if power is being supplied to EASYSENSE QAdvanced (via a power supply or USB connection).
Press the red button to return to the System menu.
Note: Ideally EASYSENSE Q Advanced should be stored with at least 40% or more charge. Do not store EASYSENSEQ Advanced with its battery fully discharged or with sensors connected. Some reserve charge is needed to retain dataand settings in memory. See page 23 for powering information.
3. Set date & time:
Set date format: Select how you would like the date displayed. Use the blue up/down buttons toscroll through the choice of formats: DD-MM-YY, MM-DD-YY, YYYY-MM-DD until your choice of format is shown. Press to select.
Set Time: uses a 24 hour clock. Use the blue up/down buttons to scroll the numbers up or downuntil the correct hour is shown, press to select, the cursor will move onto minutes. Repeat for minutes and then seconds.
21
Set Date: day/month/year. Use the blue up/down buttons to scroll the numbers up or down untilthe correct day is shown, press to select, repeat for month and then year.
Press the red button to return to the System menu.
4. Internal Temp:Use the blue buttons to toggle the internal temperature sensor On or Off. If set to On, the temperature sensor will be recognised as Input No. 7.
The internal temperature sensor can be used to measure the temperature of EASYSENSE QAdvanced’s environment. For convenience the built-in temperature sensor is displayed on the samescale as the plug-in temperature sensors. However EASYSENSE Q Advanced can only be used inan environment of 0 to 40°C, 0 to 95%RH (non-condensing).
Note: The speed of reaction to a change in temperature will be slow in comparison to a plug-in Temperature sensor dueto EASYSENSE Q Advanced’s plastic case.
Press to return to the System menu.
5. Data setsData Sets Stored – Indicates the number of individual data sets stored.Memory Used – Indicates the amount of memory used in storing the captured data as a percentage of the total memory.
To delete all or some data sets – Press for the delete menu. Use the scroll buttons to selecteither ‘All data sets’ or an individual set of data to be deleted. Press to select and then to confirm your choice. Press to return to Data sets.
Press to return to the System menu.
Switch offUse the blue up/down buttons to scroll the menu until the pointer is pointing at Switch off. Press the green button to select.
EASYSENSE Q Advanced will go direct into low power (sleep mode). Press any button to ‘wake’ itup.
Note: You do not have to use this option to switch the EASYSENSE Q Advanced unit off. After a period of inactivity thelogger will auto power down.
22
Technical Information for EASYSENSE Q Advanced
Selecting the sensor rangeSome plug-in Smart Q Sensors have more than one range. The range can be altered either onEASYSENSE Q Advanced (see below) or on the computer by using Sensor Config in Settings fromthe EASYSENSE program. Once selected EASYSENSE Q Advanced will use this range (until it ischanged).
!! Whilst in Meter mode use the blue up/down buttons to move the list until the pointer is pointing at the appropriate sensor.
!! Press the green button to view the ranges available.
Note: If there isn’t a choice of range available for the selected sensor then pressing this button will have no effect.
!! An asterisk * will indicate the present range selected. Use the blue up/down buttons to scroll the list until the pointer is pointing at the required range.
!! Press the green button to select the range and return to Meter mode.
!! Press the red button to exit Meter mode and return to the Main Menu.
Hard ResetShould EASYSENSE Q Advanced fail to respond to the computer or a button press, carry out aHARD RESET.
1. If necessary attach EASYSENSE Q Advanced to mains power.
2. Hold the red square and both blue triangle buttons down (at the same time) for a second and then release.
If the hard reset has been done correctly, the LCD will momentarily display EASYSENSE Q Advanced and the version number of its operating system before returning to the main menuIf EASYSENSE Q Advanced still fails to respond, please contact Data Harvest.
Note: A Hard Reset does not erase any stored data sets but if a recording is interrupted by a reset, then the data beingcaptured will not be stored.
Powering EASYSENSE Q AdvancedEASYSENSE Q Advanced can be powered by:
1. Using the mains power supply provided.
2. By the USB port (whilst connected to the computer).
3. By its internal batteries (when charged).
The power light on EASYSENSE Q Advanced will only light when the unit is accepting power from amains power supply or via the USB cable.
23
Mains PowerThe power supply unit supplied is used to power EASYSENSE Q Advanced while it is connected tothe computer and to recharge its internal batteries in preparation for logging data away from thecomputer. Connect the mains power adapter to the socket on the back of the unit marked
Power supply specifications are: U.K: 5V DC mains adaptor, able to supply at least 500 mA, with a positive centre and negative outerpin.
NON UK: 5V DC switch mode power supply, with a positive centre and negative outer pin.
BatteriesEASYSENSE Q Advanced is fitted with a rechargeable lithium ion battery pack. When the batteriesare fully charged they will power EASYSENSE Q Advanced in Easy Log or remote mode for at least35 days (if Bluetooth is not ON).
Whenever EASYSENSE Q Advanced is connected to its mains power supply or the USB port on thecomputer, it will automatically re-charge the batteries. A full charge will take approximately 4 – 5hours.
Notes:!! The drivers for EASYSENSE Q Advanced must be installed on the computer before charging.
!! If the computer is switched off or in sleep mode, charging via the USB port will stop.
!! EASYSENSE Q Advanced can only be connected directly to a computers USB port or by using a powered USB hub. It will not work with an unpowered hub (EASYSENSE Q Advanced requires an output current of 500mA).
Lithium ion batteries are ‘memory-free’ and prefer a partial rather than a full discharge. Constant partial discharges with frequent recharges will not cause any harm. Frequent full discharges shouldbe avoided whenever possible.
Ideally EASYSENSE Q Advanced should be stored at about 40% or more charge. Do not store EASYSENSE Q Advanced with its battery fully discharged. Even when turned off(sleep), Q Advanced will use a small amount of current, and the battery will slowly discharge. IfEASYSENSE Q Advanced is to be stored for lengthy periods without use then it’s a good idea torecharge the batteries every 6 – 8 weeks.
The speed at which a lithium ion battery will age is governed by both its storage temperature (preferably less than 40ºC) and state-of-charge. Eventually the battery pack will no longer deliver thestored energy and will need to be replaced. A fully charged battery that looses its charge quickly willdemonstrate the need for replacement. When this happens contact Data Harvest and request a battery replacement pack for EASYSENSE Q Advanced – Product No. 5007.
The Lithium batteries in EASYSENSE Q Advanced operate best at near room temperature, between10 and 30 C, (50 to 86 F) but can be used at any temperature between 0 to 40 C (32 to 104 F). If QAdvanced has been left in the cold, let it warm to near room temperature before waking it fromsleep.
24
Automatic StandbyEASYSENSE Q Advanced has no ON switch. To operate, press any one of the buttons on the toppanel. When EASYSENSE Q Advanced is disconnected from the power supply or USB port, it will go intolow power sleep mode to reduce power consumption if more than two minutes have passed sinceany measurements have been taken or a button was pressed. EASYSENSE Q Advanced will wakeup either when a button is pressed or will auto-wake up when communicating with the computer viathe USB port.While remote recording EASYSENSE Q Advanced will stay awake until the interval between readings reaches 5 seconds or greater – at this point it will begin to sleep between samples (wakingup just enough in front of the sample time to allow the sensors to stabilise). While taking measurements in the Time & Motion mode, EASYSENSE Q Advanced will stay awake.
Specifications4 x 20 Character LCD Display.USB communication V1.1 & V2.0 compatible.Memory Capacity: 256KB.Rate: max logging speed is 20 microseconds between samples (50 kHz).Digital timing from A to B: 4 ìs resolution. 12 bit sampling resolution.Firmware upgradeable.Operating range: 0 - 40°C and 0 to 95%RH (non-condensing).
Bluetooth functionality (if fitted): Compatible with a Bluetooth V1.1 or later devices.Operating range: 10 metre (33 Feet) radius indoors.
Care & MaintenanceClean with a damp cloth, do not immerse in water or detergent.
EASYSENSE Q Advanced is suitable for use in an operating range of 0 – 40 C and 0 to 95%RH(non-condensing).
If Q Advanced has been left in the cold, let it warm to near room temperature before waking it fromsleep.
Do not expose to direct sunlight for extended periods of time. Do not expose to temperatures greater than 60 C, e.g. near a heater or inside a car in hot weather. Do not submerse in water.Do not subject to extreme heat or cold or leave in a location where it will get wet. EASYSENSE QAdvanced is not waterproof.
Do not store EASYSENSE Q Advanced with its battery fully discharged. Ideally EASYSENSE QAdvanced should be stored at about 40% or more state-of-charge. See page 24.
25
Updating EASYSENSE Q Advanced’s Firmware To update the firmware of your EASYSENSE Q Advanced unit:
26
Step 1. Copy the English Firmware Update onto the hard disc of your computer.
Step 2. Connect EASYSENSE Q Advanced to the computer using the USB cable.
Step 3. Carry out a HARD RESET on Q Advanced by holding down the red and both blue buttons for a second.
Wait for a few seconds
A progress bar will indicate EASYSENSE QAdvanced being programmed.
A tick will indicate if the process was successful.Disconnect the EASYSENSE Q Advanced unit.
If you wish to repeat these processes, connect another EASYSENSE Q Advanced unit and hit any key on the computer’s keyboard to go back to the start screen (step 2).
A cross will indicate that an error occurred. Hit any key on the computers keyboard to go back to start screen (step 2) and try again.
Step 4. Exit the program.
Trouble ShootingBefore reporting faults please attempt a HARD RESET of the unit.
1. Connect to power.
2. Hold down the red square and both blue triangle buttons and keep them all held down for 1 second and then release.
If the hard reset has been done correctly, the LCD will momentarily display EASYSENSE Q Advanced and the version number of its operating system before returning to the main menu.
Technical support If you are experiencing a problem, please contact the Technical Support department at DataHarvest. Please provide details of:
!! The computer platform it is being used with.
!! The software version number.
!! A description of the problem being encountered.
If possible, telephone from a location where you can operate EASYSENSE Q Advanced with thecomputer.
Support QuestionsQ 1. The LCD is blank and pressing a button doesn’t wake it upConnect EASYSENSE Q Advanced to power either by using its mains power adapter or by connecting to the USB port and leave to charge for at least 5 minutes. HARD RESET the unit.
Q 2. What do I do when I get a Memory full message?Press the green button to return to the Main Menu. You will need to free some memory by deleting some or all data sets from EASYSENSE Q Advanced’s memory using delete in Data Setsfrom the System menu. See page 22 for further details.
Q 3. Will I get a warning if the battery level is low? When the charge level of the battery is very low (about 10 % or less) a ‘Battery low..’ message willstart to appear on the LCD screen. Connect EASYSENSE Q Advanced to its power supply or to theUSB port on a computer to charge the batteries. Press any button to clear the message.
Note: If the battery low message is ignored, and the charge level drops even further, the logger will display “Rechargebattery!” and switch off. Charge the batteries.
Q 4. Do the batteries need to be discharged/ reconditioned? No, the batteries in EASYSENSE Q Advanced are lithium ion and are ‘memory-free’. Avoid full discharges when ever possible. Constant partial discharges with frequent recharges will not causeany harm.
Q 5. My batteries do not seem to hold their charge any more. Do I need to send the unit back for areplacement to be fitted?No, order a replacement battery pack from Data Harvest - Product No. 5007.
Q 6. I am experiencing problems establishing a connection between EASYSENSE Q Advanced andthe EASYSENSE software when connected via a USB port.
27
1. Check the LCD screen on EASYSENSE Q Advanced shows the Main Menu.
2. Check that the USB lead is plugged in.
3. Select Interface from the unable to connect message (or from the File menu). Check the interfaceis set to EasySense Range and that the method of connection is USB port.
4. If there is still a problem, check the USB drivers have installed correctly. Go to Device manager i.e. Windows 98 Users: Go to Start-> Settings -> Control Panel-> System -> Device Manager Windows XP Pro & 2000 Users: Go to Start-> Control Panel-> (if necessary switch to Classic view) -> System -> Hardware tab-> Device Manager.
Check a DHG EasySense Q Advanced device is listed in theUniversal Serial Bus controller’s list.
If there are any question marks or exclamation marks then thedrivers haven’t installed correctly. Delete the drivers, remove theEASYSENSE Q Advanced and re-install the drivers by followingthe initial setup instructions.
Appendix 1: EasyLog LoggingEASYSENSE Q Advanced records data at a rate of 40 samples per second until it has captured1000 samples. At this point the sample rate halves (i.e. 20 samples per second) and alternate samples are discarded (leaving 500 samples). It will continue at this speed until it has capturedanother 500 samples (1000 total), then the sample rate halves again (i.e.10 samples per second)and it discards half the stored data, and so on.
28
Sample Rate Interval (seconds) Days Hours Min Sec Samples
40 per sec 0.025 (25ms) 0 0 0 25 0 - 1000
20 per sec 0.05 (50ms) 0 0 0 50 Compress to a half 500 - 1000
10 per sec 0.1 (100ms) 0 0 1 40 Compress to a half 500 - 1000
2 per sec 0.5 (500ms) 0 0 8 20 Compress to a fifth 200 - 1000
1 per sec 1 0 0 16 40 Compress to a half 500 - 1000
Every 5 sec 5 0 1 23 20 Compress to a fifth 200 - 1000
Every 15 sec 15 0 4 10 0 Compress to a third 330 - 1000
Every 30 sec 30 0 8 20 0 Compress to a half 500 - 1000
Every 1 minute 60 0 16 40 0 Compress to a half 500 - 1000
Every 5 minutes 300 3 11 20 0 Compress to a fifth 200 - 1000
Every 15 minutes 900 10 10 0 0 Compress to a third 330 - 1000
Every 30 minutes 1800 20 20 0 0 Compress to a half 500 - 1000
Every 1 hour 3600 41 16 0 0 Compress to a half 500 - 1000
DURATION
Appendix 2 - Duration and Interval Table for Logging
Pre-triggers are only available with fast recording times and when a trigger of sensor rises or fallsbelow has been set.
For very fast sample rates there is a limit to the number of sensors that can be connected, this isindicated in the maximum sensors column. For slower rates the internal temperature sensor and upto six external sensors can be used.
The following Smart Q Sensors are not able to provide readings at intervals of less than 20ms (50Hz): Ohaus Scout Pro Top-pan Balance Adapter (Product No. 3060), Carbon Dioxide Gas Sensor(Product No. 3152), Drop Counter and Bubble Sensor (Product No. 3266), Geiger Muller Sensor(Product No. 3265), Heart Rate and Pulse Waveform (Product No. 3147), Motion Sensor (ProductNo.3705 or 3270) and the Polar Heart Rate Exercise Sensor (Product No. 3148).
29
Duration Interval Samples Max. no. of sensors Pre-trigger
0.02 s 20 µs 1000 1 ""
(20 ms) 50 µs 400 2 ""
100 µs 200 4 ""
200 µs 100 ""
500 µs 40 ""
1 ms 20 ""
2 ms 10 ""
Duration Interval Samples Max. no. of sensors Pre-trigger
0.05 s 20 µs 2500 1 ""
(50 ms) 50 µs 1000 2 ""
100 µs 500 4 ""
200 µs 250 ""
500 µs 100 ""
1 ms 50 ""
2 ms 25 ""
5 ms 10 ""
Duration Interval Samples Max. no. of sensors Pre-trigger
0.1 s 50 µs 2000 2 ""
(100 ms) 100 µs 1000 4 ""
200 µs 500 ""
500 µs 200 ""
1 ms 100 ""
2 ms 50 ""
5 ms 20 ""
10 ms 10 ""
Duration Interval Samples Max. no. of sensors Pre-trigger
0.2 s 50 µs 4000 2 ""
(200 ms) 100 µs 2000 4 ""
200 µs 1000 ""
500 µs 400 ""
1 ms 200 ""
2 ms 100 ""
5 ms 40 ""
10 ms 20 ""
20 ms 10 ""Duration Interval Samples Pre-trigger
0.5 s 200 µs 2500 ""
(500 ms) 500 µs 1000 ""
1 ms 500 ""
2 ms 250 ""
5 ms 100 ""
10 ms 50 ""
20 ms 25 ""
50 ms 10
Duration Interval Samples Pre-trigger
1s 500 µs 2000 ""
1 ms 1000 ""
2 ms 500 ""
5 ms 200 ""
10 ms 100 ""
20 ms 50 ""
50 ms 20
100 ms 10
30
Duration Interval Samples
2 min 50 ms 2400
100 ms 1200
200 ms 600
500 ms 240
1 s 120
2 s 60
5 s 24
10 s 12
Duration Interval Samples
5 min 100 ms 3000
200 ms 1500
500 ms 600
1 s 300
2 s 150
5 s 60
10 s 30
20 s 15
30 s 10
Duration Interval Samples
10 min 200 ms 3000
500 ms 1200
1 s 600
2 s 300
5 s 120
10 s 60
20 s 30
30 s 20
1 min 10
Duration Interval Samples Pre-trigger
10 s 5 ms 2000 ""
10 ms 1000 ""
20 ms 500
50 ms 200
100 ms 100
200 ms 50
500 ms 20
1 s 10
Duration Interval Samples Pre-trigger
30 s 10 ms 3000 ""
20 ms 1500 ""
50 ms 600
100 ms 300
200 ms 150
500 ms 60
1 s 30
2 s 15
Duration Interval Samples Pre-trigger
1 min 20 ms 3000 ""
50 ms 1200
100 ms 600
200 ms 300
500 ms 120
1 s 60
2 s 30
5 s 12
Duration Interval Samples Pre-trigger
20 s 5 ms 4000 ""
10 ms 2000 ""
20 ms 1000 ""
50 ms 400
100 ms 200
200 ms 100
500 ms 40
1 s 20
2 s 10
Duration Interval Samples Pre-trigger
2 s 500 µs 4000 ""
1 ms 2000 ""
2 ms 1000 ""
5 ms 400 ""
10 ms 200 ""
20 ms 100 ""
50 ms 40
100 ms 20
200 ms 10
Duration Interval Samples Pre-trigger
5 s 2 ms 2500 ""
5 ms 1000 ""
10 ms 500 ""
20 ms 250 ""
50 ms 100
100 ms 50
200 ms 25
500 ms 10
31
Duration Interval Samples
20 min 500 ms 2400
1 s 1200
2 s 600
5 s 240
10 s 120
20 s 60
30 s 40
1 min 20
2 min 10
Duration Interval Samples
30 min 500 ms 3600
1 s 1800
2 s 900
5 s 360
10 s 180
20 s 90
30 s 60
1 min 30
2 min 15
Duration Interval Samples
1 hour 1 s 3600
2 s 1800
5 s 720
10 s 360
20 s 180
30 s 120
1 min 60
2 min 30
5 min 12
Duration Interval Samples
2 hours 2 s 3600
5 s 1440
10 s 720
20 s 360
30 s 240
1 min 120
2 min 60
5 min 24
10 min 12
Duration Interval Samples
4 hours 5 s 2880
10 s 1440
20 s 720
30 s 480
1 min 240
2 min 120
5 min 48
10 min 24
20 min 12
Duration Interval Samples
3 hours 5 s 2160
10 s 1080
20 s 540
30 s 360
1 min 180
2 min 90
5 min 36
10 min 18
Duration Interval Samples
5 hours 5 s 3600
10 s 1800
20 s 900
30 s 600
1 min 300
2 min 150
5 min 60
10 min 30
20 min 15
30 min 10
Duration Interval Samples
6 hours 10 s 2160
20 s 1080
30 s 720
1 min 360
2 min 180
5 min 72
10 min 36
20 min 18
30 min 12
Duration Interval Samples
7 hours 10 s 2520
20 s 1260
30 s 840
1 min 420
2 min 210
5 min 84
10 min 42
20 min 21
30 min 14
Duration Interval Samples
8 hours 10 s 2880
20 s 1440
30 s 960
1 min 480
2 min 240
5 min 96
10 min 48
20 min 24
30 min 16
Duration Interval Samples
12 hours 20 s 2160
30 s 1440
1 min 720
2 min 360
5 min 144
10 min 72
20 min 36
30 min 24
1 hour 12
Duration Interval Samples
1 day 30 s 2880
1 min 1440
2 min 720
5 min 288
10 min 144
20 min 72
30 min 48
1 hour 24
32
Duration Interval Samples
5 days 2 min 3600
5 min 1440
10 min 720
20 min 360
30 min 240
1 hour 120
Duration Interval Samples
6 days 5 min 1728
10 min 864
20 min 432
30 min 288
1 hour 144
Duration Interval Samples
7 days 5 min 2016
10 min 1008
20 min 504
30 min 336
1 hour 168
Duration Interval Samples
10 days 5 min 2880
10 min 1440
20 min 720
30 min 480
1 hour 240
Duration Interval Samples
14 days 10 min 2016
20 min 1008
30 min 672
1 hour 336
Duration Interval Samples
21 days 10 min 3024
20 min 1512
30 min 1008
1 hour 504
Duration Interval Samples
28 days 20 min 2016
30 min 1344
1 hour 672
Duration Interval Samples
35 days 20 min 2520
30 min 1680
1 hour 840
Duration Interval Samples
2 days 1 min 2880
2 min 1440
5 min 576
10 min 288
20 min 144
30 min 96
1 hour 48
Duration Interval Samples
3 days 2 min 2160
5 min 864
10 min 432
20 min 216
30 min 144
1 hour 72
Duration Interval Samples
4 days 2 min 2880
5 min 1152
10 min 576
20 min 288
30 min 192
1 hour 96
Appendix 3: Logging menuWhen pressed:
At date & time:
Sensor falls below:
Sensor rises above:
33
Use the blue buttons to scroll the numbers up and down, press the green button toselect and move to the nextset
Use the blue buttons to scrollthrough to the required numberand press the green button toselect
Use the blue buttons to scrollthrough to the required numberand press the green button toselect
Appendix 4: Timer Interrupters and Parameters
Interrupt cards
Preset values are 30.0, 40.0, 50.0, 95.0, 100.0 and 120.0 mm. Measure the solid part of the card that will pass through the Light Gate. The two segments of a double interrupt card must be equal in width.
Picket fencePreset values of pitch are = 10.0, 20.0, 40.0,60.0, 80.0 mm.
Measure from the start of one black edge to the start of the next black edge.
10 Spoked PulleyThe measurements for the Data Harvest Spoked Pulley are pre-defined.
DistancePreset values are 100, 200, 300, 400, 500, 600, 700, 800, 900 mm, 1.0, 2.0, 3.0, 4.0, 5.0 or 6.0m
Measure from the sensor connected to Input A to the sensor at Input B. E.g. with Timing mats measure from the centre of one mat to the centre of the other mat.
34
Single interrupt card Double interrupt cards
Picket fence
Timing mats
OR OR
Appendix 5: Timing options
Time at A
Time at A or B
Time from A to B
35
A
Stop - A Off Start - A On
A measurement will be taken each time asignal change is detected at either sensor5:A or sensor 6:B. The current measurementfrom A or B will be displayed on the LCDscreen.
Timing will start when a signal change isdetected at sensor 5:A and stops when the signal at 6:B changes (so it measures the timetaken by an object to travel from sensor A tosensor B).
The blue buttons can be used to scroll throughand examine the readings already taken.
The average measurement
The measurement
Over this number of readings
The reading numberof this measurement
The measurement The reading number of themeasurementshown
Timing starts when the signal at input 5:A changes and stopswhen the signal reverts back.
!! With Light Gates it will be the time it takes for an object to pass through the light beam.
!! For a Push Switch it will be the length of time that the switch is kept depressed.
!! For Timing mats it will be the length of time someone stands on the mat.
The blue buttons can be used to scroll through and examine thereadings already taken.
Period at A
Stopwatch A to A
The time will start to be measured when the signal at input 5:A changes (ON) and will continue until the signal at 5:A changes again (ON) i.e. like a stopwatch.
The blue buttons can be used to scroll through and examine the readings already taken.
36
Period at A measures t0 # t4t0 = Start (front edge of pendulum passes light gate - going
Press to Start (A On),then press again to Stop (A On)
Start the pendulum swinging, and when itis moving freely press the green buttonon the EASYSENSE Q Advanced unit forthe recording to start (the symbol will disappear from the first line). The time will start to be measured whenthe pendulum first passes through thelight gate, it will ignore the second signalchange (when the pendulum passes backthrough) and will stop at the third change(when the pendulum arrives back at thelight gate). The display will show the timefor a complete period.
The blue buttons can be used to scrollthrough and examine the readingsalready taken.
Speed at ATiming will start when the signal at input 5:A changes and stops when the signal changes back.
Single interrupt card
Picket fence
When a picket fence is used to measure Speed at A, the measurements shown are for instantaneous speed i.e. at this distance, the speed was.
This data can be used to plot a distance vs. time or instantaneous speed vs. time graph
To improve the accuracy of readings, an increment is automatically applied to a picket fence with apitch length of less than 60 mm. This will mean that there are fewer readings than number of pitches
on a fence.
Note: It is envisaged that when a picket fence with a pitch length of 10 mm is used that it will be used on a buggy type investigations (which produceslower times than dropping thorough light gates), the times are therefore averaged over less pitches.
Pitch length (l) = 80 mm - readings taken with a pitch increment of 1 (80 mm).
37
Pitch length (l) Readings taken with a pitch increment of
80 mm 1 (80 x 1 = 80 mm)
60 mm 1 (60 x 1 = 60 mm)
40 mm 2 (40 x 2 = 80 mm)
20 mm 4 (20 x 4 = 80 mm)
10 mm 5 (10 x 5 = 50 mm)
A
Stop A off Start A on
Use the blue buttons to scroll through and examine the readings already taken
When a single interrupt card passes through a Light Gate,the time measured is for how long the card took to passthrough the sensor.
Speed is calculated using the length of the interrupt carddivided by the time taken for the card to pass.
The blue buttons can be used to scroll through and examinethe readings already taken.
Spoked Pulley
When a Spoked Pulley is used to measure Speed at A, the measurements shown are for instantaneous speed i.e. it took this amount of time to travel this distance and the speed was
The measurements for the Data Harvest Spoked Pulley are pre-defined.
Set up the investigation but do not press enter on EASYSENSE Q Advanced untilyou are ready to take readings (the spokes on the pulley can easily interrupt the Light Gate beam and create false results). When all is ready press enter on theEASYSENSE Q Advanced unit for the recording to start (the symbol will disappearfrom the first line).
The blue buttons can be used to scroll through and examine the readings already taken.
Speed at A or B
A measurement is taken each time a signal change is detected (when an object passes through)either sensor 5:A or sensor 6:B. The current measurement from A or B will be displayed on the LCDscreen.
3 Speeds at A or B
Three measurements will be taken for a signal change at either sensor 5:A and/or sensor 6:B. E.g.for elastic or inelastic collision investigations. The latest measurement from A or B will be displayedon the LCD screen.
Speed from A to B
Timing will start when a signal change is detected at sensor 5:A and stops when the signal at 6:Bchanges (so it measures the speed of an object to travel from sensor A to sensor B).
The blue buttons can be used to scroll through and examine the readings already taken.
38
Acceleration at A
Double interrupt card
Picket fence
When a picket fence is used to measure Acceleration at A, the measurements shown are for instantaneous acceleration i.e. it took this amount of time to travel this distance and the accelerationwas.
To improve the accuracy of readings, an increment is automatically applied to a picket fence with apitch length of less than 60 mm. This will mean that there are fewer readings than number of pitcheson a fence.
Note: It is envisaged that when a picket fence with a pitch length of 10 mm is used that it will be used on a buggy typeinvestigations (which produce slower times than dropping thorough light gates), the times are therefore averaged overless pitches.
Instantaneous Acceleration is calculated using the change in Velocity of 2 pitches divided by the time taken for the velocity to change.
39
The blue buttoncan be used to scrollthrough and examinethe readings alreadytaken
Time takenfor velocityto change
Raw Data
0
1
0
1
t3
V2
V1
t2
t1
t0
(l)
(l)
Average acceleration can be measured using a single light gate with a double interrupt card. Acceleration is calculated using the length of the segments on the double interrupt card.
The blue buttoncan be used to scrollthrough and examinethe readings alreadytaken
V1 – V2t2 + t0 – t3 + t1
2 2
t4
t3
t2
t1
t0
Acceleration = Change in Velocity =Time taken
V2 Length of segment - V1 Length of segment Time (t3 – t2) Time (t0 – t1)
Time taken
Spoked Pulley
When a Spoked Pulley is used to measure Acceleration at A, the measurements shown are forinstantaneous acceleration i.e. at this distance, the acceleration was.
The measurements for the Data Harvest Spoked Pulley are pre-defined.
Set up the investigation but do not press enter on EASYSENSE Q Advanced untilyou are ready to take readings (the spokes on the pulley can easily interrupt the light gate beam and create false results). When all is ready press enter on theEASYSENSE Q Advanced unit for the recording to start (the symbol will disappear from the first line).
The blue buttons can be used to scroll through and examine the readings already taken.
Acceleration A to B
A single interrupt card is used to measure the Velocity at A, the Velocity at B and the time taken totravel from A to B.
Acceleration = Change in Velocity = Velocity at B – Velocity at ATime taken Time taken to travel from A to B
40
Time taken to travel from A to B
The blue buttoncan be used to scrollthrough and examine the readings alreadytaken
Light Gate at 5:A
Light Gate at 6:B
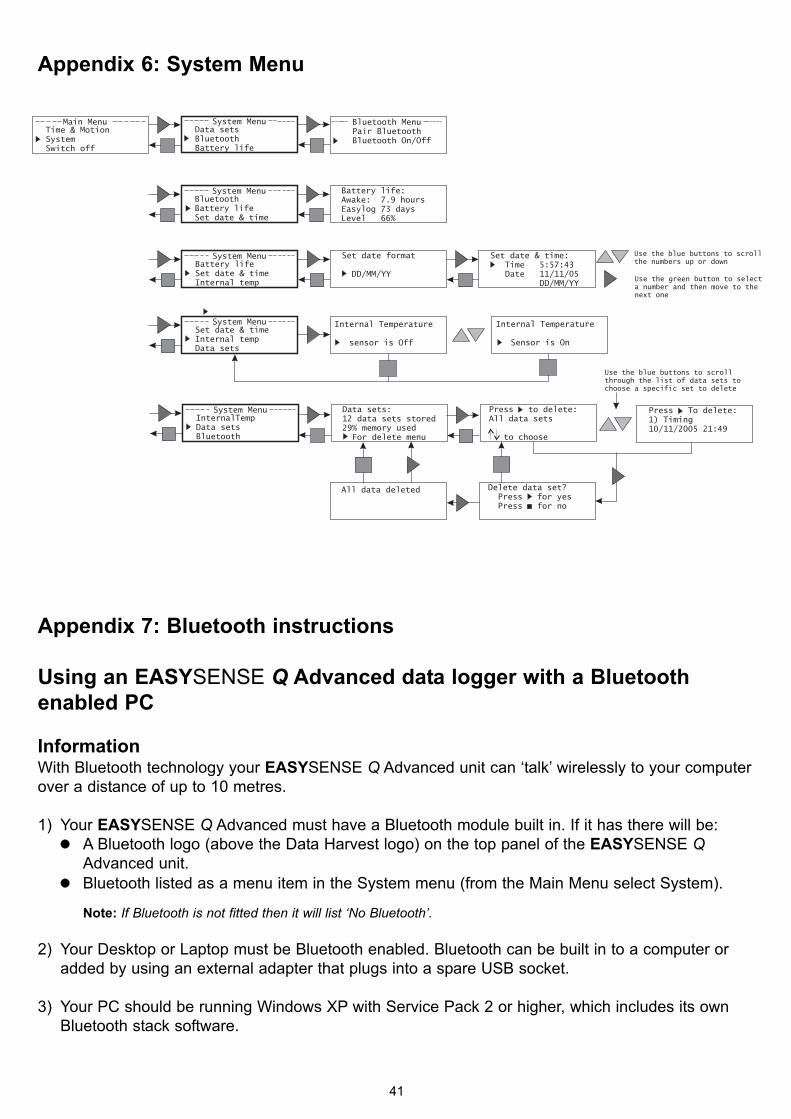
Appendix 6: System Menu
Appendix 7: Bluetooth instructions
Using an EASYSENSE Q Advanced data logger with a Bluetoothenabled PC
InformationWith Bluetooth technology your EASYSENSE Q Advanced unit can ‘talk’ wirelessly to your computerover a distance of up to 10 metres.
1) Your EASYSENSE Q Advanced must have a Bluetooth module built in. If it has there will be:!! A Bluetooth logo (above the Data Harvest logo) on the top panel of the EASYSENSE Q
Advanced unit. !! Bluetooth listed as a menu item in the System menu (from the Main Menu select System).
Note: If Bluetooth is not fitted then it will list ‘No Bluetooth’.
2) Your Desktop or Laptop must be Bluetooth enabled. Bluetooth can be built in to a computer or added by using an external adapter that plugs into a spare USB socket.
3) Your PC should be running Windows XP with Service Pack 2 or higher, which includes its own Bluetooth stack software.
41
General InfoBluetooth will allow only one EASYSENSE Q Advanced unit to talk to one computer at a time. It isnot possible to connect an EASYSENSE Q Advanced unit simultaneously to multiple computers.Once paired EASYSENSE Q Advanced will store the electronic identity of the Bluetooth device itwas paired with, so it can automatically re-connect to the adapter/computer in the future. It will onlystore the electronic identity of the device it was last paired with.
If you use a Bluetooth USB adapter then Windows XP will install a new set of drivers each time theadapter is plugged into a new USB port. Each Bluetooth USB adapter identifies itself to the computer as a different device so if you plug another adapter into the same USB port then anotherset of drivers will be installed. The result of either of these actions is a different COM port setting,which will need to be selected from Interface in the File menu of the EASYSENSE software.
For these reasons we strongly recommend that an EASYSENSE Q Advanced unit is always usedwith the same computer, with the same Bluetooth USB adapter connected to the same USB port onthe computer.
Notes:!! You may find it useful to number the computer, EASYSENSE Q Advanced unit, Bluetooth adapter and USB port to
identify this combination.
!! If Bluetooth is switched on, you will not be able to communicate with the EASYSENSE software via a USB cable.
PowerPower consumption is increased when Bluetooth is switched On. To check the number of hours EASYSENSE Q Advanced could operate without a power supplyattached, make sure Bluetooth is switched on (blue LED is flashing), that the sensors to be used areconnected and then select Battery life from the System menu.
Installing the Bluetooth USB adapter The instructions supplied apply for use with EASYSENSE Q Advanced used with the Bluetooth USBadapter (Product No. 4002) supplied by Data Harvest.
Microsoft’s Service Pack 2 for Windows XP includes its own Bluetooth stack. To install the BluetoothUSB adapter, simply plug the adapter into a spare USB port (preferably a port that the adapter canbe left in). Windows will identify the adapter and load the drivers; the process is automatic andrequires no input from the user.
EASYSENSE Q Advanced is a Bluetooth 1.1 Standard device, and as such should operate withother manufacturer’s Bluetooth adapters/dongles (Version 1.1 or higher). However Data Harvestcannot guarantee full operation with all makes of adapter, and are unable to offer technical supporton how to install and operate with Bluetooth adapters/dongles other than the product it supplies.
Initial use (pairing EASYSENSE Q Advanced to the PC)To use the EASYSENSE Q Advanced with a PC via Bluetooth, an initial pairing must be created.This pairing allows the logger to automatically re-connect to the PC in the future, and ensures that itwill not talk to or interfere with any other Bluetooth to PC connections running nearby.
EASYSENSE Q Advanced will attempt to pair with another Bluetooth device for 2 minutes, givingtime for the PC Bluetooth services to be started
Note: The following screen shots are based on a PC using the standard Windows XP Bluetooth software stack. OtherBluetooth adapters/dongles may use different software, and screens may appear different. However, the principlesdescribed for ‘Discovery & Pairing’ are the same.
42
This initial set up is a three step process:
Step 1) Discover devicesConnect the Bluetooth USB adapter to the PC and wait until the blue LED on the adapter has started flashing (this lets you know that Windows has started Bluetooth services).
A Bluetooth icon should appear in the lower left area of the task bar, doubleclick on the Bluetooth icon to open the Bluetooth Devices manager or open viaControl Panel from the Start menu.
Note: If you do not have a Bluetooth icon, open up the Control Panel and click onBluetooth Devices. Go to the Options Tab and tick the final box at the bottom of thepage ‘Show the Bluetooth icon on the notification area’.
Step 2) Pair the devices1. Select the Devices tab. Click Add and the ‘Add Bluetooth Device
Wizard’ will be launched.
On EASYSENSE Q Advanced:2. Use the blue up/down buttons to scroll the main menu until the
pointer is pointing at System. Press the green button to select.
3. Use the blue up/down buttons to scroll the menu until the pointer is pointing at Bluetooth. Press the green button to select.
4. Use the blue up/down buttons to scroll the menu until the pointer is pointing at Pair Bluetooth. Press the green button to select.
The screen will show;!! ID: this is the EASYSENSE Q Advanced’s serial number, which will be used to identify the
logger in the new devices list e.g. 060131 - 01256. !! Passkey: All EASYSENSE Q Advanced units have a passkey of 1234.
Note: The passkey is not configurable and is fixed at manufacture.
!! Pairing message: displays the point in the pairing process that EASYSENSE Q Advanced hasreached.
Powered/Discovering – this is shown when the Bluetooth module in EASYSENSE Q Advanced is initialised.Pairing enabled - EASYSENSE Q Advanced is transmitting pairing information that can be received by a Bluetooth receiver (the Bluetooth USB adapter or the PC).Paired: xxxxxxxxxx (e.g. 000B0D6904AE) – the pairing between EASYSENSE Q Advancedand the computer is complete; the number displayed is the electronic identity of the Bluetooth device it is paired with.
Note: If at any stage EASYSENSE Q Advanced goes to ‘sleep’ during this process the blue LED will stop flashing. Press any button on the unit to ‘wake’ it up. Press the red button on the Q Advanced unit, to exit the Pair Bluetooth menu and then press the green button to select Pair Bluetooth again.
43
On the computer 5. Tick the box on the Wizard to indicate ‘My device is set up and ready to be found’.
Click on Next to begin.
6. Your PC will then start searching for any Bluetooth devices that are discoverable and within range.
The LED on the Bluetooth USB adapter will be lit solidly during the search and will start blinking when the search is complete.
7. Click on the EASYSENSE Q Advanced that is going to be paired.
Click on Next
Note: The EASYSENSE Q Advanced unit is identified by its serial number, which is written on the base of the unit and shown on the LCD display (when Pair Bluetooth is selected).
Note: If you have taken more than 2 minutes Q Advanced may show a ‘Pairing failed’ message. Press the red button on the Q Advanced unit, to exit the Pair Bluetooth menu and then press the green button to select again. Click on Search Again in the Device Wizard.
44
8. You will then be asked if a Passkey is required. Click on “Use the passkey found in the documentation”
9. Enter the passkey (1234).Click Next
There will be short pause as passkey information is exchanged between the computer and EASYSENSE Q Advanced; the screen will show a check list for each stage. When the exchange has taken place and is successful the final page of the wizard will be shown.
Windows XP will assign two COM ports, one for incoming and one for outgoing connections. EASYSENSE Q Advanced will communicate with the computer (and therefore the EASYSENSE software) over the ‘Outgoing COM port. Make a note of the ‘Outgoing COM port’ number.
Note: Windows has up to 255 COM ports available (depending on the PC’s set up). COM ports indicated may have very high number values, with the EASYSENSE software this is not a problem.
The LCD screen on EASYSENSE Q Advanced will show the electronic identity number of the Bluetooth device it has paired with.
45
10. Click on Finish.
11. Press the red button on EASYSENSE Q Advanced twice to return to the Main menu.
Step 3: 1. Open the EASYSENSE software program.
2. It is likely that a communication error message will appear because the software does not know how to find the EASYSENSE Q Advanced yet. Click on Interface.
3. Select the Interface as EASYSENSE Range.
4. Select Serial port and then the serial (COM) port configured for Bluetooth from the drop down menu. (There will be a pair of COM ports listed, select the Outgoing COM Port number).
5. Click on OK. The program will save your selection so it will be automatically configured when next used.
6. When a connection is established the Home page will open. Select one of the New experiment modes i.e. EasyLog, Graph, Meters, Scope, Snapshot or Timing.
Use after the initial set upPress any button on EASYSENSE Q Advanced to wake up the unit. If the blue LED doesn’t start toflash check that Bluetooth is On (System menu -> Bluetooth menu -> Bluetooth On/Off).
Open the EASYSENSE software. As long as the EASYSENSE Q Advanced unit is being used withthe same computer / Bluetooth USB adapter, connected to the same USB port, communication willbe established and the Home page will open.
Trouble shooting
Q 1.The blue LED on EASYSENSE Q Advanced isn’t flashing.Press any button on EASYSENSE Q Advanced to wake up the unit. If the blue LED doesn’t start toflash check that Bluetooth is On (System menu -> Bluetooth menu -> Bluetooth On/Off).
Q 2. Why can’t I turn Bluetooth on, the only option I get is Off?This indicates that Bluetooth is not currently paired with a computer/Bluetooth USB adapter.
Q 3. I have paired previously with this computer, the Device Wizard shows the Q Advanced unit as ‘passkey enabled’ and ‘already connected’ but Q Advanced shows ‘Pairing failed’. This can happen if the EASYSENSE Q Advanced unit has since been paired with another computer/Bluetooth USB adapter. Start the pairing process again from the beginning.
Q 4. I get a ‘Communications error’ message when I open the EASYSENSE software. Try the following until communication is established: 1. Press any button on EASYSENSE Q Advanced to wake up the unit and check the blue LED is
flashing (if not see Q.1) and click on Retry.
46
2. Check the battery life level is sufficient (from the System menu) or connect to mains power.
3. Check the LCD screen on Q Advanced shows the Main Menu and click on Retry.
4. Select Interface. The Interface selected should be ‘EasySense Range’. The Connection should be ‘Serial port’. There will be two Bluetooth link COM port options, select the outgoing port number and click on OK.
To check the Outgoing COM port number for the Bluetooth device!! From Start select Control Panel on the PC
!! Double click on the Bluetooth Devices icon
!! Select the COM Ports tab.
!! The devices and the virtual Com ports they use will be shown in a list. Identify the EASYSENSE Q Advanced unit by its serial number and note its ‘Outgoing’ Com port number.
!! Check the EASYSENSE software it set to the same port number.
Q 5. If I press a button on Q Advanced the LCD screen remains blank. If I do a hard reset, bluetooth flashes once and the LCD screen goes blank again. The power level has dropped too low. Connect to a power supply and recharge the batteries.
47
48
Note: Data Harvest products are designed for educational use and are not intended for use in industrial, medical or commercial applications.
WEEE (Waste Electrical and Electronic Equipment) Legislation.
Data Harvest Group Limited are fully compliant with WEEE legislation and are pleased to provide a disposal service for any of our products when their life expires. Simply return them to us clearly identified as ‘life expired’ and we will dispose of them for you.
WarrantyEASYSENSE Q Advanced is warranted to be free from defects in materials and workmanship for aperiod of 12 months from the date of purchase provided it has been used in accordance with anyinstructions, under normal laboratory conditions. This warranty does not apply if the EASYSENSE QAdvanced has been damaged by accident or misuse.
In the event of a fault developing within the 12-month period, EASYSENSE Q Advanced must bereturned to Data Harvest for repair or replacement at no expense to the user other than postalcharges.