11
1 Digital Signature (PKI) Help Guide CONTENTS SECTION-1 System Requirements page – 2 SECTION-2 PKI Installation page - 3 SECTION-3 Procedure for Log-in using PKI eToken page - 7
1
Digital Signature (PKI) Help Guide
CONTENTS
SECTION-1 System Requirements page – 2 SECTION-2 PKI Installation page - 3
SECTION-3 Procedure for Log-in using PKI eToken page - 7

2
SECTION-1 Systems Requirements
Supported Operating Systems:
• Windows XP professional
• Windows 2000 professional
• Windows Vista professional
• Windows 7 professional
Supported Office Tools (Word & Excel):
• Microsoft Versions 2007 & 2003 ( .doc & .xls formats only)
Supported Browser:
• Microsoft Internet Explorer version 6,7 & 8
Minimum System Configuration:
• Any recent PC or Laptop
• USB Ports
• 512MB of Memory (RAM)
Resolution:
• Best viewed under 1024 x 768 pixels
PKI eToken Drivers:
• To enable successful PKI based log-in, the eToken drivers has to be installed and
configured in the Internet Browser. For more information, refer eToken in FAQ document.
Minimum Internet Connectivity:
• 512 kbps Broadband
Supported File Types:
• Supporting Documents of only .doc, .xls, .pdf, .jpg & .png file types should be uploaded of
size not exceeding 5 Mb per attachment.
It is recommended that all files to be uploaded are error free.

3
SECTION-2 PKI Installation 1. Install the EXE file from CD
eToken Model Alladin
Step A Insert CD to CD drive
Step B Install etoken drivers. (Or Click on Installation EXE in CD and install eToken drivers.)
Step C In the CD, right click the chain certificate and install (separate CD)
Note: If the tokens are like, iKey, Starkey, Vasco & Gemalto. The respective drivers have to install. 2. Restart the system 3. Plug the PKI Key in System. 4. Open IE browser.
a). Enable ActiveX controls:
i) Go to Tools>Internet options, Click 'Security', then select 'Internet'. ii) Click 'Custom Level 'and enable all the options for 'ActiveX controls and plugins and
make “Low safety” for S/w channel permissions. iii) Same for Local Intranet and Same for Trusted Sites. iv) Click 'OK 'to save the setting.
4
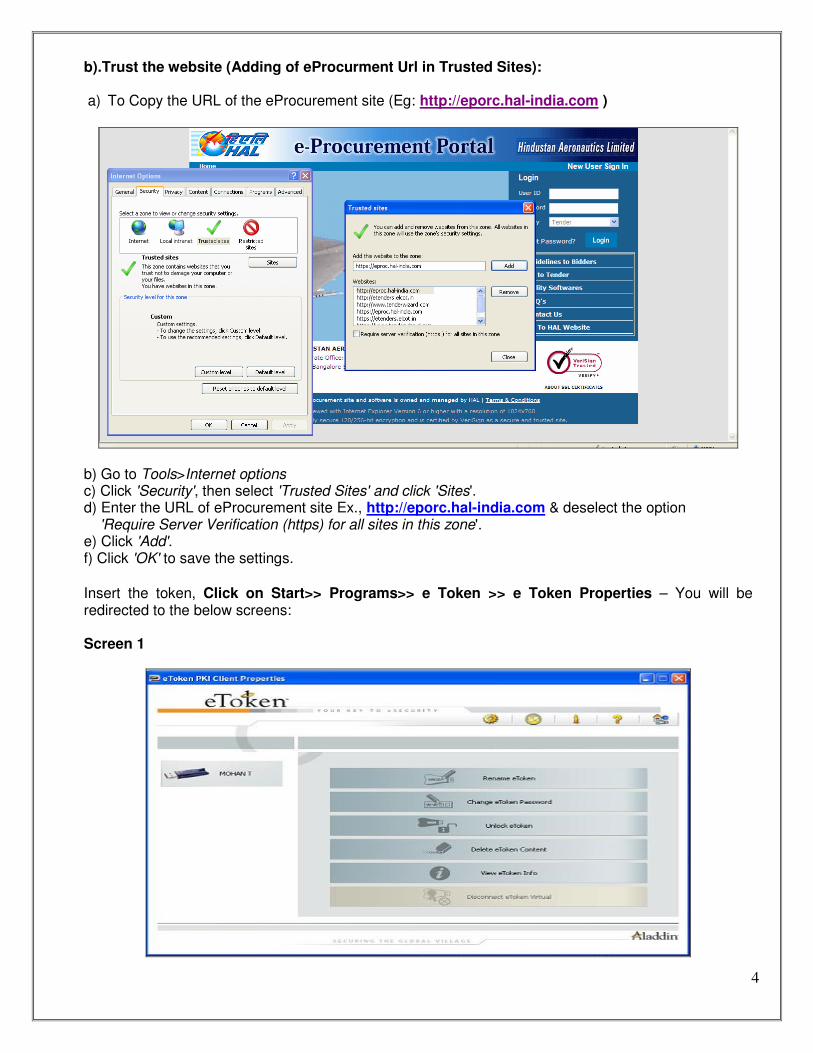
b).Trust the website (Adding of eProcurment Url in Trusted Sites): a) To Copy the URL of the eProcurement site (Eg: http://eporc.hal-india.com )
b) Go to Tools>Internet options c) Click 'Security', then select 'Trusted Sites' and click 'Sites'. d) Enter the URL of eProcurement site Ex., http://eporc.hal-india.com & deselect the option 'Require Server Verification (https) for all sites in this zone'. e) Click 'Add'. f) Click 'OK' to save the settings.
Insert the token, Click on Start>> Programs>> e Token >> e Token Properties – You will be redirected to the below screens: Screen 1

5
Screen 2 – Click on Advanced View
Screen 3 – Select the Certificate
The above screens confirm that your certificate is available.

6
Next step is to check the certificate in Internet Explorer: Insert the token, open the IE >> Tools >> Internet Options >> Contents >> Certificates – You will get the name of the Certificate user in the window as shown below:
View DSC serial number: Select the certificate and click on “view” button and go to “detail” where you can view the serial number of certificate.
If certificate is shown in both the places, then you can login.

7
SECTION-3 Procedure for Log in using PKI eToken
1) Open the browser and enter the URL: http://eporc.hal-india.com
2) Enter your eProcurement User ID and Password and Click on “Login”.
For first time login with DSC, system will ask to install the Java components. Follow the screens below:
Note: If not asked, you have to install Java version 6 update 29 or 30. Screen 1

8
Screen 2
Screen 3
Screen 4
9
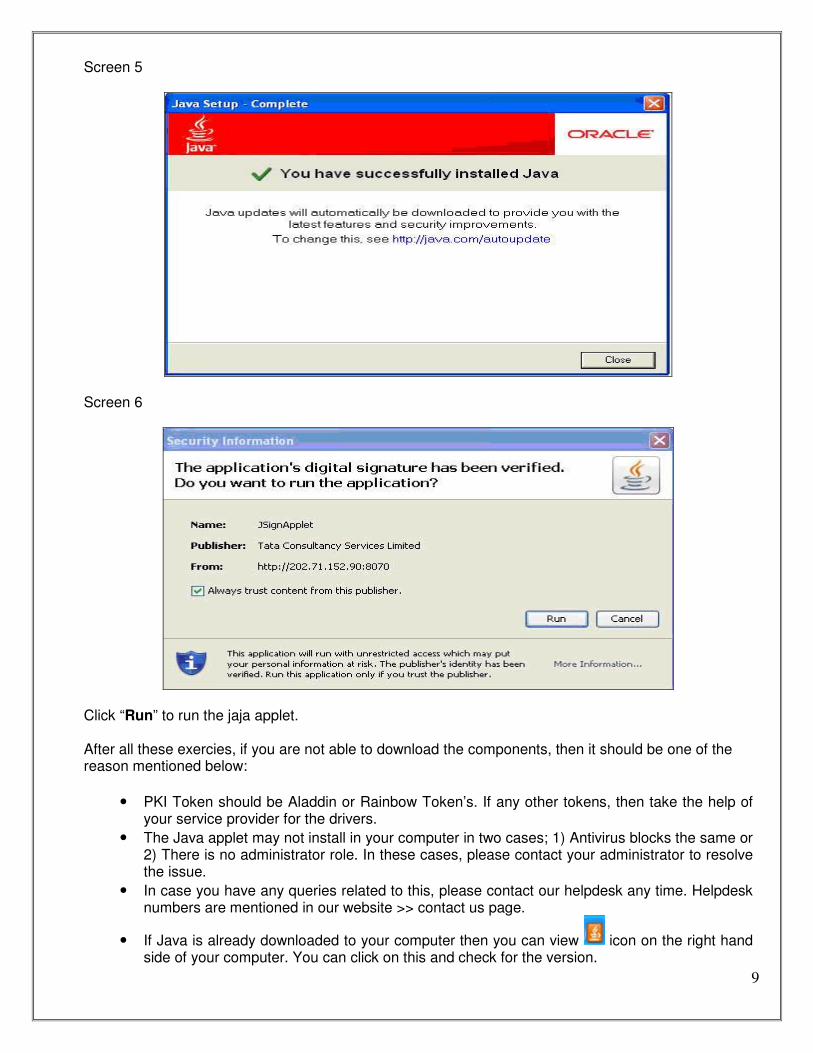
Screen 5
Screen 6
Click “Run” to run the jaja applet. After all these exercies, if you are not able to download the components, then it should be one of the reason mentioned below:
• PKI Token should be Aladdin or Rainbow Token’s. If any other tokens, then take the help of your service provider for the drivers.
• The Java applet may not install in your computer in two cases; 1) Antivirus blocks the same or 2) There is no administrator role. In these cases, please contact your administrator to resolve the issue.
• In case you have any queries related to this, please contact our helpdesk any time. Helpdesk numbers are mentioned in our website >> contact us page.
• If Java is already downloaded to your computer then you can view icon on the right hand side of your computer. You can click on this and check for the version.

10
3) Click “SELECT THE CERTIFICATE”
IMPORTANT: If downloading PKI COMPONENTS screen appears, wait until certificate selection screen appears. (It may take around 5minutes to download eMudhra Web Signer component)
4) Select your certificate and press OK. (Refer Figure as shown below)
5) Provide eToken Password and Click “Ok”.
11
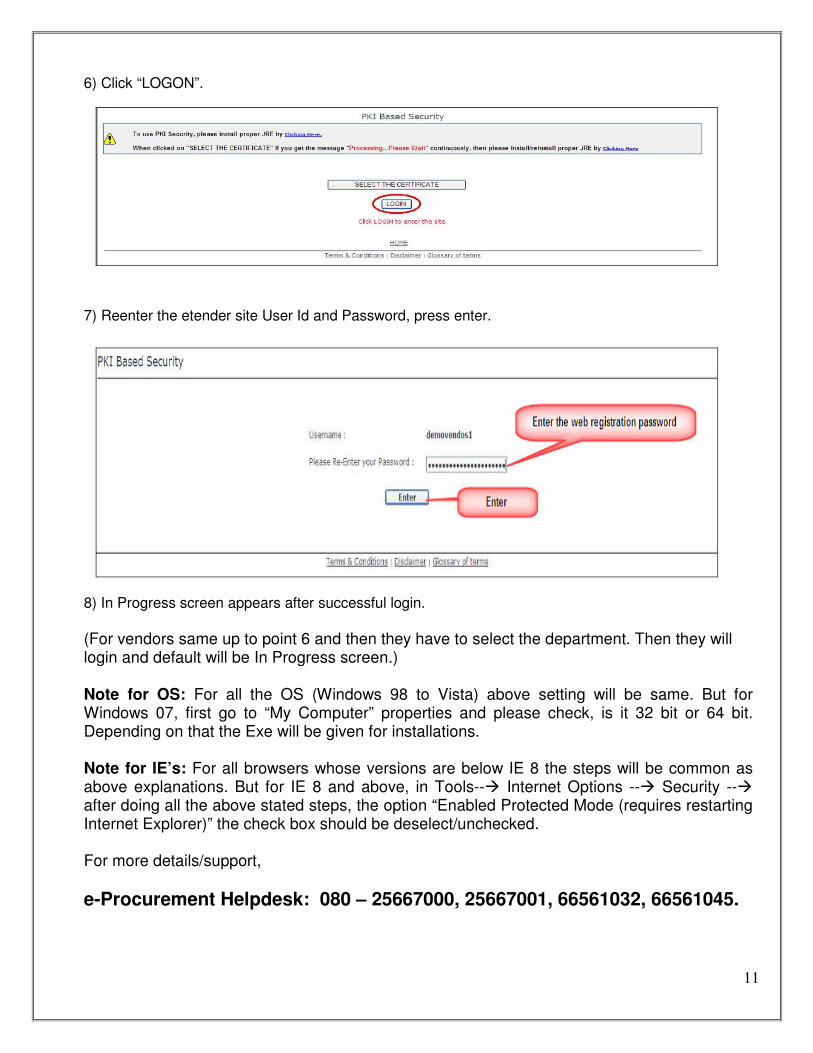
6) Click “LOGON”.
7) Reenter the etender site User Id and Password, press enter.
8) In Progress screen appears after successful login.
(For vendors same up to point 6 and then they have to select the department. Then they will login and default will be In Progress screen.) Note for OS: For all the OS (Windows 98 to Vista) above setting will be same. But for Windows 07, first go to “My Computer” properties and please check, is it 32 bit or 64 bit. Depending on that the Exe will be given for installations. Note for IE’s: For all browsers whose versions are below IE 8 the steps will be common as above explanations. But for IE 8 and above, in Tools--� Internet Options --� Security --� after doing all the above stated steps, the option “Enabled Protected Mode (requires restarting Internet Explorer)” the check box should be deselect/unchecked. For more details/support,
e-Procurement Helpdesk: 080 – 25667000, 25667001, 66561032, 66561045.


