25
| Date post: | 07-Jul-2018 |
| Category: |
Documents |
| Upload: | vuongtuyen |
| View: | 228 times |
| Download: | 2 times |
Click to confirm the automatic USB copy while LED Blinking.
nking
Press 5 sec for system reset.
::
Power LED. It
is On fo
r powered.
Ready LED. It is O
n for re
ady and Blinking for re
set.
Gigabit LED. It
is On when networks speed is 1000Mbps.
LAN LED. It is O
n for n
etwork connected and Blinking for a
ctivity.
HDD LED. It is Blinking when HDD is accessed.
USB LED. It is O
n for U
SB device connection and Blinking fo
r USB auto copy.
:: :
: :
:
LED Icon
NAS I
Indication

Thank you for buying ipTIME NASThank you for buying ipTIME NASⅠ!!!!!!The utility software for NASThe utility software for NASⅠ can be run on can be run on
Windows 2000, XP, Vista and Windows 7 OS environment.Windows 2000, XP, Vista and Windows 7 OS environment.In other OS like Mac OS or Linux, installation can be done using web browser manually.In other OS like Mac OS or Linux, installation can be done using web browser manually.
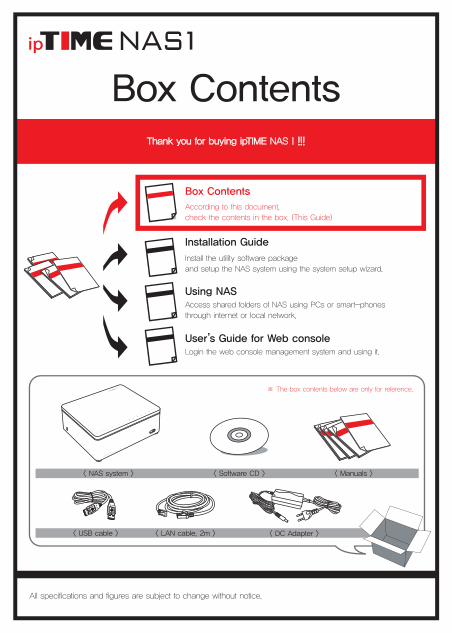
According to this document, check the contents in the box.
Box Contents
Access shared folders of NAS using PCs or smart-phones through internet or local network.
Using NAS
User’
Install the utility software package and setup the NAS system using the system setup wizard. (This Guide)
Installation Guide
Installation Guide
s Guide for Web console
Login the web console management system and using it.
All specifications and figures are subject to change without notice.

Installing the HDDOne.Install HDD as the pictures below.
1 Unlock the foot screws.
4 Connect SATA cables to HDD and insert the HDD.
2 Open the top cover. 3 Remove the PAD for slim HDD.
6 Close the top cover. 7 Lock the foot screws. 8 Done.
5 Put the PAD on the topfor your needs.
NAS I
Indication

Connecting cablesTwo.Connect cables as numbered as pictures below.
Click Power button on the rear panel of NAS and check the LEDs as above.
Use ipTIME IP router with firmware higher than 7.40 when connect NAS to network.
<ipTIME NASⅠ>
<ipTIME IP router>Indication
Power LED. It is On for powered.
Ready LED. It is On for ready and Blinking for reset.
Gigabit LED. It is On when networks speed is 1000Mbps.
LAN LED. It is On for network connected and Blinking for activity.
HDD LED. It is Blinking when HDD is accessed.
USB LED. It is On for USB device connection and Blinking for USB auto copy.
:: : : :
:LED Icon
NASI

Installing Utility SoftwareThree.
3
Some Stages are omitted.
Start Installation
Click [Next] to start the installation.
Click [Finish] when the installation is finished.
1 2Insert CD Install the Utility
4 Finish Installation
Click [ipTIME NAS Utility Install] when the CD launcher program is started.The utility software for NASⅠ can
be run on Windows 2000, XP, Vista and Windows 7 OS environment. In other OS like Mac OS or Linux, installation can be done using web browser manually.

Configuring the NASFour. Some of the configuration stages are omitted.
1 Run ipTIME NAS console
Double Click [ipTIME NAS console]in the Desktop screen.
2 Select NAS
Choose NAS from searching list.Choose [Open NAS Web Console].Click [Run] button.
4 Run System Wizard
Check [Run System Wizard].Click [Run] to start the wizard.
3 Login
a
b c
a
b
Login to the selected NAS as a※ The default password for admin is
“admin” account.
‘admin’.
5 Start System Wizard
Click [Next] button to begin the wizard.
6 Enter the hostname
Enter the hostname wantedand click [Next] button.
7 Change the default password for admin
Change the password for adminand click [Next] button.
8 Add a new administrator
9 Initialize and Format Disk
Choose Yes or No for initialize & Format Hard Diskand click [Next] button.※ Formatting is not needed if the disk is already formatted.
Creating default folders for serviceActivate the shared folders for Windows and FTP
Turn on the FTP and Window serviceand click [Next] button.
11 Register ipDISK service
Select [New Registration] for ipDISK service and click [Next] button.
12
13 Configure ipDISK service
Fill Service ID and E-mail.Select ipDISK(FTP) port as an Auto.※ To select ipDISK port as an Auto, use ipTIME IP router with firmware higher than 7.40.
14 Finish the configuration
Review the configurations and click [Next] button to finish.
Choose Yes or No for adding a new administrator account and click [Next] button.※ Adding a new administrator account can be done later, Choose“No” and continue the wizard.
Be sure the default folders for service will be created.
“Data”and “Media”

Managementwith Web ConsoleAppendix.
The configuration done by system wizard can be reviewed by the web console.
※ Click [ipTIME NAS Console] icon to login to the web console.※ Adding a user, creating a folder and other jobs can be done in the web console.※ Refer “User’s Guide for Web Console Management” for more detail information.

Thank you for buying ipTIME NASThank you for buying ipTIME NASⅠ!!!!!!The utility software for NASThe utility software for NASⅠ can be run on Windows 2000, XP, Vista can be run on Windows 2000, XP, Vista
and windows 7 OS environment. In the smart-phone environment and windows 7 OS environment. In the smart-phone environment ipTIME NASipTIME NASⅠ can be easily accessed using smart-phone apps also available. can be easily accessed using smart-phone apps also available.
According to this document, check the contents in the box.
Box Contents
Access shared folders of NAS using PCs or smart-phones through internet or local network. (This Guide)
Using NAS
User’
Install the utility software package and setup the NAS system using the system setup wizard.
Installation Guide
Using NAS
s Guide for Web console
Login the web console management system and using it.
All specifications and figures are subject to change without notice.
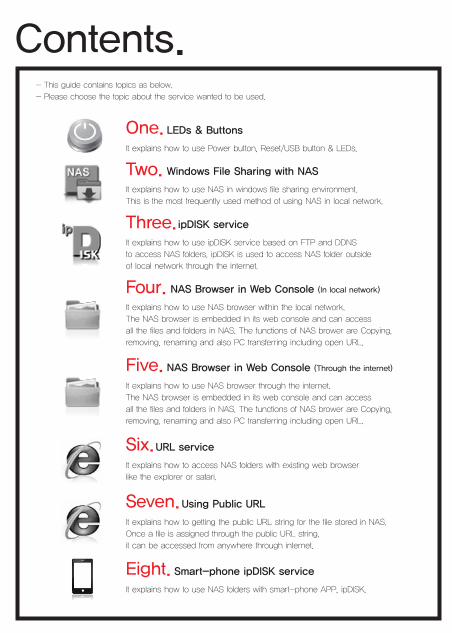
- This guide contains topics as below.
- Please choose the topic about the service wanted to be used.
Contents.
It explains how to use NAS in windows file sharing environment.This is the most frequently used method of using NAS in local network.
Windows File Sharing with NASTwo.
It explains how to use ipDISK service based on FTP and DDNS to access NAS folders. ipDISK is used to access NAS folder outside of local network through the internet.
ipDISK serviceThree.
It explains how to use NAS browser within the local network.The NAS browser is embedded in its web console and can access all the files and folders in NAS. The functions of NAS brower are Copying, removing, renaming and also PC transferring including open URL.
NAS Browser in Web Console (In local network)Four.
It explains how to use NAS browser through the internet.The NAS browser is embedded in its web console and can access all the files and folders in NAS. The functions of NAS brower are Copying, removing, renaming and also PC transferring including open URL.
NAS Browser in Web Console (Through the internet)Five.
It explains how to access NAS folders with existing web browser like the explorer or safari.
URL serviceSix.
It explains how to getting the public URL string for the file stored in NAS.Once a file is assigned through the public URL string, it can be accessed from anywhere through internet.
Using Public URLSeven.
It explains how to use NAS folders with smart-phone APP, ipDISK.
Smart-phone ipDISK serviceEight.
It explains how to use Power button, Reset/USB button & LEDs.
LEDs & Buttons One.

LEDs & Buttons
This system has 2 buttons and 6 LEDs.
One.
Power button
It is for system power on/off.
Power LED
It show the status of NAS power. On - Power On. Off - Power Off.
Ready LED
Ready LED shows the status of NAS Services.On - All NAS services are available. Slow blinking - Booting or Shutting down(All NAS services are unavailable.) Fast blinking - Running factory default. Off - Booting or HDD Power Save Mode.
Gigabit LED
Gigabit LED shows the gigabit ability of LAN Port LinkOn - The link of LAN port is Gigabit Speed. Off - The link of LAN port is not Gigabit Speed.
LAN LED
LAN LED shows the link status of LAN port. On - The link of LAN port is on. Off - The link of LAN port is off.
HDD LED
HDD LED shows the status of internal HDD. On - NAS recognized the internal HDD. Blinking - Internal HDD is being accessed. Off - NAS can't recognized the internal HDD or HDD Power Save Mode.
USB LED
USB LED shows the status of USB MEMORY port. On - USB storage device is connected and ready to use. Fast blinking - Wait USB Copy event for 10 seconds. - To run USB Copy, push the button. Slow blinking - Now USB copy action is running. Off - No USB device is connected.
Reset/USB Copy button
To make system with factory default configuration, 1. Keep this button pushed for more than 5 seconds. 2. Ready LED shows fast blinking. 3. After factory default is done, NAS will be restarted. To run USB Copy operation, 1. Connect USB storage device. 2. USB LED will show fast blinking. 3. During fast blinking, push this button. 4. Predefined USB Copy operation will be started. 5. During USB Copy operation, USB LED shows slow blinking.
Indication
Power LED. It is On for powered.
Ready LED. It is On for ready and Blinking for reset.
Gigabit LED. It is On when networks speed is 1000Mbps.
LAN LED. It is On for network connected and Blinking for activity.
HDD LED. It is Blinking when HDD is accessed.
USB LED. It is On for USB device connection and Blinking for USB auto copy.
:: :: :
:LED Icon
NASI

Opening a Folder
Double click the folder to be opened.
4
Windows File Sharing with NASTwo.A. Before opening the NAS folders... To use NAS in windows file sharing, following setup need to be done through the web console.
6 Checking the Service for Windows File Sharing
Select the menu [Server] > [Windows File Sharing] from the left menu browser.Make the service as on.Click [Save] to finish setup.
Checking Accounts4
Select the menu [Folder/User] > [User] from the left menu browser.Check the user accounts.Click [Save] to finish setup.
B. Accessing Windows Shared Folder
Select the menu [Folder/User] > [Folder] from the left menu browser.Select the folder to be used for windows file sharing.Check the user for this folder.Make sure the Windows Share is checked for the selected folder.Click [Save] to finish setup.
Checking the Folder for Windows File Sharing5
Running ipTIME NAS Console
Double click the [ipTIME NAS Console] icon in the desktop window.
1
Select the NAS from the searched list.Choose [Open NAS Web Console] and click the [Run].
Opening NAS web console2 Login3
Choose Web console and enter the user account and password.Click the [LOG IN] to start the web console.
Running ipTIME NAS Folder
Double Click [ipTIME NAS Folder] iconin the desktop.
1 Selecting the local network
Select [Connect a folder of NAS on a local network]and click [Next].
2 Selecting NAS
Select NAS from the searching list and click [Next].
3
Login
Enter the user name and the password.※ User management can be done through Web console of NAS. See the appendix.
5
Using NAS※Copying files
※Watching movies
※Viewing photos※Editing documents
The files in the folder can be accessed as a local folder at local PC.
6
※Refer [User’s Guide for Web console] for more information about the web console.
※Playing songs

Login3
Enter the user name and the password and click [Log on].
ipDISK serviceThree.A. Before using ipDISK service... To use ipDISK service, following setup need to be done through the web console.
B. Using ipDISK Service
Running ipTIME NAS Console
Double click the [ipTIME NAS Console] icon in the desktop window.
1
Select the NAS from the searched list.Choose [Open NAS Web Console] and click the [Run].
Opening NAS web console2 Login3
Choose Web console and enter the user account and password.Click the [LOG IN] to start the web console.
Double Click [ipDISK] iconin the desktop.
Running ipDISK1
Enter the service account and click [Connect].
Entering the service2
※ In the case when the executing files cause problems, copy the file to the local PC and use it.
Using NAS4
Checking ipDISK service4
Select the menu [Server] > [ipDISK Service] from the left menu browser.Make the service as on.Click [Save] to finish setup.
Checking FTP Server for ipDISK service6
Select the menu [Server] > [FTP Server] from the left menu browser.Make the service as on.Click [Save] to finish setup.
7 Checking the Folder for FTP
Select the menu [Folder/User] > [Folder] from the left menu browser.Select the folder to be used for ipDISK(FTP) service.Check the user for this folder.Make sure the FTP(ipDISK Service) is checked for the selected folder.Click [Save] to finish setup.
5 Checking Accounts
Select the menu [Folder/User] > [User] from the left menu browser.Check the user accounts.Click [Save] to finish setup.
※Refer [User’s Guide for Web console] for more information about the web console.

NAS Browser in Web Console (In local network)Four.
[Notice] The file size is limited to 2GB when upload a file from PC.
PC transfer65 Using NAS BrowserChanging to NAS Browser mode4
Click [NAS Browser] to enter NAS browser mode. Use top-down menu to edit or sort files and folders. Use the [File Transfer] menu to up/download files to/from PC.
Running ipTIME NAS Console
Double click the [ipTIME NAS Console] icon in the desktop window.
1
Select the NAS from the searched list.Choose [Open NAS Web Console] and click the [Run].
Opening NAS web console2 Login3
Choose Web console and enter the user account and password.Click the [LOG IN] to start the web console.

NAS Browser in Web Console (Through the internet)Five.
[Notice] The file size is limited to 2GB when upload a file from PC.
Connecting Web Console via the internet1
Using NAS Browser4
Use top-down menu to edit or sort files and folders.
Enter the ipDISK service URL and HTTP port number in the address field of internet browser as above. ipDISK service URL can be found
in the [System Information] menu.
The HTTP port number can be omitted when port number is 80.
Changing to NAS Browser mode3
Click [NAS Browser] to enter NAS browser mode.
:
2 Login
Enter the user account and the password.Click [LOG IN] to open the web console.

URL serviceSix.A. Before using URL service... To use URL service, following setup need to be done through the web console.
B. Using URL Service
[Notice] The file size is limited to 2GB when upload a file from PC.
PC transfer65 Using NAS ServiceConnecting URL Service4
Click [NAS Browser] to enter NAS browser mode. Use top-down menu to edit or sort files and folders. Use the [File Transfer] menu to up/download files to/from PC.
Running ipTIME NAS Console
Double click the [ipTIME NAS Console] icon in the desktop window.
1
Select the NAS from the searched list.Choose [Open NAS Web Console] and click the [Run].
Opening NAS web console2 Login3
Choose Web console and enter the user account and password.Click the [LOG IN] to start the web console.
Running [ipTIME NAS Console] (in the local network)
Double click [ipTIME NAS Console] in the desktop window.Select the NAS and click [Run] from the NAS list
1
Enter the ipDISK service URL and HTTP port number in the address field of internet browser as above.
Connecting Web Console (via the internet)2
or
Login3
Select URL service radio button and enter the user account and the password.Click [LOG IN] to open the web console.
:
Select the menu [Server] > [URL Service] in the left menu browser.Make the service as on.Click [Save] to finish setup.
6 Checking URL service
Select the menu [Folder/User] > [User] from the left menu browser.Check the user accounts.Click [Save] to finish setup.
Checking Accounts4
Select the menu [Folder/User] > [Folder] from the left menu browser.Select the folder to be used for URL service.Check the user for this folder.Make sure the [URL Service] is checked for the selected folder.Click [Save] to finish setup
Checking the Folder for URL service5

Using Public URLSeven.
Make sure [All User] is added to the user list.Click [NAS Browser] to enter NAS browser mode.
Select the menu [Folder/User] > [Folder] from the left menu browser.Select the folder to be used for Public URL service.Add [All User] for the user list for the folderClick [Save] to finish setup.
Select the file for getting public URL.Run [File Transfer] > [Get URL of file] from the top-down menu.The public URL string for selected file will be displayed in popup window.
Getting Public URL65 Changing to NAS Browser modeAdding All User Attribute4
4
Running ipTIME NAS Console
Double click the [ipTIME NAS Console] icon in the desktop window.
1
Select the NAS from the searched list.Choose [Open NAS Web Console] and click the [Run].
Opening NAS web console2 Login3
Choose Web console and enter the user account and password.Click the [LOG IN] to start the web console

B. iPhone
Smart-phone ipDISK serviceEight.
Select ipDISK icon. Enter ipDISKUser account and password.
Run ipDISK Run ipDISK
A.Android Phone
[Using Examples] [Using Examples]
Selecting ipDISK1 Running ipDISK2 Login3
Touch Touch
Select ipDISK icon. Enter ipDISK User account and password.
Selecting ipDISK1 Running ipDISK2 Login3
Touch Touch
Uploadb
The files in the phone canbe uploaded to the NAS.
Downloadb
The files in the NAS can bedownloaded to the phone.
TouchTouch
Uploada
The files in the phone canbe uploaded to the NAS.
TouchTouch
Downloadc
The files in the NAS can bedownloaded to the phone.
TouchTouch
※ The figures on smart-phone can be different.
※ ipDISK APP can be downloaded from the Android market
and Apple App-store using the searching keyword “ipDISK”.
a Installing App
TouchTouch
To install the App, search with keyword, ipdisk in the Android market.“ ”
cInstalling App
TouchTouch
To install the App, search with keyword, ipdisk in the Apps store.“ ”
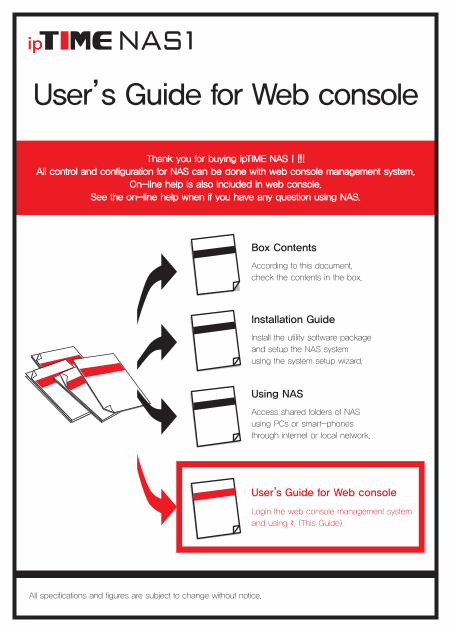
Thank you for buying ipTIME NASThank you for buying ipTIME NASⅠ!!!!!!All control and configuration for NAS can be done with web console management system.All control and configuration for NAS can be done with web console management system.
On-line help is also included in web console.On-line help is also included in web console.See the on-line help when if you have any question using NAS.See the on-line help when if you have any question using NAS.
According to this document, check the contents in the box.
Box Contents
Access shared folders of NAS using PCs or smart-phones through internet or local network.
Using NAS
Install the utility software package and setup the NAS system using the system setup wizard.
Installation Guide
Login the web console management system and using it. (This Guide)
User’s Guide for Web console
All specifications and figures are subject to change without notice.
User’s Guide for Web console

Login to Web consoleOne.
1 2
3
Run ipTIME NAS console
Login
Select NAS
Double Click [ipTIME NAS console]in the Desktop screen.
Choose NAS from searching list.Chose [Open NAS Web Console].Click [Run] button.
4 Web console management system
Web console management is displayed as Above.
Login to the selected NASas a※ The default password for admin is
“admin”account.
‘admin’.

User ManagementTwo.
Select [Folder/User] > [User] menu.
Click [New User] icon then the user account field will be activated.
Enter account name and password for the new user.
Click [Save].
Select [Folder/User] > [User] menu.
Select a user for changing.
Change the field wanted.
Click [Save].
Select [Folder/User] > [User] menu.
Select a user for deleting.
Click [Remove User] icon to delete.
A. Adding a User
B. Deleting a User C. Changing Information
Check to assignadministrator authority.
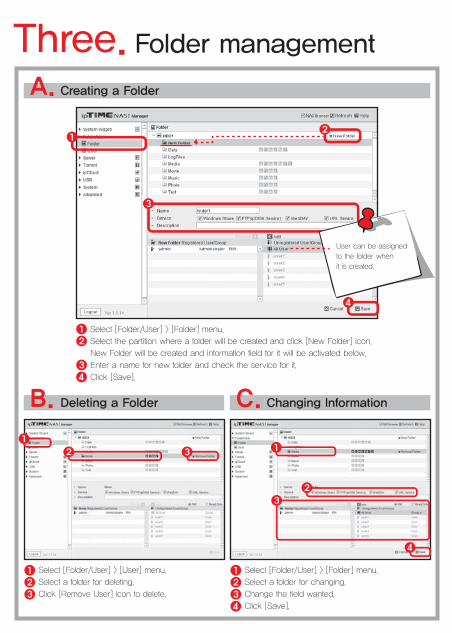
Folder managementThree.
Select [Folder/User] > [Folder] menu.
Select the partition where a folder will be created and click [New Folder] icon.
New Folder will be created and information field for it will be activated below.
Enter a name for new folder and check the service for it.
Click [Save].
Select [Folder/User] > [Folder] menu.
Select a folder for changing.
Change the field wanted.
Click [Save].
Select [Folder/User] > [User] menu.
Select a folder for deleting.
Click [Remove User] icon to delete.
A. Creating a Folder
B. Deleting a Folder C. Changing Information
User can be assigned to the folder when it is created.

Windows/FTP server managementFour.
Select
[Server] > [Windows File Sharing] menu.
Turn on or off
windows file sharing service.
Click [Save].
Select [Server] > [FTP] menu.
Turn on or off FTP service.
Click [Save].
Select [Server] > [URL Service] menu.
Turn on or off URL service.
Click [Save].
A.Windows File Sharing
B. FTP Server
C. URL Service
The windows file sharing service for each folder can be enabled from [Folder] menu.
The FTP server service for each folder can be enabled from [Folder] menu.
The URL service for each folder can be enabled from [Folder] menu.

Select [Server] > [iTunes Server].
Enter iTunes server name and turn on it.
Select a folder and click [Set] icon to assign it as an iTunes folder.
Select a folder and click [Clear] icon to deassing it from the iTunes service.
Click [Save].
Run iTunes.
Select the [NAS1] previously
assigned in web console of NAS.
The files placed in the folder
previously assigned to
iTunes will be shown.
Setup for Media(DLNA) server is also same.
iTunes serviceFive.

Torrent managementSix.
A. Setup Torrent
Select [Torrent] > [Torrent Setup] menu.
Turn on the Torrent service.
Select the folder where files
will be downloaded
and click [Set Download Folder].
Click [Save].
B. Using Torrent
Select [Torrent] > [Torrent] menu.
Click [ADD TORRENT] icon.
Select the torrent file for download.
Click [Open] to begin the download.
C. Viewing Status
The torrent file currently downloaded.
The download path.
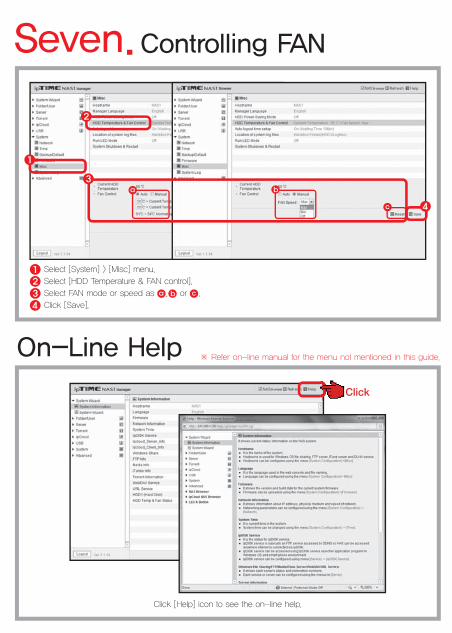
Controlling FANSeven.
On-Line Help
Select [System] > [Misc] menu.
Select [HDD Temperature & FAN control].
Select FAN mode or speed as , or .
Click [Save].
a b
c
Click [Help] icon to see the on-line help.
※ Refer on-line manual for the menu not mentioned in this guide.


