35
Continuous deployment using Microsoft Azure Web Sites
| Date post: | 17-Dec-2016 |
| Category: |
Documents |
| Upload: | phungkhanh |
| View: | 239 times |
| Download: | 3 times |
Continuous deployment using Microsoft Azure Web Sites
Contents
Overview ............................................................... 4
Deployment and release strategies ................ 5 Blue-green deployment ....................................................... 5
Canary releasing .................................................................... 5
Deployment and release strategies for Microsoft Azure Web Sites ............................... 6
Creating long-lived branches for releases ....................... 8
A/B test releases ..................................................................... 9
Feature work on the master branch .................................. 10
Managing creation and configuration scripts for components ............................................................................ 11
Building the deployment pipeline using Git .................... 12
Building the deployment pipeline using Visual Studio Online .............................................................. 14
Swapping the production and staging environments .......................................................................... 18
Scripting configuration and deployment on Microsoft Azure Web Sites ......................... 19
Working with the cross-platform CLI ................................ 19
Working with PowerShell cmdlets ..................................... 19
Automating the creation and deletion of web sites ...... 20
Configuring custom domain names ................................. 21
Configuring an SSL certificate ............................................. 22
Continuous deployment using Microsoft Azure Web Sites
Configuring application settings and connection strings ................................................................. 23
Working with the staging environment ............................ 24
Deploying a web site ............................................................ 25
Managing releases using the Service Gateway .................................................. 28
Scripting example ............................................... 31 Creating and configuring web sites .................................. 32
Creating a new component ................................................ 33
Swapping a web site ............................................................. 34
In closing ............................................................... 34
Resources .............................................................. 35
Contact the author ............................................. 35
© 2014 Microsoft Corporation. All rights reserved. This document is provided “as-is.” Information and views expressed in this document, including URL and other Internet web site references, may change without notice. You bear the risk of using it. This document does not provide you with any legal rights to any intellectual property in any Microsoft product. You may copy and use this document for your internal, reference purposes. You may modify this document for your internal, reference purposes.
Continuous deployment using Microsoft Azure Web Sites

Delivering a service instead of shipping software requires a cultural change in how development and operations teams interact. Namely, there has to be joint accountability to deliver the service level agreement (SLA) as one team. A central part of continuous delivery is automation: From checking in new code to building, testing, and deploying, automation is the key to continuously delivering a service. Gone are the days of the waterfall process, where the developer hands the code to the test department, which then hands it to the operations group. It is now one team that is responsible for developing, testing, and operating the service.
This document discusses how to realize a continuous deployment pipeline using Microsoft Azure Web Sites. To successfully implement such an approach, deployment is the last step of the full delivery pipeline, which consists of configuration management, continuous integration, automated testing, and automated deployment.
Because it focuses on how to implement continuous deployment, this document assumes that there is an automated configuration, build, and test environment already in place. For detailed information on these latter topics, I recommend reading Continuous Delivery: Reliable Software Releases through Build, Test, and Deployment Automation by Jez Humble and David Farley—a great book covering all aspects of continuous delivery and a definite must read!1
This document covers the following topics as part of continuous deployment:
Deployment and release strategies: Discusses common release and deployment strategies independent of the underlying technologies.
Deployment and release strategies for Microsoft Azure Web Sites: Discusses in detail release and deployment strategies for Microsoft Azure Web Sites, as well as the use of Git and Microsoft Visual Studio Online.
Scripting the configuration and deployment of Microsoft Azure Web Sites: Provides details on how to build an automated deployment pipeline using the Microsoft Azure Command Line Interface (CLI) and Windows PowerShell scripting.
Managing releases using the Service Gateway: Introduces the Service Gateway to implement advanced release strategies.
Scripting example: Provides a comprehensive example of the previously discussed topics.
1 Jez Humble and David Farley, Continuous Delivery: Reliable Software Releases through Build, Test, and Deployment Automation, Addison-Wesley Professional, August 2010.
Overview
Continuous deployment using Microsoft Azure Web Sites 4

The first thing to remember is that deployment does not equal release: As part of continuous deployment, we trigger the deployment pipeline as soon as a check-in happens. If the check-in unit tests and integration builds are successful, we run the integration tests and—only after this step—deploy the artifacts to the staging environment (just to then perform more tests, such as smoke and acceptance tests). If all tests are passed, the new release can be rolled out across the production environment. Having such a deployment strategy in place becomes handy when instant releases (like bug fixes) are required. The goal is to fully automate this deployment pipeline to shorten the time (and pain) from check-in to release. While doing so, the solution must be able to respond to requests at all times, even when in the process of deploying or testing a new release. To achieve zero downtime, we commonly take advantage of two deployment strategies: blue-green deployment and canary releasing.
It is important to understand that risks grow exponentially greater as more check-ins occur between releases. This means that launching with new releases more frequently is actually less risky because the scope of the changes is better understood. This is counterintuitive to many people.
Blue-green deployments are based on two identical deployment environments—one for production and one for staging. The key is to ensure that the two environments are truly identical, including the data they manage. Zero downtime releases are achieved by deploying to the staging environment. After the new deployment is smoke tested, traffic is routed to the staging environment, which now becomes the production environment. While blue-green deployments provide a simple and powerful way to test a deployment before going into production, they might require staging environments of similar size and capacity to perform capacity tests. This might not be an economically feasible option for large-scale services.
Microsoft Azure Web Sites and its staging slots provide an out-of-the-box experience for blue-green deployments. Basically, two deployment slots that can be swapped are provided. In most scenarios, this is the default deployment strategy.
Canary releasing addresses the challenge of testing a new release with only a subset of servers. This approach can also be used for A/B testing: A small percentage of users is routed to the new service, while the majority still works against the old version. This allows the team to get direct feedback without being at risk of impacting most users. Note that it is possible to have multiple versions running in parallel. The same approach can be used to perform capacity tests without routing actual
Deployment and release strategies
Blue-green deployment
Canary releasing
Continuous deployment using Microsoft Azure Web Sites 5
users to the release that is under test. (This basically tests the new version in production without routing actual users to it.)
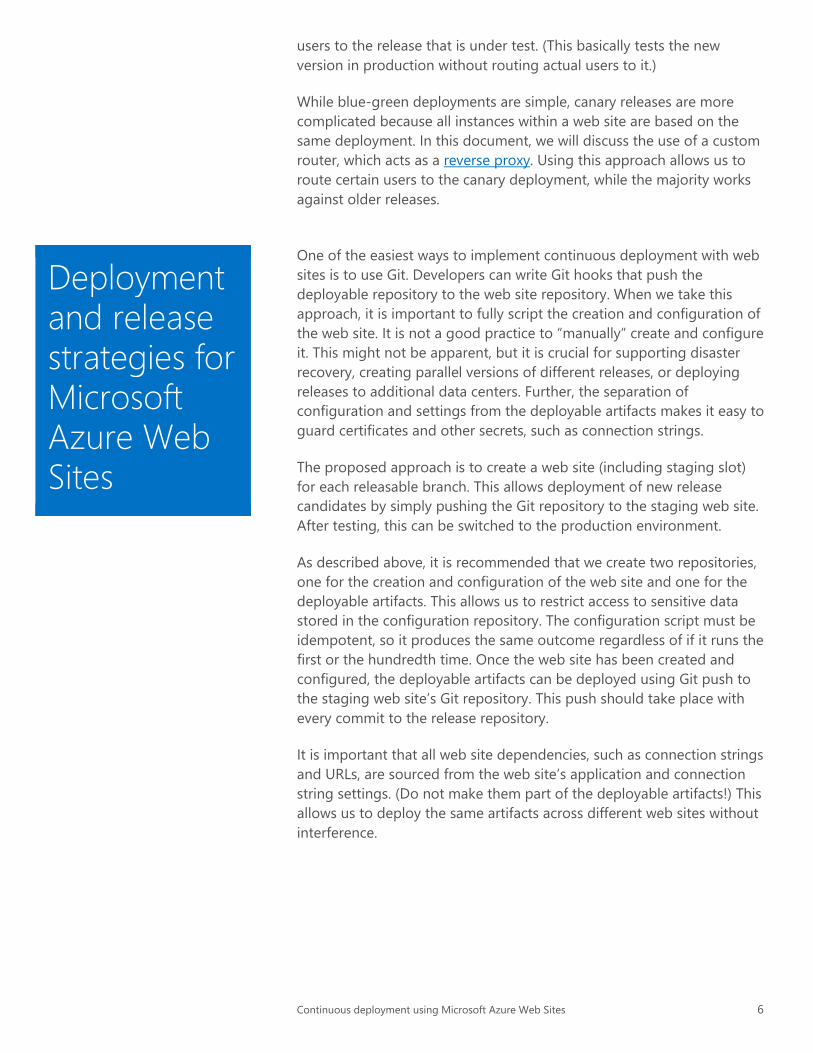
While blue-green deployments are simple, canary releases are more complicated because all instances within a web site are based on the same deployment. In this document, we will discuss the use of a custom router, which acts as a reverse proxy. Using this approach allows us to route certain users to the canary deployment, while the majority works against older releases.
One of the easiest ways to implement continuous deployment with web sites is to use Git. Developers can write Git hooks that push the deployable repository to the web site repository. When we take this approach, it is important to fully script the creation and configuration of the web site. It is not a good practice to “manually” create and configure it. This might not be apparent, but it is crucial for supporting disaster recovery, creating parallel versions of different releases, or deploying releases to additional data centers. Further, the separation of configuration and settings from the deployable artifacts makes it easy to guard certificates and other secrets, such as connection strings.
The proposed approach is to create a web site (including staging slot) for each releasable branch. This allows deployment of new release candidates by simply pushing the Git repository to the staging web site. After testing, this can be switched to the production environment.
As described above, it is recommended that we create two repositories, one for the creation and configuration of the web site and one for the deployable artifacts. This allows us to restrict access to sensitive data stored in the configuration repository. The configuration script must be idempotent, so it produces the same outcome regardless of if it runs the first or the hundredth time. Once the web site has been created and configured, the deployable artifacts can be deployed using Git push to the staging web site’s Git repository. This push should take place with every commit to the release repository.
It is important that all web site dependencies, such as connection strings and URLs, are sourced from the web site’s application and connection string settings. (Do not make them part of the deployable artifacts!) This allows us to deploy the same artifacts across different web sites without interference.
Deployment and release strategies for Microsoft Azure Web Sites
Continuous deployment using Microsoft Azure Web Sites 6
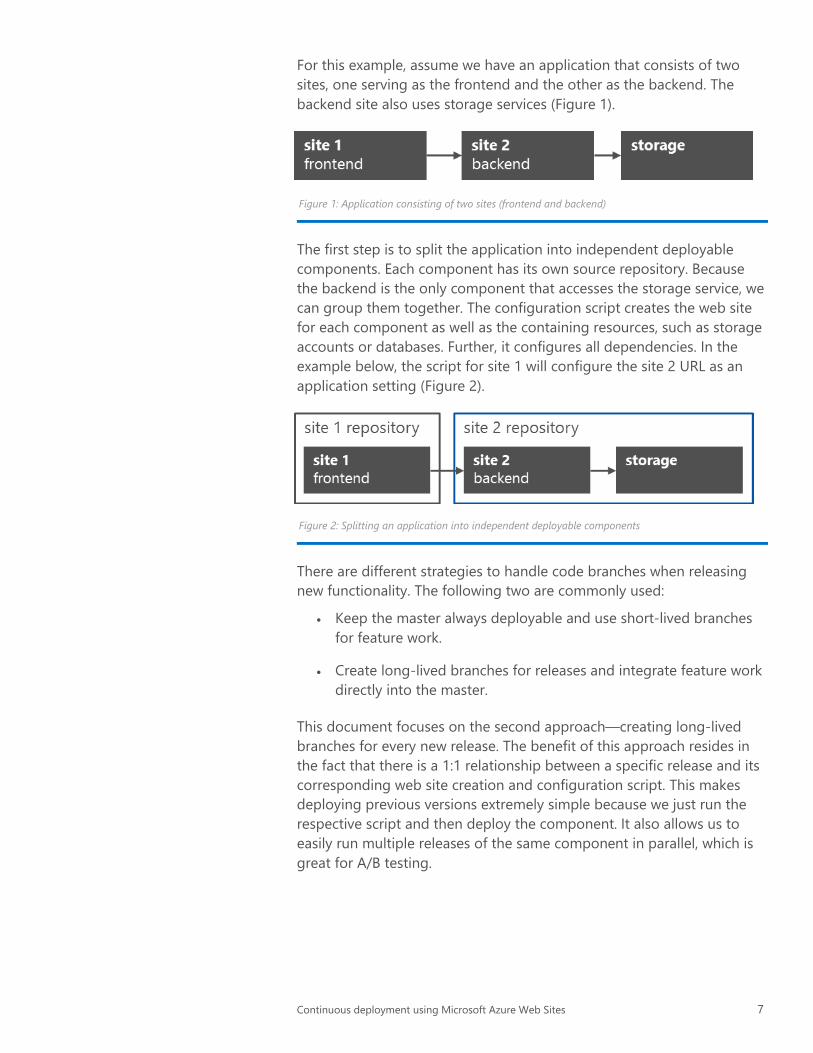
For this example, assume we have an application that consists of two sites, one serving as the frontend and the other as the backend. The backend site also uses storage services (Figure 1).
Figure 1: Application consisting of two sites (frontend and backend)
The first step is to split the application into independent deployable components. Each component has its own source repository. Because the backend is the only component that accesses the storage service, we can group them together. The configuration script creates the web site for each component as well as the containing resources, such as storage accounts or databases. Further, it configures all dependencies. In the example below, the script for site 1 will configure the site 2 URL as an application setting (Figure 2).
Figure 2: Splitting an application into independent deployable components
There are different strategies to handle code branches when releasing new functionality. The following two are commonly used:
Keep the master always deployable and use short-lived branches for feature work.
Create long-lived branches for releases and integrate feature work directly into the master.
This document focuses on the second approach—creating long-lived branches for every new release. The benefit of this approach resides in the fact that there is a 1:1 relationship between a specific release and its corresponding web site creation and configuration script. This makes deploying previous versions extremely simple because we just run the respective script and then deploy the component. It also allows us to easily run multiple releases of the same component in parallel, which is great for A/B testing.
Continuous deployment using Microsoft Azure Web Sites 7
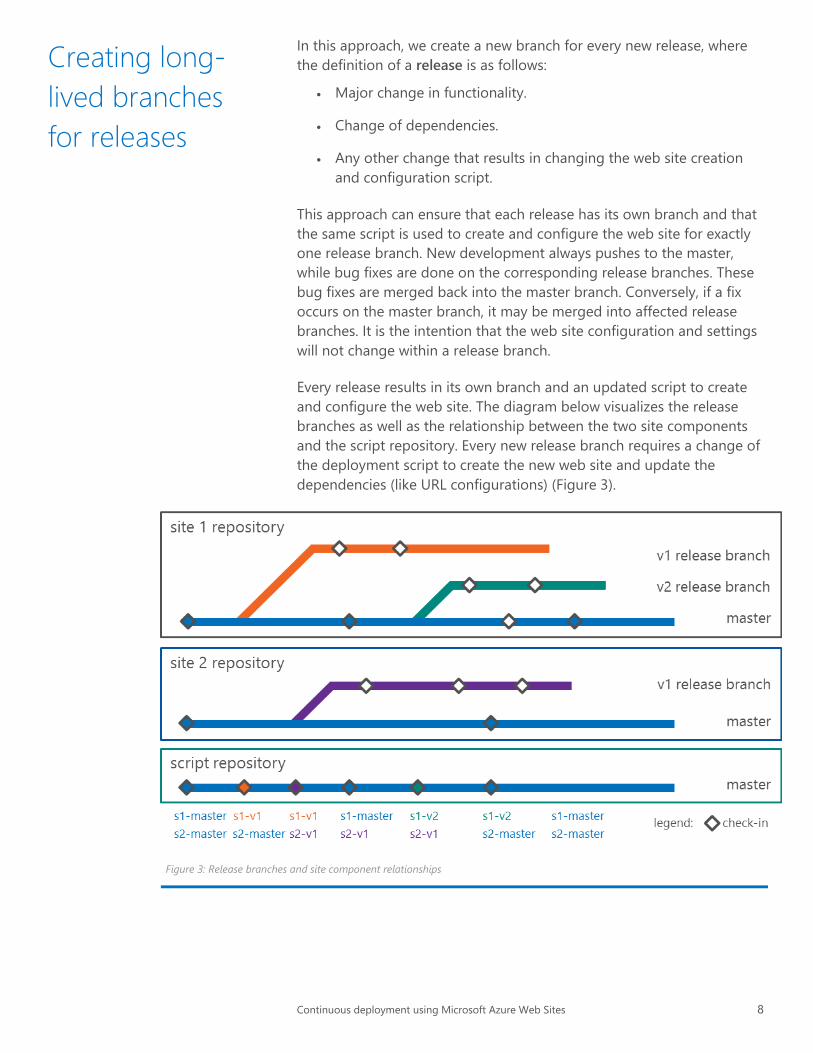
In this approach, we create a new branch for every new release, where the definition of a release is as follows:
Major change in functionality.
Change of dependencies.
Any other change that results in changing the web site creation and configuration script.
This approach can ensure that each release has its own branch and that the same script is used to create and configure the web site for exactly one release branch. New development always pushes to the master, while bug fixes are done on the corresponding release branches. These bug fixes are merged back into the master branch. Conversely, if a fix occurs on the master branch, it may be merged into affected release branches. It is the intention that the web site configuration and settings will not change within a release branch.
Every release results in its own branch and an updated script to create and configure the web site. The diagram below visualizes the release branches as well as the relationship between the two site components and the script repository. Every new release branch requires a change of the deployment script to create the new web site and update the dependencies (like URL configurations) (Figure 3).
Figure 3: Release branches and site component relationships
Creating long-lived branches for releases
Continuous deployment using Microsoft Azure Web Sites 8

The above release structure results in the following release instances (Figure 4). Note that at this stage, we are not deploying the master branch.
Figure 4: Release instances
Bug fixes for an existing release are deployed to the staging environment, and after tests are passed, the staging and production slots can be swapped.
Now assume that we want to A/B test V2 of site 1 while the majority of requests are still handled by the current version (V1). To do this, we basically run two versions of site 1 (V1 and V2). After internally testing V2, we can use a reverse proxy that routes a percentage of the requests to the newly deployed release of the web site. (In this example, we routed 0.1 percent of requests, as shown in Figure 5):
Figure 5: Using a reverse proxy to conduct A/B testing on site 1
A/B test releases
Continuous deployment using Microsoft Azure Web Sites 9
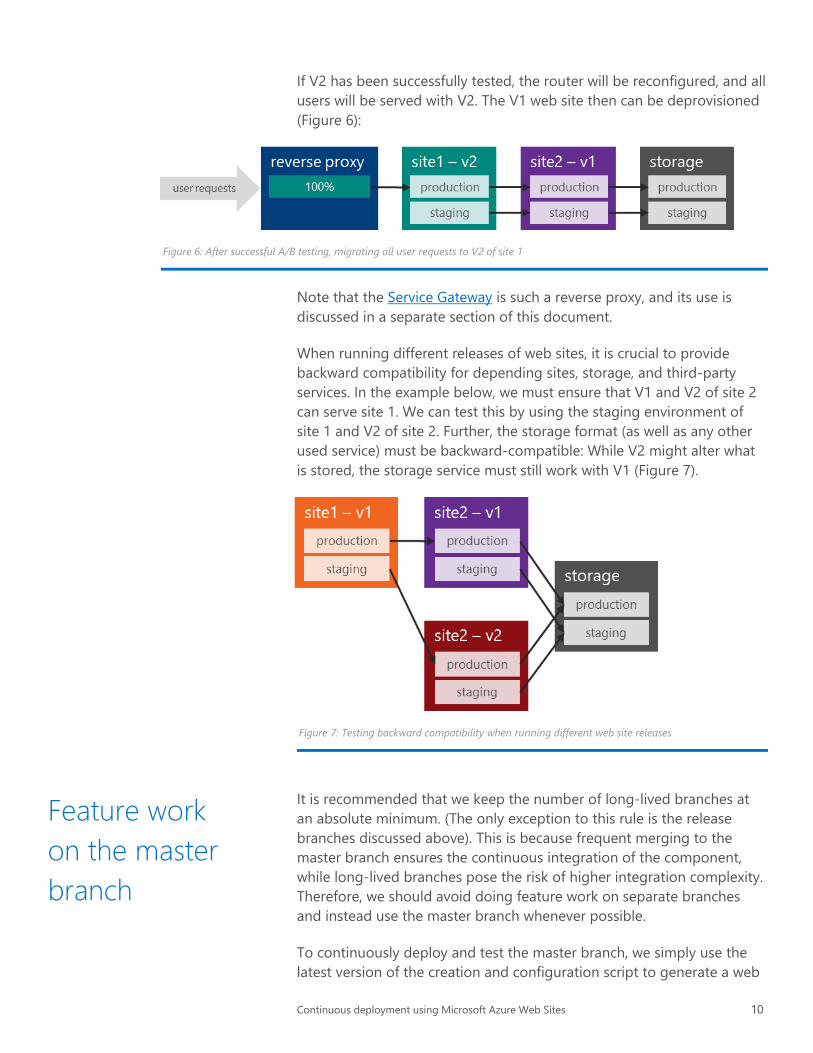
If V2 has been successfully tested, the router will be reconfigured, and all users will be served with V2. The V1 web site then can be deprovisioned (Figure 6):
Figure 6: After successful A/B testing, migrating all user requests to V2 of site 1
Note that the Service Gateway is such a reverse proxy, and its use is discussed in a separate section of this document.
When running different releases of web sites, it is crucial to provide backward compatibility for depending sites, storage, and third-party services. In the example below, we must ensure that V1 and V2 of site 2 can serve site 1. We can test this by using the staging environment of site 1 and V2 of site 2. Further, the storage format (as well as any other used service) must be backward-compatible: While V2 might alter what is stored, the storage service must still work with V1 (Figure 7).
Figure 7: Testing backward compatibility when running different web site releases
It is recommended that we keep the number of long-lived branches at an absolute minimum. (The only exception to this rule is the release branches discussed above). This is because frequent merging to the master branch ensures the continuous integration of the component, while long-lived branches pose the risk of higher integration complexity. Therefore, we should avoid doing feature work on separate branches and instead use the master branch whenever possible.
To continuously deploy and test the master branch, we simply use the latest version of the creation and configuration script to generate a web
Feature work on the master branch
Continuous deployment using Microsoft Azure Web Sites 10
site called <component>-master. If the master branch requires new or modified configuration settings, we just change the latest version of the corresponding script in the script repository, which then makes it into all subsequent release branches. Returning to the example above, site 1 and site 2 would continuously deploy their master to the corresponding web site. Because these deployments are for test purposes only, it is recommended to work against separate test storage accounts, databases, and services (Figure 8):
Figure 8: Continuously deploying the master branch to the corresponding web site
As soon as the master branch is ready to become the latest release, we simply branch the master to create the new release branch, and the corresponding scripts are modified and checked in to the script repository.
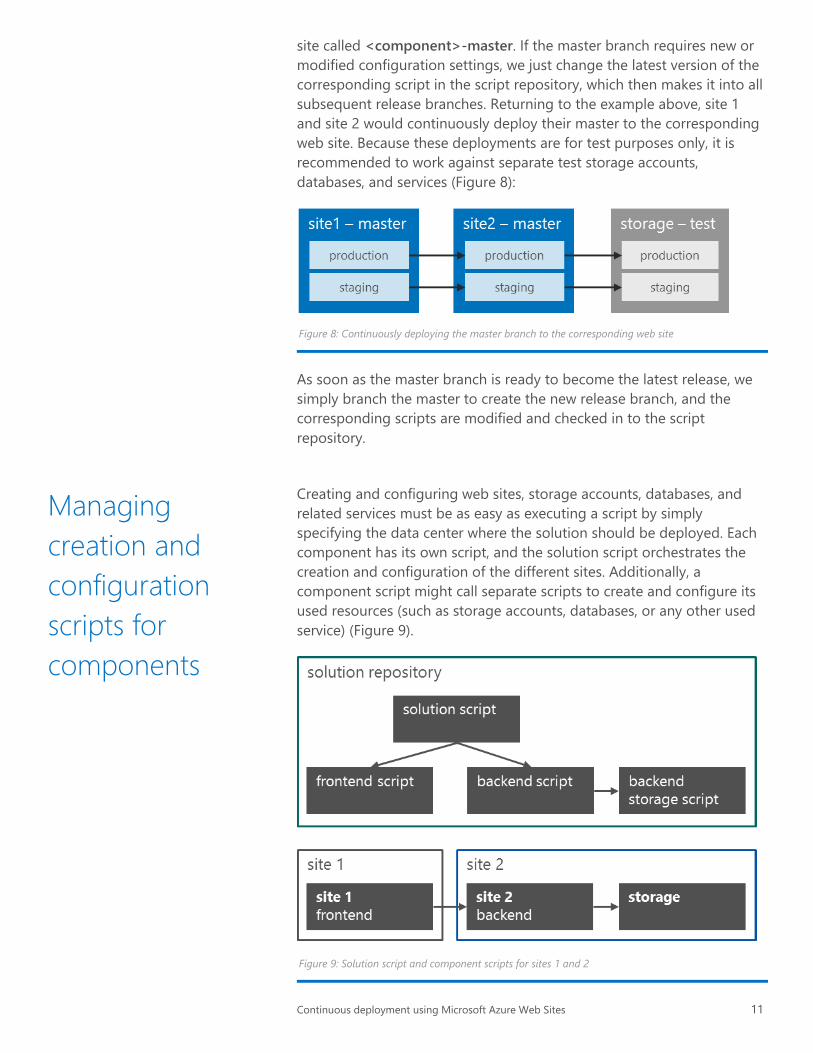
Creating and configuring web sites, storage accounts, databases, and related services must be as easy as executing a script by simply specifying the data center where the solution should be deployed. Each component has its own script, and the solution script orchestrates the creation and configuration of the different sites. Additionally, a component script might call separate scripts to create and configure its used resources (such as storage accounts, databases, or any other used service) (Figure 9).
Figure 9: Solution script and component scripts for sites 1 and 2
Managing creation and configuration scripts for components
Continuous deployment using Microsoft Azure Web Sites 11

Once the web sites and their linked resources are created and configured, the component repositories must be wired to automatically deploy to the web sites when a check-in happens. This process involves a Git server or Visual Studio Online, which are discussed in the next two subsections.
With Git, the basic idea is to deploy the component to the staging environment each time a commit to the corresponding branch takes place. For the rest of this subsection, we assume that the repositories are on a Git server. (To learn more about running Git on a server, go to http://git-scm.com/book/en/Git-on-the-Server.) One way to create a Git server is to take advantage of Microsoft Azure Virtual Machines.
Git provides a simple and flexible way to run custom scripts when certain events take place. These scripts are called hooks (http://git-scm.com/ book/en/Customizing-Git-Git-Hooks). Using hooks allows us to run custom scripts for the client and server side.
To enable continuous deployment, we hook up the server updates (post-update hook) and push the updated branches to the corresponding web site’s staging environment (Figure 10).
Figure 10: Using Git hooks to enable continuous deployment
Building the deployment pipeline using Git
Continuous deployment using Microsoft Azure Web Sites 12
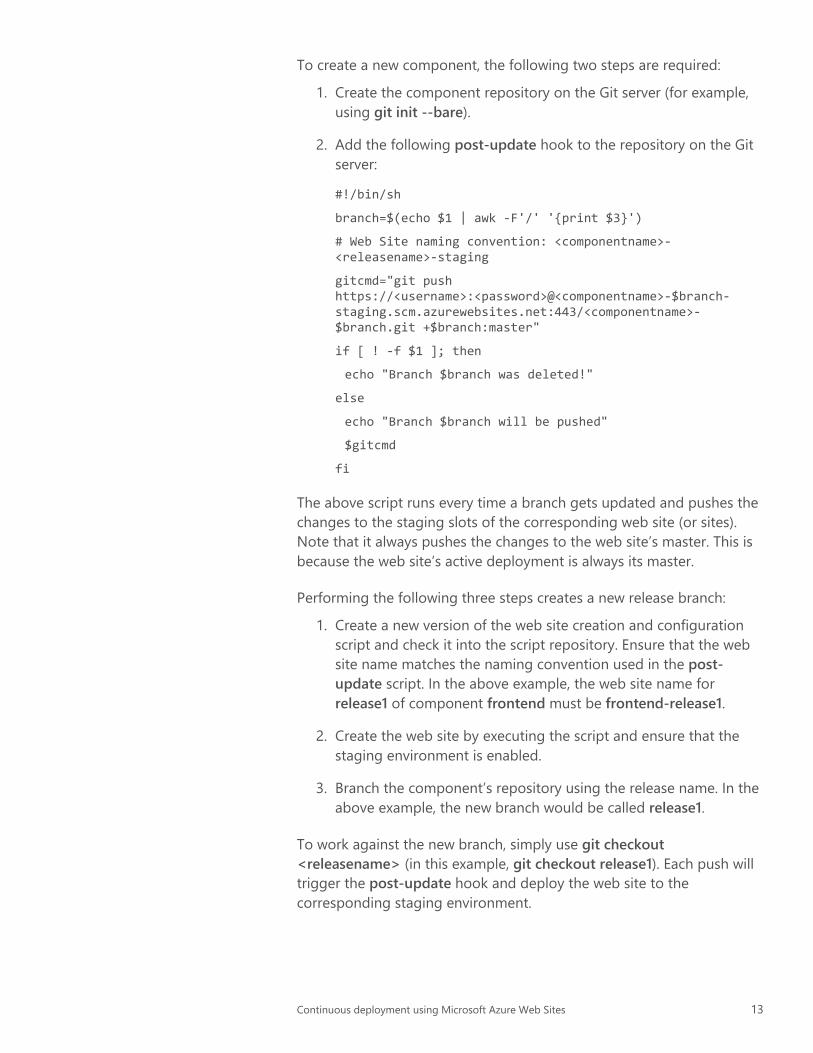
To create a new component, the following two steps are required:
1. Create the component repository on the Git server (for example, using git init --bare).
2. Add the following post-update hook to the repository on the Git server:
#!/bin/sh
branch=$(echo $1 | awk -F'/' '{print $3}')
# Web Site naming convention: <componentname>-<releasename>-staging
gitcmd="git push https://<username>:<password>@<componentname>-$branch-staging.scm.azurewebsites.net:443/<componentname>-$branch.git +$branch:master"
if [ ! -f $1 ]; then
echo "Branch $branch was deleted!"
else
echo "Branch $branch will be pushed"
$gitcmd
fi
The above script runs every time a branch gets updated and pushes the changes to the staging slots of the corresponding web site (or sites). Note that it always pushes the changes to the web site’s master. This is because the web site’s active deployment is always its master.
Performing the following three steps creates a new release branch:
1. Create a new version of the web site creation and configuration script and check it into the script repository. Ensure that the web site name matches the naming convention used in the post-update script. In the above example, the web site name for release1 of component frontend must be frontend-release1.
2. Create the web site by executing the script and ensure that the staging environment is enabled.
3. Branch the component’s repository using the release name. In the above example, the new branch would be called release1.
To work against the new branch, simply use git checkout <releasename> (in this example, git checkout release1). Each push will trigger the post-update hook and deploy the web site to the corresponding staging environment.
Continuous deployment using Microsoft Azure Web Sites 13

Microsoft Visual Studio Online (www.visualstudio.com) is a powerful application lifecycle management (ALM) service in the cloud. It comes with version control (Team Foundation Version Control and Git), rich build and test automation, and product backlogs and dashboards—all run as a service. Visual Studio Online provides the capabilities required to create rich deployment pipelines. Note that for this document, we focus on the automated build and deployment portion of the pipeline. Please refer to http://www.visualstudio.com/get-started/overview-of-get-started-tasks-vs for information on how to integrate testing and other capabilities into the deployment pipeline.
Similar to the Git approach described above, we want to use Visual Studio Online to build and deploy the web site after every check-in. First, create a team project and select Git as the version control system:
1. Navigate to the admin page of the control panel by going to https://<vsoaccount>.visualstudio.com/_admin (replacing <vsoaccount> with our Visual Studio Online account name).
2. Select Create a new team project.
Building the deployment pipeline using Visual Studio Online
Continuous deployment using Microsoft Azure Web Sites 14

3. When prompted by the Create New Team Project dialog box, select Git as the version control system.
Now, to create a new component, simply create a new repository as part of this team project. We can do this through the Version Control section of the control panel:
4. Navigate to the Version Control section by going to https://<vsoaccount>.visualstudio.com/DefaultCollection/<teamproject>/_admin/_versioncontrol (replacing <vsoaccount> with our Visual Studio Online account name and <teamproject> with the name of the team project).
5. Select New repository to create the new repository.
Continuous deployment using Microsoft Azure Web Sites 15

Finally, to create a new release branch, follow these steps:
6. Create a new version of the web site creation and configuration script and commit it to the script repository.
7. Create the web site by executing the script. (Ensure the script enables the staging slot.)
8. Create and publish a new branch (for example, using the Team Explorer within Visual Studio).
9. Create a new build definition (for example, using the Team Explorer within Visual Studio) and configure it for continuous integration and deployment:
– Select Continuous Integration as the build trigger.
– Include the newly created branch to the list of monitored branches for continuous integration.
– Select the GitContinuousDeploymentTemplate as the build template.
Continuous deployment using Microsoft Azure Web Sites 16
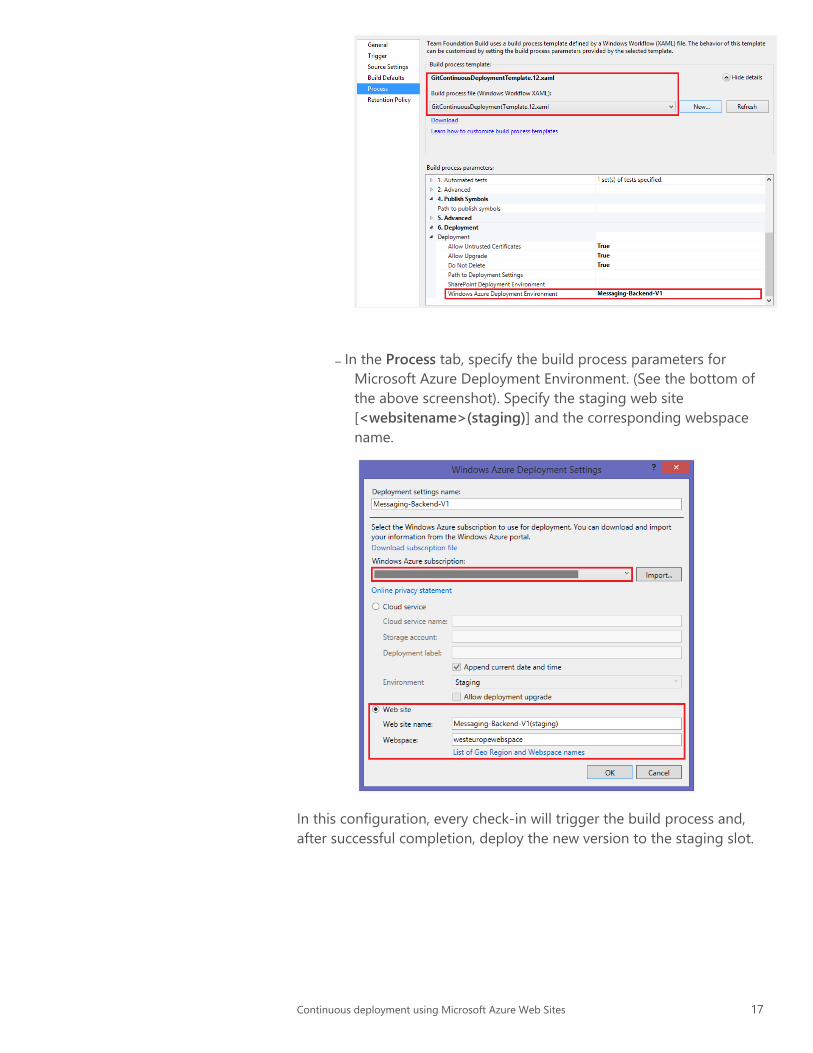
– In the Process tab, specify the build process parameters for Microsoft Azure Deployment Environment. (See the bottom of the above screenshot). Specify the staging web site [<websitename>(staging)] and the corresponding webspace name.
In this configuration, every check-in will trigger the build process and, after successful completion, deploy the new version to the staging slot.
Continuous deployment using Microsoft Azure Web Sites 17
As already mentioned, swappable staging and production slots are included with Microsoft Azure Web Sites. Swapping these slots not only means swapping the deployed artifacts, but also the general settings, connection strings, handler mappings, and monitoring and diagnostic settings. Only the following configuration will not be swapped:
Publishing endpoints.
Custom domain names.
SSL certificates and bindings.
Scale settings.
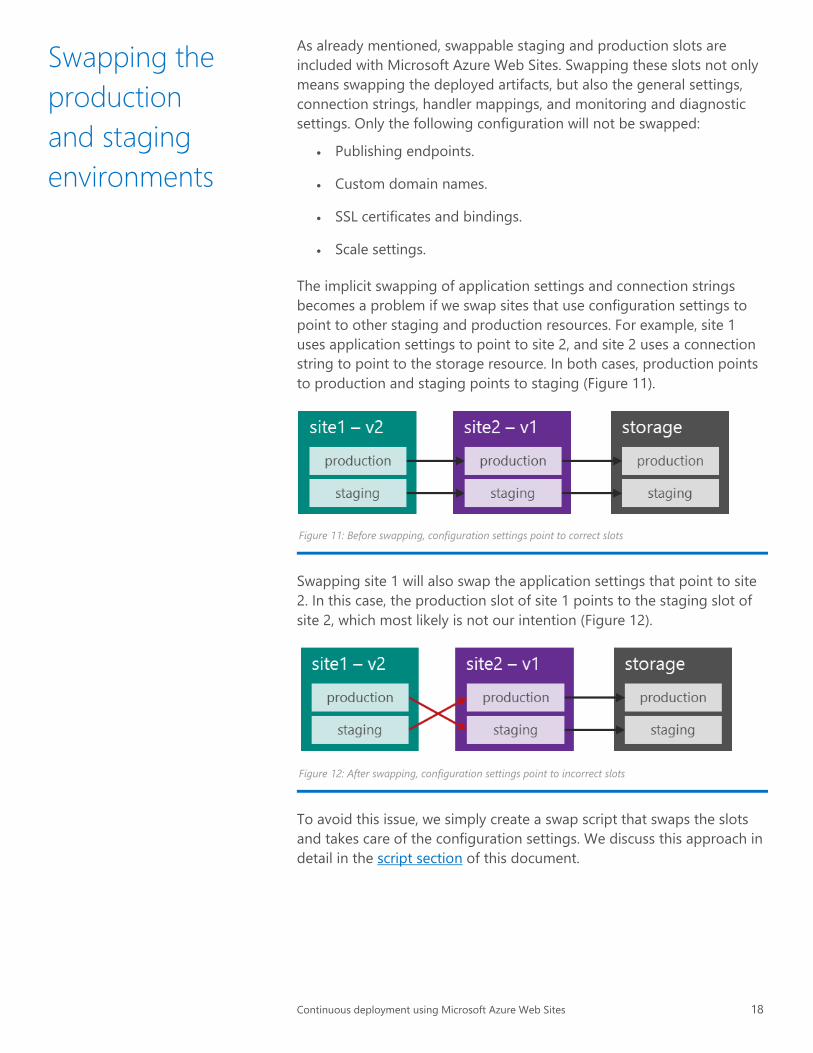
The implicit swapping of application settings and connection strings becomes a problem if we swap sites that use configuration settings to point to other staging and production resources. For example, site 1 uses application settings to point to site 2, and site 2 uses a connection string to point to the storage resource. In both cases, production points to production and staging points to staging (Figure 11).
Figure 11: Before swapping, configuration settings point to correct slots
Swapping site 1 will also swap the application settings that point to site 2. In this case, the production slot of site 1 points to the staging slot of site 2, which most likely is not our intention (Figure 12).
Figure 12: After swapping, configuration settings point to incorrect slots
To avoid this issue, we simply create a swap script that swaps the slots and takes care of the configuration settings. We discuss this approach in detail in the script section of this document.
Swapping the production and staging environments
Continuous deployment using Microsoft Azure Web Sites 18
The importance of automation has been emphasized throughout this document: In today’s business environment, it is essential to be able to create and configure all resources automatically—without manual interaction. This necessitates treating the infrastructure basically as code, as well.
Microsoft Azure provides two scripting platforms to automate work: Windows PowerShell cmdlets and cross-platform command line tools for Windows, Mac, and Linux. Additionally, it exposes a REST API and the corresponding managed libraries called Microsoft Azure Management Libraries (WAML). The following subsections take a closer look at the cross-platform CLI and PowerShell.
Most command line interface commands are grouped based on the corresponding Microsoft Azure capabilities, such as cloud services (service), web sites (site) or SQL databases (sql).
Another important command is account. It is used to import subscription details and to specify the active subscription for all subsequent commands:
To import a subscription: azure account import <publish filename>
To select the imported subscription as the active account for any further interaction with the service: azure account set <subscription name> (with all following commands now working against the selected subscription)
Alternatively, the azure login command can be employed to use the Azure Active Directory credentials (instead of importing a publish file).
Similar to the cross-platform CLI, the Windows PowerShell cmdlets are grouped according to Window Azure capabilities. However, without the CLI’s hierarchical command structure, PowerShell cmdlets work quite differently. For example, the following two commands are used to import and select active subscriptions:
Import-AzurePublishSettingsFile <publish filename>
Select-AzureSubscription <subscription name> (with all following commands now working against the selected subscription)
Unfortunately, not all functionality is exposed through CLI or PowerShell scripts, and the functionality exposed is not symmetric between the two.
Scripting configuration and deployment on Microsoft Azure Web Sites
Working with the cross-platform CLI
Working with PowerShell cmdlets
Continuous deployment using Microsoft Azure Web Sites 19
Below are the four most important PowerShell cmdlets for working with web sites:
New-AzureWebsite: Creates a new web site.
Get-AzureWebsite: Retrieves a web site object containing its settings and configuration.
Set-AzureWebsite: Configures a web site.
Remove-AzureWebsite: Deletes a web site.
With the cross-platform CLI, the azure site create command creates a new web site. The command allows the explicit creation of a Git repository, but does not make any other deployment options (like TFS and Dropbox) scriptable. The command is idempotent, so it can be executed multiple times with the same result. Therefore, it is not a problem to call azure site create on an existing site.
The following script creates a new web site with its Git repository: azure site create --location <location> --git <website name>
One way to check if a web site name is available is to simply perform a name lookup:
$HostName = “$WebSiteName .azurewebsites.net"
$WebSiteNameExists = $True
try {
[net.dns]::GetHostEntry($HostName)
}
catch {
$WebSiteNameExists = $False
azure site create –git <website name>
}
Once the web site is created, the azure site set command can be used to configure its general settings:
.NET version: Valid options are v3.5 and v4.5.
PHP version: Valid options are off, v5.3, and v5.4.
Platform: Valid options are x86 and x64.
Enable/disable web sockets.
Enable/disable remote debugging. (Version of remote debugging is either VS2012 or VS2013.)
Mode for managed pipeline: Valid values are Classic and Integrated.
Automating the creation and deletion of web sites
Continuous deployment using Microsoft Azure Web Sites 20

Further, the azure site scale command can be used to scale the web site: azure site scale mode --mode standard <website name>
azure site scale instances --instances 4 --size medium <website name>
Finally, should an existing site need to be deleted, the azure site delete command can be used.
With PowerShell cmdlets, New-AzureWebSite and Remove-AzureWebSite are provided to create and delete web sites: New-AzureWebSite -Name <website name> -git -Location
<location>
Remove-AzureWebSite –Name <website name> -Force
As of May 2014, there is no simple way to define scale mode and instance size using Microsoft Azure Service Management PowerShell cmdlets. While the PowerShell cmdlets for Microsoft Azure Resource Manager provide this capability, Resource Manager is still in preview and is not covered in this document.
Configuring a CNAME or an A record is fairly straightforward. To take advantage of this capability, we need to configure Microsoft Azure Web Sites for shared or standard mode. This can be done using azure site scale mode standard <website name> as the CLI script.
Configuring the CNAME and A record can be fully scripted on Microsoft Azure Web Sites. However, not all DNS registrars provide scripting capabilities and therefore might require some manual steps. These steps are highlighted below in blue italics.
Configuring a CNAME 1. Add the CNAME to the domain registrar using a subdomain alias
(such as www) that points to the Microsoft Azure Web Sites default site URL (<mysite>.azurewebsites.net).
2. To add the subdomain name (for example, www.cloudbeatsch.net) to Microsoft Azure Web Sites, use the following CLI script: azure site domain add <subdomain name> <website name>
Configuring an A record 1. Add the A record to the domain registrar using the Microsoft Azure
Web Sites IP address as its value. This can be resolved using the following PowerShell script:
$HostName = <website name> + ".azurewebsites.net"
Configuring custom domain names
Continuous deployment using Microsoft Azure Web Sites 21

$AddressList = @(([net.dns]::GetHostEntry($HostName)).AddressList)
$IPAddress = $AddressList.IPAddressToString
2. Microsoft Azure Web Sites will need to verify that we own the respective domain name. For this verification, create a CNAME entry for the hostname awverify that points to awverify.<website name>.azurewebsites.net.
3. As soon as these values have been replicated across the DNS network, we can configure the Microsoft Azure Web Sites domain (for example, cloudbeatsch.net) by using the following CLI script: azure site domain add <domain name> <website name>
Within PowerShell, custom domain names can be set using the Set-AzureWebSite cmdlet:
Set-AzureWebSite -Name <website name> -Hostnames @(“<domain name>”)
To use our own SSL certificate, we must configure Microsoft Azure Web Sites for standard mode. This can be done using the azure site scale mode standard <website name> CLI script.
Configuring Microsoft Azure Web Sites for SSL requires two steps:
1. Upload the SSL certificate using the following CLI script: azure site cert add -c <certificate path> -k <password> <website name>
2. Configure the SSL bindings. Server Name Indication (SNI) and IP-based SSL are supported.
Note that in the case of IP-based SSL, a virtual IP address is created, which requires an update of the related A record. To retrieve the new IP address, the same PowerShell script can be used as for retrieving the IP address for the initial A record:
$HostName = <website name> + ".azurewebsites.net"
$AddressList = @(([net.dns]::GetHostEntry($HostName)).AddressList)
$IPAddress = $AddressList.IPAddressToString
As of May 2014, neither the CLI nor the PowerShell tools provide the functionality to configure SSL bindings. However, they can be configured using the REST API. A lightweight example of how to configure SSL bindings using Guzzle is discussed in the following blog post: http://blog.syntaxc4.net/post/2014/02/22/using-guzzle-to-interact-with-the-windows-azure-management-api.aspx.
Configuring an SSL certificate
Continuous deployment using Microsoft Azure Web Sites 22
Besides the general configuration of web sites, Microsoft Azure Web Sites separates application settings and connection strings, which are used for linked resources. Whether we use application settings or connection strings depends on how the deployed application or framework handles configuration.
Application settings can be set easily by using the azure site appsetting add command: azure site appsetting add <key1>=<value1> <website name>
It is also possible to add a semicolon-separated list of key/value pairs: azure site appsetting add <key1>=<value1>;<key2>=<value2>
<website name>
If one of the values contains a semicolon (;), the value must be put between two backslash marks (“\”): azure site appsetting add <key1>=”\”<value;1>”\” <website
name>
azure site appsetting add <key1>=”\”<value;1>”\”;<key2>=”\”<va;2>”\” <website name>
Connection strings work in the same way as application settings, but they also require a connection type (like Microsoft SQL Azure, SQL Server, Custom, or MySql). The connection string values are hidden in the Microsoft Azure portal. To add a connection string, we can use the azure site connectionstring add command: azure site connectionstring add <connection name> <value>
<type> <website name>
With PowerShell, we can use the Set-AzureWebSite cmdlet to set the application settings and connection strings:
$appSettings = @{“<key1>" = "<value1>"}
$connStringInfo = @{
Name = "<key1>"; Type = "SQLAzure"; ConnectionString = “<value1>” }
Set-AzureWebsite -Name <website name> -AppSettings $appSettings `
-ConnectionStrings $connStringInfo
Configuring application settings and connection strings
Continuous deployment using Microsoft Azure Web Sites 23
Working with the staging environment is just like working with any other web site. Most azure site commands provide the --slot option to target the staging environment. To create the staging environment, we simply run the azure site create command using the --slot staging option. For example, the following three commands create, scale, and configure the staging environment:
azure site create –git --slot staging <websitename>
azure site scale instances --instances 2 --size small --slot staging <websitename>
azure site set --php-version v5.4 -R -W --slot staging <websitename>
The azure site swap command can be used to swap the production and staging environments: azure site swap --quiet <websitename>
As discussed previously, this will also swap the following configuration settings:
General settings.
Connection strings.
Handler mappings.
Monitoring and diagnostic settings.
We can create a swap script that preserves the production and staging settings. The script consists of the following six steps:
1. Retrieve configuration settings from the production slot.
2. Retrieve configuration settings from the staging slot.
3. Set production settings for the staging slot.
4. Restart the staging slot to retrieve the new settings.
5. Swap slots.
6. Set staging settings for the staging slot.
Below is a PowerShell script that swaps the slots while preserving the application settings and connection strings for production and staging:
#1. Retrieve production settings
$prodWebSite = Get-AzureWebsite -Name <websitename> -slot production
#2. Retrieve staging settings
$stagingWebSite = Get-AzureWebsite -Name <websitename> -slot staging
Working with the staging environment
Continuous deployment using Microsoft Azure Web Sites 24
#3. Set production settings for staging slot
Set-AzureWebsite -Name <websitename> -slot staging`
-AppSettings $prodWebSite.AppSettings`
-ConnectionStrings $prodWebSite.ConnectionStrings
#4. Restart the staging slot
Restart-AzureWebsite -Name <websitename> -slot staging
#5. Swap slots
azure site swap --quiet <websitename>
#6. Set staging settings
Set-AzureWebsite -Name <websitename> -slot staging`
-AppSettings $stagingWebSite.AppSettings`
-ConnectionStrings $stagingWebSite.ConnectionStrings
As of May 2014, Git and GitHub are the two supported deployment methods when using azure site create.
The azure site create --git command creates a Git remote entry called azure. This remote entry points to the web site’s Git repository. The simplest way to deploy is by pushing the local repo to the remote azure entry through the git push azure <your branch> command.
To create a Git repository for an already existing site, we can just rerun the azure site create --git command. This will create the Git repo if it is not already there.
In addition, the deployment username and password can be set by using the following command: azure site deployment user set <username> <password>
Note here that the username and password are set for a user—not for an individual web site. This means all that all web sites within a subscription share the same username and password.
Finally, the Git repo URL has the following format: https://<username>@<websitename>.scm.azurewebsites.net/<websitename>.git.
Customizing the deployment process Each Git push triggers the deployment process, which can be customized using a custom deployment script. (The only exception is when pushing from TFS Git, which has its own build system.) This script can be used to fetch specific libraries, customize the file copy process, or run quick post-deployment tests (such as consistency checks or validation of file signatures/hashes). Note that this should only be done when running in basic or standard mode; otherwise, a lasting CPU utilization during deployment might shut down the web site.
Deploying a web site
Continuous deployment using Microsoft Azure Web Sites 25
Creating a custom script is as easy as running the azure site deploymentscript command for the required target platforms (such as node, ASP.NET, and PHP). The command creates .deployment and deploy.cmd files, which must be added to the root of the local source repo.
To customize the default deployment, simply edit the deploy.cmd file. In essence, it consists of pre-deployment, build (for .NET projects), and post-deployment steps. We can use the post-deployment step to run some high-level tests to verify deployment or to update configuration settings for static web pages.
Taking a closer look at the later example, imagine we have an ember.js framework (or any other static client web application) that calls a REST backend. In this case, we would use a REST adapter within the store.js file:
DS.RESTAdapter.reopen({
url: “http://backendurl”
});
Because ember.js is a client model-view-controller (MVC) framework, we cannot use the web site’s application settings to configure the URL for the REST backend. One way to overcome this issue is to configure the URL as a pre-deployment task. We basically read the application settings of the web site and change the URL in the store.js file. To do so, we first replace the URL in the store.js file with a placeholder (in this case, BACKEND_URL):
DS.RESTAdapter.reopen({
url: “BACKEND_URL”
});
We then configure an application setting for the respective web site. This setting holds the actual backend URL and will be used by the deployment script to replace the placeholder: azure site appsetting add
BACKEND_URL=https://mybackendurl.com <website name>
Next, we create the deployment script that will replace the URL placeholder each time we deploy the web site. We use the azure site deploymentscript command to generate the skeleton deployment script: azure site deploymentscript –basic
Finally, we add the replacement functionality right before the file sync takes place. The values of the application settings are defined as script variables, so we can simply retrieve the value of the backend URL using % BACKEND_URL%.
Continuous deployment using Microsoft Azure Web Sites 26
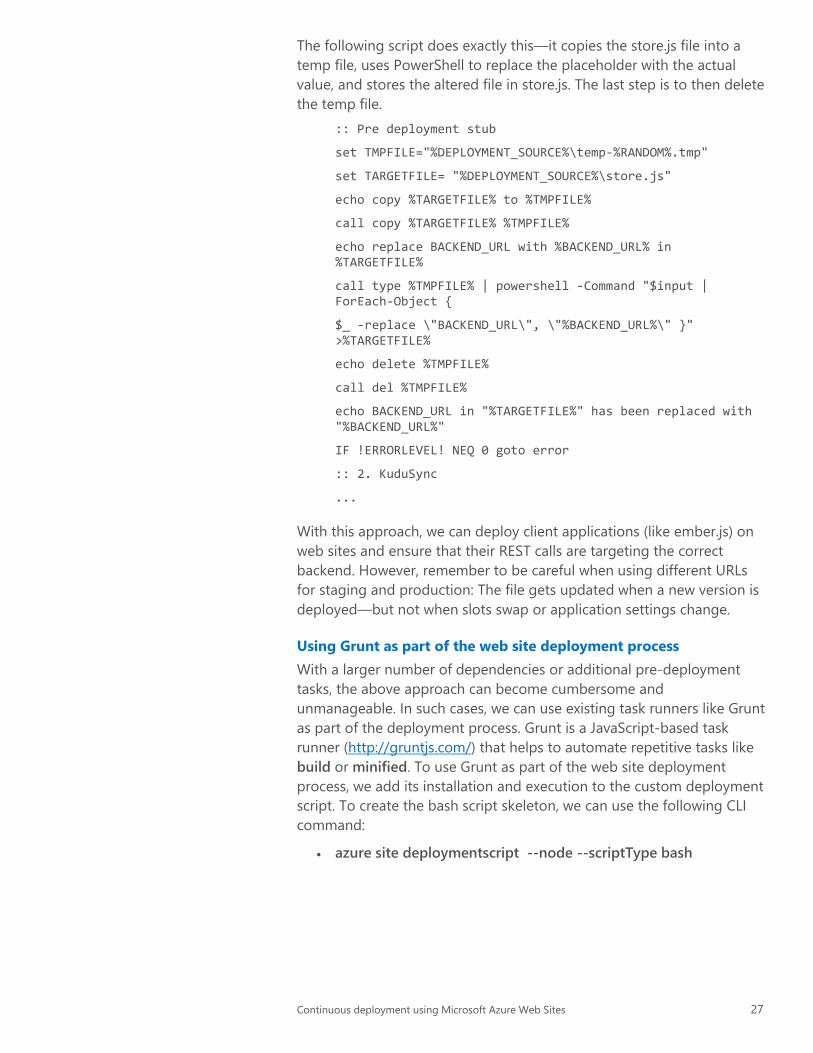
The following script does exactly this—it copies the store.js file into a temp file, uses PowerShell to replace the placeholder with the actual value, and stores the altered file in store.js. The last step is to then delete the temp file.
:: Pre deployment stub
set TMPFILE="%DEPLOYMENT_SOURCE%\temp-%RANDOM%.tmp"
set TARGETFILE= "%DEPLOYMENT_SOURCE%\store.js"
echo copy %TARGETFILE% to %TMPFILE%
call copy %TARGETFILE% %TMPFILE%
echo replace BACKEND_URL with %BACKEND_URL% in %TARGETFILE%
call type %TMPFILE% | powershell -Command "$input | ForEach-Object {
$_ -replace \"BACKEND_URL\", \"%BACKEND_URL%\" }" >%TARGETFILE%
echo delete %TMPFILE%
call del %TMPFILE%
echo BACKEND_URL in "%TARGETFILE%" has been replaced with "%BACKEND_URL%"
IF !ERRORLEVEL! NEQ 0 goto error
:: 2. KuduSync
...
With this approach, we can deploy client applications (like ember.js) on web sites and ensure that their REST calls are targeting the correct backend. However, remember to be careful when using different URLs for staging and production: The file gets updated when a new version is deployed—but not when slots swap or application settings change.
Using Grunt as part of the web site deployment process With a larger number of dependencies or additional pre-deployment tasks, the above approach can become cumbersome and unmanageable. In such cases, we can use existing task runners like Grunt as part of the deployment process. Grunt is a JavaScript-based task runner (http://gruntjs.com/) that helps to automate repetitive tasks like build or minified. To use Grunt as part of the web site deployment process, we add its installation and execution to the custom deployment script. To create the bash script skeleton, we can use the following CLI command:
azure site deploymentscript --node --scriptType bash
Continuous deployment using Microsoft Azure Web Sites 27

The actual pre-deployment task to install and run Grunt is as follows:
1. Run npm install to download and install the node packages referred to in package.json.
$NPM_CMD install
2. Install bower using npm install bower and bower install.
$NPM_CMD install bower
./node_modules/.bin/bower install
3. Install Grunt using npm install grunt-cli and execute grunt tasks running Grunt.
$NPM_CMD install grunt-cli
./node_modules/.bin/grunt --no-color build
So far, the deployment script has installed Grunt on the web site and run it to build the JavaScript application. (This might include steps such as resolving URLs or minifying the JavaScript application.) The last step is to deploy the distributable files using Kudu Sync:
4. In the following example, we deploy the minified scripts from the dist directory (generated by Grunt) to the target directory ("$DEPLOYMENT_TARGET"). To do so, we use the kudu sync command. (Kudu is the engine behind Git deployments in Microsoft Azure Web Sites.)
"$KUDU_SYNC_CMD" -v 500 -f "$DEPLOYMENT_SOURCE/dist" -t "$DEPLOYMENT_TARGET" -n "$NEXT_MANIFEST_PATH" -p "$PREVIOUS_MANIFEST_PATH" -i ".git;.hg;.deployment;deploy.sh"
A more detailed description of this approach can be found in Jay Harris’s blog: http://www.cptloadtest.com/2013/12/03/Git-And-Grunt-Deploy-To-Windows-Azure.aspx.
The Service Gateway is a reverse proxy that runs as a Microsoft Azure cloud service. In addition to providing capabilities such as authentication and monitoring, it is very helpful when implementing A/B testing. It also offers the functionality needed to use one custom domain name across multiple releases.
Managing releases using the Service Gateway
Continuous deployment using Microsoft Azure Web Sites 28

Imagine that we want to A/B test site 1 while serving all requests from the site URL http://mydomain.net (Figure 13).
Figure 13: A/B testing while serving all requests from one site URL
The Service Gateway allows us to define URL routes (called roles) and for each route, the weighting of its target. To implement A/B testing, we define the default route for the Gateway’s URL (http://mydomain.net) and specify the weighting for the three target sties—site1 – v1, site1 – v2, and site1 – v2 (staging). This is easily done by creating two items: a role index configuration to specify the default role (route) and the corresponding role configuration to define the weighting across the three targets. Below are the two configuration files in json, where <configlocation> refers to the location of the configuration files (like blob storage).
https://<configlocation>/RoleIndex.json {
Roles :
{
"_Default" : https://<configlocation>/defaultRole.json
}
}
https://<configlocation>/defaultRole.json {
"Target":
[
{
"Weight":949,
"Redirect":"http://site1–v1.azurewebsites.net”
Continuous deployment using Microsoft Azure Web Sites 29
},
{
"Weight":50,
"Redirect":"http://site1–v2.azurewebsites.net”
},
{
"Weight":1,
"Redirect":"http://site1–v2(staging).azurewebsites.net”
},
]
}
In the above example, we distribute the incoming requests by percentage across the weighted targets. It is also possible to route requests based on discrete criteria such as tenant, user, or IP address. The Gateway ensures affinity once a session has been selected for a route target, which avoids users being randomly routed on each request.
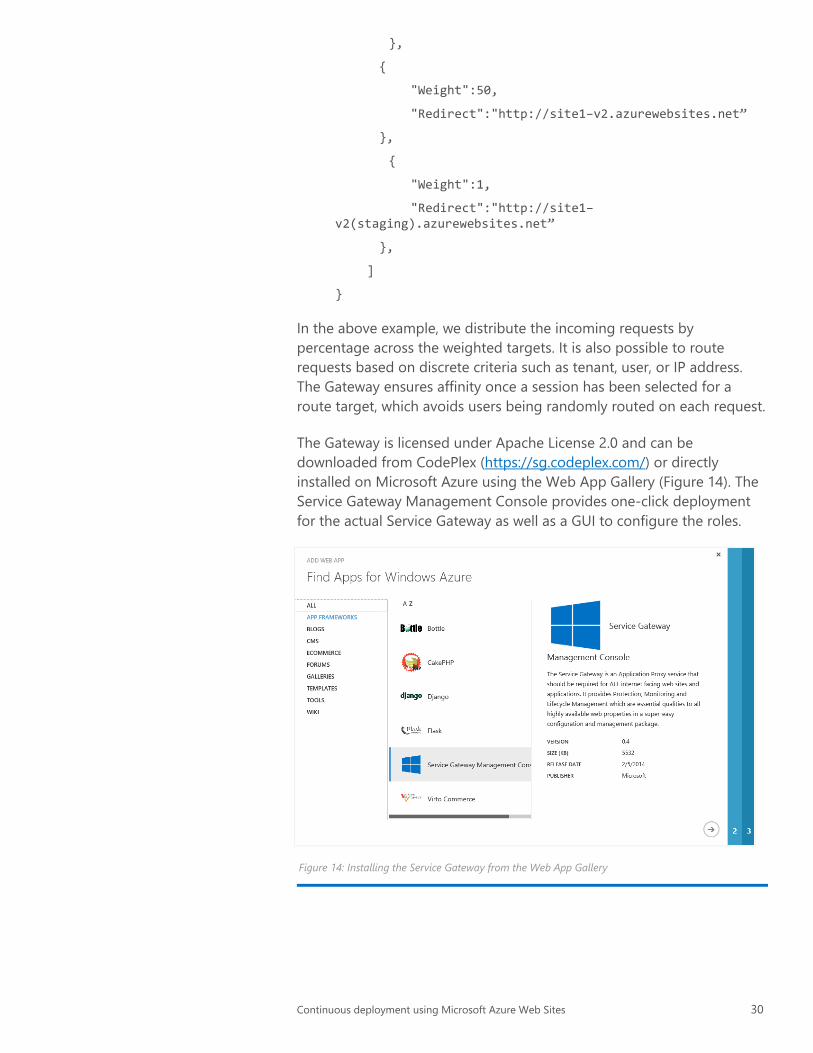
The Gateway is licensed under Apache License 2.0 and can be downloaded from CodePlex (https://sg.codeplex.com/) or directly installed on Microsoft Azure using the Web App Gallery (Figure 14). The Service Gateway Management Console provides one-click deployment for the actual Service Gateway as well as a GUI to configure the roles.
Figure 14: Installing the Service Gateway from the Web App Gallery
Continuous deployment using Microsoft Azure Web Sites 30
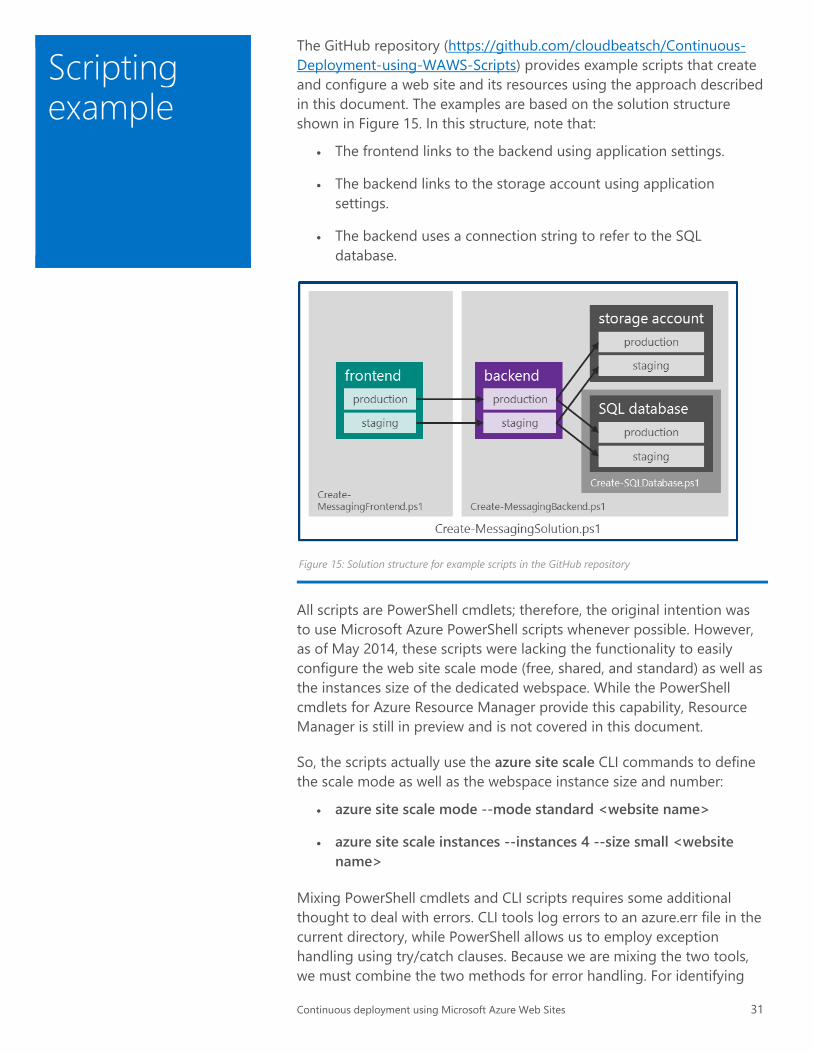
The GitHub repository (https://github.com/cloudbeatsch/Continuous-Deployment-using-WAWS-Scripts) provides example scripts that create and configure a web site and its resources using the approach described in this document. The examples are based on the solution structure shown in Figure 15. In this structure, note that:
The frontend links to the backend using application settings.
The backend links to the storage account using application settings.
The backend uses a connection string to refer to the SQL database.
Figure 15: Solution structure for example scripts in the GitHub repository
All scripts are PowerShell cmdlets; therefore, the original intention was to use Microsoft Azure PowerShell scripts whenever possible. However, as of May 2014, these scripts were lacking the functionality to easily configure the web site scale mode (free, shared, and standard) as well as the instances size of the dedicated webspace. While the PowerShell cmdlets for Azure Resource Manager provide this capability, Resource Manager is still in preview and is not covered in this document.
So, the scripts actually use the azure site scale CLI commands to define the scale mode as well as the webspace instance size and number:
azure site scale mode --mode standard <website name>
azure site scale instances --instances 4 --size small <website name>
Mixing PowerShell cmdlets and CLI scripts requires some additional thought to deal with errors. CLI tools log errors to an azure.err file in the current directory, while PowerShell allows us to employ exception handling using try/catch clauses. Because we are mixing the two tools, we must combine the two methods for error handling. For identifying
Scripting example
Continuous deployment using Microsoft Azure Web Sites 31

CLI errors, we basically delete the azure.err (if it exists) and check if, at the end of the script, a new azure.err file has been created. If this is the case, we have an issue with one of the CLI commands. Detecting PowerShell issues is easier: Because we put the script body within a try clause, PowerShell exceptions will be automatically handled by the catch class. The PowerShell script below does exactly this. We just have to place the actual script commands at the position designated as <script body>:
if ((Test-Path "azure.err") -eq $True) {
Write-Host "azure.err will be deleted"
del azure.err
}
try{
# start of script body
<script body>
# end of script body
if ((Test-Path "azure.err") -eq $True) {
Write-Host "CLI ERRORS - check azure.err for details on errors"
}
else {
Write-Host “CLI & POWERSHELL SUCCESS"
}
}
catch {
Write-Host "POWERSHELL ERROR - Azure PowerShell command terminated an error:” Write-Host $_
}
The Create-MessagingSolution.ps1 script represents the top-level script that creates and configures all web sites and resources. It requires the following parameters:
AzureSubscription: The name of the subscription where the solution should be deployed to. (Use azure account list to see a list of imported subscriptions.)
DCLocation: The name of the data center location (for example, West Europe).
FrontendReleaseName: The release branch name for the frontend (such as V2).
BackendReleaseName: The release branch name for the backend (such as V4).
Creating and configuring web sites
Continuous deployment using Microsoft Azure Web Sites 32

DeleteExistingWebSites: Defines if existing web site instances will be deleted. If set to $True, existing web sites (staging and production) will be deleted before the creation and configuration of new instances. If set to $False, the script will not delete existing web site instances but will reconfigure them.
CreateNewDatabase: Defines whether a new database and database server should be created or an existing one should be used. If set to $True, the script creates two new databases on two new database servers (one for production and one for staging). If set to $False, the script searches the database servers within the specified data center location (DCLocation parameter) for the existing databases. It aborts if the databases cannot be found.
Example calls:
.\Create-MessagingSolution.ps1 <subscriptionname> "West Europe" V3 V6 $True $True Creates the production and staging web sites for frontend V3 and
backend V6 in West Europe. (If the web sites already exist, it will delete and recreate them.)
Creates two storage accounts (if they do not already exist).
Creates two SQL databases on two database servers (one for production and one for staging).
.\Create-MessagingSolution.ps1 <subscriptionname> "West Europe" V3 V6 $False $False Creates the production and staging web sites for frontend V3 and
backend V6 in West Europe. (It does not delete already existing web sites for the frontend V3 and backend V6 releases.)
Creates two storage accounts (if they do not already exist).
Searches for existing databases within the database servers that belong to the subscription and are located in the West Europe data center. (It will abort if the databases cannot be found.)
The CreatePostUpdateScripts.ps1 script creates the post_update hook bash script for a new Git repository. We simply copy the generated post_update script into the hook directory of the component’s Git server repository. The post_update hook creation script requires the following parameters:
ComponentName: The name of the component. This must match the component name and naming convention used to create the corresponding web sites. Within these examples, the naming convention for the web sites is <ComponentName>-<RealeaseName>.
Creating a new component
Continuous deployment using Microsoft Azure Web Sites 33

GitUserName: The Git user name that is configured to publish to the web site repository.
GitPassword: The corresponding password.
The following two calls create the update hooks for the two components of the messaging solution (MsgSolCB-Frontend and MsgSolCB-Backend):
.\CreatePostUpdateScripts.ps1 MsgSolCB-Frontend UserName PassWord
.\CreatePostUpdateScripts.ps1 MsgSolCB-Backend UserName PassWord
Once the scripts have been placed in the hook folder of the respective Git server repository, each check-in will trigger deployment to the appropriate web site.
The Swap-WebSite.ps1 script can be used to swap the staging and production slots while preserving the slot settings. (The original production settings remain with the new production slot, and the original staging settings remain with the new staging slot.) The script requires the following parameters:
AzureSubscription: The name of the subscription where the solution should be deployed to. (Use azure account list to see a list of imported subscriptions.)
WebSiteName: The name of the web site to be swapped.
The following call swaps MsgSolCB-Frontend-V3 with MsgSolCB-Frontend-V3 (staging) while preserving the production and staging settings: .\Swap-WebSite.ps1 <subscriptionname> MsgSolCB-Frontend-
V3
Continuous deployment occupies a central role in delivering world-class services and web sites. Many aspects must be considered when building a deployment pipeline. However, regardless of the chosen approach, the following four tenets should be followed:
Treat infrastructure as code: Automate service creation and minimize manual tasks.
Automation is not an afterthought: Invest in automation at the beginning of a project. When a disaster happens, it is already too late.
Swapping a web site
In closing
Continuous deployment using Microsoft Azure Web Sites 34
Integrate and deploy frequently: Frequent check-ins, builds, tests, and deployments minimize integration complexity.
Deliver as one team: Build, test, and operate as one team with joint accountability for end-to-end service delivery.
Book: Continuous Delivery: Reliable Software Releases through Build, Test, and Deployment Automation by Jez Humble and David Farley
Git reference manual: http://git-scm.com/doc
Git on the server: http://git-scm.com/book/en/Git-on-the-Server
Git hooks: http://git-scm.com/book/en/Customizing-Git-Git-Hooks
Visual Studio Online: www.visualstudio.com
Microsoft Azure CLI tools and PowerShell downloads: http://www.windowsazure.com/en-us/downloads/
Microsoft Azure PowerShell cmdlet reference: http://msdn.microsoft.com/en-us/library/windowsazure/jj554330.aspx
Kudu: https://github.com/projectkudu
Grunt: http://gruntjs.com/
Git and Grunt deployment to Microsoft Azure: http://www.cptloadtest.com/2013/12/03/Git-And-Grunt-Deploy-To-Windows-Azure.aspx
Service Gateway on CodePlex: https://sg.codeplex.com/
Example script repository on GitHub: https://github.com/cloudbeatsch/Continuous-Deployment-using-WAWS-Scripts
Beat Schwegler [email protected]
http://cloudbeatsch.com @cloudbeatsch
Resources
Contact the author
Continuous deployment using Microsoft Azure Web Sites 35


