1/15/2007 12:36:00 PM Doc120-017-B_OP-Controller-Pro 1 of 19 ALLTRAX Inc. 1111 Cheney Creek Road Grants Pass, OR 97527 Voice: 541.476.3565 Fax: 541.476.3566 Controller Pro Instruction Manual These instructions cover: • Installing Controller Pro • Programming • Troubleshooting Doc# Doc120-017 Revision: B ECO: 010507 Note: Document revision history and EC information also located in “Revision History” section on page 3
Transcript
1/15/2007 12:36:00 PM Doc120-017-B_OP-Controller-Pro 1 of 19
ALLTRAX Inc.1111 Cheney Creek Road Grants Pass, OR 97527 Voice: 541.476.3565 Fax: 541.476.3566
Controller Pro Instruction Manual
These instructions cover:
• Installing Controller Pro • Programming • Troubleshooting
Doc# Doc120-017 Revision: B ECO: 010507 Note: Document revision history and EC information also located in “Revision History” section on page 3
1/15/2007 12:36:00 PM Doc120-017-B_OP-Controller-Pro 2 of 19
ALLTRAX Inc.1111 Cheney Creek Road Grants Pass, OR 97527 Voice: 541.476.3565 Fax: 541.476.3566
2. Warnings: ............................................................................................................................................ 4 3. Controller Pro Installation: ................................................................................................................ 4 4. Installing the Adapter Cable............................................................................................................... 5 5. Powering up the controller: ................................................................................................................ 5
5.1. Power up outside of a vehicle ............................................................................................................. 5 5.1.1. AXE: ..................................................................................................................................... 5 5.1.2. DCX: ..................................................................................................................................... 6
5.2. Power up in a vehicle: ........................................................................................................................ 6 5.2.1. AXE: ..................................................................................................................................... 6 5.2.2. DCX: ..................................................................................................................................... 6
9.1. Control Panel.................................................................................................................................... 10 9.1.1. Switches and Settings........................................................................................................... 11
10. Troubleshooting............................................................................................................................. 18 10.1. Controller Not Responding Error message ...................................................................................... 18 10.2. Changes to settings are not taking effect ......................................................................................... 19
1/15/2007 12:36:00 PM Doc120-017-B_OP-Controller-Pro 3 of 19
ALLTRAX Inc.1111 Cheney Creek Road Grants Pass, OR 97527 Voice: 541.476.3565 Fax: 541.476.3566
1. Document Scope The following is the manual for using Alltrax’s Controller Pro communications program. Controller Pro allows a computer to communicate with most Alltrax controller models. This revision document reflects using the USB to RS232 port adapter for communications to the controller. When only using the RS232 serial cable, there has been com port problems associated with various computers. A USB adapter simplifies the process and is highly recommended to use.
Items needed: Hardware:
• A computer with Windows 98/2000/NT/XP
• A serial cable with a male DB-9 connector and USB adapter listed below.
o Cables to Go, Port Authority™ 2 USB to Serial Adapter. www.cablestogo.com o Radio Shack, 6 Ft. (1.8m) USB-to-Serial Port Cable, Model: 26-183, Catalog #: 26-183 o Note: At this time, the Belkin USB-Serial Adapter Model #F5U103 does not work with
Controller Pro
• A 18v minimum power source, if bench programming units.
(Two 9v batteries in series work well for this application) Software:
• Controller Pro Software (see www.alltraxinc.com and download http://www.alltraxinc.com/old/Software/WEBControllerPRO.zip
1.1. Revision History: At each revision, all the changes made to the document should be discussed, including the principal author of each revision should be included. • Rev P1 — Initial revision. The principal author Richard Csuk, ALLTRAX Customer Service • Rev A - Initial Release per EC-081106 • Rev B – Added new error code, fix formatting issues, Released per EC-010507
1.2. References: The reference documents section should contain a list of all supporting and related documents. The list should include both internal and external document reference either specifically called out in the document, or relevant documents that give more detail or background.
1.3. Glossary:
1/15/2007 12:36:00 PM Doc120-017-B_OP-Controller-Pro 4 of 19
ALLTRAX Inc.1111 Cheney Creek Road Grants Pass, OR 97527 Voice: 541.476.3565 Fax: 541.476.3566
2. Warnings: Disconnect all battery charging sources while programming the Alltrax Controller.
Any programming changes done in the vehicle should be performed with the vehicle safely disabled. Either put the drive wheels on jack stands, or position the vehicle where it is safe to drive while altering the controller.
3. Controller Pro Installation: • Go to www.alltraxinc.com.
• Scroll to the bottom of the screen and look for the link called DCX/PDX.
• Click on the link.
• Save the file to your desktop.
• Once it has completed downloading, double click the webcontrollerpro.zip file.
• Select ControllerPro.exe.
• Right click and choose Extract.
• When prompted select your desktop as the location for the file.
• On the desktop will be an image that looks like an Alltrax controller called Controller Pro. Delete the controllerpro.zip file.
• Whenever you want to program a controller, you need to double-click on the controller image.
1/15/2007 12:36:00 PM Doc120-017-B_OP-Controller-Pro 5 of 19
ALLTRAX Inc.1111 Cheney Creek Road Grants Pass, OR 97527 Voice: 541.476.3565 Fax: 541.476.3566
4. Installing the Adapter Cable • Before installing the USB cable, a driver CD must be inserted and install drivers BEFORE plugging
the cable into the computer. Follow the manufacturer’s recommendations. • After the drivers are installed, restart the computer to load the new USB drivers into the Windows
program. • Connect the USB Serial adapter to the computers USB port, Windows should find “New Hardware”.
• Remove the black 2” plug on the top of the controller to expose the DB-9 serial connector.
• Connect the adapter cable from the computer to the connector on the controller and make sure the connections are snug.
5. Powering up the controller:
5.1. Power up outside of a vehicle
5.1.1. AXE: Connect the negative wire to the B- bus bar. The positive wire is connected to Pin 1. (See Fig 1)
Figure 1
1/15/2007 12:36:00 PM Doc120-017-B_OP-Controller-Pro 6 of 19
ALLTRAX Inc.1111 Cheney Creek Road Grants Pass, OR 97527 Voice: 541.476.3565 Fax: 541.476.3566
5.1.2. DCX: Connect the negative wire to the B- bus bar. The positive wire is connected to Pins 5, 6, 9 and 10. (See Fig 2)
Note: Flashing red LED’s may appear when the controller is powered up outside of a vehicle, this is normal and will not affect programming the controller at all.
5.2. Power up in a vehicle:
5.2.1. AXE: In order for the AXE controller to be powered up, the key switch must be turned on and the throttle foot pedal depressed enough to close the throttle switch. The foot pedal must be depressed the entire time for programming. Once the foot pedal is released, the controller will shut down.
5.2.2. DCX: Turn on the key switch and put the car into Forward or Reverse.
1/15/2007 12:36:00 PM Doc120-017-B_OP-Controller-Pro 7 of 19
ALLTRAX Inc.1111 Cheney Creek Road Grants Pass, OR 97527 Voice: 541.476.3565 Fax: 541.476.3566
6. Getting Started Before you can talk to the Alltrax controller you need to make sure of a couple of things.
• When using the USB to DB-9 adapter cable ensure that the software drivers are installed properly.
• Any battery charging devices need to be disconnected before programming, failure to do so could damage the controller or the computer.
• The controller needs to be powered up BEFORE starting ControllerPro.exe.
• Make sure the vehicle is up on jacks or is in a safe position to be programmed while driven.
• Remove the black plug on the top of the controller to expose the DB-9 programming port on the controller.
• Controller Pro will automatically detect the settings to communicate with the controller, there is no need to set these like with previous versions of Controller Pro know as MotorControl
• Any changes made to the settings of the controller do not take effect in the controller until the Set button has been pushed.
(Note the DCX is shown for reference only – all RS232 ports are in the same location)
7. Quick Programming Guide Programming the controller is a very simple operation.
• Turn on the computer
• Connect cables from computer to controller
• Power up controller
• Start ControllerPro.exe
• Change the setting(s) to the desired value.
• Press the Set button to program the changes into the controller
• Press the Refresh button to display the updated settings
1/15/2007 12:36:00 PM Doc120-017-B_OP-Controller-Pro 8 of 19
ALLTRAX Inc.1111 Cheney Creek Road Grants Pass, OR 97527 Voice: 541.476.3565 Fax: 541.476.3566
8. Upgrading Controller Software A majority of the Alltrax motor controllers also have the ability to be re-programmed with upgraded software. In most cases, it is not necessary to upgrade the unit’s software for stock or aftermarket replacements unless a specific revision is needed for a particular application.
Note: Upgrades are to be only done when directed to do so by Alltrax or one of its Authorized Distributors, Dealers or OEM’s.
• Power up the controller and start Controller Pro (Sections 5 and 6 details)
• In the Tools menu, select Upgrade (In this example we are upgrading from Field Map 4 to Field Map 9)
• Select the “HEX” file located on your desk top (or other location that you saved the file that was provided by Alltrax). This is the program for the controller.
Note: The HEX file name may not match the actual field map – don’t confuse the “file name” with “Field Map”
1/15/2007 12:36:00 PM Doc120-017-B_OP-Controller-Pro 9 of 19
ALLTRAX Inc.1111 Cheney Creek Road Grants Pass, OR 97527 Voice: 541.476.3565 Fax: 541.476.3566
• The Upgrade will program the unit with the new Field Map program and show the controller is writing the program into the controllers flash memory.
• After the program is finished writing the memory locations, hit REFRESH to re-read the program. The field map now shows the new Field Map #
1/15/2007 12:36:00 PM Doc120-017-B_OP-Controller-Pro 10 of 19
ALLTRAX Inc.1111 Cheney Creek Road Grants Pass, OR 97527 Voice: 541.476.3565 Fax: 541.476.3566
9. The Interface
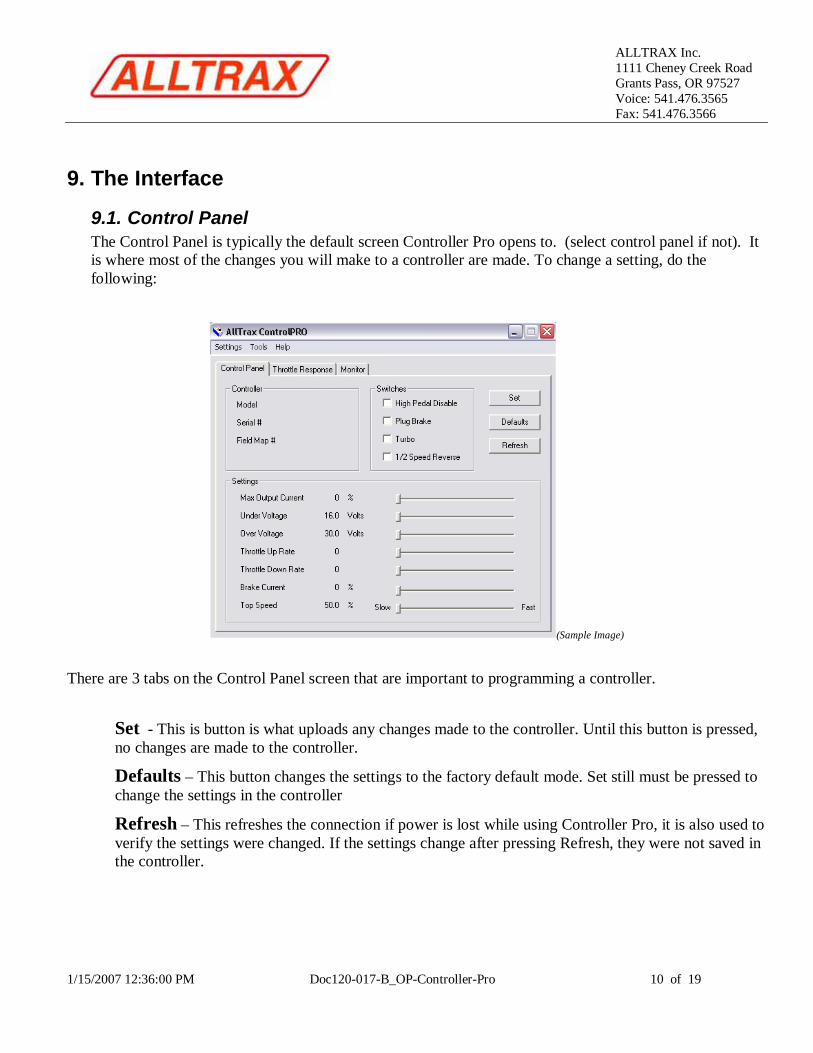
9.1. Control Panel The Control Panel is typically the default screen Controller Pro opens to. (select control panel if not). It is where most of the changes you will make to a controller are made. To change a setting, do the following:
(Sample Image)
There are 3 tabs on the Control Panel screen that are important to programming a controller. Set - This is button is what uploads any changes made to the controller. Until this button is pressed, no changes are made to the controller.
Defaults – This button changes the settings to the factory default mode. Set still must be pressed to change the settings in the controller
Refresh – This refreshes the connection if power is lost while using Controller Pro, it is also used to verify the settings were changed. If the settings change after pressing Refresh, they were not saved in the controller.
1/15/2007 12:36:00 PM Doc120-017-B_OP-Controller-Pro 11 of 19
ALLTRAX Inc.1111 Cheney Creek Road Grants Pass, OR 97527 Voice: 541.476.3565 Fax: 541.476.3566
9.1.1. Switches and Settings
High Pedal Disable – AXE and DCX Models Checking this box enables HPD, which will prevent the controller from providing output power in the event the throttle is applied when the controller is powered on. When this box is clear, the controller will start up and provide output power, when KSI energized, if the throttle is depressed.
Plug Brake – AXE “P” models only Checking this box enable plug braking on those controllers equipped with an A2 bus bar terminal. Plug braking on AXE controllers is proportional to throttle position, reaching full braking force at about 25% of throttle travel. Deselecting this box disables plug braking. The unit will apply normal power to motor if direction is reversed. (Vehicle may jerk or spin tires if motor direction is reversed while in motion). (Plug brake takes effect after a power cycle when this option is changed)
Turbo – DCX models only This feature enables a turbo boost mode when enabled. It only goes into and stays in turbo mode when two conditions are met. The throttle position is at 100% for at least 1 second and the controller is not in current limit. The controller will adjust the field map to allow for extra speed while those conditions are met.
½ Speed Reverse – AXE and DCX Models Checking this box enables ½ Speed reverse. When reversing this limits the vehicle speed to half of the throttle position. Top speed is reduced by half by this setting. Disabling ½ Speed Reverse does not reduce the vehicle speed when going in reverse.
Max Output Current – All models This slider sets the maximum output current the controller can supply to the motor. Output current is adjusted as a percentage of maximum rated current of the controller. For example, an AXE4844 can supply a maximum of 400A with the slider at 100%, 300A at 75% and 200A at 50%.
Under Voltage – All models This slider sets the under voltage shut off of the controller. It prevents battery damage by turning off the controller in case the battery voltage drops too low. Generally speaking, it is undesirable to pull the terminal voltage of a 6V lead-acid battery below 4.0V, for example 24V on a 36V system. Adjusting this slider increments the under voltage setting in 1/10ths of a volts.
Over Voltage – All models This slider sets the over voltage shut off of the controller. It prevents damage to the controller in an over voltage situation. If the batteries get over charged or any other situation that exceeds the voltage rating of the controller, the controller will shut down. Adjusting this slider increments the over voltage setting in 1/10ths of a volts.
1/15/2007 12:36:00 PM Doc120-017-B_OP-Controller-Pro 12 of 19
ALLTRAX Inc.1111 Cheney Creek Road Grants Pass, OR 97527 Voice: 541.476.3565 Fax: 541.476.3566
Throttle Up Rate – All models This slider adjusts the rate the controller output current responds to an increase in throttle position. The rate of increase is on a scale of 1 to 15, with 1 being the slowest and 15 being the fastest. Typical settings are between 3-8.
Throttle Down Rate – All models This slider adjusts the rate the controller output current responds to an decrease in throttle position. The rate of increase is on a scale of 1 to 15, with 1 being the slowest setting It is recommended that this parameter typically be set to twice the value of the throttle up rate, when throttle up rate is less than 7.
Brake Current – AXE “P” and DCX models On AXE models equipped with a plug brake (suffix “P” in the model number), this slider adjusts the amount of brake current as a percent of 100A of brake current. Refer to AXE specifications for maximum available brake current depending on the model of controller.
On DCX models, this is the Regen feature. The setting is the percentage of possible current available. This all depends on the motor. A hi-torque low-speed motor needs a lower percentage value and a hi-speed low-torque motor needs a higher value. (Note: On 48v systems, the Regen feature may not turn on due to the higher RPM needed to switch this function on.)
Top Speed – All Models This slider sets the top speed of the vehicle as a percentage of top speed. The controller applies this percentage to the actual throttle position. If the slider is set to 75%, whatever the actual throttle position is, the controller interprets it as 3/4ths that position.
1/15/2007 12:36:00 PM Doc120-017-B_OP-Controller-Pro 13 of 19
ALLTRAX Inc.1111 Cheney Creek Road Grants Pass, OR 97527 Voice: 541.476.3565 Fax: 541.476.3566
9.2. Throttle Response This panel is where you can make changes to the throttle type and throttle curve. The curve is the behavior of the controller at various throttle positions. Any change to the throttle setting will take effect immediately.
(Sample Image)
9.2.1. Throttle Sensor Types The following is a list of all the supported throttle types and the most common vehicle that uses the throttle. By no means is this an exhaustive or complete list.
Yamaha 0-1k – AXE models Typically used on the Yamaha Mid 92-94, G9, G14 & G16
0-5k – AXE and DCX models Typically used on 95 and older Club Cars, 94 and older EZ-GO Marathons & Yamaha G8
5k-0 – AXE and DCX models Typically used on Melex Cars
1/15/2007 12:36:00 PM Doc120-017-B_OP-Controller-Pro 14 of 19
ALLTRAX Inc.1111 Cheney Creek Road Grants Pass, OR 97527 Voice: 541.476.3565 Fax: 541.476.3566
0-5 Volts – AXE models
6-10.5 Volts – AXE models Typically used on Taylor Dunn cars
Club Car 5k-0 3 wire – AXE models (Also known as V-Glide or M-Core throttles) Typically used in 96 and newer Club Cars
EZ-GO ITS – AXE and DCX models Typically used on all PDS and DCS, 95 and newer Medalist and TXT EZ-GO, Yamaha G19 and Club Car Regen2/PD+
Pump – AXE models This sensor setting treats any throttle position as 100% throttle. Throttle ramp rates still function.
1/15/2007 12:36:00 PM Doc120-017-B_OP-Controller-Pro 15 of 19
ALLTRAX Inc.1111 Cheney Creek Road Grants Pass, OR 97527 Voice: 541.476.3565 Fax: 541.476.3566
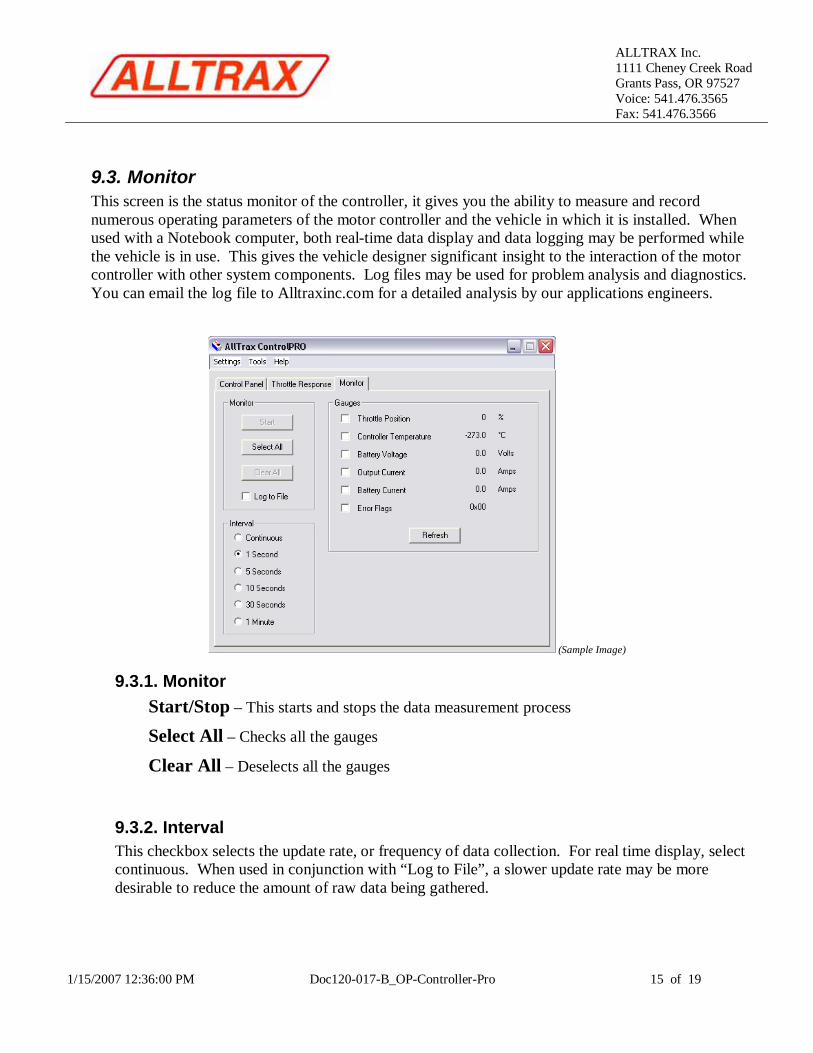
9.3. Monitor This screen is the status monitor of the controller, it gives you the ability to measure and record numerous operating parameters of the motor controller and the vehicle in which it is installed. When used with a Notebook computer, both real-time data display and data logging may be performed while the vehicle is in use. This gives the vehicle designer significant insight to the interaction of the motor controller with other system components. Log files may be used for problem analysis and diagnostics. You can email the log file to Alltraxinc.com for a detailed analysis by our applications engineers.
(Sample Image)
9.3.1. Monitor Start/Stop – This starts and stops the data measurement process
Select All – Checks all the gauges
Clear All – Deselects all the gauges
9.3.2. Interval This checkbox selects the update rate, or frequency of data collection. For real time display, select continuous. When used in conjunction with “Log to File”, a slower update rate may be more desirable to reduce the amount of raw data being gathered.
1/15/2007 12:36:00 PM Doc120-017-B_OP-Controller-Pro 16 of 19
ALLTRAX Inc.1111 Cheney Creek Road Grants Pass, OR 97527 Voice: 541.476.3565 Fax: 541.476.3566
9.3.3. Gauges These are the motor controller parameters which are to be monitored. Checking an adjacent box enables that measurement. Clicking “Refresh” will perform a one-time update to the gauges which are selected. It is generally recommended that you select all the gauges, as this will provide the most insight into the operation of the controller.
Throttle Position This gauge displays the % of total throttle output. For example 50% would be at ½ throttle. The displayed parameter is the actual throttle position, limited by the fact that the controller could be in current limit. If the controller’s output current reaches the maximum rating, the throttle position won’t advance any further, regardless if the throttle is full on.
Controller Temperature This is the internal temperature of the controller, in Celsius. Accuracy: +/- 5%.
Battery Voltage This is the voltage present across the B+ and B- bus bars of the controller. Exception: Club Car compatible models. This is the voltage present across the KSI input to B- bus bar of the DCX controller. Accuracy: +/- 5%
Output Current This is the measured output or motor current of the controller. Accuracy +/-10%
Battery Current This is the calculated input or battery current to the controller. It is calculated as: Battery current = motor current times throttle position %. It is accurate, given that motor current is continuous (which it generally is with any series motor), not discontinuous. Accuracy: +/- 10%
1/15/2007 12:36:00 PM Doc120-017-B_OP-Controller-Pro 17 of 19
ALLTRAX Inc.1111 Cheney Creek Road Grants Pass, OR 97527 Voice: 541.476.3565 Fax: 541.476.3566
Error Flags This register should display as 0x00 during normal operation. Any value greater than zero is an error, and the controller will not provide any output power. The following is a list of errors that might appear during monitoring. Each of errors has a code that blinks Red on the LED on the front panel.
0x01 = Throttle Position Sensor Over Range
0x02 = Under Temperature. Controller below -25°C 0x04 = HPD. Throttle hasn’t gone to zero during this power on cycle.
0x08 = Over Temperature. Controller over 95°C
0x10 = Open Field (DCX Only) 0x20 = Battery Under Voltage detected. Battery V < undervoltage slider
0x40 = Battery Over Voltage detected. Battery V > overvoltage slider 0x80 = Controller in boot sequence. Occurs within 25mS of power up.
If any other number appears as an error code, contact Alltrax Technical Support for more assistance.
1/15/2007 12:36:00 PM Doc120-017-B_OP-Controller-Pro 18 of 19
ALLTRAX Inc.1111 Cheney Creek Road Grants Pass, OR 97527 Voice: 541.476.3565 Fax: 541.476.3566
10. Troubleshooting
10.1. Controller Not Responding Error message • Make sure the controller is powered up with at least 18v
• Check all connections
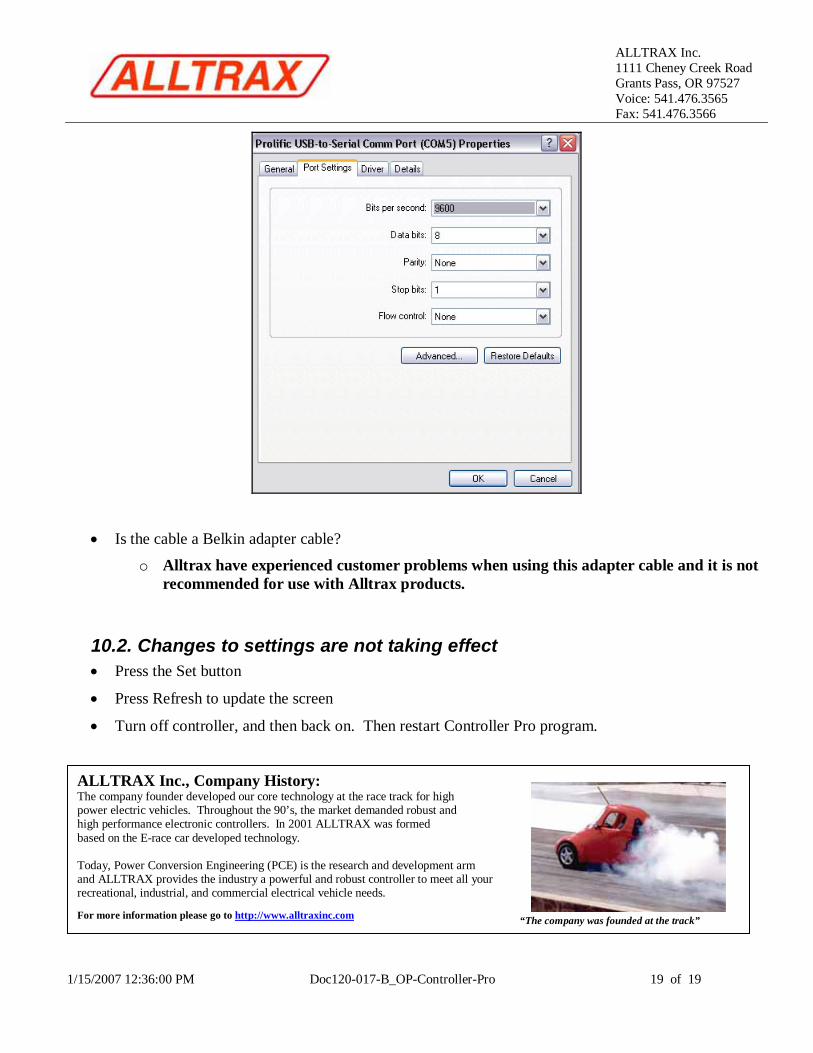
• Check to see if the driver was installed for the USB cable: o Go to Start > Settings > Control Panel > System > Hardware > Device Manager
• The screen should look something like the above picture, change the location of the cable and see if the Com port changes with each move. If it doesn’t, reinstall the driver software.
• Verify the com port settings are correct: o Get to the Device Manager screen the same way as in the previous step.
o Right click on the cable, and select properties.
1/15/2007 12:36:00 PM Doc120-017-B_OP-Controller-Pro 19 of 19
ALLTRAX Inc.1111 Cheney Creek Road Grants Pass, OR 97527 Voice: 541.476.3565 Fax: 541.476.3566
• Is the cable a Belkin adapter cable?
o Alltrax have experienced customer problems when using this adapter cable and it is not recommended for use with Alltrax products.
10.2. Changes to settings are not taking effect • Press the Set button
• Press Refresh to update the screen
• Turn off controller, and then back on. Then restart Controller Pro program.
ALLTRAX Inc., Company History: The company founder developed our core technology at the race track for high power electric vehicles. Throughout the 90’s, the market demanded robust and high performance electronic controllers. In 2001 ALLTRAX was formed based on the E-race car developed technology. Today, Power Conversion Engineering (PCE) is the research and development arm and ALLTRAX provides the industry a powerful and robust controller to meet all your recreational, industrial, and commercial electrical vehicle needs. For more information please go to http://www.alltraxinc.com