24
Installation, Operation and Maintenance Manual eTempo/Plus ® Control eTempo ® Control Steam Genie ™ AromaSteam Steamhead Mr.Steam Essential Oils mr . steam ® controls

Installation, Operation and Maintenance Manual
eTempo/Plus® Control
eTempo® Control
Steam Genie™
AromaSteam Steamhead
Mr.Steam Essential Oils
mr .steam
® con
trol
s

eTEMPO® / eTEMPO/PLUS® / Steam Genie® / Steamhead • Owner’s Manual2
Table of Contents
General I nformation & Care Tips 3
Safety & Operating Information 4
eTEMPO® & eTEMPO/PLUS® 5
Installation Instructions 6-8
eTEMPO®
Operating Instructions 9-10
eTEMPO/PLUS®
Operating Instructions 11-13
Steam Genie™ 14
Installation 15
Operation 16-17
Pairing 18
Battery Replacement 19
Installing the Holder 20
STEAMHEAD & ESSENTIAL OIL 21
AromaSteam Steamhead Installation 22-23
Using Essential Oils 23

3eTEMPO® / eTEMPO/PLUS® / Steam Genie® / Steamhead • Owner’s Manual
As you follow these instructions, you will notice warning and caution symbols. This blocked information is important for the safe and efficient installation and operation of this generator. These are types of potential hazards that may occur during installation and operation:
states a hazard may cause serious injury or death if precautions are not followed.
signals a situation where minor injury or product damage may occur if you do not follow instructions.
IMPORTANT NOTE: This highlights information that is especially relevant to a problem-free installation.
1. Use only mild soap and water on a soft cloth to clean the control.
2. Do not use any abrasive cleansers.
3. If the decorative cover is damaged on the eTEMPO or eTEMPO/PLUS call MrSteam technical service for replacement parts.
This document contains important safety, operation and maintenance information. Leave this document with the hom-eowner. Do not discard this document.Discontinue use of the steam generator or control if the steam generator is damaged or otherwise not functioning properly. Doing so may result in an inoperative or hazardous installation.
Care Tips for All Controls & Steamhead
For additional information contact a MrSteam Technical Service representative:New York Corporate Office: 1 800 76 STEAM • West Coast Regional Office: 1 800 72 STEAM
Additional product and Installation information is available at the MrSteam web site: www.mrsteam.com
General Information
! wARNING
! CAUTION

eTEMPO® / eTEMPO/PLUS® / Steam Genie® / Steamhead • Owner’s Manual4
• Set the steambathing temperature according to personal preference, however it is highly recommended to begin steam- bathing at a low temperature setting to gauge comfort and safety levels. Set the duration at 10 minutes max. to gauge comfort and safety levels. This will allow the steam generator to heat up and begin producing steam.
• Do not install or use any eTEMPO/PLUS, eTEMPO or Steam Genie controls without reading and understanding the MrSteam steam generator Installation and Operation Manual (part number 101289 Revision number 10.0/08 or higher). Failure to read and understand these instructions may result in an inoperative or hazardous installation.
• A peel and stick warning is provided with the MrSteam steam generator Installation and Operation Manual. MrSteam strongly recommends that this warning be read and posted in a conspicuous location near the steam room.
• Install the eTEMPO or eTEMPO/PLUS controls according to installation instructions. Failure to install according to instructions will result in an inoperative control or hazardous overheating or inadequate heating of the steam room.
• If a eTEMPO or eTEMPO/PLUS control is installed outside the steam room a Remote Temperature Probe (part number MSTS) must be installed inside the steam room per installation instructions supplied with the Remote Temperature Probe. Failure to install according to instructions will result in an inoperative control and overheating of the steam-room.
• Do not route any eTEMPO/PLUS, eTEMPO or Steam Genie control wiring inside conduit with power lines or close to hot water or steam piping. Doing so may result in an inoperative or hazardous installation.
• Do not alter or modify any eTEMPO/PLUS, eTEMPO or Steam Genie controls. Doing so may result in an inoperative or hazardous installation.
IMPORTANT NOTES:• Do not operate any eTEMPO/PLUS, eTEMPO or Steam Genie controls with anything other than a MrSteam eTEMPO
compatible steam generator. MrSteam residential steam generators with serial numbers lower than 900.000, or any other brand of steam generator are not to be operated with eTEMPO controls. Doing so may result in an inoperative installation.
Safety & Operating Information
! wARNING
! CAUTION

eTempo/Plus® ControleTempo® Control
In-Shower Electronic Controls
mr .steam
® con
trol
s

eTEMPO® / eTEMPO/PLUS® / Steam Genie® / Steamhead • Owner’s Manual6
am
4.000
4.000
.920.90003.900
0.800
12" long pigtail
.884
onoff
p1p2
timetemp
aroma chroma
onoff
p1p2
timetemp
aroma chroma
Installation Instructions for Round and Square eTEMPO & eTEMPO/PLUS
BOX CONTENTS:
• eTEMPO® or eTEMPO/PLUS Control• Control Cable (30 ft.)• Steam Head• Tube of Silicon Sealant• Owner’s Manual
Step 1Determine the desired installation location of the control. The eTEMPO and eTEMPO/PLUS controls are designed to be installed inside or outside the steam room as a matter of personal preference.
If the control is installed inside the steamroom the control must be located:• 4-5 feet above the floor near the bather seating area.• on a vertical wall• Do not locate the control above or near the steamhead.
Do not expose control to direct steam emission.
Do not locate the control where other controls, accessories, shower heads, valves, body sprays or similar within the shower could cause confusion or interfere with the Mr.Steam control’s intended use and function.
The control cable length is 30 feet. Insure that the control and/or steam generator are located accord-ingly. Contact a MrSteam technical service represen-tative if a longer cable is required. Contact mr.steam for optional 60 foot cable PN: 103990-60.If the control is installed outside the steam room a Remote Temperature Probe Part Number MSTS must be installed inside the steam room.IMPORTANT: See installation instructions supplied with the Temperature Probe before rough-in or installation of the control.
Dimensional Information for eTEMPO® & eTEMPO/PLUS®
! CAUTION

7eTEMPO® / eTEMPO/PLUS® / Steam Genie® / Steamhead • Owner’s Manual
Connect control hereMini-Din
connector
Diagram 1
Step 4Firmly connect the connector to the 12” cable from the back of the control. Turn on power to the steam generator and test the control to verify correct connections. Test per the instructions on page 9. Proceed with installation and verification of proper control function.
Step 5Remove & discard peel-off paper to expose adhesive liner as shown in Diagram 4.
Step 2Make a one-inch diameter hole in the desired control location (Diagram 1). Do not oversize or undersize the hole.
Step 3 Route the control cable (provided with the control) from the wall cutout to the steam generator. Connect the black round Mini-Din connector to the steam generator connector as shown in diagram 2.
NOTE: The connector is keyed, it will only connect when the flat is facing up
IMPORTANT: Be careful not to strain, staple, pinch orotherwise damage the control cable. Route cable as required to permit replacement.
Diagram 4
Diagram 3
Installation Instructions for eTEMPO® & eTEMPO/PLUS®
Diagram 2
eTEMPO® / eTEMPO/PLUS® / Steam Genie® / Steamhead • Owner’s Manual8
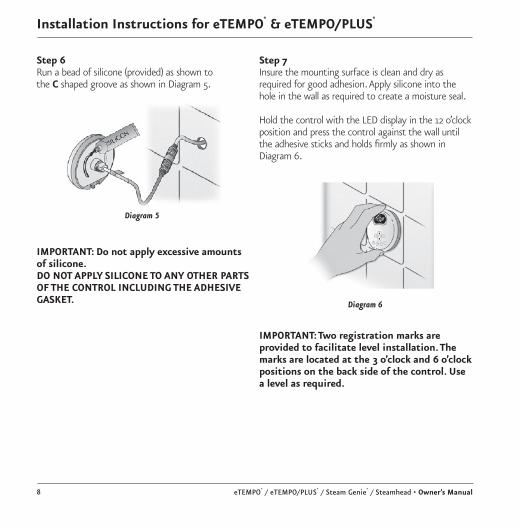
Step 7Insure the mounting surface is clean and dry as required for good adhesion. Apply silicone into the hole in the wall as required to create a moisture seal.
Hold the control with the LED display in the 12 o’clock position and press the control against the wall until the adhesive sticks and holds firmly as shown in Diagram 6.
IMPORTANT: Two registration marks are provided to facilitate level installation. The marks are located at the 3 o’clock and 6 o’clock positions on the back side of the control. Use a level as required.
Step 6Run a bead of silicone (provided) as shown to the C shaped groove as shown in Diagram 5.
IMPORTANT: Do not apply excessive amounts of silicone. DO NOT APPLY SILICONE TO ANY OTHER PARTS OF THE CONTROL INCLUDING THE ADHESIVE GASKET.
Diagram 5
Diagram 6
Installation Instructions for eTEMPO® & eTEMPO/PLUS®

9eTEMPO® / eTEMPO/PLUS® / Steam Genie® / Steamhead • Owner’s Manual
The eTEMPO Control features programmable digital temperature control,a fixed (60) minute duration, ON/OFF and PAUSE.
ON/OFFPress the ON/OFF key to start or stop the flow of steam. Steam will begin to flow a few minutes after the control is turned ON. The duration required for the steamroom to reach steambathing temperatures depends on the steam-room construction and steam generator specifications. Steam may continue to flow for a short time after the control is turned OFF.
PAUSE featureIf a pause in steam flow is desired press the PAUSE key. The display will flash while the control is in the PAUSE mode. The timer will continue to countdown while in the PAUSE mode.
Timer featureWhen the control is turned ON a 60 minute time duration is initiated. The control will turn off after 60 minutes unless the control is turned off manually.
Memory featureIf the control is turned off manually before 60 minutes then the default temperature of 110°F will be used the next time the control is turned on. If the control times out at 60 minutes (not manually turned off) then the previous user temperature setting will be used when the steambath is used again.
Set the steambathing tempera-ture according to personal preference, however it is highly recommended to begin steambathing at a low temperature setting to gauge comfort and safety levels. Set the duration at 10 minutes max. to gauge comfort and safety levels. This will allow the steam generator to heat up and begin producing steam.
eTEMPO® Operating Instructions
! wARNING

eTEMPO® / eTEMPO/PLUS® / Steam Genie® / Steamhead • Owner’s Manual10
eTEMPO® Operating Instructions
Setting the temperatureThe control is preset and will display the temperature setting of 110°F (default setting). Use the UP and DOwN keys to change the temperature seting from 100°F to 120°F in one degree increments.
Changing the Temperature Units (°F/°C)When the generator is Off, Press and hold ON/OFF key for 10 seconds. The temperature units will be displayed as Fahrenheit (TuF) or Celsius (TuC). Use the UP/DOwN keys to choose between (TuF) and (TuC). Press ON/OFF key to accept the new value and exit.

11eTEMPO® / eTEMPO/PLUS® / Steam Genie® / Steamhead • Owner’s Manual
eTEMPO/PLUS Operating Instruction
The eTEMPO/PLUS Control features programmable digital temperature control, programmable time duration, clock, Aromasteam, ChromaSteam, ON/OFF and two personal settings.
ON/OFFPress the ON/OFF key to start or stop the flow of steam. The Set Point is displayed. Steam will begin to flow a few minutes after the control is turned ON. The duration required for the steamroom to reach steambathing tempera-tures depends on the steamroom construction and steam generator specifications. Steam may continue to flow for a short time after the control is turned OFF.
Set the steambathing temperature according to personal preference, how-ever it is highly recommended to begin steambathing at a low temperature setting to gauge comfort and safety levels. Set the duration at 10 minu-tes max. to gauge comfort and safety levels. This will allow the steam generator to heat up and begin producing steam.
Powering up the unitWhen the generator is first powered up or after a power interruption, the clock display flashes and the clock is ready to be set.NOTE: pressing the ON/OFF will start the generator even if the clock has not been set.
Setting the clockWhen the display is not flashing: Press and hold the TIME key until the display starts flashing.Use the UP/DOwN keys to select desired value, at this time the AM/PM logo will be displayed. Press the TIME key to save changes.NOTE: the clock can only be set when the generator is off.
eTEMPO/PLUS® Operating Instructions
! wARNING

eTEMPO® / eTEMPO/PLUS® / Steam Genie® / Steamhead • Owner’s Manual12
Setting the time duration/Viewing the clockPress TIME key to set or display the remaining relaxation time or the clock. The control is preset and will display a TIME setting of 20 minutes (default setting).
With the TIME or CLOCK displayed, press the UP or DOwN keys to set the desired duration time (2 - 60 minutes) in two minutes increments.
Set the steambathing duration according to personal preference, however it is highly recommended to begin steambathing at a shorter dura-tion to gauge comfort and safety levels.
The control will turn off when the relaxation period times out. Then, the clock time will be displayed.
eTEMPO/PLUS® Operating Instructions
Setting the temperaturePress TEMP key to set the desired temperature or display the temperature setting. The control is preset and will display a temperature setting of 110°F (default setting).
With the temperature displayed, press the UP or DOwN keys to set the desired temper- ature (100°F to 120°F) in one degree increments.Set the steambathing temp- erature according to personal preference, however it is highly recommended to begin steam-bathing at a low temperature setting to gauge comfort and safety levels.
Changing the Temperature Units (°F/°C)When the generator is Off, Press and hold ON/OFF key for 10 seconds. The temperature units will be displayed as Fahrenheit (TuF) or Celsius (TuC). Use the UP/DOwN keys to choose between (TuF) and (TuC). Press ON/OFF key to accept the new value and exit.

13eTEMPO® / eTEMPO/PLUS® / Steam Genie® / Steamhead • Owner’s Manual
Memory featureIf the control is turned off manually before it times out then the default settings of 20 minutes and 110°F will be used the next time the control is turned on. If the control times out (not manually turned off) then the previous user time and temperature settings will be used when the steambath is used again.
PROG 1 and PROG 2 FeatureThe P1/P2 key program and store preferred settings.
To program preferred settings: Press ON/OFF key to turn generator on. Press P1/P2 key once to program PROG1. Press it twice to program PROG2. The selected parameter will be displayed. Enter the preferred time and temperature settings. The eTEMPO/PLUS will store the following settings: set point, time duration & aroma state.
To select PROG1 or PROG2: Press ON/OFF key then press P1/P2 key once to select PROG1, press it twice to select PROG2. The steambath will begin to operate at the stored settings.
eTEMPO/PLUS® Operating Instructions
AromaSteamTo enjoy the benefits of the AromaSteam system, the AromaSteam system and the steam generator must be at on at the same time. Press the ON/OFF key to turn the steam generator on. Then, press the aroma key to activate the AromaSteam system. When the steam is generated the aroma oils will mix with the steam flow.The aroma indicator will be dis-played. The AromaSteam turns off automatically when the steam genera-tor stops heating. Press the aroma key to turn it off during a steam session. The aroma indicator will turn off.
ChromaSteamThe ChromaSteam system will activate colored lights in the steam shower. Press the chroma key to turn lights on. Press twice to select the current light color. Press again to turn the lights off. Note that the lights can be turned on even if the steam generator is off and the ChromaSteam system hasn’t timed out.

eTEMPO® / eTEMPO/PLUS® / Steam Genie® / Steamhead • Owner’s Manual14
BOX CONTENTS:
• Steam Genie
• Steam Genie Holder
• Interface Module
• Lanyard
• 5 ft. Interface Module Connection Cable
• 2 Interface Module Mounting Screws
• Installation and Operation Instructions
A Steam Genie used in close proximity to multiple generators, may inadvertently turn them on.
Please read the paragraph on pairing in this manual if more than one Steam Genie is used in close proximity.
• Ensure the steam room door is closed when using a Steam Genie. Leaving the steam room door open during steam generator operation may result in property damage.
• Do not route any eTEMPO/PLUS, eTEMPO, or Steam Genie control wiring inside conduit with power lines or close to hot water or steam piping. Doing so may result in an inoperative or hazardous installation.
• Do not alter or modify any eTEMPO/PLUS, eTEMPO or Steam Genie controls. Doing so may result in an inoperative or hazardous installation.
Steam Genie™ Control - Wireless Control
! warNiNg
! CauTiON
FCC ID: KSK-104058 FCC ID: KSK-104059
Mr.Steam: Steam genieThis equipment has been tested and found to comply with the limits for a Class B digital device, |
pursuant to Part 15 of FCC Rules. These limits are designed to provide reasonable protection against harmful interference in a residential installation. Operation is subject to the following two conditions:
1) This device may not cause harmful interface, and 2) This device must accept any interface received, including interface that may cause undesired operation.
Changes or modifications not expressly approved by the party responsible for compliance could void the user’s authority to operate the equipment.

15eTEMPO® / eTEMPO/PLUS® / Steam Genie® / Steamhead • Owner’s Manual
Steam Genie Interface Module Installation
• Connect the STEAM GENIE INTERFACE MODULE to the generator by plugging in the provided 5 foot cable to the STEAM GENIE INTERFACE MODULE and the Steam Genie con-nector on the side of the generator as shown.
• Mount the Steam genie Interface Module in a dry, indoor location. For maximum range, the Steam Genie Interface Module should be mounted as high as practical and away from metal that could effect the radio signal. Securing it to a nearby wood stud is ideal. The antenna should be pointing upwards.
• With the generator powered, the red light (steam off) or green light (steam on) should come on when plugged in. Press the toggle steam button to confirm proper connection.
• Press the ON/OFF button and confirm that the Steam Genie lights match the state of the steam generator. Red for Steam Off (eTempo control is off) and green for Steam On (eTempo control is on).
• The yellow RF activity light on the STEAM GENIE INTERFACE MODULE should flash each time the button on the Steam Genie FOB is pressed.
• Test the range of the Steam Genie FOB. It may be necessary to change the location of the Steam Genie Interface Module to improve the range. Contact Mr.Steam technical service for an optional 60 foot cable, part number 103978-60.
eTEMPO® / eTEMPO/PLUS® / Steam Genie® / Steamhead • Owner’s Manual16
Steam Genie Operation
! CAUTION
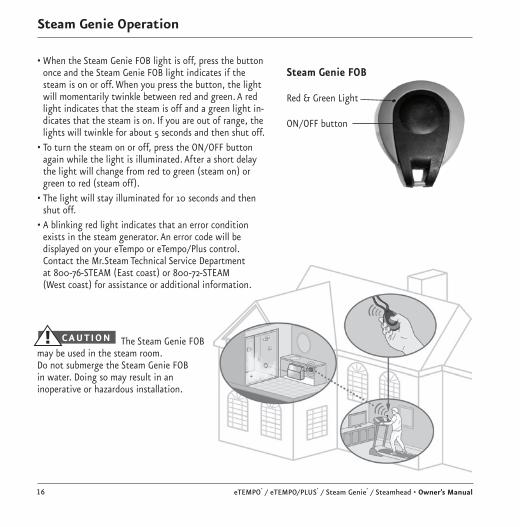
Steam Genie FOB
Red & Green Light
ON/OFF button
• When the Steam Genie FOB light is off, press the button once and the Steam Genie FOB light indicates if the steam is on or off. When you press the button, the light will momentarily twinkle between red and green. A red light indicates that the steam is off and a green light in-dicates that the steam is on. If you are out of range, the lights will twinkle for about 5 seconds and then shut off.
• To turn the steam on or off, press the ON/OFF button again while the light is illuminated. After a short delay the light will change from red to green (steam on) or green to red (steam off).
• The light will stay illuminated for 10 seconds and then shut off.
• A blinking red light indicates that an error condition exists in the steam generator. An error code will be displayed on your eTempo or eTempo/Plus control. Contact the Mr.Steam Technical Service Department at 800-76-STEAM (East coast) or 800-72-STEAM (West coast) for assistance or additional information.
The Steam Genie FOB may be used in the steam room. Do not submerge the Steam Genie FOB in water. Doing so may result in an inoperative or hazardous installation.

17eTEMPO® / eTEMPO/PLUS® / Steam Genie® / Steamhead • Owner’s Manual
Steam Genie Operation
• The Steam Genie interface module is connected to and mounted near your steam generator and normally does not require any attention.
• The 4 lights on the STEAM GENIE INTERFACE MODULE indicate the status of the steam generator that it is connected to. At least one light will be on to show you that the Steam genie Interface Module is operating.
• If the red light is on, the steam cycle is off. If the green light is on, the steam cycle is on.
• If the red light is blinking there is an error condi-tion in the steam generator. An error code will be displayed on your eTempo or eTempo/Plus control.
mr .steam
®43-2034th
Street
Long
IslandCity,N
Y11101•1
80076
STEAM
STEAM OFF
STEAM ON
RF ACTIVITY
PAIRING
mr.steamAdjust AddressGreen LED blinks
address in pairing mode
Toggle SteamPress and Hold toenter pairing mode
Antenna
Mounting Holes
Connection to steam generator
(on the side of Interface Module)
Toggle SteamButton
AddressButton
StatusLEDs
Contact the Mr.Steam Technical Service Department at 800-76-STEAM (East coast) or 800-72-STEAM (West coast) for assistance or additional informa-tion.
• The yellow light flashes to indicate when the ON/OFF button on the STEAM GENIE FOB is pressed.
• The blue light is on to indicate that you are in pairing mode.
• While in pairing mode, the green light will continu-ously flash the STEAM GENIE INTERFACE MODULE address (1-8).
• You can turn the generator on and off by pressing either button on the STEAM GENIE INTERFACE MODULE (while not in pairing mode).
Steam Genie Interface Module

eTEMPO® / eTEMPO/PLUS® / Steam Genie® / Steamhead • Owner’s Manual18
Pairing
• The STEAM Genie FOB and STEAM Genie Interface Module come paired from the factory with address 1. The Steam Genie FOB and Steam Genie Interface Module can be set to one of eight different ad-dresses.
• Pairing is required if you have more than one steam generator in your home or if you experience interference from a neighbor’s steam generator.
• You can determine the pairing of an Steam Genie FOB and STEAM Genie Interface Module by pressing and holding the ON/OFF button for 2 seconds. If you are within range of the Steam Genie Interface Module, the green light will flash from 1 to 8 times depending on the address. To change the address of the Steam Genie Interface Module, you must enter pairing mode.
• To enter pairing mode, press and hold the Toggle-Steam button on the Steam Genie Interface Module for 2 seconds until the blue indicator light comes on. The green indicator light will start flashing the current address every 4 seconds. Count from 1 to 8 flashes. To change the STEAM Genie Interface Module address press the Adjust-Address button. Observe that the flash increments from 1 to 8 and then back to 1 each time you press it.
• To change the address of the Steam Genie FOB, to match the address of the STEAM Genie Interface Module, press and hold the ON/OFF button while the STEAM GENIE INTERFACE MODULE is in pairing mode. You will see the new flash count on the Steam Genie FOB.
• To exit pairing mode, press the Toggle-Steam button on the STEAM Genie Interface Module and observe that the blue light turns off. Pairing mode will automatically exit after 60 seconds.
Note: The Steam Genie FOB and STEAM Genie Interface Module address are maintained even when power is removed.

19eTEMPO® / eTEMPO/PLUS® / Steam Genie® / Steamhead • Owner’s Manual
Battery Replacement
Your Steam Genie is equipped with a factory installed battery. A replacement disk battery #CR2032 is available at most local drug stores.
To replace the battery:1. Unscrew the 2 Philips head screws on the Steam Genie
FOB case2. Pry open the hinged case.3. Carefully lift out the circuit board.4. Slide out the old battery.5. Slide in a new battery making sure that the + side is facing outwards (away from the circuit board).6. Replace the circuit board in the case. Be sure the
button is facing the right way or else the case will not close. 7. Snap the case closed.8. Test the remote.9. Replace the 2 screws.
NOTE: The Steam Genie FOB will remember its address when the battery is removed.
Case
Battery
Circuit Board

eTEMPO® / eTEMPO/PLUS® / Steam Genie® / Steamhead • Owner’s Manual20
Installing the Steam Genie Holder
A holder is provided with the Steam Genie Control as an optional convenience.Secure the holder to a wall so the Steam Genie is oriented as shown. Determine if the two screws provided are suitable for the installation conditions. Use alternate hardware or use with plastic anchors as required by installation conditions. Seal screw holes in the wall against moisture as required.
(2) Screws Provided
Steam Genie in holder

AromaSteam Steamhead
mr .steam
® con
trol
s

eTEMPO® / eTEMPO/PLUS® / Steam Genie® / Steamhead • Owner’s Manual22
Round or Square Steamhead Installation (1/2” NPT)
Step 1
Locate steam head 6 - 12 inches above floor, except for:• Tub/shower enclosures, install 6 inches above tub top edge.• For enclosures with acrylic or other non-heat resistant
flooring install Acrylic Shield Part Number MS-103938.
Step 2
Install steamhead with the oil well facing up as shown. Hand tightening is sufficient when teflon or equal pipe thread sealing compound is used.
IMPORTANT NOTE: to preserve steam head finish, do not use wrench or other tools to tighten. DO NOT use abrasive cleansers or chemicals. Use only water with mild soap and a non-abrasive sponge.
Step 3
Secure a bronze drop ear fitting to a header and run a 1/2” copper steamline from the steam generator to the drop ear fitting. Install a temporary nipple (6” or longer) in the drop ear fitting to locate the steamhead after the wall is finished.
Oil Well
1/8” minimum clearance required when Acrylic Shield is used. See Installation Instructions provided with Acrylic Shield
End of pipe to be recessed 1/4” without Acrylic shield,1/8” with Acrylic shield
Apply with siliconeor equal salant as
required for moisture seal.
Use Teflon or equalsealant on pepe threads
Steam Supply Pipe
Installing the Round or Square AromaSteam Steamhead
IMPoRtANt: See the Installation and Operation Manual provided with the steam generator for additional important steamhead & control installation and operation information.
Consult with supplier of acrylic, fiberglass and other non-heat resistant enclosures for recommended steamhead location. Use Acrylic Shield part number MS-103938. See instructions provided with steam shield.
INSTALLER: Because the steam head and direct steam emissions are very hot, locate the steam head’ where incidental contact by bather with the steam head or direct steam emission cannot occur.
! CAUTION
! CAUTION

23eTEMPO® / eTEMPO/PLUS® / Steam Genie® / Steamhead • Owner’s Manual
Enjoy AromaSteam essential oils by placing a drop or two into your AromaSteam steamhead as shown in the attached illustra-tion. Only use Mrsteam AromaSteam Essential Oils in a Mrsteam AromaSteam steam head, or any other equivalent oil deemed suitable for use in the Mrsteam AromaSteam steamhead.
• Use essential oils with caution. Essential oils are for external use only. Keep out of reach of children. Essential oils are highly concentrated and are potent substances and should not be applied directly to the skin as they can be irritants. Use essential oils with caution.
• Place the drops into the Mrsteam AromaSteam steam head recess prior to turning on the steambath. Do not place drops in a hot steam head as SERIOUS INJURY CAN RESULT IF YOU DO NOT FOLLOW THIS WARNING.
• Start with one drop to gauge strength and suitability. Limit to a maximum of a few drops during a steambathing session. Some people may find that the aroma makes them dizzy and the user should exit the steam bath IMMEDIATELY. If skin irritation occurs stop using the oils immediately. Remove any excess oil by washing in mild soap and water. If ingested, rinse mouth with water. Administer water or milk to dilute. Contact a physician immediately.
• Tightly close containers when storing oils. Keep away from sources of ignition.
Step 4
After the wall has been finished, mark on the nipple where the surface of the wall is. Remove the nipple and measure the portion that was in the wall (the end to your mark). Subtract 1⁄4” from that dimension and select a brass nipple of that length to finish the installation.
Step 5
Remove the locating nipple and install the steamhead by wrapping Teflon tape around the threads of the new nipple and screw the nipple into the steamhead. Do not use wrenches or tools which would damage the steamhead’s finish. Wrap teflon tape around the threads of the nipple and screw the nipple and steamhead assembly you just made into the drop ear fitting in the wall. The steamhead should be flush with the wall and the well must be facing up.
Locating Nipple
Steamhead(with optional Acrylic Shield)
Using MrSteam Essential Oils
! CAUTION
AromaSteam 10 ml bottle with integrated dropper
Recess for Essential Oil
Steam emmission
slotSteam emmission slot
AromaSteamSteamhead

mr .steam
® con
trol
smr.steam®
Sussman-Automatic Corp®
43-20 34th StreetLong Island City NY 11101tel: 800-76-steam
fax: 718-472-3256
9410 S. LaCienga Blvd. Inglewood CA 90301tel: 800 72-steam
fax: 310-216-2944 9919-100780 rev 8.10


