20
CITS Procedures Manual v 5.0 3-4-14 CONVERGENCE INSUFFICIENCY TREATMENT STUDY (CITS) PROCEDURES MANUAL Version 5.0 March 4, 2014

CITS Procedures Manual v 5.0 3-4-14
CONVERGENCE INSUFFICIENCY
TREATMENT STUDY
(CITS) PROCEDURES MANUAL
Version 5.0
March 4, 2014
CITS Procedures Manual v 5.0 3-4-14
Table of Contents
CONVERGENCE INSUFFICIENCY SYMPTOM SURVEY (CISS) ADMINISTRATION .............................................................. 3
Convergence Insufficiency Symptom Survey (CISS) .......................................................................................................... 3
OCULAR ALIGNMENT ........................................................................................................................................................................... 5
Cover-Uncover Test ............................................................................................................................................................. 5
Prism and Alternate Cover Test (PACT) Measurement ....................................................................................................... 5
NEAR POINT OF CONVERGENCE (NPC) ........................................................................................................................................... 6
Near Point of Convergence (NPC) ....................................................................................................................................... 6
POSITIVE FUSIONAL VERGENCE (PFV) AT NEAR ........................................................................................................................ 7
Positive Fusional Vergence (PFV) at Near ........................................................................................................................... 7
STEREOACUITY ...................................................................................................................................................................................... 9
Randot Preschool Stereotest ................................................................................................................................................. 9
NEAR POINT OF ACCOMMODATION .............................................................................................................................................. 10
Near Point of Accommodation ........................................................................................................................................... 10
ATTENTION ASSESSMENT: SWAN ................................................................................................................................................... 11
Description ......................................................................................................................................................................... 11
INSTRUCTIONS .................................................................................................................................................................................... 112 COMPUTER-BASED AND TRADITIONAL THERAPY ................................................................................................................... 12
Active Computer-based Therapy ........................................................................................................................................ 13
Placebo Computer-based Therapy ...................................................................................................................................... 15
Near Target Push-ups ......................................................................................................................................................... 16
Yoked Prism Flippers ......................................................................................................................................................... 18
CITS Procedures Manual v 5.0 3-4-14 3
Convergence Insufficiency Symptom Survey
(CISS) Administration
Convergence Insufficiency Symptom Survey (CISS)
Description
The CISS is a 15-item questionnaire designed to assess the severity of the subject’s convergence
insufficiency (CI) symptoms. It is to be administered before any other clinical testing.
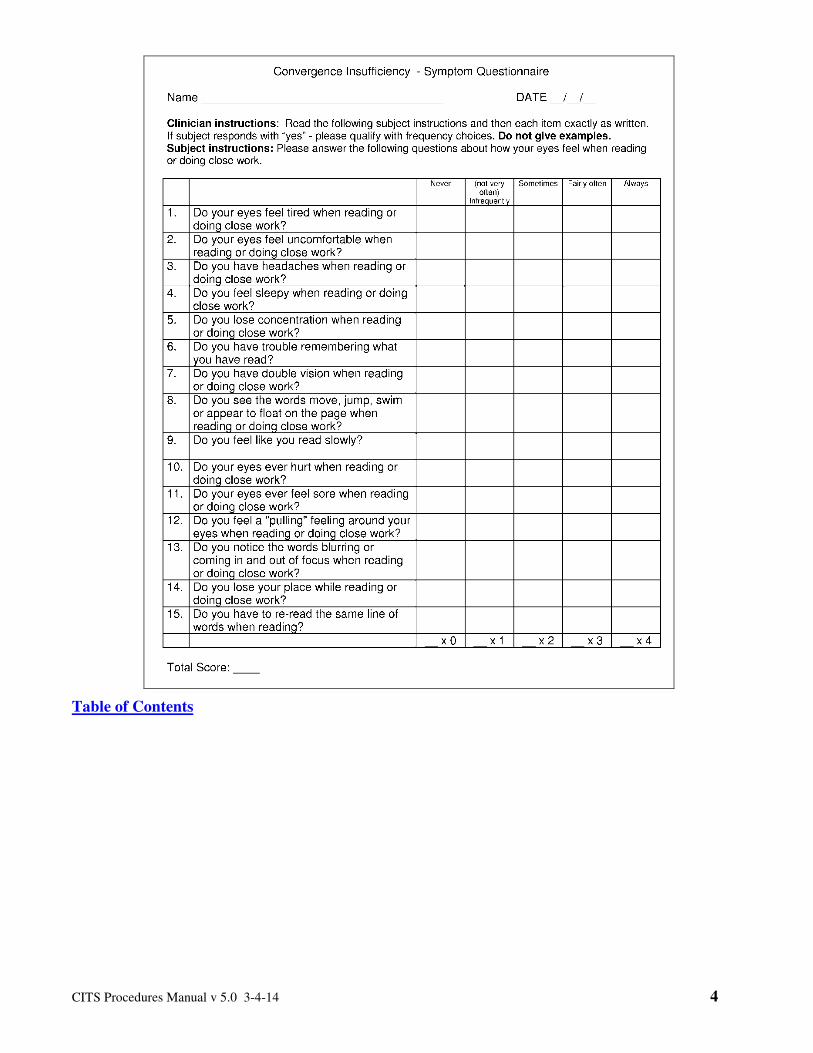
Procedure
1. Give the subject the card containing a list of the five response options (i.e., Never, Infrequently (not
very often), Sometimes, Fairly Often, Always). Read the “subject instructions” at the top of the CISS
that say, “Please answer the following questions about how your eyes feel when reading or doing
close work” to the subject.
2. Read each of the 15 questions verbatim. You may repeat the question, but never provide examples.
Ask the subject to answer as best as he/she can.
3. If subject responds with “yes”, ask the subject to quantify the frequency by choosing one of the
following five options: " Never, Infrequently (not very often), Sometimes, Fairly Often, Always.”
4. Place a check in the column that corresponds to the subject’s response for each question.
5. Score each response on a scale of 0 to 4, with 0 representing the lowest frequency of symptom
occurrence (i.e., never) and 4 representing the highest frequency of symptom occurrence (i.e.,
always) (Refer to bottom of form.)
6. After determining the score for each of the 15 questions, add the response scores within each column
and place the total for each on the bottom of the form; then add the 5 column scores together to
obtain the total CISS score.
CITS Procedures Manual v 5.0 3-4-14 4
Table of Contents
CITS Procedures Manual v 5.0 3-4-14 5
Ocular Alignment Required Equipment
• Opaque (not translucent) occluder
• Loose plastic prism set [increments 1, 2, 3, 4, 5, 6, 7, 8, 9, 10, 12, 14, 16, 18, 20, 25, 30, 40, 45, 50
prism diopters (∆)]
• Fixation targets at 40 cm (20/30 optotype on Gulden Fixation Stick #15302) and 3 meters (20/40
optotype)
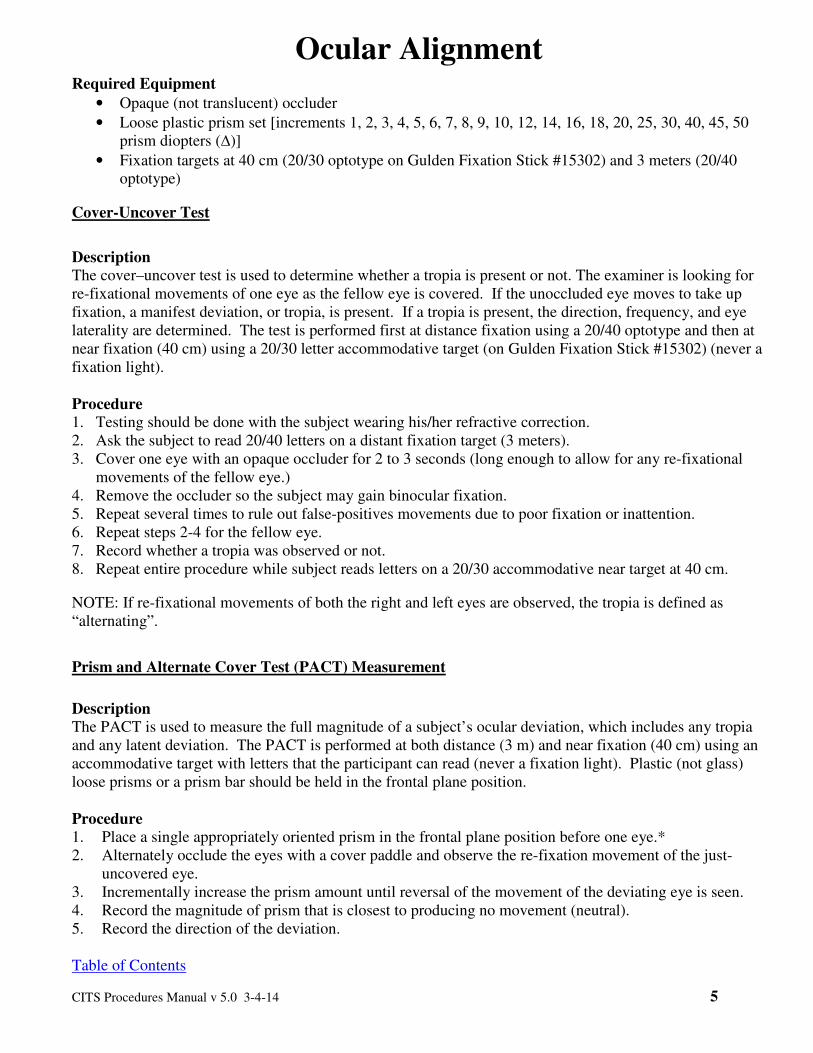
Cover-Uncover Test
Description
The cover–uncover test is used to determine whether a tropia is present or not. The examiner is looking for
re-fixational movements of one eye as the fellow eye is covered. If the unoccluded eye moves to take up
fixation, a manifest deviation, or tropia, is present. If a tropia is present, the direction, frequency, and eye
laterality are determined. The test is performed first at distance fixation using a 20/40 optotype and then at
near fixation (40 cm) using a 20/30 letter accommodative target (on Gulden Fixation Stick #15302) (never a
fixation light).
Procedure 1. Testing should be done with the subject wearing his/her refractive correction.
2. Ask the subject to read 20/40 letters on a distant fixation target (3 meters).
3. Cover one eye with an opaque occluder for 2 to 3 seconds (long enough to allow for any re-fixational
movements of the fellow eye.)
4. Remove the occluder so the subject may gain binocular fixation.
5. Repeat several times to rule out false-positives movements due to poor fixation or inattention.
6. Repeat steps 2-4 for the fellow eye.
7. Record whether a tropia was observed or not.
8. Repeat entire procedure while subject reads letters on a 20/30 accommodative near target at 40 cm.
NOTE: If re-fixational movements of both the right and left eyes are observed, the tropia is defined as
“alternating”.
Prism and Alternate Cover Test (PACT) Measurement
Description
The PACT is used to measure the full magnitude of a subject’s ocular deviation, which includes any tropia
and any latent deviation. The PACT is performed at both distance (3 m) and near fixation (40 cm) using an
accommodative target with letters that the participant can read (never a fixation light). Plastic (not glass)
loose prisms or a prism bar should be held in the frontal plane position.
Procedure
1. Place a single appropriately oriented prism in the frontal plane position before one eye.*
2. Alternately occlude the eyes with a cover paddle and observe the re-fixation movement of the just-
uncovered eye.
3. Incrementally increase the prism amount until reversal of the movement of the deviating eye is seen.
4. Record the magnitude of prism that is closest to producing no movement (neutral).
5. Record the direction of the deviation.
Table of Contents
CITS Procedures Manual v 5.0 3-4-14 6
Near Point of Convergence (NPC)
Near Point of Convergence (NPC)
Description
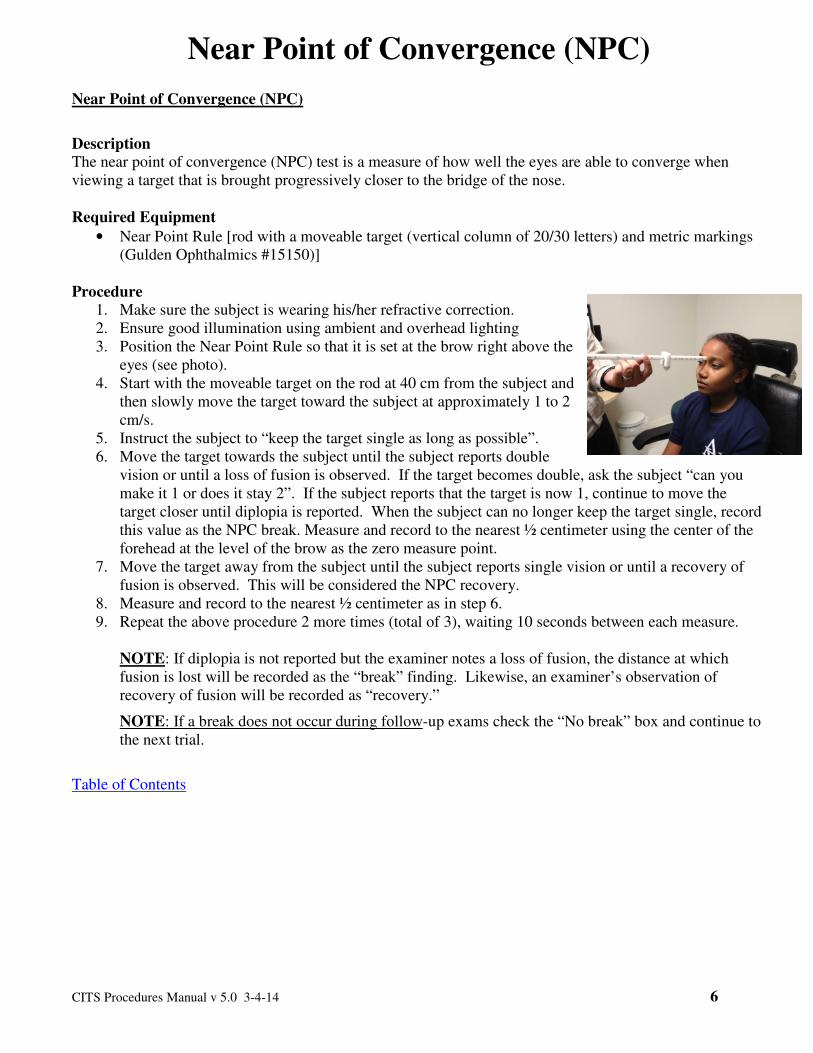
The near point of convergence (NPC) test is a measure of how well the eyes are able to converge when
viewing a target that is brought progressively closer to the bridge of the nose.
Required Equipment
• Near Point Rule [rod with a moveable target (vertical column of 20/30 letters) and metric markings
(Gulden Ophthalmics #15150)]
Procedure
1. Make sure the subject is wearing his/her refractive correction.
2. Ensure good illumination using ambient and overhead lighting
3. Position the Near Point Rule so that it is set at the brow right above the
eyes (see photo).
4. Start with the moveable target on the rod at 40 cm from the subject and
then slowly move the target toward the subject at approximately 1 to 2
cm/s.
5. Instruct the subject to “keep the target single as long as possible”.
6. Move the target towards the subject until the subject reports double
vision or until a loss of fusion is observed. If the target becomes double, ask the subject “can you
make it 1 or does it stay 2”. If the subject reports that the target is now 1, continue to move the
target closer until diplopia is reported. When the subject can no longer keep the target single, record
this value as the NPC break. Measure and record to the nearest ½ centimeter using the center of the
forehead at the level of the brow as the zero measure point.
7. Move the target away from the subject until the subject reports single vision or until a recovery of
fusion is observed. This will be considered the NPC recovery.
8. Measure and record to the nearest ½ centimeter as in step 6.
9. Repeat the above procedure 2 more times (total of 3), waiting 10 seconds between each measure.
NOTE: If diplopia is not reported but the examiner notes a loss of fusion, the distance at which
fusion is lost will be recorded as the “break” finding. Likewise, an examiner’s observation of
recovery of fusion will be recorded as “recovery.”
NOTE: If a break does not occur during follow-up exams check the “No break” box and continue to
the next trial.
Table of Contents

CITS Procedures Manual v 5.0 3-4-14 7
Positive Fusional Vergence (PFV) at Near
Positive Fusional Vergence (PFV) at Near
Description
Positive fusional vergence (PFV) at near is a measure of how well a subject can converge his/her eyes using
fusional vergence while maintaining accommodation at 40 cm.
Required Equipment
• Horizontal prism bar (Gulden B-15: increments 1, 2, 4, 6, 8, 10, 12, 14, 16, 18, 20, 25, 30, 35, 40,
and 45 prism diopters)
• Hand-held fixation target – 20/30 equivalent single letter column at 40 cm (Gulden Fixation Stick
#15302)
Procedure
1. Ensure good illumination using ambient and overhead lighting.
2. Testing should be done with the subject wearing his/her refractive correction.
3. Hold the target 40 cm in front of the subject at eye level.
4. Instruct the subject to “try and keep the target single and clear as long as possible” as base-out prism
is slowly introduced before one eye.
5. Ask the subject at each prism level if the target is single and clear.
6. Ask the subject to report when he/she experiences blurred or double vision or if the target starts to
move sideways.
7. Increase the amount of base-out prism in front of the right eye at approximately 1 prism bar
increment every 2 seconds until 20∆, then 1 prism bar increment every 5 seconds after 20∆, stopping
when the subject reports that the target blurs, moves laterally, or doubles.
8. If the subject reports blur, ask the subject “can you make it clear or does it stay blurry.” If it stays
blurry, note the prism increment where this was reported as this will be recorded as the “blur,” but
continue increasing the base-out prism as you ask the subject now to tell you when it breaks into 2.
9. If the target becomes double, ask the subject “can you make it 1 or does it stay 2”. If the subject
reports that the target is now 1, increase the prism amount until diplopia is reported. When the
subject can no longer keep the target single, record this value as the base-out break.
10. If you note that a break in fusion has occurred and the subject does not report diplopia (the subject
may then be suppressing), record this value as the base-out break.
11. After the subject reports double vision continue to add 1 more prism-bar increment of prism.
12. Ask the subject to report when he/she can get the target back together into one.
13. Reduce the base-out prism at a rate of about 1 prism bar increment every 5 sec until 20∆ is reached
and then 1 prism bar increment every 2 seconds for prism increments < 20∆ until the subject regains
single vision.
14. Record the blur, break, and recovery findings. If no blur occurs you will record an “X” for the blur
finding on the enrollment form.”
15. Repeat the above procedure 2 more times, (total of 3) waiting 10 seconds between measurements.
NOTE: If diplopia is not reported but examiner notes a loss of fusion, the prism through which
fusion is lost will be recorded as the “break” finding. Likewise, an examiner’s observation of
recovery of fusion will be recorded as “recovery.”
NOTE: If the subject is able to fuse the largest (45∆) prism, record 50∆ for the break value and have
the subject close or cover one eye to break fusion so that recovery can be measured. Record the

CITS Procedures Manual v 5.0 3-4-14 8
amount of prism through which the subject was able to regain fusion (maximum value would be
45∆).
NOTE: When testing for recovery, if the patient does not achieve single vision even with no prism in
place, add base-in prism until fusion occurs and record the values as “minus” (i.e. -8)
NOTE: If diplopia is reported initially (without introducing prism), record zero for both the break
point and recovery values, and mark ‘X’ for the blur point
Table of Contents
CITS Procedures Manual v 5.0 3-4-14 9
Stereoacuity
Randot Preschool Stereotest
Description
The Randot Preschool Stereotest measures random dot stereoacuity from 800 to 40 arc seconds (800”, 400”,
200”, 100”, 60”, 40”).
The Randot Preschool Stereotest consists of 3 booklets (or 3 tests within 1 booklet for newer versions of the
test) each with 2 sets of 4 random dot shapes (one is blank, 3 are actual figures), which can be matched to
non-stereo shapes on the opposite side of the booklets. There are a total of six levels (seconds of arc), with
two levels in each book/test. Each level has 4 rectangles that contain 3 shapes and one blank.
Required Equipment
• Preschool Randot Test (Books/Tests 1, 2, and 3)
• Polarized glasses
Specifications
• Testing order is Book/Test 3 (800”/400”), Book/Test 1 (200”/100”), Book/Test 2 (60”/40”).
Procedure
1. Testing should be done with the subject wearing his/her refractive correction.
2. As a pretest, use Book/Test #3 (800”/400”).
3. Point to the top 4 panels of non-stereo side (black on white shapes/pictures) and ask, “Can you point to
the duck?” If the child cannot correctly identify the duck, do not proceed with the rest of the test.
4. Starting with Book/Test 3, turn to the Randot side of the test booklet starting with the top level and point
to one of the boxes containing a Randot shape, asking the subject what shape is in the box. The child
should be encouraged to match one of the black and white shapes to the Randot shape.
5. Continue by pointing to another shape at the same level.
6. If 2 shapes are identified correctly at a level, testing will proceed to the next level.
7. If 2 shapes are identified incorrectly at a level, testing will stop at the current level.
8. The final score will be calculated as the finest level (lowest seconds of arc measured) at which 2 shapes
were correctly identified.
An instructional video for certifying administration of the Randot Preschool Stereotest is available on the
PEDIG website, filed under Certification Materials > Stereoacuity Testing Certification.
http://publicfiles.jaeb.org/pedig/videos/RandotVideo.avi
Table of Contents
CITS Procedures Manual v 5.0 3-4-14 10
Near Point of Accommodation
Near Point of Accommodation
The near point of accommodation is a measure of the subject’s maximum accommodative ability.
Required Equipment
• Near Point Rule (rod with a moveable target and metric markings) (Gulden Ophthalmics #15150)
• Opaque occluder
Procedure
1. Testing should be done with the subject wearing his/her refractive correction.
2. Ensure good illumination using ambient and overhead lighting.
3. Occlude the subject’s left eye.
4. Hold the Near Point Rule (with single column of 20/30 letters as the target placed at 40 cm on the
rule) with edge of rule gently above subject’s right eye at the level of his/her brow.
5. Slowly move the target toward the subject at approximately 1 to 2 cm/sec beginning at 40 cm from
the subject.
6. Instruct the subject to: “Try and keep the letters clear for as long as possible, but tell me when it
becomes blurry and you cannot get it clear again.”
7. Move the target towards the subject’s eyes until the subject reports that the letters are blurred and
he/she cannot regain clarity. This will be considered the endpoint.
8. Measure the near point of accommodation to the nearest ½ centimeter using the center of the
forehead at the level of the brow as the zero measure point. Record in centimeters.
9. Repeat the above procedure 2 more times (total of 3) waiting 10 seconds between measurements.
10. Measure the near point of accommodation of the right eye only.
Table of Contents

CITS Procedures Manual v 5.0 3-4-14 11
Attention Assessment: SWAN
Description
Attention will be assessed using the Strengths and Weaknesses of ADHD symptoms and Normal behavior
scale (SWAN).
Procedure
� Give the parent the 18-item SWAN to complete.
Instructions
� Ask the parent to complete the questionnaire while the child is being examined.
� The items are rated on a seven-point rating scale (-3 to +3).
� Positive scores indicate a report of worse than average symptoms, whereas negative scores indicate
better than average behavior.
Date Form Completed __ __ / __ __ /__ __ mm/dd/yy
1. What is your relationship with the child? Circle one
Mother Father Other: _________________________________________
Children differ in their abilities to focus attention, control activity, and inhibit impulses. For each item listed below, how does this child compare to other children of the same age? Please select the best rating based on
your observations over the past month. Compared to other children, how does this child do the following:
far slightly slightly far
below below below average above above above
Give close attention to detail and avoid careless mistakes _____ _____ _____ _____ _____ _____ _____
Sustain attention on tasks or play activities _____ _____ _____ _____ _____ _____ _____
Listen when spoken to directly _____ _____ _____ _____ _____ _____ _____
Follow through on instructions & finish school work/chores _____ _____ _____ _____ _____ _____ _____
Organize tasks and activities _____ _____ _____ _____ _____ _____ _____
Engage in tasks that require sustained mental effort _____ _____ _____ _____ _____ _____ _____
Keep track of things necessary for activities _____ _____ _____ _____ _____ _____ _____
Ignore extraneous stimuli _____ _____ _____ _____ _____ _____ _____
Remember daily activities _____ _____ _____ _____ _____ _____ _____
Sit still (control movement of hands/feet or control squirming) _____ _____ _____ _____ _____ _____ _____
Stay seated (when required by class rules/social conventions) _____ _____ _____ _____ _____ _____ _____
Modulate motor activity (inhibit inappropriate running/climbing) _____ _____ _____ _____ _____ _____ _____
Play quietly (keep noise level reasonable) _____ _____ _____ _____ _____ _____ _____
Settle down and rest (control constant activity) _____ _____ _____ _____ _____ _____ _____
Modulate verbal activity (control excess talking) _____ _____ _____ _____ _____ _____ _____
Reflect on questions (control blurting out answers) _____ _____ _____ _____ _____ _____ _____
Await turn (stand in line and take turns) _____ _____ _____ _____ _____ _____ _____
Enter into conversations & games (control interrupting/intruding) _____ _____ _____ _____ _____ _____ _____
_____________________________________________________________________________________________________________
Please return this form to the clinic staff once you have completed the questionnaire
Scoring
Enter the responses on the enrollment form on the website. The SWAN will be scored automatically by the
website as follows:
� Mean of questions 1-9 (ADHD inattention scale)
� Mean of questions 10-18 (ADHD hyperactivity/impulsivity scale)
Table of Contents

CITS Procedures Manual v 5.0 3-4-14 12
Home-Based Therapy: Overview
1. Each subject will be instructed to perform both a computer-based procedure and a procedure using
hand-held equipment.
2. The order in which the subject does the two procedures is not important. Either the hand-held
equipment procedure or the computer-based therapy procedure can be done first.
3. Subjects are permitted to take a break between the two procedures, i.e., complete the computer-based
therapy in the morning and complete the hand-held equipment procedure in the afternoon or vice
versa.
4. All computer-based therapy procedures should be completed in a single session.
5. The Near Target Push-up procedure is split into three 5-minute sessions that may be done
consecutively or with a break between sessions.

CITS Procedures Manual v 5.0 3-4-14 13
Computer-based and Traditional Therapy NOTE: In order to maintain masking, it is important that subjects are only instructed on the specific modes
of therapy that they asked to do at home.
Active Computer-based Therapy
Subjects receiving computer-based therapy (CBT) will be provided the CITS1A computer software. They
will be given the CITS1A program to install on their home computer. The computer must have a monitor
screen of 11” or larger, contain a CD/DVD drive and
have internet connectivity. The software works with
either a MAC or PC computer.
Required Equipment
• CITS1A software installed on computer
• Red – Blue filter glasses
• CITS1A accommodative flippers
Procedures
The subject will be instructed how to use the CITS1A
program as follows:
1. At the first visit, the clinic staff demonstrates
the use of the CITS1A program to the subject.
2. Therapy will include both fusional vergence and accommodative therapy,
3. The CITS1A disc will be set in the “automatic mode” and fusional vergence therapy will begin with
the Vergence (Base-Out) therapy, followed by Vergence (Base-In) therapy, Autoslide vergence
therapy, and Jump duction
therapy.
4. Accommodative therapy will be
performed using the CITS1A
accommodative program and
the CITS1A accommodative
flippers.
5. To demonstrate CITS1A, select
the “demo CITS1A” program.
6. Have the subject wear the red-
blue filter glasses and select
“Vergence (Base Out)” and the
therapy program will begin.
7. Instruct the subject that while
looking at the large square
he/she should look for a smaller
square contained inside the
larger one that is “popping out
and coming closer to him/her.”
8. Ask the subject to press the arrow key that corresponds to the location (right, left, up, down) of the
smaller square. (i.e., push the left arrow key if the small square is on the left side of the larger
square).
9. Tell the subject that if he/she correctly locates the smaller square the computer will “beep” and
increase the difficulty of the task. If the subject’s response is incorrect, a “boop” will sound and the
computer will decrease the difficulty of the task.
CITS Procedures Manual v 5.0 3-4-14 14
10. Tell the subject that when the large box separates into two, he/she should not randomly push the
arrow keys in various directions. Instead, have the subject try to adjust his/her eyes to get the 2
boxes together when they separate.
11. Have the subject practice for 3 minutes or until you feel the subject fully understands the procedure.
12. Demonstrate the “Vergence (Base In)”, “Autoslide”, and “Jump Duction” therapy procedures.
13. Demonstrate the accommodative program. The subject wears the red-blue filter glasses. The
CITS1A flipper level number for each step of the procedure will flash on the lower left corner of the
menu screen. The subject will begin with the CITS1A Flippers marked “Flipper 1” (+0.75/-1.50)
before his/her eyes (flipper held in left hand, with the assigned number towards the subject’s face
and subject looking through the bottom set of lenses). Instruct the subject to “try and get the letter
“c” clear and press the arrow key that corresponds to the direction of the gap in the letter “c” on the
screen; proceed from the left-hand box first. Emphasize that the flipper is not actually flipped at any
time during this procedure. Rather, it is held in place during the entire procedure.
14. Once the subject demonstrates an understanding of this procedure, instruct him/her to do this as
quickly as possible.
15. Each time the goal is attained, the next flipper level should be used (the appropriate flipper level
number will flash on the lower left corner of the menu screen). Demonstrate to the subject how to
change lens flippers (flipper held in left hand, with the assigned number towards the subject’s face
and looking through the bottom set of lenses).
16. Demonstrate how to find the “performance” component of the program by selecting “Performance”
on the main menu. Then select the procedure the subject wishes to view.
CITS Procedures Manual v 5.0 3-4-14 15
Placebo Computer-based Therapy (CITS2A and CITS3A)
Subjects receiving the placebo computer-based therapy will be given the placebo program (CITS2A or
CITS3A) to install on their home computer. The computer must have a monitor screen of 11” or larger,
contain a CD/DVD drive and have internet connectivity. The software works with either a MAC or PC
computer.
Procedure
The procedures for the placebo CITS2A and CITS3A are identical to the active CBT outlined above except
that the two stimuli on the screen do not separate after a correct response. In addition, in CITS2A the
accommodative procedure is not used and in CITS3A the subject will NOT be using the flippers during the
accommodation procedure.
CITS Procedures Manual v 5.0 3-4-14 16
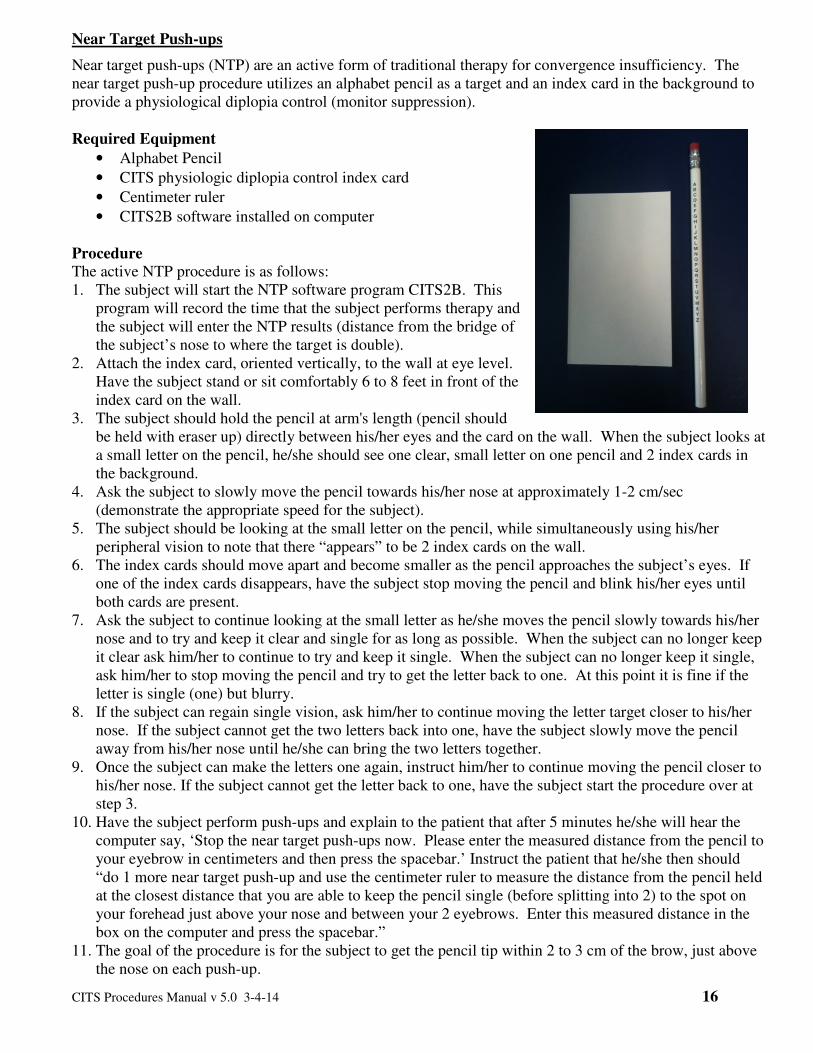
Near Target Push-ups
Near target push-ups (NTP) are an active form of traditional therapy for convergence insufficiency. The
near target push-up procedure utilizes an alphabet pencil as a target and an index card in the background to
provide a physiological diplopia control (monitor suppression).
Required Equipment
• Alphabet Pencil
• CITS physiologic diplopia control index card
• Centimeter ruler
• CITS2B software installed on computer
Procedure
The active NTP procedure is as follows:
1. The subject will start the NTP software program CITS2B. This
program will record the time that the subject performs therapy and
the subject will enter the NTP results (distance from the bridge of
the subject’s nose to where the target is double).
2. Attach the index card, oriented vertically, to the wall at eye level.
Have the subject stand or sit comfortably 6 to 8 feet in front of the
index card on the wall.
3. The subject should hold the pencil at arm's length (pencil should
be held with eraser up) directly between his/her eyes and the card on the wall. When the subject looks at
a small letter on the pencil, he/she should see one clear, small letter on one pencil and 2 index cards in
the background.
4. Ask the subject to slowly move the pencil towards his/her nose at approximately 1-2 cm/sec
(demonstrate the appropriate speed for the subject).
5. The subject should be looking at the small letter on the pencil, while simultaneously using his/her
peripheral vision to note that there “appears” to be 2 index cards on the wall.
6. The index cards should move apart and become smaller as the pencil approaches the subject’s eyes. If
one of the index cards disappears, have the subject stop moving the pencil and blink his/her eyes until
both cards are present.
7. Ask the subject to continue looking at the small letter as he/she moves the pencil slowly towards his/her
nose and to try and keep it clear and single for as long as possible. When the subject can no longer keep
it clear ask him/her to continue to try and keep it single. When the subject can no longer keep it single,
ask him/her to stop moving the pencil and try to get the letter back to one. At this point it is fine if the
letter is single (one) but blurry.
8. If the subject can regain single vision, ask him/her to continue moving the letter target closer to his/her
nose. If the subject cannot get the two letters back into one, have the subject slowly move the pencil
away from his/her nose until he/she can bring the two letters together.
9. Once the subject can make the letters one again, instruct him/her to continue moving the pencil closer to
his/her nose. If the subject cannot get the letter back to one, have the subject start the procedure over at
step 3.
10. Have the subject perform push-ups and explain to the patient that after 5 minutes he/she will hear the
computer say, ‘Stop the near target push-ups now. Please enter the measured distance from the pencil to
your eyebrow in centimeters and then press the spacebar.’ Instruct the patient that he/she then should
“do 1 more near target push-up and use the centimeter ruler to measure the distance from the pencil held
at the closest distance that you are able to keep the pencil single (before splitting into 2) to the spot on
your forehead just above your nose and between your 2 eyebrows. Enter this measured distance in the
box on the computer and press the spacebar.”
11. The goal of the procedure is for the subject to get the pencil tip within 2 to 3 cm of the brow, just above
the nose on each push-up.

CITS Procedures Manual v 5.0 3-4-14 17
12. Instruct the subject how to record his/her therapy on the CITS2B computer log.
13. Subjects may complete three, 5-minute sessions of NTP in one session, or they may break the therapy
into multiple sessions. However, all three 5-minute sessions must be completed on the same day.
Subjects will not receive any credit for doing only one or two 5-minute sessions in one day; a total of 15
minutes of therapy must be completed per day.
Before beginning NTP therapy to be performed at home, the subject will have to demonstrate to the
therapist the ability:
1. To complete 20 NTP push-ups
2. To measure the distance at which he/she experiences double vision (the break) at the 20th
repetition
3. To enter the results on the NTP therapy computer log.
CITS Procedures Manual v 5.0 3-4-14 18
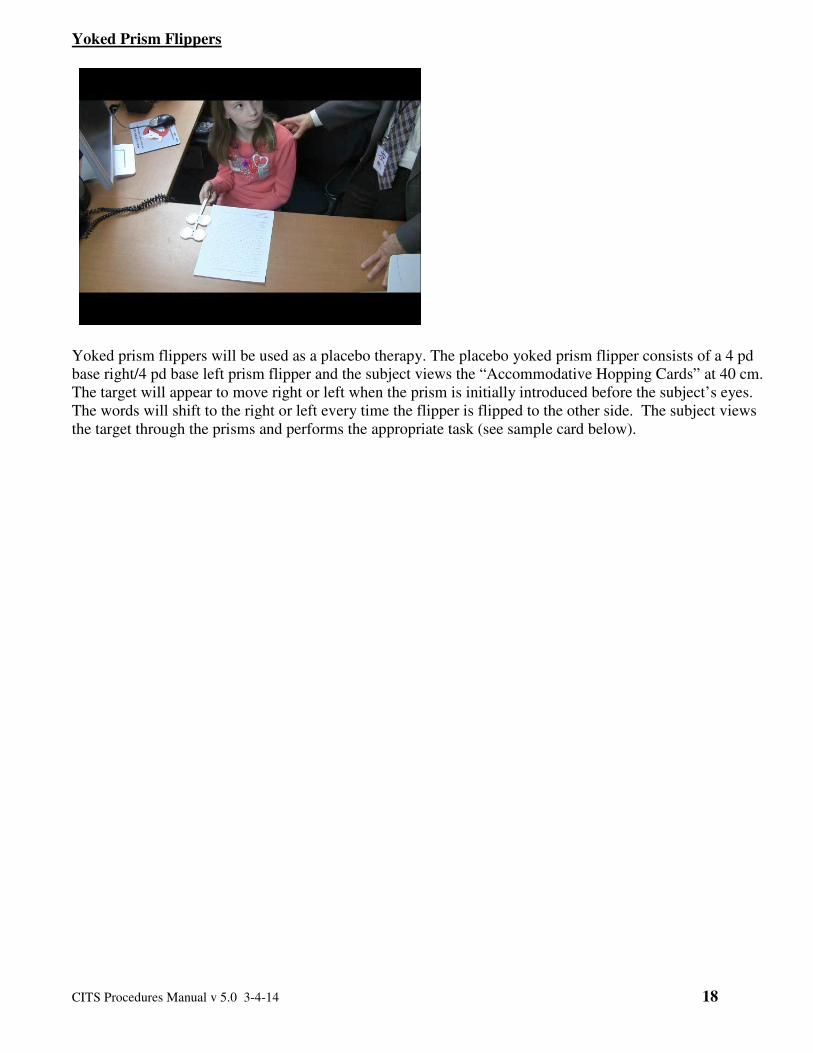
Yoked Prism Flippers
Yoked prism flippers will be used as a placebo therapy. The placebo yoked prism flipper consists of a 4 pd
base right/4 pd base left prism flipper and the subject views the “Accommodative Hopping Cards” at 40 cm.
The target will appear to move right or left when the prism is initially introduced before the subject’s eyes.
The words will shift to the right or left every time the flipper is flipped to the other side. The subject views
the target through the prisms and performs the appropriate task (see sample card below).

CITS Procedures Manual v 5.0 3-4-14 19
Accommodative Hopping Card -- A Switch lenses after each word as you follow the directions in the column to the left. Find words starting
with P
Shoe Pig Ice Please Rice People Lake
Find the body parts
Hand Ear School Arm Go Eye Lace
Find things that fly
Airplanes Flies Cat Birds Dog Rock Bug
Find things that you wear on your hands
Blue Rings Gloves Jelly Pencil Sock Butter
Find the numbers
Four Door Man Run Twelve Ten Three
Find the flowers
Rose Daisy Dirt Worm Tulip Ice Food
Find the clothes
Pencil Look Shirt Back Pants Stove Shoes
Find the Colors
Blue Yellow Think People Orange Paper Black
Find the seasons of the year
Winter Birds Snow Spring Have Look Fall
Find the days of the week
Monday Ice Cream Mother Tuesday Dog Tire Friday
Find the fruits
Fire Peach Beans Trumpet Banana Tomato Bread
Find words ending with m
Mom Night From Run Clock Log Beam
Find the States
Texas Milk Jump Ohio Write Idaho Atlanta
Find the parts of a car
Trunk Engine Tires Day Three Radio Window
Find the coins
Nickels Dimes Girl After Pennies Juice Red
Find things that make noise
Car Dog Apple Tree Thunder Ladybug Rain
Find things with
wheels Worm Wagon Pencil Puppy Mailbox Plane Sled
Find things that are orange
Carrots Clouds Trees Sweet potato Barn Pig Van
Required Equipment
• Yoked prism flippers (4 pd base right/4 pd base left)
• Accommodative Hopping cards
• Yoked prism software installed on computer
CITS Procedures Manual v 5.0 3-4-14 20
• Red-blue filter glasses
• Polaroid glasses
Procedure
1. Ensure good illumination using ambient and overhead lighting.
2. Instruct the subject to hold the prism flipper in his/her dominant hand and to view through one side
of the flipper prism lenses.
3. The subject will start the Yoked Prism software program. This program will time the subject’s
therapy and ask the subject to record the number of lines completed after every 2 ½ minutes.
4. The subject views “Accommodative Hopping Card A” at a distance of 40 cm through the prism
flippers.
5. Instruct the subject to report if the text shifts right or left, to regain his/her place as quickly as
possible, and perform the task on the first line of the card.
6. After reading each word, the prism flipper is flipped to the other side (so that the subject is viewing
through the other lenses).
7. The subject proceeds to perform the task while viewing successive lines, flipping the prism flipper to
the other side after each word until the subject reaches the end of each line.
8. The subject continues this task moving to successive lines when a line is completed and doing so
until the 2 ½ minute timer sounds.
9. The subject records the number of complete lines read on the computer.
10. The subject repeats the above procedure one more time for a total of 5 minutes.
11. Instruct the subject to use the prism flippers by themselves with no filter lenses for weeks 1 to 4, to
wear the red-blue glasses while viewing the Accommodative Hopping Card for weeks 5 through 8,
and to wear the Polaroid glasses while viewing the Accommodative Hopping Card for weeks 9
through 12 (as outlined in the protocol).
Table of Contents


