15
CSU DVComm MANUAL for COOL EDIT 2000
CSU DVComm MANUAL
for
COOL EDIT 2000

SINGLE WAVEFORM MODE
Single Waveform Interface pg 3
Recording a New File pg 7
Open an Existing File for editing pg 8
Preparing a File for Export pg 11
STUDIO PLUG-IN
The Multitrack Interface pg 12
Manipulating Files on a Track pg 13
Mixing Down the Session pg 14
VIEW THE TUTORIALS
Animated Tutorial List pg 15
2

SINGLE WAVEFORM MODE
Single Waveform Interface:
1. This is the first screen that will come up in Cool Edit. (Figure 1). This is the Single Waveform Mode, where you will record, save, edit and modify your audio files.
2. You should become familiar with the menu selections at the top
File menu will allow you to create new files, open existing onesave open files. The Edit menu in turn allows you to cut, copypaste parts of the sound file and also to “undo” recent changes. View menu allows you to change what is displayed on the screehow it is displayed. The Transform menu allows you to modifaudio file loaded in the application. The Generate menu lets ycreate tones, noise and silence. The Analyze menu allows you examine various statistics of the open file. The Favorites menu
3
Figure 1
. The s or , and The n and y the ou to

opens a macro editor. The Options menu allows you to change settings in Cool Edit and Windows. The Window menu allows you to toggle between open sound files. The Help menu provides access to the general context help as well as various tutorials built into Cool Edit. The Toolbar below the menu bar gives quick access to common functions. (Figure 2) As in Windows, you can hold the mouse over the icon and a dialogue box will give you a description of the button.
The area directly below this area and above the wave display area is called the Display Range Bar and indicates in green what portion of the entire waveform you are currently viewing in the waveform display area. (An important thing to remember here is that if you zoom in on your waveform, this bar will become smaller in size because you will be viewing a smaller portion of the entire audio file).
3. The top panel on the lower left
controls Cool Edit and is called the Transport toolbar (Figure 3) where you can access the basic audio functions you need. Using these buttons, you are able to start, stop, rewind and fast forward. Buttons you may not be familiar with are the triangle in the circle which allows you to play the wave file from start to finish, the lone triangle which will play the wave from the point at which the cursor is positioned (or only what you see on the screen) and the one that looks like eye glasses which will loop the file continuously. You can also use the space bar to both start and stop playing. By using the magnifying glass buttons you can zoom in horizontally on parts of the wave.
Figure 2
Figure 3
4
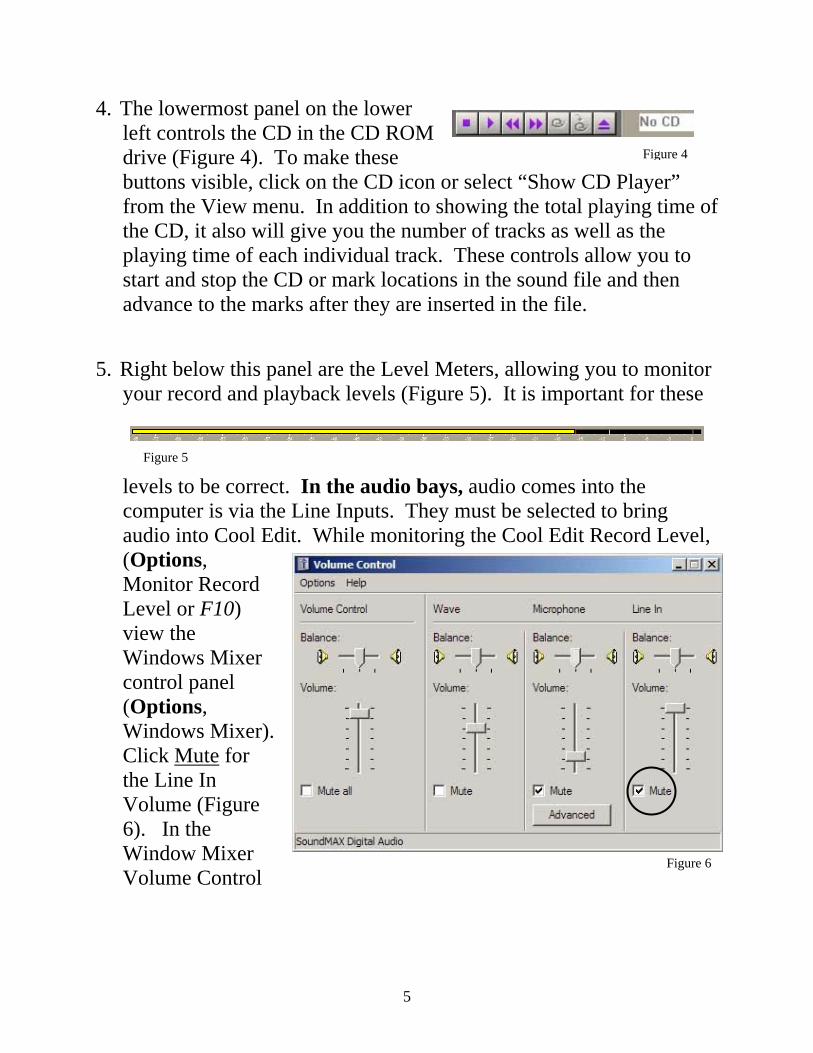
4. The lowermost panel on the lower left controls the CD in the CD ROM drive (Figure 4). To make these buttons visible, click on the CD icon or select “Show CD Player” from the View menu. In addition to showing the total playing time of the CD, it also will give you the number of tracks as well as the playing time of each individual track. These controls allow you to start and stop the CD or mark locations in the sound file and then advance to the marks after they are inserted in the file.
5. Right below this panel are the Level Meters, allowing you to monitor
your record and playback levels (Figure 5). It is important for these
levels to be correct. In the audio bays, audio comes into the computer is via the Line Inputs. They must be selected to bring audio into Cool Edit. While monitoring the Cool Edit Record Level, (Options, Monitor Record Level or F10) view the Windows Mixer control panel (Options, Windows Mixer). Click Mute for the Line In Volume (Figure 6). In the Window Mixer Volume Control
Figure 4
Figure 5
Figure 6
5

window, select Options, Properties and Recording. In the Recording Control window, (Figure 7) Select Line In and athe volume controlpeak the Cool Edit meters at appro–18 when the VU meters on the mixer reads “0” VU. Normally, this is all the way down. Setting this control too high will cause Cool Edit to distort (same as going into the
djust to
ximately
red on the VU meter).
Figure 7
Figure 8
6. Surrounding the waveform display are the Time (on the bottom) and Amplitude (on the right) Rulers (Figure 8). With the zoom controls on the bottom left panel you can zoom in horizontally (magnifying time), zoom out full, see only your selection, your selection’s head or tail. Zoom controls on the lower right zoom vertically (magnifying amplitude) on your waveform.
7. Below and to the right of your waveform display are the are the Time
Display Fields (Figure 9). These fields are helpful when you are selecting and/or splicing audio. The “Sel” field will show the time at which your selection begins, ends, and the total time. The “View” field will show the beginning and the ending as well as the total time when you have only a part of the waveform in the waveform display.
Figure 9
6

Recording a New File: 1. First you will select New from the File menu. 2. When the New Waveform dialog
box appears you will select your sample rate, channels, and the bit resolution. The settings you see in Figure 10 (44,100, Stereo, 16 bit) are required for an audio CD. Audio files prepared for digital video editing should be sampled at 48,000, stereo or mono and 16 bit.
3. Begin by setting up your source
materials (load prerecorded media into players, position microphone etc.) and configure the audio mixer by activating the proper channels and setting levels.
Figure 10
4. When you are satisfied everything is properly set up, click the Record button (Red Dot). The time counter will start running.
5. Start the audio you want to record 6. When you have finished your recording…click Stop (Green Square). 7. Click File and Save your audio as a Windows PCM (*.wav) file in the
proper directory.
7

Open an Existing File for Editing: 1. Click on File and
select Open.
Figure 11
2. Navigate to the proper directory and choose your file (Figure 11).
3. Click on Open and
the selected audio file will be displayed in the waveform display.
4. To select a portion of the waveform place the cursor
at the point on your waveform where you want to begin, left-click and then drag to the right to highlight your selection.
5. Holding down the right mouse button, you can drag
either side of your selection to extend or reduce it. 6. To adjust the beginning of your selection by 1/30th of
a second in either direction, use either the right or left keyboard arrow keys.
Figure 12
8

7. Another way to make a selection is to double click on the Sel Time Display Field and enter the values for time.
8. To visually fine-tune your selection, magnify the
waveform display by using the Zoom tools. This will give you greater control over what specific audio you want to select.
9. You can use either the Edit menu, the Toolbar or the keyboard to cut,
copy and/or paste your selections. When you want to cut out a part of your audio you first select it by placing the cursor where you want to start and then click and drag over the area to be cut. Then click the keyboard Delete key to erase it. (Remember-the selected portion turns white so you can see exactly how much will be cut out. See Figure 12.)
10. Just as you can define a
Selection and delete it, you can also cut a Selection (Edit, Cut), and paste it in a new position in the waveform. (Click at the insertion point, Edit, Paste; see Figure 13)
1. You can also delete or insert silence in to your audio. To
his will ect
you
1
Figure 13
automatically delete silence, go to Edit, Delete Silence…tdefine silence thresholds. Click OK to delete. To Add Silence, selan insertion point and go to Generate, Silence. Set the length of silence you want to insert. (This will increase your total time). If
9

want to convert a part of your audio to silence, select the part you want to silence and click Transform, Silence.
12. You also have the ability to add special effects (change Amplitude,
apply Delay Effects, Noise Reduction, and equalization Filters) by using the Transform menu. (Transforms are only available in the Single Waveform Mode.)
13. Cool Edit has an
Undo feature which must be enabled before it can be u(Figure 14) The system keeps a minimum of 5 levels of undo while you are editing. To undo an edit simply go back to the Edit menu and select Undo. Your edits are only finalized when you save and close the file.
sed.
Figure 14
14. SAVE your work often! 15. Upon completion of your edit you may want to use the Normalize
function. Normalize amplifies the highlighted selection of your waveform to within a specified percentage of the maximum level. Use Normalization to achieve the greatest amount of amplification that will not result in clipping (when set to 0dB or 100%). Click on Edit and Select Entire Wave. Next, click on Transform, Amplitude, Normalize and modify or accept the defaults.
10
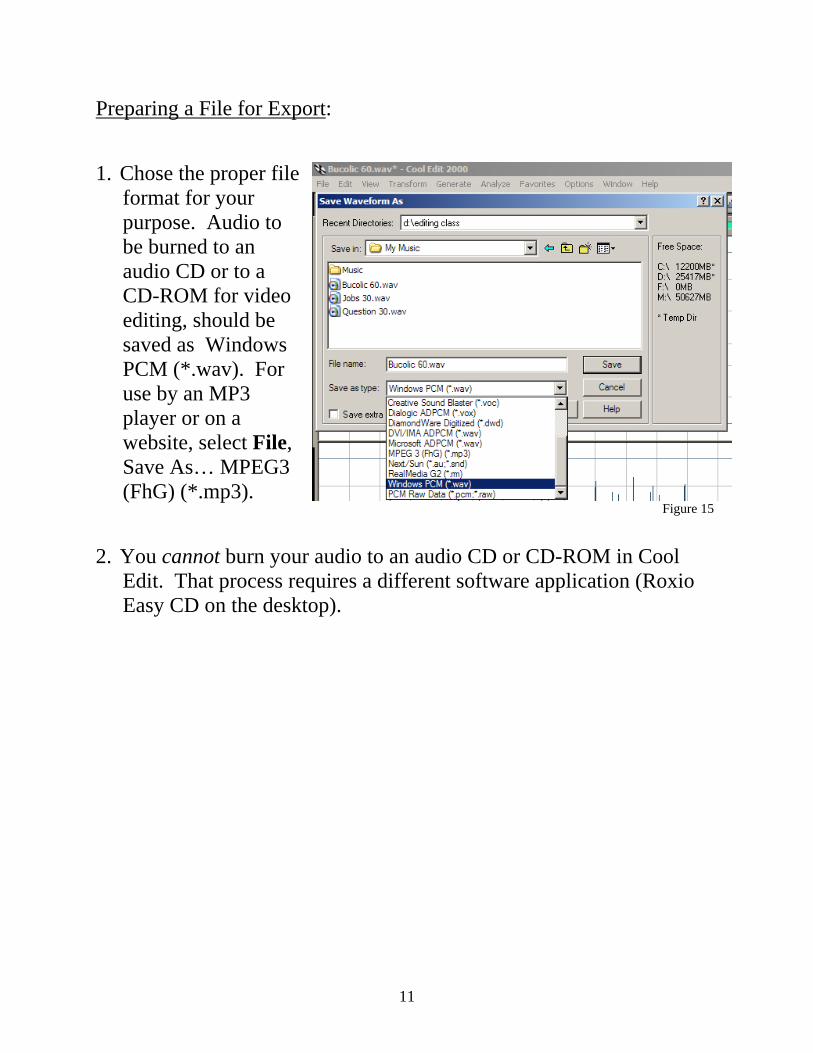
Preparing a File for Export: 1. Chose the proper file
format for your purpose. Audio to be burned to an audio CD or to a CD-ROM for video editing, should be saved as Windows PCM (*.wav). For use by an MP3 player or on a website, select File, Save As… MPEG3 (FhG) (*.mp3).
Figure 15
2. You cannot burn your audio to an audio CD or CD-ROM in Cool Edit. That process requires a different software application (Roxio Easy CD on the desktop).
11

Studio Plug-In The Multitrack Interface: 1. The Studio Plug-In allows up to four audio files to be placed on a
timeline, played simultaneously and mixed together into one audio file. Enter the Studio Plug-In by clicking the icon below File and Edit in the Single Waveform mode. Click again to return. Each audio file can be faded up or down and panned left or right at Control Points placed anywhere within the timeline. The Transport Controls, Rulers and Time Display areas are identical to the Single Waveform mode. This is the Studio Plug-In interface. (Figure 16)
Figure 16
2. There are fewer menu selections at the top of the Studio Plug-interface because most operations are performed on the indiviaudio files in the Single Waveform mode. The Studio Plug-Inwith mixing sessions, which are then saved with the audio file
12
Figure 16
In dual deals s.

3. Audio files are placed in one of the four tracks by first clicking in the
destination track, then clicking Insert and selecting them directly, if they are currently open in the Single Waveform mode, or by clicking Wave from File… and selecting from the Open a Waveform dialog box.
Manipulating Files on a Track: 1. Each track has its own
Track Console, which sets the entire track’s Pan and Volume, as well as whether the track is muted, Soloed, or enabled for recording. (Figure 17)
2. Selected files are moved
on the timeline by Right-Click-and-Dragging with the mouse. The file on Track 2 in Figure 17 is currently selected. Right-Clicking a file also opens a menu offering many manipulation operations including SPLICE, which cuts a waveform in two at the curser. Left-Clicking a file opens it in the Single Waveform mode. Any changes then made in the Single Waveform mode, like adding reverb, adjusting EQ or changing level, will appear in the Multitrack mode when you switch back.
Figure 17
13
3. The green line over the top of the waveform forms an envelope used to control the volume of the waveform. (Figure 18) Click on the line to create a control point; drag the Control Point up or down to change volume and left or right to move it in time. When the envelope is at the top of the waveform, the audio is at full volume. At the bottom, it is at zero volume.
4. The blue line over the center of the waveform forms
an envelope controlling the waveform’s pan position, where the top of the block is pan left, and the bottom is pan right. Click to create a control point and drag the point udown to change the pan setting.
5. Save your session often. Mixing Down the Session: 1. After a session is completed and saved, a Mix Down is perform
creating a new composite audio file based on the session. ClickMix Down, All Waves. The new mix down wave opens in the Waveform mode of Cool Edit for review and saving.
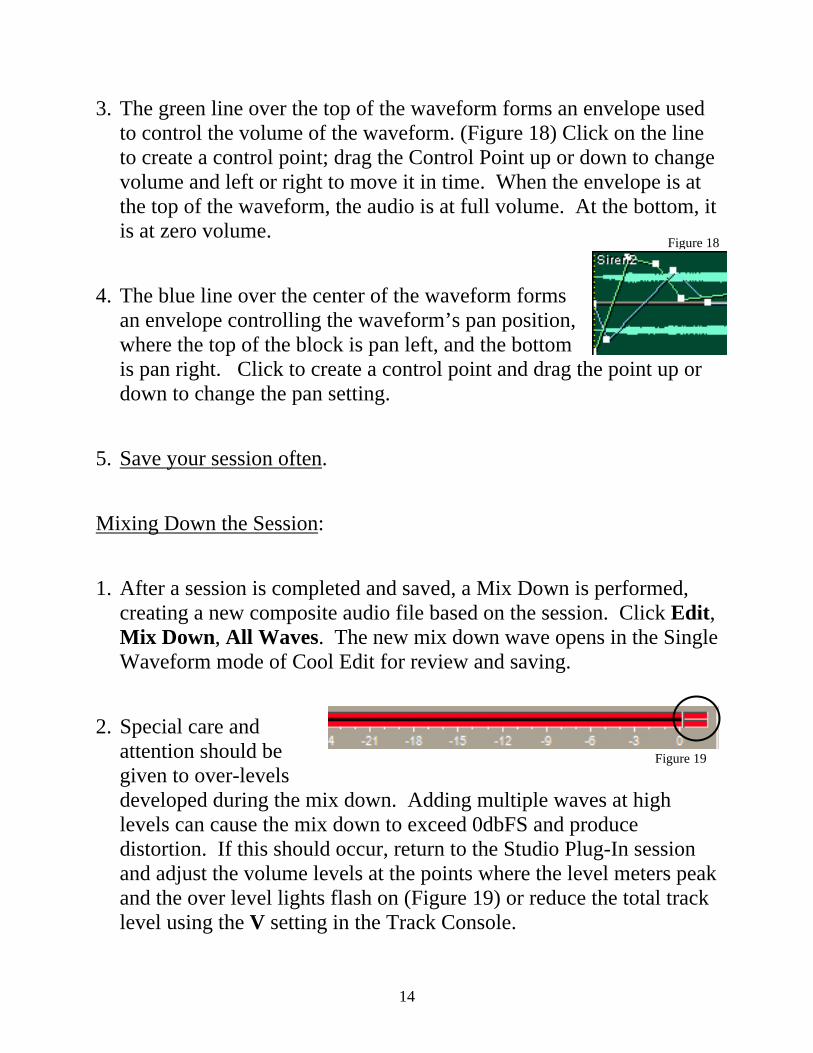
2. Special care and
attention should be given to over-levels developed during the mix down. Adding multiple waves at higlevels can cause the mix down to exceed 0dbFS and produce distortion. If this should occur, return to the Studio Plug-In sesand adjust the volume levels at the points where the level meterand the over level lights flash on (Figure 19) or reduce the totallevel using the V setting in the Track Console.
F
14
Figure 18
p or
ed, Edit, Single
h
sion s peak track
igure 19

Animated Tutorial List: In addition to the extensive Help system available in Cool Edit, the program has animated tutorials which take you step-by-step through various processes. These tutorials are strongly recommended: Overview of Cool Edit 2000 – basics of the Single Waveform mode Overview of Studio Plug-In – basics of the Multitrack mode Preparing Audio for CD –
steps before making an audio CD
Using Crossfades – automating fades and crossfades in the Multitrack mode
Interface Tips and Tricks – useful information to speed your editing and mixing
15


