151
1 Copyright ©2004 – 2019 FATbit Technologies. All Rights Reserved

1 Copyright ©2004 – 2019 FATbit Technologies. All Rights Reserved

2 Copyright ©2004 – 2019 FATbit Technologies. All Rights Reserved
Table of Contents
1. Admin Login ......................................................................................................................................... 6
2. Navigation Bars ................................................................................................................................... 8
3. Dashboard .......................................................................................................................................... 11
4. Catalog ................................................................................................................................................ 17
4.1. Shops .......................................................................................................................................... 17
4.2. Categories .................................................................................................................................. 21
4.3. Catalog ........................................................................................................................................ 24
4.4. Seller Products ........................................................................................................................... 29
4.5. Product Reviews ........................................................................................................................ 32
4.6. Brands ........................................................................................................................................ 33
4.7. Options ....................................................................................................................................... 35
4.8. Tags ............................................................................................................................................ 38
4.9. Brand Requests .......................................................................................................................... 39
4.10. Custom Product Catalog Requests ....................................................................................... 40
5. Users ................................................................................................................................................... 42
5.1. Users ........................................................................................................................................... 42
5.2. Seller Approval Form ................................................................................................................ 45
5.3. Seller Approval Requests .......................................................................................................... 47
5.4. Users’ GDPR Requests ............................................................................................................... 48
6. CMS ..................................................................................................................................................... 49
6.1. Content Pages ............................................................................................................................ 49
6.2. Content Blocks ........................................................................................................................... 51
6.3. Navigation Management ........................................................................................................... 52
6.4. Countries Management ............................................................................................................. 54
6.5. States Management ................................................................................................................... 55
6.6. Collection Management ............................................................................................................ 56
6.7. Policy Points Management........................................................................................................ 60
6.8. Empty Cart Items Management ................................................................................................ 61
6.9. Social Platforms Management .................................................................................................. 62
6.10. Shop Report Reasons Management ..................................................................................... 63
6.11. Order Cancel Reasons Management .................................................................................... 64

3 Copyright ©2004 – 2019 FATbit Technologies. All Rights Reserved
6.12. Order Return Reasons Management .................................................................................... 65
6.13. Testimonial Management ..................................................................................................... 66
6.14. Discount Coupons .................................................................................................................. 67
6.15. Language Labels .................................................................................................................... 68
6.16. Home Pages Slides Management .......................................................................................... 69
6.17. Banners .................................................................................................................................. 70
7. Shipping API....................................................................................................................................... 73
7.1. Shipping Methods ...................................................................................................................... 73
7.2. Duration Labels ......................................................................................................................... 74
7.3. Shipping Companies .................................................................................................................. 76
7.4. Shipping Company Users .......................................................................................................... 77
8. Settings ............................................................................................................................................... 79
8.1. General Settings ......................................................................................................................... 79
8.1.1. General Tab ......................................................................................................................... 79
8.1.2. Local Tab ............................................................................................................................. 80
8.1.3. SEO Tab ............................................................................................................................... 81
8.1.4. Account Tab ........................................................................................................................ 81
8.1.5. Product Tab ......................................................................................................................... 82
8.1.6. Cart/Wishlist Tab................................................................................................................. 83
8.1.7. Checkout Tab ...................................................................................................................... 83
8.1.8. Commission Tab .................................................................................................................. 85
8.1.9. Discount Tab ....................................................................................................................... 85
8.1.10. Reward Points Tab .............................................................................................................. 85
8.1.11. Affiliate Tab ......................................................................................................................... 86
8.1.12. Reviews Tab ........................................................................................................................ 87
8.1.13. Third Party API Tab .............................................................................................................. 87
8.1.14. Email Tab ............................................................................................................................. 88
8.1.15. Media Tab ........................................................................................................................... 89
8.1.16. Subscription Tab .................................................................................................................. 89
8.1.17. Referral Tab ......................................................................................................................... 89
8.1.18. Sharing Tab .......................................................................................................................... 90
8.1.19. System Tab .......................................................................................................................... 90

4 Copyright ©2004 – 2019 FATbit Technologies. All Rights Reserved
8.1.20. Live Chat Tab ....................................................................................................................... 91
8.1.21. PPC Management Tab ......................................................................................................... 91
8.1.22. Server Tab ........................................................................................................................... 91
8.1.23. Import Export Tab ............................................................................................................... 92
8.2. Payment Methods ...................................................................................................................... 93
8.3. Currency Management .............................................................................................................. 94
8.4. Sales Tax ..................................................................................................................................... 96
8.5. Commission Settings ................................................................................................................. 97
8.6. Affiliate Commission Settings ................................................................................................. 100
8.7. Email Template Management ................................................................................................. 101
8.8. Order Status Management ...................................................................................................... 103
8.9. Subscription Packages Management ..................................................................................... 104
8.10. Rewards on Every Purchase ............................................................................................... 105
9. Orders ............................................................................................................................................... 106
9.1. Orders / Customer Orders ...................................................................................................... 106
9.2. Seller Orders ............................................................................................................................ 110
9.3. Subscription Orders ................................................................................................................ 113
9.4. Withdrawal Requests .............................................................................................................. 115
9.5. Cancellation Requests ............................................................................................................. 116
9.6. Return/Refund Requests ........................................................................................................ 117
10. Smart Recommendations ............................................................................................................ 120
10.1. Manage Weightages ............................................................................................................. 120
10.2. Recommended Tag Products Weightages ......................................................................... 121
11. PPC Promotions ........................................................................................................................... 122
12. MISC (Miscellaneous) .................................................................................................................. 124
12.1. Meta Tags Management ...................................................................................................... 124
12.2. FAQs ...................................................................................................................................... 125
12.3. URL Rewriting...................................................................................................................... 126
12.4. Theme Settings .................................................................................................................... 127
13. Blog ............................................................................................................................................... 128
13.1. Blog Post Categories ............................................................................................................ 128
13.2. Blog Posts ............................................................................................................................. 130
5 Copyright ©2004 – 2019 FATbit Technologies. All Rights Reserved
13.3. Blog Contributions .............................................................................................................. 131
13.4. Blog Comments .................................................................................................................... 132
14. Reports ......................................................................................................................................... 134
14.1. Sales ...................................................................................................................................... 134
14.2. Buyers/Sellers ..................................................................................................................... 135
14.3. Affiliates ............................................................................................................................... 136
14.4. Advertisers ........................................................................................................................... 137
14.5. Products (Seller Products).................................................................................................. 138
14.6. Products (Catalog Wise) ..................................................................................................... 139
14.7. Shops .................................................................................................................................... 141
14.8. Tax ........................................................................................................................................ 142
14.9. Commission .......................................................................................................................... 143
14.10. Top Products ........................................................................................................................ 144
14.11. Most Refunded Products ..................................................................................................... 145
14.12. Top Categories ..................................................................................................................... 146
14.13. Discount Coupons ................................................................................................................ 147
15. Manage Admin Users .................................................................................................................. 148
16. Tools ............................................................................................................................................. 149
16.1. Threshold Products ............................................................................................................. 149
16.2. Abusive Keyword ................................................................................................................ 150
16.3. Messages .............................................................................................................................. 151
6 Copyright ©2004 – 2019 FATbit Technologies. All Rights Reserved
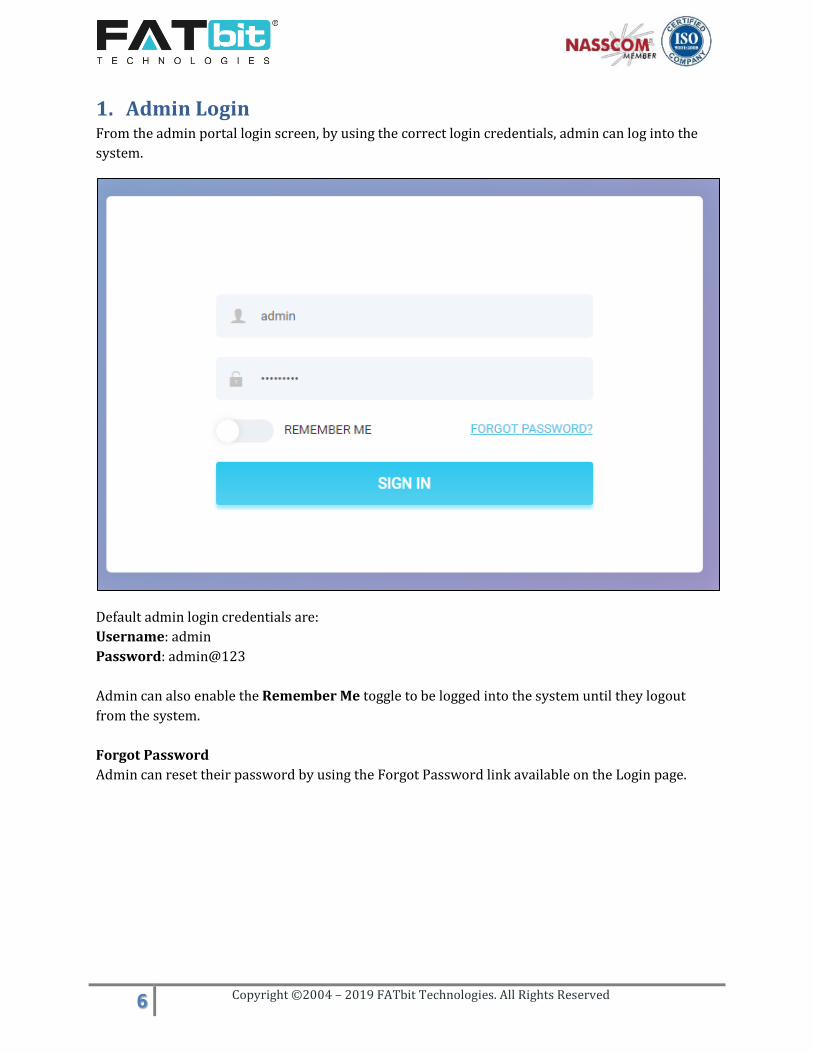
1. Admin Login From the admin portal login screen, by using the correct login credentials, admin can log into the
system.
Default admin login credentials are:
Username: admin
Password: admin@123
Admin can also enable the Remember Me toggle to be logged into the system until they logout
from the system.
Forgot Password
Admin can reset their password by using the Forgot Password link available on the Login page.

7 Copyright ©2004 – 2019 FATbit Technologies. All Rights Reserved
Admin needs to enter the registered email address to receive the reset password email on the
registered email address. Upon clicking the reset password link from the received email, admin can
set new password.

8 Copyright ©2004 – 2019 FATbit Technologies. All Rights Reserved
2. Navigation Bars After logging into the admin portal, the admin can see the top navigation bar on all the pages:
Navigation Bar Icons (On the right)
Upon clicking the YoKart logo, admin will be redirected to the Dashboard page.
Upon clicking the ‘View Store’ icon, admin is redirected to the front end of the website in a new
tab of the browser.
Upon clicking the ‘Clear Cache’ icon, admin can clear the server cache. It is recommended to
clear server cache when you add/update slide images, banner images or any other images display
on the CMS/landing pages.
Upon clicking the ‘Messages’ icon, notification list will open.
Upon clicking the ‘Language’ icon, admin can select the website language for admin portal.
Upon clicking the ‘Update Sitemap’ icon, admin can update the sitemap of the website. It is
recommended to update sitemap when you add new CMS pages or update URLs of existing CMS
pages.
Upon clicking the ‘Logout’ icon, admin will log out of the admin portal.
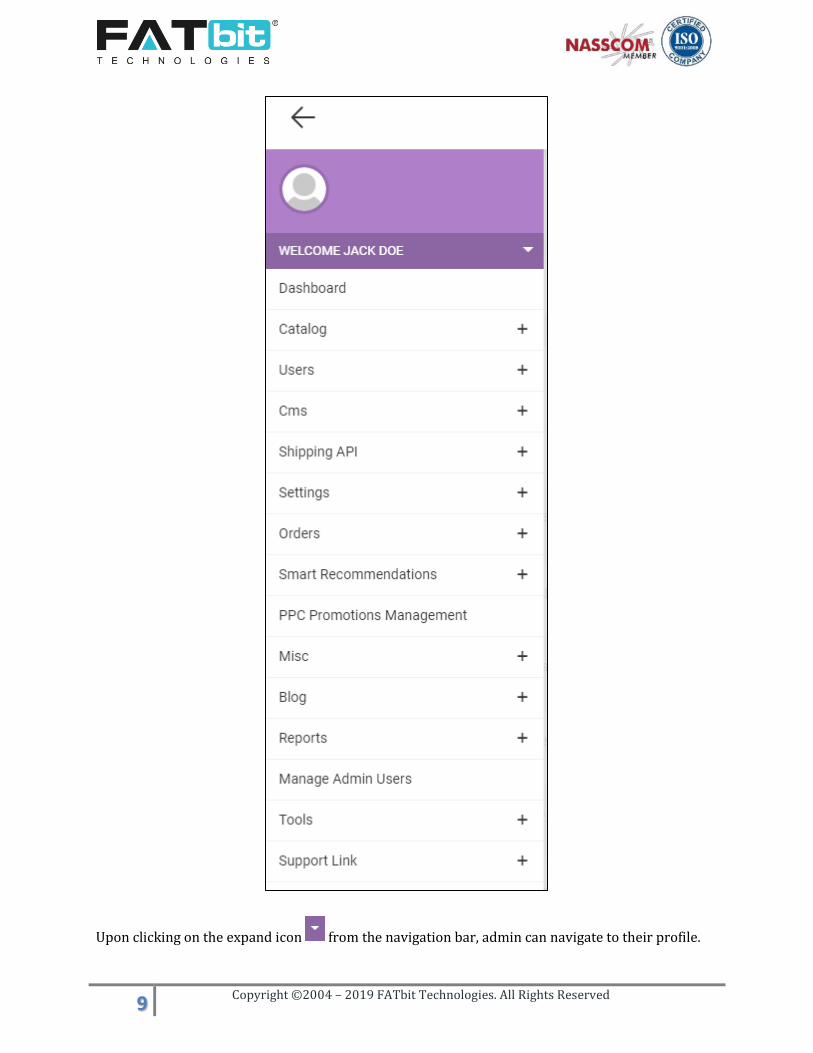
Navigation Bar Hamburger
Upon clicking the hamburger menu , left navigation bar will be displayed.
9 Copyright ©2004 – 2019 FATbit Technologies. All Rights Reserved
Upon clicking on the expand icon from the navigation bar, admin can navigate to their profile.

10 Copyright ©2004 – 2019 FATbit Technologies. All Rights Reserved

11 Copyright ©2004 – 2019 FATbit Technologies. All Rights Reserved
3. Dashboard Upon successful login to the admin portal, admin will be redirected to the dashboard page.
Dashboard page is divided into multiple sections. Please see the details of each section below:
The first section displays the following information:
● Order Sales – Admin can view total sales of the website from day 1.Admin can also view
sales for the current month of the website. Only completed orders will be considered for
calculating sales. Upon clicking this section, Admin will be redirected to the Orders Listing
page.
● Sales Earnings – Admin can view his/her total earnings in the website from day 1. Also,
admin can view earnings of current month in the website. Only completed orders will be
considered for calculating the earnings. Upon clicking this section, admin will be redirected
to the Sales Report page.
● New Users – Admin can view total registered users (Buyers & Sellers) on the website and
total registered users for the current month. Upon clicking this section, admin will be
redirected to the Users Listing page.
● New Shops – Admin can view total shops created in the website and total stores created for
the current month. Upon clicking this section, admin will be redirected to the Shops Listing
page.
Other Sections
1. Statistics – Admin can view graphical report of sales, earnings, buyer/seller users, affiliate
users and products of last 6 months from this section.
2. Traffic – This section displays the Pie-Chart report for traffic generated from different
sources like Search Engines, Direct, Referral, CPC. Admin can view it in
Today/Weekly/Monthly/Yearly basis. Only display when Google Analytics is properly
configured in the website. See settings for how to configure Google Analytics.

12 Copyright ©2004 – 2019 FATbit Technologies. All Rights Reserved
3. Visitor Statistics – This report displays statistics for total number of visitors to the website.
4. Conversion Statistics – This report displays how many users has added product into the
cart, reached to the checkout page, placed an order and cancelled an order.
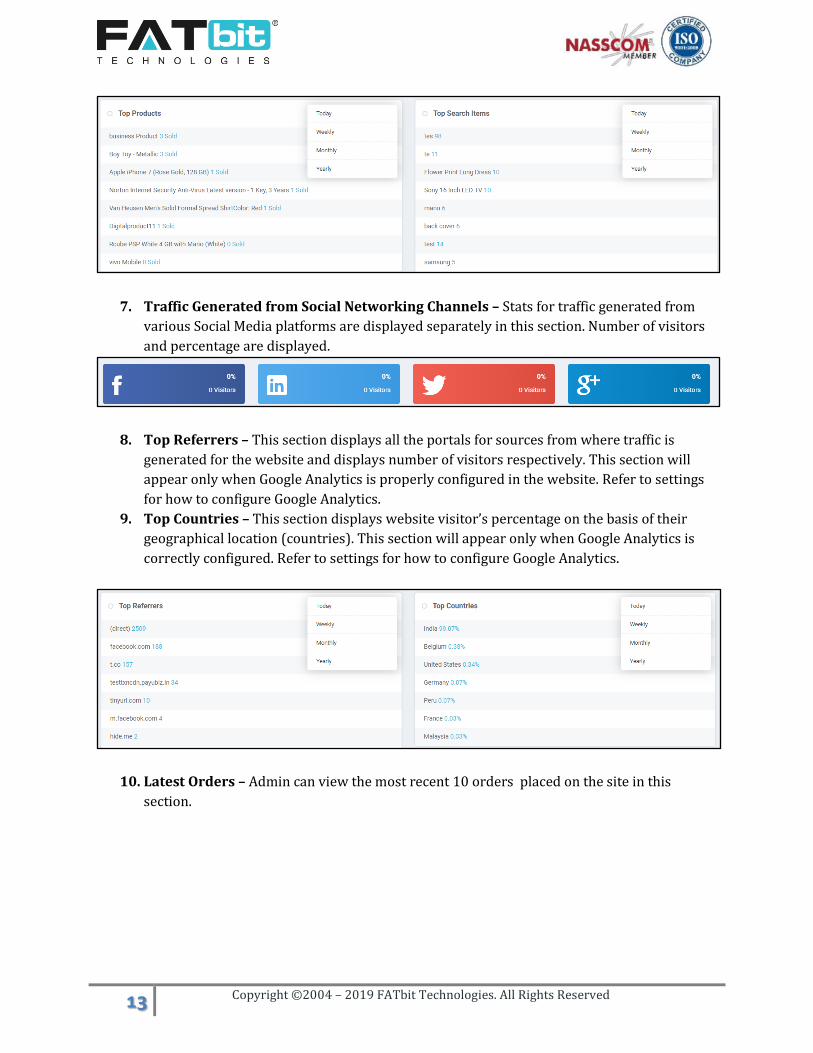
5. Top Products – This section displays list of top products on the basis of product sales.
Admin can view in the report by selecting Today/Weekly/Monthly/Yearly options.
6. Top Search Items – This section displays top keywords used on the portal to search
products. This section will only show up when Google Analytics is correctly configured.
Refer to the settings sections in this manual for how to configure Google Analytics.
13 Copyright ©2004 – 2019 FATbit Technologies. All Rights Reserved
7. Traffic Generated from Social Networking Channels – Stats for traffic generated from
various Social Media platforms are displayed separately in this section. Number of visitors
and percentage are displayed.
8. Top Referrers – This section displays all the portals for sources from where traffic is
generated for the website and displays number of visitors respectively. This section will
appear only when Google Analytics is properly configured in the website. Refer to settings
for how to configure Google Analytics.
9. Top Countries – This section displays website visitor’s percentage on the basis of their
geographical location (countries). This section will appear only when Google Analytics is
correctly configured. Refer to settings for how to configure Google Analytics.
10. Latest Orders – Admin can view the most recent 10 orders placed on the site in this
section.

14 Copyright ©2004 – 2019 FATbit Technologies. All Rights Reserved
Upon clicking theUpon clicking the “View All” link, Admin will be redirected to the orders listing
page
11. Statistics Tab – Admin can view monthly, weekly and daily statistics reports of the website
modules like users, orders etc.
12. Seller Products Tab – From this tab, admin can view 10 recently added products in the
website by sellers.

15 Copyright ©2004 – 2019 FATbit Technologies. All Rights Reserved
13. Shops Tab – From this tab, admin can view 10 recently created shops in the website by
Sellers.
14. Buyers/Sellers Signups Tab – From this tab, admin can view 10 recently registered
Buyer/Seller users in the website.

16 Copyright ©2004 – 2019 FATbit Technologies. All Rights Reserved
15. Advertiser Signups Tab – From this tab, admin can view 10 most recent registered
Advertiser users on the website.
16. Affiliate Signups Tab – From this tab, admin can view 10 most recent registered Affiliate
users on the website.

17 Copyright ©2004 – 2019 FATbit Technologies. All Rights Reserved
4. Catalog Catalog menu contains the following options:-
● Shops
● Product Categories
● Catalog
● Seller Products
● Product Reviews
● Brands
● Options
● Tags
● Brand Requests
● Custom Product Catalog Requests
4.1. Shops Admin can search and manage all the registered shops in the system from the Manage Shops page.
Search Shops Admin can search shops using the following filters:
● Keyword (Free text field)
● Featured (Featured shops will be displayed if “Yes” is selected from the dropdown)
● Status (Active/Inactive)
● Shop Status by Seller (Shop display status set by the Seller. It could be On/Off)
● Date Range (Shop creation date range)

18 Copyright ©2004 – 2019 FATbit Technologies. All Rights Reserved
Admin can perform the following actions on the shop:
● Upon clicking the Edit button, Admin can edit the shop.
● Upon clicking the shop URL, admin will be redirect to the shop front end page.
● Upon clicking the count under Reports column, admin will be redirected to the Shops
Report Listing page and see the issues reported by the buyers for the respective shop.
● Upon clicking the count under Reviews column, admin will be redirected to the Products
Reviews Listing page of the respective shop.
● Admin can change the status of the shops. Only shop with active status will be displayed on
the front end of the website.
Note:
1. Either admin or seller has changed the shop status to inactive, the shop and its products will not
display on front end of the website.
2. Featured shops will only display on Featured Shops page
Edit Shop Admin can edit the details of the shop using the “Edit” option given in the shop list. Clicking on the link will open a pop-up with information added by seller.

19 Copyright ©2004 – 2019 FATbit Technologies. All Rights Reserved
The shop details are categorized into various tabs:
General tab: Admin can edit the basic shop details from this tab.
Language tab(s): Admin can edit the language dependent information from this tab like
shop name description, shop policies etc.
Templates tab: This tab displays all the available shop templates. Media for the shop would
be added based on the selected template.
Media tab: Admin can manage the shop media like banner image etc.
Collection tab: Admin can manage shop collection from this tab. The tab is further divided
into tabs.

20 Copyright ©2004 – 2019 FATbit Technologies. All Rights Reserved
Admin can manage the linked products under this collection from the Link Tab.
On front end, collection option will be added in the Shop’s Navigation bar on Shop page only.

21 Copyright ©2004 – 2019 FATbit Technologies. All Rights Reserved
4.2. Categories Admin can manage (Add/Edit/Delete) product categories from this section. Each category can have
multiple sub-categories.
Admin can perform the following actions from the Categories Listing page:
● Admin can drag and drop by using icon to change the display order on Product Category
Listing page on front end.
● Upon clicking the Export option, admin can export all the product categories to CSV file.
● Upon clicking the Import option, admin can import product categories via CSV file. It is
recommended to export the CSV file first, make changes to it and import it back into the
system.
● Upon clicking the Add Category option, admin can add a new product category or
subcategory. Please see Add Category section below for more details.
● Upon clicking the subcategories count link, admin will be redirected to the subcategories
listing page for a particular parent category. Admin has the same options on the sub-
categories listing page that are available on the root category listing page.

22 Copyright ©2004 – 2019 FATbit Technologies. All Rights Reserved
● Upon clicking the status toggle button, admin can change the status of the product category.
Only active product categories and their products will be displayed on front end of the
website.
● Upon clicking the Edit option for a category, admin can edit the details of the category.
● Upon clicking the Delete option for a category, admin can delete the category. Admin
cannot recover or add the deleted category again so it is recommended to use this option
only for testing purpose.
Add Category Clicking on the button “Add Category” will open a pop-up where the admin can add a new category.
Admin can add a new category/subcategory by simply selecting Category Parent as “Root
Category” or admin can select any category from the dropdown list under which you would like to
add/create the sub-category.
Admin can upload an icon image and a banner image for the category from the “Media” tab. Icon
added will be used in Product Categories Listing page whereas the banner will be displayed on the
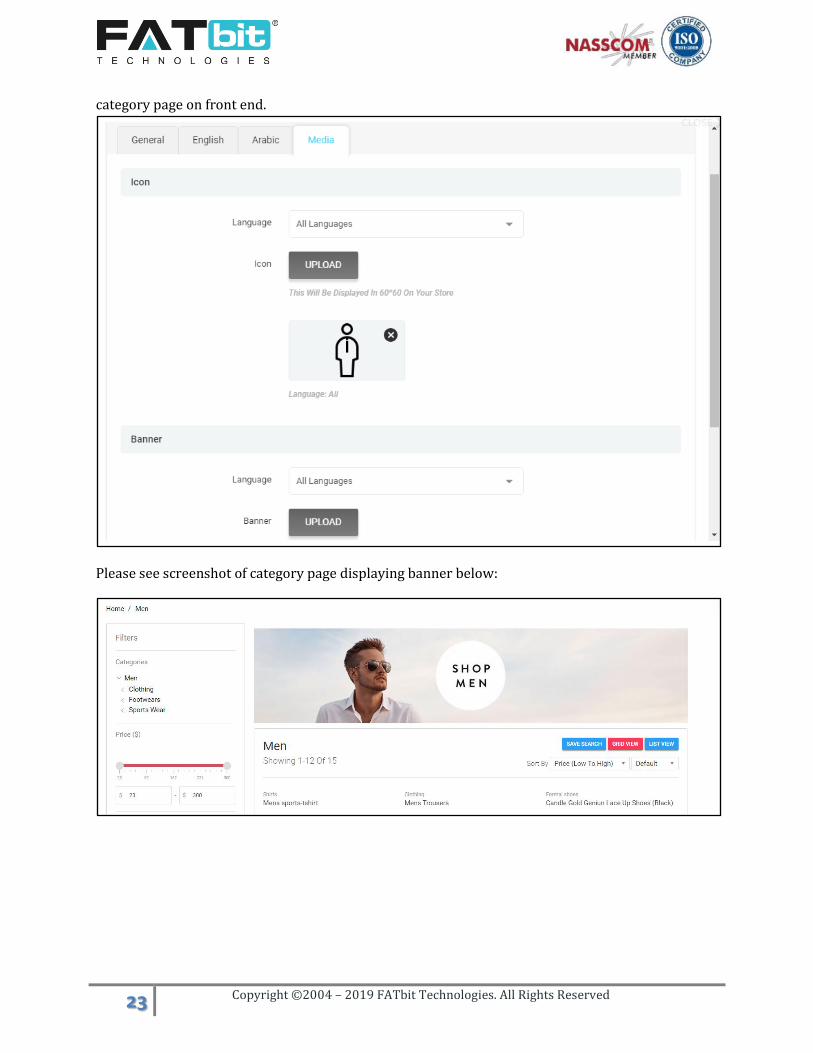
23 Copyright ©2004 – 2019 FATbit Technologies. All Rights Reserved
category page on front end.
Please see screenshot of category page displaying banner below:

24 Copyright ©2004 – 2019 FATbit Technologies. All Rights Reserved
4.3. Catalog Admin can create a catalog of products which are available for seller’s to use on their shop. Sellers
need to add products to their inventory in order to list and sell a product. Catalog Product’s do not
show up on the front end while only seller inventory products will be displayed on front end of the
website/seller shop. Please refer the screenshot below for product catalog displays on Seller end.
NOTE: Sellers can add a product into the catalog only if the admin has enabled “Activate Seller to
Add Custom products” from General Settings -> Options -> Account. Once the catalog product is
created by seller, Admin approval is required in order for the seller to add it to the inventory.
Catalog Listing Page Admin can search and manage the product catalog from the Catalog Listing Page.
Admin can search products by:
Keyword (Free text)

25 Copyright ©2004 – 2019 FATbit Technologies. All Rights Reserved
Product (Custom products are only available for specific seller or catalog products are
available for all sellers)
Category (Filter products by category)
Product status (Active/inactive)
Approval status (Only applicable to custom products added by sellers)
Product Type (Physical/digital)
Product creation date range
Admin can perform the following actions from the Catalog Listing page:
● Upon clicking the Export option, admin can export the products to a CSV file.
● Upon clicking the Import option, admin can import products via CSV file. It is recommended
to export the CSV file first and then make changes to it before importing it back.
● Upon clicking the Add Product option, admin can add a new product to the catalog. Please
refer Add Product into the Catalog section below for more details.
● Upon clicking the Edit option, admin can edit the product details.
● Upon clicking the Links option, admin can link Brand and Product categories with the
product.
● Upon clicking the Options option, admin can link Option/Variant group with the Product.
While adding product into the inventory, seller will need to select the option value.
26 Copyright ©2004 – 2019 FATbit Technologies. All Rights Reserved
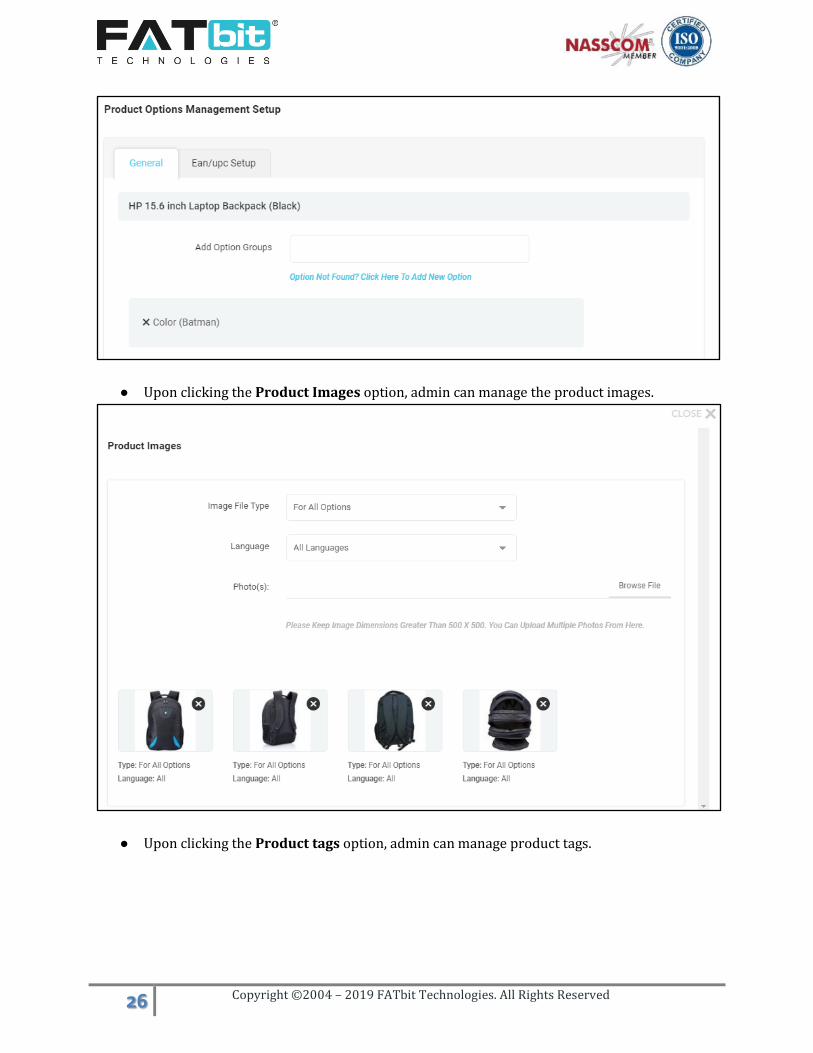
● Upon clicking the Product Images option, admin can manage the product images.
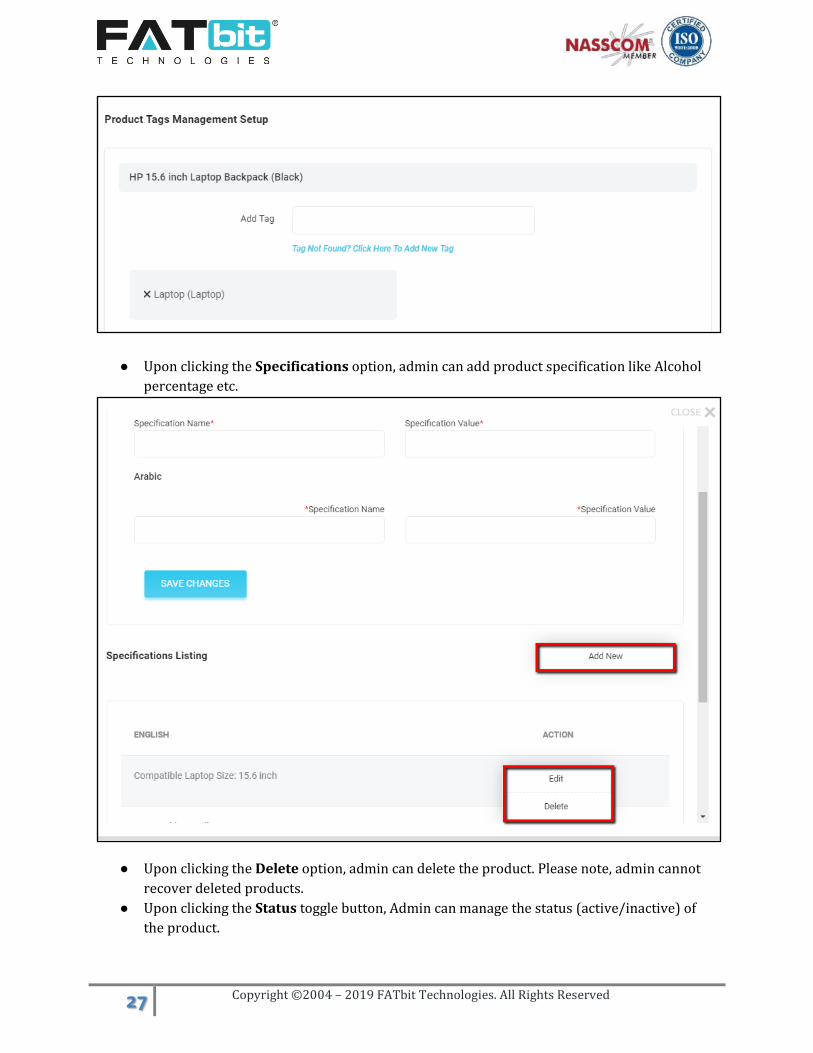
● Upon clicking the Product tags option, admin can manage product tags.
27 Copyright ©2004 – 2019 FATbit Technologies. All Rights Reserved
● Upon clicking the Specifications option, admin can add product specification like Alcohol
percentage etc.
● Upon clicking the Delete option, admin can delete the product. Please note, admin cannot
recover deleted products.
● Upon clicking the Status toggle button, Admin can manage the status (active/inactive) of
the product.
28 Copyright ©2004 – 2019 FATbit Technologies. All Rights Reserved
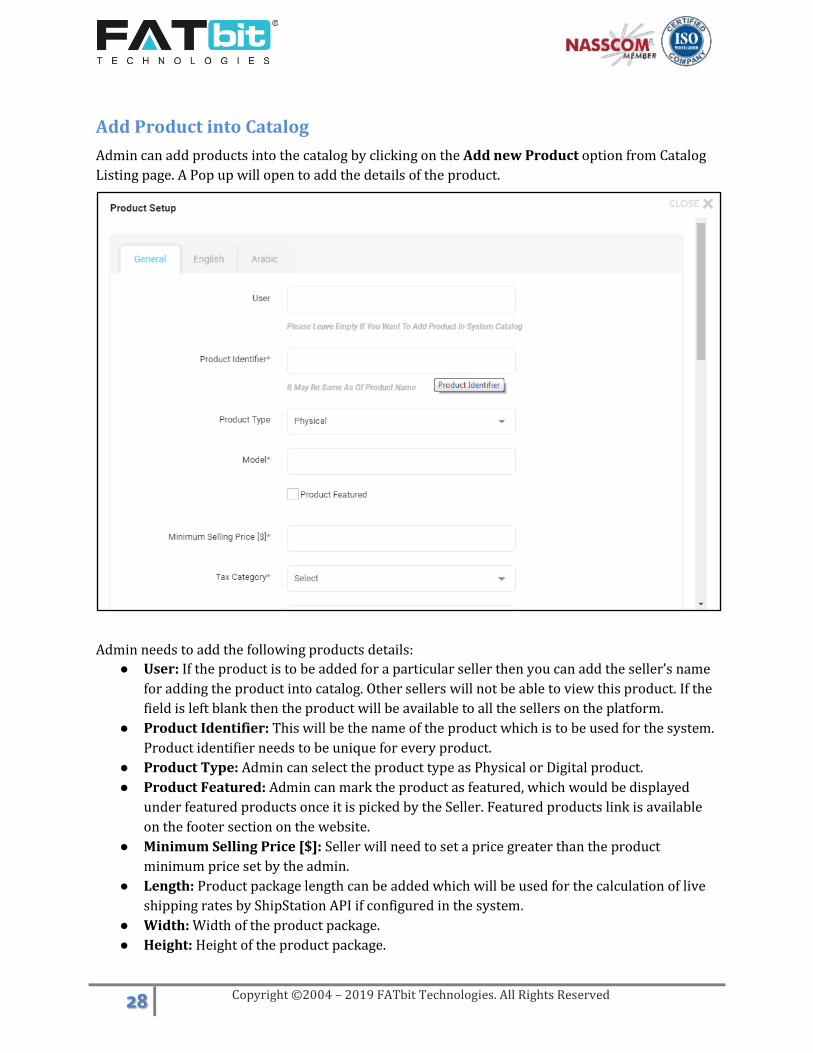
Add Product into Catalog
Admin can add products into the catalog by clicking on the Add new Product option from Catalog
Listing page. A Pop up will open to add the details of the product.
Admin needs to add the following products details:
● User: If the product is to be added for a particular seller then you can add the seller’s name
for adding the product into catalog. Other sellers will not be able to view this product. If the
field is left blank then the product will be available to all the sellers on the platform.
● Product Identifier: This will be the name of the product which is to be used for the system.
Product identifier needs to be unique for every product.
● Product Type: Admin can select the product type as Physical or Digital product.
● Product Featured: Admin can mark the product as featured, which would be displayed
under featured products once it is picked by the Seller. Featured products link is available
on the footer section on the website.
● Minimum Selling Price [$]: Seller will need to set a price greater than the product
minimum price set by the admin.
● Length: Product package length can be added which will be used for the calculation of live
shipping rates by ShipStation API if configured in the system.
● Width: Width of the product package.
● Height: Height of the product package.

29 Copyright ©2004 – 2019 FATbit Technologies. All Rights Reserved
● Dimension Unit: Unit for entered L, B & H can be selected by the admin.
● Weight: Weight of the product to be added.
● Weight Unit: Unit of Weight can be selected by admin.
● Approval Status: Admin can manage the approval status for the added products.
● Product Status: Admin can manage the status of the product. It could be active or inactive.
● Available for COD: Admin can manage if the product is available for Cash on Delivery,
After adding the basic details of the product, admin needs to add rest of the details by using options
available under the ellipsis menu like Links, Options etc.
4.4. Seller Products
This is a list of all the products picked by sellers from the product catalog created by admin/seller.
Admin can Edit/Delete a product or add/view/edit/delete special price (Added by seller). Added
special price will be shown on product listing as well as product detail page.
Admin can search seller inventories by:
Keyword (Free text field)
Seller Name or Email: This will list out all the inventory of the selected seller.
Category (Filter seller inventory by category)
Seller Inventory Status (Active/inactive)

30 Copyright ©2004 – 2019 FATbit Technologies. All Rights Reserved
Admin can perform the following actions from this page:
● Upon clicking the Export option, admin can export seller inventory data in a CSV file.
● Upon clicking the Import option, admin can import seller inventory via CSV file. It is
recommended to export CSV files first, make changes to it and then import it back to the
system.
● Upon clicking the Edit option, admin can edit the seller inventory product.

31 Copyright ©2004 – 2019 FATbit Technologies. All Rights Reserved
● Upon clicking the Special Price option, admin can view and manage special price discounts
for the particular seller product.
● Upon clicking the Delete Product option, admin can delete the product. Please note that
admin can’t recover deleted products.
● Upon clicking the Status toggle button, admin can manage the status of the seller inventory.
Note: In order to display product on front end of the website, admin should check for the following
points:
Product should be active, approved and not deleted.
Brand and product category should be linked with the product.
Product should be added/linked with at least one Seller’s store.
Seller’s email address should be verified.
Seller’s shop should be active.
Seller should have active subscription package, in case subscription module is enabled.
Seller inventory should be active and available date should be today or a past date.
32 Copyright ©2004 – 2019 FATbit Technologies. All Rights Reserved
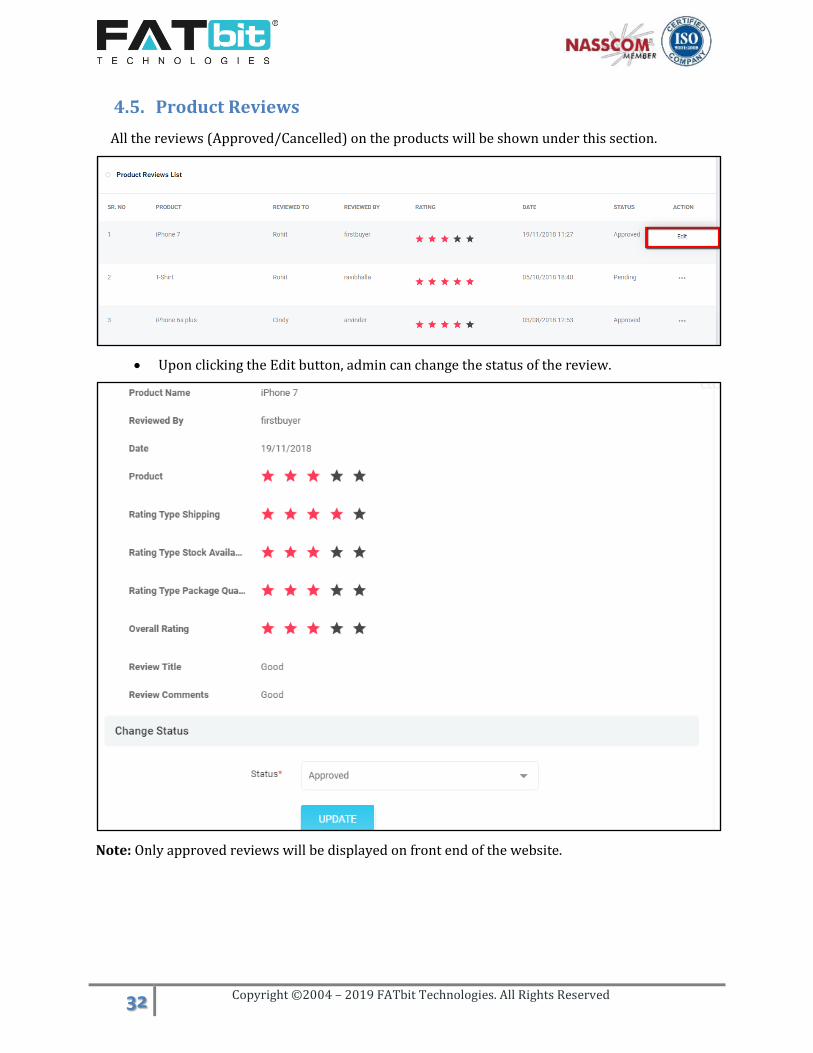
4.5. Product Reviews
All the reviews (Approved/Cancelled) on the products will be shown under this section.
Upon clicking the Edit button, admin can change the status of the review.
Note: Only approved reviews will be displayed on front end of the website.

33 Copyright ©2004 – 2019 FATbit Technologies. All Rights Reserved
Search Reviews
Admin can search reviews by using product name, rated/reviewed by user, status and date added range.
4.6. Brands
This section allows the admin to manage brands.
Admin has the following options on this page:
Admin can search Brands by using keywords. Upon clicking the Export option, admin can export brands in a CSV file.
Upon clicking the Import option, admin can import brands via a CSV file. It is
recommended to export the CSV file first, make changes to it and then import it back into
the system.
Upon clicking the Edit option, admin can edit details of the brand like Status, Name and
Media.
Upon clicking the Delete option, admin can delete the brand.
Upon clicking the Status toggle button, admin can change the status of the brand.
Upon clicking the Add Brand option, admin will be redirected to the Brand Setup page.
Admin needs to add the following details.
Brand Identifier
Brand Status
Brand Name
Media: Under media tab, the admin can upload brand logo for general & specific
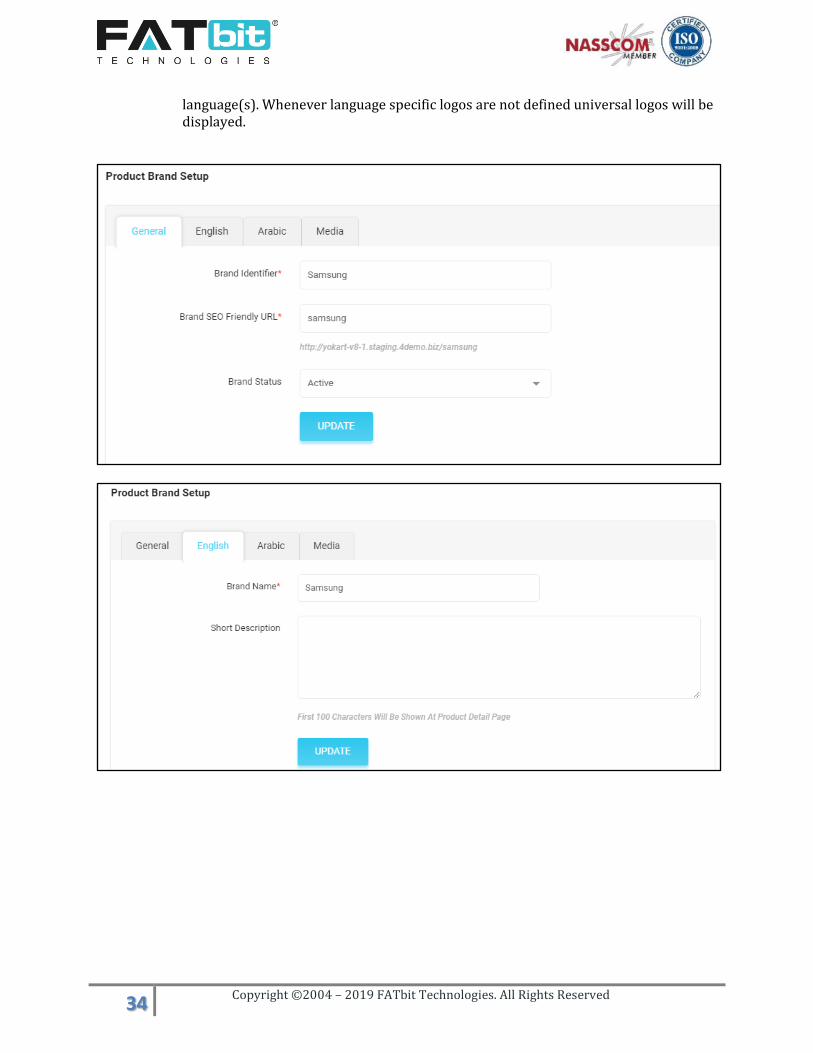
34 Copyright ©2004 – 2019 FATbit Technologies. All Rights Reserved
language(s). Whenever language specific logos are not defined universal logos will be displayed.

35 Copyright ©2004 – 2019 FATbit Technologies. All Rights Reserved
4.7. Options
Admin can search and manage options/variants from this section. Admin will be able to add an
option such as Size, Color, and Storage etc. on the basis of product requirement.
Admin has the following actions on this page:
Admin can search Options by using keyword. Upon clicking the Export option, admin can export options in CSV file.
Upon clicking the Import option, admin can import options via CSV file. It is
recommended to export the CSV file first, make changes to it and then import it back into
the system.
36 Copyright ©2004 – 2019 FATbit Technologies. All Rights Reserved
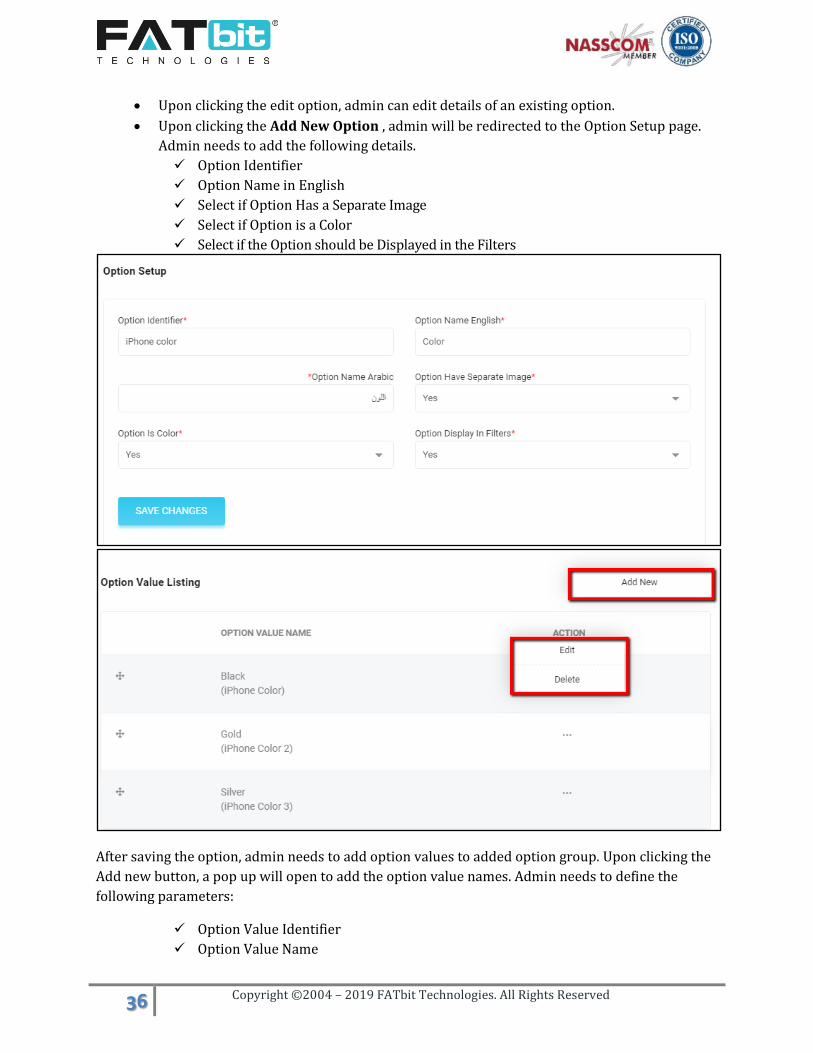
Upon clicking the edit option, admin can edit details of an existing option.
Upon clicking the Add New Option , admin will be redirected to the Option Setup page.
Admin needs to add the following details.
Option Identifier
Option Name in English
Select if Option Has a Separate Image
Select if Option is a Color
Select if the Option should be Displayed in the Filters
After saving the option, admin needs to add option values to added option group. Upon clicking the
Add new button, a pop up will open to add the option value names. Admin needs to define the
following parameters:
Option Value Identifier
Option Value Name

37 Copyright ©2004 – 2019 FATbit Technologies. All Rights Reserved
Option value color (Only if Option is Color selection is “YES”)
Seller has to select an Option while adding a product to the store. Please see below the effects of changes made by the admin in the options area in the Seller section:
The same will be displayed on the Product details page on front end of the website.

38 Copyright ©2004 – 2019 FATbit Technologies. All Rights Reserved
4.8. Tags
In this section, admin can search and manage tags for a product.
Admin has the following actions from this page:
Admin can search tags by using keyword. Upon clicking the Export option, admin can export tags in CSV file.
Upon clicking the Import option, admin can import tags via CSV file. It is recommended to
export the CSV file first, make changes to it and then import it back to the system.
Upon clicking the Edit option, admin can edit details of any existing tag.
Upon clicking the Delete option, admin can delete any existing tag.
Upon clicking the Add New Tag option, admin can add a new tag.
Admin or seller can link tags with the product while adding it.
Tags help the buyer to search the products. For example, if a product is linked with a tag “beer” then the buyer can search that product with the help of ‘beer’ keyword.

39 Copyright ©2004 – 2019 FATbit Technologies. All Rights Reserved
4.9. Brand Requests This page will display all the brand requests with status placed by the sellers only if admin has
enabled this setting from the General Settings --> Product Tab. Please refer the screenshot below:
Admin has the following functionality on this page:
Admin can search brand requests by Brand Name and Brand Identifier.
Upon clicking the Edit button, admin can edit brand details and approve/decline the
request.
Note: Approved brands will start to display under the Brand Listing page. Seller will receive an
email notification when admin approves or declines the request.
40 Copyright ©2004 – 2019 FATbit Technologies. All Rights Reserved
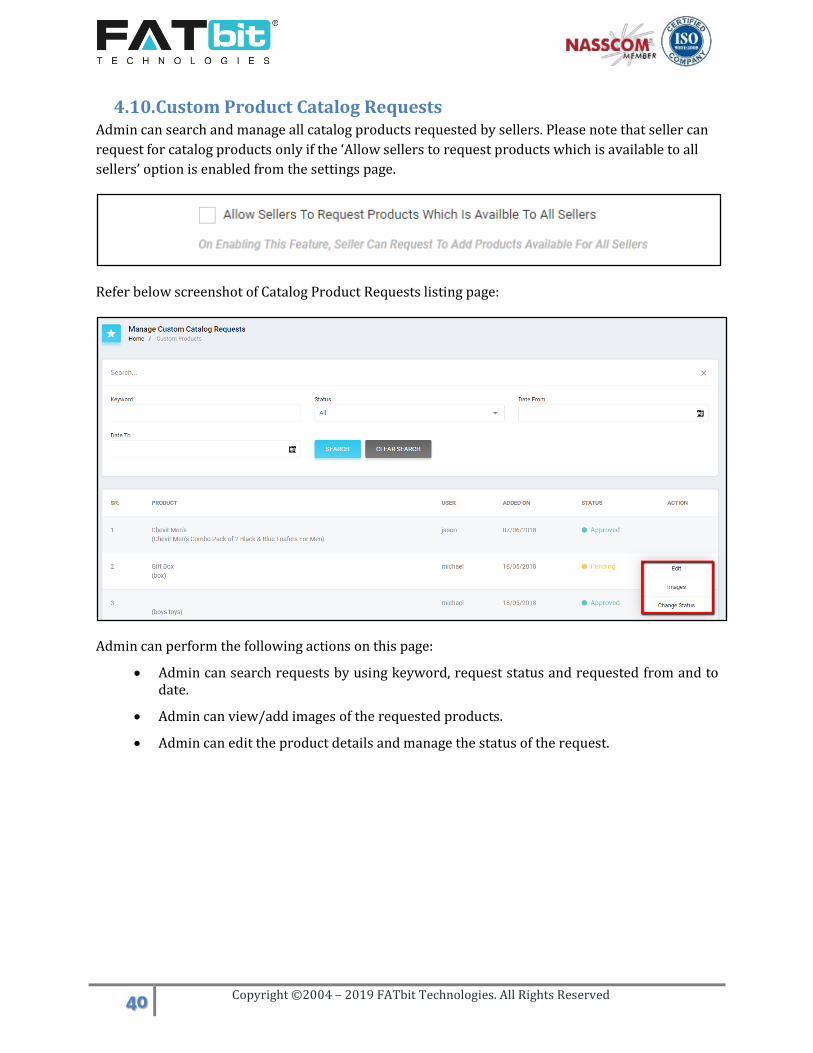
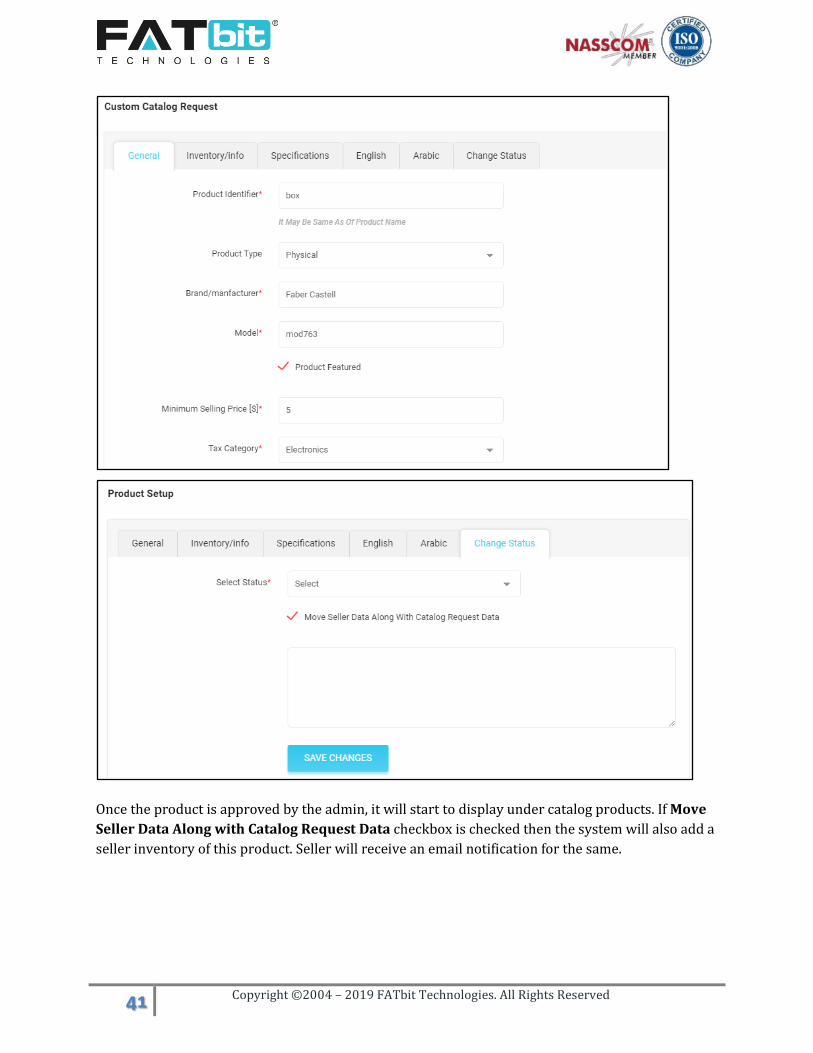
4.10. Custom Product Catalog Requests Admin can search and manage all catalog products requested by sellers. Please note that seller can
request for catalog products only if the ‘Allow sellers to request products which is available to all
sellers’ option is enabled from the settings page.
Refer below screenshot of Catalog Product Requests listing page:
Admin can perform the following actions on this page:
Admin can search requests by using keyword, request status and requested from and to date.
Admin can view/add images of the requested products.
Admin can edit the product details and manage the status of the request.
41 Copyright ©2004 – 2019 FATbit Technologies. All Rights Reserved
Once the product is approved by the admin, it will start to display under catalog products. If Move
Seller Data Along with Catalog Request Data checkbox is checked then the system will also add a
seller inventory of this product. Seller will receive an email notification for the same.
42 Copyright ©2004 – 2019 FATbit Technologies. All Rights Reserved
5. Users Users menu contains the following options:-
Users
Seller Approval Form
Seller Approval Requests
User GDPR Requests
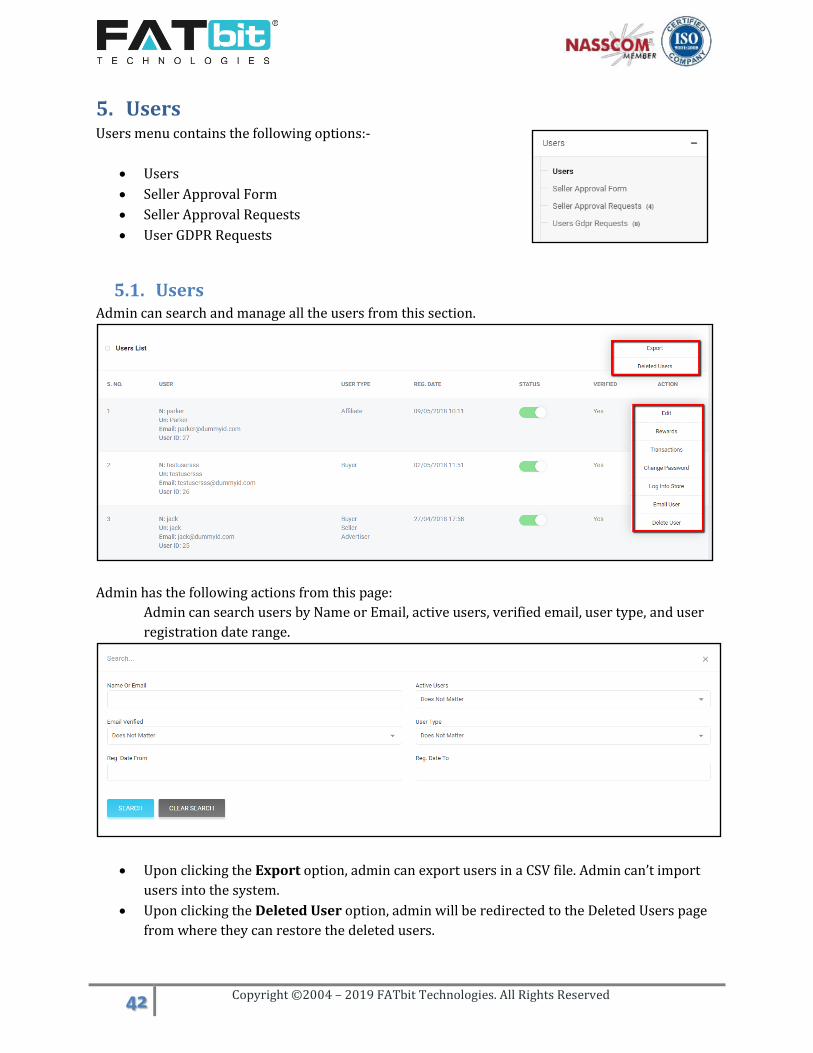
5.1. Users Admin can search and manage all the users from this section.
Admin has the following actions from this page:
Admin can search users by Name or Email, active users, verified email, user type, and user
registration date range.
Upon clicking the Export option, admin can export users in a CSV file. Admin can’t import
users into the system.
Upon clicking the Deleted User option, admin will be redirected to the Deleted Users page
from where they can restore the deleted users.

43 Copyright ©2004 – 2019 FATbit Technologies. All Rights Reserved
Upon clicking the Edit option, admin can view and edit the details of the user.
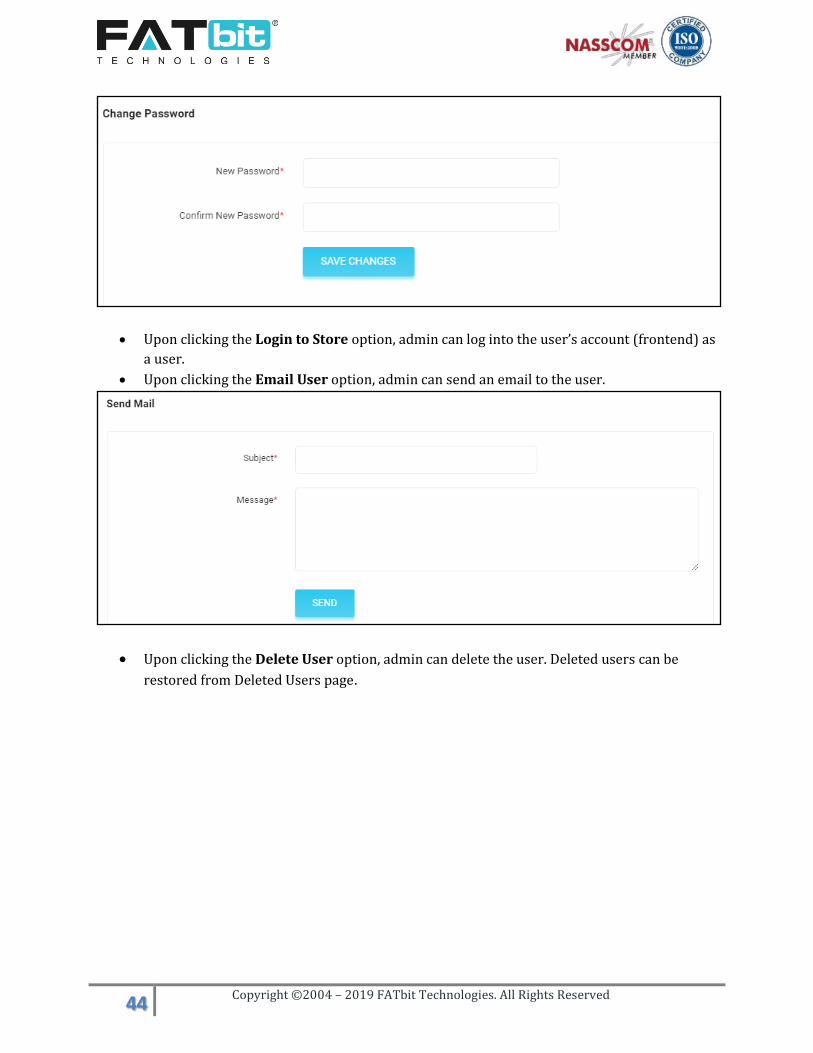
Upon clicking the Change Password option, admin can change the password for the user.
44 Copyright ©2004 – 2019 FATbit Technologies. All Rights Reserved
Upon clicking the Login to Store option, admin can log into the user’s account (frontend) as
a user.
Upon clicking the Email User option, admin can send an email to the user.
Upon clicking the Delete User option, admin can delete the user. Deleted users can be
restored from Deleted Users page.

45 Copyright ©2004 – 2019 FATbit Technologies. All Rights Reserved
5.2. Seller Approval Form From this section, admin can manage the form fields of Activation tab in Seller Signup form.
Front end Screenshot
Back end Screenshot
Admin has the following actions on this page:
Upon clicking the Add New option, admin can add a new fields into the seller signup form.

46 Copyright ©2004 – 2019 FATbit Technologies. All Rights Reserved
Upon clicking the Edit option, admin can edit details of an existing field.
Admin needs to enable ‘seller separate signup form’ settings from the Account tab in General
settings page to display link on the front end of the website.
47 Copyright ©2004 – 2019 FATbit Technologies. All Rights Reserved
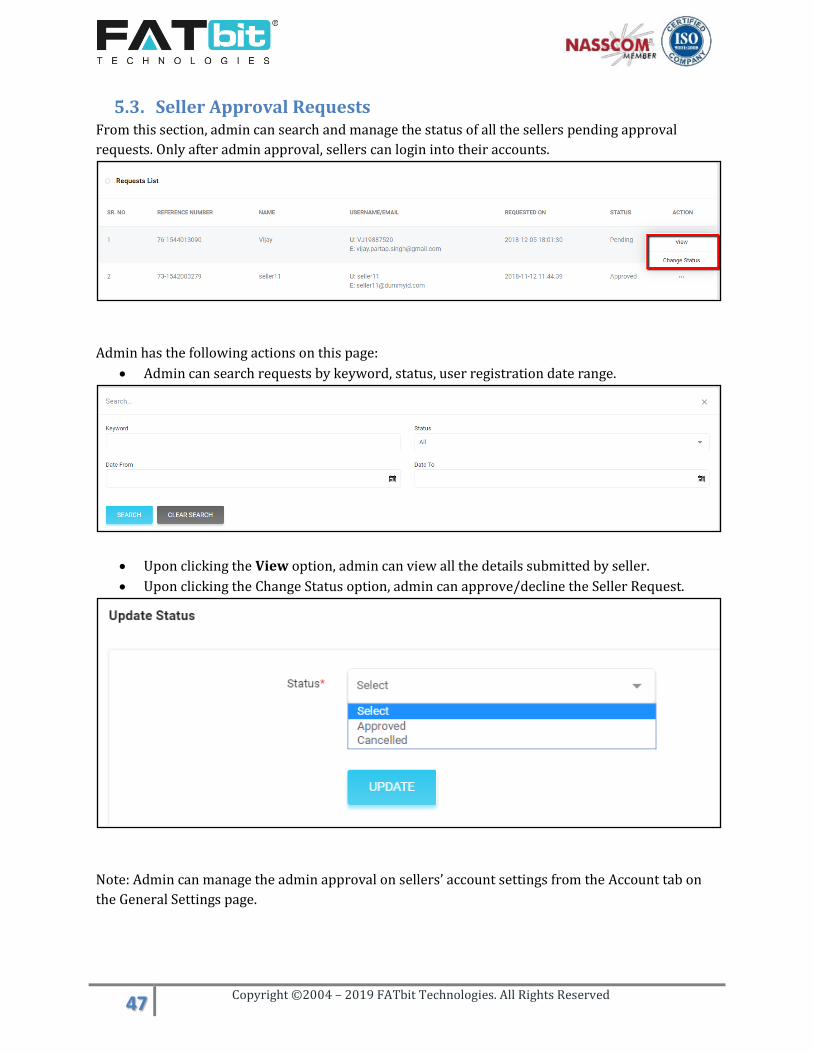
5.3. Seller Approval Requests From this section, admin can search and manage the status of all the sellers pending approval
requests. Only after admin approval, sellers can login into their accounts.
Admin has the following actions on this page:
Admin can search requests by keyword, status, user registration date range.
Upon clicking the View option, admin can view all the details submitted by seller.
Upon clicking the Change Status option, admin can approve/decline the Seller Request.
Note: Admin can manage the admin approval on sellers’ account settings from the Account tab on
the General Settings page.

48 Copyright ©2004 – 2019 FATbit Technologies. All Rights Reserved
5.4. Users’ GDPR Requests From this section, admin can search and manage the Users’ GDPR requests. This page lists two
types of requests:
1. Truncate Data: Upon clicking the Truncate User Data option, system will mark the request
as complete for record purpose only. Admin needs to truncate the user’s data from the
database manually.
2. Data Request: Admin can view the data request purpose by clicking on View Purpose
option. Admin can mark the request as complete for record purpose; Admin needs to share
the user’s data from the database manually.

49 Copyright ©2004 – 2019 FATbit Technologies. All Rights Reserved
6. CMS CMS menu contains the following options:-
Content Pages
Content Blocks
Navigation Management
Countries Management
States Management
Collection Management
Policy Points Management
Empty Cart Items Management
Social Platforms Management
Shop Report Reasons Management
Order Cancel Reasons Management
Order Return Reasons Management
Testimonial Management
Discount Coupons
Language Labels
Home Pages Slides Management
Banners
6.1. Content Pages
Content pages are pages in the system where the primary functionality for the page is to display
content/information on the website. Examples of content pages are About us, Mission, Vision etc.
On this page, admin can search and manage all the content pages.
Admin has the following functionality on this page:
Upon clicking the Layout Instructions option, admin can view the available layouts for the
content pages. These layouts vary from theme to theme.

50 Copyright ©2004 – 2019 FATbit Technologies. All Rights Reserved
Upon clicking the Add Page option, admin can add a new content page. Admin needs to fill
the following fields:
Page Identifier
SEO friendly URL
Select Layout
Page title and details as per selected layout in all languages. Upon clicking the Edit option, admin can edit the details of a content page.
Upon clicking the Delete option, admin can delete the content page.

51 Copyright ©2004 – 2019 FATbit Technologies. All Rights Reserved
6.2. Content Blocks Content blocks are the small content sections available on the pages like Become a Seller page,
Registration page, Contact us page and Password Reset page. From this page, admin can edit and
manage the status of available content blocks but can’t add new blocks.
Admin has the following operations on this page:
Upon clicking the Edit option, admin can edit the details mentioned below of the content
block:
Page Identifier
SEO friendly URL
Block title and content in all languages of the website. Upon clicking the status toggle button, admin can change the status of the block. Only
content blocks with active status will displayon the front end of the website.

52 Copyright ©2004 – 2019 FATbit Technologies. All Rights Reserved
6.3. Navigation Management From this page, admin can manage the navigation bars and their options but admin cannot add a
new navigation bar. These navigation bars display either on the header or footer of the website.
Header Navigation bars
Footer Navigation bars
Admin has the following operations on this page:
Upon clicking the Edit option, admin can edit the below details of Navigation bar:
Identifier
Status
Title in all languages of the website Upon clicking the status toggle button, admin can change the status of navigation bar. Only
navigation bar with active status will be displayed on the front end of the website.
Upon clicking the Pages option, admin will be redirected to the Navigation Pages Listing
page and can manage links of navigation bar.

53 Copyright ©2004 – 2019 FATbit Technologies. All Rights Reserved
Admin has the following options on the Navigation Pages Listing page:
Upon clicking the Back to Navigation option, admin will be redirected back to Navigation
Listing page.
Upon clicking the Add Navigation Page option, admin can link a new page in the navigation
bar. Following are the available form fields:
Caption Identifier
Type could be CMS page, External Page and Product Category page. Select CMS page option to link CMS pages, External Pages option to link any external page or hard coded pages like Contact Us, Become a Seller, Testimonial page etc and Product Category Page option to link product categories pages.
Link target: Admin can select Current Window option to open page in current tab or Blank Window option to open page in new tab.
Login Protected
Link to CMS Page/External Page/Product Category Page
Display Order
Title in all languages of the website Upon clicking the Edit option, admin can edit the details of the navigation page.
Upon clicking the Delete option, admin can delete the navigation page link from the
navigation bar.
54 Copyright ©2004 – 2019 FATbit Technologies. All Rights Reserved
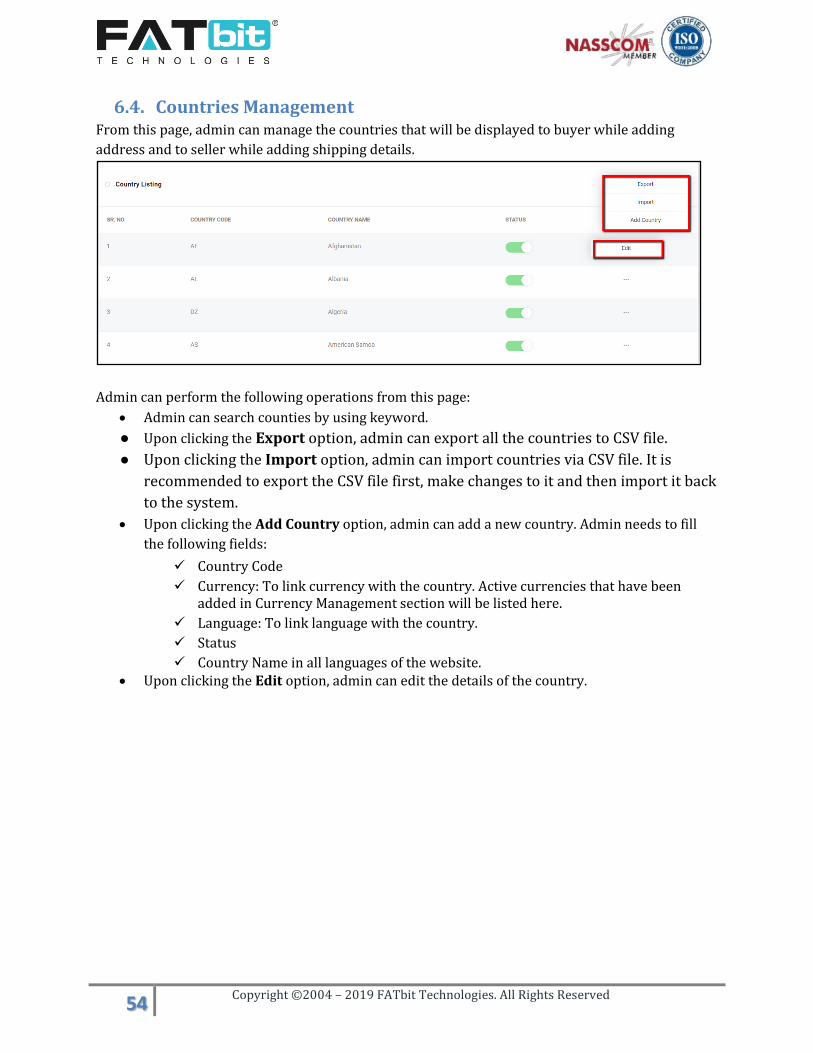
6.4. Countries Management From this page, admin can manage the countries that will be displayed to buyer while adding
address and to seller while adding shipping details.
Admin can perform the following operations from this page:
Admin can search counties by using keyword.
● Upon clicking the Export option, admin can export all the countries to CSV file.
● Upon clicking the Import option, admin can import countries via CSV file. It is
recommended to export the CSV file first, make changes to it and then import it back
to the system.
Upon clicking the Add Country option, admin can add a new country. Admin needs to fill
the following fields:
Country Code
Currency: To link currency with the country. Active currencies that have been added in Currency Management section will be listed here.
Language: To link language with the country.
Status
Country Name in all languages of the website. Upon clicking the Edit option, admin can edit the details of the country.

55 Copyright ©2004 – 2019 FATbit Technologies. All Rights Reserved
6.5. States Management From this page, admin can manage all the states that will be displayed to buyer while adding
address.
Admin has the following options on this page:
Admin can search states by using keyword and country.
● Upon clicking the Export option, admin can export all the states to a CSV file.
● Upon clicking the Import option, admin can import states via CSV file. It is
recommended to export the CSV file first, then make changes to it and import it back
to the system.
Upon clicking the Add State option, admin can add a new state. Admin needs to fill the
following fields:
State Identifier
State Code
Country: To link state with the country. Active countries that have been added in Country Management section will be listed here.
Status
State Name in all languages of the website. Upon clicking the Edit option, admin can edit the details of the state.

56 Copyright ©2004 – 2019 FATbit Technologies. All Rights Reserved
6.6. Collection Management Collections are the group of products, categories, shops or brands which displays on the homepage
of the website.
Shop Collection
Category Collection

57 Copyright ©2004 – 2019 FATbit Technologies. All Rights Reserved
Product Collection
From the Collection Listing page, admin can search and manage collections.
Admin has the following options on this page:
Admin can search collections by using keywords, collection type and layout type.
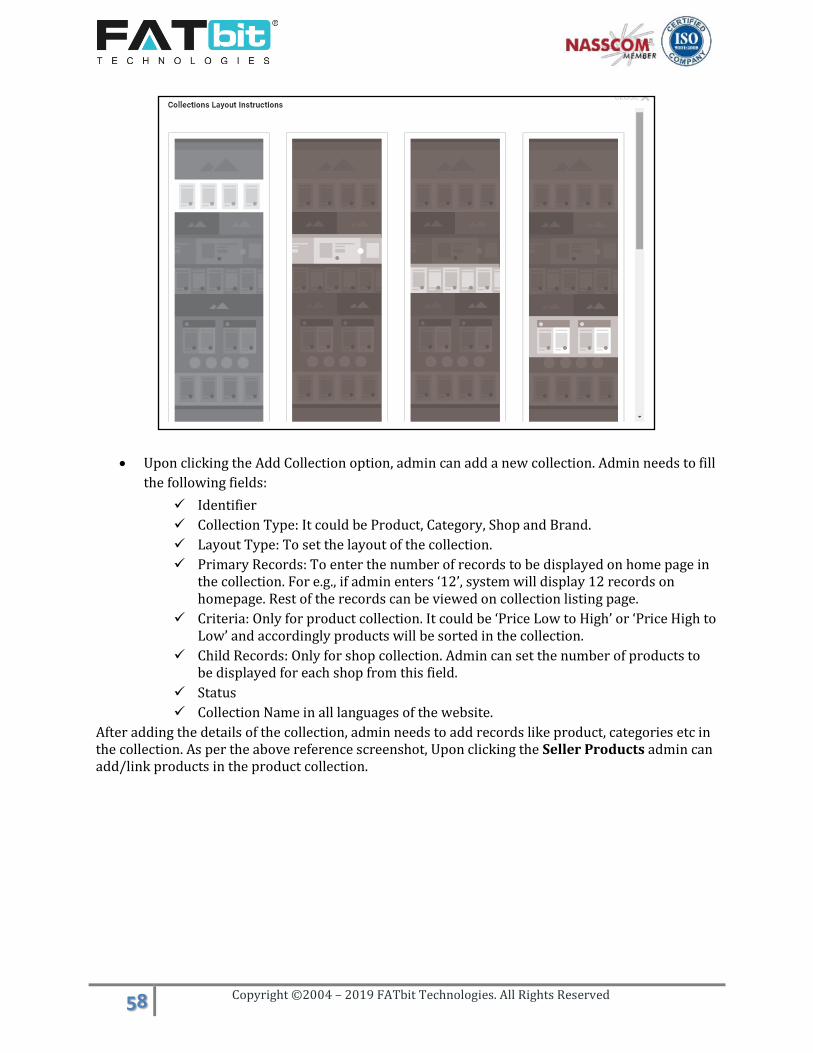
Upon clicking the Collection Layout Instructions option, admin can view the available
layouts for the collection.
58 Copyright ©2004 – 2019 FATbit Technologies. All Rights Reserved
Upon clicking the Add Collection option, admin can add a new collection. Admin needs to fill
the following fields:
Identifier
Collection Type: It could be Product, Category, Shop and Brand.
Layout Type: To set the layout of the collection.
Primary Records: To enter the number of records to be displayed on home page in the collection. For e.g., if admin enters ‘12’, system will display 12 records on homepage. Rest of the records can be viewed on collection listing page.
Criteria: Only for product collection. It could be ‘Price Low to High’ or ‘Price High to Low’ and accordingly products will be sorted in the collection.
Child Records: Only for shop collection. Admin can set the number of products to be displayed for each shop from this field.
Status
Collection Name in all languages of the website.
After adding the details of the collection, admin needs to add records like product, categories etc in the collection. As per the above reference screenshot, Upon clicking the Seller Products admin can add/link products in the product collection.

59 Copyright ©2004 – 2019 FATbit Technologies. All Rights Reserved
Upon clicking the Edit option, admin can edit the details of the collection.
Upon clicking the Delete option, admin can delete the collection.

60 Copyright ©2004 – 2019 FATbit Technologies. All Rights Reserved
6.7. Policy Points Management On this page, admin can manage warranty and return policies that will be used by the sellers to link
with the product while adding them to the inventory. The linked policies will be displayed on the
product details page.
Product Detail Page
Product Inventory Setup
Admin has the following options on this page:
Upon clicking the Add Policy Point option, admin can add a new policy. Admin needs to fill
the following fields:

61 Copyright ©2004 – 2019 FATbit Technologies. All Rights Reserved
Policy Point Identifier
Type: It could be Warranty or Return
Status
Policy Point Title in all languages of the website. Upon clicking the Status Toggle button, admin can change the status of the policy.
Upon clicking the Edit option, admin can edit the details of the policy.
Upon clicking the Delete option, admin can delete the policy.
6.8. Empty Cart Items Management On this page, the admin can manage items that are displayed on shopping cart page when it is
empty.
Empty Shopping Cart Page

62 Copyright ©2004 – 2019 FATbit Technologies. All Rights Reserved
Admin can perform the following operations from this page:
Upon clicking the Add New Empty Cart Item option, admin can add a new item on
shopping cart page. Admin needs to fill the following fields:
Empty Cart Item Identifier
Empty Cart Item URL
Open Link in new Tab (Yes/No)
Display Order
Status
Empty Cart Item Title in all languages of the website. Upon clicking the Status Toggle button, admin can change the status of the empty cart item.
Upon clicking the Edit option, admin can edit the details of the empty cart item.
Upon clicking the Delete option, admin can delete the empty cart item.
6.9. Social Platforms Management On this page, the admin can manage social media links that display at footer of the website.
Website Footer
Admin has the following options on this page:
Upon clicking the Add New Social Platform option, admin can add a new social platform to
the footer. Admin needs to fill the following fields:
Identifier
URL
Icon Type from CSS: Admin can either selects the social platform icon from the pre-defined list or upload icon from the Media tab.
Status

63 Copyright ©2004 – 2019 FATbit Technologies. All Rights Reserved
Title in all languages of the website. Upon clicking the Status Toggle button, admin can change the status of the social platform.
Upon clicking the Edit option, admin can edit the details of the social platform.
Upon clicking the Delete option, admin can delete the social platform.
6.10. Shop Report Reasons Management On this page, the admin can manage the shop report reasons that display on shop report spam page.
Shop Report Spam Page
Admin has the following options on this page:
Upon clicking the Add Reason option, admin can add a new shop report reason. Admin
needs to fill the following fields:
Reason Identifier
Reason Title in all languages of the website. Upon clicking the Edit option, admin can edit the details of the reason.
Upon clicking the Delete option, admin can delete the report reason.

64 Copyright ©2004 – 2019 FATbit Technologies. All Rights Reserved
6.11. Order Cancel Reasons Management On this page, the admin can manage order cancellation reasons that display on the order
cancellation request page.
Order Cancellation Request
Admin has the following options on this page:
Upon clicking the Add Reason option, the admin can add a new order cancellation reason.
Admin needs to fill the following fields:
Reason Identifier
Reason Title in all languages of the website. Upon clicking the Edit option, admin can edit the details of the reason.
Upon clicking the Delete option, admin can delete the cancellation reason.
65 Copyright ©2004 – 2019 FATbit Technologies. All Rights Reserved
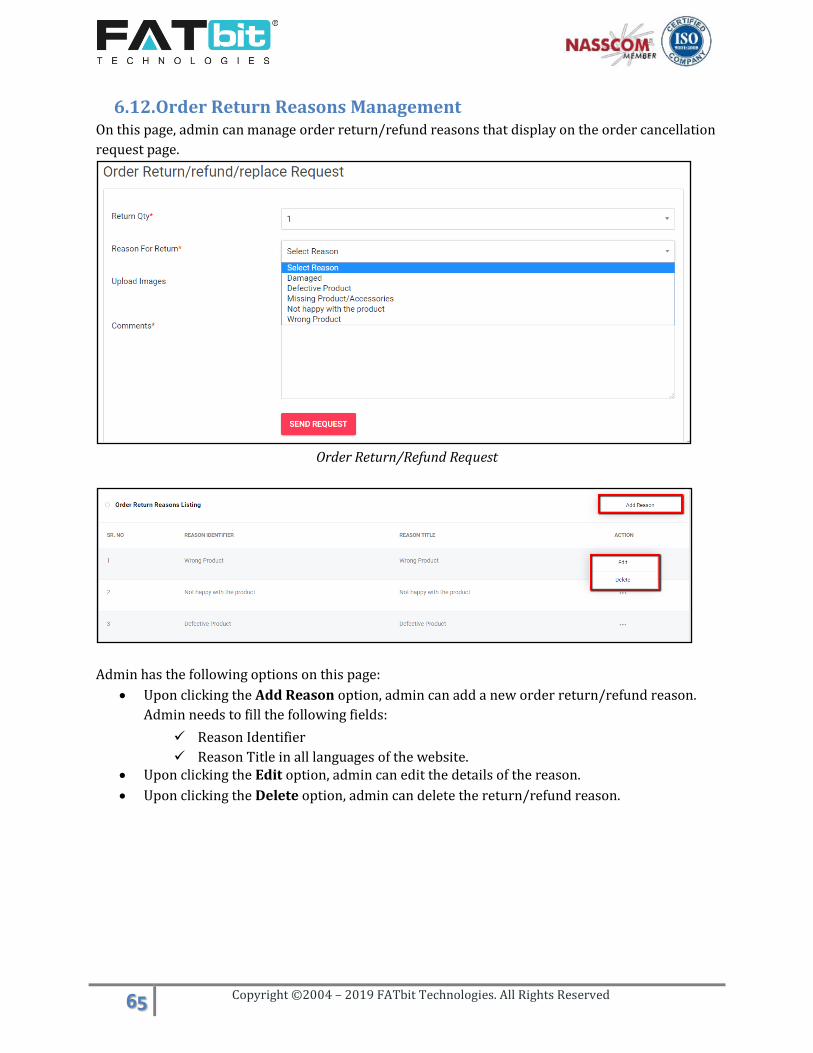
6.12. Order Return Reasons Management On this page, admin can manage order return/refund reasons that display on the order cancellation
request page.
Order Return/Refund Request
Admin has the following options on this page:
Upon clicking the Add Reason option, admin can add a new order return/refund reason.
Admin needs to fill the following fields:
Reason Identifier
Reason Title in all languages of the website. Upon clicking the Edit option, admin can edit the details of the reason.
Upon clicking the Delete option, admin can delete the return/refund reason.
66 Copyright ©2004 – 2019 FATbit Technologies. All Rights Reserved
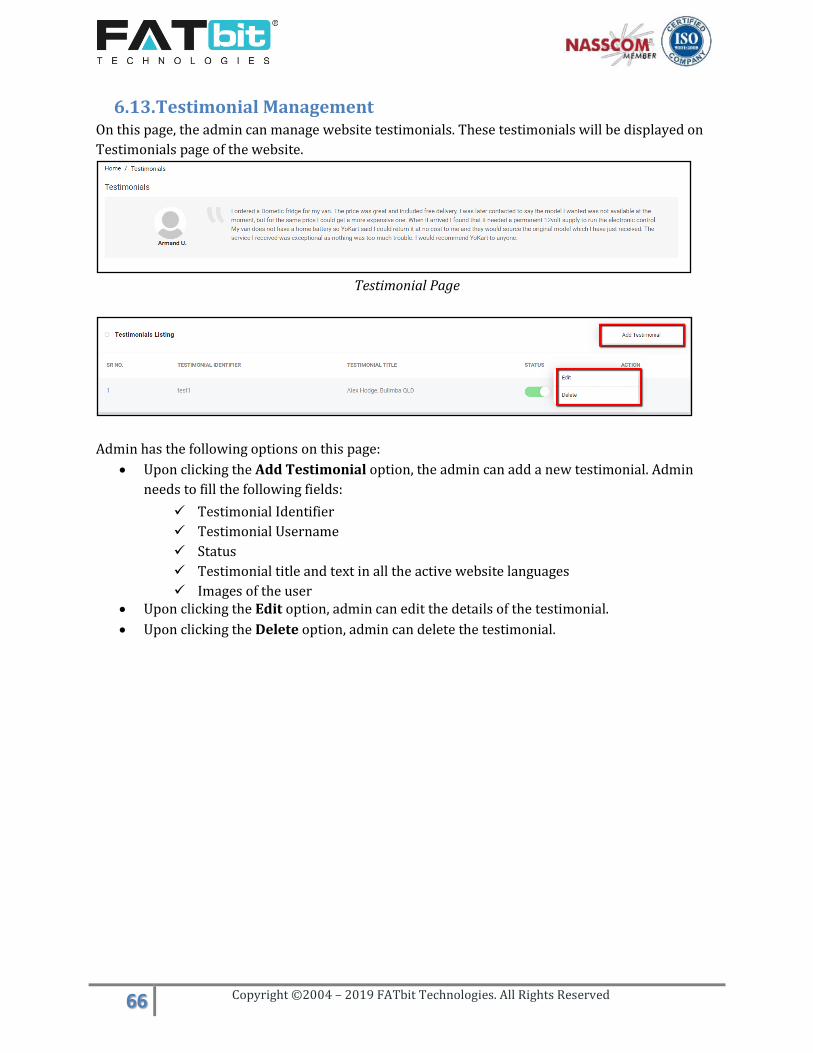
6.13. Testimonial Management On this page, the admin can manage website testimonials. These testimonials will be displayed on
Testimonials page of the website.
Testimonial Page
Admin has the following options on this page:
Upon clicking the Add Testimonial option, the admin can add a new testimonial. Admin
needs to fill the following fields:
Testimonial Identifier
Testimonial Username
Status
Testimonial title and text in all the active website languages
Images of the user Upon clicking the Edit option, admin can edit the details of the testimonial.
Upon clicking the Delete option, admin can delete the testimonial.

67 Copyright ©2004 – 2019 FATbit Technologies. All Rights Reserved
6.14. Discount Coupons On this page, the admin can manage discount coupons that can be applied by users(buyer & seller)
while buying products and subscription packages(Available only for sellers).
Admin has the following options on this page:
Admin can search coupons by using keywords and coupon type.
Upon clicking the Add coupon option, admin can add a new discount coupon. Admin needs
to fill the following details:
Coupon Identifier
Coupon Code
Select Discount Type: It could be either ‘Product Purchase’ or ‘Subscription Purchase’. Discount In: It could be either ‘Percentage’ or ‘Flat Amount’.
Discount Value
Minimum Order Value
Maximum Discount Value: Only in the case of discount in percentage.
Date From: From which date this coupon can be applied.
Date To: After this date coupon will be expired.
Uses per Coupon: How many times this coupon can be used by all the users.
Uses per Customer: How many times a user can use this coupon.
Coupon Status
Coupon Title and description in all languages of the website.
Coupon image
After creating the coupon, admin can link the coupon with products, categories and users. If linked, then the coupon will be applied to the linked products, products under linked categories and linked users can use the coupon.
Upon clicking the Edit option, admin can edit the details of the coupon.
68 Copyright ©2004 – 2019 FATbit Technologies. All Rights Reserved
Upon clicking the Link option, admin can link coupon with products, categories and users.
Upon clicking the History option, admin can view the coupon history. A detail of the coupon
usage will be shown against order etc.
Note: Admin will bear the cost of discount provided to the customers from the coupons.This
amount would be adjusted against the commission and other credits.
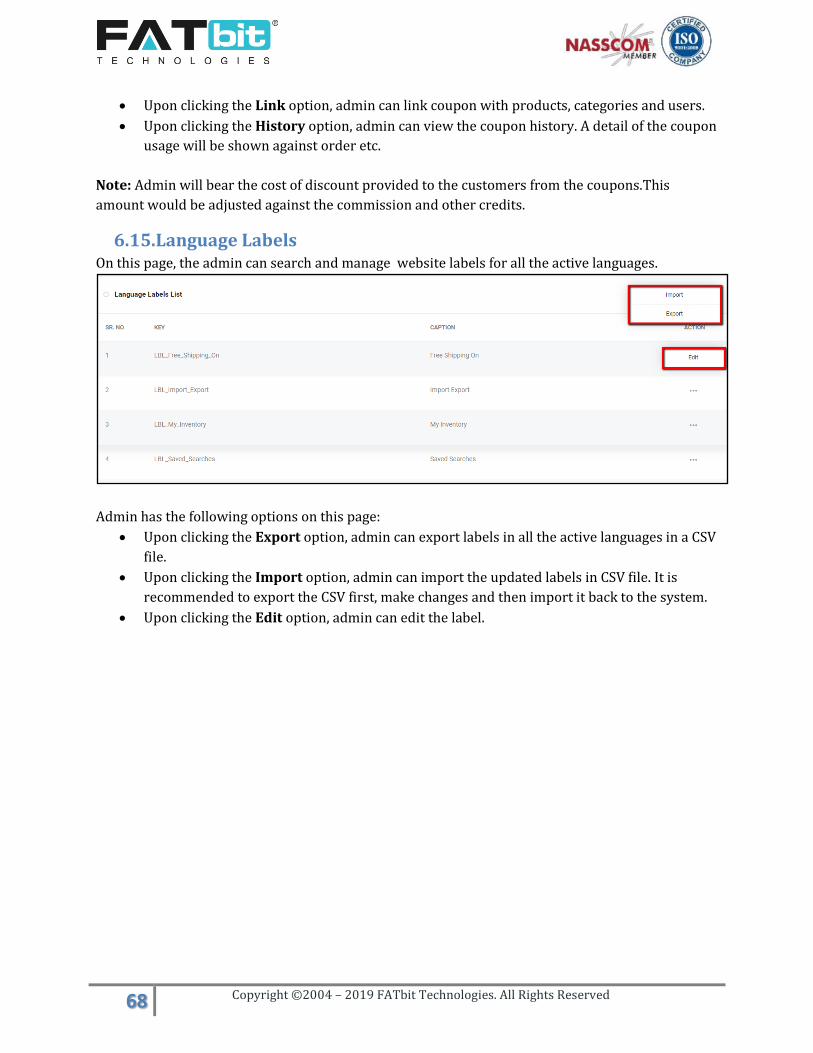
6.15. Language Labels On this page, the admin can search and manage website labels for all the active languages.
Admin has the following options on this page:
Upon clicking the Export option, admin can export labels in all the active languages in a CSV
file.
Upon clicking the Import option, admin can import the updated labels in CSV file. It is
recommended to export the CSV first, make changes and then import it back to the system.
Upon clicking the Edit option, admin can edit the label.
69 Copyright ©2004 – 2019 FATbit Technologies. All Rights Reserved
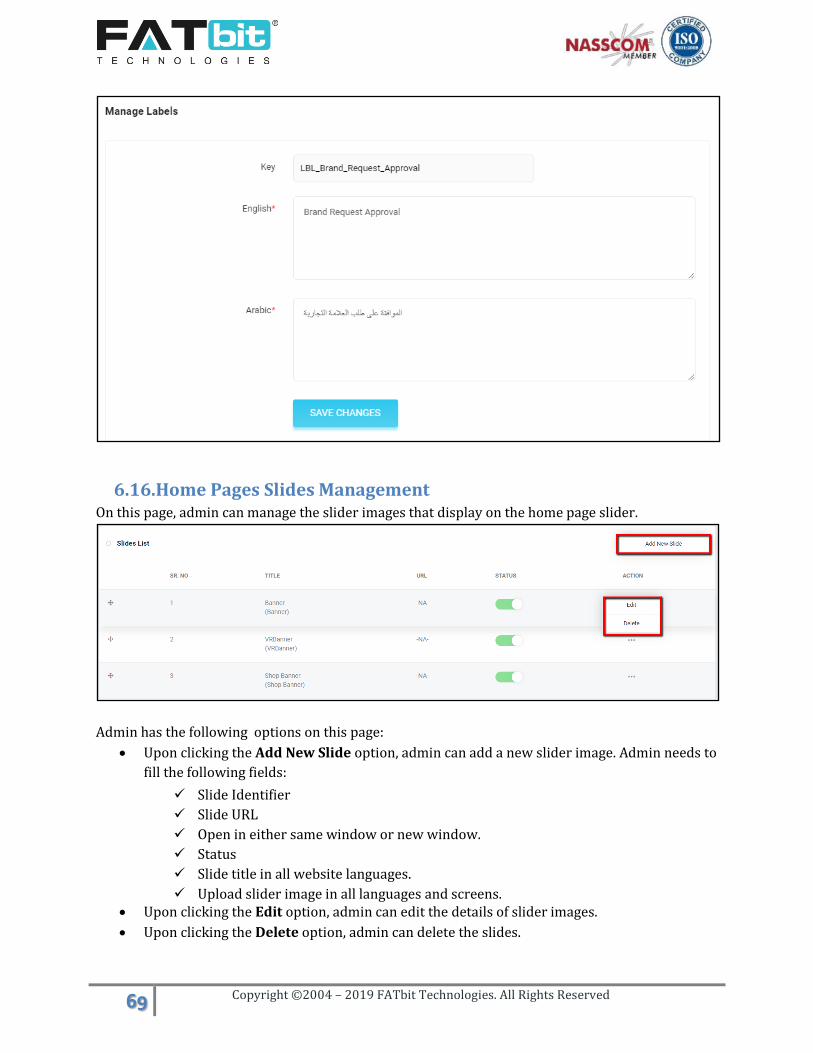
6.16. Home Pages Slides Management On this page, admin can manage the slider images that display on the home page slider.
Admin has the following options on this page:
Upon clicking the Add New Slide option, admin can add a new slider image. Admin needs to
fill the following fields:
Slide Identifier
Slide URL
Open in either same window or new window.
Status
Slide title in all website languages.
Upload slider image in all languages and screens. Upon clicking the Edit option, admin can edit the details of slider images.
Upon clicking the Delete option, admin can delete the slides.

70 Copyright ©2004 – 2019 FATbit Technologies. All Rights Reserved
Note: Active slide promotions under PPC Promotions have the higher priority of displaying on the
homepage slider than the slider images added under the slides management.
Admin can set the slides count to be displayed on the home page slider from PPC Management tab
under General Settings.
If the promotional slides added by the seller are more than the slides count set by the admin,
system will display the slides on home page slider, randomly.
6.17. Banners On this page, the admin can manage the banners that display on home page and product details
page.
Admin has the following options on this page:
Upon clicking the Banner Layout Instructions, admin can view the banner locations on the
website. Banner locations are pre-defined and admin cannot add new banner locations.
Homepage has 2 banner locations and the product details page has one banner location
(latyout 3).

71 Copyright ©2004 – 2019 FATbit Technologies. All Rights Reserved
Upon clicking the Edit option, admin can edit the details of banner location like banner
location title, promotion cost etc.
Upon clicking the Banner option, admin can see all the banners and promotions under that
banner location. If the banner count is more than the pre-defined count for that location
then the system will display banners & promotions randomly.
Admin has the following options on the banners/promotions page:
72 Copyright ©2004 – 2019 FATbit Technologies. All Rights Reserved
Upon clicking the Add New option, admin can add a new banner. Admin needs to fill the
following fields:
URL
Open in either same window or new window.
Status
Banner title in all website languages.
Upload banner image in all languages and screens. Upon clicking the Edit option, admin can edit the details of banner.
Upon clicking the Status Toggle button, admin can change the status of the banner. Only
active banners will be displayed on the website.
73 Copyright ©2004 – 2019 FATbit Technologies. All Rights Reserved
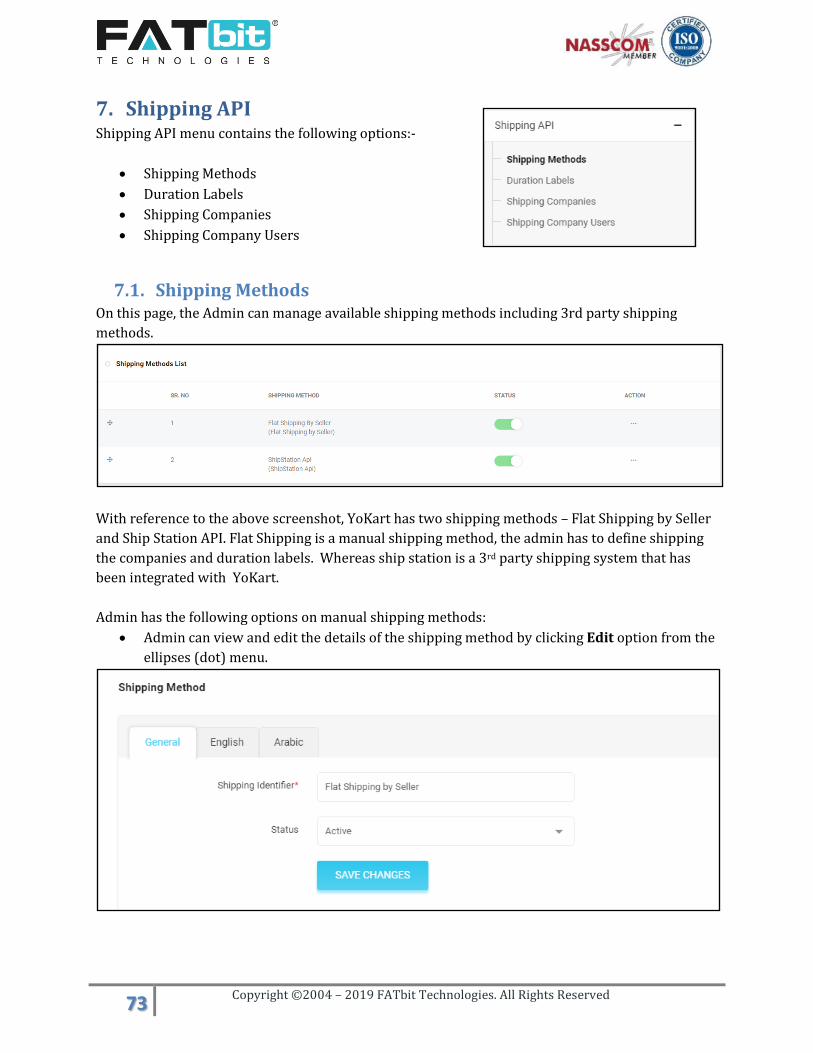
7. Shipping API Shipping API menu contains the following options:-
Shipping Methods
Duration Labels
Shipping Companies
Shipping Company Users
7.1. Shipping Methods On this page, the Admin can manage available shipping methods including 3rd party shipping
methods.
With reference to the above screenshot, YoKart has two shipping methods – Flat Shipping by Seller
and Ship Station API. Flat Shipping is a manual shipping method, the admin has to define shipping
the companies and duration labels. Whereas ship station is a 3rd party shipping system that has
been integrated with YoKart.
Admin has the following options on manual shipping methods:
Admin can view and edit the details of the shipping method by clicking Edit option from the
ellipses (dot) menu.

74 Copyright ©2004 – 2019 FATbit Technologies. All Rights Reserved
Admin has the following options on 3rd party shipping methods:
Admin can view and edit the details of the shipping method by clicking the Edit option from
the ellipses (dot) menu.
Upon clicking the Settings option, admin can set the API keys of the Shipstation shipping
method.
7.2. Duration Labels On this page, the admin can manage shipping durations for manual shipping method. These
duration labels will be linked with products to define the shipping details.
Checkout Page
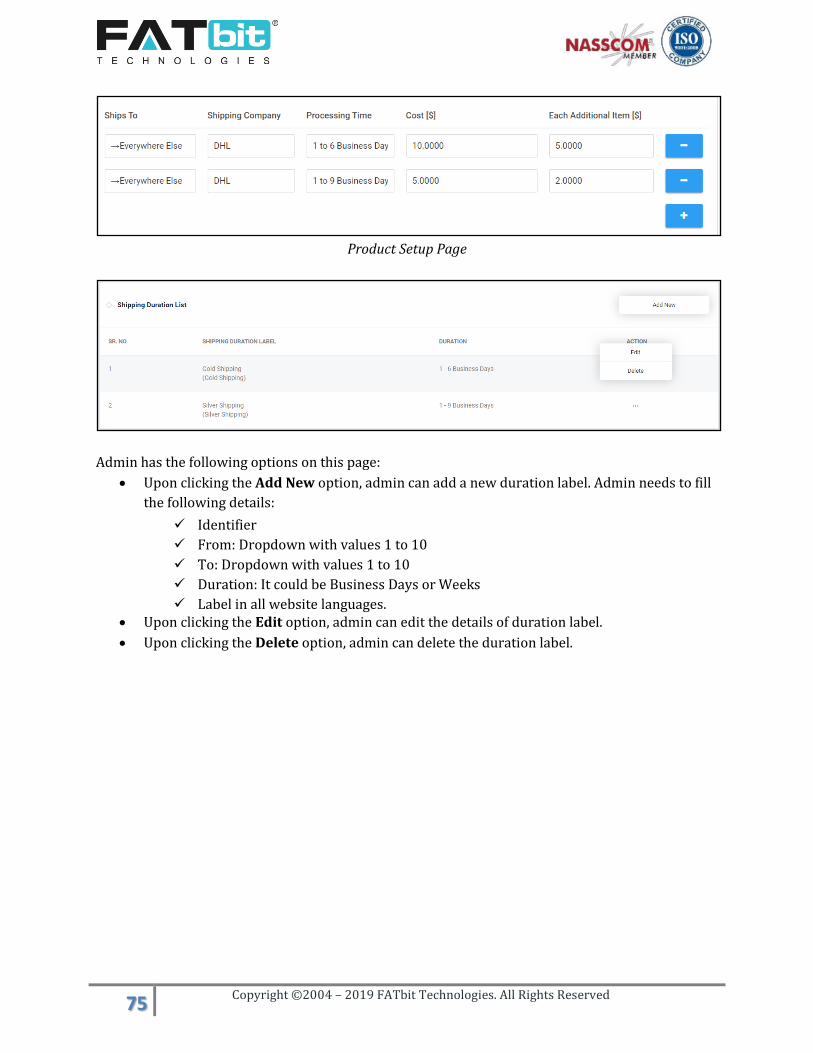
75 Copyright ©2004 – 2019 FATbit Technologies. All Rights Reserved
Product Setup Page
Admin has the following options on this page:
Upon clicking the Add New option, admin can add a new duration label. Admin needs to fill
the following details:
Identifier
From: Dropdown with values 1 to 10
To: Dropdown with values 1 to 10
Duration: It could be Business Days or Weeks
Label in all website languages. Upon clicking the Edit option, admin can edit the details of duration label.
Upon clicking the Delete option, admin can delete the duration label.

76 Copyright ©2004 – 2019 FATbit Technologies. All Rights Reserved
7.3. Shipping Companies On this page, the admin can manage shipping companies for the manual shipping method. These
shipping companies will be linked with products when defining the shipping details.
Checkout Page
Product Setup Page
Admin has the following options on the Shipping Companies Listing page:
Upon clicking the Add New option, admin can add a new shipping company. Admin need to
fill the following details:

77 Copyright ©2004 – 2019 FATbit Technologies. All Rights Reserved
Identifier
Status
Shipping Company Name in all website languages. Upon clicking the Edit option, admin can edit the details of shipping company.
Upon clicking the Delete option, admin can delete the shipping company.
7.4. Shipping Company Users On this page, the admin can add shipping users to keep a record of COD (cash on delivery) orders.
Without assigning a shipping company user, the admin cannot change the order status of COD
orders.
Admin has the following options on this page:
Upon clicking the Add New option, admin can add a new shipping company user. Admin
needs to fill the following details:
Username
Customer Name
Date of Birth
Phone
Email address
Country
State
City
Tracking Site URL Upon clicking the Edit option, admin can edit the details of company user.
Upon clicking the Assigned COD Orders option, admin can view all the assigned COD
orders to that user.

78 Copyright ©2004 – 2019 FATbit Technologies. All Rights Reserved

79 Copyright ©2004 – 2019 FATbit Technologies. All Rights Reserved
8. Settings Settings menu contains the following options:-
General Settings
Payment Methods
Currency Management
Sales Tax
Commission Settings
Affiliate Commission Settings
Email Template Management
Order Status Management
Subscription Package Management
Rewards on Every Purchase
8.1. General Settings On this page, the admin can manage overall configurations/settings of the website.
8.1.1. General Tab
On this tab, the admin can manage the following settings:
Basic Tab
1. Store Owner Email: All the administrator email notifications will be sent to the entered email
address in this field.
2. Telephone: To enter admin telephone number. This number will be displayed on footer of the
website.
3. Fax: To enter fax number. This number will be displayed on Contact Us page on the website.
4. About Us Page: To select about us page from the CMS pages.
5. Privacy Policy Page: To select privacy policy page from the CMS pages.
6. Terms and Condition Page: To select terms and conditions page from the CMS pages. This link
will display on sign up page.
7. GDPR Policy Page: To select GDPR policy page from the CMS pages. This link will display on
GDPR request data popup.
8. Cookies Policy Page: To select cookies policy page from the CMS pages. This link will display
on the cookies policy bar on bottom of the website only when cookies policies option is enabled.

80 Copyright ©2004 – 2019 FATbit Technologies. All Rights Reserved
9. Enable Cookies Policies: Upon enabling this option, the system will display the Accept Cookies
bar at bottom of the website.
10. Admin Default Items per page: This option will help the admin to set the number of items the
system will display on listing pages like users page, catalog page, seller inventories page etc
under admin panel.
Language(s) Tab
1. Website Name: To enter the website name. This name will be displayed on footer, order return
request detail page, homepage title, etc.
2. Website Owner: To enter website owner name.
3. Address: This address will be displayed on Contact Us page on the website.
4. Cookies Policies Text: This text will be displayed on cookies bar.
8.1.2. Local Tab
On this tab, the admin can manage the following settings:
1. Default Website Language: Default language of the website.
2. Time zone: Date & time on the orders, transaction etc modules will be displayed as per the
time zone selected in this field.
3. Country: To select the default country to be displayed on country dropdown.
4. Date Format: All the dates on the website displayed in the selected date format.
5. Default Website Currency: All the products on the website will be displayed in the selected
currency. Note: all the transactions will be completed in the default currency set at the time of
system installation.
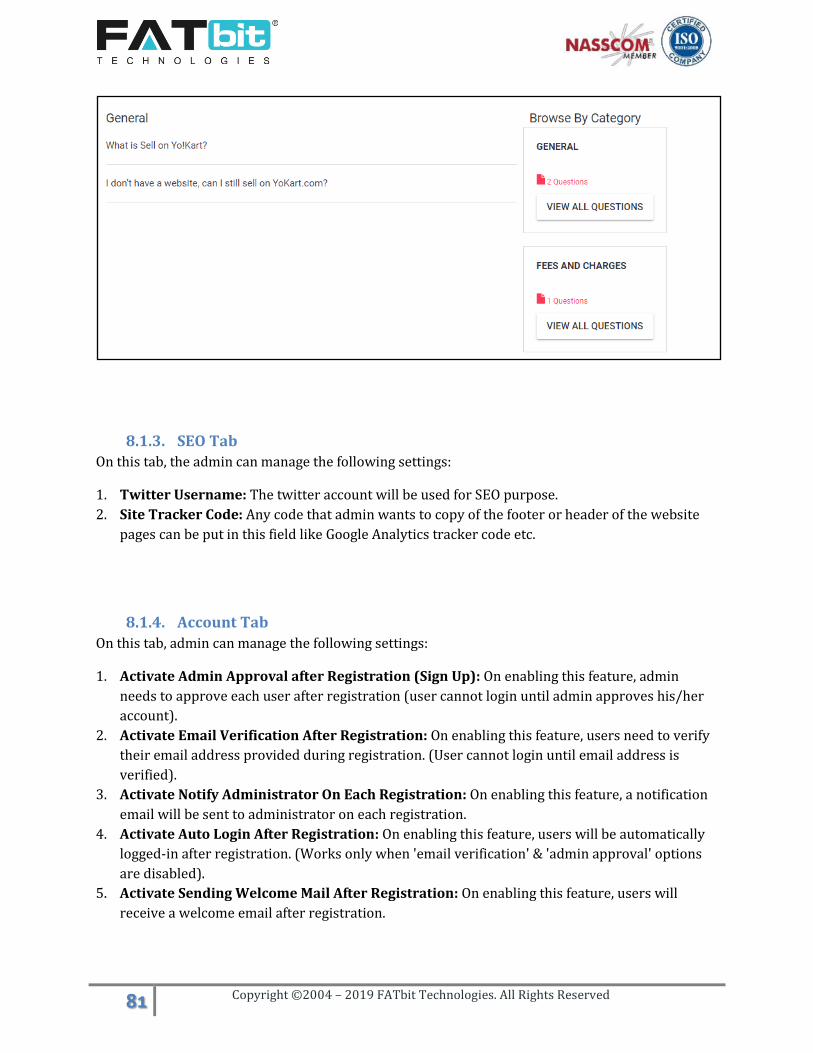
6. FAQ Page Main Category: Admin can set default FAQ category that display on FAQ page.
7. Seller Page Main FAQ Category: Admin can set default FAQ category that display on Become a
Seller page, FAQ section. Refer screenshot below, General FAQ category is set as default
category so all the questions under General category has been displayed.
81 Copyright ©2004 – 2019 FATbit Technologies. All Rights Reserved
8.1.3. SEO Tab
On this tab, the admin can manage the following settings:
1. Twitter Username: The twitter account will be used for SEO purpose.
2. Site Tracker Code: Any code that admin wants to copy of the footer or header of the website
pages can be put in this field like Google Analytics tracker code etc.
8.1.4. Account Tab
On this tab, admin can manage the following settings:
1. Activate Admin Approval after Registration (Sign Up): On enabling this feature, admin
needs to approve each user after registration (user cannot login until admin approves his/her
account).
2. Activate Email Verification After Registration: On enabling this feature, users need to verify
their email address provided during registration. (User cannot login until email address is
verified).
3. Activate Notify Administrator On Each Registration: On enabling this feature, a notification
email will be sent to administrator on each registration.
4. Activate Auto Login After Registration: On enabling this feature, users will be automatically
logged-in after registration. (Works only when 'email verification' & 'admin approval' options
are disabled).
5. Activate Sending Welcome Mail After Registration: On enabling this feature, users will
receive a welcome email after registration.
82 Copyright ©2004 – 2019 FATbit Technologies. All Rights Reserved
6. Activate Separate Seller Sign Up Form: On enabling this feature, buyers and sellers will have
a separate sign up form.
7. Activate Administrator Approval On Seller Request: On enabling this feature, admin needs
to approve seller's request after registration (seller rights will not be accessible until admin
approves, only works when 'activate separate seller sign up form' is enabled).
8. Buyers Can See Seller Tab: On enabling this feature, buyers will be able to see seller tab.
(Works only when 'activate separate seller sign up form' is enabled)
9. Enable Facebook Login: On enabling this feature, users will be able to login using Facebook
account. Please define settings for Facebook login if enabled under "Third party APIs" tab
10. Google Plus Login: On enabling this feature, users will be able to login using Google plus
account. Please define settings for Google plus login if enabled under "Third party APIs" tab.
11. Max Seller Request Attempts: Set maximum seller sign up request attempts allowed in the
system.
12. Minimum Withdrawal Amount: Admin can set the minimum withdrawal amount for
seller/affiliate to place a withdrawal request.
13. Minimum Interval [days]: Minimum interval in days between two withdrawal requests placed
by the same user.
8.1.5. Product Tab
On this tab, the admin can manage the following settings:
1. Allow Seller To Add Products: On enabling this feature, seller will be able to add product into
his/her product catalog. These products will be exclusive to the seller.
2. Activate Administrator Approval On Products: On enabling this feature, admin needs to
approve the sellers’ product added into their product catalog (Works only when “Allow Seller
To Add Products” is enabled)
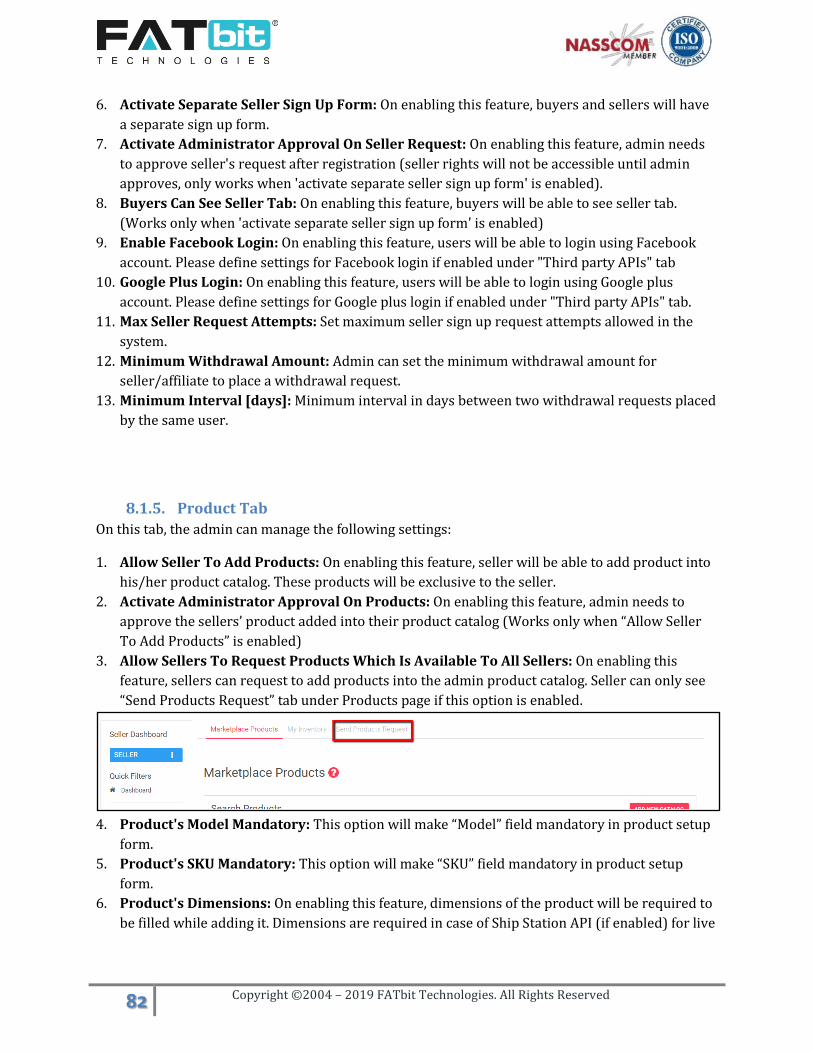
3. Allow Sellers To Request Products Which Is Available To All Sellers: On enabling this
feature, sellers can request to add products into the admin product catalog. Seller can only see
“Send Products Request” tab under Products page if this option is enabled.
4. Product's Model Mandatory: This option will make “Model” field mandatory in product setup
form.
5. Product's SKU Mandatory: This option will make “SKU” field mandatory in product setup
form.
6. Product's Dimensions: On enabling this feature, dimensions of the product will be required to
be filled while adding it. Dimensions are required in case of Ship Station API (if enabled) for live
83 Copyright ©2004 – 2019 FATbit Technologies. All Rights Reserved
shipping charges. Note: These dimensions will be package dimensions and not product
dimensions.
7. Brand Request Approval: On enabling this feature, admin needs to approve the brand
requests (Seller cannot link the requested brand with any product until it gets approved by
admin)
8. Default Items per Page (Catalog): Determines how many catalog items are shown per page
(products, categories, etc).
8.1.6. Cart/Wishlist Tab
On this tab, the admin can manage the following settings:
1. Add Favorites To Wishlist: On enabling this feature, buyer needs to create list to add products
into it. The system will not provide any default favorite list.
2. On Payment Cancel Maintain Cart: On enabling this option, system will maintain the cart
items on payment cancellation.
3. On Payment Failure Maintain Cart: On enabling this option, system will maintain the cart
items on payment failure.
4. Reminder Interval for Products in Cart [days]: System will send an email notification alert
to the buyer for the products in the cart after days set in this field. Only works if “On Payment
Cancel Maintain Cart” or “On Payment Failure Maintain Cart” option is enabled.
5. Set Notification Count To Be Sent: Set how many email notifications to be sent to the buyer.
Only works if “On Payment Cancel Maintain Cart” option is enabled.
6. Reminder Interval for Products In Wishlist [days]: System will send email notification alerts
to buyer for the products in the wishlist after days set in this field. Only works if “Add Favorites
To Wishlist” option is enabled.
7. Set Notification Count To Be Sent: Set how many email notifications to be sent to the buyer.
Only works if “Add Favorites To Wishlist” option is enabled.
8.1.7. Checkout Tab
On this tab, admin can manage the following settings:
1. Activate Live Payment Transaction Mode: Upon enabling this option, all active payment
gateways will work in live mode. If not enabled then all active payment gateways will work in
sandbox/testing mode.
2. New Order Alert Email: Once enabled, the system will send email notifications to admin on the
email address set in “Store Owner Email” when a new order placed.
3. Tax Collected By Seller: Upon enabling this option, system will credit tax amount in the orders
to sellers’ wallet upon order completion.

84 Copyright ©2004 – 2019 FATbit Technologies. All Rights Reserved
4. Return Shipping Charges To Customer: Upon enabling this option, system will credit
shipping charges to buyer’s wallet when admin/seller approves their order return/refund
request.
5. Default Child Order Status: System will set the selected status of all child orders when any
parent/customer order of payment pending has been placed. Does not work for “Cash on
Delivery (COD) orders.
6. Default Paid Order Status: System will set the selected status of all child orders when any
parent/customer order of paid payment has been placed. Does not work for “Cash on Delivery
(COD) orders.
7. Default Shipping Order Status: Admin can set statuses to be used for shipping and accordingly
system will perform the actions.
8. Default Delivered Order Status: Admin can set the statuses to be used for delivered order and
accordingly system will perform the actions.
9. Default Cancelled Order Status: Admin can set the statuses to be used for cancelled order and
accordingly the system will perform the actions.
10. Return Requested Order Status: Admin can set the order statuses to be used when a
return/refund request will be placed by the buyer.
11. Return Request Withdrawn Order Status: Admin can set the order statuses to be used when
a return/refund request will be withdrawn by the buyer.
12. Return Request Approved Order Status: Admin can set the order statuses to be used when a
return/refund request will be approved by the admin/seller.
13. Cash on Delivery Order Status: System will set statuses of all child orders when any
parent/customer order has been paid with cash on delivery payment method.
14. Seller Order Status: Seller will see only orders of statuses set by the admin in this field.
15. Buyer Order Status: Buyer will see only orders of statuses set by the admin in this field.
16. Processing Order Status: Admin can set the order statuses that can be used while processing
the order. When child order will be reached to any of the set order status, system will subtract
its quantity.
17. Completed Order Status: Admin can set statuses to be used for order completion. Please note,
system will perform few operations on completed orders like credit sellers’ order amount to
their wallets, calculate few reports on the basis of completed orders etc.
18. Feedback Ready Order Status: Admin can set statuses to be eligible for feedback/review from
buyer.
19. Allow Order Cancellation By Buyers: Buyer can only place cancellation for physical orders of
statuses set by the admin in this field.
20. Allow Order Cancellation By Buyers On Digital: Buyer can only place cancellation for digital
orders of statuses set by the admin in this field.
21. Allow Return/exchange: Buyer can only place return request for physical orders of statuses
set by the admin in this field.
22. Enable Digital Download: Buyer can only download the digital file when order status will be
one of the statuses set by the admin in this field.
23. Order Statuses To Calculate Badge Count (for Admin): Seller orders count on left navigation
bar for admin will be displayed for the order statuses set in this field.

85 Copyright ©2004 – 2019 FATbit Technologies. All Rights Reserved
24. Products on Order Stage (for Seller Inventory Report): Statuses used for products Are In Order.
This is used for Seller Dashboard Products Inventory Stock Status Report
8.1.8. Commission Tab
On this tab, the admin can manage the following settings:
1. Maximum Site Commission: Maximum commission/fees that will be charged on a particular
product/seller order.
2. Commission Charged Including Shipping: On enabling this option, commission will be
calculated including shipping charges for an order.
3. Commission Charged Including Tax: On enabling this option, commission will be calculated
including tax amount for an order.
8.1.9. Discount Tab
On this tab, the admin can manage the following settings:
1. Enable 1st Time Buyers Discount: On enabling this option, the buyer will receive a discount
coupon after successful completed of their 1st order. Rest of the fields need to be configured.
2. Discount In: It could be either in percentage or flat amount.
3. Discount Value: Discount value of the coupon.
4. Minimum Order Value: Admin can set the minimum order value to receive the coupon.
5. Max Discount Value: Admin can set maximum discount value the user can get by using the
coupon.
6. Discount Coupon Validity: Coupon validity in days from the date of credit. Please leave it
blank if you don't want coupon to expire.
8.1.10. Reward Points Tab
On this tab, the admin can manage following settings:
Rewards Points
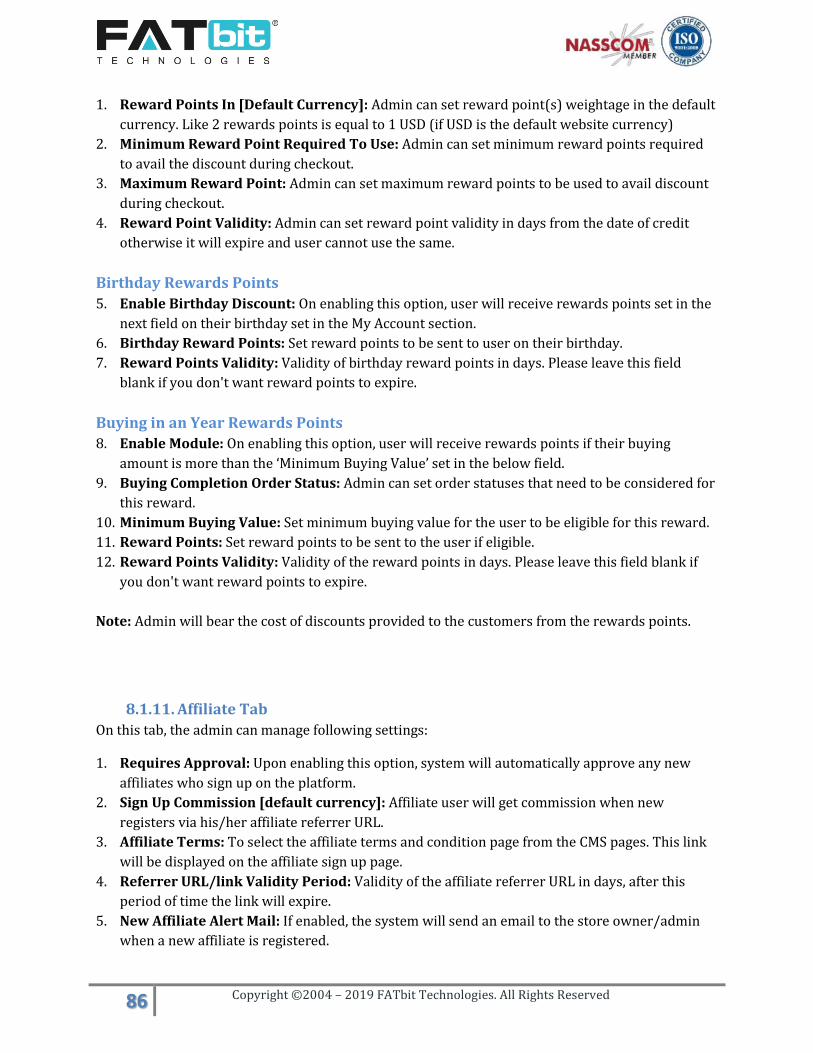
86 Copyright ©2004 – 2019 FATbit Technologies. All Rights Reserved
1. Reward Points In [Default Currency]: Admin can set reward point(s) weightage in the default
currency. Like 2 rewards points is equal to 1 USD (if USD is the default website currency)
2. Minimum Reward Point Required To Use: Admin can set minimum reward points required
to avail the discount during checkout.
3. Maximum Reward Point: Admin can set maximum reward points to be used to avail discount
during checkout.
4. Reward Point Validity: Admin can set reward point validity in days from the date of credit
otherwise it will expire and user cannot use the same.
Birthday Rewards Points
5. Enable Birthday Discount: On enabling this option, user will receive rewards points set in the
next field on their birthday set in the My Account section.
6. Birthday Reward Points: Set reward points to be sent to user on their birthday.
7. Reward Points Validity: Validity of birthday reward points in days. Please leave this field
blank if you don't want reward points to expire.
Buying in an Year Rewards Points
8. Enable Module: On enabling this option, user will receive rewards points if their buying
amount is more than the ‘Minimum Buying Value’ set in the below field.
9. Buying Completion Order Status: Admin can set order statuses that need to be considered for
this reward.
10. Minimum Buying Value: Set minimum buying value for the user to be eligible for this reward.
11. Reward Points: Set reward points to be sent to the user if eligible.
12. Reward Points Validity: Validity of the reward points in days. Please leave this field blank if
you don't want reward points to expire.
Note: Admin will bear the cost of discounts provided to the customers from the rewards points.
8.1.11. Affiliate Tab
On this tab, the admin can manage following settings:
1. Requires Approval: Upon enabling this option, system will automatically approve any new
affiliates who sign up on the platform.
2. Sign Up Commission [default currency]: Affiliate user will get commission when new
registers via his/her affiliate referrer URL.
3. Affiliate Terms: To select the affiliate terms and condition page from the CMS pages. This link
will be displayed on the affiliate sign up page.
4. Referrer URL/link Validity Period: Validity of the affiliate referrer URL in days, after this
period of time the link will expire.
5. New Affiliate Alert Mail: If enabled, the system will send an email to the store owner/admin
when a new affiliate is registered.

87 Copyright ©2004 – 2019 FATbit Technologies. All Rights Reserved
6. Activate Email Verification After Registration: On enabling this option, affiliate users need to
verify their email address provided during registration. (user cannot login until email address is
verified)
7. Activate Sending Welcome Mail After Registration: On enabling this option, affiliate user will
receive a welcome email after registration.
8.1.12. Reviews Tab
On this tab, admin can manage the following settings:
1. Default Review Status: Set the default review status when a customer adds a review on the
order. Only approved reviews will be displayed on the website.
2. Allow Reviews: If enabled then only customers can add their reviews on the orders.
3. New Review Alert Email: If enabled, system will send an email to the store owner/admin
when a new review had been posted.
8.1.13. Third Party API Tab
On this tab, admin can manage the following settings:
1. Facebook App ID: Facebook app id that will be used for Facebook login and post sharing.
2. Facebook App Secret: Facebook app secret key that will be used for Facebook login and post
sharing.
3. Twitter App Key: Twitter app id that will be used for sharing Twitter post.
4. Twitter App Secret: Twitter app secret key that will be used for sharing Twitter post.
5. Google Plus Developer Key: Used in Google plus login.
6. Google Plus Client ID: Used in Google plus login.
7. Google Plus Client Secret: Used in Google plus login.
8. Google Push Notification API Key: User for push notifications on android app.
Engage spot Push Notifications (web)
9. Enable Engage spot: If enabled, system will send push notification to the users.
10. API Key: API key of the engage spot.
11. Engage spot Code: Code provided by the engage spot for integration.
Google Map API
12. Google Map API Key: Used to get location or IP address of the user’s location.
Newsletter Subscription

88 Copyright ©2004 – 2019 FATbit Technologies. All Rights Reserved
13. Activate Newsletter Subscription: If activated, all the users’ email addresses who subscribed
from the footer of website will be shared to the selected email marketing system.
14. Email Marketing System: Admin needs to configure the selected email marketing system.
15. Mailchimp Key: Mailchimp application key used to subscribe and send newsletters.
16. Mailchimp List ID: Mailchimp subscribers list id.
17. Aweber Signup Form Code: Enter the newsletter signup code received from aweber
Google Analytics
18. Client Id: For reports fetched from the Google Analytics account and display on the admin’s
dashboard.
19. Secret Key: For reports fetched from the Google Analytics account and display on the admin’s
dashboard.
20. Analytics Id: For reports fetched from the Google Analytics account and display on the admin’s
dashboard.
Google Recaptcha
21. Site Key: For Google Recaptcha used on the sign up form, forgot password form etc.
22. Secret Key: For Google Recaptcha used on the sign up form, forgot password form etc.
8.1.14. Email Tab
On this tab, admin can manage the following settings:
Basic Tab
1. From Email: All the emails will be sent from this email address. In case Gmail SMTP is set then
system will overwrite the Gmail SMTP email.
2. Reply To Email Address: Reply on the emails will be sent to this email address.
3. Send Email: If enabled, then only system will send emails to the user.
4. Contact Email Address: All the contact us form queries will be sent to this email address.
5. Send SMTP Email: If enabled, system will use the SMTP to send emails.
6. SMTP Host: Used to setup STMP.
7. SMTP Port: Used to setup STMP.
8. SMTP Username: Used to setup STMP.
9. SMTP Password: Used to setup STMP.
10. SMTP Secure: As per the settings received from STMP server.
11. Additional Alert E-mails
Language(s) Tab
12. From Name: From name used in the emails.

89 Copyright ©2004 – 2019 FATbit Technologies. All Rights Reserved
8.1.15. Media Tab
On this tab, admin can manage the following settings:
1. Admin Logo: Display on admin panel theme on top header.
2. Desktop Logo: Display on front end of the website for desktop version.
3. Email Template Logo: Display on the emails.
4. Website Favicon: Display on the title of the browser.
5. Social Feed Image: Image used on Social media feeds
6. Payment Page Logo: Display on the payment page.
7. Watermark Image: Override the product image on product listing and details page.
8. Apple Touch Icon: Admin can update apple touch icon from here.
9. Mobile Logo: Logo of mobile app.
10. Categories Background Image: Display on the home page for categories listing collections.
8.1.16. Subscription Tab
On this tab, admin can manage the following settings:
1. Enable Subscription Module: Upon enabling this feature, sellers need to have an active
subscription package in order to display their seller inventories on the website.
2. Enable Adjust Amount: Upon enabling this option, seller can adjust the remaining balance
amount of current active subscription package while upgrading it to another subscription plan.
3. Reminder Email before Subscription Expire Days: System will send a reminder email
notification to the sellers before days set in this field.
4. Seller Subscription Status: Seller can see the subscription orders of the selected statuses on
the subscription orders listing page.
8.1.17. Referral Tab
On this tab, admin can manage the following settings:
1. Enable Referral Module: To enable share and earn feature for the users. If enabled users will
get reward points when new users register via referrer URL and purchase products on the
website.
2. Referrer URL/link Validity Period: Validity of the referrer URL in days.
Reward Benefits On Registration
3. Referrer Reward Points: Referrers will get this reward points when their referrals will
register via active referrer URL.
4. Referrer Reward Points Validity: Reward points validity in days from the date of credit.
Please leave the field blank if you don't want reward points to expire.

90 Copyright ©2004 – 2019 FATbit Technologies. All Rights Reserved
5. Referral Reward Points: Referrals will get this reward points when they register via active
referrer URL.
6. Referral Reward Points Validity: Reward points validity in days from the date of credit.
Please leave the field blank if you don't want reward points to expire.
Reward Benefits On First Purchase
7. Referrer Reward Points: Referrers will get this reward points when their referrals will place
their first orders.
8. Referrer Reward Points Validity: Reward points validity in days from the date of credit.
Please leave the field blank if you don't want reward points to expire.
9. Referral Reward Points: Referrals will get this reward points when they place their first order.
10. Rewards Points Validity In Days: Reward points validity in days from the date of credit.
Please leave the field blank if you don't want reward points to expire.
8.1.18. Sharing Tab
On this tab, admin can manage the following settings:
Language(s) Tab
1. Facebook Post Title: Enter default post title text to be used while sharing referrer URL on
Facebook.
2. Facebook Post Caption: Enter default post caption text to be used while sharing referrer URL
on Facebook.
3. Facebook Post Description: Enter default post description text to be used while sharing
referrer URL on Facebook.
4. Twitter Post Description: Enter default post description text to be used while sharing referrer
URL on Twitter.
8.1.19. System Tab
From this tab, admin can manage the following settings:
1. Auto Close System Messages: Upon enabling this option, system will automatically close
messages that display after an operation is done by the system like success messages, error
messages etc.
2. Time For Auto Close Messages: Admin can set the time in seconds after which the system
message will automatically close.
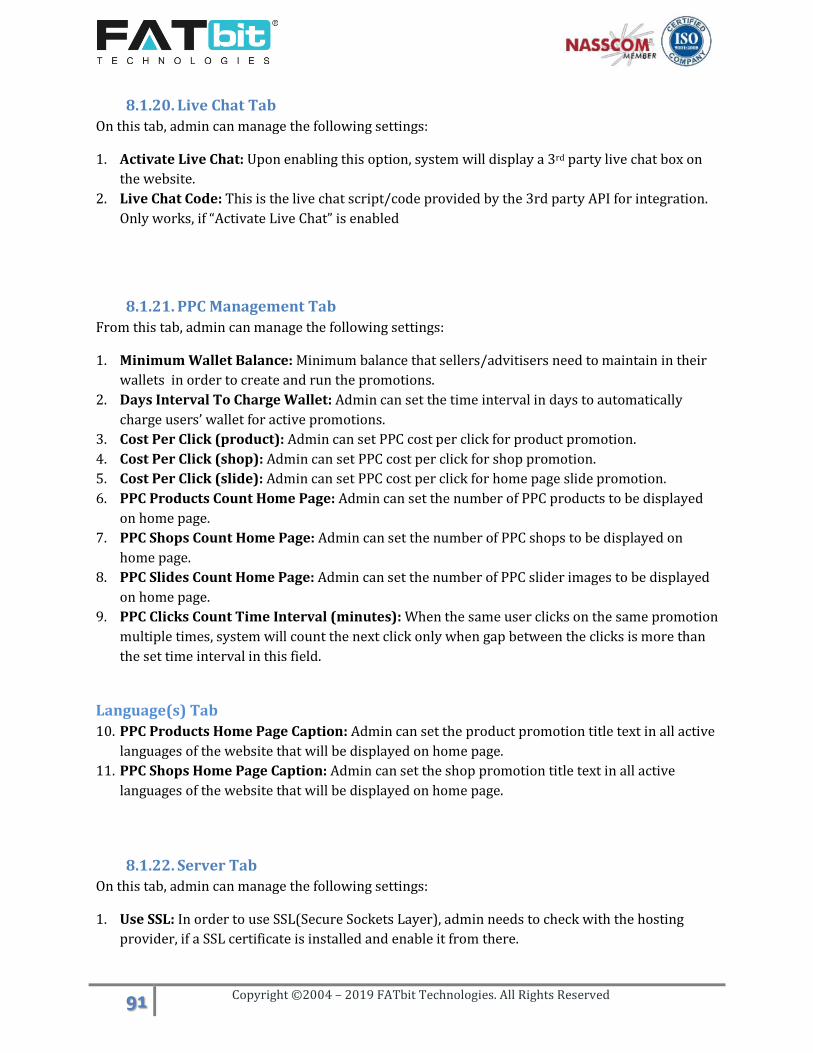
91 Copyright ©2004 – 2019 FATbit Technologies. All Rights Reserved
8.1.20. Live Chat Tab
On this tab, admin can manage the following settings:
1. Activate Live Chat: Upon enabling this option, system will display a 3rd party live chat box on
the website.
2. Live Chat Code: This is the live chat script/code provided by the 3rd party API for integration.
Only works, if “Activate Live Chat” is enabled
8.1.21. PPC Management Tab
From this tab, admin can manage the following settings:
1. Minimum Wallet Balance: Minimum balance that sellers/advitisers need to maintain in their
wallets in order to create and run the promotions.
2. Days Interval To Charge Wallet: Admin can set the time interval in days to automatically
charge users’ wallet for active promotions.
3. Cost Per Click (product): Admin can set PPC cost per click for product promotion.
4. Cost Per Click (shop): Admin can set PPC cost per click for shop promotion.
5. Cost Per Click (slide): Admin can set PPC cost per click for home page slide promotion.
6. PPC Products Count Home Page: Admin can set the number of PPC products to be displayed
on home page.
7. PPC Shops Count Home Page: Admin can set the number of PPC shops to be displayed on
home page.
8. PPC Slides Count Home Page: Admin can set the number of PPC slider images to be displayed
on home page.
9. PPC Clicks Count Time Interval (minutes): When the same user clicks on the same promotion
multiple times, system will count the next click only when gap between the clicks is more than
the set time interval in this field.
Language(s) Tab
10. PPC Products Home Page Caption: Admin can set the product promotion title text in all active
languages of the website that will be displayed on home page.
11. PPC Shops Home Page Caption: Admin can set the shop promotion title text in all active
languages of the website that will be displayed on home page.
8.1.22. Server Tab
On this tab, admin can manage the following settings:
1. Use SSL: In order to use SSL(Secure Sockets Layer), admin needs to check with the hosting
provider, if a SSL certificate is installed and enable it from there.

92 Copyright ©2004 – 2019 FATbit Technologies. All Rights Reserved
2. Enable Maintenance Mode: On enabling this option, only administrator can access the site
(e.g., http://yourdomain.com/admin). Users will see a temporary page until you return to turn
this off (turn this on, whenever you need to perform maintenance tasks on the site.).
Language(s) Tab
3. Maintenance Text: Enter the maintenance text in all active languages that will be displayed to
the users while the website is under maintainance.
8.1.23. Import Export Tab
On this tab, the admin can set whether to import/export product, categories etc with identifiers or
database id. Following options are available on this page-
1. Use Brand Id Instead Of Brand Identifier
2. Use Category Id Instead Of Category Identifier
3. Use Catalog Product Id Instead Of Catalog Product Identifier
4. Use User Id Instead Of Username
5. Use Option Id Instead Of Option Identifier
6. Use Option Value Id Instead Of Option Identifier
7. Use Tag Id Instead Of Tag Identifier
8. Use Tax Id Instead Of Tax Identifier
9. Use Product Type Id Instead Of Product Type Identifier
10. Use Dimension Unit Id Instead Of Dimension Unit Identifier
11. Use Weight Unit Id Instead Of Weight Unit Identifier
12. Use Lang Id Instead Of Lang Code
13. Use Currency Id Instead Of Currency Code
14. Use Product Condition Id Instead Of Condition Identifier
15. Use Persent Or Flat Condition Id Instead Of Identifier
16. Use Country Id Instead Of Country Code
17. Use State Id Instead Of State Identifier
18. Use Policy Point Id Instead Of Policy Point Identifier
19. Use Shipping Company Id Instead Of Shipping Company Identifier
20. Use Policy Point Type Id Instead Of Policy Point Type Identifier
21. Use Shipping Duration Id Instead Of Shipping Duration Identifier
22. Use 1 For Yes 0 For No
Note: It is recommended to use id instead of identifiers if you have basic knowledge of database
system.
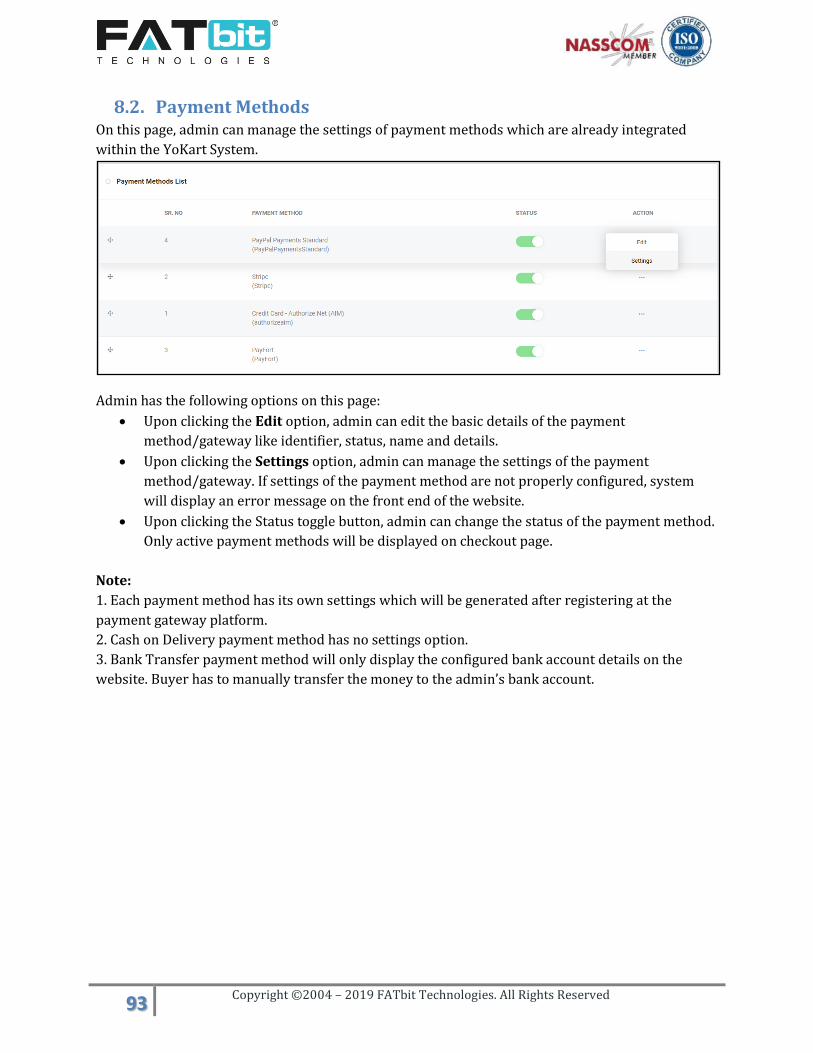
93 Copyright ©2004 – 2019 FATbit Technologies. All Rights Reserved
8.2. Payment Methods On this page, admin can manage the settings of payment methods which are already integrated
within the YoKart System.
Admin has the following options on this page:
Upon clicking the Edit option, admin can edit the basic details of the payment
method/gateway like identifier, status, name and details.
Upon clicking the Settings option, admin can manage the settings of the payment
method/gateway. If settings of the payment method are not properly configured, system
will display an error message on the front end of the website.
Upon clicking the Status toggle button, admin can change the status of the payment method.
Only active payment methods will be displayed on checkout page.
Note:
1. Each payment method has its own settings which will be generated after registering at the
payment gateway platform.
2. Cash on Delivery payment method has no settings option.
3. Bank Transfer payment method will only display the configured bank account details on the
website. Buyer has to manually transfer the money to the admin’s bank account.

94 Copyright ©2004 – 2019 FATbit Technologies. All Rights Reserved
8.3. Currency Management On this page, admin can manage the website currencies.
Admin can perform the following operations from this page:
Upon clicking the Add option, admin can add a new currency in the website. Admin needs to
fill the following details:
Currency code Currency Symbol Left Currency Symbol Right Currency Conversion Value: Currency conversion value from the default website
currency. Currency conversion value of the default website currency will be always 1.
Status Currency Name in all active website languages.
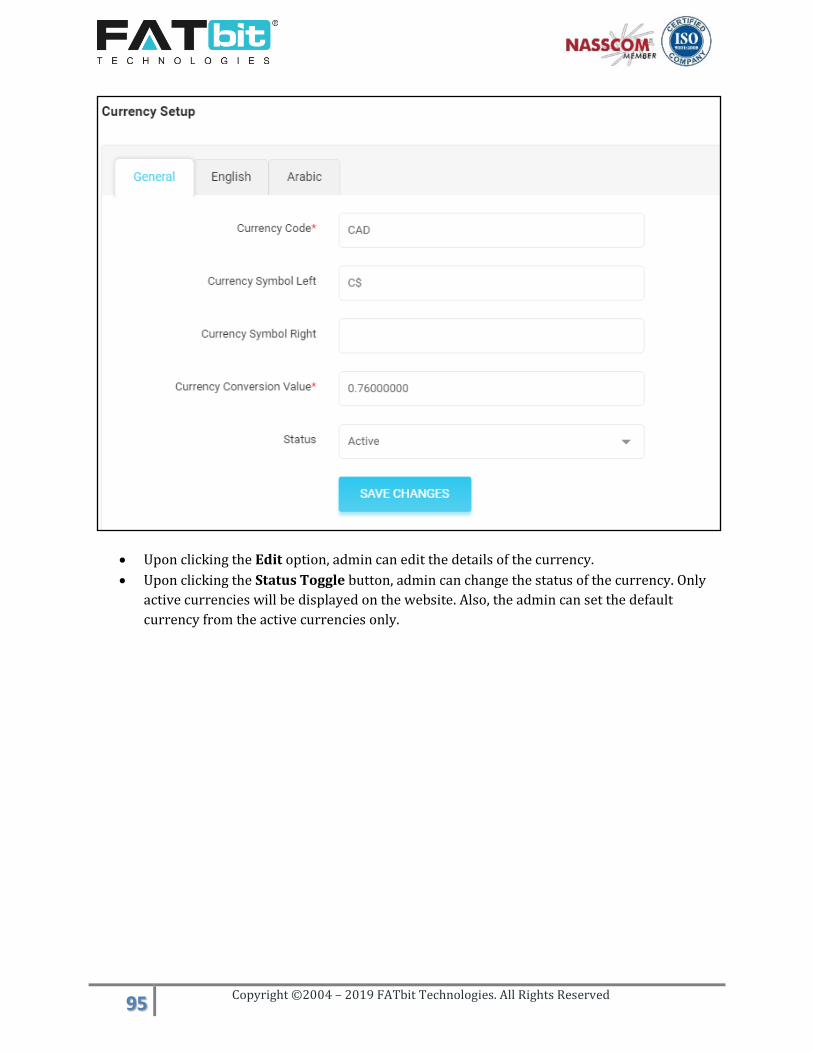
95 Copyright ©2004 – 2019 FATbit Technologies. All Rights Reserved
Upon clicking the Edit option, admin can edit the details of the currency.
Upon clicking the Status Toggle button, admin can change the status of the currency. Only
active currencies will be displayed on the website. Also, the admin can set the default
currency from the active currencies only.

96 Copyright ©2004 – 2019 FATbit Technologies. All Rights Reserved
8.4. Sales Tax On this page, admin can manage the website taxes. Admin/Seller needs to link a tax with the
product while adding it to the system. The system will calculate the tax value of the product if it is in
percentage and display it on the shopping cart or check out page to buyers.
Shopping Cart Page
Product Setup Popup
Admin has the following options on this page:
Upon clicking the Add option, admin can add a new tax category in the website. Admin
needs to fill the following details:
Tax Category Identifier Percentage: If selected ‘Yes’, then system will consider the tax value set in next field
in percentage. If selected ‘No’, then system will consider the tax value set in next field in flat amount.

97 Copyright ©2004 – 2019 FATbit Technologies. All Rights Reserved
Value Status Tax Category Name in all active website languages.
Upon clicking the Edit option, admin can edit the details of the tax category.
Upon clicking the Status Toggle button, admin can change the status of the tax category.
8.5. Commission Settings On the commission settings page, admin can manage the commissions. By default, a site level
commission has been listed on this page. Admin can add category, seller and/or product level
commission to override the site level commission.
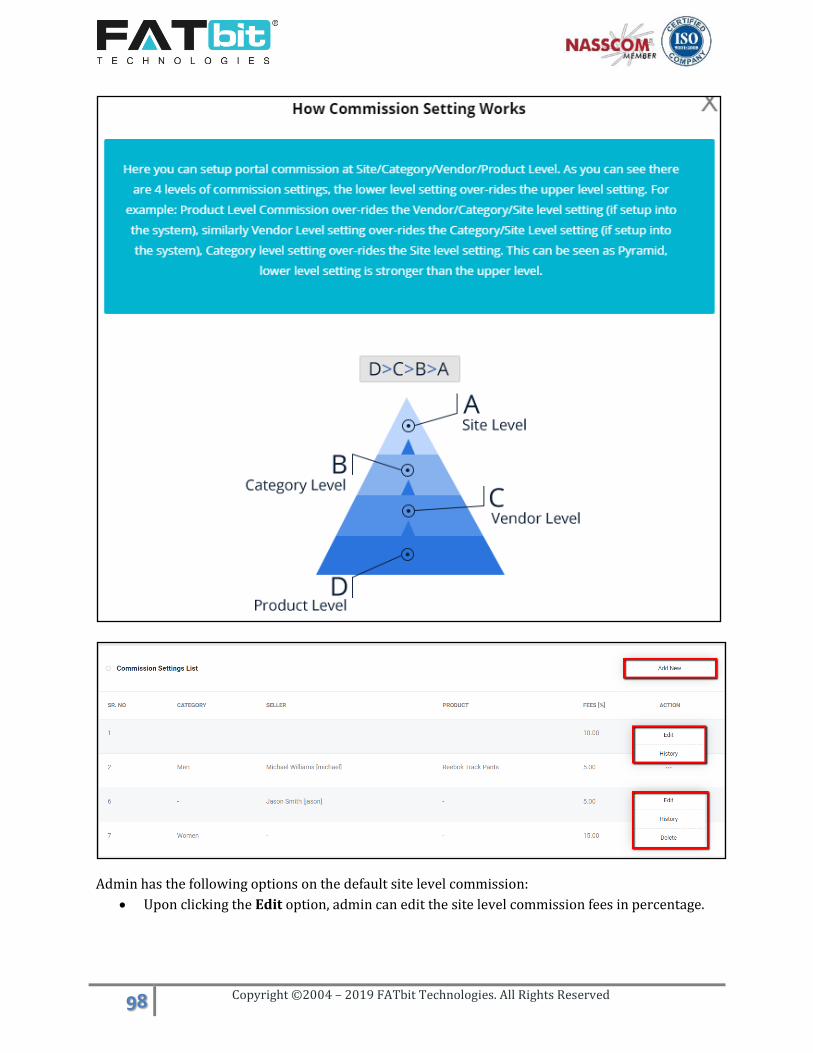
98 Copyright ©2004 – 2019 FATbit Technologies. All Rights Reserved
Admin has the following options on the default site level commission:
Upon clicking the Edit option, admin can edit the site level commission fees in percentage.

99 Copyright ©2004 – 2019 FATbit Technologies. All Rights Reserved
Upon clicking the History option, admin can view the site level commission history.
Admin has the following operations on category/seller/product level commissions:
Upon clicking the Add option, admin can add a new commission. Admin needs to fill the
following details:
Category Seller Product Commission Fees in %
Upon clicking the Edit option, admin can edit the details of commission.
Upon clicking the History option, admin can view the edit history of the commission.
Upon clicking the Delete option, admin can delete the commission.
Note: In case, the subscription module is active then the seller level commission will be generated
by the system when a seller subscribes to the package. Please refer subscription packages section
for more details.

100 Copyright ©2004 – 2019 FATbit Technologies. All Rights Reserved
8.6. Affiliate Commission Settings On this page, admin can manage commissions for affiliate users. Whenever a new purchase is
completed by users registered from the affiliate user link, system will add the respective
commission to the affiliate user’s wallet account.
By default, site level commission has been listed on this page.
Admin can perform the following operations on custom commissions:
Upon clicking the Add New option, admin can add a new commission. Admin needs to fill
the following details:
Category: System will override the site level commission for this category. Affiliate Name: System will override the site level commission for this user. Commission Fees in %
Upon clicking the Edit option, admin can edit the details of commission.
Upon clicking the History option, admin can view the edit history of the commission.
Upon clicking the Delete option, admin can delete the commission.

101 Copyright ©2004 – 2019 FATbit Technologies. All Rights Reserved
8.7. Email Template Management On this page, admin can edit the pre-defined email templates.
Upon clicking the Edit option, admin can edit the following details in the email template for all
active website languages:
Email Template Name
Subject text
Body text
Admin can also add dynamic data like website name, users’ name etc in the email templates by
using curly brackets {}. The sample dynamic data that can be used in the email template it is
displayed at the bottom of the edit page.
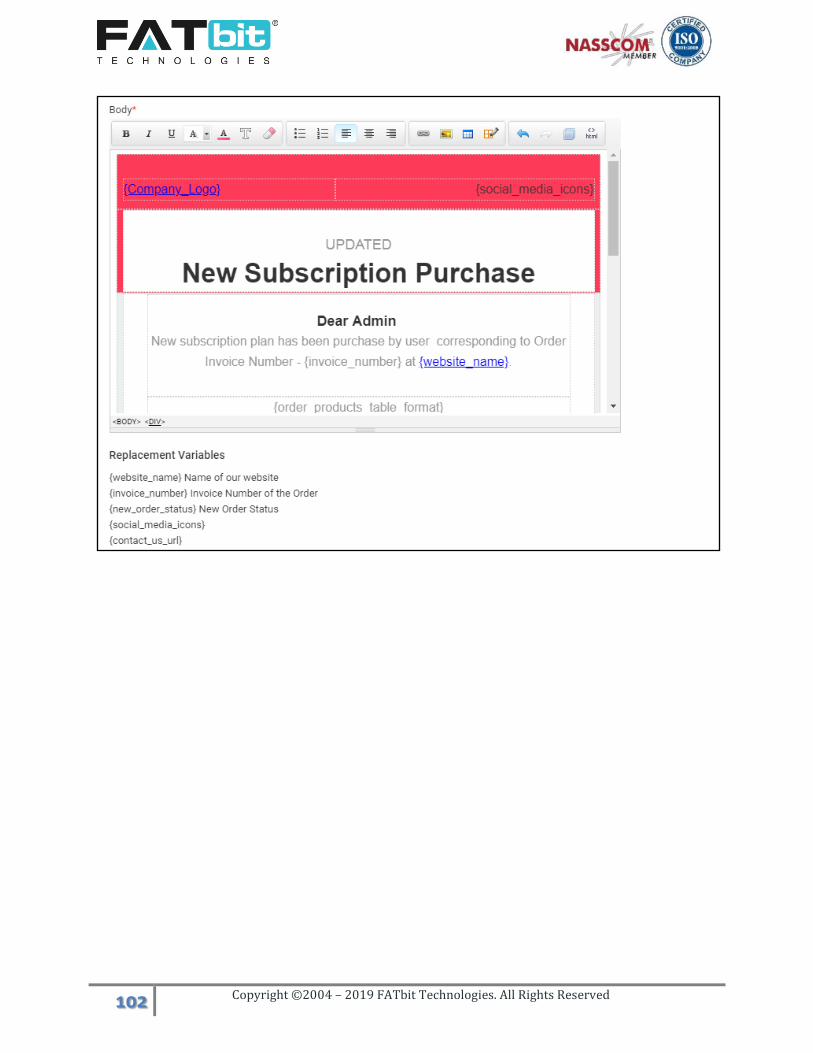
102 Copyright ©2004 – 2019 FATbit Technologies. All Rights Reserved
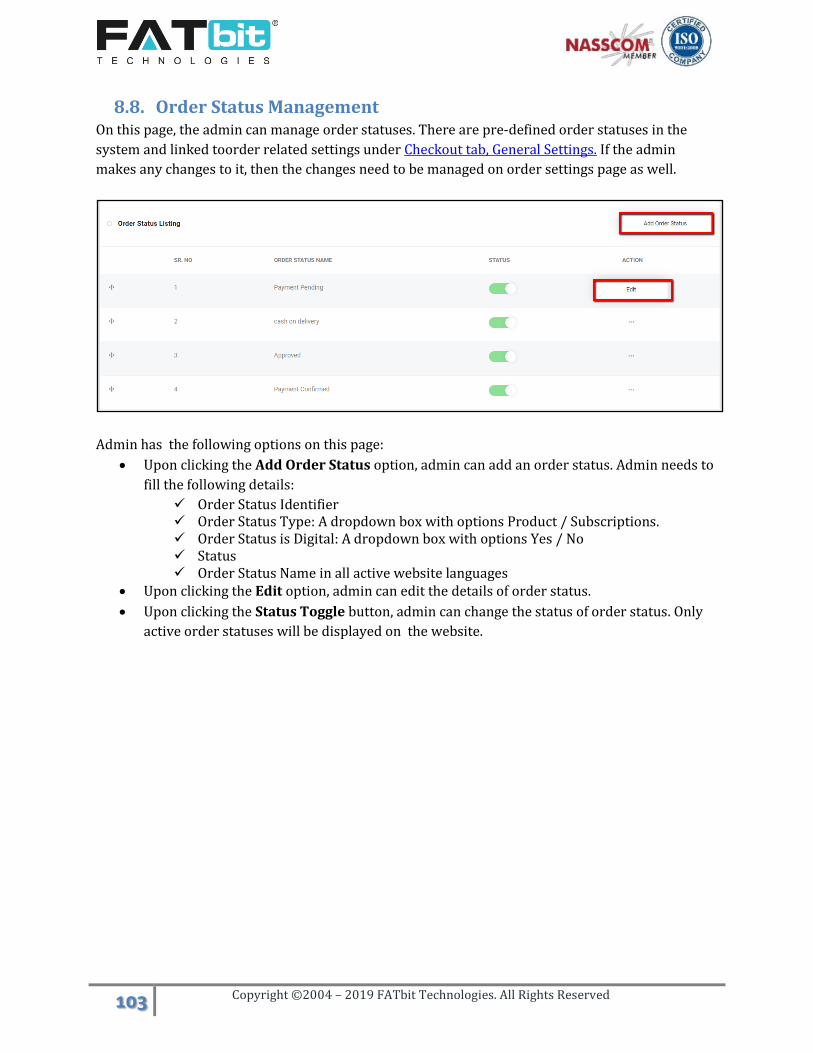
103 Copyright ©2004 – 2019 FATbit Technologies. All Rights Reserved
8.8. Order Status Management On this page, the admin can manage order statuses. There are pre-defined order statuses in the
system and linked toorder related settings under Checkout tab, General Settings. If the admin
makes any changes to it, then the changes need to be managed on order settings page as well.
Admin has the following options on this page:
Upon clicking the Add Order Status option, admin can add an order status. Admin needs to
fill the following details:
Order Status Identifier Order Status Type: A dropdown box with options Product / Subscriptions. Order Status is Digital: A dropdown box with options Yes / No Status Order Status Name in all active website languages
Upon clicking the Edit option, admin can edit the details of order status.
Upon clicking the Status Toggle button, admin can change the status of order status. Only
active order statuses will be displayed on the website.

104 Copyright ©2004 – 2019 FATbit Technologies. All Rights Reserved
8.9. Subscription Packages Management On this page, the admin can manage subscription packages and its validity.
Admin has the following options on this page:
Upon clicking the Add New Subscription Package option, admin can add a new
subscription package. Admin needs to fill the following details:
Package Identifier Package Type: A dropdown box with options Free Plan / Paid Plan Package Commission rate in percentage Package Products Allowed Package Images per product Package Status Package Display Order Package Name in all active website languages
Upon clicking the Edit option, admin can edit the details of subscription package.
Upon clicking the Status Toggle button, admin can change the status of subscription
package. Only active subscription packages will be displayed on the website.
Upon clicking the Settings option, admin will be redirected to the Subscription Packages
validity plans page.
Admin has the following options on this page:
Upon clicking the Add New Validity Plan option, admin can add a new validity plan in the
selected subscription package. Admin needs to fill the following details:
Period: A dropdown box with options -- Days / Months / Years / Unlimited Time Interval (frequency): Not applicable if period is unlimited. Price of the plan Plan Display Order: System will display the validity plans according to the display

105 Copyright ©2004 – 2019 FATbit Technologies. All Rights Reserved
order set in this field on the website. Status
Upon clicking the Edit option, admin can edit the details of the validity plan of the selected
subscription package.
Upon clicking the Subscription Packages List option, admin will be redirected back to the
Subscription Package Listing page.
Note: In case of Free Subscription Package, the system automatically creates a validity plan of ‘0’
price.
8.10. Rewards on Every Purchase On this page, the admin can manage rewards that a buyer will receive on buying products.
Admin has the following options on this page:
Upon clicking the Add New Reward on Purchase option, admin can add a new reward on
purchase. Admin needs to fill the following details:
Purchase Upto price Reward Point
Buyer will receive the reward point set in Reward Point field on purchase of amount set in Purchase
Upto field.
Upon clicking the Edit option, admin can edit the details.
Upon clicking the Delete option, admin can delete the rewards on purchase.
Note: Admin will bear the cost of discount provided to the customers from the reward points.

106 Copyright ©2004 – 2019 FATbit Technologies. All Rights Reserved
9. Orders Settings menu contains the following options:-
Orders / Customer Orders
Seller Orders
Subscription Orders
Withdrawal Requests
Cancellation Requests
Return/Refund Requests
9.1. Orders / Customer Orders In the YoKart system, order placed by a buyer is a parent order that contains all the products. For
each product in parent order, system creates child order and shares with the respective sellers.
From Orders or Customer Orders page, admin can search and view all the parent orders placed by
the buyers.
From the search section, admin can search parent order by:
Keyword: It could be Order ID, Customer Name, Customer Username and Customer Email
Address
Buyer: System suggests the buyers’ name and their email addresses when you start entering
the text.
Payment Status: The filter options are Pending / Paid / Cancelled
From and To date range to filter the orders by order placed date.
Order from and to amount range to filter orders by order amount.
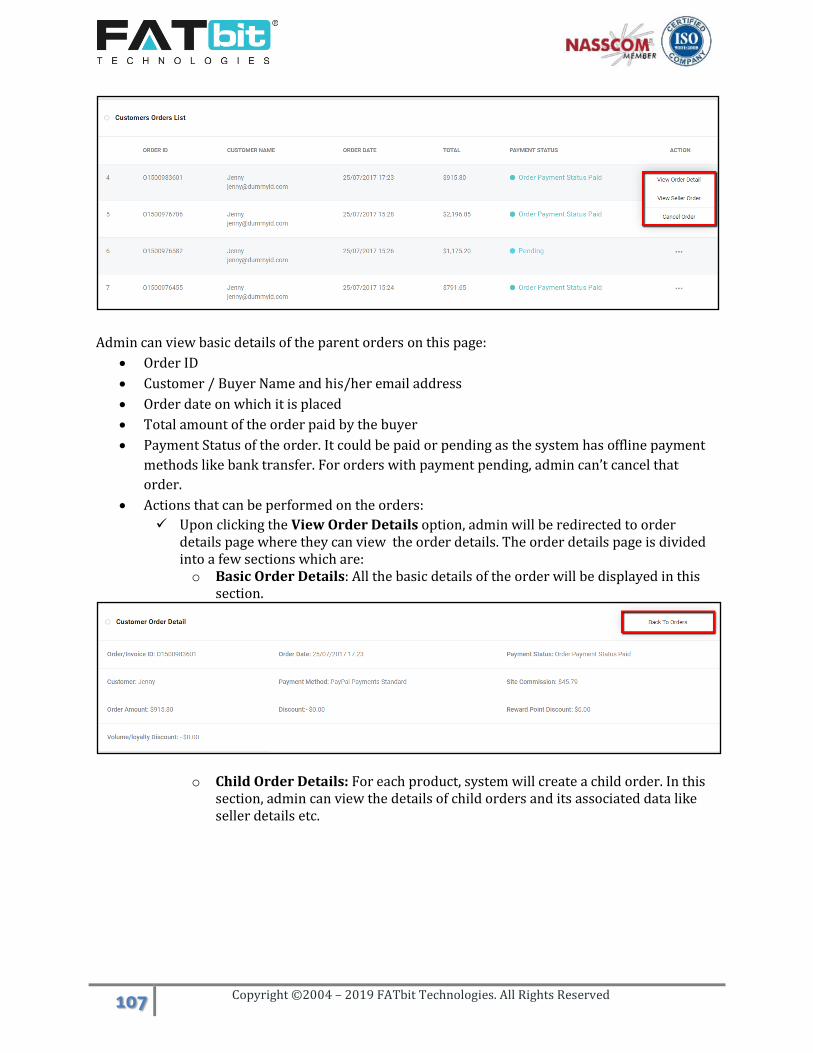
107 Copyright ©2004 – 2019 FATbit Technologies. All Rights Reserved
Admin can view basic details of the parent orders on this page:
Order ID
Customer / Buyer Name and his/her email address
Order date on which it is placed
Total amount of the order paid by the buyer
Payment Status of the order. It could be paid or pending as the system has offline payment
methods like bank transfer. For orders with payment pending, admin can’t cancel that
order.
Actions that can be performed on the orders:
Upon clicking the View Order Details option, admin will be redirected to order details page where they can view the order details. The order details page is divided into a few sections which are: o Basic Order Details: All the basic details of the order will be displayed in this
section.
o Child Order Details: For each product, system will create a child order. In this section, admin can view the details of child orders and its associated data like seller details etc.

108 Copyright ©2004 – 2019 FATbit Technologies. All Rights Reserved
o Customer Details: In this section, the admin can view the customer details like name, billing & shipping addresses etc.
o Order Payment Details: If the order payment is paid then admin can view the payment history of the order. If the order payment is pending or partially paid then admin can update the payment details.

109 Copyright ©2004 – 2019 FATbit Technologies. All Rights Reserved
Payment Paid
Payment Pending
Upon clicking the View Seller Order option, admin will be redirected to Seller Order Listing Page where the child orders/seller orders under the selected parent order will be displayed.
See Seller Orders section below for more details.

110 Copyright ©2004 – 2019 FATbit Technologies. All Rights Reserved
Upon clicking the Cancel Order option, admin can cancel the customer order. System will credit the order amount to the customer wallet upon successful cancellation of the order.
9.2. Seller Orders On the Seller Orders page, admin can search and view the seller orders/child orders.
From the search section, the admin can search Seller orders by:
Keyword: It could be Order ID or Invoice Number, Customer Name, Customer Username,
Customer Email Address, Product Name, Shop Name, Brand Name, Seller Name, Seller
Username and Seller Email Address.
Buyer: System suggests the buyers’ name and their email addresses when you start entering
the text.
Order Status: The filter options contain all the active order statuses.
From and To date range to filter the orders by order placed date.
Order from and to amount range to filter orders by order amount.

111 Copyright ©2004 – 2019 FATbit Technologies. All Rights Reserved
Admin can view basic details of the child orders on this page:
Child Order ID or Invoice Number
Seller details including shop name, seller name, seller username, email address and phone
number.
Customer details including name, username, email address and phone number
Order date on which it is placed
Child order amount
Order Status: For paid orders, the default order status will be Payment Confirmed and for
payment pending orders, default order status will be Payment Pending. Admin can manage
it from Settings page.
Actions that can be performed on the child orders are:
Upon clicking the View Order Detail option, admin will be redirected to child order details page where they can view the child order details and can manage the order status. Please see below the details of the page in sections. o Seller Order Details: In this section, the admin can view the basic details of the
child order like admin commission, order status etc. Also, the admin can take a print of the order/invoice.
o Seller & Customer Details: In this section, the admin can view the seller and customer details like name, billing & shipping addresses etc.
o Product Details: In this section, product and its related details will be displayed.
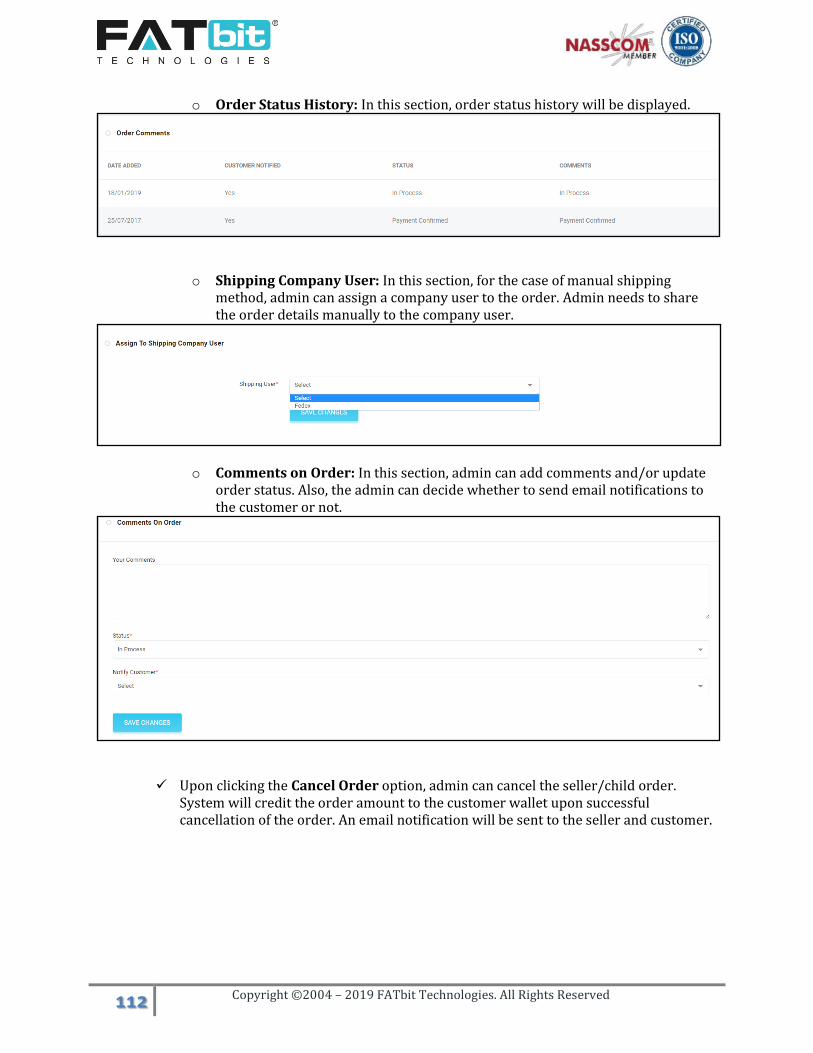
112 Copyright ©2004 – 2019 FATbit Technologies. All Rights Reserved
o Order Status History: In this section, order status history will be displayed.
o Shipping Company User: In this section, for the case of manual shipping
method, admin can assign a company user to the order. Admin needs to share the order details manually to the company user.
o Comments on Order: In this section, admin can add comments and/or update order status. Also, the admin can decide whether to send email notifications to the customer or not.
Upon clicking the Cancel Order option, admin can cancel the seller/child order. System will credit the order amount to the customer wallet upon successful cancellation of the order. An email notification will be sent to the seller and customer.

113 Copyright ©2004 – 2019 FATbit Technologies. All Rights Reserved
9.3. Subscription Orders On the Subscription Orders page, admin can search and view all the subscription orders details
placed by sellers.
Admin has the following options on this page:
From search section, Admin can search orders by keyword, buyer’s name, payment status,
date and amount range of the order.
Upon clicking the View Order Detail option, admin will be redirected to subscription order
details page where they can view the subscription order details.

114 Copyright ©2004 – 2019 FATbit Technologies. All Rights Reserved
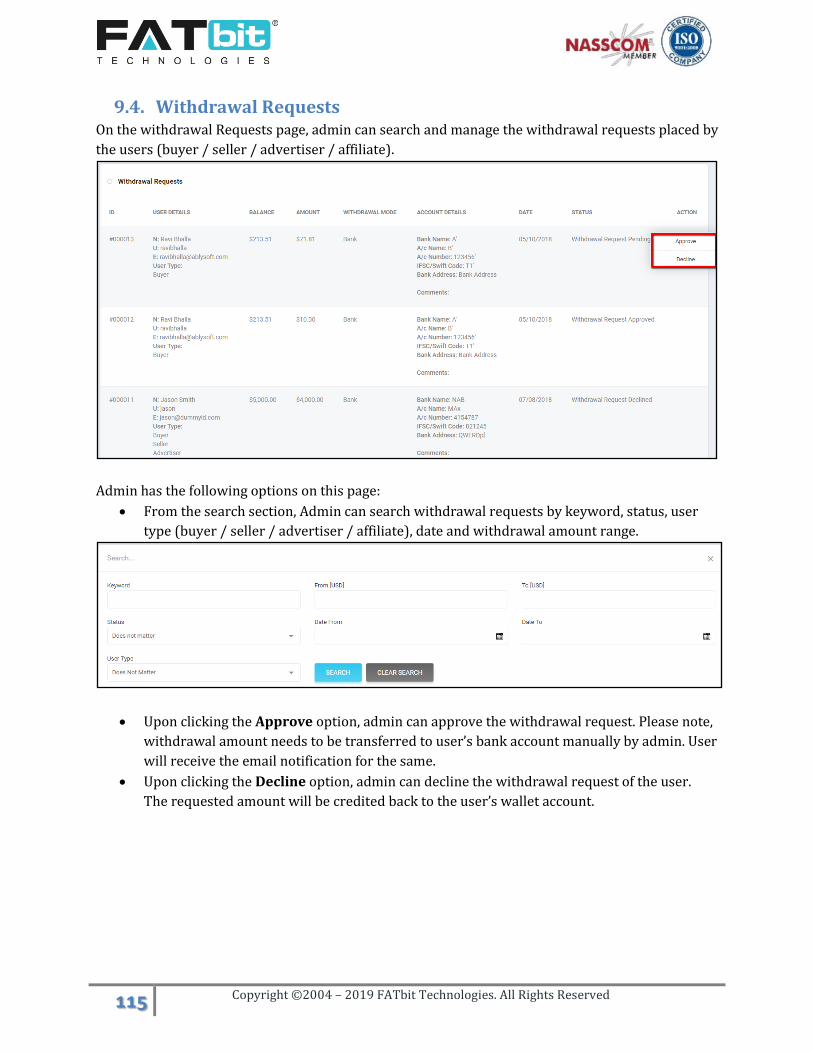
115 Copyright ©2004 – 2019 FATbit Technologies. All Rights Reserved
9.4. Withdrawal Requests On the withdrawal Requests page, admin can search and manage the withdrawal requests placed by
the users (buyer / seller / advertiser / affiliate).
Admin has the following options on this page:
From the search section, Admin can search withdrawal requests by keyword, status, user
type (buyer / seller / advertiser / affiliate), date and withdrawal amount range.
Upon clicking the Approve option, admin can approve the withdrawal request. Please note,
withdrawal amount needs to be transferred to user’s bank account manually by admin. User
will receive the email notification for the same.
Upon clicking the Decline option, admin can decline the withdrawal request of the user.
The requested amount will be credited back to the user’s wallet account.

116 Copyright ©2004 – 2019 FATbit Technologies. All Rights Reserved
9.5. Cancellation Requests On the Cancellation Requests page, admin can search and manage all the order cancellation
requests placed by the buyers. For pending order cancellation requests, seller can’t update the
order status till admin takes necessary action.
Admin has the following options on this page:
From the search section, Admin can search cancellation requests by keyword, request
status, order status, cancel reason, buyer details, seller details and date range on which
cancellation requests have been placed.
Upon clicking the Approve option, admin can approve the order cancellation request.
Admin can decide whether to transfer the order cancellation amount to the user’s wallet
account or not. User will receive an email notification for the same.

117 Copyright ©2004 – 2019 FATbit Technologies. All Rights Reserved
Upon clicking the Decline option, admin can decline the order cancellation request of the
user. User will be notified for the same.
9.6. Return/Refund Requests On the Return/Refund Requests page, admin can search and manage product return/refund
requests placed by the buyers. Either seller or admin can update the status of these requests.
Admin has the following options on this page:
From the search section, admin can search requests by buyer details, request id/reference
number, seller details, product name, request status and date range on which refund
requests have been placed.
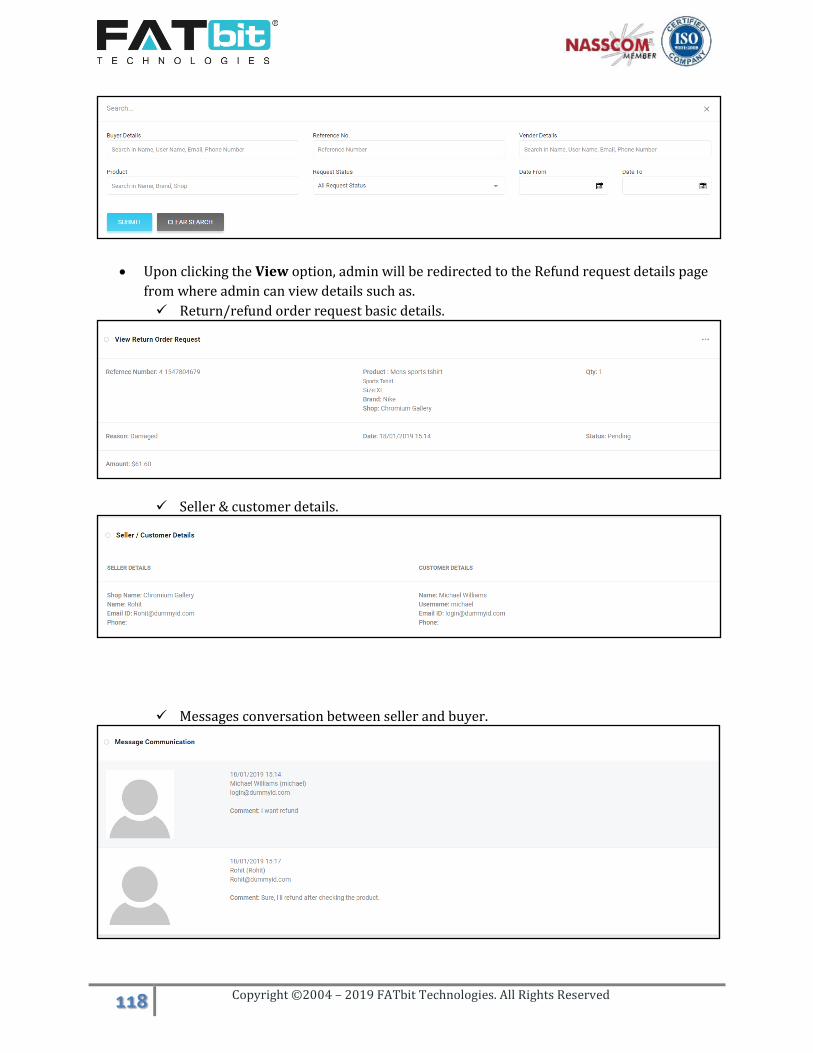
118 Copyright ©2004 – 2019 FATbit Technologies. All Rights Reserved
Upon clicking the View option, admin will be redirected to the Refund request details page
from where admin can view details such as.
Return/refund order request basic details.
Seller & customer details.
Messages conversation between seller and buyer.
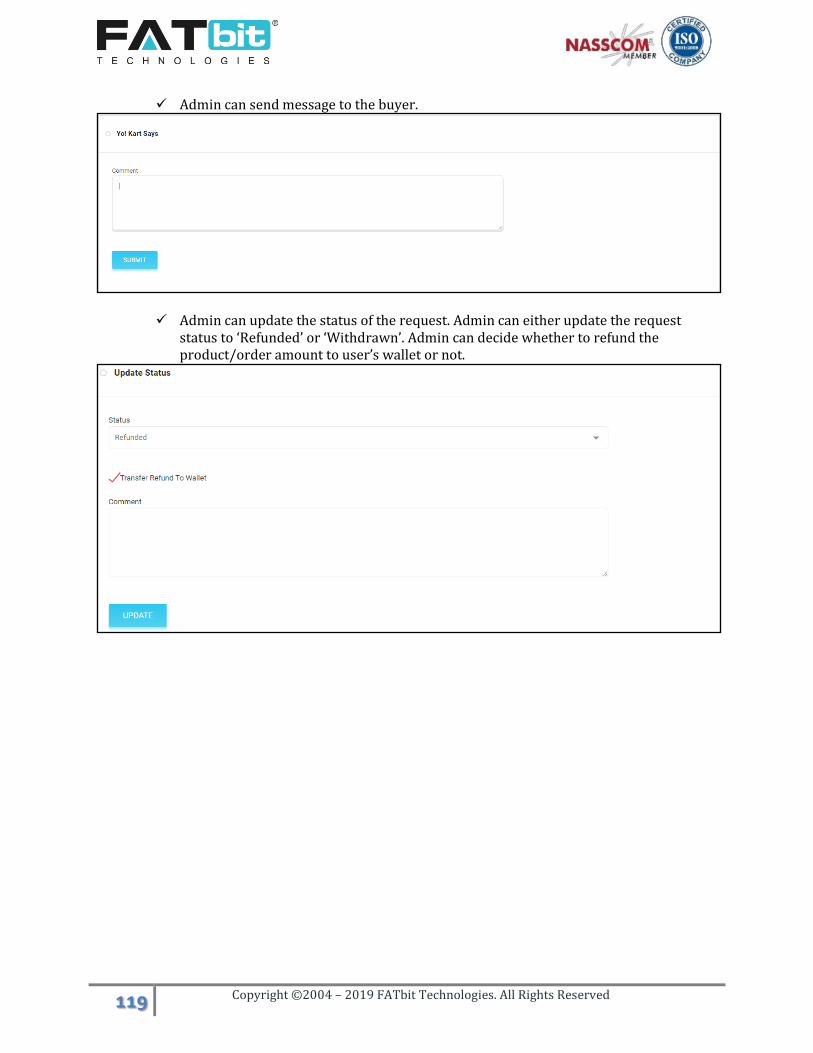
119 Copyright ©2004 – 2019 FATbit Technologies. All Rights Reserved
Admin can send message to the buyer.
Admin can update the status of the request. Admin can either update the request status to ‘Refunded’ or ‘Withdrawn’. Admin can decide whether to refund the product/order amount to user’s wallet or not.

120 Copyright ©2004 – 2019 FATbit Technologies. All Rights Reserved
10. Smart Recommendations Smart Recommendations menu contains the following options:-
Manage Weightages
Recommended Tag Products Weightages
10.1. Manage Weightages On the Manage Weightages page, admin can set the weightage given by the system to the products
when a particular event happens. These events are pre-defined and the admin cannot define new
event. List of events are listed below:
1. Product View: Weightage given to the product when a user views the product detail page.
2. Product Order Paid: Weightage given to the product when a user orders the product.
3. Product time spent: Weightage is given to the product when a user spends some time
viewing it.
Products with higher weightages will be recommended to the user on the product details page of
same category on the website.
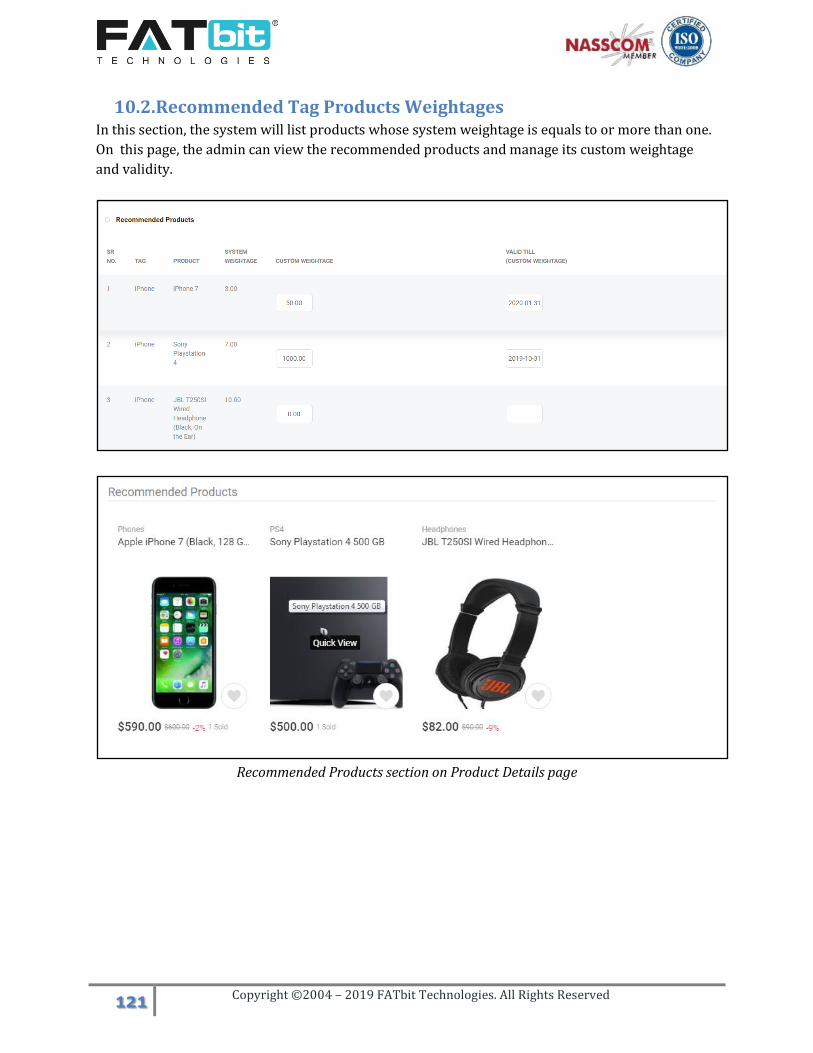
121 Copyright ©2004 – 2019 FATbit Technologies. All Rights Reserved
10.2. Recommended Tag Products Weightages In this section, the system will list products whose system weightage is equals to or more than one.
On this page, the admin can view the recommended products and manage its custom weightage
and validity.
Recommended Products section on Product Details page
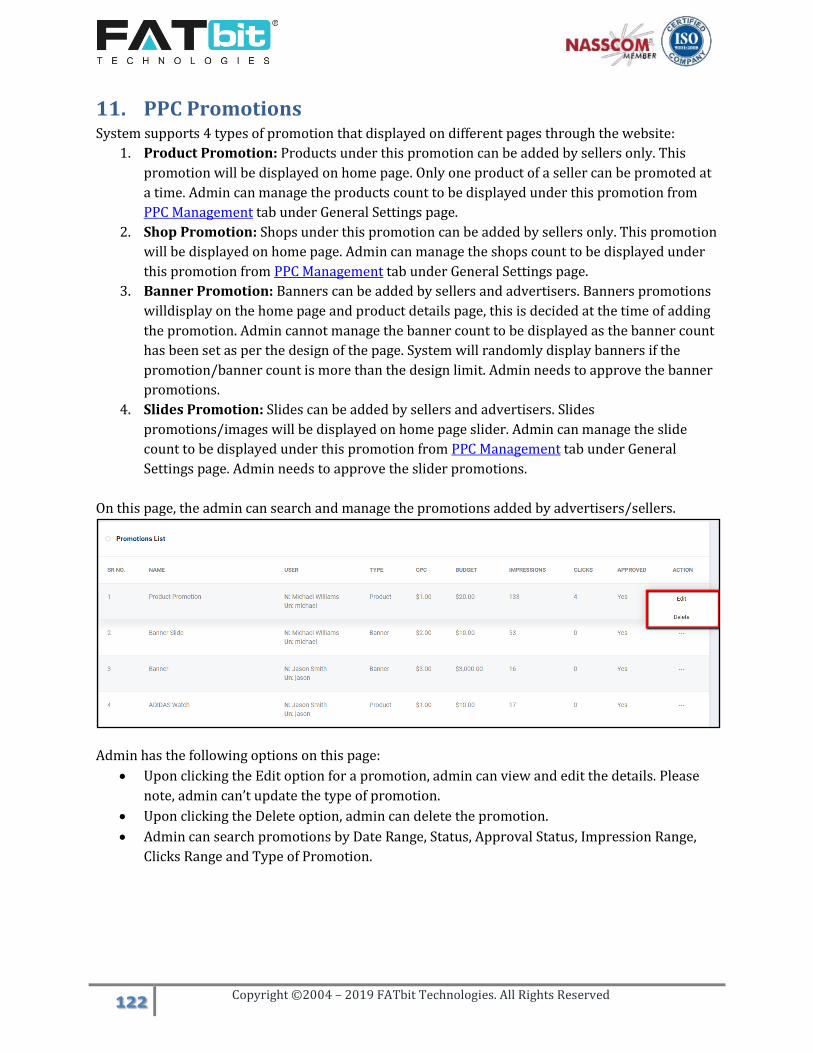
122 Copyright ©2004 – 2019 FATbit Technologies. All Rights Reserved
11. PPC Promotions System supports 4 types of promotion that displayed on different pages through the website:
1. Product Promotion: Products under this promotion can be added by sellers only. This
promotion will be displayed on home page. Only one product of a seller can be promoted at
a time. Admin can manage the products count to be displayed under this promotion from
PPC Management tab under General Settings page.
2. Shop Promotion: Shops under this promotion can be added by sellers only. This promotion
will be displayed on home page. Admin can manage the shops count to be displayed under
this promotion from PPC Management tab under General Settings page.
3. Banner Promotion: Banners can be added by sellers and advertisers. Banners promotions
willdisplay on the home page and product details page, this is decided at the time of adding
the promotion. Admin cannot manage the banner count to be displayed as the banner count
has been set as per the design of the page. System will randomly display banners if the
promotion/banner count is more than the design limit. Admin needs to approve the banner
promotions.
4. Slides Promotion: Slides can be added by sellers and advertisers. Slides
promotions/images will be displayed on home page slider. Admin can manage the slide
count to be displayed under this promotion from PPC Management tab under General
Settings page. Admin needs to approve the slider promotions.
On this page, the admin can search and manage the promotions added by advertisers/sellers.
Admin has the following options on this page:
Upon clicking the Edit option for a promotion, admin can view and edit the details. Please
note, admin can’t update the type of promotion.
Upon clicking the Delete option, admin can delete the promotion.
Admin can search promotions by Date Range, Status, Approval Status, Impression Range,
Clicks Range and Type of Promotion.

123 Copyright ©2004 – 2019 FATbit Technologies. All Rights Reserved

124 Copyright ©2004 – 2019 FATbit Technologies. All Rights Reserved
12. MISC (Miscellaneous) Miscellaneous menu contains the following options:-
Meta Tags Management
FAQs
URL Rewriting
Theme Settings
12.1. Meta Tags Management On this page, the admin can manage Meta tags for all the pages of the website including, products
categories, products, blogs etc.
Admin has the following options on this page:
Upon clicking the Edit option, admin can view and edit the Meta tags of the selected page.

125 Copyright ©2004 – 2019 FATbit Technologies. All Rights Reserved
12.2. FAQs On this page, the admin can search and manage FAQ categories and FAQs. These FAQ categories and
FAQs will be either displayed on FAQ page or FAQ section on Become a Seller page.
Admin has the following options on this page:
Upon clicking the Add Category option, admin can add a new FAQ category. Admin need to
fill the following details:
Category Identifier Status Type: It could be FAQ page or Seller page and according FAQs under the category will
be displayed on the respective page. Category Name in all the website languages.
Upon clicking the Edit option, admin can edit the details of FAQ category
Upon clicking the Status Toggle button, admin can change the status of the category.
Upon clicking the Delete option, admin can delete the category.
Upon clicking the FAQ Listing option, admin will be redirected to FAQs Listing page and can
manage FAQs under that category.
Admin has the following options on this page:
Upon clicking the Add FAQ option, admin can add a new FAQ under the selected category.
Admin needs to fill the following details:
FAQ Identifier Status FAQ Title and Content in all the website languages from language tab.

126 Copyright ©2004 – 2019 FATbit Technologies. All Rights Reserved
Upon clicking the Edit option, admin can edit the FAQ details.
Upon clicking the Delete option, admin can delete the FAQ.
12.3. URL Rewriting On this page, the admin can search and rewrite URL’s of the website pages including products,
blogs, CMS pages etc.
Admin has the following options on this page:
Upon clicking the Add New option, admin can add a custom URL of the page which is not in
the list. Admin needs to fill the following details:
Original URL without website domain name Custom URL without website domain name
For e.g. if your website URL is http://domainname.com/cms/view/1; Following would be the entries for URL rewriting Original URL should be “cms/view/1” Custom URL should be “My-custom-page”
Upon clicking the Edit option, admin can edit the custom URL.
Upon clicking the Delete option, admin can delete the rewritten URL.
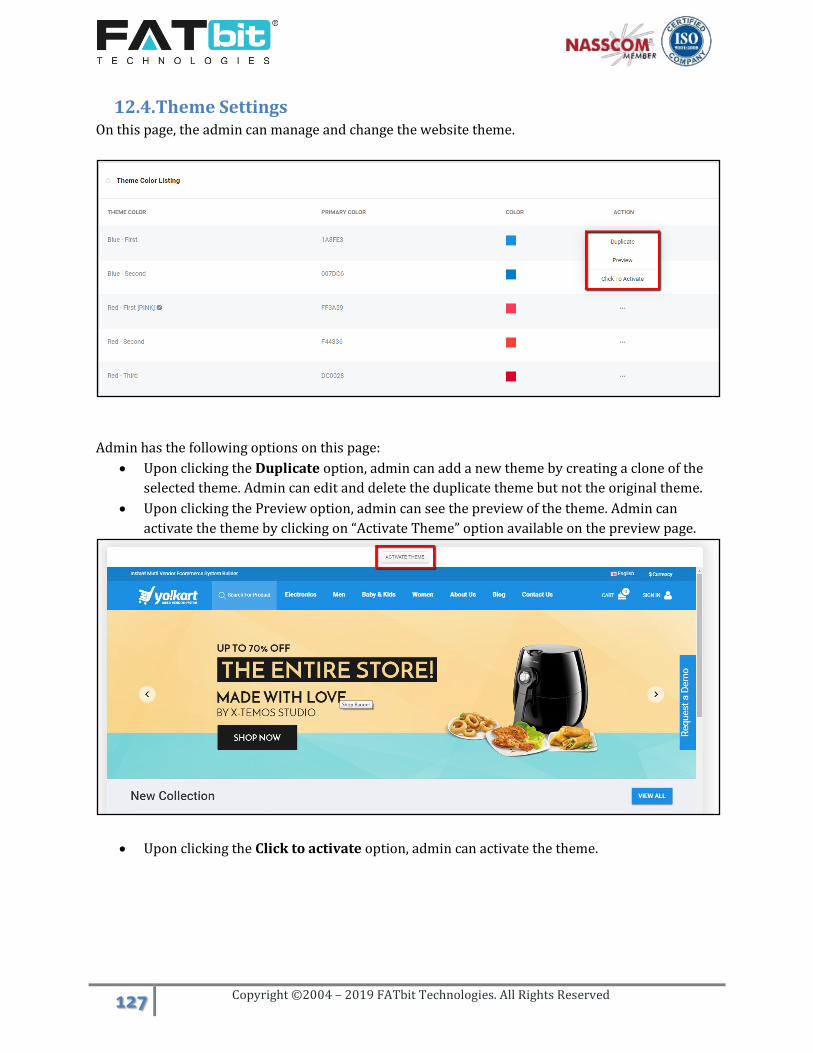
127 Copyright ©2004 – 2019 FATbit Technologies. All Rights Reserved
12.4. Theme Settings On this page, the admin can manage and change the website theme.
Admin has the following options on this page:
Upon clicking the Duplicate option, admin can add a new theme by creating a clone of the
selected theme. Admin can edit and delete the duplicate theme but not the original theme.
Upon clicking the Preview option, admin can see the preview of the theme. Admin can
activate the theme by clicking on “Activate Theme” option available on the preview page.
Upon clicking the Click to activate option, admin can activate the theme.

128 Copyright ©2004 – 2019 FATbit Technologies. All Rights Reserved
13. Blog Blog menu contains the following options:-
Blog Post Categories
Blog Posts
Blog Contributions
Blog Comments
13.1. Blog Post Categories On this page, admin can manage blog post categories.
Admin can view following information about each blog post categories:
Sr. No – Serial Number
Category Name – Name of category
Subcategories – Total count of subcategories
Status – Current Status of a category
Action – Edit, Delete
Admin has the following options on this page:
Upon clicking the Add Blog Post Category option, admin can add a parent or child blog
category. Admin needs to fill the following details:
Category Identifier SEO Friendly URL Category Parent Category Status Featured: Featured categories will be displayed on the top of the blog page. Category Name in all active website languages.

129 Copyright ©2004 – 2019 FATbit Technologies. All Rights Reserved
Upon clicking the Edit option, admin can edit the details of the category.
Upon clicking the Status Toggle button, admin can change the status of category. Only
active blog categories and its posts will be displayed on the website.
Upon clicking the Delete option, admin can delete the blog category. Please note, it is
recommended to use this option very carefully as the admin cannot restore the deleted
categories.

130 Copyright ©2004 – 2019 FATbit Technologies. All Rights Reserved
13.2. Blog Posts On this page, the admin can view and manage all the blog posts.
Admin can view following information about each blog post:
Sr. No – Serial Number
Post Title – Title of a blog post
Category – Category of a blog post
Published Date – Published date of a blog post
Post Status – Current status of a post
Action – Edit, Delete
Admin has the following options on this page:
Upon clicking the Add Blog Post Category option, admin can add a parent or child
category. Admin needs to fill the following details to add a post:
Post Identifier SEO Friendly URL Post Status Comment Open: If enabled, user can comment on the post. Link Category: To link the post with categories. Title, Post Author Name, Short Description and Description of the post in all website
languages. Post Images
Upon clicking the Edit option, admin can edit the details of the blog post.
Upon clicking the Delete option, admin can delete the blog post. Please note, it is
recommended to use this option very carefully as admin cannot restore a deleted blog post.

131 Copyright ©2004 – 2019 FATbit Technologies. All Rights Reserved
13.3. Blog Contributions On this page, the admin can manage the blog contribution requests added by users from the blog
details page.
Blog Details Page
Admin has the following options on this page:
Upon clicking the Edit option, admin can update the status of the blog contribution request.
An email notification will be sent to the user for the same. In case, the admin approves the
request then they need to add the blog post manually from the blog post section.
Upon clicking the Delete option, admin can delete the contribution request.

132 Copyright ©2004 – 2019 FATbit Technologies. All Rights Reserved
13.4. Blog Comments On this page, the admin can view the comments posted by users on the blog posts if enabled.
Admin needs to approve the comments for them to display on blog post page. Admin can delete the
comments as well.
Admin can see the following information about each blog comment:
Sr. No – Serial Number
Author Name – Name of an author
Author Email – Email id of an author
Status – Current status of a comment
Post Title – Title of a post
Posted On – Date and time when a comment posted on the site
Action – Edit, Delete
Admin can view more details about a comment such as User IP, User agent etc.
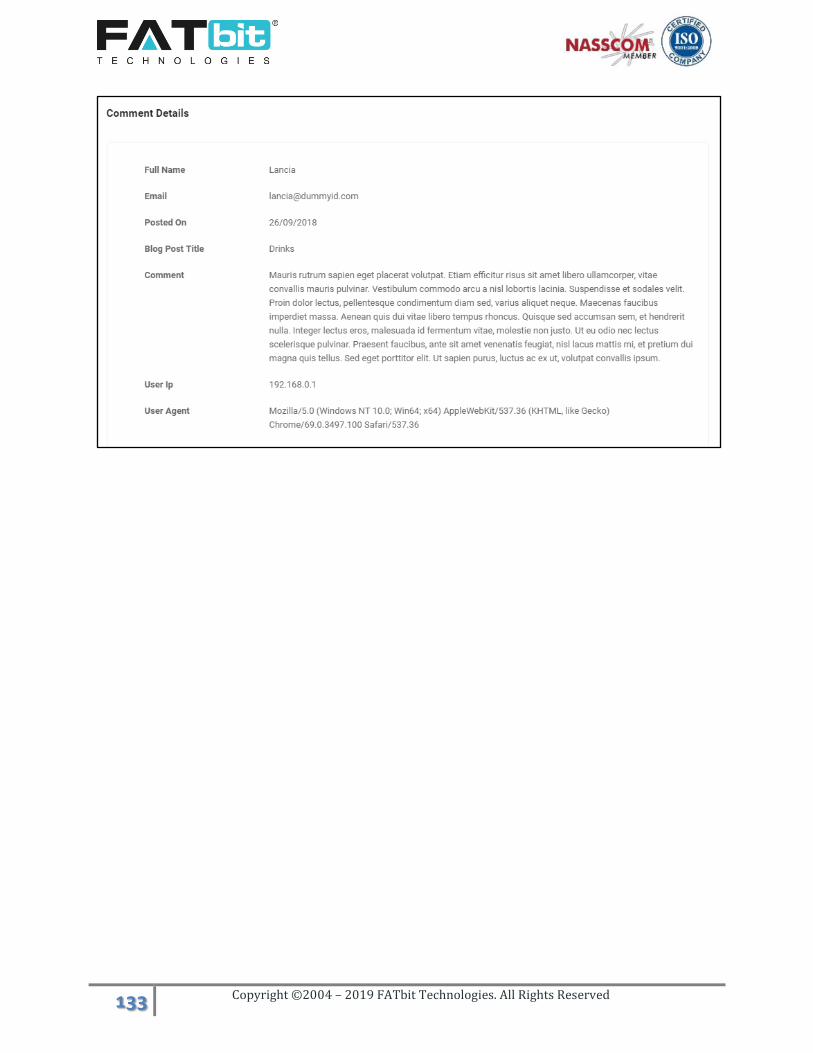
133 Copyright ©2004 – 2019 FATbit Technologies. All Rights Reserved
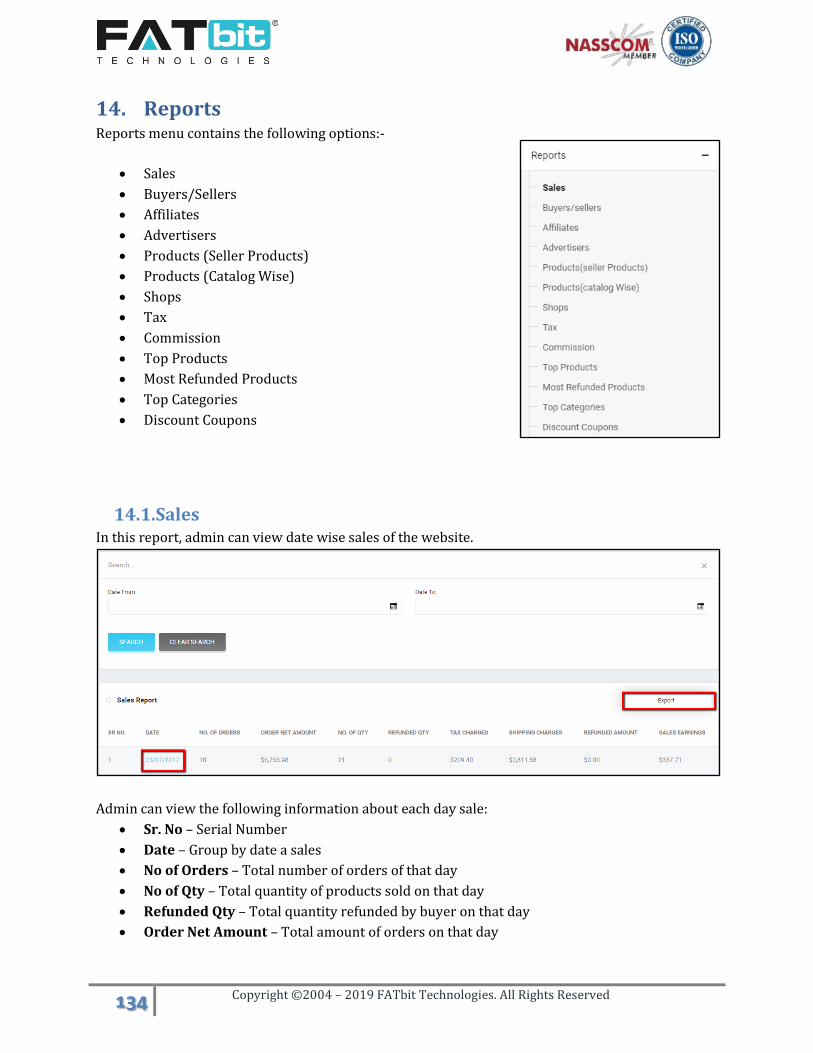
134 Copyright ©2004 – 2019 FATbit Technologies. All Rights Reserved
14. Reports Reports menu contains the following options:-
Sales
Buyers/Sellers
Affiliates
Advertisers
Products (Seller Products)
Products (Catalog Wise)
Shops
Tax
Commission
Top Products
Most Refunded Products
Top Categories
Discount Coupons
14.1. Sales In this report, admin can view date wise sales of the website.
Admin can view the following information about each day sale:
Sr. No – Serial Number
Date – Group by date a sales
No of Orders – Total number of orders of that day
No of Qty – Total quantity of products sold on that day
Refunded Qty – Total quantity refunded by buyer on that day
Order Net Amount – Total amount of orders on that day

135 Copyright ©2004 – 2019 FATbit Technologies. All Rights Reserved
Tax Charged – Total amount of tax calculated on orders
Shipping Charges – Total amount of shipping charges on orders on that date
Refunded Amount - Total amount of refund on that day
Sales Earnings – Portal earnings for that day
Upon clicking the date, admin can view the details of each order for that date.
Admin can view following information about each sale for that day:
Sr. No – Serial Number
Invoice Number – Order id/invoice number of the order
Order Net Amount – Total amount of the order including shipping charges and taxes if any
No of Qty – Total quantity of products sold in the order
Refunded Qty – Refund quantity in that order if any
Tax Charged – Tax amount charged in that order
Shipping Charges – Tax amount charged in that order
Refunded Amount – Refunded amount in case refund request has been approved for that
order
Sales Earnings – Portal earnings/admin commission from that order.
Note: Admin can export all the reports in a csv file.
14.2. Buyers/Sellers In this report, the admin can view buyer and seller users’ detailed report.

136 Copyright ©2004 – 2019 FATbit Technologies. All Rights Reserved
Admin can view following information about each buyer or seller or both:
Name – Name of the user
Email Address – Email address of the user
Reg. Date – Registration date of the user
Bought QTY – Total quantity of products bought by the user
Sold QTY – Total quantity of products sold by the user
Orders Placed – Total orders have been placed by the user
Orders Received – Total orders have been received by the user
Purchases – Total amount of purchases has been done by the user
Sales – Total amount of sales has been completed by the users. Only sales of completed
orders will be considered.
Balance – Current amount in user’s wallet
14.3. Affiliates In this report, admin can view affiliate users’ detailed report.

137 Copyright ©2004 – 2019 FATbit Technologies. All Rights Reserved
Admin can view following information about each affiliate user:
Name – Name of the user
Email Address – Email address of the user
Reg. Date – Registration date of the user
Balance – Current amount in user’s wallet
Revenue – Total earnings of the user
Signup Revenue – Total earnings of the user from signups
Order Revenue – Total earnings of the user from orders placed by users signed up via
affiliate link.
Signups – Total buyers registered from affiliate link of the user.
14.4. Advertisers In this report, admin can view buyer and seller users’ detailed report.
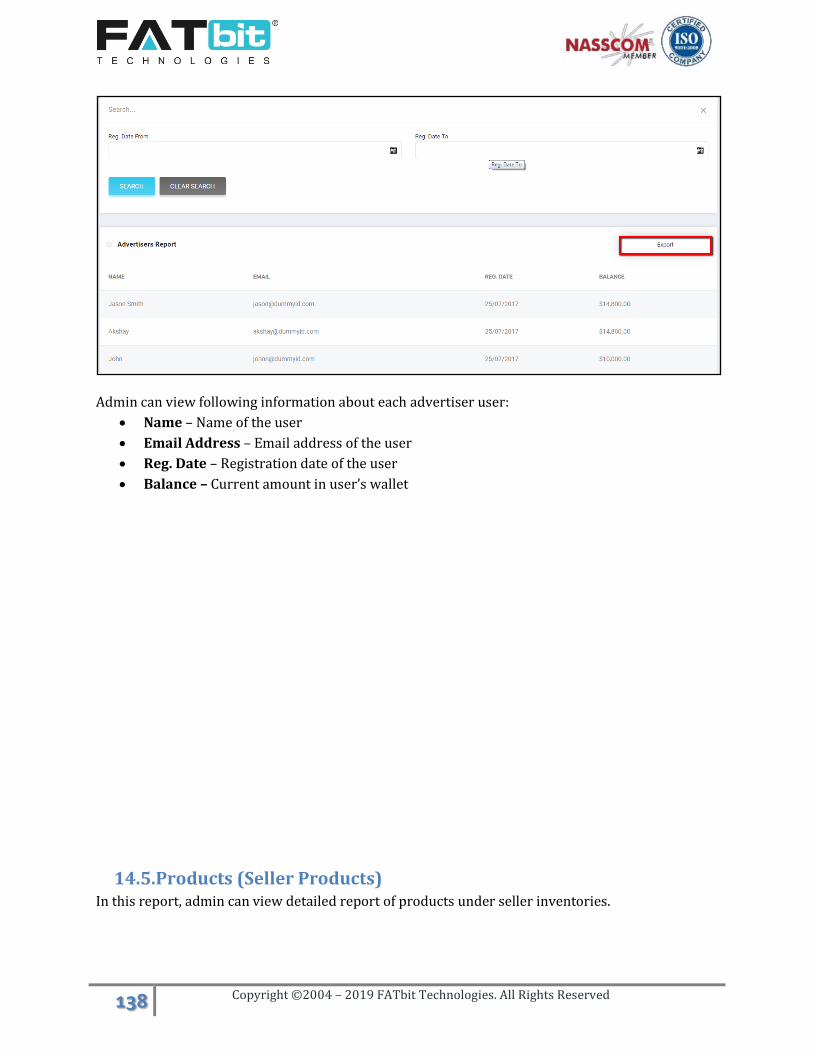
138 Copyright ©2004 – 2019 FATbit Technologies. All Rights Reserved
Admin can view following information about each advertiser user:
Name – Name of the user
Email Address – Email address of the user
Reg. Date – Registration date of the user
Balance – Current amount in user’s wallet
14.5. Products (Seller Products) In this report, admin can view detailed report of products under seller inventories.

139 Copyright ©2004 – 2019 FATbit Technologies. All Rights Reserved
Admin can view following information about each seller inventory:
Title – Product details like product name, options, brand, shop name will be displayed
Favorites – Total number of users added the product into their favorites/wishlist
Unit Price – Price of the product
No. of Orders – Total orders have been placed of the product
Sold QTY (Sold – Refund QTY) – Total sold quantity of the product. Whenever a
return/refund request will be placed, it will be considered as refund request for this report.
Total (A) – Total amount of the sold product quantity
Shipping (B) – Total amount of shipping has been calculated on the total sales of the
product.
Tax (C) – Total tax amount has been calculated on the total sales of the product.
Total (A+B+C) – Total sales amount of the product including shipping and taxes
Commission – Total admin commission earned for the product
14.6. Products (Catalog Wise) In this report, admin can view detailed report of each product under catalog.

140 Copyright ©2004 – 2019 FATbit Technologies. All Rights Reserved
Admin can view following information about each product:
Title – Product name and brand will be displayed
No. of Orders – Total orders have been placed of the product
Sold QTY (Sold – Refund QTY) – Total sold quantity of the product. Whenever a
return/refund request will be placed, it will be considered as refund request for this report.
Total (A) – Total amount of the sold product quantity
Shipping (B) – Total amount of shipping has been calculated on the total sales of the
product.
Tax (C) – Total tax amount has been calculated on the total sales of the product.
Total (A+B+C) – Total sales amount of the product including shipping and taxes
Commission – Total admin commission earned for the product

141 Copyright ©2004 – 2019 FATbit Technologies. All Rights Reserved
14.7. Shops In this report, admin can view detailed report of each shop of the system.
Admin can view following information about each shop:
Name – Shop name and its creation date
Owner –Seller Name/shop owner and his/her email address
Items – Total products of the shop
Sold QTY – Total quantity of sold products of the shop
Sales – Total sales amount of the shop
Favorites – Total number of users added the shop products into their favorites/wishlist
Commission – Total admin commission earned from the shop
Reviews – Total number of reviews has been posted by users for the shop
Ratings – Average rating of the shop.

142 Copyright ©2004 – 2019 FATbit Technologies. All Rights Reserved
14.8. Tax In this report, admin can view taxes of each seller of the system.
Admin can view following information about tax of each shop:
Name – Seller’s shop name
Owner –Seller Name/shop owner and his/her email address
Orders – Total completed orders of the shop
Tax – Total tax amount of completed orders of the shop
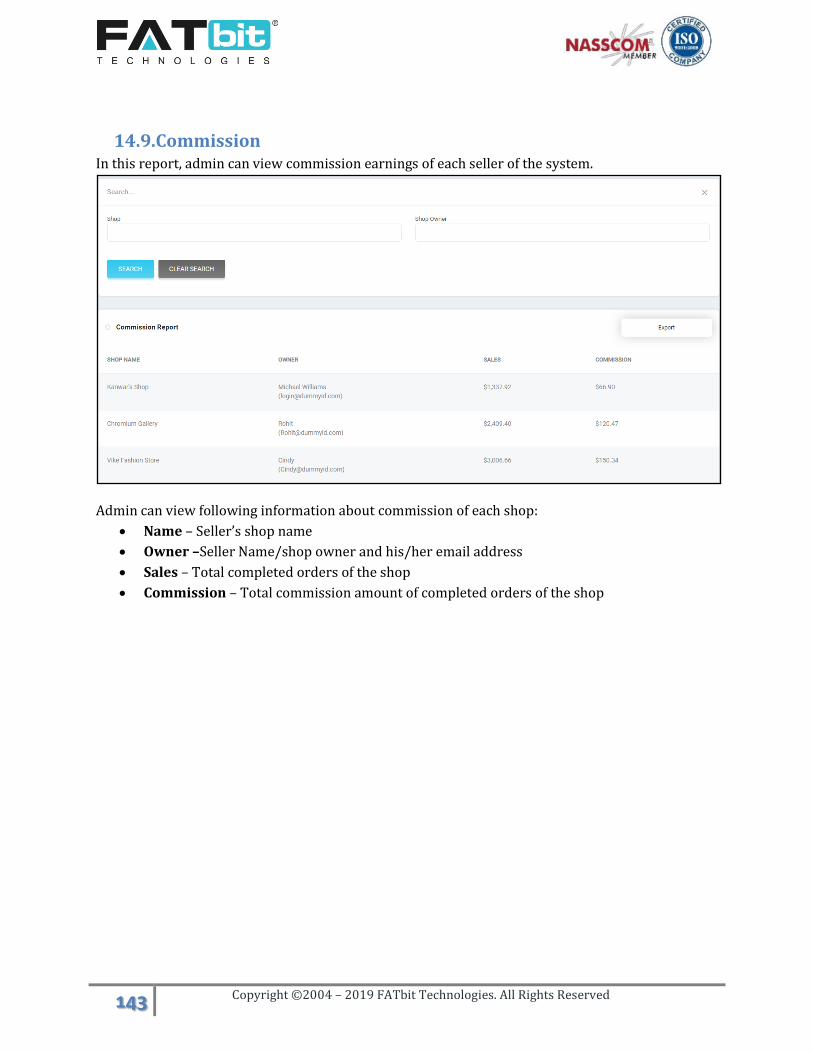
143 Copyright ©2004 – 2019 FATbit Technologies. All Rights Reserved
14.9. Commission In this report, admin can view commission earnings of each seller of the system.
Admin can view following information about commission of each shop:
Name – Seller’s shop name
Owner –Seller Name/shop owner and his/her email address
Sales – Total completed orders of the shop
Commission – Total commission amount of completed orders of the shop
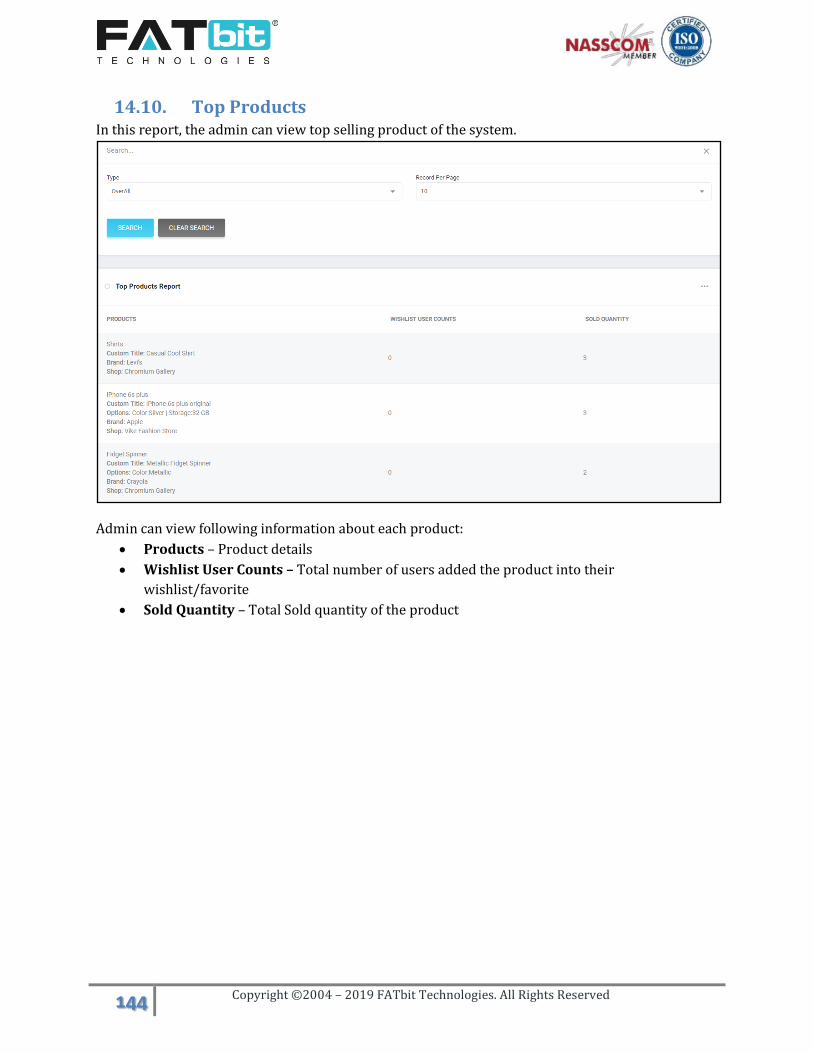
144 Copyright ©2004 – 2019 FATbit Technologies. All Rights Reserved
14.10. Top Products In this report, the admin can view top selling product of the system.
Admin can view following information about each product:
Products – Product details
Wishlist User Counts – Total number of users added the product into their
wishlist/favorite
Sold Quantity – Total Sold quantity of the product

145 Copyright ©2004 – 2019 FATbit Technologies. All Rights Reserved
14.11. Most Refunded Products In this report, admin can view most refunded products of the system.
Admin can view following information about each product:
Products – Product details
Wishlist User Counts – Total number of users added the product into their
wishlist/favorite
Sold Quantity – Total Sold quantity of the product

146 Copyright ©2004 – 2019 FATbit Technologies. All Rights Reserved
14.12. Top Categories In this report, admin can view categories of top selling products of the system.
Admin can view following information about each category:
Category – Category name. It could be parent or child category.
Sold Quantity – Total sold quantity of products of that category
Wishlist User Counts – Total number of users added products of that category into their
wishlist/favorite.

147 Copyright ©2004 – 2019 FATbit Technologies. All Rights Reserved
14.13. Discount Coupons In this report, admin can view details report of all discount coupons of the system.
Admin can view following information about each discount coupon:
Coupon Code – Code of the discount coupon
Order ID –Order id in which the coupon has been used
Customer – Username of the user who has used that coupon
Amount – Discount amount that user has availed from that coupon on the order
Date – Date on which the coupon has been used.

148 Copyright ©2004 – 2019 FATbit Technologies. All Rights Reserved
15. Manage Admin Users On this page, the admin can manage sub-admin users of the website.
Admin has the following options on this page:
Upon clicking the Add Admin User, admin can add a new sub-admin user. Admin needs to
fill the following details:
Full Name
Username
Email Address
Password
Confirm Password
Status
Admin needs to share the login credentials to the sub-admin users manually.
Upon clicking the Edit option, admin can edit the details of the user except password.
Upon clicking the Change Password option, admin can change the password of the user’s
account.
Upon clicking the Permission option, admin can set the permission of the module for the
selected user. It could be None / View Only / View & Edit. By default, ‘None’ permission is
set for all modules.
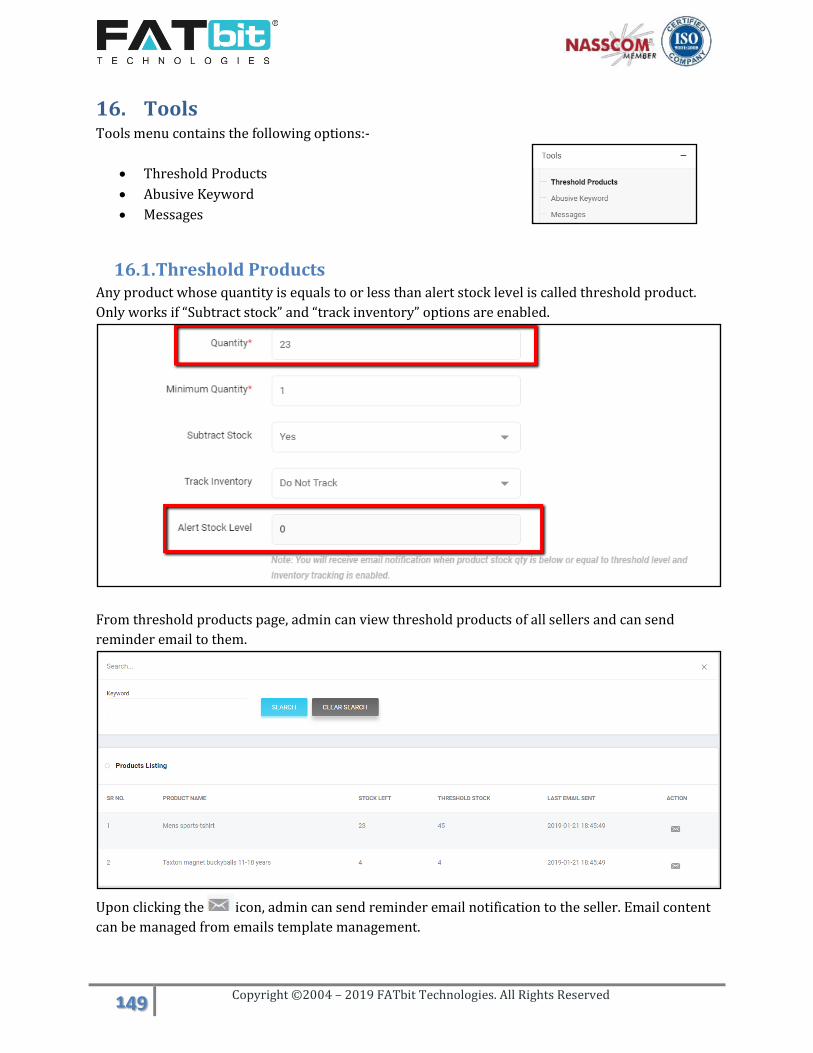
149 Copyright ©2004 – 2019 FATbit Technologies. All Rights Reserved
16. Tools Tools menu contains the following options:-
Threshold Products
Abusive Keyword
Messages
16.1. Threshold Products Any product whose quantity is equals to or less than alert stock level is called threshold product.
Only works if “Subtract stock” and “track inventory” options are enabled.
From threshold products page, admin can view threshold products of all sellers and can send
reminder email to them.
Upon clicking the icon, admin can send reminder email notification to the seller. Email content
can be managed from emails template management.

150 Copyright ©2004 – 2019 FATbit Technologies. All Rights Reserved
16.2. Abusive Keyword On the Abusive Keyword page, admin can view manage abusive words on the website. If any user
uses these words in blog comments, the system will restrict them. But when any user uses these
words in order reviews, system will allow them to post it and send an email notification to the
admin for the same.
Admin has the following options on this page:
Upon clicking the Add Keyword option, admin can add a new abusive keyword. Admin
needs to fill the following details:
Select Language
Keyword
Upon clicking the Edit option, admin can edit the details of keyword.
Upon clicking the Delete option, admin can delete the keyword.

151 Copyright ©2004 – 2019 FATbit Technologies. All Rights Reserved
16.3. Messages On the Messages page, admin can view all the messages threads between sellers and buyers.
Admin has the following options on this page:
Admin can search messages threads by using keywords, message posted by, posted to and
date range.
Upon clicking the View option, admin can view all the messages of a conversation thread.
Admin can also edit and delete the message posted by the user (buyer/seller).


