144

Trend Micro Incorporated reserves the right to make changes to this document and tothe products described herein without notice. Before installing and using the software,please review the readme files, release notes, and the latest version of the applicable userdocumentation, which are available from the Trend Micro website at:
http://docs.trendmicro.com/en-us/enterprise/trend-micro-security-(for-mac).aspx
Trend Micro, the Trend Micro t-ball logo, OfficeScan, Worry-Free and TrendLabs aretrademarks or registered trademarks of Trend Micro, Incorporated. All other product orcompany names may be trademarks or registered trademarks of their owners.
Copyright © 2013 Trend Micro Incorporated. All rights reserved.
Document Part No.: TSEM25920/130401
Release Date: June 2013
The user documentation for Trend Micro Security (for Mac) introduces the mainfeatures of the software and installation instructions for your production environment.Read through it before installing or using the software.
Detailed information about how to use specific features within the software are availablein the online help file and the online Knowledge Base at Trend Micro’s website.
Trend Micro always seeks to improve its documentation. If you have questions,comments, or suggestions about this or any Trend Micro document, please contact us [email protected].
Please evaluate this documentation on the following site:
http://www.trendmicro.com/download/documentation/rating.asp
i
Table of ContentsPreface
Preface ............................................................................................................... vii
Trend Micro Security (for Mac) Documentation ....................................... viii
Audience ........................................................................................................... viii
Document Conventions ................................................................................... ix
Terminology ....................................................................................................... ix
Chapter 1: Introducing Trend Micro Security (for Mac)About Trend Micro Security (for Mac) ....................................................... 1-2
Key Features and Benefits ............................................................................. 1-2
New in this Release ........................................................................................ 1-3
The Trend Micro Security (for Mac) Server ............................................... 1-4
The Trend Micro Security (for Mac) Agent ............................................... 1-5
Chapter 2: Installing the ServerServer Installation Requirements ................................................................. 2-2
Update Source ................................................................................................. 2-3
Installing the Trend Micro Security (for Mac) Server ............................... 2-4
Activating the Product for the First Time .................................................. 2-7
Performing Post-installation Tasks on the Server ..................................... 2-9
Uninstalling the Trend Micro Security (for Mac) Server ........................ 2-10
Chapter 3: Getting StartedThe Web Console ........................................................................................... 3-2
Opening the Web Console .................................................................... 3-2
Security Summary ........................................................................................... 3-3
Trend Micro Security (for Mac) Administrator’s Guide
ii
The Agent Tree ............................................................................................... 3-4Agent Tree General Tasks .................................................................... 3-4Agent Tree Specific Tasks ..................................................................... 3-5
Groups .............................................................................................................. 3-6Adding a Group ...................................................................................... 3-7Deleting a Group or Agent ................................................................... 3-7Renaming a Group ................................................................................. 3-8Moving an Agent .................................................................................... 3-8
Widgets ............................................................................................................. 3-9Agent Connectivity (Mac) Widget ....................................................... 3-9Agent Updates (Mac) Widget ............................................................. 3-11Security Risk Detections (Mac) Widget ............................................ 3-12
Trend Micro Smart Protection ................................................................... 3-12
Chapter 4: Installing the AgentAgent Installation Requirements .................................................................. 4-2
Agent Installation Methods and Setup Files ............................................... 4-2Installing on a Single Mac Computer .................................................. 4-3Installing on Several Mac Computers ................................................. 4-9
Agent Post-installation ................................................................................. 4-12
Agent Uninstallation .................................................................................... 4-14
Chapter 5: Keeping Protection Up-to-DateComponents .................................................................................................... 5-2
Update Overview ............................................................................................ 5-3
Server Update .................................................................................................. 5-4Configuring the Server Update Source ............................................... 5-5Configuring Proxy Settings for Server Updates ................................ 5-6Server Update Methods ......................................................................... 5-6
Agent Updates ................................................................................................. 5-8Configuring Agent Update Settings ..................................................... 5-9Launching Agent Update from the Summary Screen ..................... 5-11Launching Agent Update from the Agent Management Screen ... 5-11
Table of Contents
iii
Chapter 6: Protecting Mac Computers from Security RisksAbout Security Risks ...................................................................................... 6-2
Viruses and Malware .............................................................................. 6-2Spyware and Grayware .......................................................................... 6-4
Scan Types ....................................................................................................... 6-5Real-time Scan ......................................................................................... 6-5Manual Scan ............................................................................................ 6-6Scheduled Scan ....................................................................................... 6-8Scan Now ................................................................................................. 6-9
Settings Common to All Scan Types ........................................................... 6-9Scan Criteria .......................................................................................... 6-10Scan Actions .......................................................................................... 6-12Scan Exclusions .................................................................................... 6-16Cache Settings for Scans ..................................................................... 6-20
Security Risk Notifications and Logs ........................................................ 6-22Configuring Administrator Notification Settings ............................ 6-22Configuring Security Risk Notifications for Administrators ......... 6-23Configuring Outbreak Notifications for Administrators ............... 6-24Viewing Security Risk Logs ................................................................ 6-25
Chapter 7: Protecting Mac Computers from Web-basedThreats
Web Threats .................................................................................................... 7-2
Web Reputation .............................................................................................. 7-2
Configuring Web Reputation Settings ......................................................... 7-2
Configuring the Approved URL List .......................................................... 7-5
Viewing Web Reputation Logs ..................................................................... 7-6
Chapter 8: Managing the Server and AgentsUpgrading the Server and Agents ................................................................ 8-2
Upgrading the Server ............................................................................. 8-2Upgrading Agents ................................................................................... 8-4
Managing Logs ................................................................................................ 8-5
Trend Micro Security (for Mac) Administrator’s Guide
iv
Managing Licenses .......................................................................................... 8-6
Backing Up the Server Database .................................................................. 8-7
Restoring the Server Database ...................................................................... 8-8
Trend Micro Control Manager ..................................................................... 8-9Control Manager Integration in this Release ...................................... 8-9
Configuring Agent-Server Communication Settings .............................. 8-10
Agent Icons ................................................................................................... 8-11
Chapter 9: Getting HelpTroubleshooting .............................................................................................. 9-2
Web Console Access .............................................................................. 9-2Server Uninstallation .............................................................................. 9-4Agent Installation ................................................................................... 9-5General Agent Error .............................................................................. 9-6
The Trend Micro Knowledge Base .............................................................. 9-6
Contacting Technical Support ...................................................................... 9-7Speeding Up Your Support Call ........................................................... 9-7
Contact Information ...................................................................................... 9-8
Security Information Center ......................................................................... 9-8
TrendLabs ........................................................................................................ 9-9
Documentation Feedback ............................................................................. 9-9
Appendix A: IPv6 Support in Trend Micro Security (for Mac)IPv6 Support for Trend Micro Security (for Mac) Server and Agents .. A-2
Trend Micro Security (for Mac) Server IPv6 Requirements ................... A-2
Trend Micro Security (for Mac) Agent IPv6 Requirements ................... A-2
Pure IPv6 Server Limitations ....................................................................... A-3
Pure IPv6 Agent Limitations ....................................................................... A-3
Configuring IPv6 Addresses ........................................................................ A-4
Screens That Display IP Addresses ............................................................ A-5

Table of Contents
v
Appendix B: Product Terminology and ConceptsIntelliScan ........................................................................................................ B-2
Uncleanable Files ........................................................................................... B-2
IndexIndex .............................................................................................................. IN-1


vii
Preface
PrefaceWelcome to the Trend Micro Security (for Mac) Administrator’s Guide. Thisdocument discusses Trend Micro Security (for Mac) server and agent installation, gettingstarted information, and server and agent management.
Trend Micro Security (for Mac) Administrator’s Guide
viii
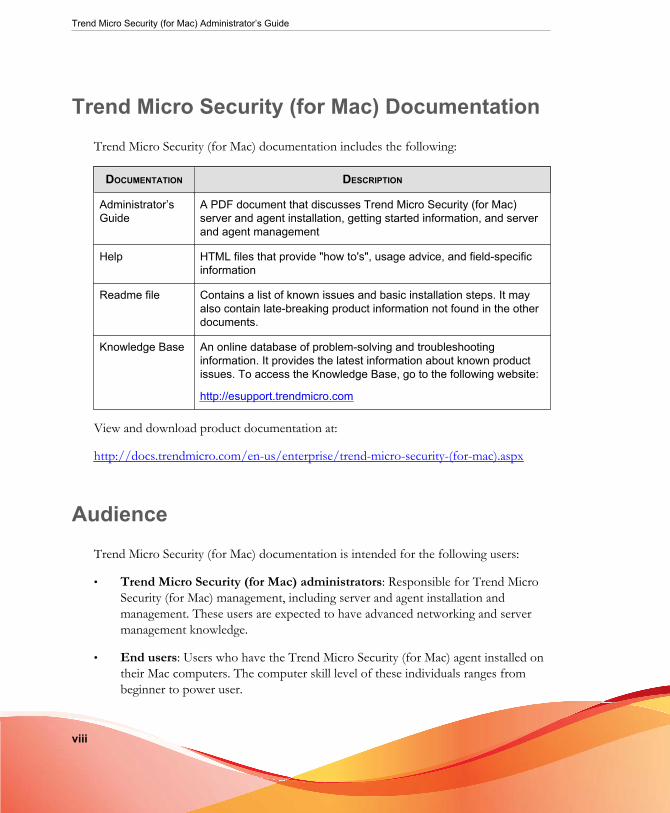
Trend Micro Security (for Mac) DocumentationTrend Micro Security (for Mac) documentation includes the following:
DOCUMENTATION DESCRIPTION
Administrator’sGuide
A PDF document that discusses Trend Micro Security (for Mac)server and agent installation, getting started information, and serverand agent management
Help HTML files that provide "how to's", usage advice, and field-specificinformation
Readme file Contains a list of known issues and basic installation steps. It mayalso contain late-breaking product information not found in the otherdocuments.
Knowledge Base An online database of problem-solving and troubleshootinginformation. It provides the latest information about known productissues. To access the Knowledge Base, go to the following website:
http://esupport.trendmicro.com
View and download product documentation at:
http://docs.trendmicro.com/en-us/enterprise/trend-micro-security-(for-mac).aspx
AudienceTrend Micro Security (for Mac) documentation is intended for the following users:
• Trend Micro Security (for Mac) administrators: Responsible for Trend MicroSecurity (for Mac) management, including server and agent installation andmanagement. These users are expected to have advanced networking and servermanagement knowledge.
• End users: Users who have the Trend Micro Security (for Mac) agent installed ontheir Mac computers. The computer skill level of these individuals ranges frombeginner to power user.
Preface
ix
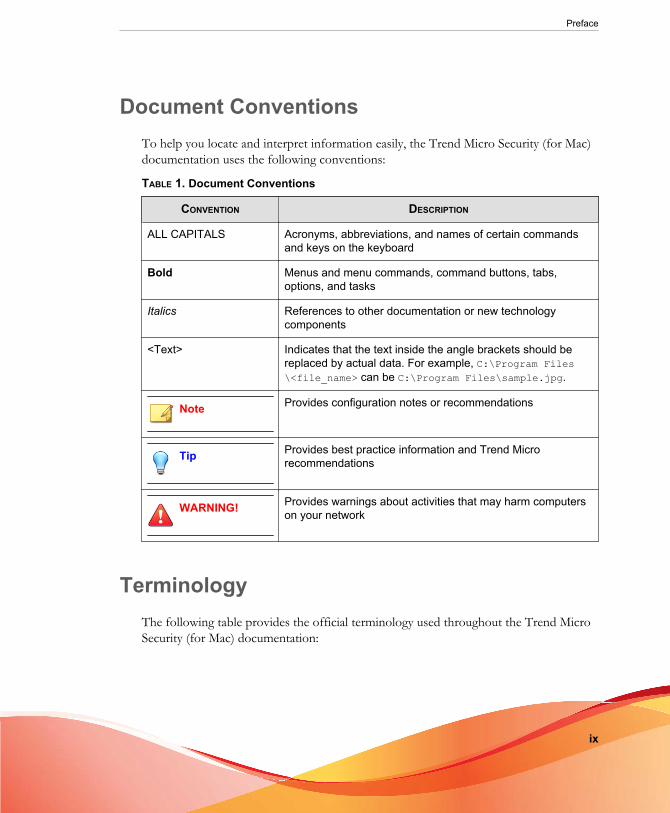
Document ConventionsTo help you locate and interpret information easily, the Trend Micro Security (for Mac)documentation uses the following conventions:
TABLE 1. Document Conventions
CONVENTION DESCRIPTION
ALL CAPITALS Acronyms, abbreviations, and names of certain commandsand keys on the keyboard
Bold Menus and menu commands, command buttons, tabs,options, and tasks
Italics References to other documentation or new technologycomponents
<Text> Indicates that the text inside the angle brackets should bereplaced by actual data. For example, C:\Program Files\<file_name> can be C:\Program Files\sample.jpg.
Note Provides configuration notes or recommendations
Tip Provides best practice information and Trend Microrecommendations
WARNING! Provides warnings about activities that may harm computerson your network
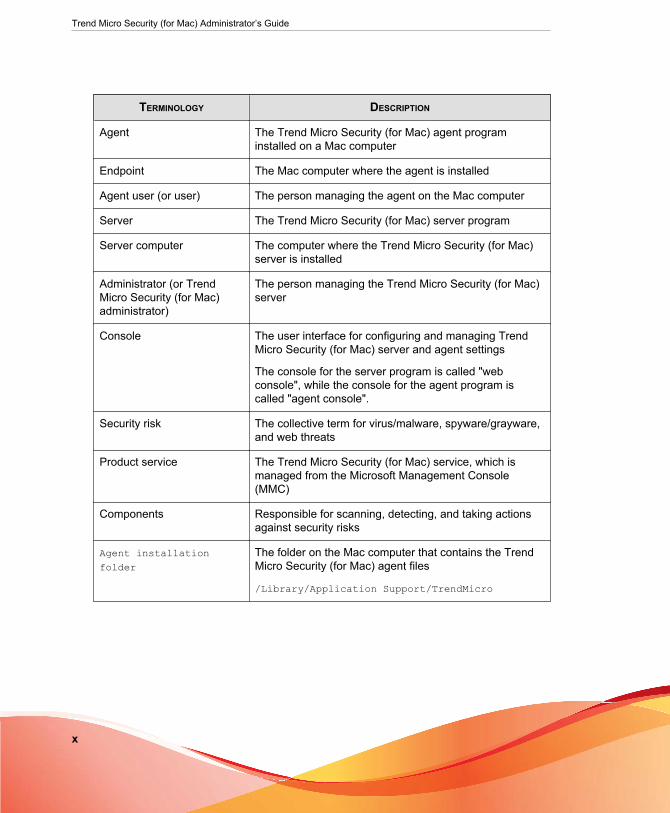
TerminologyThe following table provides the official terminology used throughout the Trend MicroSecurity (for Mac) documentation:
Trend Micro Security (for Mac) Administrator’s Guide
x
TERMINOLOGY DESCRIPTION
Agent The Trend Micro Security (for Mac) agent programinstalled on a Mac computer
Endpoint The Mac computer where the agent is installed
Agent user (or user) The person managing the agent on the Mac computer
Server The Trend Micro Security (for Mac) server program
Server computer The computer where the Trend Micro Security (for Mac)server is installed
Administrator (or TrendMicro Security (for Mac)administrator)
The person managing the Trend Micro Security (for Mac)server
Console The user interface for configuring and managing TrendMicro Security (for Mac) server and agent settings
The console for the server program is called "webconsole", while the console for the agent program iscalled "agent console".
Security risk The collective term for virus/malware, spyware/grayware,and web threats
Product service The Trend Micro Security (for Mac) service, which ismanaged from the Microsoft Management Console(MMC)
Components Responsible for scanning, detecting, and taking actionsagainst security risks
Agent installationfolder
The folder on the Mac computer that contains the TrendMicro Security (for Mac) agent files
/Library/Application Support/TrendMicro
Preface
xi
TERMINOLOGY DESCRIPTION
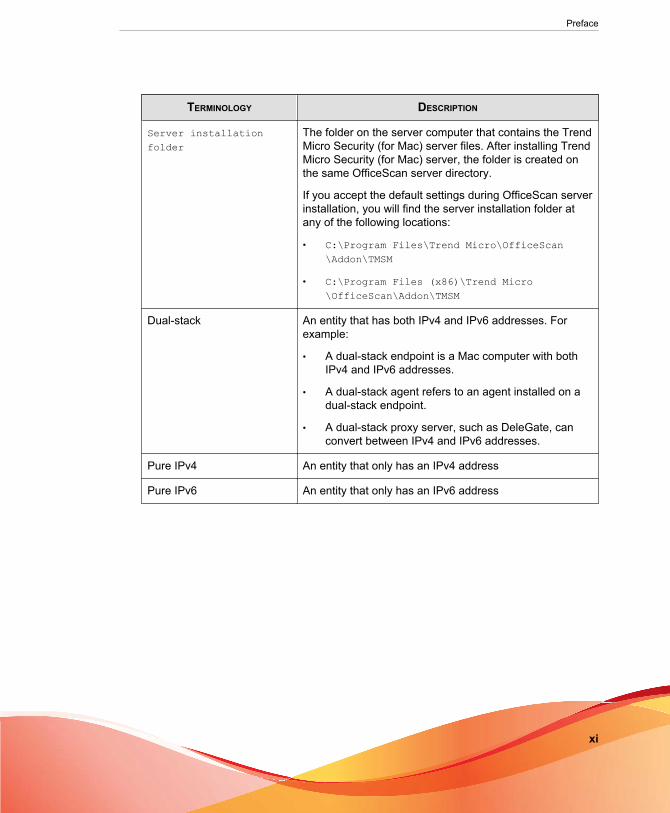
Server installationfolder
The folder on the server computer that contains the TrendMicro Security (for Mac) server files. After installing TrendMicro Security (for Mac) server, the folder is created onthe same OfficeScan server directory.
If you accept the default settings during OfficeScan serverinstallation, you will find the server installation folder atany of the following locations:
• C:\Program Files\Trend Micro\OfficeScan\Addon\TMSM
• C:\Program Files (x86)\Trend Micro\OfficeScan\Addon\TMSM
Dual-stack An entity that has both IPv4 and IPv6 addresses. Forexample:
• A dual-stack endpoint is a Mac computer with bothIPv4 and IPv6 addresses.
• A dual-stack agent refers to an agent installed on adual-stack endpoint.
• A dual-stack proxy server, such as DeleGate, canconvert between IPv4 and IPv6 addresses.
Pure IPv4 An entity that only has an IPv4 address
Pure IPv6 An entity that only has an IPv6 address


1-1
Chapter 1
Introducing Trend Micro Security (forMac)
This chapter introduces Trend Micro™ Security (for Mac) and provides an overview ofits features and capabilities.
Trend Micro Security (for Mac) Administrator’s Guide
1-2
About Trend Micro Security (for Mac)Trend Micro™ Security (for Mac) provides the latest endpoint protection againstsecurity risks, blended threats, and platform independent web-based attacks.
The Trend Micro Security (for Mac) server is a plug-in program integrated with TrendMicro products such as OfficeScan and Worry-free Business Security and installedthrough the Plug-in Manager framework. The Trend Micro Security (for Mac) serverdeploys agents to Mac computers.
Key Features and BenefitsTrend Micro Security (for Mac) provides the following features and benefits:
• Security Risk Protection
Trend Micro Security (for Mac) protects Mac computers from security risks byscanning files and then performing a specific action on each security risk detected.An overwhelming number of security risks detected over a short period of timesignals an outbreak. Trend Micro Security (for Mac) notifies you of any outbreak soyou can take immediate action, such as cleaning infected computers and isolatingthem until they are completely risk-free.
• Web Reputation
Web Reputation technology proactively protects Mac computers within or outsidethe corporate network from malicious and potentially dangerous websites. WebReputation breaks the infection chain and prevents downloading of malicious code.
• Centralized Management
A web-based management console gives administrators transparent access to allagents on the network. The web console coordinates automatic deployment ofsecurity policies, pattern files, and software updates on every agent. Administratorscan perform remote administration and configure settings for individual agents oragent groups.
Introducing Trend Micro Security (for Mac)
1-3
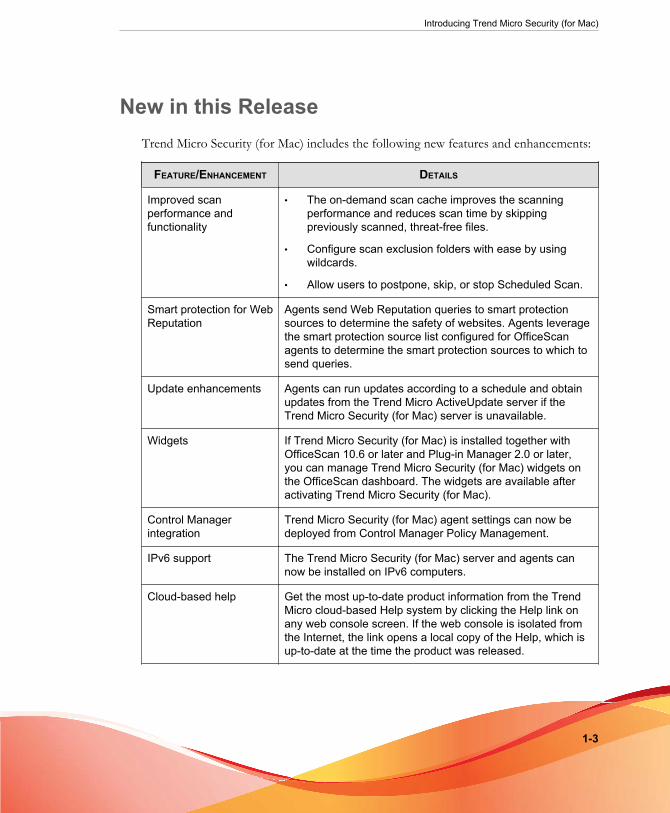
New in this ReleaseTrend Micro Security (for Mac) includes the following new features and enhancements:
FEATURE/ENHANCEMENT DETAILS
Improved scanperformance andfunctionality
• The on-demand scan cache improves the scanningperformance and reduces scan time by skippingpreviously scanned, threat-free files.
• Configure scan exclusion folders with ease by usingwildcards.
• Allow users to postpone, skip, or stop Scheduled Scan.
Smart protection for WebReputation
Agents send Web Reputation queries to smart protectionsources to determine the safety of websites. Agents leveragethe smart protection source list configured for OfficeScanagents to determine the smart protection sources to which tosend queries.
Update enhancements Agents can run updates according to a schedule and obtainupdates from the Trend Micro ActiveUpdate server if theTrend Micro Security (for Mac) server is unavailable.
Widgets If Trend Micro Security (for Mac) is installed together withOfficeScan 10.6 or later and Plug-in Manager 2.0 or later,you can manage Trend Micro Security (for Mac) widgets onthe OfficeScan dashboard. The widgets are available afteractivating Trend Micro Security (for Mac).
Control Managerintegration
Trend Micro Security (for Mac) agent settings can now bedeployed from Control Manager Policy Management.
IPv6 support The Trend Micro Security (for Mac) server and agents cannow be installed on IPv6 computers.
Cloud-based help Get the most up-to-date product information from the TrendMicro cloud-based Help system by clicking the Help link onany web console screen. If the web console is isolated fromthe Internet, the link opens a local copy of the Help, which isup-to-date at the time the product was released.
Trend Micro Security (for Mac) Administrator’s Guide
1-4
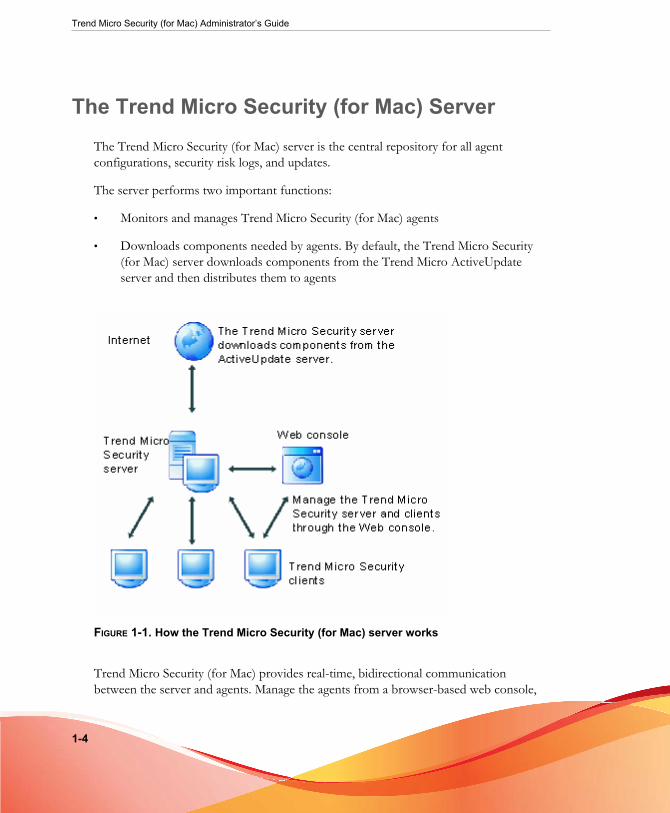
The Trend Micro Security (for Mac) ServerThe Trend Micro Security (for Mac) server is the central repository for all agentconfigurations, security risk logs, and updates.
The server performs two important functions:
• Monitors and manages Trend Micro Security (for Mac) agents
• Downloads components needed by agents. By default, the Trend Micro Security(for Mac) server downloads components from the Trend Micro ActiveUpdateserver and then distributes them to agents
FIGURE 1-1. How the Trend Micro Security (for Mac) server works
Trend Micro Security (for Mac) provides real-time, bidirectional communicationbetween the server and agents. Manage the agents from a browser-based web console,
Introducing Trend Micro Security (for Mac)
1-5
which you can access from virtually anywhere on the network. The server communicateswith the agent through the ActiveMQ™ protocol.
The Trend Micro Security (for Mac) AgentProtect Mac computers from security risks by installing the Trend Micro Security (forMac) agent on each computer. The agent provides three scan types:
• Real-time Scan
• Scheduled Scan
• Manual Scan
The agent reports to the parent Trend Micro Security (for Mac) server from which itwas installed. The agent sends events and status information to the server in real time.Agents communicate with the server through the ActiveMQ protocol.

2-1
Chapter 2
Installing the ServerThis chapter describes system requirements and the installation procedure for TrendMicro Security (for Mac) server.
Trend Micro Security (for Mac) Administrator’s Guide
2-2
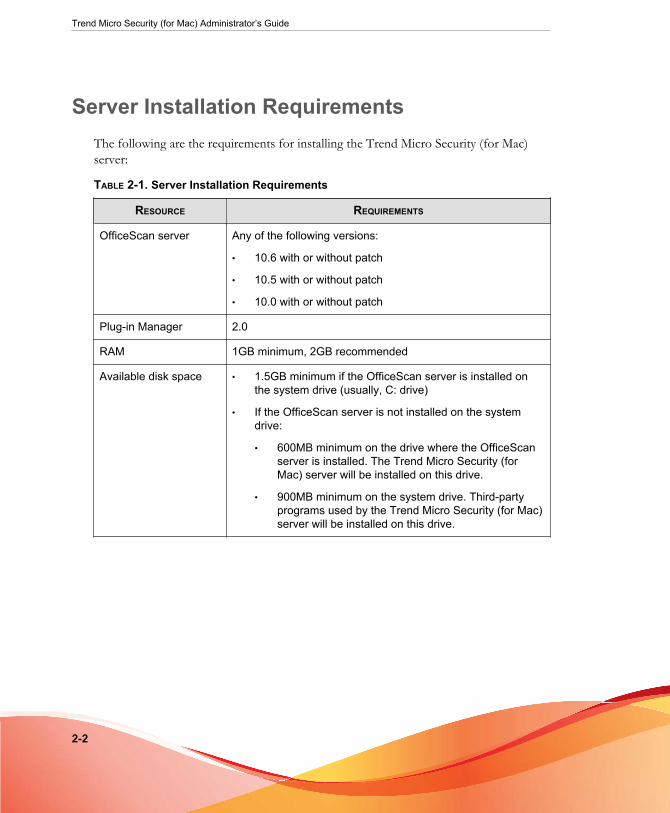
Server Installation RequirementsThe following are the requirements for installing the Trend Micro Security (for Mac)server:
TABLE 2-1. Server Installation Requirements
RESOURCE REQUIREMENTS
OfficeScan server Any of the following versions:
• 10.6 with or without patch
• 10.5 with or without patch
• 10.0 with or without patch
Plug-in Manager 2.0
RAM 1GB minimum, 2GB recommended
Available disk space • 1.5GB minimum if the OfficeScan server is installed onthe system drive (usually, C: drive)
• If the OfficeScan server is not installed on the systemdrive:
• 600MB minimum on the drive where the OfficeScanserver is installed. The Trend Micro Security (forMac) server will be installed on this drive.
• 900MB minimum on the system drive. Third-partyprograms used by the Trend Micro Security (for Mac)server will be installed on this drive.
Installing the Server
2-3
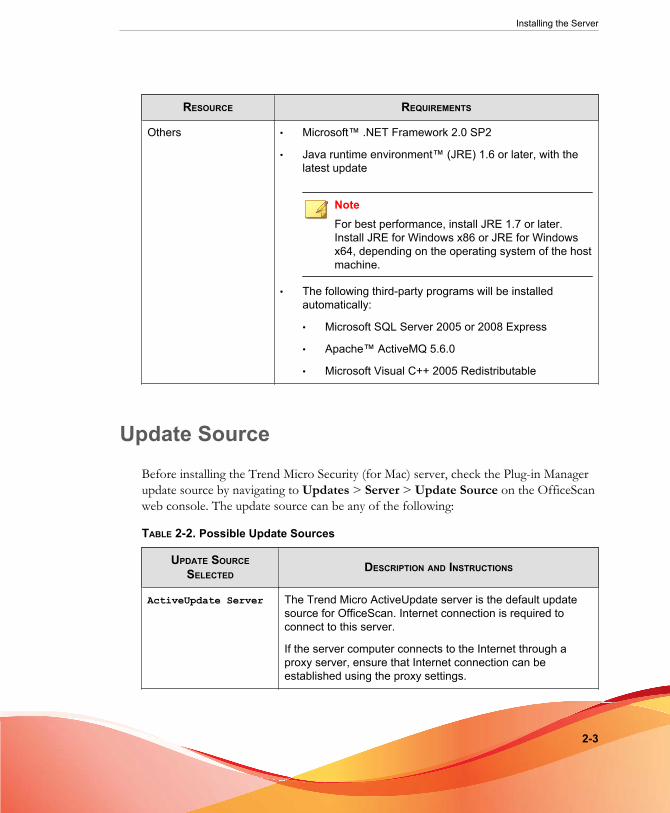
RESOURCE REQUIREMENTS
Others • Microsoft™ .NET Framework 2.0 SP2
• Java runtime environment™ (JRE) 1.6 or later, with thelatest update
NoteFor best performance, install JRE 1.7 or later.Install JRE for Windows x86 or JRE for Windowsx64, depending on the operating system of the hostmachine.
• The following third-party programs will be installedautomatically:
• Microsoft SQL Server 2005 or 2008 Express
• Apache™ ActiveMQ 5.6.0
• Microsoft Visual C++ 2005 Redistributable
Update SourceBefore installing the Trend Micro Security (for Mac) server, check the Plug-in Managerupdate source by navigating to Updates > Server > Update Source on the OfficeScanweb console. The update source can be any of the following:
TABLE 2-2. Possible Update Sources
UPDATE SOURCESELECTED
DESCRIPTION AND INSTRUCTIONS
ActiveUpdate Server The Trend Micro ActiveUpdate server is the default updatesource for OfficeScan. Internet connection is required toconnect to this server.
If the server computer connects to the Internet through aproxy server, ensure that Internet connection can beestablished using the proxy settings.
Trend Micro Security (for Mac) Administrator’s Guide
2-4
UPDATE SOURCESELECTED
DESCRIPTION AND INSTRUCTIONS
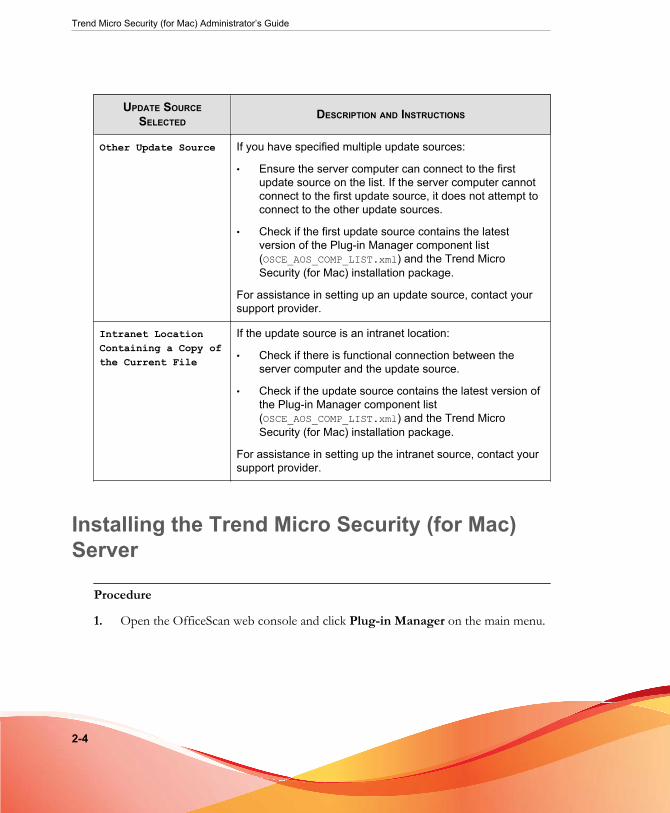
Other Update Source If you have specified multiple update sources:
• Ensure the server computer can connect to the firstupdate source on the list. If the server computer cannotconnect to the first update source, it does not attempt toconnect to the other update sources.
• Check if the first update source contains the latestversion of the Plug-in Manager component list(OSCE_AOS_COMP_LIST.xml) and the Trend MicroSecurity (for Mac) installation package.
For assistance in setting up an update source, contact yoursupport provider.
Intranet LocationContaining a Copy ofthe Current File
If the update source is an intranet location:
• Check if there is functional connection between theserver computer and the update source.
• Check if the update source contains the latest version ofthe Plug-in Manager component list(OSCE_AOS_COMP_LIST.xml) and the Trend MicroSecurity (for Mac) installation package.
For assistance in setting up the intranet source, contact yoursupport provider.
Installing the Trend Micro Security (for Mac)Server
Procedure
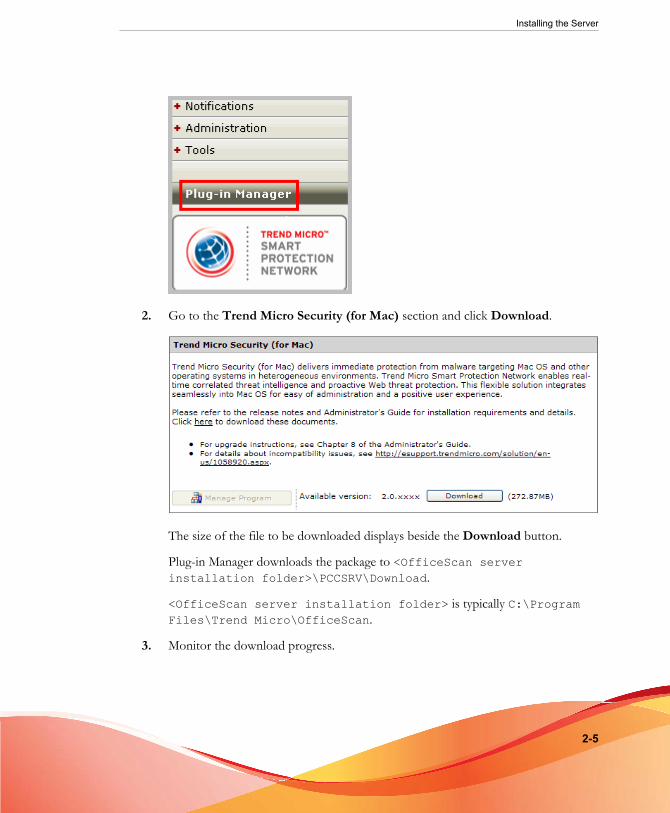
1. Open the OfficeScan web console and click Plug-in Manager on the main menu.
Installing the Server
2-5
2. Go to the Trend Micro Security (for Mac) section and click Download.
The size of the file to be downloaded displays beside the Download button.
Plug-in Manager downloads the package to <OfficeScan serverinstallation folder>\PCCSRV\Download.
<OfficeScan server installation folder> is typically C:\ProgramFiles\Trend Micro\OfficeScan.
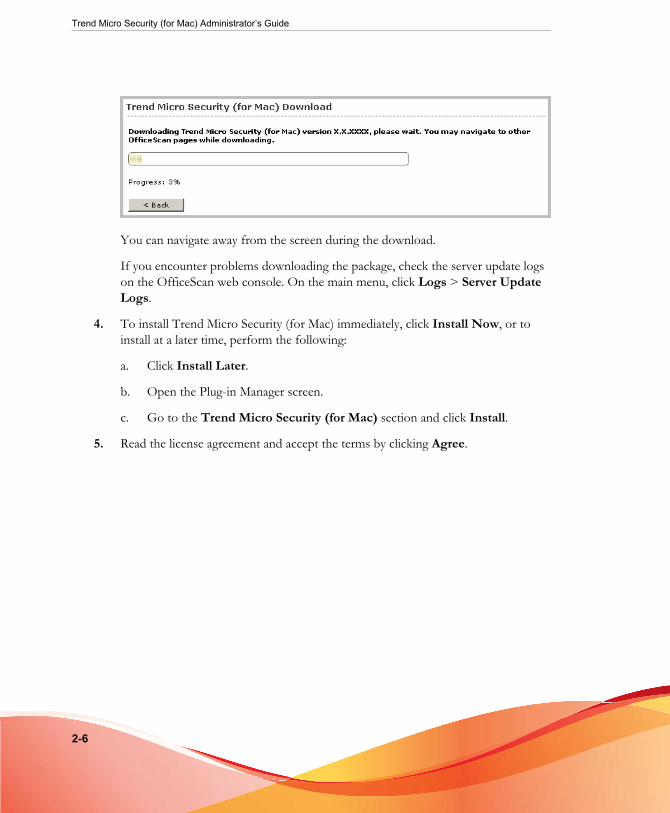
3. Monitor the download progress.
Trend Micro Security (for Mac) Administrator’s Guide
2-6
You can navigate away from the screen during the download.
If you encounter problems downloading the package, check the server update logson the OfficeScan web console. On the main menu, click Logs > Server UpdateLogs.
4. To install Trend Micro Security (for Mac) immediately, click Install Now, or toinstall at a later time, perform the following:
a. Click Install Later.
b. Open the Plug-in Manager screen.
c. Go to the Trend Micro Security (for Mac) section and click Install.
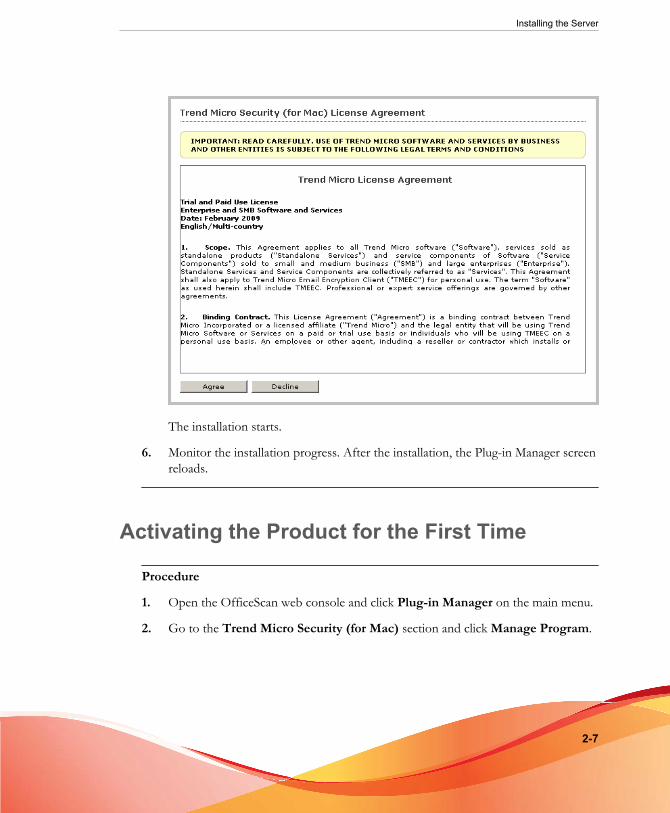
5. Read the license agreement and accept the terms by clicking Agree.
Installing the Server
2-7
The installation starts.
6. Monitor the installation progress. After the installation, the Plug-in Manager screenreloads.
Activating the Product for the First Time
Procedure
1. Open the OfficeScan web console and click Plug-in Manager on the main menu.
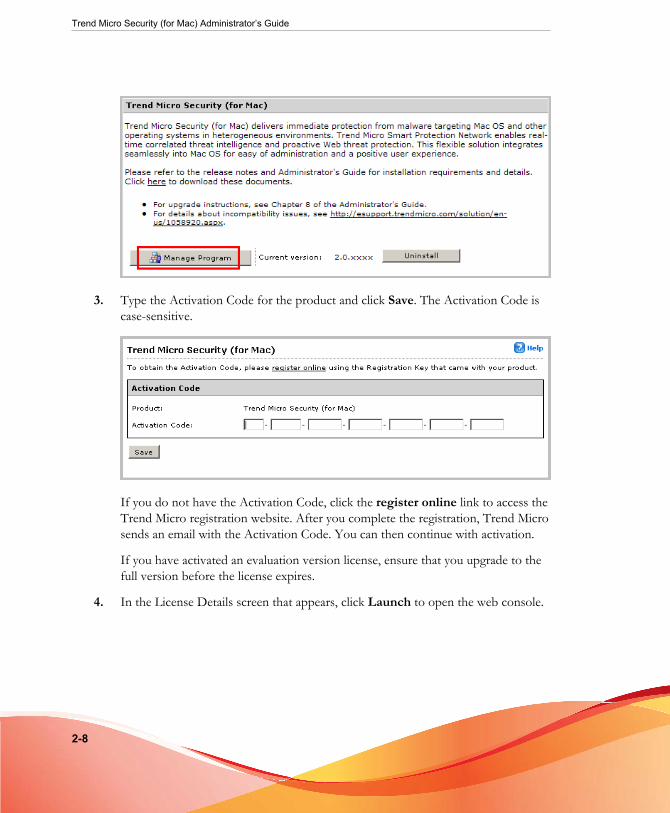
2. Go to the Trend Micro Security (for Mac) section and click Manage Program.
Trend Micro Security (for Mac) Administrator’s Guide
2-8
3. Type the Activation Code for the product and click Save. The Activation Code iscase-sensitive.
If you do not have the Activation Code, click the register online link to access theTrend Micro registration website. After you complete the registration, Trend Microsends an email with the Activation Code. You can then continue with activation.
If you have activated an evaluation version license, ensure that you upgrade to thefull version before the license expires.
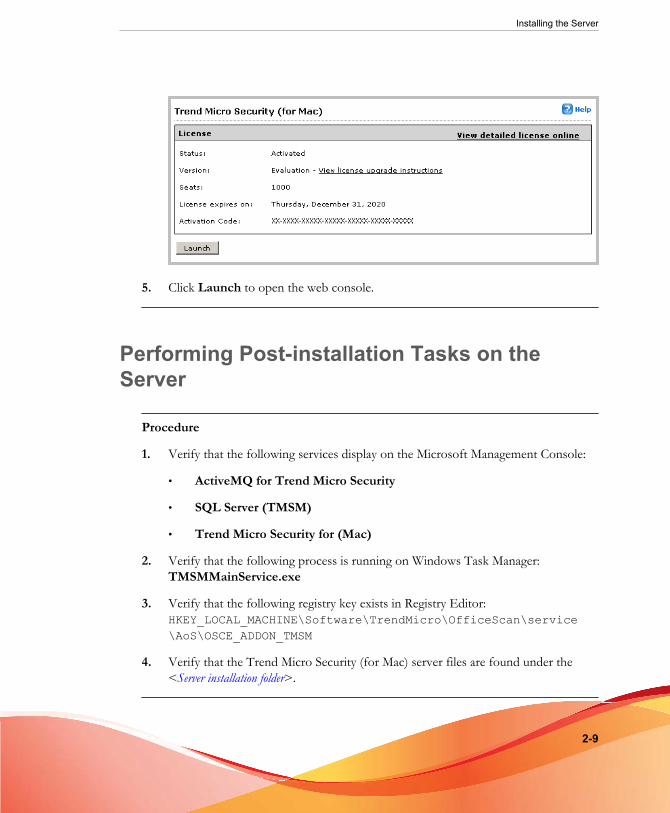
4. In the License Details screen that appears, click Launch to open the web console.
Installing the Server
2-9
5. Click Launch to open the web console.
Performing Post-installation Tasks on theServer
Procedure
1. Verify that the following services display on the Microsoft Management Console:
• ActiveMQ for Trend Micro Security
• SQL Server (TMSM)
• Trend Micro Security for (Mac)
2. Verify that the following process is running on Windows Task Manager:TMSMMainService.exe
3. Verify that the following registry key exists in Registry Editor:HKEY_LOCAL_MACHINE\Software\TrendMicro\OfficeScan\service\AoS\OSCE_ADDON_TMSM
4. Verify that the Trend Micro Security (for Mac) server files are found under the<Server installation folder>.
Trend Micro Security (for Mac) Administrator’s Guide
2-10
Uninstalling the Trend Micro Security (for Mac)Server
Procedure
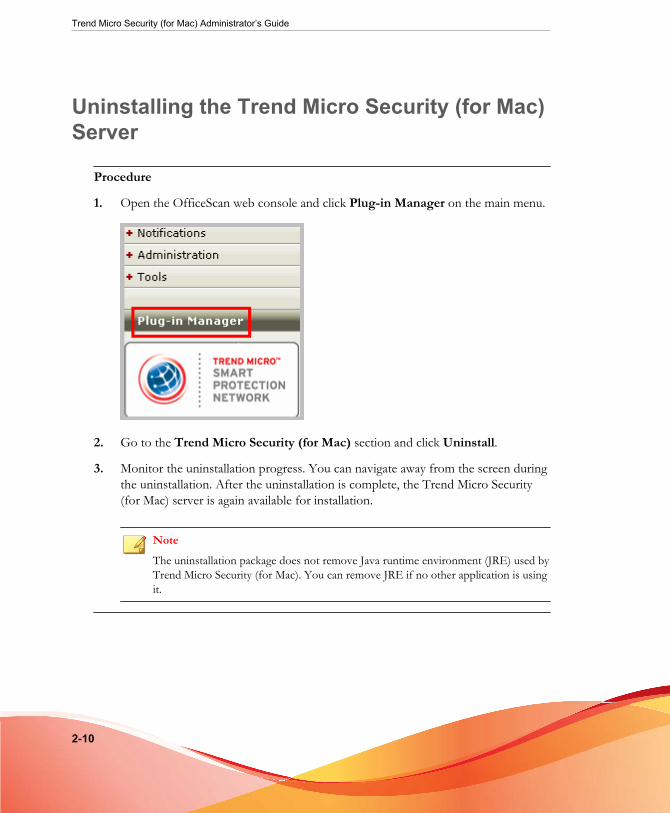
1. Open the OfficeScan web console and click Plug-in Manager on the main menu.
2. Go to the Trend Micro Security (for Mac) section and click Uninstall.
3. Monitor the uninstallation progress. You can navigate away from the screen duringthe uninstallation. After the uninstallation is complete, the Trend Micro Security(for Mac) server is again available for installation.
NoteThe uninstallation package does not remove Java runtime environment (JRE) used byTrend Micro Security (for Mac). You can remove JRE if no other application is usingit.

3-1
Chapter 3
Getting StartedThis chapter describes how to get started with Trend Micro Security (for Mac) and initialconfiguration settings.

Trend Micro Security (for Mac) Administrator’s Guide
3-2
The Web ConsoleThe web console is the central point for monitoring Trend Micro Security (for Mac)agents and configuring settings to be deployed to agents. The console comes with a setof default settings and values that you can configure based on your securityrequirements and specifications.
Use the web console to do the following:
• Manage agents installed on Mac computers
• Organize agents into logical groups for simultaneous configuration andmanagement
• Set scan configurations and initiate scanning on a single or multiple computers
• Configure security risk notifications and view logs sent by agents
• Configure outbreak criteria and notifications
Opening the Web Console
Before you begin
Open the web console from any computer on the network that has the followingresources:
• Monitor that supports 800 x 600 resolution at 256 colors or higher
• Microsoft™ Internet Explorer™ 7.0 or later. If the computer runs an x64 typeplatform, use the 32-bit version of Internet Explorer.
Procedure
1. On a web browser, type the OfficeScan server URL.
2. Type the user name and password to log on to the OfficeScan server.
3. On the main menu, click Plug-in Manager.
Getting Started
3-3
4. Go to the Trend Micro Security (for Mac) section and click Manage Program.
Security SummaryThe Summary screen appears when you open the Trend Micro Security (for Mac) webconsole or click Summary in the main menu.
TipRefresh the screen periodically to get the latest information.
Agents
The Agents section displays the following information:
• The connection status of all agents with the Trend Micro Security (for Mac) server.Clicking a link opens the agent tree where you can configure settings for the agents.
• The number of detected security risks and web threats
• The number of computers with detected security risks and web threats. Clicking anumber opens the agent tree displaying a list of computers with security risks orweb threats. In the agent tree, perform the following tasks:
• Select one or several agents, click Logs > Security Risk Logs, and thenspecify the log criteria. In the screen that displays, check the Results columnto see if the scan actions on the security risks were successfully carried out.For a list of scan results, see Scan Results on page 6-26.
• Select one or several agents, click Logs > Web Reputation Logs, and thenspecify the log criteria. In the screen that displays, check the list of blockedwebsites. You can add websites you do not want blocked to the list ofapproved URLs. For details, see Configuring the Approved URL List on page7-5.
Update Status
The Update Status table contains information about Trend Micro Security (for Mac)components and the agent program that protects Mac computers from security risks.
Trend Micro Security (for Mac) Administrator’s Guide
3-4
Tasks in this table:
• Update outdated components immediately. For details, see Launching Agent Updatefrom the Summary Screen on page 5-11.
• Upgrade agents to the latest program version or build if you recently upgraded theserver. For agent upgrade instructions, see Upgrading the Server and Agents on page8-2.
The Agent TreeThe Trend Micro Security (for Mac) agent tree displays all the agents that the servercurrently manages. All agents belong to a certain group. Use the menu items above theagent tree to simultaneously configure, manage, and apply the same configuration to allagents belonging to a group.
Agent Tree General TasksBelow are the general tasks you can perform when the agent tree displays:
Procedure
• Click the root icon ( ) to select all groups and agents. When you select the rooticon and then choose a task above the agent tree, a screen for configuring settingsdisplays. On the screen, choose from the following general options:
• Apply to All Agents: Applies settings to all existing agents and to any newagent added to an existing/future group. Future groups are groups not yetcreated at the time you configure the settings.
• Apply to Future Groups Only: Applies settings only to agents added tofuture groups. This option will not apply settings to new agents added to anexisting group.
• To select multiple adjacent groups or agents, click the first group or agent in therange, hold down the SHIFT key, and then click the last group or agent in therange.
Getting Started
3-5
• To select a range of non-contiguous groups or agents, hold down the CTRL keyand then click the groups or agents that you want to select.
• Search for an agent to manage by specifying a full or partial agent name in theSearch for computers text box. A list of matching agent names will appear in theagent tree.
NoteIPv6 or IPv4 addresses cannot be specified when searching for specific agents.
• Sort agents based on column information by clicking the column name.
• View the total number of agents below the agent tree.
Agent Tree Specific TasksAbove the agent tree are menu items that allow you perform the following tasks:
MENU BUTTON TASK
Tasks • Update agent components. For details, see Agent Updates onpage 5-8.
• Run Scan Now on Mac computers. For details, see Scan Now onpage 6-9.
Trend Micro Security (for Mac) Administrator’s Guide
3-6
MENU BUTTON TASK
Settings • Configure scan settings.
• Manual Scan on page 6-6
• Real-time Scan on page 6-5
• Scheduled Scan on page 6-8
• Scan Exclusions on page 6-16
• Cache Settings for Scans on page 6-20
• Configure Web Reputation settings. For details, see ConfiguringWeb Reputation Settings on page 7-2.
• Configure update settings. For details, see Configuring AgentUpdate Settings on page 5-9.
Logs View logs.
• Viewing Security Risk Logs on page 6-25
• Viewing Web Reputation Logs on page 7-6
Manage AgentTree
Manage Trend Micro Security (for Mac) groups. For details, seeGroups on page 3-6.
GroupsA group in Trend Micro Security (for Mac) is a set of agents that share the sameconfiguration and run the same tasks. By organizing agents into groups, you cansimultaneously configure, manage, and apply the same configuration to all agentsbelonging to the groups.
For ease of management, group agents based on their departments or the functions theyperform. You can also group agents that are at a greater risk of infection to apply a moresecure configuration to all of them.You can add or rename groups, move agents to adifferent group, or remove agents permanently. An agent removed from the agent tree isnot automatically uninstalled from the Mac computer. The agent can still performserver-dependent tasks, such as updating components. However, the server is unawareof the existence of the agent and therefore cannot send configurations or notificationsto the agent.
Getting Started
3-7
If the agent has been uninstalled from the Mac computer, it is not automaticallyremoved from the agent tree and its connection status is "Offline". Manually remove theagent from the agent tree.
Adding a Group
Procedure
1. Navigate to Agent Management.
2. Click Manage Agent Tree > Add Group.
3. Type a name for the group you want to add.
4. Click Add.
The new group appears in the agent tree.
Deleting a Group or Agent
Before you begin
Before deleting a group, check if there are agents that belong to the group and thenmove the agents to another group. For details about moving agents, see Moving an Agenton page 3-8.
Procedure
1. Navigate to Agent Management.
2. In the agent tree, select specific groups or agents.
3. Click Manage Agent Tree > Remove Group/Agent.
4. Click OK to confirm the deletion.
Trend Micro Security (for Mac) Administrator’s Guide
3-8
Renaming a Group
Procedure
1. Navigate to Agent Management.
2. In the agent tree, select the group to rename.
3. Click Manage Agent Tree > Rename Group.
4. Type a new name for the group.
5. Click Rename.
The new group name appears in the agent tree.
Moving an Agent
Procedure
1. Navigate to Agent Management.
2. In the agent tree, select one or several agents belonging to a group.
3. Click Manage Agent Tree > Move Agent.
4. Select the group to which to move the agent.
5. Decide whether to apply the settings of the new group to the agent.
Tip
Tip: Alternatively, drag and drop the agent to another group in the agent tree.
6. Click Move.
Getting Started
3-9
WidgetsManage Trend Micro Security (for Mac) widgets on the OfficeScan dashboard. Thewidgets are available after activating Trend Micro Security (for Mac).
To view widgets, be sure that the OfficeScan version is 10.6 or later and the Plug-inManager version is 2.0 or later.
For details on working with widgets, see the OfficeScan documentation.
Agent Connectivity (Mac) Widget
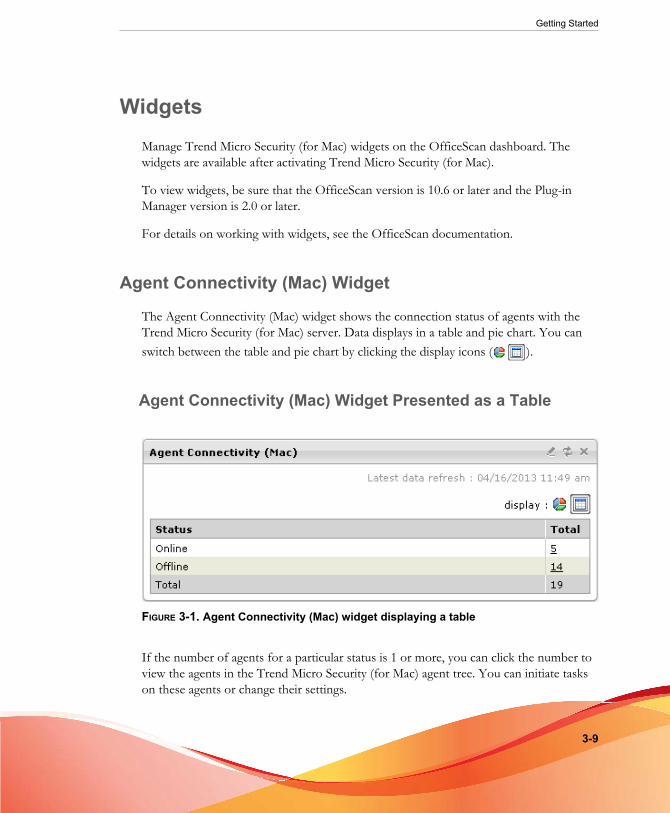
The Agent Connectivity (Mac) widget shows the connection status of agents with theTrend Micro Security (for Mac) server. Data displays in a table and pie chart. You canswitch between the table and pie chart by clicking the display icons ( ).
Agent Connectivity (Mac) Widget Presented as a Table
FIGURE 3-1. Agent Connectivity (Mac) widget displaying a table
If the number of agents for a particular status is 1 or more, you can click the number toview the agents in the Trend Micro Security (for Mac) agent tree. You can initiate taskson these agents or change their settings.
Trend Micro Security (for Mac) Administrator’s Guide
3-10
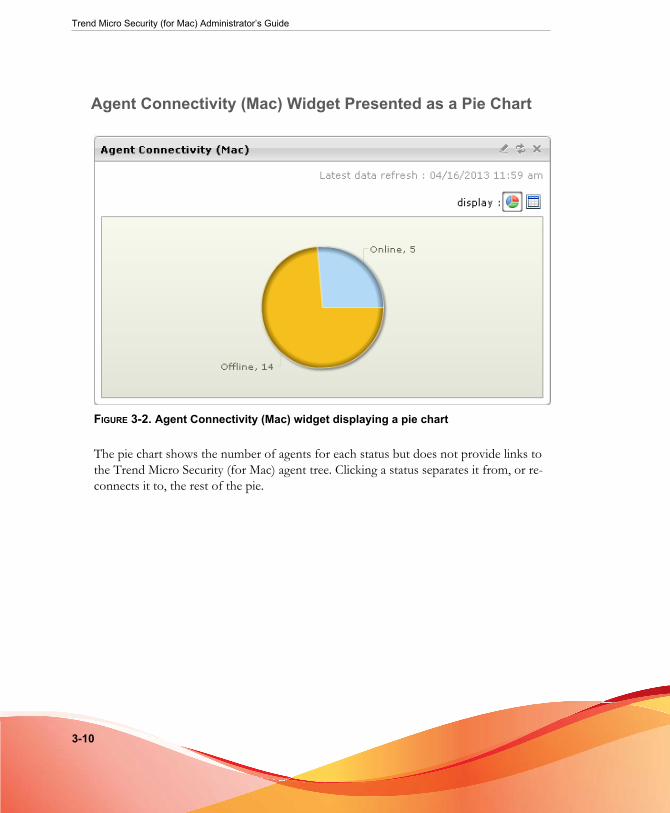
Agent Connectivity (Mac) Widget Presented as a Pie Chart
FIGURE 3-2. Agent Connectivity (Mac) widget displaying a pie chart
The pie chart shows the number of agents for each status but does not provide links tothe Trend Micro Security (for Mac) agent tree. Clicking a status separates it from, or re-connects it to, the rest of the pie.
Getting Started
3-11
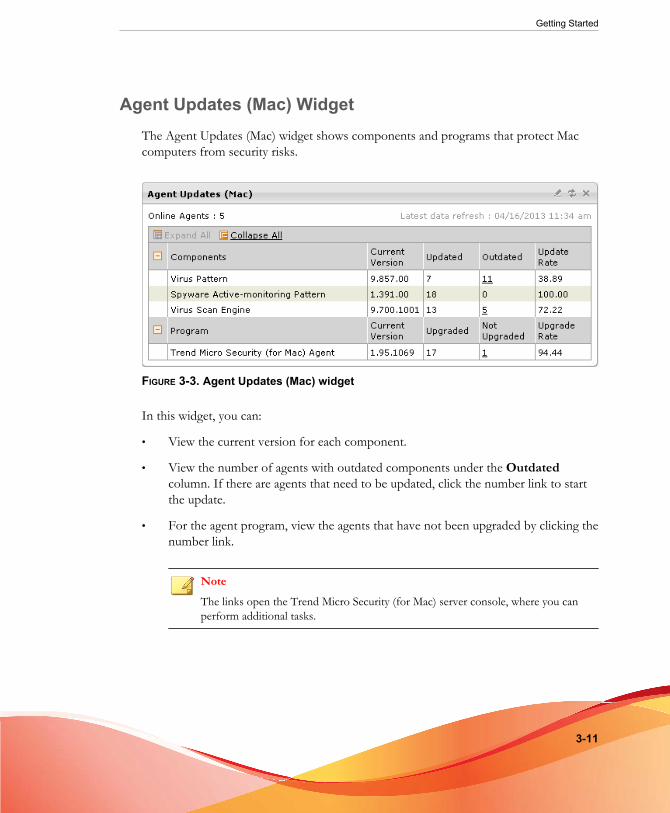
Agent Updates (Mac) WidgetThe Agent Updates (Mac) widget shows components and programs that protect Maccomputers from security risks.
FIGURE 3-3. Agent Updates (Mac) widget
In this widget, you can:
• View the current version for each component.
• View the number of agents with outdated components under the Outdatedcolumn. If there are agents that need to be updated, click the number link to startthe update.
• For the agent program, view the agents that have not been upgraded by clicking thenumber link.
NoteThe links open the Trend Micro Security (for Mac) server console, where you canperform additional tasks.
Trend Micro Security (for Mac) Administrator’s Guide
3-12
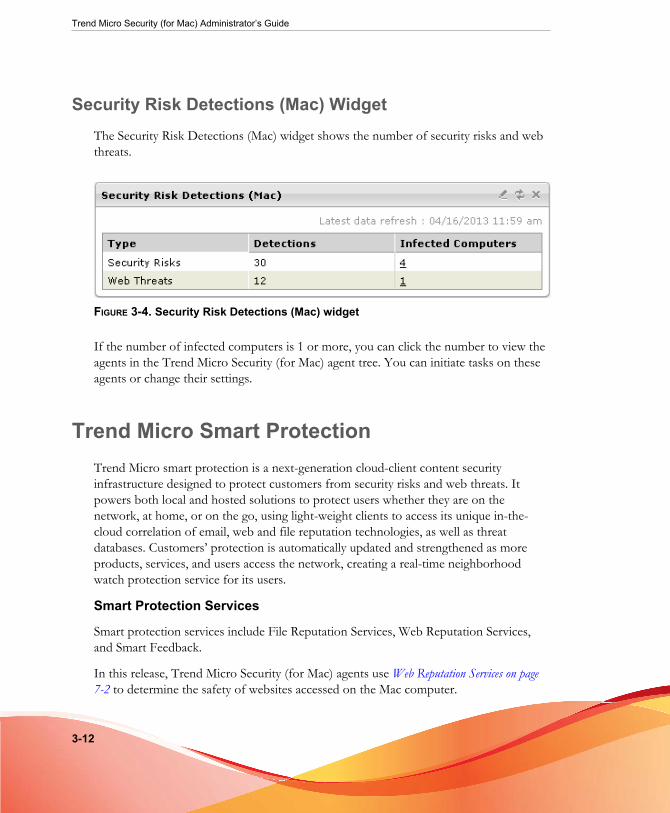
Security Risk Detections (Mac) WidgetThe Security Risk Detections (Mac) widget shows the number of security risks and webthreats.
FIGURE 3-4. Security Risk Detections (Mac) widget
If the number of infected computers is 1 or more, you can click the number to view theagents in the Trend Micro Security (for Mac) agent tree. You can initiate tasks on theseagents or change their settings.
Trend Micro Smart ProtectionTrend Micro smart protection is a next-generation cloud-client content securityinfrastructure designed to protect customers from security risks and web threats. Itpowers both local and hosted solutions to protect users whether they are on thenetwork, at home, or on the go, using light-weight clients to access its unique in-the-cloud correlation of email, web and file reputation technologies, as well as threatdatabases. Customers’ protection is automatically updated and strengthened as moreproducts, services, and users access the network, creating a real-time neighborhoodwatch protection service for its users.
Smart Protection Services
Smart protection services include File Reputation Services, Web Reputation Services,and Smart Feedback.
In this release, Trend Micro Security (for Mac) agents use Web Reputation Services on page7-2 to determine the safety of websites accessed on the Mac computer.
Getting Started
3-13
Smart Protection Sources
Web Reputation Services are delivered through smart protection sources, namely,Trend Micro Smart Protection Network and Smart Protection Servers.
Trend Micro Smart Protection Network is a globally scaled, Internet-based,infrastructure and is intended for users who do not have immediate access to theircorporate network.
Smart Protection Servers are for users who have access to their local corporate network.Local servers localize smart protection services to the corporate network to optimizeefficiency.
Smart Protection Source for External Agents
External agents, which are agents that are unable to maintain a functional connectionwith the Trend Micro Security (for Mac) server, send Web Reputation queries to SmartProtection Network. Internet connection is required to send queries successfully.
Go to the Web Reputation Services screen and enable Web Reputation policy forexternal agents. For the detailed steps, see Configuring Web Reputation Settings on page 7-2.
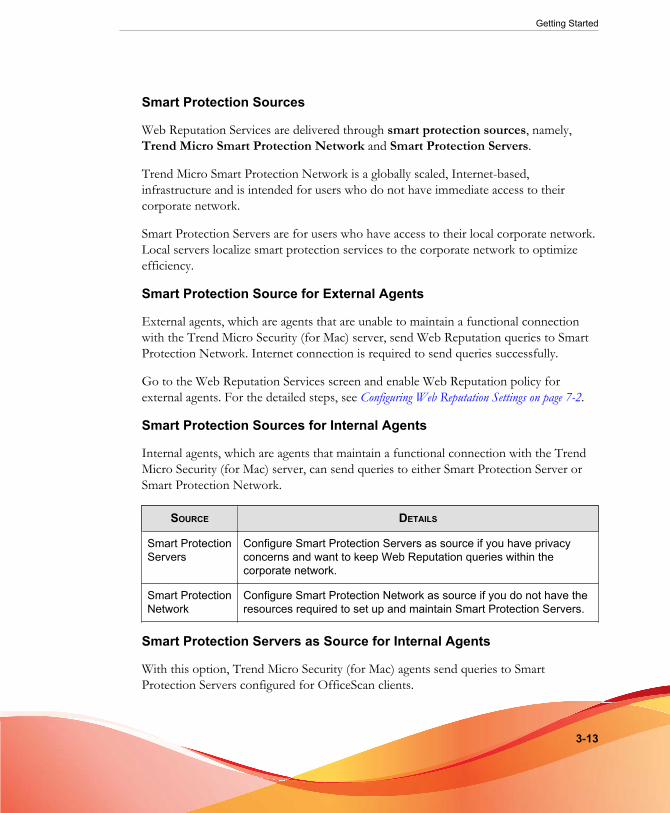
Smart Protection Sources for Internal Agents
Internal agents, which are agents that maintain a functional connection with the TrendMicro Security (for Mac) server, can send queries to either Smart Protection Server orSmart Protection Network.
SOURCE DETAILS
Smart ProtectionServers
Configure Smart Protection Servers as source if you have privacyconcerns and want to keep Web Reputation queries within thecorporate network.
Smart ProtectionNetwork
Configure Smart Protection Network as source if you do not have theresources required to set up and maintain Smart Protection Servers.
Smart Protection Servers as Source for Internal Agents
With this option, Trend Micro Security (for Mac) agents send queries to SmartProtection Servers configured for OfficeScan clients.
Trend Micro Security (for Mac) Administrator’s Guide
3-14
This option is only available if the OfficeScan version is 10.5 or later. OfficeScan 10,which is supported in this Trend Micro Security (for Mac) release, is not compatiblewith Smart Protection Servers that deliver Web Reputation Services.
If your Trend Micro Security (for Mac) server is installed with OfficeScan 10, upgradeOfficeScan to version 10.5 or later. If it is not possible to upgrade OfficeScan, chooseSmart Protection Network as source.
If your OfficeScan version is 10.5 or later, read the following guidelines to allow agentsto send queries to Smart Protection Servers successfully:
1. Set up the smart protection environment, if you have not done so. For instructionsand guidelines on setting up the environment, refer to the followingdocumentation:
• For OfficeScan 10.5, see Chapter 3 of the documentation, which isdownloadable at:
http://docs.trendmicro.com/all/ent/officescan/v10.5/en-us/osce_10.5_gsg.pdf
• For OfficeScan 10.6, visit the following web page:
http://docs.trendmicro.com/all/ent/officescan/v10.6/en-us/osce_10.6_olhsrv/ohelp/smart/stusmps.htm
2. On the web console for Trend Micro Security (for Mac) server, go to the WebReputation Settings screen and enable the option Send queries to SmartProtection Servers. For the detailed steps, see Configuring Web Reputation Settings onpage 7-2.
ImportantThis option cannot be enabled if the Trend Micro Security (for Mac) server isinstalled with OfficeScan 10. If this option is enabled from Control Manager PolicyManagement and then deployed to Trend Micro Security (for Mac) server installedwith OfficeScan 10, the setting will not take effect and the option will remaindisabled.
3. Be sure that Smart Protection Servers are available. If all Smart Protection Serversare unavailable, agents do not send queries to Smart Protection Network, leavingcomputers vulnerable to threats.
Getting Started
3-15
4. Be sure to update Smart Protection Servers regularly so that protection remainscurrent.
Smart Protection Network as Source for Internal Agents
Internet connection is required to send queries to Smart Protection Networksuccessfully.
To configure Smart Protection Network as source for internal agents, go to the WebReputation Services screen and enable Web Reputation policy for internal agents. Besure not to select the option Send queries to Smart Protection Servers. For thedetailed steps, see Configuring Web Reputation Settings on page 7-2.

4-1
Chapter 4
Installing the AgentThis chapter describes Trend Micro Security (for Mac) agent installation requirementsand procedures.
For details on upgrading the agent, see Upgrading the Server and Agents on page 8-2.
Trend Micro Security (for Mac) Administrator’s Guide
4-2
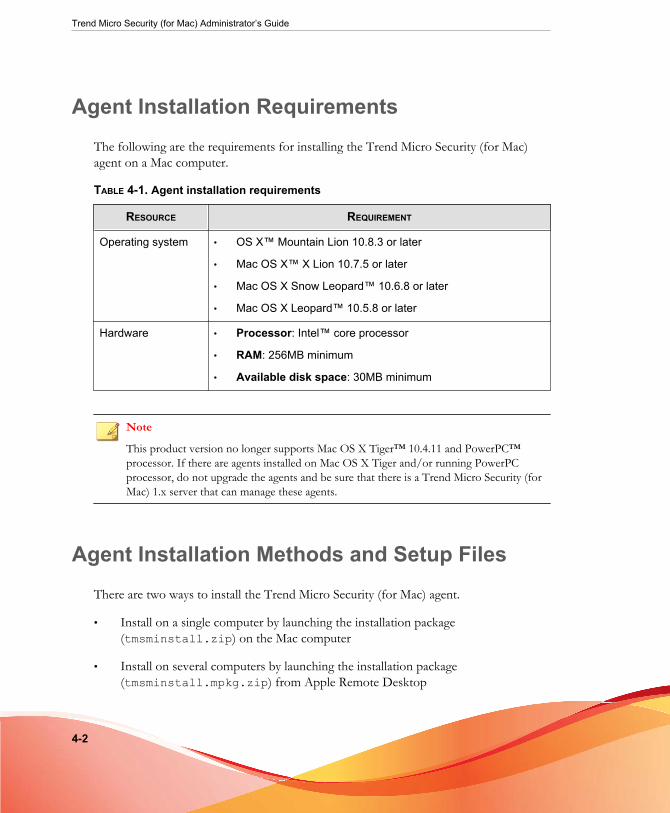
Agent Installation RequirementsThe following are the requirements for installing the Trend Micro Security (for Mac)agent on a Mac computer.
TABLE 4-1. Agent installation requirements
RESOURCE REQUIREMENT
Operating system • OS X™ Mountain Lion 10.8.3 or later
• Mac OS X™ X Lion 10.7.5 or later
• Mac OS X Snow Leopard™ 10.6.8 or later
• Mac OS X Leopard™ 10.5.8 or later
Hardware • Processor: Intel™ core processor
• RAM: 256MB minimum
• Available disk space: 30MB minimum
Note
This product version no longer supports Mac OS X Tiger™ 10.4.11 and PowerPC™processor. If there are agents installed on Mac OS X Tiger and/or running PowerPCprocessor, do not upgrade the agents and be sure that there is a Trend Micro Security (forMac) 1.x server that can manage these agents.
Agent Installation Methods and Setup FilesThere are two ways to install the Trend Micro Security (for Mac) agent.
• Install on a single computer by launching the installation package(tmsminstall.zip) on the Mac computer
• Install on several computers by launching the installation package(tmsminstall.mpkg.zip) from Apple Remote Desktop
Installing the Agent
4-3
Note
To upgrade agents, see Upgrading the Server and Agents on page 8-2.
Obtain the necessary agent installation package from the Trend Micro Security (for Mac)server and copy it to the Mac computer.
There are two ways to obtain the package:
• On the Trend Micro Security (for Mac) web console, navigate to Administration> Agent Setup Files and click a link under Agent Installation File.
Note
The links to the agent uninstallation packages are also available on this screen. Usethese packages to remove the agent program from Mac computers. Choose thepackage according to the version of the agent program that you wish to remove. Forinformation on uninstalling the Trend Micro Security (for Mac) agent, see AgentUninstallation on page 4-14.
• Navigate to <Server installation folder>\TMSM_HTML\ClientInstall.
Installing on a Single Mac ComputerThe process of installing the Trend Micro Security (for Mac) agent on a single computeris similar to the installation process for other Mac software.
During the installation, users may be prompted to allow connections to iCoreService,which is used to register the agent to the server. Instruct users to allow the connectionwhen prompted.
Procedure
1. Check for and uninstall any security software on the Mac computer.
2. Obtain the agent installation package tmsminstall.zip.
For information on obtaining the package, see Agent Installation Methods and SetupFiles on page 4-2.
Trend Micro Security (for Mac) Administrator’s Guide
4-4
3. Copy tmsminstall.zip on the Mac computer and then launch it using a built-inarchiving tool, such as Archive Utility.
WARNING!The files on tmsminstall.zip may become corrupted if users launch it usingarchiving tools not built-in on the Mac.
To launch tmsminstall.zip from Terminal, use the following command:
ditto –xk <tmsminstall.zip file path> <destination folder>
For example:
ditto –xk users/mac/Desktop/tmsminstall.zip users/mac/Desktop
Launching tmsminstall.zip creates a new folder tmsminstall.
4. Open the tmsminstall folder and launch tmsminstall.pkg.
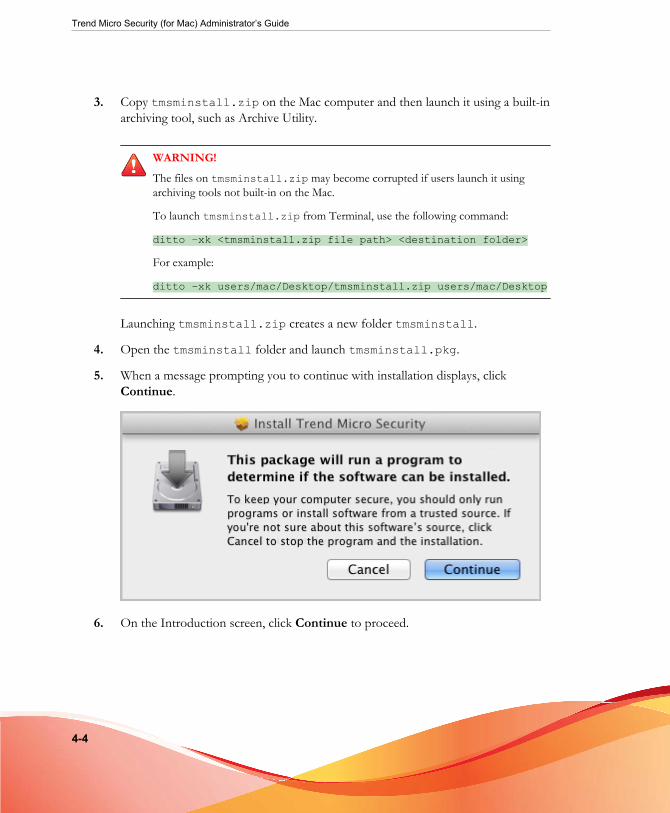
5. When a message prompting you to continue with installation displays, clickContinue.
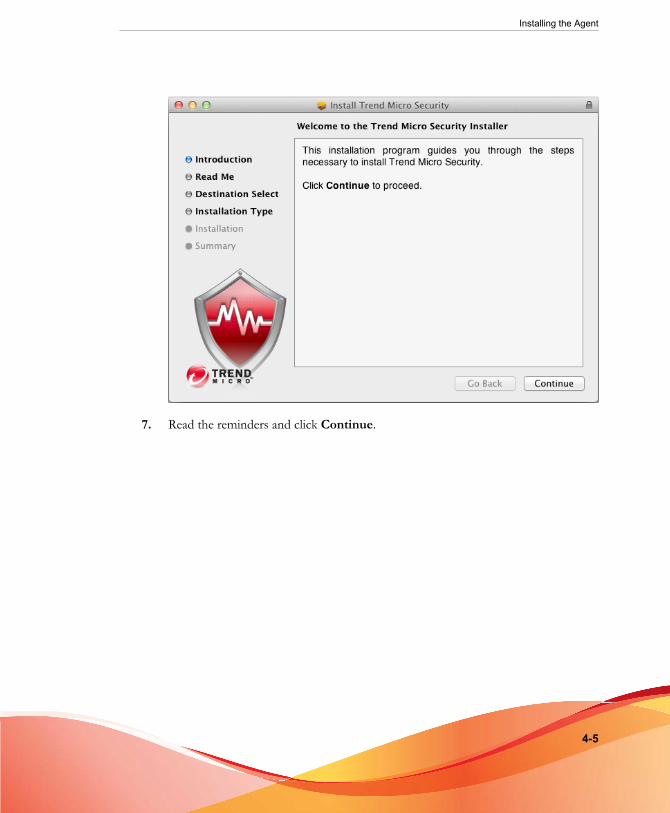
6. On the Introduction screen, click Continue to proceed.
Installing the Agent
4-5
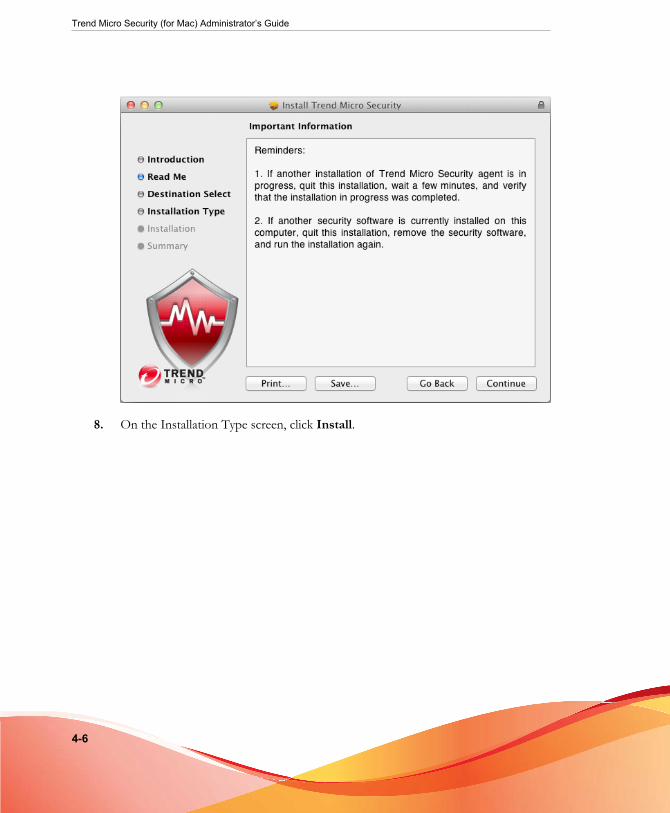
7. Read the reminders and click Continue.
Trend Micro Security (for Mac) Administrator’s Guide
4-6
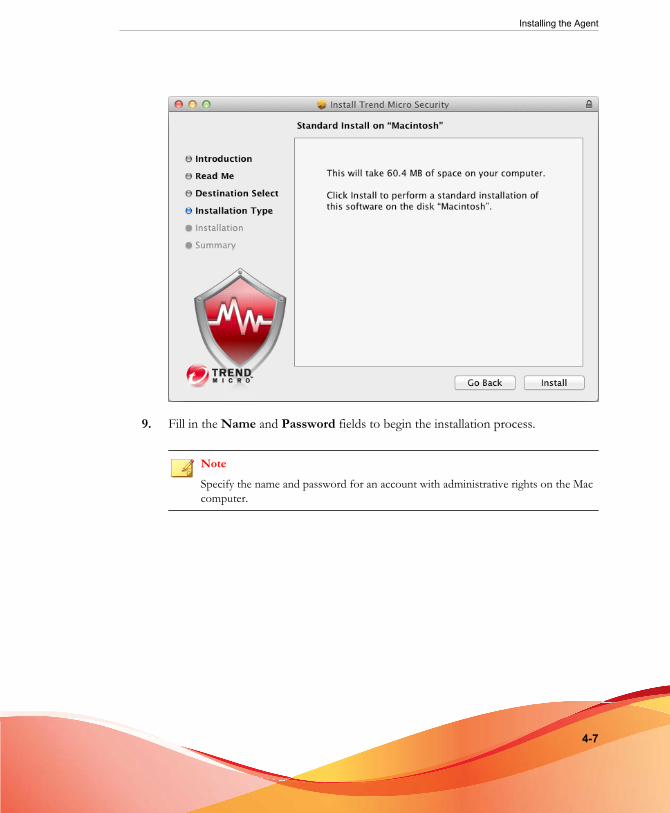
8. On the Installation Type screen, click Install.
Installing the Agent
4-7
9. Fill in the Name and Password fields to begin the installation process.
NoteSpecify the name and password for an account with administrative rights on the Maccomputer.
Trend Micro Security (for Mac) Administrator’s Guide
4-8
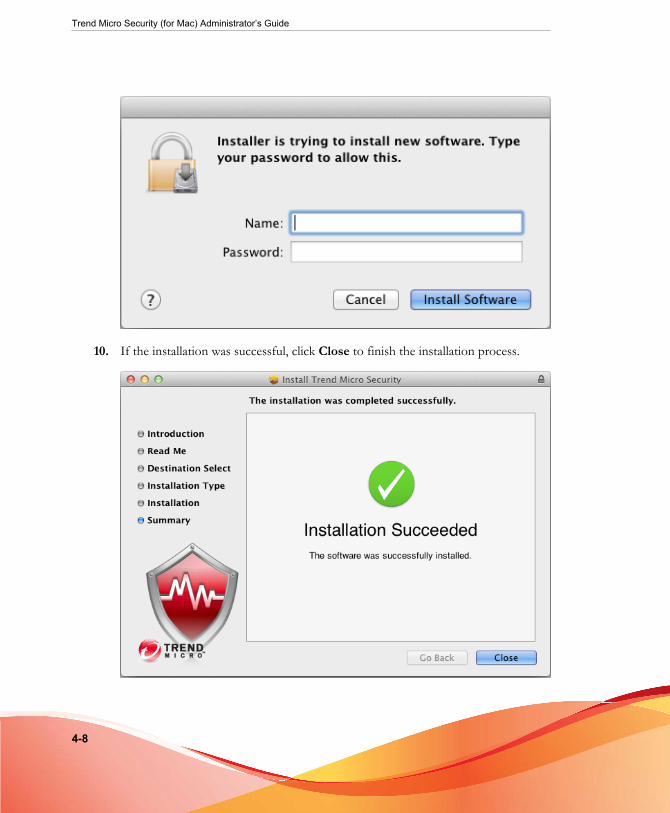
10. If the installation was successful, click Close to finish the installation process.
Installing the Agent
4-9
The agent automatically registers to the server where the agent installation packagewas obtained. The agent also updates for the first time.
What to do next
Perform agent post-installation tasks. For details, see Agent Post-installation on page 4-12.
Installing on Several Mac ComputersThe process of installing Trend Micro Security (for Mac) agent on several computers canbe simplified by using Apple Remote Desktop.
NoteIf Mac computers only have an IPv6 address, read the IPv6 limitations for Apple RemoteDesktop agent deployment in Pure IPv6 Agent Limitations on page A-3.
Procedure
1. Check for and uninstall any security software on the Mac computer.
2. Obtain the agent installation package tmsminstall.mpkg.zip. For informationon obtaining the package, see Agent Installation Methods and Setup Files on page 4-2.
3. Copy tmsminstall.mpkg.zip on the Mac computer with Apple RemoteDesktop and then launch it using a built-in archiving tool, such as Archive Utility.
WARNING!The files on tmsminstall.mpkg.zip may become corrupted if users launch itusing archiving tools not built-in on the Mac.
To launch tmsminstall.mpkg.zip from Terminal, use the following command:
ditto –xk <tmsminstall.mpkg.zip file path> <destinationfolder>
For example:
ditto –xk users/mac/Desktop/tmsminstall.mpkg.zip users/mac/Desktop
Trend Micro Security (for Mac) Administrator’s Guide
4-10
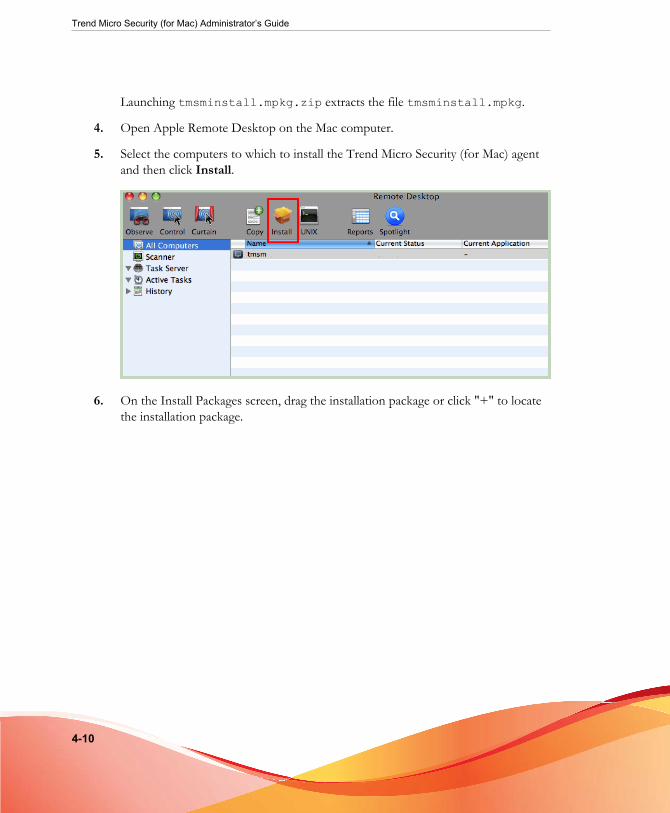
Launching tmsminstall.mpkg.zip extracts the file tmsminstall.mpkg.
4. Open Apple Remote Desktop on the Mac computer.
5. Select the computers to which to install the Trend Micro Security (for Mac) agentand then click Install.
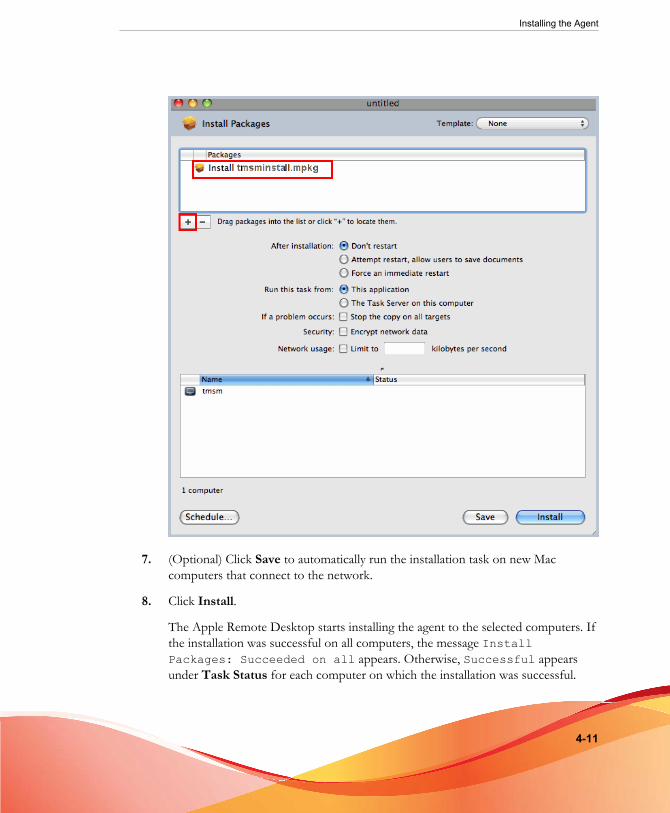
6. On the Install Packages screen, drag the installation package or click "+" to locatethe installation package.
Installing the Agent
4-11
7. (Optional) Click Save to automatically run the installation task on new Maccomputers that connect to the network.
8. Click Install.
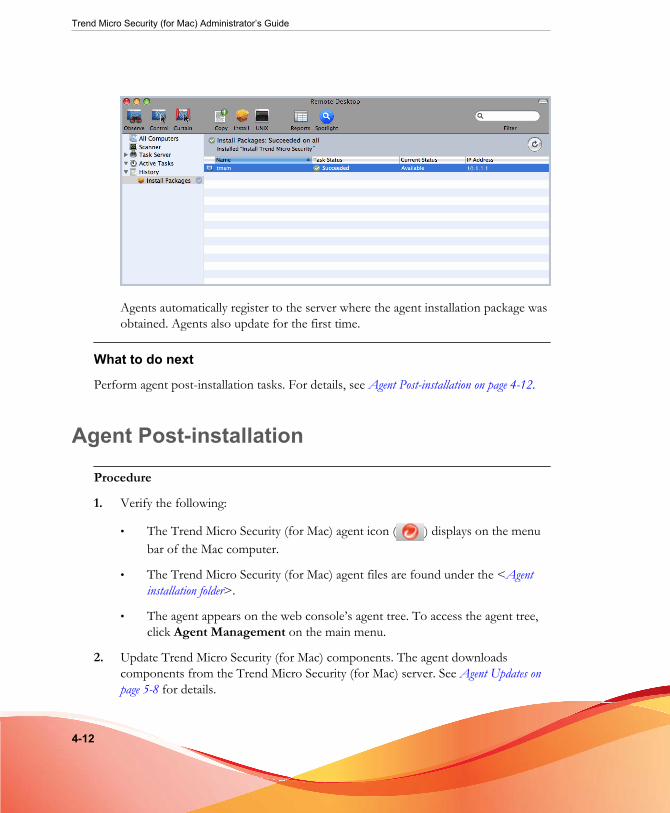
The Apple Remote Desktop starts installing the agent to the selected computers. Ifthe installation was successful on all computers, the message InstallPackages: Succeeded on all appears. Otherwise, Successful appearsunder Task Status for each computer on which the installation was successful.
Trend Micro Security (for Mac) Administrator’s Guide
4-12
Agents automatically register to the server where the agent installation package wasobtained. Agents also update for the first time.
What to do next
Perform agent post-installation tasks. For details, see Agent Post-installation on page 4-12.
Agent Post-installation
Procedure
1. Verify the following:
• The Trend Micro Security (for Mac) agent icon ( ) displays on the menubar of the Mac computer.
• The Trend Micro Security (for Mac) agent files are found under the <Agentinstallation folder>.
• The agent appears on the web console’s agent tree. To access the agent tree,click Agent Management on the main menu.
2. Update Trend Micro Security (for Mac) components. The agent downloadscomponents from the Trend Micro Security (for Mac) server. See Agent Updates onpage 5-8 for details.
Installing the Agent
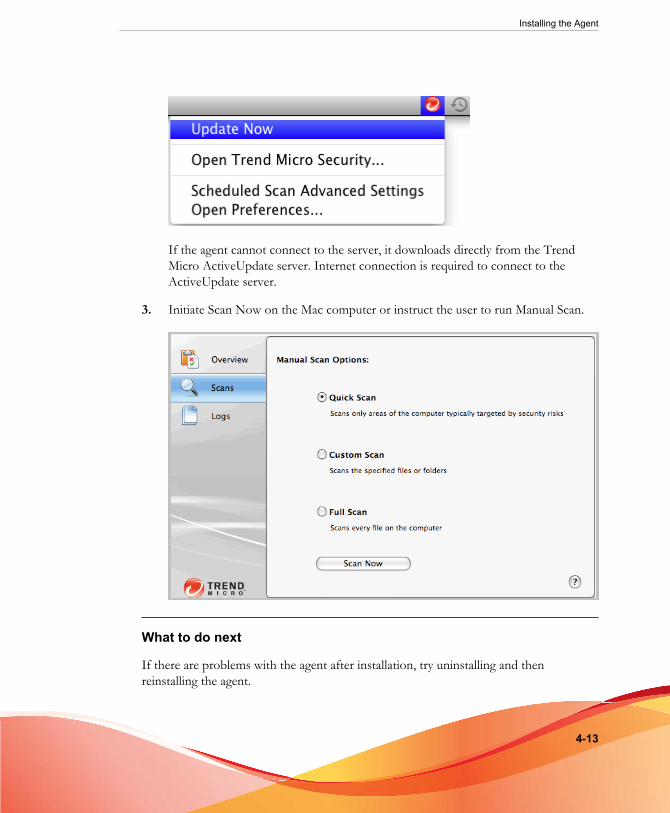
4-13
If the agent cannot connect to the server, it downloads directly from the TrendMicro ActiveUpdate server. Internet connection is required to connect to theActiveUpdate server.
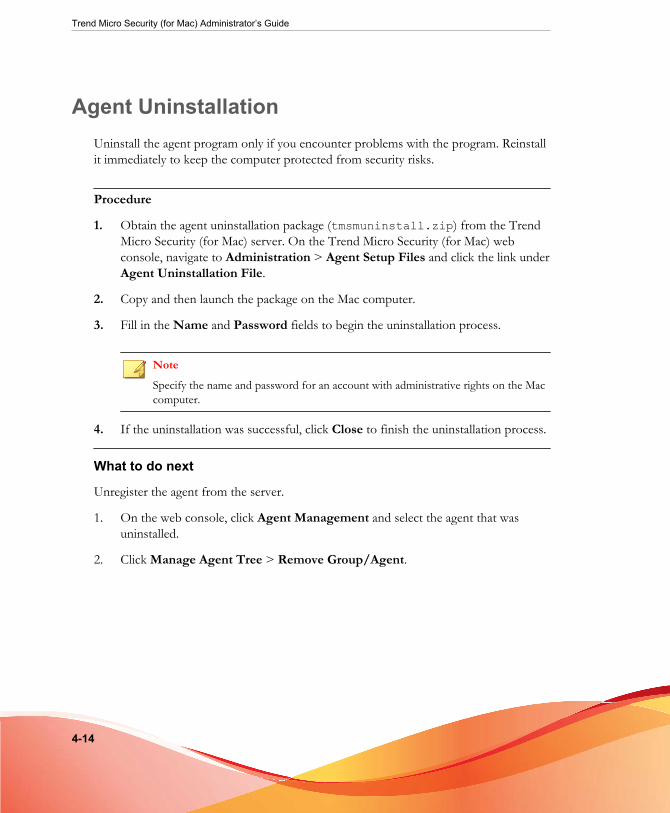
3. Initiate Scan Now on the Mac computer or instruct the user to run Manual Scan.
What to do next
If there are problems with the agent after installation, try uninstalling and thenreinstalling the agent.
Trend Micro Security (for Mac) Administrator’s Guide
4-14
Agent UninstallationUninstall the agent program only if you encounter problems with the program. Reinstallit immediately to keep the computer protected from security risks.
Procedure
1. Obtain the agent uninstallation package (tmsmuninstall.zip) from the TrendMicro Security (for Mac) server. On the Trend Micro Security (for Mac) webconsole, navigate to Administration > Agent Setup Files and click the link underAgent Uninstallation File.
2. Copy and then launch the package on the Mac computer.
3. Fill in the Name and Password fields to begin the uninstallation process.
NoteSpecify the name and password for an account with administrative rights on the Maccomputer.
4. If the uninstallation was successful, click Close to finish the uninstallation process.
What to do next
Unregister the agent from the server.
1. On the web console, click Agent Management and select the agent that wasuninstalled.
2. Click Manage Agent Tree > Remove Group/Agent.

5-1
Chapter 5
Keeping Protection Up-to-DateThis chapter describes Trend Micro Security (for Mac) components and updateprocedures.

Trend Micro Security (for Mac) Administrator’s Guide
5-2
ComponentsTrend Micro Security (for Mac) makes use of components to keep agent computersprotected from the latest security risks. Keep these components up-to-date by runningmanual or scheduled updates.
In addition to the components, Trend Micro Security (for Mac) agents also receiveupdated configuration files from the Trend Micro Security (for Mac) server. Agents needthe configuration files to apply new settings. Each time you modify Trend MicroSecurity (for Mac) settings through the web console, the configuration files change.
Virus Pattern
The Virus Pattern contains information that helps Trend Micro Security (for Mac)identify the latest virus/malware and mixed threat attack. Trend Micro creates andreleases new versions of the Virus Pattern several times a week, and any time after thediscovery of a particularly damaging virus/malware.
Spyware Active-monitoring Pattern
The Spyware Active-monitoring Pattern contains information that helps Trend MicroSecurity (for Mac) identify spyware and grayware.
Virus Scan Engine
At the heart of all Trend Micro products lies the scan engine, which was originallydeveloped in response to early file-based computer viruses. The scan engine today isexceptionally sophisticated and capable of detecting different types of security risks,including spyware. The scan engine also detects controlled viruses that are developedand used for research.
Updating the Scan Engine
By storing the most time-sensitive information about security risks in the pattern files,Trend Micro minimizes the number of scan engine updates while keeping protection up-to-date. Nevertheless, Trend Micro periodically makes new scan engine versionsavailable. Trend Micro releases new engines under the following circumstances:
• Incorporation of new scanning and detection technologies into the software
• Discovery of a new, potentially harmful security risk that the scan engine cannothandle
Keeping Protection Up-to-Date
5-3
• Enhancement of the scanning performance
• Addition of file formats, scripting languages, encoding, and/or compressionformats
Agent Program
The Trend Micro Security (for Mac) agent program provides the actual protection fromsecurity risks.
Update OverviewAll component updates originate from the Trend Micro ActiveUpdate server. Whenupdates are available, the Trend Micro Security (for Mac) server downloads the updatedcomponents.
You can configure the Trend Micro Security (for Mac) server to update from a sourceother than the Trend Micro ActiveUpdate server. To do this, you need to set up acustom update source. For assistance in setting up this update source, contact yoursupport provider.
The following table describes the different component update options for the TrendMicro Security (for Mac) server and agents:
Trend Micro Security (for Mac) Administrator’s Guide
5-4
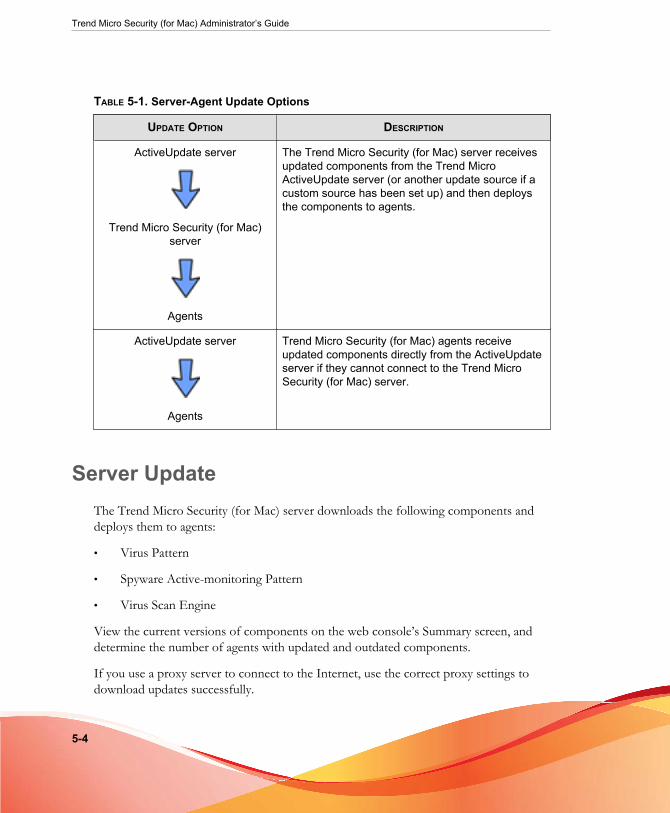
TABLE 5-1. Server-Agent Update Options
UPDATE OPTION DESCRIPTION
ActiveUpdate server
Trend Micro Security (for Mac)server
Agents
The Trend Micro Security (for Mac) server receivesupdated components from the Trend MicroActiveUpdate server (or another update source if acustom source has been set up) and then deploysthe components to agents.
ActiveUpdate server
Agents
Trend Micro Security (for Mac) agents receiveupdated components directly from the ActiveUpdateserver if they cannot connect to the Trend MicroSecurity (for Mac) server.
Server UpdateThe Trend Micro Security (for Mac) server downloads the following components anddeploys them to agents:
• Virus Pattern
• Spyware Active-monitoring Pattern
• Virus Scan Engine
View the current versions of components on the web console’s Summary screen, anddetermine the number of agents with updated and outdated components.
If you use a proxy server to connect to the Internet, use the correct proxy settings todownload updates successfully.
Keeping Protection Up-to-Date
5-5
Configuring the Server Update SourceConfigure the Trend Micro Security (for Mac) server to download components from theTrend Micro ActiveUpdate server or from another source.
Note
If the server only has an IPv6 address, read the IPv6 limitations for server updates in PureIPv6 Server Limitations on page A-3.
After the server downloads any available updates, it automatically notifies agents toupdate their components. If the component update is critical, let the server notify theagents at once by navigating to Agent Management > Tasks > Update.
Procedure
1. Navigate to Server Updates > Update Source.
2. Select the location from where you want to download component updates.
• If you choose ActiveUpdate server:
• Ensure that the Trend Micro Security (for Mac) server has Internetconnection.
• If you are using a proxy server, test if Internet connection can beestablished using the proxy settings. For details, see Configuring ProxySettings for Server Updates on page 5-6.
• If you choose a custom update source:
• Set up the appropriate environment and update resources for this updatesource.
• Ensure that there is functional connection between the server computerand this update source. For assistance in setting up an update source,contact your support provider.
• You can obtain updates from Control Manager by typing the ControlManager HTTP address.
Trend Micro Security (for Mac) Administrator’s Guide
5-6
3. Click Save.
Configuring Proxy Settings for Server UpdatesConfigure the Trend Micro Security (for Mac) server to use proxy settings whendownloading updates from the Trend Micro ActiveUpdate server.
NoteIf the server only has an IPv6 address, read the IPv6 limitations for proxy settings in PureIPv6 Server Limitations on page A-3.
Procedure
1. Navigate to Administration > External Proxy Settings.
2. Select the check box to enable the use of a proxy server.
3. Specify the proxy server name or IPv4/IPv6 address and port number.
4. If the proxy server requires authentication, type the user name and password in thefields provided.
5. Click Save.
Server Update MethodsUpdate Trend Micro Security (for Mac) server components manually or by configuringan update schedule.
• Manual update: When an update is critical, perform manual update so the servercan obtain the updates immediately. See Manually Updating the Server on page 5-7for details.
• Scheduled update: The Trend Micro Security (for Mac) server connects to theupdate source during the scheduled day and time to obtain the latest components.See Scheduling Updates for the Server on page 5-7 for details.
Keeping Protection Up-to-Date
5-7
After the server finishes an update, it immediately notifies agents to update.
Scheduling Updates for the Server
Configure the Trend Micro Security (for Mac) server to regularly check its update sourceand automatically download any available updates. Using scheduled update is an easyand effective way of ensuring that protection against security risks is always current.
After the server finishes an update, it notifies agents to update.
Procedure
1. Navigate to Server Updates > Scheduled Update.
2. Select the components to update.
3. Specify the update schedule.
For daily, weekly, and monthly updates, the period of time is the number of hoursduring which Trend Micro Security (for Mac) will perform the update. Trend MicroSecurity (for Mac) updates at any given time during this time period.
For monthly updates, if you selected the 29th, 30th, or 31st day and a month doesnot have this day, Trend Micro Security (for Mac) runs the update on the last dayof the month.
4. Click Save.
Manually Updating the Server
Manually update the components on the Trend Micro Security (for Mac) server afterinstalling or upgrading the server and whenever there is an outbreak.
Procedure
1. Navigate to Server Updates > Manual Update.
2. Select the components to update.
Trend Micro Security (for Mac) Administrator’s Guide
5-8
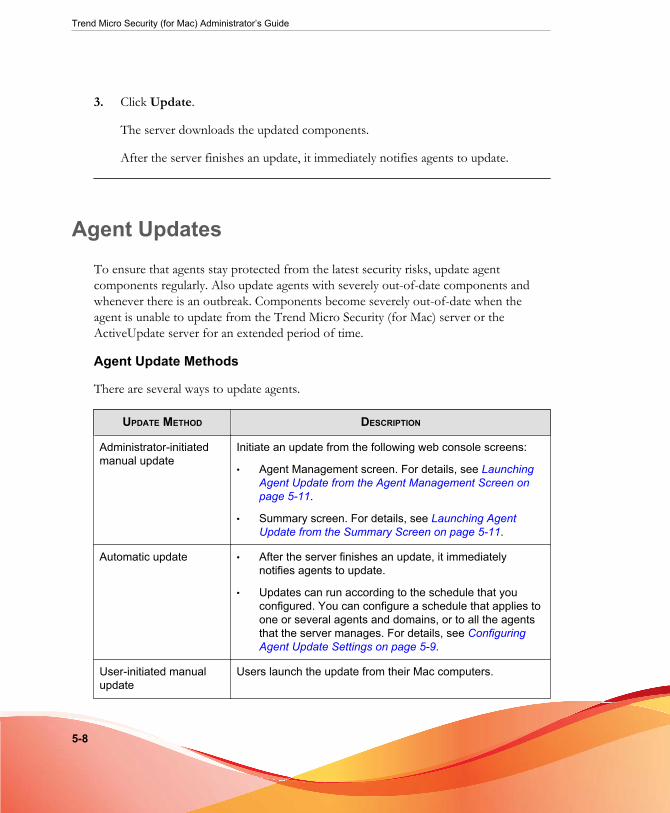
3. Click Update.
The server downloads the updated components.
After the server finishes an update, it immediately notifies agents to update.
Agent UpdatesTo ensure that agents stay protected from the latest security risks, update agentcomponents regularly. Also update agents with severely out-of-date components andwhenever there is an outbreak. Components become severely out-of-date when theagent is unable to update from the Trend Micro Security (for Mac) server or theActiveUpdate server for an extended period of time.
Agent Update Methods
There are several ways to update agents.
UPDATE METHOD DESCRIPTION
Administrator-initiatedmanual update
Initiate an update from the following web console screens:
• Agent Management screen. For details, see LaunchingAgent Update from the Agent Management Screen onpage 5-11.
• Summary screen. For details, see Launching AgentUpdate from the Summary Screen on page 5-11.
Automatic update • After the server finishes an update, it immediatelynotifies agents to update.
• Updates can run according to the schedule that youconfigured. You can configure a schedule that applies toone or several agents and domains, or to all the agentsthat the server manages. For details, see ConfiguringAgent Update Settings on page 5-9.
User-initiated manualupdate
Users launch the update from their Mac computers.
Keeping Protection Up-to-Date
5-9
Agent Update Source
By default, agents download components from the Trend Micro Security (for Mac)server. In addition to components, Trend Micro Security (for Mac) agents also receiveupdated configuration files when updating from the Trend Micro Security (for Mac)server. Agents need the configuration files to apply new settings. Each time you modifyTrend Micro Security (for Mac) settings on the web console, the configuration fileschange.
Before updating the agents, check if the Trend Micro Security (for Mac) server has thelatest components. For information on how to update the Trend Micro Security (forMac) server, see Server Update on page 5-4.
Configure one, several, or all agents to download from the Trend Micro ActiveUpdateserver if the Trend Micro Security (for Mac) server is unavailable. For details, seeConfiguring Agent Update Settings on page 5-9.
Note
If an agent only has an IPv6 address, read the IPv6 limitations for agent updates in PureIPv6 Agent Limitations on page A-3.
Agent Update Notes and Reminders
• Trend Micro Security (for Mac) agents can use proxy settings during an update.Proxy settings are configured on the agent console.
• During an update, the Trend Micro Security (for Mac) icon on the menu bar of theMac computer indicates that the product is updating. If an upgrade to the agentprogram is available, agents update and then upgrade to the latest program versionor build. Users cannot run any task from the console until the update is complete.
• Access the Summary screen to check if all agents have been updated.
Configuring Agent Update Settings
For a detailed explanation of agent updates, see Agent Updates on page 5-8.
Trend Micro Security (for Mac) Administrator’s Guide
5-10
Procedure
1. Navigate to Agent Management.
2. In the agent tree, click the root icon ( ) to include all agents or select specificgroups or agents.
3. Click Settings > Update Settings.
4. Select the check box to allow agents to download updates from the Trend MicroActiveUpdate server.
Note
If an agent only has an IPv6 address, read the IPv6 limitations for agent updates inPure IPv6 Agent Limitations on page A-3.
5. Configure scheduled updates.
a. Select Enable scheduled update.
b. Configure the schedule.
c. If you select Daily or Weekly, specify the time of the update and the timeperiod the Trend Micro Security (for Mac) server will notify agents to updatecomponents. For example, if the start time is 12pm and the time period is 2hours, the server randomly notifies all online agents to update componentsfrom 12pm until 2pm. This setting prevents all online agents fromsimultaneously connecting to the server at the specified start time,significantly reducing the amount of traffic directed to the server.
6. If you selected group(s) or agent(s) on the agent tree, click Save to apply settings tothe group(s) or agent(s). If you selected the root icon ( ), choose from thefollowing options:
• Apply to All Agents: Applies settings to all existing agents and to any newagent added to an existing/future group. Future groups are groups not yetcreated at the time you configure the settings.
Keeping Protection Up-to-Date
5-11
• Apply to Future Groups Only: Applies settings only to agents added tofuture groups. This option will not apply settings to new agents added to anexisting group.
Launching Agent Update from the Summary ScreenFor other agent update methods, see Agent Updates on page 5-8.
Procedure
1. Click Summary in the main menu.
2. Go to the Update Status section and click the link under the Outdated column.
The agent tree opens, showing all the agents that require an update.
3. Select the agents that you want to update.
4. Click Tasks > Update.
Agents that receive the notification start to update. On Mac computers, the TrendMicro Security (for Mac) icon on the menu bar indicates that the product isupdating. Users cannot run any task from the console until the update is complete.
Launching Agent Update from the Agent ManagementScreen
For other agent update methods, see Agent Updates on page 5-8.
Procedure
1. Navigate to Agent Management.
2. In the agent tree, click the root domain icon ( ) to include all agents or selectspecific groups or agents.
3. Click Tasks > Update.

Trend Micro Security (for Mac) Administrator’s Guide
5-12
Agents that receive the notification start to update. On Mac computers, the TrendMicro Security (for Mac) icon on the menu bar indicates that the product isupdating. Users cannot run any task from the console until the update is complete.

6-1
Chapter 6
Protecting Mac Computers fromSecurity Risks
This chapter describes how to protect computers from security risks using file-basedscanning.
Trend Micro Security (for Mac) Administrator’s Guide
6-2
About Security RisksSecurity risk includes viruses, malware, spyware, and grayware. Trend Micro Security (forMac) protects computers from security risks by scanning files and then performing aspecific action for each security risk detected. An overwhelming number of security risksdetected over a short period of time signals an outbreak, which Trend Micro Security(for Mac) can help contain by enforcing outbreak prevention policies and isolatinginfected computers until they are completely risk-free. Notifications and logs help youkeep track of security risks and alert you if you need to take immediate action.
Viruses and MalwareTens of thousands of virus/malware exist, with more being created each day. Computerviruses today can cause a great amount of damage by exploiting vulnerabilities incorporate networks, email systems and websites.
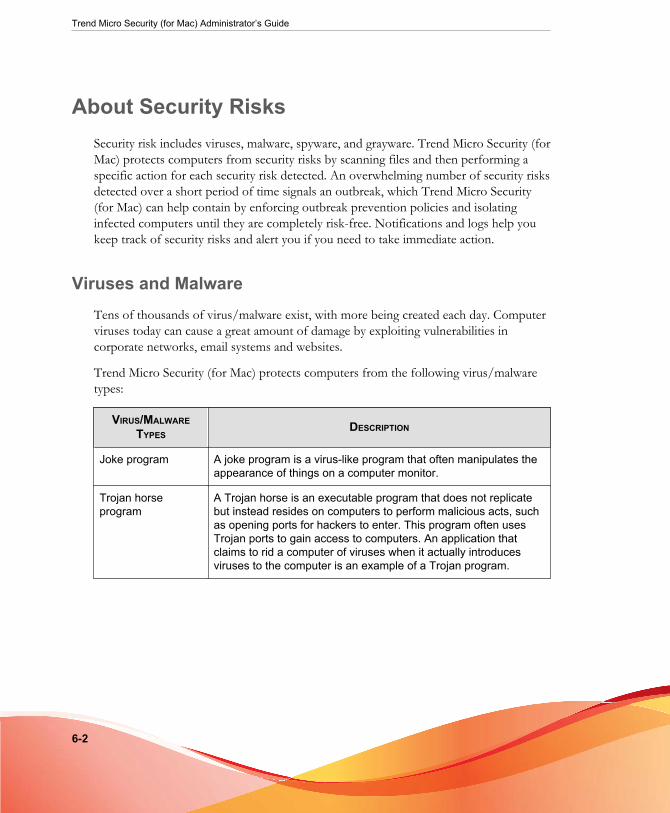
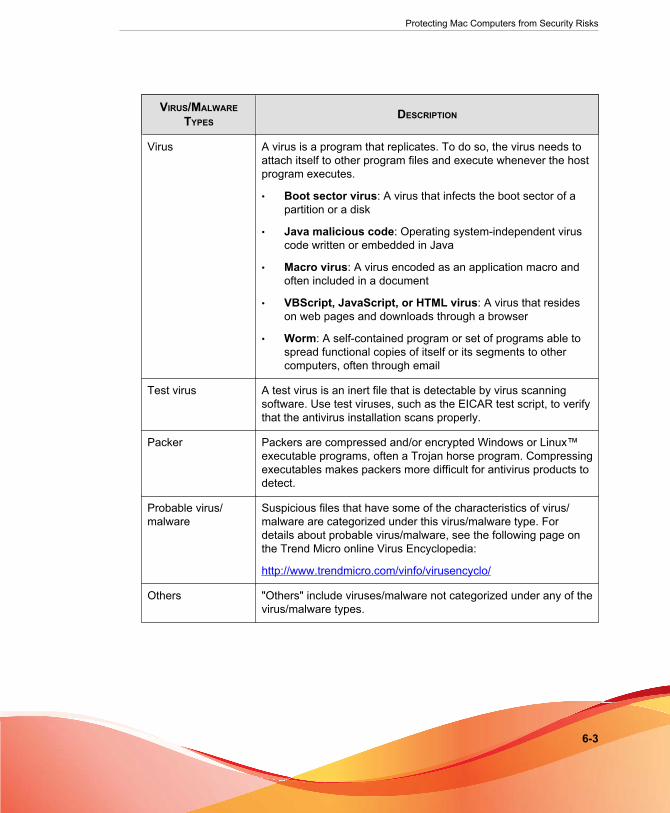
Trend Micro Security (for Mac) protects computers from the following virus/malwaretypes:
VIRUS/MALWARETYPES
DESCRIPTION
Joke program A joke program is a virus-like program that often manipulates theappearance of things on a computer monitor.
Trojan horseprogram
A Trojan horse is an executable program that does not replicatebut instead resides on computers to perform malicious acts, suchas opening ports for hackers to enter. This program often usesTrojan ports to gain access to computers. An application thatclaims to rid a computer of viruses when it actually introducesviruses to the computer is an example of a Trojan program.
Protecting Mac Computers from Security Risks
6-3
VIRUS/MALWARETYPES
DESCRIPTION
Virus A virus is a program that replicates. To do so, the virus needs toattach itself to other program files and execute whenever the hostprogram executes.
• Boot sector virus: A virus that infects the boot sector of apartition or a disk
• Java malicious code: Operating system-independent viruscode written or embedded in Java
• Macro virus: A virus encoded as an application macro andoften included in a document
• VBScript, JavaScript, or HTML virus: A virus that resideson web pages and downloads through a browser
• Worm: A self-contained program or set of programs able tospread functional copies of itself or its segments to othercomputers, often through email
Test virus A test virus is an inert file that is detectable by virus scanningsoftware. Use test viruses, such as the EICAR test script, to verifythat the antivirus installation scans properly.
Packer Packers are compressed and/or encrypted Windows or Linux™executable programs, often a Trojan horse program. Compressingexecutables makes packers more difficult for antivirus products todetect.
Probable virus/malware
Suspicious files that have some of the characteristics of virus/malware are categorized under this virus/malware type. Fordetails about probable virus/malware, see the following page onthe Trend Micro online Virus Encyclopedia:
http://www.trendmicro.com/vinfo/virusencyclo/
Others "Others" include viruses/malware not categorized under any of thevirus/malware types.
Trend Micro Security (for Mac) Administrator’s Guide
6-4
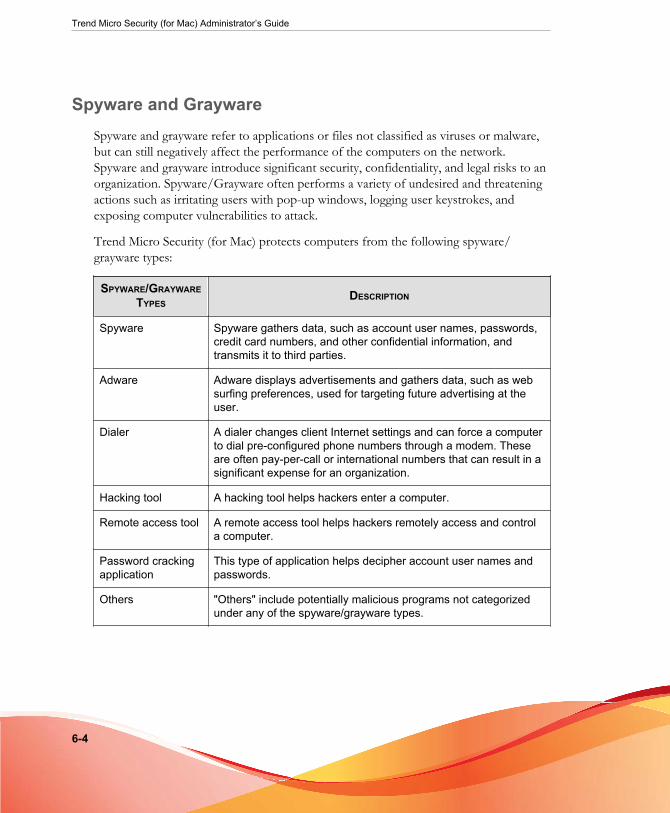
Spyware and GraywareSpyware and grayware refer to applications or files not classified as viruses or malware,but can still negatively affect the performance of the computers on the network.Spyware and grayware introduce significant security, confidentiality, and legal risks to anorganization. Spyware/Grayware often performs a variety of undesired and threateningactions such as irritating users with pop-up windows, logging user keystrokes, andexposing computer vulnerabilities to attack.
Trend Micro Security (for Mac) protects computers from the following spyware/grayware types:
SPYWARE/GRAYWARETYPES
DESCRIPTION
Spyware Spyware gathers data, such as account user names, passwords,credit card numbers, and other confidential information, andtransmits it to third parties.
Adware Adware displays advertisements and gathers data, such as websurfing preferences, used for targeting future advertising at theuser.
Dialer A dialer changes client Internet settings and can force a computerto dial pre-configured phone numbers through a modem. Theseare often pay-per-call or international numbers that can result in asignificant expense for an organization.
Hacking tool A hacking tool helps hackers enter a computer.
Remote access tool A remote access tool helps hackers remotely access and controla computer.
Password crackingapplication
This type of application helps decipher account user names andpasswords.
Others "Others" include potentially malicious programs not categorizedunder any of the spyware/grayware types.
Protecting Mac Computers from Security Risks
6-5
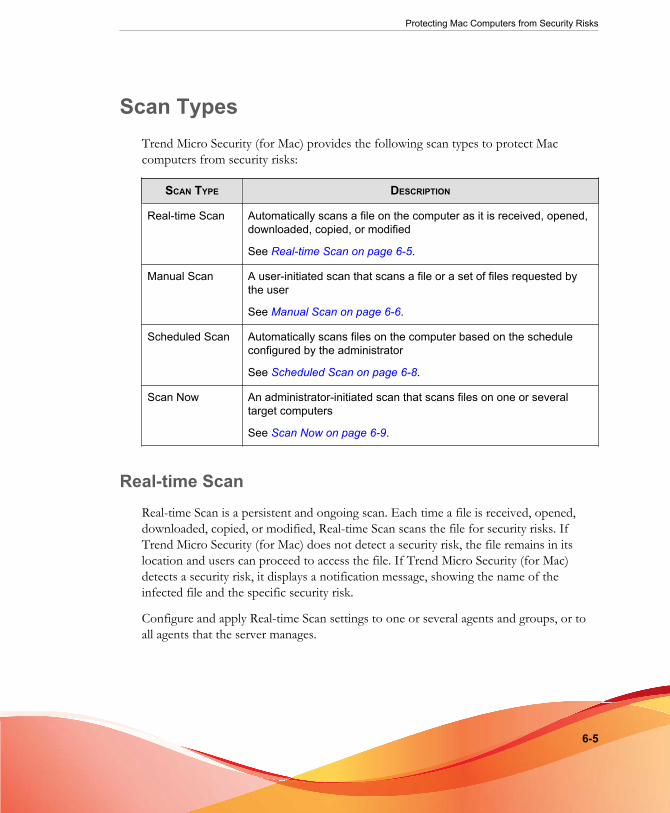
Scan TypesTrend Micro Security (for Mac) provides the following scan types to protect Maccomputers from security risks:
SCAN TYPE DESCRIPTION
Real-time Scan Automatically scans a file on the computer as it is received, opened,downloaded, copied, or modified
See Real-time Scan on page 6-5.
Manual Scan A user-initiated scan that scans a file or a set of files requested bythe user
See Manual Scan on page 6-6.
Scheduled Scan Automatically scans files on the computer based on the scheduleconfigured by the administrator
See Scheduled Scan on page 6-8.
Scan Now An administrator-initiated scan that scans files on one or severaltarget computers
See Scan Now on page 6-9.
Real-time ScanReal-time Scan is a persistent and ongoing scan. Each time a file is received, opened,downloaded, copied, or modified, Real-time Scan scans the file for security risks. IfTrend Micro Security (for Mac) does not detect a security risk, the file remains in itslocation and users can proceed to access the file. If Trend Micro Security (for Mac)detects a security risk, it displays a notification message, showing the name of theinfected file and the specific security risk.
Configure and apply Real-time Scan settings to one or several agents and groups, or toall agents that the server manages.
Trend Micro Security (for Mac) Administrator’s Guide
6-6
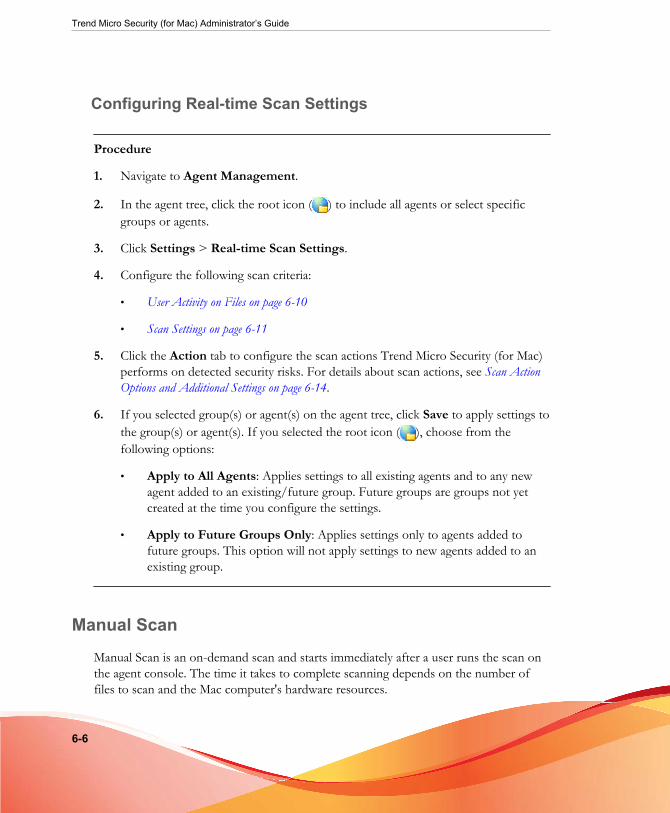
Configuring Real-time Scan Settings
Procedure
1. Navigate to Agent Management.
2. In the agent tree, click the root icon ( ) to include all agents or select specificgroups or agents.
3. Click Settings > Real-time Scan Settings.
4. Configure the following scan criteria:
• User Activity on Files on page 6-10
• Scan Settings on page 6-11
5. Click the Action tab to configure the scan actions Trend Micro Security (for Mac)performs on detected security risks. For details about scan actions, see Scan ActionOptions and Additional Settings on page 6-14.
6. If you selected group(s) or agent(s) on the agent tree, click Save to apply settings tothe group(s) or agent(s). If you selected the root icon ( ), choose from thefollowing options:
• Apply to All Agents: Applies settings to all existing agents and to any newagent added to an existing/future group. Future groups are groups not yetcreated at the time you configure the settings.
• Apply to Future Groups Only: Applies settings only to agents added tofuture groups. This option will not apply settings to new agents added to anexisting group.
Manual Scan
Manual Scan is an on-demand scan and starts immediately after a user runs the scan onthe agent console. The time it takes to complete scanning depends on the number offiles to scan and the Mac computer's hardware resources.
Protecting Mac Computers from Security Risks
6-7
Configure and apply Manual Scan settings to one or several agents and groups, or to allagents that the server manages.
Configuring Manual Scan Settings
Procedure
1. Navigate to Agent Management.
2. In the agent tree, click the root icon ( ) to include all agents or select specificgroups or agents.
3. Click Settings > Manual Scan Settings.
4. Configure the following scan criteria:
• Scan Settings on page 6-11
• CPU Usage on page 6-11
5. Click the Action tab to configure the scan actions Trend Micro Security (for Mac)performs on detected security risks. For details about scan actions, see Scan ActionOptions and Additional Settings on page 6-14.
6. If you selected group(s) or agent(s) on the agent tree, click Save to apply settings tothe group(s) or agent(s). If you selected the root icon ( ), choose from thefollowing options:
• Apply to All Agents: Applies settings to all existing agents and to any newagent added to an existing/future group. Future groups are groups not yetcreated at the time you configure the settings.
• Apply to Future Groups Only: Applies settings only to agents added tofuture groups. This option will not apply settings to new agents added to anexisting group.
Trend Micro Security (for Mac) Administrator’s Guide
6-8
Scheduled ScanScheduled Scan runs automatically on the appointed date and time. Use Scheduled Scanto automate routine scans on the agent and improve scan management efficiency.
Configure and apply Scheduled Scan settings to one or several agents and groups, or toall agents that the server manages.
Configuring Scheduled Scan Settings
Procedure
1. Navigate to Agent Management.
2. In the agent tree, click the root icon ( ) to include all agents or select specificgroups or agents.
3. Click Settings > Scheduled Scan Settings.
4. Select the check box to enable Scheduled Scan.
5. Configure the following scan criteria:
• Schedule on page 6-12
• Scan Target on page 6-10
• Scan Settings on page 6-11
• CPU Usage on page 6-11
6. Click the Action tab to configure the scan actions Trend Micro Security (for Mac)performs on detected security risks. For details about scan actions, see Scan ActionOptions and Additional Settings on page 6-14.
7. If you selected group(s) or agent(s) on the agent tree, click Save to apply settings tothe group(s) or agent(s). If you selected the root icon ( ), choose from thefollowing options:
• Apply to All Agents: Applies settings to all existing agents and to any newagent added to an existing/future group. Future groups are groups not yetcreated at the time you configure the settings.
Protecting Mac Computers from Security Risks
6-9
• Apply to Future Groups Only: Applies settings only to agents added tofuture groups. This option will not apply settings to new agents added to anexisting group.
Scan Now
Scan Now is initiated remotely by a Trend Micro Security (for Mac) administratorthrough the web console and can be run on one or several Mac computers.
Initiate Scan Now on computers that you suspect to be infected.
Initiating Scan Now
Before you begin
All the Scheduled Scan settings, except the actual schedule, are used during Scan Now.To configure settings before initiating Scan Now, follow the steps in Configuring ScheduledScan Settings on page 6-8.
Procedure
1. Navigate to Agent Management.
2. In the agent tree, click the root icon ( ) to include all agents or select specificgroups or agents.
3. Click Tasks > Scan Now.
Settings Common to All Scan TypesFor each scan type, configure three sets of settings: scan criteria, scan exclusions, andscan actions. Deploy these settings to one or several agents and groups, or to all agentsthat the server manages.
Trend Micro Security (for Mac) Administrator’s Guide
6-10
Scan CriteriaSpecify which files a particular scan type should scan using file attributes such as filetype and extension. Also specify conditions that will trigger scanning. For example,configure Real-time Scan to scan each file after it is downloaded to the computer.
User Activity on FilesChoose activities on files that will trigger Real-time Scan. Select from the followingoptions:
• Scan files being created/modified: Scans new files introduced into the computer(for example, after downloading a file) or files being modified
• Scan files being retrieved: Scans files as they are opened
• Scan files being created/modified and retrieved
For example, if the third option is selected, a new file downloaded to the computer willbe scanned and stays in its current location if no security risk is detected. The same filewill be scanned when a user opens the file and, if the user modified the file, before themodifications are saved.
Scan TargetSelect from the following options:
• All scannable files: Scan all files
• File types scanned by IntelliScan: Only scan files known to potentially harbormalicious code, including files disguised by a harmless extension name. SeeIntelliScan on page B-2 for details.
• File or folder name with full path: Only scan the specified file or files found in aspecific folder.
1. Type a full file path or directory path and then click Add.
• Full file path example: /Users/username/temp.zip
• Directory path example: /Users/username
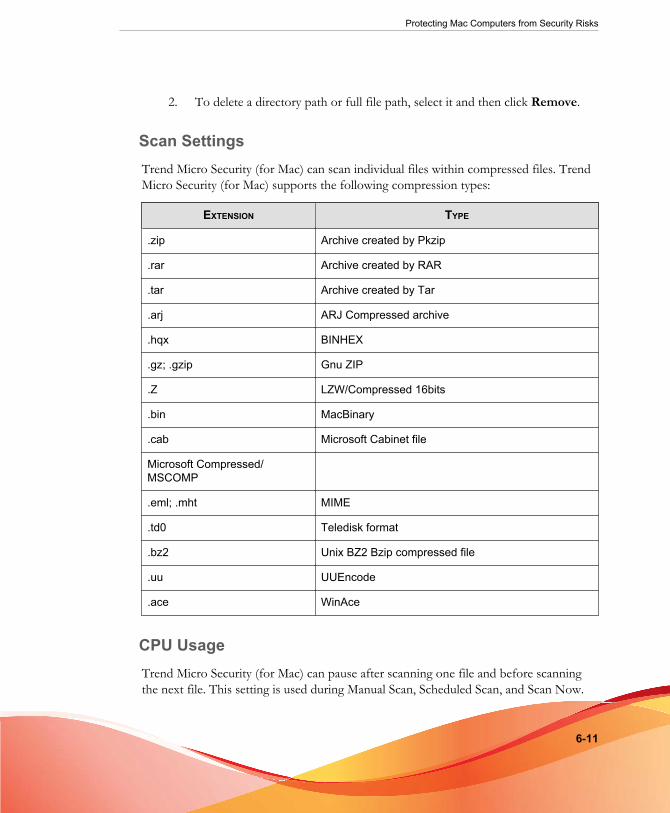
Protecting Mac Computers from Security Risks
6-11
2. To delete a directory path or full file path, select it and then click Remove.
Scan SettingsTrend Micro Security (for Mac) can scan individual files within compressed files. TrendMicro Security (for Mac) supports the following compression types:
EXTENSION TYPE
.zip Archive created by Pkzip
.rar Archive created by RAR
.tar Archive created by Tar
.arj ARJ Compressed archive
.hqx BINHEX
.gz; .gzip Gnu ZIP
.Z LZW/Compressed 16bits
.bin MacBinary
.cab Microsoft Cabinet file
Microsoft Compressed/MSCOMP
.eml; .mht MIME
.td0 Teledisk format
.bz2 Unix BZ2 Bzip compressed file
.uu UUEncode
.ace WinAce
CPU UsageTrend Micro Security (for Mac) can pause after scanning one file and before scanningthe next file. This setting is used during Manual Scan, Scheduled Scan, and Scan Now.
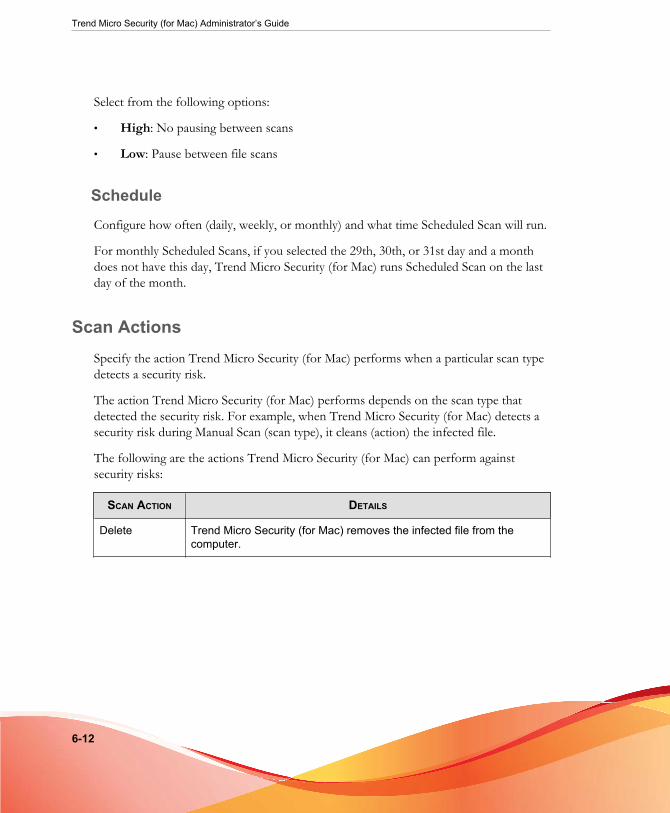
Trend Micro Security (for Mac) Administrator’s Guide
6-12
Select from the following options:
• High: No pausing between scans
• Low: Pause between file scans
Schedule
Configure how often (daily, weekly, or monthly) and what time Scheduled Scan will run.
For monthly Scheduled Scans, if you selected the 29th, 30th, or 31st day and a monthdoes not have this day, Trend Micro Security (for Mac) runs Scheduled Scan on the lastday of the month.
Scan ActionsSpecify the action Trend Micro Security (for Mac) performs when a particular scan typedetects a security risk.
The action Trend Micro Security (for Mac) performs depends on the scan type thatdetected the security risk. For example, when Trend Micro Security (for Mac) detects asecurity risk during Manual Scan (scan type), it cleans (action) the infected file.
The following are the actions Trend Micro Security (for Mac) can perform againstsecurity risks:
SCAN ACTION DETAILS
Delete Trend Micro Security (for Mac) removes the infected file from thecomputer.
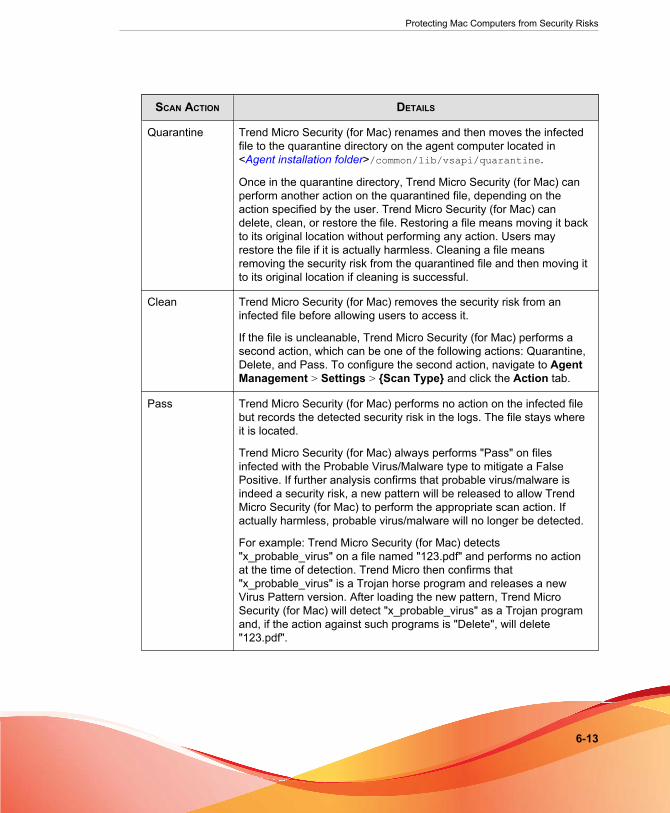
Protecting Mac Computers from Security Risks
6-13
SCAN ACTION DETAILS
Quarantine Trend Micro Security (for Mac) renames and then moves the infectedfile to the quarantine directory on the agent computer located in<Agent installation folder>/common/lib/vsapi/quarantine.
Once in the quarantine directory, Trend Micro Security (for Mac) canperform another action on the quarantined file, depending on theaction specified by the user. Trend Micro Security (for Mac) candelete, clean, or restore the file. Restoring a file means moving it backto its original location without performing any action. Users mayrestore the file if it is actually harmless. Cleaning a file meansremoving the security risk from the quarantined file and then moving itto its original location if cleaning is successful.
Clean Trend Micro Security (for Mac) removes the security risk from aninfected file before allowing users to access it.
If the file is uncleanable, Trend Micro Security (for Mac) performs asecond action, which can be one of the following actions: Quarantine,Delete, and Pass. To configure the second action, navigate to AgentManagement > Settings > {Scan Type} and click the Action tab.
Pass Trend Micro Security (for Mac) performs no action on the infected filebut records the detected security risk in the logs. The file stays whereit is located.
Trend Micro Security (for Mac) always performs "Pass" on filesinfected with the Probable Virus/Malware type to mitigate a FalsePositive. If further analysis confirms that probable virus/malware isindeed a security risk, a new pattern will be released to allow TrendMicro Security (for Mac) to perform the appropriate scan action. Ifactually harmless, probable virus/malware will no longer be detected.
For example: Trend Micro Security (for Mac) detects"x_probable_virus" on a file named "123.pdf" and performs no actionat the time of detection. Trend Micro then confirms that"x_probable_virus" is a Trojan horse program and releases a newVirus Pattern version. After loading the new pattern, Trend MicroSecurity (for Mac) will detect "x_probable_virus" as a Trojan programand, if the action against such programs is "Delete", will delete"123.pdf".
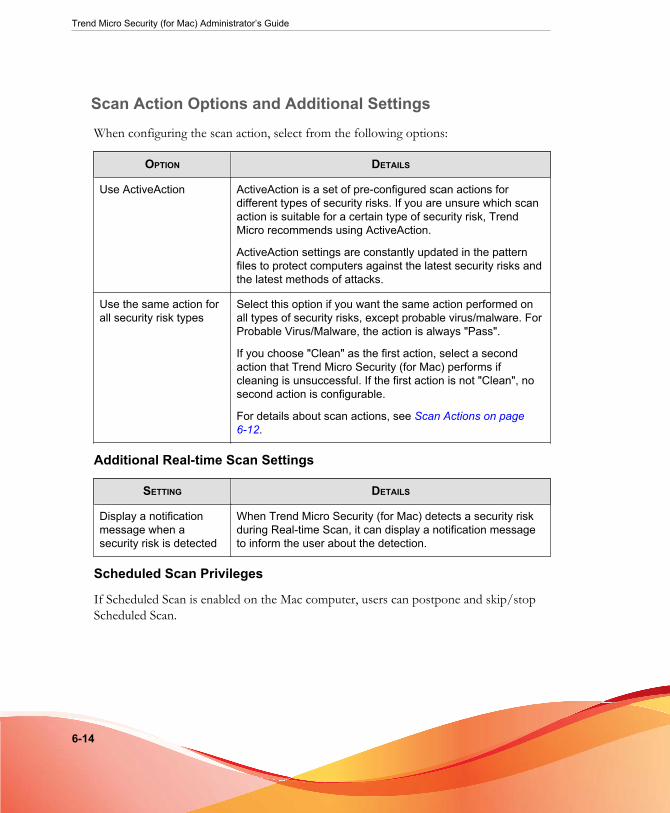
Trend Micro Security (for Mac) Administrator’s Guide
6-14
Scan Action Options and Additional Settings
When configuring the scan action, select from the following options:
OPTION DETAILS
Use ActiveAction ActiveAction is a set of pre-configured scan actions fordifferent types of security risks. If you are unsure which scanaction is suitable for a certain type of security risk, TrendMicro recommends using ActiveAction.
ActiveAction settings are constantly updated in the patternfiles to protect computers against the latest security risks andthe latest methods of attacks.
Use the same action forall security risk types
Select this option if you want the same action performed onall types of security risks, except probable virus/malware. ForProbable Virus/Malware, the action is always "Pass".
If you choose "Clean" as the first action, select a secondaction that Trend Micro Security (for Mac) performs ifcleaning is unsuccessful. If the first action is not "Clean", nosecond action is configurable.
For details about scan actions, see Scan Actions on page6-12.
Additional Real-time Scan Settings
SETTING DETAILS
Display a notificationmessage when asecurity risk is detected
When Trend Micro Security (for Mac) detects a security riskduring Real-time Scan, it can display a notification messageto inform the user about the detection.
Scheduled Scan Privileges
If Scheduled Scan is enabled on the Mac computer, users can postpone and skip/stopScheduled Scan.
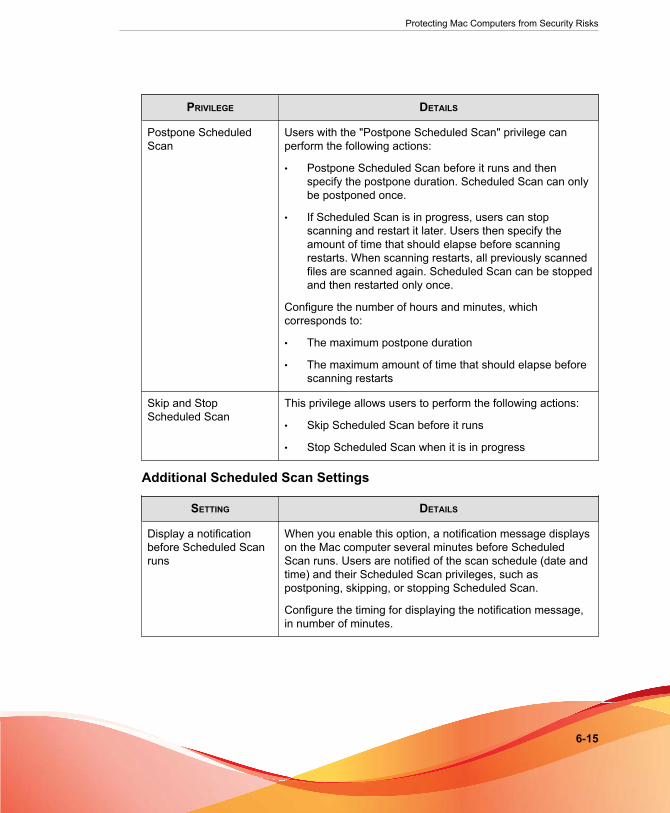
Protecting Mac Computers from Security Risks
6-15
PRIVILEGE DETAILS
Postpone ScheduledScan
Users with the "Postpone Scheduled Scan" privilege canperform the following actions:
• Postpone Scheduled Scan before it runs and thenspecify the postpone duration. Scheduled Scan can onlybe postponed once.
• If Scheduled Scan is in progress, users can stopscanning and restart it later. Users then specify theamount of time that should elapse before scanningrestarts. When scanning restarts, all previously scannedfiles are scanned again. Scheduled Scan can be stoppedand then restarted only once.
Configure the number of hours and minutes, whichcorresponds to:
• The maximum postpone duration
• The maximum amount of time that should elapse beforescanning restarts
Skip and StopScheduled Scan
This privilege allows users to perform the following actions:
• Skip Scheduled Scan before it runs
• Stop Scheduled Scan when it is in progress
Additional Scheduled Scan Settings
SETTING DETAILS
Display a notificationbefore Scheduled Scanruns
When you enable this option, a notification message displayson the Mac computer several minutes before ScheduledScan runs. Users are notified of the scan schedule (date andtime) and their Scheduled Scan privileges, such aspostponing, skipping, or stopping Scheduled Scan.
Configure the timing for displaying the notification message,in number of minutes.
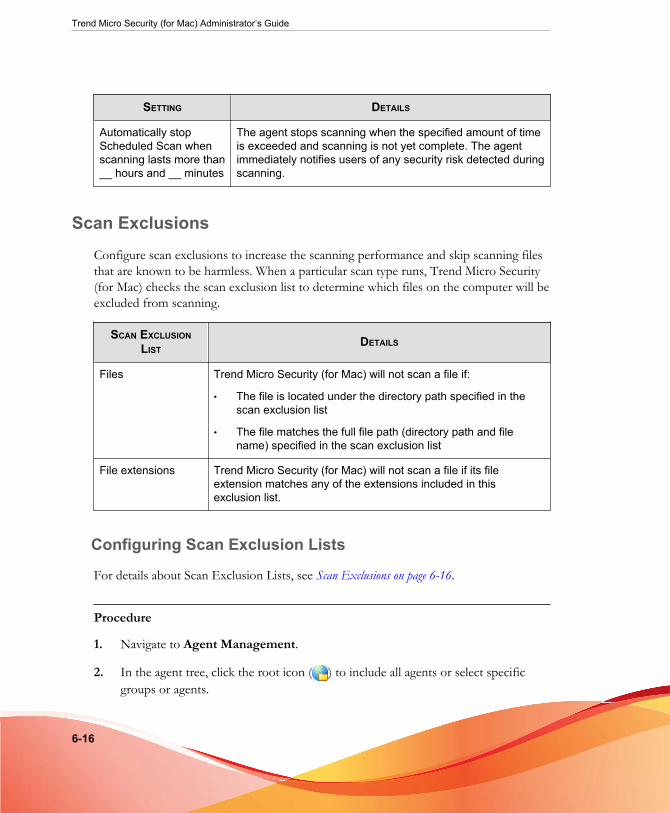
Trend Micro Security (for Mac) Administrator’s Guide
6-16
SETTING DETAILS
Automatically stopScheduled Scan whenscanning lasts more than__ hours and __ minutes
The agent stops scanning when the specified amount of timeis exceeded and scanning is not yet complete. The agentimmediately notifies users of any security risk detected duringscanning.
Scan Exclusions
Configure scan exclusions to increase the scanning performance and skip scanning filesthat are known to be harmless. When a particular scan type runs, Trend Micro Security(for Mac) checks the scan exclusion list to determine which files on the computer will beexcluded from scanning.
SCAN EXCLUSIONLIST
DETAILS
Files Trend Micro Security (for Mac) will not scan a file if:
• The file is located under the directory path specified in thescan exclusion list
• The file matches the full file path (directory path and filename) specified in the scan exclusion list
File extensions Trend Micro Security (for Mac) will not scan a file if its fileextension matches any of the extensions included in thisexclusion list.
Configuring Scan Exclusion Lists
For details about Scan Exclusion Lists, see Scan Exclusions on page 6-16.
Procedure
1. Navigate to Agent Management.
2. In the agent tree, click the root icon ( ) to include all agents or select specificgroups or agents.
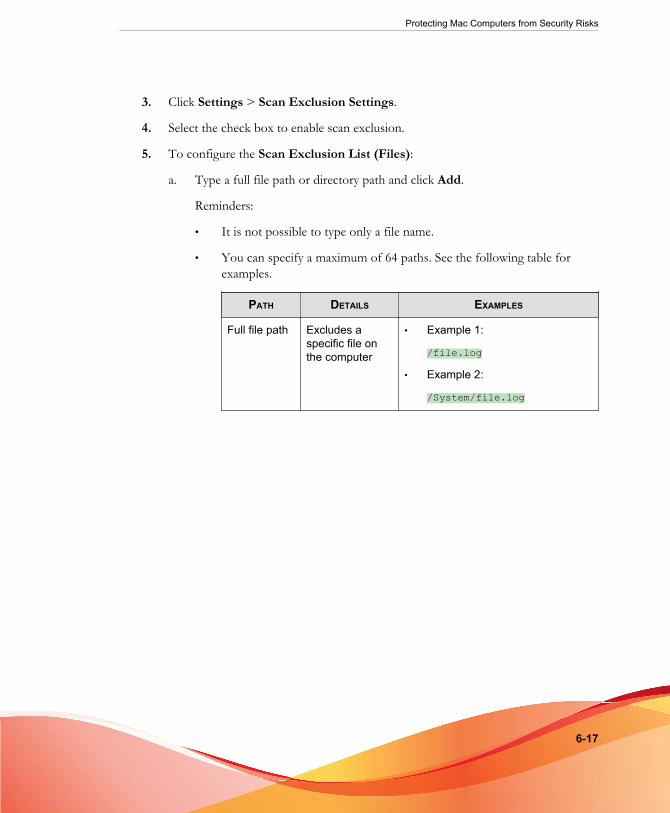
Protecting Mac Computers from Security Risks
6-17
3. Click Settings > Scan Exclusion Settings.
4. Select the check box to enable scan exclusion.
5. To configure the Scan Exclusion List (Files):
a. Type a full file path or directory path and click Add.
Reminders:
• It is not possible to type only a file name.
• You can specify a maximum of 64 paths. See the following table forexamples.
PATH DETAILS EXAMPLES
Full file path Excludes aspecific file onthe computer
• Example 1:
/file.log
• Example 2:
/System/file.log
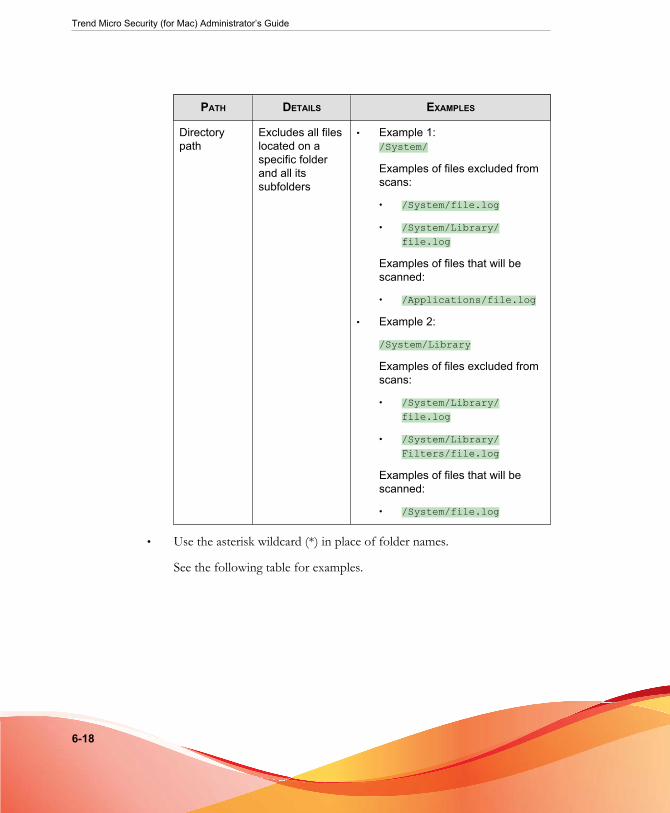
Trend Micro Security (for Mac) Administrator’s Guide
6-18
PATH DETAILS EXAMPLES
Directorypath
Excludes all fileslocated on aspecific folderand all itssubfolders
• Example 1:/System/
Examples of files excluded fromscans:
• /System/file.log
• /System/Library/file.log
Examples of files that will bescanned:
• /Applications/file.log
• Example 2:
/System/Library
Examples of files excluded fromscans:
• /System/Library/file.log
• /System/Library/Filters/file.log
Examples of files that will bescanned:
• /System/file.log
• Use the asterisk wildcard (*) in place of folder names.
See the following table for examples.
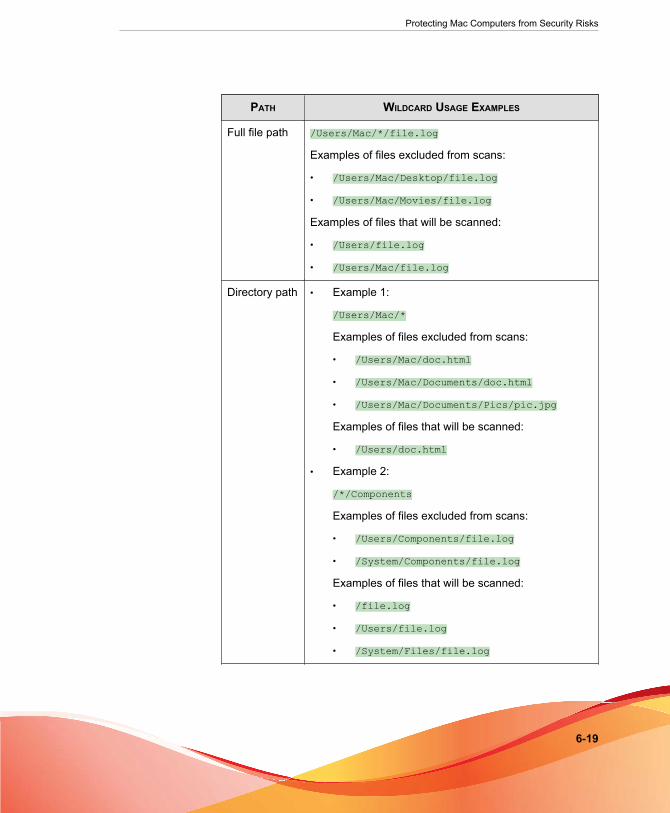
Protecting Mac Computers from Security Risks
6-19
PATH WILDCARD USAGE EXAMPLES
Full file path /Users/Mac/*/file.log
Examples of files excluded from scans:
• /Users/Mac/Desktop/file.log
• /Users/Mac/Movies/file.log
Examples of files that will be scanned:
• /Users/file.log
• /Users/Mac/file.log
Directory path • Example 1:
/Users/Mac/*
Examples of files excluded from scans:
• /Users/Mac/doc.html
• /Users/Mac/Documents/doc.html
• /Users/Mac/Documents/Pics/pic.jpg
Examples of files that will be scanned:
• /Users/doc.html
• Example 2:
/*/Components
Examples of files excluded from scans:
• /Users/Components/file.log
• /System/Components/file.log
Examples of files that will be scanned:
• /file.log
• /Users/file.log
• /System/Files/file.log
Trend Micro Security (for Mac) Administrator’s Guide
6-20
• Partial matching of folder names is not supported. For example, it is notpossible to type /Users/*user/temp to exclude files on folder namesending in user, such as end_user or new_user.
b. To delete a path, select it and click Remove.
6. To configure the Scan Exclusion List (File Extensions):
a. Type a file extension without a period (.) and click Add. For example, typepdf. You can specify a maximum of 64 file extensions.
b. To delete a file extension, select it and click Remove.
7. If you selected group(s) or agent(s) on the agent tree, click Save to apply settings tothe group(s) or agent(s). If you selected the root icon ( ), choose from thefollowing options:
• Apply to All Agents: Applies settings to all existing agents and to any newagent added to an existing/future group. Future groups are groups not yetcreated at the time you configure the settings.
• Apply to Future Groups Only: Applies settings only to agents added tofuture groups. This option will not apply settings to new agents added to anexisting group.
Cache Settings for ScansEach time scanning runs, the agent checks the modified files cache to see if a file hasbeen modified since the last agent startup.
• If a file has been modified, the agent scans the file and adds it to the scanned filescache.
• If a file has not been modified, the agent checks if the file is in the scanned filescache.
• If the file is in the scanned files cache, the agent skips scanning the file.
• If the file is not in the scanned files cache, the agent checks the approvedfiles cache.
Protecting Mac Computers from Security Risks
6-21
Note
The approved files cache contains files that Trend Micro Security (for Mac)deems trustworthy. Trustworthy files have been scanned by successive versionsof the pattern and declared threat-free each time, or threat-free files that haveremained unmodified for an extended period of time.
• If the file is in the approved files cache, the agent skips scanning the file.
• If the file is not in the approved files cache, the agent scans the file andadds it to the scanned files cache.
All or some of the caches are cleared whenever the scan engine or pattern is updated.
If scans are run frequently and many files hit the caches, the scanning time reducessignificantly.
If scans are seldom run, disable the caches so that files can be checked for threats witheach scan.
Configuring Cache Settings for Scans
For details about the on-demand scan cache, see Cache Settings for Scans on page 6-20.
Procedure
1. Navigate to Agent Management.
2. In the agent tree, click the root icon ( ) to include all agents or select specificgroups or agents.
3. Click Settings > Cache Settings for Scans.
4. Select Enable the on-demand scan cache.
5. If you selected group(s) or agent(s) on the agent tree, click Save to apply settings tothe group(s) or agent(s). If you selected the root icon ( ), choose from thefollowing options:
Trend Micro Security (for Mac) Administrator’s Guide
6-22
• Apply to All Agents: Applies settings to all existing agents and to any newagent added to an existing/future group. Future groups are groups not yetcreated at the time you configure the settings.
• Apply to Future Groups Only: Applies settings only to agents added tofuture groups. This option will not apply settings to new agents added to anexisting group.
Security Risk Notifications and LogsTrend Micro Security (for Mac) comes with a set of default notification messages toinform you and other Trend Micro Security (for Mac) administrators of detected securityrisks or any outbreak that has occurred.
Trend Micro Security (for Mac) generates logs when it detects security risks.
Configuring Administrator Notification Settings
When security risks are detected or when an outbreak occurs, Trend Micro Security (forMac) administrators can receive notifications through email.
Procedure
1. Navigate to Notifications > General Settings.
2. In the SMTP server field, type either an IPv4/IPv6 address or computer name.
3. Type a port number between 1 and 65535.
4. Type the sender’s email address in the From field.
5. Click Save.
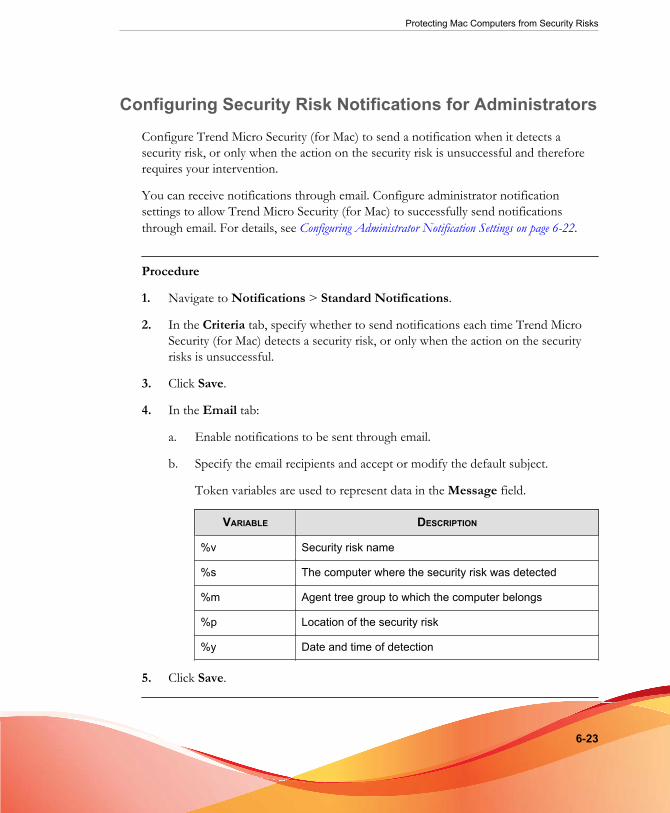
Protecting Mac Computers from Security Risks
6-23
Configuring Security Risk Notifications for Administrators
Configure Trend Micro Security (for Mac) to send a notification when it detects asecurity risk, or only when the action on the security risk is unsuccessful and thereforerequires your intervention.
You can receive notifications through email. Configure administrator notificationsettings to allow Trend Micro Security (for Mac) to successfully send notificationsthrough email. For details, see Configuring Administrator Notification Settings on page 6-22.
Procedure
1. Navigate to Notifications > Standard Notifications.
2. In the Criteria tab, specify whether to send notifications each time Trend MicroSecurity (for Mac) detects a security risk, or only when the action on the securityrisks is unsuccessful.
3. Click Save.
4. In the Email tab:
a. Enable notifications to be sent through email.
b. Specify the email recipients and accept or modify the default subject.
Token variables are used to represent data in the Message field.
VARIABLE DESCRIPTION
%v Security risk name
%s The computer where the security risk was detected
%m Agent tree group to which the computer belongs
%p Location of the security risk
%y Date and time of detection
5. Click Save.
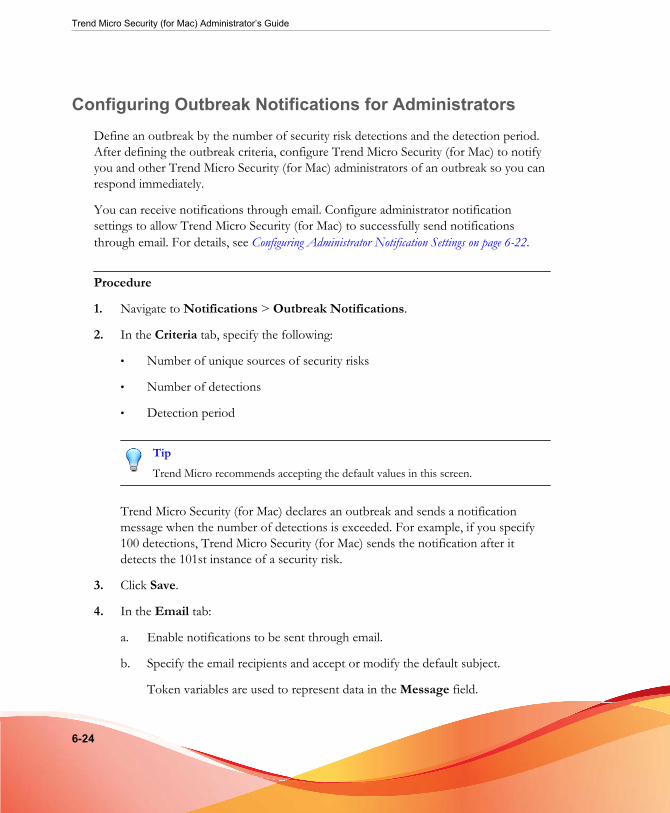
Trend Micro Security (for Mac) Administrator’s Guide
6-24
Configuring Outbreak Notifications for AdministratorsDefine an outbreak by the number of security risk detections and the detection period.After defining the outbreak criteria, configure Trend Micro Security (for Mac) to notifyyou and other Trend Micro Security (for Mac) administrators of an outbreak so you canrespond immediately.
You can receive notifications through email. Configure administrator notificationsettings to allow Trend Micro Security (for Mac) to successfully send notificationsthrough email. For details, see Configuring Administrator Notification Settings on page 6-22.
Procedure
1. Navigate to Notifications > Outbreak Notifications.
2. In the Criteria tab, specify the following:
• Number of unique sources of security risks
• Number of detections
• Detection period
TipTrend Micro recommends accepting the default values in this screen.
Trend Micro Security (for Mac) declares an outbreak and sends a notificationmessage when the number of detections is exceeded. For example, if you specify100 detections, Trend Micro Security (for Mac) sends the notification after itdetects the 101st instance of a security risk.
3. Click Save.
4. In the Email tab:
a. Enable notifications to be sent through email.
b. Specify the email recipients and accept or modify the default subject.
Token variables are used to represent data in the Message field.
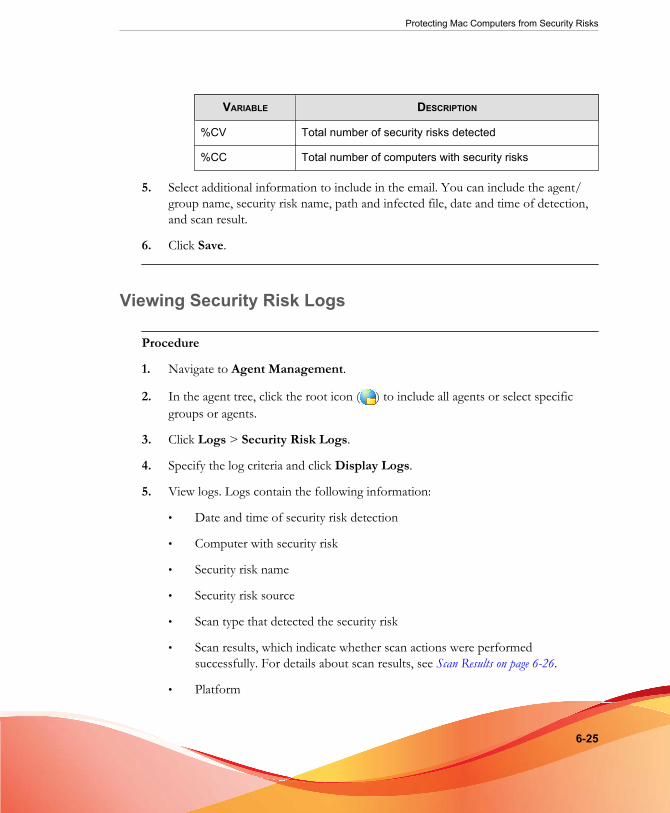
Protecting Mac Computers from Security Risks
6-25
VARIABLE DESCRIPTION
%CV Total number of security risks detected
%CC Total number of computers with security risks
5. Select additional information to include in the email. You can include the agent/group name, security risk name, path and infected file, date and time of detection,and scan result.
6. Click Save.
Viewing Security Risk Logs
Procedure
1. Navigate to Agent Management.
2. In the agent tree, click the root icon ( ) to include all agents or select specificgroups or agents.
3. Click Logs > Security Risk Logs.
4. Specify the log criteria and click Display Logs.
5. View logs. Logs contain the following information:
• Date and time of security risk detection
• Computer with security risk
• Security risk name
• Security risk source
• Scan type that detected the security risk
• Scan results, which indicate whether scan actions were performedsuccessfully. For details about scan results, see Scan Results on page 6-26.
• Platform
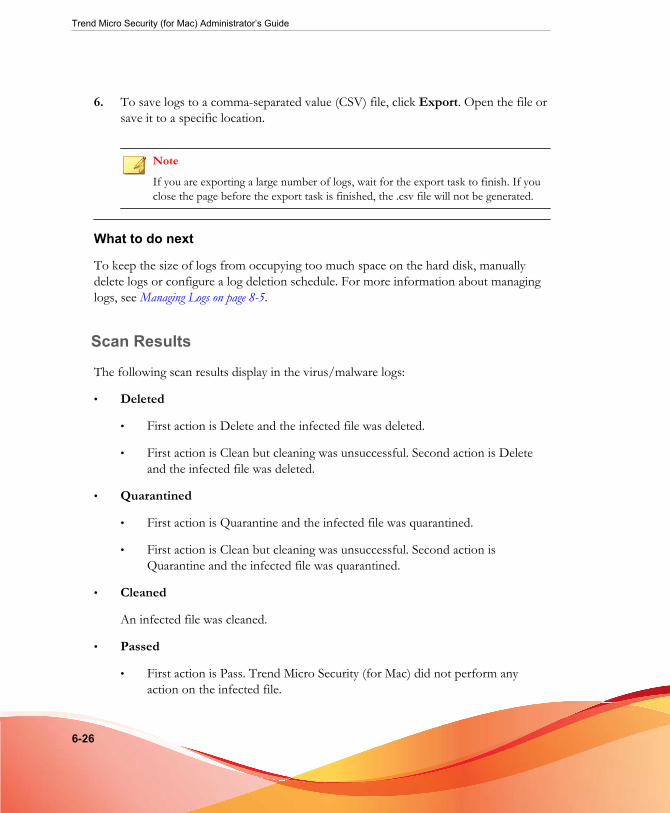
Trend Micro Security (for Mac) Administrator’s Guide
6-26
6. To save logs to a comma-separated value (CSV) file, click Export. Open the file orsave it to a specific location.
Note
If you are exporting a large number of logs, wait for the export task to finish. If youclose the page before the export task is finished, the .csv file will not be generated.
What to do next
To keep the size of logs from occupying too much space on the hard disk, manuallydelete logs or configure a log deletion schedule. For more information about managinglogs, see Managing Logs on page 8-5.
Scan Results
The following scan results display in the virus/malware logs:
• Deleted
• First action is Delete and the infected file was deleted.
• First action is Clean but cleaning was unsuccessful. Second action is Deleteand the infected file was deleted.
• Quarantined
• First action is Quarantine and the infected file was quarantined.
• First action is Clean but cleaning was unsuccessful. Second action isQuarantine and the infected file was quarantined.
• Cleaned
An infected file was cleaned.
• Passed
• First action is Pass. Trend Micro Security (for Mac) did not perform anyaction on the infected file.
Protecting Mac Computers from Security Risks
6-27
• First action is Clean but cleaning was unsuccessful. Second action is Pass soTrend Micro Security (for Mac) did not perform any action on the infectedfile.
• Unable to clean or quarantine the file
Clean is the first action. Quarantine is the second action, and both actions wereunsuccessful.
Solution: See “Unable to quarantine the file” below.
• Unable to clean or delete the file
Clean is the first action. Delete is the second action, and both actions wereunsuccessful.
Solution: See “Unable to delete the file” below.
• Unable to quarantine the file
The infected file may be locked by another application, is executing, or is on a CD.Trend Micro Security (for Mac) will quarantine the file after the application releasesthe file or after it has been executed.
Solution
For infected files on a CD, consider not using the CD as the virus may infect othercomputers on the network.
• Unable to delete the file
The infected file may be locked by another application, is executing, or is on a CD.Trend Micro Security (for Mac) will delete the file after the application releases thefile or after it has been executed.
Solution
For infected files on a CD, consider not using the CD as the virus may infect othercomputers on the network.
• Unable to clean the file

Trend Micro Security (for Mac) Administrator’s Guide
6-28
The file may be uncleanable. For details and solutions, see Uncleanable Files on pageB-2.
7-1
Chapter 7
Protecting Mac Computers from Web-based Threats
This chapter describes web-based threats and using Trend Micro Security (for Mac) toprotect your network and computers from web-based threats.
Trend Micro Security (for Mac) Administrator’s Guide
7-2
Web ThreatsWeb threats encompass a broad array of threats that originate from the Internet. Webthreats are sophisticated in their methods, using a combination of various files andtechniques rather than a single file or approach. For example, web threat creatorsconstantly change the version or variant used. Because the web threat is in a fixedlocation of a website rather than on an infected computer, the web threat creatorconstantly modifies its code to avoid detection.
In recent years, individuals once characterized as hackers, virus writers, spammers, andspyware makers have become known as cyber criminals. Web threats help theseindividuals pursue one of two goals. One goal is to steal information for subsequentsale. The resulting impact is leakage of confidential information in the form of identityloss. The infected computer may also become a vector to deliver phish attacks or otherinformation capturing activities. Among other impacts, this threat has the potential toerode confidence in web commerce, corrupting the trust needed for Internettransactions. The second goal is to hijack a user’s CPU power to use it as an instrumentto conduct profitable activities. Activities include sending spam or conducting extortionin the form of distributed denial-of-service attacks or pay-per-click activities.
Web ReputationTrend Micro Security (for Mac) leverages Trend Micro’s extensive web securitydatabases to check the reputation of websites that users are attempting to access. Thewebsite’s reputation is correlated with the specific web reputation policy enforced on thecomputer. Depending on the policy in use, Trend Micro Security (for Mac) will eitherblock or allow access to the website. Policies are enforced based on the agent’s location.
Configuring Web Reputation SettingsWeb Reputation settings include policies that dictate whether Trend Micro Security (forMac) will block or allow access to a website. To determine the appropriate policy to use,Trend Micro Security (for Mac) checks the agent's location. An agent's location is"internal" if it can connect to the Trend Micro Security (for Mac) server. Otherwise, anagent's location is "external".
Protecting Mac Computers from Web-based Threats
7-3
Procedure
1. Navigate to Agent Management.
2. In the agent tree, click the root icon ( ) to include all agents or select specificgroups or agents.
3. Click Settings > Web Reputation Settings.
4. To configure a policy for external agents:
a. Click the External Agents tab.
b. Select Enable Web reputation policy.
When the policy is enabled, external agents send web reputation queries to theSmart Protection Network.
Note
If an agent only has an IPv6 address, read the IPv6 limitations for WebReputation queries in Pure IPv6 Agent Limitations on page A-3.
c. Select from the available web reputation security levels: High, Medium orLow
Note
The security levels determine whether Trend Micro Security (for Mac) will allowor block access to a URL. For example, if you set the security level to Low,Trend Micro Security (for Mac) only blocks URLs that are known to be webthreats. As you set the security level higher, the web threat detection rateimproves but the possibility of false positives also increases.
d. To submit web reputation feedback, click the URL provided. The TrendMicro Web Reputation Query system opens in a browser window.
5. To configure a policy for internal agents:
a. Click the Internal Agents tab.
b. Select Enable Web reputation policy.
Trend Micro Security (for Mac) Administrator’s Guide
7-4
When the policy is enabled, internal agents send web reputation queries to:
• Smart Protection Servers if the Send queries to Smart ProtectionServers option is enabled.
• Smart Protection Network if the Send queries to Smart ProtectionServers option is disabled.
NoteIf an agent only has an IPv6 address, read the IPv6 limitations for WebReputation queries in Pure IPv6 Agent Limitations on page A-3.
c. Select Send queries to Smart Protection Servers if you want internal agentsto send web reputation queries to Smart Protection Servers.
• If you enable this option, agents refer to the same smart protectionsource list used by OfficeScan agents to determine the Smart ProtectionServers to which they send queries.
ImportantBefore enabling this option, read the guidelines in Trend Micro SmartProtection on page 3-12.
This option cannot be enabled if the Trend Micro Security (for Mac)server is installed with OfficeScan 10. If this option is enabled fromControl Manager Policy Management and then deployed to Trend MicroSecurity (for Mac) server installed with OfficeScan 10, the setting will nottake effect and the option will remain disabled.
• If you disable this option, agents send web reputation queries to SmartProtection Network. Mac computers must have Internet connection tosend queries successfully.
d. Select from the available web reputation security levels: High, Medium orLow
Protecting Mac Computers from Web-based Threats
7-5
NoteThe security levels determine whether Trend Micro Security (for Mac) will allowor block access to a URL. For example, if you set the security level to Low,Trend Micro Security (for Mac) only blocks URLs that are known to be webthreats. As you set the security level higher, the web threat detection rateimproves but the possibility of false positives also increases.
Agents do not block untested websites, regardless of the security level.
e. To submit web reputation feedback, click the URL provided. The TrendMicro Web Reputation Query system opens in a browser window.
f. Select whether to allow the agents to send web reputation logs to the server.Allow agents to send logs if you want to analyze URLs being blocked byTrend Micro Security (for Mac) and take the appropriate action on URLs youthink are safe to access.
6. If you selected group(s) or agent(s) on the agent tree, click Save to apply settings tothe group(s) or agent(s). If you selected the root icon ( ), choose from thefollowing options:
• Apply to All Agents: Applies settings to all existing agents and to any newagent added to an existing/future group. Future groups are groups not yetcreated at the time you configure the settings.
• Apply to Future Groups Only: Applies settings only to agents added tofuture groups. This option will not apply settings to new agents added to anexisting group.
Configuring the Approved URL ListApproved URLs bypass Web Reputation policies. Trend Micro Security (for Mac) doesnot block these URLs even if the Web Reputation policy is set to block them. AddURLs that you consider safe to the approved URL list.
Procedure
1. Navigate to Administration > Web Reputation Approved URL List.
Trend Micro Security (for Mac) Administrator’s Guide
7-6
2. Specify a URL in the text box. You can add a wildcard character (*) anywhere onthe URL.
Examples:
• www.trendmicro.com/* means that all pages on the www.trendmicro.comdomain will be approved.
• *.trendmicro.com/* means that all pages on any sub-domain oftrendmicro.com will be approved.
You can type URLs containing IP addresses. If a URL contains an IPv6 address,enclose the address in square brackets.
3. Click Add.
4. To delete an entry, click the icon next to an approved URL.
5. Click Save.
Viewing Web Reputation LogsBefore you begin
Configure internal agents to send Web Reputation logs to the server. Do this if you wantto analyze URLs that Trend Micro Security (for Mac) blocks and take appropriate actionon URLs you think are safe to access.
Procedure
1. Navigate to Agent Management.
2. In the agent tree, click the root icon ( ) to include all agents or select specificgroups or agents.
3. Click Logs > Web Reputation Logs.
4. Specify the log criteria and click Display Logs.
5. View logs. Logs contain the following information:
Protecting Mac Computers from Web-based Threats
7-7
• Date/Time Trend Micro Security (for Mac) blocked the URL
• Computer where the user accessed the URL
• Blocked URL
• URL's risk level
• Link to the Trend Micro Web Reputation Query system that provides moreinformation about the blocked URL
6. To save logs to a comma-separated value (CSV) file, click Export to CSV. Openthe file or save it to a specific location.
NoteIf you are exporting a large number of logs, wait for the export task to finish. If youclose the page before the export task is finished, the .csv file will not be generated.
What to do next
To keep the size of logs from occupying too much space on the hard disk, manuallydelete logs or configure a log deletion schedule. For more information about managinglogs, see Managing Logs on page 8-5.


8-1
Chapter 8
Managing the Server and AgentsThis chapter describes Trend Micro Security (for Mac) server and agent managementand additional configurations.
Trend Micro Security (for Mac) Administrator’s Guide
8-2
Upgrading the Server and AgentsThe Plug-in Manager console displays any new Trend Micro Security (for Mac) build orversion.
Upgrade the server and agents immediately when the new build or version becomesavailable.
Before upgrading, be sure that the server and agents have the resources outlined in ServerInstallation Requirements on page 2-2 and Agent Installation Requirements on page 4-2.
Upgrading the ServerBefore you begin
Trend Micro recommends backing up the server’s program files and database, which canbe restored if there are problems with the upgrade.
• Program files
• Default path:
C:\Program Files\Trend Micro\OfficeScan\Addon\TMSM
Or
C:\Program Files (x86)\Trend Micro\OfficeScan\Addon\TMSM
• Files to back up:
• ..\apache-activemq\conf\activemq.xml
• ..\apache-activemq\conf\broker.pem
• ..\apache-activemq\conf\broker.ks
• ..\apache-activemq\bin\win32\wrapper.conf
• ..\apache-activemq\bin\win64\wrapper.conf
• ..\ServerInfo.plist
• Database files. See Backing Up the Server Database on page 8-7.
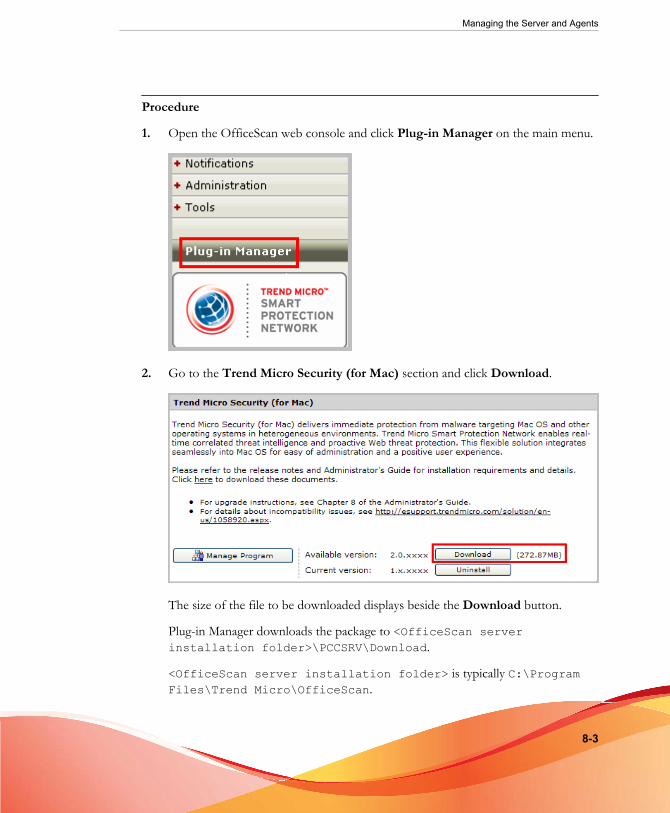
Managing the Server and Agents
8-3
Procedure
1. Open the OfficeScan web console and click Plug-in Manager on the main menu.
2. Go to the Trend Micro Security (for Mac) section and click Download.
The size of the file to be downloaded displays beside the Download button.
Plug-in Manager downloads the package to <OfficeScan serverinstallation folder>\PCCSRV\Download.
<OfficeScan server installation folder> is typically C:\ProgramFiles\Trend Micro\OfficeScan.
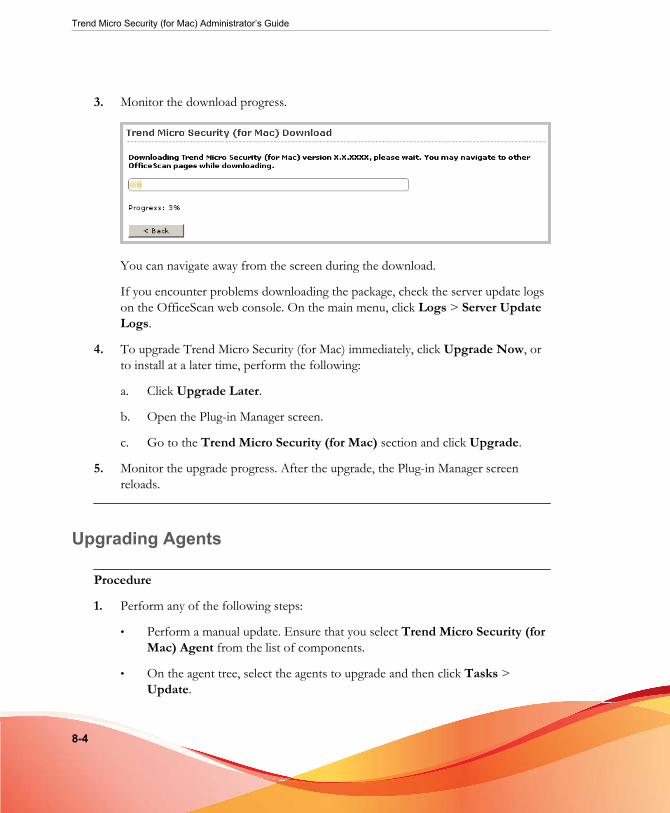
Trend Micro Security (for Mac) Administrator’s Guide
8-4
3. Monitor the download progress.
You can navigate away from the screen during the download.
If you encounter problems downloading the package, check the server update logson the OfficeScan web console. On the main menu, click Logs > Server UpdateLogs.
4. To upgrade Trend Micro Security (for Mac) immediately, click Upgrade Now, orto install at a later time, perform the following:
a. Click Upgrade Later.
b. Open the Plug-in Manager screen.
c. Go to the Trend Micro Security (for Mac) section and click Upgrade.
5. Monitor the upgrade progress. After the upgrade, the Plug-in Manager screenreloads.
Upgrading Agents
Procedure
1. Perform any of the following steps:
• Perform a manual update. Ensure that you select Trend Micro Security (forMac) Agent from the list of components.
• On the agent tree, select the agents to upgrade and then click Tasks >Update.
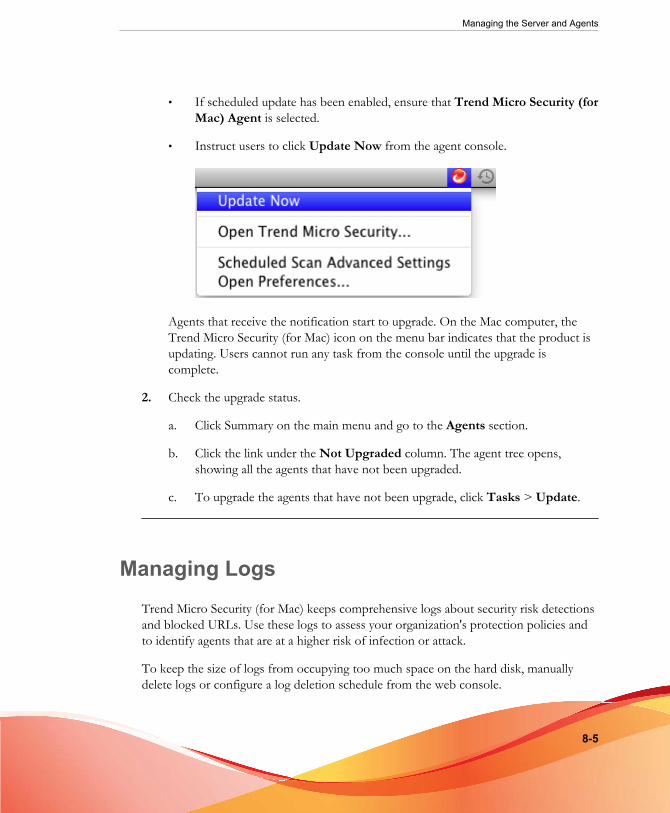
Managing the Server and Agents
8-5
• If scheduled update has been enabled, ensure that Trend Micro Security (forMac) Agent is selected.
• Instruct users to click Update Now from the agent console.
Agents that receive the notification start to upgrade. On the Mac computer, theTrend Micro Security (for Mac) icon on the menu bar indicates that the product isupdating. Users cannot run any task from the console until the upgrade iscomplete.
2. Check the upgrade status.
a. Click Summary on the main menu and go to the Agents section.
b. Click the link under the Not Upgraded column. The agent tree opens,showing all the agents that have not been upgraded.
c. To upgrade the agents that have not been upgrade, click Tasks > Update.
Managing LogsTrend Micro Security (for Mac) keeps comprehensive logs about security risk detectionsand blocked URLs. Use these logs to assess your organization's protection policies andto identify agents that are at a higher risk of infection or attack.
To keep the size of logs from occupying too much space on the hard disk, manuallydelete logs or configure a log deletion schedule from the web console.
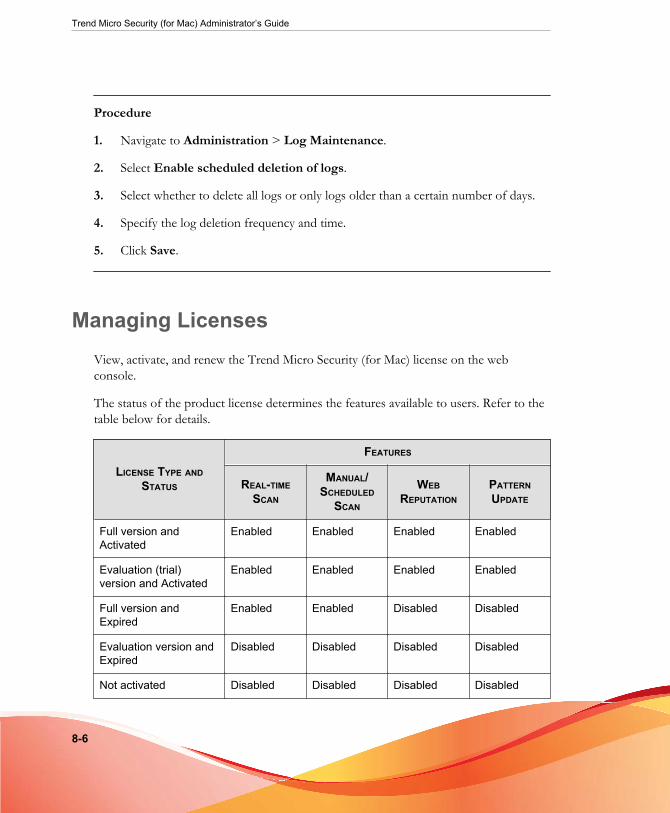
Trend Micro Security (for Mac) Administrator’s Guide
8-6
Procedure
1. Navigate to Administration > Log Maintenance.
2. Select Enable scheduled deletion of logs.
3. Select whether to delete all logs or only logs older than a certain number of days.
4. Specify the log deletion frequency and time.
5. Click Save.
Managing LicensesView, activate, and renew the Trend Micro Security (for Mac) license on the webconsole.
The status of the product license determines the features available to users. Refer to thetable below for details.
LICENSE TYPE ANDSTATUS
FEATURES
REAL-TIMESCAN
MANUAL/SCHEDULED
SCAN
WEBREPUTATION
PATTERNUPDATE
Full version andActivated
Enabled Enabled Enabled Enabled
Evaluation (trial)version and Activated
Enabled Enabled Enabled Enabled
Full version andExpired
Enabled Enabled Disabled Disabled
Evaluation version andExpired
Disabled Disabled Disabled Disabled
Not activated Disabled Disabled Disabled Disabled
Managing the Server and Agents
8-7
NoteIf the server only has an IPv6 address, read the IPv6 limitations for license updates in PureIPv6 Server Limitations on page A-3.
Procedure
1. Navigate to Administration > Product License.
2. View license information. To get the latest license information, click UpdateInformation.
The License Information section provides you the following details:
• Status: Displays either "Activated" or "Expired"
• Version: Displays either "Full" or "Evaluation" version. If you are using anevaluation version, you can upgrade to the full version anytime. For upgradeinstructions, click View license upgrade instructions.
• Seats: The maximum number of agents installations the license supports
• License expires on: The expiration date of the license
• Activation Code: The code used to activate the license
3. To specify a new Activation Code, click New Activation Code.
4. In the screen that opens, type the Activation Code and click Save.
This screen also provides a link to the Trend Micro website where you can viewdetailed information about your license.
Backing Up the Server Database
Procedure
1. Stop the following services from Microsoft Management Console:
Trend Micro Security (for Mac) Administrator’s Guide
8-8
• ActiveMQ for Trend Micro Security
• Trend Micro Security for (Mac)
2. Open SQL Server Management Studio (for example, from Windows Start menu> Programs > Microsoft SQL Server {version} > SQL Server ManagementStudio.
3. Search for db_TMSM and then use the backup function in SQL ServerManagement Studio to back up the database files.
See the SQL Server Management Studio documentation for details.
4. Start the stopped services.
Restoring the Server DatabaseBefore you begin
Prepare the backup of the database files created during backup. For details, see BackingUp the Server Database on page 8-7.
Procedure
1. Stop the following services from Microsoft Management Console:
• ActiveMQ for Trend Micro Security
• Trend Micro Security for (Mac)
2. Open SQL Server Management Studio (for example, from Windows Start menu> Programs > Microsoft SQL Server {version} > SQL Server ManagementStudio.
3. Search for db_TMSM and then use the detach option in SQL Server ManagementStudio to detach the current database files.
See the SQL Server Management Studio documentation for details.
4. Use the attach option to attach the backup of the database files.
Managing the Server and Agents
8-9
5. Start the stopped services.
Trend Micro Control ManagerTrend Micro Control Manager is a central management console that manages TrendMicro products and services at the gateway, mail server, file server, and corporatedesktop levels. The Control Manager web-based management console provides a singlemonitoring point for managed products and services throughout the network.
Control Manager allows system administrators to monitor and report on activities suchas infections, security violations, or virus entry points. System administrators candownload and deploy components throughout the network, helping ensure thatprotection is consistent and up-to-date. Control Manager allows both manual and pre-scheduled updates, and the configuration and administration of products as groups or asindividuals for added flexibility.
Control Manager Integration in this ReleaseThis Trend Micro Security (for Mac) release supports Control Manager 6.0. In thisrelease, you can create, manage, and deploy Trend Micro Security (for Mac) policiesfrom Control Manager.
The following are the policy configurations available in Control Manager:
• Manual Scan Settings
• Real-time Scan Settings
• Scan Exclusion Settings
• Cache Settings for Scans
• Scheduled Scan Settings
• Update Settings
• Web Reputation Settings
See the Control Manager documentation for details.
Trend Micro Security (for Mac) Administrator’s Guide
8-10
Note
You can also specify Control Manager as the Trend Micro Security (for Mac) server’supdate source. For details, see Configuring the Server Update Source on page 5-5.
Configuring Agent-Server CommunicationSettings
Agents identify the server that manages them by the server’s name or IPv4/IPv6address. During the Trend Micro Security (for Mac) server installation, the installeridentifies the server computer’s IP addresses, which are then displayed on the webconsole’s Agent-Server Communication screen.
The server communicates with agents through the listening port, which is port number61617 by default.
Notes and reminders:
• If you change the port number, ensure that it is not currently in use to preventconflicts with other applications and agent-server communication issues.
• If a firewall application is in use on the server computer, ensure that the firewalldoes not block agent-server communication through the listening port. Forexample, if the OfficeScan agent firewall has been enabled on the computer, add apolicy exception that allows incoming and outgoing traffic through the listeningport.
• You can configure agents to connect to the server through a proxy server. A proxyserver, however, is usually not required for agent-server connections within thecorporate network.
• If you plan to update or replace all of the existing server names and IPv4/IPv6addresses or change the listening port or proxy settings, do so before installingagents. If you have installed agents and then make changes, agents will loseconnection with the server and the only way to re-establish connection is to re-deploy the agents.
Managing the Server and Agents
8-11
Procedure
1. Navigate to Administration > Agent-Server Communication.
2. Type the server’s name or IPv4/IPv6 address(es), and listening port.
Note
If there are multiple entries in the Server name (or IP address) field, the agentrandomly selects an entry. Ensure that agent-server connection can be establishedusing all the entries.
3. Select whether agents connect to the server through a proxy server.
a. Select the proxy server protocol.
b. Type the proxy server name or IPv4/IPv6 address, and port number.
c. If the proxy server requires authentication, type the user name and passwordin the fields provided.
4. Click Save.
5. If you are prompted to restart Trend Micro Security (for Mac) services for thesettings to take effect, perform the following steps:
a. Navigate to the <Server installation folder>.
b. Double-click restart_TMSM.bat.
c. Wait until all the services have restarted.
Agent IconsIcons on the Mac computer’s system tray indicate the agent’s status and the task it iscurrently running.
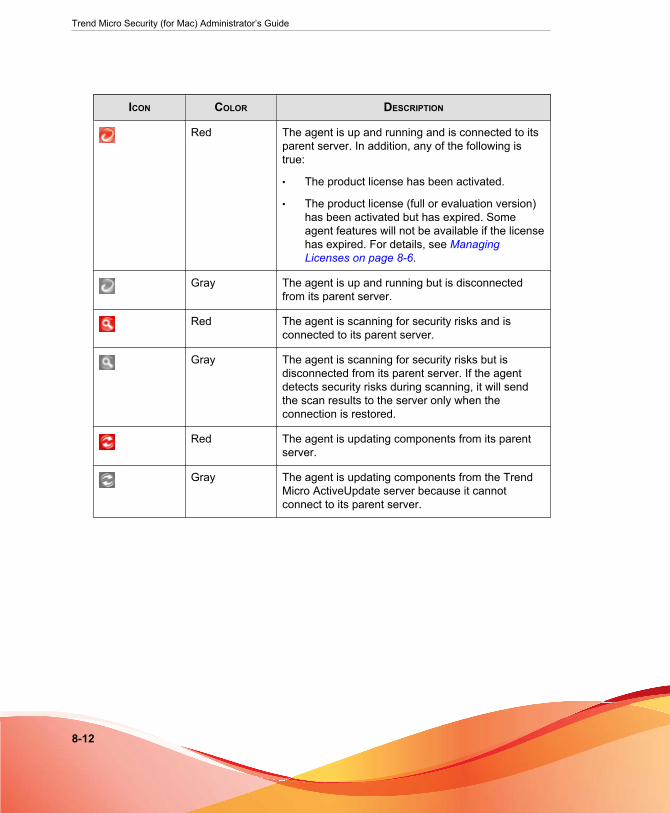
Trend Micro Security (for Mac) Administrator’s Guide
8-12
ICON COLOR DESCRIPTION
Red The agent is up and running and is connected to itsparent server. In addition, any of the following istrue:
• The product license has been activated.
• The product license (full or evaluation version)has been activated but has expired. Someagent features will not be available if the licensehas expired. For details, see ManagingLicenses on page 8-6.
Gray The agent is up and running but is disconnectedfrom its parent server.
Red The agent is scanning for security risks and isconnected to its parent server.
Gray The agent is scanning for security risks but isdisconnected from its parent server. If the agentdetects security risks during scanning, it will sendthe scan results to the server only when theconnection is restored.
Red The agent is updating components from its parentserver.
Gray The agent is updating components from the TrendMicro ActiveUpdate server because it cannotconnect to its parent server.
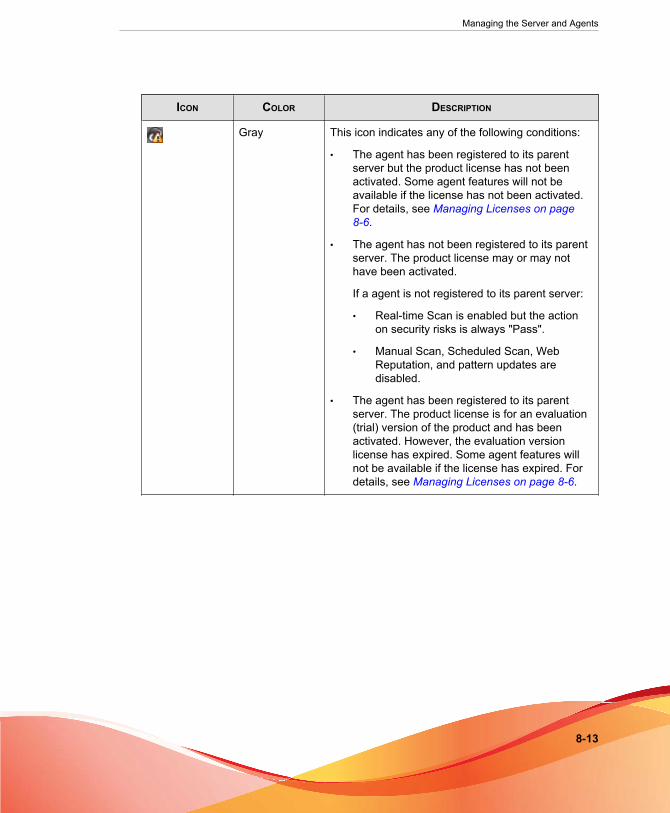
Managing the Server and Agents
8-13
ICON COLOR DESCRIPTION
Gray This icon indicates any of the following conditions:
• The agent has been registered to its parentserver but the product license has not beenactivated. Some agent features will not beavailable if the license has not been activated.For details, see Managing Licenses on page8-6.
• The agent has not been registered to its parentserver. The product license may or may nothave been activated.
If a agent is not registered to its parent server:
• Real-time Scan is enabled but the actionon security risks is always "Pass".
• Manual Scan, Scheduled Scan, WebReputation, and pattern updates aredisabled.
• The agent has been registered to its parentserver. The product license is for an evaluation(trial) version of the product and has beenactivated. However, the evaluation versionlicense has expired. Some agent features willnot be available if the license has expired. Fordetails, see Managing Licenses on page 8-6.


9-1
Chapter 9
Getting HelpThis chapter describes troubleshooting issues that may arise and how to contactsupport.
Trend Micro Security (for Mac) Administrator’s Guide
9-2
Troubleshooting
Web Console AccessProblem:
The web console cannot be accessed.
Procedure
1. Check if the computer meets the requirements for installing and running TrendMicro Security (for Mac) server. For details, see Server Installation Requirements on page2-2.
2. Check if the following services have been started:
• ActiveMQ for Trend Micro Security
• OfficeScan Plug-in Manager
• SQL Server (TMSM)
• Trend Micro Security for (Mac)
3. Collect debug logs. Use 'error' or 'fail' as keyword when performing a search on thelogs.
• Installation logs: C:\TMSM*.log
• General debug logs: <Server installation folder>\debug.log
• OfficeScan debug logs: C:\Program Files\Trend Micro\OfficeScan\PCCSRV\Log\ofcdebug.log
a. If the file does not exist, enable debug logging. On the banner of theOfficeScan web console, click the first "c" in "OfficeScan", specifydebug log settings, and click Save.
b. Reproduce the steps that led to the web console access problem.
c. Obtain the debug logs.
Getting Help
9-3
4. Check the Trend Micro Security (for Mac) registry keys by navigating toHKEY_LOCAL_MACHINE\SOFTWARE\TrendMicro\TMSM.
5. Check the database files and registry keys.
a. Check if the following files exist under C:\Program Files\MicrosoftSQL Server\MSSQL.x\MSSQL\Data\:
• db_TMSM.mdf
• db_TMSM_log.LDF
b. Check if the Trend Micro Security (for Mac) database instance on theMicrosoft SQL server registry key exists:
• HKEY_LOCAL_MACHINE\SOFTWARE\Microsoft\Microsoft SQLServer\Instance Names
• HKEY_LOCAL_MACHINE\SOFTWARE\Microsoft\Microsoft SQLServer\MSSQL.x\MSSQLServer\CurrentVersion
6. Send the following to Trend Micro:
• Registry files
a. Navigate to HKEY_LOCAL_MACHINE\SOFTWARE\Microsoft\Microsoft SQL server\TMSM.
b. Click File > Export and then save the registry key to a .reg file.
• Server computer information
• Operating system and version
• Available disk space
• Available RAM
• Whether other plug-in programs, such as Intrusion Defense Firewall, isinstalled
7. Restart the Trend Micro Security (for Mac) services.
a. Navigate to the <Server installation folder>.
Trend Micro Security (for Mac) Administrator’s Guide
9-4
b. Double-click restart_TMSM.bat.
c. Wait until all the services have restarted.
8. The Trend Micro Security (for Mac) service should always be running. If thisservice is not running, there may be a problem with the ActiveMQ service.
a. Back up ActiveMQ data in C:\Program Files\Trend Micro\OfficeScan\Addon\TMSM\apache-activemq\data\*.*.
b. Delete the ActiveMQ data.
c. Try to restart the Trend Micro Security (for Mac) service by double-clickingrestart_TMSM.bat.
d. Try to access the web console again to check if the access problem has beenresolved.
Server Uninstallation
Problem:
The following message displays:
Unable to uninstall the plug-in program. The uninstallationcommand for the plug-in program is missing in the registry key.
Procedure
1. Open registry editor and navigate to HKEY_LOCAL_MACHINE\SOFTWARE\TrendMicro\OfficeScan\service\AoS\OSCE_Addon_Service_CompList_Version.
2. Reset the value to 1.0.1000.
3. Delete the plug-in program registry key; for example, HKEY_LOCAL_MACHINE\SOFTWARE\TrendMicro\OfficeScan\service\AoS\OSCE_ADDON_xxxx.
4. Restart the OfficeScan Plug-in Manager service.

Getting Help
9-5
5. Download, install, and then uninstall the plug-in program.
Agent Installation
Problem:
The installation was unsuccessful. The installation package (tmsminstall.zip ortmsminstall.mpkg.zip) was launched using an archiving tool not built-in on theMac or through an unsupported command (such as unzip) issued from a command-line tool, causing the extracted folder (tmsminstall) or file (tmsminstall.mpkg) tobecome corrupted.
Procedure
1. Remove the extracted folder (tmsminstall) or file (tmsminstall.mpkg).
2. Launch the installation package again using a built-in archiving tool such asArchive Utility.
You can also launch the package from the command line by using the followingcommand:
• If the package is tmsminstall.zip:
ditto –xk <tmsminstall.zip file path> <destinationfolder>
For example:
Trend Micro Security (for Mac) Administrator’s Guide
9-6
ditto –xk users/mac/Desktop/tmsminstall.zip users/mac/Desktop
• If the package is tmsminstall.mpkg.zip:
ditto –xk <tmsminstall.mpkg.zip file path> <destinationfolder>
For example:
ditto –xk users/mac/Desktop/tmsminstall.mpkg.zipusers/mac/Desktop
General Agent ErrorProblem:
An error or problem was encountered on the agent.
Procedure
1. Open <Agent installation folder>/Tools and launch Trend Micro Debug Manager.
2. Follow the on-screen instructions in the tool to successfully collect data.
WARNING!The tool will not work if a user moves it to a different location on the Mac computer.If the tool has been moved, uninstall and then install the Trend Micro Security (forMac) agent.
If the tool was copied to another location, remove the copied version and then runthe tool from its original location.
The Trend Micro Knowledge BaseThe Trend Micro Knowledge Base, maintained at the Trend Micro website, has themost up-to-date answers to product questions. You can also use Knowledge Base to
Getting Help
9-7
submit a question if you cannot find the answer in the product documentation. Accessthe Knowledge Base at:
http://esupport.trendmicro.com/en-us/business/default.aspx
Trend Micro updates the contents of the Knowledge Base continuously and adds newsolutions daily. If you are unable to find an answer, however, you can describe theproblem in an email and send it directly to a Trend Micro support engineer who willinvestigate the issue and respond as soon as possible.
Contacting Technical SupportTrend Micro provides technical support, pattern downloads, and program updates forone year to all registered users, after which you must purchase renewal maintenance. Ifyou need help or just have a question, please feel free to contact us. We also welcomeyour comments.
Worldwide support offices:
http://www.trendmicro.com/support
Trend Micro product documentation:
http://docs.trendmicro.com/en-us/home.aspx
Speeding Up Your Support CallWhen you contact Trend Micro, to speed up your problem resolution, ensure that youhave the following details available:
• Microsoft Windows and Service Pack versions
• Network type
• Computer brand, model, and any additional hardware connected to your computer
• Amount of memory and free hard disk space on your computer
• Detailed description of the install environment
Trend Micro Security (for Mac) Administrator’s Guide
9-8
• Exact text of any error message given
• Steps to reproduce the problem
Contact InformationIn the United States, you can reach the Trend Micro representatives through phone, fax,or email:
Trend Micro, Inc. 10101 North De Anza Blvd., Cupertino, CA 95014
Toll free: +1 (800) 228-5651 (sales) Voice: +1 (408) 257-1500 (main) Fax: +1 (408)257-2003
Web address: www.trendmicro.com
Email: [email protected]
Security Information CenterComprehensive security information is available at the Trend Micro website:
• List of viruses and malicious mobile code currently "in the wild," or active
• Computer virus hoaxes
• Internet threat advisories
• Virus weekly report
• Virus Encyclopedia, which includes a comprehensive list of names and symptomsfor known viruses and malicious mobile code
http://about-threats.trendmicro.com/threatencyclopedia.aspx
• Glossary of terms
Getting Help
9-9
TrendLabsTrendLabsSM is the global antivirus research and support center of Trend Micro.Located on three continents, TrendLabs has a staff of more than 250 researchers andengineers who operate around the clock to provide you, and every Trend Microcustomer, with service and support.
You can rely on the following post-sales service:
• Regular virus pattern updates for all known "zoo" and "in-the-wild" computerviruses and malicious codes
• Emergency virus outbreak support
• Email access to antivirus engineers
• Knowledge Base, the Trend Micro online database of technical support issues
TrendLabs has achieved ISO 9002 quality assurance certification.
Documentation FeedbackTrend Micro always seeks to improve its documentation. If you have questions,comments, or suggestions about this or any Trend Micro document, please go to thefollowing site:
http://www.trendmicro.com/download/documentation/rating.asp


A-1
Appendix A
IPv6 Support in Trend Micro Security(for Mac)
This appendix is required reading for users who plan to deploy Trend Micro Security(for Mac) in an environment that supports IPv6 addressing. This appendix containsinformation on the extent of IPv6 support in Trend Micro Security (for Mac).
Trend Micro assumes that the reader is familiar with IPv6 concepts and the tasksinvolved in setting up a network that supports IPv6 addressing.
Trend Micro Security (for Mac) Administrator’s Guide
A-2
IPv6 Support for Trend Micro Security (forMac) Server and Agents
IPv6 support for Trend Micro Security (for Mac) started in version 2.0. Earlier TrendMicro Security (for Mac) versions do not support IPv6 addressing. IPv6 support isautomatically enabled after installing or upgrading the Trend Micro Security (for Mac)server and agents that satisfy the IPv6 requirements.
Trend Micro Security (for Mac) Server IPv6Requirements
Trend Micro Security (for Mac) server must be installed with an OfficeScan serverversion that supports IPv6.
IPv6 support in OfficeScan started in version 10.6. Earlier OfficeScan versions that arecompatible with Trend Micro Security (for Mac) (see Server Installation Requirements on page2-2) do not support IPv6 addressing.
See the OfficeScan 10.6 or later documentation for details about IPv6 support.
Trend Micro Security (for Mac) Agent IPv6Requirements
All Mac OS X versions supported by the Trend Micro Security (for Mac) agent alsosupport IPv6.
It is preferable for the agent to have both IPv4 and IPv6 addresses as some of theentities to which it connects only support IPv4 addressing.
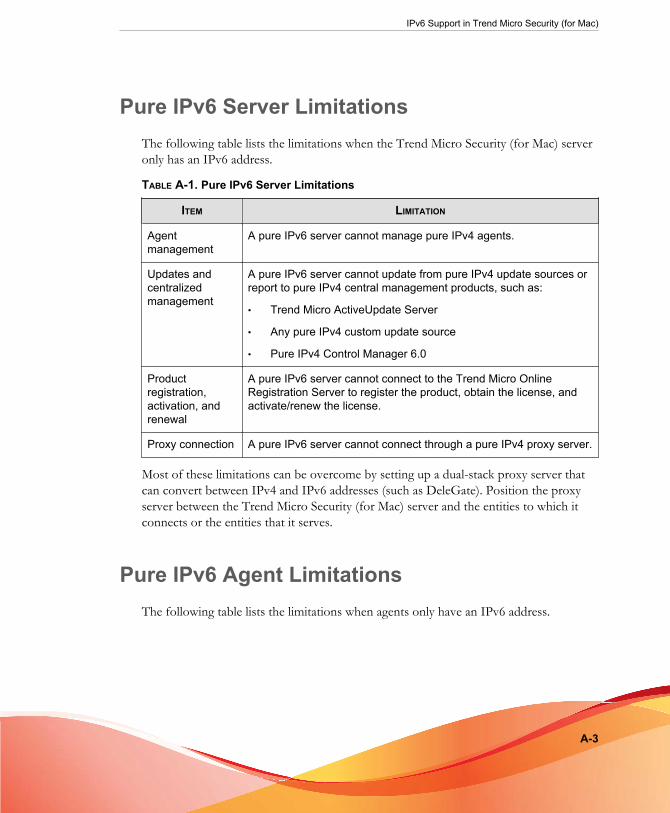
IPv6 Support in Trend Micro Security (for Mac)
A-3
Pure IPv6 Server LimitationsThe following table lists the limitations when the Trend Micro Security (for Mac) serveronly has an IPv6 address.
TABLE A-1. Pure IPv6 Server Limitations
ITEM LIMITATION
Agentmanagement
A pure IPv6 server cannot manage pure IPv4 agents.
Updates andcentralizedmanagement
A pure IPv6 server cannot update from pure IPv4 update sources orreport to pure IPv4 central management products, such as:
• Trend Micro ActiveUpdate Server
• Any pure IPv4 custom update source
• Pure IPv4 Control Manager 6.0
Productregistration,activation, andrenewal
A pure IPv6 server cannot connect to the Trend Micro OnlineRegistration Server to register the product, obtain the license, andactivate/renew the license.
Proxy connection A pure IPv6 server cannot connect through a pure IPv4 proxy server.
Most of these limitations can be overcome by setting up a dual-stack proxy server thatcan convert between IPv4 and IPv6 addresses (such as DeleGate). Position the proxyserver between the Trend Micro Security (for Mac) server and the entities to which itconnects or the entities that it serves.
Pure IPv6 Agent LimitationsThe following table lists the limitations when agents only have an IPv6 address.
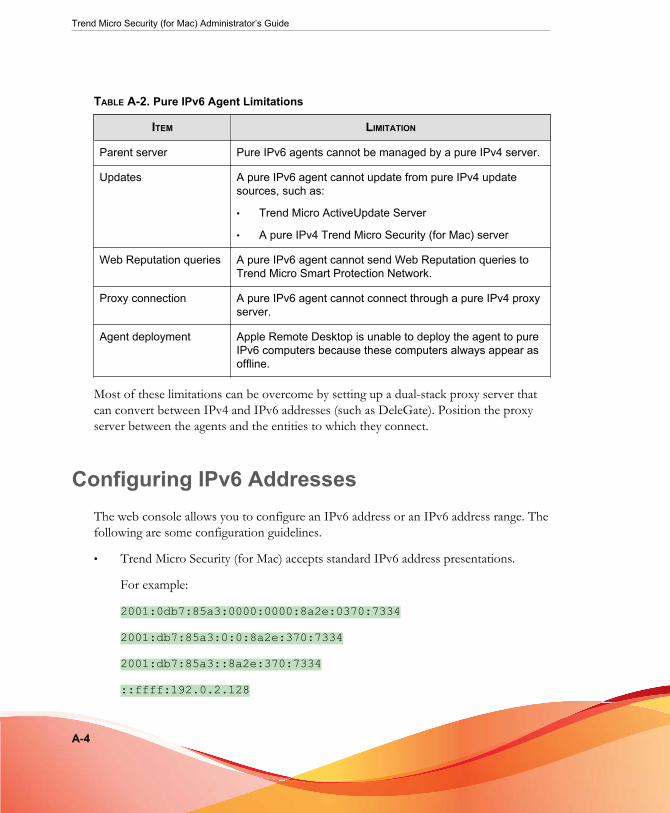
Trend Micro Security (for Mac) Administrator’s Guide
A-4
TABLE A-2. Pure IPv6 Agent Limitations
ITEM LIMITATION
Parent server Pure IPv6 agents cannot be managed by a pure IPv4 server.
Updates A pure IPv6 agent cannot update from pure IPv4 updatesources, such as:
• Trend Micro ActiveUpdate Server
• A pure IPv4 Trend Micro Security (for Mac) server
Web Reputation queries A pure IPv6 agent cannot send Web Reputation queries toTrend Micro Smart Protection Network.
Proxy connection A pure IPv6 agent cannot connect through a pure IPv4 proxyserver.
Agent deployment Apple Remote Desktop is unable to deploy the agent to pureIPv6 computers because these computers always appear asoffline.
Most of these limitations can be overcome by setting up a dual-stack proxy server thatcan convert between IPv4 and IPv6 addresses (such as DeleGate). Position the proxyserver between the agents and the entities to which they connect.
Configuring IPv6 AddressesThe web console allows you to configure an IPv6 address or an IPv6 address range. Thefollowing are some configuration guidelines.
• Trend Micro Security (for Mac) accepts standard IPv6 address presentations.
For example:
2001:0db7:85a3:0000:0000:8a2e:0370:7334
2001:db7:85a3:0:0:8a2e:370:7334
2001:db7:85a3::8a2e:370:7334
::ffff:192.0.2.128

IPv6 Support in Trend Micro Security (for Mac)
A-5
• Trend Micro Security (for Mac) also accepts link-local IPv6 addresses, such as:
fe80::210:5aff:feaa:20a2
WARNING!Exercise caution when specifying a link-local IPv6 address because even thoughTrend Micro Security (for Mac) can accept the address, it might not work as expectedunder certain circumstances. For example, agents cannot update from an updatesource if the source is on another network segment and is identified by its link-localIPv6 address.
• When the IPv6 address is part of a URL, enclose the address in square brackets.
• For IPv6 address ranges, a prefix and prefix length are usually required.
Screens That Display IP AddressesThe agent tree displays the IPv6 addresses of agents under the IPv6 Address column.


B-1
Appendix B
Product Terminology and ConceptsThe items contained in this appendix provide further information about Trend Microproducts and technologies.
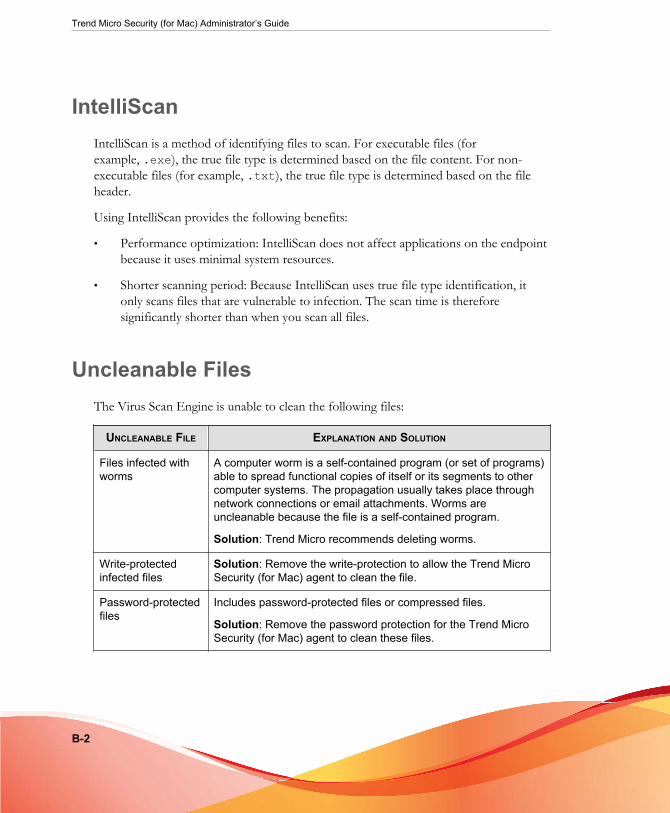
Trend Micro Security (for Mac) Administrator’s Guide
B-2
IntelliScanIntelliScan is a method of identifying files to scan. For executable files (forexample, .exe), the true file type is determined based on the file content. For non-executable files (for example, .txt), the true file type is determined based on the fileheader.
Using IntelliScan provides the following benefits:
• Performance optimization: IntelliScan does not affect applications on the endpointbecause it uses minimal system resources.
• Shorter scanning period: Because IntelliScan uses true file type identification, itonly scans files that are vulnerable to infection. The scan time is thereforesignificantly shorter than when you scan all files.
Uncleanable FilesThe Virus Scan Engine is unable to clean the following files:
UNCLEANABLE FILE EXPLANATION AND SOLUTION
Files infected withworms
A computer worm is a self-contained program (or set of programs)able to spread functional copies of itself or its segments to othercomputer systems. The propagation usually takes place throughnetwork connections or email attachments. Worms areuncleanable because the file is a self-contained program.
Solution: Trend Micro recommends deleting worms.
Write-protectedinfected files
Solution: Remove the write-protection to allow the Trend MicroSecurity (for Mac) agent to clean the file.
Password-protectedfiles
Includes password-protected files or compressed files.
Solution: Remove the password protection for the Trend MicroSecurity (for Mac) agent to clean these files.
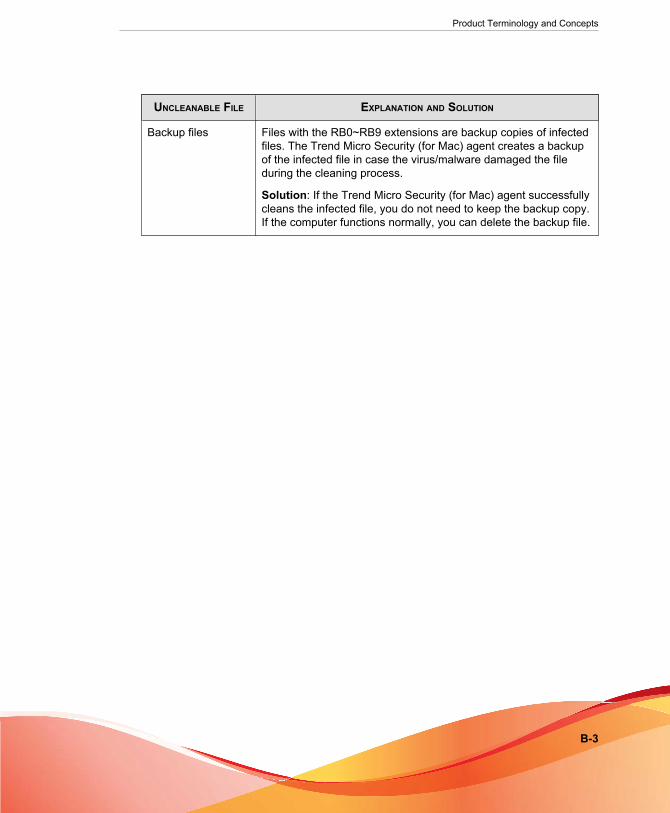
Product Terminology and Concepts
B-3
UNCLEANABLE FILE EXPLANATION AND SOLUTION
Backup files Files with the RB0~RB9 extensions are backup copies of infectedfiles. The Trend Micro Security (for Mac) agent creates a backupof the infected file in case the virus/malware damaged the fileduring the cleaning process.
Solution: If the Trend Micro Security (for Mac) agent successfullycleans the infected file, you do not need to keep the backup copy.If the computer functions normally, you can delete the backup file.

IN-1
IndexAagent tree, 3-4
general tasks, 3-4
Ccomponents, 3-11contacting, 9-6–9-9
documentation feedback, 9-9Knowledge Base, 9-6technical support, 9-7Trend Micro, 9-6–9-9
Control Manager integration, 8-9CPU usage, 6-11
Ddocumentation feedback, 9-9
IIntelliScan, 6-10IPv6 support, A-2
limitations, A-3
KKnowledge Base, 9-6
Pperformance control, 6-11programs, 3-11
Sscan criteria
CPU usage, 6-11files to scan, 6-10schedule, 6-12user activity on files, 6-10
scan types, 6-5
Security Information Center, 9-8
Ttechnical support, 9-7TrendLabs, 9-9Trend Micro
contact information, 9-8Knowledge Base, 9-6Security Information Center, 9-8TrendLabs, 9-9
Vvirus/malware scan
results, 6-26
Wweb console, 3-2
about, 3-2web threats, 7-2widgets, 3-9, 3-11, 3-12


