49
Corporate Online. Using Agency Effective as at April 2015
| Date post: | 06-Jun-2018 |
| Category: |
Documents |
| Upload: | nguyenkhanh |
| View: | 213 times |
| Download: | 0 times |

Corporate
Online. Using Agency
Effective as at April 2015

Westpac Corporate Online is an internet-based electronic platform, providing a single point
of entry to a suite of online transactional services specifically designed for major Australian,
New Zealand and international corporations and government bodies.
By working closely with customers like you, Westpac has developed Corporate Online as a
portal environment that delivers greater control, productivity and flexibility to your business.
Control how your organisation uses Corporate Online, including which applications and
features staff members can use and which accounts and services they have access to.
Increase productivity by getting straight to work with Corporate Online’s easy-to-use
interface and simple workflows.
Use Corporate Online’s flexibility to create a setup that matches your business needs and can
grow and change as your business does.
Corporate Online employs a “best of breed” security model, using a range of protective
technologies to guard your organisation’s information and to assist you in better managing
the risks of fraudulent activity. These include 128bit encryption and SecurID® Tokens
For detailed information on Corporate Online’s extensive security features, please ask your
Westpac relationship manager.
This user guide forms part of your Agreement with us and provides information for your use
of this product within Westpac Corporate Online.
This user guide describes how to use the features of the Agency application. It does not
provide any information regarding your obligations as a participant in the Australian Paper
Clearing System (APCS) or the Bulk Electronic Clearing System (BECS). For more
information on your obligations contact your Westpac relationship manager, or the
Australian Payments Clearing Association (APCA).
Certain words used throughout the user guide may have a defined meaning in the Glossary.
Copyright © 2015 Westpac Banking Corporation ABN 33 007 457 141 AFSL and
Australian credit licence 233714.


This guide describes how to use the Agency functionality of Westpac Corporate Online.
It is one of a suite of guides that cover the wide range of applications and features that are
available through Corporate Online.
Where can I find a copy of this guide?
The most up-to-date versions of this and other Corporate Online user guides can be found on
the User Guides page of Corporate Online.
If you must print this document, always download the PDF from Corporate Online then print
from that: don’t print a saved PDF or photocopy a paper copy as it may not be current.
What else should I read?
As well as reading this guide, we strongly recommend you read Introducing Corporate
Online, which covers topics such as logging on and security.

Corporate Online Agency provides the functionality that allows organisations to export their
daily transaction files for the following Australian payment systems:
Bulk Electronic Clearing System (BECS) aka Clearing System 2 (CS2)
Australian Paper Clearing System (APCS) aka Clearing System 1 (CS1).
Agency also allows for the creation or import of files containing dishonours, returns, and
refusals, and the ability to view voucher images for transactions in these clearing systems.
Agency uses the same basic features and workflows for working with electronic transactions
in both clearing systems.
The Agency application is broken down into features to allow your organisation to manage
which tasks can be performed by which users (according to their job role). The features are:
Feature (as allocated
in Administration)
which allows you to…
Transaction
information View and print APCS and BECS Agency transaction
information — see Viewing Agency Transactions on page 11.
Voucher
images
View voucher images for paper-based Agency transactions (e.g.
cheques, deposit slips), where available, via the transaction
information screens. — see Procedure: Viewing a voucher
image for an Agency transaction on page 14.
Settlement reports View and print daily settlement reports — see Viewing End of
Day Settlement Reports on page 17.
Create file Initiate the return, dishonour, or refusal of Agency transactions
by creating a returns or dishonour file within Corporate Online.
— see Procedure: Creating an Agency file on page 29.
Import file Import return or dishonour files created by your own systems
and send them for processing.
— see Procedure: Importing an Agency file on page 25.
Export Export Agency transactions made available overnight for upload
into your own systems
— see Procedure: Exporting Agency Files on page 18.
To use any of these features a user requires access to the feature and as well as to an office
and a BSB. To return bulk electronic (Direct Entry) transactions you also need a Direct
Entry return ID. This access is managed in the Administration application by your
organisation’s Corporate Online administrator.
New Corporate Online Offices can also be created by your organisation’s Corporate Online
Administrators.
If your BSB or Direct Entry return ID has not been loaded in Corporate Online, please
contact your Westpac relationship manager for assistance.
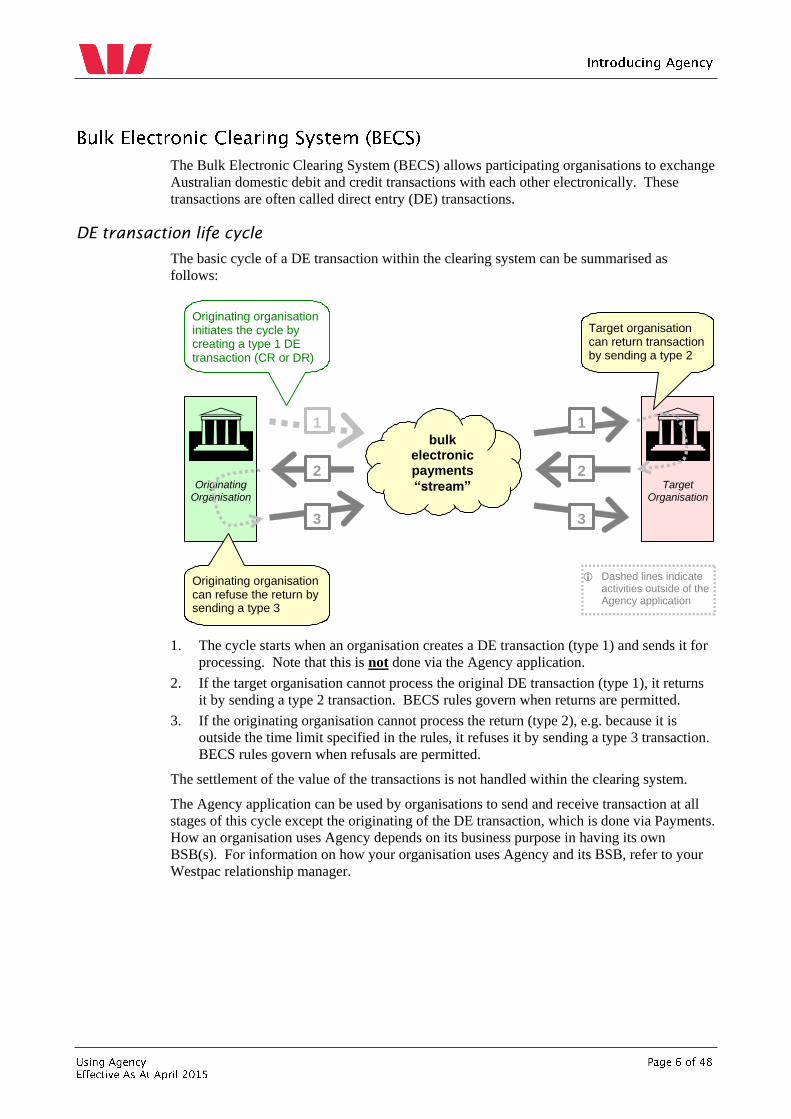
The Bulk Electronic Clearing System (BECS) allows participating organisations to exchange
Australian domestic debit and credit transactions with each other electronically. These
transactions are often called direct entry (DE) transactions.
DE transaction life cycle
The basic cycle of a DE transaction within the clearing system can be summarised as
follows:
Originating Organisation
bulk electronic payments
“stream”
Target Organisation
Originating organisation initiates the cycle by creating a type 1 DE transaction (CR or DR)
Target organisation can return transaction by sending a type 2
Originating organisation can refuse the return by sending a type 3
1 1
2 2
3 3
Dashed lines indicate activities outside of the Agency application
1. The cycle starts when an organisation creates a DE transaction (type 1) and sends it for
processing. Note that this is not done via the Agency application.
2. If the target organisation cannot process the original DE transaction (type 1), it returns
it by sending a type 2 transaction. BECS rules govern when returns are permitted.
3. If the originating organisation cannot process the return (type 2), e.g. because it is
outside the time limit specified in the rules, it refuses it by sending a type 3 transaction.
BECS rules govern when refusals are permitted.
The settlement of the value of the transactions is not handled within the clearing system.
The Agency application can be used by organisations to send and receive transaction at all
stages of this cycle except the originating of the DE transaction, which is done via Payments.
How an organisation uses Agency depends on its business purpose in having its own
BSB(s). For information on how your organisation uses Agency and its BSB, refer to your
Westpac relationship manager.
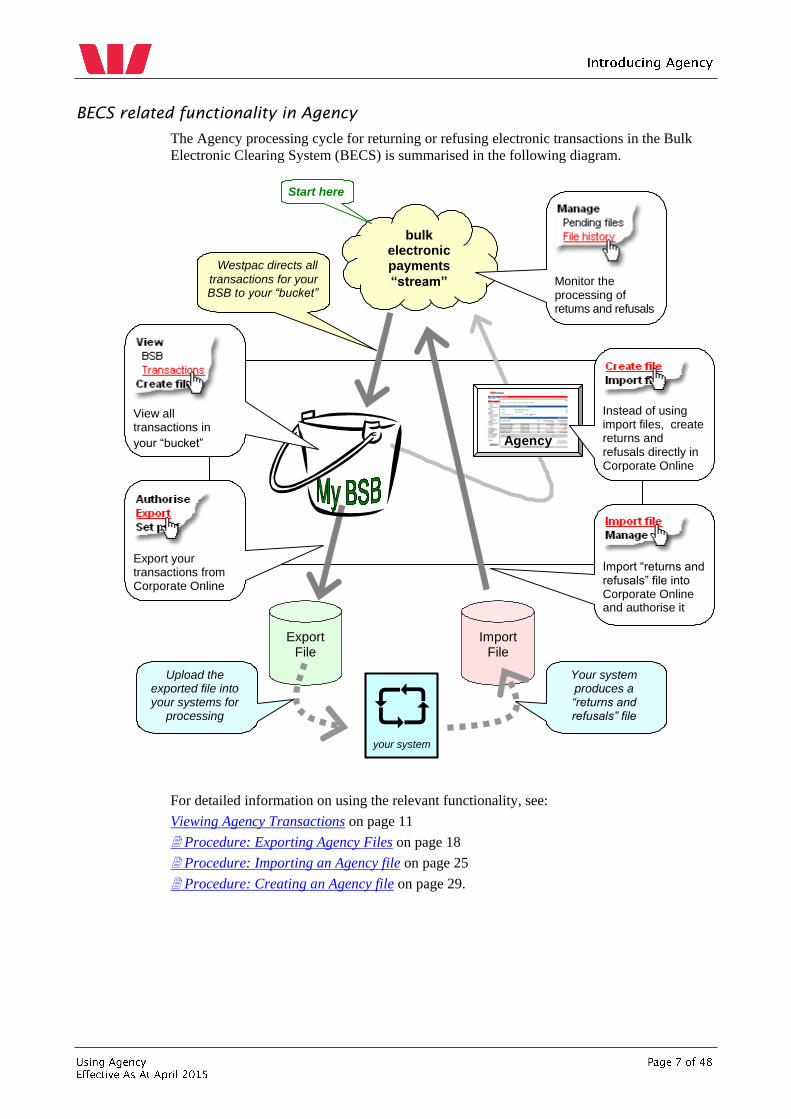
BECS related functionality in Agency
The Agency processing cycle for returning or refusing electronic transactions in the Bulk
Electronic Clearing System (BECS) is summarised in the following diagram.
Export File
bulk electronic payments
“stream”
Import File
Westpac directs all
transactions for your BSB to your “bucket”
your system
Upload the exported file into your systems for
processing
Export your transactions from Corporate Online
Import “returns and refusals” file into Corporate Online and authorise it
Your system produces a “returns and refusals” file
Agency
Instead of using import files, create returns and refusals directly in Corporate Online
View all transactions in
your “bucket”
Start here
Monitor the processing of returns and refusals
For detailed information on using the relevant functionality, see:
Viewing Agency Transactions on page 11
Procedure: Exporting Agency Files on page 18
Procedure: Importing an Agency file on page 25
Procedure: Creating an Agency file on page 29.

The Australian Paper Clearing System (APCS) allows participating financial institutions to
exchange Australian domestic paper-based transactions (e.g. cheques) with each other.
These transactions are presented electronically and are processed overnight.
Electronically presented paper-based transaction life cycle
The basic life cycle for a paper-based transaction can be summarised as follows:
Originating Organisation
paper based
payments
“stream”
Target Organisation
Originating organisation initiates the cycle by creating a type 1010 transaction for a paper-voucher it has received
1010
1011 1011
1012 1012
Target organisation can dishonour transaction by sending a type 1011
Originating organisation can refuse the dishonour by sending a type 1012
1010 The cycle starts when an organisation creates a type 1010 transaction for a paper-
voucher it has received and sends it for processing. Note that this is not done via the
Agency application.
1011 If the target organisation cannot process the original type 1010 transaction, it
dishonours it by sending a type 1011 transaction. APCS rules govern when
dishonours are permitted.
1012 If the originating organisation cannot process the dishonour, e.g. because it is outside
the time limit specified in the rules, it refuses it by sending a type 1012 transaction.
APCS rules govern when refusals are permitted.
The settlement of the value of the transactions is not handled within the clearing system.
The Agency application can be used by organisations to send and receive transaction at all
stages of this cycle except the originating of the 1010 transaction. How an organisation uses
Agency depends on its business purpose in having its own BSB(s). For information on how
your organisation uses Agency and its BSB, refer to your Westpac relationship manager.

APCS related functionality in Agency
The Agency processing cycle for dishonouring or refusing electronically presented paper-
based transactions in the Australian Paper Clearing System (APCS) is summarised in the
following diagram.
Export File
Australian paper
clearing
“stream”
Import File
Westpac directs all transactions for your BSB to your “bucket”
your system
Upload the exported file into your systems for
processing
Export your transactions from Corporate Online
Import “dishonours and refusals” file into Corporate Online and authorise it
Your system produces a
“dishonours and refusals” file
Agency
Instead of using import files, create dishonours and refusals directly in Corporate Online
View value and vouchers for all transactions in your “bucket”
Start here
Monitor the processing of dishonours & refusals
For detailed information on using the relevant functionality, see:
Viewing Agency Transactions on page 11.
Procedure: Viewing a voucher image for an Agency transaction on page 14.
Procedure: Exporting Agency Files on page 18
Procedure: Importing an Agency file on page 25.
Procedure: Creating an Agency file on page 29.

Voucher image fees are charged per voucher and per search (for the detailed list of
transactions making up a credit transaction). Before a fee is incurred, Corporate Online
displays a warning and asks you to accept the fee. There is no charge for viewing a voucher
a second or subsequent time within seven calendar days of an initial fee-incurring view.
However, searching for and viewing the detailed transaction list again (e.g. to re-access
recently viewed vouchers for a credit transaction) will incur another search fee.
Fees are billed to the office in which the relevant activity occurred.
For more information on Corporate Online fees and charges, refer to the Corporate Online
Terms and Conditions, which is published on the Westpac internet site, or talk to your
Westpac relationship manager.
Note that using Agency functionality and submitting Agency files may incur fees in addition
to those charged by Corporate Online. Contact your Westpac relationship manager for more
information.
Agency transaction information remains available in Corporate Online for 100 business
days. Voucher images are available for as long as the related transactions are available.
Return and dishonour files created in Corporate Online (using the Create file feature) remain
available for 100 business days.
File history remains available for 100 business days.
Export data remains available for export for 100 business days.
To retain Agency data beyond the 100 business day limit, export it and store it in your own
systems (see Procedure: Exporting Agency Files on page 18).
All activities performed by users on files are audited.
To view the audit information for a file, click on the View detailed audit information link
that appears at the bottom of the file summary screens.
Audit information includes the date and time of each event, a description of the activity,
and the name of the user that performed it.
Corporate Online administrators can report on all user activities in Corporate Online.
See the Reporting section in Administering Corporate Online.

Agency allows you to view many types of transactions.
Participants in the Australian Paper Clearing System (APCS) may be able to view the
following transaction types:
electronically presented transactions (1010)
electronically dishonoured transactions (1011)
electronically refused transactions (1012)
voucher required transactions (1510).
Participants in the Bulk Electronic Clearing System (BECS) may be able to view the
following Direct Entry (DE) transactions types:
Original Direct Entry transactions (type 1)
Direct Entry returns (type 2)
Direct Entry refusals (type 3)
manually exchanged transactions (CV).
Transactions in both BECS and APCS can be flagged E for electronic and P for paper.
All the transactions viewed in Agency should be flagged E (electronic), except for BECS
CV transactions which are flagged P (paper).
Use this procedure to browse your Agency transactions. You can browse via the BSB or by
filtering all transactions.
To browse Agency transactions you need:
creator and/or authoriser access to the Agency > Transaction information feature
access to at least one office and BSB.
Start from anywhere in the Agency application:
1. Find a transaction by either drilling down from the BSB or browsing transactions.
Drill down via BSB Browse transactions
(a) From the Agency menu,
Select View > BSB
Corporate Online displays a list of available BSBs.
(a) From the Agency menu,
Select View > Transactions
(b) Click on a BSB link.
Corporate Online displays a list of accounts.
Corporate Online displays a
list of transactions.
Browse the list, filter it, or
use the search function to
locate the transaction.
(c) Click on an Account link

Drill down via BSB Browse transactions
Corporate Online displays a list of transactions.
(d) Click on a transaction link
(b) Click on a transaction link
Corporate Online displays
the transaction details.
Corporate Online displays the transaction details. For example:
The fields displayed depend on the transaction type.
For paper-based transactions, voucher images may be available.
See Procedure: Viewing a voucher image for an Agency transaction on page 14.
The view screens in Agency includes a search button to allow you to search for one
transaction or a group of transactions.
To search for transactions:
1. Click the Search button (at the bottom of the screen).

Corporate Online displays the Transaction list search screen.
2. Enter office and BSB to search, plus any additional search criteria.
Field Notes
Office From the drop-down list, select the office that contains the BSB
you want to search.
BSB Select the BSB to search.
Date Use the calendars ( ) to set a date range.
Account Enter the account number (issued by the Agency)
Transaction type Select a transaction type (credit or debit) from the drop-down list
Type Select the type (1010, DE Type 1, etc) from the drop down list
Serial number Enter the transaction’s serial number
Lodgement reference Enter the transaction’s lodgement reference number
Transaction code Enter the transaction code
Trace number Enter a trace number
Trace BSB Enter the trace BSB (i.e. where the cheque was deposited)
Voucher indicator Select the voucher indicated (paper, delayed etc.) from the drop
down list
Amount Enter either a specific amount to search or a range of amounts.
3. Click the Submit button.
Corporate Online displays transactions matching the search criteria on the Transaction list
screen.
4. Perform one of the following actions:
To view a particular transaction’s details, click a transaction link. For example:
Corporate Online displays the transaction.
Click the Back button to return to the search results screen.
To clear the search criteria, click the Clear button.
Corporate Online clears the search criteria, then redisplays the screen and shows all
transactions for the list filter (office, BSB, and dates).

Use this procedure to view the voucher image(s) associated with a paper-based Agency
transaction.
Corporate Online’s Voucher imaging feature allows you to view and print an image of the
paper vouchers associated with transactions. Both sides of the voucher are displayed.
Viewing voucher images incurs a fee. Corporate Online asks you to confirm that you want
to perform an action that incurs a fee.
The vouchers are presented for viewing as PDFs, which can be printed, saved, and emailed.
To view voucher images for Agency transactions you need:
creator and/or authoriser access to both the Agency > Transaction information feature
and the Agency > Voucher images feature.
access to at least one office and BSB.
Start from anywhere in the Agency application:
1. Find a transaction by either drilling down from the BSB or browsing transactions.
Drill down via BSB Browse transactions
(a) From the Agency menu,
Select View > BSB
Corporate Online displays a list of available BSBs.
(a) From the Agency menu,
Select View > Transactions
(b) Click on a BSB link.
Corporate Online displays a list of accounts.
Corporate Online displays a
list of transactions.
Browse the list, filter it, or
use the search function to
locate the transaction.
(c) Click on an Account link
Corporate Online displays a list of transactions.
(d) Click on a transaction link
(b) Click on a transaction link

2. Corporate Online displays the transaction details.
View transaction image shows the voucher for the transaction details displayed.
For a debit, this will usually be a cheque.
For a credit, this will usually be the deposit slip.
For credit transactions, in addition to the credit transaction voucher, you may also be
able to view a detailed list of the transactions that made up the credit if the deposit was
made with Westpac. Vouchers should be available for all paper based transactions in
that list (i.e. for the cheques deposited).
3. Perform one of the following actions:
To view the transaction voucher:
(a) Click the View transaction image link.
Corporate Online displays a fee warning.
(b) Click the OK button to accept the fee.
Corporate Online will display a PDF of the voucher.
Go to step 6.
To view the detailed transaction list:
(a) Click the View detailed transaction list button.

Corporate Online displays a fee warning.
(b) Click the OK button to accept the fee.
Corporate Online displays a detailed transaction list of the transactions that made up the
deposit. For example:
(c) Click the account number link of the transaction you want to view. For example:
Corporate Online displays a fee warning.
(d) Click the OK button to accept the fee.
Corporate Online will display a PDF of the voucher.
Go to step 6.
4. Use the Adobe Reader to view the voucher.
To print the PDF,
click the print icon on the Adobe Reader tool bar.
For more information, see the Adobe Reader’s help and user guides. If you’re viewing a lot
of PDFs, it’s worth spending some time learning how to use Reader’s shortcuts and features.

The Settlement reports feature allows you to view and print your End of Day Settlement
reports for the last 100 business days.
The morning of each business day there will be a settlement report available covering the net
of all of the various transactions types processed across all of your organisation’s BSBs for
the previous business day.
Use this procedure to view end of day settlement reports for your organisation.
To view settlement reports you need access to the Agency > Settlement reports feature.
Start from anywhere in the Agency application:
1. From the Agency menu, Select View > Settlement reports.
Corporate Online displays the View settlement reports screen.
2. Select the dates of the reports to display, then click the Update list button.
Corporate Online displays any reports that match the selection criteria.
3. Click on a report name link.
Corporate Online displays the settlement report. For example:
4. Print the authority as you would any page displayed by your internet browser.
Export allows you to export Agency transaction files out of Corporate Online and save it
onto your network or local drive for further processing by your own systems.
Once the data leaves Corporate Online, you will be responsible for its safe keeping and data
integrity.
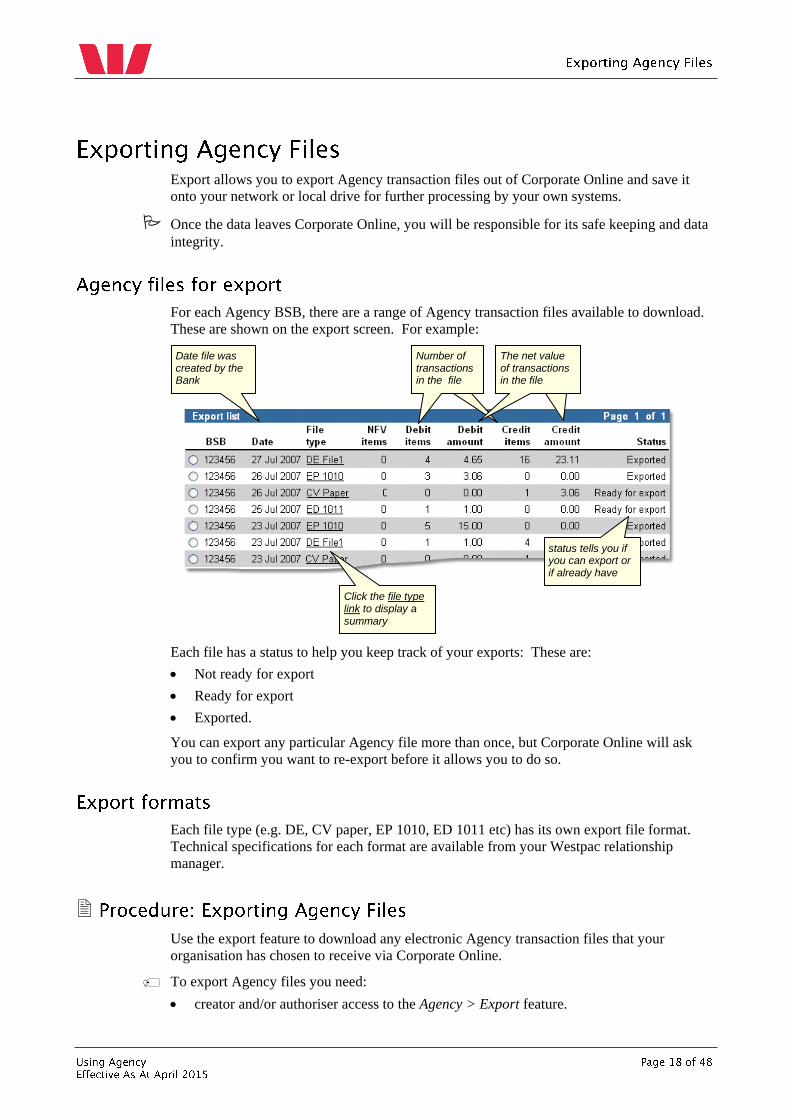
For each Agency BSB, there are a range of Agency transaction files available to download.
These are shown on the export screen. For example:
Date file was created by the Bank
The net value of transactions in the file
status tells you if you can export or if already have
Number of transactions in the file
Number of transactions in the file
The net value of transactions in the file
Click the file type link to display a summary
Each file has a status to help you keep track of your exports: These are:
Not ready for export
Ready for export
Exported.
You can export any particular Agency file more than once, but Corporate Online will ask
you to confirm you want to re-export before it allows you to do so.
Each file type (e.g. DE, CV paper, EP 1010, ED 1011 etc) has its own export file format.
Technical specifications for each format are available from your Westpac relationship
manager.
Use the export feature to download any electronic Agency transaction files that your
organisation has chosen to receive via Corporate Online.
To export Agency files you need:
creator and/or authoriser access to the Agency > Export feature.

access to the office and BSB for the file to be exported.
Start from anywhere in the Agency application:
1. From the left-hand navigation menu, select Agency > Export.
Corporate Online displays the Export screen.
2. Select the office, BSB, file types and dates of the exports to display, then click the Update
list button.
Corporate Online displays any files that match the selection criteria.
You can view a summary of an export file by clicking the File type Link.
For example
3. Select the file to export…
… then click the Export button.
If you have selected any files with a status of Exported, Corporate Online displays a
warning. For example:
Click the OK button to proceed.

4.. Corporate Online displays the Download being processed screen. For example:
Shortly after this, Corporate Online displays a File download dialog. For example:
5. Click the Save button on the File Download dialog.
Corporate Online displays a Save As dialog. For example:
The default name supplied by Corporate Online should be unique.
6. Navigate to the appropriate location on your network or local drive, alter the file name if
appropriate (the one offered is unique), then click the Save button.
Corporate Online exports the data to the specified location. This may take some time,
depending on your internet bandwidth and the size of the file. You can perform other tasks
while the file is downloading. The progress dialog closes when the download is complete.
7. Back on the Download being processed screen, click the OK button.
Corporate Online updates the status of the export to “Exported”. Corporate Online allows
you to re-export files you have already exported, but it will warn you at the time.

The processing of Agency return, dishonour, and refusal files can be initiated by importing a
file created by your own system (see Procedure: Importing an Agency file on page 25
creating a file within Corporate Online (see Procedure: Creating an Agency file on page
29).
All files must be fully authorised before Westpac accepts them for processing (see
Procedure: Authorising an Agency file on page 33)
For the “big picture” of how the features for working with files sit in the Agency transaction
processing cycles, see Bulk Electronic Clearing System (BECS) on page 6 and Australian
Paper Clearing System (APCS) on page 8.
Corporate Online requires that tasks such as create files or import files must be authorised.
To manage the authorisation of tasks, Corporate Online uses the concept of a workflow.
Activities such as importing or creating return and dishonour files then sending them for
processing use workflows. A typical workflow might look like this.
Authorise
file
Create file and send
to authorise
Corporate Online accepts file
for processing
Both imported files and created files use the same workflow.
In the terms of a workflow, the “creator” is the user who either creates a file or imports a file
(which “creates it” in Corporate Online).
How many steps make up a workflow?
The number of steps required to create (or import) and authorise a file in Agency is
determined by the authorisation model chosen by your organisation for Agency.
In Agency, Corporate Online offers two authorisation models:
single authorisation
dual authorisation.
Single is the simplest authorisation model, in business terms. Each file must be created, then
authorised (once), at which time Corporate Online accepts it for processing.
COL accepts
file for processing
Create file and send
to authorise
Authorise file
Dual is the most robust and flexible authorisation model. Each file is created, then goes
through a two-stage authorisation process before being accepted for processing.
2
nd Authorise
file
COL accepts file
for processing
1st Authorise
file
Create file and send
to authorise

Your Corporate Online administrator can tell you which authorisation models your
organisation is using for Agency by running an active profile report for your organisation
(see Administering Corporate Online).
Agency uses the same authorisation model for both creating and importing files. Other
Corporate Online applications (e.g. Administration, Payments) can use different
authorisation models, as per your organisation’s set up.
Who can perform which steps in a workflow?
Corporate Online allows your organisation to restrict what steps users can perform in a
Payments workflow. This defines each user’s role. There are two main roles in a workflow:
creator (who creates or imports a file then sends it to authorise)
authoriser.
Authorise
file
Corporate Online accepts file for
processing
Create file and send
to authorise
Creator Authoriser
In addition, your organisation can determine if individual users can play more than one role
in a particular workflow (i.e. can they be both create/import files and authorise them) and
whether users performing both roles are permitted to authorise the files they themselves have
created or imported (called “self-authorising”).
Authorise
file
Corporate Online makes file
available for use
Create file and send
to authorise
Creator + Self-Authoriser
Users may only create and/or authorise things they have access to. To work on a file, a user
must have access to everything involved in the task, including:
the relevant features (e.g. Create file or Import file)
the office
the BSB
the DE return ID (if applicable).
Your access to these components and your user role is controlled by your organisation’s
Corporate Online administrators.
You will have the same role for both creating and importing files in Agency. Your
Corporate Online administrator can tell you what your role is in Agency.
You may have a different role in other applications (e.g. Administration, Payments).

If your organisation is using dual authorisation, it may choose to restrict which combinations
of authorisers can authorise a particular file. To do this, Corporate Online groups authorisers
into two groups: primary authorisers and secondary authorisers. Your organisation then
determines which combinations are permitted (e.g. any two authorisers, one primary plus
one secondary authoriser, one primary authoriser plus any other authoriser).
Bear in mind that if a “security option” is used, any authoriser can perform the first
authorisation. The security option restricts which authoriser can perform the second
authorisation.
Security options only affect authorisation and do not restrict the actions of creators.
Your Corporate Online administrator can tell you what security options your organisation is
using for Agency by running an active profile report for your organisation (see
Administering Corporate Online). They can also tell you what authority level you have by
running an active profile report for you.

The import file workflow can be summarised as follows:
Status: Part authorised
Status:
Authorised
Status: Unauthorised
Status: Rejected
Status: Error in file
Dual authorisation model only
Status:
Incomplete
Status: File loading
Status: Bank accepted
Corporate Online imports the file and verifies it.
Corporate Online sends the file for bank processing
For the “big picture” of how the features such as import file sit in the Agency transaction
processing cycles, see Bulk Electronic Clearing System (BECS) on page 6 and Australian
Paper Clearing System (APCS) on page 8.

Use this procedure to import an Agency file and send it for authorisation.
To import an Agency file you need:
creator to the Agency > Import file feature
access to an office and a BSB.
To import a file for Direct Entry returns you also need a Direct Entry return ID.
Start from anywhere in the Agency application.
1. From the Agency menu, select Import file
Corporate Online displays the Import file screen.
2. Select the office from the drop down list.
3. To locate the file you want to import, click the Browse button.
Corporate Online displays a Choose dialog. For example:
The dialog may look different depending on your computer’s operating system.
Use the Choose file dialog to locate the file you want to import, then click the Open button
on the dialog.
Corporate Online adds the chosen file name to the import screen.
4. Back on the Import file screen, click the Import file button.

Corporate Online displays a File import progress dialog. For example:
Corporate Online imports the file. The time taken depends on the size of the file.
You can continue using Corporate Online while a file is importing: just be sure not to close
the File import process dialog.
When Corporate Online has finished importing the file, it displays the import status.
Your file must now be sent to authorise.
Click the OK button to close the progress window.
If your input file contained a basic error, Corporate Online displays that on the progress
dialog.
You can either correct your import file details in the system that created the file or
use the amend function on the Pending payments screen.
5. Back on the Import file screen,
click the Go to pending files button.
Corporate Online displays the Pending files screen.
6. Check your file has been imported and has a status of I and is ready to be sent to authorise.
7. Select the file you have imported…
then click the Send to authorise button.

Corporate Online updates the status to Unauthorised.
This file must be fully authorised. See Procedure: Authorising an Agency file on
page 33.
Agency files must be fully authorised by 5.00 pm AEST on a business day for
processing that night.
Most errors detected by Corporate Online when importing Agency files must be fixed in the
system that created the Agency file.
Validation errors detected in imported files can be viewed via the pending files screen. See
Procedure: Working with pending files on page 35.
Typical errors include:
file contains data that does not match the specified format
file is incomplete and headers or trailers are missing or do not match other transactions
the user importing the file does not have access to the BSB or, for DE files, the return ID in
the office they were using to import the file. Your Corporate Online administrators can
grant the relevant access in the appropriate office.
If BSBs or DE return IDs in a file are wrong, the details in the creating system may need to
be updated.

The file creation workflow can be summarised as follows:
Status: Part authorised
Status:
Authorised
Status: Unauthorised
Status: Rejected
Dual authorisation model only
Status: Incomplete
Corporate Online sends the file for bank processing
Status:
Bank accepted
For the “big picture” of how the features such as create file sit in the Agency transaction
processing cycles, see Bulk Electronic Clearing System (BECS) on page 6 and Australian
Paper Clearing System (APCS) on page 8.

Use the Agency’s file creation functionality to create a Returns and Refusals file. One single
file can contain returns and refusals for both electronic transactions (Direct Entry) and
electronically presented paper-based transactions.
Corporate Online will only allow you to create returns or dishonours for transactions you
can access to via Agency. Some transaction types cannot be returned, dishonoured, or
refused; as a result, manual transactions (CV) and refusals (DE type 3 transactions and type
1012 transactions) will not appear on the create file screens.
Each transaction can be returned, dishonoured or refused only once via file creation.
To create an Agency file you need:
creator to the Agency > Create file feature
access to an office and a BSB.
To create a file for Direct Entry returns you also need a Direct Entry return ID.
Start from anywhere in the Agency application.
1. From the Agency menu, select Create file.
Corporate Online displays the Create file – Enter file details screen.
2. Enter the file details…
Field Notes
Office Select the office to create the file in.
Corporate Online takes a moment to add the next field to
the screen.
BSB Select the BSB the transactions are drawn on
Return ID Select the return ID if you are returning Direct Entry
transactions
File name Enter the name of the file the transactions will be created
under
Date The date shown is today or the next available business date.
This cannot be changed
Then click the Continue button.
Corporate Online displays the Choose the transactions to be returned screen.

3. Select the transactions to be returned or refused…
…then click the Update selection button to add the selected transactions to your “returns
and refusals basket”. You will add the return details for each transaction in step 5.
Always click the Update selection button before moving to another page, otherwise the
selected transactions will not be added to your “basket”.
To find particular transactions, use the search and filter features.
4. When you have added all the transactions you want to return or refuse to your “basket”,
click the Continue button.
Note: You can add more transactions to your file later in the process (see step 6)
5. For each transaction you have selected in step 3,
Corporate Online displays the Enter reason screen.
You will see this screen once for every transaction you chose to return in step 3.
Perform one of the following actions:
To include the transaction in your file, select a reason for the return or refusal,
enter additional details that are required (according to the type of transaction),
then click the Save and Continue button.
For paper-based transactions where you have the value but not the matching voucher,
you can choose to request the voucher by clicking the Voucher required button.
To skip a transaction and not include it in the file,
click the Go to next transaction button.
Alternatively, to start over, click the Cancel button.
When you have actioned all transactions in your “basket”,
Corporate Online displays the Summary screen.
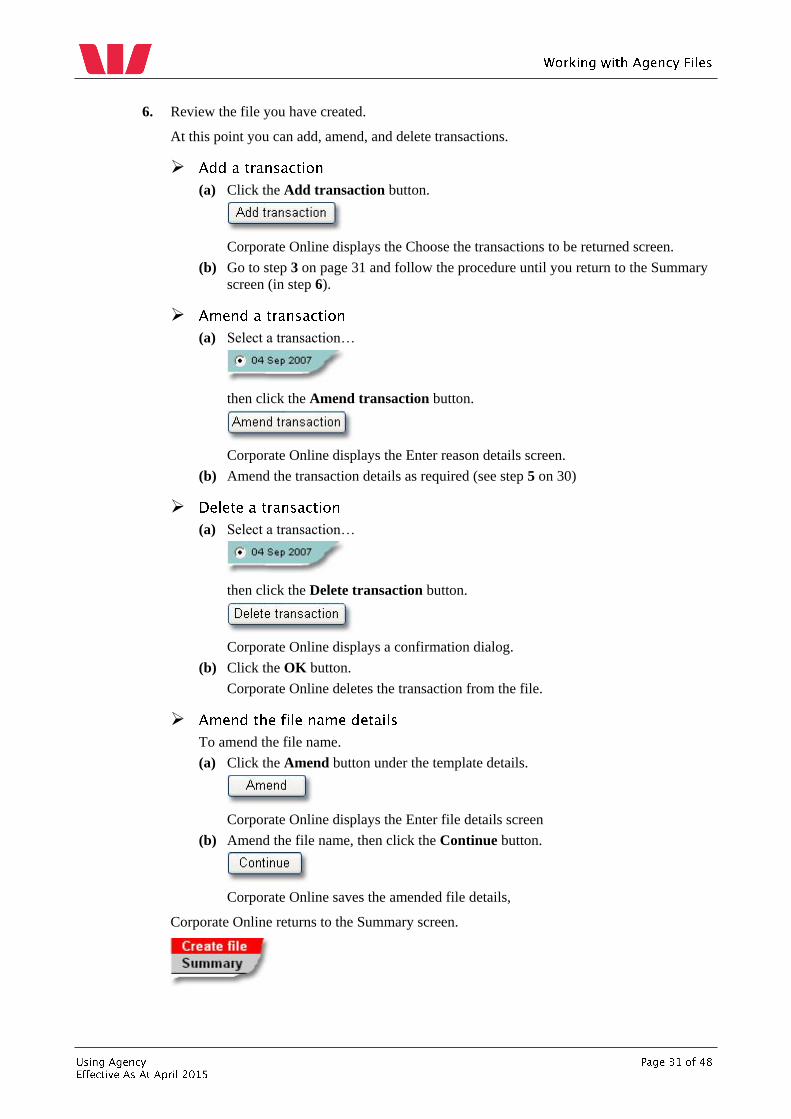
6. Review the file you have created.
At this point you can add, amend, and delete transactions.
(a) Click the Add transaction button.
Corporate Online displays the Choose the transactions to be returned screen.
(b) Go to step 3 on page 31 and follow the procedure until you return to the Summary
screen (in step 6).
(a) Select a transaction…
then click the Amend transaction button.
Corporate Online displays the Enter reason details screen.
(b) Amend the transaction details as required (see step 5 on 30)
(a) Select a transaction…
then click the Delete transaction button.
Corporate Online displays a confirmation dialog.
(b) Click the OK button.
Corporate Online deletes the transaction from the file.
To amend the file name.
(a) Click the Amend button under the template details.
Corporate Online displays the Enter file details screen
(b) Amend the file name, then click the Continue button.
Corporate Online saves the amended file details,
Corporate Online returns to the Summary screen.

7. When you have finished working on the file you have created,
click the Send to authorise button.
Corporate Online updates the status to unauthorised and saves the file details.
This file must be fully authorised. See Procedure: Authorising an Agency file on
page 33.
Agency files must be fully authorised by 5.00 pm AEST on a business day for
processing that night.

Use this procedure to authorise an Agency file so it can be processed.
To authorise an Agency file you need:
authoriser access to Agency > Import file or Agency > Create file feature
access to an office and a BSB.
To authorise a file of Direct Entry returns you also need a Direct Entry return ID.
Your user role (e.g. primary or secondary) may mean you cannot authorise a particular task,
depending on who created it, who first-authorised it, and your organisation’s authorisation
model.
Start from anywhere in the Agency application.
1. From the Agency menu, select Authorise.
Corporate Online displays the Authorise screen.
2. Select the file you want to authorise,
then click the Review before authorising button.
Corporate Online displays the Authorise File information screen.
3. Review the file then click the Authorise now button.
If the current time is before the cut-off time for the type of file you are authorising,
Corporate Online updates the file’s status depending on the authorisation model used
and the previous status of the file.
Authorisation model
for Agency files
File’s status Action
Single
authorisation
Unauthorised Corporate Online updates the file
status to Authorised and sends the file
for processing. Its status will then be
updated to Bank accepted.
Dual
authorisation
Unauthorised
Corporate Online updates the file
status to Partially authorised. This
template must be second authorised
before it can be used.

Authorisation model
for Agency files
File’s status Action
Part authorised Corporate Online updates the file
status to Authorised and sends the file
for processing. Its status will then be
updated to Bank accepted.
If the cut-off time has passed, Corporate Online displays a warning that you have
missed the cut-off. Choose to roll the value date to the next business day, or cancel the
authorisation.
Track the progress of the processing of your file with the File history screen.
To ensure Agency files are processed in a timely manner, Corporate Online imposes a cut-
off time after which it will not accept Agency file submissions.
Agency files must be fully authorised by 5.00 pm AEST on a business day for
processing that night.
Agency files submitted after the cut-off time will be processed the next business day,
providing the returns, dishonours, and refusals are still within the processing time limits
imposed by the Bulk Electronic Clearing System (BECS) or the Australian Paper Clearing
System (APCS). Westpac is not responsible for any items returned “out of time” if they
were authorised after the cut-off time.

The Manage pending payments screen allows you to track the progress of both imported
files and created files through the file workflow (see Import file workflow on page 24) and
Create file workflow on page 28). It also displays any errors detected in the file prior to it
being fully authorised and sent for processing.
Once the file has been accepted by the Bank for processing, follow its progress with the
Manage file history screen (see File History on page 38).
Use this procedure to view or work with pending files.
To perform this procedure you need
creator or authoriser access to Agency > Import file or Agency > Create file feature
access to an office and BSB.
Start from anywhere in the Agency application:
1. From the left-hand navigation menu, select Agency > Manage > Pending files.
Corporate Online displays the Manage pending files screen.
2. If required, set search criteria for the list of reports to display,
then click the Update list button.
Corporate Online displays a list of files that match the search criteria.
3. Perform one or more of the following actions:
Select the file
then click the Send to authorise button.
Corporate Online updates the file’s status to unauthorised.

Click on a file name link.
Corporate Online displays the file information screen.
From there you can view the transactions by clicking on a serial number link.
Select the file
then click the Delete button.
Corporate Online displays the Delete payment file confirmation screen.
Click the Delete now button.
Corporate Online deletes the file.
Only files created within Corporate Online can be amended; they can be amended only
up until they have been sent for authorisation.
To amend a file created using file creation, select the file
then click the Amend button.
Corporate Online displays the file summary screen. See step 6 of Procedure:
Creating an Agency file on page 29.
A file’s status may mean some of these actions cannot be performed.

Corporate Online uses the following Agency file status codes:
File status Description Explanation
B Bank accepted for
processing
The Agency file has been fully authorised and accepted
by the bank for processing. Track the file’s processing
by the Bank with its file history status (see
Procedure: Viewing Agency file on page 38).
D Deleted The Agency file has been deleted and will not be
processed.
E Error in validation
of file
Errors were encountered in the process of importing
(validating). The file will not be processed.
F File loading in
process
The Agency file is in the process of being imported.
I Incomplete -
waiting to be sent
to authorisation
The Agency file has been imported into Corporate
Online or has been created. The file has not yet been
sent for authorisation (see Procedure: Working with
pending files on page 35)
P Partially
authorised
The Agency file has been authorised by one authoriser,
but your organisation’s authorisation model requires a
second authorisation before the Bank will accept the
file for processing (see Procedure: Authorising an
Agency file on page 33).
R Rejected The Agency file has been rejected by one of the
authorisers. If it was imported it must be re-imported.
If it was created within Corporate Online it must be
amended.
U Unauthorised The Agency file has been sent for authorisation but has
not yet been authorised (see Procedure: Authorising
an Agency file on page 33).
The same codes are used for both imported files and created files.
To see how the workflows use file status, refer to the workflow diagrams:
Import file workflow on page 24
Create file workflow on page 28.

File History allows you to track the processing of a file and the transactions within that file
after the file has been accepted for processing by the Bank.
Use this procedure to view the progress of a file and its transactions.
All users with access to Agency > Import files or Agency > Create files can perform this
procedure.
Start from anywhere in the Agency application:
1. From the left-hand navigation menu, select Agency > Manage > File history.
Corporate Online displays the Manage file history screen.
2. If required, set search criteria for the list of files to display,
then click the Update list button.
Corporate Online displays a list of files.
Use this screen to check the file history status of your file.
The file history status codes are listed in the table in Agency file history status codes on
page 39.
3. Click on a file name link.
Corporate Online displays the File details report screen for this file.
Use this screen to check the details of the file, including a summary of any errors.
4. To review an individual transaction, click on the Serial number link.
Corporate Online displays the Agency transaction information screen which displays all of
the transaction’s details including their transaction history status codes.
The transaction history status codes are listed in the table in Agency transaction history
status codes on page 39.

Corporate Online uses the following codes for Agency file history status:
File status Description Explanation
COMPL Processing
completed
The Agency file has been fully processed by the
Bank and all transactions have been sent to the
destination financial institutions.
Corporate Online uses the following codes for Agency transaction history status:
File status Description Explanation
DUPLT Duplicate This transaction has either already been processed or
has been included in another file awaiting
authorisation.
PROCD Processed The Agency file has been processed by the Bank.
UNPRC Unprocessed The Agency file has not been processed by the Bank
at this stage. It may require action by another user
(e.g. authorisation). The file’s “workflow” status
code (see Agency file status codes on page 37) will
describe what action is required.

This section introduces some of the basic skills that apply to many of the screens you will
encounter when using the Agency features.
These basic skills can be used anywhere the feature (e.g. the Print preview button) appears.
They may not be referred to specifically in the procedures.
Many of the screens in the Agency application include a Print Preview button to allow you
to preview then print the details displayed on the screen.
1. Click the Print preview button.
Corporate Online pops up a print preview window. For example:
2. Click the Print this page button.
Your computer pops up a Print dialog. For example:
3. Make the appropriate printer selections and adjustments, then click the Print button.
Your computer should now print the previewed information.
4. Click the Close button.

The only way to enter a date into most Corporate Online screens is by using the pop-up
calendar. Using the calendar ensures you won’t enter dates that are inappropriate for the
context of the screen, e.g. by entering payment value dates for weekends, searching for
transactions too far in the past, etc.
To use the calendar to enter a date:
1. Click on the Calendar icon to the right of the date you want to alter. For example:
Corporate Online displays a calendar pop-up window. For example:
The colour of the individual days on the calendar tells you whether they are appropriate for
the context of the screen you are working on. The calendar takes into account how far in the
past or future a date can be and most holiday restrictions (except for international payments).
2. If required, change the month by using the arrows or the drop-down box at the top of the
pop-up window. For example:
3. Select a valid date by clicking on a black date (or today in red, if permitted). For example:
Corporate Online now displays the date selected. For example:
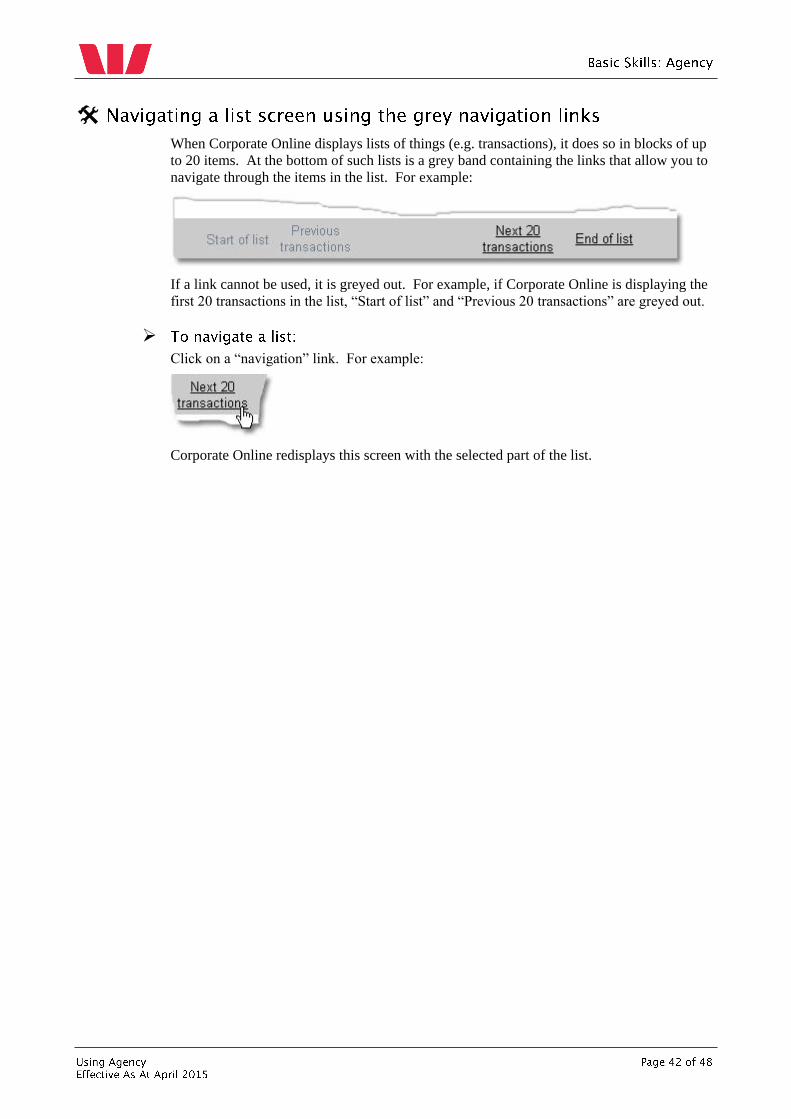
When Corporate Online displays lists of things (e.g. transactions), it does so in blocks of up
to 20 items. At the bottom of such lists is a grey band containing the links that allow you to
navigate through the items in the list. For example:
If a link cannot be used, it is greyed out. For example, if Corporate Online is displaying the
first 20 transactions in the list, “Start of list” and “Previous 20 transactions” are greyed out.
Click on a “navigation” link. For example:
Corporate Online redisplays this screen with the selected part of the list.
Set preferences allow you to set the default values displayed by Agency to the screens,
offices, and BSBs you use the most. This can save you time and hassle.
Each user sets their own preferences. Preferences must be set for each Corporate Online
application (e.g. Agency, Accounts, Payments) individually.
Procedure: Setting Preferences for Agency
Use this procedure to set your preferences for Agency.
All users with access to Agency can perform this procedure.
Start from anywhere in the Agency application.
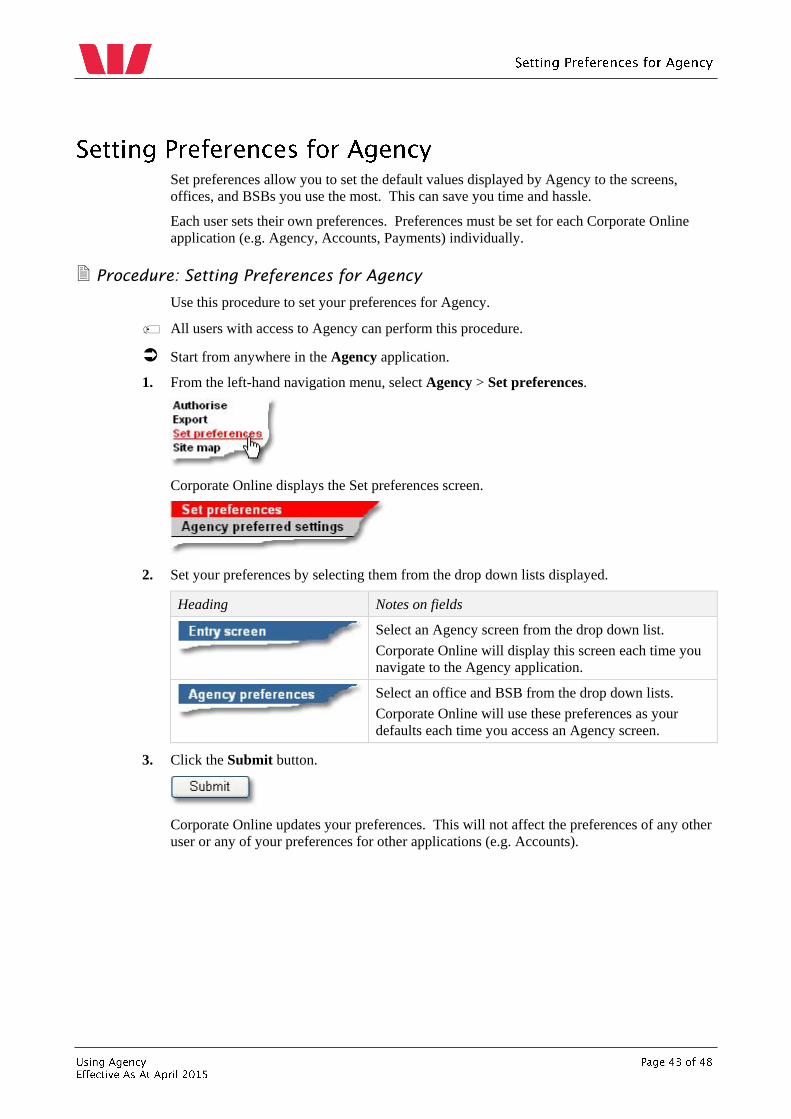
1. From the left-hand navigation menu, select Agency > Set preferences.
Corporate Online displays the Set preferences screen.
2. Set your preferences by selecting them from the drop down lists displayed.
Heading Notes on fields
Select an Agency screen from the drop down list.
Corporate Online will display this screen each time you
navigate to the Agency application.
Select an office and BSB from the drop down lists.
Corporate Online will use these preferences as your
defaults each time you access an Agency screen.
3. Click the Submit button.
Corporate Online updates your preferences. This will not affect the preferences of any other
user or any of your preferences for other applications (e.g. Accounts).

The following terms are used in the Corporate Online user guides.
Administration is a Corporate Online application that allows administrators to manage a
Corporate Online setup, including the creation of users, on behalf of an organisation.
Adobe® Reader is a piece of software that allows you to view and print a PDF file.
Adobe Reader is available for free from Adobe’s website (www.adobe.com).
In the context of Corporate Online, an Agency is a non-bank financial institution that is
performing transaction banking under its own BSB.
Agency is a Corporate Online application that provides features to view, export and import
transaction data from BECS and APCS, including balances, transactions and voucher
images.
An Agency BSB is a six digit BSB (Bank, State and Branch) allocated to an Agency.
In the context of Corporate Online, an Agency file is a file containing returns, dishonours
and refusals for either BECS or APCS.
APCA, the Australian Payments Clearing Association, is the organisation that manages
BECS and APCS and the participation of financial institutions in those systems.
APCS, the Australian Paper Clearing System, is the system that allows participating
financial institutions to exchange Australian domestic paper-based transactions (e.g.
cheques) with each other. These transactions are presented electronically and are processed
overnight.
An application is a high level group of functionality offered by Corporate Online.
An authorisation model defines how many users are required to authorise a particular type of
task and what combinations of users are required for a successful authorisation.
Authorisation user role is a workflow setting made at the organisation level that determines
what roles users can play in workflows (e.g. can they self-authorise?).
An authoriser is a user whose access allows them to perform the authorisation step of a
workflow. Corporate Online verifies the identity of authorisers with a security token.
Authority level is the user setting that determines what roles they can play in a workflow
(e.g. creator, authoriser) and which tasks they can authorise.

BECS, the Bulk Electronic Clearing System, is the system that allows participating financial
institutions to exchange Australian domestic debit and credit transactions with each other
electronically. These transactions are often called direct entry transactions or DE
transactions. They are processed overnight.
BSB is a six digit number that identifies the Bank, State and Branch at which an Australian
bank account is held. An account number identifies the account. Both are required to
correctly identify an account for an electronic transaction.
In Corporate Online, business day means any weekday (Monday to Friday) that is not a
public holiday in the jurisdiction(s) relevant to the payment type or service.
Agency transactions (for both BECS and APCS) are not processed if the weekday is an
Australia-wide public holiday.
A Corporate Online administrator is a user within your organisation who has access to
Administration and can manage the assignment of applications, features, accounts, and
services to users and offices within your organisation.
A creator is a user whose access allows them to perform the creation step of a workflow.
DE (Direct Entry) is the name given to the overnight electronic payment transactions
submitted by files in a specified format and processed by BECS (Bulk Electronic Clearing
System).
Dual authorisation is an authorisation model that requires two users to authorise a particular
type of task.
A feature is a logical group of application functionality offered by Corporate Online.
A filter is something you apply to a long list to view only a subset of that list.
A task that has been authorised by the requisite number of authorisers as determined by the
authorisation model set for the workflow is said to be fully authorised.
An office is a flexible logical entity used to segregate payments, billing, beneficiaries,
templates, and trade finance agreements within an organisation in a Corporate Online setup.
An organisation is the highest level entity that can be represented in a Corporate Online
setup.
A task that has been authorised by only one authoriser but the authorisation model set for the
workflow is dual authorisation is said to be partially authorised.
PDF stands for Portable Document Format. A PDF file is usually referred to as a PDF.
PDFs can be viewed and printed with Adobe Reader.

Preferences define a set of default values (e.g. screens, offices, accounts) for a particular user
for a particular application. Preferences are not available in Administration.
Primary authorisers are authorisers placed in the first group under a dual authorisation
security option (which determines which combinations of primary and secondary may
authorise a particular task).
Secondary authorisers are authorisers placed in the second group under a dual authorisation
security option (which determines which combinations of primary and secondary may
authorise a particular task).
A security option determines which combinations of authorisers (grouped as primary and
secondary) can authorise a particular task under a dual authorisation security model.
Self-authoriser is a user who is permitted by the authorisation model to both create and
authorise a particular type of task.
A setup is how a customer’s business structure is established in Corporate Online to control
access to information (e.g. account transactions), services, products and features.
Single authorisation is an authorisation model that requires only one user to authorise a
particular type of task.
Status is the attribute that identifies where a particular task (or sub-task) is up to in a
workflow.
A task is a piece of work managed by a workflow (e.g. creating a file, importing a file).
A task that has been created but not yet authorised is said to be unauthorised.
A user is an identifiable person registered to access Corporate Online whose identity has
been verified either by Westpac or a Corporate Online administrator.
See authority level.
A voucher image is the image of the paper voucher used to effect a paper-based transaction
(e.g. a cheque, a deposit slip, a remittance advice).
A workflow is a defined series of steps that a task must pass through to be completed
correctly. Corporate Online uses workflows to manage the creation and authorisation of
items deemed to be of value. For example, in Administration, creating and authorising tasks
to amend a setup is managed with a workflow.

about
APCS, 8
authorisation, 21
BECS, 6
exporting, 18
history, 10
voucher images, 14
workflows, 21
Adobe
troubleshooting, 50
Agency
features, 5
user sub-task, 44
settlement reports, 17
viewing voucher image, 14
voucher images, 14
Agency file
status codes, 37
Agency files
authorising, 33
creating, 29
cut-off times, 34
errors, 27
exporting, 18
history, 10
importing, 25
troubleshooting, 27
working with, 21
Agency transactions
browsing, 11
searching, 12
viewing, 11
APCS, 8
audit information, 10
authorisation
about, 21
authoriser, 22
creator, 22
models
dual, 22
single, 21
security options, 23
user roles, 22
which model?, 22
authoriser, 22
primary, 23
secondary, 23
authorising
agency files, 33
basic skills
calendar, 41
entering dates, 41
navigating lists, 42
print preview, 40
searching, 12
BECS, 6
browsing
Agency transactions, 11
settlement reports, 17
voucher images, 14
buttons
print preview, 40
search, 12
calendar
basic skills, 41
charges, 10
creating
files, 29
creator, 22
cut-off times
Agency files, 34
data types
exporting, 18
dates
basic skills, 41
DE
authorising files, 33
creating files, 29
cut-off times, 34
importing files, 25
diagram
file creation workflow, 28
import file workflow, 24
dishonours
authorising files, 33
creating files, 29
importing files, 25
dual authorisation
model, 22
security options, 23
entering
dates, 41
errors
troubleshooting in files, 27
exporting
Agency files, 18
file formats, 18
status, 18
exports
history, 10
features
Agency, 5
fees, 10
file creation
workflow diagram, 28
file formats
exporting, 18
file history, 38
status codes, 39
viewing, 38
files
authorising, 33
creating, 29
cut-off times, 34
errors, 27
exporting, 18
history, 10
importing, 25
troubleshooting, 27
working with, 21
history
agency files, 10
exports, 10
transaction information, 10
import file workflow
diagram, 24
importing
files, 25
information
history, 10
lists
navigating, 42
models
dual authorisation, 22
single authorisation, 21
which one?, 22
navigating lists
basic skills, 42
passwords
resetting, 47
PDFs
troubleshooting, 50
pending files
working with, 35
preferences
setting, 49
primary authoriser, 23
print preview
printing, 40
print schedules
troubleshooting, 50
printing
print preview, 40
settlement reports, 17
voucher images, 14
procedure
viewing Agency file history,
38
working with pending files, 35
procedures

amending your Adobe reader
settings, 51
authorising a task, 45
authorising an Agency file, 33
browsing Agency transactions,
11
creating an Agency file, 29
exporting Agency files, 18
importing an Agency file, 25
printing an Agency transaction
voucher image, 14
printing settlement reports, 17
rejecting a task, 45
resetting a user password, 47
setting preferences for
Agency, 49
viewing a voucher image for
an Agency transaction, 14
viewing settlement reports, 17
refusals
authorising files, 33
creating files, 29
importing files, 25
resetting
user passwords, 47
returns
authorising files, 33
creating files, 29
importing files, 25
searching
basic skills, 12
secondary authoriser, 23
security options
authorisation, 23
setting
preferences, 49
settlement reports
printing, 17
viewing, 17
single authorisation model, 21
skills
calendar, 41
entering dates, 41
navigating lists, 42
print preview, 40
searching, 12
status
Agency files, 37
file creation, 28
file history, 39
file transaction, 39
import files, 24
sub-tasks
user
Agency features, 44
tasks
create file, 29
import file, 25
reset password, 47
transactions
browsing, 11
searching, 12
status codes, 39
viewing, 11
vouchers, 14
troubleshooting
Adobe, 50
file errors, 27
PDFs, 50
print schedules, 50
voucher images, 50
user guide, 4
user passwords
resetting, 47
user roles
authorisation, 22
user sub-tasks
Agency features, 44
users
authorisation roles, 22
resetting passwords, 47
viewing
Agency transactions, 11
file history, 38
settlement reports, 17
voucher images, 14
voucher images
about, 14
troubleshooting, 50
workflows
about, 21
file creation, 28
import file, 24
working
Agency files, 21


