Chemical Separation of Al and Be from Quartz-bearing rocks Bodo Bookhagen, Stanford University Cosmogenic Isotopes Lab The following guidelines describe how to extract 26Al and 10Be from quartz-bearing rocks to create sample targets for Accelerator Mass Spectrometry (AMS). This manual describes the “Bookhagen processing method” in a step-by-step fashion; however, some samples with abnormal behavior may be treated differently. Throughout the manual, I give suggestions what to do if a certain step produces aberrant results. I would like to point out that this manual combines several people’s work that has been improved and streamlined. If you use these methods, please cite the original work. We are currently working on a new separation method with a new resin and will change our procedures in the near future. Kohl, C.P., and Nishiizumi, K., 1992, Chemical isolation of quartz for measurement of in situproduced cosmogenic nuclides: Geochimica et Cosmochimica Acta, v. 56, p. 3583–3587. von Blanckenburg F., Hewawasam T., and Kubik P. (2004) Cosmogenic nuclide evidence for low weathering and denudation in the wet tropical Highlands of Sri Lanka. J. Geoph. Res., 109, F03008, doi10.1029/2003JF000049 Other interesting sources of information include, but are not exhaustively represented in, the following references. Note that these chemical separation methods are different than those described here: John Stone’s Cosmogenic Isotope Laboratory at the University of Washington: http://depts.washington.edu/cosmolab/index.html Arjun Heimsath’s web page at Dartmouth College: http://www.dartmouth.edu/~arjunh/ Paul Bierman’s web page at the University of Vermont: http://www.uvm.edu/cosmolab/ John Gosse’s Dalhousie Cosmogenic Nuclide Exposure Dating Facility: http://cnef.earthsciences.dal.ca/index.html Tibor Dunai’s Cosmogenic Nuclide Laboratory at The University of Edinburgh: http://www.geos.ed.ac.uk/facilities/cosmolab/ PRIME Lab of Purdue University: http://www.physics.purdue.edu/primelab/ This manual consists of four parts that detail the rock-processing procedure. In summary, the rock/sand is first cleaned, crushed, and washed in the sieving and mineral separation laboratory. Second, the pre- treated sand is leeched in a low concentrated Hydrofluoric-Nitric acid mixture in ultrasonic tanks. Third, Aluminum and Beryllium is extracted from 1/48
Transcript
Chemical Separation of Al and Be from Quartz-bearing rocks Bodo Bookhagen, Stanford University
Cosmogenic Isotopes Lab The following guidelines describe how to extract 26Al and 10Be from
quartz-bearing rocks to create sample targets for Accelerator Mass Spectrometry (AMS). This manual describes the “Bookhagen processing method” in a step-by-step fashion; however, some samples with abnormal behavior may be treated differently. Throughout the manual, I give suggestions what to do if a certain step produces aberrant results.
I would like to point out that this manual combines several people’s work that has been improved and streamlined. If you use these methods, please cite the original work. We are currently working on a new separation method with a new resin and will change our procedures in the near future.
Kohl, C.P., and Nishiizumi, K., 1992, Chemical isolation of quartz for measurement of in situproduced cosmogenic nuclides: Geochimica et Cosmochimica Acta, v. 56, p. 3583–3587.
von Blanckenburg F., Hewawasam T., and Kubik P. (2004) Cosmogenic nuclide evidence for low weathering and denudation in the wet tropical Highlands of Sri Lanka. J. Geoph. Res., 109, F03008, doi10.1029/2003JF000049
Other interesting sources of information include, but are not exhaustively represented in, the following references. Note that these chemical separation methods are different than those described here:
John Stone’s Cosmogenic Isotope Laboratory at the University of Washington: http://depts.washington.edu/cosmolab/index.html
Arjun Heimsath’s web page at Dartmouth College: http://www.dartmouth.edu/~arjunh/
Paul Bierman’s web page at the University of Vermont: http://www.uvm.edu/cosmolab/
John Gosse’s Dalhousie Cosmogenic Nuclide Exposure Dating Facility: http://cnef.earthsciences.dal.ca/index.html
Tibor Dunai’s Cosmogenic Nuclide Laboratory at The University of Edinburgh: http://www.geos.ed.ac.uk/facilities/cosmolab/
PRIME Lab of Purdue University: http://www.physics.purdue.edu/primelab/
This manual consists of four parts that detail the rock-processing procedure. In summary, the rock/sand is first cleaned, crushed, and washed in the sieving and mineral separation laboratory. Second, the pre-treated sand is leeched in a low concentrated Hydrofluoric-Nitric acid mixture in ultrasonic tanks. Third, Aluminum and Beryllium is extracted from
Chemical Separation of Al and Be from Quartz-bearing rocks Bodo Bookhagen, Stanford University
2/48
pure Quartz using ion-exchange column chemistry. Fourth, the Accelerated Mass Spectrometry (AMS) target loading of the pure Beryllium and Aluminum.
The ‘bottleneck’ of these operations is the first two steps. The chemical separation is fairly straightforward and several samples can be processed simultaneously. The fourth step is also straightforward, but must be performed in a glove box due to the carcinogenic nature of Beryllium oxide.
Where appropriate, I give links to an Excel spreadsheet that will help calculate certain concentrations or will guide you through certain steps. As it is with every scientific method: Work as carefully as possible and take notes at every step! Also, record any abnormal behavior or observation while you process your samples. This will be a tremendous help later during processing steps and will aid in the interpretation of cosmogenic abundances.
Any comments and suggestions to this manual are highly appreciated. Please send them to Bodo Bookhagen ([email protected]).
Chemical Separation of Al and Be from Quartz-bearing rocks Bodo Bookhagen, Stanford University
3/48
Chemical Separation of Al and Be from Quartz-bearing rocks Bodo Bookhagen, Stanford University
Part A: Quartz separation and pre-treatment in the mineral separation laboratory (rock crushing, magnetic separation,
heavy liquid separation) This step reduces the bulk field sample (surface sample or riversand sample), into well-sorted sand fractions, which will be used in the leeching phase of the sample preparation.
The cleaning, crushing, and sieving in this step is performed in the sieving and rock-crushing room in Mitchell A72. Please contact the TA of the mineral separation facility to schedule an introduction. Do not use the rooms without prior training!
HEALTH AND SAFETY ADVISORY This work produces relatively high amounts of dust compared to
typical lab work. You must wear proper protective equipment, including a dust mask (NIOSH N95), safety glasses, and gloves. Face shields and goggles are also available in the room. You have to clean up the lab after every sample that you processed! Please follow the general safety and lab procedure as described to you by the mineral-separation TA [The following steps given here are thus only a rudimentary description].
Contact Bodo Bookhagen if you can not find the mineral-separation TAs – an introduction to the rock crushing room is mandatory as it contains heavy machinery that can cause serious health damage if not operated properly.
4/48
Chemical Separation of Al and Be from Quartz-bearing rocks Bodo Bookhagen, Stanford University
A.1: Rock crushing and sieving
1. Start your lab notebook and lab data sheet. This should always be your first step!
2. Ensure that the work area is clean, before working with your sample.
3. Clean the rock sample with a brush and scraper. Do not wet the samples (or if you clean them under tap water, let them dry before continuing). If you work with sand samples (e.g. for basin-wide erosion rates of river catchments), proceed to step X.
4. If the sample has a diameter larger than 3 cm, use the hammer and chisel to crush the rock. If your sample has a diameter larger than 4 cm, chip off pieces within 4 cm depth of the exposure surface.
5. Use the mechanical jaw crusher in the far left of the room to gravel size small enough to fit through the feed chute of the radial crusher. Don’t forget to turn on the vacuum cleaner.
6. Before inserting the contact plates of the radial crusher, ensure that they are clean. Clean with a wire brush.
7. Adjust the gap between the plates to about 2.5 mm. This produces coarse sand sized grains. Turn on the vacuum cleaner. Close the plate cover and turn on the motor. Be sure that the collection box is in place under the crushing plates! Feed one or two small sample pieces through the crusher chute. Sieve your entire sample.
8. Narrow the gab between the plates to 1 mm. This produces sand sized grains.
9. Set up your sieves using the following sizes [Note, we have a clean set of sieves in the cosmogenic nuclide lab, Mitchell A20, ask Bodo Bookhagen for more information]: 0.125 – 0.250 – 0.500 – 0.710 – 1 – 1.5 – 2 [all units are mm]. It is very helpful to use the mechanical shaker right next to the entrance door. You may have to add a few ‘empty’ sieves to make it fit in the shaker. Shake for approximately 5 – 10 minutes (depending on volume of material). You may have to watch the shaking process, as the pile in the shaker tends to get loose.
10. You are aiming for the grain size 0.250 to 0.500 mm. If you end up with a lot of material larger than 0.710 mm, rerun this part of your sample through the radial crusher with 1 mm plate distance. Resieve. [Note: The grain sizes produced for a given plate distance depend on the material and rock type. Most of the quartz-bearing rocks have similar strength and thus the given description will work. Use your own judgment and experience to produce the
5/48
Chemical Separation of Al and Be from Quartz-bearing rocks Bodo Bookhagen, Stanford University
appropriate grain size. Always use larger plate distance – once your grain size becomes too small, the material may not be very suitable anymore.]
11. Pour the different size fractions into separate labeled plastic zip-loc bags. Put away the > 0.5 mm and < 0.25 mm fractions into storage.
12. Clean the work area thoroughly! You are responsible for a clean working environment.
After sieving the samples, have a close look at the material. Are there micas, feldspar, garnets, zircons, pyroxenes, or other non-quartz minerals in the samples? If you have a high content of non-quartz minerals, you should treat your samples with one of the following steps: Magnetic separation and/or heavy-liquid separation. The equipment for these operations are located in Mitchell A55. Again, contact the mineral separation TA for an introduction. Note: The material for the heavy-liquid separation is slightly poisonous and an introduction is mandatory! Before using any equipment, you must sign up!
6/48
Chemical Separation of Al and Be from Quartz-bearing rocks Bodo Bookhagen, Stanford University
A.2: Magnetic Separation in the Frantz (optional, but suggested) If you samples contains micas (muscovite and/or biotite), use the magnetic mineral separator (Frantz). There are three Frantzs in the mineral separation laboratory and thus you can get quite a bit of material processed in a short amount of time. Follow the manuals in the mineral separation laboratory to achieve best results for your magnetic mineral separation.
Figures 1 and 2: Photographs of the ‘old’ horizontal Frantz (magnetic separator, top) and the heavy-liquid setup(right) in Michell A55.
7/48
Chemical Separation of Al and Be from Quartz-bearing rocks Bodo Bookhagen, Stanford University
A.3: Heavy-Liquid separation (optional) If you sample contains many heavy minerals (zircons, garnet, pyroxene), I suggest using the heavy-liquid separation first. While this step involves a little more ‘active’ work, you can get a 500g sample separated in as little as 1 hour. The Frantz runs longer, but requires only initial setup and often runs overnight.
Again, follow the heavy-liquid separation manual. With the available setup, you can separate ~175g of material in one flask. The mixing motor usually runs for 30 minutes. You will notice that the heavier minerals sink to the bottom of the flask – these are then emptied out first and dried separately from the quartz-fraction.
If you sample has many ‘dark’ or ‘smoky-looking’ minerals in the quartz fraction, you most likely have quite a bit of feldspar in your sample. Feldspar has a slightly higher density than quartz and you will have to use a different concentration of the SPT to separate those two minerals in the next step. You will note that during the emptying of your flask, the slightly heavier feldspar is at the bottom of the quartz-feldspar pile. You may exploit that to rudimentarily separate feldspar from quartz.
Make sure that you thoroughly rinse your sample after it was in contact with the Sodium PolytungsTate (SPT). SPT is water soluble, but must be completely removed before further processing. SPT dries fast and causes the grains to stick together. SPT is a low poison!
8/48
Chemical Separation of Al and Be from Quartz-bearing rocks Bodo Bookhagen, Stanford University
Part B: Further Quartz cleaning and leeching in the ultrasonic tank using a low-concentrated hydrofluoric-nitric acid mixture
HEALTH AND SAFETY ADVISORY BEFORE continuing your work in Mitchell A20, you MUST have
completed the safety classes. Please enroll in a training course before taking it on the following website: http://www.stanford.edu/dept/EHS/prod/training/safetytrain/About.htmlThe required safety courses for you are EHS-4200 General Safety Training and EHS-1900 Chemical Lab Safety Training.
Please click on this web site then click on the Axess web site where you'll need to register in STARS. Enter your login and password. Then, click on the training option at the top of the Axess page. You can search for these courses by clicking on Search Catalog. It should prompt you from there.
You will receive an email confirmation announcing your successful completion after you've taken each course. If you want to work in Mitchell A20, please make sure to send a copy of that to me ([email protected]).
Again, I would like to emphasize that most of the chemicals (HCl, HNO3, H2SO4, HF) you will be working with pose serious health hazards. If you work in Mitchell A20, you must be at full health. If you experience dizziness or drowsiness, do not work in Mitchell A20. Read the Health advice posted in Mitchell A20. It is mandatory to wear full personal protective equipment, especially when working with concentrated acids. These include:
1. goggles (prescription glasses are not enough!) 2. double gloves - neoprene 3. closed-toe shoes with socks 4. long pants (no shorts!) 5. lab coat 6. face shield 7. neoprene apron 8. small Chemical Spill Kit
In addition, you will have to read, understand, agree, and sign a declaration that you have been trained in all necessary Standard
Chemical Separation of Al and Be from Quartz-bearing rocks Bodo Bookhagen, Stanford University
Operating Procedures (SOPs). A copy of it will be stored in the cosmogenic nuclide lab. If you are unsure about any step, please contact the lab manager (Bodo Bookhagen) or the PI (Prof. George Hilley) and clarify these issues.
After the mineral separation laboratory you should have a pretty clean sample that you will clean even more during the next few steps. First, you want to remove all carbonates, organic material, and dirt from the sample in a 1:1 Hydrochloric Acid solution. Second, you will leech the quartz in a low concentration hydrofluoric-nitric acid mixture.
10/48
Chemical Separation of Al and Be from Quartz-bearing rocks Bodo Bookhagen, Stanford University
B.1A: 1:1 Hydrochloric Acid bath (glass beakers)
This steps describes the Hydrochloric Acid bath in glass beakers, see B.1B to do this step in 4L canisters in the ultrasonic bath.
Work carefully and only in the fume hood!
1. Verify that emergency eyewash/shower is accessible and tested within the last month.
2. Verify that fume hoods are currently certified.
3. Check the integrity of all containers and any connections prior to any filling.
4. During the entire process, carefully survey benchtop and floor area for any drips form the hose. Clean up spills immediately.
5. Check if all 4L glass beakers are properly labeled and no label has been wiped off. Especially, the “1:1 Hydrochloric Acid” and unique canister number must be clearly readable.
6. It is essential that you wear a face shield over your safety glasses, double neoprene gloves, and the neoprene aprons to ensure proper protection for concentrated acid spills.
7. Weigh your sample and record the sample mass.
8. Wash the samples with DI water. The rinsewater can go down the drain. Rinse until water is clear.
9. Dry sample in the oven or under a heat lamp [Note: this may take several hours].
10. Weigh your sample and record the weight. Use appropriate sample amount for your acid solution.
11. Place a large secondary containment made out of polypropylene (or similar acid-resistant material) into the fume hood. Take one of the 4L beakers (only use the one, labeled ‘1:1 Hydrochloric Acid’), label with sample name, and fill with milliQ water first. Then move to the fume hood and fill in concentrated Hydrochloric Acid (36%). You always use half water, half acid. For ~125 g of sample, you will need 1 L of solution (0.5L milliQ + 0.5L Hydrochloric Acid). Do not use more than 3L of acid mixture in a 4L glass beaker. Add a few mL conc. H2O2 to the solution.
12. In the FUME HOOD: Place secondary containment into the fume hood and only work in this secondary containment. Fill the sample
11/48
Chemical Separation of Al and Be from Quartz-bearing rocks Bodo Bookhagen, Stanford University
material SLOWLY into the ‘1:1 Hydrochloric Acid mixture’. NOTE: If you sample contains large amounts of carbonate it will foam. Wait a few minutes before adding more sample material. If your sample foamed during this period, you will need to watch it closely, as it may foam more during the heating period.
13. In the FUME HOOD: All heating processes and heated objects are to remain in the fume hood. Ensure that there are no combustible materials near the hot plate. Observe the sample for 30 minutes. If no foaming or bubbles can be observed, cover with watch glass, move the 4L container onto a hot plate and start heating. Watch closely for the next hour. If it starts foaming, remove from hot plate and wait 30 minutes. Repeat until you can heat the sample without foaming.
14. In the FUME HOOD: If everything remains calm for one hour, stir sample with long glass stirrer. Cover with watch glass and heat overnight (use timer). Ensure that the temperature is below boiling at ~75°C (setting 175 on the FisherScience hotplate in Mitchell A20).
15. In the FUME HOOD: After heating, let acid solution cool for 4 hours before emptying into a waste canister. Place large secondary containment into fume hood. Move properly labeled (with Stanford Hazardous Waste Tag) hydrochloric acid waste canister into fume hood onto the secondary containment.
16. In the FUME HOOD: Rinse thoroughly with DI water (at least 4 times). The first rinse also goes into the hydrochloric acid waste tank. Fill in water into a 4L glass beaker labeled with ‘DI water’ and transfer to the fume hood. After the first rinse, you can transfer the sample out of the fume hood and rinse them next to the sink. There is a large container designed for this purpose. If there are traces of yellow or orange colors left, rinse more.
17. If solution is very dirty (dark brown colors), you may have to repeat the 1:1 Hydrochloric acid step.
18. Fill sample with squirt bottle (labeled ‘milliQ water’) into a pre-weighted crystallizing dish/glass beaker and dry in oven and/or under heat lamp. When dried, record weight.
19. All 4L beakers will be washed with soap, rinsed with DI, and can then be used again.
12/48
Chemical Separation of Al and Be from Quartz-bearing rocks Bodo Bookhagen, Stanford University
B.1B: 1:1 Hydrochloric Acid bath (4L canisters)
As an alternative to B.1A, you may use the 4L containers and heat the sample in the large ultrasonic tank. This allows you to processes ~9 samples (each ~375g) in one batch. Here is a step-wise description:
1. Verify that emergency eyewash/shower is accessible and tested within last month.
2. Verify that fume hoods are currently certified.
3. Check the integrity of all containers and any connections prior to any filling.
4. During the entire process, carefully survey benchtop and floor area for any drips form the hose. Clean up spills immediately.
5. Check if all 4L canister are properly labeled and no label has been wiped off. Especially, the “1:1 Hydrochloric Acid” and unique canister number must be clearly readable.
6. Check if the 4L canisters you intend to use are clean, healthy, and do not show any signs of cracking. If you push in the outside wall of a canister with your hands and the canister shows cracks, it is time to replace this canister.
7. It is essential that you wear a face shield over your safety glasses, double neoprene gloves, and the neoprene aprons to ensure proper protection for concentrated acid spills.
8. Weigh your sample and record the sample mass.
9. Wash the samples with DI water. The rinsewater can go down the drain. Rinse until water is clear.
10. Dry sample in the oven or under a heat lamp [Note: this may take several hours].
11. Weigh your sample and record the weight. Use appropriate sample amount for your acid solution.
12. Place a large secondary containment made out of polypropylene (or similar acid-resistant material) into the fume hood. Take one of the 4L canisters (only use the one, labeled ‘1:1 Hydrochloric Acid’), label with sample name, and fill with milliQ water first. Then move to the fume hood and fill in concentrated Hydrochloric Acid (36%). You always use half water, half acid. For ~125 g of sample, you will need 1 L of solution (0.5L milliQ + 0.5L Hydrochloric Acid). Do not use more than 3L of acid mixture in a 4L canister. Add a few mL conc. H2O2 to the solution.
13/48
Chemical Separation of Al and Be from Quartz-bearing rocks Bodo Bookhagen, Stanford University
13. In the FUME HOOD: Place secondary containment into the fume hood and only work in this secondary containment. Fill the sample material SLOWLY into the 4L canister labeled ‘1:1 Hydrochloric Acid’. NOTE: If you sample contains large amounts of carbonate it will foam. Wait a few minutes before adding more sample material. If your sample foamed during this period, you will need to watch it closely, as it may foam more during the heating period.
14. In the FUME HOOD: Observe the sample for 30 minutes. If no foaming or bubbles can be observed, close the lid tightly, and swirl beaker to get sample into suspension. Open Lid and watch for another 30 minutes.
15. If no foaming occurs, close the lid.
16. Place all the canisters into the bath. You can put up to 8 4L canisters and 3 2L canisters into the ultrasonic bath. If you don’t need all 8x4L and 3x2Lcanisters, you still have to put 8+3 canisters into the bath to ensure they are not sliding around. You can fill the remaining canisters without sample material with DI water.
17. Once all the canisters are in the ultrasonic bath, check the water level. Fill in DI water up to ~4cm (~1.5 inches) from the top of the bath. The exact amount is not really important; however, ensure that there is enough water in the bath to cover the bottom of the canisters. Never run the Ultrasonic bath without water, as it will shorten the lifetime of the unit.
18. Turn on the heat for the ultrasonic bath. It is automatically set to 70°C and it will take about 1hr to warm up the bath.
19. Watch the samples for the next hour – if a sample starts to foam, remove sample from ultrasonic tank and place into the fume hood. Open lid and let cool for 30 minutes. Move the sample back to the ultrasonic tank. Repeat until the sample does not foam anymore.
20. If needed, set the timer to the left of the bath. You run the ultrasonic bath and heater for 24 hours.
21. Turn on the ultrasonic unit and close the door.
22. After the Ultrasonic tank run, let samples cool for 6 hours. Remove samples from bath and move into the fume hood.
23. In the FUME HOOD: Rinse thoroughly with DI water (at least 4 times). The first rinse also goes into the hydrochloric acid waste tank. Fill in water into a 4L glass beaker labeled with ‘DI water’ and transfer to the fume hood. After the first rinse, you can transfer the sample out of the fume hood and rinse them next to the sink. There is a large
14/48
Chemical Separation of Al and Be from Quartz-bearing rocks Bodo Bookhagen, Stanford University
container designed for this purpose. If there are traces of yellow or orange colors left, rinse more.
24. If solution is very dirty (dark brown colors), you may have to repeat the 1:1 Hydrochloric acid step.
25. Pour sample out of the 4L canisters into a large polypropylene tray and rinse thoroughly with DI. Use the squirt bottle (labeled ‘milliQ water’) to transfer sample into a pre-weighted crystallizing dish/glass beaker. Place in dry in oven and/or under heat lamp. When dried, record weight.
All 4L canisters will be washed with soap, rinsed with DI, and can then be used again.
15/48
Chemical Separation of Al and Be from Quartz-bearing rocks Bodo Bookhagen, Stanford University
B.2: Leeching in a 1% Hydrofluoric-Nitric Acid mixture
You are only interested in the cosmogenic nuclides produced in-situ in the quartz minerals. In order to prevent any contamination from garden variety cosmogenic nuclides that are located in the outer rims of the quartz grains, we will leech (or etch) away the outer rims. In order to achieve this (and not dissolve the entire quartz grain), we use a combination of hydrofluoric and nitric acid in a very low concentration (1%). This part of the operation is divided into two parts: First, making a 20L solution and second filling the 4L containers with the low-concentrated solution.
Figure 3: Cleaning and washing area of samples for the use in the Ultrasonic bath.
16/48
Chemical Separation of Al and Be from Quartz-bearing rocks Bodo Bookhagen, Stanford University
B.2.1: Preparing a 20L 1% HF and 1% HNO3 acid mixture
In order to make the 20L solution, you must closely follow the Standard Operating Procedure (SOP) – Preparing a 20L 1%HF and 1% HNO3 acid mixture. Instead of mixing every canister separately, we make a solution in a 20L tank that is then filled into the 4L canister. This is much more time efficient and safer as you need to handle the concentrated acid only once. Please read the SOP and follow the described steps. In summary, these steps are:
1. Verify that emergency eyewash/shower is accessible and tested within last month.
2. Verify that fume hoods are currently certified.
3. Check the location and expiration of the Calcium Gluconate and that a copy of the MSDS for HF is available
4. Ensure that the spigot of the 20L carboy is tightly screwed on and that the carboy is emptied completely.
5. Turn on the milliQ filter machine and fill the carboy with milliQ water up to the 19L mark.
6. Add 300mL milliQ water with the glass measuring cylinder.
7. It is essential that you wear a face shield over your safety glasses, double neoprene gloves, and the neoprene aprons to ensure proper protection for concentrated acid spills.
8. FUME HOOD: Place the carboy in its large, secondary containment tray.
9. FUME HOOD: Place a medium, secondary containment tray in the fume hood and add 400mL hydrofluoric acid (HF) using the polypropylene 500mL measuring cylinder while working over the secondary containment tray.
10. FUME HOOD: Add 300mL Nitric Acid (HNO3) using the glass measuring cylinder.
11. FUME HOOD: Close the carboy and ensure that all spigots are closed. Gently swirl and shake several times to extensively mix the acids and water. Ensure that no inverting of container occurs.
12. Place the carboy and its secondary containment tray onto the cart and move it back to its dedicated position.
13. Wash the measuring cylinders, rinse them 3 x with milliQ water, and collect first wash as hazardous waste.
17/48
Chemical Separation of Al and Be from Quartz-bearing rocks Bodo Bookhagen, Stanford University
Now you are ready to put parts of your sample into the filled 4L containers. For the first ultrasonic leech, you may use 7.5 g per 1L 1% HF/HNO3 acid solution. These are 30g per 4L container. Split the sample over several canisters. For the second and each successive leech, use 60g per 4L container (15 g per 1L acid solution).
18/48
Chemical Separation of Al and Be from Quartz-bearing rocks Bodo Bookhagen, Stanford University
B.2.2: Filling 4L canisters with a 1% HF and 1% HNO3 acid mixture
After making a 20L canister with a 1% Hydrofluoric-Nitric Acid solution, you can start filling the 4L canisters. This is described in detail by the Standard Operating Procdure (SOP) – Filling 4L canisters with a 1% HF and 1% HNO3 acid mixture. Please read the SOP and follow the described steps. In summary, these steps are:
1. Verify that emergency eyewash/shower is accessible and tested within last month.
2. Verify that fume hoods are currently certified.
3. Check the location and expiration of the Calcium Gluconate and that a copy of the MSDS for HF is available
4. Ensure that the spigot of the 20L carboy is tightly screwed on and that the carboy is emptied completely.
5. Check the integrity of all containers and any connections prior to any filling.
6. During the entire process, carefully survey benchtop and floor area for any drips form the hose. Clean up spills immediately.
7. Check if all 4L canister are properly labeled and no label has been wiped off. Especially, the “1% Hydrofluoric Acid”, “1% Nitric Acid”, unique canister number must be clearly readable.
8. Check if the 4L canisters you intend to use are clean, healthy, and do not show any signs of cracking. If you push in the outside wall of a canister with your hands and the canister shows cracks, it is time to replace this canister.
9. It is essential that you wear a face shield over your safety glasses, double neoprene gloves, and the neoprene aprons to ensure proper protection for concentrated acid spills.
10. FUME HOOD: Take the 20L carboy from its large, secondary containment tray and put it on the elevated surface.
11. FUME HOOD: Place a medium, secondary containment tray in the fume hood below the 4L canister that will be filled with the low-concentrated acid mixture.
12. FUME HOOD: Fill the 4L canister up to its 4L mark.
13. FUME HOOD: After filling the 4L canisters, close the carboy and ensure that all spigots are closed. When the 20L carboy is empty, it is ready to be filled with a 1% HF/HNO3 acid mixture, following the
19/48
Chemical Separation of Al and Be from Quartz-bearing rocks Bodo Bookhagen, Stanford University
‘SOP for preparing a 20L (5gl) 1% Hydrofluoric (HF) and 1% Nitric (HNO3) acid mixture for use in canisters in the Ultrasonic bath’.
14. FUME HOOD: Transfer the sample into the filled 4L canisters while they are still in the fume hood. Use a plastic spoon or a Pyrex beaker with pre-weighted sample material. You can use 7.5g sample for 1L 1%HF/HNO3 solution for the first ultrasonic-bath run. That is ~30g for 4L 1% HF/HNO3. For the second and third ultrasonic-bath run, you can use 10-15g sample material for 1L 1% HF/HNO3 (~60g for 4L 1%HF/HNO3).
15. FUME HOOD: Close the lid of the 4L canister tightly.
16. Once you have filled all 4L canisters with your sample material, ensure all lids are tightly closed. Open the door to the ultrasonic bath and place the canister into the cold ultrasonic bath – one at a time.
17. Place all the canisters into the bath. You can put up to 8 4L canisters and 3 2L canisters into the ultrasonic bath. If you don’t need all 8x4L and 3x2Lcanisters, you still have to put 8+3 canisters into the bath to ensure they are not sliding around. You can fill the remaining canisters without sample material with DI water.
18. Once all the canisters are in the ultrasonic bath, check the water level. Fill in DI water up to ~4cm (~1.5 inches) from the top of the bath. The exact amount is not really important; however, ensure that there is enough water in the bath to cover the bottom of the canisters. Never run the Ultrasonic bath without water, as it will shorten the lifetime of the unit.
19. Turn on the heat for the ultrasonic bath. It is automatically set to 70°C and it will take about 1hr to warm up the bath.
20. If needed, set the timer to the left of the bath. You run the ultrasonic bath and heater for 10 hours.
21. Turn on the ultrasonic unit and close the door.
22. Place the 20L carboy and its secondary containment tray onto the cart and move it back to its dedicated position.
20/48
Chemical Separation of Al and Be from Quartz-bearing rocks Bodo Bookhagen, Stanford University
B.2.3: Emptying 4L canisters filled with 1% HF and 1% HNO3
You have to be very careful, when emptying out the 4L canisters. Please follow the Standard Operating Procedure (SOP) – Emptying 4L canisters (1%HF + 1% HNO3) closely. Please read the SOP and follow the described steps. In summary, these steps are:
1. Verify that emergency eyewash/shower is accessible and tested within last month.
2. Check the location and expiration of the Calcium Gluconate and that a copy of the MSDS for HF is available
3. During the entire process, carefully survey benchtop and floor area for any drips. Clean up spills immediately.
4. Ensure that the 55gl drum is placed correctly onto the secondary containment and that there is enough space left in the drum.
5. It is essential that you wear a face shield over your safety glasses, double neoprene gloves, and the neoprene aprons to ensure proper protection for concentrated acid spills.
6. Check the pH of the bath with pH paper (orange box, “Jumbo Insta Check” in the drawer opposite to the dishwasher). If the pH of the bath is below 4, a canister may have leaked. If this is the case (very unlikely): First, leave canisters in bath, second turn off ultrasonic bath and heater, and third contact Lab Manager or PI for immediate assistance. Note: This does not pose an immediate health danger – the Lab Manager and PI can assist in emptying out the ultrasonic bath. All canisters must be rinsed with DI water before they are opened.
7. Before taking the 2/4L canisters out of the ultrasonic bath, ensure that all lids are tightly screwed on and the tank cooled down for at least one hour after turning the heat off. Take out all the canisters one by one and place them into the secondary containment tray on the work surface near the 55gl drum.
8. If you have to take out the canisters while they are still hot, wear two pairs of neoprene gloves plus the orange heat-resistant glove pair (located in the glove-box container to the left of the fume hood).
9. Wait for at least 3 hours to let the canisters cool down.
10. If you want to open the canisters and they are still luke-warm (hand-warm), open them in the fume hood to ensure that vapor can escape. It is safe to open the canisters when they are at room temperature.
21/48
Chemical Separation of Al and Be from Quartz-bearing rocks Bodo Bookhagen, Stanford University
11. Before pouring any acid into the 55gl drum, ensure that the funnel is securely screwed on the lid and that there is enough space left in the drum. Do not empty out the canisters, if there is not enough space left in the 55gl drum! Check the red level monitor that is inserted in the small opening in the drum.
12. Work with one canister at a time: Carefully unscrew the lid and screw the special pouring lid onto the canister. Use only the special pouring lid for emptying out the canisters.
13. Carefully pour out all low-concentrated acid into the 55gl drum.
14. Unscrew the special pouring lid and put the original lid back onto the canister. Close tightly. Place the special pouring lid into the secondary containment tray right next to the 55gl drum.
15. Repeat until all canisters are emptied.
16. Carry all closed canisters to the sink just below the water purification unit. Fill about 100mL milliQ water into each canister and close the canister again.
17. Carry all closed canisters back to the designated work area near the 55gl drum. Empty out all canisters with the special pouring lid as described above.
18. Wash the sample two more times with milliQ water in the sink just below the water purification system. The rinseates can go down the drain, if pH is above 5.5.
Figure 4: Low-concentrated Hydrofluoric/Nitric Acid Filling Station. We mix the 1% HF/HNO3 acid solution in these 20L canisters. They allow us to fill 5x4L canisters – a fast, safe, and efficient way for the HF leeching step.
22/48
Chemical Separation of Al and Be from Quartz-bearing rocks Bodo Bookhagen, Stanford University
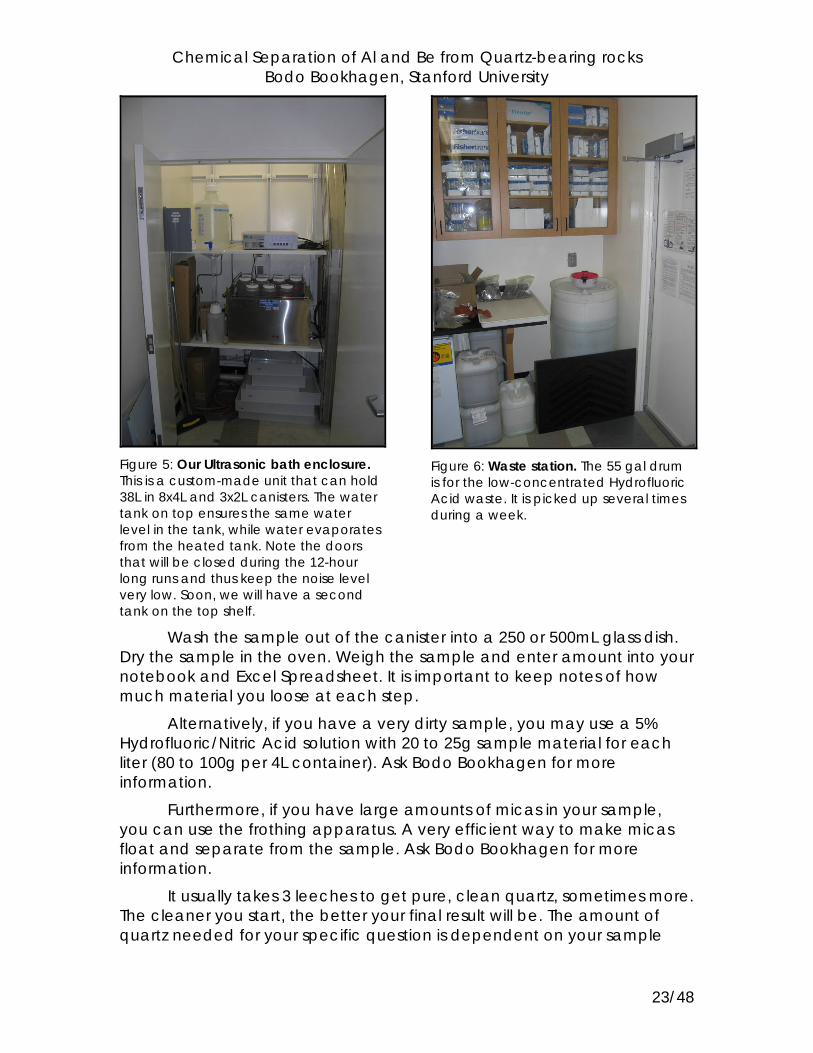
Figure 5: Our Ultrasonic bath enclosure. This is a custom-made unit that can hold 38L in 8x4L and 3x2L canisters. The water tank on top ensures the same water level in the tank, while water evaporates from the heated tank. Note the doors that will be closed during the 12-hour long runs and thus keep the noise level very low. Soon, we will have a second tank on the top shelf.
Figure 6: Waste station. The 55 gal drum is for the low-concentrated Hydrofluoric Acid waste. It is picked up several times during a week.
Wash the sample out of the canister into a 250 or 500mL glass dish. Dry the sample in the oven. Weigh the sample and enter amount into your notebook and Excel Spreadsheet. It is important to keep notes of how much material you loose at each step.
Alternatively, if you have a very dirty sample, you may use a 5% Hydrofluoric/Nitric Acid solution with 20 to 25g sample material for each liter (80 to 100g per 4L container). Ask Bodo Bookhagen for more information.
Furthermore, if you have large amounts of micas in your sample, you can use the frothing apparatus. A very efficient way to make micas float and separate from the sample. Ask Bodo Bookhagen for more information.
It usually takes 3 leeches to get pure, clean quartz, sometimes more. The cleaner you start, the better your final result will be. The amount of quartz needed for your specific question is dependent on your sample
23/48
Chemical Separation of Al and Be from Quartz-bearing rocks Bodo Bookhagen, Stanford University
location, age, and scientific question you are asking. Use the Excel spreadsheet named ‘CosmoLab_guidesheet.xls’ and go to worksheet ‘Surface Ages’ or ‘Qtz-Erosion Rates’ to roughly calculate how much pure quartz you will need to get sufficient accurate results. In this spreadsheet, you can also make assumptions about the amount of material you have to collect to obtain measurable results.
24/48
Chemical Separation of Al and Be from Quartz-bearing rocks Bodo Bookhagen, Stanford University
Part C: Quartz dissolution and Ion-exchange column separation chemistry.
This part of the procedure describes how to isolate the elements Beryllium and Aluminum from the other elements in quartz. The Be and Al fractions are loaded in targets which are analyzed by AMS [for example at Lawrence Livermore National Lab (Bob Finkel) or at PRIME Lab]. The accelerator only uses a fraction of the sample loaded in the target – it measures a ratio of cosmogenic to non-cosmogenic isotopes. For the case of Beryllium, it is assumed that Beryllium is not present as a mineral phase in the sample and a known amount of non-cosmogenic Beryllium is added to the sample (‘Beryllium carrier’).
Before starting with the chemical steps, I suggest looking at the PDF Cosmolab_acid_mixtures.pdf that briefly describes how the acids are mixed that we use in the CRN Target Preparation Facility.
An excerpt from the document:
Acid Normality Mixture to make a 2000mL solution HCl 0.5N 83mL of conc. HCl (36%) + 1917mL of milliQ water HCl 1N 167mL of conc. HCl (36%) + 1833mL of milliQ water HCl 6N 1000mL of conc. HCl (36%) + 1000mL of milliQ water HCl 8N 1333mL of conc. HCl (36%) + 667mL of milliQ water
Mixing of 0.4M Oxalic acid (COOH)2 Molar weight of Oxalic acid, M = 126.07 g/mol Mixing a 2 liter 0.4M oxalic acid solution: 126.07 g/mol x 0.4 mol/l x 2 = 100.9 g Mixing a 1 liter 0.4M oxalic acid solution: 126.07 g/mol x 0.4 mol/l = 50.5 g Put the weight of 100.9 g into the 2L LDPE bottle and add 2L of water. Close lid, shake well – it may take up to several hours until all crystals are dissolved.
25/48
Chemical Separation of Al and Be from Quartz-bearing rocks Bodo Bookhagen, Stanford University
C.1: Measuring Al and other elements in the Part Sample Aliquot (PSA)
After the leeching step, you have to determine a preliminary Aluminum concentration of your sample. This will tell you how ‘clean’ you sample really is. Note that while your sample may look clean, there might be feldspar present that has a higher Al concentration. You may also be interested in knowing how much Titanium contains the sample as high Ti amounts can complicate the chemical processing.
For the purpose of your initial element measurement, it is sufficient to take a 0.5 g aliquot. I refer to this as the Part Sample Aliquot (PSA). This can be used to determine if your sample is clean enough and can be processed further. If your Al concentration of your sample is above ~250 ppm, it may be an indication that non-quartz minerals (e.g., feldspar) are present. You can then either run more ultrasonic baths or decide to do a heavy-liquid separation.
In a few cases of very low Al amounts, you will need to add an Aluminum carrier of a known concentration. You are aiming for 2-4 mg of Al in your sample.
If you are running several samples from a similar source region, one 0.5 g aliquot measurement may be enough. You will measure a more precise Al and element concentration of your sample after digesting.
1. Weigh ~0.5 g quartz into a 25mL Teflon beaker. Use highest precision and record weigh in Excel Spreadsheet (Worksheet C – Chemical Separation, section C.1, column ‘Qtz Mass used for PSA analyses (g)’).
2. Carefully add ~10mL Hydrofluoric Acid. Heat on a hot plate with Teflon watch glass for several hours (or overnight).
3. Remove watch glass and evaporate HF. This may take several hours.
4. If quartz is not completely dissolved, repeat HF dissolution.
5. Add a few mL ‘aqua regia’ (3:1 HCl:HNO3) [You have to wait for ~0.5 hours until the 3:1 Hydrochloric:Nitric Acid mixture turns red and starts bubbling]. Dry down. Repeat 3 times.
6. Add 5mL Hydrochloric Acid and dry down.
7. Allow beaker to cool until warm to touch.
8. Add a minimum amount of concentrated Hydrochloric Acid to dissolve cake. Preferable, you add 3mL conc. HCl. Add 2mL milliQ water and make sure sample is in contact with the acid-milliQ mixture.
26/48
Chemical Separation of Al and Be from Quartz-bearing rocks Bodo Bookhagen, Stanford University
9. If there are undissolved residues in sample (for example, dark, heavy minerals) OR if the acid-milliQ mixture is not clear, you have to filter the solution. It is safe to filter your solution and I strongly recommend this step. If your solution is clear and there are no residues, continue at step 11.
10. Set up the filter apparatus and use the small filter paper. Wetten the paper and put a 15mL HDPE bottle below the filter. Filter your sample and wash the Teflon beaker and filter three times with 2mL 6N Hydrochloric acid into the 15mL HDPE bottle. Skip to step 12.
11. Pour your sample (5mL) in pre-weighted 15mL HDPE bottle (record in Excel Spreadsheet). Wash the beaker with 3mL 0.5N Hydrochloric acid 2 times to make a total of ~11mL solution.
12. Measure weigh and record in Excel Spreadsheet (column: ‘full 15mL HDPE bottle (g)’). Shake well.
13. Now, the sample is ready for measurement. Set up an appointment at the ICP-AES and just before walking over to the Green Building, pour 5-6mL of the sample into the 10mL Disposable Culture Tubes (13x100 mm).
Calculate Al concentration using your Excel Spreadsheet based on the following relation:
preliminary Al concentration [ppm] = Al [ppm 0.5g aliquot] x (Mass of solution in 15mL LDPE [g])/ (aliquot weight [g]).
Or in other words, multiply your results from the ICP measurement with the solution factor (usually on the order of ~20).
If you have a low concentration of Al, you may proceed to the next step (C.2 Quartz dissolution and adding of Be carrier).
27/48
Chemical Separation of Al and Be from Quartz-bearing rocks Bodo Bookhagen, Stanford University
C.2: Quartz dissolution and adding of Be carrier
All work has to be done in the fume hood. While handling the Hydrofluoric acid you have to be extra careful. Work slowly. Do not rush.
Before the dissolution process, you must know the sample size. Use the Excel Spreadsheet to determine the amount of sample material based on age, production rate, and Be carrier.
1. Verify that emergency eyewash/shower is accessible and tested within last month.
2. Check the location and expiration of the Calcium Gluconate and that a copy of the MSDS for HF is available
3. During the entire process, carefully survey benchtop and floor area for any drips. Clean up spills immediately.
4. Ensure that the 55gl drum is placed correctly onto the secondary containment and that there is enough space left in the drum.
5. It is essential that you wear a face shield over your safety glasses, double neoprene gloves, and the neoprene aprons to ensure proper protection for concentrated acid spills.
6. While digestion the samples, no other work is allowed in the fume hood!
7. Take Teflon beaker of appropriate size for your sample (100, 250, 400, or 1000mL). Weigh sample precisely on the Fisher 225D scale (record in Excel Spreadsheet Cosmolab_guidesheet, worksheet C – Chemical Separation, C.2 and C.3: column ‘Qtz Mass used for analyses (g)’). Pour in Teflon beaker and wetten thoroughly with milliQ water. Use the same amount of milliQ as your sample mass. For example, if you have a 25g sample, add ~12mL milliQ. This step prevents the sample from splashing when the Hydrofluoric Acid is added.
8. Add known amount of Be carrier. In most instances, these are 0.3 to 0.5 mg. Sometimes you may want to use less. Chemistry is generally easier with 0.5 mg of Be carrier. Precisely record name, concentration, and weight used of carrier (columns ‘Be carrier weight (g)’, ‘Be carrier concentration (mg/g)’). Also weigh the Be-carrier bottle before and after use (record in Excel spreadsheet _and_ in Lab Notebook). Do not leave the lid open of the Be carrier, close tight after use. For example: If the carrier solution concentration is 500 μg/mL, add 1mL.
9. Move Teflon beaker with sample and Be carrier to the fume hood. All of the following steps are conducted in the FUME HOOD.
28/48
Chemical Separation of Al and Be from Quartz-bearing rocks Bodo Bookhagen, Stanford University
10. Work with one Teflon beaker (sample) at a time. Add the same amount of 49% Hydrofluoric Acid (HF) as your sample mass. Add 69% Nitric Acid (HNO3), use half of your sample amount. For example, if you have a 25g sample, add 25mL HF and 12mL HNO3. Work carefully and pour HF slowly. Wetten your sample in the first steps prevents splashing and a strong exothermic reaction. Now, the acid mixture has a concentration of ~20% HF and ~30% HNO3.
11. Place Teflon lid on the Teflon beaker and let sit for 1 hour.
12. The next steps involve heating the Teflon beaker on a hot plate. Ensure that all flammable and combustible materials are not kept near the hot plate.
13. Move Teflon beaker without lid to hot plate and heat to 65°C. This corresponds to setting 150 on the hot plates used in Mitchell A20. Evaporate to dryness. This may take up to 6 hours, depending on sample mass and volume of acid mixture used. While heating, lower the hood sash down as feasible. Note: This setting prevents the sample from boiling. Under no circumstances, you want to boil your sample at this step.
14. Remove from hot plate and allow cooling for one hour.
15. Wetten your sample with a few mL milliQ water. Add 2x the sample mass HF to your Teflon beaker. For example, for a 25g sample, add 50mL HF.
16. Place Teflon beaker on the hot plate and increase temperature setting to 200. This corresponds to a temperature of ~75°C. Observe closely for the next 2 hours. If foaming occurs, remove beaker from the hot plate and allow cooling for 5 minutes. Place back on the hot plate. If sample is thoroughly heated and no foaming occurs, put lid on the Teflon beaker and heat for 24hrs.
17. Remove lid and evaporate to dryness. While heating and evaporating, lower the hood sash down as feasible.
18. If quartz is not completely dissolved, repeat HF dissolution from step 15.
19. Add a 10mL ‘aqua regia’ (3:1 HCl:HNO3) [You have to wait for ~0.5 hours until the 3:1 Hydrochloric:Nitric Acid mixture turns red and starts bubbling]. Dry down.
20. Repeat 3 times.
21. Dissolve in 10mL concentrated HCl and dry down.
22. The sample is now digested and the residue can be dissolved for further chemical processing.
29/48
Chemical Separation of Al and Be from Quartz-bearing rocks Bodo Bookhagen, Stanford University
C.3: Measuring Al in a Total Sample Aliquot (TSA) This step measures the Al content in your entire sample that you
dissolved in the previous step. It may be skipped if you are only interested in processing Be. Still, I suggest measuring the Al and Ti content.
1. Dissolve in 10mL concentrated HCl. Heat for several minutes on the hot plate until everything is dissolved.
2. Pre weigh a 15/50mL Falcon tube and write down the precise weight (column ‘15/50mL Falcon Tube weight (g)’). Pour sample into Falcon tube and centrifuge for 8 minutes at 3000rpm (setting 1).
3. Pour supernate into a pre-weighted 60mL bottle (column ‘60 ml LDPE Tare (g) 225D’). Wash Teflon beaker with 10mL 6N HCl. Repeat 3 times. Keep Teflon beaker with lid in the fume hood.
4. Pour 5mL 6N HCl into 15/50mL Falcon Tube, vortex, and centrifuge. This step cleans the residue in the Falcon Tube. Pour supernate into 60mL bottle. Repeat this step 3 times.
5. You should now have ~55mL of acid solution in your 60mL bottle. Take precise weight of bottle (column ‘Full 60mL LDPE (g)’).
6. Dry the undissolved material in the Falcon tube in a rack under the heat lamp in the fume hood. When dry, allow to cool, and record weight (column ‘15/50mL Falcon Tb. w/ undiss. material (g)’). The difference of the pre-weighted 15/50mL falcon tube and this weight is the weight of your residue. This will be subtracted from your total sample weight and stored in the column ‘corrected Qtz Mass used for analyses (g)’. If your sample was very clean, you may not have any residue.
7. Pre-weigh 15mL HDPE bottle (column ‘empty 15mL w/ lid LDPE Rate (g)’). Label on two sides.
8. Depending on your first ICP PSA (Part Sample Aliquot) concentration measurement, you take a Total Sample Aliquot (TSA). This is usually between 0.5 or 1 mL. A suggestion is given in column ‘sugg. aliq. based on PSA for 8mL milliQ (g)’. This suggestion assumes that you are diluting the aliquot with 8mL milliQ. You are aiming for an Al concentration of ~10 ppm. Use the Excel Spreadsheet to determine your amount.
9. Add ~8mL of 0.5N HCl or 8mL milliQ. You should now have about 8.5 to 9 mL in your 15mL HDPE bottle.
10. Measure weigh and record in Excel Spreadsheet in ‘total mass in 15mL LDPE (g)’. Shake well. Weigh 60mL bottle after you have taken the TSA as well and record in ‘Mass 60mL LDPE (g) > Aliquot 225D’.
30/48
Chemical Separation of Al and Be from Quartz-bearing rocks Bodo Bookhagen, Stanford University
11. Now, the sample is ready for ICP measurement. Set up an appointment at the ICP-AES and just before walking over to the Green Building, pour 5-6mL of the sample into the 10mL Disposable Culture Tubes (13x100 mm). Cover with Parafilm when walking to the Green building.
12. Pour the reminder of the dissolved sample from your 60mL bottle back into the Teflon beaker. Wash 60mL HDPE bottle 3 times with 10mL 6N HCl and pour wash into the Teflon beaker.
13. Evaporate to dryness.
14. If your Al concentration is above 5mg, I suggest using 5mL column in step C.5 (Be column) and C.7 (Al column). If it is above 10mg, I suggest using 10mL columns. If it is above 25mg, you may not be able to store all Al in the 10mL column and you may have a sample size that is too large or a dirty sample (e.g. contaminated by Feldspar).
31/48
Chemical Separation of Al and Be from Quartz-bearing rocks Bodo Bookhagen, Stanford University
C.3B: Hydroxide co-precipitation (optional) This step is optional and only necessary for very dirty samples.
1. Dissolve sample in 3mL 6N HCl
2. Add 1:1 NH4OH until pH is between 7 and 8.5
3. Vertex and set in heating block for several hours at ‘high heat’, level 1.
4. Be, Al, Fe, Cr, Cu, Ni, Zn, Co, Pb, U and REE hydroxides precipitate
5. Centrifuge and discard supernate into separate bottle (containing K, Na, Ca, Mg, Mn), label ‘Mg’
6. Wash precipitate with milliQ water (+0.01% NH4OH), centrifuge, supernate goes into Mg-bottle. Use Brinkman Bottletop dispenser with prepared milliQ (+0.01% NH4OH).
7. Do last step 3 times
8. Dissolve precipitate with 6N HCl
9. Evaporate on a hot plate
10. Ready to load into Fe Column
32/48
Chemical Separation of Al and Be from Quartz-bearing rocks Bodo Bookhagen, Stanford University
C.4: Fe column This step is the first separation step in which you separate iron and
similar elements from Al and Beryllium. Usually, the 5mL column works for every sample – if you have a very large or dirty sample with a high Fe content, you may want to use the 10mL columns. Print out the worksheet from the Excel Spreadsheet called ‘Fe-column.xls’.
The spreadsheet will serve as a guideline for processing 10 samples at a time. Enter the sample names and mark every step that you have processed. I usually use a ‘/’ if I have filled in the solution in the column and I add a ‘\’ (making it an ‘X’), when the solution was filtered through the column. Also, it helps having the spreadsheet right next to the column or taped to the front of the fume hood.
1. Take a 5mL Biorad AG1-X8 (100-200 mesh) anion resin packed in a 10 mL Kontes Borosilicate column. This column is stored in 0.5N HCl. There are 10mL columns available, too (for very large samples).
2. If you are preparing a new column:
a. Mark 5mL on the column by measuring with milliQ water b. Make a slurry from the Biorad resin and milliQ water c. Load carefully up to 5mL mark with a pipette d. Wash with 2CV 0.5N HCl and ensure that resin is evenly
packed and no air bubbles are within the column e. Condition resin with conc. HCl (2CV) f. Wash with 10CV 0.5N HCl g. The column is now ready to use
3. Condition resin with 8N HCl (2CV, i.e. 2*5mL)
4. Dissolve sample in a minimum amount of conc. HCl (=4mL)
5. Place 50mL PFA beaker below the column and label ‘Be+Al’, you will collect ~10mL (2CV).
6. Load ~2mL at a time (total of ~4mL) and wait until sample is completely loaded into the column
7. Wash sidewalls of the beaker 2x with 3mL 8N HCl and load into column to make up a total of ~10mL (2CV)
8. Place new 100mL beaker below column and label ‘Fe’.
9. There should be a thin yellow/orange rim at the top of the column – that is the iron that will be washed out
10. Collect 10CV (50mL) of 0.5N HCl. This fraction contains (Mn, Mg, Co, Fe)
11. Evaporate all fractions on a hot plate (with heat lamp).
33/48
Chemical Separation of Al and Be from Quartz-bearing rocks Bodo Bookhagen, Stanford University
12. Dissolve Fe fraction in 6N HCl and fill into 60mL HDPE bottle, labeled with sample name + ‘Main Bottle’.
13. When ‘Be+Al’ fraction is evaporated add ~4mL of 0.4M oxalic acid and boil at ~60C for about 2 hrs with lid
14. If 0.4M oxalic acid-sample mix is not clear, centrifuge for 8 min at 3000 rpm (program 1 on accuSpin 400). Load supernate only to column.
34/48
Chemical Separation of Al and Be from Quartz-bearing rocks Bodo Bookhagen, Stanford University
C.5: Be column
Depending on the amount of Al in your sample, you will have to choose 2, 5, or 10mL columns. For small, clean samples, 2mL will mostly work, for large samples (i.e., riversand samples, very dirty samples), you may want to use the 10mL column. Print out the corresponding worksheet (2mL, 5mL, or 10mL) from the Excel Spreadsheet called ‘Be-column.xls’. Again, follow the signs as marks as explained in the Fe column.
Here, I give the amounts for the 2mL column – you have to adjust the volumes accordingly, depending on what column size you are using and what amount of Aluminum is in your sample.
1. Prepare 7.5mL Spectrum 104704 polypropylene column with 2mL Biorad AG50-X8 cation resin (200-400 mesh). This column is stored in milliQ water.
2. If you are preparing a new column:
a. Mark 2mL on the column by measuring with milliQ water b. Make a slurry from the Biorad resin and milliQ water c. Load carefully up to 2mL mark with a pipette d. Wash with 2CV 0.5N HCl and ensure that resin is evenly
packed and no air bubbles are within the column e. Condition resin with conc. HCl (2CV) f. Wash with 10CV 0.5N HCl g. Wash with 5CV milliQ water h. The column is now ready to use
3. 4mL + 6mL 6N HCl: clean resin
4. 4mL + 6mL milliQ water: remove HCl from resin
5. 4mL + 6mL: 0.4M oxalic acid: condition resin
6. Place Teflon PFA beaker (100mL) under the column and label ‘Al+Ti’ (ensure that PFA beaker is clean – rinse with 6N HCl and 3x milliQ if unsure).
7. Load sample with narrow transfer pipette from PFA beaker – 4mL – into column (oxalic Acid complexes all trivalent cations which are therefore not retained on a cation resin)
8. 2mL of 0.4M oxalic acid: wash sidewalls of beaker and load into column
9. 2mL of 0.4M oxalic acid: wash sidewalls of beaker and load into column
10. 20mL of 0.4M oxalic acid [you can put 5mL at a time into the column]: elute Al, Ti
35/48
Chemical Separation of Al and Be from Quartz-bearing rocks Bodo Bookhagen, Stanford University
11. 2mL + 4mL milliQ to remove oxalic acid from resin
12. 2mL + 6mL 0.5N HCl: elute Na
13. Place new PFA beaker labeled ‘Be’ under the column
14. Be: Add 2mL + 2mL + 10mL 1M HCl
15. Clean resin with 20mL 6N HCl
16. 10mL milliQ to remove HCl
17. Seal and store column in milliQ
18. Both fractions (Al+Be) are evaporated under a heat lamp and on a hot plate on low settings.
36/48
Chemical Separation of Al and Be from Quartz-bearing rocks Bodo Bookhagen, Stanford University
C.6: Purifying Be fraction
This step takes the Beryllium fraction from the previous Be-column run and turns it into Beryllium hydroxide (Be(OH)2).
1. Dissolve dried-down Beryllium fraction from previous Be-column run with 1mL 6N Hydrochloric Acid. Place Nalgene PFA beaker on hot plate at low setting for ~30 minutes.
2. Pour sample into 15mL Falcon Tube.
3. Rinse sample beaker 3 times with ~1mL 0.5N Hydrochloric Acid and pour into Falcon Tube. There should be 4-5mL of solution in the Falcon Tube.
4. Add milliQ water to the Falcon tube up to 7 mL. If you used more Hydrochloric Acid to dissolve your sample and you already have 7mL of acid solution in your Falcon tube, omit this step.
5. Add 5mL of 1:1 NH4OH up to 12mL in your Falcon tube.
6. Shake and vortex for 10 sec. Ensure that pH > 7 and pH < 9.
7. Put in Dry Bath incubator (Heat Block) on high heat setting 1 to 2. Heat for 12 hours or overnight. You should see Beryllium hydroxide forming.
8. Centrifuge 8 minutes at 3000 rpm (setting 1 at accuspin 400).
9. Discard supernate and wash Beryllium hydroxide slurry with 5mL of milliQ water + a few drops of NH4OH (use prepared water in Brinkman Bottletop dispenser).
10. Shake and vortex for 10 sec.
11. Centrifuge at setting 1.
12. Repeat steps 9 to 11 three times.
37/48
Chemical Separation of Al and Be from Quartz-bearing rocks Bodo Bookhagen, Stanford University
C.7: Extracting Al from the Al fraction [after the Be column (C.5)]
This step takes the ‘Al+Ti’ fraction from the previous column run and separates Al and Ti. Note: If your sample contained high amounts of Aluminum and you were using a larger column for step 5, you will need to use a larger column for this step as well. Print out the corresponding worksheet (2mL, 5mL, or 10mL) from the Excel Spreadsheet ‘Al-column.xls’. Here, I describe the steps necessary to run a 2mL column (good for Aluminum content of less than 10mg).
1. Prepare 7.5mL Spectrum 104704 polypropylene column with 2mL Biorad AG1-X8 resin (100-200 mesh). This column is stored in milliQ water.
2. If you are preparing a new column:
a. Mark 2mL on the column by measuring with milliQ water b. Make a slurry from the Biorad resin and milliQ water c. Load carefully up to 2mL mark with a pipette d. Wash with 2CV 0.5N HCl and ensure that resin is evenly
packed and no air bubbles are within the column e. Condition resin with conc. HCl (2CV) f. Wash with 10CV 0.5N HCl g. Wash with 5CV milliQ water h. The column is now ready to use
7. Place new Nalgene PFA beaker labeled ‘before Al’ under the column. Safe this fraction if Al elutes early.
8. Dissolve ‘Al+Ti’ fraction in 8mL 0.4M Oxalic Acid and load into column. If not entirely dissolved, centrifuge and load supernate only into the column.
9. Wash ‘Al+Ti’ beaker 2x with 4 mL 0.4M oxalic Acid
10. 5mL + 5mL + 5mL + 5mL milliQ to remove all 0.4M Oxalic Acid from resin.
11. Place 25mL Nalgene PFA beaker labeled ‘Al’ under the column.
12. 5mL + 5mL 8N HCl to collect Al.
13. Place new Nalgene PFA beaker labeled ‘Ti’ under the column (save in case Al elutes late).
38/48
Chemical Separation of Al and Be from Quartz-bearing rocks Bodo Bookhagen, Stanford University
14. 5 x 4mL 0.5N HCl.
15. Remove Nalgene PFA beaker and clean resin with 4 ml + 4mL + 4mL milliQ.
16. Evaporate all fractions under the heat lamp.
17. Dissolve ‘Ti’ fraction in 6N HCl and fill into 60mL HDPE ‘Main bottle’.
18. Dissolve ‘before Al’ fraction in ‘aqua regia’ (3:1 HCl:HNO3) [You have to wait for ~0.5 hours until the 3:1 Hydrochloric:Nitric Acid mixture turns red and starts bubbling]. Dry down. Repeat 3 times.
19. Dissolve ‘before Al’ fraction in 6N HCl and fill into 60mL HDPE ‘Main bottle’.
20. ‘Al’ fraction is ready to be purified in the next step.
39/48
Chemical Separation of Al and Be from Quartz-bearing rocks Bodo Bookhagen, Stanford University
C.8: Purifying Al fraction
This step takes the Aluminum fraction from the previous Al-column run and turns it into Aluminum hydroxide (Al(OH)3).
1. Dissolve dried-down Al fraction from previous Al-column run with 1mL 6N Hydrochloric Acid. Place Nalgene PFA beaker on hot plate at low setting for ~30 minutes.
2. Pour sample into 15mL Falcon Tube.
3. Rinse sample beaker 3 times with ~1mL 0.5N Hydrochloric Acid and pour into Falcon Tube. There should be 4-5mL of solution in the Falcon Tube.
4. Add milliQ water to the Falcon tube up to 7 mL. If you used more Hydrochloric Acid to dissolve your sample and you already have 7mL of acid solution in your Falcon tube, omit this step.
5. Add 5mL of 1:1 NH4OH up to 12mL in your Falcon tube.
6. Shake and vortex for 10 sec. Ensure that pH > 7 and pH < 9.
7. Put in Dry Bath incubator (Heat Block) on high heat setting 1 to 2. Heat for 12 hours or overnight. You should see Aluminum hydroxide forming.
8. Centrifuge 8 minutes at 3000 rpm (setting 1 at accuspin 400).
9. Discard supernate and wash Aluminum hydroxide slurry with 5mL of milliQ water + a few drops of NH4OH (use prepared water in Brinkman Bottletop dispenser).
10. Shake and vortex for 10 sec.
11. Centrifuge at setting 1.
12. Repeat steps 9 to 11 three times.
40/48
Chemical Separation of Al and Be from Quartz-bearing rocks Bodo Bookhagen, Stanford University
Figure 7: Dry-bath incubator. Note the various sizes for 50ml Falcon Tubes (top), 15mL Falcon Tube (bottom left), and a custom-made block for holding quartz crucibles used for oxidizing Berylliumhydroxide (bottom right).
Figure 8: Close-up view of the custom-made dry bath incubator. Note the quartz crucible sticking out on the top left.
41/48
Chemical Separation of Al and Be from Quartz-bearing rocks Bodo Bookhagen, Stanford University
Part D: Preparing samples for AMS targets and AMS target loading
In this part, I describe how to load the targets. While this step is the very last before the actual AMS measurements it is very tedious as all work has to be conducted in a glove box.
It is a white crystalline oxide and formed in the tube furnace. Beryllium oxide formed at high temperatures (>800°C) is inert but may be easily dissolved in hot aqueous ammonium bifluoride (NH4HF2) or a hot solution of concentrated sulfuric acid (H2SO4) and ammonium sulfate ((NH4)2SO4). BeO is carcinogenic if the powder is ingested or inhaled and may cause chronic beryllium disease.
HEALTH AND SAFETY ADVISORY
Again, I would like to emphasize that Beryllium Oxide (BeO) is a very dangerous substance. If you work in Mitchell A20, you must be at full health. If you experience dizziness or drowsiness, do not work in Mitchell A20. Read the Health advice posted in Mitchell A20. It is mandatory to wear full personal protective equipment, especially when working with concentrated acids. These include:
1. goggles (prescription glasses are not enough!) 2. double gloves - neoprene 3. closed-toe shoes with socks 4. long pants (no shorts!) 5. lab coat 6. face shield 7. neoprene apron 8. small Chemical Spill Kit
In addition, you will have to read, understand, agree, and sign a declaration that you have been trained in all necessary Standard Operating Procedures (SOPs). A copy of it will be stored in the cosmogenic nuclide lab. If you are unsure about any step, please contact the lab manager (Bodo Bookhagen) or the PI (Prof. George Hilley) and clarify these issues.
Chemical Separation of Al and Be from Quartz-bearing rocks Bodo Bookhagen, Stanford University
Figure 9: Backside of glove box used for loading the targets. Note the HEPA filter unit on top of the glove box. There is a stainless-steel plate for holding the targets (cathodes) and a hammer inside the glove box.
Figure 10: Stainless steel plate with target (cathode). The plate provides extra stability while the sample is loaded and hammered into the target.
43/48
Chemical Separation of Al and Be from Quartz-bearing rocks Bodo Bookhagen, Stanford University
D.1+2: Drying Al and Be Hydroxide in dry bath and Burning in tube furnace
This step describes the igniting (or burning) process of the Beryllium and Aluminum Hydroxide to Beryllium and Aluminum Oxide. Please follow the accompanying SOP Igniting Beryllium and Aluminum Hydroxide to Beryllium and Aluminum Oxide closely. The ignited samples can then be loaded into the targets, described in the SOP loading AMS targets for Beryllium and Aluminum.
Before you can use the low Boron quartz crucibles, you will have to clean them. Follow these steps to get clean quartz vials:
1. Count 100 vials into a 1000 ml clean Nalgene PFA beaker.
2. Rinse vials several times with milliQ water
3. Wash the vials in 1:8 Nitric acid (~8.5 %). Soak overnight.
4. Rinse vials several times with milliQ to remove Nitric acid
5. Make a 1:3 Hydrofluoric Acid solution (~49% concentrated HF, diluted with 3 times milliQ makes a ~16% solution).
6. Use 1L Teflon beaker, fill in all quartz vials. Cover quartz vials with ~16% HF solution by about 1-2 cm, and turn up hotplate.
7. Boil 30 minutes. For the hotplates in use in Mitchell A20, set the temperature to 200°C and allow 15 minutes to heat up the solution. The beakers will be a total of 45 minutes on the hot plate.
8. Turn off hotplate and allow beakers to cool. Drain acid to waste. Wash with milliQ water several times.
9. Add 1:1 Nitric acid to cover vials by 1-2 cm.
10. Return beaker to hotplate and boil for 30 minutes.
11. Allow beakers to cool; drain acid to waste.
12. Rinse vials several times in milliQ water, then rinse each vial individually and try to shake off all excess water.
13. If you intend to use the vials for Beryllium, you leech them a second time in the ~16% HF solution. Repeat step 5-12, but boil only for 15 minutes in step 7.
14. Dry under heat lamp in fume hood. Place in washed zip lock bags in batches of 25. Label bags to indicate who and when they were cleaned. Place Beryllium vials in a separate bags.
15. Place all bags in a second zip lock bag. Check all vials for holes in the bottom before using them. Discard any with holes.
44/48
Chemical Separation of Al and Be from Quartz-bearing rocks Bodo Bookhagen, Stanford University
Now you are ready to run the drying procedure. Note: You will have to clean the inner crucibles only once, they are discarded after each use. You clean the outer quartz crucibles after every use – they can be reused several times.
1. Verify that emergency eyewash/shower is accessible and tested within last month.
2. Verify that fume hoods are currently certified.
3. It is essential that you clean the work space sufficiently before starting to work. Avoid any contamination issues.
4. Take the 15mL Falcon tubes containing your Beryllium or Aluminum Hydroxide. Pour supernate into waste bin.
5. Place heat block with custom-made blocks for quartz vials into the fume hood and turn on high heat, setting 1.
6. Weigh and record weight of quartz vials that will be used for sample loading. Label on two sides.
7. Use a pipette to transfer Beryllium or Aluminum Hydroxide slurry to vial in heat block.
8. Wait until water in sample evaporated and add more sample material. This may take several hours.
9. Allow quartz vials to cool for 1 hour and place into larger quartz vials with lid. Label.
10. Place larger quartz vials with sample material in smaller, inside quartz vials into the custom-made quartz glass rack. Record exact sample order.
11. Remove heat block from fume hood and carefully place tube furnace into the fume hood.
12. Insert rack with samples carefully into tube furnace.
13. Post sign on fume hood indicating “Furnace in Use, no other use of fume hood allowed”. Turn on tube furnace to 400°C. Wait for 1 hours, then increase temperature to 850°C. It takes about 2 hours to reach 850°C. When the temperature of 850°C has been reached, wait 15 minutes and turn off. Let cool overnight or for 8 hours.
14. Inside the fume hood, carefully remove the rack with vials and label the beakers again. All labels are removed at temperature above 400°C.
15. Inside the fume hood, weigh the quartz vials and record weight in notebook.
45/48
Chemical Separation of Al and Be from Quartz-bearing rocks Bodo Bookhagen, Stanford University
16. Decontaminate furnace surface and hood surfaces with Acetone and Kimwipes. All Kimwipes used inside the glove box will go into the plastic bag labeled ‘BeO waste’ (with a Stanford Hazardous Waste tag). Initiate a pick up from EH&S at http://wastepickup.stanford.edu.
17. Place sample back into rack and move to glove box. The samples are now ready to be loaded into the AMS targets.
18. Remove the tube furnace from the fume hood and place it in its dedicated place.
Figure 11: Front view of glove box.
Figure 12: Low Boron quartz glass holder. We use this custom-made design to ignite our samples in the tube furnace.
Chemical Separation of Al and Be from Quartz-bearing rocks Bodo Bookhagen, Stanford University
D.3: Loading samples into AMS targets in the glove box
This step describes the handling and loading of targets that will be sent to an AMS. All work has to be done in the glove box!
Please follow the SOP Loading AMS targets for Beryllium and Aluminum closely!
1. Verify that emergency eyewash/shower is accessible and tested within last month.
2. Check the integrity of all connections and gloves of the glove box prior to any work in the glove box. Check glove box owner’s manual for guidance on proper use and inspection.
3. It is essential that all grinding and loading work is done within the glove box.
4. Take the BeO in its holding rack and place it inside the glove box through the air lock. Make sure that you have precisely weighted and recorded the weight of all vials (done in the previous step).
5. Remove the outer quartz vial and place in the plastic bucket within the glove box. Use tweezers to remove the inner vial. The outer quartz vials will be cleaned in Nitric Acid and may be reused.
6. The inner vial contains the BeO/Al2O3. Put it in the Aluminum holding block and grind with the drill gauge for several minutes (5 to 10 minutes).
7. Grind BeO/Al2O3 until in a fine-grained state. Note: Al2O3 is much harder than BeO and may need longer grinding.
8. Add Silver powder to the grinded Al2O3 and Niobium powder to BeO. Add by weight. Grind for several more minutes until well mixed.
9. Grind all samples and mix with Silver/Niobium. Put back into the holding block and weigh all vials. Record weight and determine Oxide to Metal ratios.
10. Clean working space carefully after every grinded sample with Kimwipes and Acetone. All Kimwipes used inside the glove box will go into the plastic bag labeled ‘BeO waste’ (with a Stanford Hazardous Waste tag).
11. Carefully pour a part of the BeO-Niobium/Al2O3-Silver mixture into the AMS target. Use the drill gauge and hammer to put material fully into the AMS target. You will need only a fraction of the material.
47/48
Chemical Separation of Al and Be from Quartz-bearing rocks Bodo Bookhagen, Stanford University
12. The rest of the BeO-Niobium/Al2O3-Silver mixture goes into a labeled plastic vial. Save this material in case more measurements are needed.
13. Put target into its plastic container. The target is now sealed and can be transported to the AMS measuring facility.
14. When all samples have been loaded, wipe all items in the glove box with Acetone and Kimwipes. All Kimwipes used inside the glove box will go into the plastic bag labeled ‘BeO waste’ (with a Stanford Hazardous Waste tag).
15. Remove all items from the glove through the air lock.
16. Clean the glove box with Acetone and Kimwipes. All Kimwipes used inside the glove box will go into the plastic bag labeled ‘BeO waste’ (with a Stanford Hazardous Waste tag). Initiate a pick up from EH&S at http://wastepickup.stanford.edu.
17. Turn on the vacuum system of the glove box. This helps to remove Berylliumoxid particles that are airborne inside the glove box – IMPORTANT: This does not ensure complete decontamination of glove box interior.