CHAPTER 5-1 Cisco Prime Network 3.10 Customization Guide OL-28067-01 5 Create Workflows to Execute a Series of Commands on a Device The following topics describe how to use the Prime Network Workflow GUI client to create workflow templates that allow you to deploy and execute a series of commands in runtime. • What is Prime Network Workflow?, page 5-1 • Prime Network Workflow Window, page 5-3 • Steps for Creating a Workflow Template, page 5-5 • Create and Test a New Workflow Template, page 5-5 • Using Tasks in the Task Library, page 5-7 • Prime Network Activation Workflow Template Attributes, page 5-13 • Workflow Operations (Run, View, Abort, Delete), page 5-14 • View Workflow History Using Prime Network Events, page 5-18 • Create Custom Tasks for Workflows, page 5-19 Additional information about Prime Network Workflow is available on the Cisco Developer Network (CDN), including sample workflow that will help you become familiar with the framework. What is Prime Network Workflow? Prime Network Workflow is used for creating activation workflow templates. A workflow template consists of several tasks which are grouped together and specified into a flow, with certain sequences, branches, and failure policies (including rollback procedures). You can test and preview workflow templates before deploying (copying) them to the gateway to make them available to Prime Network users. After a template is deployed to the gateway, users with OperatorPlus privileges can execute the workflow using a BQL command. Each time a user executes a workflow, Prime Network creates a new workflow instance with its own unique ID, and stores it in the database. Thus there can be many instantiations of a single workflow template. Each instance has its own output, which you can export and use to analyze the commands. Workflows can be nested, which means one workflow can invoke subworkflows synchronously, and pass arguments to each subworkflow invocation. This allows you to group and isolate tasks that are in a child workflow (sub-workflow) from tasks that are in the parent workflow.
Transcript
OL-28067-01
C H A P T E R 5
Create Workflows to Execute a Series of Commands on a Device
The following topics describe how to use the Prime Network Workflow GUI client to create workflow templates that allow you to deploy and execute a series of commands in runtime.
• What is Prime Network Workflow?, page 5-1
• Prime Network Workflow Window, page 5-3
• Steps for Creating a Workflow Template, page 5-5
• Create and Test a New Workflow Template, page 5-5
• Using Tasks in the Task Library, page 5-7
• Prime Network Activation Workflow Template Attributes, page 5-13
• View Workflow History Using Prime Network Events, page 5-18
• Create Custom Tasks for Workflows, page 5-19
Additional information about Prime Network Workflow is available on the Cisco Developer Network (CDN), including sample workflow that will help you become familiar with the framework.
What is Prime Network Workflow?Prime Network Workflow is used for creating activation workflow templates. A workflow template consists of several tasks which are grouped together and specified into a flow, with certain sequences, branches, and failure policies (including rollback procedures). You can test and preview workflow templates before deploying (copying) them to the gateway to make them available to Prime Network users.
After a template is deployed to the gateway, users with OperatorPlus privileges can execute the workflow using a BQL command. Each time a user executes a workflow, Prime Network creates a new workflow instance with its own unique ID, and stores it in the database. Thus there can be many instantiations of a single workflow template. Each instance has its own output, which you can export and use to analyze the commands.
Workflows can be nested, which means one workflow can invoke subworkflows synchronously, and pass arguments to each subworkflow invocation. This allows you to group and isolate tasks that are in a child workflow (sub-workflow) from tasks that are in the parent workflow.
Chapter 5 Create Workflows to Execute a Series of Commands on a Device What is Prime Network Workflow?
Workflows can include commands that you created using Command Builder as long as the commands have been published (made accessible to) the NEs that will be affected by the workflow. Those commands are called by BQL tasks in the workflow. Like Command Builder, Workflow can access all information models (IMOs).
The Workflow GUI is based on LiquidBPM by Autonomy, Inc., with extensions that are specific to Prime Network. Because in many cases the Prime Network procedure is the same as the LiquidBPM procedure, the topics in this section will direct you to the LiquidBPM online help, which can be launched from the Workflow GUI client.
The Workflow Engine resides on the gateway using AVM 66. A workflow that is stored on the gateway (rather than locally on a client machine) is called a deployed workflow. Deployed workflows can be managed from the Prime Network Administration GUI client, where users with Administrator privileges can view the workflow’s status and properties. To deploy, retrieve, or delete a workflow template from the gateway, AVM 66 must be running.
Launching Prime Network WorkflowIf Prime Network is installed as a standalone product, launch Workflow as follows:
Start > All Programs > Cisco Prime Network > Cisco Prime Network Workflow
If Prime Network is installed in suite mode with Cisco Prime Central, launch Workflow by selecting Tools > Workflow in the Prime Network Vision GUI client.
5-2Cisco Prime Network 3.10 Customization Guide
OL-28067-01
Chapter 5 Create Workflows to Execute a Series of Commands on a Device Prime Network Workflow Window
Prime Network Workflow WindowFigure 5-1 shows an example of the Prime Network Workflow window when a template is opened.
Figure 5-1 Workflow Window
Table 5-1 and Table 5-2 lists the action and tasks with which you should become familiar.
1 Drawing area 2 Task toolbar (see Table 5-2)
3 Task attribute table 4 Tree
5 Action toolbar (see Table 5-1)
Table 5-1 Important Workflow Template Actions
Tasks Description
New Workflow creates a new workflow template and automatically saves it on the local client machine.
Tip If you want to create a wizard using the Activation Wizard Builder (AWB), choose File > New Activation Workflow to create the activation. That template contains information that is necessary for creating a wizard using the AWB.
The Open Workfow, Save Workflow As, Rename Workflow, and Delete choices all perform operations on this same directory.
Import Workflow loads a saved template XML file into the Workflow Editor.
5-3Cisco Prime Network 3.10 Customization Guide
OL-28067-01
Chapter 5 Create Workflows to Execute a Series of Commands on a Device Prime Network Workflow Window
Export saves a workflow template as an XML file on the local machine. This is useful if you want to perform file actions, such copying or e-mailing it to another location. (The XML template is not saved in the Prime Network database.)
Execute runs the workflow template on the local machine. If the workflow template contains valid BQL tasks, they will be executed on the gateway.
Retrieve Workflow from Server retrieves a workflow template from the Prime Network database and loads it into the Workflow Editor.
Delete Workflow from Server deletes a workflow template from the Prime Network database.
Deploy Workflow saves the workflow template on the gateway and in the Prime Network database.
Table 5-2 Important Workflow Template Tasks
Tasks Description
Execute BQL calls commands that reside on the client machine. For more information, see Execute BQL Task, page 5-8.
Subflow another workflow in an embedded fashion. See Workflow Call Task, page 5-9.
Lock protects a resource so that it cannot be used concurrently by multiple workflows. See Lock and Unlock Task, page 5-11.
Unlocks a locked resource. Unlock unlocks a locked resource so that it can be locked and unlocked using the Lock task and the Unlock task. See Lock and Unlock Task, page 5-11.
Activation Tokenizer provides repetitive looping so that multiple attributes can be passed to the workflow. See Activation Tokenizer Task, page 5-12.
Table 5-1 Important Workflow Template Actions (continued)
Tasks Description
5-4Cisco Prime Network 3.10 Customization Guide
OL-28067-01
Chapter 5 Create Workflows to Execute a Series of Commands on a Device Steps for Creating a Workflow Template
Steps for Creating a Workflow TemplateThese steps describe how to create a workflow template.
Figure 5-2 Steps for Creating a Workflow
Note Commands you create with Command Builder must be published (made accessible to) all NEs that are affected by the workflow. If a workflow calls a command that has not been published to the NE, it will fail on the NE.
For more information about:
• Creating a command using the Command Builder GUI client, see Configure Devices by Creating and Executing Commands, page 4-1).
• Creating a workflow template and testing it locally, see Create and Test a New Workflow Template, page 5-5.
• Running the workflow, see Workflow Operations (Run, View, Abort, Delete), page 5-14.
Create and Test a New Workflow TemplateYou can create workflow templates from scratch, or retrieve an existing workflow template, rename it, and edit it. When you create a new workflow template, the template information is saved on your local client machine until you deploy (save) it to the gateway. When you deploy the workflow template to the gateway, it can be viewed and managed from the Prime Network Administration GUI client. To retrieve, deploy, or delete an existing workflow templates from the gateway, AVM 66 must be running so that Workflow and the gateway can properly communicate.
Step 1: Create a command usingCommand Builder and preview it
Step 3: Test the workflow locally
Step 2: Define tasks and workflowsusing Prime Network Workflow
Step 5: Run the workflow
Step 4: Deploy the workflow to the gateway
Step 6: View the workflow results in Prime Network Administration
2925
80
5-5Cisco Prime Network 3.10 Customization Guide
OL-28067-01
Chapter 5 Create Workflows to Execute a Series of Commands on a Device Create and Test a New Workflow Template
Tip Use Export to save templates. This saves the template as an XML file.
Use this procedure to create a new workflow template.
Step 1 Launch Prime Network Workflow (see Launching Prime Network Workflow, page 5-2).
Step 2 Create the new workflow template by choosing one of the following:
• If you want to create a non-activation workflow, choose File > New Workflow.
• If you want to create an activation workflow, choose File > New Activation Workflow.
• To open an existing template, choose File > Open Workflow, which will list all of the templates that are stored in C:/Cisco Systems/Prime Network/studio_db.
Step 3 Name the template in accordance with the following rules, and click OK.
• Do not include underscore ( _ ) or percent (%) wildcards.
• If you are creating an activation workflow, give the template an NSA_ prefix (otherwise it will not appear in the Activation History window).
Tip Use a suffix to differentiate workflow templates created in different Prime Network versions, such as _v_3_8 and _v_3_9. This will help when you upgrade the Prime Network software.
The template is saved on the local client machine under C:/Cisco Systems/Prime Network/studio_db.
Step 4 Add Tasks to the workflow template. The following steps describe the basic process:
a. Click a Task in the task toolbar, and click your mouse in the drawing area. The task is added to the drawing area.
Several tasks are especially useful for Prime Network and are described in Using Tasks in the Task Library, page 5-7. For information about the other tasks that are available, see the LiquidBPM online help (select File >Help and select Task Library).
b. Assign properties to the task by right-clicking the task icon and selecting Edit Properties. This opens a properties sheet.
c. Define the properties. Properties are divided into three types:
– General Properties, which are property types that are common to all tasks (such as Name). Some properties are assigned by Prime Network (for example, a task ID number); these are called fixed properties. The other properties are defined by the user and are called editable properties.
– Attributes, which are task-specific properties.
Tip Incorrect attribute names are a common cause of workflow template errors, so be careful when entering this information.
– Callback Scripts, which specify actions that should be performed (or criteria that should be met) before or after performing the task, or if an exception is encountered.
5-6Cisco Prime Network 3.10 Customization Guide
OL-28067-01
Chapter 5 Create Workflows to Execute a Series of Commands on a Device Using Tasks in the Task Library
Tip If you want Prime Network to generate an event when a workflow is aborted, configure a preActivateScript in the Callback Scripts tab:thisWorkflow.getRootTask().abort();
Note By default, all attributes in Prime Network Workflow are of the type String. To use another attribute type, such as Integer, set the flag use-workflow-string-param-casting to true in NETWORKHOME/Main/registry/workflowavm.xml. In workflowavm.xml, the flag use-workflow-string-param-casting appears under the workflow key. After you change this flag to true, you can use attribute types other than String.
Step 5 Test the template locally.
a. Choose Tools > Execute Workflow. Different tabbed views are opened. The graphical, tabular, and XML views provide different ways to examine the workflow progress, and the Workflow State Analysis tab that reflects the activation status of the workflow.
b. Set the test attribute values:
– Right-click anywhere in the grey area and select Workflow Properties.
– In the Attributes tab, click the Default Values area and enter some values.
– Click Apply and Close.
c. Click Activate. A Console window opens and prints the status of each task in the workflow template.
d. Close the Console window. Note that the shape and colors of the tasks in the Graphical View tab changes to show the activation status of each task: Ready (blue), Active (green), Abort (red), Done (grey), and Passive (light grey).
Step 6 Once you have tested the workflow template successfully on the local client, you can do any of the following:
a. Save the workflow template on the gateway and in the Prime Network database by choosing Tools > Deploy Workflow.
b. Use a BQL command to run the workflow template on the gateway. See Preview and Run Workflow Templates, page 5-14.
c. (Activation workflow templates only) Create a wizard that will call the workflow template. See Steps for Creating an Activation Wizard, page 6-3.
Using Tasks in the Task LibraryThe following tasks are of special importance in Prime Network. See the accompanying topics for more information.:
Task Type For more information, see:
Execute BQL Execute BQL Task, page 5-8
Workflow Call Workflow Call Task, page 5-9
Subflow Subflow Task, page 5-11
5-7Cisco Prime Network 3.10 Customization Guide
OL-28067-01
Chapter 5 Create Workflows to Execute a Series of Commands on a Device Using Tasks in the Task Library
BQL commands are specified in the Command Template tab of the Task Properties dialog box, and the result is stored in a task attribute called Result so that it can be used by scripts and other tasks. The Command Template tab can reference workflow template attributes and task attributes. At runtime, the attribute’s values are substituted into the template before it is run.
Note The BQL task in a workflow template can only execute script BQLs and any of the generic commands: Get, Delete, Find, Update, Set.
Note When you execute a workflow to run commands on a device, using the RunWorkflow BQL command, it will be executed only if the preview flag in the RunWorkflow BQL is false. If the value of the preview flag is true, it will only be previewed. See Preview and Run Workflow Templates, page 5-14for details.
Execute BQL TaskThe BQL task in a workflow template can only execute script BQLs and any of the generic commands: Get, Delete, Find, Update, Set. The Execute BQL task has an additional tab in its properties sheet, Command Template, where you enter the command definition.
In the following example, a user used an activation template, and created a BQL task and named it Create VRF. The BQL task calls AddVrfSite, which is a command the user built with Command Builder. All of the attributes in the AddVrfSite command are entered in the Attributes tab.
Chapter 5 Create Workflows to Execute a Series of Commands on a Device Using Tasks in the Task Library
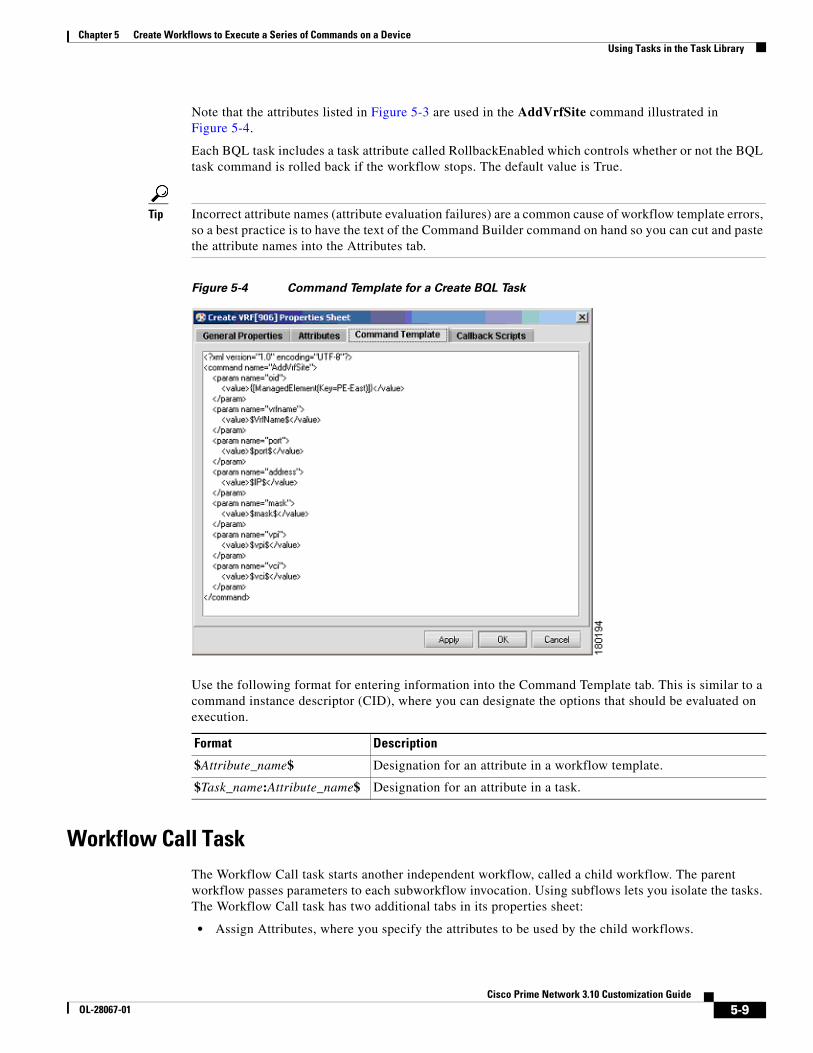
Note that the attributes listed in Figure 5-3 are used in the AddVrfSite command illustrated in Figure 5-4.
Each BQL task includes a task attribute called RollbackEnabled which controls whether or not the BQL task command is rolled back if the workflow stops. The default value is True.
Tip Incorrect attribute names (attribute evaluation failures) are a common cause of workflow template errors, so a best practice is to have the text of the Command Builder command on hand so you can cut and paste the attribute names into the Attributes tab.
Figure 5-4 Command Template for a Create BQL Task
Use the following format for entering information into the Command Template tab. This is similar to a command instance descriptor (CID), where you can designate the options that should be evaluated on execution.
Workflow Call TaskThe Workflow Call task starts another independent workflow, called a child workflow. The parent workflow passes parameters to each subworkflow invocation. Using subflows lets you isolate the tasks. The Workflow Call task has two additional tabs in its properties sheet:
• Assign Attributes, where you specify the attributes to be used by the child workflows.
Format Description
$Attribute_name$ Designation for an attribute in a workflow template.
$Task_name:Attribute_name$ Designation for an attribute in a task.
5-9Cisco Prime Network 3.10 Customization Guide
OL-28067-01
Chapter 5 Create Workflows to Execute a Series of Commands on a Device Using Tasks in the Task Library
• Target Template, where you enter the child workflows that will be called by the parent workflow.
Note Child workflows are not visible through the API. You must interact directly with the parent workflow.
The parent workflow only runs when the subworkflow has finished.
A subflow does the following:
• The parent workflow passes parameters to the child workflow. If the parent workflow is aborted or deleted, the child workflow is also aborted or deleted.
• The child workflow is runs separately, and has its own scope for attributes. Its output is directed to the parent workflow.
• The parent workflow waits for the child workflow to terminate, and only runs when the child workflow has finished. If the child workflow stops, the parent workflow also stops.
The maximum nesting depth is 16, and rollback is performed at all depths.
In the following example, a user created a workflow call task named Workflow Call. Figure 5-5 shows the Assign Attributes tab, which instructs the task to use the parent attributes as input to this task.
Figure 5-5 Assign Attributes Tab for a Workflow Call Task
Use the following format for entering information into the Assign Attributes tab.
The child workflows that will be called by this task are displayed in Figure 5-6.
Designation for attributes taken from a particular task in the parent workflow.
5-10Cisco Prime Network 3.10 Customization Guide
OL-28067-01
Chapter 5 Create Workflows to Execute a Series of Commands on a Device Using Tasks in the Task Library
Figure 5-6 Target Template Tab for a Workflow Call Task
Subflow TaskThe Subflow task is used to embed and run another workflow in a workflow instance. It is similar to the Workflow Call task except that in the Subflow task, the workflows are actually embedded in each other. The maximum workflow nesting depth is defined in the registry. The default value is 16.
To configure this type of task, see the instructions in Workflow Call Task, page 5-9.
Lock and Unlock TaskThe Lock and Unlock tasks allow you to protect a component from concurrent use by multiple workflows. Both tasks have an additional tabs in its properties sheet, Resource Names, where you list the resources to be locked (and unlocked). A lock can be owned by only one workflow at a time.
Activities not related to workflows can access a resource even when it is locked by a workflow. Participation in the locking process is optional.
Resources are automatically locked during rollback, but the system prevents deadlocks before they occur. Upon detecting an imminent deadlock, the lock operation belonging to the workflow with the least progress fails. A failed lock might or might not abort the workflow.
Figure 5-7 gives an example of a lock task.
5-11Cisco Prime Network 3.10 Customization Guide
OL-28067-01
Chapter 5 Create Workflows to Execute a Series of Commands on a Device Using Tasks in the Task Library
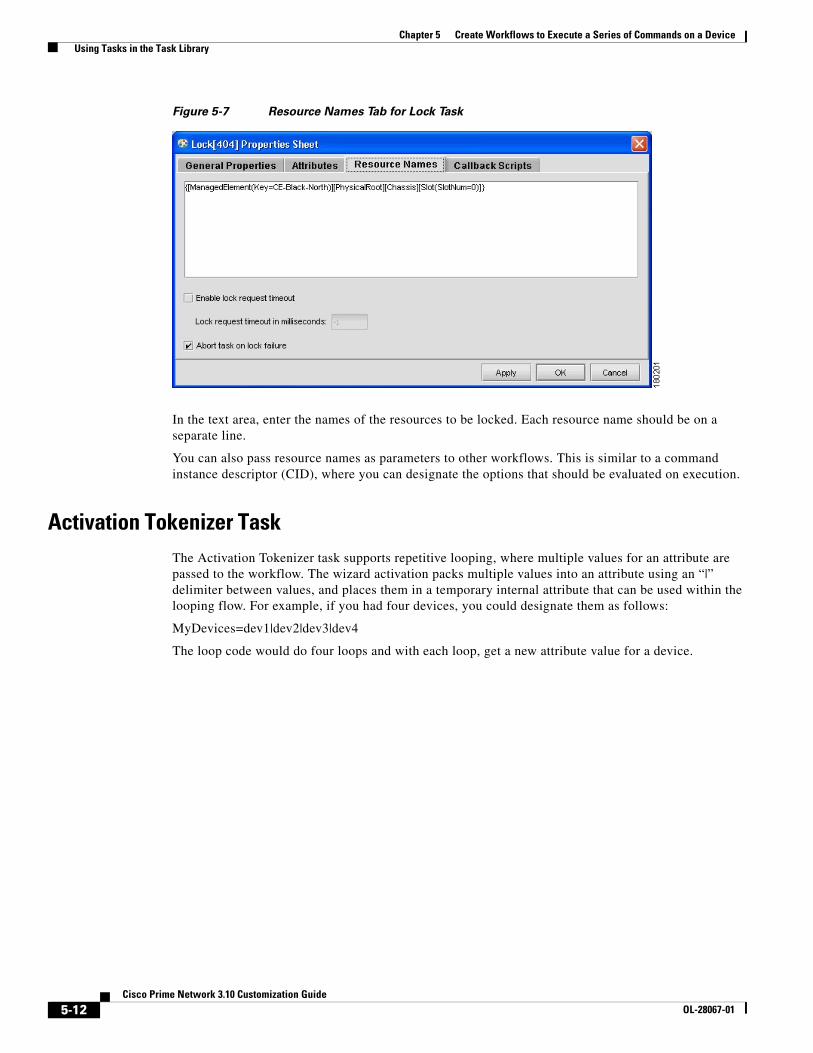
Figure 5-7 Resource Names Tab for Lock Task
In the text area, enter the names of the resources to be locked. Each resource name should be on a separate line.
You can also pass resource names as parameters to other workflows. This is similar to a command instance descriptor (CID), where you can designate the options that should be evaluated on execution.
Activation Tokenizer TaskThe Activation Tokenizer task supports repetitive looping, where multiple values for an attribute are passed to the workflow. The wizard activation packs multiple values into an attribute using an “|” delimiter between values, and places them in a temporary internal attribute that can be used within the looping flow. For example, if you had four devices, you could designate them as follows:
MyDevices=dev1|dev2|dev3|dev4
The loop code would do four loops and with each loop, get a new attribute value for a device.
5-12Cisco Prime Network 3.10 Customization Guide
OL-28067-01
Chapter 5 Create Workflows to Execute a Series of Commands on a Device Prime Network Activation Workflow Template Attributes
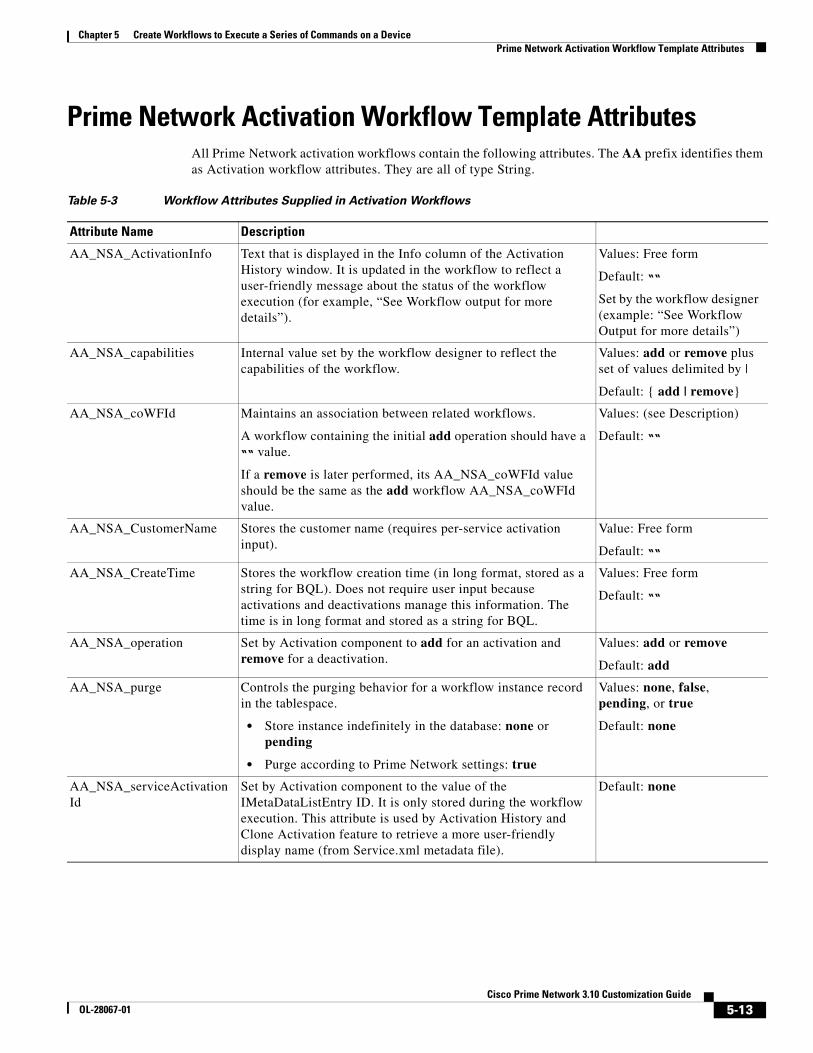
Prime Network Activation Workflow Template AttributesAll Prime Network activation workflows contain the following attributes. The AA prefix identifies them as Activation workflow attributes. They are all of type String.
Table 5-3 Workflow Attributes Supplied in Activation Workflows
Attribute Name Description
AA_NSA_ActivationInfo Text that is displayed in the Info column of the Activation History window. It is updated in the workflow to reflect a user-friendly message about the status of the workflow execution (for example, “See Workflow output for more details”).
Values: Free form
Default: ““
Set by the workflow designer (example: “See Workflow Output for more details”)
AA_NSA_capabilities Internal value set by the workflow designer to reflect the capabilities of the workflow.
Values: add or remove plus set of values delimited by |
Default: { add | remove}
AA_NSA_coWFId Maintains an association between related workflows.
A workflow containing the initial add operation should have a ““ value.
If a remove is later performed, its AA_NSA_coWFId value should be the same as the add workflow AA_NSA_coWFId value.
Values: (see Description)
Default: ““
AA_NSA_CustomerName Stores the customer name (requires per-service activation input).
Value: Free form
Default: ““
AA_NSA_CreateTime Stores the workflow creation time (in long format, stored as a string for BQL). Does not require user input because activations and deactivations manage this information. The time is in long format and stored as a string for BQL.
Values: Free form
Default: ““
AA_NSA_operation Set by Activation component to add for an activation and remove for a deactivation.
Values: add or remove
Default: add
AA_NSA_purge Controls the purging behavior for a workflow instance record in the tablespace.
• Store instance indefinitely in the database: none or pending
• Purge according to Prime Network settings: true
Values: none, false, pending, or true
Default: none
AA_NSA_serviceActivationId
Set by Activation component to the value of the IMetaDataListEntry ID. It is only stored during the workflow execution. This attribute is used by Activation History and Clone Activation feature to retrieve a more user-friendly display name (from Service.xml metadata file).
Default: none
5-13Cisco Prime Network 3.10 Customization Guide
OL-28067-01
Chapter 5 Create Workflows to Execute a Series of Commands on a Device Workflow Operations (Run, View, Abort, Delete)
Workflow Operations (Run, View, Abort, Delete)These topics explain how to perform workflow operations using saved templates:
• Preview and Run Workflow Templates, page 5-14
• View Workflow Status, page 5-15
• View Workflow Output, page 5-15
• Abort Workflow, page 5-16
• Delete Workflow, page 5-17
Preview and Run Workflow TemplatesUse the following BQL command to preview or run a workflow that has been deployed to the gateway. This command returns the ID of the new workflow. (There is no option to run workflows from the Prime Network Administration GUI client.)
In this example, the preview value is set to false, and the task is fully executed. This is the default.
AA_NSA_type Set by Activation component to NSA to distinguish these workflows from non-Prime Network workflows. Is used internally and cannot be modified.
Default: NSA
AA_NSA_UserName Stores the user name at the time of activation or deactivation; no user input required.
Values: Free form
Default: ““
Table 5-3 Workflow Attributes Supplied in Activation Workflows
Attribute Name Description
5-14Cisco Prime Network 3.10 Customization Guide
OL-28067-01
Chapter 5 Create Workflows to Execute a Series of Commands on a Device Workflow Operations (Run, View, Abort, Delete)
If the application settings (global settings in the Administration GUI) require input of each user's device access credentials, you need to add the following parameters to the command. If these parameters are not added, the credentials specified during VNE creation will be used.
View Workflow Output The following BQL command displays the output of a workflow. You can use this command when you are testing a workflow and after you execute it. Administrators can also view workflow output from the Administration GUI client by right-clicking a workflow and choosing Show Output.
Chapter 5 Create Workflows to Execute a Series of Commands on a Device Workflow Operations (Run, View, Abort, Delete)
This command returns the output as a string; for example:
<?xml version="1.0" encoding="UTF-8"?><IMO>
<Output type="String">…
[progress messages and script testing results]
…</Output>
</IMO>
Abort WorkflowWorkflows can be manually aborted using the BQL command below. Users with Administrator privileges can also abort running workflows from the Administration GUI client by right-clicking a running workflow and choosing Abort.
A workflow will automatically abort if any of its tasks are aborted. When a workflow aborts, a workflow rollback occurs. This means all Execute BQL tasks that have already run will roll back. The rollback is performed according to actions specified in the command when it was created using Command Builder. Scripts roll back in the reverse order of their execution.
Rollback can be disabled for specific BQL tasks by setting the RollbackEnabled value task attribute to false in the respective BQL task. This is useful for a BQL task executing a script that does not have an appropriate rollback, or a BQL task executing a gateway command.
Note If you want Prime Network Events to display an event when a Workflow is aborted, add the following line to the preActivateScript in the Callback Scripts tab:thisWorkflow.getRootTask().abort();
For more information, see Prime Network Workflow application online help for Engine Behavior > Workflow State Transitions.
Note Gateway commands do not support rollback. Rollback scripts must be specified in the workflow templates.
The following BQL command stops a workflow that has been executed from the gateway. This includes stopping a running workflow, and rolling back all activation scripts that have been executed. Messages are returned only if the command fails.
Chapter 5 Create Workflows to Execute a Series of Commands on a Device Workflow Operations (Run, View, Abort, Delete)
Delete WorkflowThis BQL command deletes an inactive workflow (that is, one that has already been completed or aborted) from the Prime Network database. Users with Administrator privileges can also delete workflows from the Administration GUI client by right-clicking a running workflow and choosing Delete.
Note Delete operations performed from the Workflow GUI client will delete templates, not workflow instances.
Chapter 5 Create Workflows to Execute a Series of Commands on a Device View Workflow History Using Prime Network Events
View Workflow History Using Prime Network EventsYou can view the history of workflows by opening Prime Network Events and clicking the Provisioning Tab, as shown in Figure 5-8.
Figure 5-8 Prime Network Events - Provisioning Tab
You can also view the properties of the event, as shown in Figure 5-9.
5-18Cisco Prime Network 3.10 Customization Guide
OL-28067-01
Chapter 5 Create Workflows to Execute a Series of Commands on a Device Create Custom Tasks for Workflows
Figure 5-9 Properties of the Event
The Description area of the Provisioning Event Properties window displays the details of the execution of the workflow, including all scripts, script rollbacks, and log messages.
Create Custom Tasks for WorkflowsThese topics explain how to extend the Workflow Engine with custom tasks and Prime Network Workflow callbacks:
• Write Code for New Custom Tasks, page 5-19
• Package the New Tasks for Deployment, page 5-20
• Deploy the Custom Tasks, page 5-22
Write Code for New Custom Tasks
Custom Tasks
The procedure for developing custom tasks is explained in the LiquidBPM documentation. The following is the definition of a simple task class:
public class CustomTask1 extends SynchronousTask {
5-19Cisco Prime Network 3.10 Customization Guide
OL-28067-01
Chapter 5 Create Workflows to Execute a Series of Commands on a Device Create Custom Tasks for Workflows
public CustomTask1(Key _key) {super(_key);
}
public void perform() {System.err.println("Hello from CustomTask1");
}}
Custom Task Panel Factories
A TaskPanelFactory implementation class can be assigned to each custom task class. This allows you to create custom property sheets for the custom class. This factory class should implement the interface com.dralasoft.gui.common.ext.TaskPanelFactory. A simple way to do this is to extend com.dralasoft.gui.common.ext.DefaultPanelFactory and override some of its methods.
Workflow Callbacks Class
It is possible to develop a class that implements the Prime Network Workflow callbacks. This class should implement the interface com.sheer.client.workflowstudio.IWorkflowEditorCallbacks, which includes the following methods:
/*** Called before the deploy template action* @param templateName* @return true if deploy template action should proceed*/public boolean preDeployTemplate(String templateName);
/*** Called after the deploy template action* @param templateName*/public void postDeployTemplate(String templateName);
/*** Called before the delete template action* @param templateName* @return true if delete template action should proceed*/public boolean preDeleteTemplate(String templateName);
/*** Called after the delete template action* @param templateName*/public void postDeleteTemplate(String templateName);
/*** @param templateName* @return true if this template should be displayed, false if not*/public boolean shouldDisplayTemplate(String templateName);
Package the New Tasks for DeploymentClasses and resources must be packaged into JAR files to be deployed on the server. A JAR file can contain multiple tasks and an optional workflow callback implementation.
5-20Cisco Prime Network 3.10 Customization Guide
OL-28067-01
Chapter 5 Create Workflows to Execute a Series of Commands on a Device Create Custom Tasks for Workflows
In addition to the class files, each JAR file must contain a descriptor file named extension-config.xml. This file contains the XML block or blocks that define the tasks’ appearance in the task palette, the tasks’ custom panel factories, and, optionally, the Prime Network Workflow callback implementation.
Custom Tasks
In addition to the custom tasks class files, task icons should be included in the JAR file.
Task icons should measure 16 by 16 pixels and must be placed in the JAR file in the subdirectory, com/dralasoft/gui/common/images/16x16.
Custom Task Panel Factories
The full class name of the task panel factory should be added in an element called task-panel-factory-class inside the custom-task element. If this element is not specified, com.dralasoft.gui.common.ext.DefaultPanelFactory is used for the custom task.
Workflow Callbacks Class
Adding an editor-callbacks-class element to the extension-config element configures a class that implements the Prime Network Workflow callbacks. This element should be added to the extension-config.xml file in only one of the JAR files (if the element is present in more then one descriptor, one element’s value would be used arbitrarily).
The following example of the contents of a task descriptor file defines two task types, one of which has a task panel factory, and an editor callback implementation:
Chapter 5 Create Workflows to Execute a Series of Commands on a Device Create Custom Tasks for Workflows
Deploy the Custom TasksTo deploy JAR files:
Step 1 Confirm that no workflows are currently running because this procedure will restart the Workflow engine.
Step 2 On the Prime Network gateway, create a directory called NETWORKHOME/dralasoft_extensions.
Step 3 Copy the JAR files to the NETWORKHOME/dralasoft_extensions directory.
Step 4 Run the script NETWORKHOME/Main/scripts/installDralasoftExtensions.pl.
Note Run this script each time you want to add a JAR file, remove a JAR file, or replace an existing JAR file with a new version.
The script uninstalls and reinstalls JAR files so that the set of installed JAR files is the same as the contents of the directory NETWORKHOME/dralasoft_extensions. We therefore recommend that you keep files with a .jar extension here even after they have been deployed.
Step 5 When the script is done, launch Prime Network Workflow. The deployed JAR files are automatically downloaded, and the new tasks are included in the task toolbar.