37
Created for Beavers, Cubs, Scouts & Explorers Created By Samantha Eagle

Created for Beavers, Cubs, Scouts & Explorers
Created By Samantha Eagle

©www.easierscouting.com | Contents 2
"Copyright Notices"
© Copyright Samantha Eagle
All rights reserved.
No part of this publication may be reproduced or transmitted in any form or by any means
mechanical or electronic, including photocopying and recording, or by any information and
retrieval system, without permission in writing from the publisher.
The purchaser is authorised to use any of the information in this publication for his or her own
use ONLY.
For example, if you are a leader trainer you are within your rights to show any or all of the
material to other leaders within your possession. However it is strictly prohibited to copy and
share any of the materials with anyone.
Requests for permission or further information should be addressed to Samantha Eagle, PO Box
245, La Manga Club Murcia, 30389, Spain.
Published by Samantha Eagle
PO Box 245, La Manga Club Murcia, 30389, Spain.
Email: [email protected]
Legal Notices
While all attempts have been made to verify information provided in this publication, neither
Author nor the Publisher assumes any responsibility for errors, omissions, or contrary
interpretation of the subject matter given in this product.

©www.easierscouting.com | Contents 3
Contents
"Copyright Notices" .................................................................................................................................... 2
Contents...................................................................................................................................................... 3
A little note for you… .................................................................................................................................. 4
Activity No. 1 – “Easy Nail Art Blue Heart” .................................................................................................. 5
Suitable for Cubs, Scouts & Explorers ....................................................................................................... 5
Activity No. 2 – “Fun Candy Special Message” ............................................................................................. 7
Suitable for Beavers, Cubs, Scouts & Explorers ......................................................................................... 7
Activity No. 3 – “Easy Cute Memory Keepsake Card” .................................................................................. 8
Suitable for Beavers & Cubs ...................................................................................................................... 8
Activity No. 4 – “Easy Gift Box” ................................................................................................................. 11
Suitable for Beavers, Cubs, Scouts & Explorers ....................................................................................... 11
Activity No. 5 – “Dad Rocks Paperweight” ................................................................................................. 14
Suitable for Beavers, Cubs, Scouts & Explorers ....................................................................................... 14
Activity No. 6 – “Folding Craft Stick Card” ................................................................................................. 15
Suitable for Beavers, Cubs, Scouts & Explorers ....................................................................................... 15
Activity No. 7 – “Gold Trophy” .................................................................................................................. 16
Suitable for Beavers, Cubs, Scouts & Explorers ....................................................................................... 16
Activity No. 8 – “Nuts & Bolts Heart Plaque” ............................................................................................. 18
Suitable for Beavers, Cubs, Scouts & Explorers ....................................................................................... 18
Activity No. 9 – “Dads Easy Peg Plane” ...................................................................................................... 20
Suitable for Beavers, Cubs, Scouts & Explorers ....................................................................................... 20
Activity No. 10 – “Dads Lotto Card” ........................................................................................................... 22
Suitable for Scouts & Explorers ............................................................................................................... 22
Activity No. 11 – “Things I Love About You Scratch Card Easier Version” .................................................. 26
Suitable for Beavers, Cubs & Scouts ........................................................................................................ 26
Activity No. 12 – “Quick & Easy Father’s Day Card” ................................................................................... 29
Suitable for Beavers, Cubs, Scouts & Explorers ....................................................................................... 29
Activity No. 13 – “Origami Popup Card” .................................................................................................... 31
Suitable for Cubs, Scouts & Explorers ..................................................................................................... 31
Activity No. 14 – “Easy Necktie Card” ........................................................................................................ 36
Suitable for Beavers, Cubs, Scouts & Explorers ....................................................................................... 36
©www.easierscouting.com | A little note for you… 4
A little note for you…
Hi, here’s the Father’s Day Pack. There’s some really fun little pressies and cards the kids
can make for Dad. Mindful of the fact that some children may not have a dad most of
the gifts and cards can be tailored for a special person or granddad.
PRINTING HELP
IMPORTANT - If you are not intending to print in colour make sure you set your printer
to greyscale (this can be found in the Print Dialog box).
Because the entire pack is in one document you will need to print specific pages for the
activity you want to do. To do this you need to type the number of the page you want
printed in your print dialog box.
Have fun
Samantha
©www.easierscouting.com | Activity No. 1 – “Easy Nail Art Blue Heart” 5
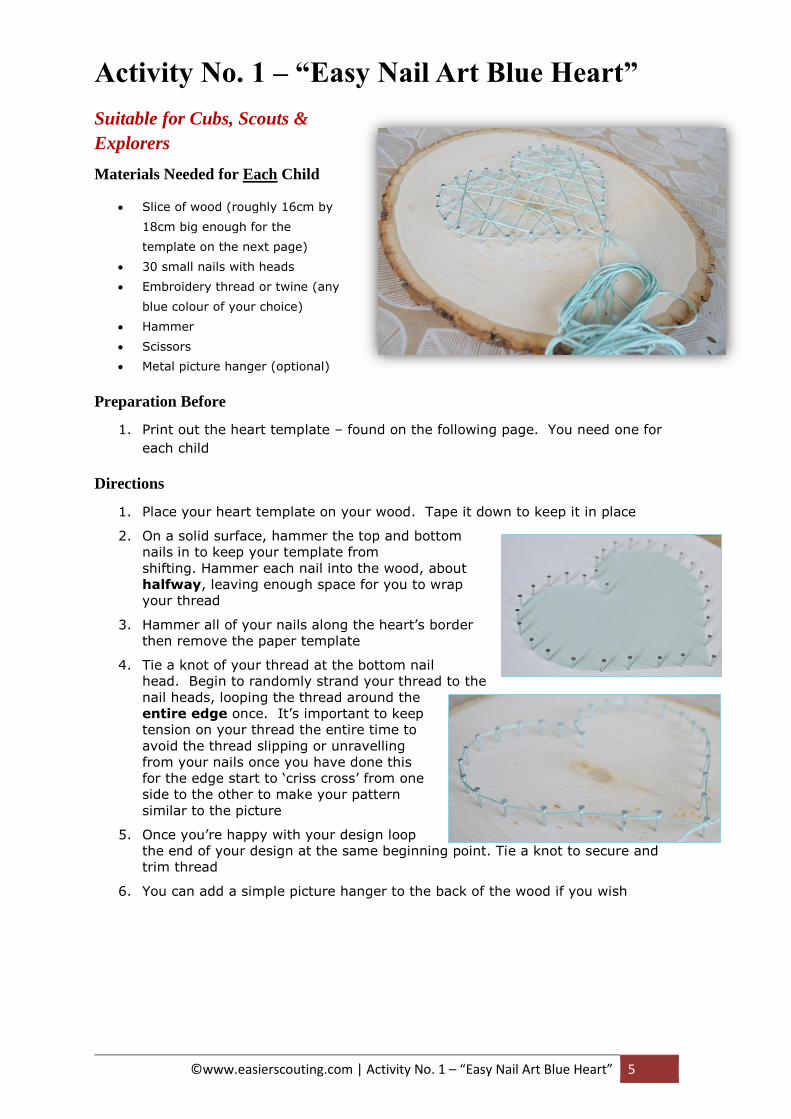
Activity No. 1 – “Easy Nail Art Blue Heart”
Suitable for Cubs, Scouts &
Explorers
Materials Needed for Each Child
Slice of wood (roughly 16cm by
18cm big enough for the
template on the next page)
30 small nails with heads
Embroidery thread or twine (any
blue colour of your choice)
Hammer
Scissors
Metal picture hanger (optional)
Preparation Before
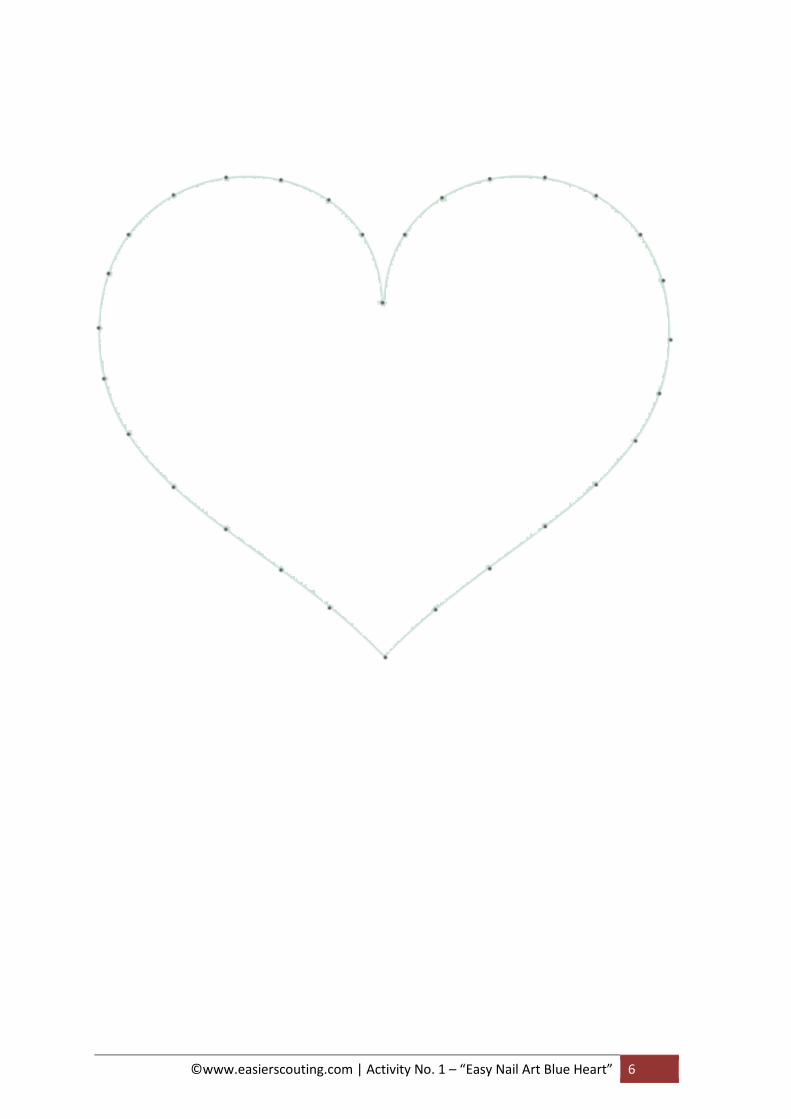
1. Print out the heart template – found on the following page. You need one for
each child
Directions
1. Place your heart template on your wood. Tape it down to keep it in place
2. On a solid surface, hammer the top and bottom
nails in to keep your template from
shifting. Hammer each nail into the wood, about
halfway, leaving enough space for you to wrap
your thread
3. Hammer all of your nails along the heart’s border
then remove the paper template
4. Tie a knot of your thread at the bottom nail
head. Begin to randomly strand your thread to the
nail heads, looping the thread around the
entire edge once. It’s important to keep
tension on your thread the entire time to
avoid the thread slipping or unravelling
from your nails once you have done this
for the edge start to ‘criss cross’ from one
side to the other to make your pattern
similar to the picture
5. Once you’re happy with your design loop
the end of your design at the same beginning point. Tie a knot to secure and
trim thread
6. You can add a simple picture hanger to the back of the wood if you wish
©www.easierscouting.com | Activity No. 1 – “Easy Nail Art Blue Heart” 6

©www.easierscouting.com | Activity No. 2 – “Fun Candy Special Message” 7
Activity No. 2 – “Fun Candy Special Message”
For this card the children would write a message and stick candy in replace of the
words. You would design this on an A3 sheet of card. Or A4 if you only intend to use
a little candy.
Suitable for Beavers, Cubs, Scouts & Explorers
Materials Needed
If you want to follow my message exactly you will need to buy the candy to match the picture below for each child otherwise the kids can make up their own words
Directions
1. Use nice writing on a large piece of card and stick the candy in the places shown below.
Hey presto you’ve made a delicious card with some lovely words
Dear Dad we were going to send you to for
Father’s Day but we thought you would so
we are sending you to the instead so you can get some
If you get the on the
way have some because it’s more healthy. I’ve
arranged for you to get to the rocket on a but don’t
forget to leave the out. Dad hopefully when you get back
we can go on a together and I can
in your ear I LOVE YOU XXX

©www.easierscouting.com | Activity No. 3 – “Easy Cute Memory Keepsake Card” 8
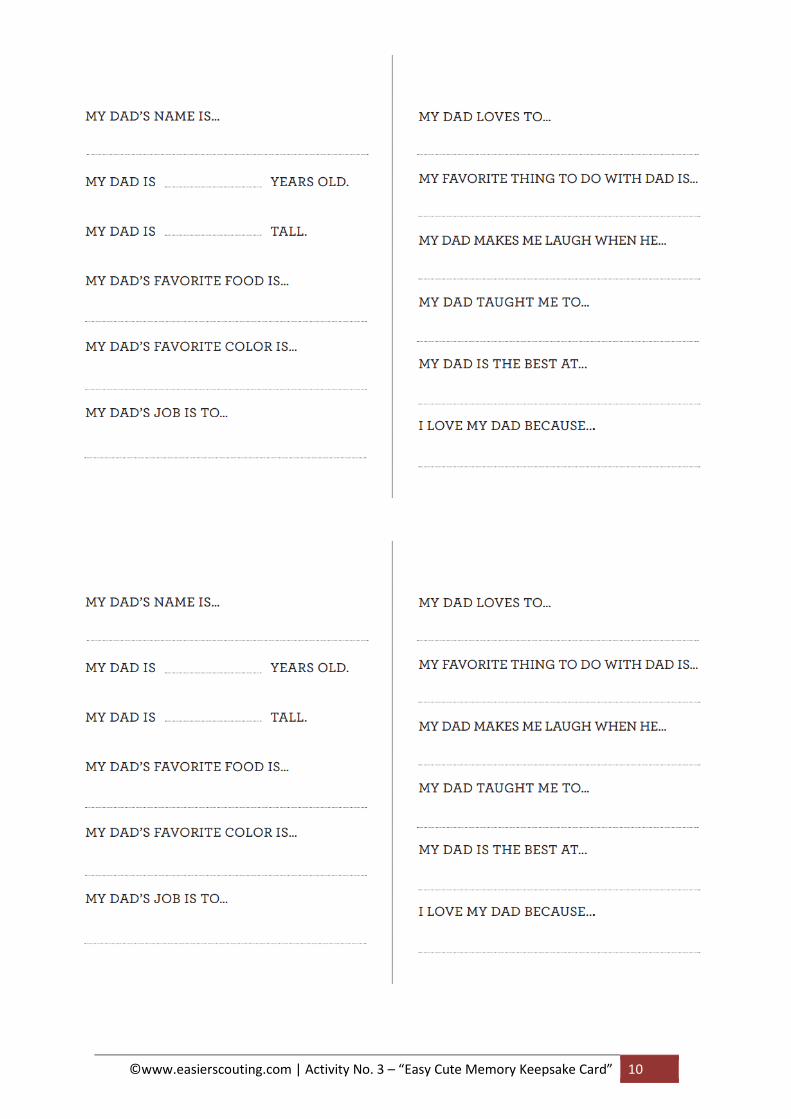
Activity No. 3 – “Easy Cute Memory
Keepsake Card”
Suitable for Beavers & Cubs
Materials Needed
Template (found on the next page)
Scissors/Guillotine
Pen
Prit stick type glue
Preparation Before
1. Print out the card template – found on the following page. You need one for
each child – if you can print it on really thick paper or thin card. If this isn’t
possible then stick the template onto some same size card
2. Use a guillotine to cut round the front and back of the card keeping it together
and flat (the kids can fold it)
3. Now print out the page to go inside the card (this will be cut out and stuck on
the insides
Directions
1. Draw a picture or stick a photo of dad on the front cover
2. Write your name on the back of the card
3. Now fold the card in half
4. Fill in the blanks for the middle of the card cut it out and stick it in the middle
of the card
Thanks to… www.marthastewart.com

©www.easierscouting.com | Activity No. 3 – “Easy Cute Memory Keepsake Card” 9
©www.easierscouting.com | Activity No. 3 – “Easy Cute Memory Keepsake Card” 10
©www.easierscouting.com | Activity No. 4 – “Easy Gift Box” 11
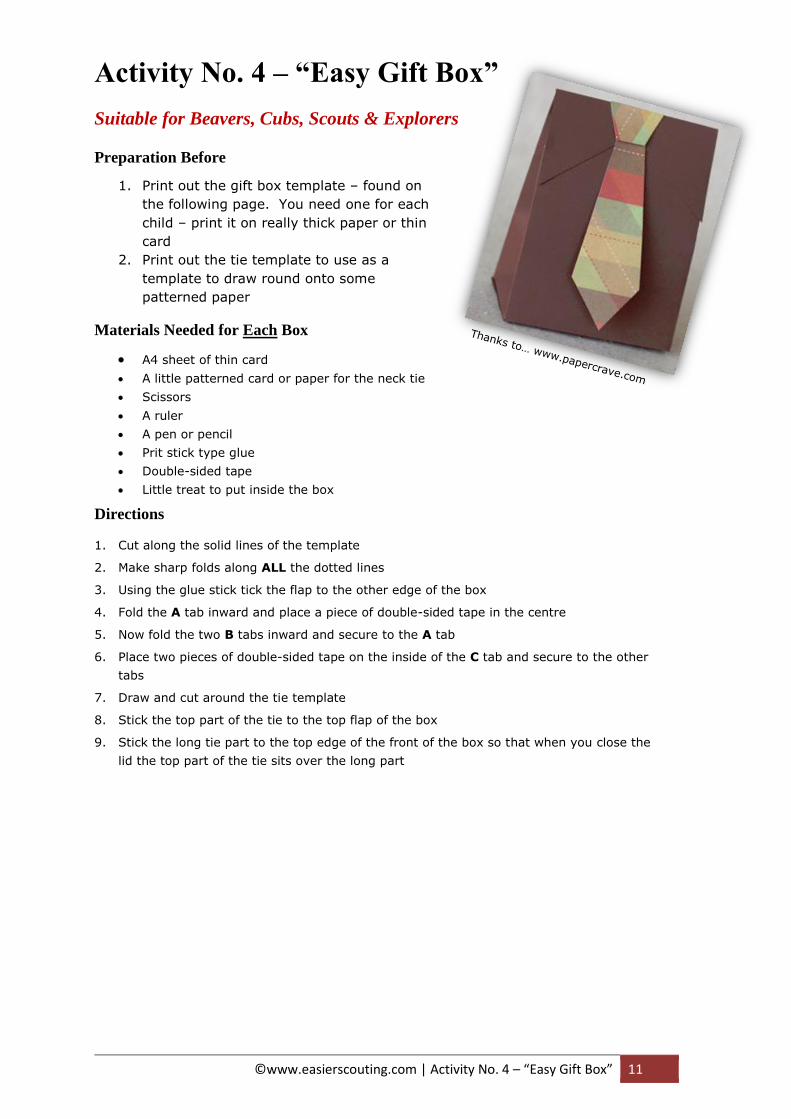
Activity No. 4 – “Easy Gift Box”
Suitable for Beavers, Cubs, Scouts & Explorers
Preparation Before
1. Print out the gift box template – found on
the following page. You need one for each
child – print it on really thick paper or thin
card
2. Print out the tie template to use as a
template to draw round onto some
patterned paper
Materials Needed for Each Box
A4 sheet of thin card
A little patterned card or paper for the neck tie
Scissors
A ruler
A pen or pencil
Prit stick type glue
Double-sided tape
Little treat to put inside the box
Directions
1. Cut along the solid lines of the template
2. Make sharp folds along ALL the dotted lines
3. Using the glue stick tick the flap to the other edge of the box
4. Fold the A tab inward and place a piece of double-sided tape in the centre
5. Now fold the two B tabs inward and secure to the A tab
6. Place two pieces of double-sided tape on the inside of the C tab and secure to the other
tabs
7. Draw and cut around the tie template
8. Stick the top part of the tie to the top flap of the box
9. Stick the long tie part to the top edge of the front of the box so that when you close the
lid the top part of the tie sits over the long part

©www.easierscouting.com | Activity No. 4 – “Easy Gift Box” 12

©www.easierscouting.com | Activity No. 4 – “Easy Gift Box” 13
©www.easierscouting.com | Activity No. 5 – “Dad Rocks Paperweight” 14
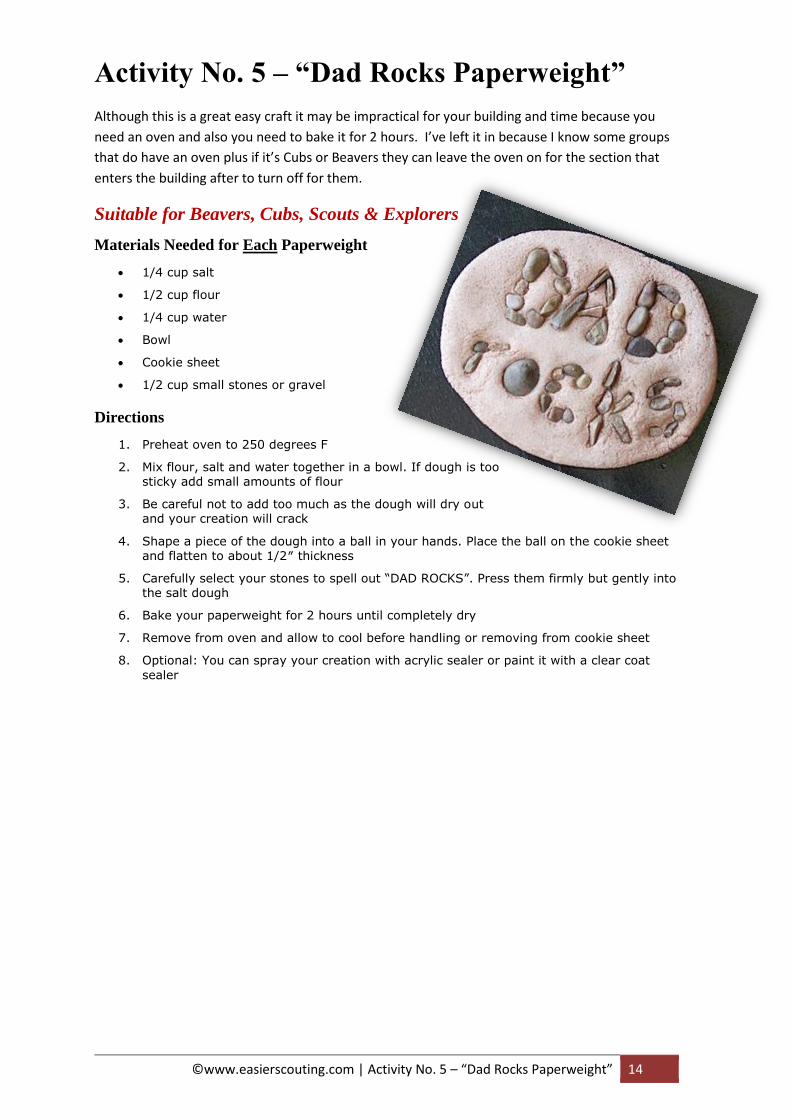
Activity No. 5 – “Dad Rocks Paperweight”
Although this is a great easy craft it may be impractical for your building and time because you
need an oven and also you need to bake it for 2 hours. I’ve left it in because I know some groups
that do have an oven plus if it’s Cubs or Beavers they can leave the oven on for the section that
enters the building after to turn off for them.
Suitable for Beavers, Cubs, Scouts & Explorers
Materials Needed for Each Paperweight
1/4 cup salt
1/2 cup flour
1/4 cup water
Bowl
Cookie sheet
1/2 cup small stones or gravel
Directions
1. Preheat oven to 250 degrees F
2. Mix flour, salt and water together in a bowl. If dough is too sticky add small amounts of flour
3. Be careful not to add too much as the dough will dry out and your creation will crack
4. Shape a piece of the dough into a ball in your hands. Place the ball on the cookie sheet and flatten to about 1/2″ thickness
5. Carefully select your stones to spell out “DAD ROCKS”. Press them firmly but gently into the salt dough
6. Bake your paperweight for 2 hours until completely dry
7. Remove from oven and allow to cool before handling or removing from cookie sheet
8. Optional: You can spray your creation with acrylic sealer or paint it with a clear coat
sealer
©www.easierscouting.com | Activity No. 6 – “Folding Craft Stick Card” 15
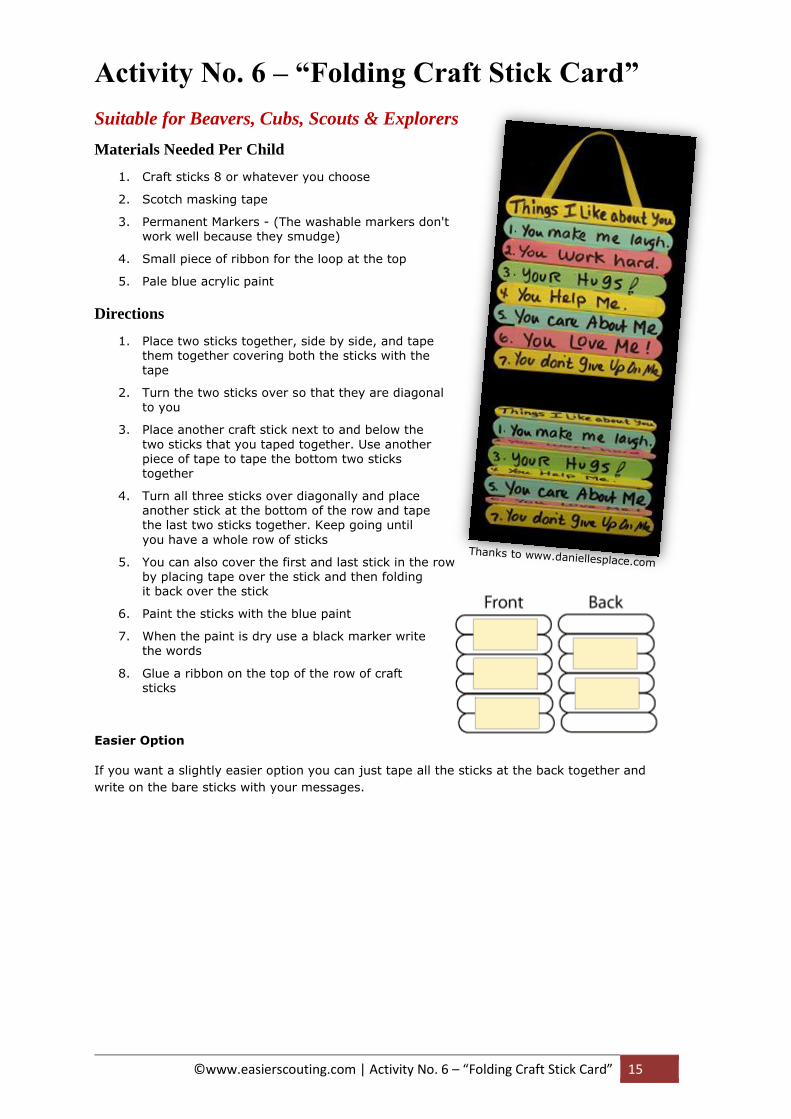
Activity No. 6 – “Folding Craft Stick Card”
Suitable for Beavers, Cubs, Scouts & Explorers
Materials Needed Per Child
1. Craft sticks 8 or whatever you choose
2. Scotch masking tape
3. Permanent Markers - (The washable markers don't work well because they smudge)
4. Small piece of ribbon for the loop at the top
5. Pale blue acrylic paint
Directions
1. Place two sticks together, side by side, and tape them together covering both the sticks with the tape
2. Turn the two sticks over so that they are diagonal to you
3. Place another craft stick next to and below the
two sticks that you taped together. Use another piece of tape to tape the bottom two sticks together
4. Turn all three sticks over diagonally and place another stick at the bottom of the row and tape the last two sticks together. Keep going until
you have a whole row of sticks
5. You can also cover the first and last stick in the row by placing tape over the stick and then folding it back over the stick
6. Paint the sticks with the blue paint
7. When the paint is dry use a black marker write the words
8. Glue a ribbon on the top of the row of craft sticks
Easier Option
If you want a slightly easier option you can just tape all the sticks at the back together and
write on the bare sticks with your messages.
©www.easierscouting.com | Activity No. 7 – “Gold Trophy” 16
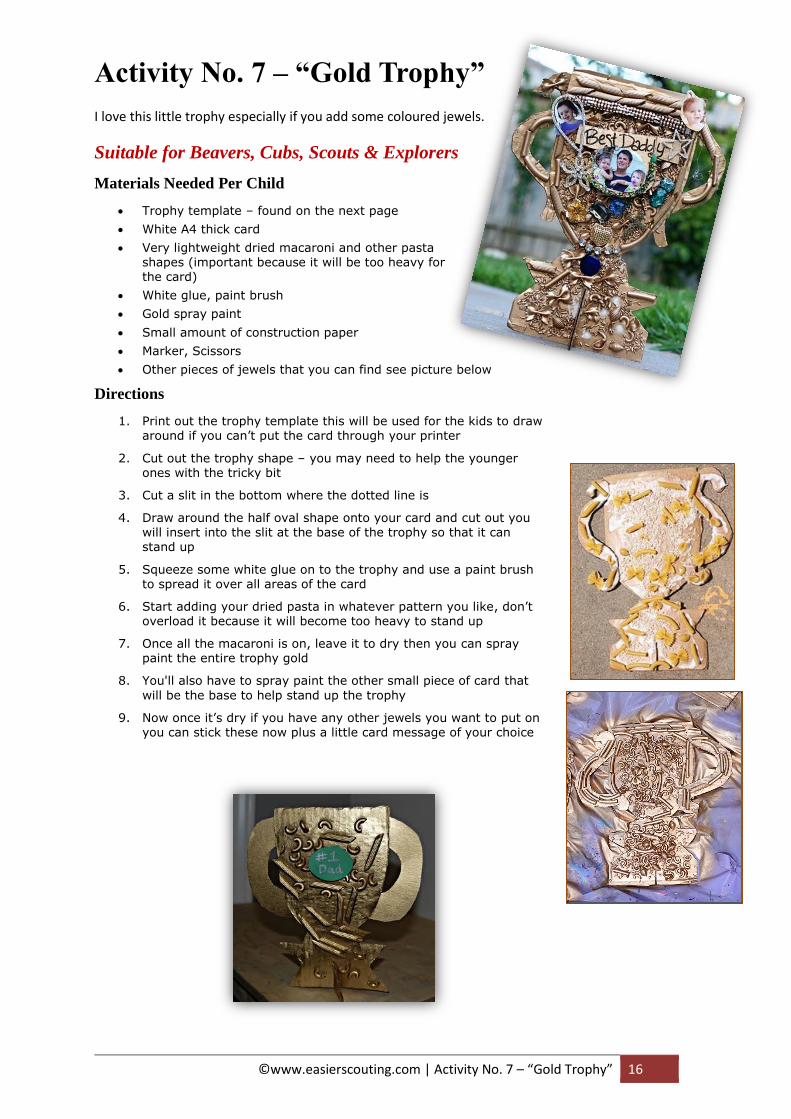
Activity No. 7 – “Gold Trophy”
I love this little trophy especially if you add some coloured jewels.
Suitable for Beavers, Cubs, Scouts & Explorers
Materials Needed Per Child
Trophy template – found on the next page
White A4 thick card
Very lightweight dried macaroni and other pasta shapes (important because it will be too heavy for the card)
White glue, paint brush
Gold spray paint
Small amount of construction paper
Marker, Scissors
Other pieces of jewels that you can find see picture below
Directions
1. Print out the trophy template this will be used for the kids to draw around if you can’t put the card through your printer
2. Cut out the trophy shape – you may need to help the younger ones with the tricky bit
3. Cut a slit in the bottom where the dotted line is
4. Draw around the half oval shape onto your card and cut out you will insert into the slit at the base of the trophy so that it can
stand up
5. Squeeze some white glue on to the trophy and use a paint brush to spread it over all areas of the card
6. Start adding your dried pasta in whatever pattern you like, don’t overload it because it will become too heavy to stand up
7. Once all the macaroni is on, leave it to dry then you can spray paint the entire trophy gold
8. You'll also have to spray paint the other small piece of card that
will be the base to help stand up the trophy
9. Now once it’s dry if you have any other jewels you want to put on you can stick these now plus a little card message of your choice

©www.easierscouting.com | Activity No. 7 – “Gold Trophy” 17
©www.easierscouting.com | Activity No. 8 – “Nuts & Bolts Heart Plaque” 18
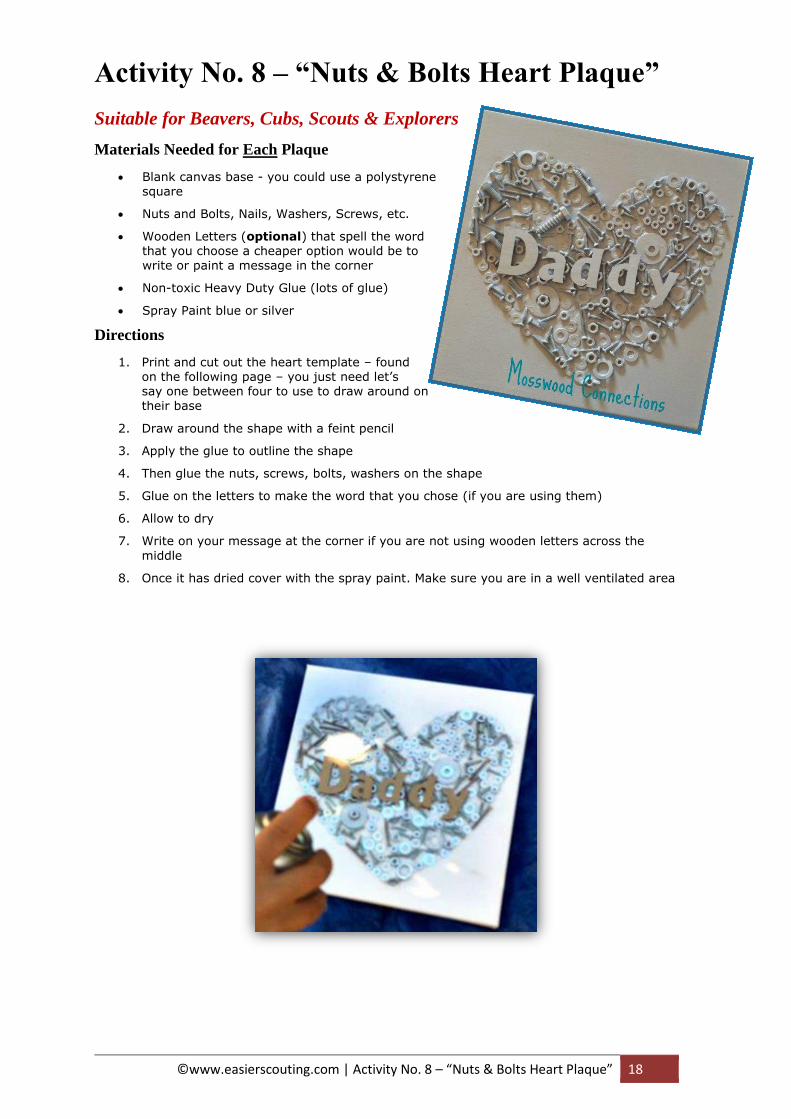
Activity No. 8 – “Nuts & Bolts Heart Plaque”
Suitable for Beavers, Cubs, Scouts & Explorers
Materials Needed for Each Plaque
Blank canvas base - you could use a polystyrene square
Nuts and Bolts, Nails, Washers, Screws, etc.
Wooden Letters (optional) that spell the word that you choose a cheaper option would be to write or paint a message in the corner
Non-toxic Heavy Duty Glue (lots of glue)
Spray Paint blue or silver
Directions
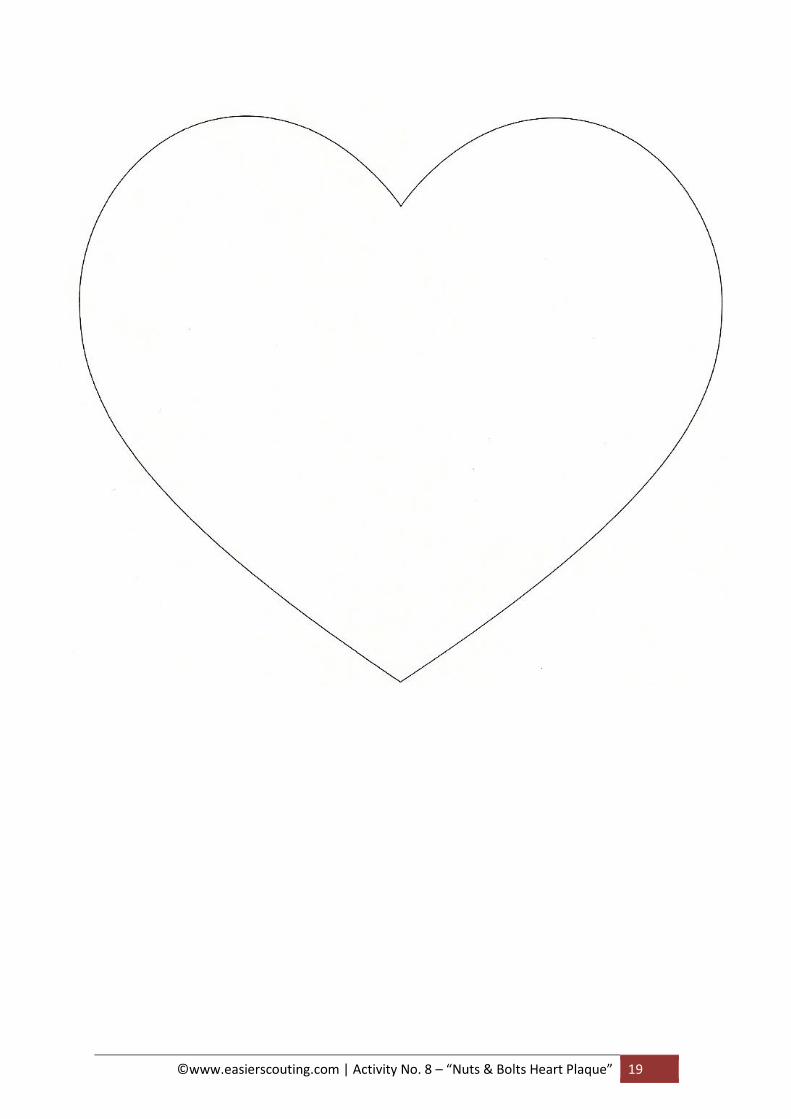
1. Print and cut out the heart template – found on the following page – you just need let’s say one between four to use to draw around on their base
2. Draw around the shape with a feint pencil
3. Apply the glue to outline the shape
4. Then glue the nuts, screws, bolts, washers on the shape
5. Glue on the letters to make the word that you chose (if you are using them)
6. Allow to dry
7. Write on your message at the corner if you are not using wooden letters across the
middle
8. Once it has dried cover with the spray paint. Make sure you are in a well ventilated area
©www.easierscouting.com | Activity No. 8 – “Nuts & Bolts Heart Plaque” 19

©www.easierscouting.com | Activity No. 9 – “Dads Easy Peg Plane” 20
Activity No. 9 – “Dads Easy Peg Plane”
I think Dad will love this little peg plane pressie it’s really cheap and easy to make. I thought you
could spray it or paint it with a colour once it’s finished. And maybe write a little message on it
like “Love you Dad” on one of the wings.
Suitable for Beavers, Cubs, Scouts &
Explorers
Materials Needed Per Plane
Glue suitable for wood
5 x craft sticks
1 x wooden peg
1 x toothpick
1 x cork
Spray paint or normal paint
Directions
1. Print out the picture of the plane found on the next page and get the kids to make
their plane by looking at the picture
2. Basically you are sticking two stick to the top and bottom of the peg towards the
end
3. Cut smaller pieces of the sticks to stick on the end of the peg for its tail
4. Cut the cork into 3 pieces two thin and the other one is half
5. Force the toothpick through the three cork pieces
6. Now stick the top of the cork to the underneath of the peg

©www.easierscouting.com | Activity No. 9 – “Dads Easy Peg Plane” 21

©www.easierscouting.com | Activity No. 10 – “Dads Lotto Card” 22
Activity No. 10 – “Dads Lotto Card”
This is a great craft but the children will need to use a cutting knife. Also to cut out the circles could take a while so if you only have one craft knife this will be impractical for a large group because the children will be waiting. They are pretty cheap to buy and are useful for many crafts so if you did invest in some they won’t go to waste. Maybe you could share the cost between sections.
Suitable for Scouts & Explorers
Materials Needed
Metallic acrylic paint
X-Acto knife (craft cutting tool)
Cutting surface/mat/plastic chopping board
Liquid dish soap
Foam paintbrush or any mixing tool will do
Clear contact paper Masking tape
Card Template (found on the following page)
Preparation
1. Print and cut out the card template if you can’t put card through your printer stick this as paper onto a piece of card (you’ll notice I’ve created one without Dad on it in case a child doesn’t have a Dad and wants to make it for their grandpa or stepdad. You need one template for each child and another one for each team of three to use as a template to create the acrylic squares
Directions
1. Cut a square from the contact paper the size needs to cover the six squares on the lotto card. Tape it to the cutting surface
2. Squirt a good amount of metallic paint onto the contact paper
3. Add a small amount of liquid dish soap, about a 3:1 ratio
4. Mix the two with a your foam or paintbrush, and spread evenly
over the contact paper
5. Let this dry for about an hour
6. Add another layer if it's too thin – you don’t want to see the pen behind it. Once dry, remove the contact paper from the cutting surface
7. With the craft knife you need to put the card template onto your cutting surface and cut out the squares. This one will be used as a
template to make the squares for the acrylic paint so you only need let’s say one for each team of three. Each child can take it in turns to cut out the middle of the squares so they will do two each
8. Now on their own card with the squares intact the children will write three different messages on three of the squares then repeat those for the other three
Clear contact paper can be found in any craft or stationery shop or order on amazon

©www.easierscouting.com | Activity No. 10 – “Dads Lotto Card” 23
9. These messages can say what they would like their dad to win, for example, Breakfast of his choice, A footrub, something that is personal to their own dad or whoever they are making it for
10. Tape the contact paper back to cutting mat. Take the cut out card the one you created in a team as a template and lay it on top of the contact paper, and cut inside the squares if they are sharing the cutting tool get them to cut two each then pass it on
11. Carefully peel away backing off the contact paper
12. Place the scratch-off square over the prizes on their card the one that they wrote their messages on
13. Dad will use a coin to scratch off the prizes

©www.easierscouting.com | Activity No. 10 – “Dads Lotto Card” 24
Match 3 to win
Match 3 to win

©www.easierscouting.com | Activity No. 10 – “Dads Lotto Card” 25
Match 3 to win
Match 3 to win
©www.easierscouting.com | Activity No. 11 – “Things I Love About You Scratch Card Easier Version”
26
Activity No. 11 – “Things I Love About You
Scratch Card Easier Version”
I’ve created another Scratch Card activity for the younger children where they don’t need to use a craft knife.
Suitable for Beavers, Cubs & Scouts
Materials Needed
Metallic acrylic paint
Scissors
Cutting surface/mat/plastic chopping board
Liquid dish soap
Paintbrush
Clear contact paper Masking tape
Card Template (found on the following page)
Preparation
1. Print and cut out the card template, you’ll notice on the A4 sheet it has the template at the top and just squares at the bottom you need both for each child. Cut out the top one and leave the squares to the side for a moment
2. If you can’t put card through your printer stick the scratch card onto a piece of card (you’ll notice I’ve created one without Dad on it in case a child doesn’t have a Dad and wants to make it for their grandpa or stepdad.
Directions
1. On the main card template get the children to write in the squares things they love about their Dad or friend
2. Now put the clear contact paper on top of the squares template you put to one side and draw around the squares as neatly as possible
3. Cut out each square that has been traced on the contact paper
4. Carefully peel away backing off the contact paper of each square
5. Place the scratch-off square over the each square on their card
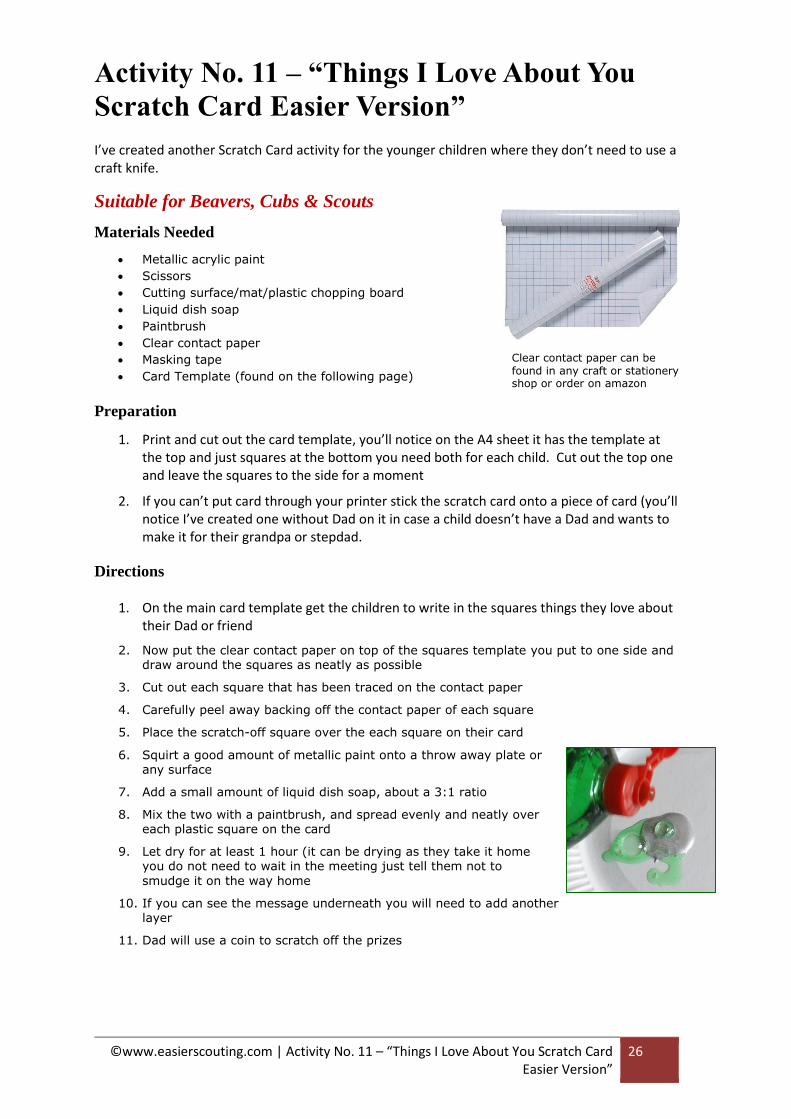
6. Squirt a good amount of metallic paint onto a throw away plate or any surface
7. Add a small amount of liquid dish soap, about a 3:1 ratio
8. Mix the two with a paintbrush, and spread evenly and neatly over each plastic square on the card
9. Let dry for at least 1 hour (it can be drying as they take it home you do not need to wait in the meeting just tell them not to
smudge it on the way home
10. If you can see the message underneath you will need to add another layer
11. Dad will use a coin to scratch off the prizes
Clear contact paper can be found in any craft or stationery shop or order on amazon

©www.easierscouting.com | Activity No. 11 – “Things I Love About You Scratch Card Easier Version”
27
These will be used to trace onto the clear contact paper
Scratch to find out

©www.easierscouting.com | Activity No. 11 – “Things I Love About You Scratch Card Easier Version”
28
These will be used to trace onto the clear contact paper
Scratch to find out

©www.easierscouting.com | Activity No. 12 – “Quick & Easy Father’s Day Card” 29
Activity No. 12 – “Quick & Easy Father’s Day
Card”
Suitable for Beavers, Cubs, Scouts & Explorers
Materials Needed Per Card
A5 coloured piece of card
Preparation
1. Print and cut out the card template onto think white
paper
Directions
1. Stick the template onto an A5 piece of card
2. Write your message on the back

©www.easierscouting.com | Activity No. 12 – “Quick & Easy Father’s Day Card” 30

©www.easierscouting.com | Activity No. 13 – “Origami Popup Card” 31
Activity No. 13 – “Origami Popup Card”
This may look a bit complex but when you actually break it down it’s really easy. Another option to this card if you like the origami letters is just to mount the letters onto the front of a piece of card and write your message on the back.
Suitable for Cubs, Scouts & Explorers
Materials Needed Per Card
Scrapbook paper - 3 pieces 5 x 5 inches in size
can be any patterned paper of your choice (I
have also put a couple of patterned squares in
case you can’t get hold of patterned paper you
can print these out – they are the correct size
you need)
Some other patterned scrap paper for the
balloons
2 x A4 card stock
Felt Pens
Scissors
Double-sided tape
Hole punch
Twine
Making the Origami Letters
1. Cut 3 pieces of scrapbook paper 5 x 5 inches in size or use my ones that I’ve put in this document
2. You are going to make 2 x Letter D’s and 1 letter A
3. See the next page on how to make the letters
Directions
1. Fold your card in half so that it’s a top folded card
2. Along the card's spine, make six cuts through both layers of cardstock to create three 1/2 inch wide and 1-inch deep strips that are perpendicular to the fold and evenly spaced as shown
3. Open the card and poke the strips forward. This creates the pop-up effect
©www.easierscouting.com | Activity No. 13 – “Origami Popup Card” 32
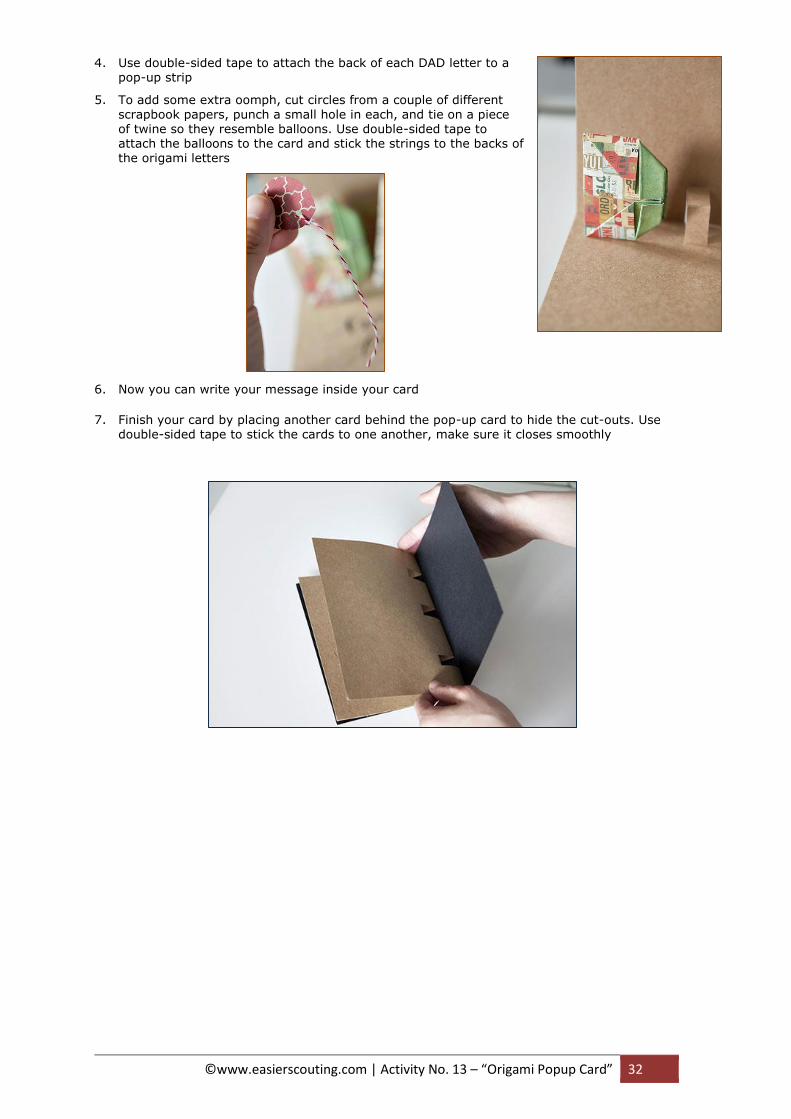
4. Use double-sided tape to attach the back of each DAD letter to a pop-up strip
5. To add some extra oomph, cut circles from a couple of different
scrapbook papers, punch a small hole in each, and tie on a piece of twine so they resemble balloons. Use double-sided tape to attach the balloons to the card and stick the strings to the backs of the origami letters
6. Now you can write your message inside your card
7. Finish your card by placing another card behind the pop-up card to hide the cut-outs. Use double-sided tape to stick the cards to one another, make sure it closes smoothly
©www.easierscouting.com | Activity No. 13 – “Origami Popup Card” 33
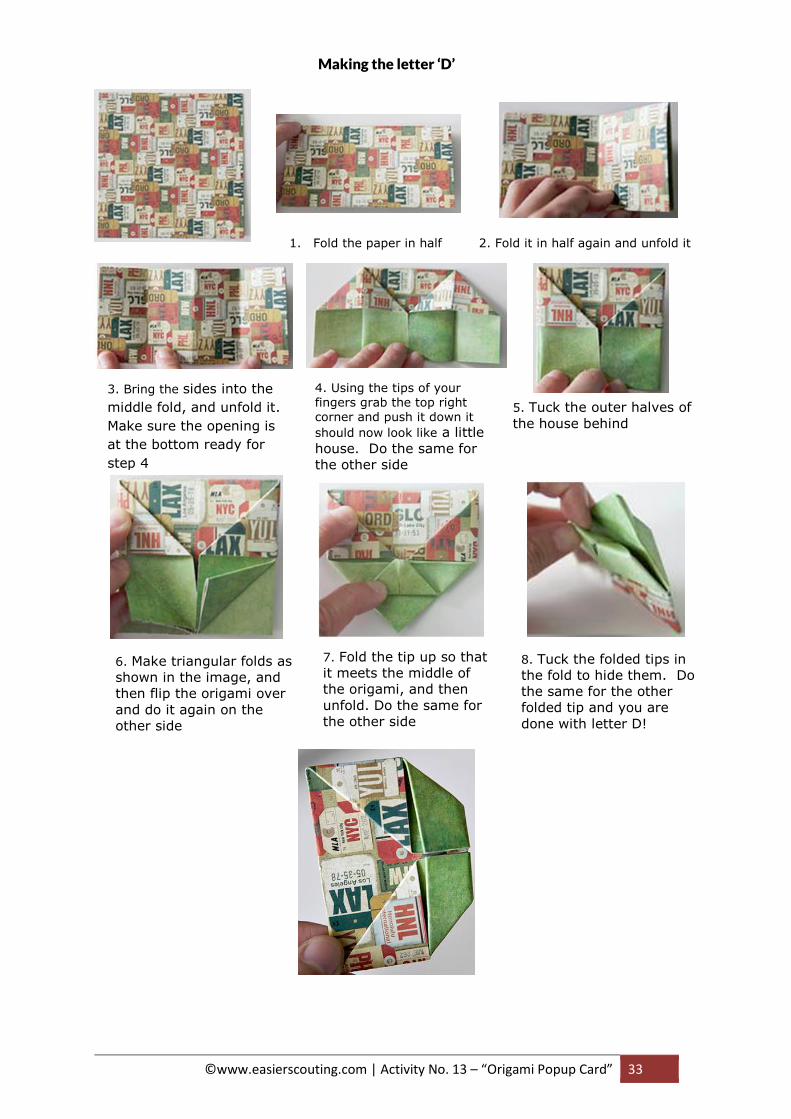
Making the letter ‘D’
2. Fold it in half again and unfold it 1. Fold the paper in half
3. Bring the sides into the
middle fold, and unfold it.
Make sure the opening is
at the bottom ready for
step 4
4. Using the tips of your fingers grab the top right corner and push it down it
should now look like a little
house. Do the same for
the other side
5. Tuck the outer halves of
the house behind
6. Make triangular folds as
shown in the image, and
then flip the origami over
and do it again on the
other side
7. Fold the tip up so that
it meets the middle of
the origami, and then
unfold. Do the same for
the other side
8. Tuck the folded tips in
the fold to hide them. Do
the same for the other
folded tip and you are
done with letter D!
©www.easierscouting.com | Activity No. 13 – “Origami Popup Card” 34
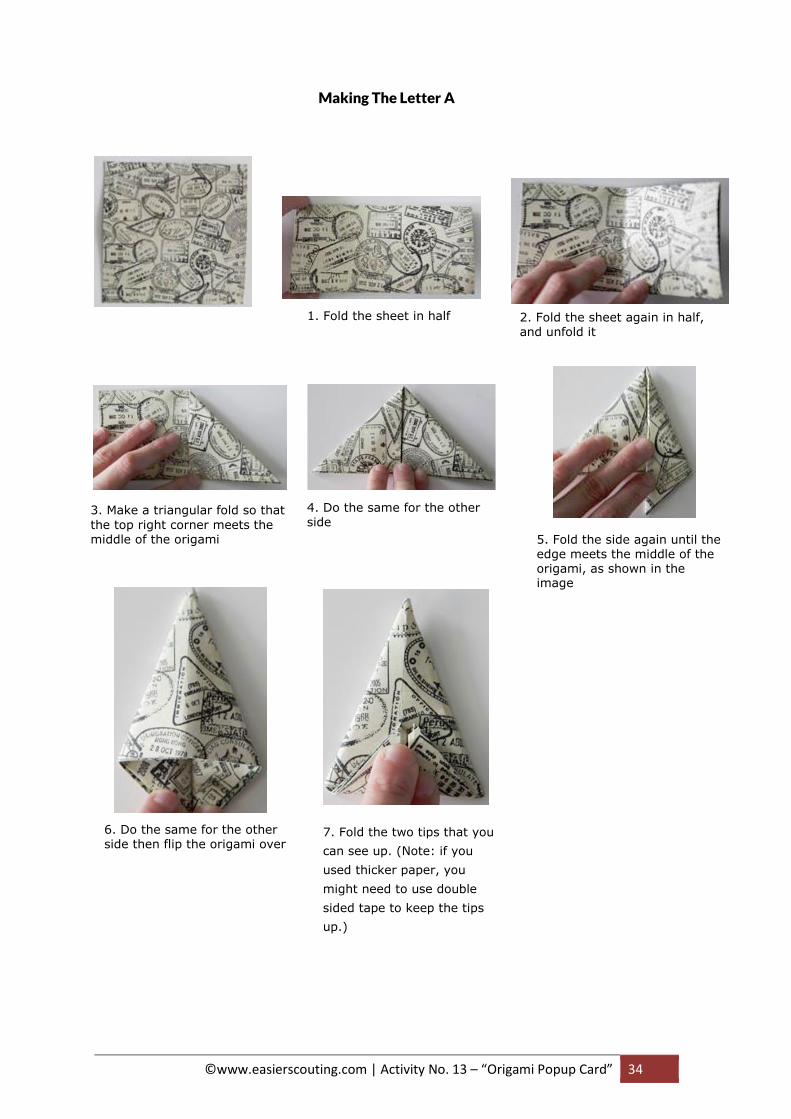
Making The Letter A
1. Fold the sheet in half
2. Fold the sheet again in half, and unfold it
3. Make a triangular fold so that
the top right corner meets the
middle of the origami
4. Do the same for the other side
5. Fold the side again until the edge meets the middle of the origami, as shown in the image
6. Do the same for the other side then flip the origami over
7. Fold the two tips that you
can see up. (Note: if you
used thicker paper, you
might need to use double
sided tape to keep the tips
up.)

©www.easierscouting.com | Activity No. 13 – “Origami Popup Card” 35
©www.easierscouting.com | Activity No. 14 – “Easy Necktie Card” 36
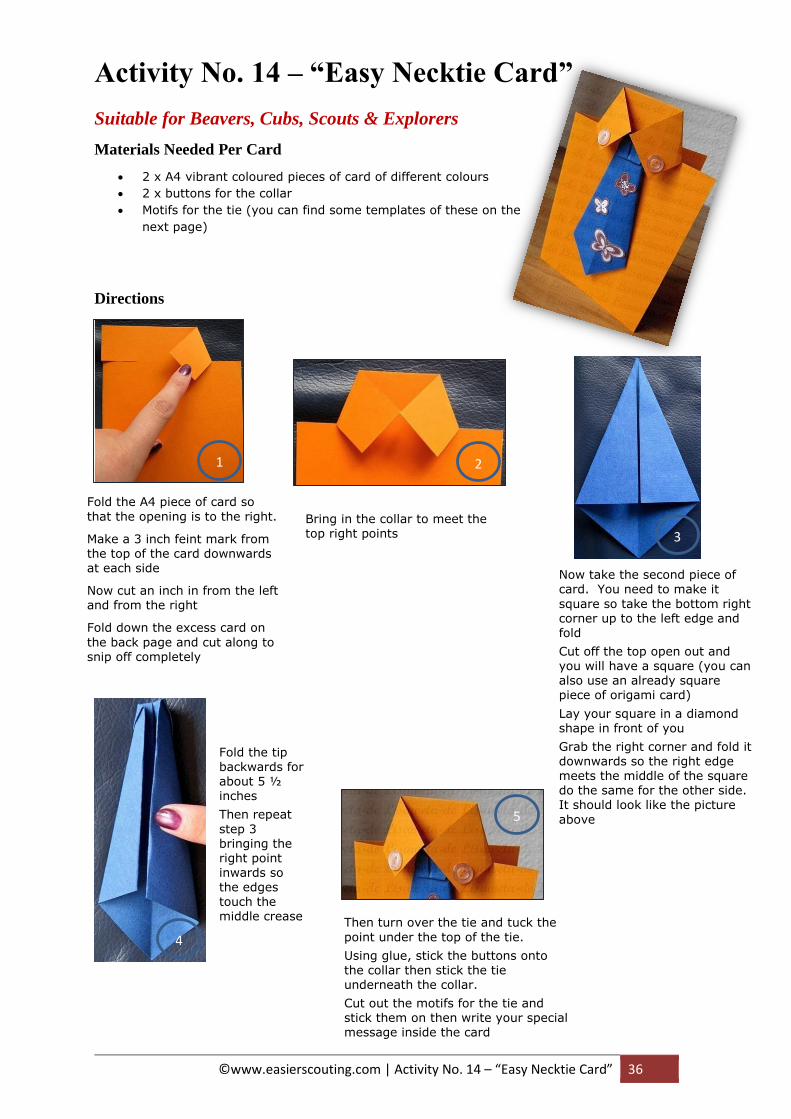
Activity No. 14 – “Easy Necktie Card”
Suitable for Beavers, Cubs, Scouts & Explorers
Materials Needed Per Card
2 x A4 vibrant coloured pieces of card of different colours
2 x buttons for the collar
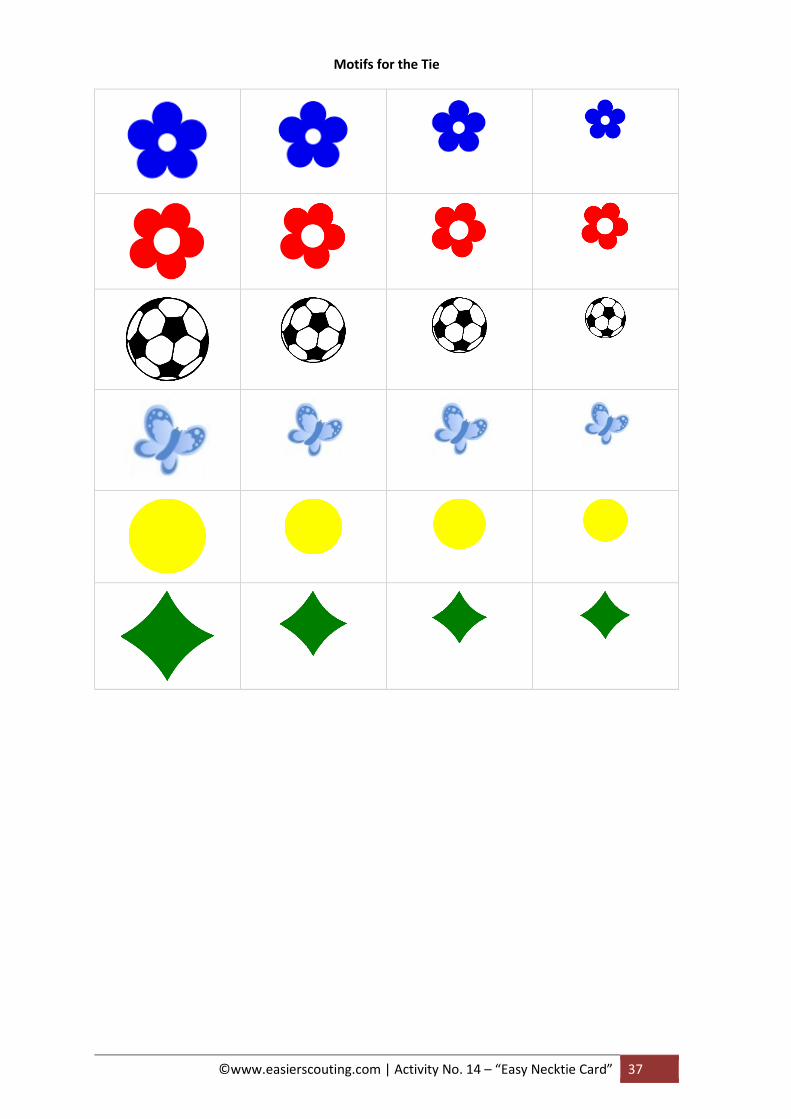
Motifs for the tie (you can find some templates of these on the
next page)
Directions
Fold the A4 piece of card so
that the opening is to the right.
Make a 3 inch feint mark from the top of the card downwards at each side
Now cut an inch in from the left and from the right
Fold down the excess card on
the back page and cut along to snip off completely
Bring in the collar to meet the
top right points
1 2
3
Now take the second piece of card. You need to make it
square so take the bottom right corner up to the left edge and fold
Cut off the top open out and you will have a square (you can also use an already square piece of origami card)
Lay your square in a diamond shape in front of you
Grab the right corner and fold it
downwards so the right edge meets the middle of the square do the same for the other side. It should look like the picture
above
4
Fold the tip backwards for about 5 ½ inches
Then repeat
step 3 bringing the right point inwards so the edges touch the middle crease
Then turn over the tie and tuck the
point under the top of the tie.
Using glue, stick the buttons onto
the collar then stick the tie underneath the collar.
Cut out the motifs for the tie and stick them on then write your special message inside the card
5
©www.easierscouting.com | Activity No. 14 – “Easy Necktie Card” 37
Motifs for the Tie


