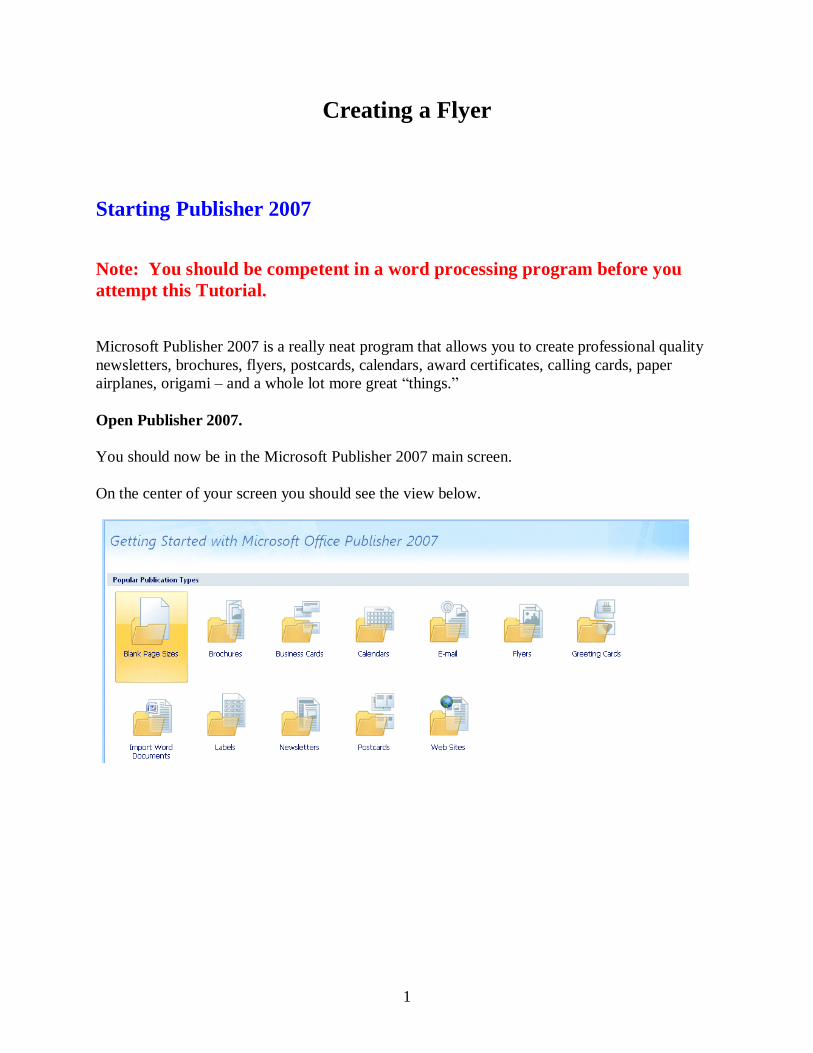
1 Creating a Flyer Starting Publisher 2007 Note: You should be competent in a word processing program before you attempt this Tutorial. Microsoft Publisher 2007 is a really neat program that allows you to create professional quality newsletters, brochures, flyers, postcards, calendars, award certificates, calling cards, paper airplanes, origami – and a whole lot more great “things.” Open Publisher 2007. You should now be in the Microsoft Publisher 2007 main screen. On the center of your screen you should see the view below.
Transcript
1
Creating a Flyer
Starting Publisher 2007
Note: You should be competent in a word processing program before you
attempt this Tutorial.
Microsoft Publisher 2007 is a really neat program that allows you to create professional quality
newsletters, brochures, flyers, postcards, calendars, award certificates, calling cards, paper
airplanes, origami – and a whole lot more great “things.”
Open Publisher 2007.
You should now be in the Microsoft Publisher 2007 main screen.
On the center of your screen you should see the view below.
2
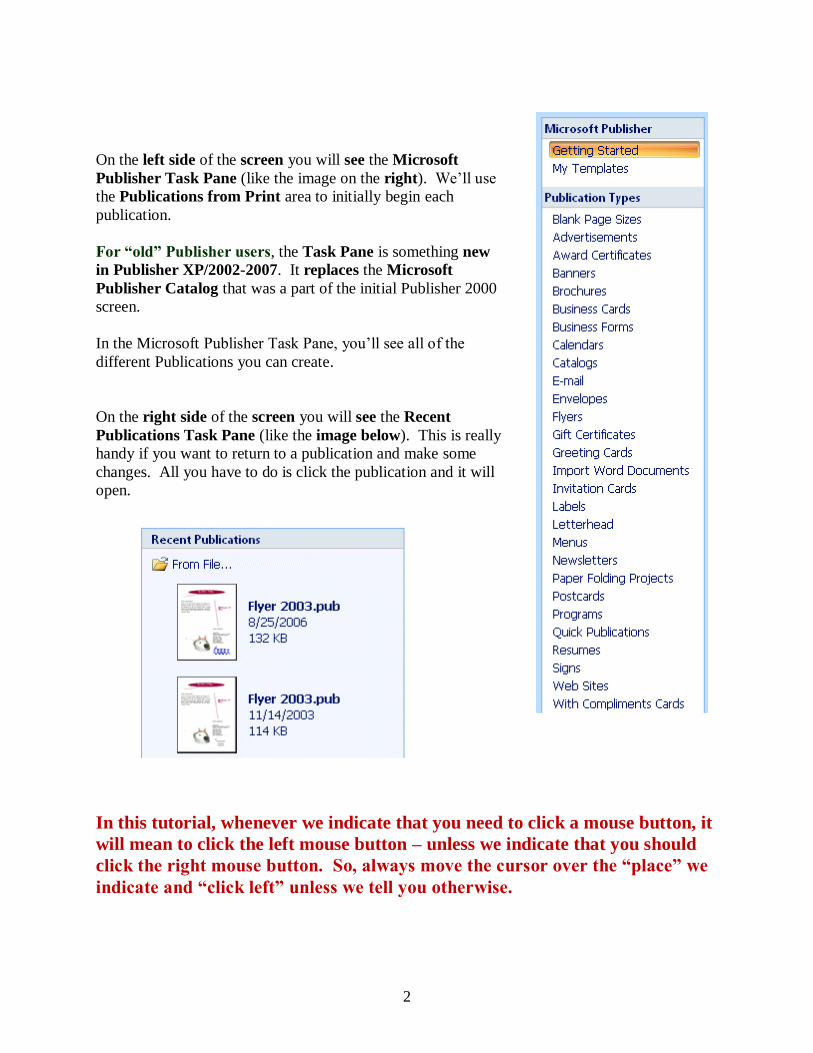
On the left side of the screen you will see the Microsoft
Publisher Task Pane (like the image on the right). We’ll use
the Publications from Print area to initially begin each
publication.
For “old” Publisher users, the Task Pane is something new
in Publisher XP/2002-2007. It replaces the Microsoft
Publisher Catalog that was a part of the initial Publisher 2000
screen.
In the Microsoft Publisher Task Pane, you’ll see all of the
different Publications you can create.
On the right side of the screen you will see the Recent
Publications Task Pane (like the image below). This is really
handy if you want to return to a publication and make some
changes. All you have to do is click the publication and it will
open.
In this tutorial, whenever we indicate that you need to click a mouse button, it
will mean to click the left mouse button – unless we indicate that you should
click the right mouse button. So, always move the cursor over the “place” we
indicate and “click left” unless we tell you otherwise.
3
Using the Microsoft Publisher Task Pane
Click-on Flyers in Microsoft Publisher Task Pane (on the left
side of your screen). On the right side of the screen you will now
see Flyer template design styles for a number of different Flyers
(Accent Box, Arcs, etc.).
Use the “elevator bar” on the right side of the Flyers area to move up and
down to see the various Flyer design templates. Also notice that as you come to a new style that
it will be highlighted in orange. Notice, as you view the various types of Flyers, that you can
have those “little tear off things” with your phone number on the bottom. We’ll show you how
to do this.
Next, click-on Brochures in the Microsoft Publisher Task
Pane. Notice, when you click, a number of different types of
brochures appear below the brochure selection (Informational,
Price List, Event, etc). Use the elevator bar on the right of the
Brochures area, which now appears, to view the various types of
brochures. While you are doing this, notice the differences
between the various types of brochures.
Elevator Bar
4
When you have viewed brochures, to your satisfaction, click-on
Newsletters in the Microsoft Publisher Task Pane (as you did
for Brochures and Flyers). Notice again, there are several
different types of Newsletters. Use the elevator bar on the
right of Newsletters to move down the various Newsletter
styles.
Now, proceed down the Publication Types list and click-on any
of the publications in which you are interested – Postcards,
Business Cards, Calendars, Award Certificates, Paper Airplanes
– whatever you want to look at.
Creating a Flyer
As indicated, at the beginning of the tutorial, we think the Flyer is the easiest publication on
which to begin. So, click on the Flyers category under Publication Types (on the left of the
screen). Use the Elevator Bar and move down until you can see the Classic Designs Category.
Your screen should look like the image below.
We’ll use the “Arcs” style for all Publisher publications. It is the one above on the right
(arrow). Point to the Arcs Informational Flyer and click-on it. A preview will appear, on the
right side of your screen. You will see Arcs “highlighted by an orange border around the
selection (like the one above)”. This indicates that you have selected the Arcs flyer. To work
with the Arcs flyer, double click twice quickly on Arcs. The screen will change and you
will see the Arc Flyer enlarged on the right side of the screen (image at the top of the next
page).
5
Notice that the Arcs flyer has a “default” Business Name, some phone numbers, and other
data. Since this is the first time that you have used Publisher 2007, you will need to change
the default information to your information.
As shown in the image on the right, click the Edit Tab in
the Menu Bar and a drop down menu will appear. Notice,
at the bottom of the menu, a Business Information choice.
Click Business Information…
The Business Information Menu Screen (image at top of
next page) will appear.
6
If you have used previous versions of Publisher you will notice that the Personal Information
Menu screen has been replaced by the Business Information Menu below. Now you can create
“unlimited” addresses! The default information is called Custom 1 – it’s what you see in the
Flyer on the last page. We’ll change this to our information and give it a new name. To get
started, click the Edit button.
When the Edit Business Information Set Menu Screen appeared we replaced the default
information with “our” business information. Go ahead and enter your information, or some
fun information, if you desire – you can come back and edit or remove information later – as
need be. Notice we changed the Business Information set name from Custom 1 to something
more logical for us. When you have finished entering your information, click the Save button.
7
Your updated Business Information menu screen should look similar to the image below. If you
see any mistakes, click the Edit button. If everything is OK, click the Update Publication
button. Notice that the menu screen closes and all of the information you entered is now shown
in the Flyer!
We’ll work with you to create a new logo for your business/group later in the tutorial.
Now we’ll use the Format Publication Task Pane to
enhance our Flyer.
Notice that the Flyer Options selection indicates that we
have chosen Arcs– since that is the Flyer Design we
selected.
We’ll “stick with” Arcs for this tutorial, but if you desire to
choose a different Template, you can click the Change
Template button.
Also notice, that you can change the Page size on with
Flyer Options as well.
8
Next click-on the Page Options selection. This
Task Pane let’s you add various “objects” to
your Flyer. Notice, on our Flyer, we already
have a Logo like the one on the right.
Use the elevator bar (on the right side of the
Task Pane) to move up and down the Suggested
Objects area. As you move, click several of the
objects. As you select the different Objects, you
will notice that the Flyer template, on the right,
changes as the Objects you selected are
“dropped” in the middle of your Flyer.
Don’t worry about this – we’ll show you how
to remove them in a minute.
Later, as you become more accomplished with
Publisher, you’ll be able to “drag” these objects
to other places on your publications.
A BIG BUTTON!
If you “goof-up” it’s easy to get back to where
you were. In the Button Bar, below the Menu
Bar, there is a little, blue circular arrow. This
is the undo button. If you click-on this button
you will undo your last “click.” Try this, if you
desire, by clicking the circular, blue undo arrow. You’ll probably need this several times as
we proceed through this tutorial. We sure did – many times.
Go ahead and remove all of the objects you placed in the middle of your Flyer.
Elevator Bar
9
Next we’ll choose a Color Scheme for our Flyer. Click the
Color Schemes choice in the Format Publication Task Pane.
Use the elevator bar (on the right side of the Task Pane) to
move up and down the Apply a color scheme area. As you
move, click-on several of the color schemes. As you select the
different Color Schemes, you will notice that the Flyer
template on the right changes its Color Scheme to the one you
selected in Apply a color scheme on the left.
We’ll choose the Burgundy Color Scheme since these reflect
our college colors.
You choose a Color Scheme that you like. You can come back
and change it any time you desire.
Next, click-on Font Schemes. The Font Schemes Task Pane at
the left will appear. The default (original) settings for the this
Flyer’s fonts are Arial and Times New Roman.
Use the elevator bar on the right of the Font Schemes area to
select a font that you like.
We’ll stay with the default – Arial and Times New Roman.
Now return to the Flyer Options Task Pane
10
Any time that you desire to change anything we’ve covered so far, simply click-on that selection
in the Format Publications Task Pane. It’s just that simple!
We’re now ready to work more “precisely” with our Flyer, but first it would be a good idea to
save our Flyer.
Saving your Flyer and other Microsoft Publications
You can either click-on File in the Menu Bar and then on Save or Save As, or you can click-on
the little Save diskette in the button bar. Either method will bring you to the Save As screen
below.
Notice that we are saving on our Local Disk (C:) hard drive and that we have used the File
name Flyer. When you decide on a drive (on which to save), name your file and click-on Save.
You can close the Flyer Options Task Pane – and make it appear again any time you
desire.
If you want to “close” the Format Publication Task
Pane simply point to the small “X” in the upper
right corner of the Task Pane and click-on it.
11
If you, at a later time desire to re-open the
Format Publication Task Pane and revise some
of your choices, simply click View in the Menu
Bar and then click Task Pane. Your Format
Publication Task Pane will again appear on the
left. You can close and open this pane anytime.
Editing the Flyer
Take few minutes and look at the Flyer. At the current time
you are able to view the entire flyer. At the top of the
screen, under the Menu Bar, you will notice an area that indicates something % (this depends
on your screen resolution). This tells you the size of the Flyer you are viewing. You'll find, as
we continue through this tutorial in Microsoft Publisher 2007, that it will really be helpful to
view entire Pages in the Flyer, Brochure and Newsletter. Other times, while we are editing a
portion of each of these publications, it will be great if we can “zoom-in” on a specific object
or area of the publication to enlarge it for editing. If we can look at some text, an object or
picture in a larger view, we will be able to edit the “thing” more easily.
Editing Titles
Notice the title area at the top. We’ll start our editing here. Move your cursor over the title
object and click-the left mouse button on the title object.
Note: whenever we indicate that you are to click-on an object in a
publication, this means to click-the left mouse button.
Click-on the Title
12
Zoom-in and Zoom-out
You will notice, when you click-on the title, small circles appear on the four corners and four
sides of the Title area. We call these “grabbers.” We’ll work with these in a few moments. To
make this task much easier, it would be really neat if we could ZOOM-IN on the title – so we’ll
have a BIGGER object on which to work. Whenever you want to zoom-in or out, simply tap
the F9 Function key at the top of the keyboard! Since we clicked-on the title, we will zoom-
in on the title when we tap F9. Tap F9 now.
You will zoom-in on your title and your title should look similar to the image below.
Notice that the zoom percentage now indicates 100%. It will be a lot easier to work with this
larger title.
First we’ll edit the title text. Point the cursor arrow just to the left of the P in Product in the
title and click the left mouse button. You should see a vertical light-green flashing cursor. If
you don’t see the cursor - try again. When you see the cursor, you will be in a “word processor
edit mode.” Tap the Del (Delete) key until you have erased Product/Service Information.
When you have done this, you will only see the light-green flashing cursor in the center of the
title. Now type-in a title you would like for your flyer. We’ll use Lynchburg College – since
that’s where we’re creating this tutorial.
When you have done this, look at the title and see if you still have the “grabbers” on the sides
and corners. If you do - fine. If you don’t, click-on the title again. Once you have the grabbers
slowly move your mouse over the title area – do not click. You’ll notice that as your mouse
moves over this area a number of different “assistants” appear and disappear.
These assistants indicate when you can move and re-size the title. The little crossed
arrows indicate that if you click and hold down the left mouse button and then
move the mouse (drag the mouse), you will see the “whole” title move. Try this. If you place
the cursor over one of the grabbers, you will see a little box with two arrows. If
you now click and hold down the left mouse button, and move (drag) the mouse
a bit you will notice that the title gets a bit larger or smaller.
Grabbers
s
Group Object Pieces
13
If you “goof-up” it’s easy to get back to where you were. In the Button Bar
below the Menu Bar there is a little, blue circular arrow. This is the undo
button. If you click-on this button you will undo your last “click.” Try this, if
you desire, by clicking-on the circular, blue undo arrow. You’ll probably need this
several times as we proceed through this tutorial. We sure did – many times.
Make sure that you can still see the grabbers. If you can’t – click-on
the title. You may have noticed that just below the title there is a
little box that looks like it has two small boxes in it (see the arrow on
the right). If you move the cursor arrow over these “boxes” and pause
you will notice that a text help indicates “Ungroup Objects.” When you moved the title –
everything moved – a group of objects. This is great if you desire to keep all of the objects
together.
If you want to move the individual objects that make up the group –
then click-on the boxes. They will move apart – or ungroup (see
image at right). You can now click and move the individual objects as
you want. Try this or don’t try this – your choice. If you do move the
elliptical, colored background, or the text, you’ll notice that the Object Box disappears. When
you're finished, if you desire to re-group the Text Block objects, all you have to do is click-on
the Undo arrow until you have your title back the way you want it. You’ll notice at some
point that the Object Box reappears and then groups the objects as one object. The Object Box
will look like the upper box on the right when the title is regrouped. The Grouped and
Ungrouped Object boxes don’t look that much different. So, be careful as you “click” the Undo
button.
If you “goof” – don’t forget the undo arrow.
Changing Title and Title Text Colors
We’ll now do some RIGHT mouse button clicking. If you place the cursor arrow over any
object in a Microsoft product and click the RIGHT mouse button, a “tailored” drop down
menu appears with features “tailored” to the area/object on which you clicked. This is really
neat. Many folks use this a lot – others are just discovering this feature. So, point the cursor
arrow to the middle of you title text (make sure the text is highlighted) and click the RIGHT
mouse button. A drop down menu (like the one below) will appear. Notice, that at exact place
where you clicked in the title, a corner of the menu box appears. This indicates exactly
“where” you clicked. We’ll use this drop down menu to change the text color.
After you have right-clicked on the text, a
menu box will remain on the screen until you
either click somewhere else, or click-on one of
the menu choices. Move your mouse cursor
down the menu box until it is over Change
Text (see right arrow). A group of choices
for changing text appears (like the picture on
the right). Now move the cursor from Change
Text over Font. Click-on Font.
14
The Font menu below will appear.
At the beginning of this tutorial we indicated that you should be competent in a word
processing program. So, we will not spend a lot of time on editing and enhancing text in this
tutorial. You can see from the Font menu above that the default font in this title is Ariel Black,
font size 14. If you desire, you can change the font, font size, font color and add effects. To do
this, simply click-on the small down arrows to the right of each effect and select the font changes
you desire.
Don’t forget, just like when you are using the word processor, you have to highlight the text
you desire to change. If you have not done this, simply return to the text box, highlight the text,
click-right on the text, and return to the Font menu as you did a few moments ago.
Notice, if you change the color, that the color scheme you selected is available to maintain
uniformity throughout your Flyer. You may choose other colors if you desire.
Don't forget - if you make a mistake you can always click-on the
blue undo arrow and try again.
15
Changing the Color of the Text Background Box
You may also change the background colors in the
AutoShape (the colored oval around your text), if you
desire. First – Ungroup the two objects. Carefully point to
the edge of the colored oval and click the right mouse
button. The drop down menu box to the right will appear.
This right click has to be precise. You must see the menu to
the right and choose Format AutoShape. If, after several
“right clicks” you do not see this menu, ungroup the objects
(like we did on Page 13). Then, right click on the oval and the
menu at the right will appear. When you select Format
AutoShape the menu below will appear.
When the Format
AutoShape menu at the left
appears, you may change the
Colors and Lines, Size,
Layout, etc., as you desire.
In the Format AutoShape menu above, if you choose
to change the background color of the oval, you have a
number of choices. If you click-on the down arrow to
the right of Color in the Fill area, and then choose Fill
Effects you will be given a number of additional
choices. Experiment with these if you desire.
16
Grouping and Ungrouping Groups of Objects
After you have made your text and background changes you may choose to ungroup the
various objects that make up the title object group. We talked about this at the top of Page 13.
One nice thing - if you ungroup the objects, and move them, it makes editing,
coloring and sizing the individual objects easier. After you have made any
changes you desire, you can re-group the objects in any pattern you desire.
Once you have done this you may again click on the group objects button.
When you do, you will see the objects re-group. This new group will now
move as a single group.
If you do not see the object buttons (above to the right), we’ll now explain how to group objects
that are not grouped.
Grouping Objects that are not Grouped
You should be “zoomed-in” on the title object at this
point. If you are, tap the F9 function key to “zoom-out”
so that you can again see the whole Flyer. If you can
already see the Flyer, do not zoom-out. Look at the
lower right corner of the Flyer. You will see what
appear to be several small text boxes. Click-on one of
the boxes, and tap the F9 key to zoom-in on them.
You should now see an image similar to the one on the
right. The information you view was created by the
data you entered in your Business Information at the
beginning of the tutorial. If you did not enter your
changes to the default information, you will see the
default information that was displayed in the Business
Information “box.” If you now desire to enter or change information in the Business
Information menu screen, click-on Edit in the Menu Bar, then click-on Business Information.
Edit as you desire then click-on Update. This will change your information in this and future
Publications. Neat! If you desire to change the information in this Flyer you may also do so
in each text box. Notice that the information appears to be in three separate text boxes. Click-
on each of these boxes. As you do, you will see sizing grabbers appear on each box. The top
box has a title, the middle box has name and address information and the bottom box contains
phone and e-mail information.
17
When you click on the top box, you will see a title. This title normally “fits” in the box and is
OK. Some folks enter long titles and you may see a little box with an A and three periods
along the bottom edge of the text box. This did not occur in our top box.
However, when we clicked–on our middle box, the
little box with an A and three periods appeared.
This little box indicates a “text overflow,” which
simply means that the box is too small for our address
text. To fix this, we’ll have to enlarge our middle
box. If you decide to make the middle box larger,
you’ll have to be careful. If you enlarge it into either
the top or bottom boxes, you may “cover the text” in
these boxes. So, it’s normally best to “drag” the top
box up a bit, by clicking on it, letting the “crossed
arrows” appear, then holding down the left mouse button, and dragging it up a bit. You can
then drag it down when you are finished. Notice, in our box, that we don’t have the last part of
our address. So, we’ll enlarge the box and complete the address.
We noticed, in the above image, that our address
“wrapped” some of the “lines” of the Address
(USA in the bottom line). So, after completing
the address, we “widened” the text box so that the
lines would not wrap. The image at the left is the
enlarged image with all of the text showing.
When we did this we noticed that our text box “crossed over” the thin blue line that goes
around the border on all four sides of the Flyer Page. This blue line represents the default
borders (margins) that Microsoft Publisher places on each of its publications as a guide. Since
we are a bit outside these lines, we might get an error message when we print this Flyer
indicating that we are outside the borders. This is no big deal, as the Flyer will print fine.
However, just to be safe we move our text box a bit to the left so all three boxes were inside the
blue line.
Note: you may see some spell check errors in each of the three text boxes. This is simply
Publisher (through Microsoft Word) telling you that these words are not in the Word Dictionary.
You will see a “wavy red underline” under each word that the dictionary does not recognize. As
with Microsoft Word, you can simply right click-on the underlined word and see if the spell
checker has the word in the dictionary. If it does, click-on the word. If not, you can choose to
ignore the error or add the word to the dictionary.
Now click-on each box and drag it until the three boxes are aligned the way you want them.
18
Grouping Ungrouped Text Boxes
When you are satisfied that everything is OK (all the
boxes are “lined-up” like the image on the left), then
you’re ready to group them. To create a single group
from these three boxes (so that when you click-on any of
the boxes the whole group will move), do the following.
Make sure you can see all three boxes (like the image
on the left). If you can’t, use the elevator bars on the
right and bottom of the screen until all three boxes are
visible. Again make sure that the boxes are aligned
exactly like you want them. Then click the left mouse
button lightly-on the first box. You will see the
grabbers. Now – this is important – HOLD DOWN
one of the Ctrl keys (next to the space bar on the
keyboard). With the Ctrl key held down, move the
cursor over the middle box and click the left mouse
button again. You should now see both the top and middle boxes with grabbers around
them. You should also see the little box with the two object pieces at the bottom right corner
of the middle box. The object pieces should be apart indicating that the top and middle boxes
are not grouped. Don’t do anything yet – we’ll come back to the object pieces after we have
added the bottom box. Hold down the Ctrl key again and click-on the bottom box. Now all
three boxes should have grabbers around the sides.
If they do not, repeat the above instructions until
they do. You should now see the ungrouped object
pieces box at the bottom right corner of the bottom
text box.
Click left the ungrouped object pieces box. The
objects should now join into a single object. The
object grouping box, at the bottom of the boxes,
should now look like the image
on the right. You will now see
grabbers around the “entire”
three text boxes. This indicates
that when you move the single box, all three
smaller text boxes will move together. Pretty neat.
Microsoft Publisher was thinking ahead of you when
it saw you “Ctrl click” each text box. It assumed you
wanted to join them.
19
Changing and Editing Images and Photographs
You should now be in the zoomed-in view on the grouped objects that you just worked with
(on the last Page). Tap the F9 key to zoom-out so that you can view the entire Flyer. When
you can see the entire Flyer you will see a photograph in the lower left portion of the Flyer.
Click-on the photograph, then tap the F9 key to zoom-in again. Your image should look like
the one below.
Let’s assume we desire to change the image to something more appropriate with our Flyer
topic. Point somewhere in the image, and click the LEFT mouse button. This will “mark” or
“identify” the picture above – as the image we desire to replace.
Click-on Insert in the Menu Bar, and then
select Picture, and then Clip Art.
The Insert Clip Art Task Pane (at the top of the next Page) will appear on the left side of your
screen.
20
We’ll only deal with Clip Art in this tutorial. When you
become more advanced you can import your images directly
from a scanner, digital camera or a file on your computer.
Notice, at the top of the Clip Art Task Pane (at the left),
there is a Search for: area. We typed computer in the area
below Search text and then clicked-on the Go button.
The bottom
of the Clip
Art Task
Pane is now
“filled with
computer clip
art the images
you see on the left. If we like one of the images, all we have
to do is move our mouse cursor over the right edge of the
image, and we’ll see a small down arrow appear (like the
one above – we chose the student working on the computer)
If we click-on
the down arrow
the menu
screen on the
right will
appear. We
have a number
of choices. For
now, we’ll click
Insert.
Notice, at the top of the next Page, that our computer lab is now on top of the old image.
21
Oh my goodness! The image we
selected is now too big for our Flyer
and the old image is still there!
All we have to do to remove the old
picture is to click the left mouse button
on the old picture (don’t click-on your
image), and tap the Delete Key on the
keyboard. When you do, you’ll see that
your image is now the only image and that
you can re-size and move it as you desire
(as shown on Page 12).
If you don’t like the image you chose
and desire to do another Search, simply
repeat the instructions on the last two
pages. This will take you back to the
original Clip Art Task Pane so that you can try another search on a different topic.
Don't forget - if you make a mistake you can always click-on the
blue undo arrow and try again.
22
Our image looked like the one on the far right when we first pasted it into the flyer. To move
your image around on the flyer move the cursor over the image until your cursor becomes the
“crossed arrows.” When you see the four-arrow graphic (like the one on the right), click
and hold down the left mouse button and move (drag) the image to a place on your flyer
where you think it looks best.
To make the image larger, or smaller, move your cursor over one of
the small circles on one of the corners of the image. When your
cursor is over a corner you will see a two-arrow cursor (similar to the
one on the right). When you see this two-arrow cursor, click and hold
down the left mouse button and move (drag) the cursor out or in until
you have the size you desire. If you “grab” the circles in the middle of
the top, bottom and left or right sides of the image, and move them, you
will either make your image “skinny” or “fat.” So, most of the time, it’s
best to use the corner circles.
Save your work!
Note: When you insert or paste images into Publisher publications, more often than not, they are
copied or pasted on top of the prior image. This is not a problem. You can click-on the image
that you do not desire and then tap the Delete key, or delete the first image before you insert or
paste the new image.
So far we’ve worked with the Title
and Title Box at the top of the Flyer,
the three Personal Information Text
Boxes in the lower right area, and the
image. Now let’s replace and edit the
text in the Text Box at the upper left
side of the Flyer. Tap the F9 key to
zoom out (so you can see the entire
flyer).
23
Editing and Replacing Text in Text Boxes.
When you can see the
entire Flyer, click-on
the Text Box indicated
above and tap the F9
key to zoom-in. Or, if
you are already in the
magnified view, move to
the text box and click-on
it. You should now see a
text box like the one on
the right.
Notice how the text in the box indicates the type of text that you should place in the text box
area. Each Microsoft Publisher 2007 publication will have instructional assistance text where
appropriate.
Now we’ll add some text about our wonderful whatnots that we sell at the arts festival on
campus. To do this we’ll use a special Microsoft Publisher feature: Edit the text in Microsoft
Word.
24
First, point to the text box and
RIGHT click-on the text. A
drop down menu box like the
one on the left appears. Move the
cursor down to Change Text.
When the next drop down menu
appears, move the cursor down to
Edit Story in Microsoft Word
and click the left mouse button.
Microsoft Word will now open
and the text shown on the screen
will be the text above.
Delete the above text in Microsoft Word and type-in the following – or some text you like:
Come to the Fifth Annual College Art Festival. In addition to great buys on
wonderful works of art by the students, you can also purchase some of our
fantastic and world-renowned whatnots. Each whatnot is unique and
irresistible.
This text is being typed-in a special Microsoft Word screen.
When you have finished typing the text above, click on the
Microsoft Office Button (at the top left corner of Microsoft
Word). You will see a drop down menu like the one to the
right. When it appears you will see a unique selection: Close
& Return to Flyer. pub. Click-on Close & Return to Flyer.
pub.
25
Microsoft Word will appear to close, and you will return to your Publisher Flyer text area.
Notice that the text you edited in Microsoft Word now appears in the selected text box. If you
decide to make more changes in this text, simply repeat the above instructions. Click
anywhere in your text and click-right, and then follow the above instructions. You will again
return to your text in Microsoft Word where you can make any additions and edit, as you
desire.
Your text box in the
Flyer will look
similar to the text on
the left. You can
change fonts, resize
and color the text,
just like you did
previously. You
can also resize the
text box as well.
Don't forget - if you make a mistake you can always click-on the
blue undo arrow and try again.
Logo Text and Logo Picture
If you can see the whole Flyer you are where you should
be at this point. If you can't see your entire flyer, zoom-
out, as you have done before by tapping the F9 key. Now
that you can view the entire Flyer, look in the lower right
corner of the Flyer, just below the Personal
Information Text Boxes - that we worked on before -
there is a small box with the word Organization below a
pyramid. Click-on this box. Then zoom-in again by
tapping the F9 key.
When you have zoomed-in, your image should look like the one above. This image looks
similar to a "Grouped" set of boxes, but there are no "object boxes."
If you are familiar with Publisher 2002 and 2003 you will find that editing your Logo’s has a few
more steps in Publisher 2007. The Logo Task Pane has been replaced by a Design Gallery.
We’ll now show you how to find the Design Gallery and alter your Logos. We’ll also show you
the “new” method for saving your Logos – that’s more flexible than before.
Now trust us and click the current Logo and then tap the Delete key. We’ll replace this Logo
with one we like. If we don’t delete it now, we’ll have two Logos’ – one on top of the other.
26
Printing Your Flyer
Printing your Flyer, or any publication, is very similar to printing in any word processor. In the
Microsoft Office modules you can either click-on a small printer in button bar or click-on File
in the Menu Bar and then on Print in the drop down menu. One small, logical note. Many
computer users seem to forget that you can only print color from a color printer. Frequently,
users assume that if the computer has color on the screen the printer will print color.
Final Flyer Observations
All of the skills you learned in creating your Flyer can be used in the Brochure
and Newsletter. All three publications have Title and Text Boxes, Personal Information Text
Boxes, Images, Logos, text to edit or replace with other text. You may group or ungroup objects,
change color schemes, and fonts. So, when these common tasks are also used in the Brochure or
Newsletter we will not cover them again. We will only cover additional new skills in creating
these new publications.
Don't forget to Save!
If you still have your Flyer open, please close it. Click-on File in the Menu Bar and then on
Close. In most other Microsoft software, the current document on which you are working can
also be closed by clicking-on the small lower "X" in the upper right corner of the screen. In
Publisher you do not have this "X," so if you click-on the single "X," It will completely exit from
Publisher. If this happens it's no big deal. Simply start Publisher again and you will be ready to