Creating a Realtime Image Sharing App With Ionic and Socket
11
1 Creating a Realtime Image Sharing App With Ionic and Socket.io If you are into hybrid mobile app development you must have come across Ionic Framework. Basically Ionic lets you build mobile apps using your favorite web technologies. That means you don't need to learn Java, Objective C etc to create smartphone apps. Rather you will create HTML5 apps as usual and they will be running in smartphones as WebView. Behind the scenes Ionic uses Cordova for its core tools. Another great thing about Ionic is that it utilizes AngularJS perfectly so that you can create rich and robust AngularJS apps that happen to run as smartphone apps! This tutorial, targeted towards Ionic beginners, shows how to create a realtime image sharing app using Ionic and a little bit of Socket.io. The only requirement of this tutorial is that you should have basic knowledge of Ionic and working knowledge of Node.js. So, let's get started. Getting Started The app we are going to develop is really simple. We will create a mobile app for image sharing. Users have to provide a nick name to enter the chat. Once you are in you can browse your device and upload images which will be shared with all other users of the app. To make it work we will use Node.js+Socket.io as the backend. Finally, our Ionic app will communicate with this backend to work. Here is a video which shows how the end product will look and work. I am working with two browser windows and sharing images. But we will also see how to install the app on your smartphone and share images with your computer. Designing Backend To start let's first design the Node.js backend. So, just create an empty directory called socketio‐ backend and in the terminal type cd socketio‐backend. This is the directory name used by me. You can choose a different name if you like. Now type npm init, hit enter and it will ask you some questions regarding the app name, version, entry point etc. Have a look at the screenshot below to get an idea.
Transcript
1
Creating a Realtime Image Sharing App With Ionic and Socket.io
If you are into hybrid mobile app development you must have come across Ionic Framework. Basically Ionic lets you build mobile apps using your favorite web technologies. That means you don't need to learn Java, Objective C etc to create smartphone apps. Rather you will create HTML5 apps as usual and they will be running in smartphones as WebView. Behind the scenes Ionic uses Cordova for its core tools. Another great thing about Ionic is that it utilizes AngularJS perfectly so that you can create rich and robust AngularJS apps that happen to run as smartphone apps!
This tutorial, targeted towards Ionic beginners, shows how to create a realtime image sharing app using Ionic and a little bit of Socket.io. The only requirement of this tutorial is that you should have basic knowledge of Ionic and working knowledge of Node.js. So, let's get started.
Getting Started
The app we are going to develop is really simple. We will create a mobile app for image sharing. Users have to provide a nick name to enter the chat. Once you are in you can browse your device and upload images which will be shared with all other users of the app. To make it work we will use Node.js+Socket.io as the backend. Finally, our Ionic app will communicate with this backend to work.
Here is a video which shows how the end product will look and work. I am working with two browser windows and sharing images. But we will also see how to install the app on your smartphone and share images with your computer.
Designing Backend
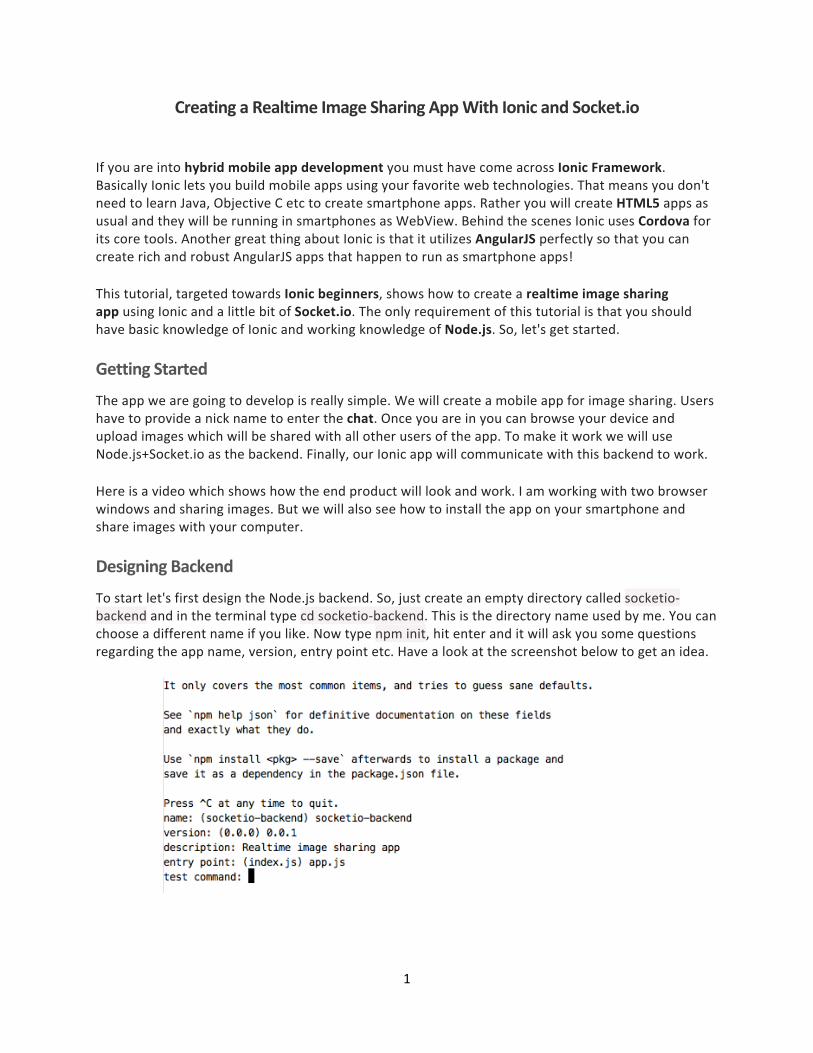
To start let's first design the Node.js backend. So, just create an empty directory called socketio‐backend and in the terminal type cd socketio‐backend. This is the directory name used by me. You can choose a different name if you like. Now type npm init, hit enter and it will ask you some questions regarding the app name, version, entry point etc. Have a look at the screenshot below to get an idea.
2
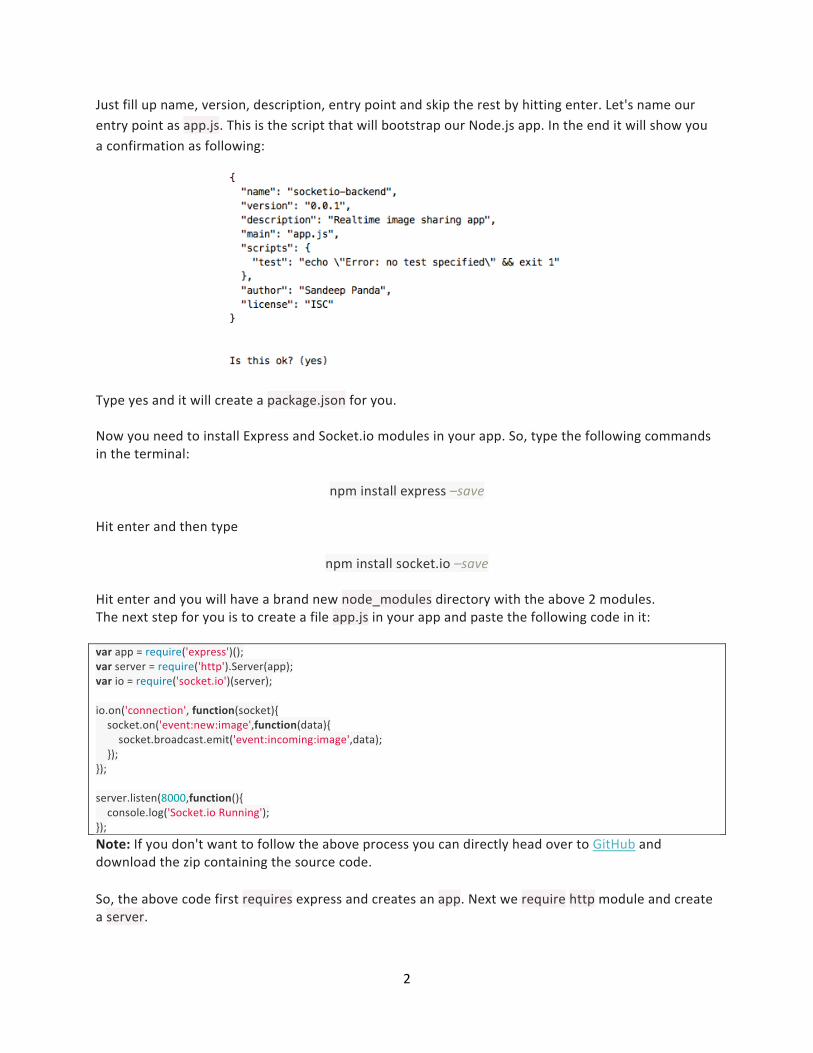
Just fill up name, version, description, entry point and skip the rest by hitting enter. Let's name our entry point as app.js. This is the script that will bootstrap our Node.js app. In the end it will show you a confirmation as following:
Type yes and it will create a package.json for you. Now you need to install Express and Socket.io modules in your app. So, type the following commands in the terminal:
npm install express –save
Hit enter and then type
npm install socket.io –save
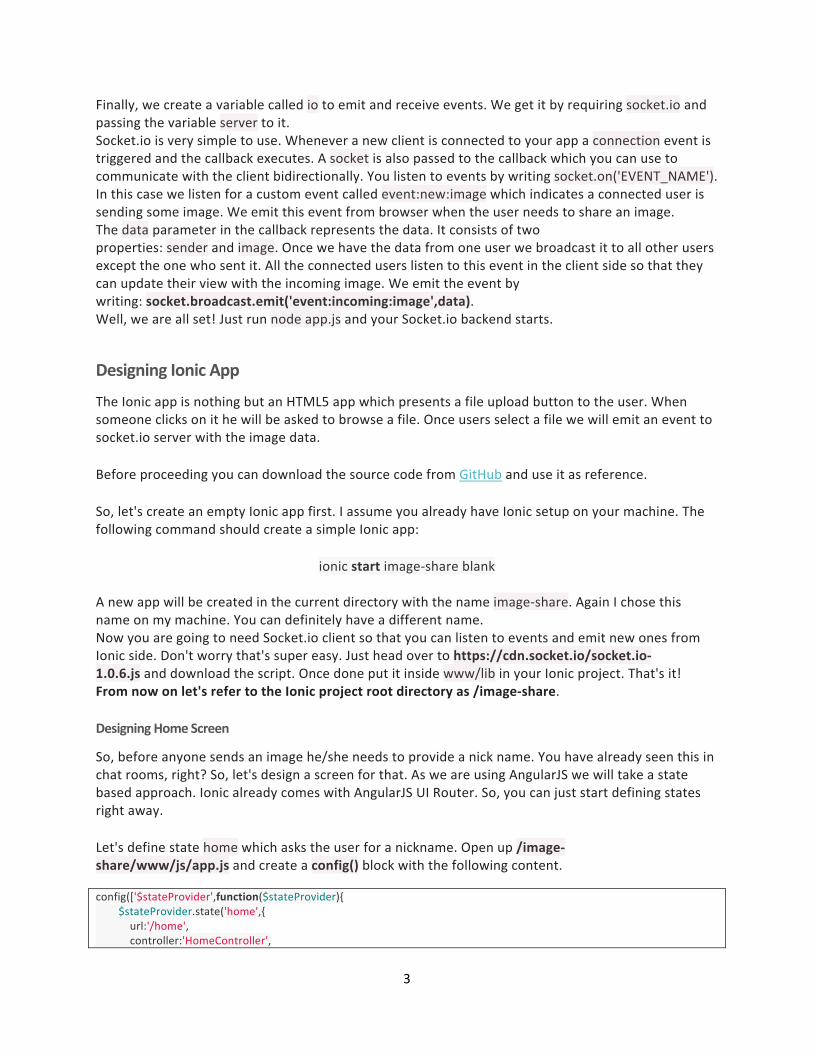
Hit enter and you will have a brand new node_modules directory with the above 2 modules. The next step for you is to create a file app.js in your app and paste the following code in it: var app = require('express')(); var server = require('http').Server(app); var io = require('socket.io')(server); io.on('connection', function(socket){ socket.on('event:new:image',function(data){ socket.broadcast.emit('event:incoming:image',data); }); }); server.listen(8000,function(){ console.log('Socket.io Running'); }); Note: If you don't want to follow the above process you can directly head over to GitHub and download the zip containing the source code.
So, the above code first requires express and creates an app. Next we require http module and create a server.
3
Finally, we create a variable called io to emit and receive events. We get it by requiring socket.io and passing the variable server to it. Socket.io is very simple to use. Whenever a new client is connected to your app a connection event is triggered and the callback executes. A socket is also passed to the callback which you can use to communicate with the client bidirectionally. You listen to events by writing socket.on('EVENT_NAME'). In this case we listen for a custom event called event:new:image which indicates a connected user is sending some image. We emit this event from browser when the user needs to share an image. The data parameter in the callback represents the data. It consists of two properties: sender and image. Once we have the data from one user we broadcast it to all other users except the one who sent it. All the connected users listen to this event in the client side so that they can update their view with the incoming image. We emit the event by writing: socket.broadcast.emit('event:incoming:image',data). Well, we are all set! Just run node app.js and your Socket.io backend starts.
Designing Ionic App
The Ionic app is nothing but an HTML5 app which presents a file upload button to the user. When someone clicks on it he will be asked to browse a file. Once users select a file we will emit an event to socket.io server with the image data.
Before proceeding you can download the source code from GitHub and use it as reference.
So, let's create an empty Ionic app first. I assume you already have Ionic setup on your machine. The following command should create a simple Ionic app:
ionic start image‐share blank A new app will be created in the current directory with the name image‐share. Again I chose this name on my machine. You can definitely have a different name. Now you are going to need Socket.io client so that you can listen to events and emit new ones from Ionic side. Don't worry that's super easy. Just head over to https://cdn.socket.io/socket.io‐1.0.6.js and download the script. Once done put it inside www/lib in your Ionic project. That's it! From now on let's refer to the Ionic project root directory as /image‐share.
Designing Home Screen
So, before anyone sends an image he/she needs to provide a nick name. You have already seen this in chat rooms, right? So, let's design a screen for that. As we are using AngularJS we will take a state based approach. Ionic already comes with AngularJS UI Router. So, you can just start defining states right away.
Let's define state home which asks the user for a nickname. Open up /image‐share/www/js/app.js and create a config() block with the following content. config(['$stateProvider',function($stateProvider){ $stateProvider.state('home',{ url:'/home', controller:'HomeController',
4
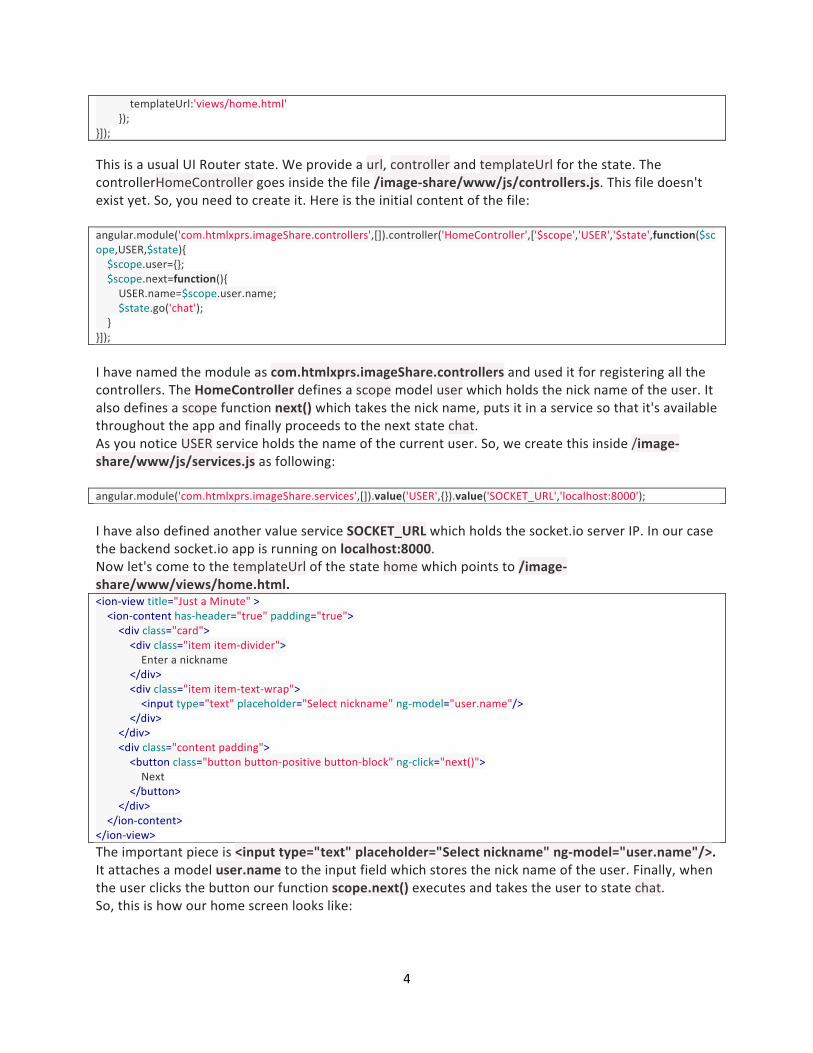
templateUrl:'views/home.html' }); }]); This is a usual UI Router state. We provide a url, controller and templateUrl for the state. The controllerHomeController goes inside the file /image‐share/www/js/controllers.js. This file doesn't exist yet. So, you need to create it. Here is the initial content of the file: angular.module('com.htmlxprs.imageShare.controllers',[]).controller('HomeController',['$scope','USER','$state',function($scope,USER,$state){ $scope.user={}; $scope.next=function(){ USER.name=$scope.user.name; $state.go('chat'); } }]); I have named the module as com.htmlxprs.imageShare.controllers and used it for registering all the controllers. The HomeController defines a scope model user which holds the nick name of the user. It also defines a scope function next() which takes the nick name, puts it in a service so that it's available throughout the app and finally proceeds to the next state chat. As you notice USER service holds the name of the current user. So, we create this inside /image‐share/www/js/services.js as following: angular.module('com.htmlxprs.imageShare.services',[]).value('USER',{}).value('SOCKET_URL','localhost:8000'); I have also defined another value service SOCKET_URL which holds the socket.io server IP. In our case the backend socket.io app is running on localhost:8000. Now let's come to the templateUrl of the state home which points to /image‐share/www/views/home.html. <ion‐view title="Just a Minute" > <ion‐content has‐header="true" padding="true"> <div class="card"> <div class="item item‐divider"> Enter a nickname </div> <div class="item item‐text‐wrap"> <input type="text" placeholder="Select nickname" ng‐model="user.name"/> </div> </div> <div class="content padding"> <button class="button button‐positive button‐block" ng‐click="next()"> Next </button> </div> </ion‐content> </ion‐view> The important piece is <input type="text" placeholder="Select nickname" ng‐model="user.name"/>. It attaches a model user.name to the input field which stores the nick name of the user. Finally, when the user clicks the button our function scope.next() executes and takes the user to state chat. So, this is how our home screen looks like:
Designin
Now thatusers to sfollowing .config(['$st $stateP url:'/ cont temp }).state url:'/ cont temp }); }]); The ChatCbut later angular.morootScope){ }]); Now the t<ion‐view t <ion‐cont <brows <chat‐l </ion‐con</ion‐view>
points to viee some pics" > r="true" paddine‐file> <!‐‐Direc<!‐‐Directive 2‐‐
creen let's deimages share
rovider){
ge‐share/wwit if needed.
re.controllers').c
ews/chat.htm
g="true"> ctive 1‐‐> ‐>
5
efine the secoed by others.
ww/js/controHere is how t
controller('Chat
ml which look
ond state wh So, we start
ollers.js. Currthe controlle
Controller',['$sc
ks like followi
hich is chat. Twith definin
rently it doeser is defined:
cope','$rootSco
ng:
his will allowg the state as
sn't do anythi
pe',function($s
w s
ing,
cope,$
You can swe will ge
Now let's
browseF
This direceventevepropertie
1. se2. im
The direcangular.moER){ return { scope:{ }, replace restrict link:fun scop do } angu var ang
see the two det to them sh
see how the
File Directiv
ctive allows tent:file:selectes:
ender: The nimage: The da
tive is definedule('com.html
{
e:true, t:'AE', nction(scope,ele
pe.browseFile=fuocument.getElem
ular.element(do
r file=e.target.fi
gular.element(d
directives brohortly. With a
e directives w
ve
he users to seted once the
ick name of tata URL of the
ed inside /imaxprs.imageShar
em,attrs){
unction(){ mentById('brow
cument.getElem
les[0];
document.getEle
owseFile anda little bit of C
work!
elect an imagfile is selecte
the user whoe selected im
age‐share/wwre.directives',[])
wseBtn').click();
mentById('brow
ementById('bro
6
chatList. DonCSS our 2nd s
ge from theired. It also sen
sends the immage.
ww/js/directi.directive('brow
wseBtn')).on('cha
owseBtn')).val('')
n't worry! Thscreen now lo
r gallery and bnds a data wi
mage.
ives.js and thwseFile',['$rootS
ange',function(e
);
ese are custoooks like follo
broadcasts ath the event
he content is Scope','USER',fu
e){
om directivesowing:
n which has tw
as following:nction($rootSco
s and
wo
ope,US
7
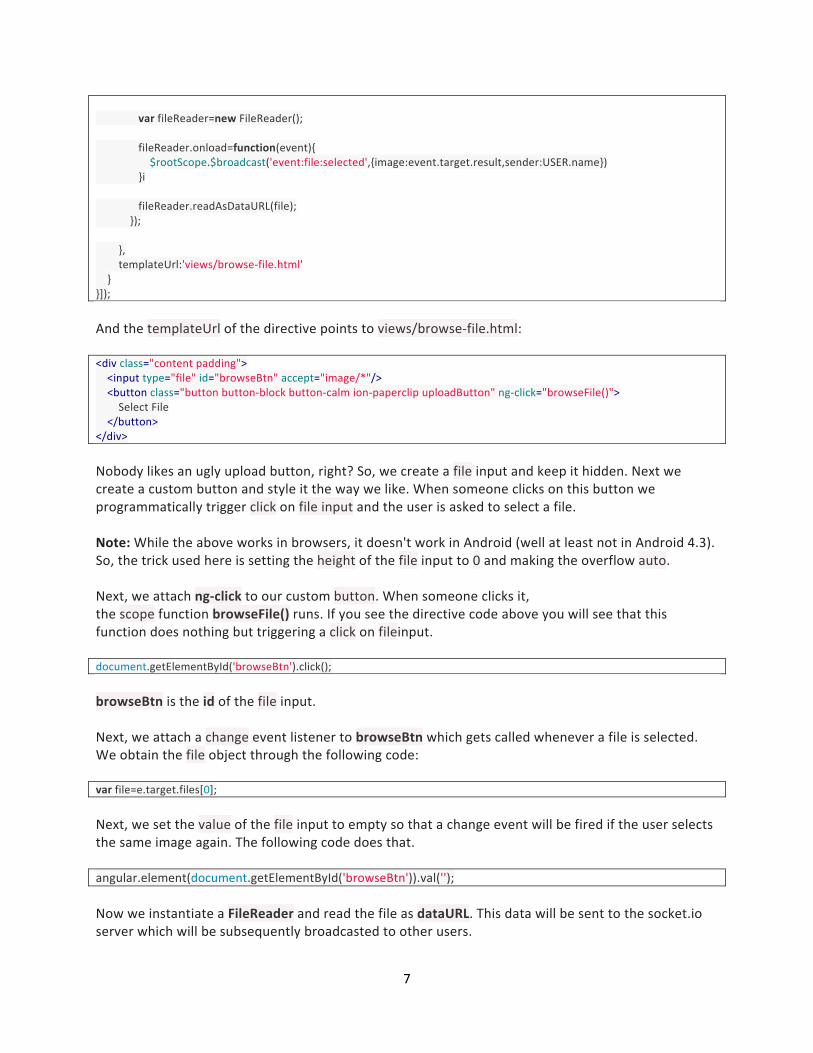
var fileReader=new FileReader(); fileReader.onload=function(event){ $rootScope.$broadcast('event:file:selected',{image:event.target.result,sender:USER.name}) }i fileReader.readAsDataURL(file); }); }, templateUrl:'views/browse‐file.html' } }]); And the templateUrl of the directive points to views/browse‐file.html: <div class="content padding"> <input type="file" id="browseBtn" accept="image/*"/> <button class="button button‐block button‐calm ion‐paperclip uploadButton" ng‐click="browseFile()"> Select File </button> </div> Nobody likes an ugly upload button, right? So, we create a file input and keep it hidden. Next we create a custom button and style it the way we like. When someone clicks on this button we programmatically trigger click on file input and the user is asked to select a file. Note: While the above works in browsers, it doesn't work in Android (well at least not in Android 4.3). So, the trick used here is setting the height of the file input to 0 and making the overflow auto. Next, we attach ng‐click to our custom button. When someone clicks it, the scope function browseFile() runs. If you see the directive code above you will see that this function does nothing but triggering a click on fileinput. document.getElementById('browseBtn').click(); browseBtn is the id of the file input. Next, we attach a change event listener to browseBtn which gets called whenever a file is selected. We obtain the file object through the following code: var file=e.target.files[0]; Next, we set the value of the file input to empty so that a change event will be fired if the user selects the same image again. The following code does that. angular.element(document.getElementById('browseBtn')).val(''); Now we instantiate a FileReader and read the file as dataURL. This data will be sent to the socket.io server which will be subsequently broadcasted to other users.
8
var fileReader=new FileReader(); fileReader.onload=function(event){ $rootScope.$broadcast('event:file:selected'{image:event.target.result,sender:USER.name}); } fileReader.readAsDataURL(file); We broadcast an event event:file:selected on $rootScope and pass a data. This event is handled by chatListdirective and sent to socket.io server. That's all about this directive which is then used in chat.html as following: <browse‐file></browse‐file>
chatList Directive
This directive uses the Socket.io client library we downloaded earlier to communicate with the backend. So, the directive looks like following:
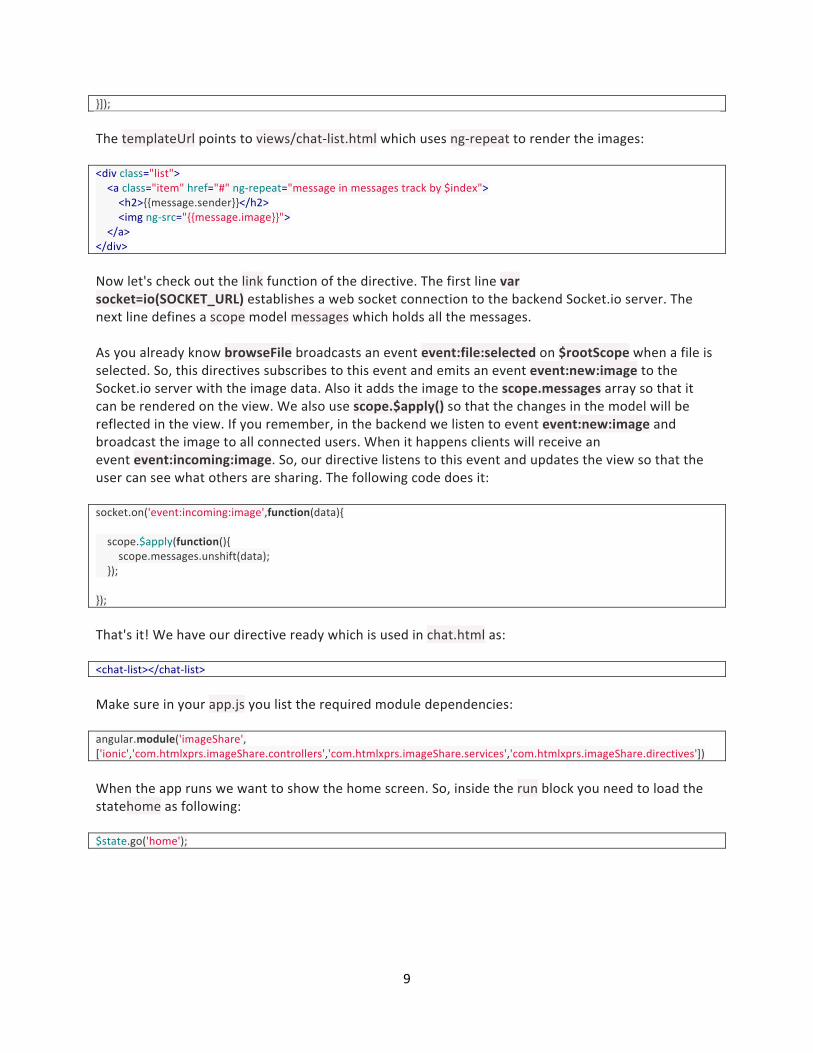
}]); The templateUrl points to views/chat‐list.html which uses ng‐repeat to render the images: <div class="list"> <a class="item" href="#" ng‐repeat="message in messages track by $index"> <h2>{{message.sender}}</h2> <img ng‐src="{{message.image}}"> </a> </div> Now let's check out the link function of the directive. The first line var socket=io(SOCKET_URL) establishes a web socket connection to the backend Socket.io server. The next line defines a scope model messages which holds all the messages. As you already know browseFile broadcasts an event event:file:selected on $rootScope when a file is selected. So, this directives subscribes to this event and emits an event event:new:image to the Socket.io server with the image data. Also it adds the image to the scope.messages array so that it can be rendered on the view. We also use scope.$apply() so that the changes in the model will be reflected in the view. If you remember, in the backend we listen to event event:new:image and broadcast the image to all connected users. When it happens clients will receive an event event:incoming:image. So, our directive listens to this event and updates the view so that the user can see what others are sharing. The following code does it: socket.on('event:incoming:image',function(data){ scope.$apply(function(){ scope.messages.unshift(data); }); }); That's it! We have our directive ready which is used in chat.html as: <chat‐list></chat‐list> Make sure in your app.js you list the required module dependencies: angular.module('imageShare', ['ionic','com.htmlxprs.imageShare.controllers','com.htmlxprs.imageShare.services','com.htmlxprs.imageShare.directives']) When the app runs we want to show the home screen. So, inside the run block you need to load the statehome as following: $state.go('home');
10
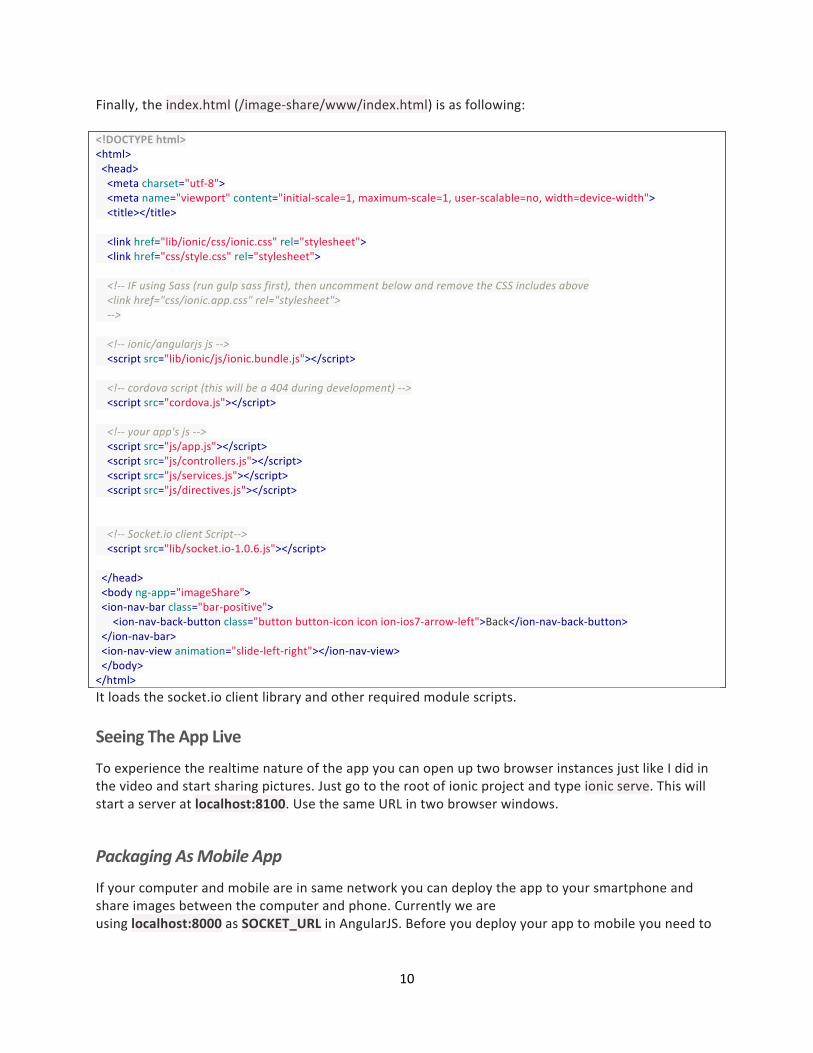
Finally, the index.html (/image‐share/www/index.html) is as following: <!DOCTYPE html> <html> <head> <meta charset="utf‐8"> <meta name="viewport" content="initial‐scale=1, maximum‐scale=1, user‐scalable=no, width=device‐width"> <title></title> <link href="lib/ionic/css/ionic.css" rel="stylesheet"> <link href="css/style.css" rel="stylesheet"> <!‐‐ IF using Sass (run gulp sass first), then uncomment below and remove the CSS includes above <link href="css/ionic.app.css" rel="stylesheet"> ‐‐> <!‐‐ ionic/angularjs js ‐‐> <script src="lib/ionic/js/ionic.bundle.js"></script> <!‐‐ cordova script (this will be a 404 during development) ‐‐> <script src="cordova.js"></script> <!‐‐ your app's js ‐‐> <script src="js/app.js"></script> <script src="js/controllers.js"></script> <script src="js/services.js"></script> <script src="js/directives.js"></script> <!‐‐ Socket.io client Script‐‐> <script src="lib/socket.io‐1.0.6.js"></script> </head> <body ng‐app="imageShare"> <ion‐nav‐bar class="bar‐positive"> <ion‐nav‐back‐button class="button button‐icon icon ion‐ios7‐arrow‐left">Back</ion‐nav‐back‐button> </ion‐nav‐bar> <ion‐nav‐view animation="slide‐left‐right"></ion‐nav‐view> </body> </html> It loads the socket.io client library and other required module scripts.
Seeing The App Live
To experience the realtime nature of the app you can open up two browser instances just like I did in the video and start sharing pictures. Just go to the root of ionic project and type ionic serve. This will start a server at localhost:8100. Use the same URL in two browser windows.
Packaging As Mobile App
If your computer and mobile are in same network you can deploy the app to your smartphone and share images between the computer and phone. Currently we are using localhost:8000 as SOCKET_URL in AngularJS. Before you deploy your app to mobile you need to
11
change this to real IP of your machine because localhost won't be resolved to our socket.io server in a mobile app. When you type ionic serve you can see it starts a server at http://your_ip_here:8100. You can just copy your_ip_here portion, combine it with port 8000 and use it as SOCKET_URL value service. We do this because ionic starts a server at port 8100 which is used by our AngularJS app. But our socket.io server runs on port 8000. If you have trouble you can use the following commands to get the IP depending on your OS.
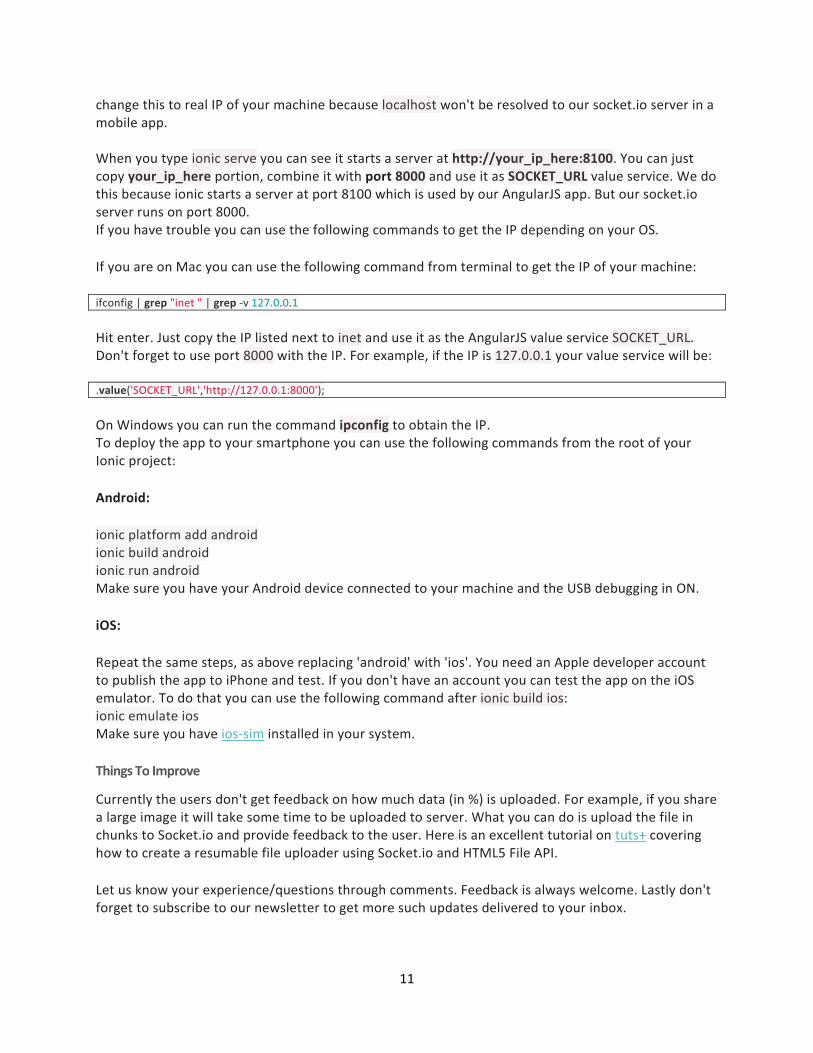
If you are on Mac you can use the following command from terminal to get the IP of your machine:
ifconfig | grep "inet " | grep ‐v 127.0.0.1 Hit enter. Just copy the IP listed next to inet and use it as the AngularJS value service SOCKET_URL. Don't forget to use port 8000 with the IP. For example, if the IP is 127.0.0.1 your value service will be: .value('SOCKET_URL','http://127.0.0.1:8000'); On Windows you can run the command ipconfig to obtain the IP. To deploy the app to your smartphone you can use the following commands from the root of your Ionic project:
Android:
ionic platform add android ionic build android ionic run android Make sure you have your Android device connected to your machine and the USB debugging in ON.
iOS:
Repeat the same steps, as above replacing 'android' with 'ios'. You need an Apple developer account to publish the app to iPhone and test. If you don't have an account you can test the app on the iOS emulator. To do that you can use the following command after ionic build ios: ionic emulate ios Make sure you have ios‐sim installed in your system.
Things To Improve
Currently the users don't get feedback on how much data (in %) is uploaded. For example, if you share a large image it will take some time to be uploaded to server. What you can do is upload the file in chunks to Socket.io and provide feedback to the user. Here is an excellent tutorial on tuts+ covering how to create a resumable file uploader using Socket.io and HTML5 File API.
Let us know your experience/questions through comments. Feedback is always welcome. Lastly don't forget to subscribe to our newsletter to get more such updates delivered to your inbox.