12 Chapter 1 Creating an HTML file (Mac) Navigate to your Applications folder Locate and run TextEdit Keep TextEdit in your Dock All HTML files are text files. To create a text file you need an application that allows you to create plain text without throwing in a lot of fancy formatting and special characters. You just need plain, pure text. We’ll use TextEdit on the Mac in this book; however, if you prefer another text editor, that should work fine as well. And, if you’re running Windows, you’ll want to skip ahead a couple of pages to the Windows instructions. The TextEdit application is in the Applications folder. The easiest way to get there is to choose “New Finder Window” from the Finder’s File menu and then look for the Application directly in your shortcuts. When you’ve found it, click on Applications. You’ll probably have lots of applications listed in your applications folder, so scroll down until you see TextEdit. To run the application, double click on the TextEdit icon. If you want to make your life easier, click and hold on the TextEdit icon in the Dock (this icon appears once the application is running). When it displays a popup menu, choose “Keep in Dock.” That way, the TextEdit icon will always appear in your Dock and you won’t have to hunt it down in the Applications folder every time you need to use it. Step one: Step two: Step three (optional): Your Finder shortcuts. Here’s TextEdit. writing html on a macintosh
Transcript
12 Chapter 1
Creating an HTML file (Mac)
Navigate to your Applications folder
Locate and run TextEdit
Keep TextEdit in your Dock
All HTML files are text files. To create a text file you need an application that allows you to create plain text without throwing in a lot of fancy formatting and special characters. You just need plain, pure text.
We’ll use TextEdit on the Mac in this book; however, if you prefer another text editor, that should work fine as well. And, if you’re running Windows, you’ll want to skip ahead a couple of pages to the Windows instructions.
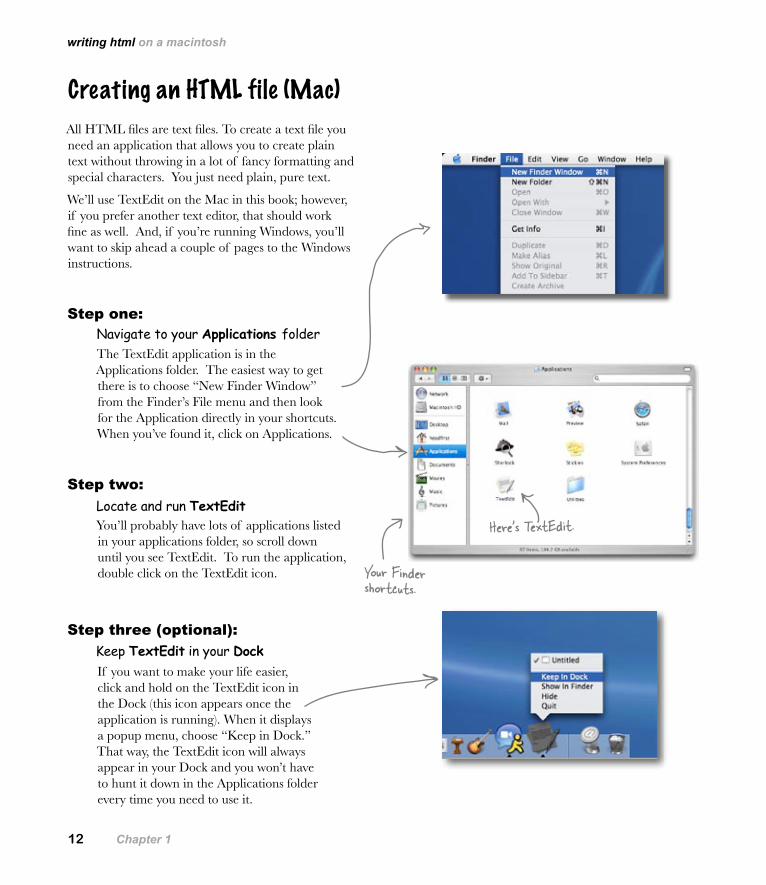
The TextEdit application is in the Applications folder. The easiest way to get there is to choose “New Finder Window” from the Finder’s File menu and then look for the Application directly in your shortcuts. When you’ve found it, click on Applications.
You’ll probably have lots of applications listed in your applications folder, so scroll down until you see TextEdit. To run the application, double click on the TextEdit icon.
If you want to make your life easier, click and hold on the TextEdit icon in the Dock (this icon appears once the application is running). When it displays a popup menu, choose “Keep in Dock.” That way, the TextEdit icon will always appear in your Dock and you won’t have to hunt it down in the Applications folder every time you need to use it.
Step one:
Step two:
Step three (optional):
Your Finder shortcuts.
Here’s TextEdit.
writing html on a macintosh
getting to know html
you are here 13
Change your TextEdit PreferencesBy default, TextEdit is in “rich text” mode, which means it will add its own formatting and special characters to your file when you save it – not what you want. So, you’ll need to change your TextEdit Preferences so that TextEdit saves your work as a pure text file. To do this, first choose the
“Preferences” menu item from the TextEdit menu.
Step four:
Set Preferences for Plain textOnce you see the Preferences dialog box, there are three things you need to do.
First, choose “Plain text” as the default editor mode in the New Document tab.
Second, in the “Open and Save” tab, make sure that the “Add .txt extension to plain text files” is unchecked.
Last, make sure “Ignore rich text commands in HTML files” is checked.
That’s it; to close the dialog box click on the red button in the top left corner.
Step five:
Quit and restartNow quit out of TextEdit by choosing Quit from the TextEdit menu, and then restart the application. This time, you’ll see a window with no fancy text formatting menus at the top of the window. You’re now ready to create some HTML.
Step six:
This text formatting menu means you’re in “rich text” mode. If you see these, you need to change your preferences.
See, the formatting menu is gone: that means we’re in text mode.
14 Chapter 1
Creating an HTML file (Windows)
Open the Start menu and navigate to Notepad
If you’re reading this page you must be a Windows XP user. If not, you might want to skip a couple of pages ahead. Or, if you just want to sit in the back and not ask questions, we’re okay with that too.
To create HTML files in XP we’re going to use Notepad – it ships with every copy of Windows, the price is right, and it’s easy to use. If you’ve got your own favorite editor that runs on XP, that’s fine too; just make sure you can create a plain text file with an “.html” extension.
Assuming you’re using Notepad, here’s how you’re going to create your first HTML file.
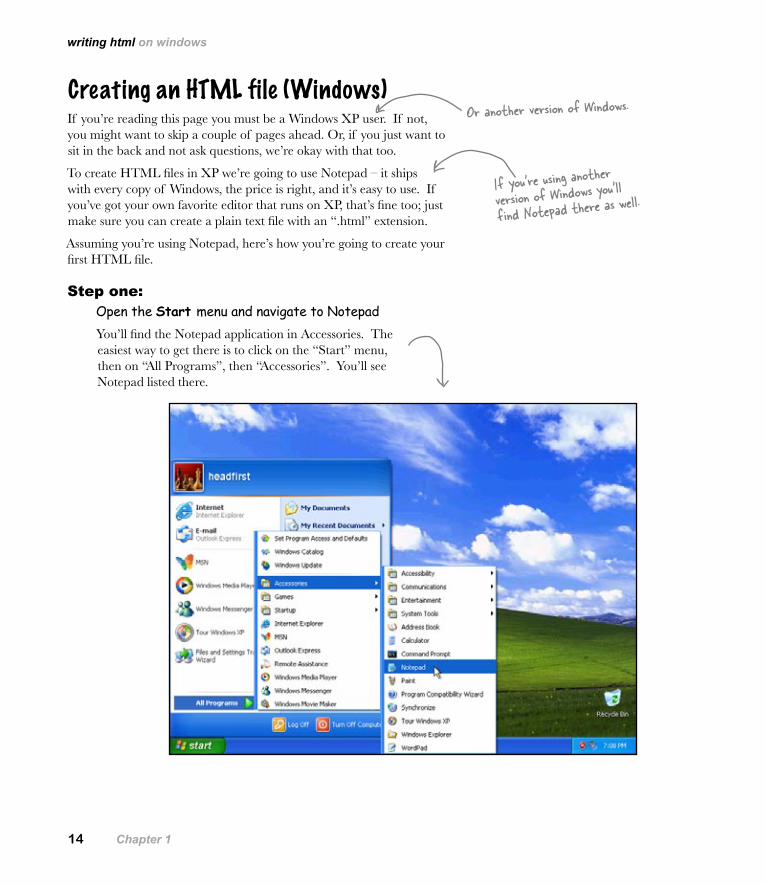
You’ll find the Notepad application in Accessories. The easiest way to get there is to click on the “Start” menu, then on “All Programs”, then “Accessories”. You’ll see Notepad listed there.
Step one:
If you’re using another
version of Windows you’ll find Notepad there as well.
Or another version of Windows.
writing html on windows
getting to know html
you are here 15
Open NotepadOnce you’ve located Notepad in the Accessories folder, go ahead and click on it. You’ll see a blank window ready for you to start typing HTML.
Step two:
Don’‛t hide extensions of well known file types.
By default XP’s File Explorer hides the file extensions of well known file types. For example, a file named, “Irule.html” will be shown in the Explorer as “Irule” without its “.html” extension.
It’s much less confusing if XP shows you these extensions, so let’s change your folder options so you can see the file extensions.
First, in any Explorer window select “Folder Options...” from the Tools menu.
Next, in the “View” tab, under “Advanced settings”, scroll down until you see “Hide extensions for known file types” and uncheck this option.
That’s it. Click on the OK button to save the preference and you’ll now see the file extensions in the Explorer.
Step three (optional):
But recommended.
16 Chapter 1
Q: Why am I using a simple text editor? Aren’t there powerful tools like Dreamweaver, FrontPage and GoLive for creating Web pages?
A: You’re reading this book because you want to understand the true technologies used for Web pages, right? Now those are all great tools, but they do a lot of the work for you, and until you are a master of HTML and CSS you want to learn this stuff without a big tool getting in your way. Once you’re a master, however, these tools do provide some nice features like syntax checking and previews. At that point, when you view the “code” window, you’ll understand everything in it, and you’ll find that changes to the raw HTML and CSS are often a lot faster than going through a user interface. You’ll also find that as standards change, these tools aren’t always updated right away and may not support the most recent standards until their next release cycle. Since you’ll know how to change the HTML and CSS without the tool, you’ll be able to keep up with the latest and greatest all the time.
Q: I get the editor, but what browser am I supposed to be using? There are so many – Internet Explorer, Firefox, Opera, Safari – what’s the deal?
A: The simple answer: use whatever browser you like. HTML and CSS are industry standards, which means that all browsers try to support HTML and CSS in the same way (just make sure you are using the newest version of the browser for the best support).The complex answer: in reality there are slight differences in the way browsers handle your pages. If you’ve got users who will be accessing your pages in a variety of browsers, then always test your web page in several different browsers. Some pages will look exactly the same; some won’t. The more advanced you become with HTML and CSS, the more these slight differences may matter to you, and we’ll get into some of these subtleties throughout the book.If you’re looking for a good browser, give Mozilla’s Firefox a try; it has very good HTML and CSS support.
Q: I’m creating these files on my own
computer – how am I going to view these on the Web/Internet?
A: That’s one great thing about HTML: you can create files and test them on your own computer and then later publish them on the Web. Right now we’re going to worry about how to create the files and what goes in them. We’ll come back to getting them on the Web a bit later.
there are no
Dumb Questions
editors and html
getting to know html
you are here 17
Okay, now that you know the basics of creating a plain text file, you just need to get some content into your text editor, save it, and then load it into your browser.
Start by typing in the beverages straight from the CEO’s napkin; these beverages are the content for your page. You’ll be adding some HTML markup to give the content some structure in a bit, but for now, just get the basic content typed in. While you’re at it, go ahead and add “Starbuzz Coffee Beverages” at the top of the file.
Meanwhile, back at Starbuzz Coffee...
MacWindows
Type in the info from the napkin like this.
18 Chapter 1
Saving your work...Once you’ve typed in the beverages from the CEO’s napkin, you’re going to save your work in a file called “index.html”. Before you do that, you’ll want to create a folder named
“starbuzz” to hold the site’s files.
To get this all started, choose “Save” from the File menu and you’ll see a “Save As” dialog box. Then, here’s what you need to do:
Mac Windows
Windows
First, create a “starbuzz” folder for all your Starbuzz related files. You can do this with the New Folder button.
1
Next, click on the newly created “starbuzz” folder and then enter “index.html” as the file name and click on the Save button.
2
Using Windows you need to also choose “All Files” as your type, otherwise Notepad will add a “.txt” to your filename.
Create a new folder here.
Create a new folder here.
saving your html
getting to know html
you are here 19
Opening your Web page in a browserAre you ready to open your first Web page? Using your favorite browser, choose “Open File...” (or “Open...” using Windows XP and Internet Explorer) from the File menu and navigate to your “index.html” file. Select it and click “Open”.
Mac
On the Mac, navigate to your file, and select it by clicking on the file icon and then on the Open button.
Then click “Browse” to get a browse dialog and navigate to where you saved your file.
Windows
In Windows Internet Explorer it’s a two step process. First you’ll get the open dialog box.
20 Chapter 1
Mac
WindowsTaking your page for a test drive...
Depending on your operating system and browser, often you can just double-click the HTML file or drag it on top of the browser icon to open it.
Much simpler.
Success! You’ve got the page loaded in the browser, although the results are a little... uh... unsatisfying. But that’s just because all you’ve done so far is go through the mechanics of creating a page and viewing it in the browser. And, so far, you’ve only typed in the content of the Web page. That’s where HTML comes in. HTML gives you a way to tell the browser about the structure of your page. What’s structure? As you’ve already seen, it is a way of marking up your text so that the browser knows what’s a heading, what text is in a paragraph, what text is a subheading, and so on. Once the browser knows a little about the structure, it can display your page in a more meaningful and readable manner.
testing your html
getting to know html
you are here 21
Starbuzz Coffee Beverages
House Blend, $1.49 A smooth, mild blend of coffees from Mexico, Bolivia and Guatemala.
Mocha Cafe Latte, $2.35 Espresso, steamed milk and chocolate syrup.
Cappuccino, $1.89 A mixture of espresso, steamed milk and foam.
Chai Tea, $1.85 A spicy drink made with black tea, spices, milk and honey.
Markup MagnetsSo, let’s add that structure...
Your job is to add structure to the text from the Starbuzz napkin. Use the fridge magnets at the bottom of the page to mark up the text so that you’ve indicated which parts are headings, subheadings and paragraph text. We’ve already done a few to get you started. You won’t need all the magnets below to complete the job; some will be left over.
<h1>
Use this magnet to start a heading. Use this magnet
to end a heading.
Use this magnet to end a subheading.Use this magnet
to start a subheading.
Use this magnet to end a paragraph.
Use this magnet to start a paragraph.
<h1><h1>
<h1> </h1>
</h1></h
1></h1><h2><h2>
<h2></h2></h
1></h2>
<p><p>
<p> </p>
</p></p>
<h2> </h2>
</p><p>
22 Chapter 1
Congratulations, you’ve just written your first HTML!
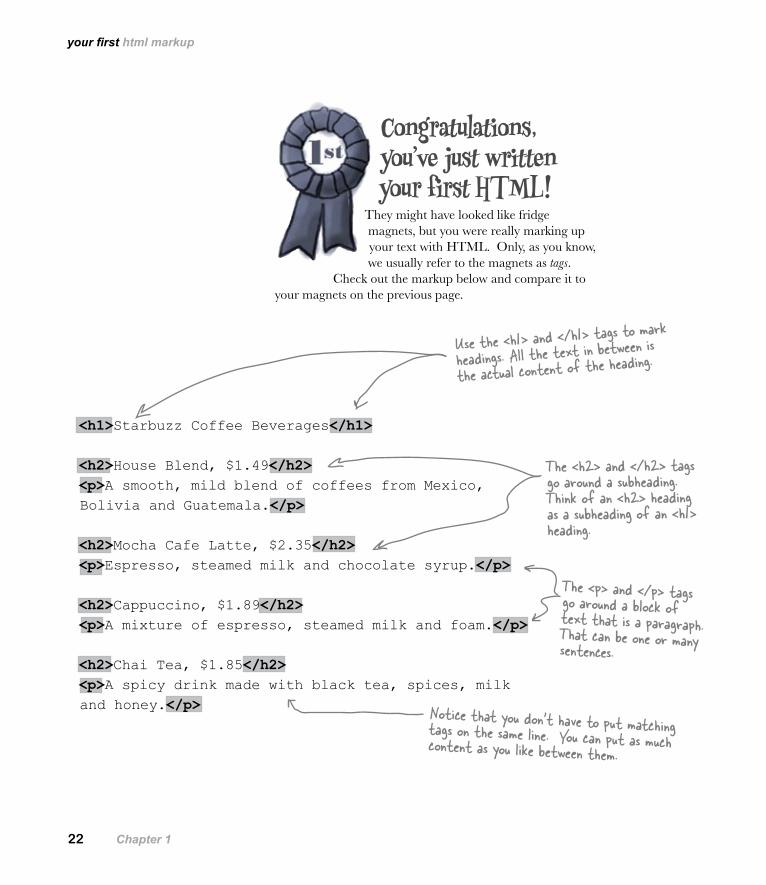
They might have looked like fridge magnets, but you were really marking up your text with HTML. Only, as you know, we usually refer to the magnets as tags.
Check out the markup below and compare it to your magnets on the previous page.
Use the <h1> and </h1> tags to mark
headings. All the text in between is the actual content of the hea
ding.
The <h2> and </h2> tags go around a subheading. Think of an <h2> heading as a subheading of an <h1> heading.
The <p> and </p> tags go around a block of text that is a paragraph. That can be one or many sentences.
Notice that you don’t have to put matching tags on the same line. You can put as much content as you like between them.
<h1>Starbuzz Coffee Beverages</h1>
<h2>House Blend, $1.49</h2> <p>A smooth, mild blend of coffees from Mexico, Bolivia and Guatemala.</p>
<h2>Mocha Cafe Latte, $2.35</h2> <p>Espresso, steamed milk and chocolate syrup.</p>
<h2>Cappuccino, $1.89</h2> <p>A mixture of espresso, steamed milk and foam.</p>
<h2>Chai Tea, $1.85</h2> <p>A spicy drink made with black tea, spices, milk and honey.</p>
your first html markup
getting to know html
you are here 23
Are we there yet?You have an HTML file with markup – does that make a Web page? Almost. You’ve already seen the <html>, <head>, <title>, and <body> tags, and we just need to add those to make this a first class HTML page...
Next add <head> and </head> tags. The
head contains information about your Web
page, like its title. For now, think about it
this way: the head allows you to tell the
browser things about the Web page.
The body contains all the content and structure of your Web page – the parts of the Web page that you see in your browser.
<html>
<head>
<title>Starbuzz Coffee</title>
</head>
<body>
<h1>Starbuzz Coffee Beverages</h1>
<h2>House Blend, $1.49</h2>
<p>A smooth, mild blend of coffees from Mexico,
Bolivia and Guatemala.</p>
<h2>Mocha Cafe Latte, $2.35</h2>
<p>Espresso, steamed milk and chocolate syrup.</p>
<h2>Cappuccino, $1.89</h2>
<p>A mixture of espresso, steamed milk and foam.</p>
<h2>Chai Tea, $1.85</h2>
<p>A spicy drink made with black tea, spices,
milk and honey.</p>
</body>
</html>
The head consists of the <head> & </head> tags and everything in between.
The body consists of the <body> & </body> tags and everything in between.
Keep your head and body separate when writing HTML.
First, surround your HTML with <html> & </html> tags. This tells the browser the content of the file is HTML.
Go ahead and put a title inside the head. The title usually appears at the top of the browser window.
24 Chapter 1
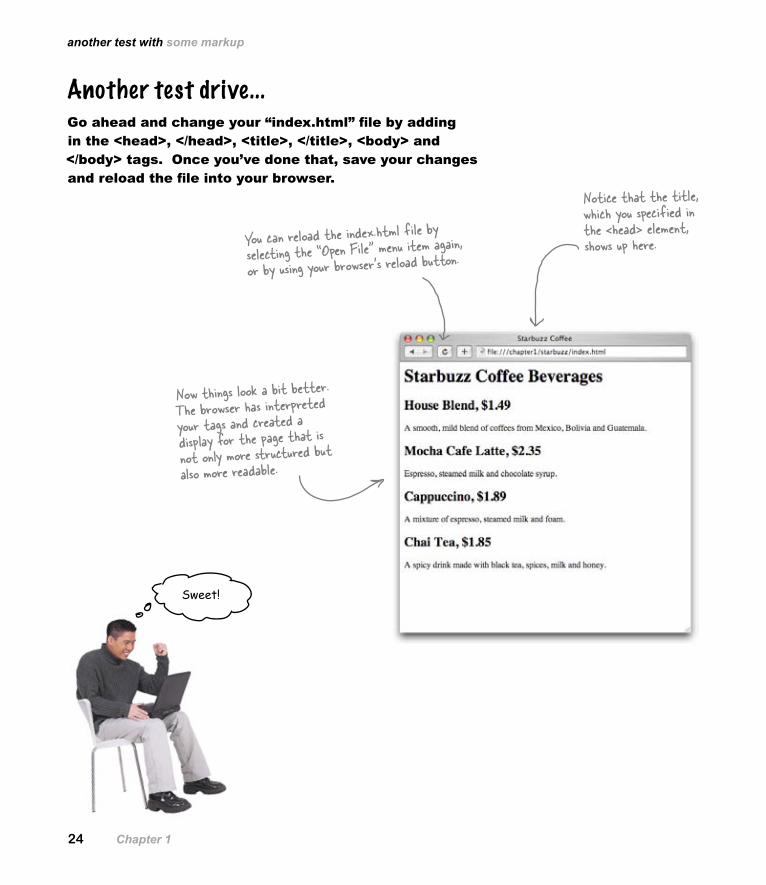
Notice that the title, which you specified in the <head> element, shows up here.
Another test drive...Go ahead and change your “index.html” file by adding in the <head>, </head>, <title>, </title>, <body> and </body> tags. Once you’ve done that, save your changes and reload the file into your browser.
You can reload the index.html file by selecting the “Open File” menu item again, or by using your browser’s reload button.
Now things look a bit better.The browser has interpreted your tags and created a display for the page that is not only more structured but also more readable.