2 PUBLICCreating and Building Sets With the Information Design Tool
Content
1 About this user guide
This guide describes how to use the sets materialization service of the information design tool. Use this guide when the information design tool is set to launch set edition mode only. The guide is taken from the Working with Sets chapter of the Information Design Tool User Guide.
Creating and Building Sets With the Information Design ToolAbout this user guide PUBLIC 3
2 What's new in the information design tool sets functionality
Links to information about the new features and documentation changes for the information design tool sets edition mode for the 4.2 SP7 version of SAP BusinessObjects BI platform.
What's new Link to more information
The information design tool detects the collation for SQL Server database strings (collations in SQL Server provide sorting rules, case, and accent sensitivity properties for your data). The tool then ensures that tables that are materialized have the same collation as the source database tables.
Collation enhancement for SQL Server [page 11]
4 PUBLICCreating and Building Sets With the Information Design Tool
What's new in the information design tool sets functionality
3 Sets Editor default options
How to set the default options for the information design tool Sets Editor.
The Window Preferences Information Design Tool Sets Editor option ets you set the following options:
● Allow warnings when rebuilding/purging a set● Manage numeric and date objects in Visual Data steps● Choose to use a classic Venn Diagram for Sets on Sets steps
1. From the information design tool main menu, select Window Preferences .2. In the Preferences dialog box, expand the Information Design Tool node and select Sets Editor.3. Choose to warn the user of the possible consequences when rebuilding or purging a set.4. Choose to automatically apply a Yes/No condition when adding numeric or date objects to a Visual Data
step5. Choose to use a classic Venn Diagram when creating a Sets on Sets step.6. To restore the default values for preferences on the current page, click Restore Defaults.7. To save the changes and continue editing preferences, click Apply.8. To save the changes and close the Preferences dialog box, click OK.
Creating and Building Sets With the Information Design ToolSets Editor default options PUBLIC 5
4 Segmenting your data with Sets
A set defines a sequence of related lists of values defined directly on a universe, and combined in the information design tool, to create a complex query filter available to the SAP BusinessObjects Web Intelligence Query panel. You create sets using the Set editor.
Related Information
Introduction to sets [page 6]Setting up the sets services on the CMC [page 12]Managing set containers [page 13]Designing sets [page 17]Building a set [page 25]Publishing a set container [page 44]
4.1 Introduction to sets
You build sets in the information design tool by creating, restricting, and combining lists of values from universe objects. When you publish a set to the repository, Web Intelligence users can use the set as a query filter in the SAP BusinessObjects Web Intelligence Query Panel.
Understanding your lists to define sets
When you ask a question about some aspect of your data, most of the time you will end up with one or more lists of values. These could be lists of customers, products, sales, user satisfaction indices, and all of it will be stored in some form of list. If you are looking for something specific, then you would consider only the part of a list that interests you, and then compare it with other lists that may also show a limited number of values based on your search focus.
For example, you may be planning a marketing campaign to boost sales of a line of your products. As you don't want to waste money targeting the wrong customer group, you would probably consult your product line, sales, and customer lists. Then you would look at more limited lists, those customers who: belong to a certain age group, have bought related products, buy predominantly from the online store, are single, are employed in a technology related industry, and so on.
How do you create and manage these lists? What is the best way to limit or restrict the values in a list, then compare the results with other ones? Once you have finished comparing and restricting the values in different
6 PUBLICCreating and Building Sets With the Information Design Tool
Segmenting your data with Sets
lists, wouldn't it be useful to be able to use the sequence of list combinations for other questions? Perhaps over different calendar periods, or for different regions?
One solution that SAP BusinessObjects provides for handling multiple lists, is to allow the data in these lists to be accessed by objects in a universe built by the information design tool. The universe is available as a datasource to the SAP BusinessObjects Web Intelligence Query Panel, and you can follow a line of questioning about your data by building queries combining these objects.
You can restrict the list of values by creating query filters. However, if you have multiple lists with many filters, a query can quickly become quite complex. You would save a lot of time if all of the lists and filters that you use regularly were combined into one object. This is what you can do with a set; create a single object that combines any combination of lists into a single filter. A subject is the central theme of a set, for example customers, accounts, or products. It is based on a single dimension in the business layer that has a primary key defined in the Keys tab of the dimension properties.
A set allows you to combine multiple lists of values with their restrictions, into a single repository object that is available to SAP BusinessObjects Web Intelligence users in the Query Panel.
Viewing the membership values for a set
In the Sets outline, you can right-click on a saved set and select Show Set Values to display the associated membership values (if any) for this set.
Set tables and column collation in SQL Server
When the information design tool creates any tables for sets which are related to columns in your SQL Server database, the tool automatically detects collation for the referenced columns and ensures all materialization tables storing data from those columns are created with the same collation.
Related Information
Managing set containers [page 13]Designing sets [page 17]Overview of a set to filter life cycle [page 7]
4.1.1 Overview of a set to filter life cycle
You create a set by combining lists of values based on most universe objects, then build and publish the set to the repository. When you build the set, it saves the data to a database column. As a set designer you need database access to write to the set tables. The set is called automatically at run time into the Query Panel when
Creating and Building Sets With the Information Design ToolSegmenting your data with Sets PUBLIC 7
the universe is used as the datasource. The set itself is not an object in the universe, but is part of an independent object in the repository called a set container associated with its source universe.
Here are the main stages in a set filter's life cycle:
Set Filter Life Cycle
Stage What you need to do
Enable set creation by creating a set container. The administrator creates the set container based on a universe. Select a universe in the repository, then create a set container that will hold the subjects, sets, and the calendars used for time based sets. You must define your calendar(s) here if you are going to create temporal sets. You can only have one set container, but the set container can contain many sets.
The published new container is just a placeholder for the final sets that will be created and used.
Design and build the set(s). The person designing the sets retrieves the set container to a local project, then starts designing the set definition using the data available and a subject. A set contains data from a single subject and can be used to filter on most universe objects and calendar periods.
If you have not finished developing the set, you can make the set Hidden so that the end users cannot see or use the set. Sets can be set to Active, Hidden, or Deprecated.
● When you Build a set, the set tables are created and filled in the database. Tables are actually created when a first Set is built, either via an ad-hoc build from the information design tool, or via scheduling in the CMC.
● When you refresh a set, its membership is updated according to the set definition
● When you Purge a set, the database tables are emptied.
Define the set as hidden. When a set is hidden, when it is published to the repository, it cannot be seen in SAP BusinessObjects Web Intelligence and SAP Crystal Reports. This prevents users from using a set filter that is not ready, or is not intended for use. Use this to create a technical set, simplifying maintenance of the business set
Freeze the set In the set edition pane, click Frozen to freeze the set. When you freeze a set, it cannot be edited or manipulated. You can now tag specific Sets as references, so they can’t be edited or built/purged any more. Only a change of name or description is allowed. You can use this to create a reference for subsequent analysis of return on investment.
8 PUBLICCreating and Building Sets With the Information Design Tool
Segmenting your data with Sets
Stage What you need to do
Publish the set container. Publish the set container to the repository. The sets are made available at runtime to SAP BusinessObjects Web Intelligence and SAP Crystal Reports as query filters associated with the universe.
Materialize your sets schema to a different database. In order to avoid saving the set membership to the original source database, you can materialize to a defined location.
Schedule the refresh of the set container. You can schedule the times to refresh the set membership in the Central Management Console.
Declare a set as deprecated. When a set is replaced by a different set, or if the set is no longer maintained with respect to the database objects, declare the set filter as deprecated. Deprecated sets cannot be used to create new sets.You can schedule or refresh reports based on deprecated sets or groups.
See Related Information for an end to end procedure that gives a more detailed overview of the creation process, and information on the different roles used to set up and build the set.
4.1.2 Prerequisites for working with sets
Before you can start creating and publishing sets with the information design tool, you need to take note of the following conditions and required pre-requisites.
Creating and Building Sets With the Information Design ToolSegmenting your data with Sets PUBLIC 9
Before you work with sets you need Applies to Description
Database access rights Set Designer You need to have the following database permissions to ensure that the appropriate statements are executed when building a set in the database:
● CREATE TABLE● INSERT● UPDATE● DELETE● SELECT● DROP TABLE
Each subject will have its own table for all sets based on this subject.
The table is only created when the first set on this subject is built. Each Set container will have 2 additional tables for storing set metadata. These are created when the first set in the container is built..
NoteA second connection can be used by the Set Designer to create set tables. The initial universe connection is usually read only. However, when building sets, the Set Designer must use the connection with write access to create the set tables.
CMS access rights ● Universe Designer● Set Container
Administrator● Set Designer
You need to have the administrator rights to create a connection to a data source, and publish files to the CMS repository. This is defined in the CMC.
Universe access rights ● Universe Designer● Set Designer
You need to have Universe Designer rights to open a business layer and data foundation. You create sets independently of the universe, but you need to access object properties and the data foundation for certain set management tasks.
Primary key defined for dimensions to be used as set subjects.
Universe Designer A subject is based on a single dimension in the business layer that has a primary key defined in the Keys tab of the dimension properties.
Additionally, dimensions used for a subject must match the following criteria:
● is based on one table● does not use @ constructs● is of a simple type● does not involve prompts or contexts
10 PUBLICCreating and Building Sets With the Information Design Tool
Segmenting your data with Sets
4.1.3 Collation enhancement for SQL Server
On SQL Server there can be multiple Databases used for sets:
● The customer database● The materialization database (where the set tables are created with data from the database columns)● TempDB used by SQL Server for temporary tables. Sets also use this database.
If the database or string columns have a different collation configured then when comparing the columns against each other, SQL Server may throw an error. This is because SQL Server can't resolve the collation conflict between the capitalization in the column names when they are compared.
When you create any tables for sets which are related to the customer columns in SQL Server, all materialization tables storing data from those columns are now created with the same collation (this includes temporary tables in the TempDB).
4.1.4 Restrictions when working with sets
The following restrictions apply when working with sets.
Restrictions
Feature Restriction
Subjects containing Unicode values Set subjects cannot be based on a table column containing Unicode values.
Set table names Set table names should only contain the following characters:
abcdefghijklmnopqrstuvwxyz
ABCDEFGHIJKLMNOPQRSTUVWXYZ
0123456789
underscores
The set table names must not start with an underscore as the first character.
Set container You can only have one set container, but the set container can contain many sets.
Manage set containers/When you add a new Calendar/Start Date of first and last Periods, the date is truncated
Manage sets/Calendar editor In the dialog for creating a calendar, the user interface string incorrectly mentions deletion, when it should refer to selecting the start/end dates. "Start Date of first and last Periods:" was wrongly replaced by "Delete Sets"
Creating and Building Sets With the Information Design ToolSegmenting your data with Sets PUBLIC 11
Feature Restriction
Set: Visual Data step: custom value for date type objects is not supported.
Only use the proposed data formats: integer and string.
Set: Visual Data step: custom values for numeric type. Only use integers for custom numeric type values in the Visual Data step editor.
Set: Visual Data step: Measures must be at the last step position in a set.
Once you have added a measure to your Visual Data query, you can only add measures.
Set: Query Panel step: incompatible objects are not supported.
Ensure your queries consist of objects that are compatible with the other steps in the set.
Sets on Sets editor You can only add existing sets.
Currently, hidden sets do not appear when they are used in Sets on Sets.
CMC: Set container scheduling: Scheduling is limited to single set or group
4.2 Setting up the sets services on the CMC
You can isolate the sets materialization service inside a new Adaptive Processing Server (APS)
Isolating the sets materialization service can be useful to create a dedicated Adaptive Processing Server for various reasons. You also need to add the Adaptive Connectivity Service inside the same APS. This can be achieved by cloning an existing APS. You must be an admistrator to do perform this task. Here's how to do this:
1. In the CMS, select Web Servers Server List2. Create the server, choose Category - Core services3. Choose Sets Materialization Service4. Click Next5. Add the Adaptive Connectivity Service to the right panel6. Click Next7. Give the server a name and click Create8. Stop the original MYSIAAaptiveProcessingServer9. Right-click the MYSIAAaptiveProcessingServer file and choose Select services.10. Remove Set Materialization (this forces the new server to be the only one running this service, thus
isolating it)11. Check two things in the properties pane of the new APS:
○ Check that the command line parameters contains the line "-Dbusinessobjects.connectivity.directory=C:/Program Files (x86)/SAP BusinessObjects/SAP BusinessObjects Enterprise XI 4.0//dataAccess/connectionServer" (this is an example, but depends on your installation).
○ Check the option Automatically start this server when the Server Intelligence Agency starts
12 PUBLICCreating and Building Sets With the Information Design Tool
Segmenting your data with Sets
12. Right-click on the new server and select Enable.13. Start the original server and the new server.
This service is transparent to the information design tool.
Setting the information design tool to start in simplified sets editing mode
You must configure the information design tool .ini file so that the tool starts up in simplified sets editing mode. To do this:
1. Open the informationdesigntool.ini file2. Add the line: -Dsets.simplified.perspective=true3. Start informationdesigntool.exe and the tool will start in sets editing mode only.
4.3 Managing set containers
You need a Set Container before you can start creating sets. You use the Set Containers Management dialog to do the following:
● Select or Remove subjects from the set container you are creating/editing, and add a description for each subject, if required. You can also create multi-key subjects (click Add Subjects).
● Create or edit calendars for temporal sets● Publish your sets schema to a different database to your production environment.● Create, edit, or remove containers.
When you create the Set Container, A Set Container is a .sets file that specifies the subjects and calendars that you can use as the basis for you sets. It is created from a universe (.UNX) and published to the CMS repository. You then retrieve the Set Container to a local project where Subjects are automatically detected by the information design tool and made available to the Set Container. When you design your sets, the set definition is stored in the Set Container. Calendars are available to all set containers. When you have finished creating your sets, you publish the Set Container to the repository. The sets can now be used by SAP BusinessObjects Web Intelligence.
Usage of Set Container is compatible with concurrent set authoring. The system automatically merged existing sets and created sets when publishing local container or retrieving the container from repository.
NoteYou can only create one set container for each universe.
Related Information
Creating a set container from a universe [page 14]
Creating and Building Sets With the Information Design ToolSegmenting your data with Sets PUBLIC 13
4.3.1 Creating a set container from a universe
You create and manage a set container using the Set Containers Management dialog box, accessed by right-clicking a single source relational universe (.UNX) in the repository. Before you can create a set container, ensure that the following pre-requisites are met:
● The universe must be a single source relational universe.● You have the appropriate permissions required for the Set Container Administrator role.● The universe has been set up to allow the use of sub-queries.● Dimensions in the business layer that you want available as compatible subjects. Set Containers
Management automatically detects these dimensions. If the business layer does not have any primary key dimensions, then no subjects will be available for the set container.
You have the following information and options to create and manage a set container available in Set Containers Management:
Set Containers Management tabs Description
Subjects Subjects detected in the universe are listed. Click Synchronize with universe to update the list with the latest version of the universe and potentially add new subject candidates. Existing subjects might no longer meet the requirements which led to their initial creation, because dimensions have disappeared or lost their primary key.
Calendars Calendars available to all temporal sets are listed. Click Add a new Calendar to create a new calendar or click the ellipsis button to modify an existing one in the list.
Database Useful to provision set data in a dedicated store and manage security accesses.
Deployment Current set containers associated with the universe are listed. Click Add a new Container to create a new container.
NoteFor this release, only one set container is available for each universe.
Do the following to create a new Set Container:
1. Right-click a universe in the Repository Resources tab then select Manage Set Containers from the drop down list.
The set container manager appears.2. Click the Subjects tab.
The subjects that have been detected in the universe are listed. A membership table with a default name is listed for each subject in the Membership table column. A membership table contains the data for a subject. It is created in the database when a set based on this subject is built for the first time. You can remove unwanted subjects from the container, they will not be available to the sets you want to create.
3. If you want to change subject or membership table names, double-click a name and type a new one. You can also accept the default names, however, you may prefer to give them a more relevant one, since once the set container is published, you can't modify subject or membership table names.
4. Click the Calendars tab.
This tab lists the calendars available to the set container. When you create a set container, the list is empty.
14 PUBLICCreating and Building Sets With the Information Design Tool
Segmenting your data with Sets
5. If you want to create temporal sets to evaluate changes in your data over calendar periods, then create a calendar for your Sets Container by doing the following:
○ Click the Add a new calendar button.○ In the Calendar editor, type a name for the calendar, select its period duration, the number of periods
to apply it to, and pick a start period date, then click OK. You can refer to the section on creating calendars in Related Topics for more information.
6. Click the Deployment tab.
This tab lists the set containers available. When you create a set container the list is empty.7. Click the Add a new Container button.
Default set container name, location, and table names are automatically entered in the list. The Metadata and History tables are created in the database when the set container is built for the first time. These are used to show data changes when sets are built.
8. If you want to change the default values, do the following:
○ Double-click the set container name, the metadata table or history table names and type new ones.○ Click the ellipsis button in the Location column to select a different repository path indicating where to
store the set container.
You can also accept the default names and location, however, you may prefer to give them relevant names as once the set container is published, you can't modify the set container name, the associated table names, or the project path.
9. Click Publish.
A new set container is added to the Sets folder in the Repository Resources pane. You will retrieve this Set Container to your Local Project folder and build your sets locally.
Example
The following animated image shows an overview of the procedure and a worked example. The example does not show use of the Database tab which was a recent addition to the tool. The animation may not be available in some reading formats that do not support animated gifs.
Creating and Building Sets With the Information Design ToolSegmenting your data with Sets PUBLIC 15
4.3.2 Retrieving a set container to build a set
A Set Container published to the repository has the file extension .SETS. Before you start authoring sets, you initially need to retrieve the set container from the repository and save it to a local project. You can then open the local set container in the Sets editor in the information design tool and start defining and developing sets based on the subjects in the set container. The sets are saved when you save the set container locally. When you publish to the repository it updates the current version.
1. In the Repository Resources pane, browse to the Sets folder and right-click the Set Container .sets file.
2. Select Retrieve Sets Container from the context menu.
The Select a Local Project selection box appears. It lists the local projects you have defined in the information design tool.
3. Browse to and select the project to receive the set container, then click OK.4. The set container is copied to the local project and opens automatically in the Sets editor.
Related Information
Managing set containers [page 13]
16 PUBLICCreating and Building Sets With the Information Design Tool
Segmenting your data with Sets
4.3.3 Advanced subjects creation
You can combine two or more subjects to create a composite subject that is made up of multiple primary keys. Select the first subject that you want to combine, the tool automatically shows only you only subjects with a compatible primary key. Select one or more compatible subjects. Click OK to create the composite subject or Cancel. In the Containers Management pane, you can add a name and a description for your composite subject. The composite subject is listed in the available subjects when you create your sets.
NoteSubjects making up composite subjects are not necessarily public and can be removed from the container, without compromising their composite subjects.
4.4 Designing sets
A set is made up of one or more lists of values that are linked as a series of steps, each list restricting the values available for the following ones. When published to the repository, the set appears as a filter object available to the Query Panel in SAP BusinessObjects Web Intelligence and to SAP Crystal Reports. If you are looking for something in your data, then the step based sequence of lists that make up the set will help you find it, while at the same time hiding the potential complexity behind its construction.
You create a set based on a subject defined in a set container. The subject is typically built on a business layer dimension. The members of the dimension make the data available to build the set. You can create two types of set:
Set type Description
Static The set members are fixed at a moment in time. A static set is like a snapshot of your data that captures a state of the population that you are considering for analysis. For example the Gold customers targeted in a marketing campaign, where the campaign is an event and the Gold customers are the facts associated with that event.
Temporal The set members are dynamic, so can change over multiple calendar periods used to build the set. A temporal set is a collection of members who joined, left or stayed over each calendar period. A calendar is defined by a begin and end date - for example from January 1st 2015 to December 31st 2015 - a certain number of periods, and a duration for each period. In a temporal set, periods do not overlap, and have all the same duration.
A new set is empty. You need lists with members to make it useful. You can add members by using one of the following:
● Insert Visual Data: Selecting the set members from a tree view by drilling down on business items, showing their values and counts.
● Insert Sets on Sets: Combining any of the sets defined on the same subject? OR ON A COMPATIBLE ONE. You do this graphically by combining set collections that can contain multiple sets to create combinations of sets using intersection, union, or exclusion of sets.
Creating and Building Sets With the Information Design ToolSegmenting your data with Sets PUBLIC 17
● Insert Query Panel Step: Unleash the full power of the Query Panel.
You add lists of members in a series of steps that correspond to a sequence of questions. The logic of the questions is to refine your data, so you create steps of member lists in a sequence that you can add, subtract, or keep based on the previous list of members.
Once you have defined your new set, you can build it (this is optional), then save it to the set container in your local project. If you publish the set container to the repository, the set is made available in the Query Panel for SAP BusinessObjects Web Intelligence and SAP Crystal Reports, where it appears as a set filter.
NoteA set that has been built, but remains non-published, is always available in the preview panel of the Sets editor unless it is marked as hidden or deprecated.
This is an overview of the process you follow to design then build a new set:
What you do to build and design a new set Go here for information
Retrieve and open the set container. Retrieving a set container to build a set [page 16]
Choose the type of set. It can be either a static or temporal set.
● Defining a static set [page 26]● Defining a temporal set [page 29]
Choose the members of the set visually by:
● selecting the members from a list
● combining any of the subject-compatible sets in the container to create a new set.
● using the querying capabilities of the Query Panel.
● Inserting a visual data step in a set [page 36]● Creating a Sets on Sets Step [page 38]● Inserting a Query Panel step [page 40]
Build your set and publish it to the repository. ● Building a set [page 25]● Publishing a set container [page 44]
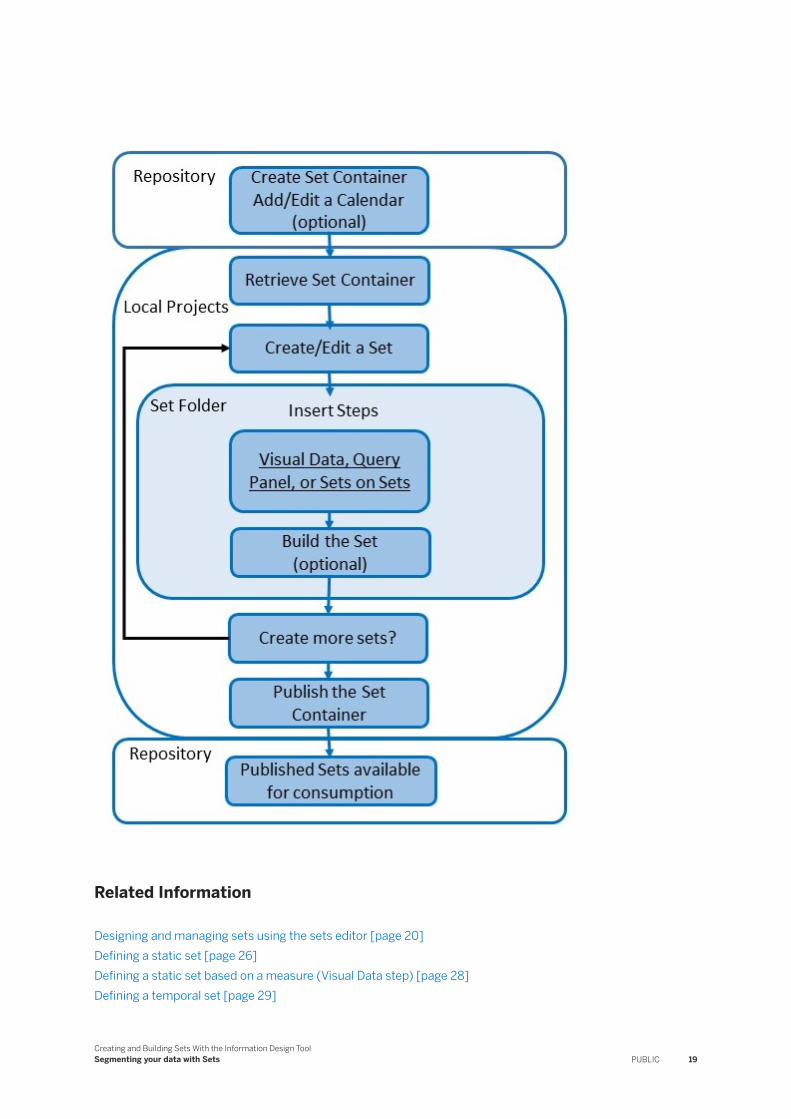
4.4.1 Overview of how to create a set
You create your sets in a container. The administrator creates the container and calendars for temporal sets, then the container is retrieved locally. You then create a set and insert steps according to your requirements. You can hide work in progress and declare sets as deprecated when necessary.
18 PUBLICCreating and Building Sets With the Information Design Tool
Segmenting your data with Sets
Related Information
Designing and managing sets using the sets editor [page 20]Defining a static set [page 26]Defining a static set based on a measure (Visual Data step) [page 28]Defining a temporal set [page 29]
Creating and Building Sets With the Information Design ToolSegmenting your data with Sets PUBLIC 19
Set steps [page 34]Building a set [page 25]Publishing a set container [page 44]Editing set display options [page 22]Specifying how set filters are used (Consumption tab) [page 23]Previewing a set as a filter in the query panel [page 25]Hiding a set [page 43]
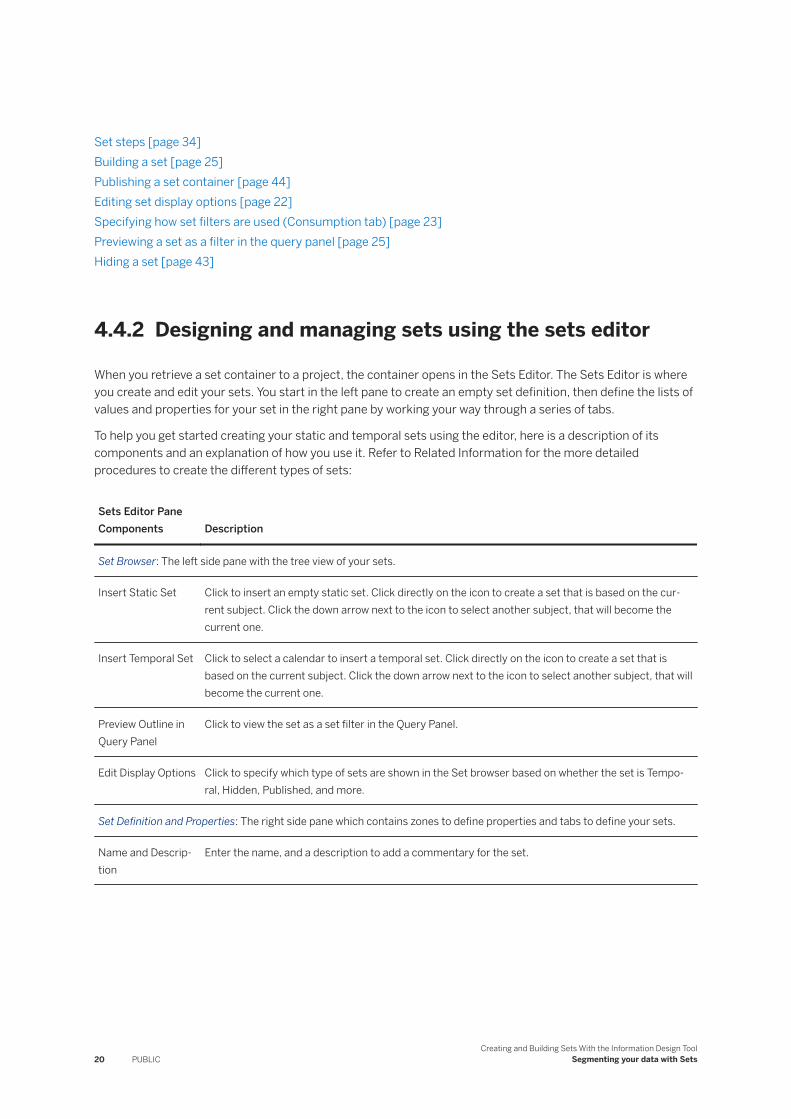
4.4.2 Designing and managing sets using the sets editor
When you retrieve a set container to a project, the container opens in the Sets Editor. The Sets Editor is where you create and edit your sets. You start in the left pane to create an empty set definition, then define the lists of values and properties for your set in the right pane by working your way through a series of tabs.
To help you get started creating your static and temporal sets using the editor, here is a description of its components and an explanation of how you use it. Refer to Related Information for the more detailed procedures to create the different types of sets:
Sets Editor Pane Components Description
Set Browser: The left side pane with the tree view of your sets.
Insert Static Set Click to insert an empty static set. Click directly on the icon to create a set that is based on the current subject. Click the down arrow next to the icon to select another subject, that will become the current one.
Insert Temporal Set Click to select a calendar to insert a temporal set. Click directly on the icon to create a set that is based on the current subject. Click the down arrow next to the icon to select another subject, that will become the current one.
Preview Outline in Query Panel
Click to view the set as a set filter in the Query Panel.
Edit Display Options Click to specify which type of sets are shown in the Set browser based on whether the set is Temporal, Hidden, Published, and more.
Set Definition and Properties: The right side pane which contains zones to define properties and tabs to define your sets.
Name and Description
Enter the name, and a description to add a commentary for the set.
20 PUBLICCreating and Building Sets With the Information Design Tool
Segmenting your data with Sets
Sets Editor Pane Components Description
Steps tab Each list of values in a set is called a Step. Use this tab to select and insert data values for each list of values. Insert Visual Data allows you to manually select values from a hierarchy of business objects, Insert Sets on Sets gives you the choice of combining sets to create a list based on the union or intersection of the sets. Insert Query Panel step enables you to create a complex filter by using the Query Panel. Edit Step opens the appropriate step wizard to modify your values choices. Build actually creates your set by inserting its values in a database column. Purge allows you to purge a built set. Temporal Management gives you options to customize the calendar periods actually built by an autofill temporal set and to set rollback and autofill options.
Time tab Shows you information on the type of temporal set and its calendar. You can change the Autofill nature of a temporal set only if the set has no membership, right after creation time, or after a complete purge.
History tab Shows you statistical information for a built set. You can see at a glance the members who have joined and left the set over the calendar period. In the graph section you can select a chart that tracks the joiners and leavers for any part of the associated calendar period. You can also click the Save icon at the right of the tab to save the graphic as an image file. For a static set, members should not change over time, unless you modify its definition, or your data changes. Build actually creates your set membership by inserting its values in a database column. Purge allows you to purge a built set. Use the Temporal Management option to customize the calendar periods actually built by an autofill temporal set and to use rollback and autofill features.
Consumption tab Shows you various pieces of information about how this set will behave at consumption time, which can be tested beforehand via the dedicated Query Panel:
● Its preferred location in the Query Panel’s outline (e.g. after this particular business item, as the last child of this folder, etc.)
● Its visibility through security access level● Its visibility through state (active, hidden, deprecated)● Its visibility through its mandatory nature (same notion as a standard filter)
Repository tab Shows you information about the set, set container and universe that you are using, such as:
● The repository path of the universe associated with this particular set container
● The repository path of the set container
● The various revisions of the set, the set container and the universe
● The last publisher of the set, set container and universe
Related Information
Defining a static set [page 26]Defining a temporal set [page 29]Previewing a set as a filter in the query panel [page 25]Editing set display options [page 22]
Creating and Building Sets With the Information Design ToolSegmenting your data with Sets PUBLIC 21
Sets Editor default options [page 5]
4.4.3 Working with sets in set editing mode
When the information design tool is configured to launch in Set editing mode, the only resources you are allowed to edit are Sets. Therefore, the Local Projects and Repository panes are not visible. Furthermore, the toolbar and menus have been simplified to accommodate for this focus on sets. This is useful to shield Set authors from universe concepts and local/remote resource paradigm. It is meant to reduce learning curve and increase audience to less technical operators. A user can do the following:
● Create, edit, delete, and build sets● Create, edit, delete, and build groups● Save and Publish sets and groups. Save and Publish are merged into single operation so use get the
perception that saving Set makes it public.
Pressing Ctrl+S will transparently auto-publish the set container if no concurrent authoring issues were found.
Related Information
Starting the information design tool in set editing mode
4.4.4 Editing set display options
A set container is designed to contain hundreds, or even thousands of sets. Filtering capabilities have been provided so you can quickly display only the relevant ones for your daily tasks. Filtering criteria include set name, visibility in the Query Panel, publishing status, or even subject.
A subject is the central theme of a set, for example customers, accounts, or products. It is based on a single dimension in the business layer that has a primary key defined in the Keys tab of the dimension properties. A set contains data from a single subject and it is the subject that determines the data available to the new set.
1. Open a set container in one of the following ways:
○ Retrieve a set container from Repository Resources tab. Or○ Double click a set container from Local Projects pane.
2. In the Sets pane of the Sets editor, click the Edit display options filter icon at the top of the pane.
A display options box appears. By default, all options are selected. You have the following options:○ Static: Display static sets○ Mandatory: Display mandatory sets○ Filter by name: filter the sets by name○ Active: display sets with Active visibility level○ Hidden: display sets with Hidden visibility level○ Deprecated: display sets with Deprecated visibility level
22 PUBLICCreating and Building Sets With the Information Design Tool
○ Mandatory: display sets that are mandatory○ Non Mandatory: display sets that are not mandatory○ Published: display sets that are already available in the repository○ Not Published: display sets that are local to this information design tool○ Show sets created under: The subjects available in the set container are listed.When a subject is
selected, only sets defined for this subject are displayed in the Sets pane.3. Select one or more display options.4. Click anywhere outside of the box to close it.5. You can also relocate the popup window to a more suitable location on then later dock/reattach it back to
its initial location via a dedicated button in its title bar. .
Related Information
Defining a static set [page 26]Defining a temporal set [page 29]Designing sets [page 17]Sets Editor default options [page 5]
4.4.5 Using scoring in your sets
You can provide scoring for set members to differentiate between them. This allows you to score different aspects of members of a set and aggregate the scores generated by the different set steps, then analyze the results. The members with the the highest score are the members who were present in most or all of the steps.
The domain expert assigns scores to selected members of a set step.
A score is assigned to a member who is present for that specific step. You can assign a score to any type of set step. The score is totaled per member as the steps are built alongside their containing set.
In temporal sets, scores can change with time, but only the last score from the last built set can be obtained.
4.4.6 Specifying how set filters are used (Consumption tab)
You can set the following options for the set that determine set filter properties in the Query Panel:
Set filter property Option Description
Outline Position Indicates the position of the set filter in the object viewer of the Query Panel. For example BEFORE Dw Crm Product\Product Id shows that the system will try to position the set filter immediately above the Product ID objet in the Query Panel.
Creating and Building Sets With the Information Design ToolSegmenting your data with Sets PUBLIC 23
Set filter property Option Description
Change Click to select a new position in the Query Panel object browser.
Reset Click to reset the default position for a set filter which is immediately under the subject dimension in the object browser. Visibility can also be reset.
Visibility The set filter can be set to be:
● Active: Visible in the Query Panel● Hidden: Not visible in the Query Panel. This option can be used for a
set that is in progress.● Deprecated: Not visible to discourage continued use. SAP
BusinessObjects Web Intelligence reports will break until fixed.
Security Accessible by users with Object Security level not less than
You set the availability of the set filter for SAP BusinessObjects Web Intelligence users with the selected security profile (and above).
1. Click a set in the set browser.2. Click the Consumption tab in the Set Properties pane to the right of the set browser.
The default position of the set filter in the Query Panel's object tree view appears in the Position field.3. Select the set filter options as described in the previous table.
4.4.6.1 Re-positioning a set filter in the list of available objects
A set appears as a set filter object in the Query Panel immediately under its subject dimension in the list of available objects. You can modify this default positioning as follows:
1. Open a set in the Set Editor.2. Click the Consumption tab.
The Outline pane displays the current position of the set filter in the Object pane of the Query Panel.3. Click the Change button.
A list of available objects appears. The current position of the set filter is indicated by the two boxes at the top of the list. You can select either a position after or before a selected object in the list, or as the first or last child of a selected folder.
4. Click an object in the list that you want to use to position the set filter.5. Select either Before, After, First or Last from the drop down list at the top left of the list, depending on
whether you want the set filter to be positioned before or after the selected object in the object tree view.6. Click Validate.7. Click the Preview Outline in Query Panel icon in the tool bar at the top of the Set Browser pane, and browse
to the new placement of the set filter.
24 PUBLICCreating and Building Sets With the Information Design Tool
Segmenting your data with Sets
The set filter is positioned as close as possible the newly indicated place in the available objects list.
4.4.7 Previewing a set as a filter in the query panel
You can preview the set filter for a built set in the available objects pane of the Query Panel.
1. Click the Preview Outline in Query Panel icon in the tool bar at the top of the Set Browser pane.
The Query Panel opens.2. Expand the folder that contains the subject dimension used for the set.
By default, the set filter is positioned under its subject dimension in the list of available objects, or as close as possible to the new location you provided in the Consumption tab.
Related Information
Re-positioning a set filter in the list of available objects [page 24]
4.4.8 Filtering objects in the set editor
To filter the objects in the Set Editor, click the Filtering Options button in the side panel. You can filter by the following:
● Type (Static, Temporal, or Limited Temporal)● State (Active, Hidden, or Deprecated)● Mandatory (show mandatory or non-mandatory sets)● Published (Published or Local sets)● Security level (Published, Controlled, Restricted, Confidential, or Private)● Membership (Members with data or without data)● Subjects (select the subjects to filter on)
Related Information
Sets Editor default options [page 5]
4.4.9 Building a set
You build a set to create its list members in the database. When a set is built, its lists of values are compiled into a database column immediately making the new count available to SAP BusinessObjects Web Intelligence
Creating and Building Sets With the Information Design ToolSegmenting your data with Sets PUBLIC 25
users, if this set was already published. The set container holding all sets in the repository is updated when you republish the set container. Depending on the type of set, there are two ways to build a set:
Build set using Description
Build Available for static and temporal sets. Button appears on the Steps and History tabs in the Sets Editor. When a temporal set is built for the current period, if Allow multiple processing for current period is not selected, and if you select Build, only data for the current period up to the current date is associated with the set. It is not possible to build the set again in the current period.
Temporal Management Available for autofill temporal sets only. The button appears activated on the Steps and History tabs in the Sets Editor if you have selected the Allow Auto-Fill option in the Calendar and date selection dialog box when you created the temporal set. You can choose the following options:
● Autofill (partial or complete)● Rollback (partial or complete)● Rollback and then Autofill
Auto-Fill associates data for the specified calendar periods you choose.
Depending on the type of set, you can build using one of the following:
● For a static set, click the Build button available on the Steps or History tabs in the Sets Editor.● For a temporal set, if you want data for the current period, click the Build button available on the Steps and
History tabs in the Sets Editor. To build one period at a time (you might want to build periods in the future, for example Reservations), make sure you have not selected 'Stop at current period'.
● For a temporal set, if you want data for one or more specific periods in the past, click Temporal Management in the Steps and History tabs in the Sets Editor. All temporal Sets start building from their Base period onwards. The base period can only be changed if the set has no membership.
Related Information
Building temporal sets with autofill [page 31]
4.4.9.1 Defining a static set
Static set members are fixed at a moment in time. It is like a snapshot of your data that captures a state of the population that you are considering for analysis. Once you specify that your new set has static members, you can choose the set members either from a list of object members, or as a subset of combined sets that are already available in the set container. You can choose most universe objects to define the set.
1. Open or retrieve a set container.2. If no folder is available for the set, create one: click the Insert Folder icon in the menu bar of the Set
Browser pane and name the folder.3. Select the set folder and click the arrow to the right of the Insert Static Set icon in the menu bar of the Set
Browser pane.
26 PUBLICCreating and Building Sets With the Information Design Tool
Segmenting your data with Sets
4. Select a subject for the new set from the drop down list.
NoteIf you click the icon directly, a set is created from the currently selected subject by default.
A set file with a default name field appears under the folder node.5. Type a different name for the set if required, and press Enter to validate the name.
The Set Properties pane is shown to the right of the Set Browser pane. You choose members for the set using the Steps tab as follows:
Choose your set members by Description Go here to choose your set members
Selecting the members from an object list.
You select a range of static members from a list of all of the business layer objects available via the new set's Subject .
Inserting a visual data step in a set [page 36]
Combining any of the existing sets in the container to create a new set.
You select the intersection, union, or exclusion between several built sets based on the same subject.
Creating a Sets on Sets Step [page 38]
Using the Query Panel to define complex filters.
You unleash the power of the SAP BusinessObjects Web Intelligence Query Panel to define complex filters.
Inserting a Query Panel step [page 40]
6. Select the dimension for your set:
Selecting a Dimension or Measure (Visual Data step only)
To Select a Dimension To Select a Measure
1. Double-click an object from the Classes and Objects pane.
2. Expand the object and select each value that you want to include in the set.
3. Select a Context, if required, and click OK.4. Select the Step Action (Start, for a new item, Add,
Subtract, or Keep, depending on what relationship you want the list to have with the preceding step). For the first step you create, you Start is automatically selected, no other option is available.
5. Click Finish.
1. Double-click a Measure from the Classes and Objects pane.
2. Define a Yes/No condition for the measure (for example 'Price less than 300'), and click Create.
3. Expand the Measure and select a Context, then click OK.
4. Select No to reject the filter results from your set, or select Yes to keep the filter results. Then click OK.
5. Select the Step Action (Start, for a new item, Add, Subtract, or Keep, depending on what relationship you want the list to have with the preceding step). For the first step you create, you Start is automatically selected, no other option is available.
6. Click Finish.
Creating and Building Sets With the Information Design ToolSegmenting your data with Sets PUBLIC 27
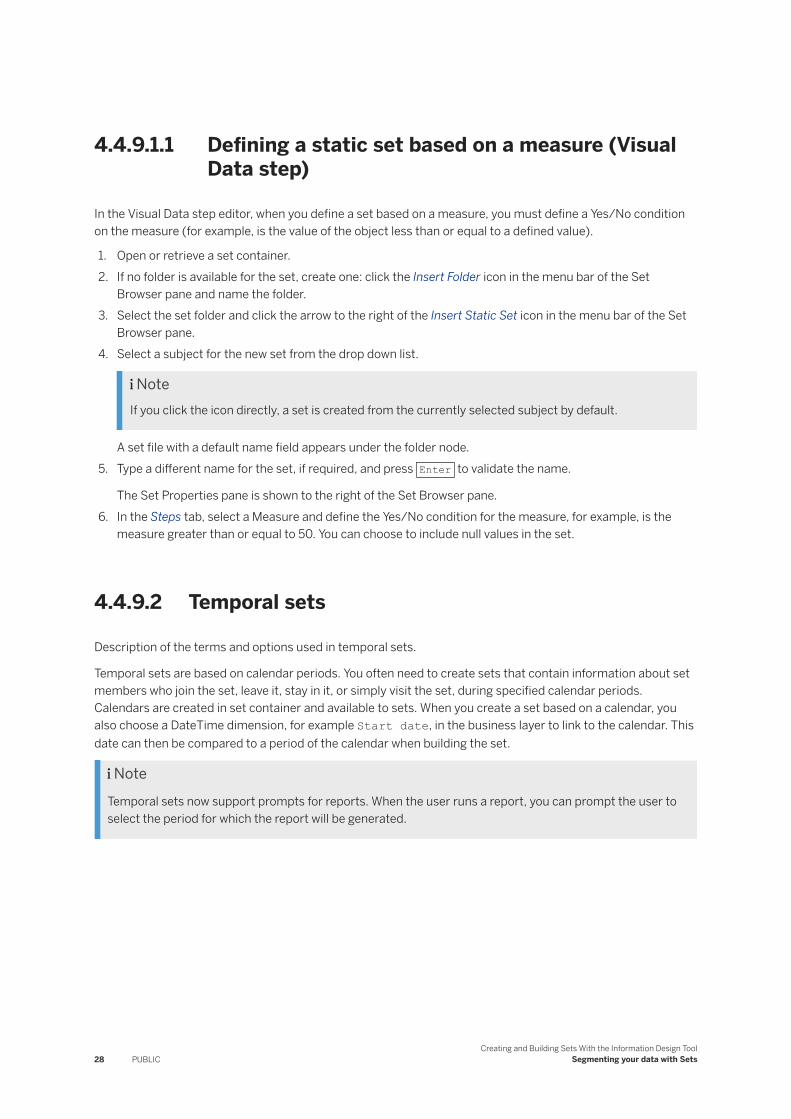
4.4.9.1.1 Defining a static set based on a measure (Visual Data step)
In the Visual Data step editor, when you define a set based on a measure, you must define a Yes/No condition on the measure (for example, is the value of the object less than or equal to a defined value).
1. Open or retrieve a set container.2. If no folder is available for the set, create one: click the Insert Folder icon in the menu bar of the Set
Browser pane and name the folder.3. Select the set folder and click the arrow to the right of the Insert Static Set icon in the menu bar of the Set
Browser pane.4. Select a subject for the new set from the drop down list.
NoteIf you click the icon directly, a set is created from the currently selected subject by default.
A set file with a default name field appears under the folder node.5. Type a different name for the set, if required, and press Enter to validate the name.
The Set Properties pane is shown to the right of the Set Browser pane.6. In the Steps tab, select a Measure and define the Yes/No condition for the measure, for example, is the
measure greater than or equal to 50. You can choose to include null values in the set.
4.4.9.2 Temporal sets
Description of the terms and options used in temporal sets.
Temporal sets are based on calendar periods. You often need to create sets that contain information about set members who join the set, leave it, stay in it, or simply visit the set, during specified calendar periods. Calendars are created in set container and available to sets. When you create a set based on a calendar, you also choose a DateTime dimension, for example Start date, in the business layer to link to the calendar. This date can then be compared to a period of the calendar when building the set.
NoteTemporal sets now support prompts for reports. When the user runs a report, you can prompt the user to select the period for which the report will be generated.
28 PUBLICCreating and Building Sets With the Information Design Tool
Segmenting your data with Sets
The following terms are used in the temporal sets options:
Temporal Set Concepts
Concept Description
Limited Temporal Sets When sets are built in the limited temporal mode, by default, only the last two sets are built. The user can define a moving window of periods to be stored in the database. Any leavers outside of this window are deleted from the database to increase storage space.
Rollback Go back to a specified period (the base period for a complete rollback, or a specified period for a partial rollback) and empty the periods built after this period. A complete rollback is equivalent to a purge operation.
Autofill Autofill means that the sets are built and filled with data going forwards from the base period. This can be used to analyze booking reservations, for example. This can also be used after a rollback to rebuild sets for past periods.
Base period This is the first period to be built.
Active period This is the last period built.
Current period The current period is the calendar period corresponding to the present day.
Future period A future period is any calendar period after the current period
Past period A past period is any calendar period prior to the current period
4.4.9.2.1 Defining a temporal set
Temporal sets are based on calendar periods. You often need to create sets that contain information about set members who join the set, leave it, stay in it, or simply visit the set, during specified calendar periods. Calendars are created in set container and available to sets. When you create a set based on a calendar, you also choose a DateTime dimension, for example Start date, in the business layer to link to the calendar. This date can then be compared to a period of the calendar when building the set.
1. Open or retrieve a set container.2. If no folder is available for the set, click the Insert a Folder icon in the menu bar of the Sets pane and name
the folder.3. Select the set folder and click the arrow to the right of the Insert Temporal Set icon in the menu bar of the
Sets pane.4. Select a subject for the new set from the drop down list.
Creating and Building Sets With the Information Design ToolSegmenting your data with Sets PUBLIC 29
A calendar and date selection box appears. It lists the calendars defined in the set container and the date dimensions available in the business layer that can be used to associate the calendar with a date reference in your datamart.
NoteIf you click the icon directly, a set is created from the currently selected subject by default.
5. Click a calendar in the list of set calendars available.6. In the lower pane, browse to and select a date dimension that links your data to the calendar. Refer to
Related Links for more details on the options available on this dialog box.7. If you want to build the sets from the present period onwards, check Allow Auto-Fill. Refer to Related Links
for more details on the Auto-Fill option.8. Click OK.
The set properties pane is shown to the right of the Sets pane. It contains a series of tabs.You choose members for the set using the Steps pane as follows:
Choose your set members by Description Go here to choose your set members
Visually selecting the members.
You select a range of static members from a list of all of the objects available via the set's Subject.
Inserting a visual data step in a set [page 36]
Combining any of the existing sets in the container to create a new set.
You select the intersection, union, or exclusion between several existing sets for the same subject.
Creating a Sets on Sets Step [page 38]
Select the members using the query panel step.
Use the full power of the query panel to create complex queries.
Inserting a Query Panel step [page 40]
See Related links for explanations for the other properties that you can view or set for a set.
4.4.9.2.1.1 Selecting calendar options for a temporal set
A calendar has been added to the Set Container. This is usually done by the administrator when creating the set container in the Repository.
The following information applies to the Calendar and date selection dialog box. This box appears when you click the Insert Temporal Set button from the Sets Browser pane to the left of the Sets Editor. Selecting calendar options here is the first step when designing a temporal set. These determine how calendar periods are mapped to your data. You have the following settings:
Calendar options Description
Pick a set calendar Calendars defined in the set container are listed.
30 PUBLICCreating and Building Sets With the Information Design Tool
Segmenting your data with Sets
Calendar options Description
Pick a date to link set periods Date/Time dimensions available to the subjects.
Allow Auto-Fill When selected, the Auto-Fill button is enabled with Build on the Steps and Time tabs. If you want to build periods in the past, select the Auto-Fill checkbox. If you want to build the present period on a regular basis, do not check Auto-Fill.
1. Select a calendar in the Pick a Set Calendar list.2. Expand the subject node and select the Date/Time dimension that provides the data for the calendar.3. Select Allow Auto-Fill if you want to have the Auto-Fill option available when you build the set.4. Click OK to continue defining the temporal set.
Related Information
Building temporal sets with autofill [page 31]Defining a temporal set [page 29]Designing and managing sets using the sets editor [page 20]
4.4.9.2.1.2 Building temporal sets with auto-fill
You can build a temporal set for specified periods rather than the current period. Selecting period options in the Auto-Fill dialog box allows you to specify the number of calendar periods that are taken into account when the set is built, starting from the last build date of the set up to the current date period, or another period that you indicate.
Using Auto-Fill to build your set ensures that the active calendar period for a set is incremented each time it is built. If you do not build with Auto-Fill, then only data from the current calendar period is taken into account.
NoteThe Auto-Fill button is enabled if you have selected the Allow Auto-Fill option in the Calendar and date selection dialog box when you created the temporal set. You can also change the Autofill nature of a temporal set after its creation, if the set has no membership. This can be achieved by purging the set.
NoteThe engine only fully builds the previous period of a nonautofill temporal set.
By design, Autofill temporal sets have all periods in the past fully built, without gaps.
You have the following options:
Creating and Building Sets With the Information Design ToolSegmenting your data with Sets PUBLIC 31
Auto-Fill Type Description
Complete Build in a row all possible periods, from the first non-built period in the past, to the last available period. You cannot build in the future.
Partial The build is from a selected base period to a selected end period.
● You can select an end period date from the Auto-Fill to calendar. The number of affected periods is automatically incremented in the Periods to auto-fill list.
● You can directly select the number of periods to automatically fill data by clicking the increase or decrease arrows in the Periods to auto-fill list.
1. Click theTemporal Management button on the Steps or History tabs.
The Auto-Fill dialog box appears.2. Do one of the following:
○ Click Complete to automatically fill data for all periods since the last build.○ Click Partial then click the calendar button at the end of the text box to choose an end date period.
Data will be inserted for all the periods up to that date. Or in the Periods to auto-fill box, click the increase or decrease buttons to select the number of periods that you want build.
3. Click Auto-Fill to build the set using the specified Auto-Fill options.
Related Information
Selecting calendar options for a temporal set [page 30]Building a set [page 25]
4.4.9.2.1.3 Managing the build history for a temporal set
The Manage Build History dialog allows you to perform the following actions:
Temporal Set Management
Setting Description
Rollback ● When complete rollback is selected, sets are rolled back to the base period from the current period. All sets are purged.
● When partial rollback is selected, all built periods are eligible for rollback. Choose the period to rollback to. The sets for the chosen periods are purged.
NoteThe Autofill option is not available.
32 PUBLICCreating and Building Sets With the Information Design Tool
Segmenting your data with Sets
Setting Description
Auto-Fill ● When complete autofill is selected, sets are built from the base period to the current period.
● When partial autofill is selected, sets are built from the selected base period for the selected number of periods.
NoteThe Rollback option is not available.
Rollback and Auto-Fill You can use this to rebuild partial set history or synchronize sets. Rollback, then autofill. You have the following options:
● Complete rollback then complete autofill.● Complete rollback to the base period, then partial auto
fill. The selected number of periods are built from the base period.
● Partial rollback, then partial autofill. Rollback and purge to a selected base period, then autofill subsequent periods to a selected period.
4.4.9.2.1.4 Managing the time settings
In the Time tab, you define the temporal set type (complete or limited) and the build options for the set.
In the upper part of the pane, you can choose between two set types:
● Temporal sets, where the set contains the full membership history.● Limited Temporal, where the last one or more periods are built Two is the default value, the maximum
number of periods is currently 9999. Leavers older than the numbers of periods will be dropped automatically during set refresh. This is useful to reduce volume of set history data.
Information about the calendar assigned to the set folder is displayed.
In the lower part of the pane, you can set the following build options:
● Allow editing of steps after the set is built This is useful to lock the set definition and enable consistent comparison over given set periods
● Allow Auto-Fill○ Stop at current period○ Allow multiple processing in current period Building during the current period will create incomplete
sets, by definition. This can be useful to get the latest memberships.○ Base Period (You can set a specific base period).
NoteWhen autofill is not allowed, the Temporal Management option in the Steps and History tabs is disabled.
Creating and Building Sets With the Information Design ToolSegmenting your data with Sets PUBLIC 33
NoteWhen Allow multiple processing in current period is not selected, once you have built a set for the current period, you cannot repeat the operation for that period. This means if you build a set on the first day of a period, you might have very little data for the set, and you will not be able to build that set again when more data is available.
4.4.9.2.1.5 Build options for the base period
Selecting the base period for a temporal set.
This feature is useful to start a history at a later period than the calendar start. It cannot be changed after first period is built. You must rollback the whole history to enable the option again. Select the first period (the base period) for your temporal set.
The set can be built from this period onwards, or rolled back to this period.
4.4.9.3 Set steps
A set is made up of different steps. There are three types of step that you can insert, depending on the complexity of the filter you want to build:
Related Information
About inserting visual data steps in a set [page 35]About inserting a Query Panel step in a set [page 39]About inserting a sets on sets step [page 38]
34 PUBLICCreating and Building Sets With the Information Design Tool
Segmenting your data with Sets
4.4.9.3.1 About inserting visual data steps in a set
You use the Insert Visual Data step editor to select set members from a list of objects available via the subject. You double-click members or drag and drop them into the set editor pane.
The member objects you can select are attributes or measures. Although you can create a set with a single list of members, the value of building a set is to combine a sequence of lists that respond to questions allowing you to refine your data set.
Adding Custom Values
In cases where values might be missing or not yet available, you can create and insert custom values. For example, if your company will be selling to a region or country for the first time at a later date, you can insert the country and region names as custom values. Custom values are added in the Visual Data pane. When the actual values are available, you can delete the custom values by clicking the Manage Custom Values in the Visual Data pane.
Managing Conditions on Measures
When you select a measure as a step, you must choose a condition for the measure. Members are constrained to a Yes/No condition (for example: Price is Greater Than 200). Setting the condition is mandatory, you can select to keep the data met by the condition, or reject it from your set. You can also add Yes/No conditions in the Visual Data pane on objets other than measures, but this is not always automatic nor mandatory..
Adding, Subtracting, or Keeping Steps
When you insert a step in a set, the first step is automatically attributed 'Start' for the set, subsequent steps can be used to add, subtract, or keep data.
Each additional list of members (step) can be combined with the previous one, using the following properties:
Set step property Description
Start This is the default step. It is the first list of members that you create, and starts the sequence of lists, each one acting on the previous one to refine your set members.
Add The list members are added to the set.
Subtract The list members are subtracted from the set.
Keep Performs an intersection between the set and the selected members. Removes those members from the set that do not exist in your selected members.
Creating and Building Sets With the Information Design ToolSegmenting your data with Sets PUBLIC 35
NoteA Subject with non-unique values is not supported. In the set editor, when a set based on multi-key subject and has a Visual Data step, if the subject values are not unique, the build fails.
Related Information
Parameters and contexts [page 37]Inserting a visual data step in a set [page 36]Creating custom values for a visual data step [page 37]Set step sampling wizard [page 41]Building a set [page 25]Hiding a set [page 43]Publishing a set container [page 44]
4.4.9.3.1.1 Inserting a visual data step in a set
You use the Visual Data editor to select set members from a list of objects available via the subject. The member objects you can select are dimensions, attributes or measures. Although you can create a set with a single list of members, the value of building a set is to combine a sequence of lists that respond to questions allowing you to refine your data set.
1. Create and name a new set.2. In the Steps tab in the Set Properties pane, click the Insert Visual Data button.3. Do one of the following:
○ Double click an object from the Classes and objects pane.○ Drag an object to the Visual Data Selected Objects pane.
4. Expand the object and select each value that you want to include in the set.When there are query contexts, the Query Contexts pane displays and you select the appropriate context and click OK. When there are parameters, the query parameter dialog displays and you edit the query and select or declare the values for the parameter.
5. Select the attribute objects from the list of values.6. The Step Action drop down list in the bottom part of the dialog is set to Start by default if this is the first
step of the set. If you are adding a list or modifying one, then you can choose Add, Subtract, or Keep depending on what relationship you want the list to have with the preceding step in the Steps tab.
7. Add a description for your step. This will help you when managing the different steps in the set you have created.
8. Click Finish.
The list of members is added to the Steps tab. If it is the first list defined for the set, then it appears as number 1 with the qualification Start.
9. Click the Insert Visual Data button to continue adding new lists of members based on the sequence of questions that you are following for the data refinement.
36 PUBLICCreating and Building Sets With the Information Design Tool
Segmenting your data with Sets
NoteWhen you create a new Visual Data step and add your first object, the tree of available objects displayed to the left is restricted to those objects that are compatible with both this first object and with the subsequent objects. Only objects that can be reached by a context-free path in the data foundation are eligible.
NoteWhen you insert a step in the set, and click on the step, a pane displays at the bottom of the Set editor showing the step details (Visual Data Details, Query Panel Step Details, or Sets on Sets Details).
10. To change position of a step in the set, click the up and down arrows at the top of the Steps tab. The step actions are automatically updated.
The set and its steps are saved in the Local Project. A new or modified set that has not been published is indicated by a red asterisk.
4.4.9.3.1.2 Creating custom values for a visual data step
In cases where values might be missing or not yet available, you can create and insert custom values. For example, if your company will be selling to a region or country for the first time at a later date, you can insert the country and region names as custom values beforehand. These values will appear in membership as soon as they become available in the database, and the set is rebuilt.
1. In the visual data pane of a set step, click on the manage custom values icon.
The Visual Data Customization pane displays with an empty table.2. Click Add and enter the new value (the value type is automatically detected).3. Press Enter , or click Apply.
The new value is displayed in the table of custom values in the Visual Data Customization pane.4. You can add, edit, remove, and change the position of the custom values.5. Click OK when you have finished entering custom values.
The custom values are displayed at the top of the values list in the Visual Data pane. When an object with the same name exists in the database, there is an information note to indicate the value already exists. Click the Manage Custom Values... icon and remove the item from the list. When you close the Visual Data Customization pane, the item is removed from the Visual Data pane.
4.4.9.3.1.3 Parameters and contexts
Parameters and contexts may require setting for Visual Data steps or Sets on Sets steps. When you select a member where parameters require setting, you should select the appropriate context for the step, and edit the parameter as required. Parameters are merged in a set. This means that if you select a country for a parameter in a step, if a subsequent step has a parameter 'Select Region', only the regions from the country selected in
Creating and Building Sets With the Information Design ToolSegmenting your data with Sets PUBLIC 37
the precedent parameter are displayed as options. When you click the Reset Structure button in the toolbar, all values are cleared.
4.4.9.3.2 About inserting a sets on sets step
You can create sets based on existing sets by using the Sets on Sets Step editor .By creating a Sets on Sets step, you create sets, unions, or intersections from existing sets by using the dedicated Venn Diagram editor.
The Sets on Sets editor automatically detects compatible sets (coming from a compatible subject in a different table). These compatible sets are displayed with the name of their subject in brackets.
You add sets to collections and can define the behavior of each collection. To select an intersection, click on the appropriate area of the Venn Diagram. To select a whole collection, right-click on the collection's non-intersected area in the Venn diagram, and choose Select whole collection in the popup menu that displays.
● Empty collections are hidden from diagram.● The Collection’s icon differs for a Union or Intersection.● When you select an area of the Venn Diagram, the selection is displayed in high contrast surrounded by a
dotted line.
You cannot select the following:
● Sets causing circular dependencies● Sets that are not compatible
Related Information
Parameters and contexts [page 37]Creating a Sets on Sets Step [page 38]Set step sampling wizard [page 41]Building a set [page 25]Hiding a set [page 43]Publishing a set container [page 44]Sets Editor default options [page 5]
4.4.9.3.2.1 Creating a Sets on Sets Step
You can select new set members by adding multiple sets for a subject into a collection, which applies an intersect or union operation on all of its sets. You can then add sets to more collections, combining them all using intersect or union operations to define a new set with members resulting from the complex combination of values.
You assign one of the following properties to your selection of members that links it to the previous step in a set, if any:
38 PUBLICCreating and Building Sets With the Information Design Tool
Segmenting your data with Sets
Set step property Description
Start This is the default step. It is the first list of members that you create, and starts the sequence of lists, each one acting on the previous one to refine your set members.
Add The list members are added to the set.
Subtract The list members are subtracted from the set.
Keep Performs an intersection between the set and the selected members. Removes those members from the set that do not exist in your selected members.
1. In the Step tab of the set editor view, click the Insert Sets on Sets icon.
The Sets on Sets Step editor displays.2. To add the first set, double-click on a set in the sets tree view.
The set is added to the first collection, and displayed in the Venn Diagram pane. To add the set to a different collection, right-click the set and select the collection in the contextual menu, or drag and drop it into the appropriate collection. To change the shape of the Venn Diagram, go to Windows/Preferences.../Information Design Tool/Sets Editor and select the shape you want.
3. Double-click on the next set to add the set to the Venn Diagram and to the second collection, or right-click the set and select a different collection for the set.
4. When you have completed your Venn Diagram, click on the intersections containing the membership you are interested in.
5. Write a description for the step.6. Click Finish.
The Sets on Sets step is added to your set, and the review pane showing the Venn Diagram is visible at the bottom of the Set Editor.
4.4.9.3.3 About inserting a Query Panel step in a set
When you create sets using the information design tool, you can insert steps in sets using the Query Panel.
You can insert set objects and sets inQuery Panel steps. This allows you to use the full query power of the Query Panel to create more sophisticated set filters.
Creating and Building Sets With the Information Design ToolSegmenting your data with Sets PUBLIC 39
Related Information
Inserting a Query Panel step [page 40]Set step sampling wizard [page 41]Building a set [page 25]Hiding a set [page 43]Publishing a set container [page 44]
4.4.9.3.3.1 Inserting a Query Panel step
You use the Query Panel editor to select set members via a list of objects available to the subject and to create powerful set filters for your queries. The objects you can select are all the ones accessible in the universe, including regular filters. You can also select compatible sets.
NoteYou can now enter custom SQL in the Query Panel by using the Expression editor. The query result objects must specify an alias that is associated with sets subject keys. for example "as id".
NoteWhen you include a set in the Query Panel step, when you run the query on a .unx universe, the set displays in the Query Panel outline.
1. Create and name a new set.2. In the Steps tab in the Set Properties pane, click the Insert Query Panel button.
The Query Panel displays and shows the dimension behind the set's subject (defined when you created the set) in the Result Objects pane. This object cannot be removed, nor the other ones be added in the Result Objects pane.
3. Expand the objects in the Available Objects pane and drag and drop one or more objects to the filter view and define the filter conditions. You can also use sets in the filter conditions, they are displayed on the left: drag and drop a set into the filter pane, as required. You can use existing set and build advanced condition. For instance, you can exclude members from MyPreviousCampaign. When there are query contexts, the Query Contexts pane displays and you select the appropriate context and click OK. When there are parameters, the Query Prompt dialog displays and you edit the query and select or declare the values for the parameter.
4. Enhance the filter by adding more objects, https://help.sap.com/viewer/3d4f417fd0764f909c0ef7931e19fe1a/4.2.6/en-US/46739fd66e041014910aba7db0e91070.html.
5. The Step Action button in the bottom part of the dialog is set to Start by default if this is the first step of the set. If you are adding a step or modifying one, then you can choose Add, Subtract, or Keep depending on what relationship you want its membership to have with the preceding step in the Steps tab.
6. Add a description for your step. This will help you when managing the different steps in the set you have created.
If there are any contexts or parameters required for your step, the Contexts pane displays, then the parameters pane (if relevant).
40 PUBLICCreating and Building Sets With the Information Design Tool
The step is added to the Steps tab. If it is the first step defined for the set, then it appears as number 1 with the qualification Start. When you add a step to existing steps, it is added in the last position. You can move the steps up or down the list of steps.
8. Continue adding new steps to your set.
NoteWhen you insert a step in the set, and click on the step, a pane displays at the bottom of the Set editor showing the step details (Visual Data Details, Query Panel Step Details, or Sets on Sets Details).
9. To change position of a step in the set, click the up and down arrows at the top of the Steps tab. The step actions are automatically updated.
The set and its steps are saved in the Local Project. A new or modified set that has been published is indicated by a red asterisk.
Related Information
Set step sampling wizard [page 41]
4.4.9.3.4 Set step sampling wizard
Use the step sampling wizard to apply sampling to your set step in order to work on a meaningful subset of the total membership.
In order to work with more manageable volumes of data, you can use the sampling wizard to select a percentage of the available rows, or a given number of rows. The sampling feature works for all step types (Visual Data step, Sets on Sets step, Query Panel step). The panel gives you the folllowing information:
Sampling options and functions
Sampling sorting method Description
None: None when the sample size is 100%
Random (Percent) When a percentage is selected, but no ordering has been specified.
Ranked (Percent) When you have chosen one or more business items to order by.
Ranked, stratified (Percent) When you have chosen one or more business items to order by and one or more business items to stratify by.
Creating and Building Sets With the Information Design ToolSegmenting your data with Sets PUBLIC 41
Sampling sorting method Description
Random, stratified (Percent) When you have not chosen one or more business items to order by and you have chosen one or more business items to stratify by.
Random (Members in total) When a number of members is defined, but no ordering has been specified.
Ranked (Members in total) When you have chosen one or more business items to order by.
Ranked, stratified (Members in total) When you have chosen one or more business items to order by and a different business item to stratify by.
Random, stratified (Members in total) When you have not chosen a business item to order by and you have chosen one or more business items to stratify by.
To order your sample, double-click in the Order by pane and select select one or more business items. You can preview the results in the preview pane. The order of the columns depends on the order of the business items in the Order by and Stratify by panes.
When you choose to stratify by, the order of the business items in the Stratify by pane determines the order of the columns in the sample preview pane.
When you have finished defining your sample, click Finish, The objects selected for sampling are available at the bottom of the Set edition pane.
Related Information
Set steps [page 34]
4.4.9.4 Defining groups of sets for processingYou can now define groups of sets automatically ordered by the system according to their inter-dependencies (if any). This will decide in which safe sequence they will be processed when they are built as a whole. Processing group allows to group a number of sets together so that they can be processed and reprocessed together and ensure that each parent set has finished processing before the child set starts.
In the Set tree pane, click the Group tile and create a new group.
Add sets to the group, then press Save.
You can schedule the group processing from the CMC. In the parameters section, select the group and select Schedule.
NoteThe CMC can only schedule the processing of one group at a time
42 PUBLICCreating and Building Sets With the Information Design Tool
Segmenting your data with Sets
4.4.9.5 Testing sets by running queries with the set filters
Once you have published your sets you can use the Query Panel to test them as follows:
Use the Query Panel in Test the set as follows
Information design tool ● From the Repository Resources pane, browse to the universe used to create the set container.
● Right-click the universe and select Run Query, or double-click the universe.● Run queries in the Query Panel using the set filter.
SAP BusinessObjects Web Intelligence
● Create a new document, and select the universe used for the set container as the data source.
● Run queries using the set filter as you would any other query filter.
Refer to the SAP BusinessObjects Web Intelligence User's Guide for information on using SAP BusinessObjects Web Intelligence.
Related Information
Using the Query Panel
4.4.9.6 Hiding a set
You can hide a set from SAP BusinessObjects Web Intelligence users. In the Consumption tab of the Set editor, set the Visibility property to Hidden. You can build or publish the set container without the reporting tools users being able to see or use the set.
4.4.9.7 Scheduling set refresh dates
You can schedule a refresh time for your sets from the home page of the Central Management Console. You select Sets from the Applications drop down menu, select the set container, and then schedule a refresh date for a set listed in the Parameters page.
Refer to the Business Intelligence Platform Administrator Guide for complete information on scheduling refresh dates in the Central Management Console.
Creating and Building Sets With the Information Design ToolSegmenting your data with Sets PUBLIC 43
When a set is defined with set steps, you can view the SQL that will be generated to materialize this set to the database. You can right-click on a set and select Show Materialization Script. You can view the SQL for the set membership, but you cannot execute the script from this view.
4.4.9.9 Editing table names in a set
You can edit the table names in a set, but you must edit all table names in that container.
NoteWhen you change table names, new tables are created, and the original tables are not deleted in the database. The new tables are associated with the defined Owner and Qualifier.
The table names are displayed in the Database tab of the Sets Containers Management dialog. Double-click a table name to start renaming the table. You can undo a name change for a table by right-clicking on the table name and selecting Undo table renaming. You can also select Copy to clipboard and the whole table structure is copied under text format to the clipboard.
NoteIf you change the Owner and Qualifier without closing the editor, the changes won't be reflected in the locally edited container. You must close and reopen the editor or click the refresh icon in the Sets pane.
4.5 Publishing a set container
You publish a set container to update the contents accessible to Set Designers in the repository. This ensures that the latest definitions of sets are available to SAP BusinessObjects Web Intelligence as set filters in the Query Panel.
1. Ensure that you saved your latest changes to the set container.2. Right-click the set container in the Local Projects pane.3. Select Publish Changes from the contextual menu.
The sets container in the repository is updated with the latest set changes.
NoteCalendars and Subjects are unaffected, and can only be updated by Administrators.
44 PUBLICCreating and Building Sets With the Information Design Tool
Segmenting your data with Sets
Important Disclaimers and Legal Information
HyperlinksSome links are classified by an icon and/or a mouseover text. These links provide additional information.About the icons:
● Links with the icon : You are entering a Web site that is not hosted by SAP. By using such links, you agree (unless expressly stated otherwise in your agreements with SAP) to this:
● The content of the linked-to site is not SAP documentation. You may not infer any product claims against SAP based on this information.● SAP does not agree or disagree with the content on the linked-to site, nor does SAP warrant the availability and correctness. SAP shall not be liable for any
damages caused by the use of such content unless damages have been caused by SAP's gross negligence or willful misconduct.
● Links with the icon : You are leaving the documentation for that particular SAP product or service and are entering a SAP-hosted Web site. By using such links, you agree that (unless expressly stated otherwise in your agreements with SAP) you may not infer any product claims against SAP based on this information.
Videos Hosted on External PlatformsSome videos may point to third-party video hosting platforms. SAP cannot guarantee the future availability of videos stored on these platforms. Furthermore, any advertisements or other content hosted on these platforms (for example, suggested videos or by navigating to other videos hosted on the same site), are not within the control or responsibility of SAP.
Beta and Other Experimental FeaturesExperimental features are not part of the officially delivered scope that SAP guarantees for future releases. This means that experimental features may be changed by SAP at any time for any reason without notice. Experimental features are not for productive use. You may not demonstrate, test, examine, evaluate or otherwise use the experimental features in a live operating environment or with data that has not been sufficiently backed up.The purpose of experimental features is to get feedback early on, allowing customers and partners to influence the future product accordingly. By providing your feedback (e.g. in the SAP Community), you accept that intellectual property rights of the contributions or derivative works shall remain the exclusive property of SAP.
Example CodeAny software coding and/or code snippets are examples. They are not for productive use. The example code is only intended to better explain and visualize the syntax and phrasing rules. SAP does not warrant the correctness and completeness of the example code. SAP shall not be liable for errors or damages caused by the use of example code unless damages have been caused by SAP's gross negligence or willful misconduct.
Gender-Related LanguageWe try not to use genderspecific word forms and formulations. As appropriate for context and readability, SAP may use masculine word forms to refer to all genders.
Creating and Building Sets With the Information Design ToolImportant Disclaimers and Legal Information PUBLIC 45
No part of this publication may be reproduced or transmitted in any form or for any purpose without the express permission of SAP SE or an SAP affiliate company. The information contained herein may be changed without prior notice.
Some software products marketed by SAP SE and its distributors contain proprietary software components of other software vendors. National product specifications may vary.
These materials are provided by SAP SE or an SAP affiliate company for informational purposes only, without representation or warranty of any kind, and SAP or its affiliated companies shall not be liable for errors or omissions with respect to the materials. The only warranties for SAP or SAP affiliate company products and services are those that are set forth in the express warranty statements accompanying such products and services, if any. Nothing herein should be construed as constituting an additional warranty.
SAP and other SAP products and services mentioned herein as well as their respective logos are trademarks or registered trademarks of SAP SE (or an SAP affiliate company) in Germany and other countries. All other product and service names mentioned are the trademarks of their respective companies.
Please see https://www.sap.com/about/legal/trademark.html for additional trademark information and notices.