14
Creating Dashboard Widgets i Creating Dashboard Widgets Intellicus Enterprise Reporting and BI Platform ©Intellicus Technologies [email protected] www.intellicus.com

Creating Dashboard Widgets i
Creating Dashboard Widgets
Intellicus Enterprise Reporting and BI Platform
©Intellicus Technologies [email protected] www.intellicus.com
Creating Dashboard Widgets ii
Copyright © 2010 Intellicus Technologies
This document and its content is copyrighted material of Intellicus Technologies.
The content may not be copied or derived from, through any means, in parts or
in whole, without a prior written permission from Intellicus Technologies. All
other product names are believed to be registered trademarks of the respective
companies.
Dated: - September 2010.
AAcckknnoowwlleeddggeemmeennttss
Intellicus acknowledges using of third-party libraries to extend support to the
functionalities that they provide.
For details, visit: http://www.intellicus.com/acknowledgements.htm .
Creating Dashboard Widgets iii
Contents
Creating Dashboard Widgets ................................................. 4
Dashboards and dashboard widgets .............................................................. 4
Dashboard Widget Designer ........................................................................ 6
Report Widget .................................................................................. 7
Widget Properties: Web Link .............................................................. 8
Report Widget Properties ................................................................... 9
Saving a Dashboard Widget.............................................................. 11
Opening a Dashboard widget ............................................................ 12
Deleting a Dashboard widget ............................................................ 12
Repository Explorer .................................................................................. 13
Creating Dashboard Widgets 4
Creating Dashboard Widgets
Dashboards and dashboard widgets
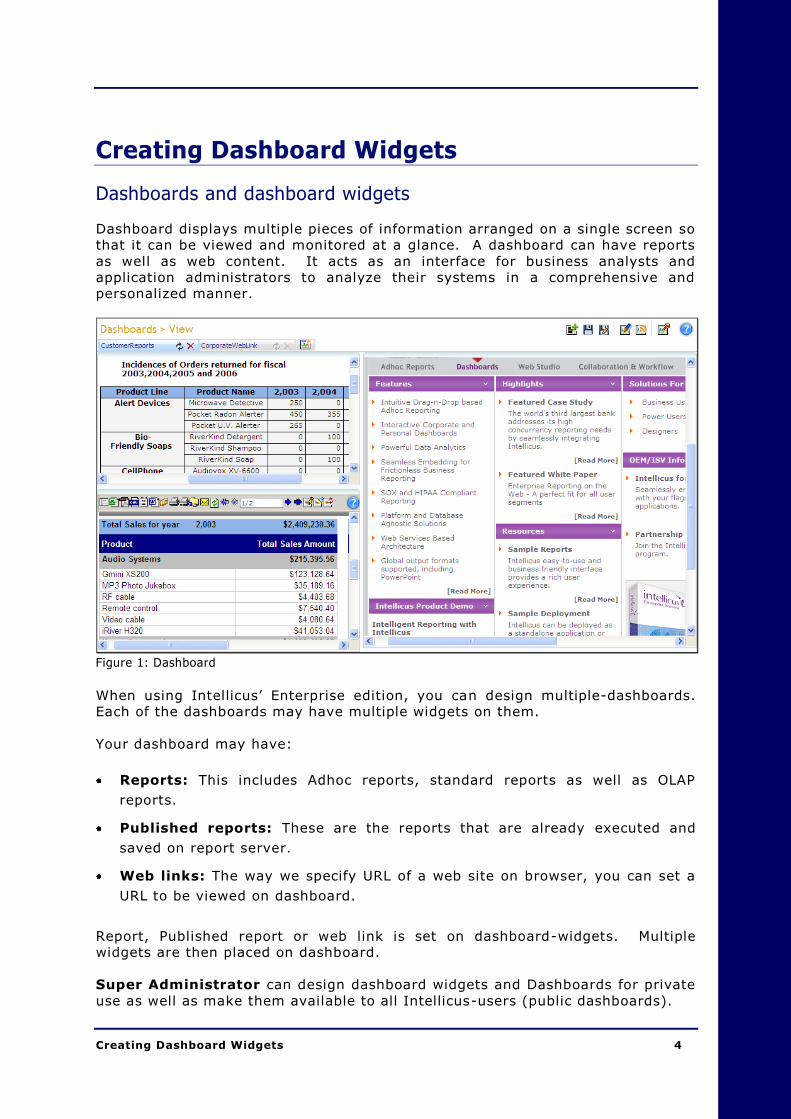
Dashboard displays multiple pieces of information arranged on a single screen so
that it can be viewed and monitored at a glance. A dashboard can have reports
as well as web content. It acts as an interface for business analysts and
application administrators to analyze their systems in a comprehensive and
personalized manner.
Figure 1: Dashboard
When using Intellicus’ Enterprise edition, you can design multiple-dashboards.
Each of the dashboards may have multiple widgets on them.
Your dashboard may have:
Reports: This includes Adhoc reports, standard reports as well as OLAP
reports.
Published reports: These are the reports that are already executed and
saved on report server.
Web links: The way we specify URL of a web site on browser, you can set a
URL to be viewed on dashboard.
Report, Published report or web link is set on dashboard-widgets. Multiple
widgets are then placed on dashboard.
Super Administrator can design dashboard widgets and Dashboards for private
use as well as make them available to all Intellicus-users (public dashboards).

Creating Dashboard Widgets 5
Administrators can design dashboard widgets and dashboards for private use
as well as make them available to users of his/her organization (public
dashboards).
All End users can make use of pre-designed dashboard widgets and design
dashboards for private use. End users can also subscribe to dashboards made
available to them by Administrator / super administrator.
End users having Widget Designer system privilege can design and save
private as well as public widgets.
Creating Dashboard Widgets 6
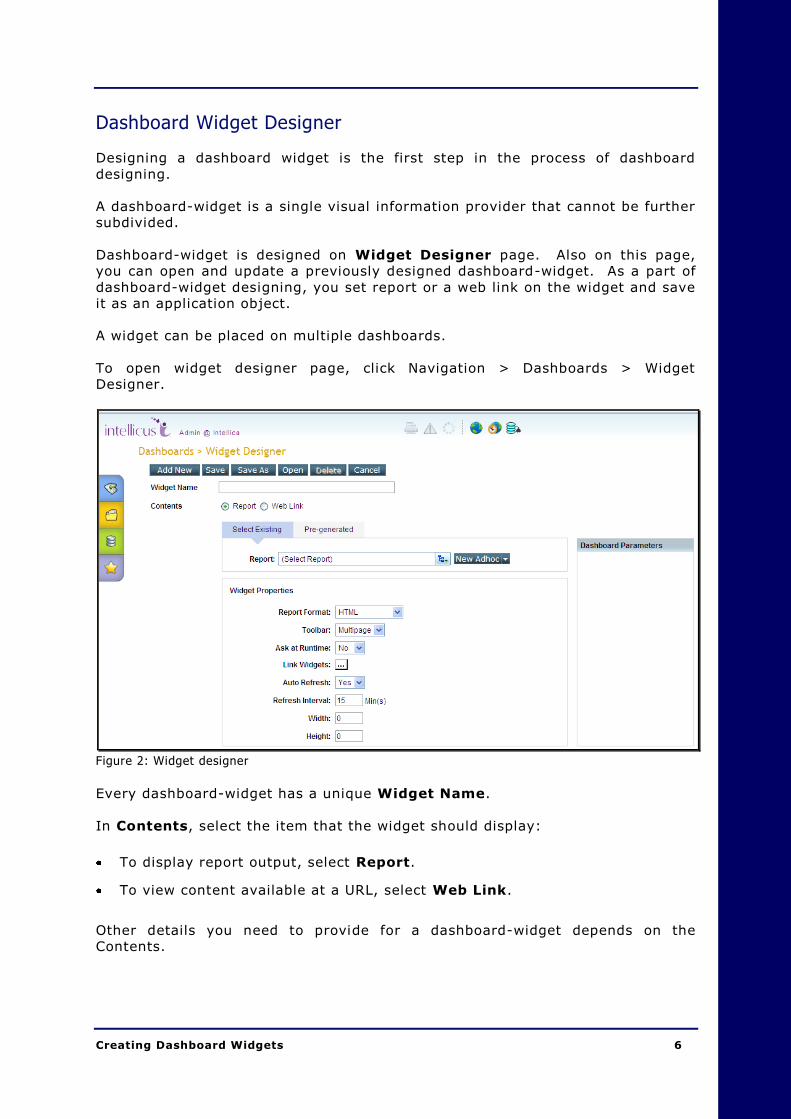
Dashboard Widget Designer
Designing a dashboard widget is the first step in the process of dashboard
designing.
A dashboard-widget is a single visual information provider that cannot be further
subdivided.
Dashboard-widget is designed on Widget Designer page. Also on this page,
you can open and update a previously designed dashboard-widget. As a part of
dashboard-widget designing, you set report or a web link on the widget and save
it as an application object.
A widget can be placed on multiple dashboards.
To open widget designer page, click Navigation > Dashboards > Widget
Designer.
Figure 2: Widget designer
Every dashboard-widget has a unique Widget Name.
In Contents, select the item that the widget should display:
To display report output, select Report.
To view content available at a URL, select Web Link.
Other details you need to provide for a dashboard-widget depends on the
Contents.
Creating Dashboard Widgets 7
Report Widget
To place a report layout on the widget, create a new OLAP layout or an adhoc
report, click Select Existing tab. When such a widget is placed on dashboard,
the report is executed and output is displayed on the widget.
To place a pre-generated report output (output of a published report) on the
widget, click Pre-generated tab. This is a report, which is already generated.
When such a widget is placed on dashboard, pre-generated output is displayed
on the dashboard as it is.
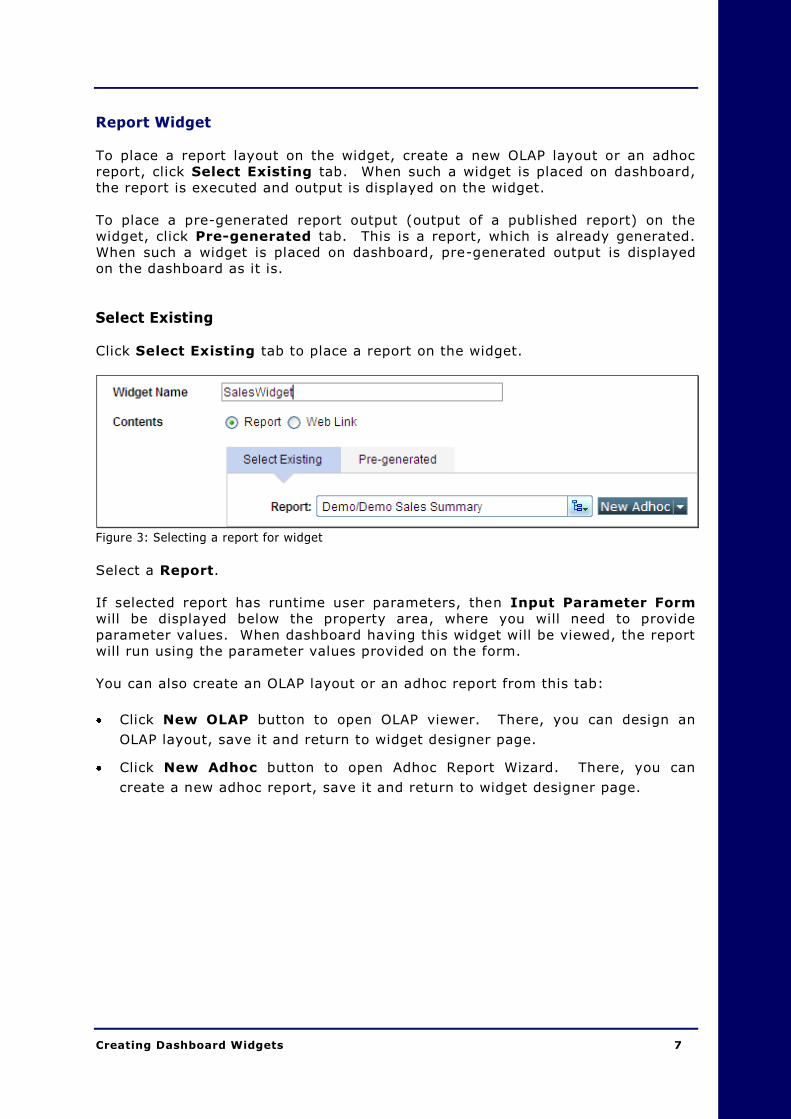
Select Existing
Click Select Existing tab to place a report on the widget.
Figure 3: Selecting a report for widget
Select a Report.
If selected report has runtime user parameters, then Input Parameter Form
will be displayed below the property area, where you will need to provide
parameter values. When dashboard having this widget will be viewed, the report
will run using the parameter values provided on the form.
You can also create an OLAP layout or an adhoc report from this tab:
Click New OLAP button to open OLAP viewer. There, you can design an
OLAP layout, save it and return to widget designer page.
Click New Adhoc button to open Adhoc Report Wizard. There, you can
create a new adhoc report, save it and return to widget designer page.
Creating Dashboard Widgets 8
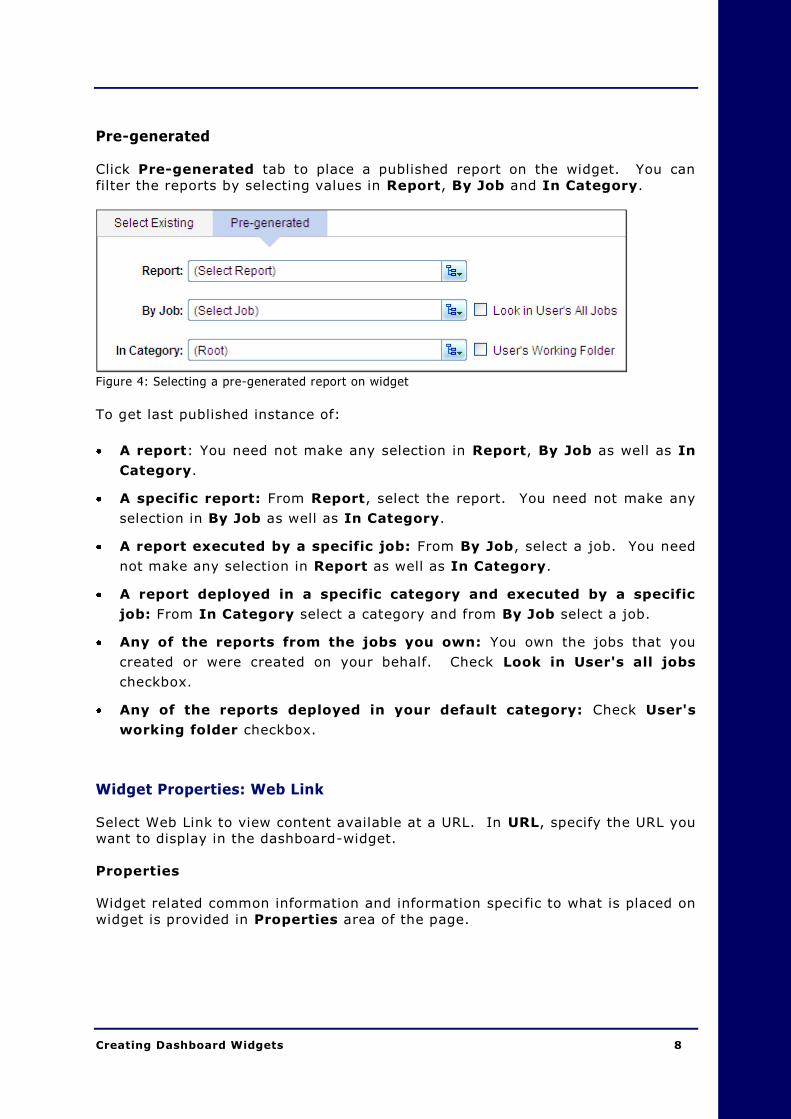
Pre-generated
Click Pre-generated tab to place a published report on the widget. You can
filter the reports by selecting values in Report, By Job and In Category.
Figure 4: Selecting a pre-generated report on widget
To get last published instance of:
A report: You need not make any selection in Report, By Job as well as In
Category.
A specific report: From Report, select the report. You need not make any
selection in By Job as well as In Category.
A report executed by a specific job: From By Job, select a job. You need
not make any selection in Report as well as In Category.
A report deployed in a specific category and executed by a specific
job: From In Category select a category and from By Job select a job.
Any of the reports from the jobs you own: You own the jobs that you
created or were created on your behalf. Check Look in User's all jobs
checkbox.
Any of the reports deployed in your default category: Check User's
working folder checkbox.
Widget Properties: Web Link
Select Web Link to view content available at a URL. In URL, specify the URL you
want to display in the dashboard-widget.
Properties
Widget related common information and information specific to what is placed on
widget is provided in Properties area of the page.
Creating Dashboard Widgets 9
Report Widget Properties
Report Format: Select the format in which report should be displayed on the
dashboard-widget.
Toolbar: Select Yes to always show the toolbar, No to keep the toolbar in
hidden state and MultiPage to show toolbar only if the report is a multi-page
report.
Ask at Run time: The report selected for dashboard-widget may have run
time parameters. Parameter value for such a report needs to be provided
during dashboard-widget design. Select Yes if the user should provide values
at runtime (when the report is actually executed) also (on dashboard viewer,
Input Parameter Form will be displayed where user will need to provide
parameter values). Select No to provide parameter values during dashboard-
widget design only.
Note: If the report uses parameter “By Ref”, then such parameters are
candidates for “Dashboard Parameters”. On Dashboard, a common Input
Parameter Form (among all the reports) will be displayed to receive
values for all such Dashboard Parameters. Even if, here Ask at run time
is set to No, user will be able to provide values for Dashboard parameters
on dashboard viewer.
Link Widgets: This is used to link this widget with another widget. This wi ll
appear if report has a chart component. When you click this button, a dialog
will open. On the dialog, in Items, select the series and in Widget(s) select
the widget to be opened when the selected series is clicked. Both the
widgets need to be placed on the dashboard.
OLAP Object (OLAP Layout) Widget Properties
View Mode: OLAP viewer can display an OLAP Layout as a chart as well as a
grid. Select Default to open the layout in the view in which it was saved.
Select Grid to open as grid. Select Chart to open in Chart view. Select Dual
to get grid as well as chart on viewer.
Data Actions: Actions like modifying the OLAP Layout, like drilling and
collapse/ expand, are considered as data actions. Select Yes if the user
should be able to take such actions on the dashboard-widget.
View Actions: This includes grid actions and chart actions like swapping of
fields and changing chart type. Select Yes if the user should be able to take
such actions on the dashboard-widget.
Layout Actions: Actions like Save, Delete and Open. If you select Yes,
buttons will appear and user will be able to take such actions. Select No to
hide the buttons.
Creating Dashboard Widgets 10
Toolbar: Using buttons on the toolbar, can carry out tasks like change views
and swap axis. Select Yes to make the toolbar visible so that user can take
such actions if desired. Select No to hide the toolbar.
Show Scrollbar: Click Yes to forcefully get viewer scrollbar when user adds a
dimension on the grid.
Explorer: It lists OLAP connections accessible to the user, cube objects in
the selected connection as well as measures/dimensions in the selected cube
object. Select Show to show the explorer on dashboard-widget. Select
Collapsed to get explorer, but in closed state. Explorer will not be displayed
if you select Hide.
Pre-generated Widget Properties
Report Format: Select the format in which report should be displayed on the
dashboard-widget.
Toolbar: Select Yes to always show the toolbar, No to keep the toolbar in
hidden state and MultiPage to show toolbar only if the report spreads over
multiple pages.
Instance Navigation: This is applicable when the report placed on the
dashboard was already run and saved multiple times. Click Yes to get a
dropdown box to select one of the saved reports and view it. Click No to view
report as per preference set in Instance Type.
Web link Widget properties
Show Scrollbar: The content at the URL may be more than what can be
displayed on the widget. If toolbar is displayed, you can scroll down to view
the parts that are not visible on the dashboard-widget. Select Yes to show
scrollbar. Select No to keep the toolbar hidden.
Properties common to all
Auto Refresh: If the report-data changes frequently, you may wish to
refresh (regenerate) the report to view the latest report-data. Select Yes, to
automatically refresh the report. Select No to continue viewing the report
that was generated when dashboard was loaded for the first time.
Refresh Interval: If Auto Refresh is Yes, specify the time in minutes after
which the report should be regenerated. For example, to refresh the report
every 15 minutes, set 15 in the box.
Creating Dashboard Widgets 11
Width and Height: In Width, specify width (in pixels) of the widget. In
Height, specify height (in pixels) of the widget. When the widget will open on
dashboard viewer, it will occupy the size specified in these boxes.
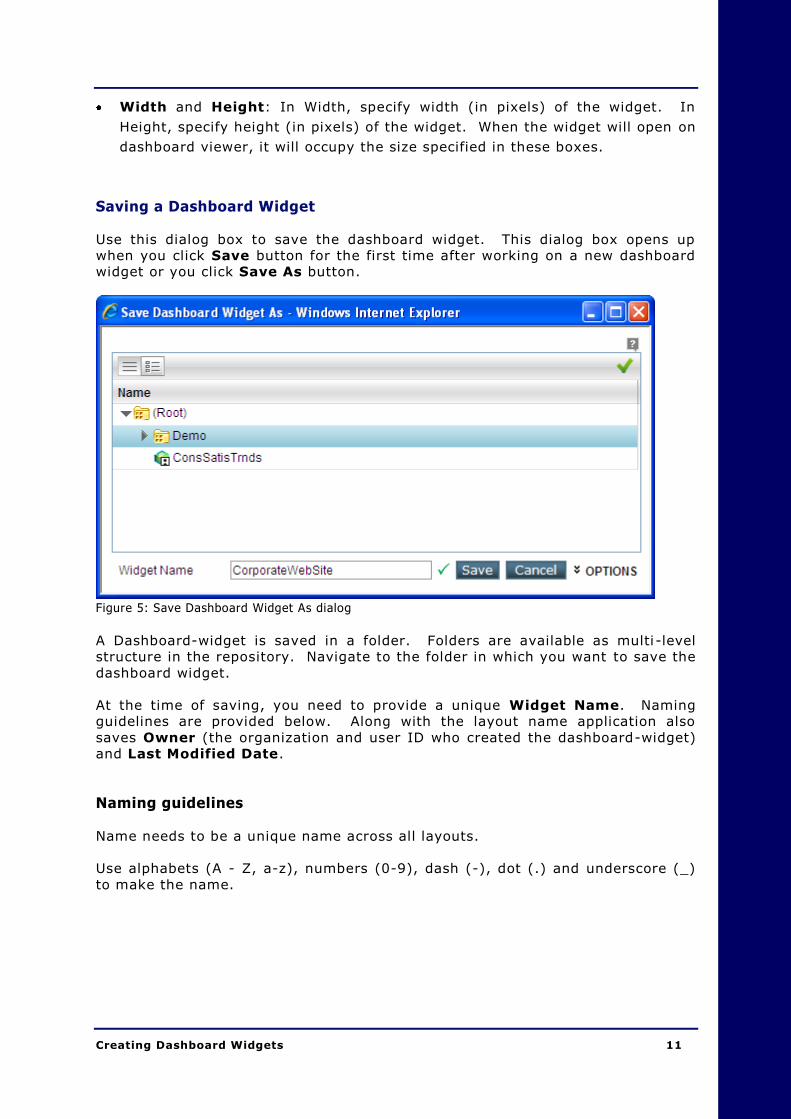
Saving a Dashboard Widget
Use this dialog box to save the dashboard widget. This dialog box opens up
when you click Save button for the first time after working on a new dashboard
widget or you click Save As button.
Figure 5: Save Dashboard Widget As dialog
A Dashboard-widget is saved in a folder. Folders are available as multi -level
structure in the repository. Navigate to the folder in which you want to save the
dashboard widget.
At the time of saving, you need to provide a unique Widget Name. Naming
guidelines are provided below. Along with the layout name application also
saves Owner (the organization and user ID who created the dashboard-widget)
and Last Modified Date.
Naming guidelines
Name needs to be a unique name across all layouts.
Use alphabets (A - Z, a-z), numbers (0-9), dash (-), dot (.) and underscore (_)
to make the name.
Creating Dashboard Widgets 12
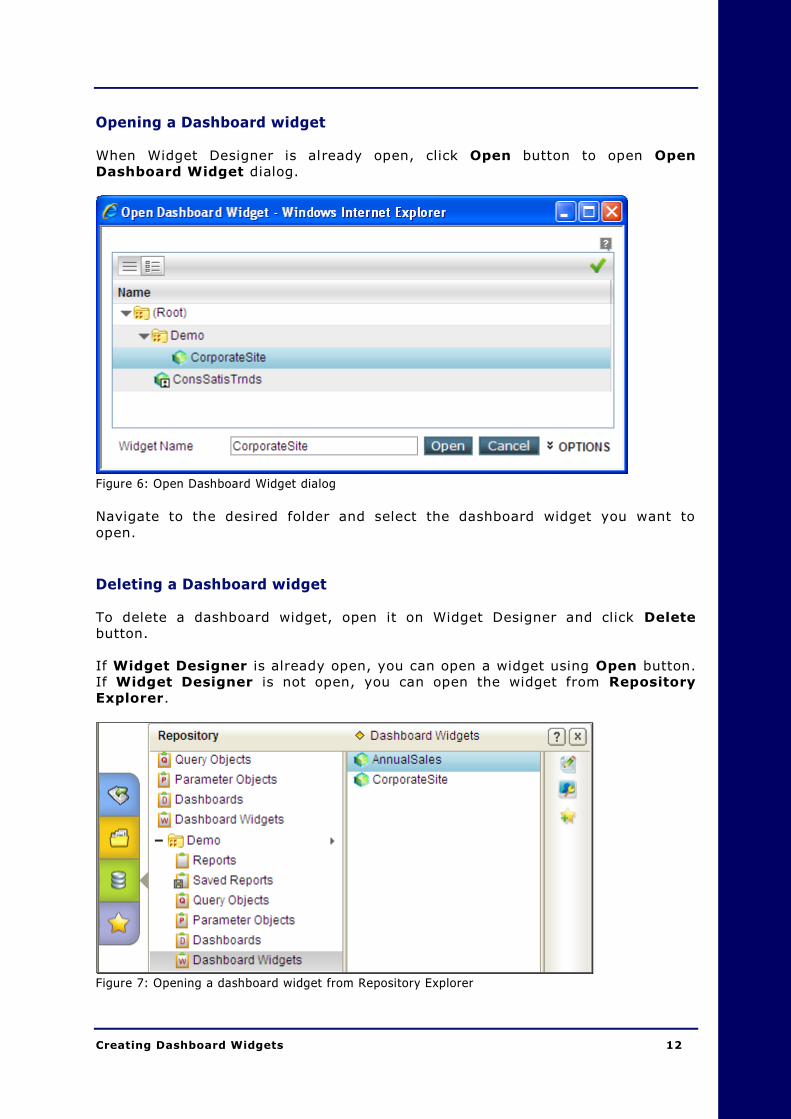
Opening a Dashboard widget
When Widget Designer is already open, click Open button to open Open
Dashboard Widget dialog.
Figure 6: Open Dashboard Widget dialog
Navigate to the desired folder and select the dashboard widget you want to
open.
Deleting a Dashboard widget
To delete a dashboard widget, open it on Widget Designer and click Delete
button.
If Widget Designer is already open, you can open a widget using Open button.
If Widget Designer is not open, you can open the widget from Repository
Explorer.
Figure 7: Opening a dashboard widget from Repository Explorer
Creating Dashboard Widgets 13
When a dashboard uses a widget that is deleted, an error message will be
displayed in that widget of the dashboard, which will keep the user informed that
the widget has been deleted.
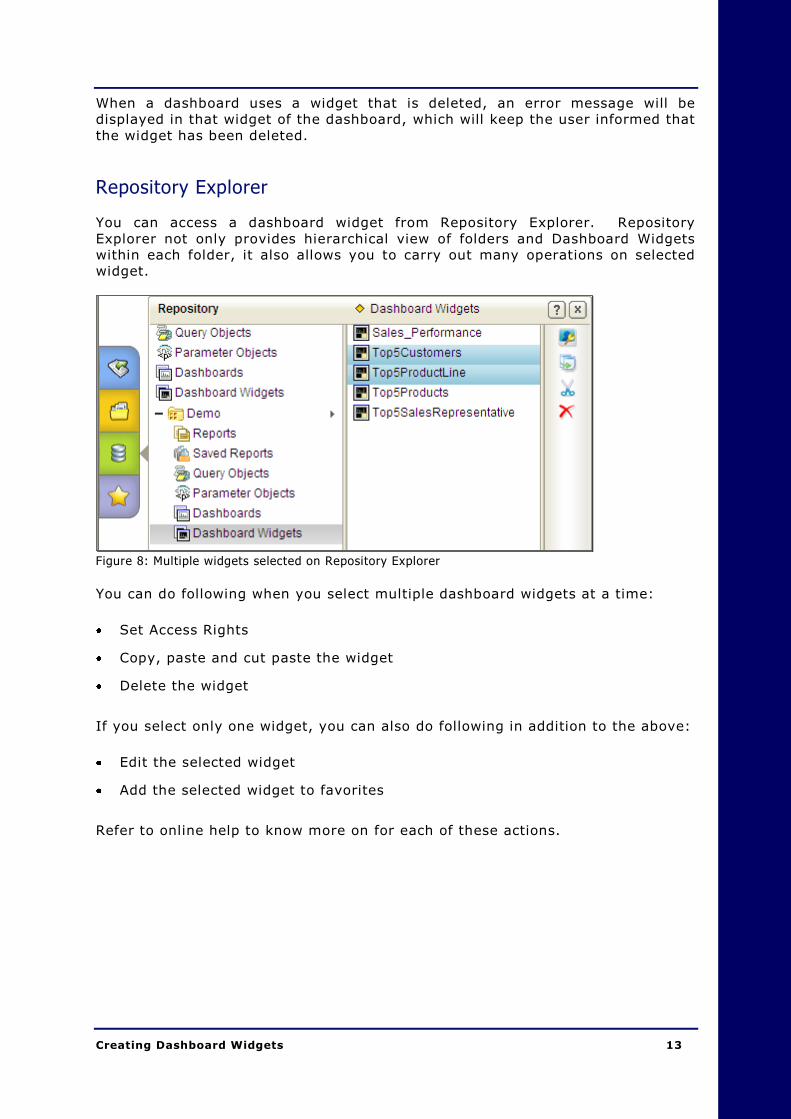
Repository Explorer
You can access a dashboard widget from Repository Explorer. Repository
Explorer not only provides hierarchical view of folders and Dashboard Widgets
within each folder, it also allows you to carry out many operations on selected
widget.
Figure 8: Multiple widgets selected on Repository Explorer
You can do following when you select multiple dashboard widgets at a time:
Set Access Rights
Copy, paste and cut paste the widget
Delete the widget
If you select only one widget, you can also do following in addition to the above:
Edit the selected widget
Add the selected widget to favorites
Refer to online help to know more on for each of these actions.


