CRM tables BUT000 : BP: General data - Contains Business Partner Number, Partner Category, Partner Type, First Name, Last Name etc. - BUT020 BP: Addresses - BUT050 BP relationships/role definitions: General data - Contains Relationship, Partner Number (PARTNER1), Relationship Category - BUT051 BP Relationship: Contact Person Relationship Similar to - BUT050 additionally contains Contact Person's Address data - BUT0BK Business Partner: Bank Data & Details BP Number, Bank Key, Bank Country Key, Bank Account Number - BNKA Bank Master Data - BUT100 BP: Roles - ADR2 Telephone Numbers (Business Address Services) - ADR6 SMTP Numbers (Business Address Services) - Contains Email - Id of the BP. - ADRC Addresses (Business Address Services) - BP's Complete Address Details- City, Country, Post Code, District, Street, Title No Etc - TSAD3T Table containing the Title text against a Title No. - COMM_PRODUCT Master Table for Product - CRMM_BUAG Master table for Business Agreement - CRMM_BUAG_H Header Data for Business Agreement such as Tax Category, Tax Characteristic, Form key, Business Agreement Class. Data in this table correspond to ISU - CRMD_OPPORT_H OPPORTUNITY HEADER DATA - CRMD_ORDERADM_H Contains the Header Information for a Business Transaction Tables in CRM hi there is some of the tables used for CRM Sales order / Quote / Sched Agreement / Contract VA02 Sales order change
Transcript
CRM tables BUT000 : BP: General data - Contains Business Partner Number, Partner Category, Partner Type, First Name, Last Name etc.- BUT020 BP: Addresses- BUT050 BP relationships/role definitions: General data - Contains Relationship, Partner Number (PARTNER1), Relationship Category- BUT051 BP Relationship: Contact Person Relationship Similar to- BUT050 additionally contains Contact Person's Address data- BUT0BK Business Partner: Bank Data & Details BP Number, Bank Key, Bank Country Key, Bank Account Number- BNKA Bank Master Data- BUT100 BP: Roles- ADR2 Telephone Numbers (Business Address Services)- ADR6 SMTP Numbers (Business Address Services) - Contains Email - Id of the BP.- ADRC Addresses (Business Address Services) - BP's Complete Address Details- City, Country, Post Code, District,Street, Title No Etc- TSAD3T Table containing the Title text against a Title No.- COMM_PRODUCT Master Table for Product- CRMM_BUAG Master table for Business Agreement- CRMM_BUAG_H Header Data for Business Agreement such as Tax Category, Tax Characteristic, Form key, Business Agreement Class. Data in this table correspond to ISU- CRMD_OPPORT_H OPPORTUNITY HEADER DATA- CRMD_ORDERADM_H Contains the Header Information for a Business Transaction
Tables in CRM
hi
there is some of the tables used for CRM
Sales order / Quote / Sched Agreement / Contract
VA02 Sales order change
VA05 List of sales orders
VA22 Quotation change
VA32 Scheduling agreement change
VA42 Contract change
Billing
VF02 Change billing document
VF11 Cancel Billing document
VF04 Billing due list
FBL5N Display Customer invoices by line
FBL1N Display Vendor invoices by line
Delivery
VL02N Change delivery document
VL04 Delivery due list
VKM5 List of deliveries
VL06G List of outbound deliveries for goods issue
VL06P List of outbound deliveries for picking
VL09 Cancel goods issue
VT02N Change shipment
VT70 Output for shipments
General
VKM3, VKM4 List of sales documents
VKM1 List of blocked SD documents
VD52 Material Determination
1. Customer Relationship Management2. Sales Processing in CRM
Action profiles in SAP-CRMSkip to end of metadata
Attachments:19 Added by Kanika Chopra, last edited by Gregor Wolf on Apr 13, 2009 (view change) show comment
Go to start of metadata
1.0 INTRODUCTION
SAP Standard Documentation of Actions
1.1 ACTIONS
Actions are used in maintaining and improving business relationships. We can schedule and start predefined conditions with
the Actions component by means of user-definable conditions from transaction and marketing objects.
Actions use the Post Processing Framework (PPF), a Basis component, which can be automated with the initiation of
outputs, follow-on documents or workflows.Using the Actions tab page within a business document, you can display a list of
actions that can be included in the business transaction.
An action profile is determined from the corresponding transaction type or item category.
Actions are stored as action definitions within an action profile.
You can control action processing using different settings and parameters:
Action changeable or executable in dialog
Action displayed in toolbar (SAP GUI)
Processing time (when saving the document or via selection report)
Partner dependence
Determination technique
Action merging
Processing types (with entry of the desired form name)
1.2 FEATURES OF ACTIONS
You can define actions dependent on conditions so that the system automatically schedules and starts them when the
conditions are fulfilled.
With actions you can:
Create follow-up transactions automatically
Execute changes in the transaction or marketing object currently being processed, for example, create new items, or status
inheritance by subordinate elements in marketing objects
Output in print, by faxing or e-mail
Actions are displayed in transaction documents that support actions and to which an action profile is assigned. You can
display a list of actions scheduled for the document on the Actions tab page of a transaction document. The following
information is displayed in the list for each action:
Status (action scheduled, action processed)
Description (purpose of action)
Conditions (settings for action definition and conditions are displayed)
Creator, Creation date
There are various processing types for actions:
Methods (Business Add-Ins)
Methods are Business Add-In (BADI) implementations. You can define your own BADI implementation to adapt actions to
your processes and needs. (EXEC_METHODCALL_PPF is the relevant BADI.)
Examples for standard methods include the following:
COPY_DOCUMENT (create a follow-up document)
COMPLETE_DOCUMENT (set status completed within document)
CREDIT_MEMO (create credit memo item)
REPAIR_ITEM (create a repair item)
1O_EVENT_CREATE (create a workflow event)
SAP Business Workflow
This is suitable for more complex processes, for example, a follow-up transaction that includes an approval process.
Smart Forms
SAP Smart Forms must be used to print, e-mail or fax documents such as an order confirmation. You can use the graphics
tool, SAP Smart Forms, to design the layout of output forms. SAP delivers several Smart Forms for outputs in SAP CRM:
Form CRM_ORDER_CONFIRMATION_01 (suitable for faxes, letters, and e-mail)
Form CRM_ORDER_LEASING_01 (suitable for faxes, letters, and e-mail)
Form CRM_OPPORTUNITY_01 (suitable for faxes, letters, and e-mail)
SAP Smart Forms offer the advantage of adapting forms without requiring programming knowledge, thanks to a completely
graphical user interface. When you request a printout of a form, the application program obtains the relevant data to be used
and prints it on the form. Data retrieval and form logic are separated from one another. SAP Smart Forms replace SAP-
Script forms (migration from SAP-Script forms to Smart Forms is supported).
2.0 HOW TO CREATE AN ACTION
2.1 STEP-BY-STEP PROCEDURE
2.1.1 Enter into any SAP-CRM Server and move to Transaction SPRO.
2.1.2 Press SAP Reference IMG -> Customer Relationship Management ->Basic Functions -> Actions -> Actions in
Transactions.
2.1.3 To create an Action Profile - Click onCREATE ACTIONS WITH WIZARD. First read the documentation.
2.1.4 Now Press the Execute Buttonto start creating an Action Profile.
2.1.5 Click CONTINUE. Enter the Details to create Action Profile.
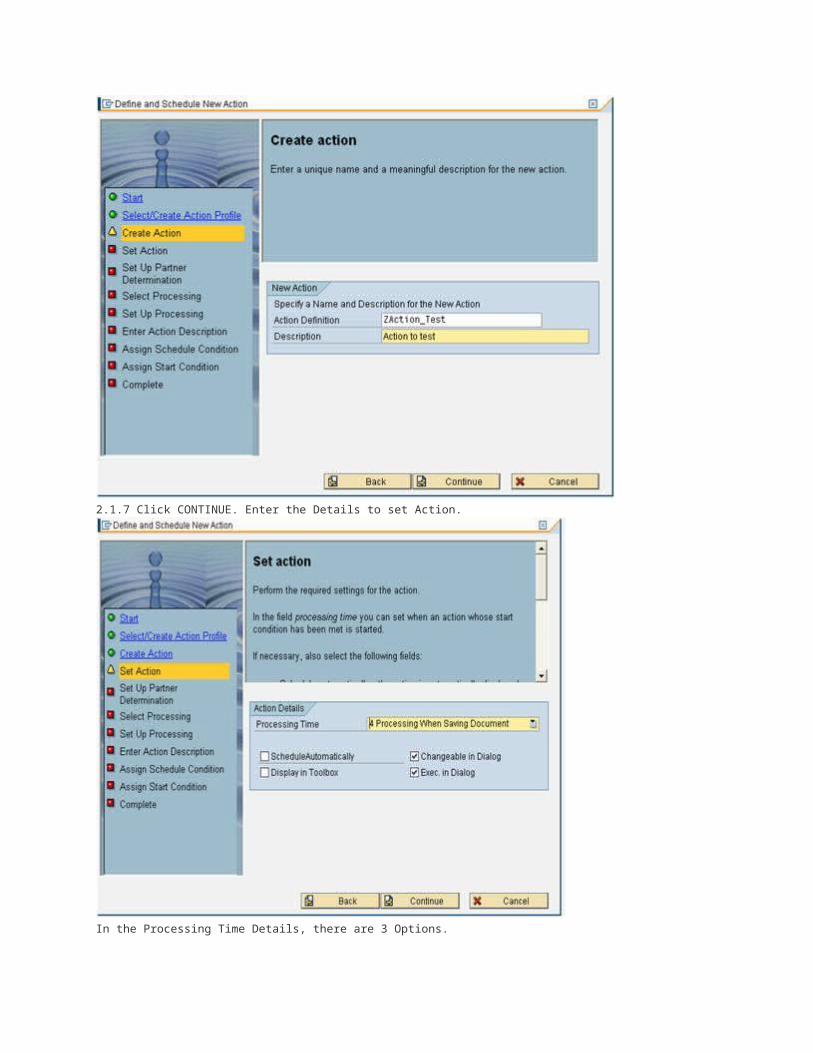
2.1.6 Click CONTINUE. Enter the Details to create Action.
2.1.7 Click CONTINUE. Enter the Details to set Action.
In the Processing Time Details, there are 3 Options.
Processing Using Selection Report gets started after a selection report is executed if the start condition has been fulfilled.
Immediate Processing gets started as soon as the start condition is fulfilled.
Processing when saving a Document gets started when the document is saved*.*
2.1.8 Click CONTINUE. Enter the Details to Set Up Partner Determination.
Partner Dependent makes this Action as dependent on Partner. The partner you choose is the one, for which the action
triggers. It first checks whether that Partner exists or not. If not, it throws an ERROR.
2.1.9 Click CONTINUE and select the Processing. The processing that we select is the one on which we want the Action to
work on.
Processing can be of various types such as:-
Select the one you want. For this case select Workflow.
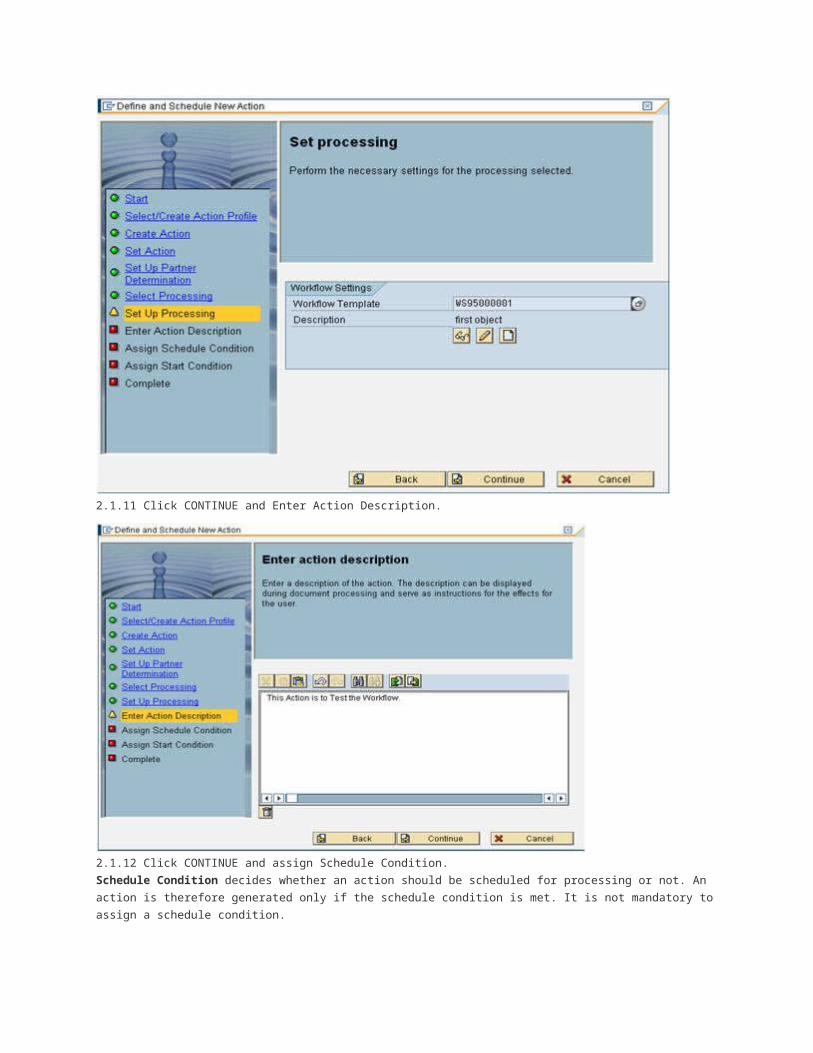
2.1.10 Click CONTINUE and Enter the Workflow Number that you want to assign with this Action.
2.1.11 Click CONTINUE and Enter Action Description.
2.1.12 Click CONTINUE and assign Schedule Condition.
Schedule Condition decides whether an action should be scheduled for processing or not. An action is therefore generated
only if the schedule condition is met. It is not mandatory to assign a schedule condition.
Select anyone that suits your requirement and proceed further.
2.1.13 Click CONTINUE and assign Start Condition.
Start Condition is checked before an action is executed. The Action is executed only if the Start Condition is satisfied.
Here you won't be able to assign a Start Condition; there is another tab in Actions where we can assign Start Condition.
2.1.14 Click CONTINUE and Action Configuration is complete.
Click CONTINUE and save it in a Transport Request.
2.1.15 To assign Start Condition -> Go-to step 2.1.2 -> Click on Change Actions and Conditions -> Define Conditions.
In Scheduling of Actions, find your Action - Test an Action Profile.
It shows you the entire Action that you created till now.
To assign start condition, Click on Start Condition Tab.
Click Edit Condition to enter a condition.
Enter a Condition.
Click 'v'.
Click on SAVE. Save it in the same Transport Request as Earlier.
And hence, this completes your Action Profile Creation for a Workflow.


![[PPT]Slide 1abcinfosoft.com/Bhoomi ERP Presentation.pps · Web viewBhoomi CRM & ERP for the Real Estate Developers ABC Info Soft Pvt. Ltd.](https://static.documents.pub/doc/80x56/5aea7cda7f8b9ad73f8d3750/pptslide-erp-presentationppsweb-viewbhoomi-crm-erp-for-the-real-estate-developers.jpg)


