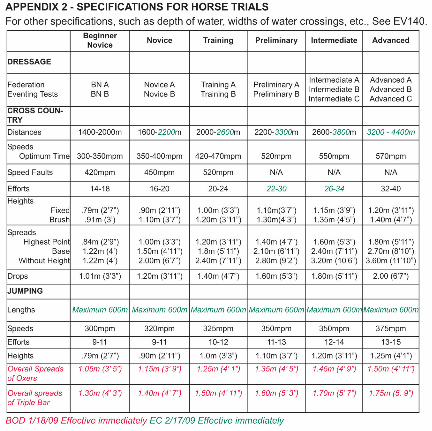
The following cross-country jump descriptions and measurements were compiled by members of the then USCTA Course Design Committee in 2000 and are intended as guidelines for providing acceptable dimensions for the various types of cross-country fences which would be designed and built on a cross-country course.
These tables should always be seen as “a work in progress”, subject to rule changes and the evolution of the sport. Footing, terrain, the approach, the landing, and where and how a fence fits in to the overall course are additional factors which must be taken into consideration.
The charts provide the designer/builder with a progression of measurements to be used in designing the appropriate fence from Novice through Advanced levels of competitions. They will be continually revised and updated.*
– *Latest Revision: June 3, 2009
Table of Contents
1. Verticals 2. Cross Question 3. Zig Zag Over Ditch 4. Helsinki 5. Oxers 6. Tables 7. Log Pile 8. Round Tops 9. Feeder / Lamb-Creep / Cabin 10. Ramps 11. Palisades 12. Sharks Teeth / Chevrons 13. Bench 14. Brush Box 15. Bullfinch 16. Double Brush 17. Ditch and Brush Box 18. Weldon's Wall 19. Open Ditch 20. Elephant Trap / Horizontal Rails 21. Trakehner 22. Key Holes 23. Roofs – Vertical (Picture Frame) 24. Roofs – Table 25. Narrows and Single Chevron with or without Brush 26. Corner 27. Steps 28. Drop Fences 29. Banks (Simple – jump in / jump out) 30. Banks (Normandy, Cornish, Irish) 31. Sunken Road 32. Bounces 33. Coffin 34. Frangible Fences 35. Water – Depths and Distances
1. VERTICALS LEVEL APPROPRIATE HEIGHT
FRONT BASE SPREAD
MINIMUM WIDTH OF JUMPABLE FACE
Novice Yes 2’ 11” 1 – 1’6” 12’ Training Yes 3’ 3” 1 – 1’6” 9’ Preliminary Yes 3’ 7” >1’ 6’ Intermediate Yes 3’ 9” >1’ 5’ Advanced Yes 3’ 11” >1’ 4’ The width of a jumpable face may be reduced where the addition of wings, trees, or bushes adds up to not less than twice the recommended jumpable width.
2. CROSS QUESTION LEVEL APPROPRIATE TOP SPREAD BASE
SPREAD (Ditch)
MINIMUM WIDTH OF FACE
Novice No Training No
Preliminary No Intermediate Yes 5’ 3” 7’ 16’ Advanced Yes 5’ 11” 8’ 16’ 3. ZIG ZAG OVER DITCH LEVEL APPROPRIATE BASE SPREAD
(Ditch) MINIMUM WIDTH OF FACE
Novice No Training No Preliminary Yes 6’ 16’ Intermediate Yes 7’ 16’ Advanced Yes 8’ 16’
4. HELSINKI
LEVEL APPROPRIATE HEIGHT TOTAL WIDTH OF EACH
JUMPABLE SECTION Novice No Training Yes 3’ 1” 10’ Preliminary Yes 3’ 5” 8’ Intermediate Yes 3’ 7” 7’ Advanced Yes 3’ 9” 6’ Heights to be measured in the center of each section. 5. OXERS LEVEL APPROPRIATE HEIGHT
FRONT HEIGHT BACK
TOP SPREAD
BASE SPREAD
MINIMUM WIDTH OF JUMPABLE FACE
Novice Yes 2’ 9” 2’ 11” 3’ 3” 4’ 7” 16’ Training Yes 3’ 1” 3’ 3” 3’ 9” 5’ 3” 12’ Preliminary Yes 3’ 6” 3’ 7” 4’ 7” < 6’ 8’ Intermediate Yes 3’ 8” 3’ 9” 5’ 3” < 7’ 7’ Advanced Yes 3’ 10” 3’ 11” 5’ 11” < 8’ 6’ The top spread for all oxers must be measured from the front of the top rail to the back of the back rail. 6. TABLES LEVEL APPROPRIATE HEIGHT
FRONT HEIGHT BACK
TOP SPREAD
BASE SPREAD
MINIMUM WIDTH OF JUMPABLE FACE
Novice Yes 2’ 9” 2’ 11” 3’ 3” 4’ 7” 16’ Training Yes 3’ 1” 3’ 3” 3’ 10” 5’ 3” 12’ Preliminary Yes 3’ 6” 3’ 7” 4’ 7” < 6’ 8’ Intermediate Yes 3’ 8” 3’ 9” 5’ 3” < 7’ 7’ Advanced Yes 3’ 10” 3’ 11” 5’ 11” < 8’ 6’ Top cladding on a table should never be thinner than 2x material, and spans between supports should be appropriate.
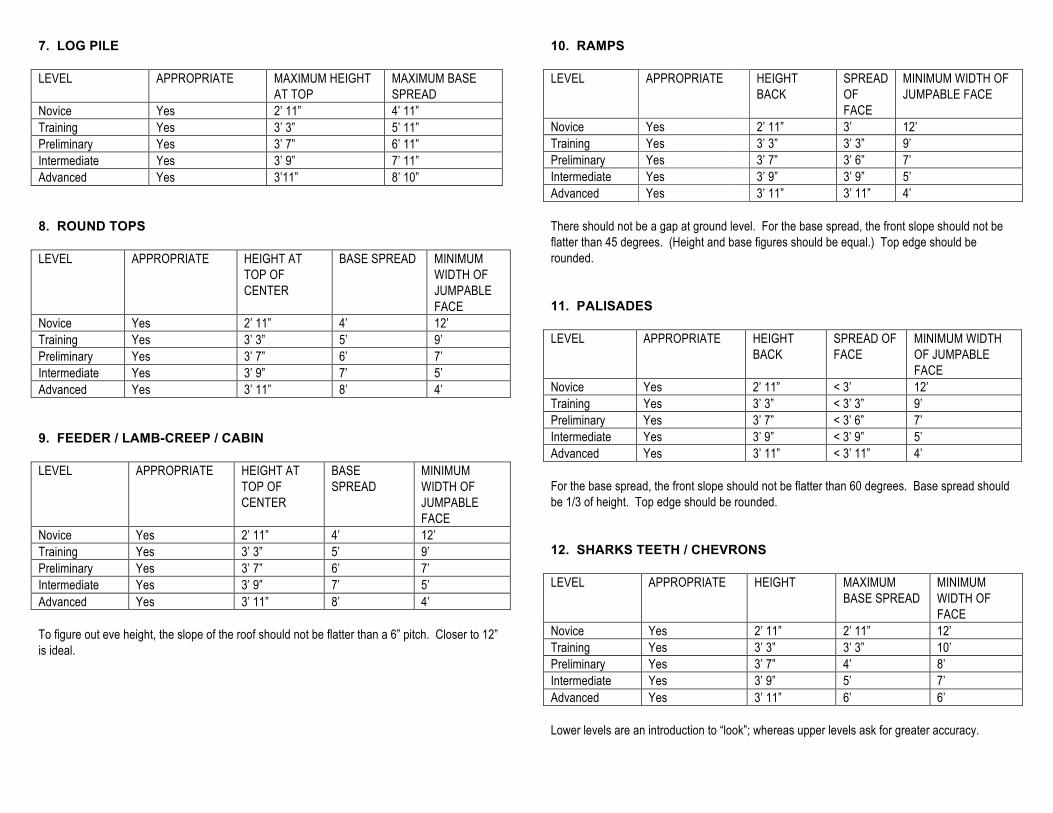
Novice Yes 2’ 11” 4’ 12’ Training Yes 3’ 3” 5’ 9’ Preliminary Yes 3’ 7” 6’ 7’ Intermediate Yes 3’ 9” 7’ 5’ Advanced Yes 3’ 11” 8’ 4’ To figure out eve height, the slope of the roof should not be flatter than a 6” pitch. Closer to 12” is ideal.
10. RAMPS LEVEL APPROPRIATE HEIGHT
BACK SPREAD OF FACE
MINIMUM WIDTH OF JUMPABLE FACE
Novice Yes 2’ 11” 3’ 12’ Training Yes 3’ 3” 3’ 3” 9’ Preliminary Yes 3’ 7” 3’ 6” 7’ Intermediate Yes 3’ 9” 3’ 9” 5’ Advanced Yes 3’ 11” 3’ 11” 4’ There should not be a gap at ground level. For the base spread, the front slope should not be flatter than 45 degrees. (Height and base figures should be equal.) Top edge should be rounded. 11. PALISADES LEVEL APPROPRIATE HEIGHT
BACK SPREAD OF FACE
MINIMUM WIDTH OF JUMPABLE FACE
Novice Yes 2’ 11” < 3’ 12’ Training Yes 3’ 3” < 3’ 3” 9’ Preliminary Yes 3’ 7” < 3’ 6” 7’ Intermediate Yes 3’ 9” < 3’ 9” 5’ Advanced Yes 3’ 11” < 3’ 11” 4’ For the base spread, the front slope should not be flatter than 60 degrees. Base spread should be 1/3 of height. Top edge should be rounded. 12. SHARKS TEETH / CHEVRONS LEVEL APPROPRIATE HEIGHT MAXIMUM
BASE SPREAD MINIMUM WIDTH OF FACE
Novice Yes 2’ 11” 2’ 11” 12’ Training Yes 3’ 3” 3’ 3” 10’ Preliminary Yes 3’ 7” 4’ 8’ Intermediate Yes 3’ 9” 5’ 7’ Advanced Yes 3’ 11” 6’ 6’ Lower levels are an introduction to “look”; whereas upper levels ask for greater accuracy.
13. BENCH LEVEL APPROPRIATE HEIGHT
BACK Novice Yes 2’ 11” Training Yes 3’ 3” Preliminary Yes 3’ 7” Intermediate Yes 3’ 9” Advanced Yes 3’ 11” Seat back should not be upright. Height of seat should equal 1/3 of total height. Depth of seat should equal 2/3 of height. This type of fence seldom needs additional material such as trees or mulch added to the base. 14. BRUSH BOX LEVEL APPROPRIATE HEIGHT
FRONT HEIGHT BACK
Novice Yes 2’ 8” 2’ 6” Training Yes 3’ 2’ 9” Preliminary Yes 3’ 5” 3’ 3” Intermediate Yes 3’ 7” 3’ 5” Advanced Yes 3’ 9” 3’ 7” Boxes should be stuffed tight enough so a foot or leg cannot get caught. If using cedar or other brush there should be a minimum of 6” above brush box. If using birch there should be a minimum of 10” above brush box. Height of back should always be 2” less than height of front. 15. BULLFINCH LEVEL APPROPRIATE HEIGHT FRONT HEIGHT BACK Novice No Training No Preliminary Yes 3’ 5“ 3’ 3” Intermediate Yes 3’ 7” 3’ 5” Advanced Yes 3’ 9” 3’ 7” Height of solid brush should be the same as a normal brush fence. See-through brush can be 1 – 3’ higher than the brush.
16. DOUBLE BRUSH LEVEL APPROPRIATE FIXED
HEIGHT TOP SPREAD
BASE SPREAD
MINIMUM WIDTH OF JUMPABLE FACE
Novice Yes 2’ 9” 3’ 3” 4’ 7” 14’ Training Yes 3’ 1” 3’ 9” 5’ 3” 12’ Preliminary Yes 3’ 5” 4’ 7” < 6’ 8’ Intermediate Yes 3’ 7” 5’ 3” < 7’ 7’ Advanced Yes 3’ 9” 5’ 11” < 8’ 6’ Height of brush in front should be 2” less than height of back. Fence must be decked with a 2” lip on the back to keep the horse from slipping into the second brush. 17. DITCH AND BRUSH BOX LEVEL APPROPRIATE HEIGHT
TOP
RAIL
HEIGHT
BACK
INSIDE
WIDTH OF
DITCH
MINIMUM
WIDTH OF
FACE
BRUSH
MEASUREMENT
Novice Yes 2’ 6” 2’ 4” insignificant 16’ 3’ 5” Training Yes 2’ 9” 2’ 7” 3’ 16’ 3’ 8” Preliminary Yes 3’ 2’ 10” 4’ 16’ 4’ 3” Intermediate Yes 3’ 3” 3’ 1” 5’ 6” 16’ 4’ 5” Advanced Yes 3’ 6” 3’ 3” 6’ 6” 16’ 4’ 7” Legal base spread is from the front of the take off rail to the back of the wall. Depth of ditch should be 1/2 the width. If the approach is on a down hill (upper levels only), the ground should be level or slightly rising for the last 16’. In all cases, avoid a 100% upright wall. The bottom of the wall should be brought forward so that there is an approximate 5 – 10 degree back leaning slope to the wall. Also, the top leading edge should be rounded and never have a sharp profile.
18. WELDON’S WALL LEVEL APPROPRIATE HEIGHT BACK INSIDE WIDTH
OF DITCH Novice No Training Yes 3’ 3” 2’ 6” Preliminary Yes 3’ 7” 3’ 6” Intermediate Yes 3’ 9” 4’ Advanced Yes 3’ 11” 5’ Legal base spread is from the front of the take off rail to the back of the wall. Depth of ditch should be 1/2 the width. If the approach is on a down hill (upper levels only), the ground should be level or slightly rising for the last 16’. In all cases, avoid a 100% upright wall. The bottom of the wall should be brought forward so that there is an approximate 5 – 10 degree back leaning slope to the wall. Also, the top leading edge should be rounded and never have a sharp profile. 19. OPEN DITCH
LEVEL APPROPRIATE INSIDE WIDTH Novice Yes 2’ Training Yes 3’ Preliminary Yes 4’ 6” Intermediate Yes 6’ Advanced Yes 8’ The legal measured width includes outside of all materials, not inside width. Take off side should have very visible half round or full rail. Depth should be approximately half of inside width. Novice ditches can be revetted front and back with a contrasting material in the bottom of the ditch (no grass). Note on measurement: A ditch must be measured outside of visible cap at the front to outside of cap at the back. Keep in mind that the material used will greatly affect the inside width, or how wide the ditch ‘looks’. A ditch built out of telephone poles (fatter material) can have an inside measurement 12” narrower (and therefore look smaller) than one built of 6x6s, but have the same legal width.
20. ELEPHANT TRAP / HORIZONTAL RAILS LEVEL APPROPRIATE HEIGHT BASE
SPREAD MINIMUM WIDTH OF FACE
Novice Yes 2’ 11” 4’ 7” 16’ Training Yes 3’ 3” 5’ 3” 16’ Preliminary Yes 3’ 7” 6’ 7” 16’ Intermediate Yes 3’ 9” 7’ 10” 12’ Advanced Yes 3’ 11” 8’ 10” 8’ Novice – Not less than 6” front rail – insignificant ditch – gap between rails must be <3” or >8” Training – Not less than 6” front rail – insignificant ditch – gap between rails must be <3” or >8” Preliminary – Not less than 6” front rail – gap between rails must be <3” or >8” Intermediate and Advanced – No ground line necessary – gap between rails must be <3” or >8” 21. TRAKEHNER LEVEL APPROPRIATE HEIGHT BASE
SPREAD MINIMUM WIDTH OF FACE
Novice Yes 2’ 11” 4’ 7” 16’ Training Yes 3’ 3” 5’ 3” 16’ Preliminary Yes 3’ 7’ 6’ 7” 16’ Intermediate Yes 3’ 9” 7’ 10” Advanced Yes 3’ 11” 8’ 10” Novice Level – Large log, shallow ditch essential Training and Preliminary Levels – Large log essential Intermediate and Advanced Levels – Large log preferred Ideally the last 1 or 2 strides should be on level or rising ground. Take off needs to be clearly defined with a prominent ground line. There has to be some way to extricate the horse from the ditch if necessary. Scoop ditch recommended for Novice and Training. Depth of ditch should equal 1/2 of the inside width measurement. At the Novice, Training, and Preliminary levels, brush or other appropriate material may be added to back of ground line to take horse’s eye upward
22. KEY HOLES LEVEL APPROPRIATE HEIGHT MAXIMUM TOP
SPREAD MINIMUM WIDTH OF OPENING
Novice No Training No Preliminary Yes 3’ 2’ 8’ Intermediate Yes 3’ 3” 2’ 6” 7’ Advanced Yes 3’ 6” 3’ 6’ Height over solid box to be 6” – 12” – (See Brush Boxes) Overhead: There must be not less than 2’ of brush below solid frame. Typically key holes do not have top spreads but if they do, top spread must not be more than 50% of permitted top spread. 23. ROOFS – VERTICAL (Picture Frame) LEVEL APPROPRIATE HEIGHT MINIMUM WIDTH
OF FACE Novice No Training Yes* 3’ 1” 16’ Preliminary Yes 3’ 6” 10’ Intermediate Yes 3’ 8” 12’ Advanced Yes 3’ 10” 8’ * Greater than 11’ height and of minimal impact Preliminary/Advanced – 11’ minimum from round to bottom of roof top or frame. “Hole” should not be less than 6’ x 6’. Never to be used in association with water. Jump materials should be of light color in situations where shadows come into play. Where roof takes “effect”, i.e. has great effect on the horse, top spread should not be more than 50% of height permitted.
24. ROOFS – TABLE LEVEL APPROPRIATE HEIGHT
FRONT HEIGHT BACK
TOP SPREAD
BASE SPREAD
MINIMUM WIDTH OF FACE
Novice No Training No Preliminary Yes 3’ 4” 3’ 6” < 3’ – 4’ < 5’ 6” 12’ Intermediate Yes 3’ 6” 3’ 8” < 3’ 6”- 4’
6” < 6’ 10’
Advanced Yes 3’ 8” 3’ 10” < 4’ – 5’ < 7’ 8’ 11’ minimum from ground to bottom of roof top or frame. Heights and top spreads can be greater if fence is under a structure where the eaves do not come into play. Where roof takes “effect”, i.e. has great effect on the horse, top spread should not be more than 50% of height permitted. Never use in association with water. Jump materials should be of light color in situations where shadows come into play. 25. NARROWS AND SINGLE CHEVRON WITH OR WITHOUT BRUSH LEVEL APPROPRIATE HEIGHT BASE
Novice Yes 2’ 9” 2’ 11” See Notes 12’ Training Yes 3’ 1” 3’ 3” See Notes 10’ Preliminary Yes 3’ 6” 3’ 7” Approximately
45 degree angle when short reaction time is involved, board in corner
6’
Intermediate Yes 3’ 8” 3’ 9” Approximately 60 degree angle when short reaction time is involved, board in corner
5’
Advanced Yes 3’ 10” 3’ 11” Approximately 75 degree angle when short reaction time is involved, board in corner
5’
Novice Angle of corner should not exceed 20 degrees – always boarded in. Top spread should not exceed 3'-3", 12' from point. Training Angle of corner should not exceed 25 degrees – always boarded in. Must have a solid top at least 10’ long with unjumpable decoration at wide end. Trees should be placed on the back rail, not in the middle of the apex. Preliminary/Training/Advanced corners with a good long approach should not be boarded in. Corners demanding quick reaction time including corners that are blind should be boarded in 6’ unless the back is brushed. See notes on Double Brush Obstacle for double brush corners.
27. STEPS LEVEL APPROPRIATE HEIGHT SINGLE HEIGHT PART OF
COMBINATION Novice Yes 2’ 11” 2’ 7” Training Yes 3’ 3” 3’ Preliminary Yes 3’ 7” 3’ 3” Intermediate Yes 3’ 9” 3’ 6” Advanced Yes 3’ 11” 3’ 9” Novice: Maximum two steps with a minimum of two strides between. Training: Suggested one stride or more. 28. DROP FENCES LEVEL APPROPRIATE MAXIMUM DROP Novice Yes 3’ 11” Training Yes 4’ 7” Preliminary Yes 5’ 3” Intermediate Yes 5’ 11” Advanced Yes 6’ 7” If possible, never land on flat ground. If drop is on flat ground the maximum drop must be significantly reduced. The top profile should be rounded with no sharp edges so that a horse may drag its stifles without injury. 29. BANKS (simple – jump in/jump out) LEVEL APPROPRIATE HEIGHT Novice Yes 2’ 9” Training Yes 3’ Preliminary Yes 3’ 3” Intermediate Yes 3’ 7” Advanced Yes 3’ 9” Novice – 3 strides (40’); Training 1 or 2 strides (18’ or 30’); Preliminary/Advanced – Banks should be no less than 12’ across the top.
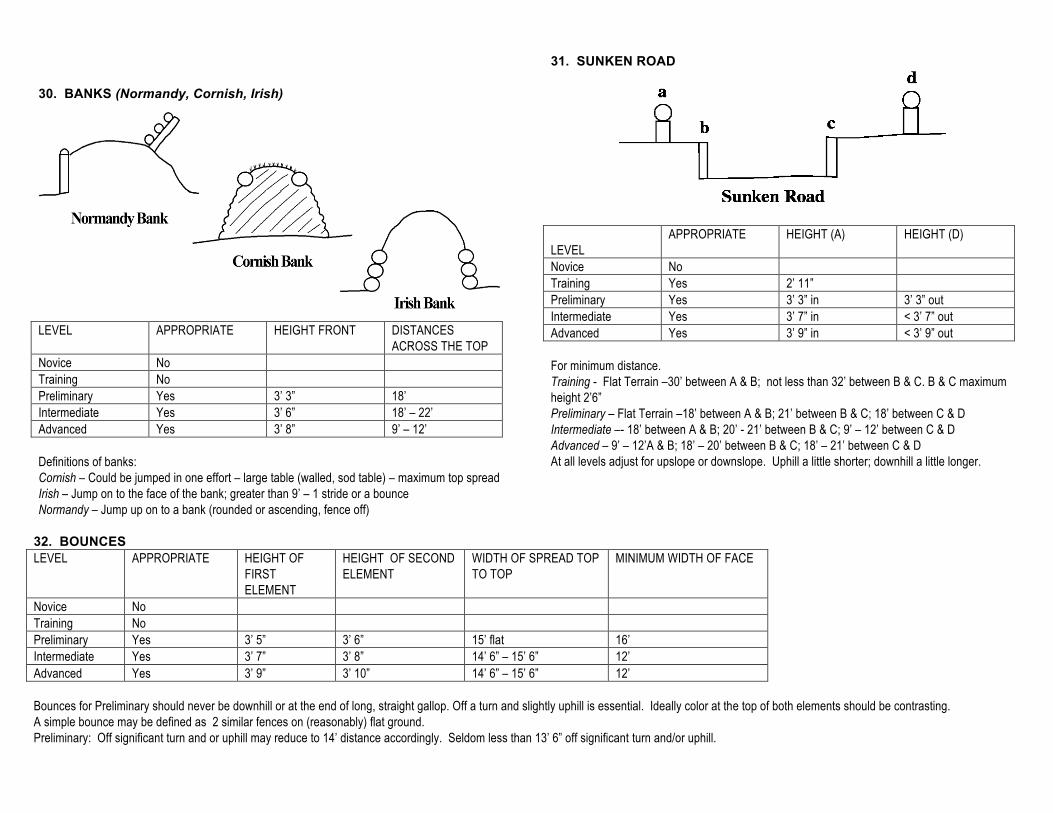
30. BANKS (Normandy, Cornish, Irish)
LEVEL APPROPRIATE HEIGHT FRONT DISTANCES
ACROSS THE TOP Novice No Training No Preliminary Yes 3’ 3” 18’ Intermediate Yes 3’ 6” 18’ – 22’ Advanced Yes 3’ 8” 9’ – 12’ Definitions of banks: Cornish – Could be jumped in one effort – large table (walled, sod table) – maximum top spread Irish – Jump on to the face of the bank; greater than 9’ – 1 stride or a bounce Normandy – Jump up on to a bank (rounded or ascending, fence off)
31. SUNKEN ROAD
LEVEL
APPROPRIATE HEIGHT (A) HEIGHT (D)
Novice No Training Yes 2’ 11” Preliminary Yes 3’ 3” in 3’ 3” out Intermediate Yes 3’ 7” in < 3’ 7” out Advanced Yes 3’ 9” in < 3’ 9” out For minimum distance. Training - Flat Terrain –30’ between A & B; not less than 32’ between B & C. B & C maximum height 2’6” Preliminary – Flat Terrain –18’ between A & B; 21’ between B & C; 18’ between C & D Intermediate –- 18’ between A & B; 20’ - 21’ between B & C; 9’ – 12’ between C & D Advanced – 9’ – 12’A & B; 18’ – 20’ between B & C; 18’ – 21’ between C & D At all levels adjust for upslope or downslope. Uphill a little shorter; downhill a little longer.
32. BOUNCES LEVEL APPROPRIATE HEIGHT OF
FIRST ELEMENT
HEIGHT OF SECOND ELEMENT
WIDTH OF SPREAD TOP TO TOP
MINIMUM WIDTH OF FACE
Novice No Training No Preliminary Yes 3’ 5” 3’ 6” 15’ flat 16’ Intermediate Yes 3’ 7” 3’ 8” 14’ 6” – 15’ 6” 12’ Advanced Yes 3’ 9” 3’ 10” 14’ 6” – 15’ 6” 12’ Bounces for Preliminary should never be downhill or at the end of long, straight gallop. Off a turn and slightly uphill is essential. Ideally color at the top of both elements should be contrasting. A simple bounce may be defined as 2 similar fences on (reasonably) flat ground. Preliminary: Off significant turn and or uphill may reduce to 14’ distance accordingly. Seldom less than 13’ 6” off significant turn and/or uphill.
33. COFFIN LEVEL APPROPRIATE HEIGHT
FRONT BASE SPREAD TOTAL WIDTH
OF FACE STRIDING
Novice Yes, half coffin Elements a) 16’ b) 18’ c) 12'-16’
half coffin jump to ditch minimum 3 strides 43’ 6”. Elements numbered separately. Ditch to jump – minimum 3 strides 45’ Insignificant ditch Terrain will significantly affect distances of stride – distances will be adjusted for terrain.
Training Yes Elements a) 2’ 11” b) n/a c) 3’ 3”
Elements a) n/a b) no more than 4’ base spread c) n/a
Elements a) 16’ b) 18’ c) 10'-16’
a) 30’ – 33’ between fence & ditch – flat ground A-B; b) ditch; c) 21’ – 22’ between ditch and a fence 1 stride – flat ground B-C; 33’ – 35’ between ditch and a fence 2 strides At least 2 elements numbered separately.
Preliminary Yes Elements a) 3’ 5” b) n/a c) 3’ 7”
Elements a) n/a b) no more than 5’ base spread c) n/a
Elements a) 12-16’ b) 16’ c) 8'-16’
a) 18’ – 21’ between fence and ditch on flat ground 1 stride going in – adjust for slight slopes of ground; b) ditch; c) min 21’ – 22’ (1stride) between ditch & fence – flat ground B-C or 33’ – 35’ (2 strides)
Intermediate Yes Elements a) 3’ 7” b) n/a c) 3’ 9”
Elements a) n/a b) no more than 6’ base spread c) n/a
Elements a) 10-16’ b) 16’ c) 6'-16’
a) 18' – 20’ between fence and ditch – A-B; b) ditch; c) 19' – 22' for the first stride ditch to fence then add 9’-12’ for the second stride B-C depending on the slope coming out of the coffin
Advanced Yes Elements a) 3’ 9” b) n/a c) 3’ 11”
Elements a) n/a b) no more than 6’ base spread c) n/a
Elements a) 12-16’ b) 16’ c) 5'-16’
a) 18' – 20’ between fence and ditch – A-B; b) ditch; c) 19' – 22' for the first stride ditch to fence then add 9’-12’ for the second stride B-C depending on the slope coming out of the coffin.
34. FRANGIBLE FENCES LEVEL APPROPRIATE HEIGHT
FRONT WIDTH OF JUMPABLE FACE
TOTAL WIDTH OF FACE
Novice No Training No Preliminary Yes 3’ 7” Min. 7’ Max. 16’ Intermediate Yes 3’ 9” Min. 5’ Max. 16’ Advanced Yes 3’ 11” Min 4’ Max. 16’ The Frangible Pin Fence refers to a construction technique used for a variety of obstacle types available for cross-country designers to choose from. In the following situations, the use of the frangible pins fence in place of a standard rail fence can be available to the discretion of the designer.
Frangible pins may only be used when the following conditions exist: Rails not more than 14” diameter, 550 pounds Posts not more than 16’ apart 16” unobstructed fall space below rail Spare pins and knowledgeable repair crew on site Pins must initially be installed by builders who have taken the frangible pin class.
35. WATER – Depths & Distances LEVEL APPROPRIATE HEIGHT
DROP INTO WATER
MINIMUM WIDTH OF WATER CROSSING
MAXIMUM DEPTH OF WATER AT LANDING OR TAKE OFF
MINIMUM DISTANCE TOTAL WIDTH OF FACE
Novice Yes N/A 20’ N/A N/A 16’ Training Yes 2’ 8” Max 30’
14” (35cms) FEI 6”-10” ideal
19’ 6” (6m) before any obstacle in water. Minimum distance between obstacles sited in water – 30’. FEI (9m)
19’ 6” (6m) before any obstacle in water. Minimum distance between obstacles sited in water – 30’. FEI (9m)
8’
Width of water; where there is a jump into water and revetted exit, bank must be greater than or equal to 3 strides (42’6”-46’) from entry jump/drop and/or bank down/drop in to water. FEI Rule – Maximum depth of water 35cms. Novice & Training entry or exit obstacles: Drops into water will ride better with a small round rail. Novice – Maximum 10” depth of water. Training – Fence before a revetment or obstacle into water should not be closer than 30’. Fence after water not less than 30’ after revetting. Preliminary – Fence after water not less than 18’ after revetting.
Intermediate – Fence after water not less than 9’ after revetting. A bounce into water is acceptable. Must be well presented with the 2nd element small (approximately 20”) and straightforward. Any significant downhill slope between elements is not appropriate. Advanced – Fence after water not less than 9’ after revetting. Training/Advanced – Adding a log at the base of the step out can be helpful for all divisions. The height of the fence is determined by the allowed drop in P, I & A divisions. In most cases, maximum height will be determined by the recommended/allowed drop. Depth of water 10” maximum; 5”-6” ideal.
Layout and design by Lola Starck, Starck Studios, 211 McNeil Street, Carterville, IL 62918-1853