Don Burrhus www.knottool.com/cross The The The The Sailor’s Cross Sailor’s Cross Sailor’s Cross Sailor’s Cross Knot Knot Knot Knot Suggested Uses: •Zipper Pull •Key Ring •Bookmark •Charm for bracelet •Pendant for Necklace Insert the long end of one of the pins into the other one at the white arrow as shown to the left. 1 Instructions Instructions Instructions Instructions The front will have the smooth face of the pins showing and the bumps will be on the back. Note: This knot is difficult and may be very challenging for beginners. This work is licensed under a Creative Commons Attribution -NonCommercial-NoDerivs License In other words, please feel free to make copies, distribute the PDF, make re-prints etc., so long as the entire ten page work is left intact and is not modified. Warning Sharp objects and small parts are a choking hazard. Burning or melted plastics are dangerous. Competent adult supervision required.
Note: This knot is difficult and may be very challenging for beginners.
This work is licensed under a Creative Commons Attribution
-NonCommercial-NoDerivs License
In other words, please feel free to make copies, distribute the PDF, make re-prints etc., so long as the entire ten page
work is left intact and is not modified. Warning Sharp objects and small parts are a choking hazard. Burning or melted plastics are dangerous. Competent adult
supervision required.
Find a point five inches from the end of the
string and pinch that point in the last bump of the pin (at the white arrow) with the short end
to the lower left. Pinch and hold the whole thing at this point to help keep the cord in
place. Put the needle on the long (working) end of the cord.
The “W” in the picture denotes the working
end. “S” means the standing (short) end. We will leave the short end alone for now.
Front
W
S
2
Take the working end “W” of the cord and
wind it up and around the vertical pin as shown so that it goes over the point where
the two pins intersect.
W
Front
S
3
ii
Go over, down around behind and back up
in front of the horizontal pin and over the cord. Then go over to the upper right,
around behind the top of the vertical pin and back around in front to the lower right.
Front
S
W
4
Go under and up around behind the
right arm of the horizontal pin. Come back to the front, go over the cord once
and under once headed to the lower left.
Front
W
S
5
Come back around to the front and
under once.
Front
W
S
7
Next, take the cord and pass it around
back going between the existing cord and the pin as shown by the needle.
Front
W
S
6
iii
Front
W
S
8
Go around behind the vertical pin and
come up and under two strands where the needle shows.
To get...
Front
W
S
9
Back S
W
11
Go up over and around behind the left
side of the horizontal pin and back to the front coming thru the existing loop as
shown headed to the upper right.
W
S
Back 12
Go up and wrap around the vertical pin,
back down to the lower right tucking thru the existing loop as shown and then do the
same thing from under to over around the right arm of the horizontal pin coming to
the front, over once and under once headed to the lower left going under as shown.
iv
Flip the whole thing over. Back W
S
10
Flip again, cross over once and then
under once headed to the lower left.
Front
W
S
13
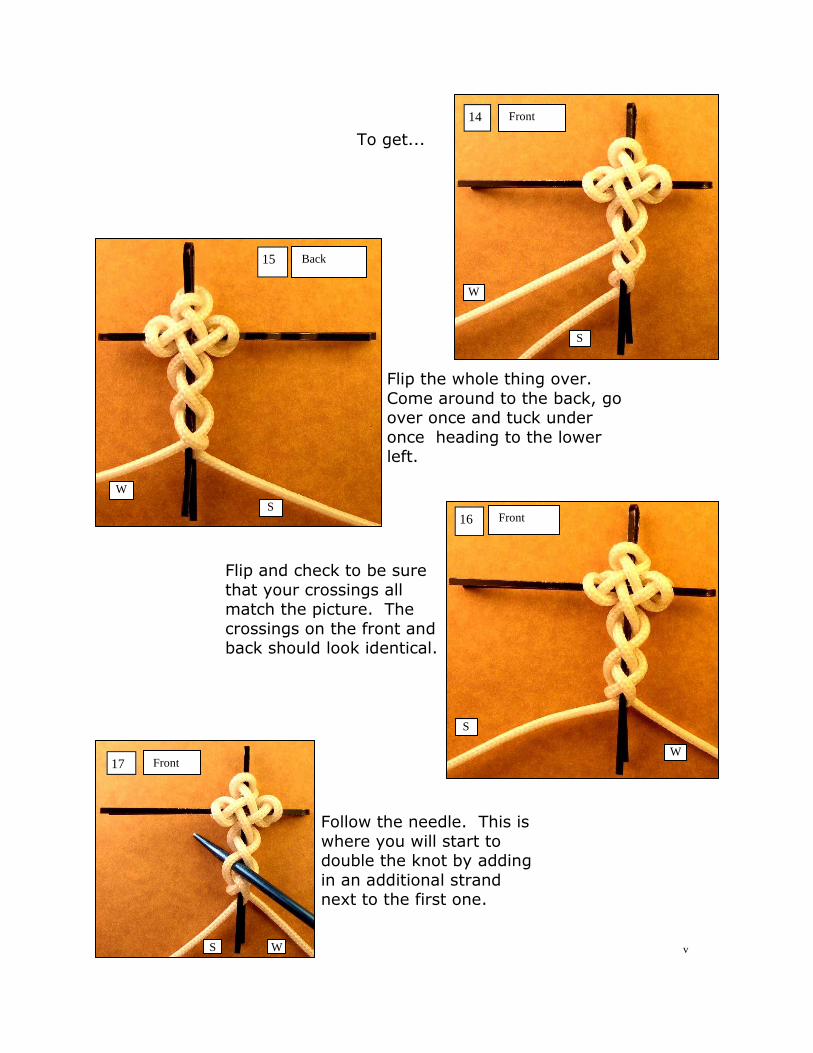
W
S
Front 14
To get...
Flip the whole thing over.
Come around to the back, go over once and tuck under
once heading to the lower left.
W
S
Back 15
v
Front
S
W
16
Flip and check to be sure
that your crossings all match the picture. The
crossings on the front and back should look identical.
Follow the needle. This is
where you will start to double the knot by adding
in an additional strand next to the first one.
S
Front
W
17
To get...
S
Front
W
18
vi
Flip and then continue to follow the existing
strand as shown. Note that you will always be staying to one side of the existing strand.
Back
W
S
19
Flip and while staying to one side, double
the entire upper front of the knot. Check to be sure that what you have done
matches the photo to the right.
Front
W
S
20
Flip and continue to
double the knot as shown being sure
not to cross over the existing strand.
Back
W S
21
Stop doubling when you
get to here. Remove the needle from the working
end of the cord.
Front
W
S
22
vii
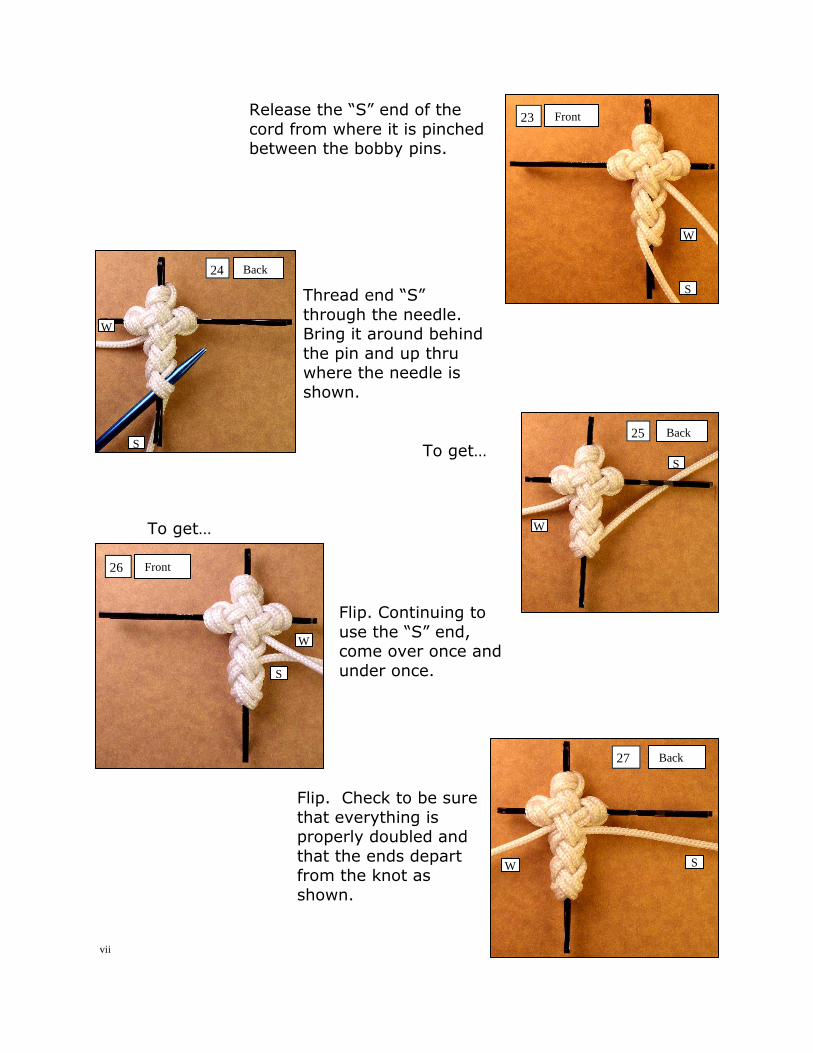
Release the “S” end of the
cord from where it is pinched between the bobby pins.
W
S
Front 23
To get…
W
S
Back 25
Thread end “S”
through the needle. Bring it around behind
the pin and up thru where the needle is
shown.
W
S
Back 24
Flip. Continuing to
use the “S” end, come over once and
under once.
Flip. Check to be sure
that everything is properly doubled and
that the ends depart from the knot as
shown.
Front
W
S
26
Back
W S
27
To get…
Do the same for the vertical
pin and remove it from the knot as well. Put the two
pins away for later…
W
S
Front 29
Flip over. Take the end “S”
and put it on the needle, then put the needle up thru
the center of the knot as shown by the needle.
Put the needle onto the “W”
end and put it down thru the center of the lower part of the
knot and out at the bottom.
Back 31 W S
Back 30
If you are going to use a swivel and split ring, thread
it onto the cord coming out of the top of the knot…
32
viii
Flip again. Remove the needle from the
cord and put it thru the bent end of the horizontal pin and use it as a handle to pull
the horizontal pin to the right and out of the knot.
Front
S
28
W
The next step is to put the
end of the strand that is coming out of the top of the
knot all of the way down thru the center of the cross
where the needle is shown. As it will be tight, you will
likely need to do this in smaller steps...
33
Put the needle on the
end and run the needle part way down thru the
center of the knot and out as shown. Continue
as shown in the pictures.
34
35
36
ix
You will end
up with this:
To remove the loop at the top of the knot, pull on
one end of the cord coming out of the bottom of the knot until the bead of the swivel is half way
inside of the top of the knot.
37
Trim the two ends off at about 2mm from the bottom of the knot. Get
your responsible adult to melt the ends of the cord with a flame (DO NOT TOUCH THE MELTED PLASTIC!) Or, you could use a drop of plastic ce-
ment on the two ends to hold them from pulling back up into the knot.
To finish with glue or heat...To finish with glue or heat...To finish with glue or heat...To finish with glue or heat...
If you would like to seal
the knot, it may be dipped in a 50/50 mix-
ture of water and white glue and then allowed
to dry thoroughly.
x
To finish with a bead...To finish with a bead...To finish with a bead...To finish with a bead...
Thread the two ends thru a bead, tie them in a
secure knot tight up against the bead and trim the ends off 2mm below the knot.
With some creativity, these knots could be
strung as beads on a cord or as a closure on a drawstring. Several of them hanging on the
ends of joined cords would make an excellent bookmark. They could also be tied directly onto
a safety pin and used as a lapel pin.
The Turks Head The Turks Head The Turks Head The Turks Head
Cookbook KitCookbook KitCookbook KitCookbook Kit Tools and detailed, step-by-step
instructions for tying over 200 traditional and unusual pattern
turks head knots.
Also available from knottool.com...Also available from knottool.com...Also available from knottool.com...Also available from knottool.com...
The Globe Knot The Globe Knot The Globe Knot The Globe Knot
Cookbook KitCookbook KitCookbook KitCookbook Kit Tools and detailed instructions
for tying over 100 ball-shaped covering knots and more.
Other tools...Other tools...Other tools...Other tools... A full line of knot tying tools, threaded needles and more are available
from knottool.com.
Don Burrhus www.knottool.com/cross
This work is licensed under a Creative Commons Attribution
-NonCommercial-NoDerivs License
In other words, please feel free to make copies, distribute the PDF, make re-prints etc., so long as the entire ten page
work is left intact and is not modified.
Warning Sharp objects and small parts are a choking hazard. Burning or melted plastics are dangerous.