+ All Categories
Home > Documents > Crown Vic Side Trunk Tray

Crown Vic Side Trunk Tray

Date post: 15-Mar-2016
Category:
Upload: lund-industries-inc
View: 218 times
Download: 0 times
Share this document with a friend
Description:
Rear “L” Bracket – Factory Hole equipment tray and into the 1/2” holes in the angle bracket on the top support. Secure the hinge to the trunk floor with (3) supplied sheet metal screws. Supplied hardware: (4) 1/4” Nyloks, (6) 1/4” fender washers, (3) 3/4” x 14 hex head Tek screws, (6) 10-32 x 3/8” pan head screws, (2) 3” x 3” 90° brackets 4. Attach equipment tray to top plate using the two swell latches through the slots in the top of the 5. Replace trunk interior trim.
1
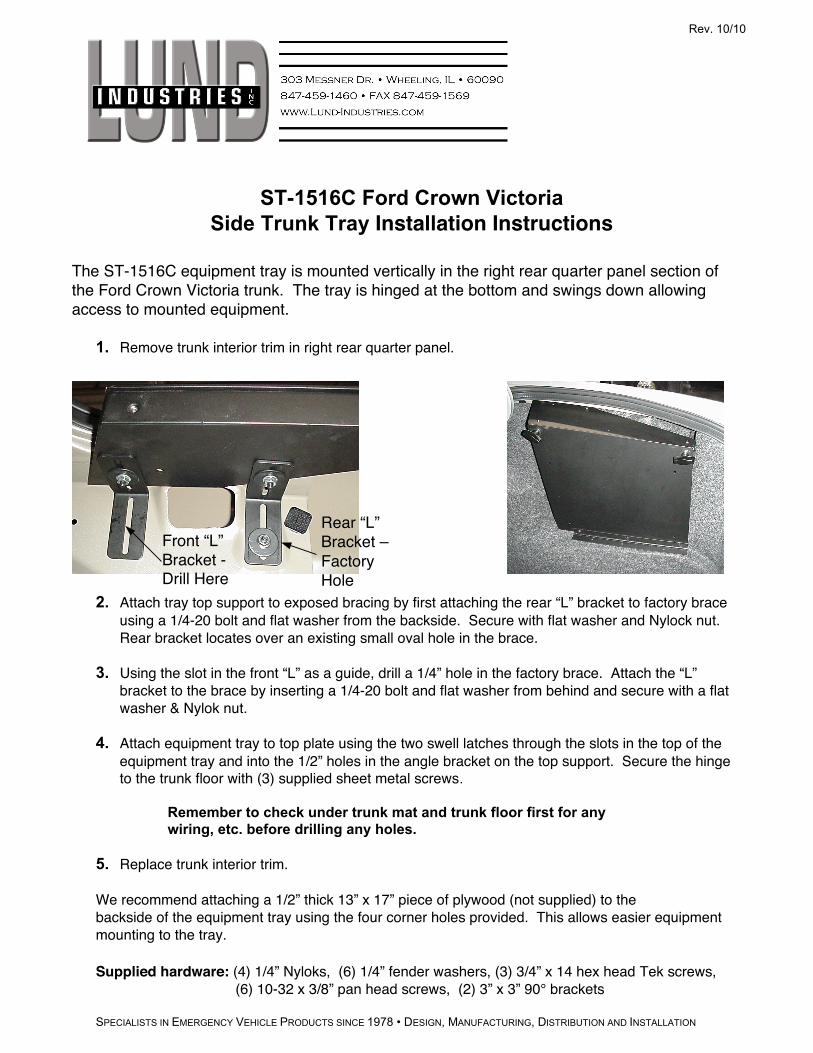
ST-1516C Ford Crown Victoria Side Trunk Tray Installation Instructions The ST-1516C equipment tray is mounted vertically in the right rear quarter panel section of the Ford Crown Victoria trunk. The tray is hinged at the bottom and swings down allowing access to mounted equipment. 1. Remove trunk interior trim in right rear quarter panel. 2. Attach tray top support to exposed bracing by first attaching the rear “L” bracket to factory brace using a 1/4-20 bolt and flat washer from the backside. Secure with flat washer and Nylock nut. Rear bracket locates over an existing small oval hole in the brace. 3. Using the slot in the front “L” as a guide, drill a 1/4” hole in the factory brace. Attach the “L” bracket to the brace by inserting a 1/4-20 bolt and flat washer from behind and secure with a flat washer & Nylok nut. 4. Attach equipment tray to top plate using the two swell latches through the slots in the top of the equipment tray and into the 1/2” holes in the angle bracket on the top support. Secure the hinge to the trunk floor with (3) supplied sheet metal screws. Remember to check under trunk mat and trunk floor first for any wiring, etc. before drilling any holes. 5. Replace trunk interior trim. We recommend attaching a 1/2” thick 13” x 17” piece of plywood (not supplied) to the backside of the equipment tray using the four corner holes provided. This allows easier equipment mounting to the tray. Supplied hardware: (4) 1/4” Nyloks, (6) 1/4” fender washers, (3) 3/4” x 14 hex head Tek screws, (6) 10-32 x 3/8” pan head screws, (2) 3” x 3” 90° brackets SPECIALISTS IN EMERGENCY VEHICLE PRODUCTS SINCE 1978 • DESIGN, MANUFACTURING, DISTRIBUTION AND INSTALLATION Rev. 10/10 Rear “L” Bracket – Factory Hole Front “L” Bracket - Drill Here
Transcript

ST-1516C Ford Crown VictoriaSide Trunk Tray Installation Instructions

The ST-1516C equipment tray is mounted vertically in the right rear quarter panel section ofthe Ford Crown Victoria trunk. The tray is hinged at the bottom and swings down allowingaccess to mounted equipment.

1. Remove trunk interior trim in right rear quarter panel.

2. Attach tray top support to exposed bracing by first attaching the rear “L” bracket to factory braceusing a 1/4-20 bolt and flat washer from the backside. Secure with flat washer and Nylock nut.Rear bracket locates over an existing small oval hole in the brace.

3. Using the slot in the front “L” as a guide, drill a 1/4” hole in the factory brace. Attach the “L”bracket to the brace by inserting a 1/4-20 bolt and flat washer from behind and secure with a flatwasher & Nylok nut.

4. Attach equipment tray to top plate using the two swell latches through the slots in the top of theequipment tray and into the 1/2” holes in the angle bracket on the top support. Secure the hingeto the trunk floor with (3) supplied sheet metal screws.

Remember to check under trunk mat and trunk floor first for anywiring, etc. before drilling any holes.

5. Replace trunk interior trim.

We recommend attaching a 1/2” thick 13” x 17” piece of plywood (not supplied) to thebackside of the equipment tray using the four corner holes provided. This allows easier equipmentmounting to the tray.

Supplied hardware: (4) 1/4” Nyloks, (6) 1/4” fender washers, (3) 3/4” x 14 hex head Tek screws, (6) 10-32 x 3/8” pan head screws, (2) 3” x 3” 90° brackets

SPECIALISTS IN EMERGENCY VEHICLE PRODUCTS SINCE 1978 • DESIGN, MANUFACTURING, DISTRIBUTION AND INSTALLATION

Rev. 10/10

Rear “L”Bracket –FactoryHole

Front “L”Bracket -Drill Here

Recommended