19
MS .NET Web RADIUS Module Implementation Guide CRYPTO-Server ™ 3 rd Party Integration 6.4 Microsoft Windows ®
MS .NET Web RADIUS Module Implementation Guide
CRYPTO-Server ™
3rd Party
Integration 6.4
Microsoft Windows ®
MS. NET Web RADIUS Module
2
Proprietary Notice
License and Warranty Information CRYPTOCard Inc. and its affiliates retain all ownership rights to the computer program described in this manual, other computer programs offered by the company (hereinafter called CRYPTOCard) and any documentation accompanying those programs. Use of CRYPTOCard software is governed by the license agreement accompanying your original media. CRYPTOCard software source code is a confidential trade secret of CRYPTOCard. You may not attempt to decipher, de-compile, develop, or otherwise reverse engineer CRYPTOCard software, or allow others to do so. Information needed to achieve interoperability with products from other manufacturers may be obtained from CRYPTOCard upon request. This manual, as well as the software described in it, is furnished under license and may only be used or copied in accordance with the terms of such license. The material in this manual is furnished for information use only, is subject to change without notice, and should not be construed as a commitment by CRYPTOCard. CRYPTOCard assumes no liability for any errors or inaccuracies that may appear in this document. Except as permitted by such license, no part of this publication may be reproduced, stored in a retrieval system, or transmitted in any form or by any means electronic, mechanical, recording or otherwise, without the prior written consent of CRYPTOCard. CRYPTOCard reserves the right to make changes in design or to make changes or improvements to these products without incurring the obligation to apply such changes or improvements to products previously manufactured. The foregoing is in lieu of all
other warranties expressed or implied by any applicable laws. CRYPTOCard does not assume or authorize, nor has it authorized any person to assume for it, any other obligation or liability in connection with the sale or service of these products. In no event shall CRYPTOCard or any of its agents be responsible for special, incidental, or consequential damages arising from the use of these products or arising from any breach of warranty, breach of contract, negligence, or any other legal theory. Such damages include, but are not limited to, loss of profits or revenue, loss of use of these products or any associated equipment, cost of capital, cost of any substitute equipment, facilities or services, downtime costs, or claims of customers of the Purchaser for such damages. The Purchaser may have other rights under existing federal, state, or provincial laws in the USA, Canada, or other countries or jurisdictions, and where such laws prohibit any terms of this warranty, they are deemed null and void, but the remainder of the warranty shall remain in effect.
Customer Obligation Shipping Damage: The purchaser must examine the goods upon receipt and any visible damage should immediately be reported to the carrier so that a claim can be made. Purchasers should also notify CRYPTOCard of such damage. The customer should verify that the goods operate correctly and report any deficiencies to CRYPTOCard within 30 days of delivery. In all cases, the customer should notify CRYPTOCard prior to returning goods. Goods returned under the terms of this warranty must be carefully packaged for shipment to avoid physical damage using materials and methods equal to or better than those with which the goods were originally shipped to the purchaser. Charges for insurance and shipping to the repair facility are the responsibility of the purchaser. CRYPTOCard will pay return charges for units repaired or replaced under the terms of this warranty.
Copyright Copyright © 2007, CRYPTOCard Inc. All Rights Reserved. No part of this publication may be reproduced, transmitted, transcribed, stored in a retrieval system, or translated into any language in any form or by any means without the written permission of CRYPTOCard Inc.
Trademarks CRYPTO-Server 6.4 Administrator’s Manual viii CRYPTOCard, CRYPTO-Server, CRYPTO-Web, CRYPTO-Kit, CRYPTO-Logon, CRYPTO-VPN, CRYPTO-Shield, CRYPTO-MAS, are either registered trademarks or trademarks of CRYPTOCard Inc. Java is a registered trademarks of Sun Microsystems, Inc.; Microsoft Windows and Windows XP/2000/2003/NT are registered trademarks of Microsoft
Corporation. SecurID is a registered trademark of RSA Security. All other trademarks, trade names, service marks, service names, product names, and images mentioned and/or used herein belong to their respective owners.
MS. NET Web RADIUS Module
3
Additional Information, Assistance, or Comments CRYPTOCard’s technical support specialists can provide assistance when planning and implementing CRYPTOCard in your network. In addition to aiding in the selection of the appropriate authentication products, CRYPTOCard can suggest deployment procedures that provide a smooth, simple transition from existing access control systems and a satisfying experience for network users. We can also help you leverage your existing network equipment and systems to maximize your return on investment. This complimentary support service is available from your first evaluation system download. CRYPTOCard works closely with channel partners to offer worldwide Technical Support services. If you purchased this product through a CRYPTOCard channel partner, please contact your reseller directly for support needs. Contact CRYPTOCard directly: International Voice: +1-613-599-2441 North America Toll Free: 1-800-307-7042 Email: [email protected] For information about obtaining a support contract, see our Support Web page at: http://www.cryptocard.com/support/cryptocardannualsupportandmaintenance/ Related Documentation Refer to the Technical Documentation section of the CRYPTOCard website for additional documentation and interoperability guides: http://www.cryptocard.com/support/technicaldocumentation/
MS. NET Web RADIUS Module
4
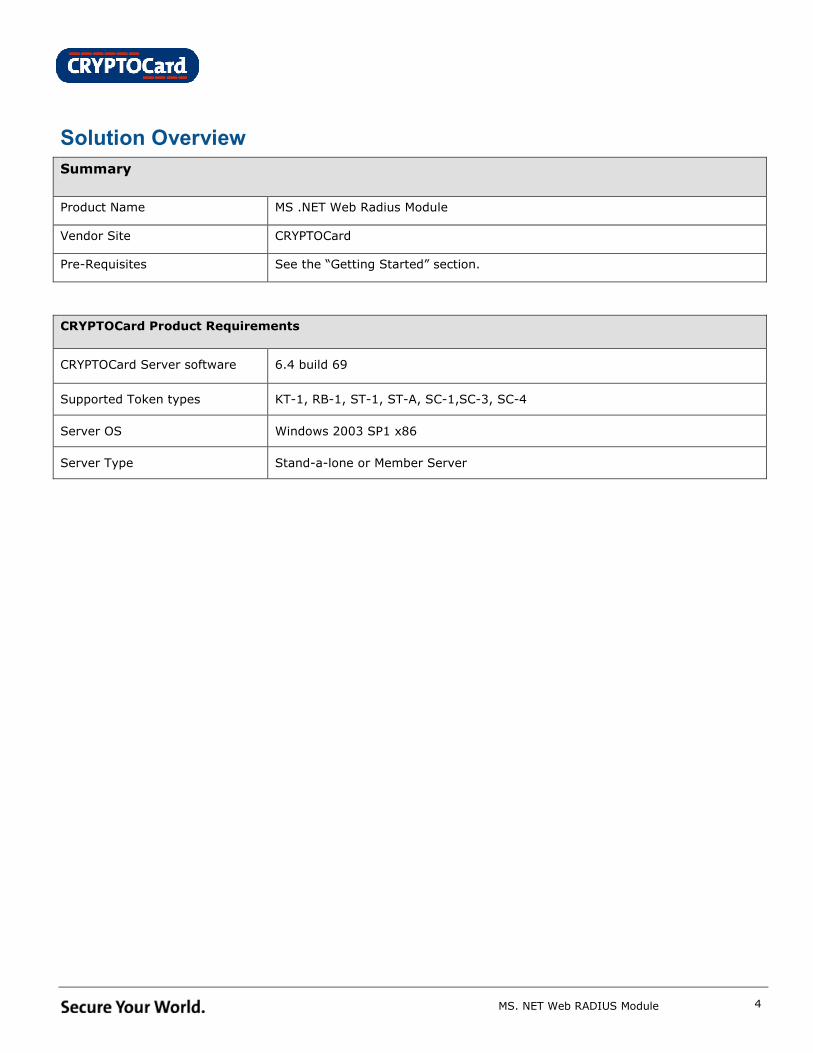
Solution Overview
Summary
Product Name MS .NET Web Radius Module
Vendor Site CRYPTOCard
Pre-Requisites See the “Getting Started” section.
CRYPTOCard Product Requirements
CRYPTOCard Server software 6.4 build 69
Supported Token types KT-1, RB-1, ST-1, ST-A, SC-1,SC-3, SC-4
Server OS Windows 2003 SP1 x86
Server Type Stand-a-lone or Member Server
MS. NET Web RADIUS Module
5
Table of Contents
SOLUTION OVERVIEW ............................................................................................................. 4
MS .NET RADIUS MODULE OVERVIEW...................................................................................... 6
HOW MS .NET RADIUS AUTHENTICATION WORKS................................................................... 6
GETTING STARTED................................................................................................................... 7
INITIAL SETUP FILES (CONFIGURATION) ............................................................................... 7
REGISTERING COMAUTH.DLL WITH WINDOWS .......................................................................................8
ADDING REGISTRY KEYS.................................................................................................................9
IIS CONFIGURATION CHECK-LIST ......................................................................................... 10
PROTECTING A WEBSITE ON THE “DEFAULT WEB SITE”........................................................ 13
RADIUS AUTHENTICATION VIA PROTECTED WEBPAGE............................................................................14
EDITING WEB.CONFIG........................................................................................................... 15
EDITING LOGIN.ASPX............................................................................................................ 18
TROUBLESHOOTING .............................................................................................................. 19
MS. NET Web RADIUS Module
6
MS .NET RADIUS Module Overview
This document presents an overview of the MS .NET RADIUS Web Module running Microsoft IIS-6.
Intercepting all resource requests; it sits in the data stream between the user’s browser and the Web
applications residing on the Web server. It allows access to the requested resource only after a
successful authentication to access the requested resource.
It may be configured to protect domain name-based and IP address-based virtual hosts (web sites).
The domain, a web site for example, is protected through a login.aspx page which is where the user is
directed to by the web.config file when they first enter the domain.
The MS .NET RADIUS Web Module must be registered on each domain (web site) that wishes to be
protected.
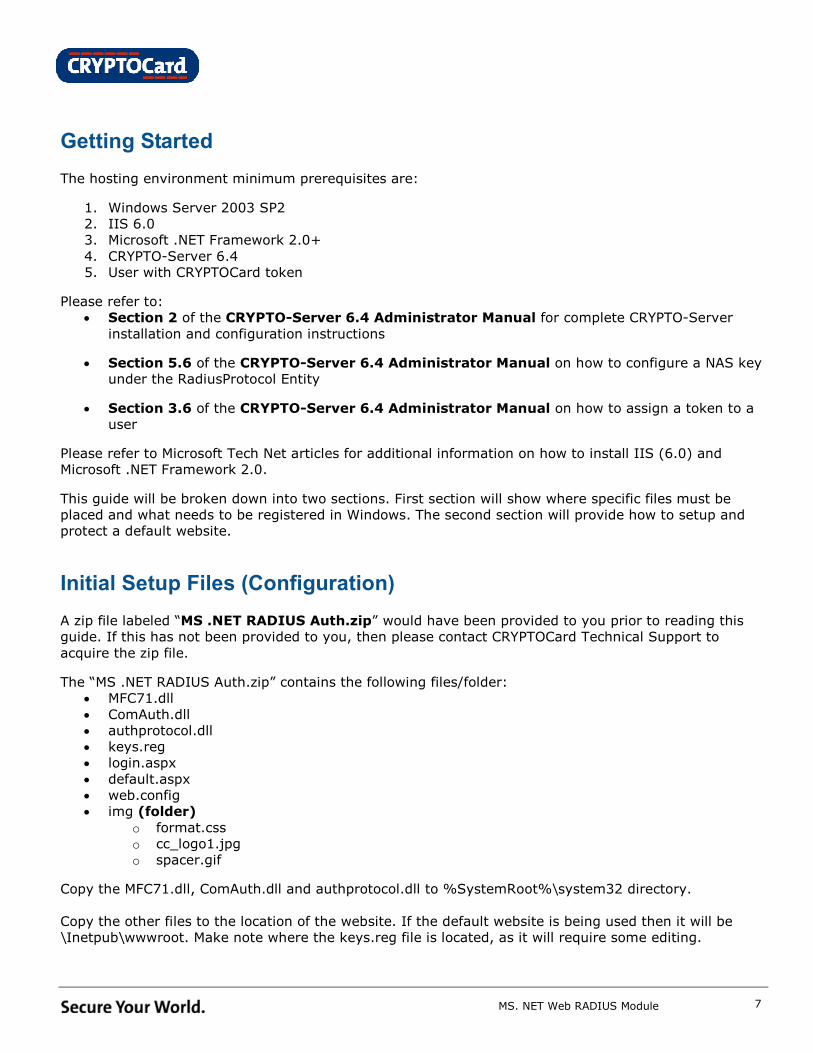
How MS .NET RADIUS Authentication Works
User(s) will either enter in the domain name or IP address of the web server, which will bring them to
the MS .NET Authentication page over port 80 and/or 443. User(s) then provide their username and
password (OTP) on the webpage. The credentials are then sent to the CRYPTO-Server on port 1812, and
1813 for authentication. Upon succeeding authentication, users can then access the protected domain –
Example: web pages, documents on your web site and all other resources which were initially protected.
NOTE: the .NET RADIUS Module is designed to only send a PAP request to the CRYPTO-Server.
MS. NET Web RADIUS Module
7
Getting Started
The hosting environment minimum prerequisites are:
1. Windows Server 2003 SP2
2. IIS 6.0
3. Microsoft .NET Framework 2.0+
4. CRYPTO-Server 6.4
5. User with CRYPTOCard token
Please refer to:
• Section 2 of the CRYPTO-Server 6.4 Administrator Manual for complete CRYPTO-Server
installation and configuration instructions
• Section 5.6 of the CRYPTO-Server 6.4 Administrator Manual on how to configure a NAS key
under the RadiusProtocol Entity
• Section 3.6 of the CRYPTO-Server 6.4 Administrator Manual on how to assign a token to a
user
Please refer to Microsoft Tech Net articles for additional information on how to install IIS (6.0) and
Microsoft .NET Framework 2.0.
This guide will be broken down into two sections. First section will show where specific files must be
placed and what needs to be registered in Windows. The second section will provide how to setup and
protect a default website.
Initial Setup Files (Configuration)
A zip file labeled “MS .NET RADIUS Auth.zip” would have been provided to you prior to reading this
guide. If this has not been provided to you, then please contact CRYPTOCard Technical Support to
acquire the zip file.
The “MS .NET RADIUS Auth.zip” contains the following files/folder:
• MFC71.dll
• ComAuth.dll
• authprotocol.dll
• keys.reg
• login.aspx
• default.aspx
• web.config
• img (folder)
o format.css
o cc_logo1.jpg
o spacer.gif
Copy the MFC71.dll, ComAuth.dll and authprotocol.dll to %SystemRoot%\system32 directory.
Copy the other files to the location of the website. If the default website is being used then it will be
\Inetpub\wwwroot. Make note where the keys.reg file is located, as it will require some editing.
MS. NET Web RADIUS Module
8
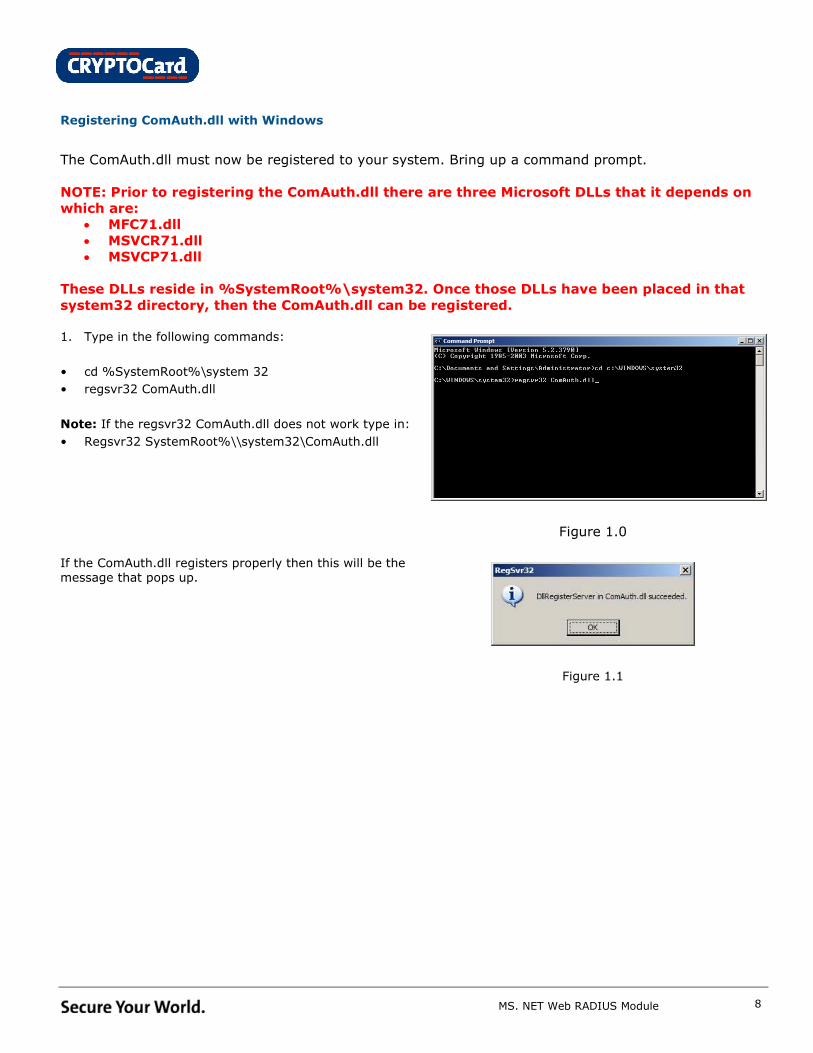
Registering ComAuth.dll with Windows
The ComAuth.dll must now be registered to your system. Bring up a command prompt.
NOTE: Prior to registering the ComAuth.dll there are three Microsoft DLLs that it depends on
which are:
• MFC71.dll
• MSVCR71.dll
• MSVCP71.dll
These DLLs reside in %SystemRoot%\system32. Once those DLLs have been placed in that
system32 directory, then the ComAuth.dll can be registered.
1. Type in the following commands:
• cd %SystemRoot%\system 32
• regsvr32 ComAuth.dll
Note: If the regsvr32 ComAuth.dll does not work type in:
• Regsvr32 SystemRoot%\\system32\ComAuth.dll
Figure 1.0 If the ComAuth.dll registers properly then this will be the
message that pops up.
Figure 1.1
MS. NET Web RADIUS Module
9
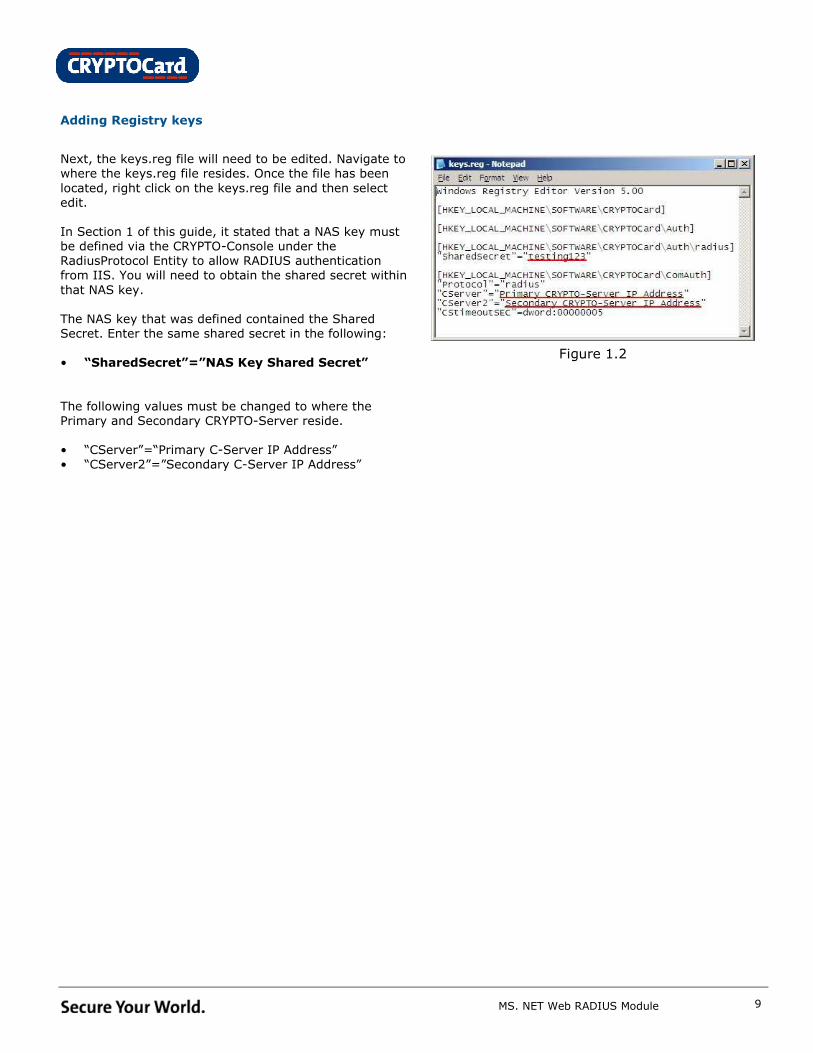
Adding Registry keys
Next, the keys.reg file will need to be edited. Navigate to
where the keys.reg file resides. Once the file has been
located, right click on the keys.reg file and then select
edit.
In Section 1 of this guide, it stated that a NAS key must
be defined via the CRYPTO-Console under the
RadiusProtocol Entity to allow RADIUS authentication
from IIS. You will need to obtain the shared secret within
that NAS key.
The NAS key that was defined contained the Shared
Secret. Enter the same shared secret in the following:
• “SharedSecret”=”NAS Key Shared Secret”
The following values must be changed to where the
Primary and Secondary CRYPTO-Server reside.
• “CServer”=“Primary C-Server IP Address”
• “CServer2”=”Secondary C-Server IP Address”
Figure 1.2
MS. NET Web RADIUS Module
10
IIS Configuration Check-list
Launch IIS, and navigate to the website that will be protected with the .NET RADIUS Web Module. Right
click at the top of the website and select Properties. Perform the following checks in these tabs:
• Directory Security
Click “Edit” under “Authentication and access control” and flag “Enable anonymous access”
• Documents
Add the default webpage users receive when logging onto the company’s website. (i.e. default.aspx)
• ASP.NET
Ensure that the “ASP.NET version” is 2.0.50727 or above.
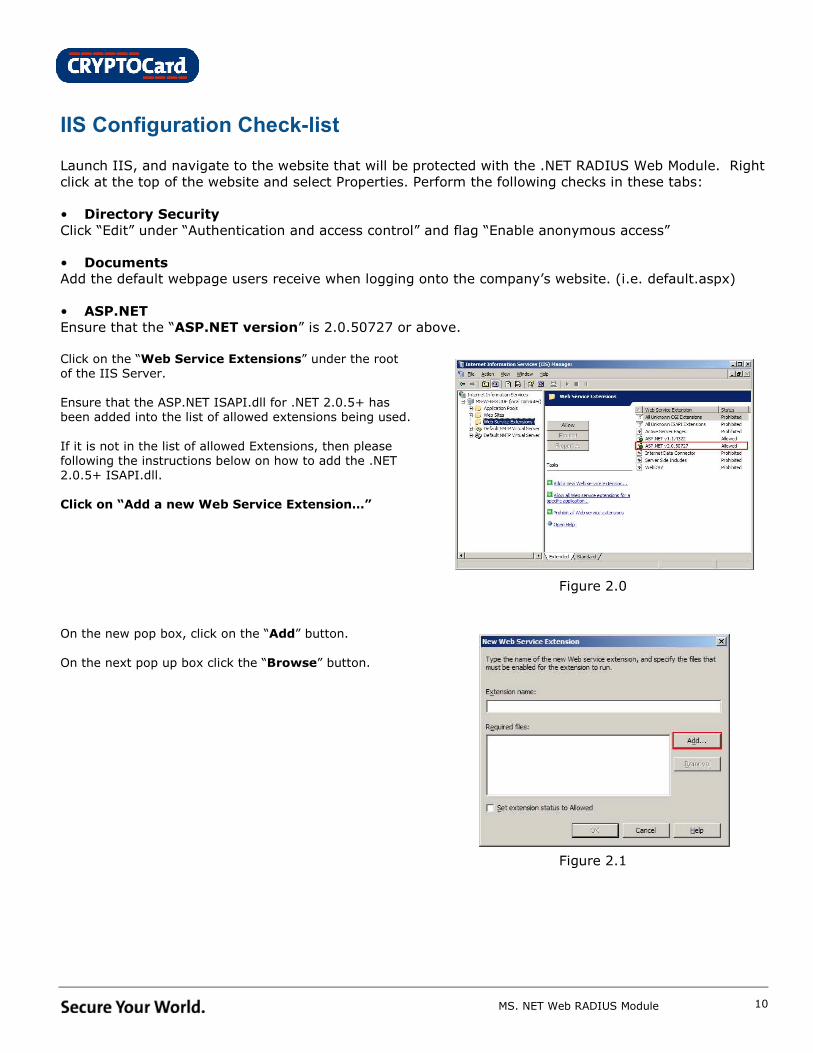
Click on the “Web Service Extensions” under the root
of the IIS Server.
Ensure that the ASP.NET ISAPI.dll for .NET 2.0.5+ has
been added into the list of allowed extensions being used.
If it is not in the list of allowed Extensions, then please
following the instructions below on how to add the .NET
2.0.5+ ISAPI.dll.
Click on “Add a new Web Service Extension…”
Figure 2.0
On the new pop box, click on the “Add” button.
On the next pop up box click the “Browse” button.
Figure 2.1
MS. NET Web RADIUS Module
11
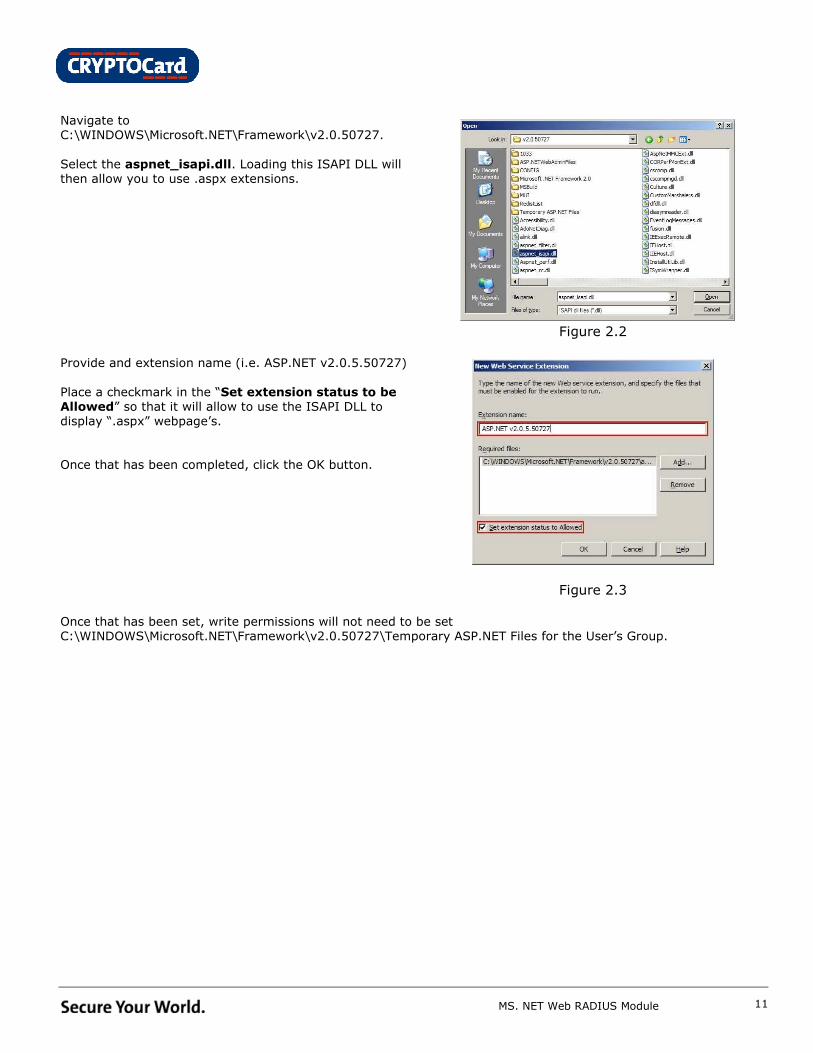
Navigate to
C:\WINDOWS\Microsoft.NET\Framework\v2.0.50727.
Select the aspnet_isapi.dll. Loading this ISAPI DLL will
then allow you to use .aspx extensions.
Figure 2.2 Provide and extension name (i.e. ASP.NET v2.0.5.50727)
Place a checkmark in the “Set extension status to be
Allowed” so that it will allow to use the ISAPI DLL to
display “.aspx” webpage’s.
Once that has been completed, click the OK button.
Figure 2.3 Once that has been set, write permissions will not need to be set
C:\WINDOWS\Microsoft.NET\Framework\v2.0.50727\Temporary ASP.NET Files for the User’s Group.
MS. NET Web RADIUS Module
12
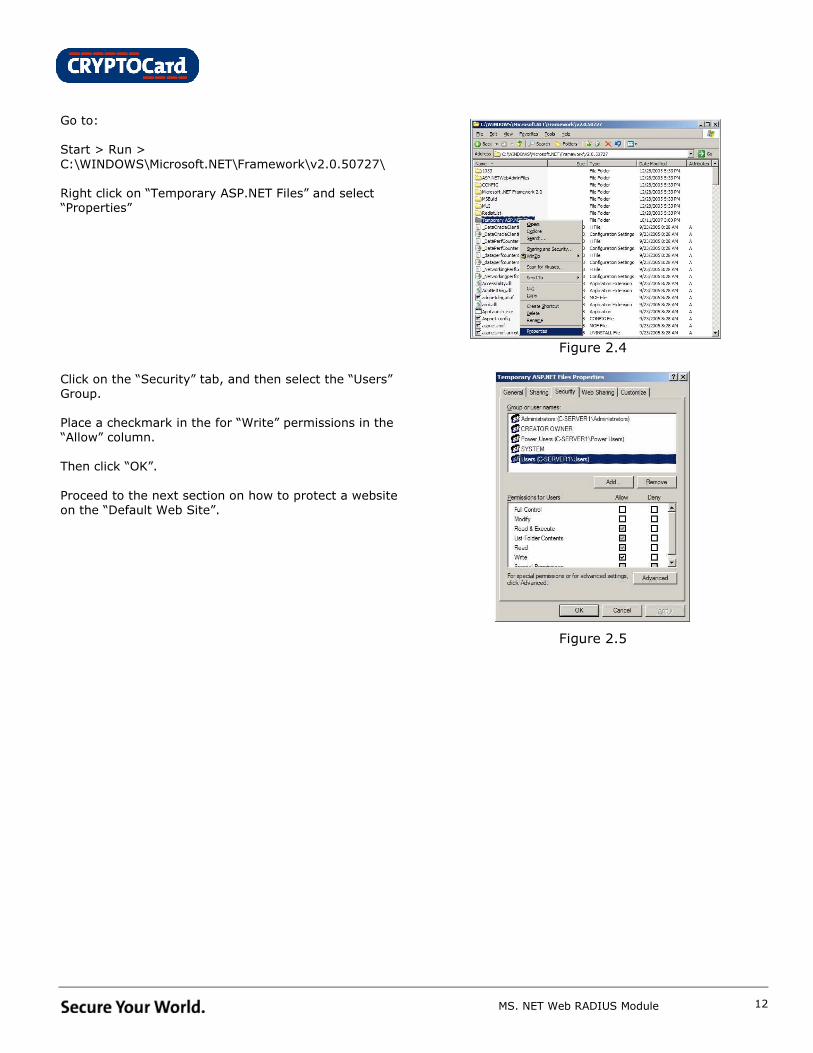
Go to:
Start > Run >
C:\WINDOWS\Microsoft.NET\Framework\v2.0.50727\
Right click on “Temporary ASP.NET Files” and select
“Properties”
Figure 2.4 Click on the “Security” tab, and then select the “Users”
Group.
Place a checkmark in the for “Write” permissions in the
“Allow” column.
Then click “OK”.
Proceed to the next section on how to protect a website
on the “Default Web Site”.
Figure 2.5
MS. NET Web RADIUS Module
13
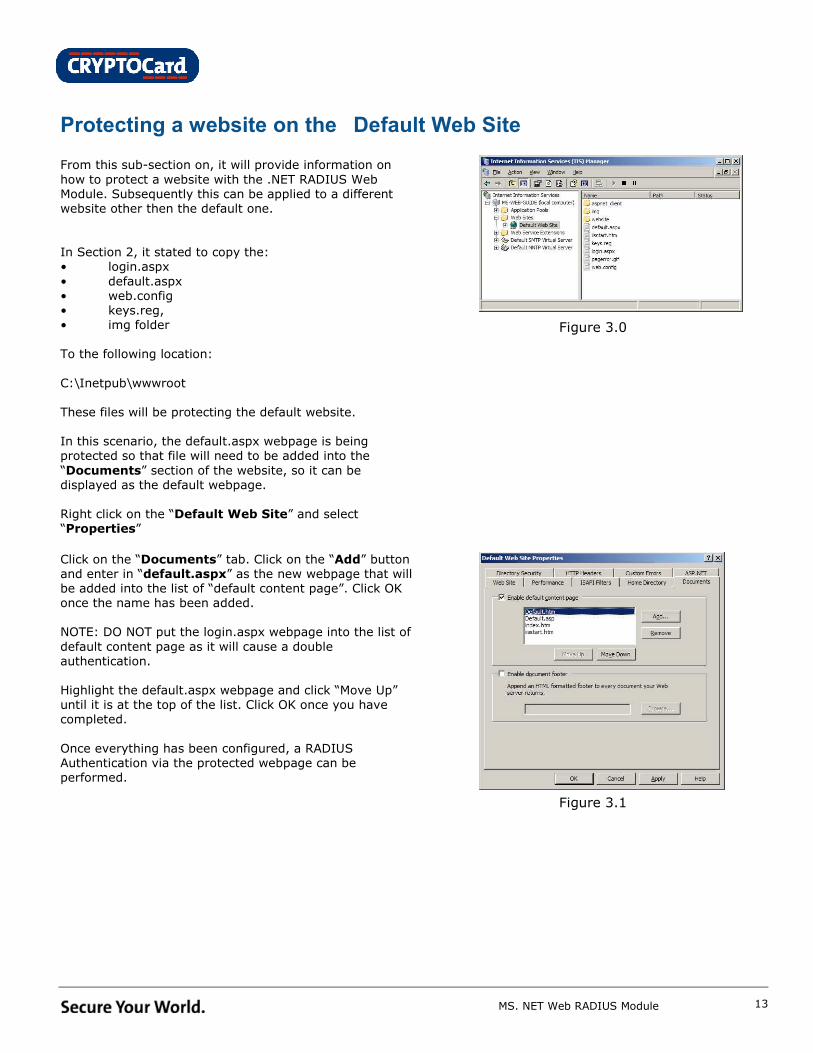
Protecting a website on the �Default Web Site� From this sub-section on, it will provide information on
how to protect a website with the .NET RADIUS Web
Module. Subsequently this can be applied to a different
website other then the default one.
In Section 2, it stated to copy the:
• login.aspx
• default.aspx
• web.config
• keys.reg,
• img folder
To the following location:
C:\Inetpub\wwwroot
These files will be protecting the default website.
In this scenario, the default.aspx webpage is being
protected so that file will need to be added into the
“Documents” section of the website, so it can be
displayed as the default webpage.
Right click on the “Default Web Site” and select
“Properties”
Figure 3.0
Click on the “Documents” tab. Click on the “Add” button
and enter in “default.aspx” as the new webpage that will
be added into the list of “default content page”. Click OK
once the name has been added.
NOTE: DO NOT put the login.aspx webpage into the list of
default content page as it will cause a double
authentication.
Highlight the default.aspx webpage and click “Move Up”
until it is at the top of the list. Click OK once you have
completed.
Once everything has been configured, a RADIUS
Authentication via the protected webpage can be
performed.
Figure 3.1
MS. NET Web RADIUS Module
14
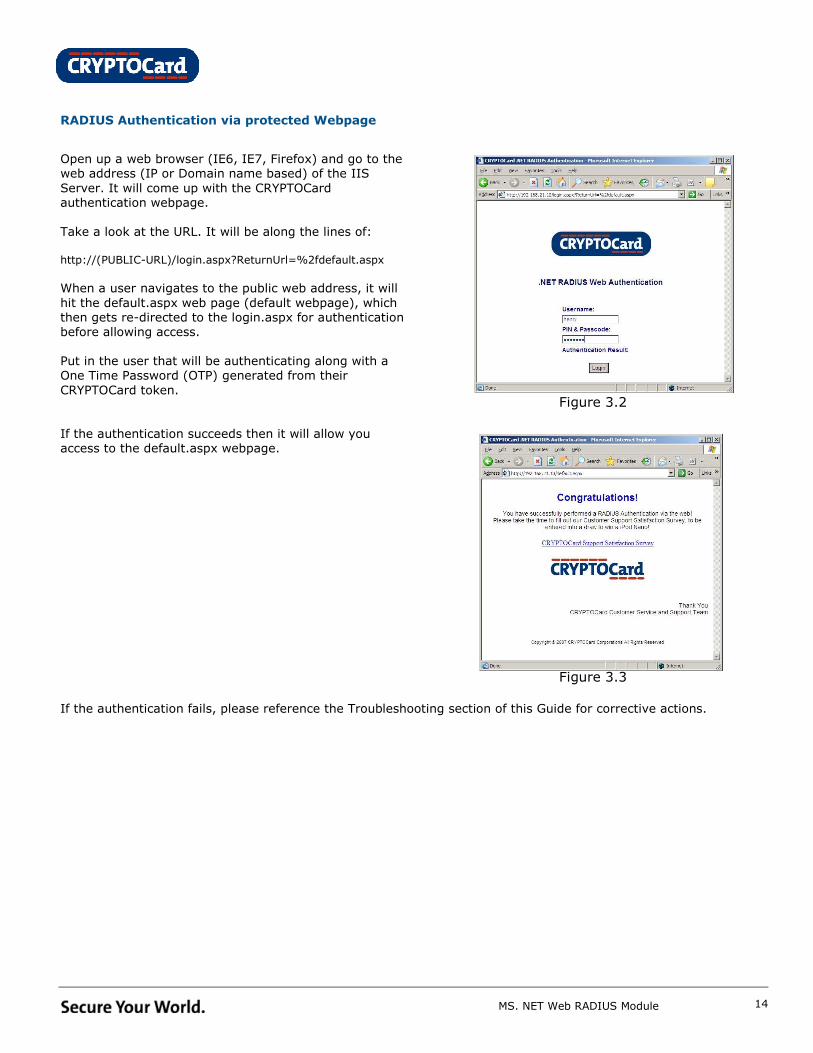
RADIUS Authentication via protected Webpage
Open up a web browser (IE6, IE7, Firefox) and go to the
web address (IP or Domain name based) of the IIS
Server. It will come up with the CRYPTOCard
authentication webpage.
Take a look at the URL. It will be along the lines of:
http://(PUBLIC-URL)/login.aspx?ReturnUrl=%2fdefault.aspx
When a user navigates to the public web address, it will
hit the default.aspx web page (default webpage), which
then gets re-directed to the login.aspx for authentication
before allowing access.
Put in the user that will be authenticating along with a
One Time Password (OTP) generated from their
CRYPTOCard token.
Figure 3.2 If the authentication succeeds then it will allow you
access to the default.aspx webpage.
Figure 3.3
If the authentication fails, please reference the Troubleshooting section of this Guide for corrective actions.

MS. NET Web RADIUS Module
15
Understanding the �web.config� file ASP.NET has built in authentication support for web
page development making it really easy for any web
developer to add personalized web pages or password-
protect areas.
The “web.config” file is an XML based configuration file
which exists for every web application. The web.config
file typical resides in the application root directory
although it is possible to have multiple web.config files.
If there is another web.config file placed in a directory
below the application root, it will use those setting
instead. The web.config file is where you will tell a web
application to use any of the three types of
authentication types which are:
1. Windows Authentication
2. Passport Authentication
3. Forms Authentication
For this application we are using “Forms Authentication”.
Figure 4.0
1. loginUrl: Directs IIS to load this defined root file upon a user going to your predetermined web site address.
Example:
If we took our example from Section 2.3; if a user went to: http://banana.bananaKing.com – the page that would show would be “login.aspx” as we specified this in the “web.config” file.
2. defaultUrl: This is the page the user is directed to after they have authenticated successfully using their CRYPTOCard token. What you type
between the quotes, whereby in Figure 2.4 we have the “default.aspx” page, you ensure that “default.aspx” be listed at the top of the “Default
Web Site Properties” panel (Documents Tab) as illustrated in Figure 2.2 within the IIS 6.0 perperties of your web site.
3. protection: The way the cookie data is protected. Possible values are: All, None, Encryption, and Validation. The default value is “All” which enables both “Encryption” and “Validation” of the cookie.
By default, cookies are encrypted using either DES or TripleDES encryption (depending on the capabilities of the server). Furthermore, the
contents of the cookie are validated with a Message Authentication Code to protect against tampering.
Encryption or validation or both features can be disabled by changing the value of protection attribute. For example, setting protection to
“Encryption” causes the cookie to be encrypted but not validated. The “Validation” attribute verifies that the contents of an encrypted cookie
have not been altered in transit.
Better performance from the application can be obtained by disabling encryption and validation; however, disabling these features also results in
a less secure site.
4. timeout: This is the maximum amount of time in minutes that a browser allows a user to be authenticated if there is no browser activity for
within the session.
5. path: This is the path used for the cookie. By default, this attribute has the vaule /.
6. deny users: The authorization section can contain either <deny> elements, which deny access for particular users, or <allow> elements, which
enable access for particular users. The symbol “?” is used for anonymous users which denies all users who supply no username or password.
Alternatively, the “*” symbol can also be used – which stands for all users (both anonymous and authenticated).
7. location path: The <location> tag allows the developer (you) to unprotect a path (folder); which is the path to apply a different set of security
rules. Also not the within the <location> tag are the <system.web> and <authorization> attributes to allow all users to access the files
contained in the “Img” folder as we specify this with the <allow users=”*”/> tag contained in the <authorization> tag. See Figure 2.4 above
for more details.
NOTE: The “login.aspx” file references both images and CSS from the “Img” folder; however because “web.config” protects access to
everything but the “login.aspx” file, if we do not declare as shown in Figure 2.4, the folder “img”.
The <location> tag needs further explanation because you can specify more than one path and then for each of those paths
(folders within the root directory of your web site) provide attributes that can either <allow> or <deny> users access to the contents of that folder.
MS. NET Web RADIUS Module
16
A KEY NOTE TO REMEMBER: If you <deny> (see point 6 above) anonymous access to a <location> and the
“login.aspx” file either references a CSS or image file from that folder to which you are denying access then those
images and CSS will not be used by the “login.aspx” page and as thus will not display the images or utilize your
intended CSS.
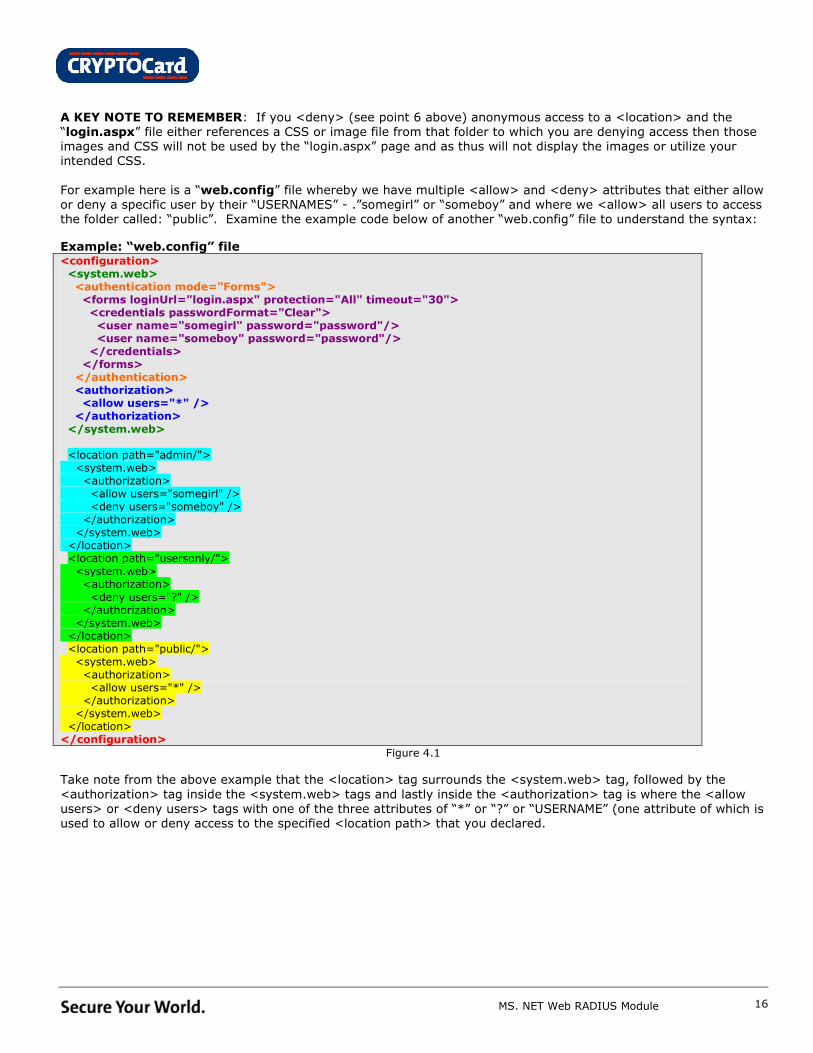
For example here is a “web.config” file whereby we have multiple <allow> and <deny> attributes that either allow
or deny a specific user by their “USERNAMES” - .”somegirl” or “someboy” and where we <allow> all users to access
the folder called: “public”. Examine the example code below of another “web.config” file to understand the syntax:
Example: “web.config” file <configuration> <system.web> <authentication mode="Forms"> <forms loginUrl="login.aspx" protection="All" timeout="30"> <credentials passwordFormat="Clear"> <user name="somegirl" password="password"/> <user name="someboy" password="password"/> </credentials> </forms> </authentication> <authorization> <allow users="*" /> </authorization>
</system.web> <location path="admin/"> <system.web> <authorization> <allow users="somegirl" /> <deny users="someboy" /> </authorization> </system.web> </location> <location path="usersonly/"> <system.web> <authorization> <deny users="?" /> </authorization> </system.web> </location> <location path="public/"> <system.web> <authorization> <allow users="*" /> </authorization> </system.web> </location> </configuration>
Figure 4.1
Take note from the above example that the <location> tag surrounds the <system.web> tag, followed by the
<authorization> tag inside the <system.web> tags and lastly inside the <authorization> tag is where the <allow
users> or <deny users> tags with one of the three attributes of “*” or “?” or “USERNAME” (one attribute of which is
used to allow or deny access to the specified <location path> that you declared.
MS. NET Web RADIUS Module
17
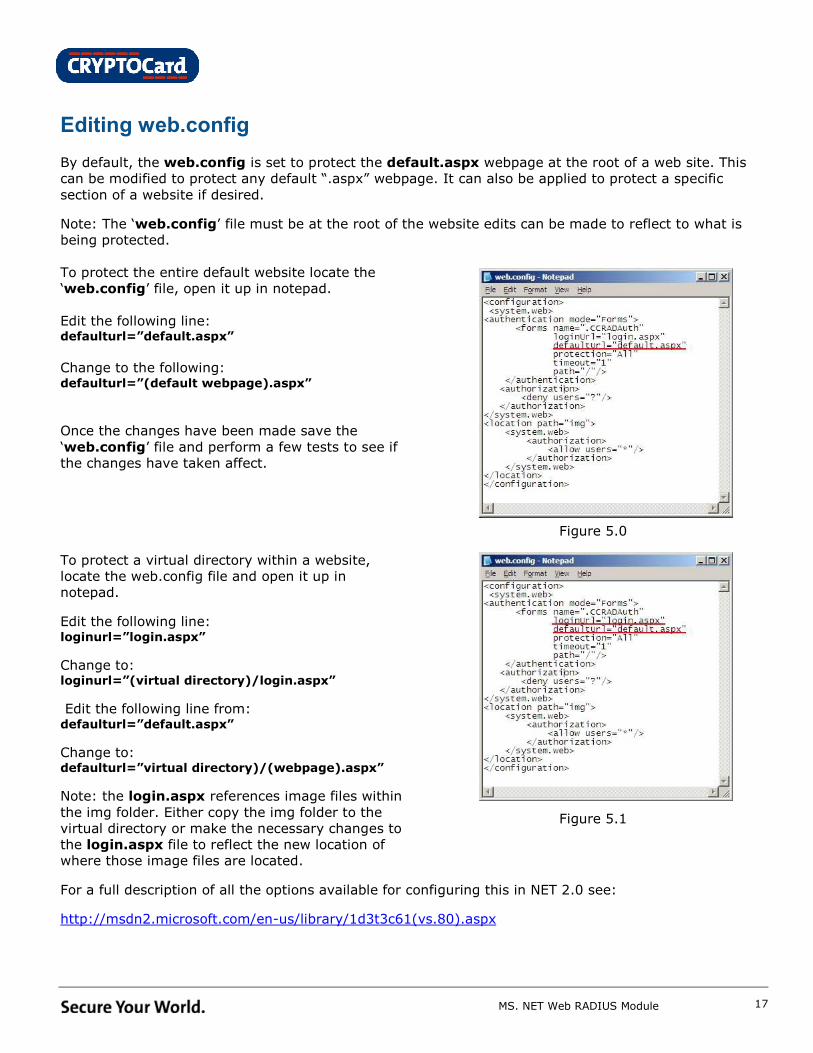
Editing web.config
By default, the web.config is set to protect the default.aspx webpage at the root of a web site. This
can be modified to protect any default “.aspx” webpage. It can also be applied to protect a specific
section of a website if desired.
Note: The ‘web.config’ file must be at the root of the website edits can be made to reflect to what is
being protected.
To protect the entire default website locate the
‘web.config’ file, open it up in notepad.
Edit the following line: defaulturl=”default.aspx”
Change to the following: defaulturl=”(default webpage).aspx”
Once the changes have been made save the
‘web.config’ file and perform a few tests to see if
the changes have taken affect.
Figure 5.0
To protect a virtual directory within a website,
locate the web.config file and open it up in
notepad.
Edit the following line: loginurl=”login.aspx”
Change to: loginurl=”(virtual directory)/login.aspx”
Edit the following line from: defaulturl=”default.aspx”
Change to: defaulturl=”virtual directory)/(webpage).aspx”
Note: the login.aspx references image files within
the img folder. Either copy the img folder to the
virtual directory or make the necessary changes to
the login.aspx file to reflect the new location of
where those image files are located.
Figure 5.1
For a full description of all the options available for configuring this in NET 2.0 see:
http://msdn2.microsoft.com/en-us/library/1d3t3c61(vs.80).aspx
MS. NET Web RADIUS Module
18
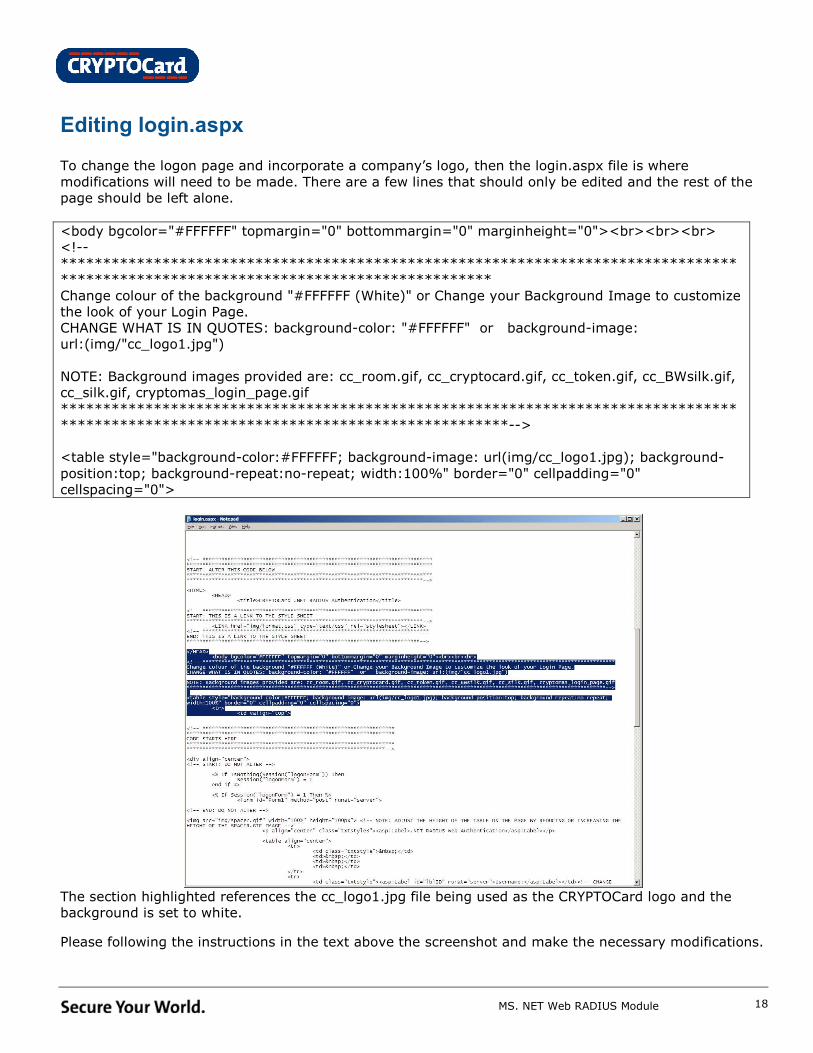
Editing login.aspx
To change the logon page and incorporate a company’s logo, then the login.aspx file is where
modifications will need to be made. There are a few lines that should only be edited and the rest of the
page should be left alone.
<body bgcolor="#FFFFFF" topmargin="0" bottommargin="0" marginheight="0"><br><br><br>
<!--
********************************************************************************
***************************************************
Change colour of the background "#FFFFFF (White)" or Change your Background Image to customize
the look of your Login Page.
CHANGE WHAT IS IN QUOTES: background-color: "#FFFFFF" or background-image:
url:(img/"cc_logo1.jpg")
NOTE: Background images provided are: cc_room.gif, cc_cryptocard.gif, cc_token.gif, cc_BWsilk.gif,
cc_silk.gif, cryptomas_login_page.gif
********************************************************************************
*****************************************************-->
<table style="background-color:#FFFFFF; background-image: url(img/cc_logo1.jpg); background-
position:top; background-repeat:no-repeat; width:100%" border="0" cellpadding="0"
cellspacing="0">
The section highlighted references the cc_logo1.jpg file being used as the CRYPTOCard logo and the
background is set to white.
Please following the instructions in the text above the screenshot and make the necessary modifications.
MS. NET Web RADIUS Module
19
Troubleshooting
Failure to authenticate during logon (CRYPTO-Server):
If a failure occurs at any time during initial logon, check to see if the token is in sync with the CRYPTO-Server,
by performing a re-sync. To learn how to re-sync a specific token, please go to the link below to access the
token guides.
http://www.cryptocard.com/support/technicaldocumentation/?cat=23
NOTE: A user can obtain a challenge for their token on the login.aspx page by providing a blank pass
code. They can also obtain a pass code from the CRYPTO-Server Administrator.
A test can also be done within the CRYPTO-Console to verify if a user’s token is sync with the CRYPTO-Server.
To learn how to test a token, please refer to Section 3.7.1 of the CRYPTO-Server 6.4 Administrator
Manual.
Radius authentication fails after re-sync (CRYPTO-Server):
If re-sync has been performed and Radius authentication fails, please check the Radius authentication in the
following file: RADIUSProtocol.dbg
The location of the “RADIUSProtocol.dbg” file can be found in the below noted platforms:
• (Windows): \CRYPTOCard\CRYPTO-Server\logs
• (Linux): /usr/local/cryptocard/CRYPTOServer/logs
• (Mac): /Applications/CRYPTO-Server/logs
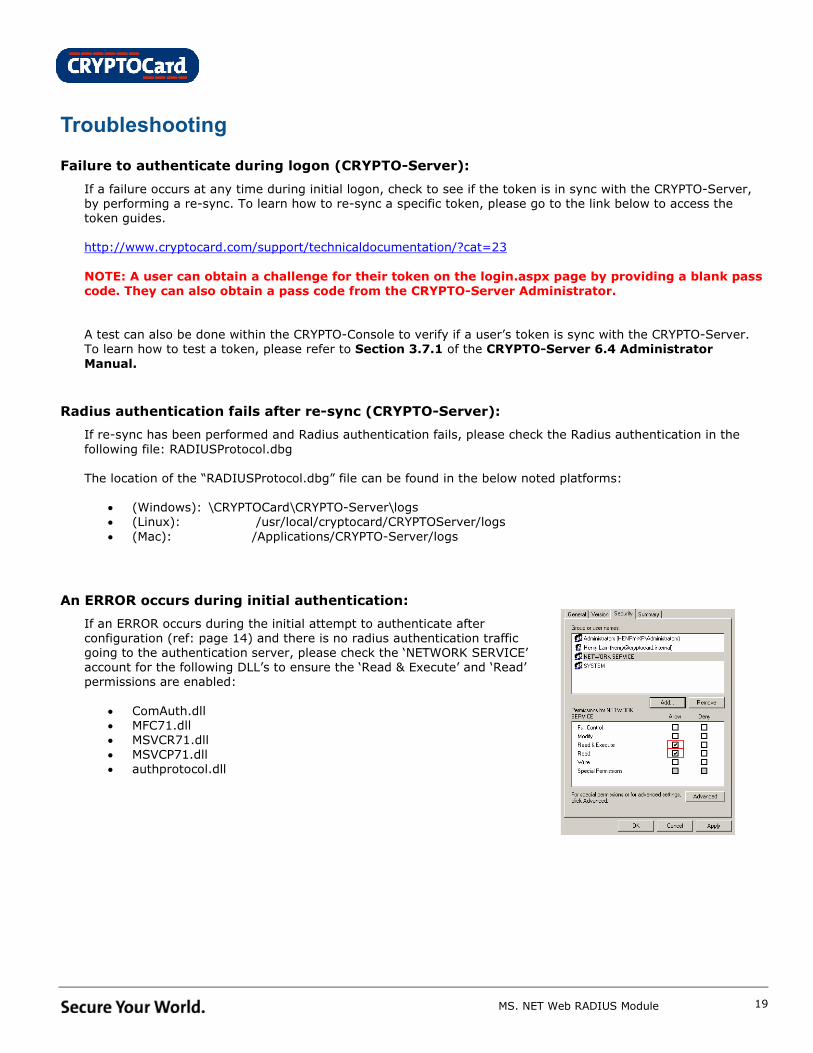
An ERROR occurs during initial authentication:
If an ERROR occurs during the initial attempt to authenticate after
configuration (ref: page 14) and there is no radius authentication traffic
going to the authentication server, please check the ‘NETWORK SERVICE’
account for the following DLL’s to ensure the ‘Read & Execute’ and ‘Read’
permissions are enabled:
• ComAuth.dll
• MFC71.dll
• MSVCR71.dll
• MSVCP71.dll
• authprotocol.dll


