24
NUMERIC UNDERPINNER / ASSEMBLEUSE NUMERIQUE Cassese / Communication CS 4008 XL Technical and User Manual Manuel Technique & d’Utilisation Version 1 - 11 / 2008

NUMERIC UNDERPINNER / ASSEMBLEUSE NUMERIQUE
Cassese / Communication
CS 4008 XL
Technical and User ManualManuel Technique & d’Utilisation
Version 1 - 11 / 2008

BACK FENCES
G 1
MAGNETICTIP
SLIDINGTABLE(TC)
SLIDING TABLELOCKING LEVER(MTC)
JOINING ANGLEADJUSTER ( AS ) BACKFENCES
INCLINATIONADJUSTERS( RI )TOP
PRESSERPLUNGER
REMOVABLE CLAMPS
Fig 2
G 2
B2
B1
ADJUSTABLE SUPPORTPRESSER
G1G2
EMERGENCY / STOP &STARTBUTTON
PRE-CLAMPINGLEVER
STAPLING BUTTON
WEDGESLOADING
DIGITALKEYBOARD
Fig 3
CS 4008XLDESCRIPTIVE
TOUCHSENSITIVESCREEN
TOP PRESSER SPEEDADJUSTER
REBATE CLAMPPRESSURE ADJUSTER
AIR VALVE
ELECTRICAL CABINET
FOOTPEDAL
Fig 1
WEDGE LOADING CHANNEL
A
WEDGEDISTRIBUTOR
PSEA
TOP PRESSER BRACKET

CS4008XL INDEX
INTRODUCTIONACCESSORIES 1SPECIFICATIONS 1OPTIONS 1WARRANTY 1
SETUP1) INSTALLATION 22) CONNECTING TO COMPRESSED AIR 33) START UP 4
ADJUSTMENTS1 ) CHOICE OF PRESSER 52 ) HOW TO USE THE SPACER BARS 53 ) ADJUSTING THE SLIDING TABLE 64 ) SELECTING THE STAPLING POSITIONS 65 ) ADJUSTING ANGLES OF THE STOPS 66 ) ADJUSTING THE JOINING ANGLE 7
JOINING1 ) MEANS OF JOINING 72 ) LOADING WEDGES 73 ) JOINING IN MODE 486 8a) SETTING COUNTER PARAMETERS 9b) MEMORISING JOINING PARAMETERS 94) JOINING IN MODE 3099 10a ) MEMORISING JOINING PARAMETERS 11b) JOINING A FRAME 115) ITEMS MODE 12
- MANAGING THE ITEMS DATABASE 12-13
NETWORK MODE
PARAMETERS6) PARAMETERS 157) SYSTEM PARAMETERS 16
PROGRAMME CHART
MAINTENANCE1) SCHEDULED MAINTENANCE 172) BLOCK H MAINTENANCE 173) REINITIALISING THE WEDGE MAINTENANCE ALARM 184) ADDITIONAL REQUIRED MAINTENANCE 185) UNBLOCKING THE HAMMER 196) EXTRACTING A WEDGE CAUGHT IN THE DISTRIBUTOR 19
TROUBLESHOOTING GUIDE
14
16
20-22
CS4008XL DESCRIPTIVE A

1
INTRODUCTION
You have just acquired a CS 4008 XL underpinning machine. We congratulate you on yourexcellent choice and thank you for your confidence. The CS 4008 XL benefits from Cassese’srecognised expertise in picture-framing products. It enables joining of all sorts of wooden andplastic mouldings, in all shapes and sizes (Patent n°7522814). Joining is achieved with speciallydesigned metal wedges ensuring perfect results.IMPORTANT: Use only Cassese® CS wedge cartridges
ACCESSORIES
The CS 4008 XL is delivered with the following accessories, inside a cardboard box:-1 adjustable presser support/1 ball lock/1 magnetic triangle imprint base/1 Black triangle (hardwood)/l White triangle (standard wood)/l magnetic rubber imprintbase/1 Green rubber tip (30 mm hardwood)/l Yellow rubber tip (30 mm standard wood)/1 set of spacer bars for small mouldings/3 Allen keys (2.5-3-5 mm).1 wedge pusher tool/1 spare hammer/1 tube of grease1 quick release female connector/1 US male nozzle/1 ribbed nozzle/2 trap door keys.
SPECIFICATIONS
Minimum moulding width: 3 mm/Maximum moulding width: 150 mmMinimum moulding height: 5 mm/ Maximum moulding height: 112 mmMinimum frame size: 85 x 85 mmMaximum joining width from the heel of the moulding: 175 mm.Size of Cassese wedges in packages of 275: 5-7-10-12-15 mm. 3-4 mm available onrequest.Two types of wedges: standard wood and hardwood.Weight of the CS 4008 XL: 150 kgOverall dimensions: Width (without base) =52 cm, Depth=62 cm, Height=l 18 cmPower supply: Electricity: 220 v, single-phase, 50/60 Hz, Pw: 500w.Pneumatic: compressed air 6-7 bars,Consumption: 5 litres per cycle.
OPTIONS
Circular rotating table (ref. Z3074) Adjustable presser (ref. Z3898)Barcode reader Z21476 (contact customer service).File storage software for PC. Copies item files from the 4008XL to a PC and from a PC to the4008XL.
WARRANTY
The CS 4008 XL is guaranteed one year for parts and labour against manufacturing defects. Wornparts or those damaged as a result of non-compliance with instructions in the present manual areexcluded from the guarantee.
2
1 ) INSTALLATION
V1
V2
V3V4
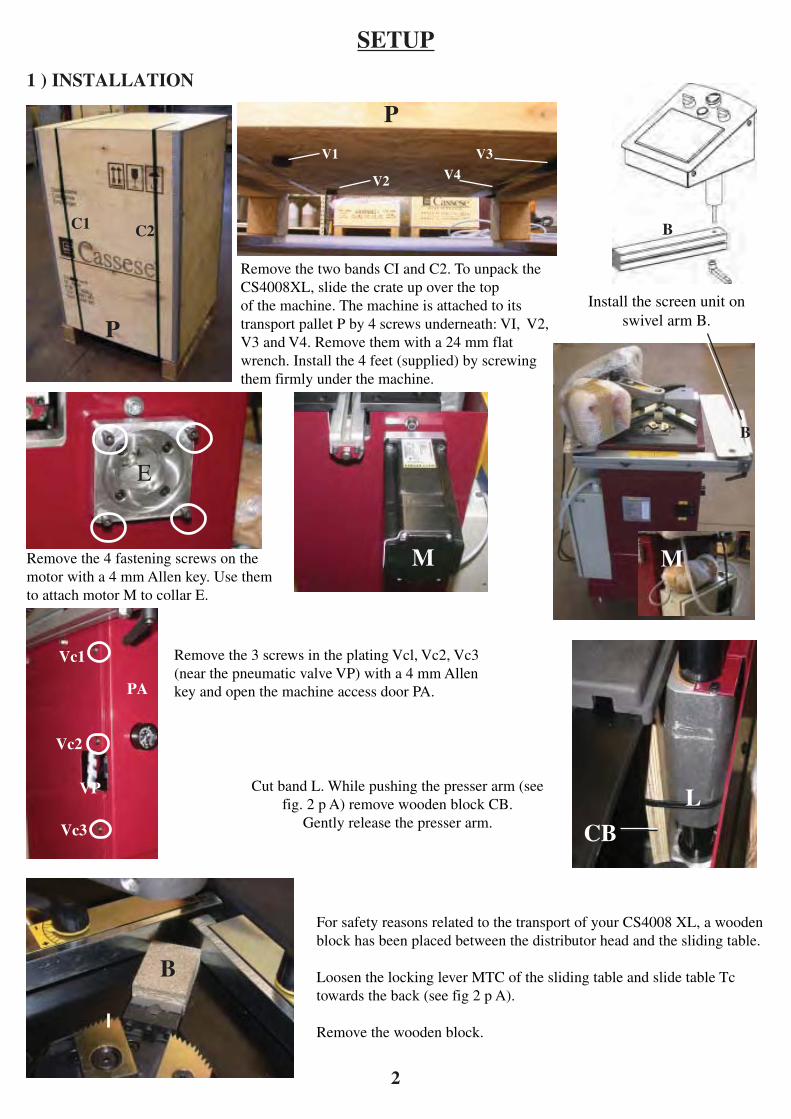
Remove the two bands CI and C2. To unpack theCS4008XL, slide the crate up over the topof the machine. The machine is attached to itstransport pallet P by 4 screws underneath: VI, V2,V3 and V4. Remove them with a 24 mm flatwrench. Install the 4 feet (supplied) by screwingthem firmly under the machine.
P
P
C1 C2
Remove the 4 fastening screws on themotor with a 4 mm Allen key. Use themto attach motor M to collar E.
MM
Cut band L. While pushing the presser arm (seefig. 2 p A) remove wooden block CB.
Gently release the presser arm.
Remove the 3 screws in the plating Vcl, Vc2, Vc3(near the pneumatic valve VP) with a 4 mm Allenkey and open the machine access door PA.
LCB
Vc1
Vc2
Vc3
VP
For safety reasons related to the transport of your CS4008 XL, a woodenblock has been placed between the distributor head and the sliding table.
Loosen the locking lever MTC of the sliding table and slide table Tctowards the back (see fig 2 p A).
Remove the wooden block.
B
SETUP
PA
E
Install the screen unit onswivel arm B.
B
B

PNEUMATIC CONNECTIONS
Connect the compressedair supply to the hoseoutside the machine, underaccess door PA
2 ) CONNECTING TO COMPRESSED AIR
USA
COMPRESSOR
USA NOZZLE
RIBBED NOZZLE
Z 675
Z 675Z 749
Z 701
Z 556STANDARD
Pull up the pressure adjustment button RP and turn it(clockwise=more pressure) until the needle of
manometer M reaches 6 bars.
RP
PA
M
Open the AIR VALVE VP, themanometer M should show apressure reading of 6 bars.
Remove the 3 screws in theplating Vcl, Vc2, Vc3 (near thepneumatic valve VP) with a 4 mmAllen key and open the machineaccess door PA.
VP
Vc1
Vc2
Vc3
PA
M
If the pressure indicated is not 6 bars:
3
M
PRESSURE REDUCINGCONNECTOR
FEMALE QUICK RELEASECONNECTOR

3 ) START UP
1 ) Connect the electrical plug of the CS4008XL to a grounded 220 Vsingle-phase outlet.2 ) Turn the compressed air valve to ON. The manometer should show 6bars (see page 3).3 ) Turn the START/STOP button. The touch sensitive screen shouldbe displayed:
CHOICE OF LANGUAGE (Press the button that corresponds to your language)
Total number ofstaplings since thebeginning of operation.
Number of cyclescompleted since thebeginning of operation.
Programversions
The default workscreen can be set in 486 or 3099 mode:Press F4 (PARAMETERS)/page 3/5 and specify thedesired type of screen with the 486/3099 button.
F4
F4
F1
F2
F3
4 ) HOMESCREEN
COMPRESSEDAIR VALVE
5 ) DEFAULT SCREEN PARAMETERS
By pressing the pedal, on the touch sensitive screen, or duringpre-clamping, the 486 or 3099 workscreen will be displayed.
4

1 ) CHOICE OF PRESSERThe presser is made up of an adjustable support and magnetic,interchangeable tips. It is mounted on the arm of the post with pinG and can be set at 7 different distances from the table. Pay closeattention to the position of the triangle (the sides of the triangleshould be parallel to stops Bl and B2: see fig 2 page A of theinstruction manual)
7-position fitting for RubberPressers and Triangles. Suppliedwith 2 magnetic tips for eachpresser imprint.
POSITIONING THE PRESSERPOSITIONING OF RUBBER PRESSERS/TRIANGLEMAXIMUM MOULDING HEIGHT FOR THE 7 POSITIONS :
BLACK PRESSER (TRIANGLE) HARDWOODWHITE PRESSER (TRIANGLE) SOFT WOODYELLOW RUBBER TIP 30 mm HARD WOODGREEN RUBBER TIP 30 mm SOFT WOOD
ADJUSTMENTS
2 ) HOW TO USE THE SPACER BARS
Presser
Moulding
G1
3
4
56
2
7
Presser
Moulding
SET OF
SPACER BARS
BAD GOOD
Stop
When joining small mouldings,lower than the height of the stops, itis necessary to use the set of spacer
bars supplied with the machine.
Distributeurd’agrafes 5
Position Triangle Rubber 30 mm1 0 13 mm 20 mm2 0 27 mm 35 mm3 0 42 mm 49 mm4 0 57 mm 63 mm5 0 71 mm 73 mm6 85 mm 92 mm7 100 mm 170 mm

1) Turn the «pre-clamping» button to ON.2 ) Place a moulding against stop Bl. If the moulding height is lower than the stops, you must insertthe set of metal spacer bars provided with the accessories before placing the mouldings againstthem (see page 5).3 ) Move sliding table TC (fig 2 p A) until clamp Gl (fig 2 p A) touches the moulding.4 ) Turn the locking lever of sliding table TC (fig 2 p A).
The CS4008XL is designed to join mouldings in 1 to 9 places with a maximum of 9 wedges foreach position. This choice is based on the width of the moulding, its hardness and thickness.
NB : IN EVERY CASE, STAPLING SHOULD BE PERFORMED AS CLOSE AS POSSIBLETO THE THICKEST PART OF THE MOULDING.
4 ) SELECTING THE STAPLING POSITION
3 ) ADJUSTING THE SLIDING TABLE
0
190 mm Maximum
HEEL
Depth ofrebate
5 ) ADJUSTING ANGLES OF THE STOPS
( RI ) BUTTONS FOR ADJUSTING STOP ANGLES
+ 0 -
R I
1
2
1) If the corner has an opening on top, turn the two adjustmentbuttons (RI) an identical value towards the MINUS sign (-)(Fig. 2 p A).2) If the corner has an opening underneath, turn the same twoadjustment buttons (RI) an identical value towards the PLUS sign(+) (Fig. 2 p A).
6
Generally, a clearance of 2 mm MINIMUM isrequired above the wedge. Wedges that are thesame size can be stacked, in order to avoid changingwedge cartridges when joining frames of variousthicknesses.
Measurement of the width is based on thediagonal cut from the depth of rebate to the heel.The profile width must not exceed 190 mm.

6 ) ADJUSTING THE JOINING ANGLE
If the corner is open towards the outside;Tighten the adjustment screw AS (page A, fig. 2 & figure AS below) to correct the error andcheck the quality of the angle by clamping the corner against the stops again.
If the corner is open towards the inside; Loosen the angle adjustment screw AS (page A, fig. 2 &figure AS below) to correct the error and check the quality of the angle by clamping the mouldingsagainst the stops again.
If you obtain this result, checkyour cutting angle. The angleis incorrect in this casebecause it is less than 45°.Have the angle of your cuttingmachine corrected.
Extérieur
Intérieur
IT IS IMPOSSIBLE TO MAKE A FRAME WITH ANGLES LESS THAN 90°
AS
1 ) MEANS OF JOINING
Joining is performed using metal wedges speciallydesigned to ensure perfect corners. Five standardsizes are available: 5, 7, 10, 12 and 15 mm,packaged in cartridges of 275 units for hardwoodsor soft woods. On special order, cartridges of 3 and4 mm wedges are available for Slips (fillets).
Turn the button WEDGES LOADING tothe ON position. The wedge loading slotC retracts. Slide the wedge loader CS in,all the way to the distributor window.Turn the button WEDGES LOADING tothe OFF position. The slot returns to itsnormal position.
2 ) LOADING WEDGES
JOINING
C
7
For greater reliability and productivity over time, use only CASSESE wedge cartridges with yourCS 4008 XL

3) JOINING IN 486 MODEThe 486 workscreen is displayed by pressing Fl. If this screen has been set as the default workscreen, it willautomatically be displayed by pressing on the homescreen. A flashing message indicates the machine must be placedin the pre-clamping position.
The post/stapling joining (P/SEA see fig. 2 p A) is initialised andmoves to position 1, near the clamps. Place the profile againststop Bl and adjust the Sliding Table (see page 6). At this point,the stapling positions and quantity of wedges for each point willhave been defined. By pressing the buttons < (back) and >(forward) you can visually change the position of the P/SEA unit.Field C provides the position of the P/SEA joining in mm, the 0position being near the clamps. Movement follows the cuttingangle. You can move directly to a given dimension by pressingfield C of position dimension. A numeric keypad is displayed.Enter the desired position, from 0 to 190. Press ENTER toconfirm the dimension.By pressing several times on POS, you can move to positions 2,3, and so on, up to a maximum of 9. After position 9=back toposition 1. You can go directly to a given position by pressing theposition number field P. A numeric keypad is displayed. Enter thedesired position n°, from 1 to 9. Press ENTER to confirm.By pressing several times on QTY, you can specify the quantityof wedges for the position: 1, 2, 3, and so on, up to a maximum of9. After 9=back to 0. You can specify directly the quantity ofwedges for a position by pressing the wedge quantity field Q. Anumeric keypad is displayed. Enter the desired quantity from 0 to9. The selection buttons Manu/Auto define the way the frame isassembled.
Turn the button PRE-CLAMPING towards ON. Resetat 0, if necessary, all the position fields POS andquantity fields QTY using the CLEAR button (RAZ).
RAZ
RAZ
CPQ
POS
QTE
8
MANU=Press Pedal (clamping) + Press Staple Button.NB: we advise you to use this two-step method for the first frames in order to check
the accuracy of the settings.
AUTO= Press Pedal (Clamping/Stapling in a single operation).

B) MEMORISING JOINING PARAMETERS
See 3099 Mode (page 10). The joining parameters in 486 Mode can be found on the 3099 Mode screen.Follow the memorisation procedure on this screen.Or switch to Items Mode using F3 and press the button FROM EXEC.The parameters previously displayed on the 486 screen can be found on the Items screen (see item memorisationpage 11)
a) SETTING COUNTER PARAMETERSPress F4 (the parameters screen is displayed), then the button at the bottom ofscreen 2/5. Specify using the button M:Mode INC COUNT (counts the stapling cycles by addition) orMode DEC COUNT (counts the stapling cycles by subtraction)Enter the unit of division in the field COUNTER DIVISION (DC):1 = counts the number of assembled corners.4 = counts the number of assembled frames (etc..)
A text message indicates the state of the machine when thereis a problem.
When a cycle is in progress, the message «cycle in progress»appears on the screen and all the buttons are blocked.The displays of positions and quantities change as the staplingcycle progresses.
M
DC
When the machine is out of wedges, it completely retracts the cartridgeloading slot and displays a message inviting you to insert a new cartridgeCS. Remove the empty cartridge. Insert the new one, pushing it until itreaches the distributor window. Press the Stapling button to continue. Themachine continues the stapling cycle where it left off.
EXEC IN PROGRESS
When an incident occurs, the RESET button interrupts thecurrent cycle. Perform re-clamping again.
The TORTOISE/HARE button is used to set the stapling mode. The stapling mode is defined in Parameters 3/5(see page xx). The standard default mode is TORTOISE. Parameterise the TORTOISE/HARE button to obtain adifferent stapling system for each mode, combining the first pressing (l=slow) and boosted pressing (2=rapid). Forexample: TORTOISE=l 11 for fragile mouldings and HARE=222 for more sturdy mouldings.
9
The COUNTER field indicates the number of cycles completed. By pressing this field,a numeric keyboard is displayed, enabling you to attribute a value: the counter can beIncremental or Decremental, see below:

Angle: 45° (squares, rectangles),30° (hexagons),25° (octagons)
Use (or not) of spacers Type of tip
Wedge size
After turning the machine on, press F2: the 3099 screen is displayed. A message invites you to perform pre-clamping.To clear all of the positions and quantities press «CLEAR» (RAZ): the post/SE stapling unit is initialised and moves tothe default position, near the clamps.
Important: the 0 position is near the clamps, the unit moves along the cutting angle.
Parameters of the position points and the quantity of wedges for each position are set in the following manner:Each stapling point is numbered from 1 to 9 and includes the distance from point 0 (clamps) and the quantity ofwedges inserted.
4) JOINING IN 3099 MODE
There are 2 methods for entering the POSITION parameters: either using the arrows < (back) and > (forward)which visually move the P/SEA to the desired position, or entering values via the numeric keyboard, which isdisplayed after pressing on the upper field (be careful to confirm each value by pressing ENTER )The quantity of wedges (from 0 to 9) is entered, after pressing the lower field, via the numeric keyboard.Proceed the same way for the subsequent positions.By pressing on the display of a position dimension, the P/SEA unit moves directly to that dimension.
ANGLE / SPACER BAR / TIP / SIZE
These elements do not affect the machine cycle. They are an optional visual aid for the operator.
The 3099 enables you to specify:
By pressing on the field marked MOULDING WIDTH, you can indicate thisdimension . Entering the moulding width is optional. It is a visual indication for theoperator, just like the tip, size, spacer bars and angle. NB: When the machine is outof wedges and the moulding width has been entered, the post will retract to themoulding width. If the moulding width has not been entered, or if it is less than theposition dimensions, the machine will move to the furthest positionand will ask you (via a message) to reload (see procedure page 8) Press the staplebutton to continue.
By pressing these buttons, you can specify:
POSITIONDIMENSION
QTY OF STAPLESFOR THE POSITION
POSITION N°
POSITION SELECTION KEY
10

After pressing REF/JOB themachine will ask you to enter anitem name using the numerickeyboard.
The SEARCH (R) key can be used to call up a [known item (in this case3099-03) from the 3099 screen.Enter the exact name of the item. Confirm by pressing ENT. I Then pressSEARCH.After pressing VERS EXEC, the machine executes the item. It is possible tocreate an item directly via the 3099 execution screen.Enter the various parameters of the moulding (positions and wedgequantities). Then enter a name in REF/JOB and validate it by pressing V.If the item already exists, a confirmation screen will be displayed.
V
Once the item name has beenentered, confirm by pressing ENTon the numeric keyboard.
The joining parameters of theprofile must be saved with thevalidation key V.
MANU=Press Pedal (clamping) + Press Staple Button.NB: we advise you to use this two-step method for the first frames in order to
check the accuracy of the settings.
AUTO= Press Pedal (Clamping/Stapling in a single operation).
A) MEMORISING JOINING PARAMETERS
B) JOINING A FRAMEOnce the parameters have been entered in the machine, two modes (AUTO and MANU) can be used to assemble theframe. They define how the stapling cycle will be launched:
You can stop the cycle in progress using theRESET button
without turning off the machine.
When the stapling cycle has been launched, the machine will display anexecution screen indicating each position as it is completed.
11
VR

5) ITEMS MODE
Press F3 to access the ITEMS screen. An item consists in the following parameters:- Item name: up to 16 alphanumeric characters. Press on the field REF ITEMS and enter the desired name via thenumeric keyboard. Then press ENT followed by V.-1 to 9 stapling positions: depending on the cutting angle and for a maximum width of 190 mm. Enter theposition after pressing on POS.1 to 9 wedges per position: enter the number of wedges after pressing on each QTY field.Moulding width: from 0 to 190 mm maximum from the depth of the rebate.Creation date: Press DATE DMY or modify each field of the date displayed.Joining angle: scroll down the different angles by pressing button AUse (or not) of spacer bars: select the desired option by pressing BType of tip: Choose one of 4 tips, then press CWedge size: Choose the size after pressing button DAll these values can be changed at a later date, by pressing thecorresponding button (or display). Modifications only affectthe item and not execution in progress.
The CS4008 can record up to 3,000 items.
V
POS
QT
A B C DTo Create a new item, press NEW. All the parameters arecleared. The date is reinitialised. Enter your parameters; enterthe item name and validate (V). If an item with the same namealready exists, a warning will be displayed. Confirmreplacement of the existing item or cancel and continue theprocedure with a different name.
MANAGING THE ITEMS DATABASE
To SEARCH for a saved item, press on the name of the item. A numeric keyboard is displayed. Enter the name andconfirm. Then press SEARCH. If the item exists, its parameters will be displayed. Otherwise, the messageINEXISTENT ITEM will be displayed.
To DELETE an item from the machine’s memory, press DELETE
To MODIFY an item, change the desired parameters and confirm. A confirmation screen will appear. Confirm or returnto the item file.
To COPY: call up the desired item (enter its name and then press SEARCH). Modify the name, then confirm bypressing V
By pressing >EXEC, you can transfer the «T parameters of the item file to the execution screen(486 or 3099 depending on parameterisation of your preferences).
By pressing EXEC<, you can transfer the execution parameters of the jobin progress to the item file.
>EXEC EXEC<,
12
SEARCH NEW DELETE VALIDATE

NOTE: A newly created item will appear in the first available empty slot. A deleted item frees up a slot. Therefore,items do not necessarily appear in the order they were created.
To search for an item in the machine’s memory using the list, enter its name after pressing ITEM NAME and confirmusing the ENT button on the numeric keyboard. Then press SEARCH to call up the item among the 3,000 files in thedatabase.
Press on one of the 10 names in the list to call up the file of the selected item. Then press >EXEC to execute it.
Press LIST OF ITEMS and a screen will display the items in themachine’s memory, by lists of 10 names.
If you press IDX, a new screen will be displayed, enabling you to scroll down the list of items saved in the machine.
You can move up and down the index from the page of 10 items displayed by pressing +10 (10 items lower), +100 (100items lower),-10 (10 items higher),-100 (100 higher).You can also enter the value of the index displayed directly by pressing IDX. You can even go to a predefined value400/800/1200/1600/2000/2400/2800 using the scroll bar.
LIST OF ITEMSNETLIST
You can search for any item using part of the name.
Example: 3099 and 3099-02 are two different items.Using the PARTIAL button, you can search for all items starting with3099.
13

THESE NETWORK FUNCTIONS ARE DESTINED TOEVOLVE -SEE EVOLUTION OF «Cassese Barcode»
The machines are connected via a network cable (e.g. Ethernet CAT5)toaPCserver.
Starting from the item file, press NETLISTPress UPDATE to update the list.Make a GET/ACK or DONE request.Press UPDATE to update the list.Execute the job and then press UPDATE to update the list.You can use the execution parameters in the NETLIST.To visualise the parameters of a job, press on the job name.Then press >EXEC. The machine is adjusted according to the Job parameters in NETLIST.Otherwise, you can execute the Job using your own parameters, or those of an item in the machine’smemory. You can still use DONE.
NETWORK MODE
LIST OF ITEMSNETLIST
14
This system only functions if the machine is connected to a PC/SERVER that dispatches jobs to a network ofmachines.The system is based on the following principle:The PC/Server records a list of orders and organises a list of Jobs according to various priorities.The server proposes, depending on the type of machine (saw/joiner) and a job database, a queue of 10 jobs.A job is defined by:•Its NAME•Its joining Parameters (when appropriate).•The Quantity requested.Its Status: FREE (waiting)/MACHINE REQUEST(GET)/REQUEST ACKNOWLEDGED (ACK)/COMPLETED (DONE).
•The quantity already completed. The machine requests a list of Jobs in thequeue. The PC/SERVER sends back a list of 10 Jobs from the list of orders,according to different parameters and priorities.
The operator selects GET-Request for Job. 1 to 10 Jobs can be requested by asingle machine.The PC/SERVER sends back the list of 10 Jobs, with the response ACK ifthe request is accepted. It could be refused, for example, if the order has been cancelled or another machine has alreadytaken the job. The machine executes the entire job or part of it.The operator enters the quantity completed and then makes a DONE request. DONE can only be executed if the job hasbeen requested and acknowledged. Several jobs may be DONE at the time of the machine request.The PC/SERVER records the job, even if it is partially completed, deallocates the Jobs Done and creates a new list withthe next 10 Jobs in the queue, and so on.

Pages 1, 2 and 3 concern variousmachine parameters.
Do not modify without authorisation from
CASSESE Customer Service
Page 3 enables you to define operational preferences of the machine.The main options are: -3099/486 MODE preference -INC/DEC counter cycle-Manuel/Auto default mode when the machine is turned on.-Stapling mode 111,1212, 122 (first pressing and boosted pressing).The stapling mode will define the use of first pressing (gentler) and secondpressing (more powerful).
Page 5 is used to manage the items database.Use only at the request of
CASSESE Customer Service.
Page 4 enables visualisation of Input/Output. This page is functional, even during
continuous operation of the machine.
Level 1-code 5000-User Level 1: RESET ALARMS, SET TIME, INTERACTIVEMODIFICATIONS OF FILES AND/OR MODIFICATIONS.
Level 2-code 9059-User Level 2: OFFSET/RATIO/SPEED/TEMPO...Level 3-code 0721- User Level 3: management of the ITEM DATABASE (parameters page 5)Level 4-code XXXX- Total access for CASSESE customer service (modification of cycle/wedge
stats, direct read/write in the Database)
Pressing F4 provides access to the PARAMETERS. Access to various parameters ofthe CS4008XL is organised in a hierarchical manner according to user level. Apassword is requested when a user tries to modify a given option (parameter pages).The user level remains active while the machine is turned on.
6) PARAMETERS
CODE
15
1111 : the machine only uses the first pressing (soft mouldings).1212 : the machine presses each wedge a second time at each stapling.1222 : the machine uses a first and second pressing, then, for stacking only, the second pressing (saves time).222 : only the main pressure (saves time with very hard would).

7) SYSTEM PARAMETERS
After pressing down on the SYS button, you can access the systems parameters. Some require a password. Authorisedadjustments for a basic user are:
CALIBRATE: To calibrate the touchpad, follow the .instructionson the screen. Press the centre of the black circle.
BACKLIGHT: Adjusts luminosity, contrastand brightness of the screen.
16
TIME:Select Year-Month-Day-Hour-Minutes-Seconds with the
left/right arrows and change the values with the + or -buttons. Save the settings with the Save button or use Quit
to exit without saving changes.
CS 4008XL PROGRAM CHART
HOME F1 F2 F3 F4
LANGUAGESELECTION 486 MODE 3099 MODE ARTICLES PARAMETERS
RAZAUTOMANU
TORTOISE/HARE
RESET
RAZAUTOMANU
TORTOISE/HARE
RESET
ANGLE
SPACER
PRESSOR
SIZE
RAZSEARCHNEW
DELETEVALIDER
ANGLESPACERPRESSORSIZEIDX
NETLISTEXECSEARCH
NEXT
PARTIAL ARTICLE
NEXT
PAGE 1/5PAGE 2/5PAGE 3/5PAGE 4/5PAGE 5/5
MAINTENANCE
Important :Before any work concerning the mechanical parts of the machine or its electrical cabinet,
make sure to turn off both the power and compressed air supplies.
1. SCHEDULED MAINTENANCE :
In order to preserve your Cassese machine and all its qualities, we recommend periodic preventive maintenance.This is why your Cassese machine will display an alarm message, after every 50000 wedges, asking you toperform maintenance on the wedge distributor. The message «nails maintenanace» means it’s time to clean thewedge distributor block H. Follow the maintenance procedure described in the chapter entitled « Block HMaintenance ». Then reinitialise the alarm as explained in «reinitialising the nails maintenance alarm».
2. BLOCK H MAINTENANCE :
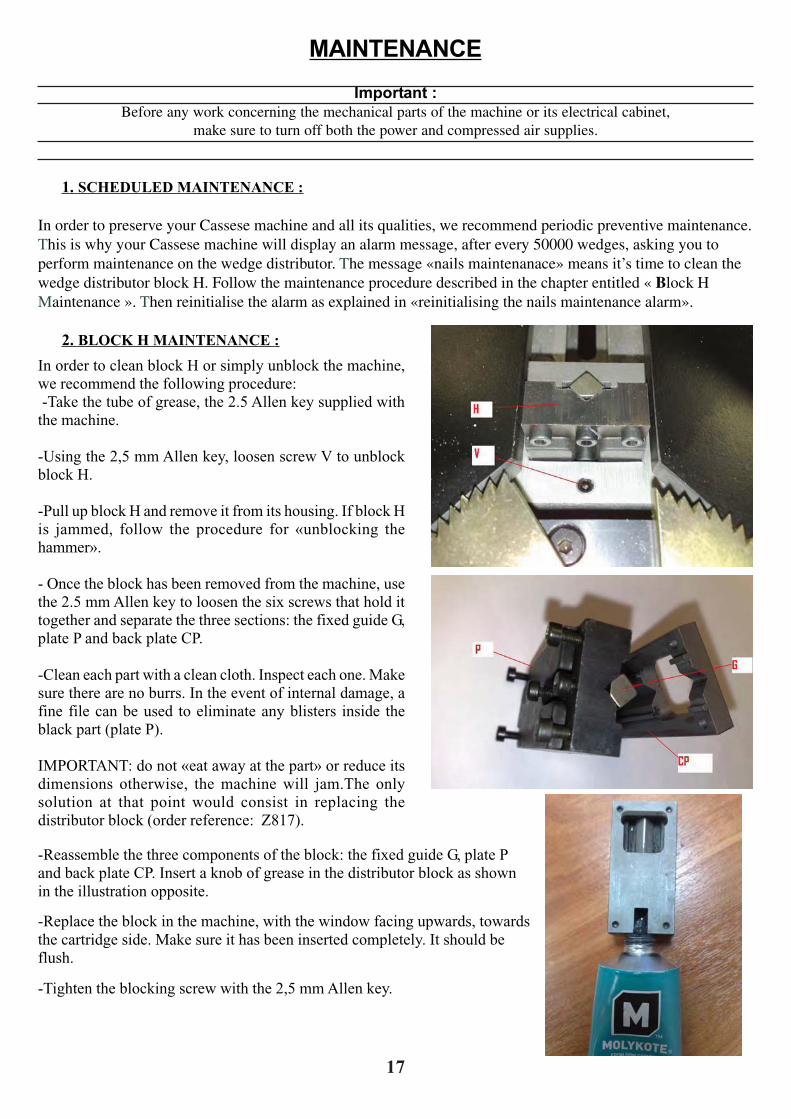
In order to clean block H or simply unblock the machine,we recommend the following procedure: -Take the tube of grease, the 2.5 Allen key supplied withthe machine.
-Using the 2,5 mm Allen key, loosen screw V to unblockblock H.
-Pull up block H and remove it from its housing. If block His jammed, follow the procedure for «unblocking thehammer».
- Once the block has been removed from the machine, usethe 2.5 mm Allen key to loosen the six screws that hold ittogether and separate the three sections: the fixed guide G,plate P and back plate CP.
-Clean each part with a clean cloth. Inspect each one. Makesure there are no burrs. In the event of internal damage, afine file can be used to eliminate any blisters inside theblack part (plate P).
IMPORTANT: do not «eat away at the part» or reduce itsdimensions otherwise, the machine will jam.The onlysolution at that point would consist in replacing thedistributor block (order reference: Z817).
-Reassemble the three components of the block: the fixed guide G, plate Pand back plate CP. Insert a knob of grease in the distributor block as shownin the illustration opposite.
-Replace the block in the machine, with the window facing upwards, towardsthe cartridge side. Make sure it has been inserted completely. It should beflush.
-Tighten the blocking screw with the 2,5 mm Allen key.
17

After performing maintenance on the wedge distributorblock, press F4 in order to access the parameter pagesof the machine. In page 1 press the button RESETNAILS ALARM. The machine will request an accesscode, type 5000 and confirm by pressing ENTER toreinitialise the alarm message.
4. ADDITIONAL REQUIRED MAINTENANCE:
We recommend keeping the machine clean. Check the ventilation filter of the electrical cabinet as well as thegeneral state of the cabinet. If it is dirty, use a vacuum cleaner on the inside of the cabinet. Do not use compressedair. There is a filter on the ventilator outlet. Remove and inspect it. Eventually clean it with water. Dry it completelybefore installing it back in the machine to avoid any contact with water.
To clean the CS4008 (table or body) do not use water based solutions, prefer WD40 or silicone sprays, which canbe used to clean grime and glue residues. Do not douse the machine ! Spray the product on a soft cloth and use itto clean the machine. Do not use solvents. The two tables of the machine are made of a composite material. Theadvantage is that this material does not suffer from corrosion and wood adhesive does not stick to it.To clean the table, avoid sharp tools that could damage the surface. This can make the table porous and make gluestick more easily.The mechanical unit used to move the stapling position forward and back does not require any special maintenance.Only the vertical column that supports the post must be lubricated (use 15W40 motor oil). Place a few drops of oilat the base of the column and do some stapling to help the oil penetrate the shaft. Lubricate this area at least oncea year and more often during intensive use.
Like any machine that includes mechanical and electrical parts,it is strictly forbidden to expose it to water. The machine shouldbe used and stored in a temperate room, away from humidity,cold, or excessively high temperatures. The use of unsuitableconsumables cancels the effect of the warranty. Without specialauthorisation, any dismantling of the machine (other than theprocedures in this manual) by an unqualified person also cancelsthe effect of the warranty.
The following parts are considered as consumables and theirwear is not covered by the warranty. Their life cycle dependsdirectly on the proper use of the machine:
3. REINITIALISING THE WEDGE MAINTENANCE ALARM:
Z506 hammer Z1783 yellow elastomer 30 mm Z1791 green elastomer 30 mm Z1813 white triangle Z1814 black triangle
18
We recommend having your Cassese equipment serviced once a year by your Cassese distributor.This interval can be shortened in cases of intensive use. The cost of this service is not covered by
the warranty. It is normal maintenance procedure.

The hammer (reference Z506) is a sort of long wedge(around five centimetres) located in the distribution blockunder the cartridge loader. A cylinder pushes it up so that itforces the wedge into the wood.
The hammer can become twisted or jammed if the machine isused incorrectly (use of unsuitable consumables, excessivelyhard wood, inappropriate stapling position…). It has a hole(in the lower part) in which the tip of a special screw is placed(reference Z1394). Indeed, this screw has a spring tip thatnormally retracts and releases the hammer if it is jammed inblock H, so that it can be removed.
5. Unblocking the hammer:
If, once block H has been unlocked, it is still impossible topull it up, this is because the hammer is still locked inposition by screw Z1394.
There is no need to dismantle the blocking screw. Asimple operation will enable you to unblock the hammer. Todo this, place your hands flat on the aluminium post thathouses the presser. Press firmly down, several times ifneeded. A snapping sound indicates that the screw hasunlocked the hammer. You can remove the distributor blockand perform the maintenance procedure described in «BlockH maintenance».
6. Extracting a wedge caught in the distributor:
Use the wedge pusher tool provided with themachine accessories. Proceed as follows:
1- Disconnect the air supply.2-Insert the wedge pusher tool and movethe wedge down. Do not push the toolmore than 6 mm into the distributor.3-Try to remove the cartridge.
If inserting the wedge pusher tool isimpossible, this means that the hammer andthe wedge are both stuck in an upwardsposition. Apply the procedure described in«Block H maintenance».
6mm MAXIMUM ( 1/4’’
WEDGE REMOVING TOOL
DISTRIBUTOR
WEDGE EXIT
During the joining process, it is possible for a wedge to enter the distributor and not be pushed into the moulding(for example if the pedal is suddenly released or pressure is too low). In this case, the top of the wedge remainsvisible at the distributor exit and the cartridge cannot be removed. The message «Alarm Nail Up» or «Âlarm Naildown » can appear on the screen.
19

You will find bellow the answers to frequent questions or troubled experimented by the users of theCS4008 machine.
The machine displays the message «alarm air pressure» and will not staple.
> Adjust the air pressure of the compressor or the machine.
The machine displays the message «nails maintenance».
> Refer to the section «scheduled maintenance».
The machine displays the message «pedal and pre-clamp».
> The pre-clamping button is still in the «ON» position during an attempt at joining by pressing thepedal. Turn it to «OFF» before pushing the pedal.
When I push the pedal, the machine blocks the mouldings with the clamps, but then releases them and does
not shoot the wedge. The message «safety clamping» is displayed.
> The table has moved back (handle not tightened enough) and proper clamping of the mouldings isnot possible. Repeat the pre-clamping procedure.
> The pre-clamping procedure was not performed correctly. Try again, following the instructions inchapter 6.
The machine appears to be inserting the wedges normally, but the «reload nails» message is displayed.
> The cartridge is empty, replace it and try joining again.> The wedge distributor is dirty and the wedges are blocked. Perform the procedure described in
«maintenance of block H».> The hammer is broken. Perform the procedure described in «block H maintenance». When you have
dismantled the distributor, check the hammer to see if it is split or twisted.
Nothing lights up, the screen is off when the emergency button is released.
> Check, for example by connecting another appliance, that the electrical outlet on which is pluggedthe machine is not defective.
> Open the machine door and check that thecircuit breaker is in the «I» position. If it isoff (button turned downwards), try to turn itback on. If it switches off again, contact yourdistributor to diagnose the problem. Forinformation, the internal plug in the electricalcabinet is for connecting a barcode reader.Connecting a more powerful appliance cancause the machine to shut off. If this is thecase, unplug the appliance beforereinitialising the circuit breaker. DO NOTconnect an appliance other than the barcodereader to this outlet.
20
TROUBLESHOOTING GUIDE:

The machine appears to be inserting the wedges normally, but the wedges are not completely inserted.
> The hammer is broken. Perform the procedure described in «block H maintenance». When you havedismantled the distributor, check the hammer to see if it is split or twisted.
> The moulding is too low or too narrow. Therefore, the vertical presser cannot block it correctly against thestops. Use the «set of spacer bars» to join the moulding (see page 5).
> Air pressure is too low. Adjust the air pressure of the compressor or the machine.> The moulding is not properly clamped to the table during the stapling process. Check the stapling position
for stability of the upper presser and that the moulding is properly braced against the table. If you are using themachine near a table supporting the frame, make sure the mouldings remain level. If this is not the case, adjust thefurniture or the machine so they are the same height (the machine has adjustable feet).
> The pedal was released too quickly. Try stapling again, keeping the pedal down until the cycle is completelyfinished.
The machine blocks, with the vertical presser against the moulding, then releases the pressure and displays
the messages «alarm nail up».
> Air pressure is too low. Adjust the air pressure of the compressor or the machine. DO NOT exceed 8bars.
> The wood is too hard. You can increase pressure, but DO NOT exceed 8 bars. Use «hardwood» wedges.> Try to use lower wedges or decrease the number of wedges at the blocking position (if stacking).> The hammer is twisted or blocked. Perform the procedure described in «block H maintenance». When you
have dismantled the distributor, check the hammer to see if it is split or twisted.> The distance between the presser and moulding is too great. Adjust the height of the presser support with
the pin. It should be less than 5 centimetres.> The downward movement of the presser is too slow. Use the speed regulator located on the side of the
machine to increase it.> The hammer is jammed, perform the procedure described in «maintenance of block H» to unblock the
hammer.The machine blocks, with the vertical presser against the moulding, then releases the pressure and displays
the message «alarm nail down».
> The pedal was released too quickly. Try stapling again, keeping the pedal down until the cycle is completelyfinishedThe machine blocks and displays the message «start of travel nail».
The sensor that informs the machine the hammer is in the downstroke position sends information that thehammer has not returned down. Perform the procedure described in «maintenance of block H» to unblock thehammer.The wedge breaks in the wood.
The wood is too hard. Use special «hardwood» wedges.The backs are stained.
The distributor is full of grease. Perform the procedure described in «maintenance of block H» and remove anyexcess grease. Do some stapling in scrap mouldings to purge any excess. Then wipe off the top of block H.Handling the mouldings is difficult.
The horizontal presser (clamps) is too tight against the mouldings. Repeat the pre-clamping procedure describedin chapter 3 page 6.The corners are crooked.
Make sure to place the first moulding against stop B1. See figure 2 page A for more details. Make sure thatclamping pressure is sufficient. Use the «clamp pressure» regulator to adjust it.The message «corrupted database» is displayed.
Press F4, then select page 5. Press «re-index database». The machine will request a code. Enter 0721, then confirmby pressing ENT. Re-indexing starts. This operation can take several minutes as the database can hold up to 3,000items.
If none of these suggestions produces the desired result, please contact your local Cassese distributor. You canalso contact us directly at www.cassese.com
21


![[4008] – 301](https://static.documents.pub/doc/80x56/61bd08ba61276e740b0eadd4/4008-301.jpg)


