96
Operating Manual A1600 DECT 6.0 Amplified Cordless Freedom Deluxe Phone™ CSC48

1 – ENGLISH
Operating Manual A1600 DECT 6.0
Amplified Cordless Freedom Deluxe Phone™
1 – ENGLISH
CSC48
V508
CSC48noAmp.indd 1 7/21/08 5:15:24 PM

2 – ENGLISH
TABLE OF CONTENTS
PRIOR TO USEPg. 6 .................. CongratulationsPg. 6-8 ............... Important Safety InstructionsPg. 9-13............. Location of ControlsPg. 13-16 .......... Key DescriptionsPg. 16-17 .......... Handset LCD Icon DescriptionsPg. 17-20 .......... Installation StepsPg. 20 ................ Hearing Aid and Cochlear Implant Users
BASE SPEAKERPHONE OPERATION MENU NAVIGATIONPg. 22-23 .......... Menu Map
LCD DISPLAYPg. 23-24 .......... LanguagePg. 24 ................ Set ContrastPg. 25 ................ Set Date & TimePg. 26-27 .......... LCD DescriptionsPg. 27-28 .......... Reviewing Voice Mail
BASE SETTINGSPg. 28-29 .......... Ringer SettingPg. 29 ................ Keypad Tones SettingPg. 30 ................ Dialing ModePg. 30-31 .......... Call Waiting/FlashPg. 31 ................ Auto On HookPg. 32-33 .......... Talking Set-Up
BASIC PHONE FUNCTIONSPg. 33-34 .......... Hands-Free Headset Jack and Audio JackPg. 34-35 .......... AmplificationPg. 36 ................ SpeakerphonePg. 36 ................ Answer a CallPg. 36-37 .......... Make a Call

3 – ENGLISH
Pg. 37-38 .......... One-Touch MemoryPg. 39-40 .......... Mute, Hold, Redial
CALLER ID (CID)Pg. 41 ................ Receiving & Storing Caller ID RecordsPg. 41 ................ Talking Caller IDPg. 42-43 .......... Caller ID on Call WaitingPg. 42 ................ Review Caller IDPg. 42 ................ Dial from Caller IDPg. 42-43 .......... Delete Caller IDPg. 43 ................ Store Caller ID
PHONEBOOKPg. 44 ................ Add Phonebook EntriesPg. 45 ................ Using a PausePg. 45 ................ View Phonebook EntriesPg. 45 ................ Dial a Phonebook NumberPg. 45-46 .......... Phonebook Entry, Edit, Erase, Record Voice
HANDSET OPERATION
MENU NAVIGATIONPg. 47-48 .......... Menu Map
HANDSET SETUPPg. 49 ................ Handset RegistrationPg. 50 ................ Handset NamePg. 50 ................ Delete/Terminate HandsetPg. 51 ................ Base SelectionPg. 51 ................ Handset ResetPg. 52 ................ Out of Range AlarmPg. 52 ................ Dialing ModePg. 53 ................ Call Waiting/FlashPg. 54 ................ Change PIN

4 – ENGLISH
LCD DISPLAYPg. 54 ................ Set ContrastPg. 55 ................ Set Date & TimePg. 56 ................ LCD DescriptionsPg. 56 ................ Reviewing Voice Mail
HANDSET SETTINGSPg. 56-57 .......... Ringer SettingPg. 58 ................ Auto AnswerPg. 58-59 .......... Keypad Tones SettingPg. 59 ................ Language SettingPg. 60 ................ Talking Set-up
BASIC PHONE FUNCTIONSPg. 61-62 .......... AmplificationPg. 62-63 .......... SpeakerphonePg. 63 ................ Answer a CallPg. 63-64 .......... Make a CallPg. 64-65 .......... One-Touch MemoryPg. 65-66 .......... Mute, Redial
CALLER ID (CID)Pg. 67 ................ Receiving & Storing Caller ID RecordsPg. 68 ................ Caller ID on Call WaitingPg. 69 ................ Review Caller IDPg. 69 ................ Dial from Caller IDPg. 69-70 .......... Delete Caller IDPg. 70 ................ Store Caller ID
PHONEBOOKPg. 72 ................ Add Phonebook EntriesPg. 72 ................ Using a PausePg. 72 ................ View Phonebook EntriesPg. 73 ................ Dial a Phonebook NumberPg. 73-74 .......... Phonebook Entry, Edit, Erase, Record Voice

5 – ENGLISH
ADDITIONAL HANDSET FUNCTIONSPg. 75 ................ PagingPg. 75 ................ Key LockPg. 75-76 .......... AlarmPg. 76 ................ Torch
PHONE ANSWERING MACHINE (TAM)Pg. 77 ................ Turn On/OffPg. 78-86 .......... TAM SettingsPg. 86 ................ Record a MemoPg. 87 ................ Security ID/PIN & Remote Access
TROUBLESHOOTING GUIDEPg. 88-90
TECHNICAL SPECIFICATIONSPg. 91
REGULATORY COMPLIANCEImportant FCC Information for CustomersPg. 92-93
INDUSTRY CANADAPg. 94
WARRANTY POLICYPg. 95-96
6 – ENGLISH
PRIOR TO USE
Congratulations on your purchase of the A1600 phone from ClearSounds Communications®. Please read this User Manual carefully in order to get the best use out of your new phone. This phone is designed for individuals with mild to severe hearing loss. Keep this manual near the phone for easy reference.
Please visit our website at www.clearsounds.com to register your product, download additional manuals and review trouble-shooting tips.
Be sure to save your sales receipt as your proof of purchase should you need warranty service. The serial number for this product is located on the underside of the base.
Warranty Service – This product is designed to provide years of quality service. However, if there is a malfunction and the troubleshooting recommendations on pages 88-90 do not resolve the problem, follow the warranty procedure on pages 95-96 .
█ IMPORTANT SAFETY INSTRUCTIONS
Read and understand the Installation Guide and User Manual. When using your phone equipment, basic safety precautions should always be followed to reduce the risk of fire, electric shock and injury to person, including the following:
WARNING: The A1600 phone is capable of amplifying sounds to a loud volume. It is important to instruct all potential users of its proper operation. It is advised to adjust the volume control to the minimum level (Low) when not in use and alert other users that hearing damage can potentiallyresult from misuse.WARNING: Use only the power supply indicated inthe User’s Manual.WARNING: To avoid the possibility of electrical shock, do not

7 – ENGLISH
use this product near water (For example, near a bathtub, wash basin, kitchen sink or laundry tub, in a wet basement or near a swimming pool) while in the bathtub or shower or when you are wet. If the phone becomes submerged in water, do not attempt to retrieve it until after you have unplugged the AC adapter from the electrical outlet and the line cord from the modular wall jack. Do not plug the phone back in until it has dried completely.WARNING: Avoid using the phone during electrical storms. There may be a remote risk of electric shock from lightning. If the electrical storm is present in your immediate area, possibility of electrical shock exists.WARNING: Do not use the phone if you suspect a gas leak in the area. The phone’s electrical contact could create a spark, which could ignite any heavy concentration of leaking gas.WARNING: When cleaning, unplug the phone first, and then use a damp cloth to wipe. Do not use liquid cleaners or aerosol cleaners on the phone. WARNING: No phone should ever be placed near an open radiator or heating register.WARNING: Occasionally a power surge can occur on electrical lines without warning. With any electrical device that you plug into an outlet, it is suggested you use a surge protector. A surge protector will prevent power surges from damaging your phone. Surge protectors are simple devices available at your local hardware store.WARNING: Do not overload wall outlets or extension cords as this can increase the risk of fire or electrical shock.WARNING: Never push any object through the slots in the phone. They can touch dangerous voltage points or short out parts that could results in risk of fire or electrical shock.WARNING: Do not cover slots and opening on the units, they are needed for ventilation and protection against overheating. WARNING: Stop using the phone if dropped or if it becomes damaged.WARNING: Ring volume is very loud and can damage your hearing. Never put your ear close to the ringer.WARNING: Pay attention to the polarity of the batteries
8 – ENGLISH
and insert the rechargeable batteries in accordance with the polarity symbols. Use only batteries identified as acceptable and never use alkaline batteries, which can cause personal injury as well as damage to the unit.
Hearing Aid Compatibility (HAC)This phone meets the FCC standards for Hearing Aid Compatibility.
IMPORTANT: YOUR RECEIPT IS PART OF YOUR WARRANTY AND MUST BE RETAINED AND PRODUCED IN THE EVENT OF A WARRANTY CLAIM.
Dial/ Speakerphone Key

9 – ENGLISH
PLEASE SAVE THESE INSTRUCTIONS
█ LOCATION OF CONTROLS
HANDSET Visual Phone Ringer & Amplify Indicator Light
Charging Contacts
(4)1-Touch Memory Dial Keys
Large LCD/Caller ID Screen
Right Soft KeyRight/Redial Key
End Key
Hash (Pound) Key
Microphone
Star Key
Lighted Keypad
Down/Phonebook Key
Left/Intercom Key
Dial/ Speakerphone Key
Up/Caller ID Key
Earpiece
Carrying Clip
Speaker
Battery Compartment Cover
Left Soft Key

10 – ENGLISH
LEFT SIDE OF HANDSET
Vol+/Vol- Key (Handset Volume)
Phone (2.5mm) Headset / Neckloop Jack
RIGHT SIDE OF HANDSET
Tone Key - Handset Tone Control
AMP Key - Amplify Activation Key
Right Soft Key
Play/Stop Key
Next Key
Previous Key
Delete Key
MEMO Key
Page Key
Call Waiting Key
Headset Key
Visual Phone Ringer
Message Waiting/New Call
In Use LED Indicator

11 – ENGLISH
Headset & Neckloop Volume
Control
Large LCD/ Caller ID Screen
Left Soft Key
Headset & Neckloop Tone
Control
Up/Down Scroll
Speaker
Lighted Keypad
(8) 1-Touch Photo Memory Dial
Prog- Program Key
Emergency memory key
Amplify Activation key
Redial Key
Microphone
Speakerphone Key

12 – ENGLISH
BACK SIDE OF BASE
Port for (optional) ClearSounds Bed Shaker
Shaker/Strobe Ringer Select
Amplification Reset Override Switch forHeadset & Neckloop (ON/OFF)
AC Power Adapter Jack
Phone Line Cord Jack
LEFT SIDE OF BASE
Audio (3.5mm) Headset / Neckloop Jack
Telephone (2.5mm) Headset / Neckloop Jack
Handset Cord Jack
RIGHT SIDE OF BASE
New Call/Voice Mail Indicator Switch
Speakerphone and Ringer Volume Controls
Memory Card (Record Speed Dial Names/Numbers)

13 – ENGLISH
UNDERSIDE OF BASEBack Light ON/OFF Switch
Empty Compartment
Memory Card
█ KEY DESCRIPTIONS
HANDSETDial KeyMake/Answer a call Activates the speakerphone if pressed during a call, as described on page 62.
End Key Long press to activate power on/off, as described on page 58.
Navigation Key:Up scroll for lists and menu optionsIncrease the earpiece/speakerphone volume during a call Enter the Caller ID (CID) book, as described on page 69.
Down scroll for lists and menu optionsDecrease the earpiece/speakerphone volume during a call Enter the Phonebook, as described on page 72.
Enter the redial list, as described on page 66.Insert a pause when pre-dialing a number or storing a phonebook entry, as described on page 72.

14 – ENGLISH
Soft Keys Two soft keys are used to select functions displayed directly above each of the soft keys (on the bottom line of the display). Functions displayed above the soft key will change as you move through the menu.
One-touch memoriesStore up to 4 numbers for one-touch memory dialing, as described on page 65.
Star KeyPress and hold to turn on/off keypad lock function, as described on page 75.
0 KeyPress and hold to activate the shaker and visual ringer function, as described on page 57.
BASEProgram KeyUse to store numbers.
Emergency KeyUse for emergency speed dialing, as described on page 37.
Amplify KeyPress to add an extra level of amplification & tone to headset or neckloop, as described on page 35.
Redial KeyLast number redial, as described on page . Insert a pause when pre-dialing a number, as described on page 37.

15 – ENGLISH
Speaker KeyMake/Answer/End a callActivates the speakerphone if pressed during a call, as described on page 36.
Soft KeysTwo soft keys are used to select functions displayed directly above each of the soft keys (on the bottom line of the display). Functions displayed above the soft key will change as you move through the menu.
Up/Down KeysScroll for menu options. Enter the CID book, as described on page 42.
Volume Up/Down KeyUse to adjust the volume of the ringer, talking dialing and talking Caller ID.
Volume & Tone KeysUse to adjust the volume and tone of the headset or neckloop, as described on page 34.
Page KeyUse to register handset(s), as described on pageUse to help locate the handset if you can’t find it, as described on page 75.
Call Waiting KeyTo disconnect a call and re-establish dial tone or to switch over to another caller if you use call waiting, as described on page 41.
Headset KeyUse for hands-free calls with a 2.5mm hands-free headset or neckloop, as described on page 33.
16 – ENGLISH
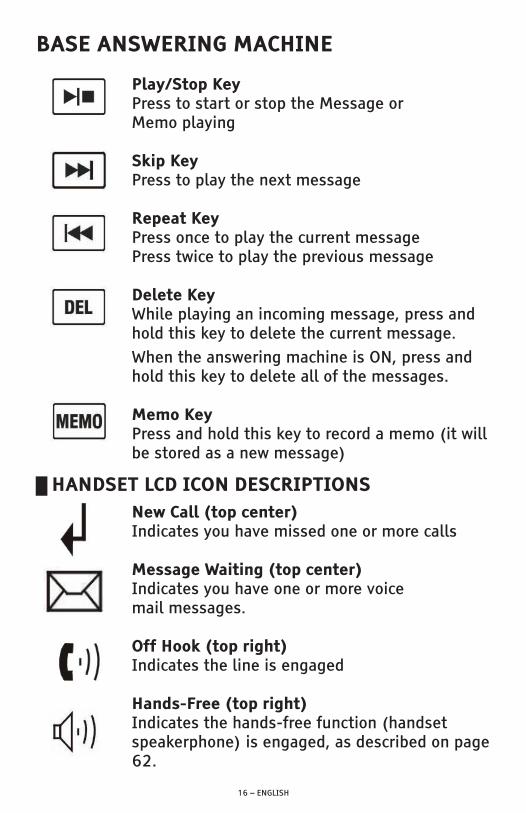
BASE ANSWERING MACHINE
Play/Stop KeyPress to start or stop the Message or Memo playing
Skip KeyPress to play the next message
Repeat KeyPress once to play the current messagePress twice to play the previous message
Delete KeyWhile playing an incoming message, press and hold this key to delete the current message.When the answering machine is ON, press and hold this key to delete all of the messages.
Memo KeyPress and hold this key to record a memo (it will be stored as a new message)
█ HANDSET LCD ICON DESCRIPTIONSNew Call (top center)Indicates you have missed one or more calls
Message Waiting (top center)Indicates you have one or more voice mail messages.
Off Hook (top right)Indicates the line is engaged
Hands-Free (top right)Indicates the hands-free function (handset speakerphone) is engaged, as described on page 62.

17 – ENGLISH
Battery (top right)Indicates battery charge level
Shaker (top center)Indicates the shaker and visual ringer are enabled, as described on page 57.
Signal (top left)Indicates the current signal strength. If the handset is too far from the base, this icon will blink on the LCD.
Alarm (top center)Appears when you set an alarm to ring at a specific time, as described on page 75.
Keypad Lock (top left)Appears when the keypad is locked, as described on page 75.
Incoming Message (center right)Appears when you have new answeringmachine message(s)
█ INSTALLATION STEPS
Installation of Your ClearSounds® A1600 DECT 6.0 Amplified Cordless Freedom Deluxe Phone™ is easy. There are some basic steps you need to take when you set-up your
phone for the first time.
If at any time you have questions about your phone after reading this manual, please contact the ClearSounds®
Customer Service Department at 1-800-965-9043.

18 – ENGLISH
█ PARTS CHECKLISTCheck the contents of the box - The A16000 should contain:
1. Phone base2. Cordless Handset 3. Batteries4. Phone Line Cords5. AC Adapter6. Carrying Clip7. User Manual
█ PHONE INSTALLATION
The phone should be located in an area where it is easy to see the visual display and lighted ringer. Choose an area near a phone wall jack (RJ11C) and power outlet. To avoid potential interference, the phone should not be located near electronic equipment, such as personal computers, television or microwave ovens.Begin by removing the clear plastic Caller ID protective tab from the handset and the base. This film tab is only for display and to protect your Caller ID displays during shipping.
Connecting Lines
1. Connect one end of the 6 ft phone cord to the line jack on the back of the base and connect the other end to a modular phone jack.
2. Plug the AC power adapter into the jack on the back of the base, then plug the AC adapter into a standard electrical outlet or surge protector.
Note: The adapter is required for the phone to work.
1 2 3
4 5 6
7
to AC outlet / to phone jack

19 – ENGLISH
Installing Batteries
Three AAA re-chargeable Ni-MH batteries come with your phone. You must install the handset batteries before using your phone.
1. Remove the battery compartment cover by sliding it downwards.
2. Insert the new batteries. Be sure to observe battery polarity as imprinted on the inside of the compartment.
3. Replace the battery compartment cover by sliding upward until it clicks into place
Note: The batteries need to be replaced if they do not recover their full storage capacity after recharging. Check the battery icon on the LCD to see the battery charge level.When replacing the batteries, always use good quality Ni-MH AAA re-chargeable batteries.
Charging the Handset
1. Place the handset into the base. The LCD screen will light up and you will hear a beep to indicate charging has begun.
2. Important: Before initial operation, you should fully charge the handset for at least 15 hours.
3. After the batteries are fully charged, check for dial tone by pressing the dial key on the handset.
When battery power is very low and you place the handset on the base, the display will show . Check the battery icon on the LCD to see the battery charge level.

20 – ENGLISH
Using the Handset Carrying Clip
You may choose to use the optional belt clip provided with your handset.
1. To attach, slide the belt clip down onto the grooves. Press the tabs on the belt clip into the slots to attach.
2. To remove, insert a screwdriver along the edge of one of its “arms” and release the clip and then lift it off.
█ Using your Phone with Hearing Aids and Cochlear Implants
Your phone can be used with hearing aids and cochlear implants equipped with a telecoil (T-coil). Adjust your hearing aid “T-switch” to the “T” position. Make sure to hold the handset close to your T-coil.
SETTING UP YOUR BASE SPEAKERPHONE
█ MENU
Screen NavigationIf you press under the word Back on the screen from any menu, the phone returns to the previous screen. The phone will automatically return to the main screen from any menu if no key is pressed for 20 seconds.
“Standby” can mean that you are at the main screen or can also mean that you are not on a live call and do not have dial tone engaged.
MENU NAVIGATION

21 – ENGLISH
To Access a MENU Option
1. Press under the word Menu on the screen to display the main menu list.
2. To scroll through menu options, press or repeatedly. The menu item that is currently selected will be highlighted.
3. When the desired menu item is highlighted, press under the word Select or Save.
4. Repeat if necessary.
To Access a MENU Option
Press under the word Back or Exit on the screen from any menu and the phone returns to the previous screen. Continue to press under the word Back or Exit to return to the main screen. The phone will automatically return to the main screen from any menu if no key is pressed for 20 seconds.
To Exit from any MENU
Press under the word Back or Exit on the screen from any menu and the phone returns to the previous screen. Continue to press under the word Back or Exit to return to the main screen. The phone will automatically return to the main screen from any menu if no key is pressed for 20 seconds.

22 – ENGLISH
MENU MAP – this identifies how the menu is displayed for navigation
Main Menu
PhoneBook (PhoneBk)(p. 43)
Set Display (p. 23)
Set Phone(p. 28)
Date and Time (p. 25)
Set Talk (p. 32)
Submenu I
Options (p. 45)
Set Language (p. 23)
Set Contrast (p. 24)
Dim: X--->x (p. 24)
Hour Format (p. 25)
Date Format (p. 25)
Set Ring (p. 28)
Call Waiting (p. 31)
Set Flash (p. 30)
Dialing Mode (p. 30)
AUTO ON HOOK (p. 31)
DIALING TALKING (p. 32)
CID TALKING (p. 32)
REVIEW TALKING(p.32)
VOICE PROMPT (p. 23)
Submenu II
Play VoiceRecord VoiceErase VoiceEditErase
Level 1-7
On or Off
12 hour clock or 24 hour clock
MM/DD or DD/MM
Ringer VolumeRinger ToneKeypad Tones ON or OFF
On or OFF
100ms, 300ms, or 600ms
Tone or Pulse
ON or OFF
ON or OFF
ON or OFF
ON or OFF

23 – ENGLISH
Reminder: Press under the word Back or Exit from any menu to return to the previous screen. Otherwise, after 20 seconds, the phone will automatically return to the main screen from any menu if no key is pressed.
█ LCD SETTINGS
Language Setting
The phone base supports up to 4 predefined languages: English, French, Spanish, German. Changing the language will cause the menu to be displayed in the new language. To select a language:
1. Press under the word Menu on the screen to display the main menu list.
2. Press or to scroll to Set Display and then press under the word Select.
3. Press under the word Select to select Language.4. The languages will be displayed. Press or to scroll
through the language options. Each language will be displayed in its own native translation.
Main Menu
TAM setup (p. 77)
Submenu I
TAM ON/OFF (p. 77)
Outgoing Msg (p. 80)
Ring Number (p.78)Security ID (p. 87)
ICM Voice Slow (p. 86)
Submenu II
Play OGMRecord OGMChange OGMErase OGM
2,4,6,8, toll saver
ON or OFF
LCD DISPLAY
24 – ENGLISH
5. Select the desired language and then press under the word Select.
To go back to the English menu if you can’t read the current language displayed:
1. Press the right soft key ( ).2. Press the left soft key ( ).3. Press the left soft key ( ).4. Press or to find “English” in the list of languages.5. Press the left soft key ( ) to save the setting.
Contrast Setting
1. Press under the word Menu on the screen to display the main menu list.
2. Press under the word Select to access Set Display.3. Press to scroll to Set Contrast and then press under
the word Select.4. Press or repeatedly to choose from the 8 available
contrast levels and then press under the word Select.
Switch to Smaller Font
If you select ON, when you pre-dial a number and the number exceeds 8 digits, the font will be switched to a smaller size automatically.
1. Press under the word Menu on the screen to display the main menu list.
2. Press under the word Select to access Set Display.3. Press to scroll to Dim:X--->x and then press under
the word Select.4. Press or to choose between ON/OFF and then
press under the word Select.

25 – ENGLISH
If you have Caller ID service, the date and hour will be automatically set when you receive your first call. If you currently do not have Caller ID service through your phone company, please follow the directions below. You can change the format of the time and date to your preference.
Hour Format Setting
1. Press under the word Menu on the screen to display the main menu list.
2. Press under the word Select to access Set Display.3. Press or to scroll to Hour Format and then press
under the word Select.4. Press or to choose between 12 hour clock and 24
hour clock and then press under the word Select.
Date Format Setting
1. Press under the word Menu on the screen to display the main menu list.
2. Press under the word Select to access Set Display.3. Press or to scroll to Date Format and then press
under the word Select.4. Press or to choose between MM/DD and DD/MM
and then press under the word Select.
Set Date & Time
1. Press under the word Menu on the screen to display the main menu list.
2. Press or to scroll to Date and Time and then press under the word Select.
3. Enter the current time using the numeric keypad and use the to select AM/PM and then press under the word Save.
4. Enter the current date using the numeric keypad and then press under the word Save.
5. Enter the current year using the numeric keypad and then press under the word Save.
26 – ENGLISH
Note: If you select 12 - Hour clock, AM/PM will appear at the right of the time in standby mode. If you select 12 – Hour, you will still need to enter the time in the 24 – Hour format.
█ LCD Descriptions
Your A1600 base has a large LCD screen that provides useful information. Your screen has a backlight that automatically switches off after 15 seconds of inactivity. You may permanently turn ON the LCD backlight by using the switch on the back of the display and select the ON position.
In standby mode, the large LCD display will show as below:
IMPORTANT: The word TOTAL refers to the total number of available Caller ID records
The word NEW refers to the total number of new Caller ID records that have not yet been reviewed
The word MSG refers to the total number of new messages received.
Notification for new messages will be displayed before new Caller ID records. Once you have listened to your new messages, the LCD will next display the new Caller ID records.
If you forget to connect the phone line cord, “No line” will show on the screen.
When you press the Menu soft key, the display will show the main menu. Use the or key to scroll through the menu and select the desired one and then press under the word Select to confirm.
27 – ENGLISH
When a new call comes in, the screen will display the caller’s phone number and/or name (provided that you subscribe to this service through your local telephone provider).
Shows the total and new calls to be reviewed. In the example, there are 16 calls in total, which includes 12 new calls.
Shows the total of new messages. In the example, there are 2 new messages and the display will show MSG 02.
If the caller has exercised the option to prevent his name and number from being sent, Private will show on the display.
This message will display when someone calls from another country, an area where the telephone company is not offering the caller identification services or is not yet providing number delivery to your area.
█ Reviewing Voice Mail Messages
You must subscribe to Voice Mail from your phone service provider to use this feature. NOTE: You are not able to utilize voice mail and the built-in answering machine at the same time.
When a voice mail message is left, the screen will display “New voice mail” and the message will be saved as a call. If you have new messages, you will hear a stutter dial tone when you pick up the handset. The phone has a voice mail message indicator light, which will blink when you have new voice mail messages and will continue to flash until the message has been retrieved. Follow the steps provided from your phone provider to listen to your message(s).

28 – ENGLISH
Note: You may permanently turn off the red flashing visual indicator for both message waiting and new calls by simply setting the indicator to the OFF position (this switch is located on the right side of the telephone).
Reminder: Press under the word Back from any menu to return to the previous screen. Otherwise, after 20 seconds, the phone will automatically return to the main screen from any menu if no key is pressed.
█ Ringer Setting
Audible Ringer
You can adjust the ringer of your phone and you can also select a ring tone. 1. Press under the word Menu on the screen to display
the main menu list.2. Press to scroll to Set Phone and then press under
the word Select.3. Press under the word Select to access Set Ring. 4. Press under the word Select to access Ringer Volume.5. Press or to select the volume (volume 1-volume 6,
or OFF). When adjusting the Volume, the base plays the selected loudness.
6. Press under the word Select to confirm. 7. To adjust the ring tone, press to scroll to Ringer Tone.8. Press or to select the desired ring tone from the 10
melodies. When adjusting the Melody, the handset plays the selected melody.
9. Press under the word Select.
PHONE BASE SETTINGS

29 – ENGLISH
In standby mode, you can adjust the ringer volume by using the Volume Control V- or V+ on the right side of the phone. The display will show the current level. For example: Volume 3. You will also hear the audible ringer at each level you select.
Visual Ringer & Shaker Option
Your phone is equipped with a bright LED light that can flash a very bright light when the phone rings. If you have selected the LED light to be ON, it will flash on all volume levels.
Your phone is equipped with a 3.5mm vibrating alert jack for an optional bed shaker (purchased separately) to alert you when the phone is ringing. Simply plug it into the shaker jack and place it between your mattress and box spring or under the cushion of a chair. When the phone rings, the pad will vibrate with each ring of the phone.
█ Keypad Tones Setting
Your ClearSounds® A1600 comes from the factory preset for menu Keypad Tones ON. This refers to having an audible tone when navigating the menu to verify a selection. To change this setting:
1. Press under the word Menu on the screen to display the main menu list.
2. Press to scroll to Set Phone and then press under the word Select.
3. Press under the word Select again to select Set Ring. 4. Press or to scroll to Keypad Tones and then press
under the word Select.5. Press or to choose between ON/OFF and then press
under the word Select.

30 – ENGLISH
█ Dialing Mode Setting
Your ClearSounds® A1600 comes from the factory preset for touch-tone service. Should you need to change this setting based on the type of phone service you have, use Tone for touch-tone service or Pulse for rotary dialing. NOTE: If you are not sure which dialing mode to select, please contact your local phone service provider. To change this setting:
1. Press under the word Menu on the screen to display the main menu list.
2. Press to scroll to Set Phone and then press under the word Select.
3. Press or to scroll to Dialing Mode and then press under the word Select.
4. Press or to select Tone or Pulse and then press the under the word Save.
█ Call Waiting (Flash)
Your ClearSounds® A1600 comes from the factory preset for Flash Time to 600ms. Flash timing is the signaling process that tells the phone system when a phone is on hook or off hook. The United States uses a 600ms timing sequence. The European Union uses a 300ms timing sequence. You can choose from 100ms, 300ms or 600ms. To change this setting:
1. Press under the word Menu on the screen to display the main menu list.
2. Press to scroll to Set Phone and then press under the word Select.
3. Press or to scroll to Set Flash and then press under the word Select.
4. The display shows the current setting. Press or to choose from 100ms, 300ms, or 600ms and then press under the word Select.

31 – ENGLISH
Your ClearSounds® A1600 comes from the factory preset for Caller ID on Call Waiting ON. To change this setting:
1. Press under the word Menu on the screen to display the main menu list.
2. Press to scroll to Set Phone and then press under the word Select.
3. Press to scroll to Call Waiting and then press under the word Select.
4. Press or to choose between ON/OFF to activate/deactivate the call waiting function and then press under the word Select.
Note: If you subscribe to Call Waiting on Caller ID, you will receive Caller ID information (if available) on Call Waiting calls (see page 41).
If you subscribe to Call Waiting service from your local phone provider, during a phone call you will hear a beep to indicate another call is waiting on the line.
1. To connect to the waiting call, press the Call Waiting key, and your original call is put on hold. The display will show F.
2. To switch between the two calls, press the Call Waiting key.
█ Auto On HookYour ClearSounds® A1600 comes from the factory preset for Auto On Hook set to OFF. This feature can automatically disconnect the line after 15-30 minutes if the phone is left off the hook. This will restore your line to be able to receive another call even if the call is not disconnected. To change this setting:1. Press under the word Menu on the screen to display
the main menu list.2. Press to scroll to Set Phone and then press under
the word Select.3. Press or to scroll to AUTO ON HOOK and then
press under the word Select.4. Press or to select On or Off and then press
under the word Save.

32 – ENGLISH
█ Talking Dialing SettingYour ClearSounds® A1600 comes from the factory preset for Talking Dialing Mode set to OFF. This feature allows you to pre-dial the number you wish to call and you will hear the number announced as you dial as well as display the numbers on the LCD. To change this setting:
1. Press under the word Menu on the screen to display the main menu list.
2. Press or to scroll to Set Talk and then press under the word Select.
3. Press under the word Select to access DIALING TALKING.4. Press or to choose between ON/OFF to activate/
deactivate the talking dialing function and then press under the word Select.
█ Talking Caller ID SettingYour ClearSounds® A1600 comes from the factory preset for Talking Caller ID Mode set to OFF and will announce the caller’s number between rings. To change this setting:
1. Press under the word Menu on the screen to display the main menu list.
2. Press or to scroll to Set Talk and then press under the word Select.
3. Press to scroll to CID TALKING and then press under the word Select.
4. Press or to select ON/OFF to activate/deactivate the dialing function and then press under the word Select.
█ Talking Review Function (Caller ID, Phonebook & Redial)
Your ClearSounds® A1600 comes from the factory preset for Talking Review set to OFF
• When reviewing CID records, the phone will announce the number.
• When reviewing phonebook entries, the phone will announce the number or recorded message.
• When using the Redial function, the phone will announce the number or recorded message.

33 – ENGLISH
To change this setting:
1. Press under the word Menu on the screen to display the main menu list.
2. Press or to scroll to Set Talk and then press under the word Select.
3. Press or to scroll to REVIEW TALKING and then press under the word Select.
4. Press or to select ON/OFF to activate/deactivate the talking review function and then press under the word Select.
█ Using the Hands-Free Headset or Audio JackYour phone is equipped with 2 Headset jacks and 1 Audio Neckloop Jack. One headset jack is located on the left side of the handset and the other headset jack is located on the left side of the base. The audio jack is located on the left side of the base. These jacks are amplified, allowing you to adjust both the tone and volume the same as you would through the handset (see page 34 for amplification instructions).
The Audio Neckloop Jack - the 3.5mm Audio Neckloop jack allows you to listen through your device while speaking into the speakerphone.
The Headset Jack – the 2.5mm Headset jack allows you to listen and speak through your hands-free headset. This 2.5mm phone headset jack accommodates a variety of optional hands-free accessories including headphones, neckloops, silhouettes, and cellular accessories.
When a 2.5mm audio device is plugged in, the incoming audio signal to the handset will now be transferred to the headset jack. No output on the handset or speakerphone will be heard.
BASIC PHONE FUNCTIONS

34 – ENGLISH
To use the cordless handset headset jack:
As soon as you plug your headset into the headset jack on the cordless handset, it will be activated.
To use the base audio neckloop jack:
1. Plug your neckloop, headphones, headset or other accessory into the base Audio jack.
2. If you want to speak into the handset, lift the handset, listen for dial tone and dial the number. Speak into the handset and adjust your volume. To end the call, replace the handset to the base.
3. If you want to speak into the speakerphone, press the Speaker key, listen for dial tone and dial the number. Speak into speakerphone (the conversation will be heard through both your audio equipment and over the speakerphone) and adjust your volume. To end the call, press the Speaker key again on the base.
To use the base headset jack:
1. Plug your neckloop, headphones, headset or other accessory into the base Headset jack.
2. Press the Headset key, listen for dial tone and dial the number. Talk into the headset microphone and adjust your volume (see below for amplification instructions). To end the call, press the Headset key.
█ Using the Base Amplification FunctionYour ClearSounds® A1600 is equipped with a specialized amplification function designed to adjust to your needs. Flexibility in the management of amplification and tone is important when trying to achieve listening clarity. Be sure to try all levels of amplification and tone to find the best level for your hearing needs.
The Volume and Tone control on the front panel of the phone allow you to adjust the volume of the headset jack and neckloop jack during a call. During a call, adjust the controls to fit the levels to your hearing requirements.

35 – ENGLISH
Using the Amplification Reset Override Switch(located on the back of the base)
The ClearSounds® A1600 is designed with unique features to protect users from being exposed to dangerous sound levels. You are able to switch between automatic or manual amplification, and you should select the setting that best suits your needs.
Set ON – When the Amplification Reset Override Switch is set to ON, the amplify function will be ON every time a call starts. The user will no longer need to remember to press the Amplify key with every telephone conversation. When the phone hangs up, the amplify setting will remain ON.
Set OFF – When the Amplification Reset Override Switch is set to OFF, the amplify function will be OFF every time a call starts. This allows people who do not require the level of amplification offered on the phone to use it. Every time a call starts, the user will need to press the Amplify key in order to gain the extra level of amplification and tone control. When the phone hangs up, the Amplify key will reset to OFF.
Important: You may manually turn ON and OFF the amplify function during a conversation by simply pressing the Amplify key.
NOTE: Your ClearSounds® A1600 comes from the factory preset in the OFF position. If you would like to override the factory preset, simply change the selection on the underside of the phone to ON.
36 – ENGLISH
█ Using your Base SpeakerphoneWhen using the speakerphone, you can enjoy the convenience of hands-free conversation.
For optimal speakerphone performance, avoid the following:• Areas with high background noise (The microphone might
pick up these sounds and prevent the speakerphone from going into the receiving mode when you finish talking).
• Surfaces affected by vibration.• Recessed areas such as in a corner, under a cupboard, or
next to a cabinet, which can generate an echo effect.
█ Answering a Call1. To answer a call, press the Speaker key on the base.2. Adjust your volume by using the volume control V- or V+
located on right side of the phone. 3. To end the call, press the Speaker key again on the base.
The display will show a Hold option once you have a call established. To put a call on hold:
1. Press under the word Hold once. The LCD will display “Call on hold.”
2. To continue the conversation, simply press under the word unhold.
█ Making a Call 1. Press the Speaker key on the base and listen for a dial tone.2. Dial the number you want to call. 3. Adjust your volume by using the volume control V- or V+
located on right side of the phone.4. When finished, press the Speaker key to hang up.
The display will show a Hold option once you have a call established. To put a call on hold:
1. Press under the word Hold once. The “LCD will display “Call on hold”.
2. To continue the conversation, simply press under the word Unhold.

37 – ENGLISH
Dialing from Standby Mode
You can enter the desired phone number in standby mode, which allows you to verify the number before dialing. If you have the TALKING DIALING function turned ON, the number will be announced as you dial (see page 32 for more information). Follow these steps:1. Enter a telephone number (up to 32 digits) and verify it
is correct. If you make a mistake while entering a number, press under the word Clear to delete it.
2. When the number appears correctly, press the Speaker key and it will dial.
Dialing from the Caller ID List (see page 42)
Dialing from the Redial List (see page 39)
█ One-Touch Memory Setting & DialingThe base allows you to program 8 frequently dialed numbers in the photo speed dial keys and 1 emergency speed dial key. Each memory key can store up to 24 digits. You can insert a 3 second pause into dialing or memory storage in order to access custom and telebanking services, long distance, calling cards, etc. Press the Redial key at the desired point in the number to insert the pause and the letter P will appear at the pause entry.
Storing Memory Numbers (while the telephone is not in use)
Method 1:
1. Press and hold one of the Memory dial keys for at least 2 seconds, and the display will show “Number:”. Enter the number and then press under the word Save.
2. The display will show “Name:” Enter the name you want to use and then press under the word Save (see page 44).
3. The display will show the list of ring tones to select from. Press or to select the desired ring tone. Press under the word Select.
4. Repeat for each Memory dial key you want to use.

38 – ENGLISH
Method 2:
1. Use the keypad to enter the number you want to store. You can use under the word Clear to edit the number.
2. Press and hold one of the Memory dial keys for at least 2 seconds, and the display will show the number you have entered. Press under the word Save.
3. The display will show “Name:” Enter the name you want to use and then press under the word Save (see page 44).
4. The display will show the list of ring tones to select from. Press or to select the desired ring tone. When adjusting the Melody, the handset plays the selected melody. Press under the word Select.
5. Repeat for each Memory dial key you want to use.
Dialing from Memory Numbers
1. In standby mode, press one of the Photo Dial keys, the display will show the corresponding number. If you selected the wrong memory dial, either select the correct memory dial or press under the word Clear repeatedly until you get back to the main screen.
2. Press the Speaker key and the phone will begin to dial.
NOTE: Entering a new number in the same location will automatically erase the previous number.
Erase Memory Numbers
1. Press under the word PhoneBk to enter the phonebook.2. Press or repeatedly until you reach the desired
entry, and then press under the word Options.3. Press or to scroll to Erase and then press under
the word Select and the entry will be immediately deleted.4. Repeat for each entry to be erased.
█ Inserting Photos in Memory Keys1. Cut your photo using the template provided as a guide. 2. Remove the transparent cover of the memory key and insert
the photo and replace the cover or slide the photo in the top slot of the cover.
39 – ENGLISH
█ Mute SettingDuring a conversation, you can temporarily switch your phone’s microphone off to have a private, off-line conversation by using the mute feature. The party on the phone cannot hear you but you can hear them. A conversation can be muted while using the handset, speakerphone or hands-free headset feature.
To mute your call any time during the conversation:1. Press under the word Mute on the screen once. “Mute”
appears on the base LCD.2. Press under the word Unmute on the screen again
to cancel and return to your phone conversation.
█ Hold FunctionThe display will show a Hold option once you have a call established.
To put a call on hold: 1. Press under the word Hold once. The LCD will
display “Call on hold”. Hanging up the handset will not disconnect the call.
2. To continue the conversation, simply pick up the handset or press under the word Unhold.
█ Redial FunctionThe Redial key is used to quickly redial the last number you dialed.
1. Press the Speaker key and listen for the dial tone.2. Press the Redial key. The phone will redial up to 32
digits automatically.
Dialing from the Redial List
1. Press the Redial key in standby mode.2. Press or repeatedly until you find the number you
want to dial. If you have activated the Talking Review feature, the number for each record will be announced as you scroll through the Redial list.
3. Press the Speaker key to dial.

40 – ENGLISH
Use Redial List Options
You can add a number to the phonebook from your redial list or delete a number in your redial list.
1. Press the Redial key in standby mode.2. Scroll to the desired number by using or .3. When the number appears on the display, press under
the word Options to choose the desired option:• Store: allows you to add the number to the
phonebook. To add, follow instructions in “Adding Phonebook Entries” on page 44.
• Erase: allows you to delete the selected number. As soon as you select Erase, the number is deleted and the next number will be displayed.
• Erase All: allows you to delete the complete redial list. You will be asked “Erase All?”. Press under the word Yes to confirm or under the word No to cancel.
Note: If no numbers are found in the Redial list, the display will show “Empty List”. When the Redial list is full, each time you dial a new number, the oldest number stored is automatically erased.
In order to utilize the Caller ID features, you must subscribe to Caller ID service through your local phone provider. This product can provide information only if both you and the caller are in areas offering Caller ID service and both telephone providers use compatible equipment.
This telephone automatically displays an incoming caller’s number/name along with the date and time of the call. It will record up to 20 calls of up to 16 digits and store the data into memory.
CALLER ID (CID) OPERATION
41 – ENGLISH
█ Receiving CID RecordsWhen you receive a call, the Caller ID information is transmitted between the first and second ring. The Caller ID information appears on the display while the phone rings, giving you a chance to monitor the information and decide whether or not to answer the call.
█ Storing CID RecordsYour base telephone’s Caller ID memory stores the data for the 20 most recent calls received. When the 21st call is received, the oldest Caller ID record (1st call) is automatically deleted.
You may review the stored information at any time. Calls received since your last review show as NEW in the display. Calls that have not been previously reviewed but were received from the same number more than once show as REPT in the display.
█ Talking Caller ID SettingYour ClearSounds® A1600 can announce the caller’s number between rings. If you have stored a phone number in the phonebook and recorded the corresponding name, when an incoming call with this number comes in, the phone will announce the name associated with this number. See page 41 for instructions on changing the Talking Caller ID setting and page 45 for instructions on recording a phonebook name.
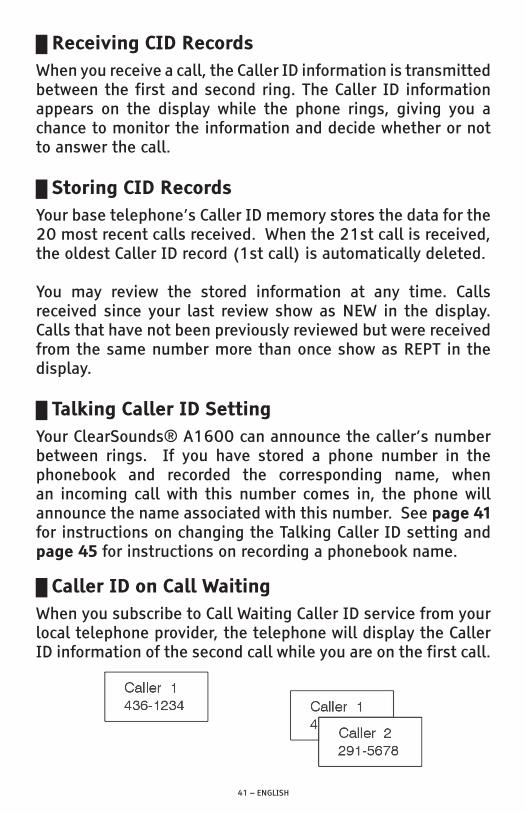
█ Caller ID on Call WaitingWhen you subscribe to Call Waiting Caller ID service from your local telephone provider, the telephone will display the Caller ID information of the second call while you are on the first call.
42 – ENGLISH
1. When you are on existing call, a tone will emit, and the Caller ID displays the incoming caller’s information.
2. Press the Call Waiting key to put the current call on hold and answer the second caller.
3. If the second call is not answered, the Caller ID information will be transferred into the Caller log. The caller information is considered “old”.
4. When you have finished with the second call, press the Call Waiting key to resume your conversation with the first caller.
█ Caller ID ListViewing the Caller List
As calls are received and stored, the display is updated to let you know how many calls have been received. Records will be listed in the order they were received.
To scroll through the CID records:
From the main screen, use or to scroll through the entries. Press to review the newest CID record and press to review the oldest CID record first.
Dialing a Number from the Caller List
Use or to locate the desired record. If you need to change the dialing format (7 digits, 10 digits or 11 digits), simply press the * key until you see the desired format of the number you would like to dial. For example, if the original number in the Caller ID list was 800-965-9043, press the * key repeatedly to change it to 1-800-965-9043 or 965-9043. Pick up the handset or press the Speaker key to dial that number.
Deleting a Single Caller List Record
1. Use or to locate the record.2. Press under the word Options and press under the
word Erase and the entry is automatically erased. 3. Continue to select records to delete or press under the
word Exit to return to the main screen.

43 – ENGLISH
Deleting All Caller List Records
1. Press or to locate any record.2. Press under the word Options and press to scroll to
Erase all and press under the word Select. 3. The display will show “Erase all?”. Press under the
word Yes to confirm or under the word No to cancel.The display will show “Empty List”.
Storing Caller List Records
1. Use or to locate the record.2. Press under the word Options and use to move to
Store and press under the word Select.3. The number will appear on the display. Press under
the word Save to confirm or press under the word Clear to erase and re-type the number and then press under the word Save.
4. “Name:” will appear with the caller’s name listed. Press under the word Clear to erase and re-type the name using the dial keypad (see page 44) or under the word Save to save the name as displayed.
5. The display will show the list of ring tones to select from. Press or to select the desired ring tone. Press under the word Select.
6. Repeat for each Caller ID entry that you want to save.
Note: You can record a voice prompt for the stored name. See page 45 for instructions.
Reminder: Press under the word Back or Exit on the screen from any menu to return to the previous screen. Otherwise, after 20 seconds, the phone will automatically return to the main screen from any menu if no key is pressed.
The built-in phonebook allows you to store frequently used numbers so that you can easily make a call without having to remember or enter the phone number. You can store up to 30 numbers in the phonebook.
PHONEBOOK OPERATION
44 – ENGLISH
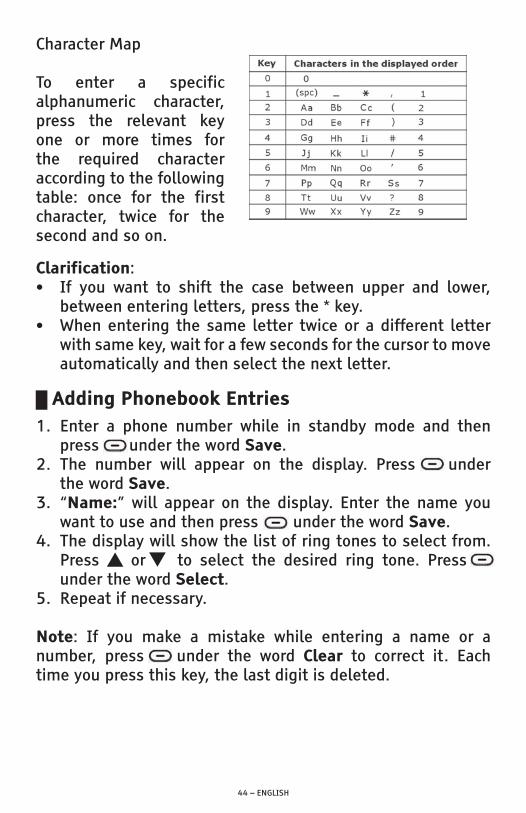
Character Map
To enter a specific alphanumeric character, press the relevant key one or more times for the required character according to the following table: once for the first character, twice for the second and so on.
Clarification:• If you want to shift the case between upper and lower,
between entering letters, press the * key.• When entering the same letter twice or a different letter
with same key, wait for a few seconds for the cursor to move automatically and then select the next letter.
█ Adding Phonebook Entries1. Enter a phone number while in standby mode and then
press under the word Save.2. The number will appear on the display. Press under
the word Save.3. “Name:” will appear on the display. Enter the name you
want to use and then press under the word Save. 4. The display will show the list of ring tones to select from.
Press or to select the desired ring tone. Press under the word Select.
5. Repeat if necessary.
Note: If you make a mistake while entering a name or a number, press under the word Clear to correct it. Each time you press this key, the last digit is deleted.
45 – ENGLISH
█ Using a Pause(used when entering a phonebook entry or photo memory key)You can insert one 3 second pause into dialing or memory storage in order to access custom and telebanking services, long distance, calling cards, etc. Press the Redial key at the desired point in the number to insert the pause and the letter P will appear at the pause entry.
█ Viewing Phonebook Entries1. Press under the word PhoneBk to enter the phonebook.2. Press or repeatedly until you reach the desired entry.3. Press under the word Options and then press or to
scroll to Edit and then press under the word Select to view the details.
Note: If you have activated the Talking Review feature, every time you press or , the system will announce the number or name of the highlighted entry.
█ Dialing A Number from the PhonebookFind the number you want to dial (refer to Viewing the Phonebook Entries above), then press the Speaker key to dial.
█ Using Phonebook Options1. Press under the word PhoneBk to enter the phonebook.2. Press or repeatedly until you reach the desired entry,
and then press under the word Options.3. Press or to choose the desired option:
• Play Voice: allows you to play the voice prompt of the selected entry. If you have recorded a name for this entry, the phone will announce the name. Otherwise, it will announce the number.
• Record Voice: allows you to record the name for the selected entry.
• Erase Voice: allows you to delete the name you have recorded for the selected entry.
46 – ENGLISH
• Edit: allows you to edit the selected entry• Erase: allows you to delete the
selected entryNote: After editing the name, you need to press the to edit the number.Note: If you record a voice prompt for an entry, an icon will appear before the name of the entry.
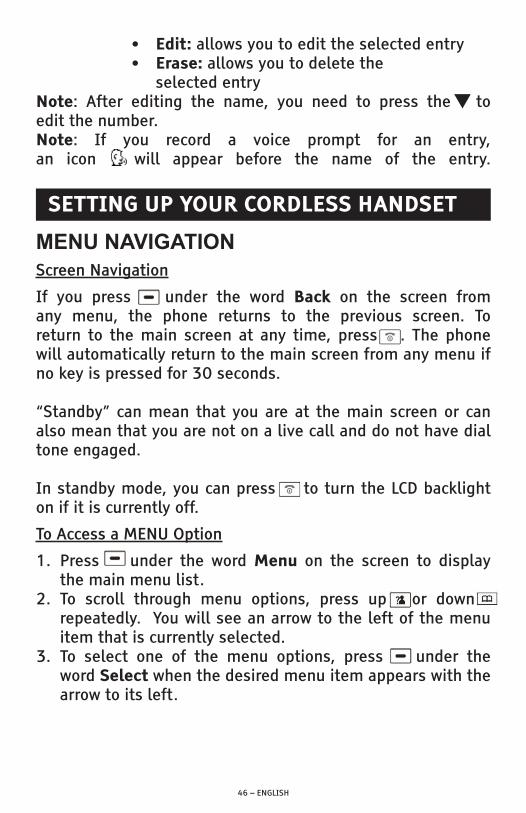
MENU NAVIGATIONScreen Navigation
If you press under the word Back on the screen from any menu, the phone returns to the previous screen. To return to the main screen at any time, press . The phone will automatically return to the main screen from any menu if no key is pressed for 30 seconds.
“Standby” can mean that you are at the main screen or can also mean that you are not on a live call and do not have dial tone engaged.
In standby mode, you can press to turn the LCD backlight on if it is currently off.
To Access a MENU Option
1. Press under the word Menu on the screen to display the main menu list.
2. To scroll through menu options, press up or down repeatedly. You will see an arrow to the left of the menu item that is currently selected.
3. To select one of the menu options, press under the word Select when the desired menu item appears with the arrow to its left.
SETTING UP YOUR CORDLESS HANDSET

47 – ENGLISH
MENU MAP – this identifies how the menu is displayed for navigation
Main Menu
Call List (Caller ID Book) (p. 69)
Phonebook (PB)(p. 71)
BS (Base) Settings
HS (Handset) Settings
Submenu I
Add to PB (Phonebook) (p. 70)Delete (p. 69)Delete All (p. 70)
Add (p. 72)View (p. 72)Edit (p. 72)Delete (p. 73)Delete All (p. 74)PB Status (p. 74)PB Record (p. 73)
Delete HS (p. 50)Dial Mode (p. 52)Flash Time (p. 53)Modify PIN (Personal Identification Number) (p. 54)
Alarm (p. 75)
Ring Setup (p. 56)
Tone Setup
Language (p. 59)HS Name (p. 50)LCD Contrast (p. 54)Auto Answer (p. 58)Amplified (p. 61)Talk Keypad (p. 60)
Submenu II
INT. (Internal) Ring (p. 56)EXT. (External) Ring (p. 56)Ring Volume (p. 56)
Key Tone (p. 58)Range Alarm (p. 52)

48 – ENGLISH
Main Menu
HS (Handset) Settings (Continued)
Registration (p. 49)
ANS. Machine (p. 77)
TAM setup (p. 77)
Submenu I
Date & Time (p. 55)
Selected Base (p. 51)
same as TAM setup(see below)
MSG Playback (p. 84)Delete All (p. 85)Memo (p. 86)TAM On/Off (p. 77)
TAM Settings (p. 78)
Submenu II
Date Format DD-MM-YY MM-DD-YYTime Format 12 HR 48 HRSet TimeSet Date
Answer Mode (p. 79)TAM Language (p. 79) Announce (p. 80)Set Ring (p. 78)Record Time (p. 78)Change PIN (p. 87)

49 – ENGLISH
Reminder: Press under the word Back on the screen from any menu to return to the previous screen. To return to the main screen, press . Otherwise, after 30 seconds, the phone will automatically return to the main screen from any menu if no key is pressed.
█ Registering the HandsetThe supplied handset is already registered to the base unit, and you can register up to 4 additional handsets to the base.1. Before registering an additional handset to the base, you
should press and hold the page key , which is located on the main base until you hear a loud tone and then release it.
2. Press under the word Menu on the screen of thehandset you are registering to display the main menu list.
3. Press up or down to scroll to Registration and then press under the word Select.
4. Press up or down to scroll through the base list and select one of the bases and then press under the word Select. The handset will search for the requested base.
5. If the base is found, and the handset is successfully registered, you will be prompted to enter the PIN code (the default PIN is 0000). Upon validation of the PIN, the Registration tone will sound and the base assigns a number to the handset. If the PIN entered is invalid, a warning tone will sound and the handset will return to the previous registration state.
6. If the base is not found, the handset will behave according to the Out of Range description found on page 52.
Note: Remove Handset 1 from the main base while
registering additional handsets.
HANDSET SET UP

50 – ENGLISH
█ Handset NameThis feature allows you to give each registered handset a name in order to easily recognize each handset if you have more than one registered to the base. To set the handset name:
1. Press under the word Menu on the screen to display the main menu list.
2. Press up or down to scroll to HS Settings and then press under the word Select.
3. Press up or down to scroll to HS Name and then press under the word Select.
4. Enter the handset name (up to 9 characters) by using the keypad (see page 71 for the character map and instructions) and then press under the word Save to confirm and exit. The handset name will be displayed above your handset number in standby mode.
Note: If you make a mistake while entering the name, press under the word Erase to correct it. Each time you pressthis key, the last character is deleted.
█ Delete/Terminate HandsetThis function allows you to delete a handset that is registered to the base. To delete/terminate a handset:
1. Press under the word Menu on the screen to displaythe main menu list.
2. Press up or down to scroll to BS Settings and then press under the word Select.
3. Press under the word Select to select Delete HS.The display will show PIN?
4. Enter the PIN (the default PIN is 0000) and then press under the word Select. If the PIN is validated, you will see a list of registered handsets.
5. Press up or down to scroll to the desired handset that you would like to delete and press under the word Select. The selected handset will no longer be registered to the base.

51 – ENGLISH
Note: If you selected the current handset or a non-registered handset, a warning tone will be heard.
█ Base SelectionThis function allows you to select a base from those already registered to the handset. To select a base:1. Press under the word Menu on the screen to display
the main menu list.2. Press up or down to scroll to HS Settings and then
press under the word Select.3. Press up or down to scroll to Selected Base and
then press under the word Select. 4. Press up or down to select the base you want and
then press under the word Select. If you select a non-existent base, the handset will sound a warning tone.
5. The display will show Searching and then BS Selected. The display will automatically return to the previous menu screen.
█ Handset ResetThis function allows you to reset the handset settings for Alarm, Audio Setup, Ring Setup, Tone Setup, Language, HS Name, Auto Answer and Date & Time to the initial factory settings. To reset the handset:
1. Press under the word Menu on the screen to display the main menu list.
2. Press up or down to scroll to Default and then press under the word Select. You will be prompted to enter the PIN.
3. Enter the PIN (the default PIN is 0000) and then press under the word Select. If the PIN is validated, the display will show Confirm?.
4. Press under the word Select to confirm or press under the word Back to cancel and exit.
If successful, the handset settings will be reset to the initial factory settings, otherwise the settings will remain. After resetting, the handset will return to standby mode.

52 – ENGLISH
█ Out of Range AlarmThis function allows you to know when the handset is out of range of the base, and a beep will sound. Your ClearSounds® A1600 comes from the factory preset for Out of Range Alarm ON. To change this setting:
1. Press under the word Menu on the screen to display the main menu list.
2. Press up or down to scroll to HS Settings and then press under the word Select.
3. Press up or down to scroll to Tone Setup and then press under the word Select.
4. Press down to select Range Alarm and then press under the word Select.
5. Press up or down to select On or Off and then press under the word Select.
█ Dialing ModeYour ClearSounds® A1600 comes from the factory preset for touch-tone service. Should you need to change this setting based on the type of phone service you have, use Tone for touch-tone service or Pulse for rotary dialing. NOTE: If you are not sure which dialing mode to select, please contact your local phone service provider. To change this setting:
1. Press under the word Menu on the screen to display the main menu list.
2. Press up or down to scroll to BS Settings and then press under the word Select.
3. Press down to select Dial Mode and then press under the word Select.
4. Press up or down to select Tone or Pulse and then press under the word Select.

53 – ENGLISH
█ Call Waiting (Flash)Your ClearSounds® A1600 comes from the factory preset for Flash Time to 600ms. Flash timing is the signaling process that tells the phone system when a phone is on hook or off hook. The United States uses a 600ms timing sequence. The European Union uses a 300ms timing sequence. You can choose from 100ms, 300ms or 600ms. To change this setting:
1. Press under the word Menu on the screen to display the main menu list.
2. Press up or down to scroll to BS Settings and then press under the word Select.
3. Press down to select Flash Time and then press under the word Select.
4. The display shows the current setting. Press up or down to choose from 100ms, 300ms, or 600ms and then press under the word Select.
Note: If you subscribe to Call Waiting on Caller ID, you will receive Caller ID information (if available) on Call Waiting calls (see page 68).
If you subscribe to Call Waiting service from your local phone provider, during a phone call you will hear a beep to indicate another call is waiting on the line.
1. To connect to the waiting call, press under the word Flash, and your original call is put on hold. The display will show R.
2. To switch between the two calls, press under the word Flash.
54 – ENGLISH
█ Modify PIN (Personal Identification Number)Your ClearSounds® A1600 is equipped with a PIN, which is used when re-setting the handset to factory default settings. The default PIN is 0000. We suggest that you do not change the PIN from 0000, but if you need to change the PIN:
1. Press under the word Menu on the screen to display the main menu list.
2. Press up or down to scroll to BS Settings and then press under the word Select.
3. Press up or down to scroll to Modify PIN and then press under the word Select.
4. The display shows “PIN ?”. Enter the current PIN, then press under the word Select. If the old PIN is validated, you will be prompted to enter a new PIN. If the old PIN is not validated, a warning beep will sound and you will be returned to the Modify PIN menu.
5. Enter the new PIN and then press under the word Select. You will be asked to confirm the PIN. Enter the new PIN again and then press under the word Select.
Reminder: Press under the word Back on the screen from any menu to return to the previous screen. To return to the main screen, press . Otherwise, after 30 seconds, the phone will automatically return to the main screen from any menu if no key is pressed.
█ LCD SettingsContrast Settings
1. Press under the word Menu on the screen to display the main menu list.
2. Press up or down to scroll to HS Settings and then press under the word Select.
3. Press up or down to scroll to LCD Contrast and then press under the word Select.
LCD DISPLAY

55 – ENGLISH
Date & Time Format Settings
If you have Caller ID service, the date and hour will be automatically set when you receive your first call. If you currently do not have Caller ID service through your phone company, please follow the directions below. You can change the format of the time and date to your preference.
1. Press under the word Menu on the screen to display the main menu list.
2. Press up or down to scroll to HS Settings and then press under the word Select.
3. Press up or down to scroll to Date & Time and then press under the word Select.
4. Press under the word Select to select Date Format.5. Press up or down to select DD-MM-YY or
MM-DD-YY and then press under the word Save. You will return to the previous screen.
6. Press down to select Time Format.7. Press up or down to select 12 – Hour or 24 – Hour
and then press under the word Save.
Set Date & Time
1. Press under the word Menu on the screen to display the main menu list.
2. Press up or down to scroll to HS Settings and then press under the word Select.
3. Press up or down to scroll to scroll to Date & Time and then press under the word Select.
4. Press up or down to scroll to Set Date and then press under the word Select.
5. Enter the current date using the keypad and then press under the word Save. You will return to the previous screen.
6. Press down to select Set Time and then press under the word Select.
7. Enter the current time using the keypad and then press under the word Save.
Note: If you select 12 - Hour clock, AM/PM will appear at the right of the time in standby mode. If you select 12 – Hour, you will still need to enter the time in the 24 – Hour format.
56 – ENGLISH
█ LCD DescriptionsYour ClearSounds® A1600 has a large LCD screen that provides useful information. Your screen has a backlight that automatically switches off after 10 seconds of inactivity.
See page 16 for LCD Window Icons Descriptions
█ Reviewing Voice Mail MessagesYou must subscribe to Voice Mail from your phone service provider to use this feature.
NOTE: You are not able to utilize voice mail and the built-in answering machine at the same time.
When a voice mail message is left, the screen will display the icon and the message will be saved as a call. If you have new messages, you will hear a stutter dial tone when you pick up the handset. You can utilize one of the M1 - M4 one-touch memory dial buttons to program your voice mail access phone number. Follow the steps provided from your phone service provider to listen to your message(s).
Reminder: Press under the word Back on the screen from any menu to return to the previous screen. To return to the main screen, press . Otherwise, after 30 seconds, the phone will automatically return to the main screen from any menu if no key is pressed.
█ Ringer SettingAudible Ringer
You can adjust the ringer of your phone and you can select separate ring tones for external calls (EXT) received through the phone network (outside calls) and internal calls (INT) received from other handsets registered to the base.
HANDSET SETTINGS

57 – ENGLISH
1. Press under the word Menu on the screen to display the main menu list.
2. Press up or down to scroll to HS Settings and then press under the word Select.
3. Press down to scroll to Ring Setup and then press under the word Select.
4. Press under the word Select to select INT Ring or press down to select EXT Ring, and then press under the word Select.
5. Press up or down to select the ring tone from Melody 1-Melody 10. When adjusting the Melody, the handset plays the selected melody.
6. Press under the word Select. 7. To adjust the volume level, select Ring Volume and then
press under the word Select. You can select and adjust the volume from Volume 1-Volume 5, or Off. When adjusting the Volume, the handset plays the selected loudness.
8. Press under the word Select.
Note: If you set the volume to “Off”, when a call comes in, only the New Call information appears on the LCD and the phone will not ring.
Visual and Vibrating Ringer
You can activate the visual ringer and vibrating handset function. A bright LED light will flash and the handset will vibrate when the phone rings. To turn this feature on/off:In standby mode, press and hold until the icon appears to activate and press and hold again to deactivate.

58 – ENGLISH
█ Turning the Handset “Power On/Off” ModeThe A1600 handset can be turned to “Power Off” mode, which can be a convenient way to prevent the phone from ringing without having to change the ringer setting. When you turn the handset to “Power Off” mode, calls can’t be made or received until you turn the power back “On”.
1. In Standby Mode (not during a live call):2. To turn the handset “Off”, simply press and hold until
the display turns off.3. To turn the handset “On”, you can either:4. Place the handset back into the base and the handset will
automatically power on.5. Press and hold until the display turns on.
█ Auto Answer SettingYour ClearSounds® A1600 comes from the factory preset for Auto Answer set to OFF. With this feature turned ON, when the phone is in the base, you can answer a call by simply picking up the handset from the base. You do not need to press any key to answer. To change this setting:
1. Press under the word Menu on the screen to display the main menu list.
2. Press up or down to scroll to HS Settings and then press under the word Select.
3. Press up or down to scroll to Auto Answer and then press under the word Select.
4. Press up or down to select On or Off to enable/disable the function and then press under the word Select.
█ Keypad Tones SettingYour ClearSounds® A1600 comes from the factory preset for menu Keypad Tones ON. This refers to having an audible tone when navigating the menu to verify a selection. To change this setting:

59 – ENGLISH
1. Press under the word Menu on the screen to display the main menu list.
2. Press up or down to scroll to HS Settings and then press under the word Select.
3. Press up or down to select Tone Setup and then press under the word Select.
4. Press under the word Select again to select Key Tone. 5. Press up or down to select On or Off to activate/
deactivate the audible tone function and then press under the word Select.
Note: In certain error conditions, a warning tone will sound when an incorrect key is pressed.
█ Language SettingThe handset supports up to 7 predefined languages: English, French, Spanish, German, Italian, Dutch and Russian. Changing the language will cause the menu to be displayed in the new language. To select a language:
1. Press under the word Menu on the screen to display the main menu list.
2. Press up or down to scroll to HS Settings and then press under the word Select.
3. Press up or down to select Language and then press under the word Select.
4. The languages will be displayed. Press up or down to scroll through the language options. Each language will be displayed in its own native translation.
5. Select the desired language and then press under the word Select.
To go back to the English menu if you can’t read the current language displayed:
1. Press the Left soft key ( ).2. Press down 3 times.3. Press the Left soft key ( ).

60 – ENGLISH
4. Press down 3 times.5. Press the Left soft key ( ).6. Press up or down to find “English” in the list
of languages.7. Press the Left soft key ( ) to save the setting.
█ Talking KeypadYour ClearSounds® A1600 comes from the factory preset for Talking Dialing Mode set to OFF This feature allows you to pre-dial the number you wish to call and you will hear the number announced as you dial as well as display the numbers on the LCD. To change this setting:
1. Press under the word Menu on the screen to display the main menu list.
2. Press up or down to scroll to HS Settings and then press under the word Select.
3. Press up or down to scroll to Talk Keypad and then press under the word Select.
4. Press up or down to select On or Off to activate/deactivate the audible tone function and then press under the word Save.

61 – ENGLISH
█ Using the Handset Amplification FunctionYour ClearSounds® A1600 is equipped with a specialized amplification function designed to adjust to your needs. Flexibility in the management of amplification and tone is important when trying to achieve listening clarity. Be sure to try all levels of amplification and tone to find the best level for your hearing needs.
Without pressing the AMP (Amplify) key, the handset provides some volume and tone control. Once the AMP key is activated, the phone will provide even greater amplification. The AMP key is located on the right side of the handset.
During a call, adjust the Vol + or Vol – keys (located on the left side of the handset) to fit your hearing requirements. You can also adjust the volume by pressing up or down on the navigation key. Adjust the Tone key (located on the right side of the handset), which is a 3-level adjustment, to fit your hearing requirements.
Using the Auto Amplification Feature
Your ClearSounds® A1600 is designed with unique features to protect users from being exposed to dangerous sound levels. You are able to switch between automatic or manual amplification, and you should select the setting that best suits your needs.
Note: As long as the Amplify mode is ON, the red Amplify Indicator Light will remain lit (located at the top of the handset, in the white “dome”).
Set ON – When the Amplification Feature is set to ON, the amplify function will be ON every time a call starts. The user will no longer need to remember to press the AMP key with every phone conversation. When the phone hangs up, the amplify setting will remain ON.
BASIC PHONE FUNCTIONS
62 – ENGLISH
Set OFF – When the Amplification Feature is set to OFF, the amplify function will be OFF every time a call starts. This allows people who do not require the level of amplification offered on the phone to use it. Every time a call starts, the user will need to press the AMP key in order to gain the extra level of amplification and tone control. When the phone hangs up, the amplify setting will reset to OFF.
Your ClearSounds® A1600 comes from the factory preset for Auto Amplification set to OFF. To change this setting:
1. Press under the word Menu on the screen to display the main menu list.
2. Press up or down to scroll to HS Settings and then press under the word Select.
3. Press up or down to scroll to Amplified and then press under the word Select.
4. Press up or down to select Off or On and then press under the word Save.
█ Using your Handset Speakerphone The handset has a built-in speakerphone. When using the speakerphone, you can enjoy the convenience of hands-free conversation. To activate the speakerphone:
In standby mode
1. Press twice to turn the speakerphone on. The icon will appear on the LCD.
2. Press to turn the speakerphone off and switch to handset mode. The icon will disappear from the LCD.
During a call
1. Press to turn the speakerphone on. The icon will appear on the LCD.
2. Press to turn the speakerphone off and return to handset mode. The icon will disappear from the LCD.
To adjust the volume, press the Vol+ or Vol- keys on the side of the handset or press up or down on the navigation key.

63 – ENGLISH
For optimal speakerphone performance, avoid the following:• Areas with high background noise (The microphone might
pick up these sounds and prevent the speakerphone from going into the receiving mode when you finish talking).
• Surfaces affected by vibration.• Recessed areas such as in a corner, under a cupboard, or
next to a cabinet, which can generate an echo effect.
█ Answering a Call from the Cordless HandsetCordless Handset out of the base
1. To answer a call, press and speak into the handset. 2. Adjust your volume and tone settings if needed.3. To end the call, press or replace the handset to the base.
Cordless Handset in the base
1. If you have activated the Auto Answer function (see page 58), simply lift the handset out of the base and speak into the handset.
2. If you have not activated the Auto Answer function, lift the handset out of the base and press and speak into the handset.
3. Adjust your volume and tone settings if needed.4. To end the call, press or replace the handset to
the base.
After you hang up, the LCD will display the call duration.
During the call, the base LCD will display the call duration.
█ Making a Call from the Cordless Handset1. Pick up the handset and press . The icon appears
on the LCD. Listen for a dial tone.2. Dial a number. If you make a mistake while entering a
number, hang up and begin again.3. Adjust your volume and tone settings if needed.4. To end the call, press or replace the handset to the base.
64 – ENGLISH
Dialing from Standby Mode
You can enter the desired phone number in standby mode, which allows you to verify the number before dialing. If you have the TALKING DIALING function turned ON, the number will be announced as you dial (see page 60 for more information). Follow these steps:
1. In standby mode, dial the number you want to call (up to 32 digits). To insert a pause, press right . If you make a mistake while entering a number, press under the word Erase to delete it.
2. When the number appears correctly, press to dial.3. Adjust your volume and tone settings if needed.4. To end the call, press or replace the handset to the base.
Dialing from the Memory M1 – M4 keys
Press one of the M1 – M4 memory dial keys and the phone will automatically begin to dial (see page 65 on how to program the memory dial keys). Note: If you turn the Key Lock feature on, the M1 – M4 keys will still be operational (see page 75for more details).
Dialing from the Caller ID List (see page 69)
Dialing from the Redial List (see page 66)
█ One-Touch Memory Setting & DialingCordless Handset
The handset allows you to program 4 frequently dialed numbers. Each memory key can store up to 24 digits. You can insert one 3 second pause into dialing or memory storage in order to access custom and telebanking services, long distance, calling cards, etc. Press the right button at the desired point in the number to insert the pause and the letter P will appear.

65 – ENGLISH
Storing M1-M4 Memory Numbers
1. Press the memory key (M1-M4) in standby mode.2. The display shows “Number ?” Enter the desired number
(up to 24 digits) and you can press under the word Erase to erase digit(s). Then press under the word Save.
3. Press up or down to select from Melody 1 through Melody 10 and then press under the word Select.
4. Repeat if necessary.
Note: These will appear as the first four entries in your phonebook.
Viewing, Editing or Deleting M1-M4 Memory Numbers
You can view, edit, and delete the M1-M4 memory dial number(s) by following the instructions in Using the Phonebook Options, found on page 73. The memory default names are M1:, M2:, M3:, M4:, and you can add a name after the M1:- M4:, but you can’t delete the default name.
Dialing from M1-M4 Memory Numbers
In standby mode, press one of the memory keys (M1-M4), the display will show the corresponding number and begin to dial. If you selected the wrong memory dial, press to hang up.
Note: If you turn the Key Lock feature on, the M1 – M4 keys will still be operational (see page 75 for more details).
█ Mute SettingDuring a conversation, you can temporarily switch your phone’s microphone off to have a private, off-line conversation by using the MUTE feature. The party on the phone cannot hear you but you can hear them. A conversation can be muted while using the handset, speakerphone or hands-free headset feature.
To mute your call any time during the conversation:
1. Press under the word Mute on the screen once. “Muted” appears on the handset LCD.
2. Press under the word Unmute on the screen again to cancel and return to your phone conversation.
66 – ENGLISH
█ Redial Function - HandsetThe Redial key is used to quickly redial the last number you dialed.1. Press right on the navigation key in standby mode.
The LCD displays the last number you dialed. 2. Press to dial.
Dial from the Redial Book
You can retrieve the last 10 numbers you have dialed and redial them quickly.1. Press right on the navigation key in standby mode.2. If you want to scroll through the redial book, press up
or down until you find the number you want to dial. 3. Press to dial.
Use Redial List Options
You can add a number to the phonebook from your redial list or delete a number in your redial list. 1. Press right on the navigation key in standby mode.2. Scroll to the desired number by using up or down .3. When the number appears on the display, press under
the word More to choose the desired option:• Add to PB (Phonebook): allows you to add
the number to the phonebook. To add, follow instructions in “Adding Phonebook Entries” on page 72.
• Delete: allows you to delete the selected number. As soon as you scroll to Delete and press under the word Select, the number is automatically deleted.
• Delete All: allows you to delete the complete redial list. You will be asked to confirm the delete. Press under the word Select to confirm or under the word Back to cancel.
Note: If no numbers are found in the Redial list, the display will show “Empty”. When the Redial list is full, each time you dial a new number, the oldest number stored is automatically erased.

67 – ENGLISH
Reminder: Press under the word Back on the screen from any menu to return to the previous screen. To return to the main screen, press . Otherwise, after 30 seconds, the phone will automatically return to the main screen from any menu if no key is pressed.
In order to utilize the Caller ID features, you must subscribe to Caller ID service through your local phone provider. This product can provide information only if both you and the caller are in areas offering Caller ID service and both telephone providers use compatible equipment.
This phone automatically displays an incoming caller’s number/name along with the date and time of the call. It will record up to 40 calls of up to 15 digits and store the data into memory.
█ Receiving CID RecordsWhen you receive a call, the Caller ID information is transmitted between the first and second ring. The Caller ID information appears on the display while the phone rings, giving you a chance to monitor the information and decide whether or not to answer the call.
Out Of Area – this message will display when someone calls from an area where Caller ID service is not offered or is not yet providing number delivery to your area.
Private – this message will display when the caller has chosen to block the name and number from being sent.
█ Storing CID RecordsYour phone’s Caller ID memory stores the data for the 40 most recent calls received. When the 41st call is received, the oldest Caller ID record (1st call) is automatically deleted.
CALLER ID (CID) OPERATION

68 – ENGLISH
█ Caller ID on Call WaitingWhen you subscribe to Call Waiting Caller ID service from your local phone provider, the phone will display the Caller ID information of the second call while you are on the first call.
1. When you are on existing call, a tone will emit, and the Caller ID displays the incoming caller’s information.
2. Press under the word Flash to put the current call on hold and answer the second caller.
3. When you have finished with the second call, press under the word Flash to resume your conversation with the first caller.

69 – ENGLISH
█ Caller ID ListViewing the Caller List
As calls are received and stored, the icon is displayed on the LCD. If the Caller ID memory is full, the icon will flash on the LCD. Records will be listed in the order they were received.
To scroll through the CID records:
Method 1: From the main screen, press up to access the CID Book. Press up or down to scroll through the entries. Press up to review the newest CID record and press down to review the oldest CID record first.
Method 2: Press under the word Menu on the screen to display the main menu list. Press under the word Select to select Call List. Press up to review the newest CID record and press down to review the oldest CID record first.
If the call record has been reviewed, the ↑ icon will appear. If the call has not been reviewed, the icon will appear.
Dialing a Number from the Caller List
After you access the CID Book following the instructions in Viewing the Caller List - Method 1:
1. Press up or down to locate the desired record. If you need to change the dialing format (7 digits, 10 digits or 11 digits), simply press under the word More to display the 3 dialing formats. For example, if the original number in the Caller ID list was 800-965-9043, you might need to change it to to 1-800-965-9043 or 965-9043 in order to dial out.
2. Press up or down to locate the desired format and press to dial.
Deleting a Single Caller List Record
1. Press under the word Menu on the screen to display the main menu list.
2. Press under the word Select to select CID List.

70 – ENGLISH
3. Press up or down to locate the desired record and press under the word More.
4. Press down to select Delete and then press under the word Select. You will hear a confirmation beep and the LCD will display the next record.
5. Continue to select records to delete.
Deleting All Caller List Records
1. Press under the word Menu on the screen to display the main menu list.
2. Press under the word Select to select CID List. 3. Press under the word More.4. Press down to scroll to Delete All and press under
the word Select.5. “Confirm ?” will appear. Press under the word Select
to confirm or press under the word Back to exit. 6. If you select Del All, you will hear a beep and the phone
returns to standby mode after clearing all of the records.
Storing Caller List Records
1. Press under the word Menu on the screen to display the main menu list.
2. Press under the word Select to select Call List.3. Press up or down to locate the desired record and
press under the word More.4. Press under the word Select to select Add to PB.5. The current name will be displayed. If necessary, press
under the word Erase to clear the name and then enter the desired name and press under the word Save.
6. The current number will be displayed. If necessary, press under the word Erase to clear the digit(s) and then enter the desired number and press under the word Save.
7. Press up or down to select the Melody ring you would like to associate with the number, and then press under the word Select.
8. Repeat if necessary.
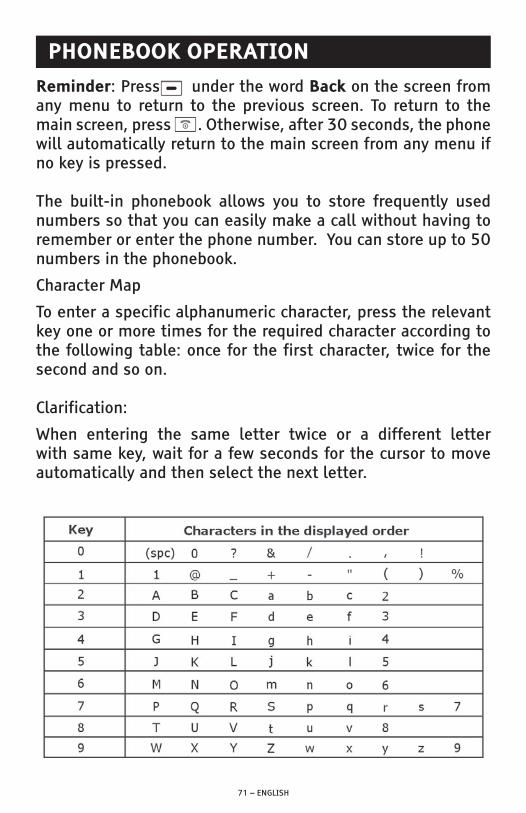
71 – ENGLISH
Reminder: Press under the word Back on the screen from any menu to return to the previous screen. To return to the main screen, press . Otherwise, after 30 seconds, the phone will automatically return to the main screen from any menu if no key is pressed.
The built-in phonebook allows you to store frequently used numbers so that you can easily make a call without having to remember or enter the phone number. You can store up to 50 numbers in the phonebook.
Character Map
To enter a specific alphanumeric character, press the relevant key one or more times for the required character according to the following table: once for the first character, twice for the second and so on.
Clarification:
When entering the same letter twice or a different letter with same key, wait for a few seconds for the cursor to move automatically and then select the next letter.
PHONEBOOK OPERATION

72 – ENGLISH
█ Adding Phonebook Entries1. Press under the word Menu on the screen to display
the main menu list.2. Press down to choose Phonebook and then press
under the word Select.3. The display shows the first entry already in the Phonebook.4. Press under the word Select and the display shows
“Add”. Press under the word Select.5. The display shows “Name?”. Enter the name you want to
use and then press under the word Save. The display shows “Number?”. Enter the desired number (up to 24 digits) and then press under the word Save.
6. Press up or down to select from Melody 1 – Melody 10 and then press under the word Select. If you want to set a VIP number, you should select a special Melody ring tone for it. This ring tone should be different than the EXT Ring tone you have set.
7. Repeat if necessary.
Note: If you make a mistake while entering a name or a number, press under the word Erase to correct it. Each time you press this key, the last digit is deleted. To clear all digits, press and hold under the word Erase.
█ Using a Pause(used when entering a phonebook entry or M1-M4 memory dial entry) You can insert one 3 second pause into dialing or memory storage in order to access custom and telebanking services, long distance, calling cards, etc. Press right on the navigation key at the desired point in the number to insert the pause and the letter P will appear at the pause entry.
█ Viewing Phonebook Entries1. In standby mode, press down to enter the phonebook.2. Press up or down to scroll through the list until
the desired entry is displayed.

73 – ENGLISH
█ Dialing a Number from the Phonebook1. In standby mode, press down to enter the phonebook.2. Press up or down to scroll through the list until
the desired entry is displayed. You can also press the first letter of the contact name using the keypad and the LCD will display the corresponding section of your phonebook and you can press up or down to find the desired entry.
3. Press or press under the word Dial.
█ Using Phonebook OptionsEditing (name, number, ring tone)
1. Press under the word Menu on the screen to display the main menu list.
2. Press down to select Phonebook and then press under the word Select.
3. Press up or down repeatedly until the entry you want to edit displays, and then press under the word Select.
4. Press down to select Edit and then press under the word Select.
5. The current name will be displayed. If necessary, press under the word Erase to clear the name and then enter the desired name and press under the word Save.
6. The current number will be displayed. If necessary, press under the word Erase to clear the digit(s) and then enter the desired number and press under the word Save.
7. Press up or down to select the Melody ring you would like to associate with the number, and then press under the word Select.
8. Repeat if necessary.

74 – ENGLISH
Deleting
Note: If you choose Delete All, all of your phonebook entries will be deleted.1. Press under the word Menu on the screen to display
the main menu list.2. Press down to select Phonebook and then press
under the word Select.3. Press up or down repeatedly until the entry you want
to delete displays, and then press under the word Select. 4. Press up or down to scroll to Delete and then press
under the word Select. The entry will be deleted and the display will show the next entry.
5. At step 4, if you choose the Delete All menu and press under the word Select, the display will show “Repeat”. You can press under the word Select to delete all the entries or press under the word Back to exit.
PB (Phonebook) Status
The PB (Phonebook) status shows the number of phonebook entries already stored. To review the PB Status:1. Press under the word Menu on the screen to display
the main menu list.2. Press down to select Phonebook and then press
under the word Select.3. Press up or down to scroll to PB Status and then
press under the word Select to view the Phonebook status.

75 – ENGLISH
█ PagingYou can page the handset from the base unit to help locate the handset. Press on the base (hold for less than 5 seconds) and all of the handsets registered to the base will ring for about 1 minute. To stop paging, press on the base again or press any key on the handset.
Note: If you hold for more than 5 seconds, the base will enter registration mode.
█ Key LockYou can lock all keys on the keypad except for the M1 – M4 memory dial keys. While in locked mode, the handset still can be answered by pressing . When you hang up, the handset will return to the locked mode.
To lock the keypad, in standby mode, press and hold until the icon appears. To unlock the keypad, press and hold until the icon disappears.
While in locked mode, if you press any key, the phone will generate a warning tone.
█ AlarmYou can set an alarm on the handset (the alarm also supports the snooze function). To set the alarm:
1. Press under the word Menu on the screen to display the main menu list.
2. Press up or down to scroll to HS Settings and then press under the word Select.
3. Press under the word Select to select Alarm and the display will show the current set-up.
4. Press up or down to select On or Off and then press under the word Select. If you select On, the display asks you to enter the time in HH:MM.
ADDITIONAL FUNCTIONS

76 – ENGLISH
5. Use the keypad to enter the time (If your time is set to the 12 – Hour format, you will still need to enter the time in the 24 – Hour format. Press under the word Select.
6. The display shows Snooze. Press under the word Select to turn Snooze On or Off.
7. Press up or down to select On or Off and then press under the word Select.
8. When the alarm sounds, press any key to switch it off. If you have selected Snooze On, the alarm will ring every 11 minutes. To stop the snooze alarm, you must press to prevent the snooze function from continuing. This automatically switches the Snooze function to Snooze Off. You will need to re-select Snooze On if you want to turn that function back on for the next time the alarm is set to go off.
█ TorchIf you turn this feature on, the visual phone ringer light will remain lit and can be used as a light. To turn this feature on/off, in standby mode, press and hold until the light turns on/off.

77 – ENGLISH
TELEPHONE ANSWERING MACHINE (TAM) OPERATION
Speakerphone Reminder: Press under the word Back from any menu to return to the previous screen. Otherwise, after 20 seconds, the phone will automatically return to the main screen from any menu if no key is pressed.
Handset Reminder: Press under the word Back from any menu to return to the previous screen. To return to the main screen, press . Otherwise, after 30 seconds, the phone will automatically return to the main screen from any menu if no key is pressed.
The answering machine will hold up to 15 minutes of messages and can be accessed from the phone or from a remote location.
█ Turn On/OffThis section shows you how to set up your answering machine to receive incoming calls. Before you begin the set up process, you must turn on the answering machine. To set this feature:
Using the Base1. Press under the word Menu on the screen to display
the main menu list.2. Press or to scroll to TAM setup and then press
under the word Select.3. Press under the word Select to access TAM ON/OFF.4. Press or to choose between ON/OFF to and then
press under the word Select.
Using the Handset1. Press under the word TAM to display the TAM main
menu list.2. Press up or down to scroll to TAM On/Off and
then press under the word Select.3. Press up or down to select Off or On and then
press under the word Select.
SETTING UP YOUR ANSWERING MACHINE

78 – ENGLISH
█ TAM SettingsRings to Answer
This is the number of rings after the answering machine takes an incoming call and plays your outgoing message. You can select from 2 to 6 rings or toll saver mode. If you select Toll Saver, the unit answers after the 2nd ring if there are new messages waiting or after the 6th ring if there are no new messages waiting. To change the ring number:
Using the Base:
1. Press under the word Menu on the screen to display the main menu list.
2. Press or to scroll to TAM setup and then press under the word Select.
3. Press or to choose Ring number and then press under the word Select.
4. Press or to choose the answer rings (2, 4, 6, 8 Rings or toll saver) and then press under the word Select.
Using the Handset:
1. Press under the word TAM to display the TAM main menu list.
2. Press up or down to scroll to TAM Settings andthen press under the word Select.
3. Press up or down to scroll to Set Ring and then press under the word Select.
4. Press up or down to select the answer rings (2, 4, 6, 8 Rings or Time Saver) and then press under the word Select.
Record Time
Using the handset, you are able to select the recording time limit for messages. You can select from 1 minute, 120 seconds, 180 seconds or unlimited. If you select unlimited, the message can continue to be recorded until the memory is full. To select the record time:

79 – ENGLISH
1. Press under the word TAM to display the TAM main menu list.
2. Press up or down to scroll to TAM Settings and then press under the word Select.
3. Press up or down to select Record Time and then press under the word Select.
4. Press up or down to select the record time (60S, 120S, 180S or Unlimited) and then press under the word Select.
Voice Prompt Language(announces answering machine functions)
The handset supports 3 predefined languages: English, French & Spanish. You can change the language used to play the voice prompt messages. To change the language:
Using the Handset:
1. Press under the word TAM to display the TAM main menu list.
2. Press up or down to scroll to TAM Settings and then press under the word Select.
3. Press up or down to select TAM Language and then press under the word Select.
4. The current language will be displayed. Press up or down to scroll through the language options. Press under the word Select to choose the desired language.
Answer Mode Selection
The answering machine offers 2 modes for operation. ANS & REC will answer and record, which is the conventional outgoing message that allows the caller to leave a message. Answer only will answer only, which is the outgoing message that does not allow a caller to leave a message (you may want to select Answer only if you do not want callers to be able to leave a message). To choose the Answer Mode, you must use the handset.

80 – ENGLISH
1. Press under the word TAM to display the TAM main menu list.
2. Press up or down to scroll to TAM Settings and then press under the word Select.
3. Press under the word Select to choose Answer Mode.4. Press up or down to select ANS & REC or Answer
Only and then press under the word Select.
Note: The Answer only message will be played if your answering machine becomes full.
Recording Outgoing Message
(each message can be up to 1 minute)
Using the Handset to record “ANS & REC”: The default announcement is “Please leave your message after the tone.” To change the message:
1. Press under the word TAM to display the TAM main menu list.
2. Press up or down to scroll to TAM Settings and then press under the word Select.
3. Press down to select Announce and then press under the word Select.
4. Press under the word Select to select ANS & REC.5. Press down to select Record MESS and then press
under the word Select.6. Record your announcement after the tone. Recording will
stop automatically after 1 minute or you can confirm and end the recording by pressing under the word Select. During the recording, the LCD will show “Recording”.
7. The announcement will be played back immediately. If you do not like your message, record your announcement again or restore it to the default one.
81 – ENGLISH
Using the base to record “ANS & REC” (called Recorded OGM):
1. Press under the word Menu on the screen to display the main menu list.
2. Press to scroll to TAM setup and then press under the word Select.
3. Press to choose Outgoing Msg and then press under the word Select.
4. Press to choose Record OGM and then press under the word Select. Speak clearly into the microphone, which is located below the Redial button. The display will show “Recording”.
5. You can record your OGM after the tone. Recording will stop automatically after 1 minute. You can also confirm and end the recording by pressing under the word End. The new OGM will be played after the recording.
Sample ANS & REC message:
Hi, this is (use your name here), I can’t answer the phone right now so please leave your name, number and a brief message after the tone and I’ll get back to you. Thank you.
Using the Handset to record “Answer only”:The default announcement is “Hello, your call cannot be taken at the moment. Please call back later.” To change the message:
1. Press under the word TAM to display the TAM main menu list.
2. Press up or down to scroll to TAM Settings and then press under the word Select.
3. Press down to select Announce and then press under the word Select.
4. Press under the word Select to select Answer Only.5. Press down to select Record MESS and then press
under the word Select.6. Record your announcement after the tone. Recording will
stop automatically after 1 minute or you can confirm and end the recording by pressing under the word Select. During the recording, the LCD will show “Recording…”
82 – ENGLISH
7. The announcement will be played back immediately. If you do not like your message, record your announcement again or restore it to the default one.
Play Announcement
Method 1: Using the Handset
1. Press under the word TAM to display the TAM main menu list.
2. Press up or down to scroll to TAM Settings and then press under the word Select.
3. Press down to select Announce and then press under the word Select.
4. Press under the word Select to select the message you want to play (ANS & REC or Answer Only).
5. Press under the word Select to choose Playback.6. Press under the word Select to choose Playback. 7. The current announcement will play. During the playback,
the display shows “Playing OGM.” You can press under the word Back to stop and exit.
Method 2: Using the Base
1. Press under the word Menu on the screen to display the main menu list.
2. Press to scroll to TAM setup and then press under the word Select.
3. Press to choose Outgoing Msg and then press under the word Select.
4. Press under the word Select to choose Play OGM.5. The current OGM will be played. During the process the
display will show Playing. You can press under the word End to stop and exit.
6. If you do not like your message, record your message again or restore it to the default one.

83 – ENGLISH
Restore Default Announcement(s)
1. You must use the base to restore the default announcement(s).
2. Press under the word Menu on the screen to display the main menu list.
3. Press or to scroll to TAM setup and then press under the word Select.
4. Press to choose Outgoing Msg and then press under the word Select.
5. Press or to choose Erase OGM and then press under the word Select.
6. You will hear a confirmation beep and the recorded OGM is now deleted and the original default message returns.
█ Message OptionsAnswering Machine Volume
When listening to your messages through the base, adjust the volume by using the Volume Control V- or V+ on the right side of the phone. When listening to your messages through the handset, adjust the volume by using the Vol+ or Vol- keys on the left side of the handset or up or down on the navigation key.
Screening Calls (only the handset can intercept the call)
1. When the answering machine answers the call, listen while the caller leaves a message.
2. To speak to the caller, pick up the handset and press (If you have Auto Answer ON and your phone is in the base, you will still need to press after picking up the handset).
The answering machine automatically stops recording when you activate the handset.
TIP: Make sure the volume on the phone is set loud enough to hear your incoming callers.

84 – ENGLISH
Play Messages
When a call is received and the TAM is ON and ANS & REC is selected, the machine will play the outgoing message, and then perform message recording. The process is as follows:
After ringing N times, the phone enters answer-record mode automatically and starts to play the outgoing message. The caller can record after the tone.
Using the Handset:
1. Press under the word TAM to display the TAM main menu list.
2. Press under the word Select to select MSG Playback.3. The phone will announce “You have N new message(s)”
or “You have N saved message(s)”. The messages will be played back and you can:
4. press to delete the current message while it is playing5. press to pause/play the current message6. press once to replay the current message and twice to
replay the previous message7. press to skip to the next message8. press under the word Back to stop playing and exit
Please Note: When listening to your messages through the handset, the message will always start playing back through the handset speakerphone. To switch to the earpiece, press . You can switch between speakerphone and handset while listening to messages by pressing .

85 – ENGLISH
Method 2: Using the Base
Play/Stop KeyPress to start or stop the Message or Memo playing
Skip KeyPress to play the next message
Repeat KeyPress once to play the current messagePress twice to play the previous message
Delete KeyWhile playing an incoming message, press and hold this key to delete the current message.When the answering machine is ON, press and hold this key to delete all of the messages. Memo KeyPress and hold this key to record a memo (it will be stored as a new message)
Delete Messages
Using the Handset (can only delete ALL messages):
1. Press under the word TAM to display the TAM main menu list.
2. Press down to select Delete All and then press under the word Select.
3. The LCD will show “Confirm ?” Press under the word OK to delete all messages or press under the word Back to cancel and exit.
Method 2: Using the Base (can delete all or specific messages)
While playing an incoming message, press and hold the key to delete the current message. Making sure the answering machine is ON, press and hold the key to delete all of the messages.

86 – ENGLISH
█ Message Playback SpeedYou can slow down the playback speed of Incoming Messages (ICM). To change this setting (through the base only):1. Press under the word Menu on the screen to display the
main menu list.2. Press or to scroll to TAM setup and then press
under the word Select.3. Press or to choose ICM Voice Slow and then press
under the word Select.4. Press or to choose On or Off and then press
under the word Save.
█ Record A MemoYou can use the phone to record memo messages (each can be up to 3 minutes). A memo can be useful as a short message to another person in the household or as a personal reminder. This memo will be played as a message.
Using the Base:
1. Press and the hold the MEMO key in standby mode. The display will show Recording Memo and the recording will start. Important: The MEMO key should be pressed and held during the whole process.
2. Release the MEMO key to end the recording.
Using the Handset:
1. Press under the word TAM to display the TAM main menu list.
2. Press up or down to select Memo and then press under the word Select.
3. Begin recording your announcement. Recording will stop automatically after 3 minutes or you can confirm and end the recording by pressing under the word OK. During the recording, the LCD will show “Recording”.
When a Memo is recorded, will appear on the LCD and you can play the memo message back as you would play answering machine messages back.

87 – ENGLISH
█ Security ID/PIN & Remote AccessSecurity ID/PIN
To operate your answering machine remotely, you will need to enter the Security ID/PIN. For security reasons, you should change this code (the default one is 0000): For more details on how to use remote access, please refer to Remote Access listed below. To change your Security ID/PIN:
Using the Base:
1. Press under the word Menu on the screen to display the main menu list.
2. Press or to scroll to TAM setup and then press under the word Select.
3. Press or to choose Security ID and then press under the word Select.
4. The display shows the current security ID. Enter the new one you want to use and then press under the word Save.
Using the Handset:
1. Press under the word TAM to display the TAM main menu list.
2. Press up or down to scroll to TAM Settings and then press under the word Select.
3. Press up or down to scroll to Change PIN and then press under the word Select.
4. Enter the current code and then press under the word OK.
5. Enter the new code twice you would like to set up (should enter twice)and then press under the word OK.
88 – ENGLISH
Remote Access
You can access many features of your answering machine remotely from any touch tone phone. A four-digit Security ID/PIN is required to access the system and the factory default code is 0000. To enter remote access:
Dial your phone number from any touch tone phone.When the Announce1/Announce2 message starts to play, you may enter the remote access mode by inputting a and then the Security ID/PIN. If you enter the ID/PIN incorrectly, the machine will ask you to enter the ID/PIN again. You are given 2 more attempts to correctly enter the ID/PIN before the line is disconnected. After you enter the ID/PIN, the system will play the menu of commands. You can then follow the commands to operate.
Note: It is best to stop playing messages before hanging up the phone.
Reminder: Your answering machine must be turned ON in order to use remote access.
No dial tone
1. Check that all phone cord connections and AC adapter are securely plugged into the phone, wall jack and electric outlet.
2. Check that the handset batteries are installed properly and are in full power (page 19).
3. Check that the phone is in the correct dialing mode: tone or pulse (page 30 or 52).
4. Plug another phone into the wall jack to make sure your phone service is working.
Nothing appears on the display
1. Check that the handset batteries are installed properly and are in full power.
TROUBLESHOOTING

89 – ENGLISH
2. Check that the handset has been turned on (page 58).
Handset seems to have a short battery life
1. Check the charging contacts. 2. Make sure you have installed the correct batteries (Never
use alkaline batteries! Only AAA NiMH rechargeable batteries should be used).
3. Consistently short battery life may indicate that the batteries need to be replaced.
No audible ringer
1. Make sure the ringer is not turned off. (pages 28-29, 56-57 )
2. Check the volume level of the ringer. (pages 28-29, 56-57)
3. Verify the AC adapter is securely plugged into the AC outlet and phone.
4. You may have too many extensions on your line. Try unplugging a few a devices.
Visual ringer and vibrating handset will not activate
1. Make sure the visual ringer and vibrating handset function is turned ON (page 57).
No amplification
1. Check to see if the Amplify button is ON. The red light should be lit (page 35, 61).
2. The AC adapter is required; make sure the AC adapter is plugged into the wall and into appropriate jack on the phone.
Low handset or speaker volume
1. Check the receiver or speaker volume settings. (page 35-36, 61-62)
2. Can’t be heard by other party3. Check that all phone cord connections are securely plugged
into the phone and wall jack.

90 – ENGLISH
Noise, Static, Interference while using the phone
1. A filter may be required for your home when you have DSL service or live near radio towers.
2. Make sure the AC adapter is not plugged into the wall outlet with other appliances.
3. Try relocating the phone to another location.
No numbers dialed when memory button is pressed1. No number stored in that memory button.
(page 37-38, 65) 2. Make sure phone number was programmed and saved.
(page 37-38, 65)3. Make sure programming is done in the correct dialing mode
(touch-tone or pulse).
Caller ID information does not show
1. Make sure you are subscribed to Caller ID service through your local phone company.
2. Let the phone ring a couple of times as there may be a delay in receiving the Caller ID information.
No Caller ID information while on a call
1. Make sure you service provides Caller ID information while you are on a call. This is sometimes known as “Caller ID on Call Waiting” or “Type II Caller ID”.
2. The phone cannot display the information if another phone on the same line is in use.
Answering Machine Tips
1. If you can’t hear the messages, or button tones, adjust the volume (page 83).
2. If the system always plays Announce2, the message memory may be full. Erase some messages.
3. If the incoming messages are incomplete, the message memory is full. Erase some messages.

91 – ENGLISH
TECHNICAL SPECIFICATIONSGeneral Number: A1600Amplification: 125dB SPL
Power Requirements: Base Input: 120 ~ 240VAC 50/60 HZ 150mAHandset Input: Ni-MH 1.2V x 3, mAhCharging Time: 15 hours
Jack: 2.5 mm headset 3.5 mm audio
Features and Specifications subject to change without notice.Purchase accessories for Your Clearsounds Phone:
Optional Neckloop: CS-CLA7V2 (connects easily
to your phone’s 2.5mm Phone Headset jack for hands-free conversations). Requires hearing aid(s) or cochlear implant(s) with t-coil(s).
Optional Headset: CS-900HS (connects easily to your phone’s 2.5mm Phone Headset jack for hands-free conversations).
To learn more, call ClearSounds at 1-800-965-9043 or visit www.clearsounds.com

92 – ENGLISH
FCC WANTS YOU TO KNOW1. This equipment complies with Part 68 of the FCC rules and
the requirements adopted by the ACTA. On the bottom of this equipment is a label that contains, among other information, a product identifier of [US: CLSTE12B]. If requested, this number must be provided to the phone company.
2. If the ClearSounds® A1600 DECT 6.0 Amplified Freedom Phone™ with Full ClearDigital Power™ causes harm to the phone network, the phone company will notify you in advance that temporary discontinuance of service may be required. But if advance notice isn’t practical, the phone company will notify the customer as soon as possible. Also, you will be advised of your right to file a complaint with the FCC if you believe it is necessary.
3. The phone company may make changes in its facilities, equipment, operations or procedures that could affect the operation of the equipment. If this happens the phone company will provide advance notice in order for you to make necessary modification to maintain uninterrupted service.
4. If you experience trouble with this equipment, you should disconnect it from the network until the problem has been corrected or until you are sure that the equipment is not malfunctioning.
5. Please follow instructions for repairing if any (e.g. battery replacement section); otherwise do not alternate or repair any parts of device except as specified.
6. Connection to party line service is subject to state tariffs. Contact the state public utility commission, public service commission or corporation commission for information.

93 – ENGLISH
7. If the phone company requests information on what equipment is connected to their lines, inform them of:
a) The phone number that this unit is connected to,b) The ringer equivalence number [1.2B] c) The USOC jack required [RJ11C], andd) The FCC Registration Number [US:]
Items (b) and (d) are indicated on the label. The ringer equivalence number (REN) is used to determine how many devices can be connected to your phone line. In most areas, the sum of the RENs of all devices on any one line should not exceed five (5.0). If too many devices are attached, they may not ring properly.
Service RequirementsIn the event of equipment malfunction, all repairs should be performed by our Company or an authorized agent. It is the responsibility of users requiring service to report the need for service to our Company or to one of our authorized agents. Service can be facilitated through our office at:
ClearSounds Communications, Inc.1743 Quincy Avenue, Suite 155 Naperville, IL 60540 U.S.A
94 – ENGLISH
INDUSTRY CANADA CS03 STATEMENTThis product meets the applicable Industry Canada technical specification. This is confirmed by the registration number. The abbreviation, IC before the registration number signifies that registration was performed based on a Declaration of Conformity indicating that Industry Canada technical specifications were met. It does not imply that Industry Canada approved the equipment.
Before installing this equipment, users should ensure that it is permissible to be connected to the facilities of the local telecommunications company. The equipment must also be installed using an acceptable method of connections. The customer should be aware that compliance with the above conditions may not prevent degradation of service in some situations.
Repairs to certified equipment should be made by an authorized Canadian maintenance facility designated by the supplier. Any repairs or alterations made by the user of this equipment, or equipment malfunctions, may give the telecommunication company cause to request the user to disconnect the equipment.WARNING! Users should not attempt to make such connections themselves, but should contact the appropriate electric inspection authority, or an electrician, as appropriate.
CAUTION: The Ringer Equivalence Number (REN) assigned to each terminal device provides an indication of the maximum number of terminals allowed to be connected to a phone interface.
The termination on an interface may consist of any combination of devices subject only to the requirement that the sum of the Ringer Equivalence Numbers of all the devices does not exceed 5. An alternative indication of the REN is the Load Number (LN); this number should be divided by 20 to approximate the equivalent REN. The REN Number of this unit is indicated on the bottom of your phone.If your home has specially wired alarm equipment connected to the phone line, ensure the installation of the A1600 does not disable alarm equipment. If you have questions about what will disable alarm equipment, consult your phone provider or a qualified installer.
This Class B digital apparatus complies with Canadian ICES-003.

95 – ENGLISH
LIMITED ONE-YEAR WARRANTY
The product is warranted by ClearSounds against manufacturing defect in material and workmanship under normal use for one (1) year from the date of purchase. Should you experience a problem, contact our customer service department or visit our website at www.clearsounds.com.
Be sure to save your sale receipt as the proof of purchase date should you need warranty service.
Your Phone comes with a (1) year limited warranty from the date of purchase. This product is warranted by ClearSounds against manufacturing defect in material and workmanship under normal use. In the event that this product fails to function properly within one year of the original purchase due to defects in materials or workmanship, return the unit (freight prepaid) with proof of purchase (sales receipt or packing slip, no exceptions) to ClearSounds Communications. ClearSounds Communications will either repair or replace the unit (with a refurbished unit or unit of equal condition) and return it you (using UPS/USPS ground shipping) at no cost to you. The warranty replacement or repair will be warranted for a period of 90 days or the remainder of the original warranty period (from original purchase date); whichever is longer.
The warranty does not cover accidents, negligence or breakage to any parts. This includes shipping damage, failure to follow instructions, misuse, fire, floods, use of incompatible accessories, Acts of God or failure in your phone service carrier’s line service. The product must not be tampered with or taken apart by anyone who is not an authorized ClearSounds Communications® representative. Tampering with the phone will void any written or implied warranties.
If a defect covered by this warranty should occur, promptly contact a Customer Service Representative by phone or log onto www.clearsounds.com to obtain a Return Merchandise

96 – ENGLISH
Authorization number and shipping instructions before shipping the product to us. Any shipment without a (RMA) Return Merchandise Authorization number will not be accepted and will be returned to you at your expense. All authorized returned products must be accompanied with proof of purchase and a brief explanation of the problem.
For out of warranty repairs and service, please contact our Customer Service Department for instructions. The repair shall be warranted for 90 days.
IMPORTANT: YOU RECEIPT IS PART OF YOUR WARRANTY AND MUST BE RETAINED AND PRODUCED IN THE EVENT OF AWARRANTY CLAIM.
Service in United States and Canada, contact: ClearSounds CommunicationsAttention: Repair Center1743 Quincy Avenue, Suite 155Naperville, IL 60540USA800-965-9043
Check our website www.clearsounds.com for additional information and to download additional manuals and information.


